

Page 1

INSTRUCTIONS
Loop Block
3214, 3230, 3245, 3255
Telephone: (262) 691-3320 • Fax: (262) 701-5780 • Web: www.harken.com • Email: harken@harken.com
N15W24983 Bluemound Road, Pewaukee, WI 53072-4974
WARNING! Strictly follow all instructions to avoid an accident, damage to your vessel,
personal injury, or death. See www.harken.com/manuals for additional safety information.
Parts
1
1) Head
2) Sideplates
3) Sheave
4) Deadend post
5) Mouth
6) Hex key
7) Blue Loctite® adhesive
8) Head securing line
2
6
3
4
5
Part
Sheave
No.
3214
3230
3245
3255
Ø
57 mm 2500 1134 5000 2268 5 mm
75 mm 5000 2268 10000 4536 8 mm
100 mm 7500 3402 15000 6804 11 mm
125 mm 11000 4990 22000 9977 14 mm
Loop and/or high-strength lashing line
When choosing a Harken Loup
working load in basket configuration exceeds the maximum working load
of the block.
When choosing a lashing line, use a breaking load that is double the block's
breaking load to account for strength loss from:
1. Knots slipping or breaking at a much lower load than line breaking load.
®
Spectra
or Dyneema®-type lines require specialized knots.
2. Splices slipping or failing due to incorrect type or execution.
3. UV damage increasing with each passing year.
7
4. Chafing seriously reducing strength.
Go to www.harken.com/knots for additional information. If you are not
comfortable choosing line, work with a qualified rigger.
Note: See chart for maximum line diameter that will fit through mouth.
8
WARNING! Knots weaken line considerably. Consult qualified rigger
or line manufacturer for advice on securing line. Use high-strength
loops or consult rigger for recommendations on lashing. Using the
wrong line, or securing the line improperly, can cause an accident.
Max working load
lb kg lb kg
= Incorrect. Avoid to prevent accidents.
Specifications
(MWL)
You Must Supply
®
soft-attach, be sure the Loup maximum
Breaking load
(BL)
Max line Ø
that fits
through mouth
Deadend
post
Sideplate alpha
Dyneema is a registered trademark of DSM Dyneema.
Loctite is a registered trademark of Henkel AG & Company KGaA.
LOUP is a registered trademark of Yale Cordage.
Spectra is a registered trademark of Honeywell International, Inc.
Block no. Sheave Ø Screw Isolator Sideplate beta Roller cage assembly Sheave w/side balls Deadend post Helicoil Sideplate alpha Head securing line
3214 57 mm HFS796 MP-3020 AL-3701 HBB85 H-34389A AL-3238 MS-210 AL-3700 HCP1438
3230 75 mm HFS806 MP-3021 AL-3727 HBB86 H-34390A AL-3336 MS-221 AL-3726 HCP1419
3245 100 mm HFS1271 MP-3022 AL-3752 HBB87 H-34391A AL-3427 MS-251 AL-3751 HCP1419
3255 125 mm HFS1275 MP-3023 AL-3770 HBB88 H-34392B AL-3515 MS-259 AL-3769 HCP392
Helicoil
Sheave with side balls
Roller cage
assembly
Sideplate beta
Isolator
Screw
Page 2
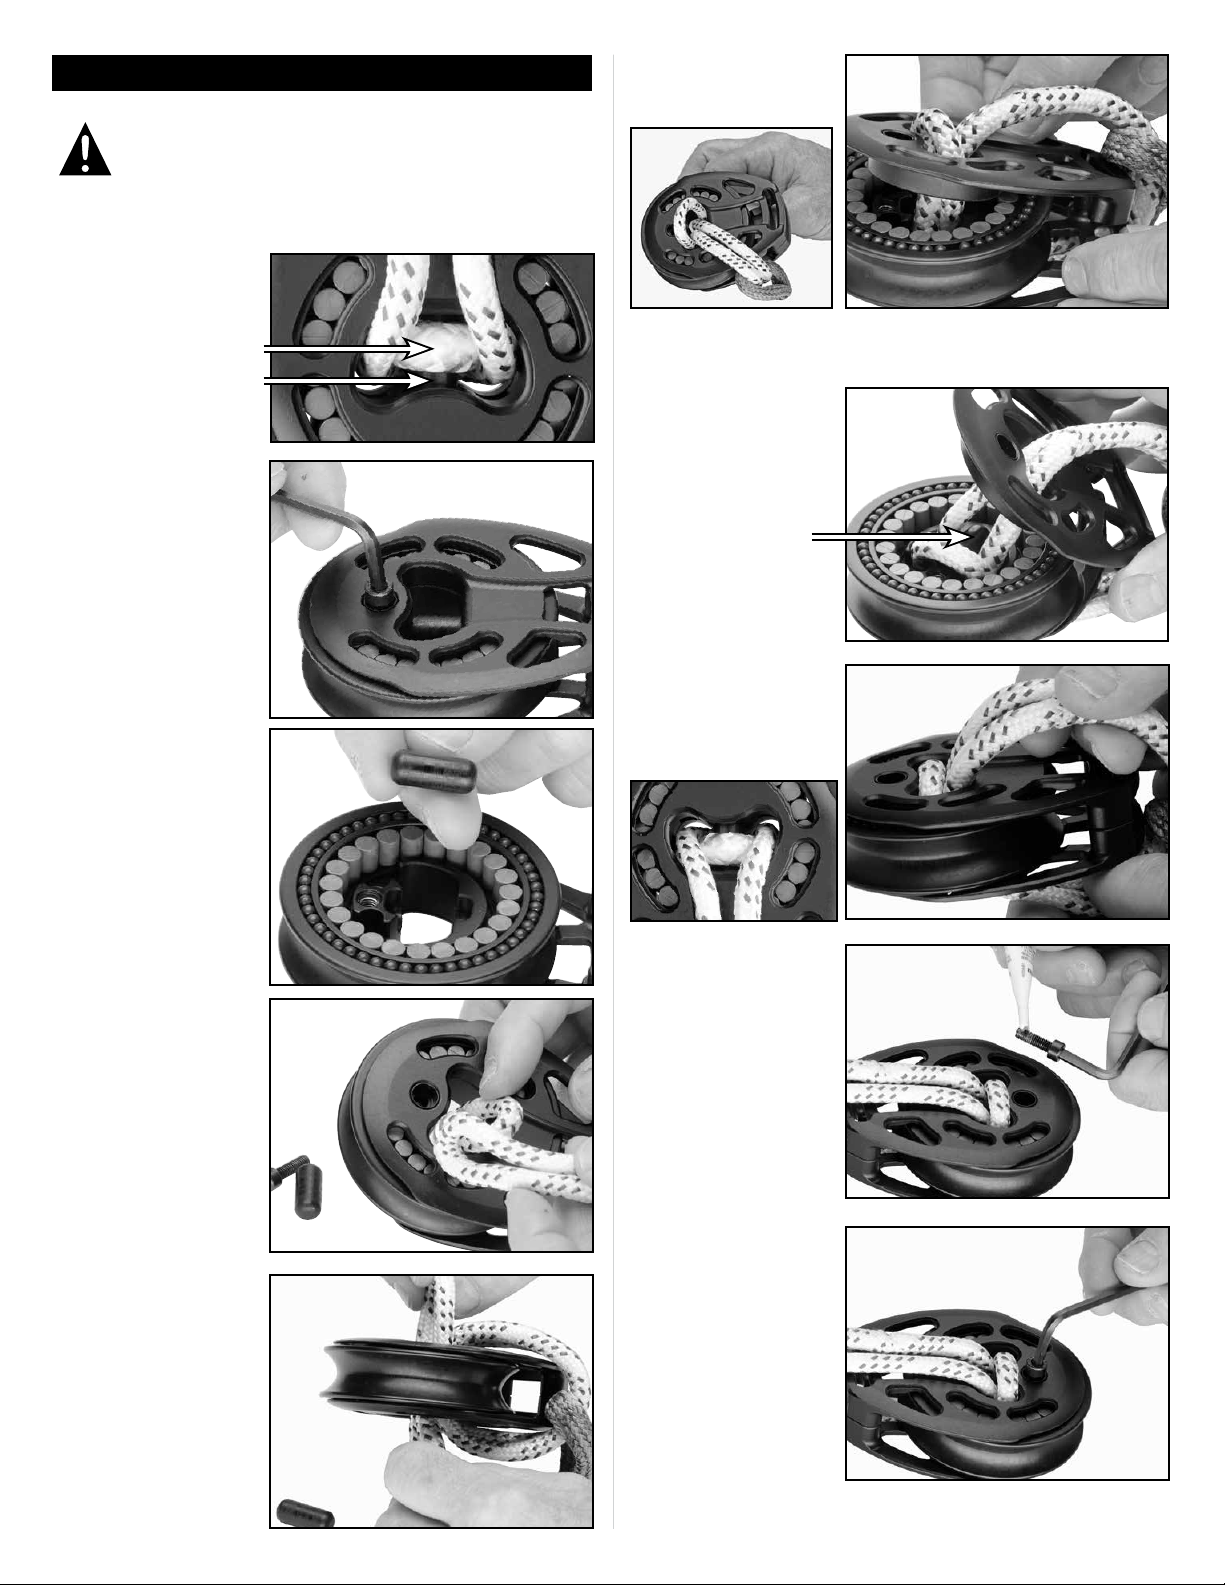
Terminating to Deadend Post
WARNING! Webbing or smaller lashings can be damaged by
being pinched between post and sideplate. Damaged webbing
or lashings can part suddenly under load. Use only loops when
terminating at deadend post.
Terminating to deadend post lets you attach block to a closed bail such
as a padeye.
5. Open sideplates without
pulling line through block.
Deadend post
1. Remove screw.
2. Remove deadend post.
Loop
Tip: With shorter loops, place loop at the side of the head to allow more
room to insert the deadend post.
6. Part legs of loop and
insert deadend post.
Make sure deadend
post is seated straight
in sideplate. Put
sideplates together.
Deadend post
7. Pull loops to seat ends
on deadend post.
3. Insert loop into block
mouth as shown.
4. Pass loop ends through
mouth so loops extend
beyond block's sideplates
as shown.
8. Reassemble block using
blue Loctite® adhesive
on screw.
Loctite is a registered trademark
of Henkel AG & Company KGaA.
Page 3

9. Secure loop to head of
block with head securing
line using a Carrick bend.
For knot tying resources:
www.harken.com/knots.
3. Reassemble block. Use blue Loctite
on screw.
Loctite is a registered trademark
of Henkel AG & Company KGaA.
®
10. Further secure knot by
carefully melting line
ends with a hot knife.
WARNING! If head-securing line comes loose, block can flip
and cause line to jam, resulting in loss of control. Inspect
head-securing line often and redo if necessary.
If head securing line comes
loose, block can flip so that
sheet rides off sheave.
Terminating Loop Outside Block or Using Lashing
If terminating line outside block or lashing using multiple strands
of smaller-diameter line, remove the deadend post.
1. Use hex key to
remove screw.
4. Lash or run loop through mouth of block.
Do not attach
to head.
Mouth
WARNING! Attaching line to block head will considerably weaken
block so it can easily break under load. Attach loop/lashing only
through mouth of sheave.
5. Secure lashings or loop
to the head using a
securing line tied in a
Carrick bend. For
knot tying resources:
www.harken.com/knots
2. Remove deadend post.
Do not use post with
multiple lashing lines.
Page 4

WARNING! Using a loop in a “choker-style” weakens the
loop connection. Do not use choker-style connection.
Choker
ALL INSTALLATIONS
Anchor Point Chafing or Cutting
WARNING! Loops or lashings running over a sharp edge can cause
part to break under load. Attach to fitting with a rounded edge.
3. Inspect loops and lashings. Replace if there are signs of wear, or if the
colored tracer fades from UV damage. Pull loop out of mouth and inspect
loop/lashing carefully for any signs of wear, UV damage, fatigue, or
strand separation. Replace loop if it shows signs of UV damage or wear.
WARNING! Failure to replace damaged or weakened parts can
cause part to break under load. Replace all loops and lashings
every year or if there is any sign of wear, UV damage, fatigue,
or strand separation. If in doubt, replace. Consult chart to match
strength of loop/lashing to block and load.
4. Inspect head securing
line to make sure knot
is holding tightly.
Loops must be attached to round bails such as those found on padeyes
or pins. Sharp edges on many perforated toerails will cut loop, severely
weakening it. When loop is attached to a plate, it must be at least 25 mm
1
(
/4") thick and have rounded edges to keep loop from being damaged.
Round edges prevent
damage to loop.
Sharp edges will
damage loop.
Inspect Parts Every Time you Sail
WARNING! Failure to inspect block, and loop, and correct any
problems, lashing may result in block breaking under load.
Inspect parts each time you sail. If parts are under load during
long passages it is important to inspect them carefully while in use.
1. Inspect block to make sure that screw is secure. If screw is loose, remove
it. Apply blue Loctite
®
adhesive and retighten.
Loctite is a registered trademark of Henkel AG & Company KGaA.
Maintenance
Harken equipment is designed for minimal maintenance, but some maintenance
is required to give the best service and to comply with the Harken limited warranty.
Cleaning: Flush blocks and loops/high-strength lashing lines thoroughly with fresh
water. Periodically, disassemble the blocks and clean with detergent and fresh water.
When assembling block, make sure screws and holes are dry. Use blue Loctite
adhesive to secure screw before assembling.
IMPORTANT! Exposure to some teak cleaners and other caustic solutions can
result in discoloration of part and is not covered under the Harken warranty.
Warranty
For additional safety, maintenance, and warranty information:
www.harken.com/manuals or the Harken catalog.
Printed in USA. 5004 06-14
 Loading...