

Page 1
™
Patent Pending
Carbo® Block
INSTRUCTIONS
Tel: 262-691-3320, Fax: 262-701-5780 • Web: www.harken.com, Email: harken@harken.com
N15W24983 Bluemound Rd, Pewaukee, WI 53072-4974
Specifications
Part
No. Description
2698
18 mm single 18 mm
2158
18 mm double 18 mm
2161
18 mm single/narrow 18 mm
Sheave
Terms
Bail
2 Laps
Head
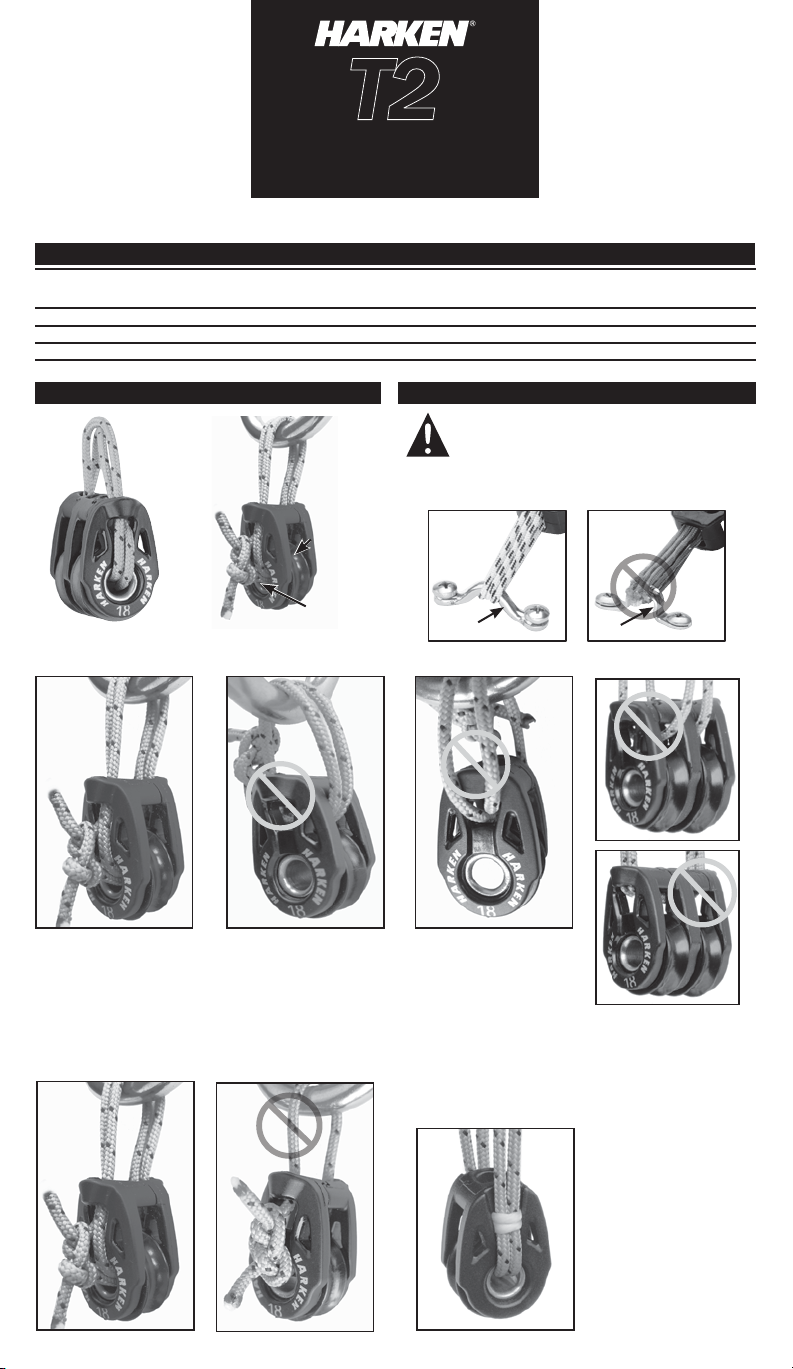
2. Always lash to mouth of the block. Head is not strong enough to secure line.
Max sheet line Ø Max working load Breaking load
Ø
in mm lb kg lb kg
3
/
16
3
3
5 275 125 992 450 HCP1438
/
16
5 450 204 1500 680 HCP1438
/
16
5 275 125 992 450 HCP1438
Planning Installation
CAUTION! Avoid injury or damage to
equipment. Follow these precautions:
4 Lashing
Strands
Sheave
Mouth
Head
1. Lash only to objects with rounded edges. Avoid
sharp corners.
Rounded Sharp
Head
Replacement
Lashing Line
3. Use two laps of supplied line to create four
strands to match the maximum working load of
the block.
4. Block 2161:
Use sailmaker's twine
or small zip tie to secure
lashing strands to head.
Page 2
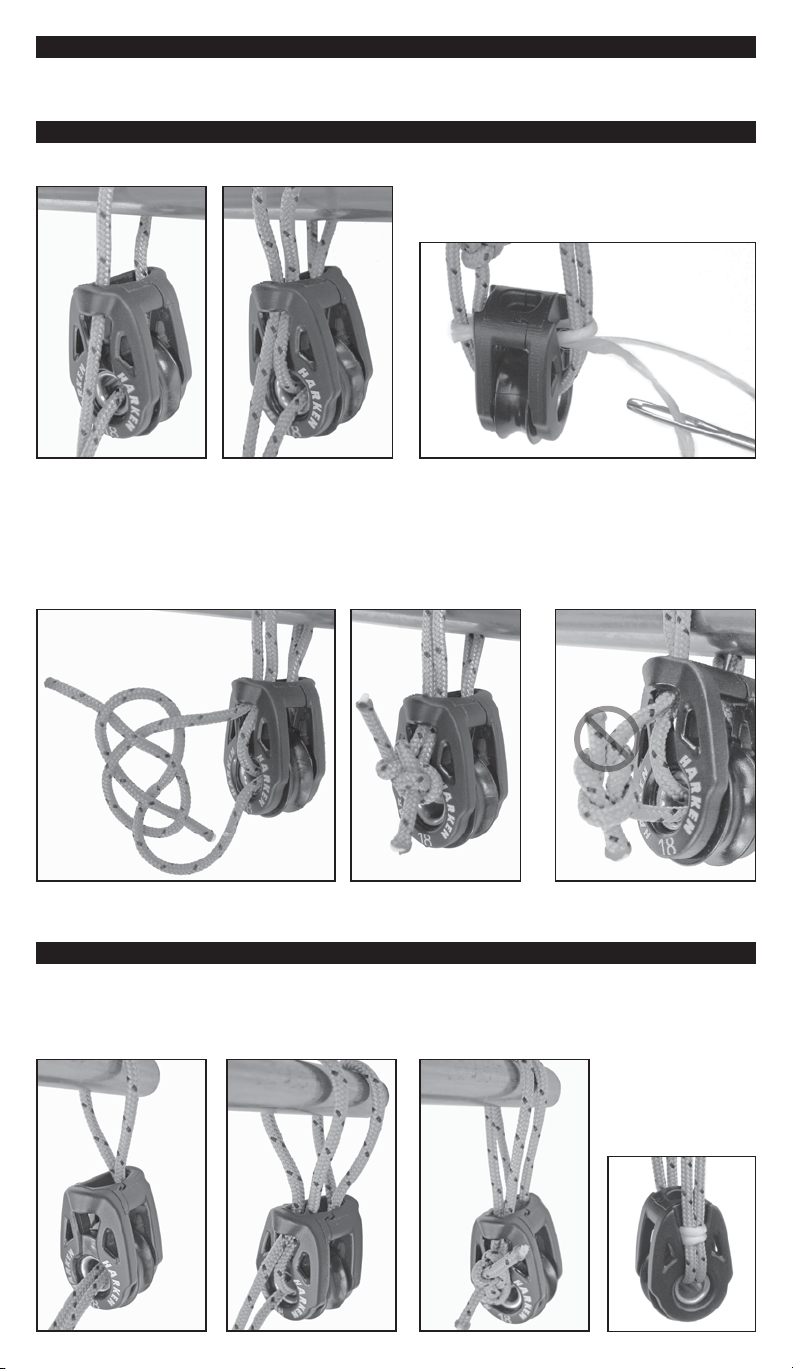
Tying Knots
See www.harken.com/knots. Alternatively, consult a good knot tying book or consult a rigger.
Lashing at 0° – Block and Bail In-line
Run line through mouth, through head, around bail, and down on other side. Repeat so there are two laps.
Block 2161: Use small zip tie or needle and
sailmaker’s twine to secure lashing strands to head.
Tie ends using a Carrick knot or other secure knot. Photo is not
intended to teach this knot. Consult knot tying book or see
www.harken.com/knots.
Do not tie square knot or
“granny knot”. These can
loosen.
Lashing at 90° – Block 90° to Bail
Run line through mouth, head, around bail, and back on the same side.
Run line from mouth through head, around bail, and back on the other side for a second lap.
Secure with Carrick knot or other secure knot. Consult knot tying book or see www.harken.com/knots.
Block 2161: Use sailmaker’s twine or small
zip tie to secure lashing strands to head.
Lap on same side.
Page 3

Becket Options
Using Lashing Line as Becket
Starting through mouth, run line through head, around bail, through head, and through mouth. Loop line
once below block. Loop line a second time forming a becket. Run line through head, around bail, and
through mouth. Secure using Carrick knot or other secure knot. Consult knot tying book or see
www.harken.com/knots.
Block 2161: Use sailmaker’s twine or small zip tie to secure lashing strands to head.
Securing Sheet Directly
to Mouth as Becket
Pass sheet through mouth
and secure with bowline,
splice, or whip line to
itself. Consult knot
tying book or see
www.harken.com/knots.
Sheet
Line
Becket
Reeve sheet line.
Using Sheet as Lashing and Becket
Do not use supplied HCP1438 line. Use a larger, stronger line that exceeds the block's breaking load to
account for loss of strength due to weakness of knots, UV damage or chafing. Run sheet through mouth,
head, around bail, and back through head. Leave tail below for tying or whipping to long section of line.
Run line back through mouth and secure to long section of line. Use bowline knot or whip lines together.
Block 2161: Use sailmaker’s twine or small zip tie to secure lashing strands to head.
Page 4

Securing Block to End of Larger Line
Securing Block to End of Larger Line
Do not use supplied HCP1438 line. Use a larger, stronger line that exceeds the block's breaking load to
account for loss of strength due to weakness of knots, UV damage or chafing. Run line through head,
through mouth, and out head.
Secure with a bowline with end whipped to loop so it stays secure. Consult knot tying book or see
www.harken.com/knots.
Securing Block to Large Diameter Object
When running line around large-diameter object such as a boom, cross line each time you pass around
the object. Block 2161: Use sailmaker’s twine or small zip tie to secure lashing strands to head. Use twine or
zip tie to hold lashing strands crossed.
Important! If lashing line is pushing outwards on head, it can break the block. Check to make sure
each lap crosses separately as shown in the photo at left below.
2161
Inspect Line Every Time You Sail
Inspect lashing line for chafe or UV damage every time you sail. Replace
damaged line immediately. Replace line with no visible damage every
two-years. Use Harken replacement line, but if using own line, see “Using
Alternate Line, Knots and Splices” and chart on back page for important
information to help you select the correct line.
Maintenance
Harken equipment is designed for minimal maintenance. However, some upkeep is required to give
the best service and comply with the Harken limited warranty.
Keep your equipment clean and free-running by frequently flushing with fresh water. Periodically
clean with mild detergent and water solution. Spin sheaves to distribute soap solution evenly.
Flush with fresh water.
IMPORTANT! Exposure to some teak cleaners and other caustic solutions can result in discoloration
of part and is not covered under the Harken warranty.
Warranty
For additional safety, maintenance and warranty information see www.harken.com/manuals or the
Harken catalog.
5060.W 6/14
 Loading...