

Page 1
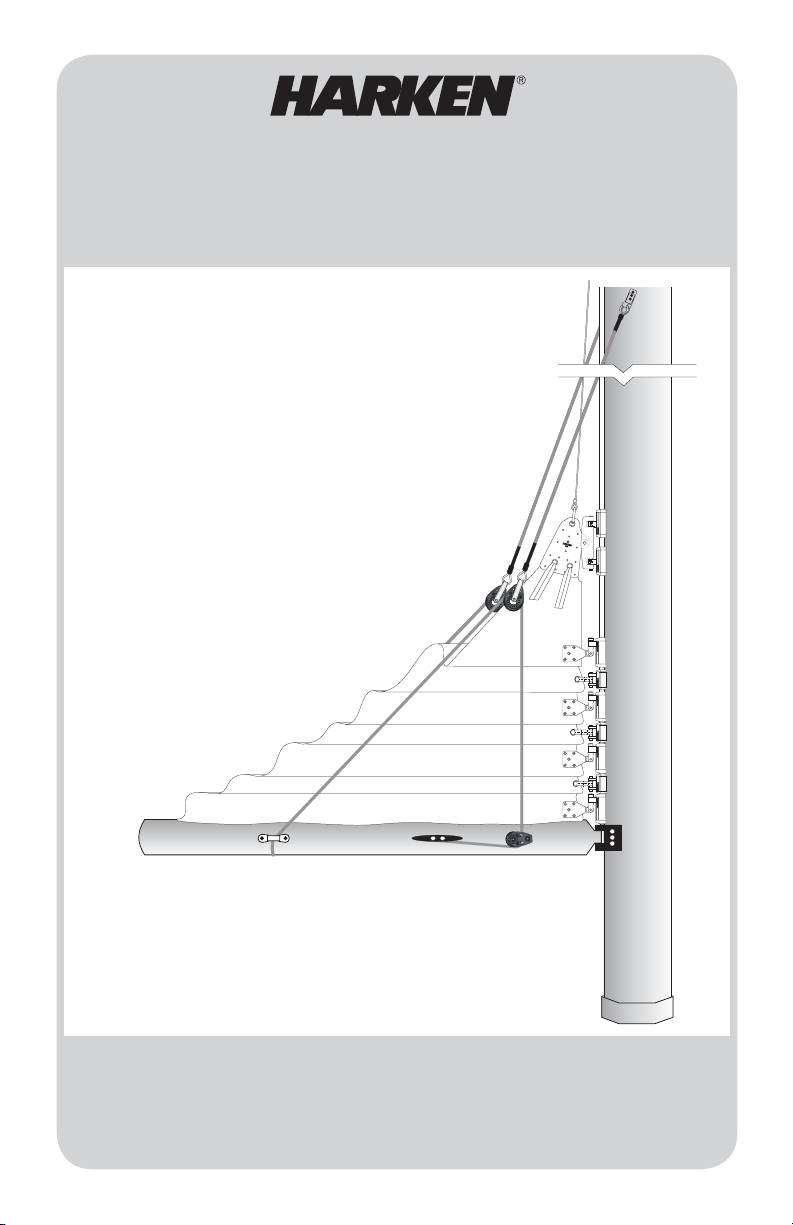
LAZY JACK KIT
254
Installation Manual – Intended for specialized personnel or expert users
4058 12/13
Boats
35 – 42 ft. (10.7 - 12.8 m)
Booms
12 - 16 ft. (3.7 - 4.9 m)
Please read these instructions carefully before installing, servicing, or
operating the equipment.This manual may be modified without notice.
See: www.harken.com/manuals for updated versions.
PLEASE SAVE THESE INSTRUCTIONS
Page 2

Parts List
2 6' (1.82 m) wire assemblies including blocks and mast tangs
2 30'6" (9.29 m) upper line assemblies with blocks
1 104' (31.69 m) adjusting line
5 H073 Stainless steel eyestraps
1 H132 Big Bullet cheek block
1 4" (101 mm) aluminum cleat
21 3/16" (4.76 mm) stainless steel rivets (includes 3 extra)
21 10-32 x .375 slotted trusshead machine screws
3 #10 x 11/4" (32 mm) flathead self-tapping screws (includes 1 extra)
3 10-32 x 3/4" (19 mm) trusshead machine screws (includes 1 extra)
3 #10 x 3/4" (19 mm) trusshead self-tapping screws (includes 1 extra)
Tools Required
Marker or pencil
5
/32" (4 mm) drill bit
Center punch Tape measure (long enough to measure luff length)
Hammer Electric drill
Drill, Tap & Screw Method:
1 – 1 slotted screwdriver
1 – 5/32" (4 mm) drill bit
1 – 10-32 tap set
Rivet Gun Method
Stainless steel rivets require a heavy-duty rivet gun. It may be necessary to rent a
rivet gun if you do not have a heavy-duty model.
Drill Bit – 13/64" (5 mm)
Topping Lift
To avoid snagging the mainsail on the Lazy Jacks when raising sail, the boat
must be equipped with a topping lift or vang that holds boom lifted.
Altering Sail Cover
Take your sail cover to a sailmaker to have slits cut in the cover for the Lazy Jacks.
Slits should have Velcro or snap closures to make it easy to cover the mainsail.
Mark your cover after installation so the slots can be positioned correctly.
Determining the Location of Mast Tang
Measure the mainsail luff length or find the “P” dimension of the mast. Find this
measurement in the left column below and circle the number in the right column.
See drawing, page 3.
Chart A
If the mainsail luff length or
P dimension measures:
10.85 - 10.97 m
12.67 - 12.80 m
The tang location
measured from the
top of the boom is:
7.14 m
7.24 m
7.34 m
7.42 m
7.52 m
7.62 m
7.72 m
7.82 m
7.92 m
8.03 m
8.13 m
8.23 m
27'4"
8.33 m
If the mainsail luff length or
P dimension measures:
42'1' to 42'6" 35'7" to 36'
42'7" to 43' 36'1" to 36'6"
43'1" to 43'6" 36'7" to 37'
43'7" to 44' 37'1" to 37'6"
44'1" to 44'6" 37'7" to 38'
44'7" to 45' 38'1" to 38'6"
45'1" to 45'6" 38'7" to 39'
45'7" to 46' 39'1" to 39'6"
46'1" to 46'6" 39'7" to 40'
46'7" to 47' 40'1" to 40'6"
47'1" to 47'6" 40'7" to 41'
47'7" to 48' 41'1" to 41'6"
— 41'7" to 42'
12.83 - 12.95 m
12.98 - 13.11 m11.00 - 11.13 m
13.13 - 13.26 m11.15 - 11.28 m
13.28 - 13.41 m11.30 - 11.43 m
13.44 - 13.56 m11.46 - 11.58 m
13.59 - 13.72 m11.61 - 11.73 m
13.74 - 13.87 m11.76 - 11.89 m
13.89 - 14.02 m11.91 - 12.04 m
14.05 - 14.17 m12.07 - 12.19 m
14.20 - 14.33 m12.22 - 12.34 m
14.35 - 14.48 m12.37 - 12.50 m
14.50 - 14.63 m12.52 - 12.65 m
2
—
The tang location
measured from the
top of the boom is:
27' 7"23'5"
27'11"23'9"
28' 3"24'1"
28' 7"24'4"
28'11"24'8"
29' 3"25'0"
29' 7"25'4"
29'11"25'8"
30' 3"26'0"
30' 7"26'4"
30'10"26'8"
31' 2"27'0"
8.41 m
8.51 m
8.61 m
8.71 m
8.81 m
8.92 m
9.02 m
9.12 m
9.22 m
9.32 m
9.40 m
9.50 m
—
—
Page 3

Installing Mast Tang and Wire Assembly
If you are installing system with the mast up, take the following parts up in the
bosun's chair or send them up with a messenger line. (Follow all precautions to insure
the safety of the person aloft. Use a safety halyard and make sure halyards are in good
condition. Make sure no one is standing where they could be hit with dropped tools.)
WARNING! When drilling through mast, do not let drill bit contact the halyard that is
holding you aloft! This may cause the halyard to fail. Limit depth.
Tape measure Screw Method
Port and starboard templates (attached to pg. 3) Drill with 5/32" (4 mm) drill bit
Tape for template #10-32 Tap & Handle
Tang assembly including wires and blocks Slotted Screw Driver
Hammer Rivet Method
Center punch Drill with 13/64" (5 mm) drill bit
Rivet Gun
Note: before going up the mast, insert the middle screw or rivet into the tang.
Squeeze the top and bottom of the tang together to insert the screw or rivet. It
may be necessary to use a pliers or vice grips.
Measure up from the top of the boom to the height from chart A (page 2).
Moveable Gooseneck - If the gooseneck is capable of moving up and down, measure
from the top of the boom when the boom is positioned in its normal sailing position.
Mark the mast at this point.
Tape the template to the side of the mast so the middle hole is even with your mark.
Line the template up so the vertical line is parallel to the side of the mast. See drawing
below.
Use center punch to mark (4) four tang holes. Remove template and drill (4) four holes.
DRILL HOLES: Screws 5/32" (4 mm) & Tap #10-32 Rivets 13/64" (5 mm)
Attach tang beginning with center holes.
Installing Mast Tangs
Mast Tang
Assembly
Top View
Tangs installed
on widest part
of mast
Measurement
from
Chart A
3
Page 4

Stringing Upper Line Assemblies
String upper line assemblies through blocks
so line splice is forward and blocks aft.
Eye Splice
Determining the Location of Boom Hardware*
Measure mainsail foot length or find E dimension of mast. Find this measurement in
left column below and circle the corresponding numbers in right column. Put a mark
on each side of boom at each measurement. See drawing, page 5.
“E” Dimension or Sail Foot Length
Cheek Block and
Middle Eyestraps
Aft EyestrapsForward Eyestraps
8'10" (2.692 m)2' 4" (.70 m)3.53 - 3.66 m 5' 6" (1.676 m)11’7” to 12’
9' 3" (2.819 m)2' 6" (.76 m)3.68 - 3.81 m 5' 9" (1.753 m)12’1” to 12’6”
9' 7" (2.921 m)2' 7" (.79 m)3.84 - 3.96 m 6' - (1.829 m)12’7” to 13’
10' - (3.048 m)2' 8" (.82 m)3.99 - 4.11 m 6' 3" (1.905 m)13’1” to 13’6”
10' 4" (3.150 m)2'10" (.85 m)4.14 - 4.27 m 6' 6"-(1.981 m)13’7” to 14’
10' 9" (3.277 m)2'11" (.88 m)4.29 - 4.42 m 6' 9" (2.057 m)14’1” to 14’6”
11' 1" (3.378 m)3' -(.91 m)4.45 - 4.57 m 6'11" (2.108 m)14’7” to 15’
11' 6" (3.505 m)3' 1" (.94 m)4.60 - 4.72 m 7' 2" (2.184 m)15’1” to 15’6”
11'10" (3.607 m)3' 2" (.97 m)4.75 - 4.88 m 7' 5" (2.261 m)15’7” to 16’
*Note - You may want to check sail containment before drilling holes in boom. To do
this, put sail on, tape boom hardware in place, reeve lines through system and lower
sail. Move if necessary.
Installing Forward Eyestrap
Hold eyestrap on side of boom even with forward
marks. Align feet of eyestrap vertically as pictured.
Mark holes. Attach eyesplices of upper line assembly
to eyestraps and screw or rivet one to each side of
the boom.
DRILL HOLES: Screws 5/32" (4 mm)
Rivets 13/64" (5 mm)
4
Page 5

Installing Cheek Block
Decide which side of mast you wish to install adjusting cheek block and if cleat
will be fore/aft of cleat. Screw or rivet cheek block even with middle mark on boom,
so sheave side of block is towards cleat. Use 3/4" (19 mm) long trusshead machine
or self-tapping screws.
DRILL HOLES: Machine Screws 5/32" (4 mm) and Tap 10-32
Self-Tapping Screws: 5/32" (4 mm)
Cleat Forward of Block
Cleat Aft of Block
Installing Adjusting Line
Separate the 104' (31.69 m)
length of line into 2 coils.
Do not cut! Lay a coil on
each side of the aft half of
the boom so the side without the splice is below the
cheek block. String each
coil of adjusting line through
lower blocks so line is
cradled under the boom.
Installing Middle Eyestrap
Attach eyesplice of
adjusting line to the
midboom eyestrap
and screw or rivet
to mast opposite the
cheek block.
DRILL HOLES:
Screws 5/32" (4 mm)
Rivets 13/64" (5 mm)
Eyestrap
Top View
Cheek Block
5
Page 6

Installing Aft Eyestraps
String end of adjusting line through cheek block. Captivate line in eyestrap on each
side of boom so line is even with your aft marks. Screw or rivet eyestraps to each
side of boom.
DRILL HOLES: Machine Screws 5/32" (4 mm) Rivets 13/64" (5 mm)
From Chart B
Installing Adjuster Cleat
Choose a place for adjuster cleat. Drill holes using 5/32" (4 mm) drill bit and mount
cleat using #10 x 11/4" flathead sheet metal screws (included).
Tip: Once you have threaded the screws into boom, remove them
and file off ends so they do not interfere with internal boom lines.
Cleat Aft of Block
Cleat Forward of Block
Using Shock Cord to Pull Lazy Jacks Outward
We recommend shock cord to hold Lazy Jacks open to make it easier to raise sail.
1. Attach shock cord to end of lower spreaders. Hog rings work well for this purpose.
Use rigging tape over hog rings.
2. Temporarily tie other end of shock cord to Lazy Jacks at a length that holds Lazy
Jacks out, but not so short that spreaders will be damaged when boom is swung out.
3. Test length by swinging boom all the way out. If necessary, lengthen shock cord
before permanently attaching to Lazy Jacks.
Shock Cord
6
Page 7

Conventional Sail Slugs
If using conventional sail slugs, make sure slugs are free to move below the gate.
Use mast gate plates so sail slugs stay in the mast groove. Contact your rigger.
Adjusting Lazy Jacks
Raise the mainsail and make sure adjusting line is uncleated at boom. Tighten the
mainsheet as tight as it will go to find maximum distance the boom would be lowered
while under sail. Next, tighten adjusting line and slack it off about 3" so it will not
interfere with sail shape. A little fine tuning may be necessary.
Using Your Lazy Jacks - Precautions
Before sailing, make sure Lazy Jacks will not catch on spreaders. While at dock,
swing boom out so sail is against spreader tips. Try lifting boom and shaking to see if
Lazy Jack lines are apt to swing behind spreaders. When first sailing with Lazy Jacks,
look aloft while sailing downwind to see if Lazy Jacks catch behind spreaders. If they
get snagged while sailing, release snagged Lazy Jacks from behind spreader before
bringing mainsail in towards center. If this is not done, you risk breaking spreaders
as mainsheet is tensioned and mainsail moves toward the centerline.
If Lazy jacks are prone to snagging spreader tips, there are 2 solutions. The easiest is
to rig shock cords to pull Lazy Jacks forward out of way of spreader tips. Rig a length
of shock cord on each side of sail. Dead end shock cord at or near gooseneck and
run it up to blocks which are suspended from wires.
If this does not help, you will need to reposition Mast Tangs so they are lower on
mast and do not interfere with spreader tips.
Lazy Jacks are designed to neatly contain mainsail on boom when you lower or reef
sails. Please contact us if you have any questions or comments.
Raising Sail
When hoisting sail, check to make sure the sail does not get caught in the Lazy Jacks.
The headboard or battens may catch between the mast and the Lazy Jacks or jam in
the angle between the lines. If the halyard is forced, this could result in a broken batten, ripped sail or damaged Lazy Jack. To avoid this, look aloft as you raise the mainsail and stop if the sail gets caught. Also, make sure the boat is facing head-to-wind.
The sail is less apt to catch on the Lazy Jacks if the topping lift is used and the Lazy
Jacks are somewhat loose. This way they will deflect out of the way easier when the
sail makes contact with them.
7
Page 8

Corporate Headquarters
N15W24983 Bluemound Rd, Pewaukee, WI 53072 USA
Telephone: (262) 691-3320 • Fax: (262) 701-5780
Web: www.harken.com • Online Catalog: www.harkenstore.com
1B Green Street, Brookvale, N.S.W. 2100, Australia
Telephone: (61) 2-8978-8666 • Fax: (61) 2-8978-8667
Web: harken.com.au • Email: info@harken.com.au
ZA Port des Minimes, BP 3064, 17032 La Rochelle Cedex 1, France
Telephone: (33) 05.46.44.51.20 • Fax: (33) 05.46.44.25.70
Via Marco Biagi, 14, 22070 Limido Comasco (CO) Italy
Telephone: (39) 031.3523511 • Fax: (39) 031.3520031
30-36 Fanshawe Street, P.O. Box 1951, Auckland 1001, New Zealand
Telephone: (64) 9-303-3744 • Fax: (64) 9-307-7987
Web: harken.co.nz • Email: harken@harken.co.nz
ul. Rydygiera 8, budynek 3A, lokal 101, I pi
Tel: +48 22 561 93 93 • Fax: +48 22 839 22 75
Main Office and Harken Brandstore: Västmannagatan 81B
Telephone: (46) 0303 61875 • Fax: (46) 0303 61876
Mailing address: Harken Sweden AB, Box 64, SE -440 30 Marstrand
Bearing House, Ampress Lane, Lymington, Hampshire S041 8LW, England
Telephone: (44) 01590-689122 • Fax: (44) 01590-610274
Web: harken.co.uk • Email: enquiries@harken.co.uk
Email: harken@harken.com
Harken Australia Pty, Ltd.
Harken France
Web: harken.fr • Email: info@harken.fr
Harken Italy S.p.A.
Web: harken.it • Email: info@harken.it
Harken New Zealand, Ltd.
Harken Polska SP ZOO
ętro, 01-793 Warszawa, Poland
Web: harken.pl • Email: polska@harken.pl
Harken Sweden AB
SE-113 26 Stockholm Sweden
Web: harken.se • Email: harken@harken.se
Harken UK, Ltd.
Please visit: http://www.harken.com/locator.aspx
to locate Harken dealers and distributors
Printed in USA 4060/9-09
 Loading...