

Page 1
INSTRUCTION SHEET
2142, 2143, 2144, 2145, 2678, 2679, 2688, 2689
Strictly follow all instructions to avoid an
accident, damage to your vessel, personal
injury or death. See www.harken.com/
manuals for additional safety information.
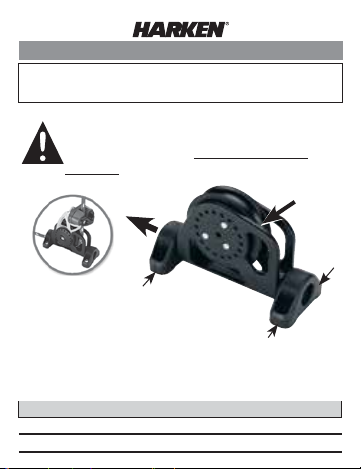
Flip-Flop Blocks
Reeve
Line
Mount using ends to mark drill
holes. Make sure they are square
and against sheave assembly.
Use all four (4) fasteners with backing plates, washers
and locknuts. Deck or mounting surface must solid,
designed for block load. Consult with builder.
Mount with 4 (SH) Sockethead Cap or (PH) Panhead Screws
2142, 2143, 2144, 2145 #10 (5 mm)
2678, 2679, 2688, 2689
1
/4" (6 mm)
Page 2
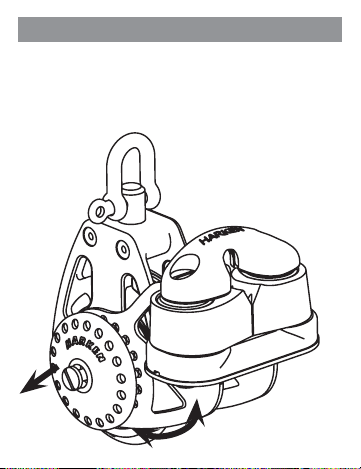
Adjusting Cam Angle
1
1. Loosen cam arm locking
plate screw and pull
outward to disengage.
2. Rotate cam arm to
desired position.
3. Press locking plate in and
tighten screw. Avoid
binding sheave, do not
overtighten screw.
2
Page 3

Reversing Cam Cleat
1. Remove screws from cam.
2. Assemble as shown.
Note: use plastic
plate on cam bottom.
3. Tighten screws. Do not
overtighten screws.
Cam pawls should
snap shut
smartly.
Part No.
57/75mm
H-26790B
Page 4

Maintenance
Harken equipment requires minimal maintenance,
but some is required to give the best service and
to comply with Harken’s limited warranty.
Keep equipment clean by frequent flushing with fresh
water. Periodically clean with mild detergent and
water solution. Spin sheaves to distribute soap
solution evenly.
In corrosive atmospheres, stainless parts may show
discoloration around holes, rivets and screws. This is
not serious and may be removed with a fine abrasive.
IMPORTANT! Exposure to some teak cleaners and
other caustic solutions can result in discoloration of
part and is not covered under the Harken warranty.
Warranty
For additional safety, maintenance and warranty
information see www.harken.com/manuals or
the Harken® catalog.
N15W24983 Bluemound Rd. • Pewaukee, WI 53072 U.S.A.
Telephone: (262) 691-3320 • Fax: (262) 701-5780
Web: www.harken.com • Email: harken@harken.com
Printed in USA 4623 04/14
 Loading...