

Page 1

Accessories You Can Purchase
for the 150 Cam-Matic
145 296
®
®
Rebuild Kit
150 Cam-Matic
150KIT
295
375
137
425
Yellow, Blue, Red, Green, Black
Cam-Matic® Cam Cleat Not Included
298
Replacement
Parts in Kit:
This baseplate
does not fit cams
built before 1993.
Qty Description Qty Description
2
Cam Cap
®
66
Delrin
2
Washer
Balls
2
1
Torsion Spring
Cam Base
Page 2

INSTRUCTION SHEET
150 Cam-Matic® Rebuild Kit
N15W24983 Bluemound Rd., Pewaukee, WI 53072-4974 USA
Tel: (262) 691-3320 • Fax: (262) 691-3008
Web: www.harken.com • E-mail: harken@harken.com
Note: Cam cleats built before 1993 have different baseplates. Cam caps and cam
bases will not fit. Replace only balls, torsion springs and washers.
You Will Need
Container to hold balls and cam parts during disassembly/assembly.
Soap and warm water to clean parts.
Optional: small amount of liquid detergent/shaving cream to keep balls in place on race.
Disassemble Cam
• Remove cam from deck.
• Take off red plastic baseplate. Carefully work one end up and then other.
• Remove torsion springs.
• Carefully put small bolt though fastener holes to remove red plastic cam caps.
• Lift cam off base, remove balls.
• Lift off red plastic washer.
• Remove remaining balls.
Replace Parts/Clean
• Replace plastic parts, balls and springs as needed.
• Wash parts using soap and hot water.
Page 3
Reassemble Cam
Tip: When replacing balls use shaving cream or
liquid detergent to keep balls in place on race.
• Put 11 balls in lower race.
• Put on red plastic washer, lip up.
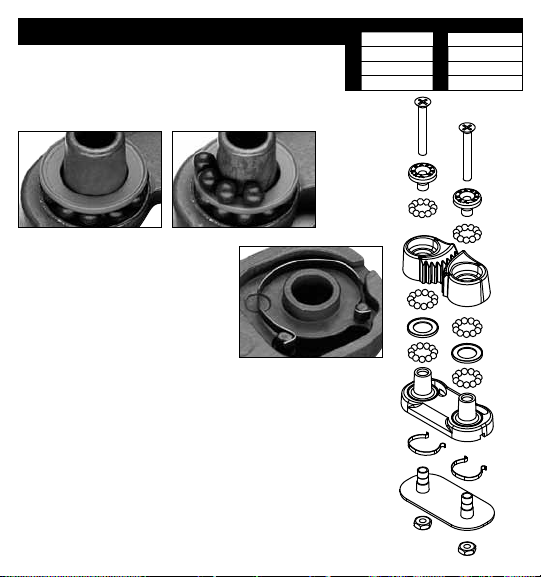
No Qty Description No Qty Description
1
2
3
4
2 Cam Cap
66 Delrin
1 Pawl (R)
1 Pawl (L)
5
2 Washer
®
Balls61 Baseplate
7
2 Torsion Spring
8
1 Cam Base
1
®
lip is up.
Put 11 Delrin
balls in next race.Put on red plastic washer so
• Put 11 balls in next race.
• Replace aluminum pawl.
Make sure it seats on balls.
• Fill cam top with 11 balls.
• Push in red plastic cam cap.
• Repeat on other cam as above.
• Turn cam over. Replace torsion
Hook each end of torsion
spring around posts.
springs. Hook each end of spring around posts.
Tip: Use two springs on each side to stiffen cam action or
to act as a backup if first spring breaks.
• Push on red plastic baseplate. Plate is not
symmetrical. Make sure to orient it correctly.
• Flush shaving cream/soap away using fresh water.
• Install cam on boat. Do not over-tighten mounting
screws; pawls will bind.
2
3
4
2
5
2
6
7
8
Page 4

Additional information:
www.harken.com\manuals
Video Demonstration
You can watch a video demonstration of rebuilding a cam at:
http://www.harken.com/Cam-Matic_Rebuild_Video/
Click on "Rebuild your 150 Cam Cleat” to play.
Maintenance
Harken equipment requires minimal maintenance, but some is required to give
the best service and to comply with Harken's limited warranty.
It is important to keep equipment clean by frequent flushing with fresh water.
In corrosive atmospheres, stainless parts may show discoloration around holes,
rivets and screws. This is not serious and may be removed with a fine abrasive.
Important: Exposure to some teak cleaners and other caustic solutions can
result in discoloration of part and is not covered under the Harken warranty.
Warranty
For additional safety, maintenance and warranty information see
www.harken.com/manuals or the Harken
Delrin® is a registered trademark of E. I. du Pont de Nemours and Company or its affiliates
®
catalog.
Printed in USA 4685/03-13
 Loading...