

Hark HK0535 Owner's Manual
Owner’s Manual
ASSEMBLY, CARE & SAFETY INSTRUCTIONS
Item No. HK0535
BIG BOSS GAS SMOKER
v6-7.16


3
HARK BIG BOSS GAS SMOKER
Warranty Details
The product is guaranteed to be free from defects in workmanship and parts for a period of 12 months from the
date of purchase. Defects that occur within this warranty period, under normal use and care, will be repaired,
replaced or refunded at our discretion.
Exposure of the product to the elements should be minimised. Once the unit has cooled and is cleaned, store the
product under cover. Polyester / vinyl barbecue covers are an optional accessory that are recommended and can
be purchased from your local HARK retail dealer.
• This warranty does not cover units that have been altered or modied.
• This warranty does not cover unauthorised repairs during the warranty period.
• This warranty does not cover damage due to normal wear and tear, misuse, abuse, accidents or improper
maintenance.
• This warranty does not cover surface scratches, dents, chips, corrosion, discolouring caused by heat or heat
damage or caused by abrasive or chemical cleaners.
• This warranty does not cover corrosion or rust caused by exposure to the elements, grease res, insects,
weather or hail. (Rust can be removed by a scrub pad and then the surface coated with cooking oil or
touched up with high heat resistant paint).
CONDITIONS OF WARRANTY
• The appliance is delivered to the HARK distributor’s service department or authorised service agent and
freight charges both ways are paid by the owner. No liability is accepted for loss or damage during transit.
• The appliance is installed by a qualied person and operated and maintained in accordance with the
instructions supplied. Repairs or service must be carried out by an authorised person.
• Installation must conform to the applicable Gas, Electrical and Building standards laid down by the local
codes for your country or region.
• No alterations or repairs have been carried out without obtaining the distributors prior consent. Such repair or
any replacement does not extend the warranty period.
• Proof of purchase together must be provided to verify purchase date and establish the warranty period. Only
the original purchaser is covered under this warranty.
• The warranty period is calculated from the date of purchase only.
• Parts installed from other manufacturers’ products will void this warranty.
The benets conferred by this warranty are in addition to all rights and remedies in respect of the product that the
consumer has under the Competition and Consumer Act 2010 and similar state and territory laws.
Our goods come with guarantees that cannot be excluded under the Australian Consumer Law. You are entitled
to a replacement or refund for a major failure and for compensation for any other reasonably foreseeable loss or
damage. You are also entitled to have the goods repaired or replaced if the goods fail to be of acceptable quality
and the failure does not amount to a major failure.
After Sales Support
Telephone: 1300 799 787
(03) 9873 2711
Email: service@hark.com.au
YEAR
WARRANTY

4
READ ALL SAFEGUARDS AND INSTRUCTIONS THOROUGHLY!
YOUR SAFETY IS VERY IMPORTANT – FAILURE TO FOLLOW PROPER PROCEDURES AND SAFEGUARDS MAY RESULT
IN PROPERTY DAMAGE OR PERSONAL INJURY.
DANGER DANGER
- This smoker is for OUTDOOR USE ONLY.
- Never operate this smoker unattended.
- The use of alcohol, prescription or non prescription
drugs may impair the consumer’s ability to properly
assemble or safely operate the smoker.
- Never operate this smoker within 7.5m (25 feet) of any
flammable liquids.
- Use this smoker only on a level, stable noncombustible
surface like brick, concrete or dirt. Do not use smoker
on or around any surface that will burn or melt like
wooden decks, dry grass, leaves, wood rails, vinyl, or
plastic.
- Never operate this smoker under any overhead
roof covering, awning or overhang. Never use
inside an enclosed area such as screen patios,
garages, buildings and tents. Keep a minimum
clearance of 100cm from all sides of the
smoker to all overhead construction and 100cm from
any walls or rails.
- Never use in or on recreational vehicles and/or
boats.
- Never use this product for anything other than its
intended purposes. Never use this smoker as a heater.
- Do not use or store flammable materials in or near this
appliance.
- Smoker is HOT while in use and after use.
- Keep children and pets away from the smoker at all
times.
- Do not spray aerosoles in the vicinity of this appliance
while it is in operation.
- Do not modify this appliance and do not use
unauthorised spare parts.
- Do not place articles on or against this appliance.
- Avoid touching hot surfaces. Always wear protective
gloves or mitts when operating the smoker.
- Do not allow anyone to conduct activities around
the smoker during or following its use until the unit has
cooled. The smoker is hot during operation and remains
hot for a period of time following its use.
- Never move the smoker when it is in use. Allow the
smoker to cool below 100ºF (38ºC) before moving
or storing it.
- Always wear shoes and protective clothing during
operation of this smoker.
- Accessory attachments and cookware not supplied
with this smoker are not recommended for use.
- Perform a leak test before each use of the smoker.
(See page 18).
- Keep the gas supply hose away from any heated
surfaces.
- Never attach a gas cylinder, move or alter ttings
when the smoker is hot or in use.
- Do not attempt to disconnect any gas tting while
the smoker is in operation.
- Never use a gas cylinder if it appears to have dents,
gouges, bulges, re damage, erosion, leak age, excessive
rust, or other forms of visible
external damage. The cylinder may be hazardous and
should be checked by a liquid propane supplier.
- Before each use, inspect gas hose for any signs
of damage and check all nuts and bolts to be sure
that they are tight and secure.
- When lighting your smoker, do not cover the
burners or restrict airow from the burners. An
explosion could occur.
- When lighting your smoker, always have both doors open.
OUTDOOR USE ONLY
SAVE AND FILE THESE INSTRUCTIONS FOR FUTURE REFERENCE
IF A BURNER DOES NOT IGNITE, TURN OFF THE CONTROL KNOB AND GAS AND WAIT 5
MINUTES BEFORE TRYING TO LIGHT IT AGAIN. IF A BURNER GOES OUT DURING OPERATION,
FIRST TURN THE CONTROL KNOB OFF, THEN THE GAS CYLINDER OFF.
5
READ ALL SAFEGUARDS AND INSTRUCTIONS THOROUGHLY!
YOUR SAFETY IS VERY IMPORTANT – FAILURE TO FOLLOW PROPER PROCEDURES AND SAFEGUARDS MAY RESULT IN
PROPERTY DAMAGE OR PERSONAL INJURY.
DANGER DANGER
• Keep clear of the smoker hose. Tripping over
the smoker hose may result in the spilling of
HOT grease or water, causing personal injury
or property damage.
• In the event of an oil/grease fire, immediately
turn off gas supply and call the fire
Department. Do not attempt to extinguish
a fire with water. A type BC or ABC fire
extinguisher may in some cases contain the
fire.
• Keep your hands, hair and face away from
the burner flame. Do not lean over or in to
the smoker when lighting the burners. This
smoker has an open flame. Be careful of loose
hair and clothing during operation, which could
catch fire.
• After use, always turn the control valve OFF
first, then the gas cylinder valve OFF.
• Always allow the hot water from the water bowl
to cool completely below 100ºF (38C) before
moving to avoid the possibility of severe burns.
• Never use glassware, plastic, or ceramic
cookware in this smoker.
• Always disconnect the gas cylinder from your
smoker when not in use.
• Do not store a spare LP-gas cylinder under or
near the smoker.
• Gas cylinders must be stored outdoors, out of
reach of children, and must not be stored in a
building, garage, or any other enclosed area.
• If you smell, hear or see gas escaping,
immediately get away from the gas cylinder and
call the Fire Department.
USE CAUTION AND COMMON SENSE WHEN OPERATING YOUR SMOKER.
SAVE THESE INSTRUCTIONS
WARNING
DO NOT SPRAY AEROSOLS IN THE VICINITY OF THIS APPLIANCE WHILE IT IS IN OPERATION.
DO NOT USE OR STORE FLAMMABLE MATERIALS IN OR NEAR THIS APPLIANCE.
DO NOT PLACE ARTICLES ON OR AGAINST THIS APPLIANCE.
DO NOT MODIFY THIS APPLIANCE.
6
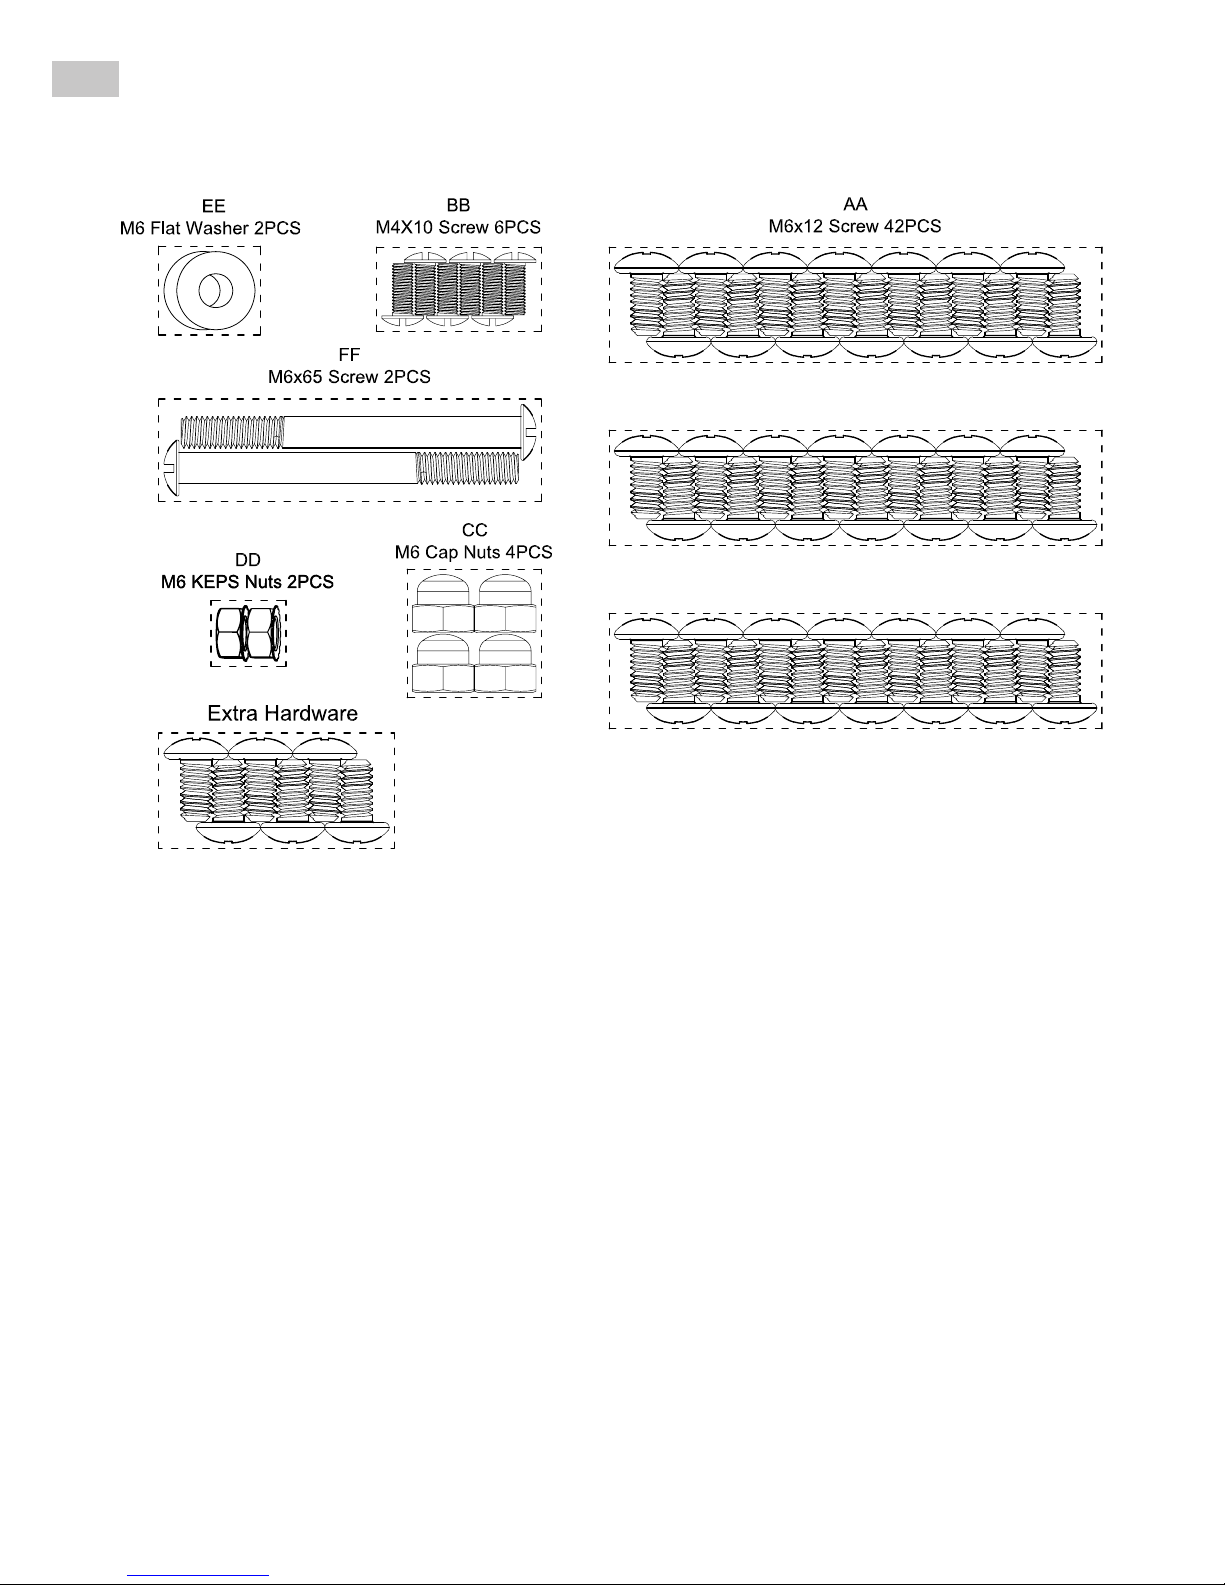
A. HARDWARE PACK
7
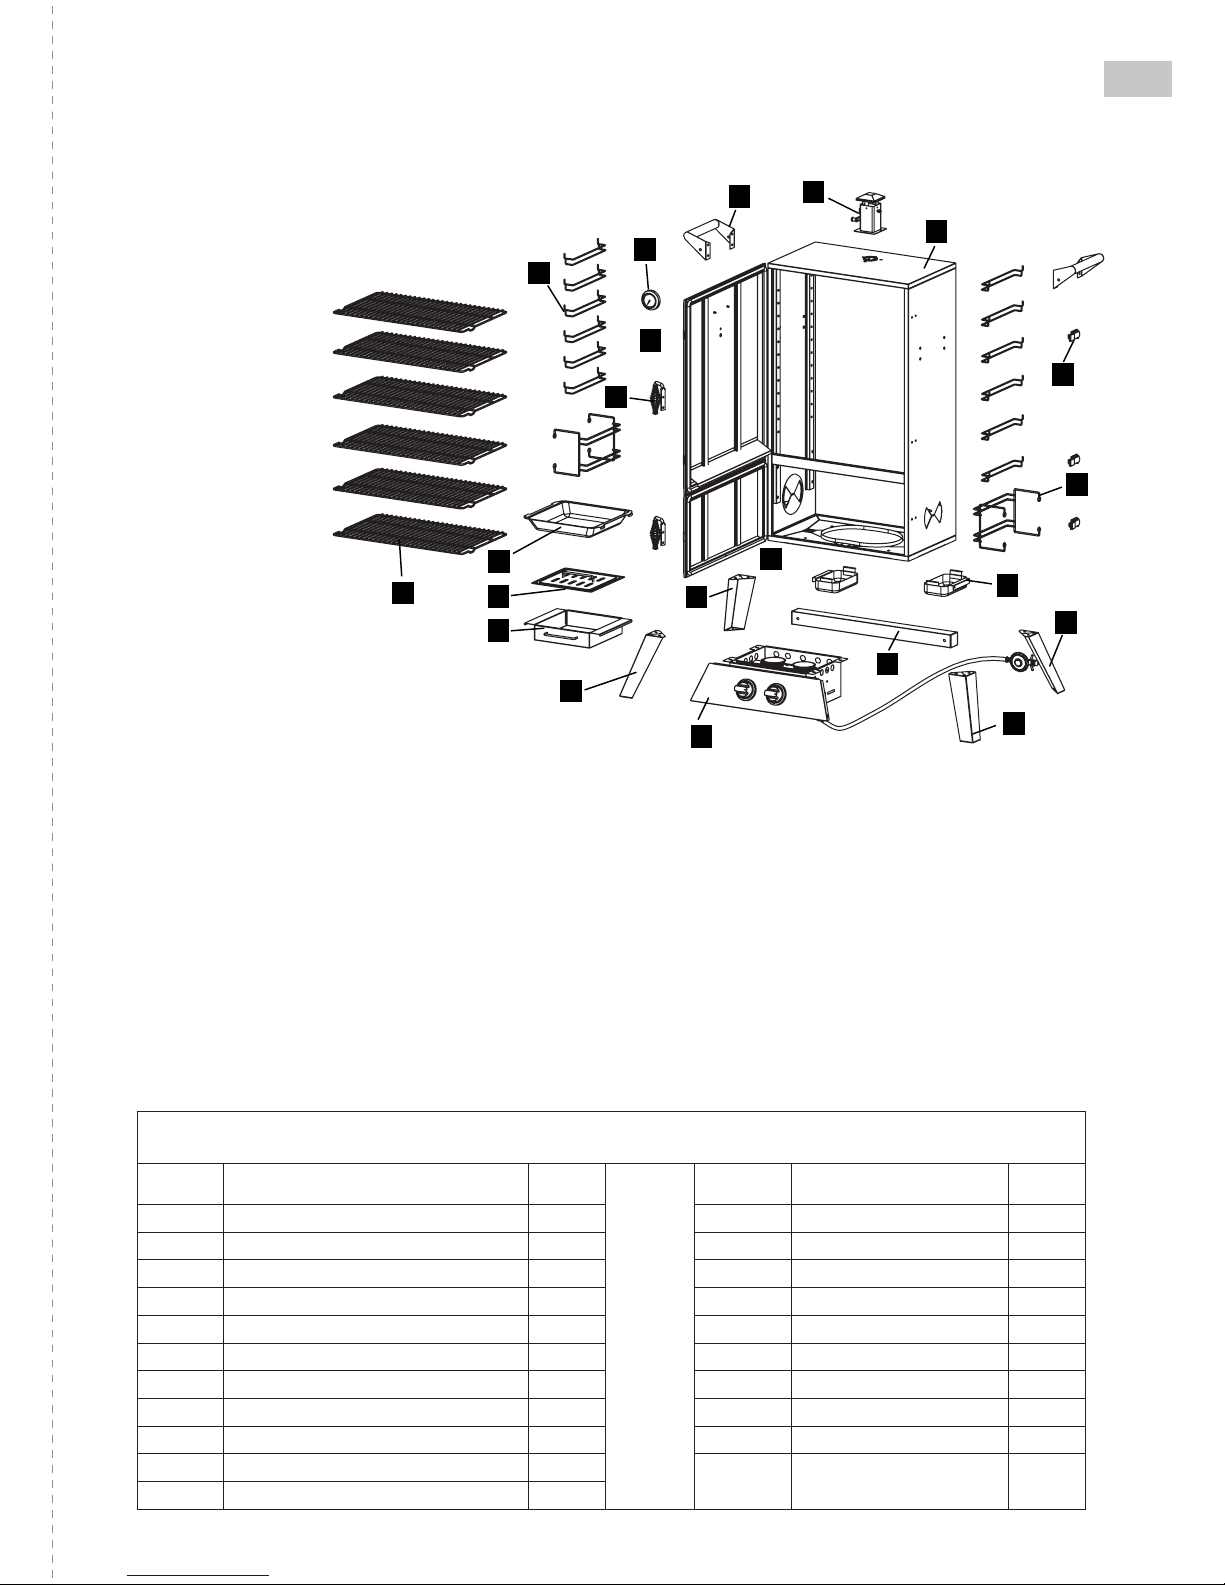
B. PARTS LIST
Primary Components
Item Description Qty Item Description Qty
A Smoker Stack Assembly 1 L Burner & Control Unit 1
B Side Handle 2 M Front Leg-Right 1
C Temperature Gauge 1 N Front Leg-Left 1
D Door Handle 2 O Water Bowl 1
E Cooking Grate 6 P Upper Door 1
F Cooking Grate Support 12 Q Lower Door 1
G Smoker Body 1 R Wood Chip Box Lid 1
H Back Leg-Right 1 S Wood Chip Box 1
I Grease Cup 2 T Back Leg-Left 1
J Door Latch 3 U Back Support Pipe 1
K Support Bracket 2
Product Dimensions: 80.2cm(w) x 52.2cm(d) x 145cm(h)
In order to properly assemble your smoker, you will only need two tools (tools not included):
- Philips head screwdriver
- shifter or 3/8” & 7/16” wrench
Be sure to have a friend help. The smoker is heavy and must be moved around during assembly and before use.
To use your smoker immediately after assembly, have an LP gas cylinder lled by an authorised LP dealer or
cylinder exchange center.
Also, be sure to have your choice of avouring wood readily available. (LP gas cylinder and avouring wood are
not included).
For further assistance, including missing or damaged parts, call 1300 799 787.
Read all safeguards and
assembly instructions
before assembling and
operating your smoker.
Before assembling your
new smoker, unpack
all parts from the box.
Carefully remove all
packing material
and layout all the parts
for easy access and
identication. Do not
discard the carton or
packaging until your
smoker is fully assembled
and operating to your
satisfaction.
A
B
C
D
E
F
G
H
I
J
K
L
M
N
O
P
Q
R
S
T
U
8
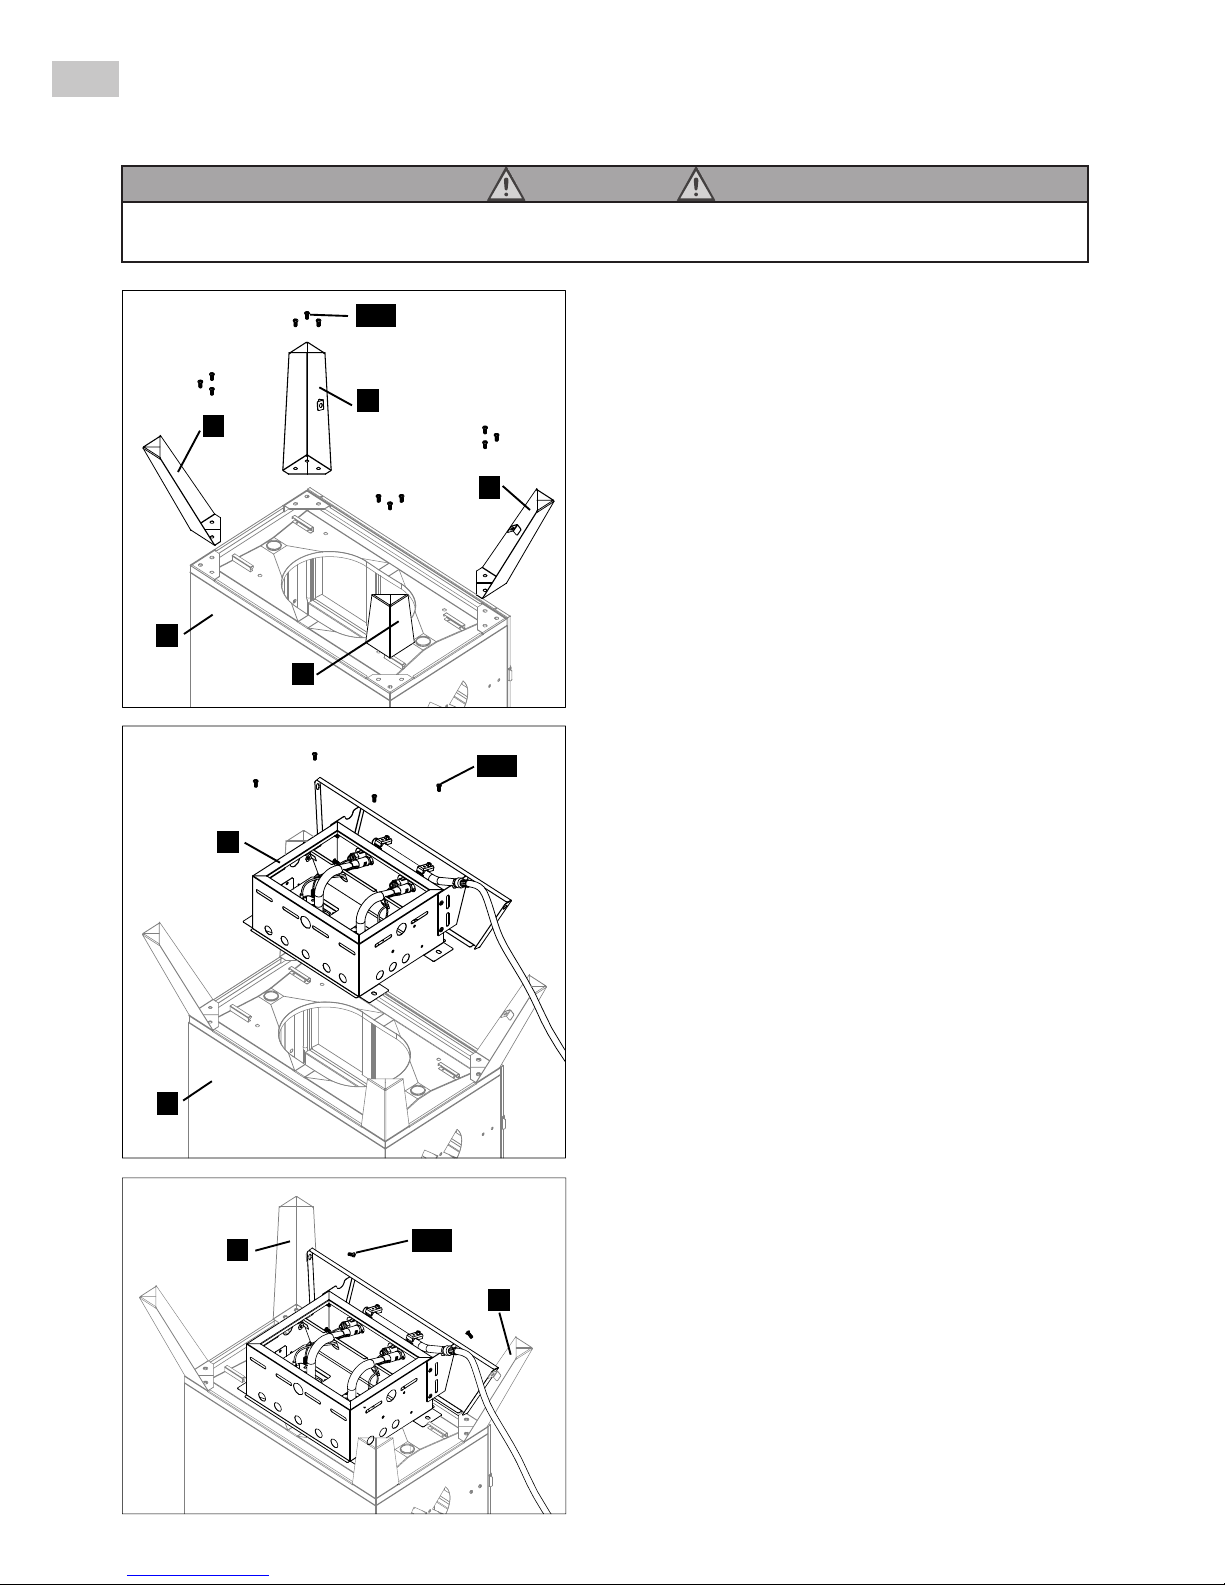
C. ASSEMBLY INSTRUCTIONS
STEP 1
Locate: Rear Leg-Right (H), Rear Leg-Left (T), Front
Leg-Right (M), Front Leg-Left (N), Smoker
Body(G), twelve M6x12 screws (AA)
Note: The doors are attached to the Smoker Body.
Tools needed: Philips head screwdriver
Procedure:
• CAUTION: Remove the Upper (P) and Lower (Q)
Doors before beginning assembly.
• Attach Rear Leg-Right (H) & Rear Leg-Left (T)&
Front Leg-Right (M) & Front Leg-Left (N) to the
Smoker Body (G) using twelve M6x12 screws (AA).
STEP 2
Locate: Burner & Control Unit (L),
six M6x12 screws (AA)
Tools needed: Philips head screwdriver
Procedure:
• Turn the Burner & Control Unit (L) upside down
and place it on the bottom of the Smoker Body
(G). Align the four bottom mounting holes on the
Burner & Control Unit (L) with the holes on the
Smoker Body (G). Secure with four M6x12 screws
(AA). Tighten screws.
Note: The control knob should be on the same side as
the door.
• Align the mounting holes on the side of the
control panel with the front legs and secure with
two M6x12 screws (AA). Tighten screws.
WARNING
DO NOT HANDLE SMOKER BY THE CROSS BAR ON SMOKER CABINET.
DO NOT LIFT OR MOVE USING THIS CROSS BAR.
T
G
H
N
M
AA
G
AA
L
N
AA
M
 Loading...