

ASSEMBLY AND OPERATION
INSTRUCTIONS
OUTDOOR JET-PRO COOKER
IMPORTANT
READ THESE INSTRUCTIONS FOR USE CAREFULLY. FAMILIARISE YOURSELF WITH THE APPLIANCE BEFORE
CONNECTING IT TO A GAS CONTAINER. KEEP THESE INSTRUCTIONS FOR FUTURE REFERENCE.

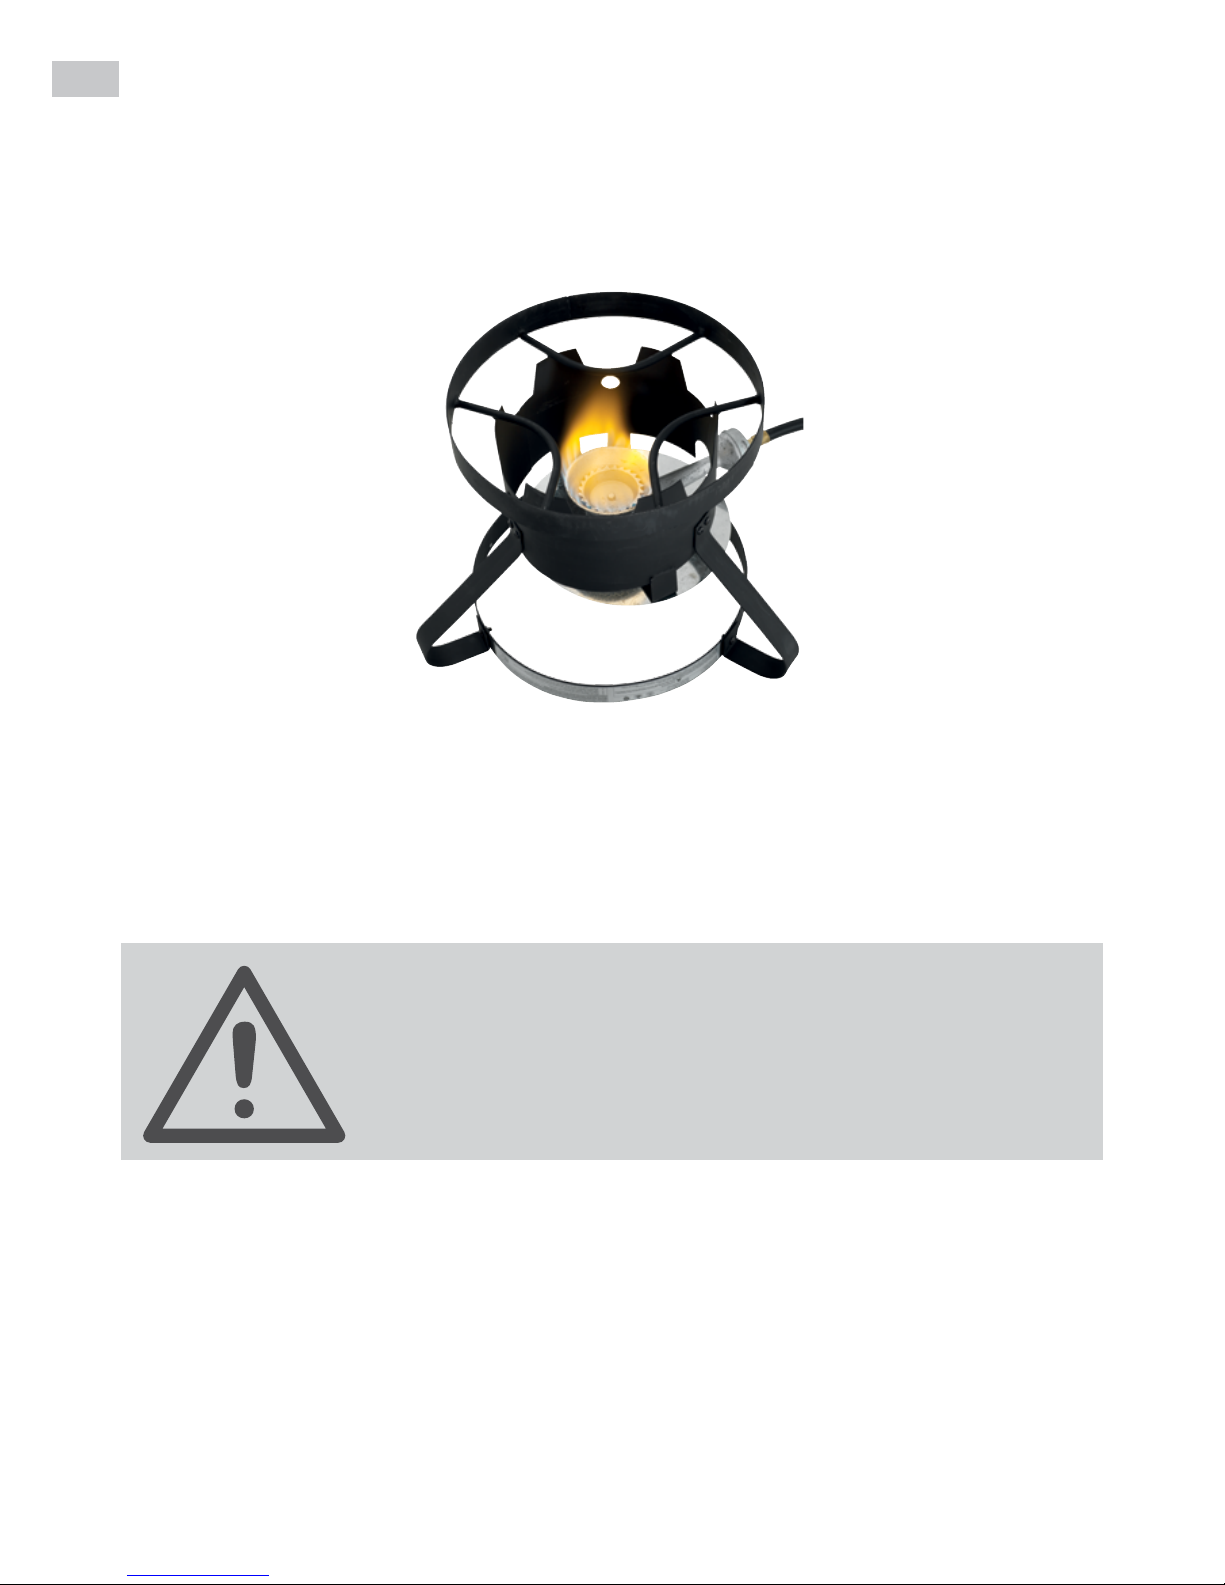
Outdoor Jet-Pro Cooker
Warranty Details
After Sales Support
Telephone: 1300 799 787
(03) 9873 2711
Email: service@hark.com.au
YEAR
WARRANTY
Hark Enterprises Pty Ltd warrants that this genuine HARK® brand product is free from
defects in workmanship and materials for 12 months from the date of purchase.
If as a result of normal use in compliance with the manufacturer’s instructions the product
fails to operate within the warranty period, we will repair or replace the product. This
warranty does not extend to cover any damage due to burn out or rust.
Our goods come with guarantees that cannot be excluded under the Australian Consumer
Law.
You are entitled to a replacement or refund for a major failure and for compensation for
any other reasonably foreseeable loss or damage. You are also entitled to have the goods
repaired or replaced if the goods fail to be of acceptable quality and the failure does not
amount to a major failure.
The benets given to you in this warranty are in addition to other rights and remedies in
respect of the product that the consumer has under the Competition and Consumer Act
2010 and similar state and territory laws.
In the event of a product failure, the goods should be returned at your cost to the original
place of purchase, with specic details of the complaint, and a copy of the purchase
receipt.
4
Model No.: HK0511
Product Name: OUTDOOR JET-PRO COOKER - For propane (LPG) use only
HAZARDOUS FIRE OR EXPLOSION MAY RESULT
IF INSTRUCTIONS ARE IGNORED.
It is the consumer's responsibility to see that the Jet-Pro Cooker is
properly assembled, installed, and taken care of. Failure to follow
instructions in this manual could result in injury and/or property damage.
FOR OUTDOOR USE ONLY. PLEASE READ INSTRUCTIONS CAREFULLY BEFORE
ASSEMBLING. RETAIN THIS MANUAL FOR FUTURE REFERENCE.
FOR YOUR SAFETY
If you smell gas:
1. Shut off gas to the appliance.
2. Extinguish any open ame.
3. If odour continues, immediately call your
gas supplier or your local re department.
PRECAUTIONS
1. Leak test all connections after each tank rell.
2. Never check for leaks with a match or open
ame.
3. Do not store or use gasoline or other
ammable vapours and liquids in the vicinity
of this appliance.
Line drawings are not to scale. Actual products may differ from drawing depending on the model purchased.
Specications are subject to change without notice.
5
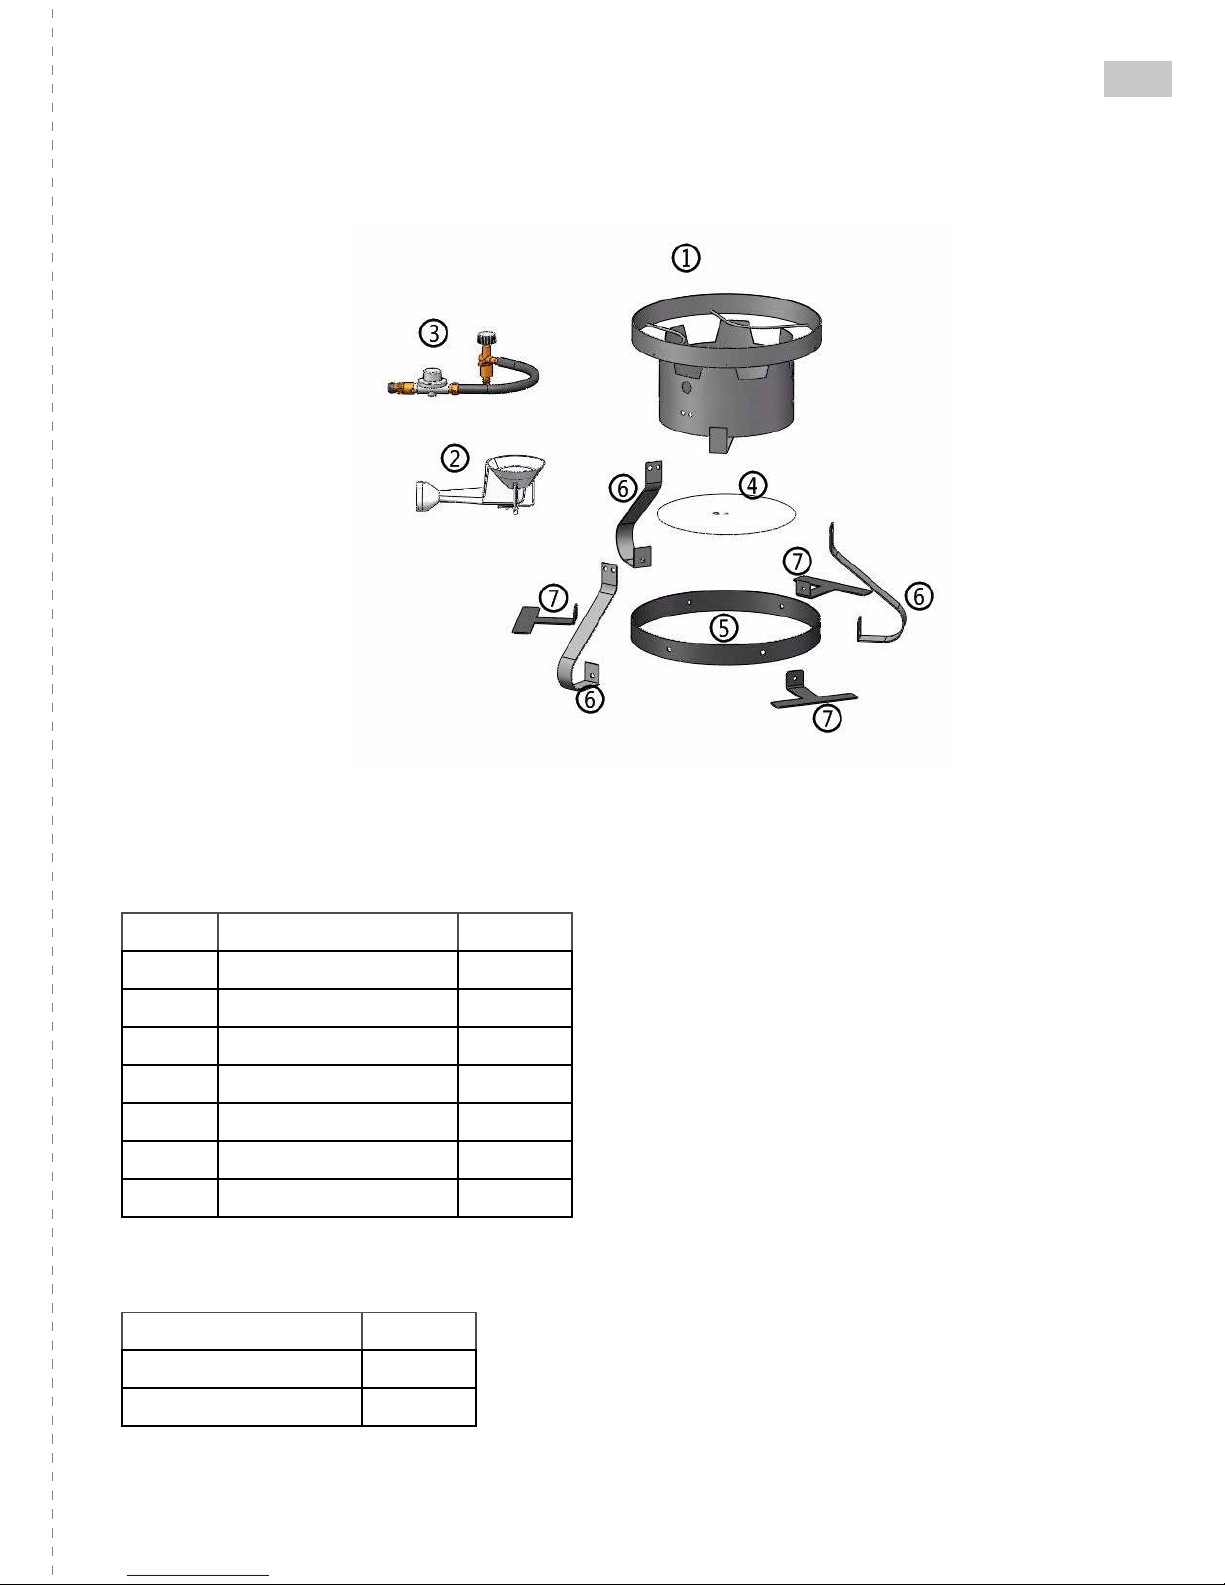
NO. Name QTY
1 Base 1
2 Burner 1
3 Hose & Regulator 1
4 Heat shield 1
5 Base ring 1
6 Leg (x 3) 3
7 Stability bracket (x 3) 3
Name QTY
M6x10 screw 12pcs
M6 Nut 12pcs
EXPANDED VIEW
Tools needed for assembly
Adjustable Wrench and Phillips Head
Screwdriver (not included)
Before assembly
Please read all instructions thoroughly
before proceeding.
Find a large, clean area in which to
assemble your Jet-Pro Cooker. Please refer
to the parts list and assembly diagram as
necessary.
Ensure any transit protection or packaging is
removed.
Do not throw out any packaging until Jet-
Pro Cooker is fully assembled in case parts
are still enclosed.
Parts List
Hardware List
6
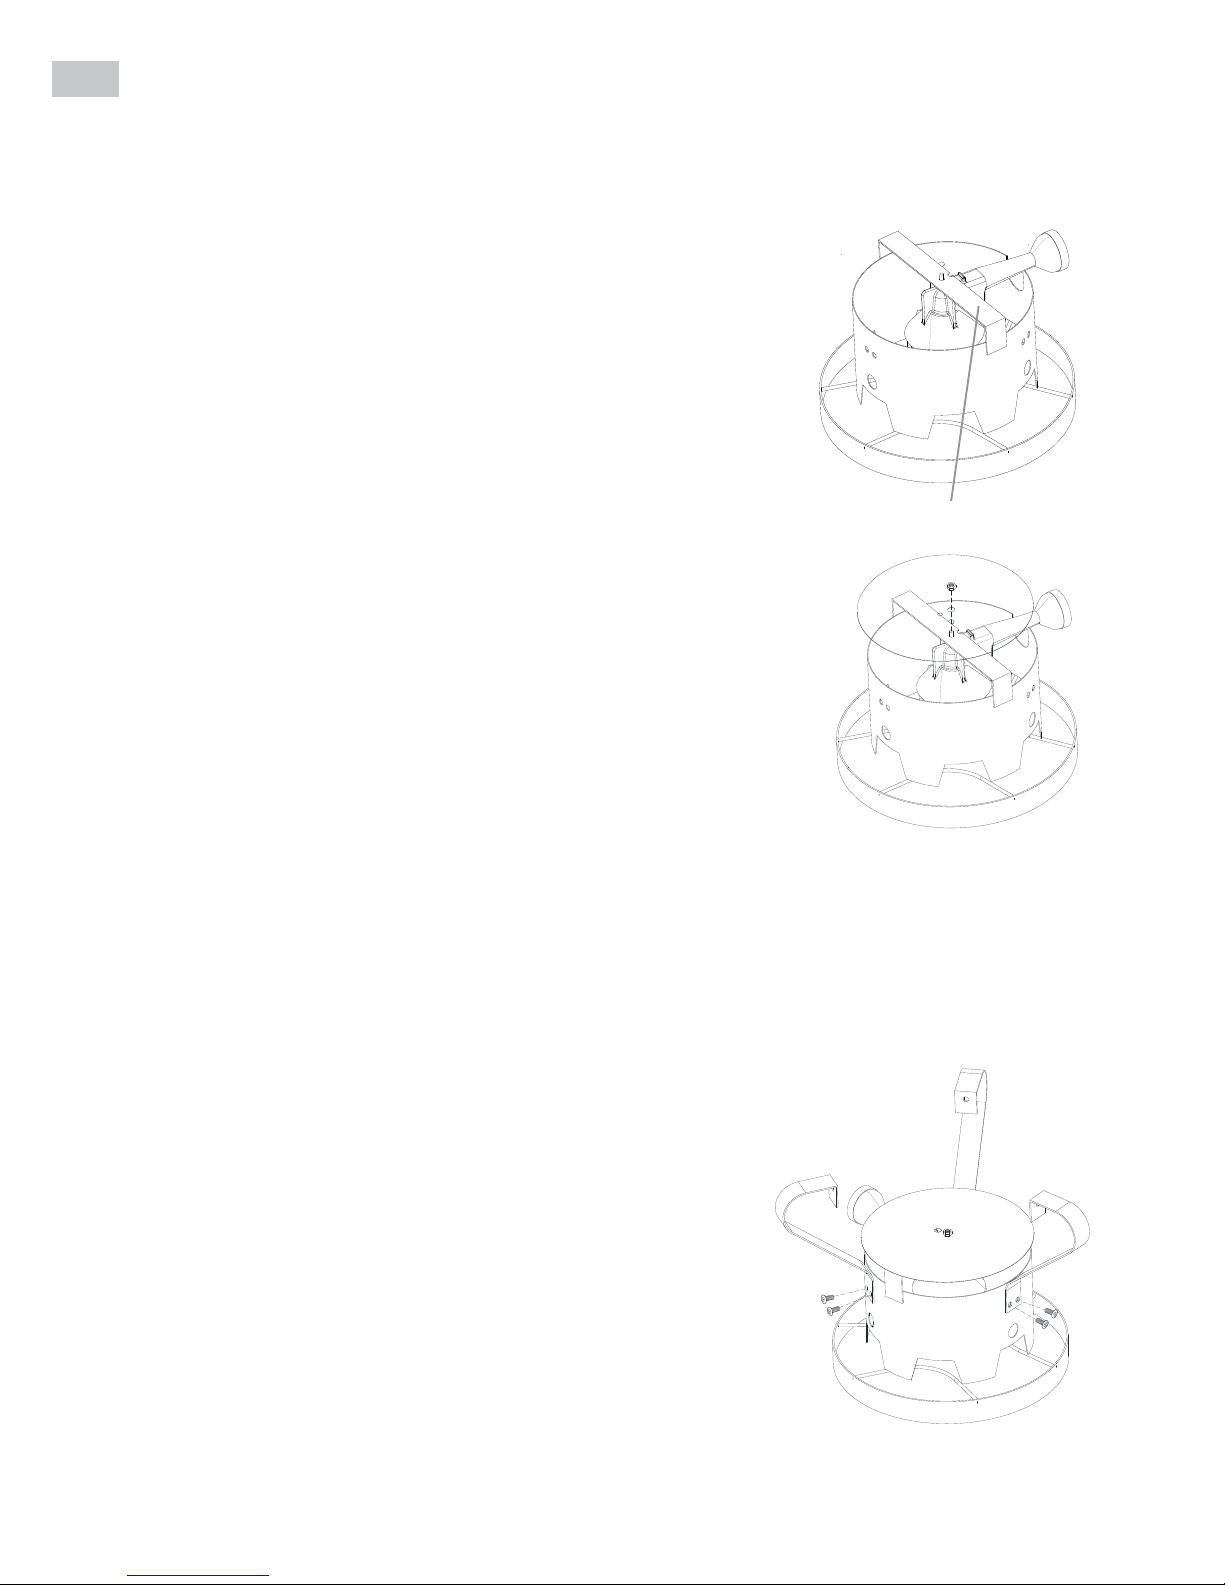
— Place base (1) upside down on an even surface. The wider ring
of the base should be facing down¬ward.
— Locate the burner mount bar stretching across the narrower
ring of the base.
— Remove the nut from the bottom of the cast burner (2).
— From the bottom side of the burner mount bar, place the cast
burner into the groove in the center of the bar. The screw on
the cast burner should fit through the hole in the center of the
mount bar. The cast burner should be positioned towards the
side of the base with the cutout section.
— The Heat Shield (4) must be installed before placing the nut on
the burner post and tightened.
— Fasten the cast burner screw securely to the burner mount bar
with the nut.
STEP 2 LEG ASSEMBLY
— Locate 3 x legs (6)
— Join each of the legs to the base ring, so that the two
holes of each leg are aligned with each set of two holes on
the base. When in position, the legs should be projecting
outward from the center of the base.
— Securely fasten each leg to the base with two M6x10
screws and M6 nuts per leg. The screws should be inserted
from the outside towards the center of the ring.
A. ASSEMBLY OF THE JET-PRO COOKER
STEP 1 SECURING THE CAST BURNER TO THE BASE
NOTE: The serrated washer that is attached to the nut, should make contact with the heat shield.
Burner Mount Bar
7
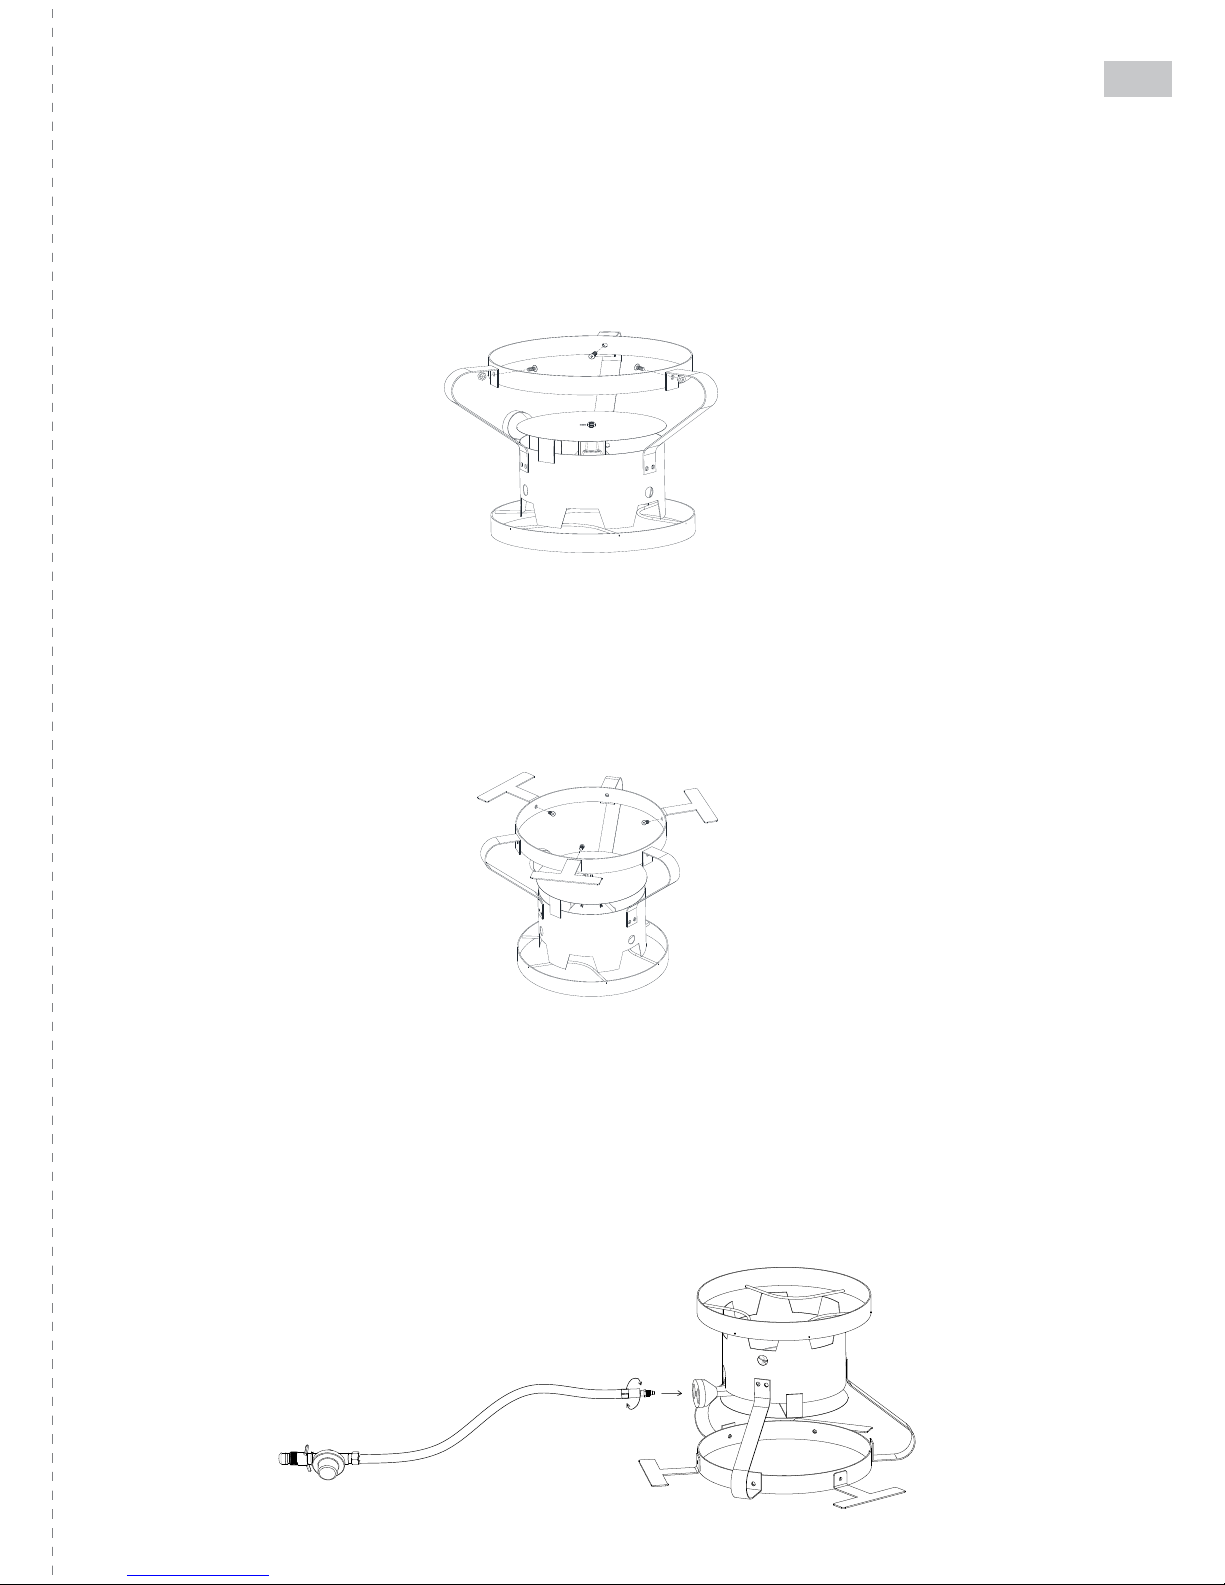
STEP 3 METAL BASE RING ASSEMBLY
— Insert the metal base ring (5) in between all three legs so that each of three holes on the ring
match up with each hole at the end of the legs.
— Securely fasten the ring by inserting a M6X10 screw into each hole and tightening with a M6
nut. The screws should be inserted from the center of the ring outward.
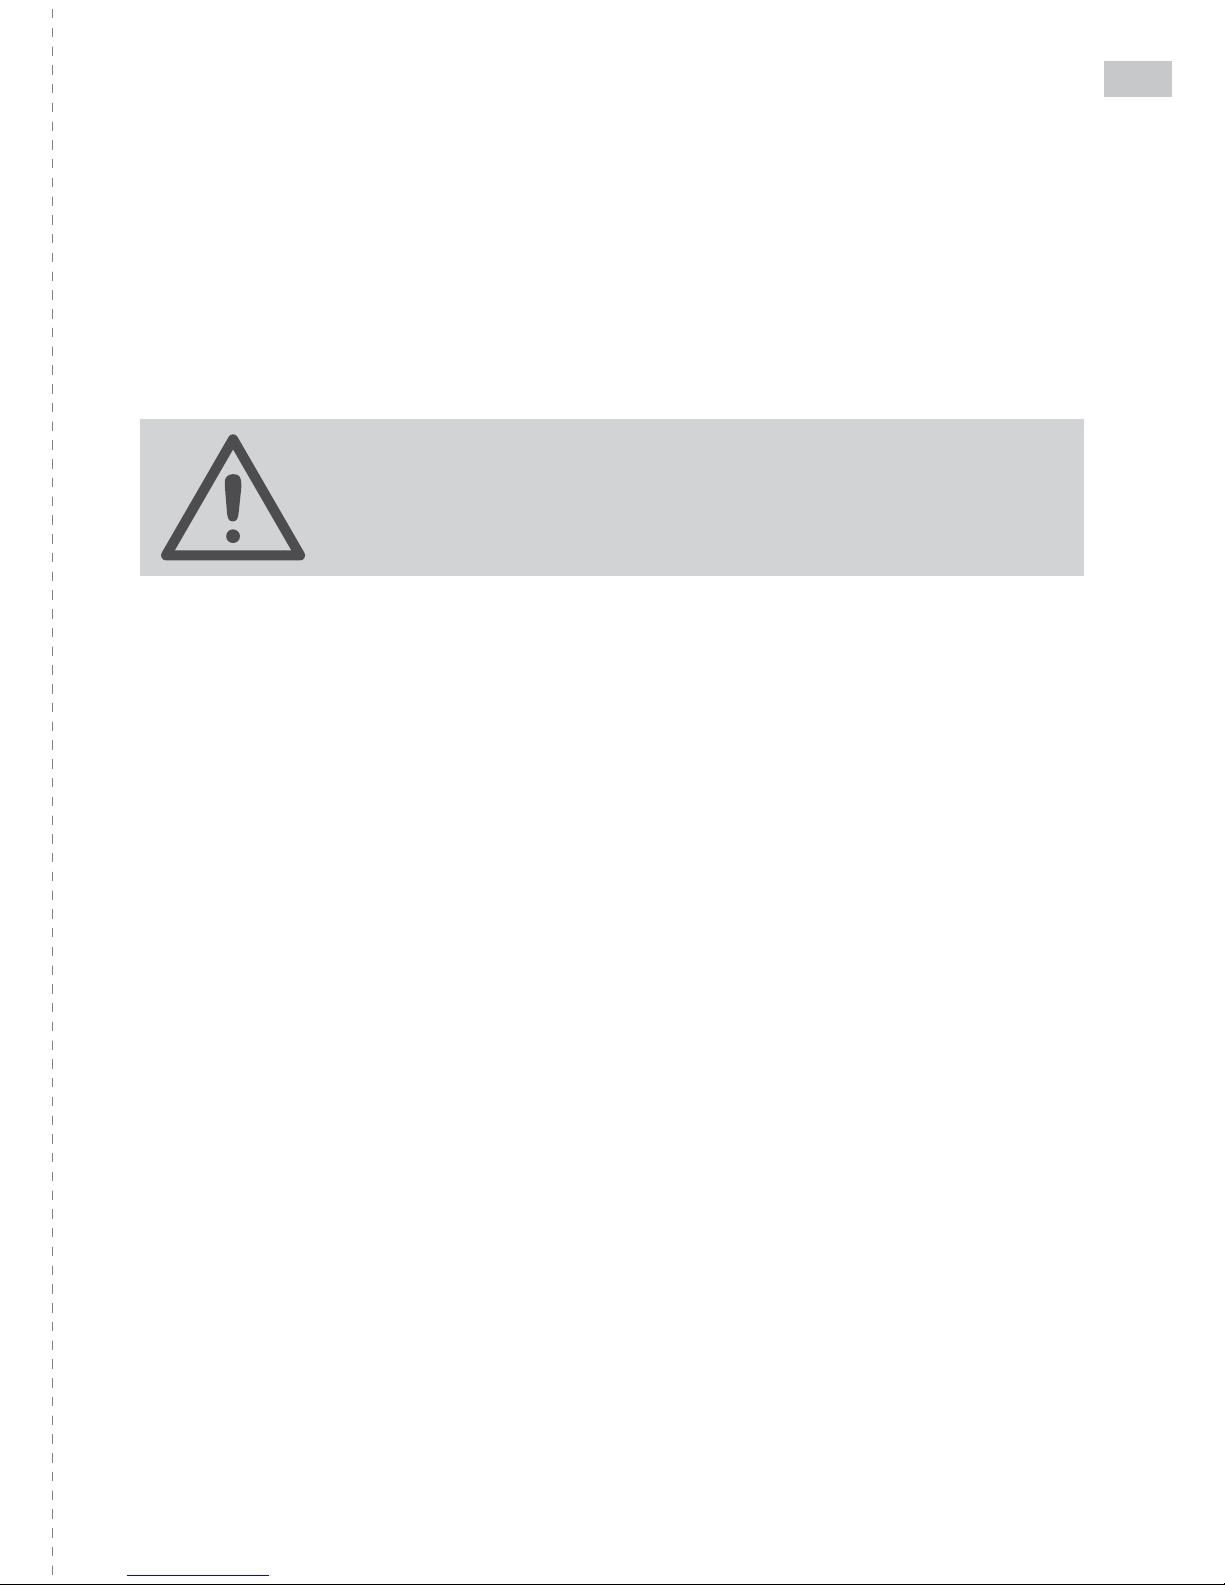
STEP 4 STABILITY BRACKET ASSEMBLY
— Attach 3 stability brackets (7) to the Metal base ring as shown with an M6x10 screw and M6
nut. The screws should be inserted from the center of the ring outward. Note that the “T” shape
faces outward from the ring.
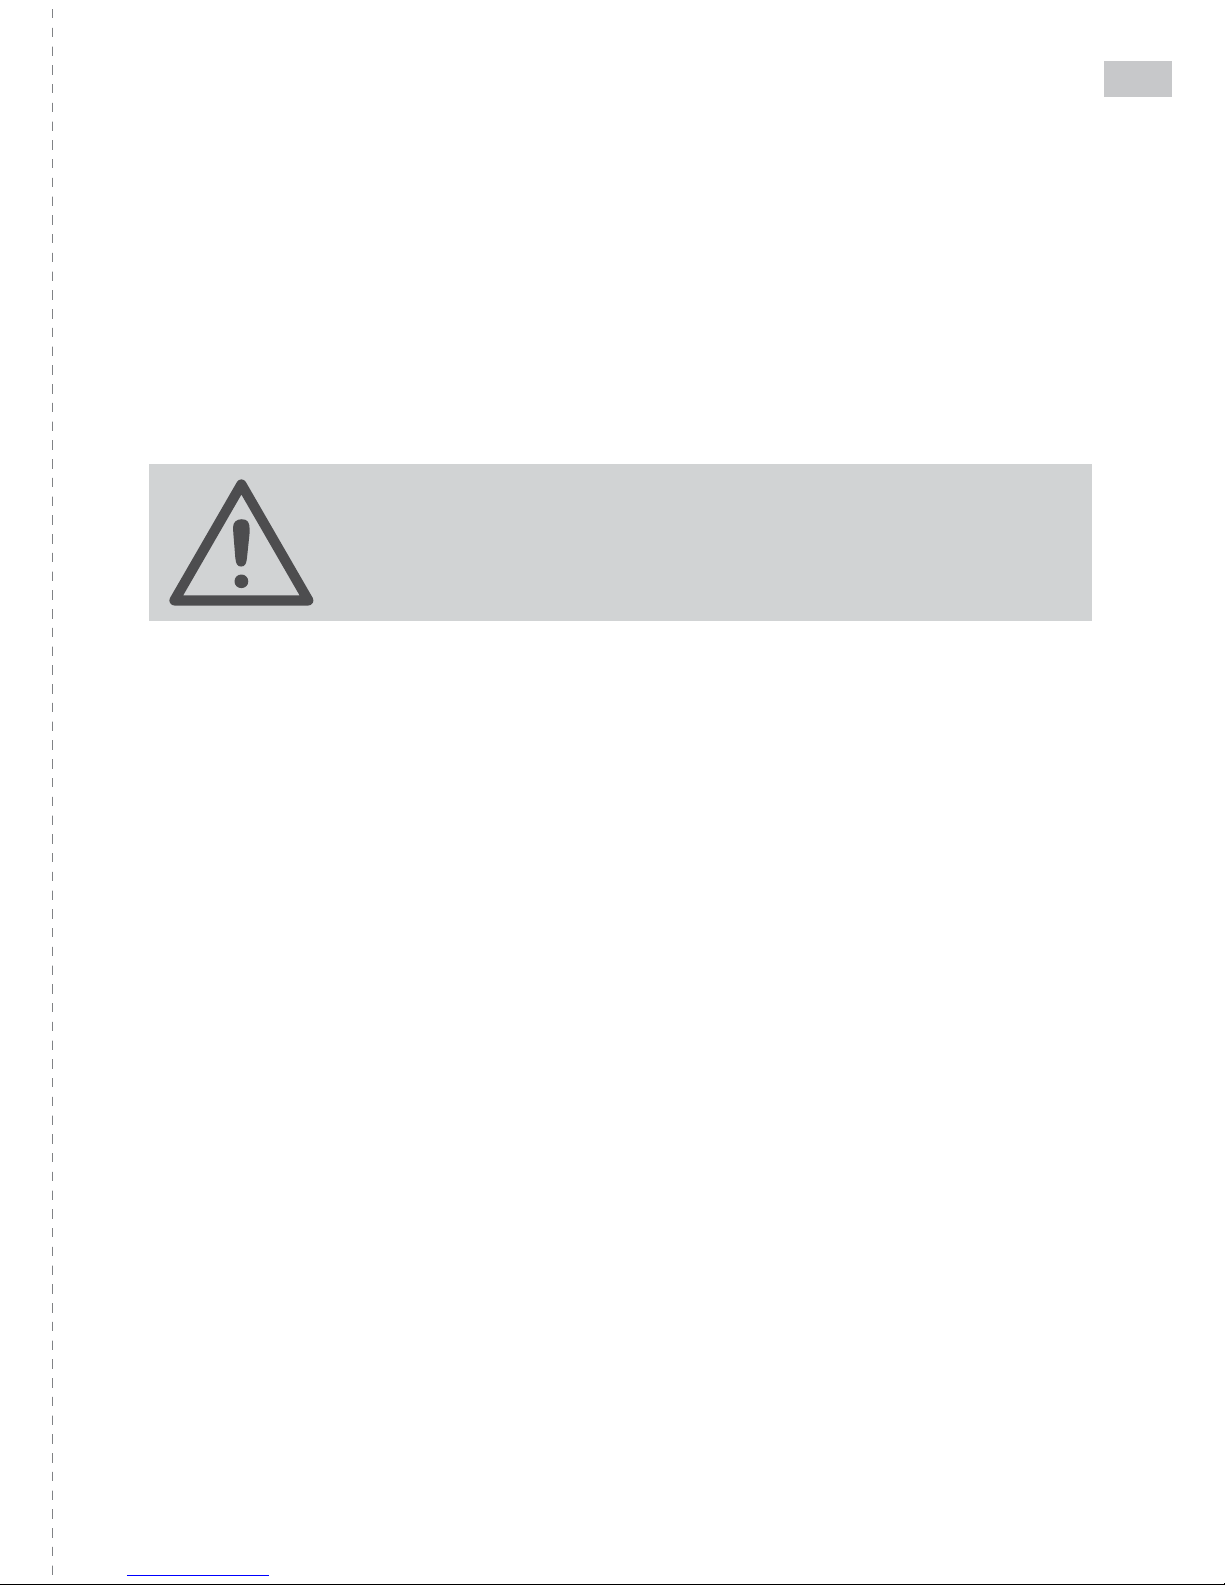
STEP 5 HOSE/REGULATOR ASSEMBLY
— Return the base to the upright position allowing the unit to stand on its newly assembled
legs.
— Carefully insert the threaded orifice end of the hose and regulator (3) into the center of the
narrow end of the burner venture (2) and carefully turn clockwise until tight and secure. You may
need a shifter to tighten the last section of the nut, BUT DO NOT OVER TIGHTEN.

8
B. THE GAS SYSTEM
1. GAS AND REGULATOR INFORMATION
This cooker is designed for propane (LPG) gas use only. Gas bottles with a "POL"
connection are to be used with this barbecue. Suitable regulators must have an outlet
pressure of 69 kPa. You must have the proper regulator and bottle in order for the barbecue
to operate safely and efciently. Ensure that a 100% propane (LPG) rellable gas cylinder
currently certied to Australian Standard AS2030.1:2009 is used. Do not use disposable gas
cylinders. Please note the hose and regulator supplied with this unit are of an approved type
and are specically designed for use with your Jet-Pro Cooker.
It may be hazardous to attempt to t other types of Gas containers.
2. CONNECTING THE HOSE AND REGULATOR TO THE GAS BOTTLE
— Only use the hose assembly supplied with this appliance for direct connection to the
cylinder – DO NOT USE ADAPTORS. Do not use any other hose assembly. Check the
gas hose for damage or signs of abrasion before each use.
— Keep the hose clear of sharp edges and hot surfaces.
— Avoid twisting or kinking the exible hose.
— If damaged, do not use the hose and replace it immediately. If there is any doubt, contact
the customer service line on 1300 799 787.
— Make sure all Jet-Pro Cooker control knobs are in the off position. Connect the regulator
to the gas cylinder by inserting the regulator connection into the gas bottle outlet. This is
tightened in an anti clockwise motion.
— Firmly hand tighten and then be sure to check for leaks at all gas connections.
— Please note that the hose is already fitted with a valve that connects to the burner.
You do not have to adjust this connection but should leak test this once the hose and
regulator are connected to the gas cylinder.
9
3. LEAK TESTING
Open the gas control valve on the cylinder. Check for leaks by brushing a solution 1/2 water
and 1/2 soap over all gas system joints, including all valve connections, hose connections
and regulator connections. DO NOT USE AN OPEN FLAME to test for leaks at anytime. If
bubbles form over any of the joints, there is a leak. Turn off the gas supply and re-tighten all
joints. If bubbles form again, do not use the Jet-Pro Cooker. Please contact the customer
service line on 1300 799 787. Check for leaks annually or whenever the hose and regulator
are disconnected from the gas cylinder.
C. INSTALLATION
1. CHOOSING A LOCATION
This Jet-Pro Cooker is for outdoor use only and should be placed in a well-ventilated
area. Take care to ensure that the Minimum clearances: From sides: 1000mm, From back:
1000mm, From above (vertical): 1000mm.
Keep this Jet-Pro Cooker away from any ammable materials!
2. OTHER PRECAUTIONS
Do not obstruct any of the ventilation openings in the Jet-Pro Cooker body. Also, position
the gas supply cylinder on level ground next to the Jet-Pro Cooker and safely away from
any source of heat. Should you need to change the gas cylinder, conrm that the cylinder
is off, and that there are no sources of ignition (cigarettes, open ame, sparks, etc.) near
before proceeding. Be sure to inspect the gas hose and ensure it is free of any twisting or
tension. The hose should hang freely with no bends, folds, or kinks, which could obstruct
the free ow of gas. Apart from the connection point, no part of the hose should touch any
hot parts. Inspect the hose before use. If the hose is damaged, it must be replaced with a
hose from the manufacturer. The length shall not exceed 1.5m. Should minimum clearances
not be adhered to severe are up may be experienced due to a lack of airow around the
Jet-Pro Cooker, thus voiding manufacture’s warranty.
FOR STORAGE AND CYLINDER EXCHANGE,
DISCONNECT THE CYLINDER ONLY.
DO NOT DISCONNECT HOSE FROM APPLIANCE.

10
D. OPERATION
WARNINGS
— This Jet-Pro Cooker should not be used indoors. USE OUTDOORS ONLY.
— Read the instructions carefully before using the appliance.
— Caution: Accessible parts may be very hot. Keep young children away.
— This appliance is not intended to be installed or used on a recreational vehicle or marine
environment.
— This appliance must only be serviced by an authorised person.
— ONLY USE IN WELL VENTILATED AREAS.
CARBON MONOXIDE HAZARD-THIS APPLIANCE CAN PRODUCE
CARBON MONOXIDE WHICH HAS NO ODOUR. USING IT IN
ENCLOSED SPACE (FOR EXAMPLE CARAVAN,TENT, CAR, MOBILE
HOME) MAY CAUSE DEATH.
SAFETY TIPS
Please observe the following points before using the Jet-Pro Cooker:
— Ensure Jet-Pro Cooker is placed on horizontal surface.
— DO NOT move appliance whilst in operation.
— Never leave Jet-Pro Cooker unattended when hot or in use.
— DO NOT modify this appliance.
— Turn off the gas supply at the gas cylinder after use.
— Do not tamper with any parts. Any modication of this appliance is dangerous and will nullify
any warranty.
— The use of protective gloves is recommended when cooking or handling any parts of the Jet-
Pro Cooker while it is hot or in use.
— In the event of a gas leak, shut off gas supply immediately and extinguish any ames. Contact
your local dealer.
• DO NOT USE THIS APPLIANCE IF IT IS LEAKING, DAMAGED OR DOES NOT
OPERATE PROPERLY
• IF THERE IS A LEAK ON YOUR APPLIANCE (SMELL OF GAS), IMMEDIATELY
ATTEMPT TO TURN OFF THE CYLINDER VALVE. REMOVE THE APPLIANCE TO A
WELL-VENTILATED LOCATION AWAY FROM ANY IGNITION SOURCE. CHECK FOR
LEAKS USING SOAPY WATER. DO NOT TRY TO DETECT LEAKS USING A FLAME’
• GAS CONTAINERS SHALL BE CHANGED IN A WELL-VENTILATED LOCATION,
PREFERABLY OUTSIDE AWAY FROM PEOPLE AND ANY SOURCE OF IGNITION,
SUCH AS NAKED FLAMES, PILOT FLAMES, ELECTRIC HEATERS/EQUIPMENT
11
E. LIGHTING THE BURNER
— Insure that the regulator control valve is in the off position.
— Slowly rotate the gas cylinder valve anti-clockwise to the on position.
— Using a long BBQ match or gas lighter for safety, insert a ame underneath the wind
shield to the burner.
— Slowly rotate the regulator control valve to the on position until the burner ignites. If it
takes more than ve seconds for the burner to ignite, rotate the regulator control valve to
the off position, then the cylinder valve to the off position and repeat the lighting process.
IN THE EVENT THAT THE BURNER DOES NOT LIGHT AFTER 3
ATTEMPTS, DO NOT RELIGHT THE BURNER FOR FIVE MINUTES.
THIS ALLOWS THE REMAINING FUMES TO CLEAR.
— As soon as the ame is lit, the regulator control can adjust the heat setting of the
burner. To increase the heat output the regulator control valve is turned in a clockwise
direction marked with the “on” arrow and to reduce the heat output the regulator control is
turned in an anti-clockwise direction marked with the “off” arrow.
TURNING THE BURNER OFF
— If the burner is no longer to be used and to reduce the risk of the gas jet getting
blocked, it is best to expel all gas from the hose assembly.
— With the burner still lit, turn the valve on the gas cylinder in a clockwise direction to the
off position. Allow the ame to extinguish and then turn the regulator control valve to the off
position.
EMPTY GAS CYLINDER
If the Gas cylinder is empty, the burner will not light.
If the burner does not light, rstly check the gas cylinder and replace with a full cylinder. If
after this the burner lights you can assume that your problem was an empty gas cylinder.

12
WARNING : All cooking vessels must t inside the top ring of the burner.

13
F. CARE AND MAINTENANCE
Warm soapy water is recommended to be used to wipe down the surfaces of the appliance.
CAUTION – You must let the appliance cool down before you clean it.
NEVER douse the Jet-Pro Cooker with water when the surfaces are hot.
DO NOT submerge in water.
DO NOT allow water to enter into the burner outlets or aeration holes
1. CARE OF BURNERS
Ensure that there are no signs of blockage (debris, insects) in either the burner portholes, the
primary air inlet, or the neck of the burner. Use compressed air or a pipe cleaner wire to clear
obstructions. A wire brush can be used to remove corrosion from the burner surfaces.
On the burner outlet is an adjustable air shutter. This has been factory set and should not
need to be adjusted.
Adjusting this allows more or less air to enter the burner which will adjust the ame
composition.
2. STORAGE
Store your Jet-Pro Cooker in a cool dry place. Cover the burner with aluminium foil in order
to prevent insects or other debris from collecting in burner holes. The gas cylinder should be
disconnected from the Jet-Pro Cooker and stored outdoors. When using the Jet-Pro Cooker
after extended periods of storage, please follow all of the care and maintenance instructions.
Cylinders must be stored outdoors in a well ventilated area out of the reach of children. Any
indoor storage shall comply with Section 2 Minor storage and usage of AS/NZS 1596.
After use, the gas control valve, hose and regulator assembly must be removed from the Jet-
Pro Cooker and stored safely until the next use of the Jet-Pro Cooker.
WARNING: Ensure any covers are removed prior to operating the Jet-Pro Cooker.
It is recomended that the Jet-Pro Cooker be serviced by an authorised gas technician every
24 months.

14
Diagrammatical Representation of
"OUTDOOR AREAS"
THIS APPLIANCE SHALL ONLY BE USED IN AN ABOVE GROUND OPEN-AIR SITUATION
WITH NATURAL VENTILATION, WITHOUT STAGNANT AREAS, WHERE GAS LEAKAGE
AND PRODUCTS OF COMBUSTION ARE RAPIDLY DISPERSED BY WIND AND NATURAL
CONVECTION. THIS JET-PRO COOKER IS NOT DESIGNED FOR MARINE USE.
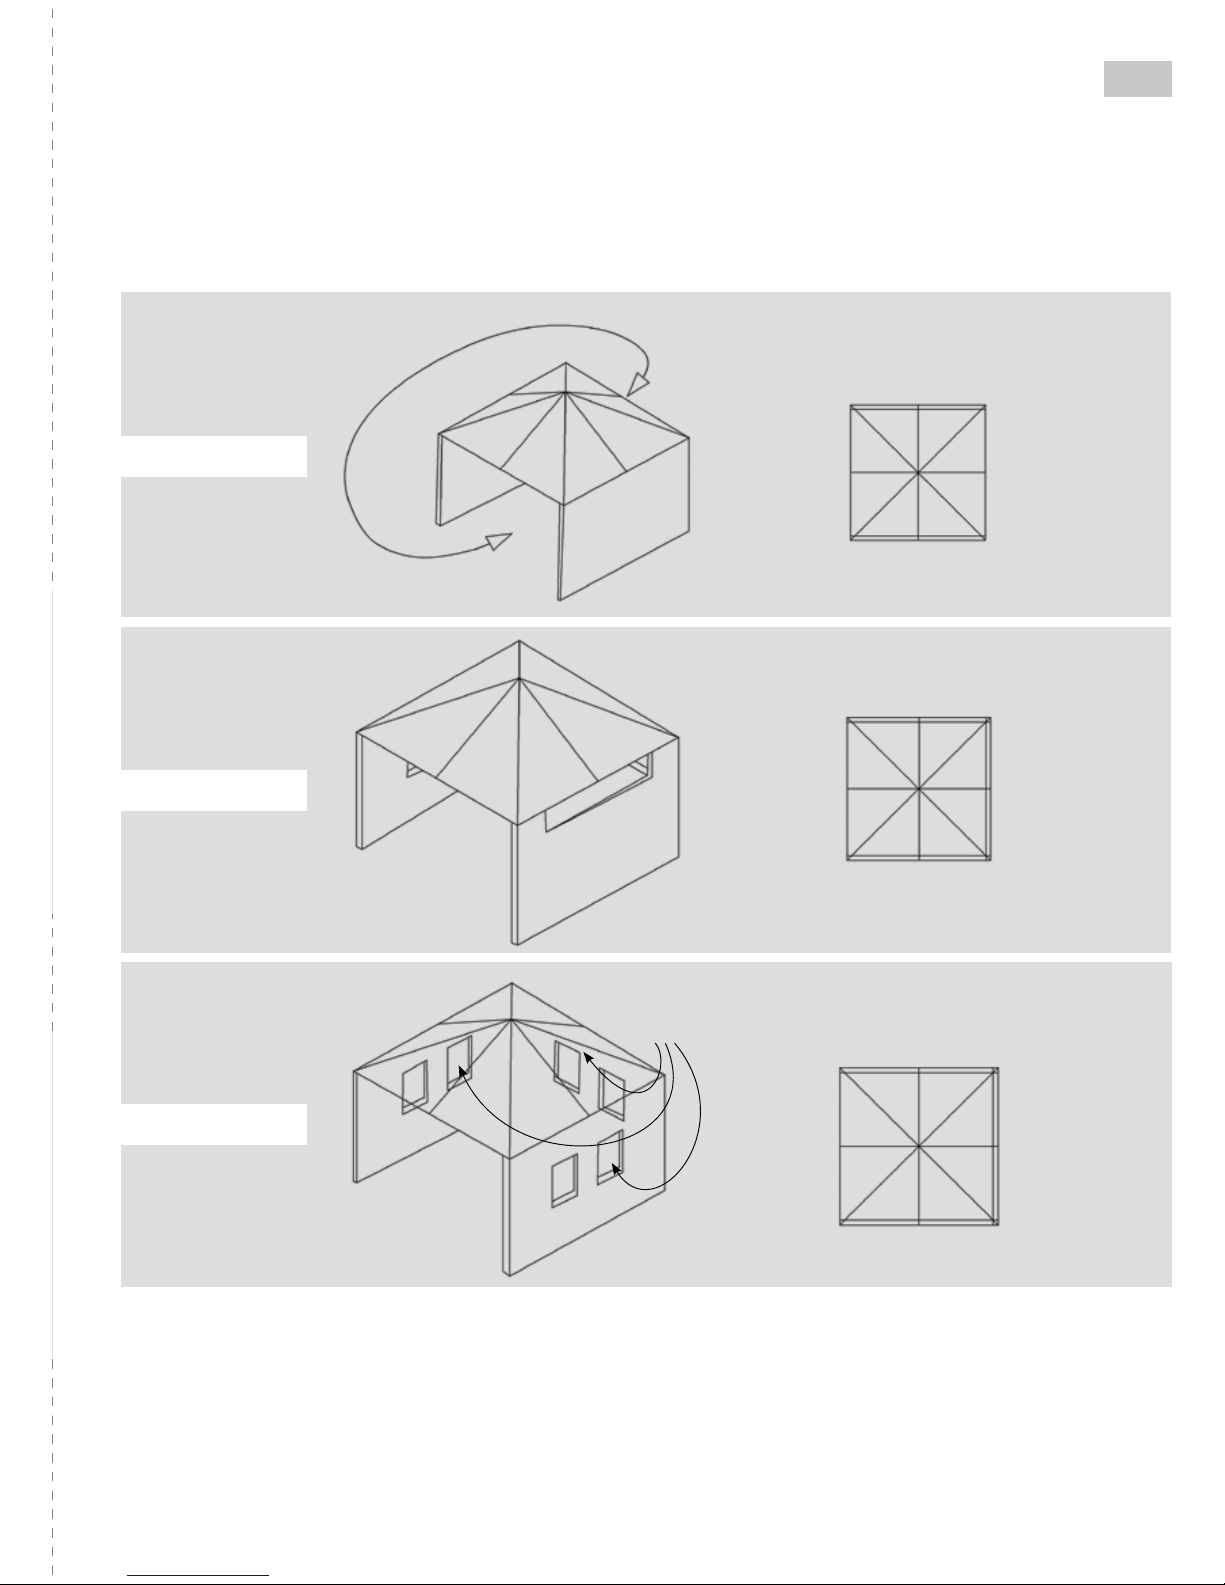
ANY ENCLOSURE IN WHICH THE APPLIANCE IS USED SHALL COMPLY WITH ONE OF THE
FOLLOWING:
— An enclosure with walls on all sides, but at least one permanent opening at ground level and
no overhead cover (refer to example 1).
— Within a partial enclosure that includes an overhead cover and more than two walls
(Refer to example 2).
Figure 1 Outdoor Area,
Example 1
Figure 2 Outdoor Area,
Example 2
15
— Within a partial enclosure that includes an overhead cover and more than two walls, the
following shall apply:
a) at least 25% of the total wall area is completely open, and
b) at least 30% of the remaining wall area is open and unrestricted
(Refer to examples 3, 4 and 5).
— In the case of balconies, at least 20% of the total side, back and front wall areas shall remain
open and unrestricted.
Both ends open
Open side at least 25%
of the total wall area
Figure 3 Outdoor Area,
Example 3
Figure 4 Outdoor Area,
Example 4
Open side at least 25%
of the total wall area
30% or more in total
of the remaining wall area
is open and unrestricted
Figure 5 Outdoor Area,
Example 5
16
REPLACEMENT PARTS
Note: Do not modify this appliance, use only original parts. This will protect your warranty
coverage for parts replaced under warranty.
AFTER SALES SERVICE
For enquiries regarding service or spare parts, please call 1300 799 787
Technical Specications
Propane
Model AGA No. Injector(mm) Pressure(kPa) Inp/Burn(MJ/h) Total(MJ/h)
HK0511 8004 G 0.89 69 50 50
Minimum clearance of Jet Pro-Cooker to combustible surfaces is 100cm at the sides, 100cm from back
and 100cm above the Jet Pro-Cooker .
Made in China
This burner is manufactured by:
Huzhou Metalwork Co Ltd.
Industrial Park ,Donglin
Zhejiang Province,
China
Made in China
Imported by:
Hark Enterprises Pty Ltd
Unit 11, 41-49 Norcal Rd
Nunawading, VIC, 3131
Local Call: 1300 799 787 (Excl. mobiles)
Phone: (03) 9873 2711
Fax: (03) 9873 2788
Email: service@hark.com.au
web: www.hark.com.au
YEAR
WARRANTY
After Sales Support
Telephone: 1300 799 787
(03) 9873 2711
Email: service@hark.com.au

Hark Enterprises Pty Ltd
Unit 11, 41-49 Norcal Rd, Nunawading, VIC 3131
T: 1300 799 787
E: service@hark.com.au
W: www.hark.com.au
 Loading...