

Hark HK0510 Assembly & Operation

Pizzeria Wood Fired Oven
Pizzeria Wood Fire Oven
Assembly & Operation
READ ALL INSTRUCTIONS, WARNINGS & SAFEGUARDS PRIOR TO ASSEMBLY
& OPERATION
FAILURE TO DO SO MAY RESULT IN PROPERTY DAMAGE, PERSONAL INJURY
DANGER
DANGER
- The Hark Pizzeria is for OUTDOOR USE ONLY.
- Never operate the oven unattended
- The use of alcohol, prescription or non prescription
drugs may impair your ability to properly assemble
or safely operate the oven.
- Never operate this oven within 7.5 metres (25 feet)
of any flammable liquids.
- Keep the area clear of all flammable liquids,
combustible material including but not limited to
wood, dry plants and including grass, brush, paper
and canvas.
- Use this oven only on a level, stable non-combustible
surface like brick, concrete or dirt. Do not use oven
on or around any surface that will burn or melt, such
as on wooden decks dry grass, wood rails, vinyl or plastic.
- Never use inside an enclosed area such as screen patios,
garages, buildings and tents. Keep a minimum clearance
of 3 metres (10 feet) from all sides of the oven to all
overhead construction and 1 metre (3 feet) from any
walls or rails.
- Never operate this oven under any overhead roof
covering, awning or overhang.
- Keep your hands, hair and face away from the firebox
flame. Do not lean over or into the firebox when lighting
or operating the oven. This oven has an open flame. Be
careful of loose clothing and hair that could catch fire
during operation of the oven.
- Always wear shoes and protective clothing during
operation of this oven.
- The oven is HOT while in use and after use. Always
wear protective gloves or mitts when operating
the oven. Avoid touching hot surfaces at all times.
- Keep CHILDREN AND PETS away from the oven at all times.
Do not allow anyone to conduct activities around the oven
during or following its use until the unit has cooled.
- Never move the oven when it is in use. Allow the oven to cool
below 40°C (115°F) before moving or storing it.
- Never use this oven as a heater.
- Never leave the firebox door open when in operation.
- Never use in or on recreational vehicles and/or boats.
- Never use this product for anything other than its intended
purposes. This oven is not intended for commercial use.
- Accessory attachments and cookware not supplied by Hark
are not recommended for use.
- Never use glassware, plastic or ceramic cookware in the oven.
- Do not use in windy conditions or days of a Total Fire Ban.
- Do not allow charcoal and or wood to rest on the walls of the
firebox. Doing so will greatly reduce the life of the metal
finish.
- Only build the fire on top of the fire bricks.
- The oven is extremely heavy. Use caution when moving or
lifting the oven to prevent strains or back injuries.
2
SAVE AND FILE THESE INSTRUCTIONS FOR FUTURE REFERENCE
Pizzeria Wood Fire Oven
Assembly & Operation
READ ALL INSTRUCTIONS, WARNINGS & SAFEGUARDS PRIOR TO ASSEMBLY
& OPERATION
FAILURE TO DO SO MAY RESULT IN PROPERTY DAMAGE, PERSONAL INJURY
DANGER
DANGER
- The Hark Pizzeria is for OUTDOOR USE ONLY.
- Never operate the oven unattended
- The use of alcohol, prescription or non prescription
drugs may impair your ability to properly assemble
or safely operate the oven.
- Never operate this oven within 7.5 metres (25 feet)
of any flammable liquids.
- Keep the area clear of all flammable liquids,
combustible material including but not limited to
wood, dry plants and including grass, brush, paper
and canvas.
- Use this oven only on a level, stable non-combustible
surface like brick, concrete or dirt. Do not use oven
on or around any surface that will burn or melt, such
as on wooden decks dry grass, wood rails, vinyl or plastic.
- Never use inside an enclosed area such as screen patios,
garages, buildings and tents. Keep a minimum clearance
of 3 metres (10 feet) from all sides of the oven to all
overhead construction and 1 metre (3 feet) from any
walls or rails.
- Never operate this oven under any overhead roof
covering, awning or overhang.
- Keep your hands, hair and face away from the firebox
flame. Do not lean over or into the firebox when lighting
or operating the oven. This oven has an open flame. Be
careful of loose clothing and hair that could catch fire
during operation of the oven.
- Always wear shoes and protective clothing during
operation of this oven.
- The oven is HOT while in use and after use. Always
wear protective gloves or mitts when operating
the oven. Avoid touching hot surfaces at all times.
- Keep CHILDREN AND PETS away from the oven at all times.
Do not allow anyone to conduct activities around the oven
during or following its use until the unit has cooled.
- Never move the oven when it is in use. Allow the oven to cool
below 40°C (115°F) before moving or storing it.
- Never use this oven as a heater.
- Never leave the firebox door open when in operation.
- Never use in or on recreational vehicles and/or boats.
- Never use this product for anything other than its intended
purposes. This oven is not intended for commercial use.
- Accessory attachments and cookware not supplied by Hark
are not recommended for use.
- Never use glassware, plastic or ceramic cookware in the oven.
- Do not use in windy conditions or days of a Total Fire Ban.
- Do not allow charcoal and or wood to rest on the walls of the
firebox. Doing so will greatly reduce the life of the metal
finish.
- Only build the fire on top of the fire bricks.
- The oven is extremely heavy. Use caution when moving or
lifting the oven to prevent strains or back injuries.
SAVE AND FILE THESE INSTRUCTIONS FOR FUTURE REFERENCE
3
1. PRIOR TO ASSEMBLY
Read all safeguards and instructions before assembling and operating your oven. In order to
properly assemble your oven, you will need the following tools (not included):
1. Phillips head screwdriver
2. Pliers or 3/8’ & 7/16” wrench
You will also need the help of three to four able-bodied persons to lift the unit once the stand is
attached to the oven. The oven is very heavy and must be moved during assembly.
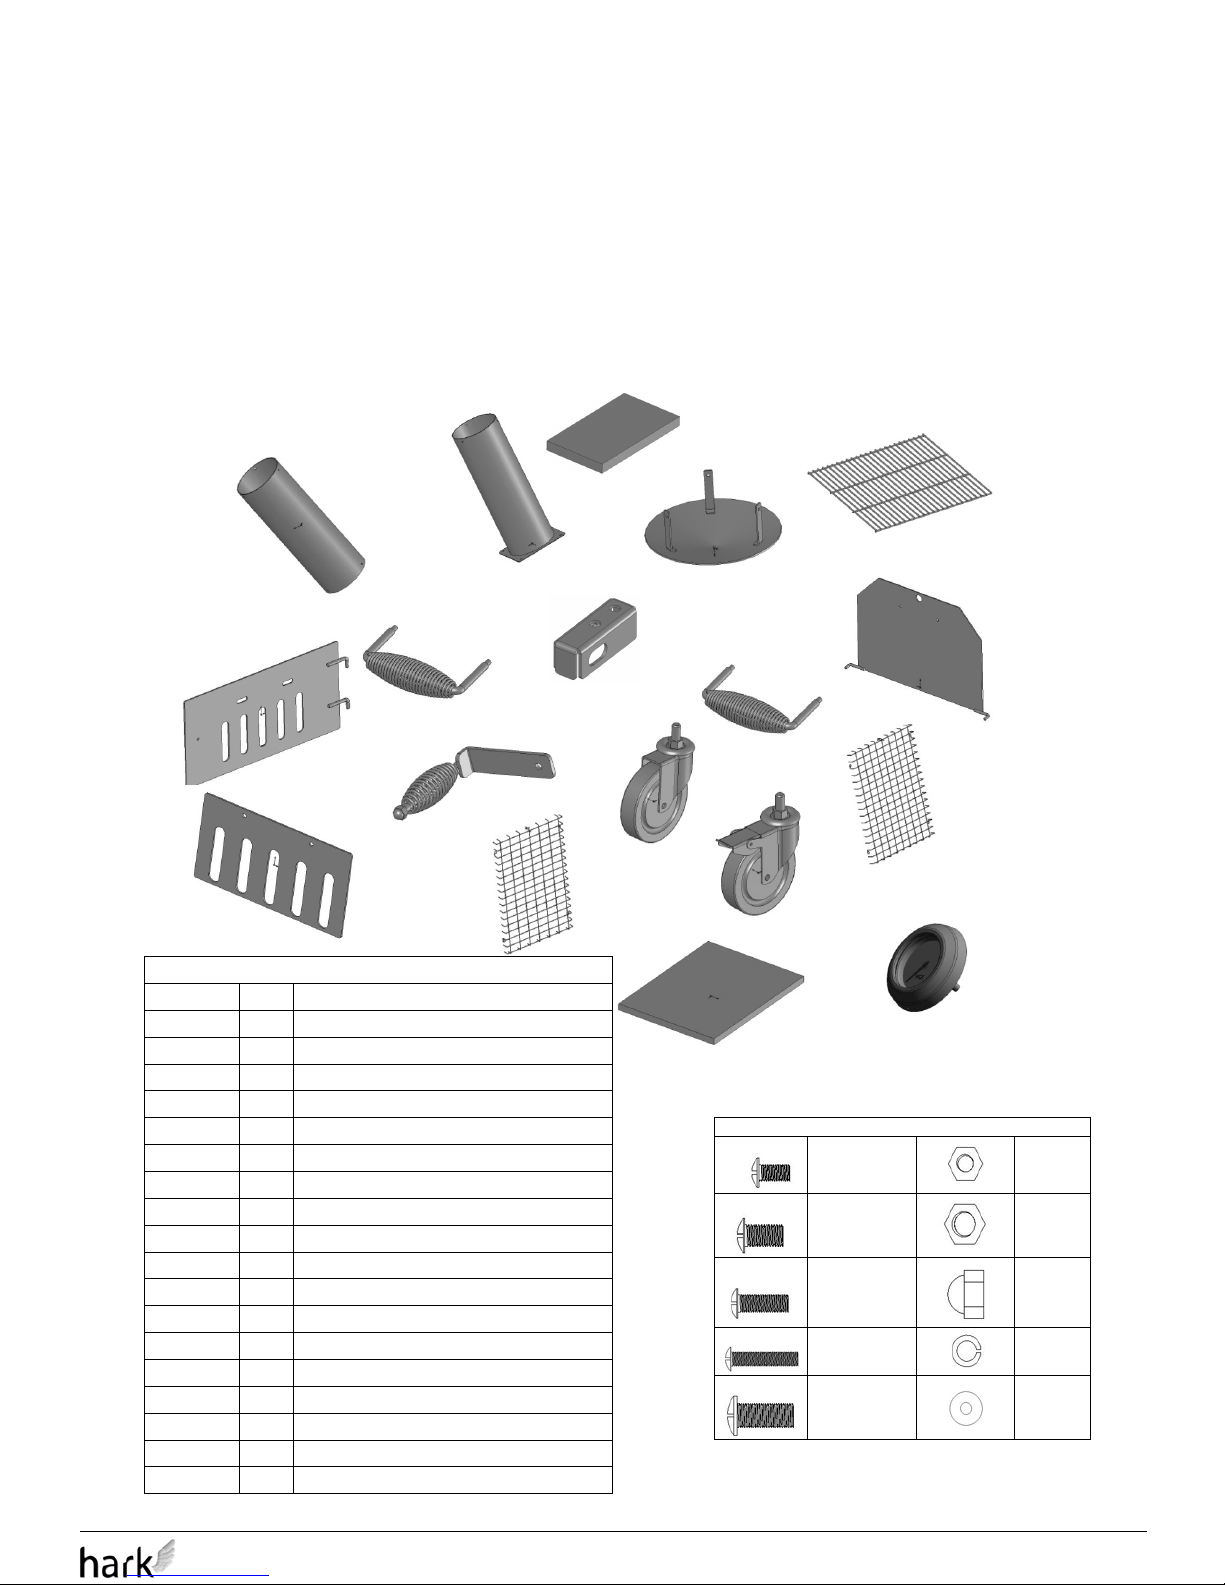
1.1 PARTS LIST
1
2
3
4
5
6
7
8
9
10
11
12
13
14
15
16
17
18
HARDWARE BAG
M5X10 – 9
M6-1
M6X12 – 20
M8 – 4
M6X18 – 1
M8 – 1
M6X30 – 4
Ø6 – 1
M8X20 - 4
Ø6 – 1
PARTS LIST
Item Qty Description
1 1 Flue – upper
2 1 Flue - lower
3 1 Flue - cover
4 1 Oven door
5 1 Oven door handle
6 2 Oven door hinge
7 1 Firebox door
8 1 Firebox latch
9 1 Firebox door handle
10 1 Firebox damper
11 2 Caster with lock
12 2 Caster without lock
13 2 Side protective mesh
14 2 Back protective mesh
15 2 Pizza stone
16 17 Fire bricks
17 1 Temperature gauge & wing nut
18 1 Roast rack
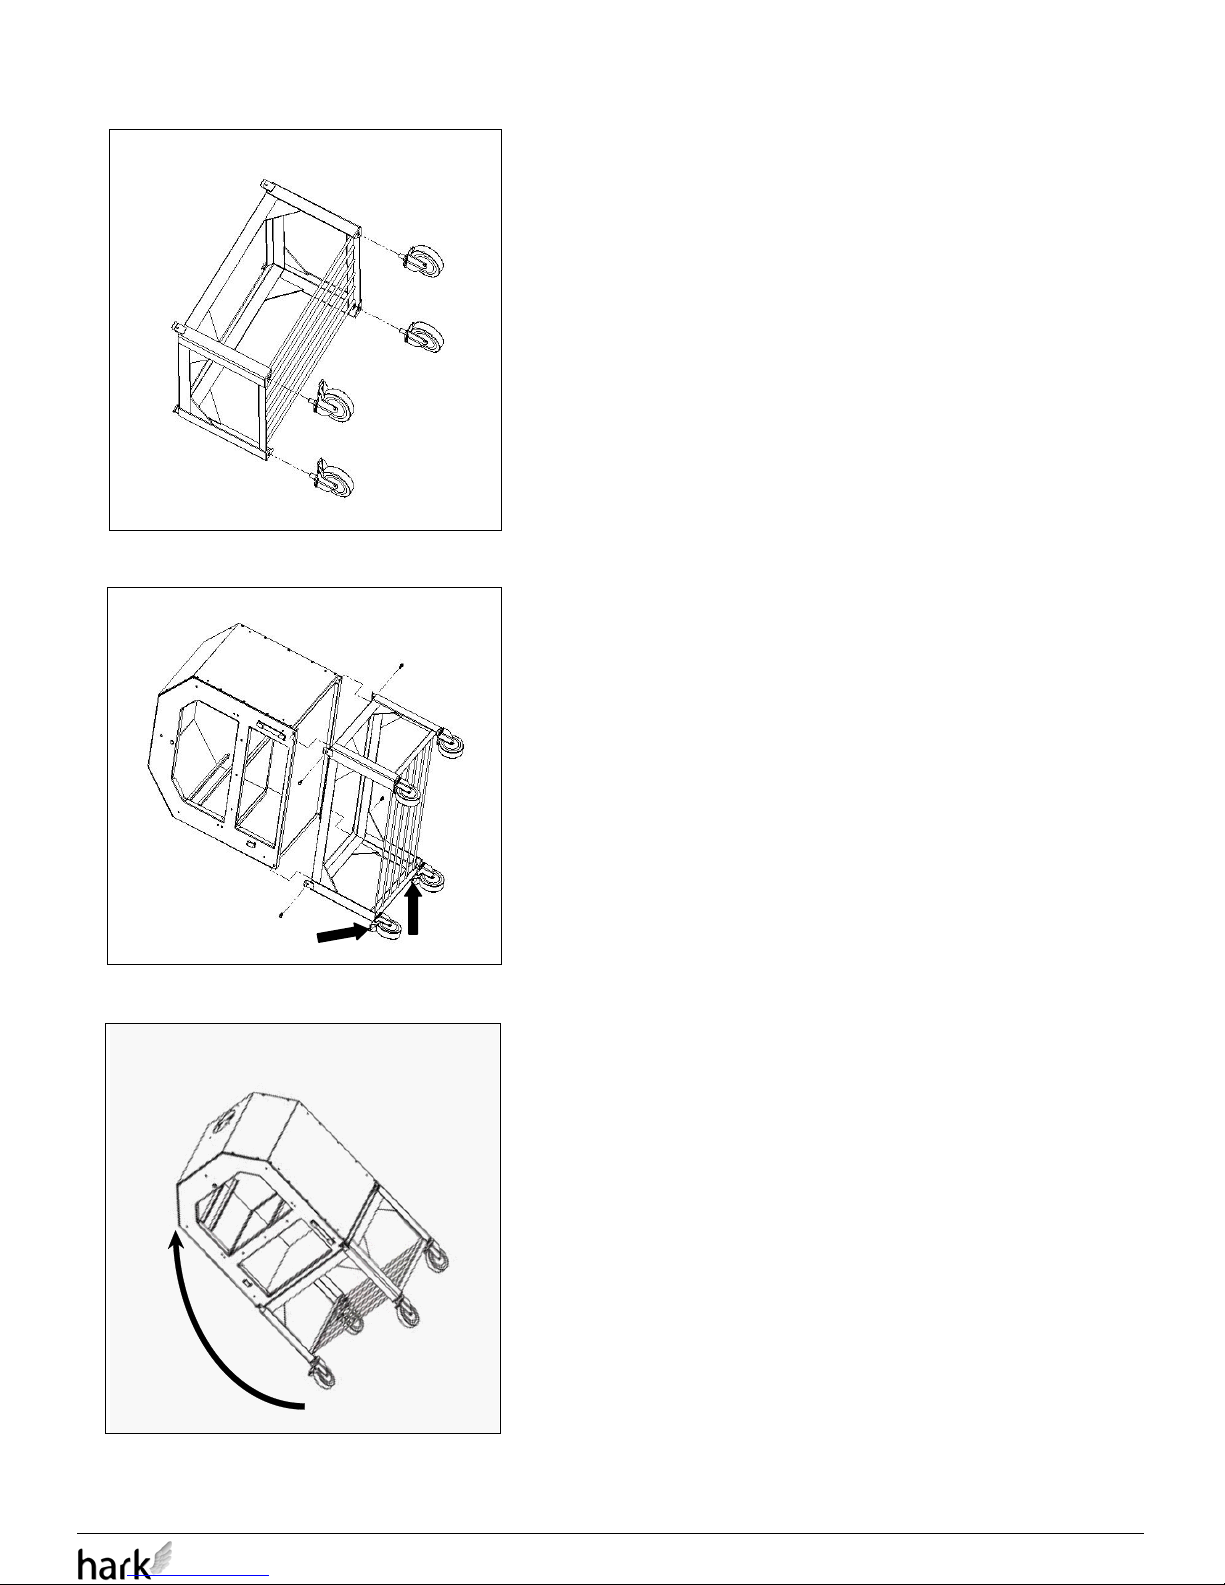
STEP 1:
ATTACH WHEELS TO STAND
Open the box marked “Stand”. Carefully remove all
packaging material and lay out all the parts for easy
access and identification. Do not discard the carton
or packaging until your oven is fully assembled and
operating to your satisfaction.
Attach the 4 wheels to the stand. Make sure that
you attach the castors with the lock to the same
side of the stand. This is important when you lift
the oven upright in step 3.
STEP 2:
ATTACH STAND TO OVEN
Open the box marked “Oven”. Open the end cap which
is marked “Open this End”.
With the help of 1-2 people, gently slide oven unit
15cms out of the box and attach the stand onto the
pizza oven body using 4 pieces of M8-20 screws.
Attach the stand with the locking castors on the same
side, closest to the ground.
STEP 3:
STAND UNIT UPRIGHT
Make sure the screws attaching the stand to the pizza
oven are done up tightly.
Make sure the castors are locked.
With the help of 3-4 able bodied people, carefully lift
the unit upright. Be careful not to place too much
weight onto the castors. Slide the cardboard box off the
pizza oven.
The oven is extremely heavy. Use caution when
moving or lifting the oven to prevent strains or
back injuries.
Figure 1
Figure 2
2. ASSEMBLY
4
Figure 3
locking castors
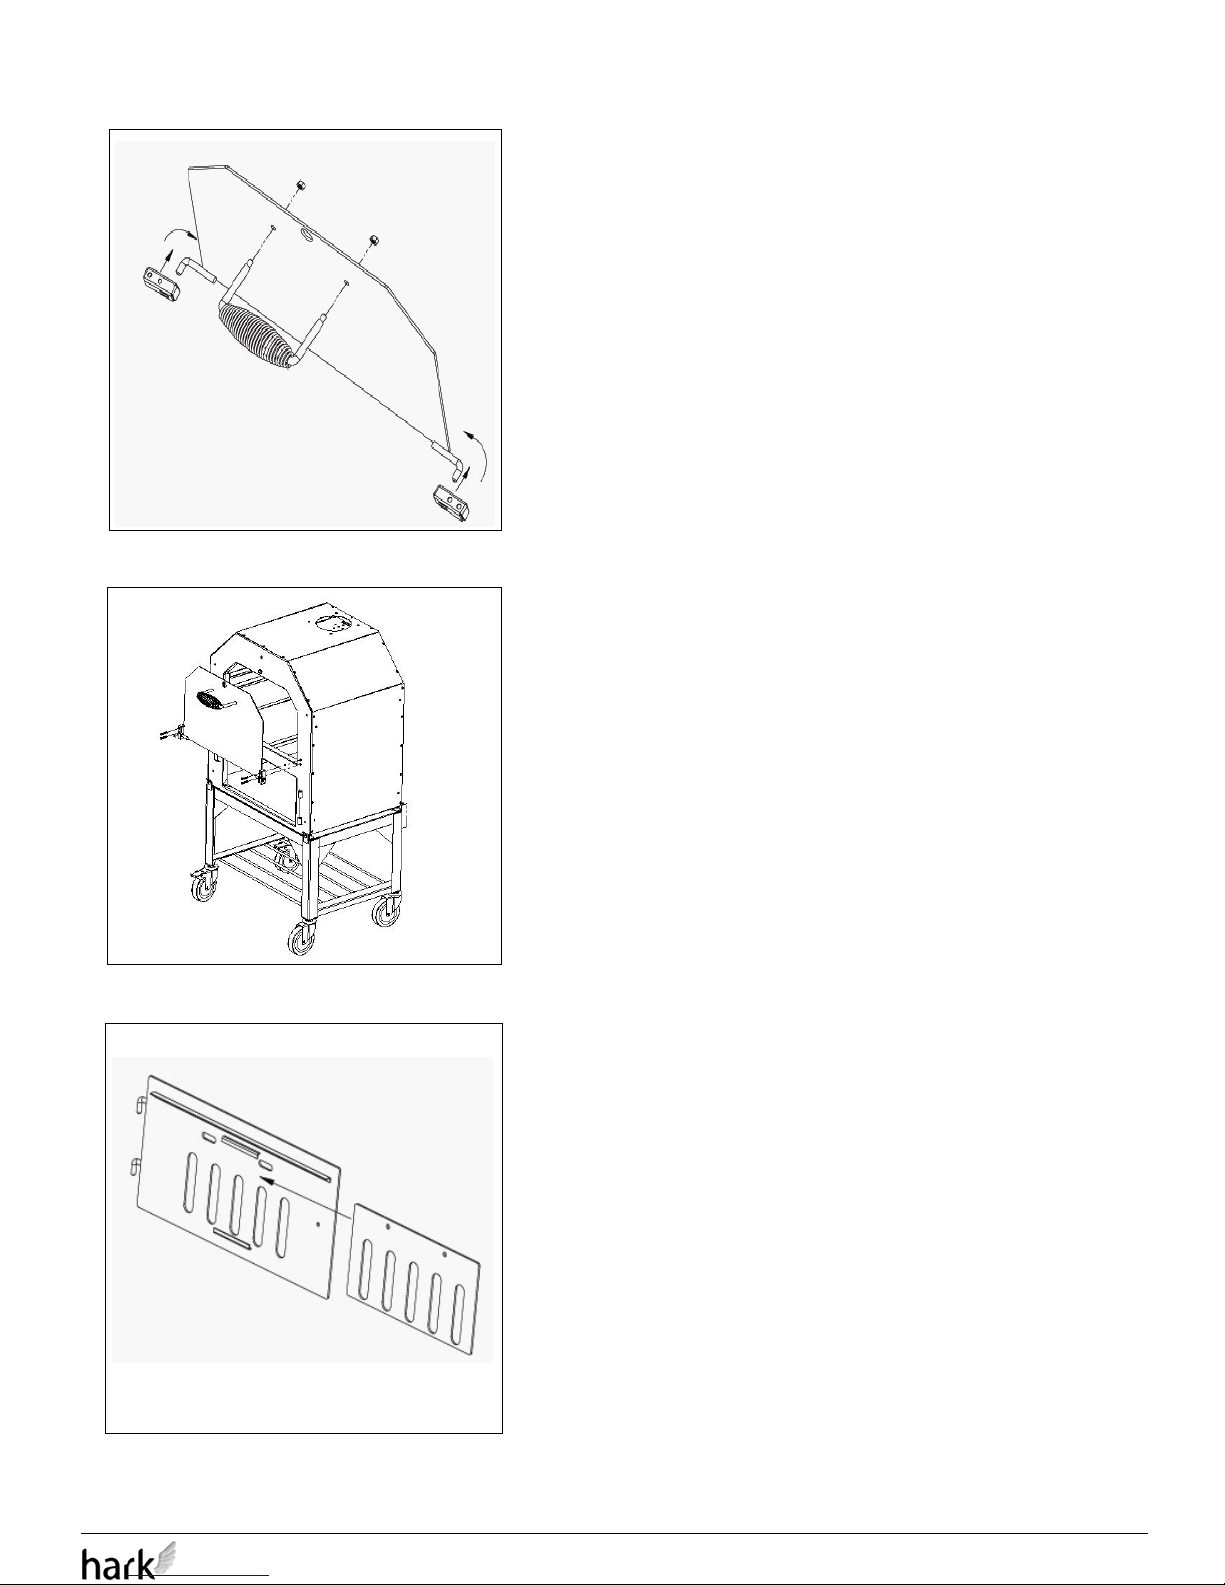
STEP 4:
ATTACH OVEN DOOR HANDLE & HINGES
Attach the oven door handle. Use 2 pieces of M8
nuts to secure the handle onto the oven door.
Slide the hinges onto the oven door support brackets. The support brackets are already in place and
are welded onto the oven door.
Figure 6a
5
Figure 4
Figure 5
STEP 5:
ATTACH OVEN DOOR
Once the hinges are in place secure these onto the
oven body using 4 pieces of M6-30 screws and 4
pieces of M6 nuts.
You may need another person to hold the oven
door while you fasten it onto the oven body as it
is heavy.
STEP 6:
ATTACH FIREBOX LATCH DAMPER AND HANDLE
Attach the damper onto the firebox door by sliding
the damper in the back of the firebox door, making
sure that it is fitted behind the positioning lugs.
 Loading...