

Page 1

myHARGRAY
DVR USER GUIDE
T EL E VI SI O N
I NT E RN E T W IR E LE S S
T EL E PH O NE
myHARGRAY
DVR USER GUIDE
SUN CITY & HILTON HEAD ISLAND
Page 2

myHARGRAY
DVR USER GUIDE
Contents
Turning on the System ................................................................................ 3
System Features ........................................................................................ 4
Channel Selection
Viewing DTV .................................................................................... 5
Remote Control .............................................................................. 5
On-screen Menu and Feature buttons ............................................ 5
Program Guide
Color Coding .................................................................................... 6
Viewing Program Information .......................................................... 6
Favorites
Adding Favorites ............................................................................. 7
Renaming/Editing Favorites ............................................................ 7
Deleting Favorites ........................................................................... 7
Reminders
Setting Autotune/Reminders .......................................................... 8
Confirming a Reminder ................................................................... 8
Pause Live TV ................................................................................. 8
Personal Video Recorder
Record Current Program for DTV view ........................................... 9
Record Current Program from the Interactive Program Guide ....... 9
Record a Future Program ................................................................ 9
Playing a Recorded Program ......................................................... 10
Control Playback of a Recorded Program ..................................... 10
Stop Recording ............................................................................. 10
Program Conflict Resolution ......................................................... 11
Record-It Overlays ........................................................................ 11
Parental Control
TV Ratings and Meanings ............................................................. 12
Setting Parental Controls .............................................................. 13
Hiding Channels ............................................................................ 13
Music
Audio Channels ............................................................................. 14
Access Music Guide ..................................................................... 14
Changing Audio Channels ............................................................. 14
Viewing Audio Information ............................................................ 14
Caller ID
Enabling or Disabling Caller ID ...................................................... 15
Reviewing Call History .................................................................. 15
Saving Call History Numbers ........................................................ 15
Deleting Call History ..................................................................... 16
Page 3

myHARGRAY
DVR USER GUIDE
Contents
Settings
System settings PIN ...................................................................... 17
Changing the System settings PIN ............................................... 17
Enable/Disable Setting PIN ........................................................... 17
Program Information Overlay ........................................................ 17
Connecting Audio ......................................................................... 18
Optimize Video .............................................................................. 18
TV display Format ......................................................................... 18
Index to parts and controls
Contents in the box ...................................................................... 19
Front Panel & Rear Panel .............................................................. 20
Remote Control ....................................................................... 21-22
Connecting the TV ..................................................................................... 23
Coaxial Cable ................................................................................ 24
RCA Composite ............................................................................ 25
HDMI or Component ............................................................... 26-27
Setting HDMI and Component Output Resolution
Setting channel ID ........................................................................ 28
Connecting Audio System ................................................................... 29-30
Powering Up Set Top Box ........................................................................ 31
Remote Control
Loading Batteries ........................................................................... 32
Controlling the Set Top Box ...................................................................... 32
Controlling your TV and other A/V devices ............................................... 34
Closed Captioning ..................................................................................... 34
Aspect Ratio ............................................................................................. 35
User Menu ................................................................................................ 36
Using User Menu
To start the User Menu ................................................................. 37
To set up a Feature ....................................................................... 37
To save your setup or exit ............................................................. 37
Setting HDMI and Component output resolution ......................... 38
Setting Closed captioning ............................................................. 38
Setting Fan Speed ........................................................................ 38
Setting TiVo keycode ..................................................................... 39
Troubleshooting ................................................................................... 40-41
Customer Specific Configuration ...............................................................42
Page 4

myHARGRAY
DVR USER GUIDE
3
Turning on the System
1. Press TV, and then PWR on the remote to turn on the television.
2. Press the STB button; then you can change the channels and use all the
Digital TV features with the remote.
Change the Way You Watch TV
Welcome to Hargray Digital Television. The Amulet device (Set Top Box), brings a rich, new
set of services directly to you through your TV and your in- home IP network. The Set Top
Box uses your existing in-home coaxial cable wiring and connects to most all entertainment
devices.
Available services may include some or all of the following features:
• High-Definition (HD), which provides crystal clear pictures and sound when compared
to standard-definition – you won’t want to watch television any other way once you’ve
experienced HD.
Don’t miss another minute of the TV shows you love!
Follow the instructions in this guide to install the Set Top Box, to become familiar with the
buttons on the front panel, and to access your programming services. Then, enjoy the features of the Set Top Box and change the way you watch TV!
Page 5

myHARGRAY
DVR USER GUIDE
4
System Features
Access to entertainment options is simple: use the preprogrammed buttons or use the
on-screen Menu to access system features such as Digital TV, Guide, Movie, Music,
Media, and Preferences.
Pressing GUIDE on the remote accesses detailed information for the selected entertainment feature (TV, Music, etc). The last channel viewed appears on a smaller screen
(screen-in-screen) while navigating the Guide.
Press HELP on the remote for hints on navigating our system features, answers to
frequently asked questions and information about legal and privacy issues.
Program Guide
Hargray provides local and premium television channels. The Guide contains detailed
information for current and future listings and a search function for locating favorite
programs. Parents can set rating and system controls for television content. Pause Live
TV programming as well.
Music
The Music feature provides a “virtual stereo” with numerous music categories. The
Music Guide provides an on-screen list of available music channels by group. Access
basic program information about music selections with the touch of a remote button.
Phone
Taking advantage of the combined television and telephone delivery service offered by
Hargray, Caller ID is available for enabled subscribers.
Settings
Change your system PIN, manage Favorites, maintain Parental Controls, and adjust
System Settings all in one location. Using a personal identification number (PIN), authorized users can adjust settings and alter the system PIN.
Digital Television (DTV)
Hargray allows you to access local and premium television channels. The Guide provides the ability to access and search program listings. Use the remote to navigate TV
channels and guide.
Access a week of programming information with the Guide. The Guide provides onscreen information for all subscriber channels and programs. The “picture in guide”
function allows you to scan the Guide while watching a program.
Note: If the remote does not function properly, ensure it is accurately programmed for
compatibility with your brand of television.
Page 6

myHARGRAY
DVR USER GUIDE
Channel Selection
Viewing DTV:
1. Press MENU on the remote.
2. Select TV from the Menu. – The first channel in the lineup appears.
3. To view a channel or change channels:
a. Enter the channel number (e.g. 04 or 141) and press ENTER using the
numeric keypad on the remote.
b. Press CH+/-.
c. Press GUIDE and use the navigation arrows and SELECT on the Guide.
d. Use the up/down navigational arrows and SELECT to browse listings.
e. Press LAST to return to previous channel.
Program information (channel, network, title, duration, airtime, and description) appears
briefly as channels change. This information appears depending on system settings.
Remote Control
Use the arrow keys on the remote to navigate the interactive viewing guide. While navigating on-screen (Guide options, buttons, icons and links), a highlight appears around
selected items.
Navigating with the Remote:
1. Use the remote arrow keys to move the on-screen highlight.
The selected option is highlighted.
2. Press SELECT on the remote.
An action occurs and the screen changes.
On-screen Menu and Feature Buttons
Navigate Hargray Digital Television two ways: the on-screen Menu or the remote Feature buttons. The Menu displays a list of main features (DTV, Movies, Music, etc.)
available on the system, contains options for controlling how and if the system displays
certain information (Parental Controls, Favorites, System Settings, Change PIN), and
provides an account history. Feature buttons (DTV, Movies, etc.) jump directly to a
particular service.
Using the Menu:
1. Press MENU on the remote.
2. Use the arrow keys and SELECT to choose a Menu option.
The system jumps to the selected feature.
5
Page 7

myHARGRAY
DVR USER GUIDE
Program Guide
The Program Guide provides the most up to date program information in an easy to
use and intuitive format. Use visual cues on the Guide to view, browse, and search
program listings.
Color Coding
The Guide contains a color coded system, to differentiate at first glance the type
of programs available. Colors include:
Light Blue Normal Programming
Dark Gray Unsubscribed
Red Sports
Green News
Royal Blue Children’s Programming
Purple Movies
Viewing Program Information
Press MENU on the remote, and then press GUIDE to access the Program Guide. Use
the navigational arrow keys to browse programs. The guide advances in 30 minute
increments displaying future programming: a highlight appears around a selected channel. Use fast forward or rewind (>> or <<) to display program listings for the next day.
Use CH+/- to preview channels in the upper right corner from the DTV Guide.
1. Highlight a program.
2. Press SELECT to change to the channel or press INFO to display program informa-
tion. Press INFO again to clear information and return to the guide.
3. Use the arrow keys and SELECT to browse other channels in the Guide.
6
Page 8
myHARGRAY
DVR USER GUIDE
7
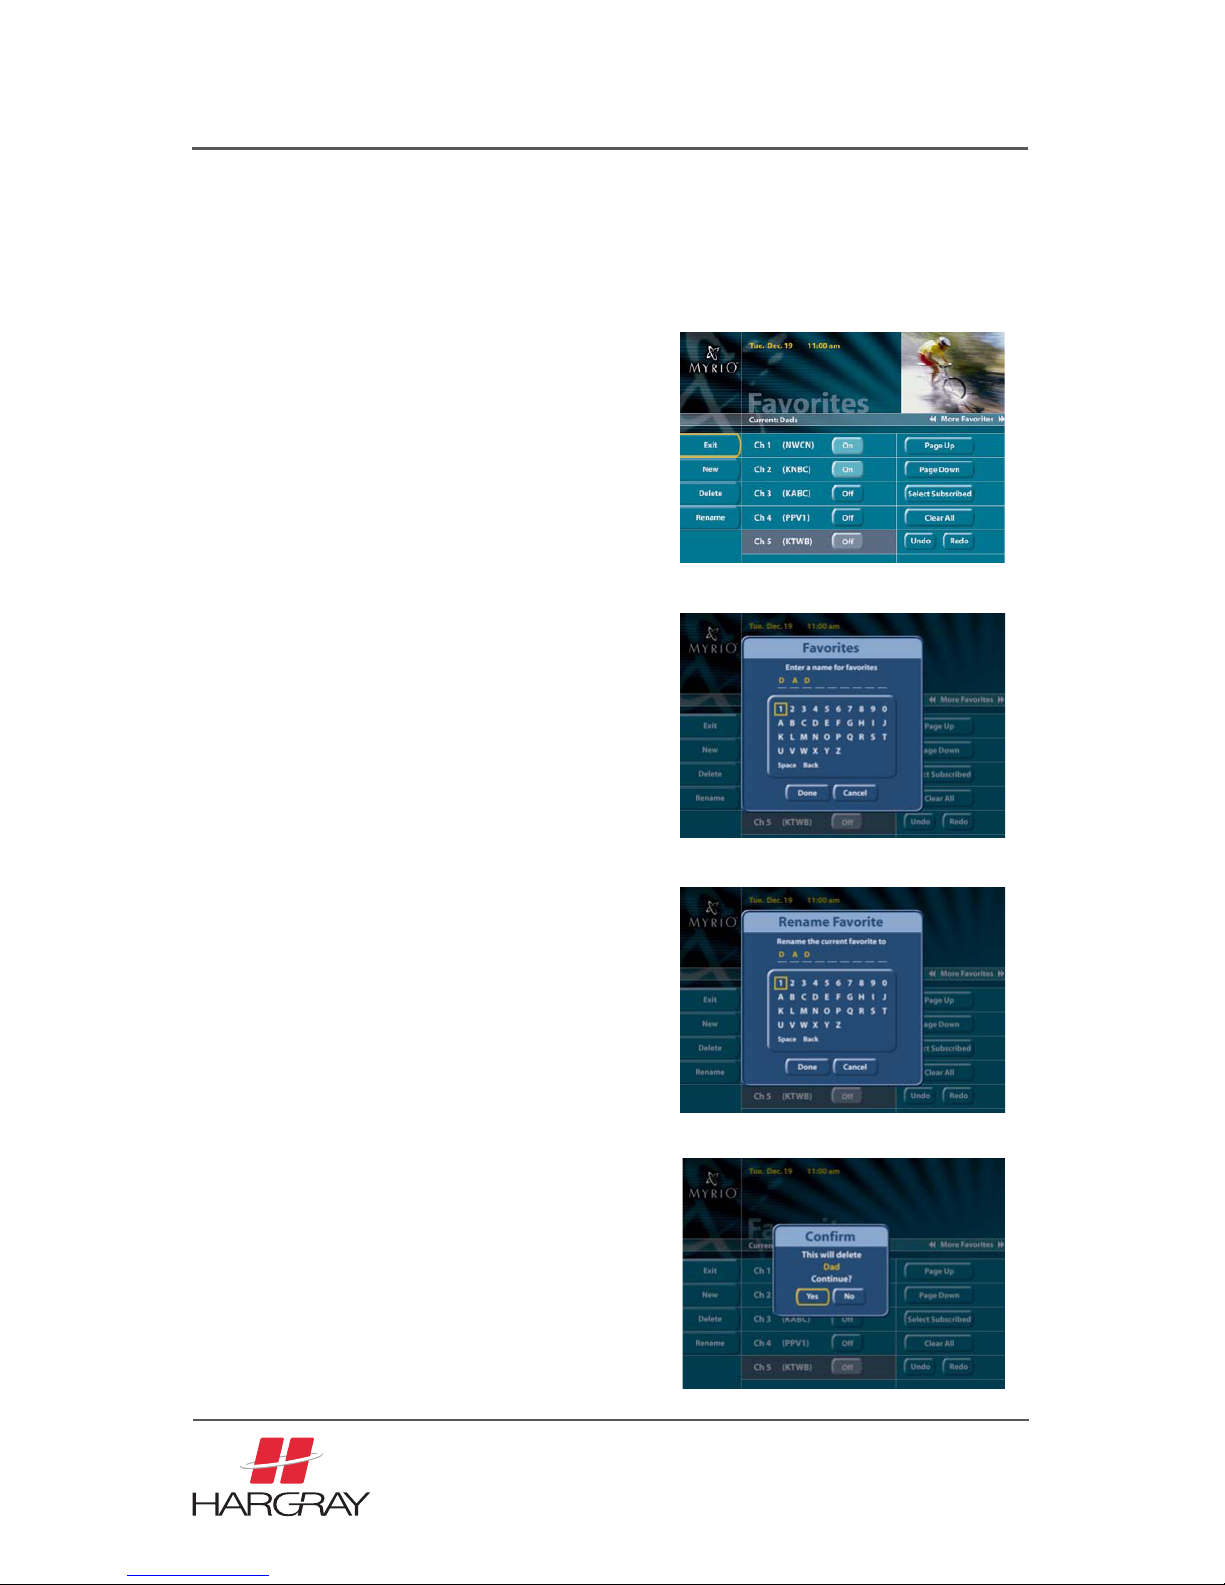
Adding Favorites
1. Press MENU on the remote, then select
SETTINGS, and then select FAVORITES.
2. Select NEW. The Enter Name dialog box
(with on-screen keyboard) appears, prompting
you to enter from 1 to 9 characters. Arrow to
the first character and press SELECT. Enter
remaining characters. To change a character,
select CANCEL.
3. Select DONE. The new Favorites name ap-
pears at the top of the screen.
4. Scroll through the list of channels and select
each channel that you would like included on
this Favorites listing.
5. Select SAVE and EXIT.
Renaming Favorites
1. Press MENU on the remote then select
SETTINGS, and then select FAVORITES.
2. Press << or >> to choose the Favorites list you
want to edit.
3. Select RENAME. The Rename dialog box ap-
pears (with on-screen keyboard), prompting
you to enter from 1 to 9 characters. Arrow to
the first character and press SELECT. Enter
remaining characters. To change a character,
select CANCEL.
4. Select DONE.
5. Select SAVE and EXIT.
Deleting Favorites
1. Press MENU on the remote, then select
SETTINGS, and then select FAVORITES.
2. Press << or >> to choose the Favorites list you
want to delete
3. Select DELETE. The Confirm dialog box ap-
pears.
4. Select YES. The Favorites screen is updated
and that particular Favorite List is deleted.
5. Select SAVE and EXIT.
Favorites
With access to hundreds of channels, you can create, edit, and delete lists of your most
frequently watched channels. Use the default favorites lists (All or Subscribed) or create
your own for members of the family.
Page 9
myHARGRAY
DVR USER GUIDE
8
Pause Live TV
You may be able to pause DTV channel programming on a channel by channel basis for
up to 30 minutes, depending upon your STB.
1. While watching DTV, press PAUSE or PLAY on the remote.
The last frame displayed freezes and a progress bar appears on the screen.
2. To end the buffering, press PLAY on the remote.
3. To rewind or fast forward, use << or >> key on the remote.
4. To return to live TV press the STOP button on the remote.
5. Select GUIDE to return to the DTV Guide. Recording will stop if you change the
channel up or down and you will not be able to access the already recorded
material.
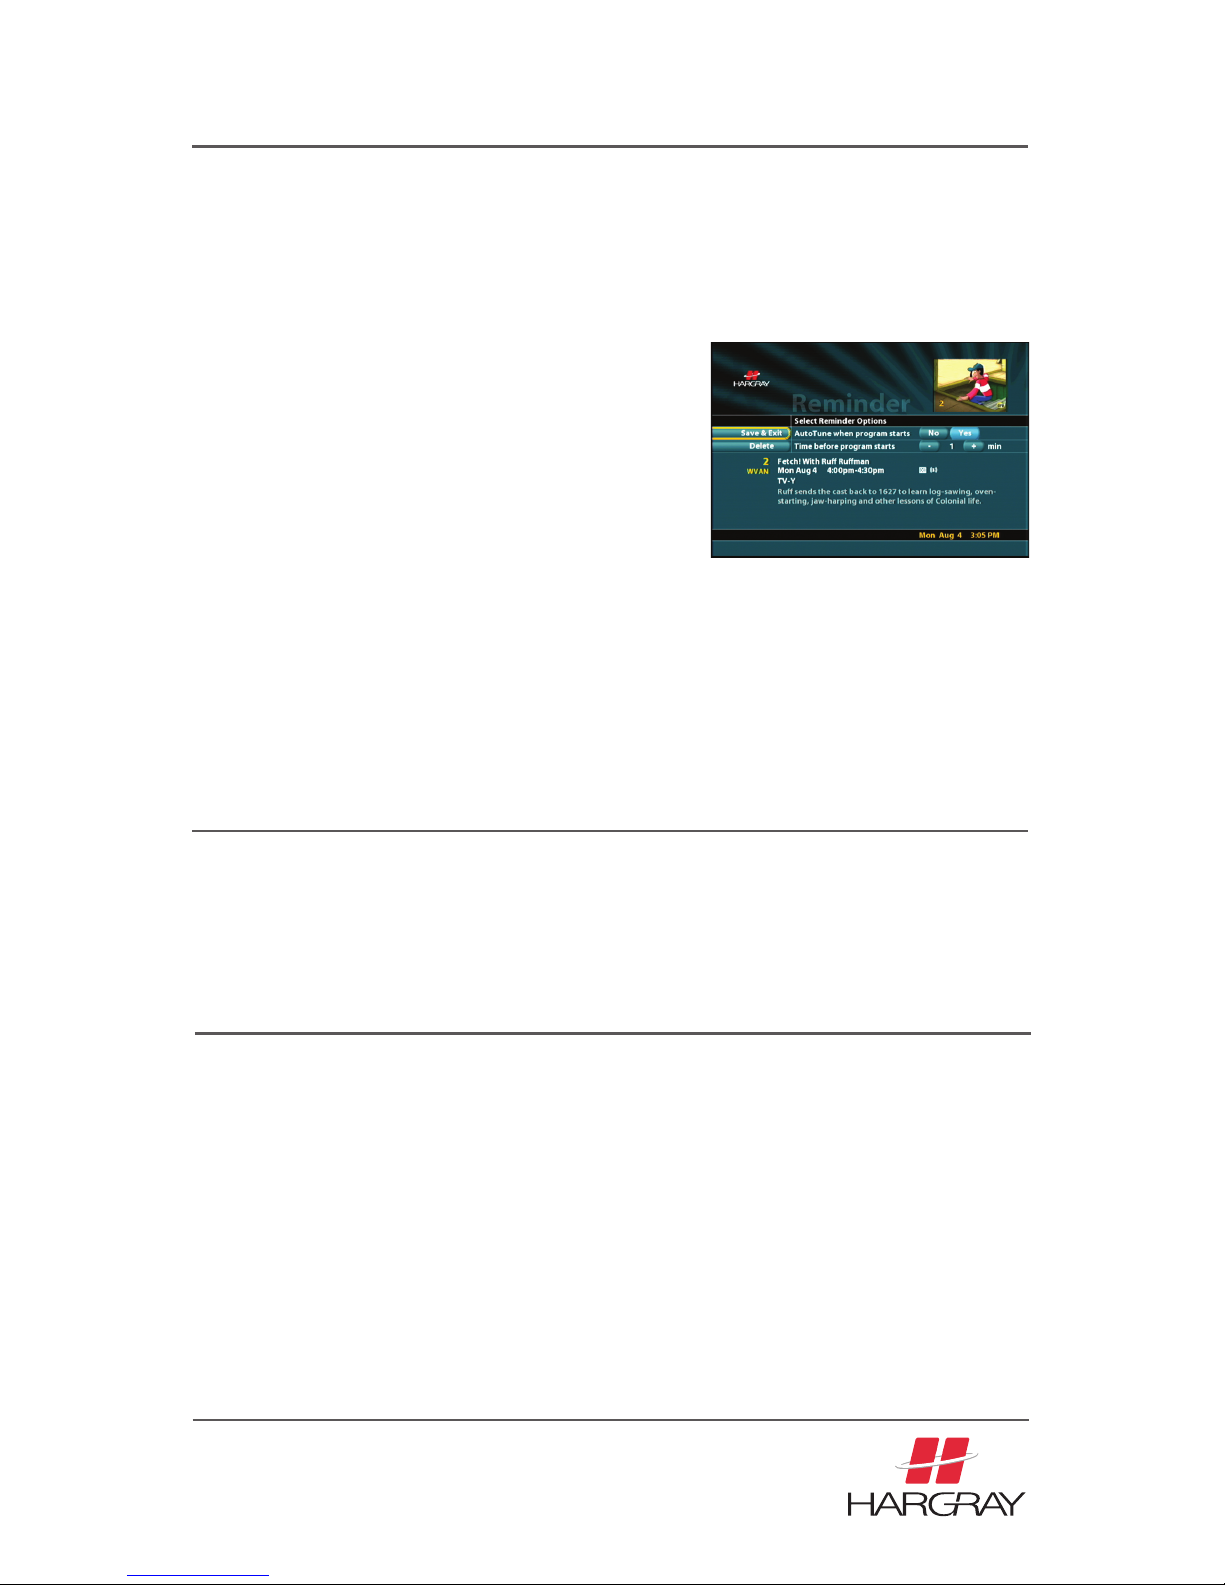
Setting Autotune/Reminders
1. Press DTV on the remote, and then press GUIDE.
The date is located in the upper left corner of the
screen.
2. Press << or >> to choose the date for the future
program you would like to watch.
3. Use the navigational arrow keys to scroll through
the list of channels and SELECT a future
program. The Autotune/Reminder dialog box
appears.
When watching digital tv, an autotune reminder automatically changes the viewed channel for
you. The autotune/reminder can only be set for a program listed within the next seven days.
Autotune/Reminders
4. Select REMINDER, then for the Autotune when program starts option select YES.
5. For the time before the program starts option, use the navigational arrows to high-
light the (+) or (-), then use SELECT to increment or decrement the number of minutes that the Confirm Reminder dialog box will appear on screen before the chosen
program starts.
6. Select SAVE and EXIT to return to the DTV Guide. When a future program is chosen
for autotune/reminder, a clock symbol appears in the chosen program box on the
Guide.
Confirming a Reminder
A Confirm Reminder dialog box appears on the current viewed channel at the advanced
time you choose when setting the Autotune/Reminder. Select DISMISS to ignore and
disregard the autotune/reminder settings if you would like to continue viewing your current program instead.
Page 10

myHARGRAY
DVR USER GUIDE
9
Personal Video Recorder (PVR)
The system includes the ability to store and playback programs.
Record Current Program from DTV view:
Record a currently playing program and save it for viewing later while in DTV mode.
1. Press the RECORD button (• [red]) on the remote control.
2. The system begins saving current program to storage, and a message will display
on-screen. A red indicator on the Set Top Box will illuminate as well.
3. The recording stops when the end of the program occurs or when you change the
press the STOP button on the remote.
Record Current Program from the
Interactive Program Guide
Record a currently playing program in Guide (or Guide Search)
1. Press the RECORD (•[red]) button on the remote control.
2. The system will begin saving current program to storage, and a red record indicator
will display on the Set Top Box and the IPG.
3. The recording stops when the end of program occurs, or when you press the STOP
button on the remote.
Record a Future Program
Recording upcoming events allows users to record a program while not at home.
1. Highlight a future program in either the Guide or any of the search mechanisms.
2. Press the RECORD (•[red]) button on the remote control or the SELECT button.
Press RECORD PROGRAM. The recording options screen appears.
3. Select SAVE and EXIT from the recording options screen. The program is marked
for recording. You are returned to the original previous screen; now the highlighted
program has an icon next to it, indicating it is marked for recording.
Page 11

myHARGRAY
DVR USER GUIDE
10
Playing a Recorded Program
Select to view existing recordings in the PVR Library. Color coding is continued from
the Guide. Unrecordable items are represented in grey. Detailed program information
displays.
1. Press the RECORD-IT button on the remote control.
2. Select RECORDED PROGRAMS in the PVR Library.
3. Navigate to select a previously recorded program.
4. Press OK button. If program exceeds parental control levels, you are prompted for
your PIN. The PVR Action screen appears for the selected program.
5. A variety of options display.
6. Select PLAY and playback begins.
7. If the program has been previously played/stopped, Select RESUME PLAY.
Playback starts from previously stopped position.
8. When the recorded program is finished playing, you may choose to keep or delete
the program from storage.
Control Playback of a Recorded Program
Control playback of a previously recorded program while watching it. The same VCR
like controls apply (FF, REW, PAUSE, STOP). Visual FF or REW is only supported on
certain set-top boxes. The FF or REW displays above the progress bar.
Stop Recording
Abort scheduled recording before it begins, allowing you to cancel the recording
and continue watching the current program.
1. When a scheduled recording event is about to occur, 10 seconds before the event,
you will be notified that the scheduled event is about to occur and that the channel
will change.
2. In the Program Options dialog box, cancel. This will cancel the recording.
3. To stop the recording of a future item, press GUIDE.
4. Select the program that you previously marked for recording.
Press RECORD PROGRAM. The recording options screen appears.
5. Select DELETE from the recording options screen. Confirm Deletion.
Page 12

myHARGRAY
DVR USER GUIDE
11
Program Conflict Resolution
When a program conflict arises that the system cannot automatically schedule around,
the user is presented with options to choose from.
Some examples of recording conflicts include:
• Starting Time – If one program starts before the other ends, the conflict resolu-
tion dialog box allows you to select which one to record.
• Priority – If two programs start at the same time, system will record the one with
the highest Priority attribute established in the system.
• Fewest Times – Choose to record the item with the fewest upcoming alternate
times (you must do this, the system will not).
• First in List – If all other aspects are equal, the system will pick the first item.
• Bandwidth Resolution – System exceeds max # streams – If the system does
not have the bandwidth to stream the PVR program in the background, then
10 seconds before the event, an overlay is displayed which gives the user the
chance to abort the recording.
Record-It Overlays
• Record-It Overlay – Change Channels: when the system will have to change
channels (exceeds max # streams) the user is prompted if they want to cancel
the event.
• Record-It Overlay – Action: when recording a program and the user initiates an
action that will cause the system to stop recording (ex. STOP, Channel +/-, etc.)
then the user is prompted to confirm stopping is ok.
Page 13

myHARGRAY
DVR USER GUIDE
12
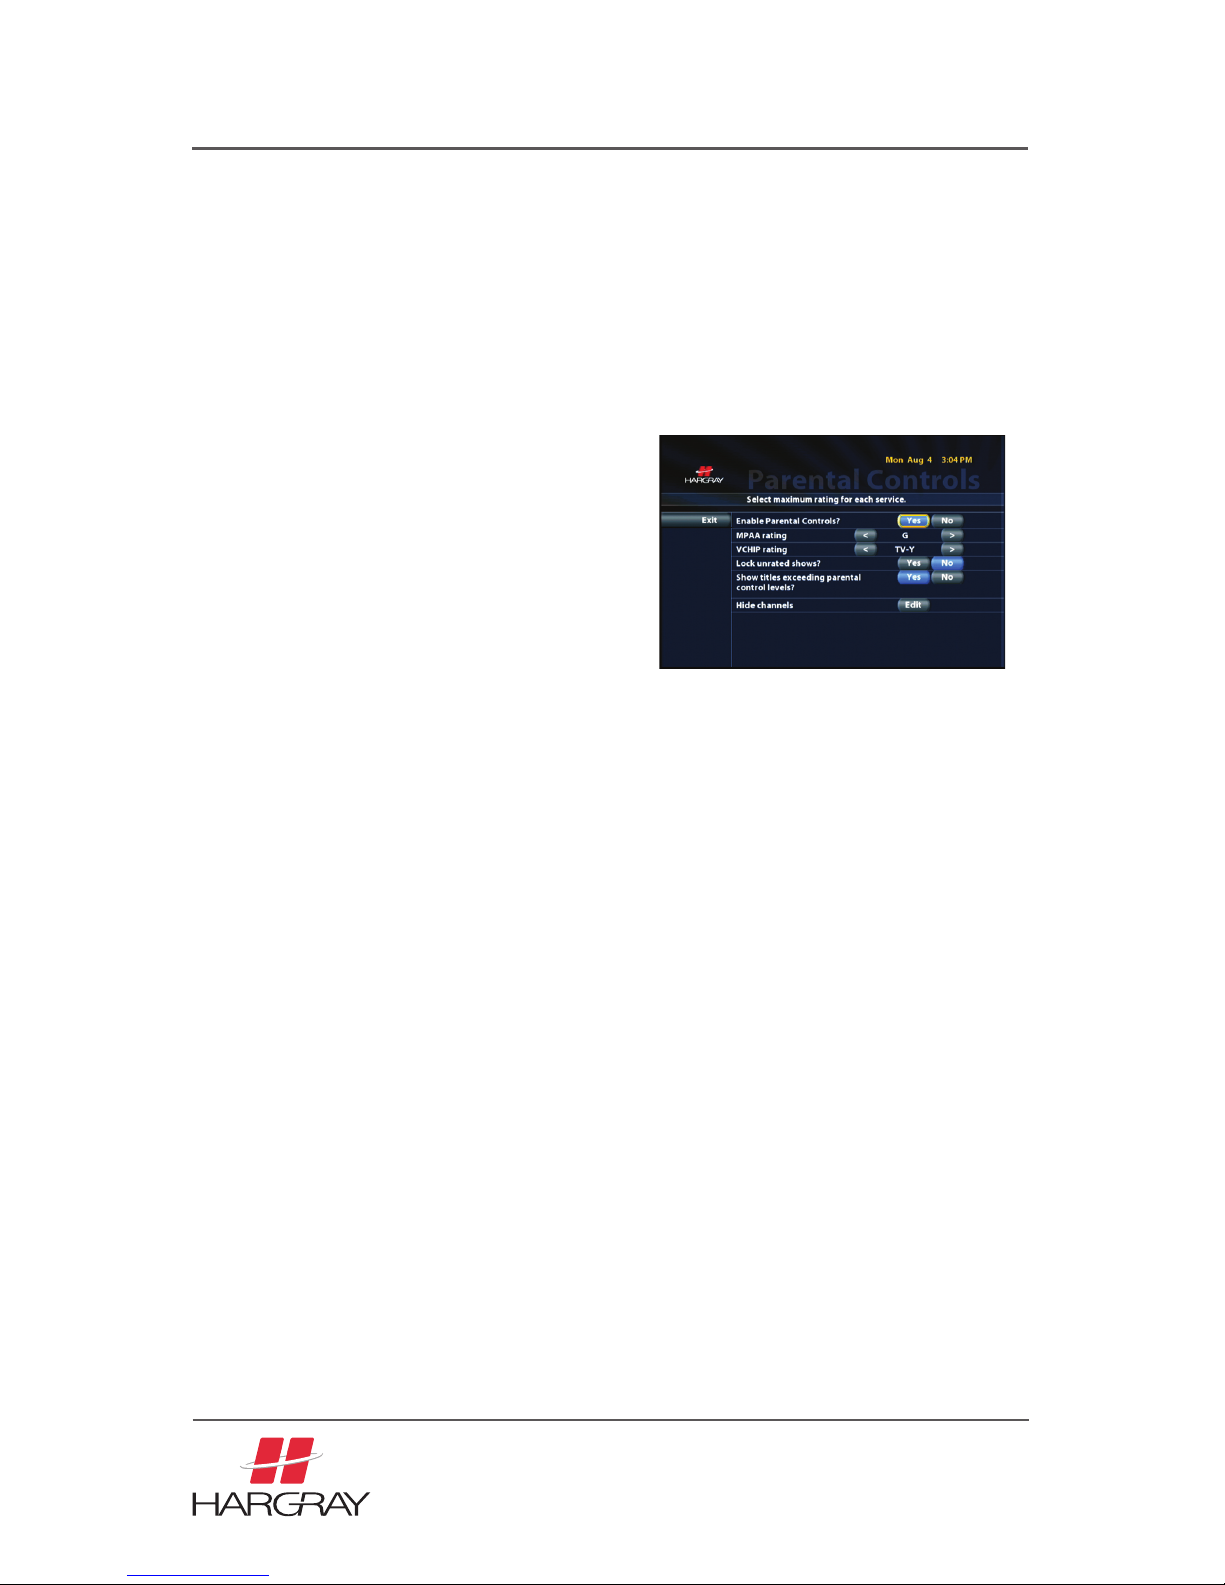
Parental Controls (DTV)
Parental Control ratings determine accessible DTV programs. The Hargray system
blocks restricted programs from being viewed and/or displayed in the Guide, according
to preset parental control settings.
Parental Guidelines for television programs contain two parts: an age-based rating indicating the age group for which a particular program is designed, and a content-based
rating indicating program material. Some key letters and definitions found in TV ratings
include:
V Violence
S Sexual Conditions
L Coarse or crude indecent language
D Suggestive dialog
FV Fantasy violence
TV Ratings and Meanings
TV-Y All Children
TV-Y7 Directed to Older Children
TV-G General Audience
TV-PG Parental Guidance Suggested
TV-14 Parents Strongly Cautioned
TV-MA Mature Audience Only
MPAA Movie Ratings and Meanings
G General Audience = All ages admitted
PG Parental Guidance suggested
Some material may not be suitable for children
PG-13 Parents strongly cautioned
Some material may be inappropriate for children under 13
R Restricted
Under 17 requires accompanying parent or adult guardian
NC-17 No one 17 and under admitted
NR Not Rated; Rating not available
Page 14
myHARGRAY
DVR USER GUIDE
13
Setting Parental Controls
1. Press MENU on the remote.
2. Select ACCOUNT INFO/SETTINGS and
then PARENTAL CONTROLS. The Enter
PIN dialog box appears.
3. Enter your PIN.
4. Select a new maximum rating for each
service: Movies or TV. Or change your
options for Enabling Parental Controls,
Lock Unrated Shows and Show Titles.
Enter preferences using the remote keys
and SELECT.
5. Press EXIT.
Parental Controls
Use Parental Controls to set maximum viewable ratings for movies and TV programs,
a well as prevent unrated TV shows from displaying. A valid PIN is required to alter
Parental Controls. TV Parental Guidelines and MPAA ratings are used for movies. These
ratings give parents more information about content and age appropriate TV shows.
When attempting to access a movie exceeding Parental Control rating, an override screen
appears. If authorized, enter your PIN to temporarily override the rating controls. If you want
to change your PIN, press MENU then select Setting and PIN options.
Hiding Channels
1. Press MENU on the remote.
2. Select SETTINGS, PARENTAL CONTROLS.
The Enter PIN dialog box appears if they are activated.
3. Enter your PIN if needed.
4. The Parental Controls screen appears. Scroll down to Hide Channels.
5. Click on EDIT.
6. To hide the channels you want, click on the channels and press SELECT
to change to OFF.
7. Select SAVE and EXIT.
8. Select EXIT.
Page 15

myHARGRAY
DVR USER GUIDE
14
Music
The Music feature provides a “virtual stereo” with numerous music categories. Access
a comprehensive Music Guide or basic program information for individual music selections with the touch of a remote button.
Audio Channels
The Music Guide provides a list of the available audio/music channels. The Music Guide
highlights and plays the most recently accessed music channel.
Access Music Guide:
1. Press MENU on the remote.
2. Select MUSIC from the Menu or press the MUSIC button on the remote.
The last audio channel begins playing. Channel information displays.
3. Press GUIDE to list available music channels.
4. Use remote arrow keys and SELECT to browse music.
Changing Audio Channels:
Change audio channels with one of the following:
• Press CH+/-.
• Use Music Guide and navigation keys.
• Use the numeric keypad and ENTER to type audio channel.
• Press LAST to return to the previous audio channel.
Viewing Audio Information
Hargray Digital TV displays basic program information for an individual audio selection
as channels are changed. The system also displays title, track, and artist information.
Page 16

myHARGRAY
DVR USER GUIDE
15
Caller ID
Enabling or Disabling Caller ID
1. Press MENU/SETTINGS on the re-
mote, select Account Info/Settings
and then select Caller ID Settings.
The Caller ID Settings screen appears,
with options to enable and display information.
2. Turn options on or off, as desired,
by highlighting the desired field and
pressing the SELECT/OK to activate.
3. Once all settings are as desired use
the arrow keys on the remote to highlight EXIT and then press SELECT/OK
and the new settings are saved.
Reviewing Call History
1. Press MENU/SETTINGS on the remote, and then Select CALLER ID and then
select CALLER ID HISTORY, or press PHONE on the remote and select CALL-
ER ID HISTORY. The Caller ID History screen appears showing the most recent
calls in reverse chronological order. The number of calls is determined by your
service provider.
2. Scroll through the list and review calls.
3. Press EXIT and return to the main menu.
Saving Caller ID History Numbers
1. Press MENU/SETTINGS on the remote, and then select CALLER ID, and then
select CALLER ID HISTORY, or press PHONE on the remote and select CALL-
ER ID HISTORY. The Call History screen appears, showing the most recent
calls in reverse chronological order. The number of calls is determined by your
service provider.
2. Select ADD next to the name/number in Call History you would like to save.
This number will automatically be added to the Caller ID List. Continue for each
number that you would like to save.
3. Press EXIT and return to the main menu
Page 17

myHARGRAY
DVR USER GUIDE
16
Avoiding Screen Burn-In
Images such as letterbox bars or side bars, bright closed-captioning backgrounds, station logos, or any other stationary images may cause the display in your HDTV to age
unevenly; this is known as screen burn-in. Refer to the user’s guide that came with
your HDTV for more information.
CAUTION:
Avoid screen burn-in! Do not display the same fixed
images on your HDTV screen for extended periods
of time.
Deleting Caller ID History
Though calls automatically fall off the Caller ID History list (oldest first) when the maxi-
mum number of logged calls has been exceeded, you can choose specific calls to
remove from the History at any time.
1. Press MENU/SETTINGS on the remote,
and then select CALLER ID, and then select
CALLER ID HISTORY, or press PHONE on the
remote and select CALLER ID HISTORY. The
Caller ID History screen appears showing the
most recent calls in reverse chronological order. The number of calls is determined by your
service provider.
2. ARROW RIGHT to the Delete column next to
the item you wish to remove from Caller ID
History.
3. Press SELECT/OK. The Call History screen is
updated and the call numbers and name are
removed.
4. Continue steps 2 and 3 for each call you would
like to delete.
5. Press EXIT and return to the main menu
Caller ID
Page 18

myHARGRAY
DVR USER GUIDE
17
Settings
The Settings feature allows authorized users to define parental controls, view account
history, and change the system PIN. A 4-digit personal identification number (PIN) is
issued by Hargray and is necessary to establish fundamental settings.
There are two PINs used in this system. When required, an on-screen message requests entering the PIN using the remote. As a security measure, asterisks appear as
numbers are entered. If the wrong PIN is entered, a message prompts a re-entry.
System Settings PIN
System settings PIN allows you to set parental controls, set your system display language and audio language, and view your account history. Using the Settings menu you
can change your System PIN, or deactivate the need for a System PIN.
Changing the System Settings PIN
Create and Modify the PIN for System Settings:
1. Press MENU on the remote.
2. Select SETTING, and then PIN OPTIONS.
3. Enter your PIN number.
4. Select EDIT to change the Settings PIN.
5. Enter numbers using the remote to change the Setting PIN.
6. Click SAVE and Exit to complete the PIN modification and return to DTV.
Enable/Disable Setting PIN
When disabled, you will no longer be prompted for your PIN while accessing
System Settings or making a purchase in the system:
1. Press MENU on the remote.
2. Select SETTINGS, and then PIN OPTIONS.
3. Enter your PIN number.
4. Select to ENABLE or DISABLE the Settings PIN; select YES or NO.
5. Click SAVE and EXIT to complete the PIN modification and return to DTV.
Program Information Overlay
Basic program information appears on-screen as channels are changed: to
enable/disable this feature:
1. Press MENU on the remote.
2. Select SETTINGS, and then SYSTEM SETTINGS. Enter the system settings PIN.
3. Use the remote arrow keys and select and verify YES or NO to Show
Information when Changing Channels.
4. Select EXIT.
Page 19

myHARGRAY
DVR USER GUIDE
18
Setting
Connecting Audio
Verify the audio connection from the set-top box to the TV. The set-top box may be
connected using either analog or digital audio. The STB default setting is analog audio.
1. Press MENU on the remote.
2. Select Settings, and then System Settings. Enter the system PIN.
3. Use the remote arrow keys and SELECT to change the output setting of your
cabling if necessary and verify Yes or No to Enable AC-3 S/PDIF output.
4. Select Exit.
Optimize Video
Select to optimize video output based on the video cable setup. Not all set-top boxes
contain this option. (Only change these settings if needed.)
1. Press MENU on the remote.
2. Select SETTINGS, and then SYSTEM SETTINGS.
3. Enter the SYSTEM PIN. If the set-top box is connected with any system video
cable, and an inconsistent option button is selected on the Settings screen, the
video image may appear distorted. To revert back to previous video settings (the default is not option selected), press PROMOS four times, then DTV once. To restore
optimum video performance, return to the System Settings screen and select the
proper video setting (setting should match video output cable choice).
4. Use the remote arrow keys and select to verify and optimize the appropriate video
output used. Choose from Composite, S-Video, or Modulator (RF or Coax).
5. Select EXIT.
TV Display Format
You can set your TV format to enable the most optimal image for your display; select
the appropriate option for your TV to preserve the complete image. Select 16:9 for 16:9
format televisions; select 4:3 or 4:30 letter box for 4:3 televisions.
Options include:
• 4:3 - Crops the left and right sides of the image and displays a 4:3 image.
• 4:3 Letter box – Shrinks the image vertically to preserve its aspect ratio
on a 4:3 display and puts black bars at the top and bottom of the image.
Page 20

myHARGRAY
DVR USER GUIDE
19
Index to parts and controls
Contents in the box
Page 21

myHARGRAY
DVR USER GUIDE
20
Index to parts and controls
Front panel and rear panel
Page 22

myHARGRAY
DVR USER GUIDE
21
Index to parts and controls
Remote Control
Page 23

myHARGRAY
DVR USER GUIDE
22
# PART NAME DESCRIPTION
1
SETUP Special Key reserved for remote programming functions.
2
INPUT
Changes the current A/V input of the selected device.
INPUT + MENU triggers STB User Menu.
3
POWER
Switches the power on/off for the currently selected device.
4
STB
Puts remote control in STB mode. Presses for more than
5 seconds will trigger remote control registration mode.
5
TV
Selects to control TV
6
LANG
Toggles closed captioning on or off on decoder 1.
7
GUIDE
Displays electronic program guide.
8
VOL + /-
Raises or lowers volume of the currently selected device.
9
LAST
Changes channel to the most recently viewed channel.
10
PAUSE
Pause button for VOD or live channel.
11
PREVIOUS/NEXT CHAPTER
Goes to previous or next movie chapter for VOD.
12
FAST REVERSE/FORWARD
Starts fast reverse or fast forward for VOD or live channel.
13
RED
*
14
GREEN
*
15
NUMBER KEYS
Allows direct access to specific channels and menu items.
16
ENTER
*
17
DTV
Returns to live programming.
18
MOVIES
Displays the VOD menu.
19
RECORD-IT
Displays the digital recorder menu.
20
PROMOS
Displays the promotion menu.
21
AUX
Selects to control AUX device.
22
INFO
Displays on-screen information about the current television
program.
23
MENU
Displays the on-screen menu.
INPUT + MENU triggers STB User Menu.
24
EXIT
Exits the current menu item.
25
CH UP/DOWN
Changes channel up or down.
26
RECORD
Records live channel.
27
STOP
Stop button for VOD or live channel.
28
ARROW KEYS
Navigates right, left, up, down in the on-screen guide.
29
OK
Executes the currently selected menu option.
30
PLAY
Play button for VOD or live channel.
31
BLUE
*
32
YELLOW
*
33
MUTE
Turns the volume of the currently selected device off.
34
MEDIA
Displays the web menu.
35
MUSIC
Displays available music channels.
36
HELP
Displays the help menu.
37
PHONE
Displays the Caller ID menu.
Page 24

myHARGRAY
DVR USER GUIDE
23
Connecting the TV
Your Set Top Box offers several options for connecting audio and video to popular TV
and audio equipment.
You can connect your Set Top Box to the TV using composite, component, HDMI
connection. You may also connect the Set Top Box to the TV using coaxial cable connection.
If your TV supports 480p, 720p or 1080i pictures, use the HDMI or the component
output jacks to connect to your TV. HDMI stands for High Definition Multimedia Interface. HDMI transfers digital audio and uncompressed digital video on a single cable.
As a result, audio cables and video cables do not need to be connected separately. The
HDMI output jack is designed to HDMI version 1.1 specifications.
HDMI and component video output support high definition video signal. They will provide the best quality video signal for HD ready TV sets.
The RCA A/V composite and RF TV output jacks only support 480i pictures.
The following table shows the video and audio output jacks and their supported video
formats:
Page 25

myHARGRAY
DVR USER GUIDE
24
Connecting the TV using Coaxial Cable
1. Use the coaxial cable that comes packaged with Set Top Box to connect your
TV’s antenna input to the Set Top Box RF TV.
2. You can either select to use CHANNEL ID 3 or CHANNEL ID 4. You can change
the channel ID by toggling the CH3/CH4 SWITCH at the rear panel.
3. Tune your TV to channel 3 or channel 4 to view the output.
Setting up TV to use CATV
In order for the Set Top Box to feed video signal to TV using RF TV, your TV must be
configured to receive signal from CATV rather than from the antenna.
Most TVs use either a physical switch located on the rear of the TV or with on-screen
programming to configure to use CATV. Consult your TV owner’s manual for instruction
if required.
Page 26

myHARGRAY
DVR USER GUIDE
25
Connecting the TV using RCA composite
1. Acquire the required cable. RCA cable comes packaged with the Set Top Box.
2. Connect the video and audio cables to the Set Top Box.
3. Connect the opposite end of the video and audio cables to the matching input
in the TV.
4. Plug in your TV and turn on the power using your TV remote control. Use your
TV remote control to select the respective video input that has connected to
the Set Top Box. Consult your TV owner’s manual for instructions as required.
5. Plug in your Set Top Box and turn on the power.
6. You should now see the output from the Set Top Box on your TV screen.
Page 27

myHARGRAY
DVR USER GUIDE
26
Connecting the TV using HDMI or Component
1. Acquire the required cable. Component cable comes packaged with the Set Top
Box. HDMI cable is not packaged with the Set Top Box. Before purchasing the
cable, consult your TV owner’s manual to confirm that your TV supports the video
signal output that you plan to use.
2. Connect the video and audio cables to the Set Top Box. (HDMI does not require
separate audio cable connection.)
3. Connect the opposite end of the video and audio cables to the matching input in
the TV.
4. Plug in your TV and turn on the power using your TV remote control. Use your TV
remote control to select the respective video input that has connected to the Set
Top Box. Consult your TV owner’s manual for instructions as required.
5. Plug in your Set Top Box and turn on the power.
6. You should now see the output from the Set Top Box on your TV screen.
Page 28

myHARGRAY
DVR USER GUIDE
27
NOTE:
• HDMI is an evolving technology, so it is possible that some TVs may not operate
properly with Set Top Box. Component output is the preferred way to connect to
your HD TV.
• When the HDMI connection cannot be verified by your TV, disconnect the HDMI
cable and then connect it again, or turn off the TV and then turn it on again.
• Analog DVI is not supported. If your TV supports digital DVI but not HDMI, you can
use an HDMI to DVI convector cable or adaptor to connect the Set Top Box HDMI to
the TV DVI. In this case, you need to connect the audio cable separately.
• Be sure to use an HDMI cable with the HDMI logo.
• If your TV does not support multi-channel audio, the Set Top Box will output PCM
audio only.
• Please refer to the next section to set the Component and HDMI output resolution.
Page 29

myHARGRAY
DVR USER GUIDE
28
Setting HDMI and Component Output Resolution
You can select 1080i, 720p, 480p or 480i on the HDMI and Component output. When
you set the output, both HDMI and Component outputs are set to the selected resolution, the “HD” indicator in front panel will glow in blue if the resolution is set to 720p
or higher. The RCA Composite and RF outputs are always set to 480i and will not be
affected by the HDMI and Component resolution setting. The resolution can be set in
the User Menu or the middleware. Please refer to the section “User Menu” on changing settings in the User Menu.
NOTE: If your TV does not display the video or error message is displayed after you
have selected a new resolution, your TV may not support the selected resolution. Refer to your TV owner’s manual for verification. Repeat the above procedures again to
find a resolution supported by your TV.
Setting channel ID
In “RF TV”, channel 3/4 is used by default. You can change the channel ID by toggling
the CH3/CH4 switch at the rear panel.
NOTE: The new channel ID will take effect immediately after the switch is toggled.
Page 30

myHARGRAY
DVR USER GUIDE
Connecting Audio System
Your Set Top Box supports AC-3 (Dolby Digital 5.1 channel). To enjoy multi-channel surround-sound, the content source must carry multi-channel AC-3 signal. Please refer to
Hargray for availability of AC-3 5.1 programs.
You can enjoy multi-channel surround-sound such as 5.1 channel by connecting the Set
Top Box to an amplifier compatible with Dolby Digital. You can connect to your amplifier using the digital optical audio output.
Consult your audio system user guide for connection. Take necessary precautions
when working with electric equipment. Remove the devices from wall power and be
sure to use caution when moving equipment to prevent injury.
If your connected TV or A/V equipment does not support AC-3, you can disable AC-3.
Enabling or disabling AC-3 is controlled by the system software (Myrio). For details
of enabling and disabling AC-3, please refer to usage instruction provided by Hargray.
Please refer to the following table for details of audio output used when AC-3 is
enabled or disabled.
29
Page 31

myHARGRAY
DVR USER GUIDE
WARNING: When connecting via the digital optical audio output to a TV or A/V decoder
that does not have Dolby Digital decoding capability, be sure to set AC-3 off to avoid
damage to equipment.
30
Page 32

myHARGRAY
DVR USER GUIDE
Powering-Up Set Top Box
Follow these steps to power up the Set Top Box:
1. Follow your TV/Network instruction to connect the Set Top Box to your network
modem or network access unit using the Ethernet cable comes packaged with the
Set Top Box.
2. Plug the socket end of the AC/DC adapter into the wall socket and the DC jack into
the power connector on the Set Top Box.
3. The Set Top Box front panel power indicator will illuminate in orange color.
4. The LINK LED indicator will illuminate in green color
NOTE: The HD LED indicator will illuminate only if the output resolution is 720p
or higher. The RECORD LED indicator will illuminate only if the (PVR) is enabled
and recording assets to the hard disk drive.
5. Within 60 seconds splash screen will appear on the TV.
6. The total boot-up time may vary.
ATTENTION: Your Set Top Box is equipped with a hard drive, disk formatting may be
required when the Set Top Box boots up for the first time. Message will be showing in
the splash screen when the disk is being formatted. Do not power off the box during
the disk formatting.
31
Page 33

myHARGRAY
DVR USER GUIDE
32
Remote Controls
Loading Batteries
The remote control comes with AA-size batteries, which needs to be installed when
you first receive your system. When you replace old batteries, you should replace all of
the batteries. Use batteries of the same kind, for example alkaline or carbon zinc, and
do not mix batteries of different kinds. Alkaline batteries last longer than carbon zinc.
WARNING: Mixing old and new batteries or different types of batteries poses a fire
hazard.
To load batteries to remote control:
1. Press down on the battery cover’s top latch and slide the cover off.
2. If you are changing out batteries, take out all of the old batteries.
3. Put the new batteries in. Make sure you match the plus ( “+” ) ends with the plus
markings on the battery case.
4. Slide the cover back into place.
Controlling the Set Top Box
Set Top Box uses InfraRed (IR) to receive remote control signals. IR signals travel only
short distances (40 feet or less), and cannot go through walls or other solid objects.
You must point the remote control to the Set Top Box, with no objects blocking the
line of sight.
Page 34

myHARGRAY
DVR USER GUIDE
URC PLUS supports both RF and IR signals. You need to follow below procedures to
program the URC PLUS to IR mode before controlling Set Top Box.
1. On the URC PLUS, press and hold the STB button for approx. 5 seconds. The STB
button backlight will illuminate. Now the URC PLUS is in registration mode.
2. On the URC PLUS, press STB once again. Both the STB and AUX button backlight
will illuminate.
3. Press 0 to set URC PLUS to IR mode only. The URC PLUS will not send
any RF signal.
The STB button backlight on the URC PLUS will blink twice to indicate that the
setting was successful.
Pressing a key other than 0 or a button is not pressed within 10 seconds,
the STB backlight will extinguish and the URC PLUS registration process
will be terminated.
33
Page 35

myHARGRAY
DVR USER GUIDE
Controlling your TV and other A/V devices
The Set Top Box remote controls can also be used to control TVs and other A/V
devices such as DVD players and recorders. The remote controls use infrared (IR) light
signals to control other devices that the remote is programmed to control. IR signals
travel only short distances (40 feet or less), and cannot go through walls or other solid
objects. You must point the remote control directly at these devices, with no objects
blocking the line of sight.
Closed Captioning
The Set Top Box supports closed captioning. To inquire closed captioning support of TV
programs, please refer to your TV service provider.
Closed captioning can be controlled by the Set Top Box. To turn on or off closed captioning, press the LANG button on the remote control. The LANG button will toggle
captioning on and off alternatively. If the captioning is disabled in the Set Top Box, you
can still enable the captioning through the television, please refer to your TV’s owner
manual for instructions on enabling the closed-captioning.
34
Page 36

myHARGRAY
DVR USER GUIDE
Aspect Ratio
Set Top Box supports display of both standard definition content which is traditionally
filmed in 4:3 aspect ratio and high definition content filmed in 16:9 aspect ratio to both
4:3 or 16:9 TV.
Setting of aspect ratio is found in the Menu. Please refer to Hargray for options available and detailed operation. Typically, aspect ratio is provided in following 3 modes:
35
Page 37

myHARGRAY
DVR USER GUIDE
User Menu
The Set Top Box User Menu is an on-screen setup menu to set up your Set Top Box
features. You need to connect the TV properly before using the User Menu.
36
Page 38

myHARGRAY
DVR USER GUIDE
Using user menu
To start the User Menu:
1. Press INPUT and then MENU in sequence within 1 second.
To set up a Feature:
1. Use remote control UP and DOWN arrow to select the feature you want to set.
The selected feature will be highlighted by a red rectangle.
2. Press OK, the feature will be highlighted in navy blue color.
3. Use remote control UP and DOWN arrow to loop through available choices.
4. Press OK again when your choice is selected.
5. If you have other features to set up, repeat the above procedures.
To Save your setup or Exit:
1. If you have made any setup and want to save the settings, select SUBMIT in the
User Menu. You will be notified the saving of your settings.
2. Select EXIT to quit the User Menu.
ATTENTION: If you exit the User Menu without doing the SUBMIT, your changes will
be lost and will not take effect.
NOTE: If you want to give up the changes, simply select EXIT.
Pressing “INPUT” and “MENU”
in sequence within 1 second
37
Page 39

myHARGRAY
DVR USER GUIDE
Using user menu
Setting HDMI and Component output resolution
You can use User Menu to set the HDMI and Component output resolution. To use
User Menu to set the output resolution, follow procedures in section Using User
Menu, to make the changes.
NOTE: Setting of HDMI and component output resolution may be disabled in User
Menu. You may need to use the middleware user menu to set the resolution. Please
refer to your service provider for details.
Setting Closed Captioning
You can use User Menu to control closed captioning. You can also use remote
control LANG button to control closed captioning. The setting made in both ways
is the same.
To use User Menu to set closed captioning, follow procedures in section Using User
Menu, to make the changes.
Please refer to section Closed Captioning for details of controlling closed captioning.
NOTE: Setting of closed captioning may be disabled in User Menu. You may need
to use the middleware user menu to control closed captioning. Please refer to your
service provider for details.
Setting Fan Speed
You can use User Menu to control the fan speed or turn off the fan at all. 3 fan speeds;
high, middle and low are provided. You can control the fan speed with fan noise level
which is acceptable to you. To ensure good heat dissipation, it is not recommended
to turn off the fan.
Follow procedures in section Using User Menu, to make the changes.
38
Page 40

myHARGRAY
DVR USER GUIDE
Using user menu
Setting TIVO IR keycode
Set Top Box is equipped with an IR receiver at the front panel. If you have TiVo or Sling
box, you can use the IR blaster provided by TiVo or Sling to control Set Top Box for
actions such as channel switching for recording or remote network viewing.
Set Top Box has implemented the following 4 IR keycodes. You can configure TiVo or
Sling, and your Set Top Box to use the same keycode in order to complete the setup.
• MAGNAVOX 10224-B
• CENTURION 00092-B
• Toshiba TSR-202 (Satellite Receiver)
• Hitachi HDS-100R (Satellite/DTRV Receiver)
Follow procedures in section Using User Menu, to make your IR keycode selection in
Set Top Box.
Please refer to the TiVo or Sling user’s manual for configuration and setup of the TiVo
and Sling box keycode.
39
Page 41

myHARGRAY
DVR USER GUIDE
If the Set Top Box does not perform as expected, the following tips may help.
Solutions to Common Problems
Many issues with Set Top Box operation can be resolved by power cycling the box.
Disconnect the power cord from the back of the Set Top Box, wait a few seconds, then
reconnect the power. The box will take several minutes to complete its reset operation.
Standby/On indicator at the front panel is not lit:
The power supply to the box is probably not working:
1. Confirm that the AC/DC adapter is connected properly to the
Power Connection.
2. Confirm that there is power from the power source.
3. Make sure you have pressed the Standby button on the front
of the box and that the Standby / On light is green.
Standby indicator turns green; no picture on the primary TV
1. Confirm that the video output connector of the Set Top Box is
properly connected to the input connector of the primary TV.
2. Confirm that the TV is set to the correct input mode.
Customer Specific Configuration
TV location (room) _______________________
Attached device(s) VCR DVD TiVo Other _______
Connection S-Video Component Coaxial
Tune to channel _____ or input _____
Troubleshooting
40
Power Connection
Page 42

myHARGRAY
DVR USER GUIDE
Troubleshooting
Before calling Hargray repair please check the following:
No Picture
Verify that the power to your TV is turned on.
If the Set Top Box is plugged into an outlet controlled by a wall switch, verify that the
switch is in the ON position.
Verify that all cables are properly connected.
If your system includes a VCR or stereo, verify that you have properly connected them
to the Set Top Box.
Verify the proper input selection to the home theater receiver or TV.
If you are using coaxial cable to connect to your TV, verify that the TV is tuned to the
correct channel. (Channel 3 or 4 (depending on your system configuration)).
No Color or Incorrect Color
Verify that the current TV program is broadcast in color.
Adjust the TV color controls.
If you are using a component video connection (PrPbY), check that all connectors are
completely and properly plugged into the Set Top Box and TV.
If you are using a component video connection (PrPbY) and your HDTV only has RGB or
RGB-HV connectors, you must use an adapter. Contact Hargray for more information.
No Sound
If your setup includes a VCR or stereo, verify that you have properly connected them to
the Set Top Box.
Verify that the volume is turned up.
Verify that the mute function is not on.
Verify the proper input selection to the home theater receiver or TV.
If you are using coaxial cable to connect to your TV, verify that the TV is tuned to the
correct channel. (Channel 3 or 4 (depending on your system configuration)).
Remote Issues
If function keys (guide, channel up / down, etc) on the remote are not responding try
pressing the STB button first and the retry the desired function key.
Mute Button may not operate on some TVs
Utilize online remote guides found at www.hargray.com/guides
Help is also available on the Set Top Box by pressing the MENU button on the remote
and then select HELP.
Telephone Support
When calling the support line please have the following information available:
1. The MAC Address or the SN (Serial Number) of the box located on the back or
underside of the Set Top Box
2. Make and Model of the Set Top Box found on the front panel.
41
Page 43

myHARGRAY
DVR USER GUIDE
Telephone Support continues
Technical Support; Monday – Saturday, 7 am to 6 pm.
Dial 611, option 2 from any Hargray phone,
or call toll-free 800-726-1266 and select the repair option.
Outages can be reported at the same number
24 hours a day, 7 days a week.
Customer Specific Configuration
TV location (room) _______________________
Attached device(s) VCR DVD TiVo Other _______
Connection S-Video Component Coaxial
Tune to channel _____ or input _____
Notes____________________________________
Customer Specific Configuration
TV location (room) _______________________
Attached device(s) VCR DVD TiVo Other _______
Connection S-Video Component Coaxial
Tune to channel _____ or input _____
Notes____________________________________
42
Page 44

myHARGRAY
DVR USER GUIDE
Bluffton
5 Buck Island Road
Bluffton, SC 29910
Hilton Head
856 William Hilton Parkway
Hilton Head Island, SC 29928
Ridgeland
8084 East Main Street
Suite B & C
Ridgeland, SC 29936
Beaufort
130 Robert Smalls Parkway
Beaufort, SC 29902
Call us today at 1-877-HARGRAY
or visit us online at hargray.com
DVRHHSC_040609
 Loading...