

Page 1

Operator’s Manual
PROFIBUS Interface Option
for the HI 2151 Series
Weight Controller
OPERATION AND
INSTALLATION
MANUAL
Document Part Number 0596-0231-01 Revision E
9440 Carroll Park Dr. • San Diego, CA 92121
Tel 858.278.2900 • Fax 858.278.6700 • www.hardysolutions.com
Page 2

HI 2151 Series Weight Controller
Profibus Interface Option
Page 3

Table of Contents
Table of Contents
SECTION 1 OVERVIEW ....................................................................................................................... 1
1.1. Scope .......................................................................................................................... 1
1.2. Description ......................................................................................................................... 1
1.3. Function .......................................................................................................................... 1
1.4. Specifications ..................................................................................................................... 1
1.5. PROFIBUS-DP Capabilities ............................................................................................... 2
1.5.3 Data Exchange ................................................................................................. 2
1.5.4 Diagnostics ....................................................................................................... 2
1.5.5 Baud Rate Auto-Detect ..................................................................................... 3
1.5.6 Multiple Nodes .................................................................................................. 3
1.5.7 GSD File ........................................................................................................... 3
1.5.8 Type File ........................................................................................................... 3
1.6 Performance Characteristics .............................................................................................. 3
SECTION 2 INSTALLATION ................................................................................................................ 5
2.1. Scope .......................................................................................................................... 5
2.2 Unpacking .......................................................................................................................... 5
2.3 Installing the Profibus Interface Option Card ..................................................................... 5
2.4. Connecting the Network Cable to the Card ....................................................................... 8
2.5. Cable and Connector Requirements .................................................................................. 9
2.6 Cable Pin Definitions .......................................................................................................... 9
2.7 Communication Rate/Cable Lengths/Connectors ............................................................ 10
SECTION 3 SETUP ............................................................................................................................ 11
3.1 Scope ........................................................................................................................ 11
3.2 Panel, Wall and Remote Setup Procedure ...................................................................... 11
3.3 Blind Unit Setup Procedure .............................................................................................. 13
3.3.1 Setting the Address for Blind Units .................................................................................. 14
SECTION 4 BLOCK READS .............................................................................................................. 15
4.1. Scope ........................................................................................................................ 15
4.2. Transfer Commands ........................................................................................................ 15
4.2.1 Overview of Transfer Commands ................................................................... 15
4.2.2 Overview of Block Transfer Commands ......................................................... 15
4.3 Detailed Command Set For Block Reads ........................................................................ 16
4.4 Response/Error Code Setup ............................................................................................ 16
4.5 Block Read Command Setup ........................................................................................... 17
4.6 Block Read Example ........................................................................................................ 17
4.7 Set Point Status/Description Bytes .................................................................................. 18
Page 4

HI 2151 Series Weight Controller
Profibus Interface Option
4.7.1 Set point Status............................................................................................... 18
4.7.2 Set point Description ....................................................................................... 18
4.8 Block Read Data Numbers ............................................................................................... 19
SECTION 5 BLOCK WRITES ............................................................................................................ 27
5.1 Scope 27
5.2 Overview of Transfer Commands .................................................................................... 27
5.3 Overview of Block Transfer Commands .......................................................................... 27
5.4 Detailed Command Set for Block Transfer (Writes) ......................................................... 28
5.5 Block Write Example ........................................................................................................ 28
5.6 Block Write Command Numbers ...................................................................................... 29
SECTION 6 SELECTABLE READS................................................................................................... 36
6.1 Scope 36
6.2 Overview of Transfer Commands .................................................................................... 36
6.3 Overview of Selectable Transfer Commands .................................................................. 36
6.4 Detailed Data Set for Selectable Read(S) ....................................................................... 37
6.5 Selectable Read Command Setup Procedures ............................................................... 37
6.6 Selectable Read Command Example .............................................................................. 38
6.7 Selectable Read Data ...................................................................................................... 39
6.7.1 Full Status and Weight Data .......................................................................... 39
6.7.2 Floating Point Weight Data ............................................................................ 40
6.7.3 Set point Relay Status 1-8 ............................................................................. 40
6.7.4 Read Tare Value ............................................................................................ 41
6.7.5 Calibration Parameters .................................................................................. 41
6.7.6 Sticker Value (Not valid for the HI 2151/30WC) ............................................ 42
6.7.7 Configuration of Rate-of-Change ................................................................... 42
6.7.8 Configuration of Analog Output ..................................................................... 42
6.7.9 Configuration of Standard RS232 Port .......................................................... 42
6.7.10 Instrument ID ................................................................................................. 43
6.7.11 Instrument identification ................................................................................. 43
6.7.12 Response/Error Code ..................................................................................... 43
6.7.13 Integrated Technician (Not Valid for HI 2151/20WC) ..................................... 44
SECTION 7 SELECTABLE WRITES ................................................................................................. 45
7.1 Scope ........................................................................................................................ 45
7.2 Overview of Transfer Commands .................................................................................... 45
7.3 Overview of Selectable Transfer Commands .................................................................. 45
7.4 Detailed Command Set for Selectable Writes .................................................................. 46
7.5 Selectable Write Command Setup Procedures ............................................................... 46
7.6 Operator Selectable Write Example ................................................................................. 47
7.7 Selectable Write Commands ............................................................................................ 48
7.7.1 Set Point Relay Functions ............................................................................. 48
7.7.2 Send Tare Value ............................................................................................ 49
7.7.3 Scale Calibration Parameters ........................................................................ 49
Page 5

Table of Contents
7.7.4 Sticker Value (This data is not valid for the HI 2151/30WC) ......................... 49
7.7.5 Configuration of Rate-of-Change ................................................................... 49
7.7.6 Configuration of Analog Output ..................................................................... 50
7.7.7 Configuration of Standard RS232 Port .......................................................... 50
7.7.8 WAVERSAVER & Excitation Monitor (HI 2151/30WC Only) ......................... 50
SECTION 8 TROUBLESHOOTING PROCEDURES ......................................................................... 51
8.1. Scope ........................................................................................................................ 51
8.2 Disassembly and Reassembly Notes and Cautions ........................................................ 51
8.3 TroubleShooting Guide .................................................................................................... 52
8.3.1 LED Does Not Come ON (See Fig. 8-1) ........................................................ 52
8.3.2 Self Test Fails ................................................................................................ 52
8.4 Error Codes ...................................................................................................................... 53
8.4 Clearing Profibus Diagnostic Code Associated Bit(S) ..................................................... 55
8.5 PROFIBUS Status Indicators ........................................................................................... 56
8.5.1 PROFIBUS Interface Card LED ..................................................................... 56
8.5.2 HI 2151 Series Indicator Light ....................................................................... 56
APPENDIX A - IEEE FOR NORMAL FLOAT TYPE ............................................................................ 57
APPENDIX B - DECIMAL, HEX, OCTAL, AND BINARY CONVERSION CHART .............................. 58
Page 6

Page 7

Section 1 OVERVIEW
Batching/Blending
Check Weighing
Filling/Dispensing
Force Measurement
Level by Weight
Rate Monitoring
1.1. SCOPE
This manual describes the operating procedures, specifications, installation, and setup for
the Hardy Process Solutions, PROFIBUS Interface Option -B12, which is used with the
Hardy HI 2151 Series Weight Controllers.
To ensure the maximum service life and safe operation of the PROFIBUS Interface Card,
use the card only as described in this manual and observe the cautions, warnings, and
safety procedures.
Hardy Process Solutions appreciates your business. Should you have any problems, please
contact our Customer Service Department at:
Phone: (858) 278-2900 FAX: (858) 278-6700
1.2. DESCRIPTION
Section 1: Overview
Using the Siemens SPC3 chip set, the PROFIBUS Option B12 interface card serves as a
high speed, intelligent client to a scanning PROFIBUS-compatible server that is setup on a
PC or PLC (Programmable Logic Controller). This arrangement supports PROFIBUS-DP
(Decentralized Periphery) and allows users to access data exchanged between the server
and the HI 2151 Weight Controller for use in PLC ladder logic, chart, or other programs.
You can configure the HI 2151 Series-B12 to function as either a local display for
weighing parameters or a blind controller that digitizes load cell signals and provides
responsive set point control.
1.3. FUNCTION
The PROFIBUS Interface Option allows the PROFIBUS server to use all of the Hardy HI
2151/20WC configuration, weighing, and scale-calibration functions. The interface
provides bi-directional communications between a server and client and allows the server
to access all configuration and weighing parameters of the HI 2151 Series Weight
Controllers.
Two data transfer options let you select commands and summaries: Selectable Transfers or
Block Transfers (a set of pre-defined data blocks). The Write commands (outputs) are sent
from the server to the weight controller. The Read Data Summaries (inputs) return weight
and scale status data to the server.
Passing the data in integer format eliminates conversion steps and reduces the time needed
to incorporate the PROFIBUS Interface Option into the server’s ladder logic or chart code.
The Interface uses transmission medium (2 or 4 wire cable) characteristic of serial field bus
applications.
1.4. SPECIFICATIONS
The PROFIBUS Interface Option is used for the following applications:
1
Page 8

HI 2151 Series Weight Controller
Profibus Interface Option
1.5. PROFIBUS-DP CAPABILITIES
1.5.1 Watch Dog
Watch Dog communication control detects failures in the bus or the assigned DPM1 (DPMaster - Class 1, which is the central controller in PROFIBUS-DP). If the interface card
detects no successful data transfers within a set interval, it switches its outputs to the failsafe state until successful communication is resumed.
1.5.2 Configuration
Configuration data contains the range of input and output areas and the information about
the data consistency (byte or word length).
The default configuration for Hardy PROFIBUS Interface is 16 words or 32 bytes.
For the 32 byte I/O the identifier bytes have the following format:
Number of Configuration bytes: 2
• Config byte 1 77 (hexadecimal)
• Config byte 2 77 (hexadecimal)
The maximum number of bytes of I/O can be achieved by setting:
Number of Configuration bytes: 4
• Config byte 1 7D (Hex)
• Config byte 2 7D (Hex)
• Config byte 3 7D (Hex)
• Config byte 4 7D (Hex)
For 112 bytes of input and 112 bytes of output.
NOTE: See DIN Standard 19245, Part 3, Paragraph 8.3.5, page 55, for a description of the config
data.
1.5.3 DATA EXCHANGE
The PROFIBUS Interface Option can exchange the Input (Read) and Output (Write) data
between devices. The PROFIBUS inputs and outputs are either selectable or block reads.
The PROFIBUS Interface Option supports the standard 16-word or 32-byte format for
transfers, but you can set it to any buffer size that is less than or equal to 112 bytes.
PRE-DEFINED BLOCKS ARE UP TO 32 BYTES IN LENGTH. IF LESS THAN 32
BYTES ARE DESIRED FOR BUS TRAFFIC CONSIDERATIONS, THEN
SELECTABLE TRANSFERS SHOULD BE USED.
NOTE: Two bytes equal one word.
1.5.4 DIAGNOSTICS
The PROFIBUS Interface Option has built-in diagnostics. Write command errors set
diagnostic bits, e.g. the NACK (not acknowledge) bit.
2
Page 9

1.5.5 BAUD RATE AUTO-DETECT
The PROFIBUS network can support up to 12 Mbaud transfer rates. The server’s Auto Detect function finds the system baud rate (the rate of the slowest component), which
eliminates the need for board settings.
1.5.6 MULTIPLE NODES
Depending on the PLC, the PROFIBUS network is configurable to include several nodes
(The HI 2151 weight controller is one node) up to a maximum of 126.
1.5.7 GSD FILE
Some PLC’s require the GSD file (HRDY2151.GSD) to assist in setting up the HI
2151/20WC Weight Controller on the PROFIBUS network. See your PLC O&M manual
or the Hardy web site. To get the GSD file file from the Hardy Website:
1. Select Support
2. Highlight Online Support
3. Click on Sample Programs.
Section 1: Overview
4. Select it from the GSD pull-down list.
1.5.8 TYPE FILE
Six Type files, referred to as the Device Data Base (DDB) Files, may be needed to
configure some of the Siemens PLCs. They are included on the Hardy disk (See DIN
Standard 19245, Part 3, Paragraph 13, Page 197) Refer to the specific Siemens PLC
manual for instructions. If type files are needed for older model PLCs, contact Hardy Tech
Support.
Description for the use of the type files:
Window COM: Copy the attached type file HI2151ax.200 in the directory
s:\COMWINx0\TYPEDAT5x. After starting WIN COM you can select your
device in the family “Others”.
DOS Com V4.x: Copy the attached files depending on your selected language
with the DOS Com under the directory of the Com.
HI2151TE.200 - English Version
HI2151TD.200 - German Version
HI2151TF.200 - French Version
HI2151TI.200 - Italian Version
HI2151TS.200 - Spanish Version
1.6 PERFORMANCE CHARACTERISTICS
Environmental Requirements
1. Temperature:
Operating - 10º to 50º º F)
Storage - 20º to 85º C (- º F)
3
Page 10
HI 2151 Series Weight Controller
Siemens TI 505 or others using (Motorola) Protocol (Bytes)
One Word (Expressed in Bytes)
Least Significant Byte (LSB)
Most Significant Byte (MSB)
7 6 5 4 3 2 1 0 7 6 5 4 3 2 1
0
Siemens S5 and S7 & Allen-Bradley PLC5 PLC series or others using (Intel) Protocol (Bytes)
One Word (Expressed in Words)
Most Significant Byte (MSB)
Least Significant Byte (LSB)
7 6 5 4 3 2 1 0 7 6 5 4 3 2 1
0
Profibus Interface Option
2. Humidity:
0 to 80% Relative Humidity (Non-condensing)
Baud Rate
9,600 kbaud to 12 Mbaud - (Auto-Selectable)
Process Control Standards Reference
Process Fieldbus (PROFIBUS) - DIN 19 245
Reference Data Protocols
Master manuals will reference data either in bytes or words using the different protocols
that are particular to a server or series of servers. For example:
1. The Siemens TI 505 Series of PLCs use the Motorola protocol and expresses reference
data in bytes.
2. The Siemens S5 and S7 PLC series and the Allen-Bradley PLC5 PLC series use an
Intel protocol and express reference data in words.
3. The PROFIBUS manual references both bytes and words.
This means that the Least Significant Byte (LSB) and the Most Significant Byte (MSB)
locations vary. Note that two bytes equals one word. (See the charts below)
TABLE 1-1 REFERENCE DATA PROTOCOLS
4
Page 11

SECTION 2 INSTALLATION
NEVER INSTALL OR REMOVE THE PROFIBUS INTERFACE CARD
WITH THE POWER CORD CONNECTED.
2.1. SCOPE
Chapter 2 explains unpacking, cabling and interconnection, and installation of the -B12
PROFIBUS Interface Card. Operators and maintenance personnel should read the
procedures in this chapter before installing or operating the PROFIBUS interface card.
2.2 UNPACKING
1. Inspect the packing for damage of any kind, before signing for or opening the package.
2. Report any damage to the carrier company immediately.
3. Check to see that everything in the package matches the bill of lading. You should
normally have:
Purchased with a new Weight controller
1 - HI 2151-B12 Series Weight Controller + PROFIBUS Interface Option.
Section 2: Installation
1 - HI 2151 Series Operation &Installation Manual
1 - PROFIBUS Operation & Installation Manual
1 - CD with the GSD File and Type Files.
Purchased separately to retrofit an HI 2151 Series WC:
1 - HI-2151 Series-B12 PROFIBUS Interface (PCB)
NOTE: The PROFIBUS Interface PCB is completely interchangeable between HI-2151 Series
Weight Controllers.
4 - #4 Phillips pan head, SEM Machine Screws.
1 - PROFIBUS Operation & Installation Manual
1 - CD with the GSD File and Type Files.
Configuration Instructions - Prt. #0597-0428-01
4. Record the model number and serial number of the weight controller or interface card
and EPROM version. Store this information in a convenient, secure location for
reference when buying parts or firmware upgrades.
2.3 INSTALLING THE PROFIBUS INTERFACE OPTION CARD
1. Disconnect all power cords from the HI 2151 Series Weight Controller.
2. Accessing the printed circuit boards
A. Wall Mount Installation (NEMA 4x Enclosure)
Open the front panel of the NEMA enclosure.
A/D converter PCB and Power/Relay PCB are fastened to the rear panel.
5
Page 12
HI 2151 Series Weight Controller
Profibus Interface Option
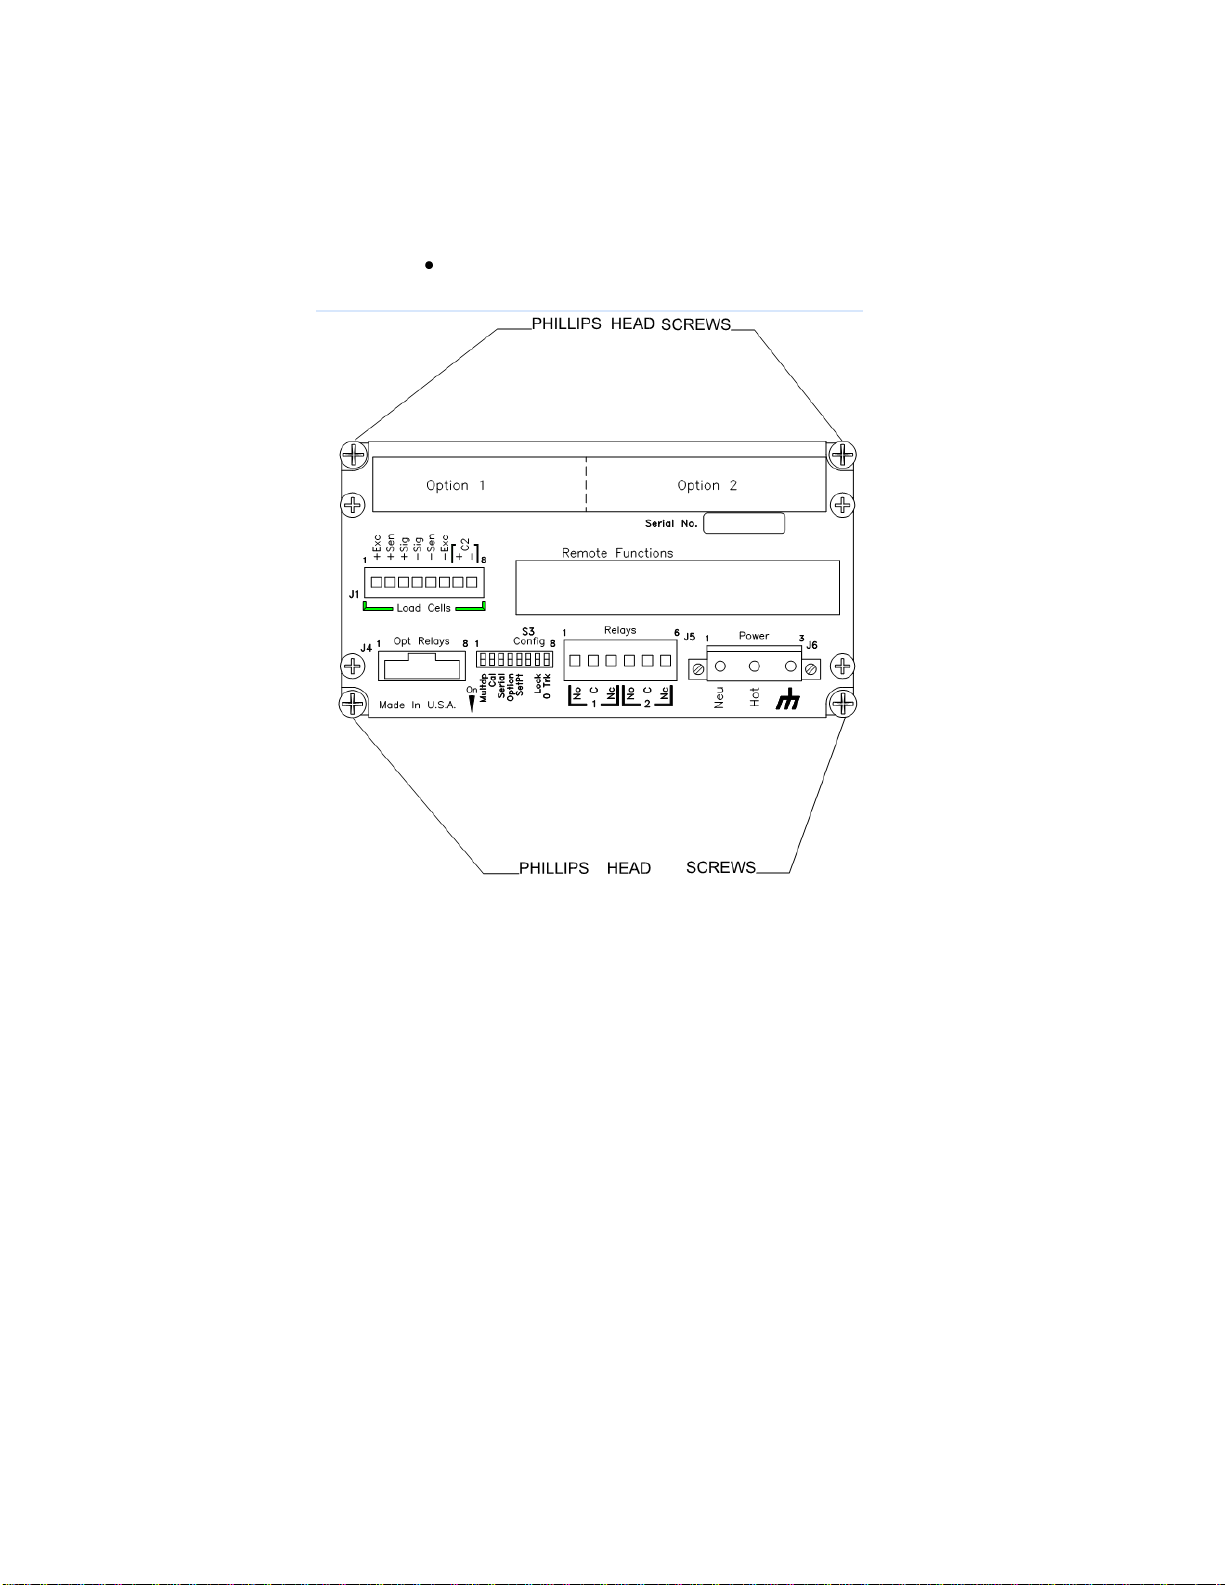
B. Panel Mount, Remote, and Blind Installations.
Remove the four Phillips head machine screws that fasten the chassis to
the HI 2151 Series WC cover.
Figure 2-2
3. Pull the chassis completely out of the cover.
4. Place the chassis on an anti-static pad.
5. Put on an anti-static wristlet and connect it to the anti-static pad.
6. Analog to Digital PCB is clearly visible and there are eight standoffs mounted on the
board. (See Fig. 2-2)
7. Remove the PROFIBUS Interface Card from the anti-static bag.
6
Page 13
Section 2: Installation
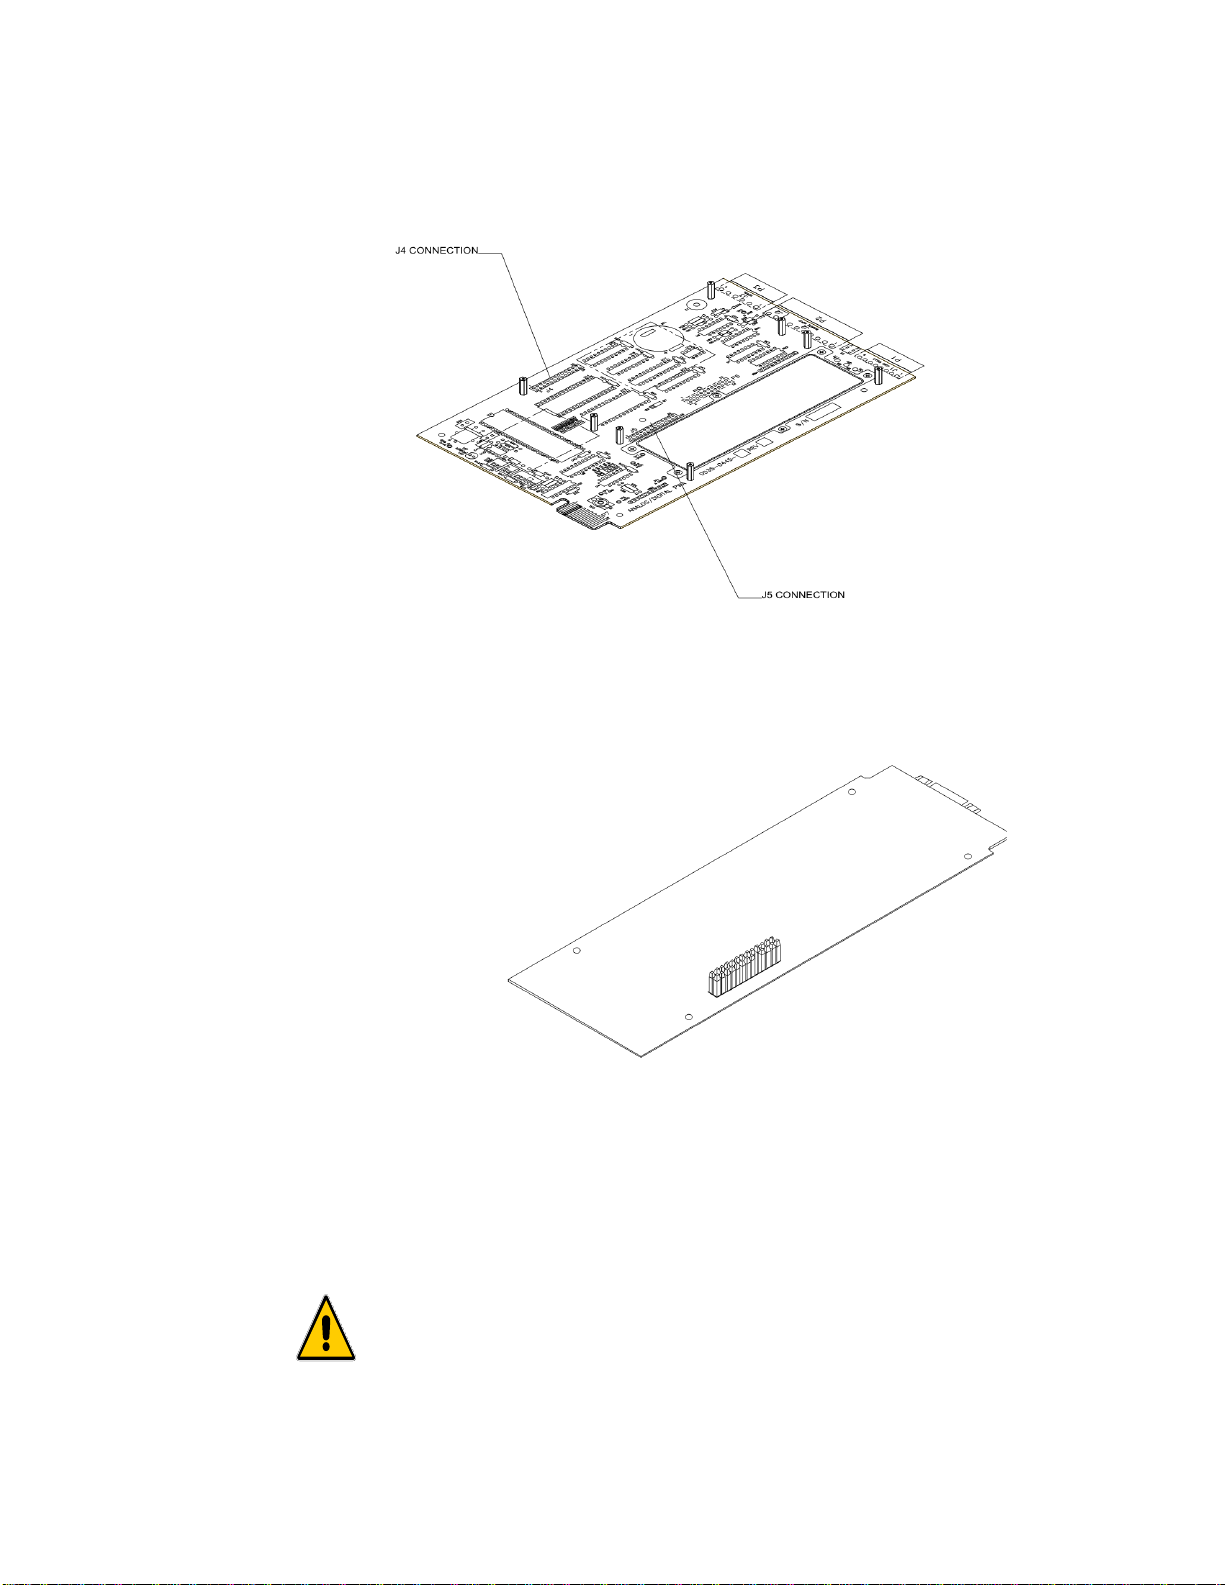
MAKE SURE THAT ALL THE PINS ARE PLUGGED INTO THE J4 OR
J5 CONNECTOR. FAILURE TO PROPERLY INSTALL THE PROFIBUS
INTERFACE CARD WILL RESULT IN PERSONAL INJURY OR
PROPERTY DAMAGE.
Figure 2-3
8. On the solder side of the PROFIBUS Interface Card, the side opposite the components,
there is a pin connector. (See Fig. 2-3)
Figure 2-4
9. With the pin connector side down, carefully plug the PROFIBUS Interface Card into
either connector J4 or J5 (See Fig. 2-2) whichever is available. These connectors also
refer to option 1 or option 2 on the rear panel. Option 1 uses connector J5. Option 2
uses connector J4. (See Fig. 2-4)
7
Page 14
HI 2151 Series Weight Controller
Profibus Interface Option
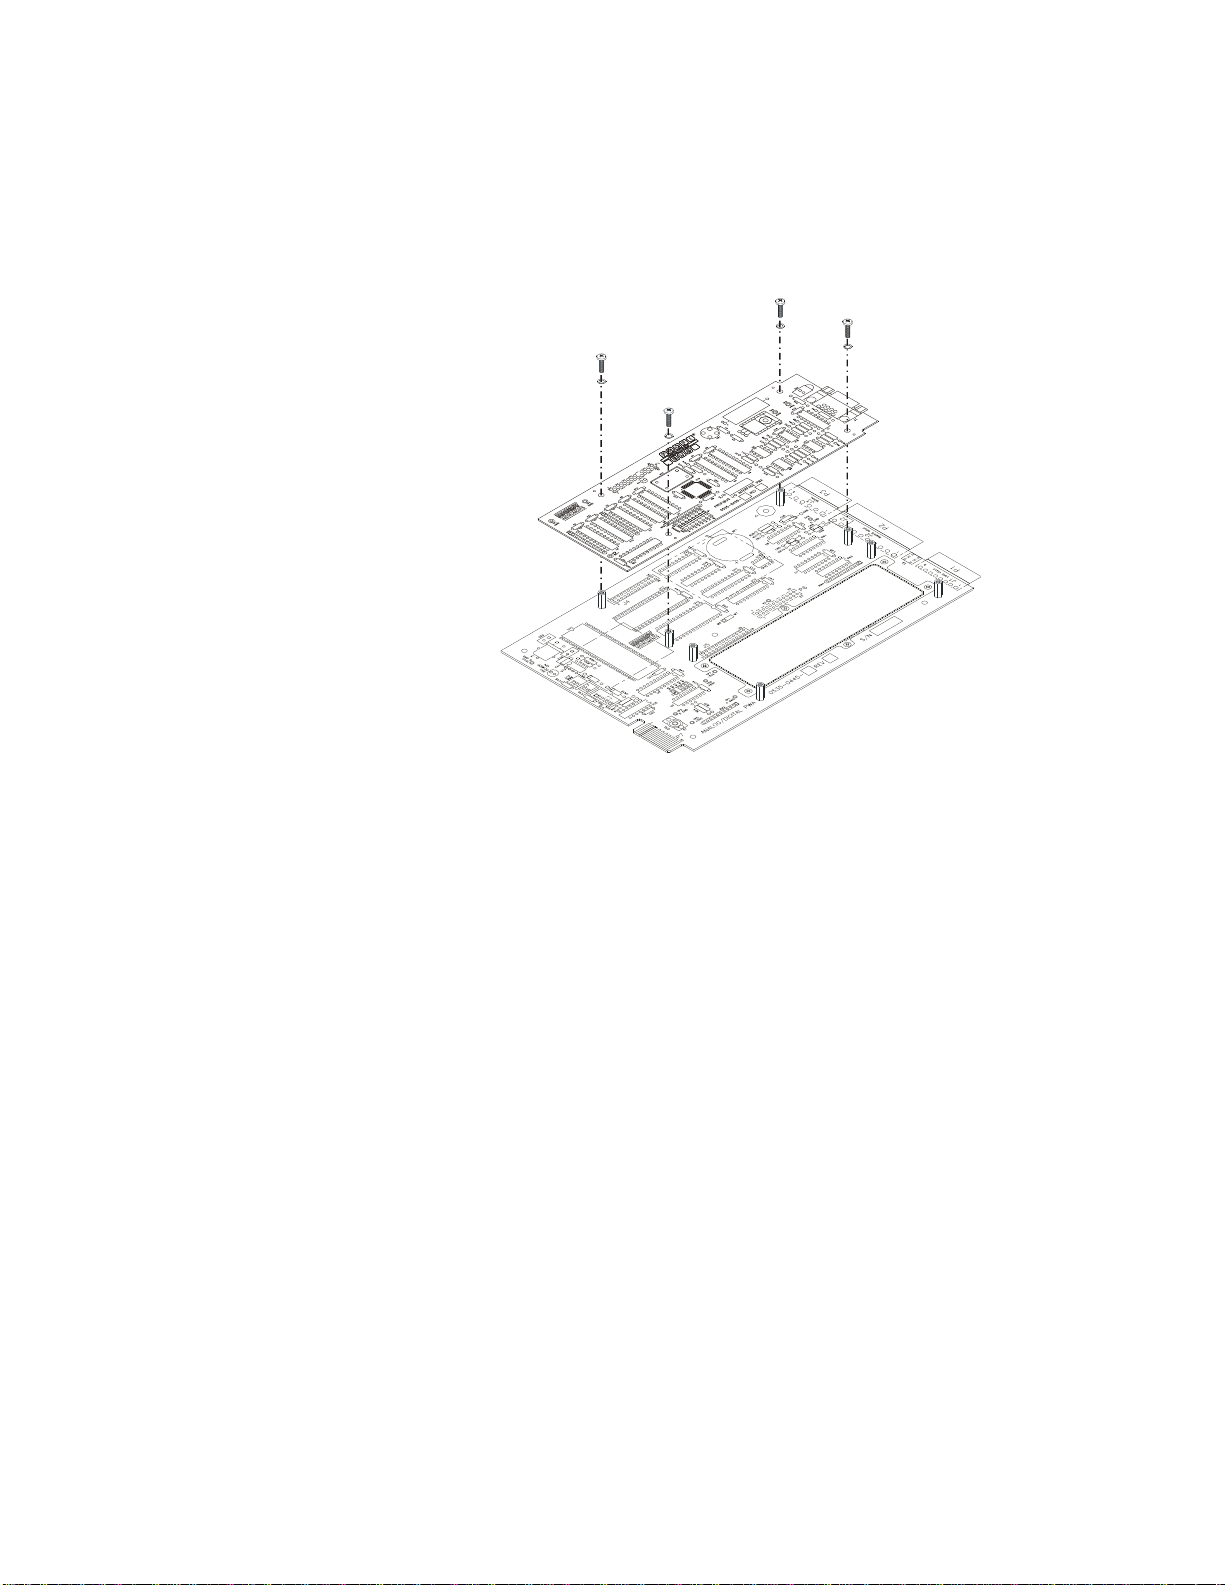
10. The through holes on the PROFIBUS Interface Card should line up with the threaded
holes in the standoffs. A little adjustment is sometimes necessary to line them up.
(See Fig. 2-5)
Figure 2-5
11. Place the washers over the holes on the component side of the PROFIBUS Interface
Card and install the four Phillips pan head SEM screws (See Fig. 2-5).
NOTE: For blind installations the dip switches will need to be set before reinstalling the chassis.
(See Chapter 3, paragraph 3.2 for instructions)
12. Slide the chassis back into the HI 2151 Series WC cover.
13. Replace the four Phillips pan head SEM screws that fasten the chassis to the HI 2151
Series WC cover.
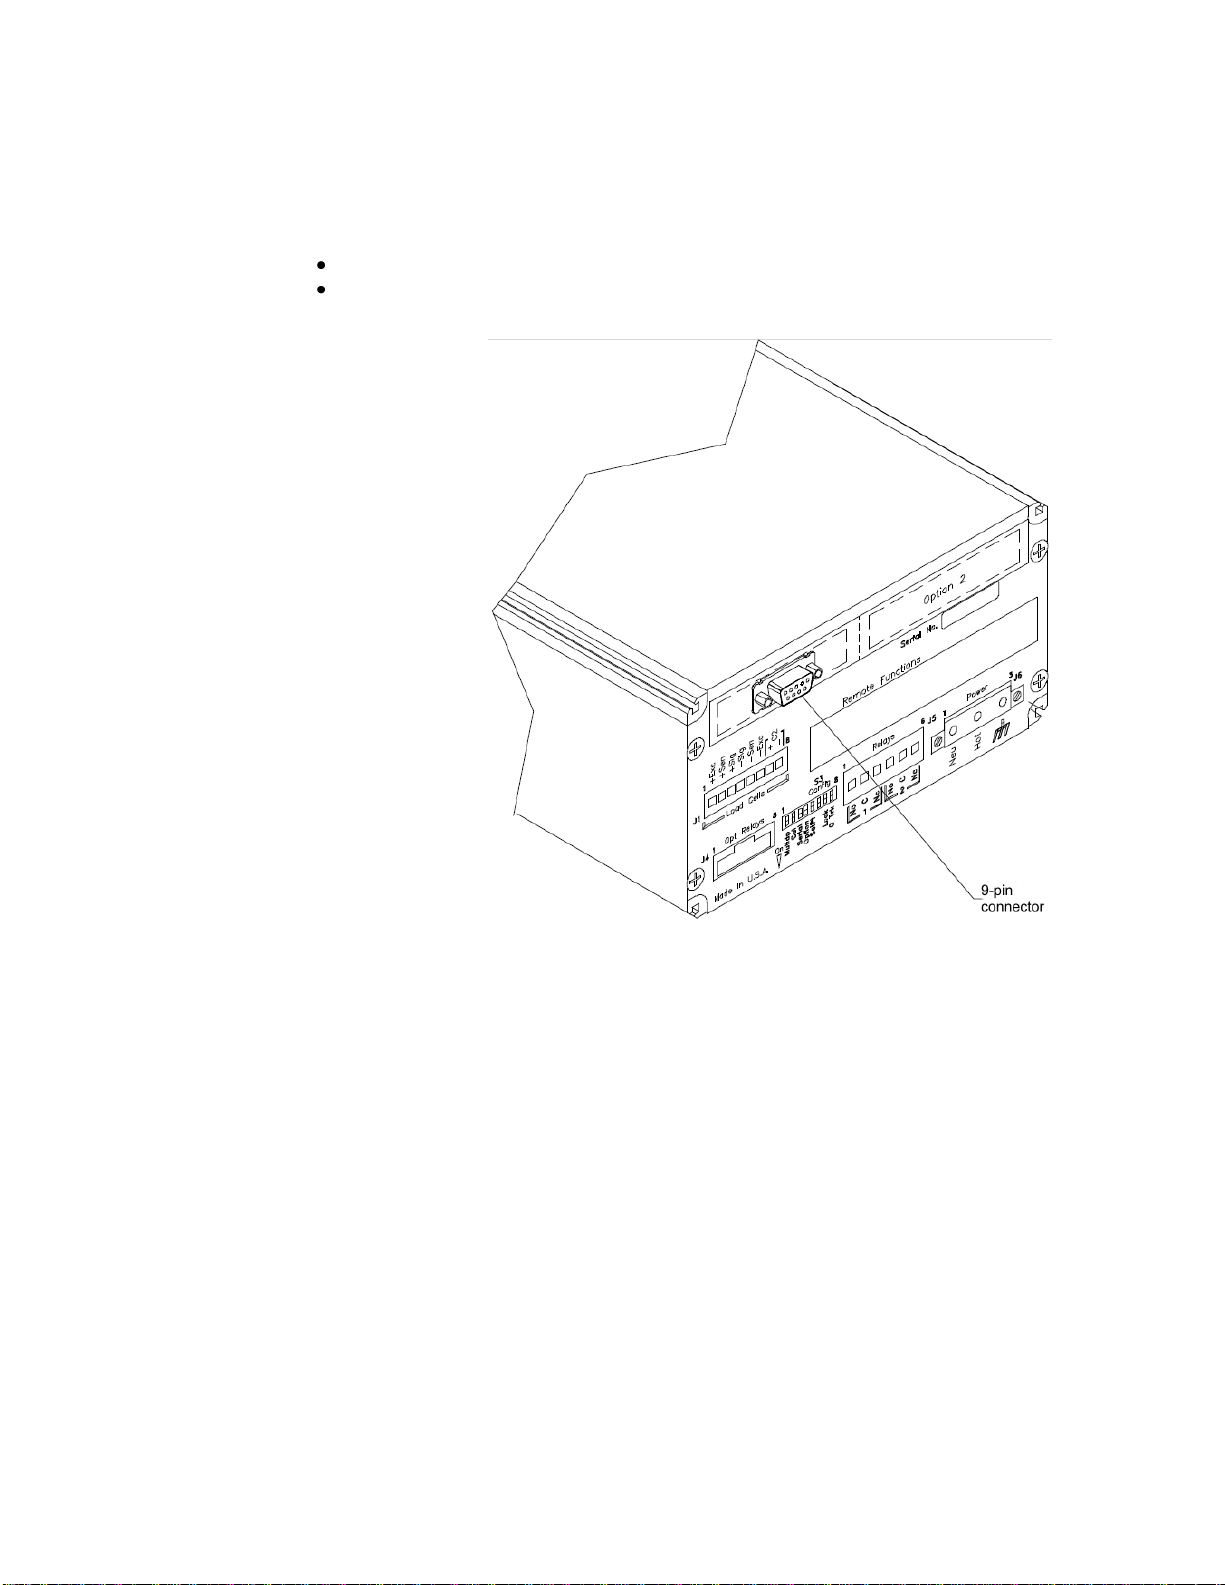
2.4. CONNECTING THE NETWORK CABLE TO THE CARD
1. The 9-pin female connector is located on the rear panel of the chassis. If the
PROFIBUS Interface Card is plugged into slot J5 the 9-pin connector will be in Option
Slot 1. If the PROFIBUS interface card is plugged into slot J4 the 9-pin connector will
be in Option Slot 2.
2. Plug the Siemens cable assembly and bus connector into the 9-pin female connector on
the rear panel of the chassis. (See Fig. 2-6)
NOTE: If the weight controller is the last node on the bus, the terminating resistor must be ON.
NOTE: It is highly recommended that the Siemens cable and bus connector listed be used. Check
with your closest Siemens Electronics dealer for pricing and availability.
8
Page 15
2.5. CABLE AND CONNECTOR REQUIREMENTS
Siemens Bus Connector - (SINEC L2) Prt. # 6ES7-972-0BA20-OXAO
Siemens Cable LWF, CMX 75C (shielded) - (SINEC L2) Prt. #6XV1-830-OAH10
Section 2: Installation
2.6 CABLE PIN DEFINITIONS
Pin 1 - Ground (outer braided shield)
Pin 3 - Signal “B” (Red)
Pin 8 - Signal “A” (Green)
Figure 2-6
9
Page 16

HI 2151 Series Weight Controller
Transmission
Speed
Without
Repeater
32 Nodes
With 1
Repeater
64 Nodes
With 2
Repeaters
92 Nodes
With 3
Repeaters
122 Nodes
9.6 k
1200 m
2400 m
3600 m
4800 m
19.2 k
1200 m
2400 m
3600 m
4800 m
93.75 k
1200 m
2400 m
3600 m
4800 m
1875 k
600 m
1200 m
1800 m
2400 m
500 k
400 m
800 m
1200 m
1600 m
1.5 M
200 m
400 m
600 m
800 m
3,6,12 M
100 m
200 m
300 m
400 m
Profibus Interface Option
2.7 COMMUNICATION RATE/CABLE LENGTHS/CONNECTORS
Shielded twisted pair two wire cable is required for the PROFIBUS Interface Connection.
The characteristic impedance of the cable should be in the range between 135 and 165
Ohms (3 to 20 MHZ), the cable capacity (conductor-conductor) should be <30 pF/M and
the conductor area should be 0,34 mm2. The 9 pin din connector on the option board is
used for all PROFIBUS connections.
10
Page 17
SECTION 3 SETUP
3.1 SCOPE
Chapter 3 consists of all the procedures to setup the PROFIBUS Interface Option. To
make sure that the interface option works properly, programmers and maintenance
personnel should be familiar with this chapter before setting up or operating the system.
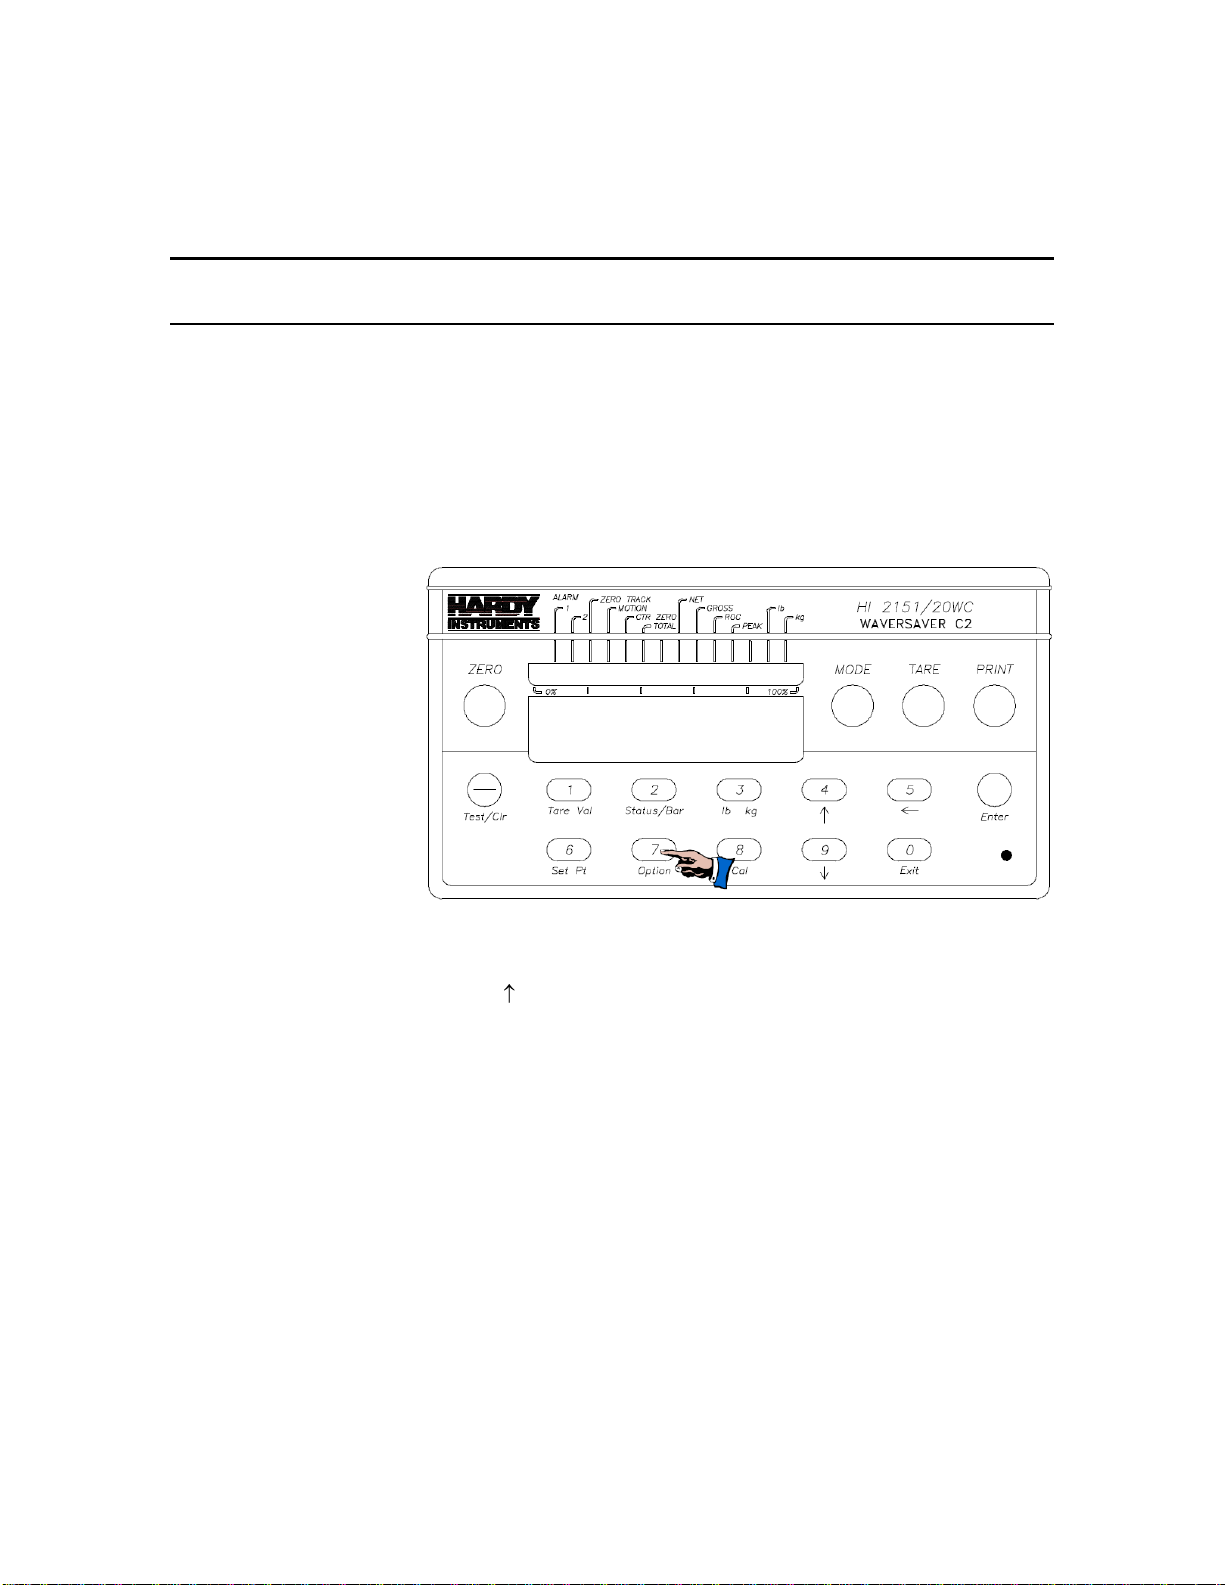
3.2 PANEL, WALL AND REMOTE SETUP PROCEDURE
1. Press the 7/Option button. (See Fig. 3-1) The first option appears.
Section 3: Setup
Figure 3-1
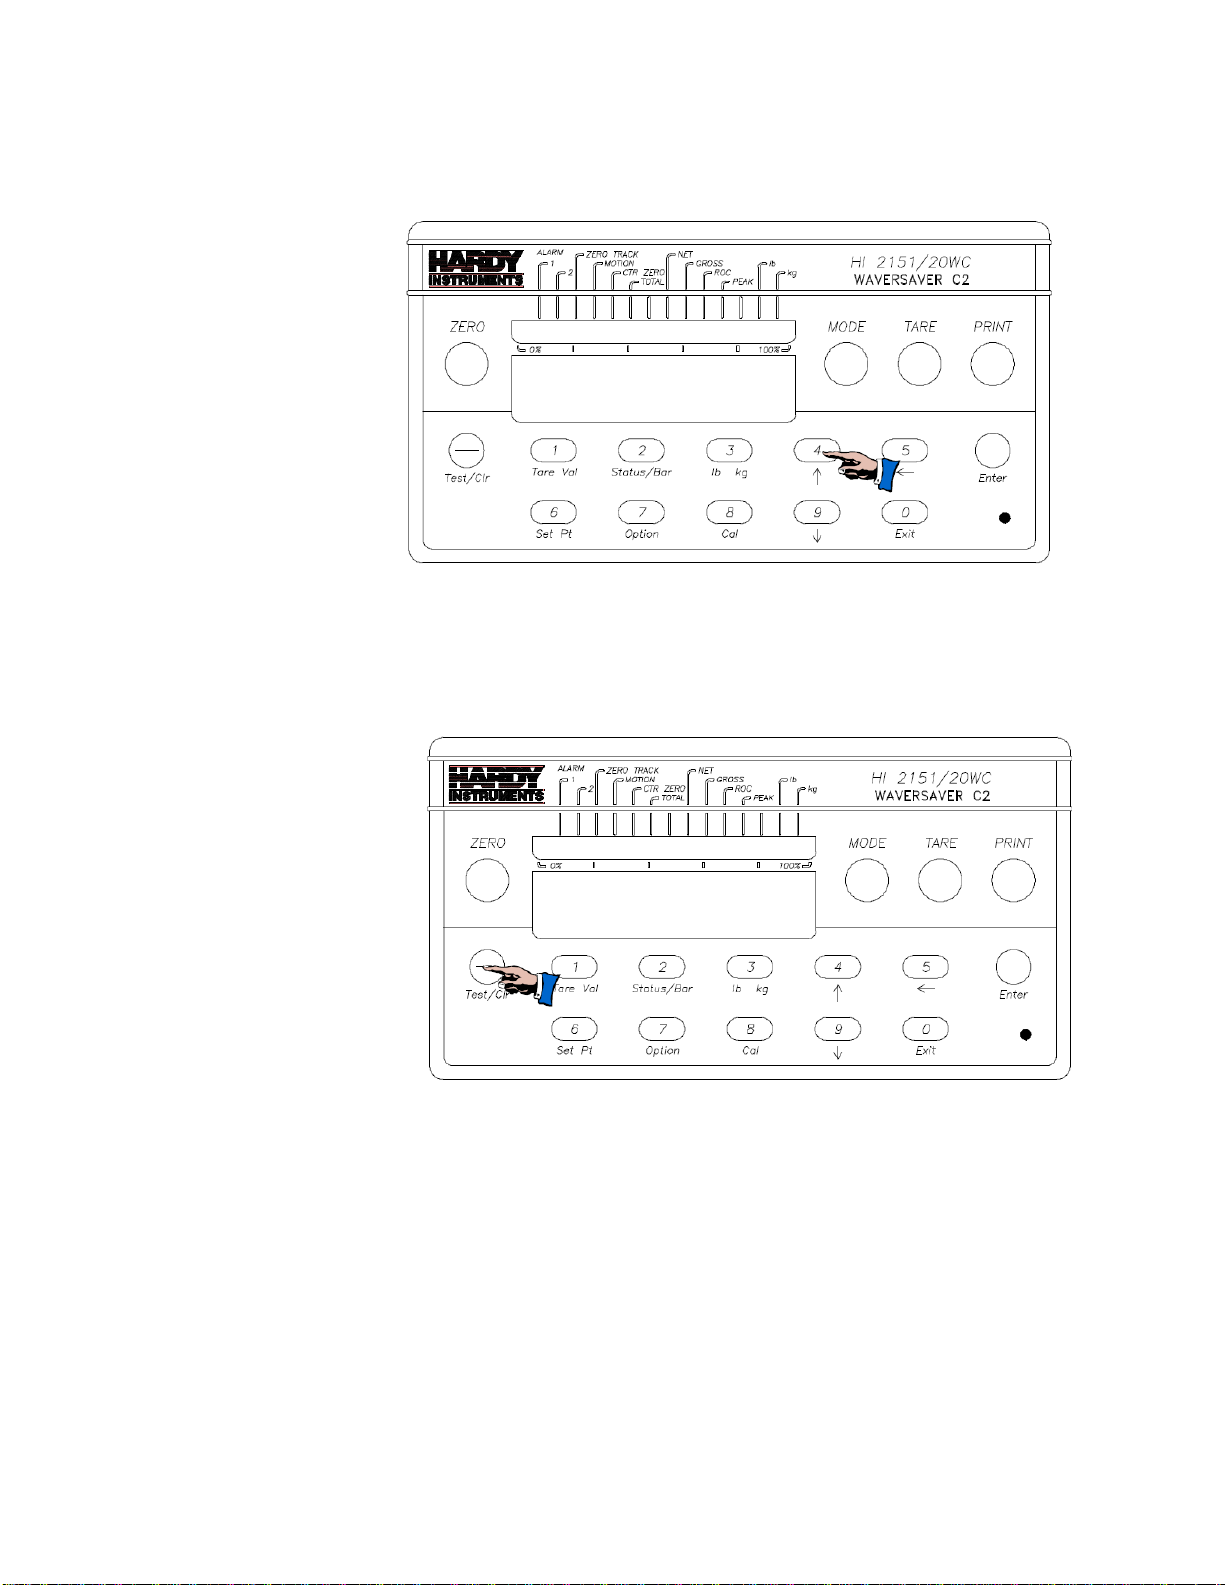
2. Press the “4/Up” ( ) arrow button until ProFi appears on the display. (See Fig. 3-2)
3. Press the “Enter” button. The current node station address appears.
4. Use the keypad to enter a node station address (the valid address range is 1-125). The
station address must be a unique number for each node on the bus.
5. Press the “Enter” button to set the node station address.
NOTE: The PROFIBUS node address number is displayed in decimal on the weight controller.
11
Page 18
HI 2151 Series Weight Controller
Profibus Interface Option
6. Press the Test/Clr button. The display should now show four “0's”. (See Fig. 3-3)
Figure 3-2
NOTE: On an uncleared display, numbers are added to the right of the existing number.
Figure 3-3
7. Use the keypad to enter the new number.
8. Press the “Enter” button to set the address.
9. Exit the Options Menu by pressing the “Exit” button.
NOTES:
1. It may be necessary to configure the PLC (using manual or auto configuration) in
addition to powering down and powering up the instrument to activate the new menu
selections. See your PLC manual to determine if this is necessary
2. The PROFIBUS Station Address cannot be changed through the PROFIBUS Network.
3. The PROFIBUS node address number is displayed in decimal on the weight controller.
12
Page 19
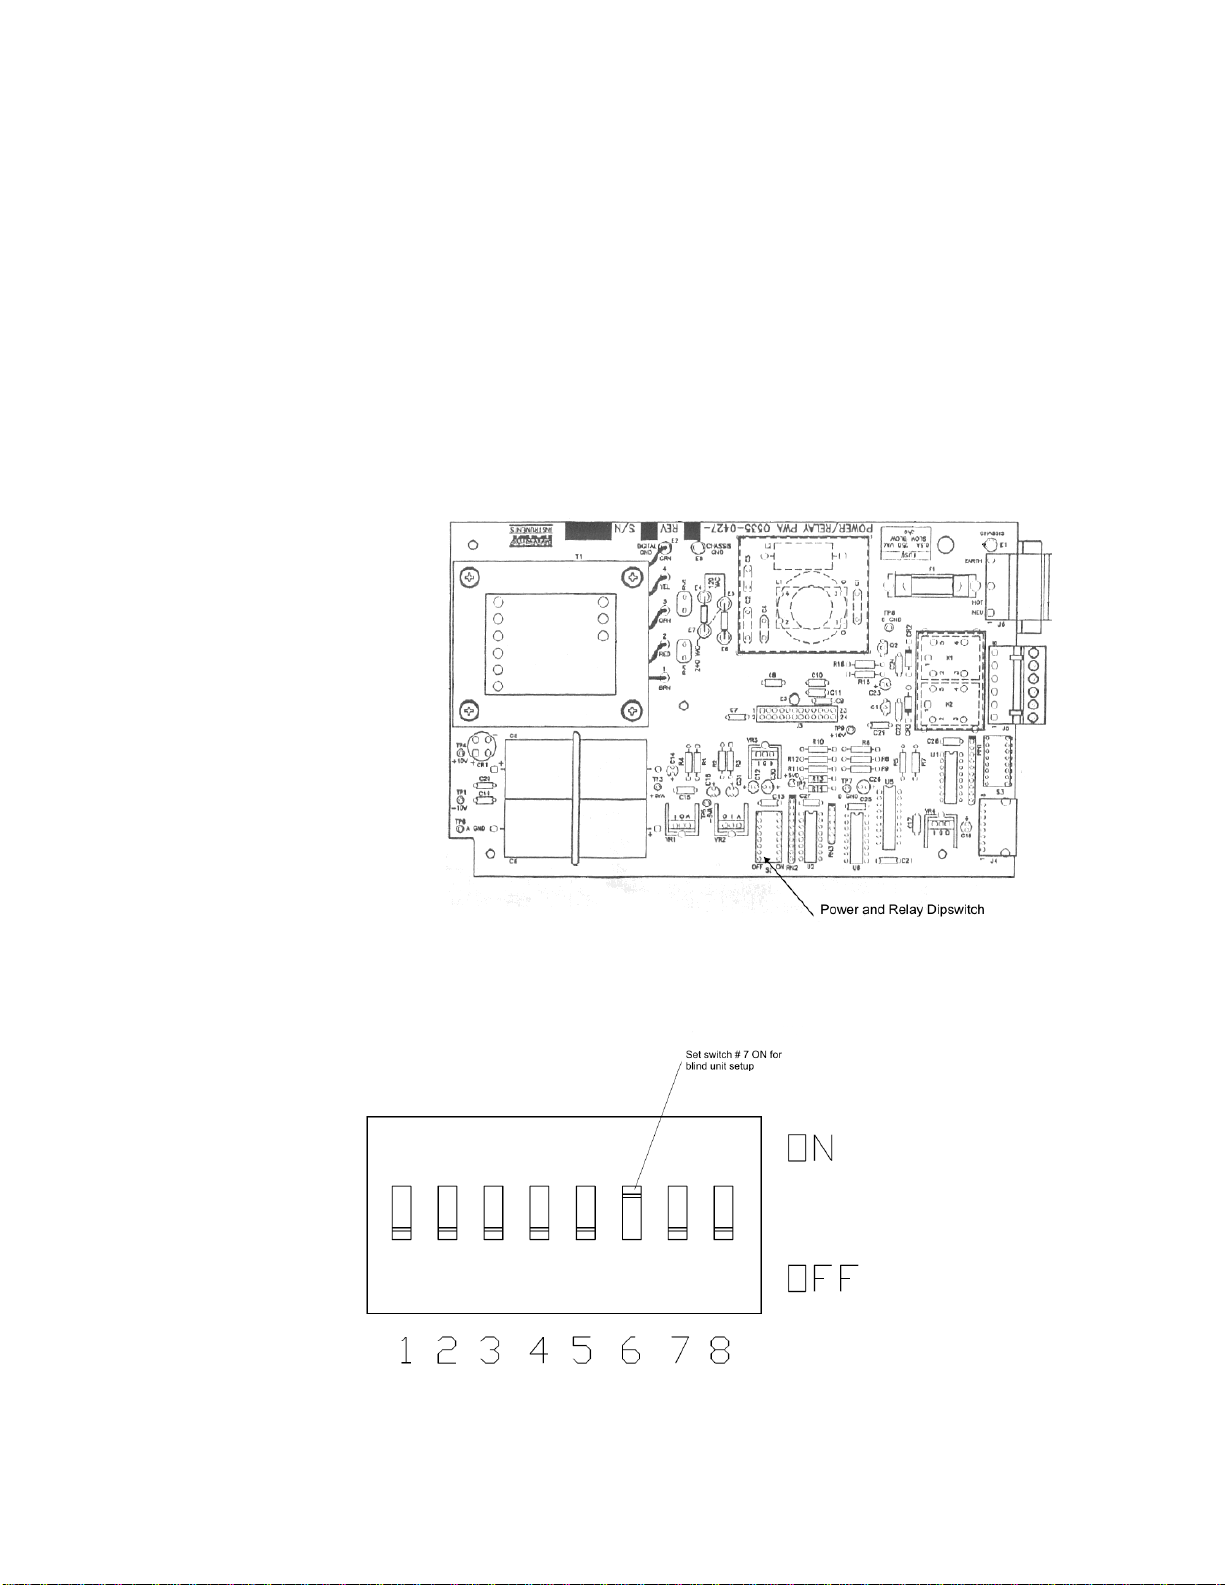
3.3 BLIND UNIT SETUP PROCEDURE
A blind HI 2151 Series Weight Controller is configured without a front panel and keypad.
To set the PROFIBUS station address, a dip switch on the PROFIBUS Interface Card and
the Power & Relay PCB, must be set.
To set the power and relay (Prt # 0535-0427) dipswitches for the PROFIBUS Interface
Card:
1. Disconnect the power cord.
2. Open the panel door.
3. On the Power & Relay Printed Circuit Board (Prt # 0535-0427) there is a dipswitch
S2. (See Fig. 3-4)
Section 3: Setup
Figure 3-4
4. Set the #6 Dipswitch to “on” and the other switches to “off” (See Fig. 3-5)
Figure3-5
13
Page 20

HI 2151 Series Weight Controller
PROFIBUS PCB DIPSWITCH
SETTING ADDRESS
To set the address to 17, set
switches 1 and 5
and all other switches .
dipswitch
ON OFF
Profibus Interface Option
3.3.1 SETTING THE ADDRESS FOR BLIND UNITS
1. The Dipswitches on the PROFIBUS Interface Card represent a binary value as
follows:
Switch Binary Value
1 1
2 2
3 4
4 8
5 16
6 32
7 64
8 Not used
2. A PROFIBUS address can have a binary value from 1 to 125.
3. To set the address move the dipswitches that total the address binary number to the
“on” position. For example: Address 17 requires dip switches 5 (16) and 1 (1) to be
turned “on”, and all the other switches must be turned “off”. (See Fig. 3-6)
4. After setting the address, the PLC can communicate with the Blind Weight Controller.
NOTE: The PROFIBUS Station Address cannot be changed through the PROFIBUS network.
Figure 3-6
NOTE: For PROFIBUS Card Serial Numbers 1001 - 1050, the dipswitch numbers do not match
the silk screened numbers on the circuit board. To set an address of 17 on the dipswitch
14
turn on 1 & 5, which correspond to the silk screened numbers 0 & 4.
Page 21

SECTION 4 BLOCK READS
1. The PLC server determines the amount of bytes that can be
transferred; not the PROFIBUS interface option.
2. When using the HI 2151 Series PROFIBUS interface, the user can
select the Block Read Data Summaries and Block Write Commands as
required. However, the amount of bytes that can be transferred is
dependent on the data transfer capability of the server being used.
3. The ladder logic program provides the server with the ability to read
and write weight data by referencing the PROFIBUS address, the byte
numbers and number of bytes.
PLC
LADDER LOGIC
PROGRAM
WRITE/READ
#5400 (hex) +
BLOCK READ
DATA NUMBER
RESPONSE
# BETWEEN
14-20 or #23 (hex) +
DATA REQUESTED
DATA EXCHANGE
BLOCK TRANSFER
4.1. SCOPE
Chapter 4 covers block read commands for the PROFIBUS Interface Option. Programmers
and users should be familiar with this chapter before operating the PROFIBUS Interface
Option.
4.2. TRANSFER COMMANDS
4.2.1 OVERVIEW OF TRANSFER COMMANDS
1. PROFIBUS Interface Card maximum buffer size: 112 byte
2. Siemens PLC
TI 505 Series PLCs
Requires the Field Interface Module (FIM) to communicate over PROFIBUS.
Can continually exchange up to 32 words or 64 bytes for both PLC input and
output with each client device.
Section 4: Block Reads
S5 Series PLCs
Requires IM 308C Module to communicate over PROFIBUS.
Can continually exchange up to 244 bytes for PLC input and output with each
client device.
S7 Series PLC
PROFIBUS ready, does not require additional modules.
Can continually exchange up to 244 bytes for PLC input and output with each
client device.
3. Allen-Bradley PLC5 Series
Requires PROFIBUS DP module to communicate over PROFIBUS.
Can continually exchange up to 244 bytes for both PLC Input and Output with
each client device.
4.2.2 OVERVIEW OF BLOCK TRANSFER COMMANDS
15
Page 22

HI 2151 Series Weight Controller
Profibus Interface Option
NOTE: The decimal point is not included in values transferred. The decimal position is a separate
parameter.
4.3 DETAILED COMMAND SET FOR BLOCK READS
NOTE: We recommend that front panel functions be controlled through the PROFIBUS network
and that the front panel control be disabled or locked out. (See the HI 2151 Series
Weight Controller Operation and Installation Manual for lockout instructions)
1. The Block Read data to be input to the server is always initiated by a Block Write
Command designating the block number that the HI 2151/20WC Weight Controller
will send to the server.
NOTE: If your server Device does not have built in PROFIBUS diagnostic capability set up the
Response/Error “90" diagnostics first, (See section 4.4) before proceeding. The write “90"
must be set before entering a block write command so that the verification process can
determine if the first block write command sent is valid or not.
2. The weight controller receives the block number command from the server, verifies
that the block number is correct, processes the weight data and prepares a response
byte (an error code response number) to the server ’s command.
NOTES: Changes to Block Writes/Charts should be made in program mode.
To prevent errors and erroneous data from being sent to the HI 2151 Series Weight
Controller, in run mode, follow the procedures below:
1. Set the Write Block Number to “0".
2. Write the new parameter to the output buffer.
3. Change the Block Number from “0" to the new number.
4.4 RESPONSE/ERROR CODE SETUP
1. The server ’s PROFIBUS diagnostics capability determines if the error code
information is automatically displayed on the server screen. The error code number
indicates if the parameter number write command is valid. (See Chapter 8, paragraphs
8.2.3 and 8.2.4)
If the PROFIBUS diagnostics are built into the server, an error code response number
is automatically displayed.
NOTES: The first 6 bytes of the diagnostic information is reserved as defined in the Profibus
Standard. Bytes 7-12 are used by the HI 2151 Series PROFIBUS interface option to
provide automatic response/error codes.
If the PROFIBUS diagnostics are not built in to the server - a write number “90" must be
performed to get the error code response.
All write commands require a 50 millisecond response delay.
The write “90" command is used for Block Transfers only, for Selectable Transfers a write
“0" command is used.
16
2. Use write “90" procedures to retrieve an error code response number. For the Error
Code List, See Chapter 8.
Page 23

Section 4: Block Reads
Block Write Command Number 84: Select Block Read Data
Byte definitions:
Block Write Number 84 (Hex 54)
Select Read Type
Block Read Value 0
Enter Block Number
a. Enter the following information to output to the weight controller:
K1: Contains Hex 5400 (Selects Block Write #84: Selects Read Summary Data)
K2: Contains Hex 5A00 (Selects Block “90" error code:)
b. MOVW1: Downloads the information in K1 & K2 into WY17-WY18 (Weight
Controller)
c. Data is read to: WX1-WX2:
WX1: Contains Hex 5A00 (Block Read Summary Data #90)
WX2: Contains Error Code (Error code number from the Error Code Table,
See Below)
4.5 BLOCK READ COMMAND SETUP
1. Use the Block Write Command 84 (54 hex) to select the Block Read Number(s).
2. On initial start up if no Block number is selected, the PROFIBUS Interface Option
will return a Default Block Number, which is Block Read Data number 20 (14 hex):
Instrument Identification.
4.6 BLOCK READ EXAMPLE
1. The following example is a setup to read the Full Status and Weight Data from the HI
2151 Series Weight Controller.
Move Word 1 (MOVW1) selects the Block to Read, in this case 20 (14 hex) - Full
Status and Weight Data. Block 20 (14 hex) has 15 words, therefore the data is
transferred to WX1 through WX15.
K1: Contains hex 5400 (Block 84: Select Read Summary Data)
K2: Contains hex 1400 (Block 20: Full Status and Weight Data - The block
number to read)
C1: When C1 is ON, Block Read 20 information is read to WX1-WX15
MOVW1: Downloads the information in K1 and K2 into WY17 and WY18 (weight
controller)
Data is read to WX1 - WX15
17
Page 24

HI 2151 Series Weight Controller
Relay 8
Relay 7
Relay 6
Relay 5
Relay 4
Relay 3
Relay 2
Relay 1
Bit 0
Bit 1
Bit 2
Bit 3
Bit 4
Bit 5
Bit 6
Bit 7
.
Relays
LSB/MSB
Relay 1 = Gross
Relay 2 = Net
0102
Relay 3 = ROC
(Rate-of-Change)
Relay 4 = Peak
0300
Relay 5 = Total
Relay 6 = Gross
0401
Relay 7 = Gross
Relay 8 = Gross
0101
Profibus Interface Option
4.7 SET POINT STATUS/DESCRIPTION BYTES
4.7.1 SET POINT STATUS
NOTE: Relays 1 and 2 are swapped on bits 6 and 7 for set point status.
4.7.2 SET POINT DESCRIPTION
1. The set point value is the target weight or level. The set points can be set to track
peak, gross, net, rate-of-change (ROC) or total. Here is a description of the set point
mode selection:
Peak 0
Gross 1
Net 2
ROC 3
Total 4
Example:
The proper set point description bytes for the desired Relay types are as follows:
18
Page 25

4.8 BLOCK READ DATA NUMBERS
Block Read Data Number 20: Full Status and Weight Data
Byte Definitions
Byte Pos.
#
Words
Start Word
# Bytes
Start Byte
Block Read Number 20 (Hex 14)
Indicator Status 1
Rate of Change currently displayed
Set point Relay 2 Active
Set point Relay 1 Active
Peak Force (weight) currently displayed
Totalized weight currently displayed
Reserved for future use
Reserved for future use
Reserved for future use
Indicator Status 2
Weight currently displayed in pounds units
Zero Track feature enabled
Reserved for future use
Current Gross weight = 0
Weight in motion, i.e. changing
Gross Weight currently displayed
Net Weight currently displayed
Weight currently displayed in kilogram units
Dipswitch Settings (Exterior)
Re-calibrate toggle
Option menu keypad lockout
Set point menu keypad lockout
Lb/Kg, Net/Gr, Tare, Zero keypad lockout
Zero tracking enable
Reserved for future use
RS 232 command lockout
Multi-drop enable (RS 422 only)
Dipswitch Settings (Interior)
Reserved for future use
Enable Gross Weight output on RS232 port
once per second
Calibration lockout for NTEP (Legal for Trade)
mode
Ignore incoming serial checksums (RS232 port)
Peak force is a result of averaged gross weight
NTEP (Legal for Trade) mode enable
Eliminate “>” on print out (RS232 port)
Reserved for blind unit toggle
Remote Functions Status
Force display to Rate-of-Change
Add current net weight to total
Hold value on display
Hold option card updates
Force display to Net weight mode
Toggle Lbs/Kg
LSB
MSB
bit 0
bit 1
bit 2
bit 3
bit 4
bit 5
bit 6
bit 7
LSB
bit 0
bit 1
bit 2
bit 3
bit 4
bit 5
bit 6
bit 7
MSB
bit 0
bit 1
bit 2
bit 3
bit 4
bit 5
bit 6
bit 7
LSB
bit 0
bit 1
bit 2
bit 3
bit 4
bit 5
bit 6
bit 7
MSB
bit 0
bit 1
bit 2
bit 3
bit 4
bit 5
1
1
1
0
1
2
1
1
1
1
1
1
0
1
2
3
4
5
Section 4: Block Reads
19
Page 26

HI 2151 Series Weight Controller
Acquire Tare
Print request (RS232 port)
Fixed Pont Weight Data
Rate-of-Change Value
Peak Force or Weight
Total Weight in Accumulator
Gross Weight
Net Weight
Tare Value
Total Words/Bytes
bit 6
bit 7
2
2
2
2
2
2
15
3
5
7
9
11
13
4
4
4
4
4
4
30
6
10
14
18
22
26
Block Read Data Number 21: Floating Point Weight Data (For IEEE Information See Appendix A)
Byte Definitions
Byte Pos.
#
Words
Start Word
# Bytes
Start Byte
Block Read Number 21 (Hex 15)
Reserved for future use
Displayed Parameter in floating point, one of the
following parameters*
Rate-of-Change Value
Peak Force or Weight
Total Weight in Accumulator
Gross Weight
Net Weight
Reserved for future use
Currently displayed value type
O = Gross
1 = Net
2 = Rate-of-Change
3 = Peak Hold
4 = Total Weight
* Only the currently displayed value is output as
floating point, configured via mode button on
the front panel.
Total Words/Bytes
LSB
MSB
LSB
MSB
1
2
1
4
0
1
3
1
1
4
1
1
8
0
1
2
6
7
Profibus Interface Option
NOTE: For Set Point Status and Description Byte information please see Paragraph 4.7.
20
Page 27

Section 4: Block Reads
Block Read Data Number 22: Set Point Relay Status 1-2
Byte Definitions
Byte Pos.
#
Words
Start Word
# Bytes
Start Byte
Block Read Number 22 (Hex 16)
Set point Status on/off (See Paragraph 4.7.1)
Set point Description #1
Set point Description #2
Set point Value #1
Preact Value #1
Dead band Value #1
Set point Value #2
Preact Value #2
Dead band Value #2
Total Words/Bytes
LSB
MSB
LSB
MSB
1
1
2
2
2
2
2
2
14
0
1
2
4
6
8
10
12
1
1
1
1
4
4
4
4
4
4
28
0
1
2
3
4
8
12
16
20
24
Block Read Data Number 23: Set Point Relay Status 3-4
Byte Definitions
Byte Pos.
#
Words
Start Word
# Bytes
Start Byte
Block Read Number 23 (Hex 17)
Set point Status on/off (See Paragraph 4.7.1)
Set point Description #3
Set point Description #4
Set point Value #3
Preact Value #3
Dead band Value #3
Set point Value #4
Preact Value #4
Dead band Value #4
Total Words/Bytes
LSB
MSB
LSB
MSB
1
1
2
2
2
2
2
2
14
0
1
2
4
6
8
10
12
1
1
1
1
4
4
4
4
4
4
28
0
1
2
3
4
8
12
16
20
24
21
Page 28

HI 2151 Series Weight Controller
Block Read Data Number 24: Set Point Relay Status 5-6
Byte Definitions
Byte Pos.
#
Words
Start Word
# Bytes
Start Byte
Block Read Number 24 (Hex 18)
Set point Status on/off (See Paragraph 4.7.1)
Set point Description #5
Set point Description #6
Set point Value #5
Preact Value #5
Dead band Value #5
Set point Value #6
Preact Value #6
Dead band Value #6
Total Words/Bytes
LSB
MSB
LSB
MSB
1
1
2
2
2
2
2
2
14
0
1
2
4
6
8
10
12
1
1
1
1
4
4
4
4
4
4
28
0
1
2
3
4
8
12
16
20
24
Block Read Data Number 23: Set Point Relay Status 7-8
Byte Definitions
Byte Pos.
#
Words
Start Word
# Bytes
Start Byte
Block Read Number 25 (Hex 19)
Set point Status on/off (See Paragraph 4.7.1 )
Set point Description #7
Set point Description #8
Set point Value #7
Preact Value #7
Dead band Value #7
Set point Value #8
Preact Value #8
Dead band Value #8
Total Words/Bytes
LSB
MSB
LSB
MSB
1
1
2
2
2
2
2
2
14
0
1
2
4
6
8
10
12
1
1
1
1
4
4
4
4
4
4
28
0
1
2
3
4
8
12
16
20
24
Profibus Interface Option
22
Page 29

Section 4: Block Reads
Block Read Data Number 26: Read Tare Value
Byte Definitions
Byte Pos.
#
Words
Start Word
# Bytes
Start Byte
Block Read Number 26 (Hex 1A)
Reserved for future use
Read Tare Value
Total Words/Bytes
LSB
MSB 1
2
3
0
1
1
1
4
6
0
1
2
Block Read Data Number 28: Calibration Parameters
Byte Definitions
Byte Pos.
#
Words
Start Word
# Bytes
Start Byte
Block Read Number 28 (Hex 1C)
Reserved for future use
Calibration Parameters:
Decimal Point Position
Units of Measure (0 = Pounds 1 = Kilograms)
C2®, Second Generation Calibration Load Cell
Count (One # found on power-up)
Totalizer Decimal Position
Display Graduation Size (“count by”)
Motion Tolerance*
Zero Tolerance
Number of readings averaged*
Span weight value or C2®Reference pont
Scale Capacity
Mid-point Linearity Calibration Value
Auto Zero Tolerance
* NOTE: If this read is performed while scale is in
the calibration mode, the
motion tolerance is “3" and
number of readings averaged
is “200".
Total Words/Bytes
LSB
MSB
LSB
MSB
LSB
MSB
1
1
1
1
1
1
1
2
2
2
1
14
0
1
2
3
4
5
6
7
9
11
13
1
1
1
1
1
1
2
2
2
2
4
4
4
2
28
0
1
2
3
4
5
6
8
10
12
14
18
22
26
NOTE: The data in Block Read #29 is not valid for the HI 2151/30WC.
23
Page 30

HI 2151 Series Weight Controller
Block Read Data Number 29: Sticker Value
Byte Definitions
Byte Pos.
#
Words
Start Word
# Bytes
Start Byte
Block Read Data Number 29 (Hex 1D)
Reserved for future use
Sticker Value
Total Words/Bytes
LSB
MSB 1
2
3
0
1
1
1
4
6
0
1
2
Block Read Data Number 30: Configuration of Rate-of-Change
Byte Definitions
Byte Pos.
#
Words
Start Word
# Bytes
Start Byte
Block Read Number 30 (Hex 1E)
Reserved for future use
Displayed Rate-of-Change time
(0 = Sec, 1 = Min, 2 = Hrs)
Rate-of-Change time base evaluation period in seconds
Time base evaluation period:
0 = 1 second 5 = 6 seconds 10 = 60 seconds
1 = 2 seconds 6 = 10 seconds 11 = 120seconds
2 = 3 seconds 7 = 12 seconds 12 = 240seconds
3 = 4 seconds 8 = 15 seconds 13 = 450seconds
4 = 5 seconds 9 = 30 seconds 14 = 900seconds
15 = 1800 secs
Total Words/Bytes
LSB
MSB
LSB
LSB
1
1
1
3
0
1
2
1
1
2
2
6
0
1
2
4
Block Read Data Number 31: Configuration of Analog Output
Byte Definitions
Byte Pos.
#
Words
Start Word
# Bytes
Start Byte
Block Read Number 31 (Hex 1F)
Weight Parameter (Value)
0 = Gross
1 = Net
2 = Rate-of-Change
3 = Peak Hold
4 = Total Weight
Wt Value is a Zero Scale Analog Output
Weight Value is a Full Scale Analog Output
Total Words/Bytes
LSB
MSB
1
2
2
5
0
1
3
1
1
4
4
10
0
1
2
6
Profibus Interface Option
24
Page 31

NOTE: The data in Block Read #32 is not valid for the HI 2151/30WC.
Block Read Data Number 32: Configuration of Standard RS232 Port
Byte Definitions
Byte Pos.
#
Words
Start Word
# Bytes
Start Byte
Block Read Number 32 (Hex 20)
Reserved for future use
Reserved for future use
Format of Printout
Print Initiation (0 = Continuous, 1 =Altered
print)
Set point, Dead band and Preact
Rate-of-Change
Tare Weight
Net Weight
Gross Weight
Print Initiation (0 = Continuous, 1 = Altered
print)
Reserved for future use (must be set to 0)
Baud Rate (0 = 600, 1 = 1200, 2 = 2400, 3 = 4800,
4 = 9600, 5 = 19200)
Port Configuration (must be set to 1for printer
output only)
Stop Bits (0 = one stop bit, 1 = two stop bits)
Parity (0 = none, 1 = even, 2 = odd)
Handshake Control (0 = hardware, 1 = software)
Word Length (0 = seven bits, 1 = eight bits)
Device Address (a value from 0-99)
Echo (0 = off, 1 = on)
Total Words/Bytes
LSB
MSB
LSB
MSB
bit 0
bit 1
bit 2
bit 3
bit 4
bit 5
bit 6
bit 7
LSB
MSB
LSB
MSB
LSB
MSB
LSB
MSB
1
1
1
1
1
1
6
0
1
2
3
4
5
1
1
1
1
1
1
1
1
1
1
1
1
12
0
1
2
3
4
5
6
7
8
9
10
11
Block Read Data Number 34: Operator Selectable Read Summary Data
Byte Definitions
Byte Pos.
#
Words
Start Word
# Bytes
Start Byte
Block Read Number 34 (Hex 22)
User Defined (Refer to Write Block #84)
1
0
Section 4: Block Reads
.
25
Page 32

HI 2151 Series Weight Controller
Block Read Data Number 35: Instrument Identification
Byte Definitions
Byte Pos.
#
Words
Start Word
# Bytes
Start Byte
Block Read Number 35 (Hex 23)
Firmware revisions level (one character text, i.e.
“A”)
Firmware version (ASCII text number)
Zero Calibration analog to digital converter raw
counts
Span Calibration analog to digital converter raw
counts
Total Words/Bytes
LSB
MSB
1
2
2
2
7
0
1
3
5
1
1
4
4
4
14
0
1
2
6
10
Block Read Data Number 36: Floating Point Data
Byte Definitions
Byte Pos.
#
Words
Start Word
# Bytes
Start Byte
Block Read Number 36 (Hex 24)
Reserved for Future Use
Gross Weight (Floating Point)
ROC Data (Floating Point)
Total Words/Bytes
LSB
MSB
1
2
2
5
0
1
3
1
1
4
4
10
0
1
2
6
Block Read Data Number 37: Integrated Technician Status
Byte Definitions
Byte Pos.
#
Words
Start Word
# Bytes
Start Byte
Block Read Number 37 (Hex 25)
Excitation Monitor ON/OFF 1 = ON 0 = OFF
Excitation Monitor Error (1 - Error, 0 = OK)
Reserved for Future Use
Total Words/Bytes
LSB
MSB
LSB
MSB
1
1
2
0
1
1
1
1
1
4
0
1
2
3
Profibus Interface Option
26
Page 33

Section 5 Block Writes
PLC
LADDER LOGIC
PROGRAM
WRITE/READ
#5400 (hex) +
BLOCK READ
DATA NUMBER
RESPONSE
# BETWEEN
14-20 or #23 (hex) +
DATA REQUESTED
DATA EXCHANGE
BLOCK TRANSFER
1. It is important to keep in mind that the amount of bytes that can be
transferred is determined by the server not the PROFIBUS
interface option.
2. When using the HI 2151 Series Weight Controller PROFIBUS
interface, the user can select the Block Read Data and Block Write
Commands as required. However, the amount of bytes that can be
transferred is dependent on the data transfer capability of the
server being used.
3. The ladder logic program provides the server with the ability to
read and write weight data by referencing the PROFIBUS address,
the byte numbers and number of bytes.
5.1 SCOPE
Chapter 5 covers block write commands for the PROFIBUS Interface Option.
Programmers and other users be familiar with this chapter before operating the PROFIBUS
Interface Option.
5.2 OVERVIEW OF TRANSFER COMMANDS
1. PROFIBUS Interface Card maximum buffer size 112 byte buffer
2. Siemens PLC
a. TI 505 Series PLC
Requires the Field Interface Module (FIM) to communicate over PROFIBUS.
Can continually exchange up to 32 words or 64 bytes for both server input
and output with each client device.
Section 5: Block Writes
b. S5 Series PLC
Requires IM 308C Module to communicate over PROFIBUS.
Can continually exchange up to 244 bytes for server input and output with
each client device.
c. S7 Series PLC
PROFIBUS ready, does not require additional modules.
Can Continually exchange up to 244 bytes for server input and output with
each client device.
3. Allen-Bradley PLC5 Series
a. Requires PROFIBUS DP module to communicate over PROFIBUS.
b. Can continually exchange up to 244 bytes for both server Input and Output with
each client device.
5.3 OVERVIEW OF BLOCK TRANSFER COMMANDS
27
Page 34

HI 2151 Series Weight Controller
Profibus Interface Option
NOTE: The weight controller will not accept write commands until calibration is sealed. Press
“Enter” at ENDCAL to seal the calibration. (See HI 2151 Series Weight Controller
Operation and Installation Manual, for calibration instructions)
5.4 DETAILED COMMAND SET FOR BLOCK TRANSFER (WRITES)
NOTE: We recommend that front panel functions be controlled through the PROFIBUS network
and that the front panel control be disabled or locked out. (See the HI 2151 Series
Weight Controller Operation and Installation Manual (#0596-0178), for lockout
instructions)
1. All write commands are initiated by the server using a ladder logic program to send a
block number to the HI 2151/20WC.
NOTE: If your server device does not have built in PROFIBUS diagnostic capability set up the
Response/Error “90" diagnostics first, (See section 4.4) before proceeding. The write “90"
must be set before entering a block write command so that the verification process can
determine if the first block write command sent is valid or not.
2. The weight controller receives a block number command, verifies that the block
number is correct, processes the weight data and prepares a response byte (an error
code response number) to the server’s command.
NOTE: Changes to Block Writes/Charts should be made in program mode.
5.5 BLOCK WRITE EXAMPLE
NOTE: When making changes to block writes in run mode, follow the procedures below:
1. Set the Block Number to “0".
2. Write the new parameter to the output buffer.
3. Change the Block Number from “0" to the new number.
The following example is a setup to download set point #1 and #2 values, preacts and dead
bands using Block Write Command 72 (48 hex): Set point Relay Status 1 & 2.
NOTE: Any set point, preact and dead band values can be entered into K memory.
When C1 is activated the Move Word 1 (MOVW1) downloads the information to the
weight controller using WY17 through WY31.
K1: Contains hex 48FF (Selects Block 72 and enables set point relays 1 and 2)
K2: Contains hex 0102 (Sets relay 1 to Gross and relay 2 to Net)
K3: Contains Double 1000 (Sets set point 1 to 1,000)
K5: Contains Double - 5 (Sets Preact 1 to negative -5)
K7: Contains Double - 10 (Sets Dead band 1 to negative -10)
K9: Contains Double - 100 (Sets set point 2 to negative -100)
K11: Contains Double 5 (Sets Preact 2 to 5)
K13: Contains Double 10 (Sets Dead band 2 to 10)
28
Page 35

C1: Starts the program
Block Write Command Number 70: Activate Scale Functions
Byte Definitions
Byte
Pos.
#
Words
Start Word
# Bytes
Start Byte
Block Write Number 70 (Hex 46)
Activate by setting remote functions bit to 1 then
reset to 0
TARE = Current Gross Weight
Initiates print on standard RS232
Add current net weight to Total
Clear Peak Hold
Clear Totalizer Accumulator
Zero the Instrument
Enable Zero Tracking (blind unit only)
Reserved for future use
Total Words/Bytes
LSB
MSB
bit 0
bit 1
bit 2
bit 3
bit 4
bit 5
bit 6
bit 7
1
1
0
1
1
1
0
1
Block Write Command Number 71: Force Relay Status
Byte Definitions
Byte
Pos.
#
Words
Start Word
# Bytes
Start Byte
Block Write Number 71 (Hex 47)
Activate by setting remote functions bit to 1 then
reset to 0
Relay 8
Relay 7
Relay 6
Relay 5
Relay 4
Relay 3
Relay 2
Relay 1
Total Words/Bytes
LSB
MSB
bit 0
bit 1
bit 2
bit 3
bit 4
bit 5
bit 6
bit 7
1
1
0
1
1
2
0
1
MOVW1: Downloads the information in K1-K14 into WY17-WY31 (weight controller)
5.6 BLOCK WRITE COMMAND NUMBERS
Section 5: Block Writes
29
Page 36

HI 2151 Series Weight Controller
Block Write Command Number 72: Set point Relay Status 1-2
Byte Definitions
Byte
Pos.
#
Words
Start Word
# Bytes
Start Byte
Block Write Number 72 (Hex 48)
Set point Enable on/off (See Chapter 4, paragraph
4.7.1)
Set point #1
Set point #2
Set point Description #1
Set point Description #2
Set point Value #1
Preact Value #1
Dead band Value #1
Set point Value #2
Preact Value #2
Dead band Value #2
Total Words/Bytes
LSB
MSB
bit 7
bit 6
LSB
MSB
1
1
2
2
2
2
2
2
14
0
1
2
4
6
8
10
12
1
1
1
1
4
4
4
4
4
4
28
0
1
2
3
4
8
12
16
20
24
Block Write Command Number 73: Set point Relay Status 3-4
Byte Definitions
Byte
Pos.
#
Words
Start Word
# Bytes
Start Byte
Block Write Number 73 (Hex 49)
Set point Enable on/off (See Chapter 4, paragraph
4.7.1)
Set point #3
Set point #4
Set point Description #3
Set point Description #4
Set point Value #3
Preact Value #3
Dead band Value #3
Set point Value #4
Preact Value #4
Dead band Value #4
Total Words/Bytes
LSB
MSB
bit 5
bit 4
LSB
MSB
1
1
2
2
2
2
2
2
14
0
1
2
4
6
8
10
12
1
1
1
1
4
4
4
4
4
4
28
0
1
2
3
4
8
12
16
20
24
Profibus Interface Option
NOTE: For Set point Status and Description Byte information please See Chapter 4, Paragraph 4.6.
30
Page 37

Section 5: Block Writes
Block Write Command Number 74: Set point Relay Status 5-6
Byte Definitions
Byte
Pos.
#
Words
Start Word
# Bytes
Start Byte
Block Write Number 74 (Hex 4A)
Set point Enable on/off (See Chapter 4, paragraph
4.7.1)
Set point #5
Set point #6
Set point Description #5
Set point Description #6
Set point Value #5
Preact Value #5
Dead band Value #5
Set point Value #6
Preact Value #6
Dead band Value #6
Total Words/Bytes
LSB
MSB
bit 3
bit 2
LSB
MSB
1
1
2
2
2
2
2
2
14
0
1
2
4
6
8
10
12
1
1
1
1
4
4
4
4
4
4
28
0
1
2
3
4
8
12
16
20
24
Block Write Command Number 75: Set point Relay Status 7-8
Byte Definitions
Byte
Pos.
#
Words
Start Word
# Bytes
Start Byte
Block Write Number 75 (Hex 4B)
Set point Enable on/off (See Chapter 4, paragraph
4.7.1)
Set point #7
Set point #8
Set point Description #7
Set point Description #8
Set point Value #7
Preact Value #7
Dead band Value #7
Set point Value #8
Preact Value #8
Dead band Value #8
Total Words/Bytes
LSB
MSB
bit 1
bit 0
LSB
MSB
1
1
2
2
2
2
2
2
14
0
1
2
4
6
8
10
12
1
1
1
1
4
4
4
4
4
4
28
0
1
2
3
4
8
12
16
20
24
31
Page 38

HI 2151 Series Weight Controller
Block Write Command Number 76: Send Tare Value
Byte Definitions
Byte
Pos.
#
Words
Start Word
# Bytes
Start Byte
Block Write Number 76 (Hex 4C)
Reserved for future use
Send Tare Value
Total Words/Bytes
LSB
MSB
1
2
3
0
1
1
1
4
6
0
1
2
Block Write Command Number 77: Scale Calibration Action
Byte Definitions
Byte
Pos.
#
Words
Start
Word
# Bytes
Start Byte
Block Write Number 77 (Hex 4D)
Activate by setting and then clearing
Current weight is an empty scale
Current weight is span weight
Store critical data in the Secure Memory
Module
Restore critical data from the Secure Memory
Module
Current weight is Midpoint Linearity value
Reserved for future use
Current weight is the C2® reference point
Reserved for future use
Total Words/Bytes
LSB
MSB
bit 0
bit 1
bit 2
bit 3
bit 4
bit 5
bit 6
bit 7
1
1
0
1
1
2
0
1
Block Write Command Number 78: Scale Calibration Action
Byte Definitions
Byte Pos.
#
Words
Start Word
# Bytes
Start Byte
Block Write Number 78 (Hex 4E)
Reserved for future use
Calibration Parameters:
Decimal Point Position
Units of Measure (0 = Pounds 1 =
Kilograms)
C2®, Second Generation Calibration Load
Cell Count . (One # found on power-up)
Totalizer Decimal Position
Display Graduation Size (“count by”)
Motion Tolerance
LSB
MSB
LSB
MSB
LSB
MSB
1
1
1
1
0
1
2
3
1
1
1
1
1
1
2
0
1
2
3
4
5
6
Profibus Interface Option
32
Page 39

Zero Tolerance
Number of readings averaged.
Span weight value or C2®Reference pont
Scale Capacity
Mid-point Linearity Calibration Value
Auto Zero Tolerance
Total Words/Bytes
1
1
1
2
2
2
1
14
4
5
6
7
9
11
13
2
2
2
4
4
4
2
28
8
10
12
14
18
22
26
Block Write Command Number 79: Sticker Value
Byte Definitions
Byte Pos.
#
Words
Start Word
# Bytes
Start Byte
Block Write Number 79 (Hex 4F)
Reserved for future use
Sticker Value
Total Words/Bytes
LSB
MSB 1
2
3
0
1
1
1
4
6
0
1
2
Block Write Command Number 80: Configuration of Rate-of-Change
Byte Definitions
Byte
Pos.
#
Words
Start
Word
# Bytes
Start Byte
Block Write Number 80 (Hex 50)
Reserved for future use
Displayed Rate-of-Change time (0 = Sec, 1 = Min, 2
= Hrs)
Rate-of-Change time base evaluation period in
seconds
Time base evaluation period:
0 = 1 sec. 5 = 6 sec. 10 = 60 sec.
1 = 2 sec. 6 = 10 sec. 11 = 120 sec.
2 = 3 sec. 7 = 12 sec. 12 = 240 sec.
3 = 4 sec. 8 = 15 sec. 13 = 450 sec.
4 = 5 sec. 9 = 30 sec. 14 = 900 sec.
15 = 1800 sec.
Total Words/Bytes
LSB
MSB
LSB
LSB
1
1
1
3
0
1
2
1
1
2
2
6
0
1
2
4
Block Write Command Number 81: Configuration of Analog Output
Byte Definitions
Byte
Pos.
#
Words
Start Word
# Bytes
Start Byte
Block Write Number 81 (Hex 51)
LSB 1 0 1 0
NOTE: This Block Write (#79) is not valid for HI 2151/30WC
Section 5: Block Writes
33
Page 40

HI 2151 Series Weight Controller
Weight Parameter (Value)
0 = Gross
1 = Net
2 = Rate-of-Change
3 = Peak Hold
4 = Total Weight
Weight Value Represented by a Zero Scale Analog
Output
Weight Value Represented by a Full Scale Analog
Output
Total Words/Bytes
MSB
2
2
5
1
3
1
4
4
10
1
2
6
Block Write Command Number 82: Configuration of Standard RS232 Port
Byte Definitions
Byte
Pos.
#
Words
Start
Word
# Bytes
Start Byte
Block Read Number 82 (Hex 52)
Reserved for future use
Reserved for future use
Format of Printout
Print Initiation (0 = Continuous, 1 =Altered print)
Set point, Dead band and Preact
Rate-of-Change
Tare Weight
Net Weight
Gross Weight
Print Initiation (0 = Continuous, 1 = Altered print)
Reserved for future use (must be set to 0)
Baud Rate (0 = 600, 1 = 1200, 2 = 2400, 3 = 4800, 4 =
9600, 5 = 19200)
Port Configuration (must be set to 1for printer output
only)
Stop Bits (0 = one stop bit, 1 = two stop bits)
Parity (0 = none, 1 = even, 2 = odd)
Handshake Control (0 = hardware, 1 = software)
Word Length (0 = seven bits, 1 = eight bits)
Device Address (a value from 0-99)
Echo (0 = off, 1 = on)
Total Words/Bytes
LSB
MSB
LSB
MSB
bit 0
bit 1
bit 2
bit 3
bit 4
bit 5
bit 6
bit 7
LSB
MSB
LSB
MSB
LSB
MSB
LSB
MSB
1
1
1
1
1
1
6
0
1
2
3
4
5
1
1
1
1
1
1
1
1
1
1
1
1
12
0
1
2
3
4
5
6
7
8
9
10
11
Profibus Interface Option
NOTE: This Block Write (#82) is not valid for HI 2151/30WC
34
Page 41

Section 5: Block Writes
Block Write Command Number 85: Integrated Technician
Byte Definitions
Byte Pos.
#
Words
Start Word
# Bytes
Start Byte
Block Write Number 85 (Hex 55)
WAVERSAVER (1-5)
Excitation Monitor 0 = OFF 1 = ON
Enter Block number (only one) or Selectable
parameter
Reserved for future use
MSB
LSB
MSM
1
1
0
1
2
1
0
1
Block Write Command Number 83: Personalized Selection of Write Commands
Byte Definitions
Byte Pos.
#
Words
Start Word
# Bytes
Start Byte
Block Write Number 83 (Hex 53)
Reserved for future use
Enter Parameter Number
Reserved for future use
Enter Parameter Value
Reserved for future use (if selection is one
byte long)
Repeat for all Write commands desired*
FF (End)
*Note: Be sure not to go over the byte limit of the
server
LSB
MSB
LSB
MSB
LSB
MSB
1
1
1 or 2
0
1
1
1
1
1
1.2 or 4
0 or 1
1
0
1
1
Block Write Command Number 84: Select Read Summary Data
Byte Definitions
Byte Pos.
#
Words
Start Word
# Bytes
Start Byte
Block Write Number 84 (Hex 54)
Select Read Type
Block Read (defaults to block #35
Instrument Identification)
Selectable Read
Enter Block number (only one) or Selectable
parameter
number)* (Repeat for all
selected parameter number)
FF (End)
*Note: Be sure not to go over the byte limit of the
server
Value
0
1
1 0 1
1
0
1
35
Page 42

HI 2151 Series Weight Controller
Profibus Interface Option
Section 6 SELECTABLE READS
6.1 SCOPE
Chapter 6 covers Selectable Read Commands for the PROFIBUS Interface Option.
6.2 OVERVIEW OF TRANSFER COMMANDS
1. PROFIBUS Interface Card maximum buffer size: 112 byte buffer
2. Siemens PLC
a. TI 505 Series PLCs
Requires the Field Interface Module (FIM) to communicate over PROFIBUS.
Can continually exchange up to 32 words or 64 bytes for both PLC input and
output with each client device.
b. S5 Series PLCs
Requires IM 308C Module to communicate over PROFIBUS.
Can continually exchange up to 244 bytes for PLC input and output with
each client device.
c. S7 Series PLC
PROFIBUS ready, does not require additional modules.
Can Continually exchange up to 244 bytes for PLC input and output with
each client device.
3. Allen-Bradley PLC5 Series
a. Requires PROFIBUS DP module to communicate over PROFIBUS.
b. Can continually exchange up to 244 bytes for both PLC Input and Output with
each client device.
6.3 OVERVIEW OF SELECTABLE TRANSFER COMMANDS
1. It is important to keep in mind that the amount of bytes that can be transferred is
determined by the server PLC not the PROFIBUS interface option.
2. When using the HI 2151 Series Weight Controller PROFIBUS interface, the user can
select the Read Data Summaries and Write Commands they require. However, the
amount of bytes that can be transferred is dependent on the data transfer capability of
the server being used.
3. By sending the proper commands to the HI 2151 Series Weight Controller, the server
can specify which weighing parameters and/or status bits should be provided.
4. The ladder logic program provides the server with the ability to read and write weight
data by referencing the PROFIBUS address, the parameter numbers and number of
bytes.
NOTE: The decimal point is not included in values transferred. The decimal position is a separate
parameter.
36
Page 43

Section 6: Selectable Reads
Block Write Command Number 84: Select Read Data
Byte definitions:
Block Write Number 84 (54 Hex)
Select Read Type
Selectable Read Value 1
Enter parameter number (repeat parameter numbers but do not exceed
word/byte limit of the PLC)
FF (end)
Operator Selectable Read Data Number 34
Byte Definitions:
Operator Selectable Read Data Number 34 (22 Hex)
Unused Byte 00
Reads operator selectable commands setup in Block Write Number 84 (Hex)
6.4 DETAILED DATA SET FOR SELECTABLE READ(S)
1. The Selectable Read data to be input to the server is always initiated by a Block Write
Command designating the parameter number that the HI 2151 Series Weight
Controller will send to the server.
NOTE: If your server Device does not have built in PROFIBUS diagnostic capability set up the
Response/Error “0" diagnostics first, (See section 4.4) before proceeding. The write “0"
must be set before entering a block write command so that the verification process can
determine if the first block write command sent is valid or not.
2. The weight controller receives the parameter number command from the server,
verifies that the parameter number is correct, processes the weight data and prepares a
response byte (an error code response number) to the server’s command.
NOTES: Changes to Block Writes/Charts should be made in program mode.
To prevent errors and erroneous data from being sent to the HI 2151 Series Weight
Controller in run mode, follow the procedures below:
1. Set the Block Number to “0".
2. Write the new parameter to the output buffer.
3. Change the Block Number from “0" to the new number.
6.5 SELECTABLE READ COMMAND SETUP PROCEDURES
1. Selectable Read Data use Block Write Number 84 (5401 hex). Block Read number 34
(2200 hex) is returned as an input to the PLC.
2. Block write number 84 allows the user to select the read data summaries desired, and
they are returned in Operator Selectable Read block 34.
37
Page 44

HI 2151 Series Weight Controller
Profibus Interface Option
Full word variables must begin on word boundaries, when transferring operator
selectable commands or data. See example below.
Example Output from the PLC, in this example indicator status 2 is desired. Indicator status
1, is used so that Tare Value starts at a word boundary:
Byte Hex# Description
Byte 0 54 Block Write Number
Byte 1 01 Selectable Read
Byte 2 02 Indicator Status 2
Byte 3 01 Indicator Status 1 (used to maintain word
Byte 4 3C Tare Value
Byte 6 FF END
Example Input to the PLC, indicates the data returned to the PLC from the output above.
Byte Hex# Description
Byte 0 22 Block Read Number
Byte 1 00 Unused
Byte 2 21 Gross Weight (bit 5) in Pounds (bit 0 is
Byte 3 00 Used as place holder (indicator status 1)
Byte 4-7 00 Tare Value = 100 (hex)
boundaries)
displayed)
00
01
00
NOTE: For outputs from the PLC “00" cannot be used to align word boundaries, because it
returns two bytes.
6.6 SELECTABLE READ COMMAND EXAMPLE
The following example is to setup read set point #1 and #2 values (without preacts and
dead bands).
1. When C1 is activated Move Word 1 (MOVW1) reads the information from the weight
controller using WX1 through WX5.
a. K1: Contains hex 5401 (Selects Block Write 84: Select Read Summary Data)
b. K2: Contains hex 181B (Selects parameter 24 Set Point #1 and parameter 27 = Set
Point #2)
c. K3: Contains hex FFFF (Ends the Selection)
2. C1: Starts the Program
3. MOVW1: Downloads the information in K1-K3 into WY17-WY19 (Weight
Controller)
4. Data is read to WX1- WX5:
a. WX1: Contains hex(Operator Selectable Read Summary Data 34
b. WX2: Contains Double + 790 (Set point 1 has a value of 790) Example value only
c. WX4: Contains Double + 800 (Set point 2 has a value of 800) Example value only.
38
Page 45

Section 6: Selectable Reads
Full Status and Weight Data
#
Words
#
Bytes
Parameter
#
Hex
Number
Indicator Status 1
Rate of Change currently displayed
Set point Relay 2 Active
Set point Relay 1 Active
Peak Force (weight) currently displayed
Totalized weight currently displayed
Reserved for future use
Reserved for future use
Reserved for future use
Indicator Status 2
Weight currently displayed in pounds units
Zero Track feature enabled
Reserved for future use
Current Gross weight = 0
Weight in motion, i.e. changing
Gross Weight currently displayed
Net Weight currently displayed
Weight currently displayed in kilogram units
Dipswitch Settings (Exterior)
Re-calibrate toggle
Option menu keypad lockout
Set point menu keypad lockout
Lb/Kg, Net/Gr, Tare, Zero keypad lockout
Zero tracking enable
Reserved for future use
RS 232 command lockout
Multi-drop enable (RS 422 only)
Dipswitch Settings (Interior)
Reserved for future use
Enable Gross Weight output on RS232 port
once per second
Calibration lockout for NTEP (Legal for Trade)
mode
Ignore incoming serial checksums (RS232 port)
Peak force is a result of averaged gross weight
NTEP (Legal for Trade) mode enable
Eliminate “>” on print out (RS232 port)
Reserved for blind unit toggle
Remote Functions Status
Force display to Rate-of-Change
Add current net weight to total
Hold value on display
Hold option card updates
Force display to Net weight mode
Toggle Lbs/Kg
bit 0
bit 1
bit 2
bit 3
bit 4
bit 5
bit 6
bit 7
bit 0
bit 1
bit 2
bit 3
bit 4
bit 5
bit 6
bit 7
bit 0
bit 1
bit 2
bit 3
bit 4
bit 5
bit 6
bit 7
bit 0
bit 1
bit 2
bit 3
bit 4
bit 5
bit 6
bit 7
bit 0
bit 1
bit 2
bit 3
0.5
0.5
0.5
0.5
0.5
1
1
1
1
1
1
2
3
4
5
1
2
3
4
5
6.7 SELECTABLE READ DATA
6.7.1 FULL STATUS AND WEIGHT DATA
39
Page 46

HI 2151 Series Weight Controller
Acquire Tare
Print request (RS232 port)
Fixed Pont Weight Data
Rate-of-Change Value
Peak Force or Weight
Total Weight in Accumulator
Gross Weight
Net Weight
Tare Value
bit 4
bit 5
bit 6
bit 7
2
2
2
2
2
2
4
4
4
4
4
4
6
7
8
9
10
11
6
7
8
9
A
B
Floating Point Weight Data
#
Words
#
Bytes
Parameter
#
Hex
Number
Displayed Parameter in floating point, one of the
following parameters*:
Rate-of-Change Value
Peak Force or Weight
Total Weight in Accumulator
Gross Weight
Net Weight
Currently displayed value type
0 = Gross
1 = Net
2 = Rate-of-Change
3 = Peak Hold
4 = Total Weight
*Note: Only the currently displayed value is output
as floating point, configured via write command
2
0.5
4
1
15
16
F
10
Set point Relay Status 1-8
#
Words
#
Bytes
Parameter
#
Hex
Number
Set point Status - on/off for all 8 relays (See Chapter
4, para.4.7.1)
Set point Description (See Chapter 4, para. 4.7.2)
Set point #1
Set point #2
Set point #3
Set point #4
Set point #5
Set point #6
Set point #7
Set point #8
Set point #1
Set point Value #1
Preact Value #1
Dead band Value #1
0.5
1
1
1
1
2
2
2
1
1
1
1
1
1
1
1
1
4
4
4
20
22
23
32
33
42
43
52
53
24
25
26
14
16
17
20
21
2A
2B
34
35
18
19
1A
Profibus Interface Option
6.7.2 FLOATING POINT WEIGHT DATA
6.7.3 SET POINT RELAY STATUS 1-8
40
Page 47

Section 6: Selectable Reads
Set point #2
Set point Value #2
Preact Value #2
Dead band Value #2
Set point #3
Set point Value #3
Preact Value #3
Dead band Value #3
Set point #4
Set point Value #4
Preact Value #4
Dead band Value #4
Set point #5
Set point Value #5
Preact Value #5
Dead band Value #5
Set point #6
Set point Value #6
Preact Value #6
Dead band Value #6
Set point #7
Set point Value #7
Preact Value #7
Dead band Value #7
Set point #8
Set point Value #8
Preact Value #8
Dead band Value #8
2
2
2
2
2
2
2
2
2
2
2
2
2
2
2
2
2
2
2
2
2
4
4
4
4
4
4
4
4
4
4
4
4
4
4
4
4
4
4
4
4
4
27
28
29
34
35
36
37
38
39
44
45
46
47
48
49
54
55
56
57
58
59
1B
1C
1D
22
23
24
25
26
27
2C
2D
2E
2F
30
31
36
37
38
39
3A
3B
Read Tare Value
#
Words
#
Bytes
Parameter
#
Hex
Number
Read Tare Value
2 4
60
3C
Calibration Parameters
#
Words
#
Bytes
Parameter
#
Hex
Number
Decimal Point Position
Units of Measure (0 = Pounds 1 = Kg)
C2®, Second Generation Calibration Load Cell
Count (One # found on power-up)
Totalizer Decimal Position
Display Graduation Size (“count by”)
Motion Tolerance
Zero Tolerance
Number of readings averaged
Span weight value or C2®Reference point
Scale Capacity
Mid-point Linearity Calibration Value
Auto Zero Tolerance
0.5
0.5
0.5
0.5
1
1
1
1
2
2
2
1
1
1
1
1
2
2
2
2
4
4
4
2
66
67
68
69
70
71
72
73
74
75
76
77
42
43
44
45
46
47
48
49
4A
4B
4C
4D
6.7.4 READ TARE VALUE
6.7.5 CALIBRATION PARAMETERS
41
Page 48

HI 2151 Series Weight Controller
Sticker Value
#
Words
#
Bytes
Parameter
#
Hex
Number
Sticker Value
2 4
78
4E
Configuration of Rate-of-Change
# Words
#
Bytes
Parameter
#
Hex
Number
Displayed Rate-of-Change time (0 = Sec, 1 =
Min, 2 = Hrs)
Rate-of-Change time base evaluation period in
seconds
Time base evaluation period:
0 = 1 sec 6 = 10 sec 11 = 120 sec
1 = 2 sec 7 = 12 sec 12 = 240 sec
2 = 3 sec 8 = 15 sec 13 = 450 sec
3 = 4 sec 9 = 30 sec 14 = 900 sec
4 = 5 sec 10 = 60 sec 15 = 1800 sec
1
1
2
2
80
81
50
51
Configuration of Analog Output
# Words
#
Bytes
Parameter
#
Hex
Number
Weight Parameter (Value)
0 = Gross
1 = Net
2 = Rate-of-Change
3 = Peak Hold
4 = Total Weight
Wt. Value shown by a zero scale analog output
Wt Value shown by a full scale analog output
0.5
2
2
1
4
4
85
86
87
55
56
57
Configuration of Standard RS232 Port
#
Words
#
Bytes
Parameter
#
Hex
Number
Format of Printout
Print Initiation (0 = Continuous, 1 =Altered
print)*
Set point, Dead band and Preact
Rate-of-Change
bit 0
bit 1
bit 2
0.5 1 90 5A
Profibus Interface Option
6.7.6 STICKER VALUE (NOT VALID FOR THE HI 2151/30WC)
6.7.7 CONFIGURATION OF RATE-OF-CHANGE
6.7.8 CONFIGURATION OF ANALOG OUTPUT
6.7.9 CONFIGURATION OF STANDARD RS232 PORT
42
Page 49

Section 6: Selectable Reads
Instrument ID
# Words
#
Bytes
Parameter
#
Hex
Number
Tare Weight
Net Weight
Gross Weight
Print Initiation (0 = Continuous, 1 = Altered
print)
Reserved for future use (must be set to 0)
Baud Rate (0 = 600, 1 = 1200, 2 = 2400,
3 = 4800, 4 = 9600, 5 = 19200)
Port Configuration (must be set to 1for printer
output only)
Stop Bits (0 = one stop bit, 1 = two stop bits)
Parity (0 = none, 1 = even, 2 = odd)
Handshake Control (0 = hardware, 1 = software)
Word Length (0 = seven bits, 1 = eight bits)
Device Address (a value from 0-99)
Echo (0 = off, 1 = on)
bit 3
bit 4
bit 5
bit 6
bit 7
0.5
0.5
0.5
0.5
0.5
0.5
0.5
0.5
1
1
1
1
1
1
1
1
91
92
93
94
95
96
97
98
5B
5C
5D
5E
5F
60
61
62
Instrument Identification
#
Words
#
Bytes
Parameter
#
Hex
Number
Firmware Revision Level (one character text, i.e. A)
(Pursuant to Revision Specification ASME
Y14.35M-1992)
Firmware Version (ASCII text number)
Zero Calibration analog-to-digital converter raw
counts
Span Calibration analog to digital converter raw
counts
0.5
2
2
2
1
4
4
4
100
101
102
103
64
65
66
67
Response/Error Code
#
Words
#
Bytes
Parameter
#
Hex
Number
Provide the last write command number with its
response/error code. (See Chapter 8 for a list of
response/error codes)
1 2 0 0
6.7.10 INSTRUMENT ID
6.7.11 INSTRUMENT IDENTIFICATION
6.7.12 RESPONSE/ERROR CODE
43
Page 50

HI 2151 Series Weight Controller
Integrated Technician
#
Words
#
Bytes
Parameter
#
Hex
Number
Excitation Test ON/OFF Flag (upperbyte)
Excitation Test Pass/Fail Flag (lowerbyte)
C2 Reference Point
WAVERSAVER
1
2
1
2
4
1
104
105
106
68
69
6A
Profibus Interface Option
6.7.13 INTEGRATED TECHNICIAN (NOT VALID FOR HI 2151/20WC)
44
Page 51

SECTION 7 SELECTABLE WRITES
7.1 SCOPE
Chapter 7 covers Selectable Write Commands for the PROFIBUS Interface Option. It is
very important that programmers and users be familiar with this chapter before operating
the PROFIBUS Interface Option.
7.2 OVERVIEW OF TRANSFER COMMANDS
1. PROFIBUS Interface Card maximum buffer size: 112 byte buffer
2. Siemens PLC
a. TI 505 Series PLCs
Requires the Field Interface Module (FIM) to communicate over PROFIBUS.
Can continually exchange up to 32 words or 64 bytes for both PLC input and
output with each client device.
Section 7: Selectable Writes
b. S5 Series PLCs
Requires IM 308C Module to communicate over PROFIBUS.
Can continually exchange up to 244 bytes for PLC input and output with each
client device.
c. S7 Series PLC
PROFIBUS ready, does not require additional modules.
Can Continually exchange up to 244 bytes for PLC input and output with
each client device.
3. Allen-Bradley PLC5 Series
a. Requires PROFIBUS DP module to communicate over PROFIBUS.
b. Can continually exchange up to 244 bytes for both PLC Input and Output with
each client device.
7.3 OVERVIEW OF SELECTABLE TRANSFER COMMANDS
1. It is important to keep in mind that the amount of bytes that can be
transferred is determined by the server not the PROFIBUS interface
option.
2. When using the HI 2151 Series Weight Controller PROFIBUS
interface, the user can select the Read Data Summaries and Write
Commands they require. However, the amount of bytes that can be
transferred is dependent on the data transfer capability of the server
being used.
3. By sending the proper commands to the HI 2151 Series Weight
Controller, the server can specify which weighing parameters and/or
status bits should be provided.
45
Page 52

HI 2151 Series Weight Controller
Block Write Command Number 83: Personalized Selection of Write
Commands
Byte definitions:
Block Write Number 83 (Hex 5300)
Unused Byte 00
Enter Parameter Number
Unused Byte
Enter Byte Value
(Repeat for all Write Commands, but do not exceed PLC word/byte limit)
FF (end)
FULL WORD VARIABLES MUST BEGIN ON WORD BOUNDARIES,
WHEN TRANSFERRING OPERATOR SELECTABLE COMMANDS OR
DATA. SEE EXAMPLE BELOW
Profibus Interface Option
4. The ladder logic program provides the server with the ability to read
and write weight data by referencing the PROFIBUS address, the
parameter numbers and number of bytes.
NOTE: The decimal point is not included in values transferred. The decimal position is a separate
parameter.
7.4 DETAILED COMMAND SET FOR SELECTABLE WRITES
NOTE: We recommend that front panel functions be controlled through the PROFIBUS network
and that the front panel control be disabled or locked out. (See the HI 2151/20 WC
Operation and Installation Manual (#0596-0178-B), Section 6, Paragraph 6.3 or HI
2151/30 WC Operation and Installation Manual (#0596-0224-A) Section 4, Paragraph
4.12, for lockout instructions)
1. All write commands are initiated by the server using a ladder logic program to send the
desired parameter number(s) to the HI 2151/20WC weight controller via the
PROFIBUS Interface Card. The weight controller receives a parameter number
command, verifies that the parameter number is correct, processes the weight data and
prepares a response byte (an error code response number) to the PLCs command.
NOTE: If you server Device does not have built in PROFIBUS diagnostic capability set up the
Response/Error “0" diagnostics first, (See Section 4.4) before proceeding. The write “0"
must be set before entering a selectable write command so that the verification process can
determine if the first selectable write command sent is valid or not.
NOTE: The write “0" should be the first command written, to ensure that the error codes are
displayed on the server screen.
7.5 SELECTABLE WRITE COMMAND SETUP PROCEDURES
1. Use Block Write Number 83 - Personalized Selection of Write Commands.
2. This block allows the user to select as many write commands up to the byte limit of the PLC.
46
Page 53

Section 7: Selectable Writes
Example Output from the server:
Byte Hex# Description
Byte 0 53 Block Write Number
Byte 1 00 Unused
Byte 2 42 Decimal Point Position (66)
Byte 3 00 Number ignored
Byte 4 03 3 Decimal Places
Byte 6 3C Tare Value
Byte Hex# Description
Byte 7 00 Number ignored
Byte 8 00 Tare Value = 100 (hex)
Byte 9 00
Byte 10 01
Byte 11 00
7.6 OPERATOR SELECTABLE WRITE EXAMPLE
1. The following example is a setup to download set point #1 and #2 values (without
preacts and dead bands).
NOTE: Any set point value can be entered into K memory.
When C1 is activated the Move Word (MOVW1) downloads the information to the weight
controller using WY17 through WY31.
K1: Contains hex 5300 (Selects Block Write #83)
K2: Contains hex 1800 (Selects parameter #24 - Set point number 1)
K3: Contains Double 790 (Sets set point 1 to 790)
K5: Contains hex 1B00 (Selects parameter #27 - Set point number 2)
K6: Contains Double 800 (Sets set point 2 to 800)
C1: Starts the program
MOVW1: Downloads the information in K1-K7 into WY17-WY23 (weight controller)
47
Page 54

HI 2151 Series Weight Controller
Set point Relay Functions
# Words
# Bytes
Parameter
#
Hex #
Force Relay
Set point Enable - on/off (See Chapter 4, para.
4.7.1)
Set point #1 bit 7
Set point #2 bit 6
Set point #3 bit 5
Set point #4 bit 4
Set point #5 bit 3
Set point #6 bit 2
Set point #7 bit 1
Set point #8 bit 0
Set point Description (See Chapter 4, para. 4.7.2)
Set point #1
Set point #2
Set point #3
Set point #4
Set point #5
Set point #6
Set point #7
Set point #8
Set point #1
Set point Value #1
Preact Value #1
Dead band Value #1
Set point #2
Set point Value #2
Preact Value #2
Dead band Value #2
Set point #3
Set point Value #3
Preact Value #3
Dead band Value #3
Set point #4
Set point Value #4
Preact Value #4
Dead band Value #4
Set point #5
Set point Value #5
Preact Value #5
Dead band Value #5
Set point #6
Set point Value #6
Preact Value #6
0.5
0.5
1
1
1
1
2
2
2
2
2
2
2
2
2
2
2
2
2
2
2
2
2
2
1
1
1
1
1
1
1
1
1
1
4
4
4
4
4
4
4
4
4
4
4
4
4
4
4
4
4
4
19
20
21
21
31
31
41
41
51
51
22
23
32
33
42
43
52
53
24
25
26
27
28
29
34
35
36
37
38
39
44
45
46
47
48
49
13
14*
15
15
1F
1F
29
29
33
33
16
17
20
21
2A
2B
34
35
18
19
1A
1B
1C
1D
22
23
24
25
26
27
2C
2D
2E
2F
30
31
Profibus Interface Option
7.7 SELECTABLE WRITE COMMANDS
7.7.1 SET POINT RELAY FUNCTIONS
48
Page 55

Section 7: Selectable Writes
Dead band Value #6
Set point #7
Set point Value #7
Preact Value #7
Dead band Value #7
Set point #8
Set point Value #8
Preact Value #8
Dead band Value #8
2
2
2
2
2
2
4
4
4
4
4
4
54
55
56
57
58
59
36
37
38
39
3A
3B
Send Tare Value
#
Words
#
Bytes
Parameter
#
Hex #
Send Tare Value
2 4
60
3C
Sticker Value
#
Words
#
Bytes
Parameter
#
Hex
#
Sticker Value
2 4
78
4E
Configuration of Rate-of-Change
# Words
#
Bytes
Parameter
#
Hex
#
Displayed Rate-of-Change time (0 = Sec, 1 = Min, 2
= Hrs)
Rate-of-Change time base evaluation period in
seconds
Time base evaluation period:
0 = 1 second 5 = 6 seconds 10 = 60 seconds
1 = 2 sec. 6 = 10 sec. 11 = 120 sec.
2 = 3 sec. 7 = 12 sec. 12 = 240 sec.
3 = 4 sec. 8 = 15 sec. 13 = 450 sec.
4 = 5 sec. 9 =360 sec. 14 = 900 sec.
15 = 1800 sec.
1
1
2
2
80
81
50
51
NOTE: The relays must be disabled by using Parameter #20 before performing a Force Relay with
Parameter #19.
7.7.2 SEND TARE VALUE
7.7.3 SCALE CALIBRATION PARAMETERS
Use Block Write to do an actual calibration.
7.7.4 STICKER VALUE (THIS DATA IS NOT VALID FOR THE HI 2151/30WC)
7.7.5 CONFIGURATION OF RATE-OF-CHANGE
49
Page 56

HI 2151 Series Weight Controller
Configuration of Analog Output
#
Words
#
Bytes
Parameter
#
Hex #
Weight Parameter (Value)
0 = Gross
1 = Net
2 = Rate-of-Change
3 = Peak Hold
4 = Total Weight
Weight Value Represented by a Zero Scale
Analog Output
Weight Value Represented by a Full Scale Analog
Output
0.5
2
2
1
4
4
85
86
87
55
56
57
Configuration of Standard RS 232Port
#
Words
#
Bytes
Parameter
#
Hex #
Format of Printout
Print Initiation (0 = Continuous, 1 =Altered
print)*
Set point, Dead band and Preact
Rate-of-Change
Tare Weight
Net Weight
Gross Weight
Print Initiation (0 = Continuous, 1 = Altered
print)
Reserved for future use (must be set to 0)
Baud Rate (0 = 600, 1 = 1200, 2 = 2400, 3 = 4800,
4 = 9600,5 = 19200)
Port Configuration (must be set to for printer
output only)
Stop Bits (0 = one stop bit, 1 = two stop bits)
Parity (0 = none, 1 = even, 2 = odd)
Handshake Control (0 = hardware, 1 = software)
Word Length (0 = seven bits, 1 = eight bits)
Device Address (a value from 0-99)
Echo (0 = off, 1 = on)
bit 0
bit 1
bit 2
bit 3
bit 4
bit 5
bit 6
bit 7
0.5
0.5
0.5
0.5
0.5
0.5
0.5
0.5
0.5
1
1
1
1
1
1
1
1
1
90
91
92
93
94
95
96
97
98
5A
5B
5C
5D
5E
5F
60
61
62
WAVERSAVER and Excitation Monitor
#
Words
#
Bytes
Parameter
#
Hex
Number
WAVERSAVER (1-5)
Excitation Monitor
0.5
0.5 1 1
99
100
63
64
Profibus Interface Option
7.7.6 CONFIGURATION OF ANALOG OUTPUT
7.7.7 CONFIGURATION OF STANDARD RS232 PORT
7.7.8 WAVERSAVER & EXCITATION MONITOR (HI 2151/30WC ONLY)
50
Page 57

Section 8: Troubleshooting
51
Section 8 Troubleshooting Procedures
8.1. SCOPE
Chapter Eight consists of all the procedures for troubleshooting the electrical, mechanical
and software of the PROFIBUS Interface Card in the event of a malfunction. All the
information covers the diagnosis and repair of malfunctioning components.
8.2 DISASSEMBLY AND REASSEMBLY NOTES AND CAUTIONS
Disconnect the power cord before disassembling.
Make sure that any disassembly is done in a clean, well ventilated, properly controlled
static environment.
Always make sure that the assemblies and sub-assemblies are well supported and
insulated when doing any repairs on the PROFIBUS Interface Card or the HI 2151
Series Weight Controller.
Place small fasteners, connectors and electrical parts in closed containers so as not to
lose parts during reassembly.
Read all the disassembly instructions before any disassembly begins. Be sure that you
are familiar with the procedures. If any of the instructions for disassembly are unclear,
contact Hardy Process Solutions, Customer Support Department for additional
information and assistance.
Do not disconnect any electrical plug, connector or terminal unless an identification
tag is present or one is attached. Always note where the connector or plug was
attached to the electrical component or wiring harness.
Always install complete hardware groups (Screws, Washers, Lock Washers, Spacers,
Etc.) back to the original point of removal.
Always replace broken or damaged modules or hardware immediately!
Always check to be sure that no loose parts are sitting on printed circuit boards or
electrical connectors or wires when disassembling or reassembling.
Always protect printed circuit boards from electrostatic discharge (ESD). Always use
approved ESD wrist straps and anti-static pads when working on the PROFIBUS
Interface Card.
Always perform a final inspection after completing any reassembly to be sure that all
fasteners are tight, all connectors are secure and there are no loose parts on the
PROFIBUS Interface Card or other PCB Cards in the HI 2151 Series Weight
Controller.
Always follow proper safety procedures when working on or around the PROFIBUS
Interface Card.
Page 58

HI 2151 Series Weight Controller
52
TROUBLE
PROBABLE CAUSE
REMEDY
LED does not come on.
No power to the board.
Check powercord to see if it is
plugged in or broken.
Check power source to see if
there is power to the outlet.
TROUBLE
PROBABLE CAUSE
REMEDY
PLFAIL
Message
System failed
the loop back
test.
PROFIBUS PCB is
plugged in incorrectly.
Remove the PROFIBUS PCB
and reinstall the card being
careful to be sure that the pins
are not bent or in the wrong
slots on the connector.
PRFAIL
Message
System failed
the RAM test.
SPC-3 (PROFIBUS) chip
has failed.
NOTE: Loop-back test
passes but the
ram test fails
Replace the PROFIBUS
Interface Card.
Contact Hardy Process
Solutions, Customer Service
Department for Instructions.
Profibus Interface Option
8.3 TROUBLESHOOTING GUIDE
8.3.1 LED DOES NOT COME ON (SEE FIG. 8-1)
8.3.2 SELF TEST FAILS
Figure 8-1
Page 59

53
Unit
Diag Bit
#
Diagnostic
Byte
Diagnostic
Bit
Decimal #
Hex
#
Description
N/A 1 0-7
N/A
N/A
Station Status 1*
N/A 2 0-7
N/A
N/A
Station Status 2*
N/A 3 0-7
N/A
N/A
Station Status 3*
N/A 4 0-7
N/A
N/A
Diagnostic server Address
N/A
5-6
0-7
N/A
N/A
Identification Number (=2151
hex)
N/A 7 0-7
N/A
N/A
Extended Diagnostics Length
N/A
8-13
0-7
N/A
N/A
Extended Diagnostics Data
(See Below)
Unit
Diag Bit
#
Diagnostic
Byte
Diagnostic
Bit
Decimal #
Hex
#
Description
1 8 1
06
06
Acknowledge good data
received
2 2
21
15
Negative Acknowledge
(NACK)-illegal command
3 3
49
31
Scale is in motion (e.g. unable
to calibrate in motion)
4 4
50
32
Current weight sensed over
scale capacity (command 70)
5 5
51
33
Weight not with zero tolerance,
unable to zero
6 6
52
34
Insufficient change in weight to
calibrate span (error #18)
7 7
53 35
Decimal point places must be
between 0 and 4
8 8
54 36
Not a valid graduation size
9 9 1
55 37
Motion value must be greater
than graduation size
10 2 56 38
Zero tolerance value must be
between 0001 -999,999
8.4 ERROR CODES
See Section 4.4 for information on error code setup
Section 8: Troubleshooting
List of Response/Error Codes
NOTE: See Profibus Standard
Page 60

HI 2151 Series Weight Controller
54
11 3 57 39
Acceptable number of
averages between 1 and 200
12 4 58 3A
Span weight value, during
calibration, must be positive
13 5 59 3B
Scale capacity value must be
positive (from 1-999,999)
14 6 60 3C
Midpoint linearity value must be
positive
15 7 61 3D
Rate-of-change time units must
be 0, 1 or 2
16 8 62 3E
Rate-of-change time base out
of range
17 10 1 65 41
Analog output not installed
18 2 66 42
Analog output request must be
between 0-4
19 3 67 43
Invalid serial port (RS232)
format request
20 4 68 44
Serial configuration values 0 o1
21 5 69 45
Baud rate request out of range
22 6 70 46
Parity request out of range
(must be 0, 1 or 2)
23 7 71 47
Stop bits must be 0 or 1
24 8 72 48
Word length must be 0 or 1
Unit Diag
Bit #
Diagnostic
Byte
Diagnostic
Bit
Decimal
#
Hex #
Description
25 11 1 73 49
Control (Hardware or Software)
must be 0 or 1
26 2 74 4A
Device Address must be
between 0-99
27 3
75
4B
Echo request must be 0 or 1
28 4 76 4C
Tare greater than scale
capacity
29 5
77
4D
Blind unit option only
30 6 78 4E
Auto zero tolerance must be
between .0001-999,999
31 7
Reserved for future use
Profibus Interface Option
NOTE: Description in the GSD file was shortened because of 32 character limit.
Page 61

Section 8: Troubleshooting
55
32 8
Reserved for future use
33 12 1 81 51
Tare value exceeds legal range
of -99,999-999,999
34 2 82 52
Units of measure are
0=Pounds/1=Kilograms
35 3
Reserved for future use
36 4 85 54
Totalizer decimal point must be
equal or less than decimal point
position (0-4)
37 5 85 55
C2 load cell count must be
between 0-8
38 6 86 56
Sticker value must be a 6 digit
number (between 65536-
999999)
39 7 87 57
Analog out should be -99,999
and 999,999
40 8 88 58
Analog low count can’t equal
high count
41
13 1 89
59
Scale in Calibration Mode*
42 2
101
Invalid WAVERSAVER
43 3
Reserved for future use
44 4
96
60
Load cell count error
45 5 97 61
No C2® load cells found
46 6 98 62
Load cell capacity/sensitivity
error
47 7
99
63
Load cell checksum error
48 8 100 64
Too many significant digits after
the decimal to be displayed
NOTES: Writes are not allowed while scale is in calibration mode.
8.4 CLEARING PROFIBUS DIAGNOSTIC CODE ASSOCIATED BIT(S)
1. A separate bit is reserved for each response/error code. When a response/error occurs, an
2. Clearing the error/code associated bit procedures.
a. Operator Selectable Transfer, rerun the Write “0" command.
b. Block Transfer, request the Read Block #90 via a Block Write 24 with data 90.
TABLE 8-1 RESPONSE/ERROR CODES
The first 6 bytes of the diagnostic information is reserved as defined in the Profibus
Standard. Bytes 7-13 are used by the HI 2151 Series -B12 PROFIBUS interface option to
provide automatic response/error codes.
associated bit will be set to 1. This bit will remain set to 1 until it is cleared.
Page 62

HI 2151 Series Weight Controller
56
Profibus Interface Option
NOTE: Sending another command with valid parameters will correct the error. However, to clear
the response/error code bits you must rerun the write “0" or “90" command, which clears
the response/error code bits. Otherwise the error bit will always reflect the previous error.
3. To check if the associated bit(s) have been cleared. Read the response/error bits to see if they
are zero. If they are not then the associated bit(s) have not been cleared. Verify to determine if
the write “0" or “90" command was correct.
8.5 PROFIBUS STATUS INDICATORS
8.5.1 PROFIBUS INTERFACE CARD LED
1. The PROFIBUS Interface Card is fitted with a “Green LED” (See Fig 8-1)
with the following indicators:
a. A solid green light = On Line/There is communication between the
PLC/PC and the PROFIBUS Interface Card.
b. A flashing green light = Off Line/There is no communication
between the PLC/PC and the PROFIBUS Interface Card.
8.5.2 HI 2151 SERIES INDICATOR LIGHT
The status of PROFIBUS communications is determined upon entering the
PROFIBUS Options Menu. (See Chapter 3) The Zero track light indicates:
1. Flashing = Run
2. Off = Off Line
Figure 8-2
Page 63

57
Appendix A - IEEE For Normal Float Type
IEEE Format for Normal Float Type
Used for Block Read #21 and Selectable Read Parameter #15.
Sign bit - 31
Exponent (8 bits) - 30 29 28 27 26 25 24 23
Mantissa (23 bits) - 22 21 20 19 18 17 16 15 14 13 12 11 10 9 8 7 4 5 6 3 2 1 0
Sign bit 0 = Positive value
1 = Negative value
Exponent 8 bit value - 127 (decimal) = EXPONENT VALUE
Mantissa
1 + 23 bit of mantissa (where binary point is just left of bit 22) = MANTISSA VALUE
Appendix
Example:
To read NET weight, read bytes 4 through 7 in Read Data Buffer and interpret NET weight
value as floating point.
Sign Exponent Mantissa
0 01111110 000000000000000000000
+ 126 - 127=-1 1 + 0 = 1 +(1.0 x 2-1) = 0.5
Page 64

HI 2151 Series Weight Controller
Binary
Octal
Decimal
Octal
0000
0001
0010
0011
0100
0101
0110
0111
1000
1001
1010
1011
1100
1101
1110
1111
0
1
2
3
4
5
6
7
10
11
12
13
14
15
16
17
0
1
2
3
4
5
6
7
8
9
10
11
12
13
14
15
0
1
2
3
4
5
6
7
8
9
A
B
C
D
E
F
Profibus Interface Option
Appendix B - Decimal, Hex, Octal, and Binary
Conversion Chart
Hexadecimal and Equivalent Numbers
Page 65

Page 66

 Loading...