

Page 1
HI 1746-WS
WEIGH SCALE MODULE
OPERATION AND INSTALLATION
MANUAL
Series C
Corporate Headquarters
9440 Carroll Park Drive
San Diego, CA 92121
Phone: (858) 278-2900
FAX: (858) 278-6700
Web-Site: http://www.hardysolutions.com
Hardy Process Solutions Document Number: 0596-0234-01 Rev H
Copyright September 2011 Hardy Process Solutions, Inc. All Rights Reserved. Printed in the U.S.A. (941028)
Page 2

Local Field Service
Hardy has over 200 field technicians in the U.S., and more positioned
throughout the world to assist you in your support needs. We also have factory engineers who will travel to your facility any
solve challenging applications. We're ready to support you with:
where in the world to help you
• Ins
• Rout
• Plant
• Emer
To request Emergency Service and Troub
Calibration, Verification or to discuss a Maintenance Agreement please call
800-821-5831 Ext. 1757 or Emergency Service after hours (Standard Hours
6:00 AM to 6:00 PM Pacific Standard Time) and weekends
tallation and start-up
ine maintenance and certification
audits and performance measurement
gency troubleshooting and repair
leshooting, Start-up, Installation,
Ext. 1111.
Outside the U.S
Hardy Process Solutions has built a network of support throughout the globe.
For specific field service options available in your area please contact your
local sales agent or our U.S. factory at +1 858-292-2710, Ext. 1757.
Page 3

Table of Contents
Table of Contents
TABLE OF CONTENTS - - - - - - - - - - - - - - - - - - - - - -I
TABLE OF ILLUSTRATIONS - - - - - - - - - - - - - - - - - - -I
CHAPTER 1 - OVERVIEW - - - - - - - - - - - - - - - - - - - - -1-1
A Brief Description of Chapter 1 - - - - - - - - - - - - - - - - - -1-1
About Hardy Manuals - - - - - - - - - - - - - - - - - - - - - - -1-2
Description - - - - - - - - - - - - - - - - - - - - - - - - - - - - -1-2
WAVERSAVER® - - - - - - - - - - - - - - - - - - - - - - - - - -1-3
C2® Calibration - - - - - - - - - - - - - - - - - - - - - - - - - -1-4
IT® - - - - - - - - - - - - - - - - - - - - - - - - - - - - - - - - -1-4
Excitation Monitor - - - - - - - - - - - - - - - - - - - - - - -1-4
Digital Volt Meter (DVM) - Optional - - - - - - - - - - - - - - -1-5
Return to Zero Test - Optional - - - - - - - - - - - - - - - - -1-5
Weighing System Tests - Optional - - - - - - - - - - - - - - -1-5
Auto Zero Tracking - - - - - - - - - - - - - - - - - - - - - - -1-6
Set Point TTL Outputs - - - - - - - - - - - - - - - - - - - - -1-6
CHAPTER 2 - SPECIFICATIONS - - - - - - - - - - - - - - - - -2-1
A Brief Description of Chapter 2 - - - - - - - - - - - - - - - - - -2-1
Specifications for a Standard HI 1746-WS Weigh Scale Module - - -2-1
Modes of Operation - - - - - - - - - - - - - - - - - - - - - -2-1
Conversion Rate - - - - - - - - - - - - - - - - - - - - - - - -2-1
Averages - - - - - - - - - - - - - - - - - - - - - - - - - - -2-1
Resolution - - - - - - - - - - - - - - - - - - - - - - - - - - -2-1
Input - - - - - - - - - - - - - - - - - - - - - - - - - - - - - -2-1
Non-Linearity - - - - - - - - - - - - - - - - - - - - - - - - -2-1
Maximum Zero Tolerance - - - - - - - - - - - - - - - - - - -2-1
WAVERSAVER® - - - - - - - - - - - - - - - - - - - - - - - -2-1
Excitation Monitor - - - - - - - - - - - - - - - - - - - - - - -2-1
Common-Mode Rejection - - - - - - - - - - - - - - - - - - -2-2
Common-Mode Voltage Range - - - - - - - - - - - - - - - - -2-2
Backplane Input Voltage - - - - - - - - - - - - - - - - - - - -2-2
Backplane Current Load - - - - - - - - - - - - - - - - - - - -2-2
Power - - - - - - - - - - - - - - - - - - - - - - - - - - - - -2-2
C2 Calibration Input - - - - - - - - - - - - - - - - - - - - - -2-2
Cable lengths - - - - - - - - - - - - - - - - - - - - - - - - -2-2
Load Cell Excitation - - - - - - - - - - - - - - - - - - - - - -2-2
C2 Calibration Output - - - - - - - - - - - - - - - - - - - - -2-2
Set Point (1 & 2) Out - - - - - - - - - - - - - - - - - - - - - -2-2
Environmental Requirements - - - - - - - - - - - - - - - - - - - -2-2
i
Page 4

HI 1746-WS WEIGHT SCALE MODULE
Temperature Coefficient - - - - - - - - - - - - - - - - - - - -2-2
Operating Temperature Range - - - - - - - - - - - - - - - - -2-2
Storage Temperature Range - - - - - - - - - - - - - - - - - -2-2
Humidity Range - - - - - - - - - - - - - - - - - - - - - - - -2-2
Approvals - - - - - - - - - - - - - - - - - - - - - - - - - - -2-3
Digital Voltmeter - - - - - - - - - - - - - - - - - - - - - - - -2-3
Optional Equipment HI 215IT Junction Box - - - - - - - - - - - - -2-3
IT Junction Box HI 215IT-SS or PS Series - - - - - - - - - -2-3
Case Dimensions - - - - - - - - - - - - - - - - - - - - -2-3
Weight - - - - - - - - - - - - - - - - - - - - - - - - - - -2-3
Enclosure Ratings - - - - - - - - - - - - - - - - - - - - -2-3
IT Junction Box HI 215IT-FG Series - - - - - - - - - - - - - -2-3
Case Dimensions - - - - - - - - - - - - - - - - - - - - -2-3
Weight - - - - - - - - - - - - - - - - - - - - - - - - - - -2-3
Enclosure Rating - - - - - - - - - - - - - - - - - - - - - -2-3
Configuration Software for Windows - - - - - - - - - - - - - -2-3
Default Parameters - - - - - - - - - - - - - - - - - - - - - - - -2-4
CHAPTER 3 - INSTALLATION - - - - - - - - - - - - - - - - - - -3-1
A Brief Description of Chapter 3 - - - - - - - - - - - - - - - - - -3-1
Unpacking - - - - - - - - - - - - - - - - - - - - - - - - - - - - -3-1
Installing the HI 1746-WS into an Allen-Bradley SLC 500
Processor or Allen-Bradley Remote Rack - - - - - - - - - - - - -3-1
Setting the Jumper for Local or Remote Mode of Operation - - -3-2
Installing the HI 1746-WS into the SLC 500 or Remote
Chassis - - - - - - - - - - - - - - - - - - - - - - - - - - -3-3
Removing the Module from the SLC 500 or Remote Chassis - - - -3-5
Installing the Module I/O Connector - - - - - - - - - - - - - - - - -3-6
About the Module I/O Connector - - - - - - - - - - - - - - - -3-6
Load Cell Wiring Diagrams - - - - - - - - - - - - - - - - - - - - -3-7
Industry Standard Load Cells - - - - - - - - - - - - - - - - - -3-8
Hardy Load Sensor with C2 - - - - - - - - - - - - - - - - - -3-9
Hardy HI 215IT Junction Box - - - - - - - - - - - - - - - - - -3-9
Installing the Hardy Configuration Software (Optional) - - - - - - - -3-10
CHAPTER 4 - SETUP - - - - - - - - - - - - - - - - - - - - - - -4-1
A Brief Description of Chapter 4 - - - - - - - - - - - - - - - - - -4-1
Power Check - - - - - - - - - - - - - - - - - - - - - - - - - - -4-1
LEDS - - - - - - - - - - - - - - - - - - - - - - - - - - - - -4-2
Run/Fault LED - - - - - - - - - - - - - - - - - - - - - - -4-2
Comm. LED - - - - - - - - - - - - - - - - - - - - - - - -4-2
C2 LED - - - - - - - - - - - - - - - - - - - - - - - - - -4-2
Setting Up Communications Between the SLC and the
ii
Page 5

Table of Contents
HI 1746-WS Weigh Scale Module - - - - - - - - - - - - - - - -4-2
Local Mode of Operation - - - - - - - - - - - - - - - - - - - -4-3
Remote Mode of Operation - - - - - - - - - - - - - - - - - - -4-3
About M Files - - - - - - - - - - - - - - - - - - - - - - - - - - -4-3
Direct M File Mapping - - - - - - - - - - - - - - - - - - - - - - -4-3
Local Mode of Operation - - - - - - - - - - - - - - - - - - - -4-3
Remote Mode of Operation - - - - - - - - - - - - - - - - - - -4-5
M File Interface to Set Up for Local Mode of Operation - - - - - - -4-5
M File Data Structure (Words 0 to 5) - - - - - - - - - - - - - -4-5
Logical File Interface to Set Up for Remote Mode of
Operation (8 Word) - - - - - - - - - - - - - - - - - - - - - - -4-6
About Logical Files - - - - - - - - - - - - - - - - - - - - - - -4-6
Command Word Encoding - - - - - - - - - - - - - - - - - - -4-7
Bits 15 & 14 - - - - - - - - - - - - - - - - - - - - - - - -4-7
Bits 8-13 - - - - - - - - - - - - - - - - - - - - - - - - - -4-7
Bits 0-7 - - - - - - - - - - - - - - - - - - - - - - - - - -4-7
Writing to the 32 Word Logical O and logical M0 files - - - - - -4-8
Command Word - - - - - - - - - - - - - - - - - - - - - - - -4-8
Writing to the M0 file - - - - - - - - - - - - - - - - - - - -4-8
For Example - - - - - - - - - - - - - - - - - - - - - - - -4-8
Writing to the O file - - - - - - - - - - - - - - - - - - - - -4-8
For Example - - - - - - - - - - - - - - - - - - - - - - - -4-8
Words 1-7 - - - - - - - - - - - - - - - - - - - - - - - - -4-8
Reading from the 32 Word Logical I and logical M1 files - - - - -4-9
Command Word - - - - - - - - - - - - - - - - - - - - - - - -4-9
Bits 15-14 set to “10” - - - - - - - - - - - - - - - - - - - -4-9
For Example - - - - - - - - - - - - - - - - - - - - - - - -4-9
Bits 15-14 set to “11” - - - - - - - - - - - - - - - - - - - -4-9
For Example - - - - - - - - - - - - - - - - - - - - - - - -4-9
Bits 15-14 set to “01” - - - - - - - - - - - - - - - - - - - -4-9
Bits 15-14 set to “00” - - - - - - - - - - - - - - - - - - - -4-9
Executable Command List - - - - - - - - - - - - - - - - - - - - -4-10
Zero Command (ZEROCMD) - - - - - - - - - - - - - - - - - -4-10
Tare Command (TARECMD) - - - - - - - - - - - - - - - - - -4-10
Write Non-Volatile Command (WRITENONVOLATILE) - - - - -4-11
Reload Non-Volatile (RELOADNONVOLATILE) - - - - - - - - -4-11
Float Integer to Integer Conversion Command (FLOAT2INT) - -4-12
Integer to Float Integer Conversion Command (INT2FLOAT) - -4-12
Cal Low Command (CALLOWCMD) - - - - - - - - - - - - - -4-13
Cal High Command (CALHIGHCMD) - - - - - - - - - - - - - -4-13
C2 Cal Command (C2CALCMD) - - - - - - - - - - - - - - - -4-13
Read C2 Serial Number Command (READC2SERIALNUM) - -4-14
Set Parameters Command (SETPARAM) - - - - - - - - - - - -4-14
iii
Page 6

HI 1746-WS WEIGHT SCALE MODULE
Get Parameters Command (GETPARAM) - - - - - - - - - - -4-15
I/O Setup Ladder Logic for Remote Mode Operation - - - - - -4-16
HI WS100 Configuration Software Interface (Remote Mode
of Operation) - - - - - - - - - - - - - - - - - - - - - - - - - - -4-18
Setting The Process Weighing Parameters - - - - - - - - - - - - -4-20
About the Ladder Logic Example - - - - - - - - - - - - - - - -4-20
Weight Multiplier - - - - - - - - - - - - - - - - - - - - - - - -4-20
SETPARAM - GETPARAM Command and Non Volatile
Memory - - - - - - - - - - - - - - - - - - - - - - - - - - -4-21
Possible Error Returns - - - - - - - - - - - - - - - - - - -4-21
Setting Parameters Ladder Logic Explanation - - - - - - - - - -4-22
SETPARAMS Local Mode of Operation - - - - - - - - - - -4-23
SETPARAMS Remote Mode of Operation - - - - - - - - -4-24
Error Code List - - - - - - - - - - - - - - - - - - - - - - - - -4-28
Calibration Setup Procedures - - - - - - - - - - - - - - - - - - -4-28
Setting the Unit of Measure - - - - - - - - - - - - - - - - - - -4-28
Setting the Motion Tolerance Value - - - - - - - - - - - - - - -4-28
Setting the Zero Tolerance Value - - - - - - - - - - - - - - - -4-29
Setting the Auto Zero Tolerance Value - - - - - - - - - - - - -4-29
Setting the Number of Readings Averages - - - - - - - - - - -4-29
Setting the Span Weight Value - - - - - - - - - - - - - - - - -4-29
Setting the WAVERSAVER Value - - - - - - - - - - - - - - -4-29
CHAPTER 5 - CALIBRATION - - - - - - - - - - - - - - - - - - -5-1
A Brief Description of Chapter 5 - - - - - - - - - - - - - - - - - -5-1
Pre-Calibration Procedures - - - - - - - - - - - - - - - - - - - - -5-1
Electrical Check Procedures - - - - - - - - - - - - - - - - - - - -5-2
Load Cell/Point Input/Output Measurements - - - - - - - - - -5-2
Load Check - - - - - - - - - - - - - - - - - - - - - - - - - - - -5-4
C2 Calibration - - - - - - - - - - - - - - - - - - - - - - - - - - -5-4
About C2 Calibration - - - - - - - - - - - - - - - - - - - - - -5-4
“THE BUTTON” C2 Calibration - - - - - - - - - - - - - - - - -5-5
C2 LED - - - - - - - - - - - - - - - - - - - - - - - - - -5-6
C2 Calibration Using Ladder Logic - - - - - - - - - - - - - - -5-6
Data Locations Used for Ladder Logic Examples (For Local
Mode of Operation Only) - - - - - - - - - - - - - - - - - - - - -5-6
N9:0 - 24 - - - - - - - - - - - - - - - - - - - - - - - - - - - -5-6
N9:50 - - - - - - - - - - - - - - - - - - - - - - - - - - - - -5-6
N9:51 - - - - - - - - - - - - - - - - - - - - - - - - - - - - -5-6
N10:0 - 2 - - - - - - - - - - - - - - - - - - - - - - - - - - - -5-6
N10:40 - 46 - - - - - - - - - - - - - - - - - - - - - - - - - -5-7
N10:60 - 72 - - - - - - - - - - - - - - - - - - - - - - - - - -5-7
N10:60 - - - - - - - - - - - - - - - - - - - - - - - - - -5-7
iv
Page 7

Table of Contents
N10:61 - - - - - - - - - - - - - - - - - - - - - - - - - -5-7
N10:62 - - - - - - - - - - - - - - - - - - - - - - - - - -5-7
N10:63-64 - - - - - - - - - - - - - - - - - - - - - - - - -5-7
N10:65-66 - - - - - - - - - - - - - - - - - - - - - - - - -5-7
N10:67-68 - - - - - - - - - - - - - - - - - - - - - - - - -5-7
N10:69-70 - - - - - - - - - - - - - - - - - - - - - - - - -5-7
N10:71-72 - - - - - - - - - - - - - - - - - - - - - - - - -5-7
C2 Calibration Ladder Logic Explanation - - - - - - - - - - - -5-7
C2 Calibration Ladder Logic Example (For Local
Mode of Operation Only) - - - - - - - - - - - - - - - - -5-8
C2 Calibration Ladder Logic Example (For Remote
Mode of Operation Only) - - - - - - - - - - - - - - - - -5-11
Hard Calibration - - - - - - - - - - - - - - - - - - - - - - - - - -5-12
Hard Calibration Ladder Logic Example - - - - - - - - - - - -5-12
CHAPTER 6 - OPERATING PROCEDURES - - - - - - - - - - - -6-1
A Brief Description of Chapter 6 - - - - - - - - - - - - - - - - - -6-1
Block Transfer, Read - - - - - - - - - - - - - - - - - - - - - - - -6-1
Block Transfer, Read Example (For Local Mode Only)
(READWEIGHT) - - - - - - - - - - - - - - - - - - - - - - - - -6-5
Explanation of the READWEIGHT Example - - - - - - - - - -6-5
READWEIGHT Ladder Logic Example - - - - - - - - - - - - -6-6
Block Transfer, Read Ladder Logic Example for Remote
Mode Operation - - - - - - - - - - - - - - - - - - - - - - - - -6-6
Block Transfer, Write - - - - - - - - - - - - - - - - - - - - - - - -6-7
Block Transfer, Write Ladder Logic Example for Remote
Mode Operation - - - - - - - - - - - - - - - - - - - - - - - - -6-9
INDEX
v
Page 8

HI 1746-WS WEIGHT SCALE MODULE
vi
Page 9

Table of Illustrations
Table of Illustrations
CHAPTER 3 - INSTALLATION - - - - - - - - - - - - - - - - - - -3-1
FIG. 3-1 HI 1746-WS WEIGH MODULE IN PROPER
ORIENTATION - - - - - - - - - - - - - - - - - - -3-2
FIG. 3-2 JUMPER LOCATION/JUMPER SET IN THE
DEFAULT OFF (LOCAL MODE) POSITION - - - - -3-3
FIG. 3-3 POSITIONING THE MODULE FOR INSTALLATION - - -3-4
FIG. 3-4 MODULE RELEASE(S) - - - - - - - - - - - - - - - - -3-5
FIG. 3-5 MODULE INSTALLED IN SLC CHASSIS - - - - - - - -3-5
FIG. 3-6 MODULE WITH DOOR OPEN - - - - - - - - - - - - - -3-7
FIG. 3-7 INDUSTRY STANDARD LOAD CELLS WIRING
DIAGRAM - - - - - - - - - - - - - - - - - - - - - -3-8
FIG. 3-8 HARDY LOAD SENSOR/C2 WIRING DIAGRAM - - - - -3-9
FIG. 3-10 HARDY HI 215IT JUNCTION BOX WIRING DIAGRAM -3-9
CHAPTER 4 - SETUP - - - - - - - - - - - - - - - - - - - - - - -4-1
FIG. 4-1 MODULE LEDS - - - - - - - - - - - - - - - - - - - - -4-2
FIG. 4-2 PRIMARY AND REMOTE COMMUNICATION
DIAGRAM - - - - - - - - - - - - - - - - - - - - - -4-7
FIG. 4-3 SETUP I/O FOR REMOTE MODE OF OPERATION - - -4-18
FIG. 4-4 SETPARAMS LADDER LOGIC EXAMPLE/LOCAL
MODE - - - - - - - - - - - - - - - - - - - - - - - -4-23
FIG. 4-5 SETPARAMS LADDER LOGIC EXAMPLE/REMOTE
MODE - - - - - - - - - - - - - - - - - - - - - - - -4-27
CHAPTER 5 - CALIBRATION - - - - - - - - - - - - - - - - - - -5-1
FIG. 5-1 PROPERLY INSTALLED LOAD CELL W/NO BINDING -5-2
FIG. 5-2 MILLIVOLTS/WEIGHT SCALE - - - - - - - - - - - - -5-3
FIG. 5-3 “THE BUTTON” C2 CALIBRATION - - - - - - - - - - -5-5
FIG. 5-4 C2 LED - - - - - - - - - - - - - - - - - - - - - - - - -5-6
FIG. 5-5 C2 LADDER LOGIC EXAMPLE/LOCAL MODE
OF OPERATION - - - - - - - - - - - - - - - - - - -5-10
FIG. 5-6 C2 LADDER LOGIC EXAMPLE/REMOTE MODE
OF OPERATION - - - - - - - - - - - - - - - - - - -5-12
CHAPTER 6 - OPERATING PROCEDURES - - - - - - - - - - - -6-1
FIG. 6-1 READWEIGHT LADDER LOGIC EXAMPLE/LOCAL
MODE OF OPERATION - - - - - - - - - - - - - -6-6
I
Page 10

HI 1746-WS WEIGH SCALE MODULE
II
Page 11

CHAPTER 1 - OVERVIEW
Chapter 1 - Overview
A BRIEF DESCRIPTION OF CHAPTER 1
This manual provides the user and service personnel
with a description of the specifications, installation,
setup, configuration, operation, communication,
maintenance, and troubleshooting procedures for the
Hardy Process Solutions HI 1746-WS Weigh Scale
Module, designed for use in Allen-Bradley’s SLC 5/
02, 5/03, 5/04, 5/05 programmable controllers. The
HI 1746-WS is equipped with W AVERSAVER
Calibration, The Button, and I
CIAN (IT) diagnostics. The module is configurable via
Windows
®
95/98/NT HI WS 100 Configuration Soft-
NTEGRATED TECHNI-
®
, C2®
ware or RS Logix 500© Industrial Programming Software. To get the maximum service life from this
product, users should operate this module in accor
dance with recommended practices either implied or
expressed in this manual. Before using the Weigh
Scale Module, all users and maintenance personnel
should read and understand all cautions, warnings,
and safety procedures, referenced or explicitly stated
in this manual, to ensure the safe operation of the
module. Hardy Process Solutions appreciates your
business. Should you not understand any information
in this manual or experience any problems with the
product, please contact our Customer Support Depart
ment at:
-
Phone: (858) 278-2900
FAX: (858) 278-6700
e-mail: hardysupport@hardysolutions.com
Web Address: http://www.hardysolutions.com
NOTE: WAVERSAVER®, C2®, INTEGRATED TECHNICIAN® are
register ed trademarks of Har dy Pr ocess Solutions Inc.
®
Windows
Corporation. RS Logix 500
is a registered trademark of the Microsoft
©
is a Copyright of Rock-
well Software Inc.
NOTE: Hardy bases all procedures with the assump tio n that
the user has an adequate understanding of all AllenBradley SLC 500 products. In addition the user
1-1
Page 12

HI 1746-WS WEIGH SCALE MODULE
should understand process control and be able to
interpret ladder logic instructions necessary to gener
ate the electronic signals that control your application(s).
About Hardy Manuals Every Hardy Installation and Operation manual is
organized into easily referenced chapters, that are
almost always the same:
• Chapter 1 - Provides an introduction to the
instrument and an Overview of the equipment
and its capabilities.
• Chapter 2 - Provides a complete list of Specifi-
cations.
• Chapter 3 - Contains information needed to
install the HI 1746-WS (both standard and
optional equipment) and the HI 215IT series
Junction Box.
• Chapter 4 - Provides complete hardware Con-
figuration instructions for setting dip switches
and jumpers.
• Chapter 5 - Pertains to the firmware/software
Setup and preparation procedures to calibrate
and operate the instrument.
• Chapter 6 - Provides all Calibration instructions.
• Chapter 7 - Pertains to the Operating Procedures of the HI 1746-WS.
• Chapter 8 - Pertains to the Troubleshooting
procedures for repair of the instrument.
-
Hardy Process Solutions hopes that this manual meets
your needs for information and operation. All correc
tions or suggestions for improvements of this manual
are welcome and can be sent to the Technical Publica
tions Department or Customer Support Department at
Hardy Process Solutions Inc.
Description The HI 1746-WS Weigh Scale Module is a self con-
tained microprocessor based I/O module with control
inputs and outputs, that is designed to be easily
plugged into the back plane of an Allen-Bradley SLC
5/02, 5/03, 5/04 or 5/05 programmable controller and/
or Remote Rack. The HI 1746-WS Weigh Scale Mod
ule can be configured to operate as either a local or
1-2
-
-
-
Page 13

Chapter 1 - Overview
remote module. The HI 1746-WS module can be used
for a wide variety of process weighing applications
such as batching, blending, filling/dispensing, check
weighing, force measurement, level by weight and
weight rate monitoring. The module can control two
(2) relays via two (2) TTL level outputs and transmits
data via the back plane to the SLC. The 20 bit analog
to digital converter in the weigh module controller
updates twenty (20) times per second and is capable
of 985,000 counts of display resolution. This gives the
instrument the ability to tolerate large “dead” loads,
over sizing of load cells/sensors and still have suffi
cient resolution to provide accurate weight measurement and control. The HI 1746-WS module is set up
©
®
95/
by using the SLC 500 AI Series, RS Logix500
Industrial Programming Software for Windows
®
98/NT or the optional Hardy Windows
95/98/NT HI
WS100 Configuration Software. The software config
uration applications must be installed in a PC with
either Ethernet, DH+, DH-485, or RS-232-C that can
initiate communications with the SLC 5/02, 5/03, 5/
04 or 5/05. To calibrate the module you can simply
push “The Button” to effect a C2 calibration. C2,
Hard (Traditional calibration with weights), and Soft
calibration can be implemented from the SLC 500 AI
Series DOS software, RS Logix500
©
Industrial Pro-
gramming Software for Windows® 95/98/NT or from
the optional Hardy WS 100 Configuration Software
for Windows. The HI 1746-WS is IT (Integrated
Technician) enabled which means the module has a
built in IT excitation monitor to detect some load cell
problems and with the addition of the optional HI
215IT Junction Box and the HI WS100 software, the
operator can use the other IT functions for fault isola
tion troubleshooting of the weighing system.
-
-
WAVERSAVER
®
T ypically, mechanical noise (from other machinery in
a plant environment) is present in forces larger than
the weight forces trying to be detected by the module.
The HI 1746-WS is fitted with WAVERSAVER
®
technology which eliminates the effects of vibratory
forces present in all industrial weight control and
1-3
Page 14

HI 1746-WS WEIGH SCALE MODULE
measurement applications. By eliminating the factor
of vibratory forces the module is capable of identify
ing the actual weight data. WAVERSAVER® can be
configured from the Configuration Software to ignore
noise with frequencies as low as 0.25 Hz. One of five
higher additional cut off frequencies may be selected
to provide a faster instrument response time. The
default factory configuration is 1.00 Hz vibration fre
quency immunity.
C2® Calibration C2 Second Generation Calibration enables a scale
system to be calibrated electronically without using
certified test weights which equals the systems load
capacity. A C2 weighing system consists of up to
eight (8) C2 load sensors, a junction box, interconnect
cable and an instrument with C2 capabilities such as
the HI 1746-WS Weight Scale Module. All Hardy C2
certified load sensors contain digital information
detailing its unique performance characteristics. The
HI 1746-WS reads the performance characteristics of
each individual load sensor and detects the quantity of
load sensors in the system. C2 Calibration can be per
formed by pressing “The Button” located in the front
of the module, or via Hardy’s Configuration Software
or Allen-Bradley’s RS Logix 500 software.
-
-
-
IT® INTEGRATED TECHNICIAN™ is a system diagnostics
utility which continuously monitors the weighing sys
tem (with up to 4 load sensors) for possible malfunctions. For full functionality the HI 215IT junction box
and Hardy’s Configuration Software for Windows
should be used. Full IT functionality allows the opera
tor to rapidly troubleshoot a weighing system from
the Configuration Software, I
CIAN Display.
NTEGRATED TECHNI-
Excitation Monitor Continuously monitors a system’s excitation current
to check for open or shorted load sensors or damaged
or broken excitation wire(s), including the wires
between the module and the IT Junction box. If the
measured current deviates more than a +/- 10% toler
ance, an “Excitation Error” bit (Module Status Word
bit 9) is set to 1.
1-4
-
-
-
Page 15

Chapter 1 - Overview
Digital Volt Meter (DVM) - Optional
NOTE: If you do not have the HI 215IT Junction Box con-
Return to Zero Test - Optional
Requires the HI 215IT Junction Box and Hardy Configuration Software to monitor both mV and mV/V
readings per individual load sensor. Once a problem is
detected by the operator the DVM readings help the
operator to isolate the faulty component. Further, the
DVM readings can be used to level a balanced system
and to make corner adjustments to platform scales.
Accuracy is +/- 2% or better of full scale.
nected to the module, the mV/V reading as displayed
in the Configuration Software, T e st display is the total
for all the load cells on the system.
Requires the HI 215IT Junction Box to monitor individual load sensors. The Hardy configuration Software is required when using this option. This test
compares the original voltage reading (saved at cali
bration) against the current voltage reading of an
empty vessel. The test displays a “Passed Return to
Zero T est” or a “Failed Return to Zero T est” s tatement
when running the System Test from the Configuration
Software, Test Display, depending on the outcome of
the test. The test checks for damaged load sensors due
to electrical zero shift or abnormal mechanical forces
that cause binding on one or all of the load sensors in
the system.
-
Weighing System Tests - Optional
Requires the HI 215IT Junction Box. This test is used
to diagnose drifting or unstable weight reading prob
lems. The Weighing System Test does the following:
1. Disconnects the controller and engages an inter-
nal reference signal to see if the problem is within
the instrument.
1. Disconnects the load sensors and engages an
internal (in the junction box) reference signal to
see if the cable between the instrument and the
Junction Box is causing the problem.
2. Reads the weight of each load sensor to see if the
load sensor might be causing the problem.
The ability to read the weight seen by each individual
load sensor allows use of this test to make cornering,
-
1-5
Page 16

HI 1746-WS WEIGH SCALE MODULE
leveling and load sharing adjustments to the weighing
system. The Hardy Configuration Software is highly
recommended for use with this option.
Auto Zero Auto Zero Tracking will indicate zero weight, as long
as any “live weight” on the scale is below the set Auto
Zero T olerance and the scale is not motion. This capa
bility allows the module to ignore material build-up in
the weighing system within a pre-set auto zero toler
ance.
Note The amount of weight zeroed off is cumulative. The
zero command will fail if the current gr oss weight plus
any previously zeroed amount exceeds the zero
tolerance.
-
-
Set Point TTL Outputs
The HI 1746-WS is equipped with two (2) standard
Digital TTL (Transistor - Transistor Logic) Level
Outputs which can be connected to external solid state
relays. Both outputs have individual set point, preact
and deadband parameters. Both outputs are rated at 10
milliamps per line. Each can be programmed to
respond to the standard Net, Gross, Rate of Change
(ROC), Excitation Monitor, Force On or Force Off
mode of operation.
1-6
Page 17

CHAPTER 2 - SPECIFICATIONS
Chapter 2 - Specifications
A Brief Description of Chapter 2
Specifications for a Standard HI 1746-WS Weigh Scale Module
Modes of Operation
Conversion Rate 20 updates per second Averages 1-255 User Selectable in single increments Resolution Displayed: 1:985,000 (@ 3 mV/V)
Input Up to eight (8) 350 ohm Full Wheatstone Bridge,
Chapter 2 lists the specifications for the HI 1746-WS
Weigh Scale Module. Specifications are listed for the
standard instrument and for optional equipment. The
specifications listed are designed to assist in the
installation, operation and troubleshooting of the
instrument. All service personnel should be familiar
with this section before attempting an installation or
repair of this instrument.
Local and Remote
1:656,000 (@ 2 mV/V)
Internal: 1:1,048,576
Strain Gauge Load Sensors/Cells (5 volt excitation)
on one vessel.
Non-Linearity 0.0015% of Full Scale Maximum Zero
Tolerance
WAVERSAVER
Excitation Monitor Current less than +/- 10% expected
®
32766
User Selectable
• 7.50 Hz
• 3.50 Hz
• 1.00 Hz (Default)
• 0.50 Hz
• 0.25 Hz
2-1
Page 18

HI 1746-WS WEIGH SCALE MODULE
Common-Mode Rejection
Common-Mode Vo lta ge Range
Backplane Input Voltage
Backplane Current Load
Power +5 VDC +/- 5% C2 Calibration
Input
Cable lengths 1000 feet maximum of C2 authorized cable
Load Cell Excitation
C2 Calibration Output
110dB at or below 60 Hz
2.5VDC maximum (with respect to earth ground)
5 VDC maximum (with respect to earth ground)
0.250 Amps at 5 VDC
Isolation from digital section 1000 VDC minimum.
250 feet maximum of C2 authorized cable (Maximum
of 4 load sensors) with IT Junction box.
5 VDC +/- 1.15 W maximum.
Isolation from digital section 1000 VDC minimum
Isolation from digital section 1000 VDC minimum
Set Point (1 & 2) Out
Environmental Requirements
Temperature Coefficient
Operating Temperature Range
Storage Temperature Range
Humidity Range 0-90% (non-condensing)
2-2
Discrete outputs (TTL) step function of 0 or +5 VDC
to drive an SSR
Less than 0.005% of full scale per degree C for CalLO and Cal-HI reference points
0o C to 60o C (32o F to 140o F)
-20o C to 85o C (-4o F to 185o F)
Page 19

Approvals UL Certification
cUL Certification
CE Approval
Digital Voltmeter Accuracy +/- 2% of full scale
Resolution
• mV/V 4 digits to the right of the decimal
• mV 1 digit to the right of the decimal
Optional Equipment HI 215IT Junction Box
IT Junction Box HI 215IT-SS or PS Series
Chapter 2 - Specifications
Case Dimensions
6.25”H x 6.25”W x 4.50D (158.75mmH x
158.75mmW x 114.3mmD)
Weight 5 pounds (2.27 Kilograms) Enclosure
-SS Stainless Steel NEMA 4 & 4X
Ratings
-PS Painted Carbon Steel NEMA 4
IT Junction Box HI 215IT-FG Series
Case Dimensions
6.50”H x 8.0”W x 4.46”D (165.1mmH x 203.2mmW
x 113.28mmD)
Weight 5 pounds (2.27 Kilograms) Enclosure
-FG Fiberglass NEMA 4 & $X
Rating
Configuration Software for Windows
Hardy’s Configuration Software for Wind ows allows
the user to configure, monitor, and troubleshoot an HI
1746-WS module and load points from any PC with
an installed Windows
®
95/98 or NT operating system.
2-3
Page 20

HI 1746-WS WEIGH SCALE MODULE
Default Parameters
Parameter Default Setting
Tare Weight 0.0 lbs
WAVERSAVER
Weight Units lbs 0
Span Weight 10,000.0 lbs
Averages 10
Auto Zero Tracking Enabled False 0
Tare Enabled True 1
Zero Enabled True 1
Calibration Type No Calibration -1
®
Table 2-1:
1 Hz 2
Setpoint Mode 1&2 Force Low,
oss
Gr
Setpoint Value 1&2 10000.0 lbs
Setpoint Deadband 1&2 0.1 lbs
Setpoint Preact 1&2 0.0 lbs
Auto-zero Tolerance 10.0 lbs
Motion Tolerance 5.0 lbs
Zero Tolerance 10
Rate of Change Time Base 10
Cal Year 0
Cal Month 0
Cal Day 0
Cal ID 0
0x12
2-4
Page 21

CHAPTER 3 - INSTALLATION
Chapter 3 - Installation
A Brief Description of Chapter 3
Unpacking Step 1. Before signing the packing slip, inspect
All information contained in Chapter 3 pertains to
unpacking, cabling, interconnecting, configuration
and installing the HI 1746-WS Weigh Scale Module.
Alternatives to any procedures contained or implied
in this chapter are not recommended. It is very impor
tant that the user and service personnel be familiar
with the procedures contained in this chapter, before
installing or operating the HI 1746-WS module.
Hardy Process Solutions appreciates your business.
Should you experience any problems installing this
equipment, contact Hardy Customer Support for
assistance.
the packing for damage of any kind.
Step 2. Report any damage to the carrier company
immediately.
Step 3. Check to see that everything in the pack-
age matches the bill of lading. You should
normally have:
• HI 1746-WS Weigh Scale Module
• Operation and Installation Manual
Step 4. Write down the Model and Serial number
of the module. Store this information in a
convenient location for reference when
contacting The Customer Support Depart
ment for parts or service.
-
-
Installing the
HI 1746-WS into an
Allen-Bradley SLC 500
Processor or AllenBradley Remote Rack
WARNING ELECTROSTATIC DISCHARGE MAY DAM-
AGE SEMICONDUCTOR COMPONENTS IN
THE MODULE. DO NOT TOUCH THE CON
NECTOR PINS. PLEASE OBSERVE THE FOLLOWING HANDLING PRECAUTIONS:
-
3-1
Page 22
HI 1746-WS WEIGH SCALE MODULE
• Wear an approved wrist-strap
grounding device when handling
the module.
• Touch a grounded object or surface to rid yourself of any electrostatic discharged prior to
ling the module.
hand
• Handle the module from the
bezel in
nector . Never, NEVER t
connector pins.
• Never install, remove, or wire
any
on. Always disconnect the power
from the SLC when working on
the module.
• Do not install the module right
next
module.
front away from the con-
ouch the
module while the power is
to an AC or high voltage DC
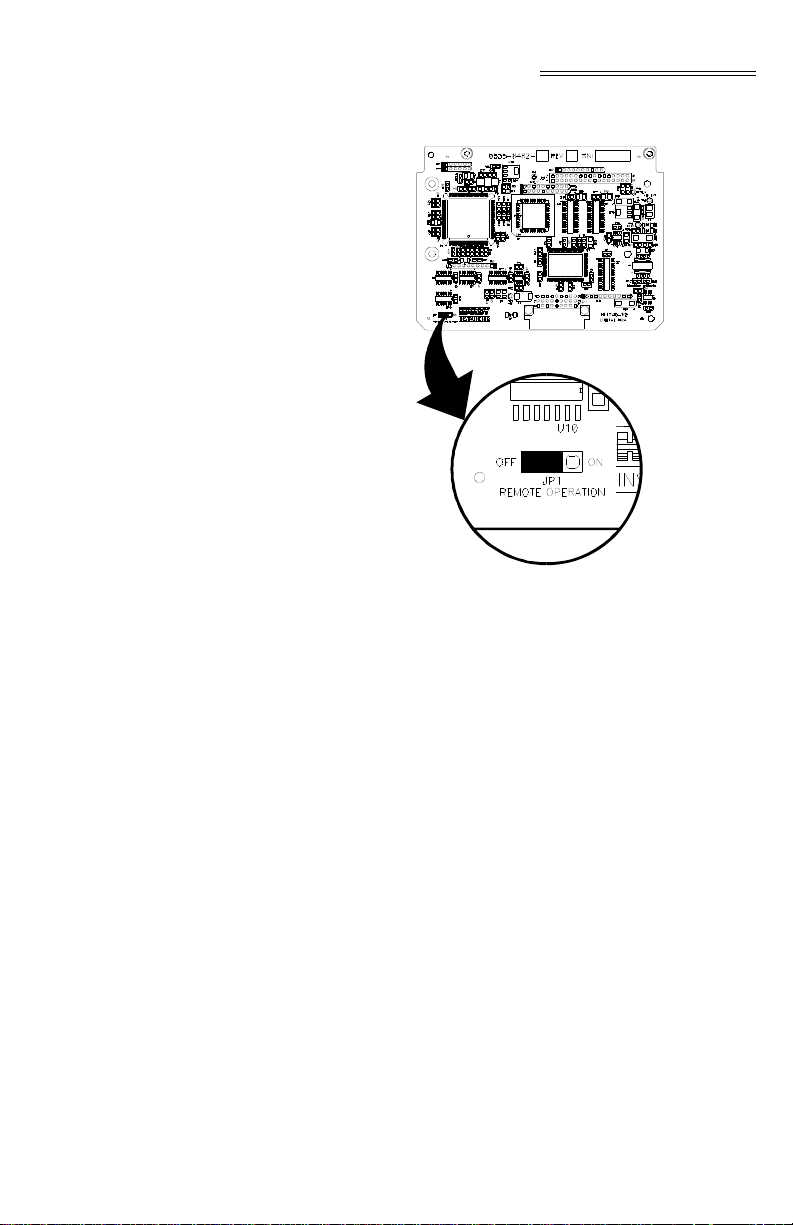
Setting the Jumper
or Local or
f
Remote Mode of
Operation
Step 1. Remove the module from its package by
ing the front cover. (See Fig. 3-1)
grasp
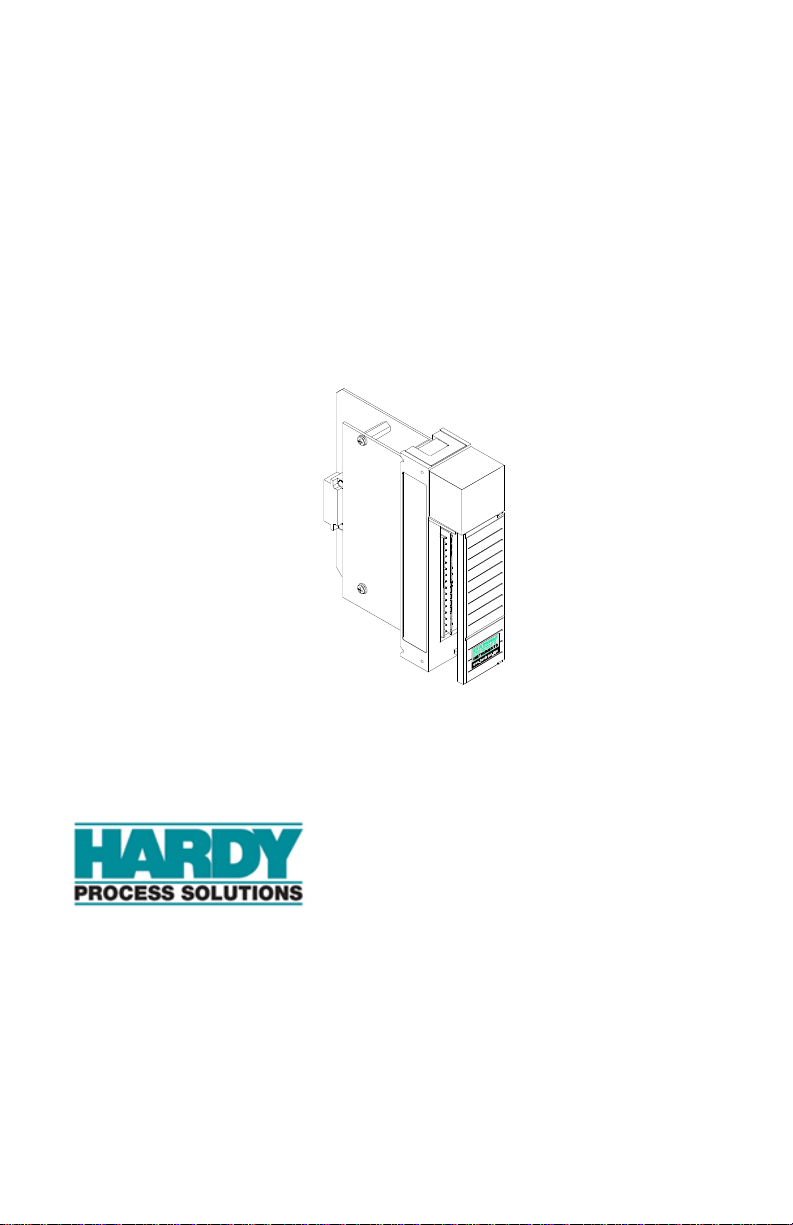
FIG. 3-1 HI 1746-WS WEIGH MODULE IN
PROPER ORIENTATION
Step 2. Place the jumper either
for Local or ON for Remote operation.
(See Fig. 3-2)
on OFF (Default)
3-2
Page 23
Chapter 3 - Installation
FIG. 3-2 JUMPER LOCATION/JUMPER SET
IN THE DEFAULT OFF (LOCAL MODE)
POSITION
Installing the HI
746-WS into the
1
SLC 500 or
Remote Chassis
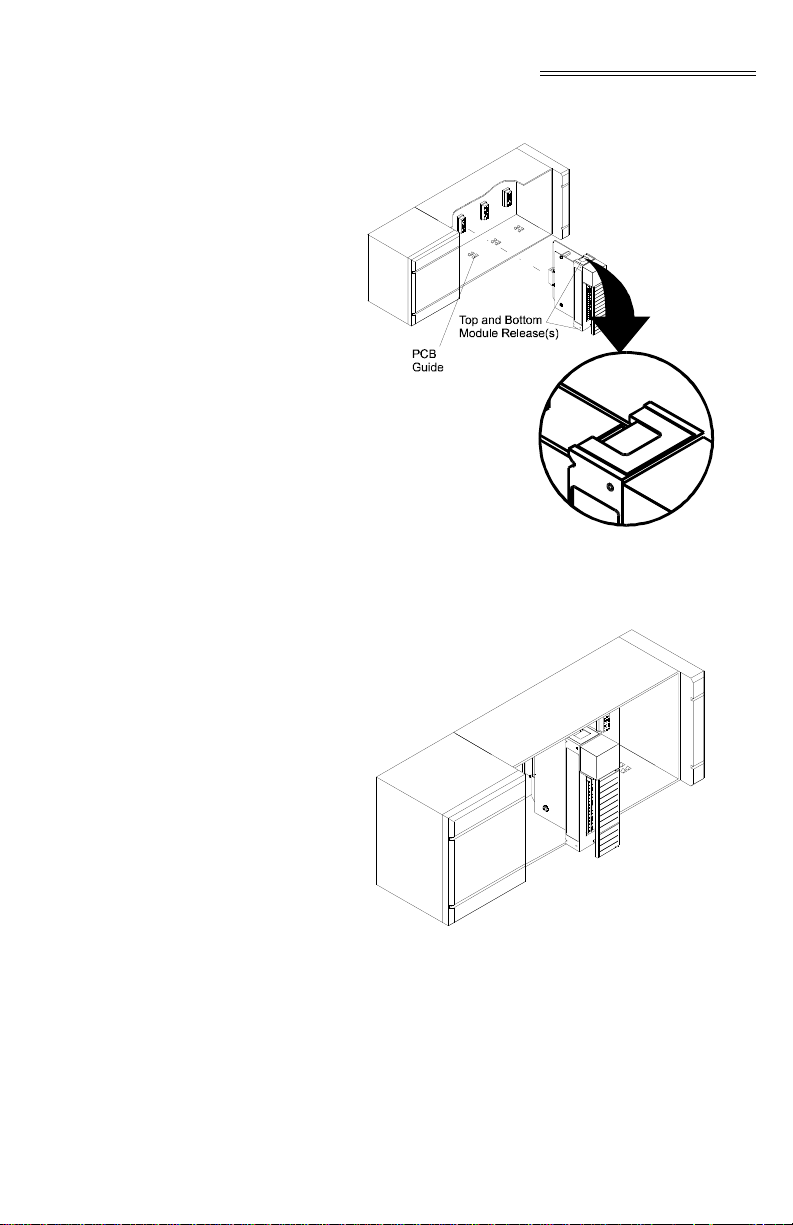
Step 1. Make sure that the module is oriented cor-
rectly for installation. (See Fig. 3-3)
3-3
Page 24

HI 1746-WS WEIGH SCALE MODULE
FIG. 3-3 POSITIONING THE MODULE FOR
Step 2. Gently slide the module into the SLC or
Step 3. Slide the digital board between the PCB
Step 4. When the module connector is touching
Step 5. The installation is complete.
INSTALLATION
Remote Chassis.
Guides
of the chassis to line up the module connector with the backplane connector.
the backplane connector
fully push toward the chassis until the pins
are pl
(both top and bottom) are snapped into
place. (See Fig. 3-4 & 3-5)
on the top plate and bottom plate
ugged in and the Processor Releases
, firmly but care-
3-4
Page 25
Chapter 3 - Installation
FIG. 3-4 MODULE RELEASE(S)
Removing the Module
rom the SLC 500 or
f
Remote Chassis
FIG. 3-5 MODULE INSTALLED IN SLC
CHASSIS
Step 1. Press down on the top and bottom Proces-
sor Releases simultaneously until the module can be pulled away from the chassis.
(See Fig
. 3-4)
3-5
Page 26

HI 1746-WS WEIGH SCALE MODULE
Step 2. Pull the module out of the Chassis.
Step 3. Store in a safe, secure location in an anti-
Installing the Module I/ O Connector
static bag or the original enclosure.
About the Module I/O Connector
The I/O Connector at the front of the module connects
the module to the load sensors and relays, or the HI
215IT Junction Box depending on how many load
sensors are installed in the weighing system. See
below for the pin-out diagram. The pin-out diagram is
located on the inside of the module door. (See Fig. 3-
5)
Pin 16 Aux In
Pin 15 N.C
Pin 14 GND
Pin 13 +V
Pin 12 Relay 2
Pin 11 +V
Pin 10 Relay 1
Pin 9 C2Pin 8 C2+
Pin 7 -Exc
Pin 6 -Sen
Pin 5 -Sig
Pin 4 +Sig
Pin 3 +Sen
Pin 2 +Exc
Pin 1 Shield
3-6
Step 1. Open the Module door to gain access to
the I/O connector. (See Fig. 3-5)
Page 27
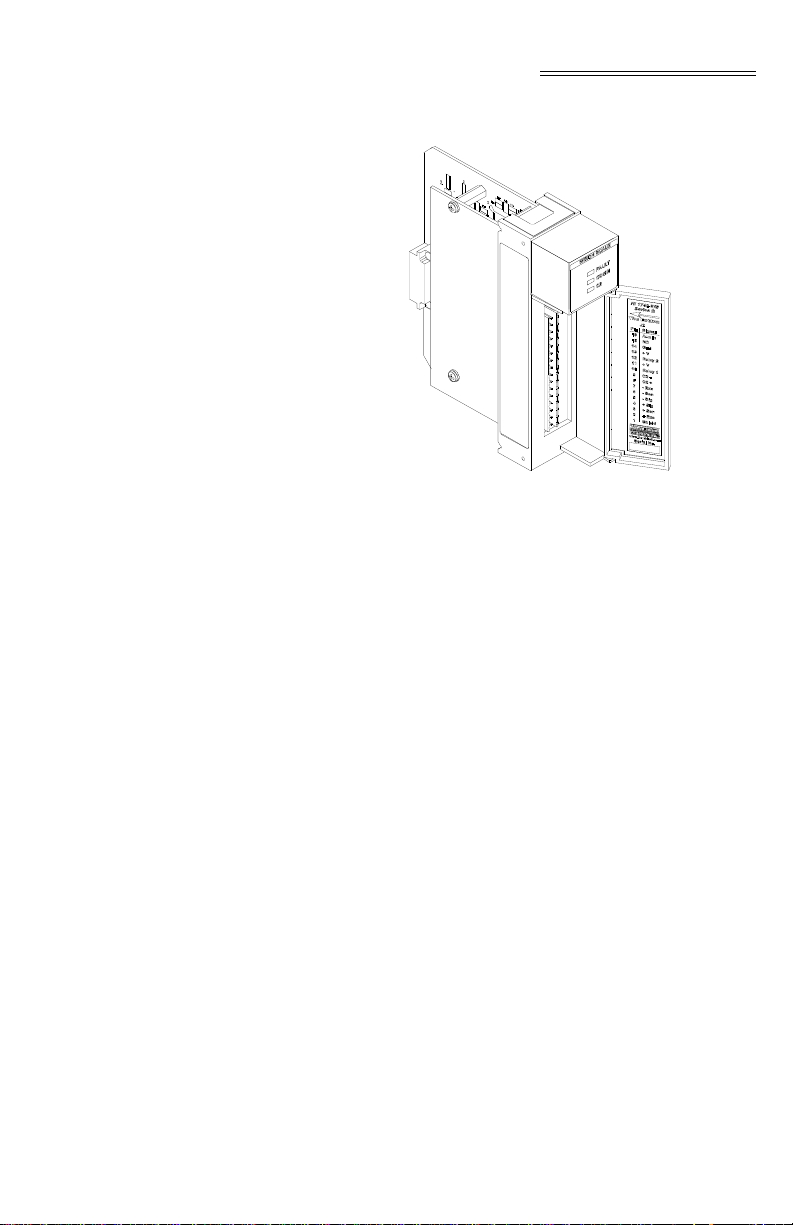
Chapter 3 - Installation
FIG. 3-6 MODULE WITH DOOR OPEN
Step 2. Install the cable and
the module door to be shut.
Step 3. There is a bracket (not shown) that allows
to use a tie wrap to secure the cable to
you
the module.
Step 4. With the plug oriented correctly
pin-out diagram above), plug the I/O male
connector into the I/O connector at the
front of the module.
Step 5. Check to be sure that the connector is
pletely plugged in before operating
com
the module.
NOTE: Most of the problems with modules are due to loose
connections. Be sur
in the event you have a problem r eceiving information
from the load cells or if the relays do not operate correctly.
Load Cell Wiring Diagrams
NOTE: The HI 1746 has two factory installed jumpers. If
application is not using C2 load cells do not
your
remove the factory installed jumpers . If your appli-
e to check the I/O connection first
connector so it allows
(See the
3-7
Page 28
HI 1746-WS WEIGH SCALE MODULE
cation requires load cells cables that are less than 50
ft. you must leave the jumpers installed or connect the
sense lines, one or the other. If your application calls
for load cell cables over 50 ft. or you are using C2
load cells, remove the jumpers and connect the sense
lines. The jumpers or sense lines must be installed at
all times.
WARNING: Load cell cable length has been calculated into C2 calibration data. Hardy recommends
t you DO NOT CUT your Advantage or Advantage
tha
Lite load sensor cable, as your C2 accuracy will be
affected and the warranty will be voided.
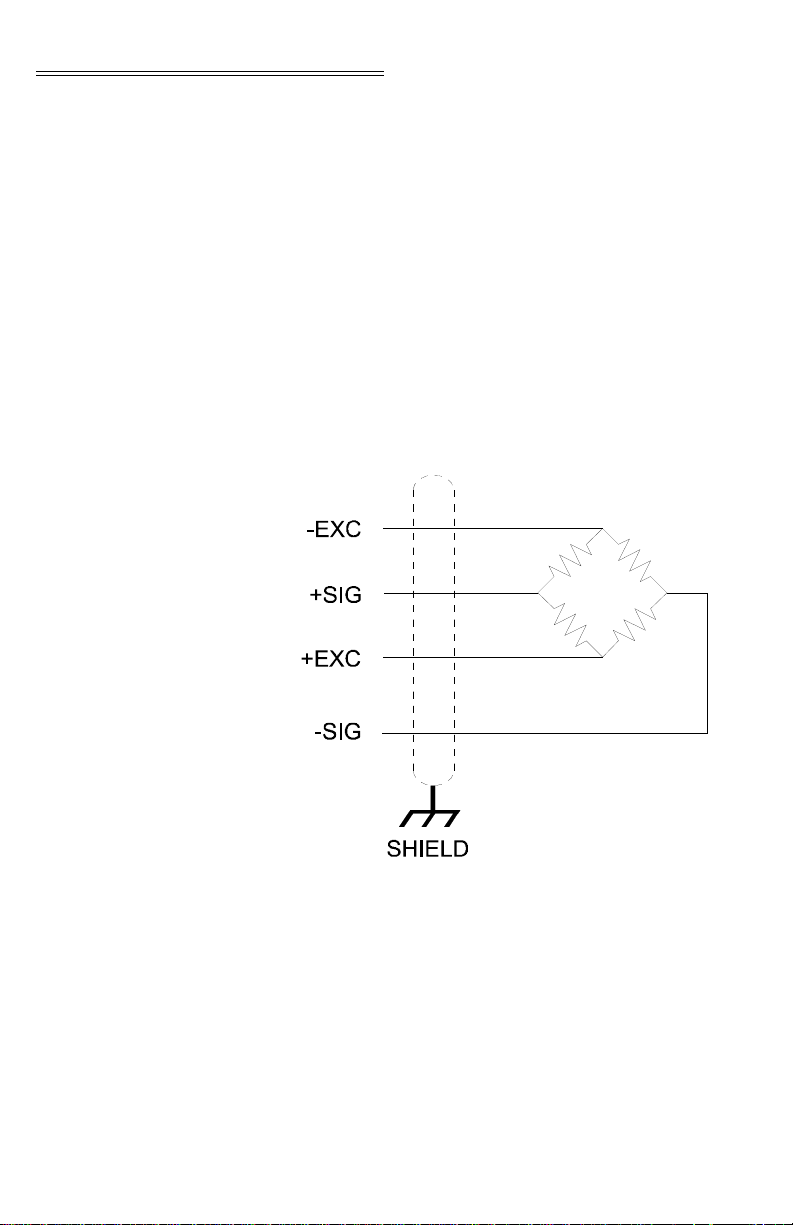
Industry Standard
Load Cell
s
3-8
FIG. 3-7 INDUSTRY STANDARD LOAD CELLS
WIRING DIAGRAM
Page 29

Hardy Load Sensor with C2
Chapter 3 - Installation
FIG. 3-8 HARDY LOAD SENSOR/C2 WIRING
DIAGRAM
Hardy HI 215IT
unction Box
J
FIG. 3-9 HARDY HI 215IT JUNCTION BOX
WIRING DIAGRAM
NOTE: When connecting the Hardy HI 215IT Junction Box
st remove the two factory installed jumpers
you mu
that are connected to contacts 2&3 and 6&7 on the
module and install sense lines.
3-9
Page 30

HI 1746-WS WEIGH SCALE MODULE
Installing the Hardy Configuration Software (Optional)
Contact your local Hardy Representative or Hardy
Sales Department for information about how to pur
chase the Hardy WS 100 Configuration Software for
Windows.
Step 1. The SETUP program copies the required
files to your hard disk.
Step 2. Run Windows NT/95/98 and insert the
Configuration Installation System Disk
into the 3.5” floppy drive.
Step 3. Click on START.
Step 4. Click on Run.
Step 5. In the Run field type the command:
a:setup. If your floppy drive is drive b
enter: b:setup.
Step 6. Press the Enter key.
Step 7. You can also use the Add/Remove Func-
tion in the Control Panel dialogue box.
a. Click on Start
b. Move the cursor to Settings.
c. Select Control Panel.
d. Double click on the Add/Remove Pro-
grams icon.
e. Click on the In stall button.
-
Step 8. The SETUP program will lead you
through the installation process.
NOTE: HI WS100 Configuration Software is an option. For
Pricing and Information for this product contact your
local Hardy Representative.
3-10
Page 31

CHAPTER 4 - SETUP
Chapter 4 - Setup
A Brief Description of Chapter 4
Power Check Step 1. Check to see that there is power to the
All information contained in Chapter 4 pertains to
firmware and software settings (Local and Remote
modes of operation) to prepare the module controller
for calibration and operation. Alternatives to these
procedures explicit or implied, contained in this sec
tion are not recommended. It is very important that
the user and service personnel be familiar with the
procedures contained in this chapter, before going
through the setup procedures. The Setup procedures
require either Allen-Bradley DOS PLC 500 AI Series
Ladder Logic Editor, Allen-Bradley RS Logix 500,
Allen-Bradley RSLinx™ or RSLinx™ Lite. The
Local Mode of Operation means the Module is
installed in a SLC Chassis and Remote Mode of Oper
ation means the Module is installed in a Remote
Chassis.
SLC and the module.
Step 2. If there is power to the module, the LEDS
should be lit. (See Fig. 4-1)
Step 3. To make any settings the LED’s should be
lit as follows:
a. Run/Fault - Steady Green
b. Communication - Flashing Green
c. C2 - Steady Green if system has C2
load cells or off if there are no C2 load
cells.
-
-
4-1
Page 32

HI 1746-WS WEIGH SCALE MODULE
LEDS
Run/Fault LED Flashing Green Self-Test is running.
Flashing Green (5Hz Flash Speed) - Self-Test
Steady Green Self-Test Passed
Flashing Red Weigh Scale Module has a fault.
Steady Red Module has a major problem.*
FIG. 4-1 MODULE LEDS
iled, or no calibration.
Fa
NOTE: * Contact Hardy Customer Support for assistance.
Comm. LED Steady Green Normal Operation
Flashing Green Block transfer is being performed.
LED is Off No Communication
C2 LED Steady Green A C2 load cell(s) has been found.
LED is Off No C2 load cells have been found.
Steady Red Unable to read loadcell data or the
cell data is in error.
load
Setting Up
Communic
Between the SLC and
the HI 1746-WS Weigh
Scale Module
4-2
ations
To set up communication between the SLC 5XX and
the HI
1746-WS Weigh Scale Module you will need
to select or enter the following information into the I/
O Configuration section of your software:
Page 33

Local Mode of Operation
Chapter 4 - Setup
Type of Device Category: Other
I/O Card ID Code: 13635
M Files
M0 = 128 Words
M1 = 128 Words
There are no G files.
Remote Mode of Operation
About M Files The M File Interface consists of two files, M0 and
Direct M File Mapping
Local Mode of Operation
Type of Device Category: Other
I/O Card ID Code: 3535
Input Words: 8
Output W ords: 8
M1. M0 and M1 files are data files that reside in the
HI 1746-WS W eigh Scale Module. There is no image
for these files in the processor memory. With respect
to the SLC processor (SLC 5/02, 5/03, 5/04, 5/05) the
M0 file is a module output file (a write only file) and
the M1 file is a module input file (a read only file).
With respect to the HI 1746-WS weigh module the
M1 file is for output from the module to the processor
and M0 file is for input from the processor to the
module. The module writes replies in the M1file to
commands that the processor writes into the M0 file.
The M files are used to control and monitor block
transfer operations.
For the 1746 modules used in the local chassis, Hardy
has available direct mapping of the parameters to the
M files. This means that you can write to a specific
location in the M0 file and the1746 will pick up the
change and apply it and reflect the change in the M1
file.
4-3
Page 34

HI 1746-WS WEIGH SCALE MODULE
NOTE: After making the change, you need to save the change
to non-volatile memory.
Changes can be made one word at a time or up to 37
words (all parameters) at a time.
NOTE: If multiple words written to the module at the same
time, data must be in the same order and have the cor
rect length for each parameter.
The mapping is as follows for all the parameters:
Parameter Word
Tare Weight (float) 28
Span Weight (float) 30
CalLO Weight (float) 32
Set Point 1 (float) 34
Dead Band 1 (float) 36
Preact 1 (float) 38
Set Point 2 (float) 40
Dead Band 2 (float) 42
Preact 2 (float) 44
Zero Tolerance (float) 46
Auto Zero Tolerance (float) 48
Motion Tolerance (float) 50
-
4-4
Parameter Word
Metric (int) 52
Waversaver (int) 53
Averages (int) 54
Zero Track Enable (int) 55
Tare Enable (int) 56
Zero Enable (int) 57
ROC Time Base (int) 58
Setpoint 1 Type (int) 59
Setpoint 2 Type (int) 60
Cal Year (int) 61
Cal Month (int) 62
Cal Day (int) 63
Cal ID (int) 64
Page 35

Chapter 4 - Setup
Remote Mode of Operation
NOTE: After making the change you need to save it to non-
M File Interface to Set Up for Local Mode of Operation
CAUTION: THIS SETUP INFORMATION IS FOR THE
For 1746 modules used in the remote chassis, direct
mapping of the parameters to the M files is also avail
able. You can write to a specific location in the M0
file, do a single Executable command, such as com
mand 4 to write non-volatile, and the 1746 will pick
up the change and apply it to the weigh module and
reflect the change in the M1 file.
volatile memory.
The 1746 module is limited to 8 words total for any
read or write at any time, so you are limited to chang
ing a maximum of 7 words at a time. The mapping is
the same as listed above for the local chassis.
LOCAL MODE OF OPERATION ONLY.
BEFORE SETTING UP FOR LOCAL MODE OF
OPERATION CHECK TO BE SURE THE
JUMPER IS SET FOR LOCAL MODE AND
THAT THE MODULE IS INSTALLED IN A
LOCAL SLC CHASSIS. (SEE CHAPTER 3, PG
3-2 FOR MORE INFORMATION)
-
-
-
M File Data Structure (Words 0 to 5)
0 Sequence Number (sequenceNum) is used to
control the flow of commands to the HI 1746-WS
module in order to prevent duplicate or invalid
commands. To write a command to the module,
the processor must copy the current sequence
number from the M1 file to the M0 file. When the
module performs the requested command, it
writes the response into the M1 file, incrementing
the sequence number by 1. To get the sequence
number from the module, a read command
should be used before a write command to
retrieve the next number from the module.
1 Command is used to select the command to be
performed. Enter the command from the Com
mand List.
-
4-5
Page 36

HI 1746-WS WEIGH SCALE MODULE
2 Command Status indicates if the command suc-
ceeded or not. The module writes a value of zero
(0) if the command succeeded. If the command
failed, the module writes an error code value
which indicates the reason for the command fail
ure. (See the Error Code List.) The Error Code
table also lists the commands where the error
code is the sum of possible error bits.
3 Offset specifies which parameter will be read or
written.
4 Length is the number of bytes in a data string
field (32 bytes maximum or 16 words)
5 Datastring field is where the actual data is entered
you want to send to the module, or to receive
from the module. Example: To set the value of
one of the module’s parameters, the value of the
parameter is written in the Datastring field.
Logical File Interface to Set Up for Remote Mode of Operation (8 Word)
-
CAUTION: THIS SETUP INFORMATION IS FOR THE
REMOTE MODE OF OPERATION ONLY.
BEFORE SETTING UP FOR REMOTE MODE
OF OPERATION, CHECK TO BE SURE THE
JUMPER IS SET FOR REMOTE MODE AND
THAT THE MODULE IS INSTALLED IN A
REMOTE CHASSIS. (SEE CHAPTER 3, PG 3-2
FOR MORE INFORMATION)
About Logical Files
4-6
For the remote mode of operation, the HI 1746-WS
has no M files. Instead, the module contains files that
correspond to the 32 word I and O files used when the
module is in the local mode of operation. These files
are referred to as “Logical MFiles”. Logical MFiles
perform the function of the I, O, and M files used in
the local mode of operation but are not directly acces
sible through the SLC backplane. (See Fig. 4-2)
•O = Output
• I = Input referenced to the CPU.
-
Page 37

Chapter 4 - Setup
FIG. 4-2 PRIMARY AND REMOTE
COMMUNICATION DIAGRAM
Command Word
oding
Enc
You may write up to 7 words at a time to either the
Logical O file or the Logical M0 file. Word #0 of the
8 word output file is used to specify where words 1-7
go in either the logical O or M0 file, is called the
“Command Word”. Word #0 of the I file will always
be a copy of the “Command Word”.
Bits 15 & 14 11 = write 0 to 7 words to the logical M0 file,
Read 7
words from the M1 file.
NOTE: You need to run any com mand through M files before
evious writes take effect.
pr
01 = write 0 to 7 words to the logical O file, Read
nfigured) I
(co
10 = configure 0 to 7 words for the I file return, configure 7 words to read from Logical I file.
00 = the configured I file returned.
Bits 8-13 Number of words to write to the logical M0
or logical
O file.
Bits 0-7 Offset (in words) in the logical
M0 or logical O file
where the write begins.
Command Word - 16 bits
Bits 15-14 Bits 13-8 Bits 7-0
4-7
Page 38

HI 1746-WS WEIGH SCALE MODULE
Command Word - 16 bits
Writing to the 32
Word Logical O
Configure the
Read and Write
You must Decide whet her you are going to write to
the M0 or O file.
Binary value indicating number of
words to write
Binary value indicating starting offset for write/read
to begin.
and logical M0
files
Command Word
Writing to the M0 file
• Bits 15-14 set to “11”, will specify a
write to the logical M0 file.
• Bits 13-8 set as a binary value indicating number of words to write (e.g. 2
would be “000010”.
• Bits 7-0 set as a binary value indicating offset word to start writer at (e.g.
28 would be “00011100”.
For Example A command word set to binary value “1100 0010
0001 1100” would indicate a write of 2 words to the
logical M0 file starting at offset word 28.
4-8
Writing to the O file
• Bits 15-14 set to “01”, will specify a
write to the logical O file.
• Bits 13-8 set as a binary value indicating number of words to write (e.g. 2
would be “000010”).
• Bits 7-0 set as a binary value indicating offset word to start write at (e.g. 7
would be “00000111”).
For Example A command word set to binary value “0100 0010
0000 0111” would indicate a write of 2 words to the
logical O file starting at offset word 7.
Words 1-7 Data to be written to the M0 or O files. Number of
words determined by setup of “Command Word
Page 39

Chapter 4 - Setup
Reading from the 32 Word Logical I and logical M1 files
Command Word
Bits 15-14 set to “10”
For Example
Bits 15-14 set to “11”
For Example
Reads are all done in the I file (not to be confused
with the “logical I file”). Word #0 will always be a
copy of the “Command Word”. Words 1-7 of the I file
can be configured to read up to 7 words from either
the Logical M1 or the Logical I file (you cannot read
from both at the same time).
Allows the user to specify what words (up to 7) from
the logical I file to appear in words 1-7 in the I file.
If bits 15-14 are set to 10 in “Command Word” and
words 1-7 of the O file are: 18,19, 20, 21, 16, 15, 24.
The return in the I file words 0-7 would be (in order):
“Command Word”, gross weight (MSW), gross
weight (LSW), net weight (MSW), net weight (LSW),
relay status, module status, and ROC evaluation
period.
When written to the logical M0 file, will cause the I
file to reflect the words at the same starting offset in
the logical M1 file as specified in bits 7-0.
If 2 words are written to the logical M0 file starting at
offset word 28, then offset words 28 and 29 of the log
ical M1 file would appear in words 1 and 2 of the I
file.
-
Bits 15-14 set to “01”
NOTE: The selected words to read are not necessarily the
Bits 15-14 set to “00”
NOTE: After an input byte is configured, the 1746 will
For a write will cause the I file to reflect the words
previously selected to read using the “10” setting.
ones being written to using the “01” setting.
Returns the configuration set up with the “10” command.
remember the configuration as long as it has power.
The Configuration is lost after you power down.
4-9
Page 40

HI 1746-WS WEIGH SCALE MODULE
Executable Command List
CAUTION: ALWAYS PERFORM A READ COMMAND
FIRST BEFORE THE WRITE COMMAND
EVERYTIME, TO GET THE CORRECT
SEQUENCE NUMBER. (SEE THE SETPARAMS EXAMPLE, RUNG 0 FOR THE LADDER LOGIC)
Zero Command
EROCMD)
(Z
SEQ
NUMBER
0
From M1 File 1
COMMAND#
(Hex)
Tare Command (TARECMD)
The Zero Command requests that the current gross
weight be set to zero.
Error Return Values:
• NOTALLOWED - the ZeroEnable parameter is
not
set to TRUE (1),
• OUTOFTOLERANCE - the current weight value
is beyon
d the limits set by the zero tolerance
parameter.
• “ST ATUSWORD” - the command failed because
weight was not stable (in motion), or that
the
there was an A/D error of some kind.
STATUS
1
2
OFFSET
3
LENGTH4DATA
The T are Command requests the current net weight be
set to zero.
5-16
4-10
Page 41

Chapter 4 - Setup
Error Return Values:
• NOTALLOWED - the TareEnable parameter is
not
set to true
• “STATUSWORD” - means the command failed
because the weight was not
stable (in motion) or
there was an A./D error.
SEQ
NUMBER
0
From M1 File 2
COMMAND#
(Hex)
Write Non-Volatile Command (WRITENONVOLA TILE)
SEQ
NUMBER
0
From M1 File 4
COMMAND#
(Hex)
Reload NonVolatile
(RELOADNONVOL
ATILE)
1
STATUS
2
OFFSET
3
LENGTH4DATA
The Write Non-Volatile Command - causes all parameters (including calibration constants) to be saved to
n-volatile memory.
the no
Error Return Values: None
STATUS
1
2
OFFSET
3
LENGTH4DATA
The Reload Non-Volatile Command - causes the
h module to re-read the values stored in its non-
weig
volatile memory. Any parameters changed since the
last write non-volatile command are overwritten. this
command can be used to abort a calibration or parameter entry session.
5-16
5-16
SEQ
NUMBER
0
From M1 File 0x10
COMMAND#
(Hex)
1
Error Return Values: None
STATUS
2
OFFSET
3
LENGTH4DATA
5-16
4-11
Page 42

HI 1746-WS WEIGH SCALE MODULE
Float Integer to Integer Conversion Command (FLOAT2INT)
SEQ
NUMBER
0
From M1 File 0x96
COMMAND#
(Hex)
1
Integer to Float Integer Conversion Command (INT2FLOAT)
The Float Integer Conversion Command - converts a
oating point number into an integer format. (For use
fl
with the SLC 5/02)
Data Input Values: 6 bytes (a four byte float, and a
byte integer)
two
Return Value: 4 byte long intege r, equal to the float
ltiplied by the integer.
mu
STATUS
2
OFFSET
3
LENGTH4DATA
5-16
The Integer to Float Integer Conversion Command -
verts a Float integer to an integer. (For use with
Con
the SLC 5/02)
Data Input Value: A four byte long integer, and a two
e integer.
byt
Return Value: A four byte float, equal to the long
ivided by the two byte integer.
d
Error Return Value:
4-12
SEQ
NUMBER
0
From M1
File
• NOTALLOWED - returned if the two byte integer is zero.
COMMAND#
(Hex)
1
0x97 Integer
STATUS
2
OFFSET
3
DATA6DATA7DATA
Integer
Dividend
LENGTH4DATA
8-16
int2
Divisor
5
Dividend
Page 43

Chapter 4 - Setup
Cal Low Command (CALLOWCMD)
SEQ
NUMBER
0
From M1 File 0x64
COMMAND#
(Hex)
1
Cal High Command (CALHIGHCMD)
The Cal Low Command - sets the “calLowCount”
parameter to the current A/D average counts when
doing a hard calibration.
Error Return Values:
• STATUSWORD - there was a conversion error,
ht in motion or an A/D error or all three.
weig
• HARDCALFAILCOUNTS - there is less than
counts between the zero and the span
100
weights.
STATUS
2
OFFSET
3
LENGTH4DATA
5-16
The Cal High Command - Sets the Span Weight
parameter to the current A/D average counts when
doing Hard CAL.
Error Return Values:
• STATUSWORD - there was a conversion error,
ht in motion or an A/D error or all three.
weig
SEQ
NUMBER
0
From M1 File 0x65
COMMAND#
(Hex)
1
C2 Cal Command (C2CALCMD)
• HARDCALFAILCOUNTS - there is less than
counts between the zero and the span
100
weights.
STATUS
2
OFFSET
3
LENGTH4DATA
5-16
The C2 Cal Command - Performs a C2 Calibration.
4-13
Page 44

HI 1746-WS WEIGH SCALE MODULE
Error Return Values:
• STATUSWORD - there was a conversion error,
weig
ht in motion or an A/D error or all three.
• C2FAILNODEVS - did not detect any C2 load
cells.
• C2FAILCAPEQ - detected two load cells with
ferent capacities.
dif
SEQ
NUMBER
0
From M1 File 0x66
COMMAND#
(Hex)
1
Read C2 Serial Number Command (READC2SERIALN UM)
SEQ
NUMBER
0
From M1 File 0x70
COMMAND#
(Hex)
1
STATUS
2
OFFSET
3
LENGTH4DATA
5-16
The Read C2 Serial Number Command - Reads the 9
serial number from a C2 chip located on every
byte
C2 load cell. Specify the index of the C2 chip to read
in commandData.offset of the Mfile. The index
should be a number of 0 to C2RomX-1 (-1 is a minus
one not a dash one), where C2RomX is the number of
C2 chips. The “serial number” will be 8 bytes of
ASCII text, followed by a 0 terminator.
Error Return Values:
• OUTOFTOLERANCE - specified chip is not
und.
fo
STATUS
2
OFFSET
3
LENGTH4DATA
5-16
Set Parameters Command (SETPARAM)
4-14
Sets a parameter in the module. (See Setting the Process Weighing Parameters below for more detailed
information.)
Page 45

Chapter 4 - Setup
Error Return Values:
• OUTOFTOLERANCE - is returned if an incor-
rect value is entered to a parameter.
• INDEXOUTOFRANGE - is returned if no
parameter co
rresponds to the offset specified.
SEQ
NUMBER
0
From M1 File 0x100 Use Parame-
Get Parameters Command (GETPARAM)
COMMAND#
(Hex)
1
STATUS
2
OFFSET
3
ter Offset
alue from
V
Table 4-1
Reads a parameter, from the module. (See Setting the
Process W eighing Parameters below for more detailed
information.)
Error Return Values:
• OUTOFTOLERANCE - is returned if an incor-
rect value is entered to a parameter.
• INDEXOUTOFRANGE - is returned if no
rresponds to the offset specified.
OFFSET
3
SEQ
NUMBER
0
COMMAND#
(Hex)
1
parameter co
STATUS
2
LENGTH4DATA
5-16
See
eight
W
Multiplier
Section
Below
LENGTH4DATA
5-16
From M1 File 0x101 Use Parame-
ter Offset
V
alue from
Table 4-1
4-15
Page 46

HI 1746-WS WEIGH SCALE MODULE
I/O Setup Ladder Logic for Remote Mode Operation
4-16
Page 47

Chapter 4 - Setup
4-17
Page 48

HI 1746-WS WEIGH SCALE MODULE
FIG. 4-3 SETUP I/O FOR REMOTE MODE OF OPERATION
HI WS100
iguration
Conf
Software Interface
(Remote Mode of
Operation)
4-18
The HI WS100 program communicates w
remote HI 1746-WS module via an integer (N7, N8,
etc.) file, as specified in the “Comm Setup Section of
the HI WS100 Configuration Software Manual Prt.
#0596-0241-01) HI WS100 and requires 17 contiguous words.
ith the
Page 49

Chapter 4 - Setup
A version of the ladder logic is contained in the HI
WS 100 Configuration Software Manual. All
addresses are arbitrary in the ladder logic example
and may need to be changed to match the hardware
configuration of your system and to prevent conflicts
in addressing.
In the Ladder Logic example provided in the HI
WS100 manual note the following:
• N9 is the data file for the data written
to and read from the module and the
trigger bit.
• The ladder logic program needs 17
contiguous words in the data file,
which are:
1. N9:0 is the write trigger
2. N9:1 to N9:8 are write data loca-
tions.
3. N9:9 to N9:17 are read data loca-
tions.
NOTE: These can be from an integer file with 17 contiguous
words available.
4. N10 is the data file for setting up
sections of the M files.
5. N10:0 sets a section of the M file
as read.
6. N10:1 sets the length
7. N10:2 sets the address.
8. N10:5 sets a section of the M file
as write
9. N10:6 sets the length
10. N10:7 sets the address
11. N10:10 to N10:19 are locations
used for checking status
NOTE: Refer to Allen-Bradley 1747 Scanner module manual
for more information on the setup of M files.
4-19
Page 50

HI 1746-WS WEIGH SCALE MODULE
12. M0:x.yy and M1:x.yyy (where x
= slot scanner module is in and
yyy = location within the M file)
are the M files being written to or
read from.
13. M0 is from the processor to the
scanner
14. M1 is from the scanner to the
processor
15. B11:0 is used for program control
bits.
• Insure the following:
1. Data file (i.e. N9) has 17 contiguous words and the file number
and first word are listed in the
appropriate fields in the “COMM
SETUP” screen in WS100 and
the “Remote” box is checked.
2. Proper driver is selected. This
should be the same driver that RS
Logix 500 would use.
3. Station number of the processor
is correct which can be found in
the driver configuration.
4. M file setup data (i.e. N10:0 to
N10:2) is correct for your setup.
5. Slot location is correct in the M
file references.
Setting The Process Weighing Parameters
About the Ladder Logic Example
Weight Multiplier To use one of the commands, place the offset of a
4-20
W e have provided a Ladder Logic example explaining
how to set the weigh process parameters. The Ladder
Logic example is meant to provide a ladder logic
model only. Your application may vary and the exam
ple may or may not meet your requirements.
parameter, from Table 4-1, into the command
Data.offset of the M0file. If you are setting a parame-
-
-
Page 51

Chapter 4 - Setup
ter, place the 4 bytes for a float, or two bytes for an
integer into the dataString.
If you have set the WEIGHTMUL TIPLIER in the output data file to a non-zero value, and you are setting a
parameter of type float, the parameter will be set to
the 4 byte integer value you place in the dataString,
divided by the WEIGHTMULTIPLIER. The parame
ter will be interpreted as pounds or kilograms,
depending on the value of the Metric parameter.
If you are reading a type float parameter, and the
WEIGHTMULTIPLIER is non-zero, the value of the
parameter returned in dataString will be a 4 byte inte
ger, equal to the parameter multiplied by the
WEIGHTMULTIPLIER. The value returned will be
pounds or kilograms, depending on the value of the
Metric Parameter.
If the WEIGHTMULTIPLIER is zero, the dataString
value returned will be a floating point integer.
-
-
NOTE: If using a multiplier, setpoint data to and from the I/O
tables is limited to three (3) decimal places.
SETPARAM GETPARAM
Command and
Non Volatile
Memory
Possible Error Returns
The parameters set using the SETPARAM command
are not automatically saved to non-volatile memory.
A separate command is required (WRITENONVOL
ATILE 4).
Some parameters are not automatically used by the
weigh module, because they are normally used only at
start up. The command to save parameters to non-vol
atile memory does cause a re-initialization, so that the
parameters will then be active.
OUTOFTOLERANCE - is returned if an incorrect
value is entered to a parameter.
INDEXOUTOFRANGE - is returned if no parameter
corresponds to the offset specified.
4-21
-
-
Page 52

HI 1746-WS WEIGH SCALE MODULE
Setting Parameters Ladder Logic Explanation
Rung #0 Does an initial read of the M1 file. This is
necessary to get the sequence number for
future writes.
Rung #1 Loads data into the write location ready to
write. The data required is:
a. Sequence Number
b. Command Number
c. Parameter Offset
d. Parameter Value
Rung #2 Checks to see if the data was loaded from
the previous rung, then writes to the M0
file.
Rung #3 Reads the M1 file for the response.
Rung #4 Checks the results of the read to make sure
that the sequence number was incremented
(write complete) and that the status is zero
(no error). If the check is good, it latches a
bit for the next parameter.
Rung #5 Checks the results of the read and if the
status is not zero (error occurred) restarts
the process of writing this parameter.
4-22
Rungs #6-30 Duplicate the same process as rungs
#1 to #5 for the remaining parameters.
a. Rungs #1-5 - Units
b. Rungs #6-10 - Number of Averages
c. Rungs #11-15 - WAVERSAVER Set-
ting
d. Rungs #16-20 - Zero Tolerance
e. Rungs #21-25 - Auto Zero Tolerance
f. Rungs #26-30 - Mot ion Tolerance
Page 53

SETPARAMS Local Mode of Operation
Chapter 4 - Setup
FIG. 4-4 SETPARAMS LADDER LOGIC EXAMPLE/LOCAL MODE
4-23
Page 54

HI 1746-WS WEIGH SCALE MODULE
SETPARAMS Remote Mode of Operation
4-24
Page 55

Chapter 4 - Setup
4-25
Page 56

HI 1746-WS WEIGH SCALE MODULE
4-26
Page 57

Chapter 4 - Setup
FIG. 4-5 SETPARAMS LADDER LOGIC EXAMPLE/REMOTE MODE
Parameter (type) Offset (Hex)
SpanWeight (float) 0x1C
CalLoW eight (float) 0x20
ZeroT olerance (float) 0x4C
AutoZeroTolerance (float) 0x50
MotionTolerance (float) 0x54
Metric (int) 0=LBS 0x14
WAVERSAVER (int) limits = 0 - 4 0x16
NumAvera ges (int) limits = 1 - 255 0x24
ZeroTrackEnable (int) 0x26
TareEnable (int) 0x28
ZeroEnable (int) 0x2A
RoctimeBase (int) li mits = 1 - 1800 0x2E
Tareweight (float) 0x10
Calyear (int) 0x9C
Calmonth (int) 0x9E
Calday (int) 0xA0
Table 4-1: Parameters and Offsets
4-27
Page 58

HI 1746-WS WEIGH SCALE MODULE
Parameter (type) Offset (Hex)
Calid (int) 0xA2
Table 4-1: Parameters and Offsets
Error Code List SUCCESS 0
NOTALLOWED -1
OUTOFTOLERANCE -3
INDEXOUTOFRANGE -4
NOSUCHCMD -5
C2FAILNODEVS -6
C2FAILCAPEQ -7 (failure, capacities
not equal)
HARCALF AILCOUNTS -8 (failure, not enough
ADC counts between
high, low)
NOTE: For a complete ladder logic example for downloading
all the parameters please go to the Hardy Process
Solutions Inc. We b Si te at: www.hardysolutions.com.
Select Support then click on Sample Programs. If you
do not have access to the Internet contact your local
Hardy Representative or Hardy Customer Support
and we will be glad to fax or mail you a hard copy.
Calibration Setup Procedures
Setting the Unit of Measure
Setting the Motion Tolerance Value
4-28
The Unit of measure (Metric - See Table 4-1) can be
set to either kilograms or pounds. Any weight value
input to the module (e.g. CAL-LO, CAL-HI setpoints)
are in the currently selected units. The unit of measure
can be set at any time, not just at calibration. Setting
the unit of measure before calibrating reminds the
user what unit of measure is being displayed. It is
important to note that the weigh scale module does
not need to be calibrated again after changing the unit
of measure.
The motion tolerance is the tolerance value used to
determine if the scale is in motion.
Page 59

Chapter 4 - Setup
Setting the Zero Tolerance Value
Setting the Auto
olerance
Zero T
Value
Sets the range of weights so that the Zero Command
works, as an offset of the calibrated Zero.
When the Auto Zero Tolerance is entered, and Auto
Zero Tracking is enabled, any weight within the
entered tolerance of zero and within the Auto Zero
Tolerance of the calibrated zero point, with the scale
not in motion, will cause the display to automatically
read zero.
NOTE: There is a short time delay (at least 1 second) before
the Auto
Zero Triggers.
The amount of weight zeroed off is cumulative. The
o command will fail if the current gross weight plus
zer
any previously zeroed amount exceeds the zero
tolerance.
Setting the
Number of
Rea
dings
Averages
Setting the Span
eight Value
W
The Number of Averages sets the number of weight
readings which will be used to compute the displayed
weight. The average is a slid ing average so that a new
average reading is available for display at every reading
The Span W eight is a reference point derived from an
actual measured weight. This should not be confused
with the Scale Capacity. If you have a 100 pound
weight and you place it on the scale, the Span Weight
would be 100 pounds.
.
Setting the
AVERSAVER
W
Value
There are 5 selectable levels. 0 provides the least
vibration immunity with the fastest response time. 4
provides the most vibration immunity with the slowest response time. Default setting is 2.
Immunity Setting
7.5 Hz 0
3.5 Hz 1
1.0 Hz 2
0.5 Hz 3
0.25 Hz 4
4-29
Page 60

HI 1746-WS WEIGH SCALE MODULE
4-30
Page 61

CHAPTER 5 - CALIBRATION
Chapter 5 - Calibration
A Brief Description of Chapter 5
Pre-Calibration Procedures
Chapter 5 pertains to the calibration procedures for
the HI 1746-WS W eigh Scale Module. Alternatives to
any procedures either implied or explicitly contained
in this chapter are not recommended. In order for the
W eigh Module to work properly, it must be calibrated
prior to operation. Calibration procedures require an
understanding of the M File interface. It is recom
mended that the module be re-calibrated periodically
or when not in use for extended periods of time. Be
sure to follow all the procedures completely to insure
that the weights read by the module are accurate. It is
very important that the user and service personnel be
familiar with the procedures contained in this chapter,
before installing or operating the HI 1746-WS Weigh
Module.
Step 1. Check to determine if the load cells have
been properly installed.
a. Refer to your load cell I&M manual for
proper installation instructions.
b. On some single and double ended shear
beam load cells there is an arrow that
indicates the direction of the applied
load. If the arrow is pointing in the
wrong direction, change the position of
the load cell so that it is mounted in the
direction of the applied load.
-
Step 2. Check for Binding on the Load Cell or
other parts of the weighing system.
CAUTION: BINDING ON A SCALE/VESSEL OR LOAD
CELL DOES NOT ALLOW THE LOAD CELL
FREE VERTICAL MOVEMENT AND MAY PRE
VENT THE INSTRUMENT FROM RETURNING
TO THE ORIGINAL ZERO REFERENCE
POINT.
a. A load cell must be mounted in such a
way that 100% of the load (Vessel w/
-
5-1
Page 62

HI 1746-WS WEIGH SCALE MODULE
b. Check to see that nothing is binding the
c. Check to see that nothi
Contents) is vertically passed through a
load cell. (See Fig. 5-1)
load cell. This
draped across the scale/vessel or the
load cell, such as a hose, electrical cord,
tubes, or other objects.
contact with the scale/vessel other than
service wires and piping that have been
properly mounted with flexible connectors.
means that nothing is
ng is coming in
FIG. 5-1 PROPERLY INSTALLED LOAD CELL W/NO BINDING
Electrical Check
cedures
Pro
Load Cell/Point
Inpu
t/Output
Measurements
5-2
Step 3. Typical Load Cell/Point Input/Output
Measurements (EXC & SIG Outputs)
a. The HI 1746-WS is designed to supply 5
excitation to as many as eight 350
VDC
Ohm load cells/points.
Page 63

Chapter 5 - Calibration
b. The expected output from each load
cell/point depends on the mV/V rating
of the load cell/point and the weight.
c. For example, a 2mV/V load cell/point
ll respond with a maximum of 10
wi
mVDC at full weight capacity of the
system which includes the weight of the
vessel and the weight of the product as
measured by the load cell/point.
d. If the load cell/point weight capacity
rated at 1000 pounds, the load cell/point
will be 10 mVDC at 1000 pounds, 7.5
mVDC at 750 pounds, 5 mVDC at 500
pounds and so on.
e. A zero reference point will vary from
to system depending on the
system
“Dead Load” of the vessel. “Dead Load”
is the weight of the vessel and appurtenances only, with no product loaded. In
our example we will
load to be 500 pounds. (See Fig. 5-2)
assume the dead
is
FIG. 5-2 MILLIVOLTS/WEIGHT SCALE
5-3
Page 64

HI 1746-WS WEIGH SCALE MODULE
f. Based on the example, the operating
range for this scale is 5-10 mVDC with
a 500 pound weight range. Understand
that after zeroing the instrument, the 0
reading refers to the zero reference point
and not absolute 0 mVDC or absolute 0
weight.
NOTE: Load cell/point measurements are checked with a dig-
ital volt meter at the J2 connector on the front of the
module or by using I
NTEGRATED TECHNICIAN with the
HI 215IT Junction Box.
Load Check Step 1. Place a load (weight) on the scale or ves-
sel.
Step 2. Check to see if the weight reading changes
on the ladder logic display in the proper
direction.
• For example: If the ladder logic dis-
play reads 100 pounds and a 20 pound
weight is placed on the vessel or
scale, the ladder logic display should
read 120 or some value over 100.
• If the ladder logic display reads 100
pounds and a 20 pound load is placed
on the vessel or scale and the reading
is 80 pounds, the reading is going in
the wrong direction and indicates
some problem with the system.
• If the ladder logic display is reading
improperly or shows no change there
is something wrong with the setup.
C2 Calibration
About C2 Calibration
5-4
Step 3. If the ladder logic display changed weight
in the proper direction, remove the weight
and proceed to calibrate the module.
C2 calibration requires C2 load sensors. If you do not
have C2 load sensors you must perform a Hard Cali
bration. The HI 1746-WS reads the performance characteristics of each individual load cell and detects the
Page 65

Chapter 5 - Calibration
quantity of load cell in the system. C2 Calibration can
be performed by pressing “The Button” located in the
front of the module, or via Allen-Bradley DOS PLC
500 AI Series Ladder Logic Editor, Allen-Bradley RS
Logix 500 or clicking the C2 selection in Hardy’s
Configuration Software.
“THE BUTTON” C2 Calibration
NOTE: If the module is being calibrated for the first time and
Step 1. Check to be sure that the parameters have
been setup fo
Chapter 4, Setup)
Step 2. Open the front door of the HI 1746-WS
dule. (See Fig. 5-3)
mo
FIG. 5-3 “THE BUTTON” C2 CALIBRATION
your not
parameters which are set by the module at power up.
Once the calibration is successful, feel free to change
the parameters to meet the requirements of your
weighing process. (See Chapter 4 - Setup) “The Button” can be used for calibrat
weighing process parameters have been set.
sure what parameters to set, use the default
r your weighing process. (See
ion at any time after the
Step 3. Press and hold “The Button” until the C2
D goes off. (See Fig. 5-4)
LE
5-5
Page 66

HI 1746-WS WEIGH SCALE MODULE
C2 LED Green Off/On Button Calibration was successful
Red then Green C2 Cal failed, scale in motion.
FIG. 5-4 C2 LED
C2 Calibration
Using La
Logic
Data Locations Used
or Ladder Logic
f
Examples (For Local
Mode of Operation
Only)
N9:0 - 24 Input Data (READWEIGHT Example) N9:50 Weight Multiplier N9:51 ROC Multip lier N10:0 - 2 Input Read from M1 File. (Sequence number, com-
5-6
dder
Step 1. Check to be sure that the parameters have
been setup for your weighing process. (See
Chapter 4, Setup)
Step 2. We have provided a Ladder Logic (for
h the local and remote mode of opera-
bot
tion) example explaining how to perform
the C2 Cal
B3 - All the B3 locations are used as
program control.
mand number and status)
ibration.
status bits for
Page 67

Chapter 5 - Calibration
N10:40 - 46 Location of data being written to M0 File. N10:60 - 72 Locations of Parameters Values
N10:60 Units N10:61 Number of Averages N10:62 WAVERSAVER Setting N10:63-64 0 Tolerance N10:65-66 A0 Tolerance N10:67-68 Motion N10:69-70 CalLo N10:71-72 Span
C2 Calibration Ladder Logic Explanation
This file will download and set a reference point for
C2 calibration and then save data to non-volatile
memory.
Rung #0 Does an initial read of the M1 file.
this is necessary to get the sequence
number for future writes.
Rungs #1-5 Downloads a reference point value.
These rungs follow the same pattern
as the SETPARAMS example in
Chapter 4.
Rungs #6-12 Writes the C2CALCMD to set the ref-
erence point. These rungs follow the
same pattern as setting a parameter in
the SETP ARAMS example in Chapter
4.
Rungs #13-17 Writes the WRITENONVOLATILE
command. This will save the new cal
ibration to the non-volatile memory.
These rungs follow the same pattern
as setting a parameter in the SET
PARMS example in Chapter 4.
-
-
5-7
Page 68

HI 1746-WS WEIGH SCALE MODULE
C2 Calibration Ladder Logic Example (For Local Mode of Operation Only)
5-8
Page 69

Chapter 5 - Calibration
5-9
Page 70

HI 1746-WS WEIGH SCALE MODULE
FIG. 5-5 C2 LADDER LOGIC EXAMPLE/LOCAL MODE OF OPERATION
5-10
Page 71

C2 Calibration Ladder Logic Example (For Remote Mode of Operation Only)
Chapter 5 - Calibration
5-11
Page 72

HI 1746-WS WEIGH SCALE MODULE
FIG. 5-6 C2 LADDER LOGIC EXAMPLE/REMOTE MODE OF
OPERATION
Hard Calibration Hard Calibration is the traditional method of calibra-
tion that uses test weights. Hardy recommends that
test weights total 80 to 100% of the scale capacity.
the
Hard Calibration
dder Logic
La
Example
5-12
Step 1. Check to be sure that the parameters have
been setup for your weighing process. (See
Chapter 4, Setup)
Step 2. W e have provided a Ladder Logic example
aining how to set the weigh process
expl
parameters. The Ladder Logic example is
meant to provide a ladder logic model
only. Your application may vary and the
example may or may not meet your
requirements.
Step 3. The Hard Calibration Ladder Logic Exam-
ple is located at the Hardy We b Site. If you
have access
a. Type the following URL: www.hardyso-
lutions.com
b. Click on the Support button.
c. Click on Sample Programs.
to the Internet:
Page 73

Chapter 5 - Calibration
d. Click on the pull down menu for the
product you are calibrating.
e. Click on the Ladder Logic Example for
the HI 1746-WS Weigh Module, Hard
Calibration.
Step 4. If you do not have access to the Internet,
call your local Hardy representative or
Hardy Customer Support and we will for
ward you a hard copy of the calibration
ladder logic explanation and ladder logic
example.
-
5-13
Page 74

HI 1746-WS WEIGH SCALE MODULE
5-14
Page 75

Chapter 6 - Operating Procedures
CHAPTER 6 - OPERATING PROCEDURES
A Brief Description of Chapter 6
CAUTION: THE OPERATING PARAMETERS ARE DIF-
Block Transfer, Read
WORD PARAMETER
0 Setpoint 1
Value (32 bit float, or integer)
All information contained in Chapter 6 pertains to the
operation of the HI 1746-WS Weigh Scale Module.
The Operating Procedures include Writing and Read
ing data transferred between the ControlLogix PLC
and the weigh scale module. The data is defined as
either Read Data (including Module Status words
indicating the current state of the module) from the
weigh scale module or Write Data sent to the module.
It is very important that the user be familiar with this
chapter before operating the weight scale module.
FERENT FOR THE LOCAL MODE AND THE
REMOTE MODE. BE SURE YOU LOOK IN THE
CORRECT SECTION FOR THE CORRECT
PARAMETERS
MSW
-
1 Setpoint 1
Value (32 bit float, or integer)
2 Setpoint 1
Deadband (32 bit float, or integer)
3 Setpoint 1
Deadband (32 bit float, or integer)
4 Setpoint 1
Preact (32 bit float, or integer)
5 Setpoint 1
Preact (32 bit float, or integer)
TABLE 6-1: BLOCK TRANSFER, READ
LSW
MSW
LSW
MSW
LSW
6-1
Page 76

HI 1746-WS WEIGH SCALE MODULE
WORD PARAMETER
6 Setpoint 1 Mode
Bit Setpoint Mode
0 ROC (Rate of Change)
1Gross
2Net
3 Gain Mode (0 = gain in wght)
(1 = loss in wght)
4 force low
5 force high
6 Excitation Error
7 No Excitation Error
8-15 Currently Not Used
7 Setpoint 2
Value (32 bit float, or integer)
8 Setpoint 2
Value (32 bit float, or integer)
9 Setpoint 2
Deadband (32 bit float, or integer)
10 Setpoint 2
Deadband (32 bit float, or integer)
11 Setpoint 2
Preact (32 bit float, or integer)
12 Setpoint 2
Preact (32 bit float, or integer)
TABLE 6-1: BLOCK TRANSFER, READ
MSW
LSW
MSW
LSW
MSW
LSW
6-2
Page 77

Chapter 6 - Operating Procedures
WORD PARAMETER
13 Setpoint 2 Mode
Bit Setpoint Mode
0 ROC (Rate of Change)
1Gross
2Net
3 Gain Mode (0 = gain in wght)
(1 = loss in wght)
4 Force low
5 Force high
6 Excitation Error
7 No Excitation Error
8-15 Currently Not Used
14 Weight Functions
Bit Weight Functions
0Zero
1Tare
2 Write Non-Volatile
3 Apply Settings
4 Reload Non-Volatile
5Cal Low Cmd
6Cal High Cmd
7 C2 Cal Cmd
8 - 15 Currently Not Used
TABLE 6-1: BLOCK TRANSFER, READ
6-3
Page 78

HI 1746-WS WEIGH SCALE MODULE
WORD PARAMETER
15 Module Status Word
Bit Module Status Bit
0 A/D Conversion Error
1 A/D Failure
2 Weight in lbs (0 = kgs)
3 Zero Tracking Enabled
4 Tare Enabled
5 Zero Enabled
6 Weight in Motion
7 No Calibration
8 Non-Volatile RAM Failure
9 Excitation Monitor
10 Communication Timeout
Error
11-13 Currently Not Used
14 Command Error
14 & 15 Currently Not Used
16 Relay Status
6-4
17 Firmware Revision
18 Gross Weight
(32 bit float, or integer)
19 Gross Weight
(32 bit float, or integer)
20 Net Weight
(32 bit float, or integer)
21 Net Weight
(32 bit float, or integer)
22 RoC (Rate of Change)
(32 bit float, or integer)
23 RoC (Rate of Change)
(32 bit float, or integer)
24 RoC Evaluation Period
TABLE 6-1: BLOCK TRANSFER, READ
MSW
LSW
MSW
LSW
MSW
LSW
Page 79

WORD PARAMETER
25 Increments on each weight update (about
110 times a second)
26-31 Currently Not Used
TABLE 6-1: BLOCK TRANSFER, READ
Block Transfer, Read Example (For Local Mode Only) (READWEIGHT)
Chapter 6 - Operating Procedures
Explanation of the READWEIGHT Example
Rung #0 Downloads the weight and rate multipliers
one time.
Rung #1 Setpoint, Status, Weight and Rate of
Change are copied from the input file for
access.
6-5
Page 80

HI 1746-WS WEIGH SCALE MODULE
READWEIGHT Ladder Logic Example
FIG. 6-1 READWEIGHT LADDER LOGIC EXAMPLE/LOCAL MODE OF
OPERATION
Block Transfer, Read
dder Logic Example
La
for Remote Mode
Operation
6-6
For Remote Mode Operation Block Transfer, Read
Examples
dysolutions.com) and Click on Support.
go to the Hardy Website (http://www.har-
Page 81

Block Transfer, Write
WORD PARAMETER
Chapter 6 - Operating Procedures
0 Setpoint 1
Value (32 bit float, or integer)
1 Setpoint 1
Value (32 bit float, or integer)
2 Setpoint 1
Deadband (32 bit float, or integer)
3 Setpoint 1
Deadband (32 bit float, or integer)
4 Setpoint 1
Preact (32 bit float, or integer)
5 Setpoint 1
Preact (32 bit float, or integer)
6 Setpoint 1 Mode
Bit Setpoint Mode
0 ROC (Rate of Change)
1Gross
2Net
3 Gain Mode (0 = gain in wght)
(1 = loss in wght)
4 Force Low
5 Force High
6 Excitation Error
7 No Excitation Error
8-15 Currently Not Used
MSW
LSW
MSW
LSW
MSW
LSW
7 Setpoint 2
Value (32 bit float, or integer)
8 Setpoint 2
Value (32 bit float, or integer)
TABLE 6-2: BLOCK TRANSFER, WRITE
MSW
LSW
6-7
Page 82

HI 1746-WS WEIGH SCALE MODULE
WORD PARAMETER
9 Setpoint 2
Deadband (32 bit float, or integer)
10 Setpoint 2
Deadband (32 bit float, or integer)
11 Setpoint 2
Preact (32 bit float, or integer)
12 Setpoint 2
Preact (32 bit float, or integer)
13 Setpoint 2 Mode
Bit Setpoint Mode
0 ROC (Rate of Change)
1Gross
2Net
3 Gain Mode (0 = gain in wght)
(1 = loss in wght)
4 force low
5 force high
6 - 15 Currently Not Used
14 Weight Functions
MSW
LSW
MSW
LSW
6-8
Bit Weight Functions
0Zero
1Tare
2 Write Non-Volatile
3 Apply Settings
4 Reload Non-Volatile
5Cal Low Cmd
6Cal High Cmd
7 C2 Cal Cmd
8- 15 Currently Not Used
15 Weight Multiplier
16 ROC Multiplier
17-31 Currently Not Used
TABLE 6-2: BLOCK TRANSFER, WRITE
Page 83

Chapter 6 - Operating Procedures
Block Transfer, Write Ladder Logic Example for Remote Mode Operation
For Remote Mode Operation Block Transfer, Write
Examples go to the Hardy Website (http://www.har
dysolutions.com) and Click on Support.
-
6-9
Page 84

HI 1746-WS WEIGH SCALE MODULE
6-10
Page 85

Index
Symbols
“THE BUTTON” C2 Calibration 5-5
Numerics
32 Word I and O Files 4-6
A
A Brief Description of Chapter 1 1-1
A Brief Description of Chapter 2 2-1
A Brief Description of Chapter 3 3-1
A Brief Description of Chapter 4 4-1
A Brief Description of Chapter 5 5-1
A Brief Description of Chapter 6 6-1
About C2 Calibration 5-4
About Hardy Manuals 1-2
About Logical Files 4-6
About M Files 4-3
About the Ladder Logic Example 4-20
About the Module I/O Connector 3-6
Add/Remove Function 3-10
Allen-Bradley DOS PLC 500 AI Series 4-1
Allen-Bradley’s SLC 5/02 1-1
Approvals 2-3
Auto Zero Tolerance 1-6
Auto Zero Tracking 1-6
Averages 2-1
Index
B
B3 Locations 5-6
Backplane Current Load 2-2
Backplane Input Voltage 2-2
Batching 1-3
Bits 0-7 4-7
Bits 15 & 14 4-7
Bits 15-14 set to “00” 4-9
Page 86

HI 1756-WS MANUAL
Bits 15-14 set to “01” 4-9
Bits 15-14 set to “10” 4-9
Bits 15-14 set to “11” 4-9
Bits 8-13 4-7
Blending 1-3
Block Transfer, Read 6-1
Block Transfer, Read Example (For Local Mode Only) (READWEIGHT) 6-5
Block Transfer, Read Ladder Logic Example for Remote Mode Operation 6-6
Block Transfer, Write 6-7
Block Transfer, Write Ladder Logic Example for Remote Mode Operation 6-9
C
C2 Cal Command (C2CALCMD) 4-13
C2 Calibration 5-4
C2 Calibration Input 2-2
C2 Calibration Ladder Logic Example (For Local Mode of Operation
Only) 5-8
C2 Calibration Ladder Logic Example (For Remote Mode of Operation
Only) 5-11
C2 Calibration Ladder Logic Explanation 5-7
C2 Calibration Output 2-2
C2 Calibration Using Ladder Logic 5-6
C2 LED 4-2, 5-6
C2® 1-1
Cable lengths 2-2
Cal High Command (CALHIGHCMD) 4-13
Cal Low Command (CALLOWCMD) 4-12
Calibration Setup Procedures 4-28
Case Dimensions 2-3
Comm Setup Section of the HI WS100 Configuration Software Manual
4-18
Comm. LED 4-2
Command Word 4-8, 4-9
Command Word Encoding 4-7
Page 87

Index
Common-Mode Rejection 2-2
Common-Mode Voltage Range 2-2
Configuration Software for Windows 2-3
Conversion Rate 2-1
Customer Support Department 1-2
D
Data Locations Used for Ladder Logic Examples (For Local Mode of
Operation Only) 5-6
Default Parameters 2-4
Description 1-2
DH+ 1-3
DH-485 1-3
Digital TTL (Transistor - Transistor Logic) Level Outputs 1-6
Digital Volt Meter (DVM) 1-5
Digital Voltmeter 2-3
Direct M File Mapping 4-3
DVM Readings 1-5
E
Electrical Check Procedures 5-2
Enclosure Rating 2-3
Enclosure Ratings 2-3
Environmental Requirements 2-2
Error Code List 4-28
Ethernet 1-3
Excitation Monitor 1-4, 1-6, 2-1
Executable Command 4-5
Executable Command List 4-9
Explanation of the READWEIGHT Example 6-5
F
Failed Return to Zero Test 1-5
Filling/Dispensing 1-3
Float Integer to Integer Conversion Command (FLOAT2INT) 4-11
For Example 4-8, 4-9
Force Off 1-6
Page 88

HI 1756-WS MANUAL
Force On 1-6
G
Get Parameters Command (GETPARAM) 4-15
Gross 1-6
H
Hard Calibration 5-12
Hard Calibration Ladder Logic Example 5-12
Hardy HI 215IT Junction Box 3-9
Hardy Instruments Website (http//www.hardyinst.com) 6-9
Hardy Load Sensor with C2 3-9
Hardy WS 100 Configuration Software 3-10
HI 215IT Junction Box 3-6
HI WS 100 Configuration Software 1-1
HI WS100 Configuration Software Interface (Remote Mode of Operation) 4-18
Humidity Range 2-2
I
I/O Setup Ladder Logic for Remote Mode Operation 4-16
Industry Standard Load Cells 3-8
Input 2-1
Installing the Hardy Instruments Configuration Software 3-10
Installing the Module I/O Connector 3-6
Integer to Float Integer Conversion Command (INT2FLOAT) 4-12
IT 1-4
IT Junction Box 1-4
IT Junction Box HI 215IT-FG Series 2-3
IT Junction Box HI 215IT-SS or PS Series 2-3
L
Ladder Logic 4-19
Ladder Logic Editor 4-1
Ladder Logic Example 4-19
LEDS 4-1, 4-2
Load Cell Excitation 2-2
Page 89

Load Cell I&M Manual 5-1
Load Cell Wiring Diagrams 3-7
Load Cell/Point Input/Output Measurements 5-2
Load Check 5-4
Local Mode of Operation 4-1, 4-3
Logical File Interface 4-6
M
M File Data Structure (Words 0 to 5) 4-5
M File Interface 5-1
M File Interface to Set Up for Local Mode of Operation 4-5
M files 4-5
M0 File 4-3, 4-5
M1 File 4-3, 4-5
Mapping 4-4
Maximum Zero Tolerance 2-1
Modes of Operation 2-1
Module Connector 3-4
Module Door 3-6
Index
N
Net 1-6
Non-Linearity 2-1
O
OFF (Default) 3-2
ON for Remote 3-2
Operating Temperature Range 2-2
P
Passed Return to Zero Test 1-5
Pin-Out Diagram 3-6
Possible Error Returns 4-21
Power 2-2
Power Check 4-1
Pre-Calibration Procedures 5-1
Page 90

HI 1756-WS MANUAL
R
Rate of Change (ROC) 1-6
Read C2 Serial Number Command (READC2SERIALNUM) 4-14
Read Data 6-1
Reading from the 32 Word Logical I and logical M1 files 4-8
READWEIGHT Ladder Logic Example 6-6
Relays 3-6
Reload Non-Volatile (RELOADNONVOLATILE) 4-11
Remote Mode of Operation 4-1, 4-3, 4-5
Removing the Module from the SLC 500 or Remote Chassis 3-5
Resolution 2-1
Return to Zero Test 1-5
RS Logix 500© 1-1
RS-232-C 1-3
Run/Fault LED 4-2
S
Sequence Number (SEQUENCENUM) 4-5
Set Parameters Command (SETPARAM) 4-14
Set Point (1 & 2) Out 2-2
Set Point TTL Outputs 1-6
SETPARAM - GETPARAM Command and Non Volatile Memory 4-21
SETPARAMS Local Mode of Operation 4-23
SETPARAMS Remote Mode of Operation 4-24
Setting Parameters Ladder Logic Explanation 4-22
Setting the Auto Zero Tolerance Value 4-29
Setting the Jumper for Local or Remote Mode of Operation 3-2
Setting the Motion Tolerance Value 4-28
Setting the Number of Readings Averages 4-29
Setting The Process Weighing Parameters 4-20
Setting the Span Weight Value 4-29
Setting the Unit of Measure 4-28
Setting the WAVERSAVER Value 4-29
Setting the Zero Tolerance Value 4-29
SETUP Program 3-10
SLC 500 AI Series 1-3
SLC Chassis 4-1
Page 91

Storage Temperature Range 2-2
System Test 1-5
T
Tare Command (TARECMD) 4-10
Technical Publications Department 1-2
Temperature Coefficient 2-2
TTL Level Outputs 1-3
U
Unit of Measure 4-28
Unpacking 3-1
W
WAVERSAVER 2-1
WAVERSAVER® 1-1
Weighing System Tests 1-5
Weight 2-3
Weight Multiplier 4-20
Windows NT/95/98 3-10
Windows® 95/98/NT 1-3
Words 1-7 4-8
Write Data 6-1
Write Non-Volatile Command (WRITENONVOLATILE) 4-10
Writing to the 32 Word Logical O and Logical M0 Files 4-8
Writing to the M0 File 4-8
Writing to the O File 4-8
WS 100 Configuration Software Manual 4-19
Index
Z
Zero Command (ZEROCMD) 4-10
Zero Weight 1-6
Page 92

HI 1756-WS MANUAL
 Loading...