

Hardwick 4100PRA, 4100PRA-K, 4100PRW, 4100PRW-K, 4121WRA Owner's Manual
...
Owner's Guide
READANDKEEPTHESEINSTRUCTIONSFORFUTUREREFERENCE.
Gas Range
CONTENTS
SAFETY INSTRUCTIONS ..................... 1-3 Broilerdrawer .............................. 11
Oven racks .................................. 11
FEATURES ................................. 4-6 Thermostat knob ............................. 12
Digitalclock/timer ............................. 4 Preheating .................................. 12
Analog clock/timer ............................ 5 Hints ..................................... 12
Eye level oven ............................... 5 Howto set over ............................. 12
Continuous cleaning oven ...................... 6 Common bakingproblems chart ............... 13
Broilinghints ................................ 14
USING YOUR COOKTOP ...................... 7-9 Broiling chart ................................ 14
Ignitionsystem ............................... 7
Pilotignition ................................ 7 MAINTENANCE ............................. 15
Pilotless ignition ............................. 7 Electricalconnection ........................ 15
Cooktop ..................................... 8 Remove range for cleaning .................... 15
Burnergrates................................. 8 Ught replacement ............................ 15
Surface burners .............................. 8 Leveling egs ............................... 15
Lighting burners .............................. 8 Propo_ona valveadjustment .............. 15
Selectingflame size ........................... 9
Griddleand 5th burner ....................... 9 CARE AND CLEANING CHART ................. "16
USING YOUR OVEN ........................ 10-14 SERVICE ..................................... "17
Pilotignt on ....... 10 Troubleshooting chart ........................ 17'
Pilotess ignition ........................... IC
Oven burner ................................. 10 WARRANTY .................................. 18
Oven door .................................. 10
Oven bottom ................................ 10
8112Pl14-60
(1/93)
IMPORTANTSAFETYINSTRUCTIONS
Readallinstructionsbeforeusingthisappliance.
Information in the Safety Instruction • Don't attempt to repair or replace • Misuse of appliance doors, such
section covers all gas cooking ap- any part of your appliance unless it as stepping, leaning or sitting on
ptiances. You may find some informa- is specifically recommended in this the door, may result in possible tip-
tion that does not pertain to your par- book. All other servicing should be re- ping of the appliance, breakage of
tieular appliance. Please review this ferred to a qualified servicer, door, and serious injuries.
section before using your cooking ap-
pliance. • Always disconnect power to ap- CAUTION: Do not use an appliance as
pliance before servicing, a step stool to cabinets above.
GENERAL SAFETY • If range is installed near a win-
CAUTION: Some cabinets and building dow, proper precautions should be
materials are not designed to withstand taken to prevent curtains from
the heat produced by the normal, safe blowing over burners creating a
operation of a cooking appliance. Dis- FIRE HAZARD.
coloration or damage, such as dela-
mination, may occur. Therefore, care
should be given to the location of clear and free from combustible
this appliance, materials, gasoline, and other flam-
• Be sure all packing materials are • To reduce the hazard of storage
removed from the range before oper- • Many aerosol-type spray cans above a range, install a ventilating
ating it to prevent fire or smoke dam- are EXPLOSIVE when exposed to hood that projects at least 5 inches
age should the packing material ignite, heat and may be highly flammable, beyond the bottom edge of the cabi-
• Have your appliance installed pliance.
and properly grounded by a quaff- Clean hood frequently to prevent
fled installer, in accordance with the grease from accumulating on hood or
Installation Instructions. Any adjust- its filter.
ment or service should be performed ABOUT YOUR APPLIANCE
only by a qualified installer or servicer. Should a boilover or spillover result
• Have the installer show you the the base of the backguard. Never off the hood's fan to avoid spread-
location of the gas shut off valve block oven vent or air intakes. Do ing the flame. After thoroughly extin-
and how to shut it off in an emer- not obstruct the flow of combustion guishing flame, the fan may be turned
gency, and ventilation air. Restriction of air on to remove unpleasant odor or
No cooking appliance should be formance.
used as a space heater to heat or • To eliminate the hazard of reach-
warm a room. This ins,ruction is Avoid touching oven vent area
based on safety considerations to pre- while oven is on and for several net storage should not be provided
vent potential hazard to the consumer minutes after oven is turned off. directly above a unit.
as well as damage to the appliance. Some parts of the vent and surround-
* ing over hot surface burners, cabi-
• Keep area around appliance
mable vapors and materials.
Avoid their use or storage near an ap- nets.
• Your appliance is vented through In an open flame, immediately turn
flow to the burner oreven[s proper per- smoke.
If such storage is provided, it should
_ngarea become hot enough [o cause be limited to items which are used in-
burns, frequently and which are safely stored
storage area for food or cooking appliance.
utensils. This instruction is based on Temoeratures in storage areas above
safety considerations to prevent poten- the unit may be unsafe for some items,
tial hazard to user and to the ap- such as volatile liqJids, cleaners or
pliance aerosol sprays.
• DO not use cooktop or oven as a
in an area subjected to heat from an
(continued next page)
1

IMPORTANTSAFETYINSTRUCTIONS(continued)
CLEANING SAFETY:
• Turn off all controls and wait for • Always turn surface burner to • Do not let cooking grease or oth-
range parts to cool before touching OFF before removing cookware, er flammable materials accumulate
or cleaning them. Do not touch the in or near the range, range hood or
burner grates or surrounding areas un- • Never heat an unopened contain- vent fan.
til they have had sufficient time to cool. er on the surface burner or in the
oven. Pressure build-up may cause • Always let quantities of hot fat
• Clean range with caution. If a wet personal injuryor damage to the
sponge or cloth is used to wipe spills range, attempting to move or handle.
on a hot cooking area, be careful to
avoid steam burns. Some cleaners can ° Do not leave any items on the • In the event of a grease fire do
produce noxious fumes if applied to a cooktop. The hot air from the vent not attempt to move pan.
hot surface, may ignite flammable items and may
• burner, then smother flaming pan by
Touching a hot oven light bulb • Always place oven racks in the covering pan completely with a lid,
with a damp cloth could cause the desired positions while oven is
bulb to break. Should the bulb break, cool. tf a rack must be moved while cookie sheet or flat tray. Or, extinguish
disconnect power to the range before flame by covering with baking soda or,
trying to remove the bulb to avoid elec- hot, be careful to avoid contact of pot if available, a multi-purpose dry chem-
trical shock, holders with oven burner flame.
COOKINGSAFETY: holders. Always avoid reaching into grease should be cleaned up as
• Be sure you know which knob oven to olace or remove food. soon as possible. If they are alloweo
controls which surface burner. AI- • Use dry, sturdy pot holders. FIRE HAZARD.
ways make sure the correct burner is Damp pot holders may cause Burns
turned on and {hat the burner has ig- from steam. Dish towels or other sub- If a grease fire occurs in the oven or
hired. When cooking is completed, turn stitutes should never be used as pot in the broiler pan, turn oven off anc
burner off. holders because they can trail across keee door closed to contain fire until it
• Always adjust surface burner
flame so that it does not extend be- • Use care when opening oven PREPAREDFOODWARNING:
yond the bottom of utensil. An ex- door. Let hot air or steam escape be- • Follow food manufacturer's
cessive flame ishazardous and fore removing or replacing food.
wastes energy.
• Never leave a surface cooking to avoid clothing fires. Loose fitting cooking, immediately discard the food
operation unattended especially or long hanging-sleeved apparel and its container. The food could be
when using a high heat =setting. should not be worn while cooking, contaminated.
Boilovers cause smoking and greasy Clothing may Jgnlte o_catch utensil
Spillovers may ignite, handles. .'continuednextpage)
container to burst resulting in serious used for deep fat frying cool before
increase pressure in closed containers Do not use water on grease fires.
which may cause them to burst. Never pick up a flaming pan. Turn off
ical or foam-type fire extinguisher.
• Slide oven rack out to add or re-
move food. using dry, sturdy pot Spills or believers which contain
to accumulate, tlaey could create a
hot surface burners and ignite or get extinguishes.
caught on range parts.
instructions. Ifa plastic frozen food
• Use caution when wearing gar- container and,or its cover distorts.
ments made of flammable material warps, or is otherwise damaged during
2

IMPORTANTSAFETYINSTRUCTIONSI00ntm+d/
UTENSILSAFETY: • Be sure utensil is large enough IMPORTANT SAFETY
• use panswith flat bottoms and to properly contain food and avoid NOTICEANDWARNING
handlesthat are easily grasped and believers. Pansize is particularlyim-
stay ¢ool. Avoid usingunstable, will accommodate the volume of food and Toxic Enforcement Act of 1986
warped, easily tipped or loose handled that is to be added as well asthe (Proposition65) requires the Governor
pans. Donot usepans if their handles bubble action of fat. Never leave a of Californiato publish alist of sub-
twist and cannot be tightened. Pans deep fat frying operationunattended, stances known to the State of Califor-
that are heavy to move when filled with nia to cause cancer or reproductive
food may also be hazardous. • Never let a pan boil dry as this harm, and requires businessesto warn
• Always place a pan offood on a could damage the utensiland theap- customers of potential exposures to
surface burner before turning it on, pliance, such substances.
and turn it offbefore removingthe pan • Many plastics are vulnerable to Users of this appliance are hereby
to preventexposure to burner flame, heat. Keep plastics away from parts of warned that the burning of gas can re-
. Always turn pan handles to the the appliance thatmay become warm suit in low-level exposureto some of
side or back of appliance, notout or hot. the listed substances, including ben-
intothe room where they are easily hit zene, formaldehyde and soot, due pri-
or reached by small children. • Do not leave plastic items on the marily tothe incomplete combustion of
portant in deep fatfrying, Be sure pan The California Safe Drinking Water
cooktop as they may me_torsoften if naturat gasor liquid petro{eum(LP)
/ lefttoo close to the vent or a lighted fuels. Properly adjusted burners will
" ' posure to these substances can also
r_ "_'_-- er's directions.
To minimize burns, ignition offlam-
mable materials and spillage due to SAVE THESE INSTRUCTIONS
unintentionalcontact with the uten-
sil,do not extend handles overadja-
centsurfaceburners.
• Do not leave children alone or Children should be taught that an Children climbing on the appliance
unsupervisednear the appliance appliance is not a toy, to reach items could be seriously
when it is inuse or is still hot. injured.
Children should never be allowed play with controls or other parts of __ /
to sit or stand on any part of the ap- the unit.
plianee.
surface burner, minimize incomplete combustion. Ex-
• When using cooking or roasting be minimized by properly venting the
bags in oven, follow the manufactu- burners to the outdoors.
• Useonly glass cookware that is
recommended for usein the oven.
CHILD SAFETY:
Children should not be allowed to
CAUTION: Do notstore items of in-
hot. Let hotutensilscoolina safe )ronthe backguard
place,outof reach of small children.
Irenin cabinets above
3
FEATURES
DIGITAL CLOCK AND
TIMER, if equipped
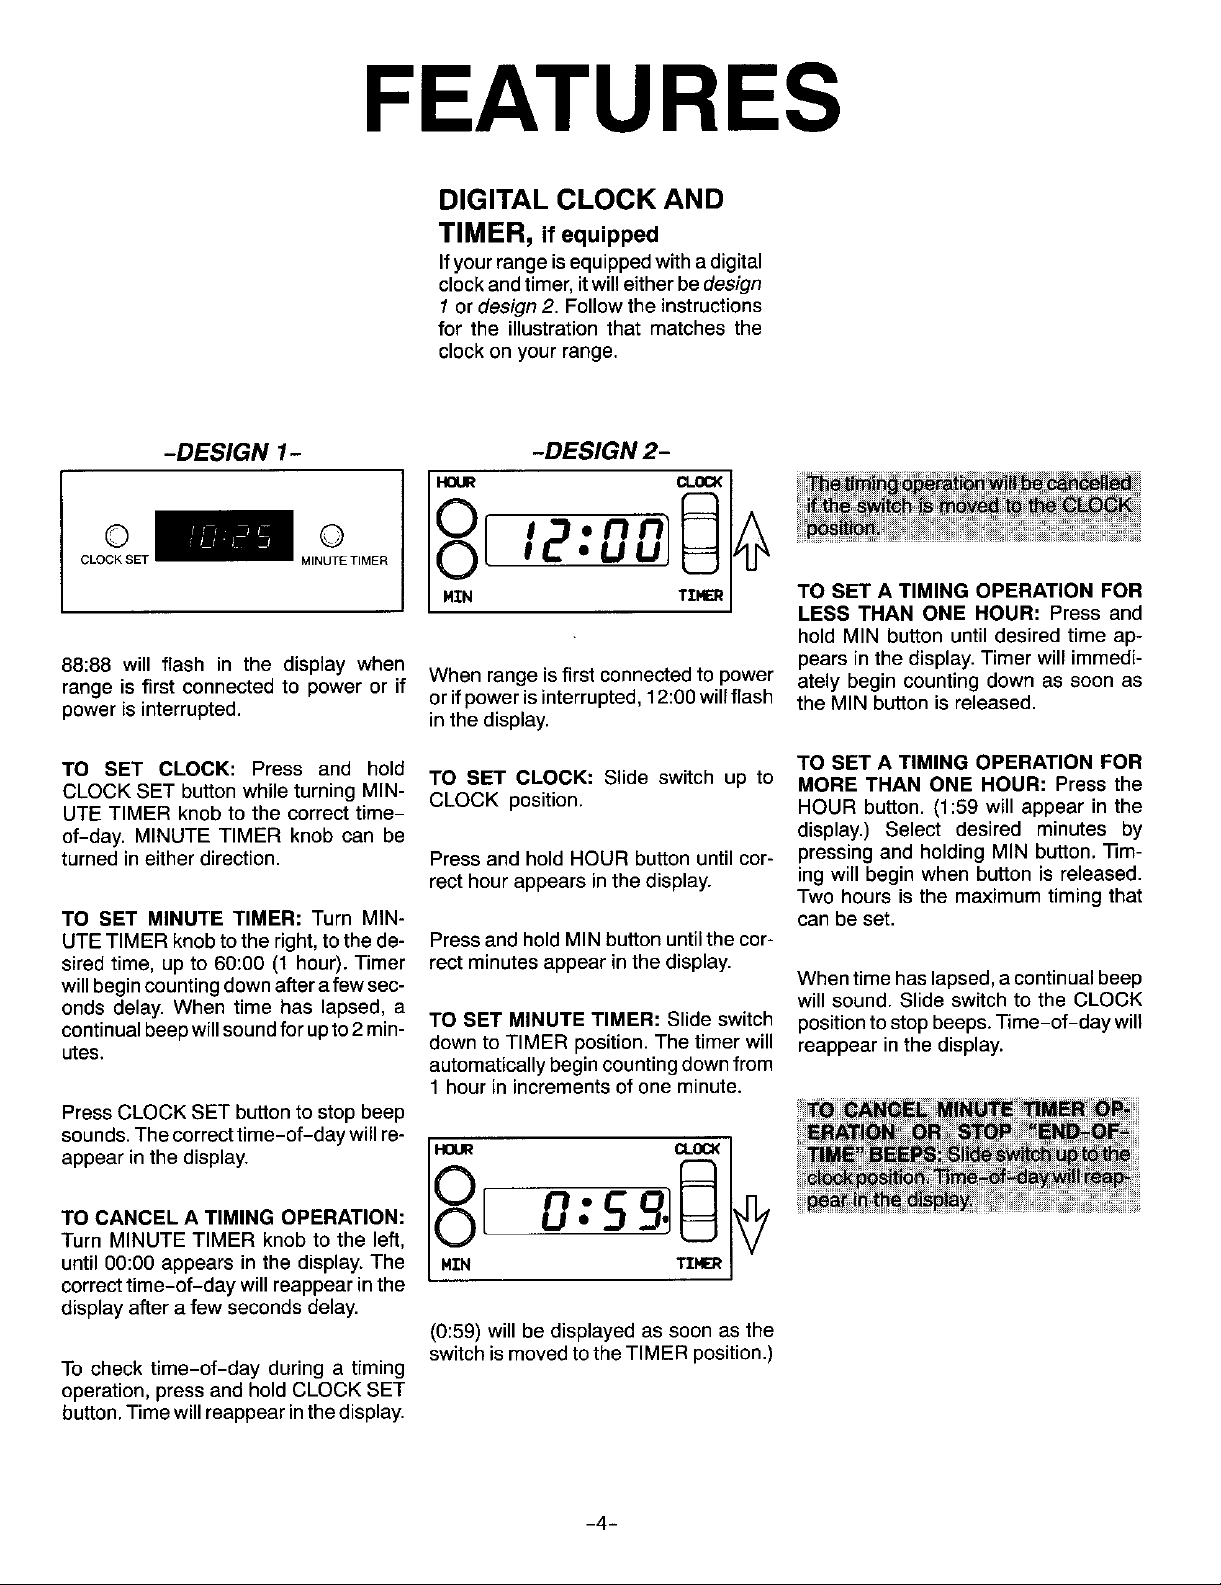
Ifyour range isequippedwitha digital
clockandtimer,itwilleitherbedesign
/ or design2. Followtheinstructions
for the illustrationthat matches the
clockon yourrange.
-DESIGN1- -DESIGN2-
© © :
CLOCK SET MINUTETIMER
TO SET A TIMING OPERATION FOR
LESS THAN ONE HOUR: Pressand
holdMIN buttonuntildesiredtime ap-
pearsinthe display.Timerwill immedi-
88:88 will flash in the display when When rangeisfirstconnectedto power ately begincountingdownas soonas
range is first connectedto poweror if orifpoweris interrupted,12:00willflash the MIN buttonisreleased.
powerisinterrupted, in thedisplay.
TO SET A TIMING OPERATION FOR
TO SET CLOCK: Press and hold TO SET CLOCK: Slide switch up to MORE THAN ONE HOUR: Press the
CLOCK SET buttonwhileturning MIN- CLOCK position. HOUR button. (1:59 will appear in the
UTE TIMER knob to the correct time-
of-day. MINUTE TIMER knob can be display.) Select desired minutes by
turned in either direction. Press and hold HOUR button until cor- pressing and holding MIN button. nm-
rect hour appears in the display, ing will begin when button is released.
TO SET MINUTE TIMER: Turn MIN- canbe set.
UTETIMER knobto the right,tothede- PressandholdMIN buttonuntilthecer-
siredtime, upto 60:00 (1 hour).Timer rect minutesappear inthe display.
willbegincountingdownafterafewsec- Whentimehaslapsed,a continualbeep
onds delay.When time has lapsed, a will sound.Slideswitchto the CLOCK
continualbeepwillsoundforupto2min- TO SET MINUTE TIMER: Slideswitch positiontostopbeeps.'rime-of-daywill
utes. downtoTIMER position.Thetimerwill reappearinthe display.
PressCLOCKSET buttonto stopbeep
sounds.Thecorrecttime-of-day willre-
appear in the display. HOUR CLOO<
Turn MINUTE TIMER knob to the left,
until 00:00 appears in the display. The MZN TZHER
correct time-of-day will reappear in the
display after afew seconds delay.
To check time-of-day during a timing
operation, press and hold CLOCK SET
button.Timewillreappearinthe display.
automaticallybegincountingdownfrom
1 hourin incrementsofoneminute.
8Lo.sg.j@
(0:59) will be displayed as soon as the
switch ismoved tothe TIMER position.)
Two hours is the maximum timing that
-4-

FEATURES
ANALOG CLOCK AND EYE LEVEL OVEN
TIMER, if equipped if equipped
The upper ovenwill eitherbea conven-
12 tional oven or a microwave oven.
11 1
10_'/_ 2 Do not use the upper oven for cooking
itemsthat aretoo heavy or bulkyto han-
9 --_'_1°[("I __qr._____3 die easily, especially if considerable
-_._.L_/2_4O,,__./j_ -._ amounts of hot fat or liquids are in-
8 i///_ 30 . x_ 4 volved. Removing such foods from the
"/]/lllh%_\\'<' oven isdifficultand can be hazardous.
7 5
6
CONVENTIONAL OVEN:
The sizeof thisovenmakesitconven-
ient for cooking smaller quantitiesof
TO SET CLOCK: PushinandturnMin- food. However,itdoes havesome limi-
uteMinderknobtothecorrecttime-of- tations.Donotusea largecookiesheet,
day. Be sure MinuteMinderhandis on panorotherutensilswhichwillblockair
OFF aftersettingclock, flowinthe oven.Usethelargerovenfor
optimumbakingresults.
TO SET MINUTE MINDER: Turnknob
in either directionto the desiredtime. MICROWAVEOVEN:
Whenthebuzzersounds,manuallytum Refer to the separate Use and Care
the MindertoOFR bookletfor informationon the micro-
wave oven.
-5-
 Loading...