

Page 1
Installation Instructions for the Hardinge
Quick-Change Collet System
Using the Hardinge Hydraulic Quick-Change Wrench
The type of machine and the size of the collet head determines which collet wrench size is used.
Install the Hardinge HQCm QuickGhange collet system as follows:
1.
lndex the spindle to the normal collet change position. Jogging the spindle until the keyway is vertical allows for an easier collet change reference.
2.
Power down the machine and remove the collet
from the spindle.
-
NOTE
The hydraulic wrench pin travel limits how far the
neck of the collet head is compressed.
compress the neck any further than necessary.
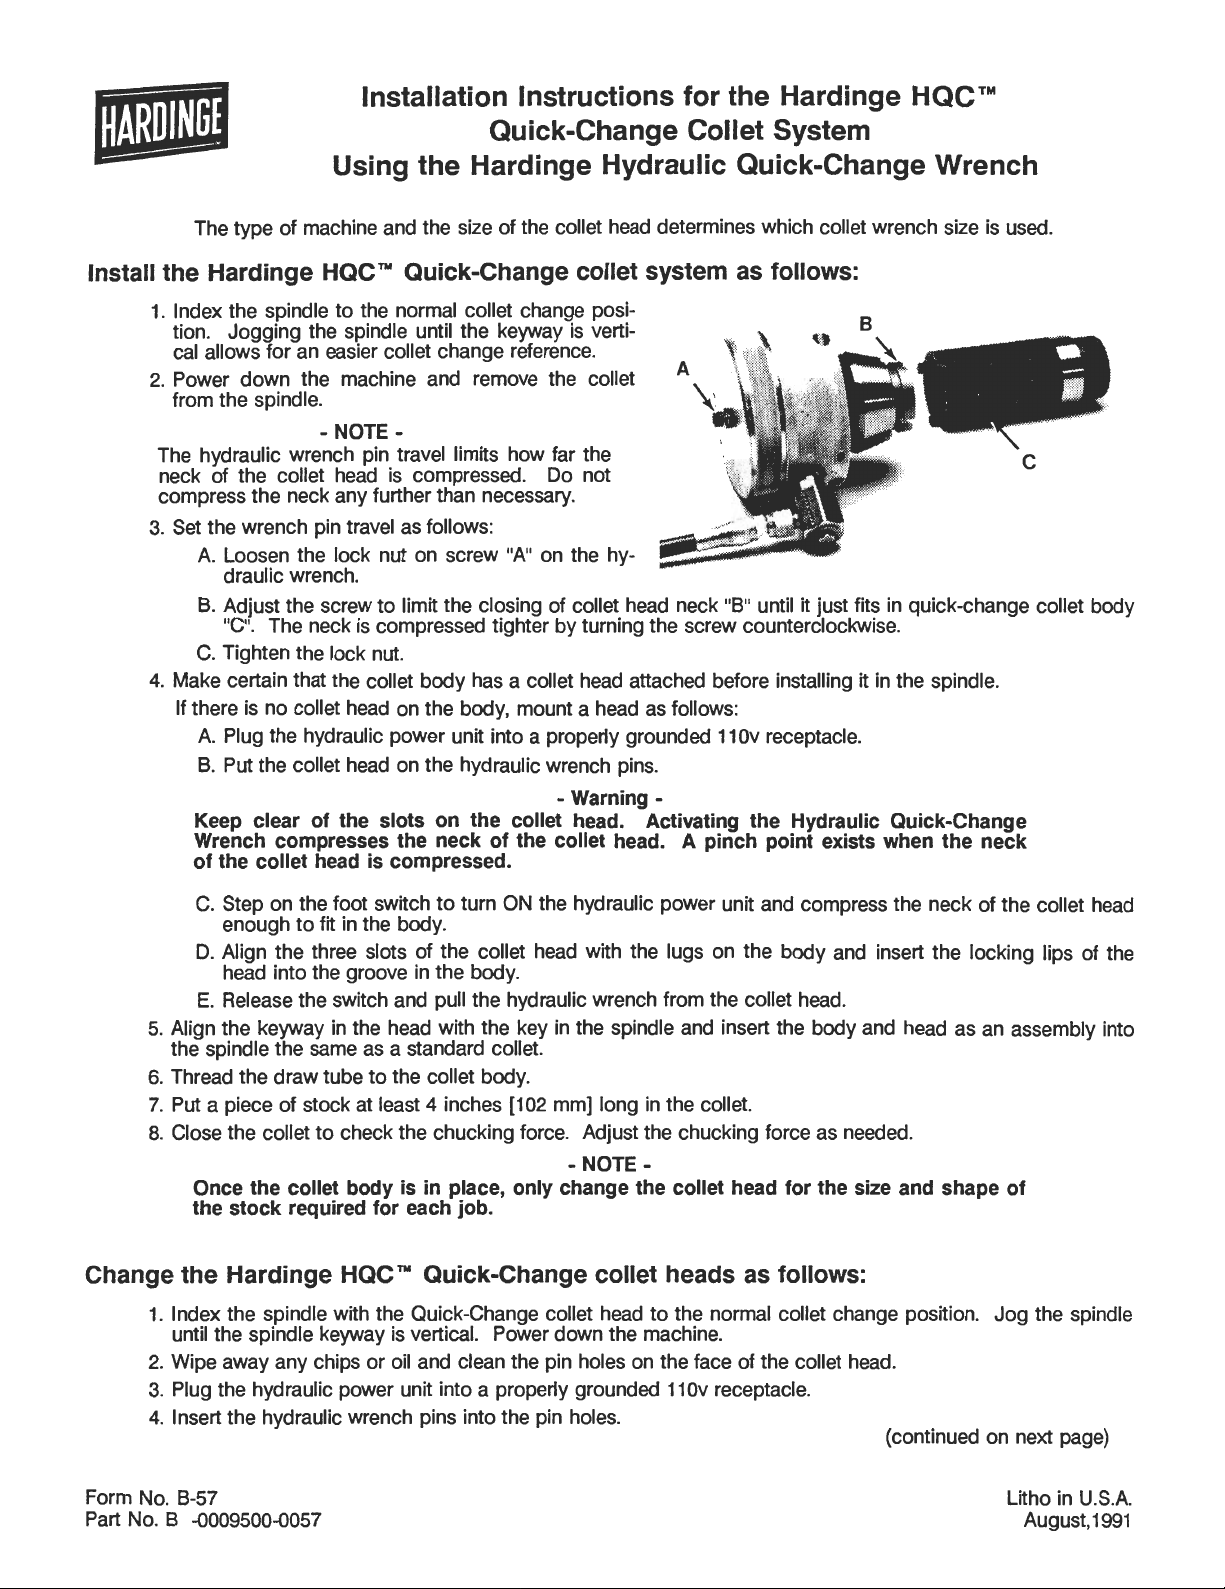
Set the wrench pin travel as follows:
A. Loosen the lock nut on screw
draulic wrench.
B.
Adjust the screw to limit the closing of collet head neck
"C".
The neck is compressed tighter by turning the screw counterclockwise.
C.
Tighten the lock nut.
Make certain that the collet body has a collet head attached before installing it in the spindle.
If there is no collet head on the body, mount a head as follows:
A. Plug the hydraulic power unit into a properly grounded 110v receptacle.
B.
Put the collet head on the hydraulic wrench pins.
Keep clear of the slots on the collet head. Activating the Hydraulic Quick-Change
Wrench compresses the neck of the collet head.
of the collet head is compressed.
-
Do not
"A
on the hy-
-
Warning
"B"
until it just fits in quick-change collet body
-
A
pinch point exists when the neck
HQCTM
Q
C.
Step on the foot switch to turn ON the hydraulic power unit and compress the neck of the collet head
enough to fit in the body.
D. Align the three slots of the collet head with the lugs on the body and insert the locking lips of the
head into the groove in the body.
E.
Release the switch and pull the hydraulic wrench from the collet head.
Align the keyway in the head with the key in the spindle and insert the body and head as an assembly into
the spindle the same as a standard collet.
Thread the draw tube to the collet body.
4
Put a piece of stock at least
Close the collet to check the chucking force. Adjust the chucking force as needed.
Once the collet body is in place, only change the collet head for the size and shape of
the stock required for each job.
inches [I02 mm] long in the collet.
-
NOTE
-
Change the Hardinge HQC" Quick-Change collet heads as follows:
1. lndex the spindle with the Quick-Change collet head to the normal collet change position. Jog the spindle
until the spindle keyway is vertical. Power down the machine.
2.
Wipe away any chips or oil and clean the pin holes on the face of the collet head.
3.
Plug the hydraulic power unit into a properly grounded 110v receptacle.
4.
Insert the hydraulic wrench pins into the pin holes.
(continued on next page)
Form No. B-57
B
Part No.
-0009500-0057
Litho in U.S.A.
August,lW
Page 2
5. Step on the foot switch to turn ON the hydraulic power unit until the neck of the collet head is compressed
enough to be removed from the body.
6. Remove the collet head from the body and spindle.
-
NOTE
DO NOT
movement will change the alignment between the spindle key and the lugs on the collet body.
7. Release the foot switch and pull the collet head from the hydraulic wrench pins.
8.
Install a clean collet head on the wrench pins.
Keep clear of the slots on the collet head. Activating the Hydraulic Quick-Change
Wrench compresses the neck of the collet head. A pinch point exists when the neck
of the collet head is compressed.
9.
Step on the foot switch to turn ON the hydraulic power unit and compress the neck of the collet head so
that it can be inserted in the body.
10. Align the head keyway with the key in the spindle while aligning the body lugs with the slots in the head;
then, insert the locking lips of the head into the groove in the body.
11. Release the foot switch and withdraw the hydraulic wrench from the collet head.
12.
Grip the collet head and pull on it to make certain that it is mounted securely in the body.
a
13. Put
14. Clean the collet heads as follows before they are stored or re-inserted in the collet body:
piece of stock in the collet. Close the collet and adjust the chucking force.
Collet heads may be difficult to re-insert in the collet body
cleaned from the head segments and inserts.
A.
Wipe oil and any contaminates from the head segments and inserts.
B.
Agitate the head in a container of cleaning solvent.
C. Use compressed air to blow off the excess solvent.
D.
Wipe the head dry with a clean shop towel.
E.
Re-insert the collet head in the body or store
stored, make certain that an anti-humidity chip is in the container to prevent rust.
JOG
the spindle while the collet head is removed from the collet body. Spindle
-
Warning
-
NOTE
-
-
-
if
oil and other contaminates are not
it
in the original tube or box. If the collet head is to be
Replace the Hardinge
1. Remove the collet head from the collet body per the instructions above.
2.
Wipe the head as clean as possible before replacing the inserts.
3. Pry the retaining plugs and insert material from the slots and clean the collet segment surfaces.
4. Place the tapered side of the insert toward the outside of the head and push
between the segments. Press the round tabs into the holes until they bottom.
5. Trim the inserts per drawing H-1100, which is included with each collet head. If the drawing information is
not available, trim the tapered tip near the neck and the long part of the insert which extends into the
opening in the center of the head as follows:
A.
Mark each part a minimum of 1/16 inch [I .6 mm] within the edges of the segments.
B.
Carefully remove the insert.
C. Cut the tabs at the mark.
6.
Replace the insert and press the round tabs fully into the bottom of the holes.
7. Repeat steps #3 through #6 to change the other two inserts.
8.
Make certain that all three inserts are bottomed fully in the holes.
9. Cover each of the insert holes with a round nylon retaining plug (Hardinge part number 7759).
10. Use a soft-faced hammer and tap each plug flush with the surface of the collet head.
HQC"
Quick-Change collet head inserts as follows:
-
NOTE
-
Remove and replace only one insert at a time.
Hardinge Brothers, Inc.
New
Elmira,
York
14902-1507
U.S.A.
it
down into the space
O
1991, Hardinge Brothers, lnc.
 Loading...