

Page 1

EAGLE BOOM
Operator’s Manual
67020304 - AU - 05/02
Page 2
2
EAGLE BOOM
EAGLE BOOM Operator’s Manual
Part number 67020304
May 2002 edition
Published by Hardi Australia Pty Ltd
Adelaide, South Australia
for Hardi Spraying Equipment Pty Ltd
Copyright © 2002 Hardi Australia Pty Ltd
All rights reserved
Writing and layout by Hardi Australia Pty Ltd
Printed in Australia
www.hardi.com.au
Hardi Spraying Equipment Pty Ltd assumes no responsibility
for any errors, inaccuracies or possible omissions in this
publication.
Illustrations, technical information and data are to the best
knowledge of Hardi Spraying Equipment Pty Ltd, correct at
the time of printing.
Hardi Spraying Equipment Pty Ltd reserves the right to make
changes in design, features, accessories, specifications and
instructions at any time and without notice.
Hardi Spraying Equipment Pty Ltd is without any obligation in
relation to products purchased before or after such changes.
All operators of the equipment dealt with by this publication
must read this entire publication prior to operating any of the
equipment. The safety section must be thouroughly read and
understood.
Failure to do so may result in injury or death.
After changing chemicals or crops it is essential that the
entire spraying system be flushed. Please refer to your
sprayer’s operator’s manual.
Failure to do so may lead to potential crop damage.
Page 3

3
EAGLE BOOM
ContentsContents
ContentsContents
Contents
Introduction .......................................................................... 4
Boom use .......................................................................4
Identification details ....................................................... 4
Safety .................................................................................... 4
Description ........................................................................... 5
Glossary ......................................................................... 5
Connection ........................................................................... 6
Connecting hydraulics.................................................... 6
Connecting electric controls ........................................... 6
Operation .............................................................................. 7
Release from transport supports.................................... 7
Boom folding and unfolding
(XY (Manual Fold) model) .............................................. 7
Boom folding and unfolding
(XY (Hydraulic Fold) model)........................................... 7
Boom folding and unfolding
(YZ model) ..................................................................... 7
Boom tilting
(YZ model) ..................................................................... 7
Maintenance ......................................................................... 8
Cleaning ............................................................................ 8
Lubrication .........................................................................8
8 Hours........................................................................... 8
25 Hours ........................................................................ 9
50 Hours ........................................................................ 9
Adjustments ....................................................................... 9
Checking and adjusting sprocket timing ........................ 9
Aligning wing assemblies ............................................... 9
Aligning intermediate and outer sections ..................... 10
Adjusting front fold cable ............................................. 10
Adjusting break-away clutch ........................................ 11
Adjusting wings level to ground ................................... 11
Adjusting centre frame .................................................12
Adjusting boomtransport position ................................ 12
Adjusting rear cable ..................................................... 13
Adjusting centre frame cables...................................... 13
Occasional maintenance .................................................13
Nozzle filters ................................................................13
Tubes and fittings......................................................... 13
Triplets (If fitted) ...........................................................14
Storage/Transportation ..................................................... 14
Safe transport and towing ............................................ 14
Off season storage ....................................................... 14
Troubleshooting ................................................................. 15
Specifications..................................................................... 17
Torque settings............................................................. 17
Materials and recycling ................................................ 17
XY model schematic .................................................... 17
YZ model schematic ....................................................17
Replacement Parts............................................................. 17
Page 4

4
EAGLE BOOM
Introduction
The reliability and efficiency of the HARDI
EAGLE boom depends upon your care. The
first step is to take the time to carefully read
this operator’s manual. It contains essential information
on efficient and safe operation of the HARDI EAGLE
boom.
Thankyou for choosing HARDI and welcome to the
increasing family of HARDI spraying equipment owners.
Boom use
The HARDI EAGLE boom is for use on a HARDI
sprayer - for the application of plant protection and liquid
fertiliser chemicals. The sprayer fitted with the EAGLE
boom must only be used for this purpose. It is not
allowable to use the sprayer for other purposes. If no
local law demands that the operator must be certified to
use spray equipment, it is strongly recommended to be
trained in the safe handling of plant protection chemicals
and plant protection, to avoid unnecessary risk for
persons and the environment.
Identification details
Please record applicable details below:
Producers Name: ...................................................
Size: .......................................................................
Model:.....................................................................
Date: .......................................................................
Dealer Name: .........................................................
Safety
This is the safety alert symbol:
When you see the symbol in this manual or on the
spraying equipment, be alert because it means
WARNING your safety is involved.
Note the following recommended precautions and safe
operating practices:
Read and understand this operator’s manual
before using the equipment. It is equally important
that other operators of this equipment read and
understand this manual.
You must read chemical labels and follow the
instructions they contain prior to using them.
Chemical labels are registered by the National
Registration Authority. However each state governs the purpose for which a chemical may be
used, this varies from state to state.
Local law may demand that the operator be certified to use spraying equipment. Adhere to the law.
Pressure test with clean water prior to using
chemicals.
Wear protective clothing.
Rinse and wash equipment after use and before
servicing.
Depressurise equipment after use and before
servicing.
Never service or repair the equipment whilst it is
operating.
Disconnect electrical power before servicing.
Always replace all safety devices or shields imme-
diately after servicing.
If an arc welder is used on the equipment or
anything connected to the equipment, disconnect
power leads before welding. Remove all inflammable or explosive material from the area.
Do not eat, drink or smoke whilst spraying or
working with contaminated equipment.
Wash and change clothes after spraying.
Wash tools if they have become contaminated.
In case of poisoning, immediately seek medical
advice. Remember to identify chemicals used.
Keep children away from the equipment.
Do not go under any part of the equipment unless it
is secured. The boom is secure when placed in the
transport brackets.
If any portion of this operator’s manual remains
unclear after reading it, contact your HARDI dealer
for further explanation before using the equipment.
Page 5

5
EAGLE BOOM
Description
The HARDI EAGLE boom is available in the
following sizes and models:
The 18-20 EAGLE booms are built with the same basic
components, with the 18 m having a different outer wing
section than the 20 m.
The 24-28 EAGLE booms are built with the same basic
components, with the 24 m having a different outer
section and different break-away section than the 28 m
(2.5 m on the 24 m boom and 2.8 m on the 28 m boom).
Components cannot be exchanged between 18-20
EAGLE and 24-28 EAGLE booms.
EAGLE booms are available in two different hydraulic
fold versions - XY and YZ. And one manual fold version
- XY.
XY (Manual Fold) model
Featuring hydraulic lift cylinder for boom height adjustment and manual boom wing fold and unfold.
XY (Hydraulic Fold) model
Featuring hydraulic lift cylinder for boom height adjustment and two-fold cylinders for simultaneous boom wing
fold and unfold.
YZ model
The same features as XY (Hydraulic Fold) model but
also has two boom wing tilt cylinders that give the ability
to obtain individual boom tilt as well as individual boom
wing fold.
Both hydraulic versions require one single acting hydraulic oulet and one double acting hydraulic outlet on
the tractor. The YZ model also requires a 12 volt connection for the in-cab mounted controls.
All EAGLE booms can be equiped with either single
Snap-Fit or Triplet Snap-Fit nozzle bodies.
Glossary
Right hand / Left hand sides
Are determined by facing the forward direction of travel.
Folded boom
Refers to the boom in transport position.
Unfolded boom
Refers to the boom in spray position.
Wing
Refers to the folding portion of the boom.
Intermediate wing section
Refers to the inner portion of the boom.
Outer wing section
Refers to the outer portion of the boom.
Break-away wing section
Refers to the breakaway portion of the boom.
Break-away
Refers to the device between the outer wing section and
breakaway wing section that allows the breakaway wing
section to swing backward if an obstacle is encountered.
Centre frame
Refers to the portion of the boom that the wings attach
to. The wings move up and down with the centre frame.
Gantry
Refers to the portion of the centre that is stationarily
attached to the sprayer frame and that the boom travels
on when raised and lowered.
Centre section
Refers to the section of the boom made up of the Centre
frame and Gantry.
Fig 1
A
B
C
D
A = Breakaway Wing Section
B = Outer Wing Section
C = Intermediate Wing Section
D = Centre Section
Page 6

6
EAGLE BOOM
Connection
The EAGLE boom requires:
• 1 single acting hydraulic outlet (All models)
• 1 double acting hydraulic outlet (All except XY
(Manual Fold) models)
• 1 12 volt power supply (YZ models only)
Connecting hydraulics
1 Attach the heavier (3/8”) hydraulic hose to the trac-
tor’s single acting outlet.
2 Attach the smaller (
1
/4”) hydraulic hoses to the
tractor’s double acting outlet.
IMPORTANT! Ensure hydraulic lines have not
been damaged during shipping.
IMPORTANT! Be sure to hook up hydraulic lines
properly!
WARNING! Improper hook-up can cause dangerous boom movements and/or damage to the
sprayer hydraulics.
WARNING! Ensure all connections are tight before
applying pressure. Search for leaks with a piece of
cardboard - not your hands!
WARNING! Escaping hydraulic fluid under pressure can penetrate the skin causing serious injury.
Avoid this hazard by relieving pressure before
disconnecting hydraulic lines.
WARNING! Always shut tractor off when connecting, servicing or adjusting boom.
Connecting electric controls
1 Attach the handle to the hydraulic lever that operates
the double acting outlet you intend to use. The
universal mounting bracket (E Fig 2) is very flexible
and a number of different mounting positions can be
used.
If required as an alternative to the handle, mount the
switch box in a suitable location in the tractor cab.
2 Connect the handle power plug or switch box power
plug (F Fig 2) to the tractors 12 volt power system.
Try to connect the handle or switch box as close as
possible to the battery for a better power supply.
HARDI recommends using electric distribution box
#817925 to insure a good power supply to various 12
volt attachments.
NOTE! Check with your HARDI dealer or your
tractor’s operator’s manual for the best location to
hook up the 12 volt system.
Polarity (+) (-)
Wire Colour Brown Blue
3 Connect the electric boom control plug (H Fig 2) to
the handle control plug or switch box control plug (G
Fig 2).
Fig 2
A
B
C
D
E
F
G
H
I
A = Left Fold Switch
B = Right Fold Switch
C = Left Tilt Switch
D = Right Tilt Switch
E = Universal Mounting Bracket
F = Handle Power Plug / Switch Box Power Plug
G = Handle Power Plug / Switch Box Control Plug
H = Boom Control Plug
I = Tractor Hydraulic Lever
A
B
D
C
HANDLE
SWITCH BOX
Page 7
7
EAGLE BOOM
Operation
CAUTION! Always operate boom on level
ground.
WARNING! Do not allow anyone near a hydraulic
boom in operation.
WARNING! Be cautious with initial use of the
hydraulic systems. If there is air in the system, this
may cause violent movements of the boom.
Therefore take care that no persons are hurt or
objects are damaged in the process of testing.
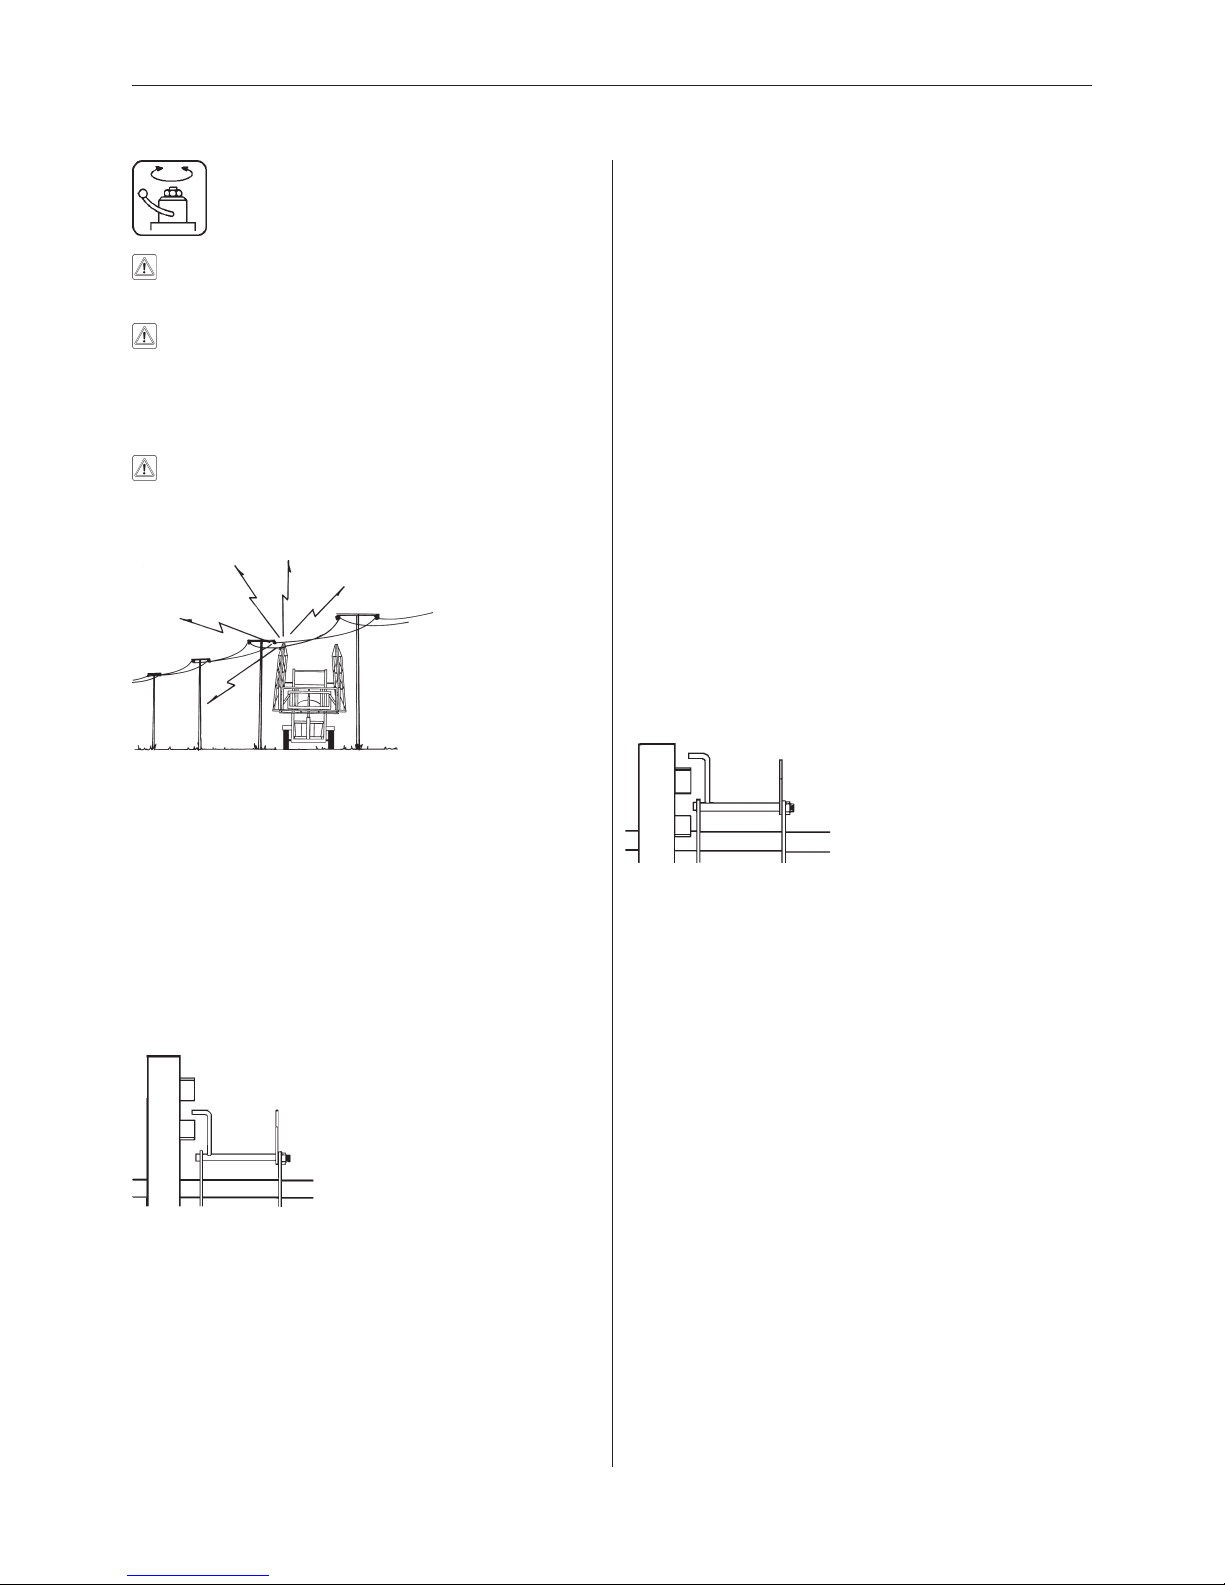
DANGER! When folding and unfolding the boom,
be sure that no person or objects are in the operating area of the boom, and that the boom cannot
touch overhead electrical wires.
Fig 3
Release from transport supports
1 Start tractor and bring engine to operating rpm.
2 Activate the single acting outlet to lift the boom out of
the transport supports.
NOTE! The boom has a rear transport hook in the
centre of the gantry. This hook has to be released
by lifting the boom with the single acting outlet until
the control arm of the hook appears between the
two flat bars of the hook guide (Fig 4).
Be careful not to bring the control arm past the
opening on the hook guide.
Fig 4
Boom folding and unfolding (XY (Manual Fold)
model)
1 Raise the boom to release it from transport supports.
2 Manually unfold each wing separately until the
mechanical lock on the wing is engaged
3 When the boom is completely unfolded, it can be
raised or lowered to desired spray height by activating the single acting hydraulic outlet.
4 Before attempting to fold boom wings back into the
transport position, the boom should be raised all the
way to the top by activating the single acting outlet.
5 Pull the cable to release the mechanical lock on the
wing, fold the wing by pushing it toward the boom
rest (assisted by a spring). Leave the folded wing
suspended above the boom rest and repeat the
process for the other wing.
Boom folding and unfolding (XY (Hydraulic
Fold) model)
1 Raise the boom to release it from the transport
supports.
2 Activate the double acting hydraulics outlet to unfold
the boom. Both wings will now unfold simultaneously.
3 When the boom is completely unfolded, it can be
raised or lowered to the desired spray height by
activating the single acting hydraulic outlet.
4 Before attempting to fold the boom wings back into
the transport position, the boom should be raised all
the way to the top by activating the single acting
outlet.
NOTE! This time the control arm on the hook
should be raised past the opening of the hook
guide (Fig 5).
Fig 5
When the boom has been raised high enough for the
control arm to go past the opening on the hook
guide, wings can be folded into transport position.
5 The boom is folded in by activating the double acting
outlet. The boom can now be lowered into the
transport supports. Ensure that the hook engages on
the crossbar on the gantry (rear transport).
Boom folding and unfolding (YZ model)
1 Raise the boom to release it from the transport
supports.
2 Depress the fold switches (A Fig 2) and (B Fig 2)
and move the hydraulic handle forward or rearward
to activate oil flow. If you do not like the direction
required to activate the boom, switch the positions of
the hoses in the double acting outlet.
3 One side folding can be acheived by following the
above procedure, except that only one of the
switches is depressed.
Boom tilting (YZ model)
1 Depress the fold switch (C Fig 2) or (D Fig 2) de-
pending on what side needs to be tilted, and move
the hydraulic handle to activate oil flow.
Page 8

8
EAGLE BOOM
Maintenance
In order to derive full benefit from the boom
for many years, the following maintenance
program should be followed.
IMPORTANT! Always read carefully through the
individual paragraphs regarding maintenance jobs
before starting the job. If any portion remains
unclear or requires facilities which are not available, then for safety reasons please leave the job
to your HARDI dealer’s workshop.For maintenance
of the sprayer, please refer to your sprayer’s
operator’s manual
.
To effectively maintain the boom you must:
1 Clean the boom as part of cleaning the sprayer, after
spraying is completed and before performing any
maintenance - Refer to
Cleaning
.
2 Lubricate the boom according to the lubrication
interval reached - Refer to
Lubrication
.
3 Perform Adjustments as needed following a daily
boom inspection - Refer to
Adjustments
(Page 9).
4 Perform Occasional maintenance jobs as needed
following boom inspections - Refer to
Occasional
maintenence
(Page 13).
5 Immediately fit Replacement parts for parts that are
worn or broken - Refer
Replacement Parts
(P.17).
Cleaning
The entire sprayer and the boom should be cleaned
together only (Refer to the
Cleaning
section in your
HARDI sprayer’s operator’s manual).
If you have a HARDI EAGLE boom fitted to an older
HARDI sprayer that does not have an operator’s
manual, or if you have a HARDI EAGLE boom fitted to a
non HARDI sprayer and you don’t have any form of
instructions or manuals, please read below for a brief
overview of cleaning:
NOTE! FOLLOW GUIDELINES ON CHEMICAL LABELS FOR
DILUTION AND CLEANING PROCEDURES AT ALL TIMES.
1 Dilute the remaining spray liquid in the tank with
at
least
10 parts of water and spray the liquid out into
the field you have just sprayed.
2 Select and use the appropriate protective clothing.
Select detergent suitable for cleaning and suitable
deactivating agents if necessary.
3 Flush and clean the sprayer and tractor externally.
Use detergent if necessary.
4 Remove all the filters and clean them - be careful not
to damage their mesh. Re-fit the filters when the
sprayer is completely clean.
5 Clean the pressure relief valve and attached hose of
any residue.
6 With the pump running, flush inside of the main tank
(remember the tank roof). Flush and operate all
components and any equipment that has been in
contact with the chemical. Before opening the
distribution valves and spraying the liquid out,
identify a suitable disposal method for the solution.
7 After spraying the liquid out, stop the pump and fill at
least 20% of main tank with clean water. Note that
some chemicals require the tank to be completely
filled. Add appropriate detergent and/or deactivating
agent, e.g. Washing Soda or Triple Ammonia.
8 Start the pump and operate all controls, enabling the
liquid to come in contact with all the components.
Remove end plugs on boom tubes while pump is not
running, then flush with clean water to ensure thorough removal of residue. Leave the distribution
valves until last. Some detergents and deactivating
agents work best if left in the tank for a short period.
Check the label.
9 Drain the tank and if the pump is able to - let the
pump run dry. Flush the inside of the tank, again
letting pump run dry (if possible).
10 If the chemicals used have a tendency to block
nozzles and filters, remove and clean them now.
11 Re-fit all the filters and nozzles and store the
sprayer. If from previous experiences, it is noted that
the solvents in the chemicals are particularly aggressive, store the sprayer with the tank lid open.
Lubrication
Recommended lubrication intervals and lubricants are
as follows.
8 Hours
Gantry and centre frame
Apply new grease to the wear surfaces of the gantry
and the centre frame (Fig 6).
1 Apply grease to the inner and outer wear surfaces of
the lower portion of the gantry with the boom hanging
in the transport hook.
2 Apply grease to the inner and outer wear surfaces of
the upper portion of the gantry with the boom unfolded and lowered all the way down.
Fig 6
Outer
Wear
Surfaces
(Run vertical
along entire
length)
Inner
Wear
Surfaces
(Run
vertical
along
entire
length)
Page 9
9
EAGLE BOOM
Boom
Grease the points indicated in Fig 7. These are labelled
on the boom as well.
Fig 7
Break-away clutch
WARNING! Never place fingers into open break-
away clutch or you may be injured should clutch
snap closed.
1 Unfold the boom into the spray position.
2 Standing in front of the outer wing section, snap the
breakaway open by quickly pushing the wing away
from you.
3 With the two clutches opened up, stick the nozzle of
a grease gun into the clutch and apply a generous
amount of grease.
4 Apply oil to the top of the breakaway hinge to lubri-
cate the bushing.
25 Hours
Chain and sprocket
Oil the entire length of the chain and all of the sprocket.
Grease sprocket shafts only where indicated in Fig 8.
Fig 8
50 Hours
Gantry and centre frame
The grease on the gantry and centre frame should be
completely cleaned off with a degreasing solvent and
new grease applied. Follow the
8 Hours
steps for
Gantry
and centre frame
for applying the new grease.
Adjustments
IMPORTANT! To maximise boom life and perform-
ance, re-tighten all boom fasteners and inspect the
boom for proper adjustment after the first 8 hours
of use.
IMPORTANT! Make it a daily (8 hours) habit to
inspect the boom for need of adjustment.
IMPORTANT! Every 40 hours, the break-away
clutch cap screws (A Fig 14) must be torqued to 55
Nm to prevent boom damage.
Checking and adjusting sprocket timing
1 With boom unfolded in the spraying position and
standing on the front side of the boom, check to
ensure that on the 18-20 boom, the 7th pin connection (A Fig 9) in the timing chain, is aligned with the
centre line between the sprocket cap screws (B Fig
9). For the 24-28 boom - 6th pin.
2 To adjust timing, loosen turnbuckles on the front and
rear cables until slack.
3 18-20 boom: Standing on the front side of the
boom, position the 7th pin (A Fig 9) of the timing
chain on the sprocket as indicated in step 1.
24-28 boom: Standing on the front side of the
boom, position the 6th pin (A Fig 9) of the timing
chain on the sprocket as indicated in step 1.
4 Adjust front and rear cable tension (Refer to
Adjust-
ing front fold cable
(Page 10) and
Adjusting rear
cable
(Page 13)).
Fig 9
Aligning wing assemblies
1 With the boom unfolded and in the working position,
check alignment of the intermediate section with the
centre frame.
Right Wing Sprocket
Rear
B
A
Oil
Grease
Page 10

10
EAGLE BOOM
2 With the fold cylinder pressurised, determine if the
intermediate section needs to be adjusted to the front
or rear to come into alignment with the centre frame.
NOTE! Because of adjustments made later, it is
better to start with the wing assemblies angled
slightly to the rear.
3 Relieve pressure from cylinder by folding boom in a
few inches.
NOTE! Cylinder rods have a machined flat, which if
visible, can be used for adjustments. If using the
machined flat for adjustment, leave the rod eye
pinned to the boom and loosen the lock nut. Refer
to Fig 19.
4 Disconnect the cylinder rod eye (B Fig 10) from the
intermediate boom section.
5 Loosen the lock nut (A Fig 10) and adjust the rod eye
(B Fig 10) in to move boom forward or out to move
boom rearward. Tighten the lock nut (A Fig 10).
6 Attach the cylinder rod to the boom and pressurise
the cylinder to check boom alignment.
Fig 10
Aligning intermediate and outer sections
18-20 boom
1 Unfold the boom into the operating (spraying) posi-
tion.
2 Hold the M12x100 adjusting bolt, loosen the lock nut
(A Fig 11), and turn the nut (B Fig 11) so the cap of
the bolt head (C Fig 11) contacts the top stop plate
with the outer and intermediate sections aligned.
3 Check to ensure that the lock nut is tight.
Fig 11
24-28 boom
1 Unfold the boom into the operating (spraying) posi-
tion.
2 Hold the M12x70 adjusting bolt, loosen the lock nut
(A Fig 12), and turn the nut (B Fig 12) so the cap of
the bolt head (C Fig 12) contacts the stop plate with
the outer and intermediate sections aligned.
3 Check to ensure that the lock nut is tight.
Fig 12
Adjusting front fold cable
WARNING! Rear cable can snap and injure you or
someone else if tensioned when the boom is
unfolded. Always adjust the front cable first with
the boom unfolded and the rear cable last with the
boom folded in the transport position.
1 Unfold the boom into the operating (spraying) posi-
tion.
2 Shut the tractor off.
3 Slide a straight edge down the underside of the
intermediate section until it just contacts the front
cable.
CB
A
A
B
C
B
A
Page 11

11
EAGLE BOOM
4 Suspend a 4.5kg weight from the cable at the
straight edge to the cable contact point and check
cable deflection by measuring the distance from the
straight edge to the cable. The cable should deflect
13-20 mm.
5 Loosen the lock nuts (A Fig 13) on the turnbuckle
assembly and adjust the turnbuckle (B Fig 13) for
proper cable deflection.
6 Tighten the lock nuts (A Fig 13) and remove the
weight.
IMPORTANT! Check the boom alignment again. If
the front cable was tightened, the wing assembly
will move forward; If loosened, the wing will move
rearward. Adjust the fold cylinder (if necessary) as
described in
Aligning wing assemblies
(Page 9).
Fig 13
Adjusting break-away clutch
1 Check that the lower nut (D Fig 14) is fully tightened.
2 The breakaway wing section should pivot around the
axle shaft (E Fig 14). Ensure that the breakaway
wing section (F Fig 14) is free to move.
3 Loosen the lock nut. (B Fig 14).
4 Tighten the adjusting nut (C Fig 14) to stiffen clutch
action. The clutch is properly tensioned when the
breakaway wing section returns to alignment with the
outer wing section after breaking away. Tighten the
lock nut (B Fig 14) after adjustment.
Fig 14
Adjusting wings level to ground
18-20 XY (Hydraulic Fold) boom
1 Loosen the lock nut (A Fig 15).
2 Adjust the adjusting nut (B Fig 15) in or out until the
wing is level to the ground.
3 Secure the lock nut (A Fig 15).
Fig 15
24-28 XY boom
1 Loosen the lock nuts (A Fig 16).
2 Adjust the length of the rod (B Fig 16) until the wing
is level to the ground. If the rod is removed to adjust
the length, the wing must be supported.
3 Secure the lock nuts (A Fig 16).
A
B
CD
E
F
A
B
A
B
Page 12

12
EAGLE BOOM
Fig 16
YZ boom
1 Loosen the lock nut (A Fig 17).
2 Apply an adjustable wrench to the machined surface
(B Fig 17).
3 Turn the cylinder rod until the boom is level to the
ground.
4 Secure the lock nut (A Fig 17).
A B
Fig 17
Adjusting centre frame
This adjustment will affect the trapeze function and must
therefore be done properly.
IMPORTANT! Lubricate the pivot linkage and
grease the skid plates prior to adjustment. Refer to
Gantry and centre frame
for both
8 Hours
(Page 8)
and
50 Hours
(Page 9).
1 Park the sprayer on level ground.
2 Tighten the adjustment bolts (A Fig 18) in approxi-
mately half a turn.
3 Lift the boom all the way to the top, then lower the
boom all the way down.
4 Repeat the above procedure until the centre frame is
firmly adjusted inside the gantry.
5 If the boom will not lower all the way down, the bolts
need to be loosened again.
B
A
6 Tighten the four adjustment bolts (B Fig 18) approxi-
mately half a turn.
7 Grasp the wing by the end and lift it approximately 50
cm. Let the wing go and it should go down to approximately horizontal position.
8 Repeat the above process until the boom is firmly
held in place, but without affecting the trapeze
function.
9 If the trapeze will not let the boom go back to the
horizontal position, the bolts must be loosened again.
Fig 18
Adjusting boomtransport position
Manual fold boom
1 Fold the boom into the transport position. Determine
if the boom sections need to be adjusted inwards or
outwards.
2 The manual fold “cylinder” has an inner and an outer
section. The inner section has a turnbuckle on both
ends. One turnbuckle is quite obvious and can be
adjusted by loosening the nut, while the other
turnbuckle protrudes through the inside of the outer
section - to adjust it, the inner and outer sections
must be pulled apart, the turnbuckle turned and
reassembled.
NOTE! If under adjusted, the boom may sit too
close to the boom rest guards. If over adjusted, the
boom may be unable to be locked in the open
position.
Hydraulic fold boom
1 Lift the boom all the way to the top.
2 Fold the boom into the transport position. With the
fold cylinder pressurized, determine if the boom
sections need to be adjusted inwards or outwards.
NOTE! The boom should be approximately 2-5 cm
inside front transport support.
A
B
Page 13

13
EAGLE BOOM
3 If the boom rests too far in on the transport support,
loosen the lock nut (B Fig 19) and adjust the collar
(A Fig 19) in towards the cylinder housing.
4 If the boom rests too far out on the transport support,
the collar (A Fig 19) has to go out from the cylinder
housing.
5 Secure the lock nut (B Fig 19).
6 Pressurise the cylinder to see if the boom is properly
adjusted. If not, repeat the above procedure until it is
correctly adjusted.
Fig 19
Adjusting rear cable
WARNING! Rear cable can snap and injure you or
someone else if tensioned when the boom is
unfolded. Always adjust the front cable first with
the boom unfolded and the rear cable last with the
boom folded in the transport position.
1 Raise the boom to its highest position. Fold the
boom to the transport position with the tilt cylinders (if
fitted) fully extended. Make sure fold cylinders are
pressurised and that the boom is folded all the way
in.
NOTE! If you have a YZ model, shut the fold
switch off.
2 Shut the tractor off.
3 Loosen the lock nuts on the turnbuckle. Adjust
(tighten) the turnbuckle so that the outer wing section
contacts the boom transport stop bracket. Tighten
the turnbuckle another 4 complete turns (24-28 boom
- tighten the turnbuckle 3 turns only) and re-tighten
the lock nuts.
Adjusting centre frame cables
IMPORTANT! Never attempt to adjust the centre
frame cables without having the boom folded all
the way into the transport position!
Centre frame cables work together to keep the centre
frame square to the gantry, while folding boom in for
transport or when spraying with one side raised and
folded.
1 Fold the boom into the transport position.
2 Shut the tractor off.
3 Check that the tilt cylinders (if fitted) are completely
retracted. Adjust if necessary.
4 Loosen the lock nuts.
IMPORTANT! Alternate from side-to-side while
making adjustments. Adjust one cable a small
amount, and then the other - to equalize cable
tension and maintain a level centre frame.
5 Properly adjusted cables will be very tight and only
deflect a small amount (fractions of a centimetre)
when pulled on by hand.
6 Tighten the lock nuts.
7 Unfold the boom to operating (spraying) position.
8 Fold the boom and check that the centre frame
remains square to gantry.
Occasional maintenance
Make it a regular habit to inspect the boom for need of
occasional maintenance.
Nozzle filters
Each nozzle assembly is equipped with a 100 mesh
filter screen as standard on units equipped with yellow
Color Tips. A properly maintained suction filter and self
cleaning Filter will eliminate blocking the screens and
nozzles.
NOZZLE SUCTION SELF-CLEANING NOZZLE
SIZE FILTER FILTER SCREEN
Lilac (08) 50 100* 100*
Brown (10)
Yellow (12)
Orange (14)
Red (16) 50* 80 80
White (18)
Green (20) 30 50 50
& Larger
*Standard mesh
Tubes and fittings
Poor seals are usually caused by:
• Missing O-rings or gaskets
• Damaged or incorrectly seated O-rings
• Dry or deformed O-rings or gaskets
• Foreign materials
Therefore, in case of leaks, do not over-tighten. Disas-
semble, check condition and position of O-ring or
gasket, clean, lubricate and reassemble.
For radial connections, only hand tighten them.
The O-rings need to be lubricated all the way around
before fitting on to the nozzle tube.
HARDI recommends using a vegetable
based oil to prolong the life of the O-ring.
24-28 m
18-20 m
A
A
A = Collar
B = Lock Nut
B
B
Page 14

14
EAGLE BOOM
Storage/Transportation
Safe transport and towing
Keep all persons away from the sprayer when
folding the boom.
Transport booms only when booms folded and resting in
transport support arms.
Ensure the transport hook on the gantry is engaged
properly.
Maximum transport speed is the lesser of:
20 km/h less than the posted speed limit; and
30 km/h; and
The tyre manufacturers maximum speed.
Have warning lights flashing when transporting or towing
a sprayer.
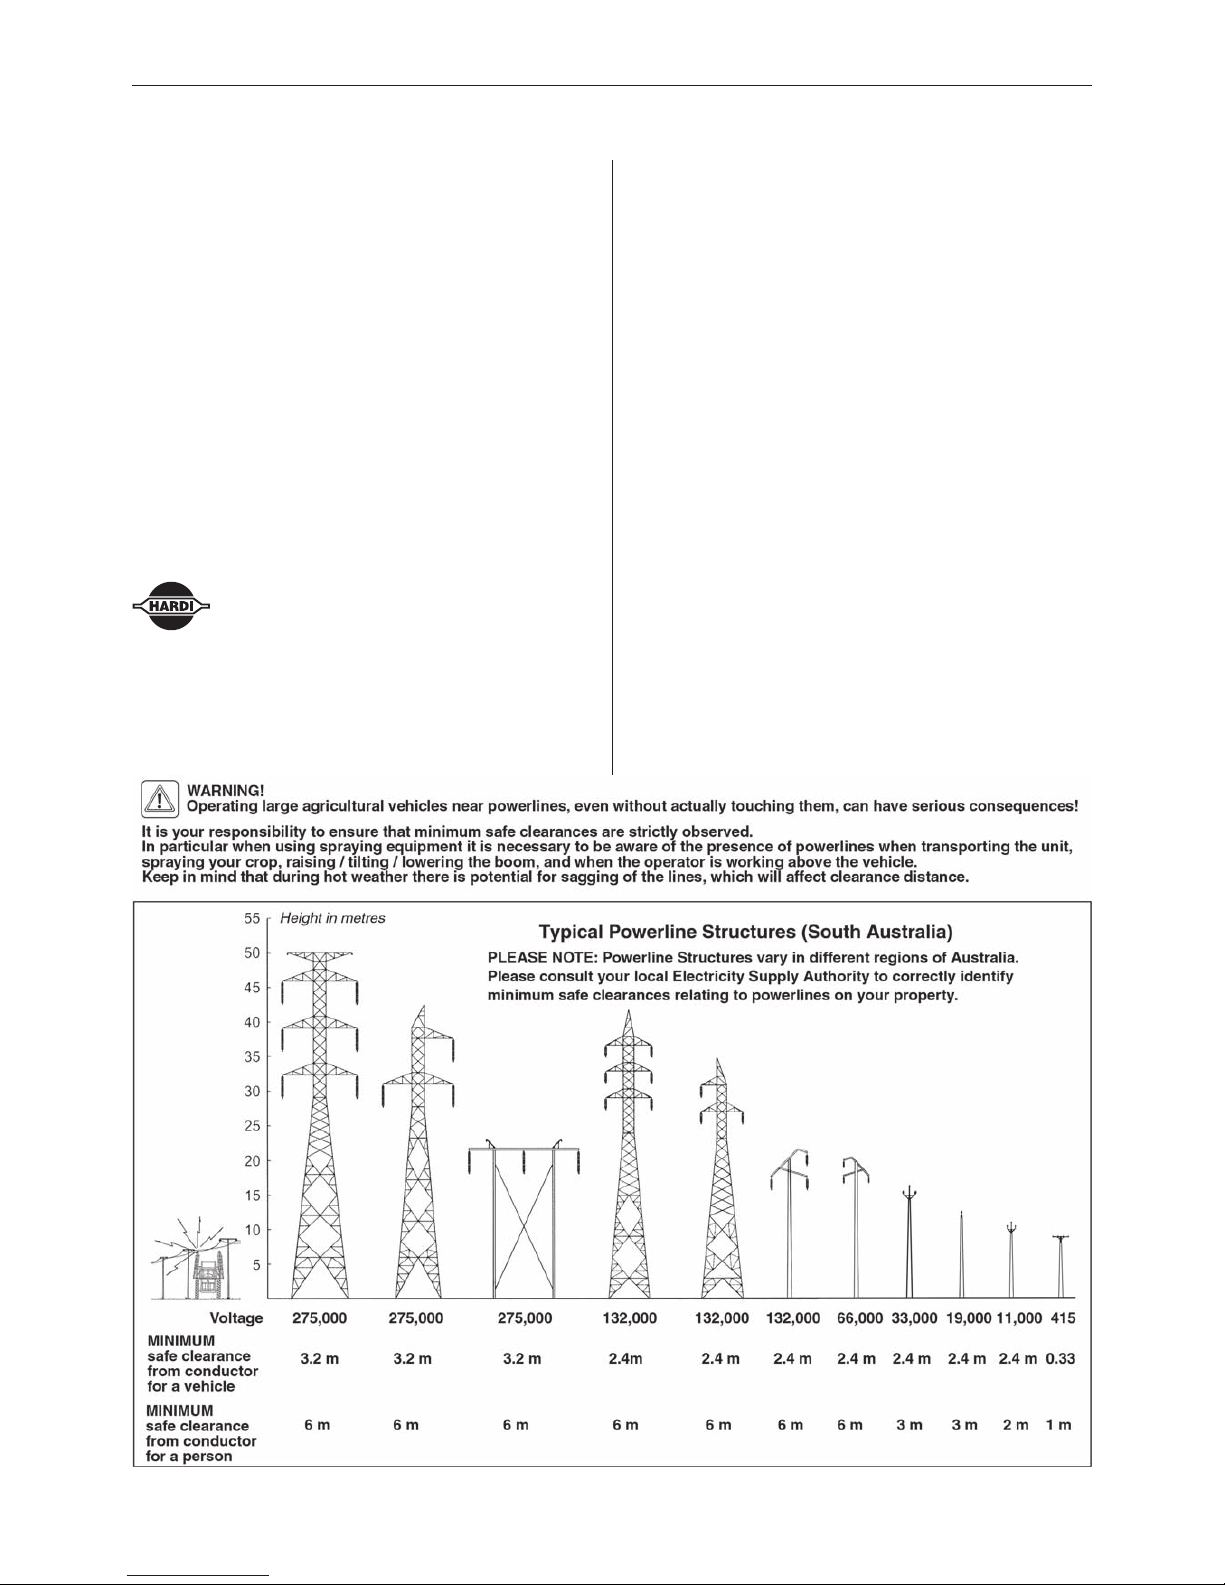
DANGER! Keep away from overhead powerlines
to avoid serious injury or death to yourself or
someone else. Know the transport height of the
sprayer, and minimum clearances (see p 2).
Off season storage
When the spraying season is over, you should devote
some extra time to cleaning and preparing the sprayer
for storage.
Please refer to the
Storage
section in your HARDI
sprayer’s operator’s manual regarding preparation
before and after off season storage.
If you have a HARDI EAGLE boom fitted to an older
HARDI sprayer that does not have an operator’s
manual, or if you have a HARDI EAGLE boom fitted to a
non HARDI sprayer and you don’t have any form of
instructions or manuals, please read below for a brief
overview of storage preparation:
To preserve the sprayer and protect the components,
carry out the following off season storage program.
1 Clean the sprayer completely - inside and outside.
Make sure that all valves, hoses and auxiliary equipment have been cleaned with detergent and flushed
with clean water, so no chemical residues are left in
the sprayer.
2 Renew damaged seals and repair leaks.
3 Empty the sprayer completely and let the pump work
for a few minutes. Operate all valves and handles to
drain as much water off the spraying circuit as
possible. Let the pump run until air is coming out of
all the nozzles (If possible). Remember to drain the
flushing tank. Ensure the foam marker is rinsed and
drained.
4 If the sprayer is not to be stored in a frost free place,
pour in a mixture of Ethylene Glycol based antifreeze and water at the ratio for the desired temperature protection. Volume of mixture should be about
1% of tank volume. Run the sprayer and circulate the
anti-freeze in the pump, controls and boom lines.
Fig 20
Triplets (If fitted)
Every 50 hours the Triplets should be disassembled,
removed and cleaned. This is done by pulling out the
stainless clip on the side of the Triplets assembly (Fig
21).
Clean the bottom part as well as the top part thoroughly.
Coat the O-ring with a light film of vegetable oil or “O-
ring Grease” if the sprayer is to be stored for a long
period of time.
If the Triplets are not cleaned regularly, possible damage to them may occur.
WARNING! Never service your contaminated
nozzle without wearing chemical resistant gloves
and safety goggles.
Fig 21
Page 15

15
EAGLE BOOM
Troubleshooting
In cases where breakdowns have occurred,
the same factors always seem responsible.
Usually hydraulic components that are contaminated
with dirt result in rapid wear to the hydraulic system.
Therefore always check hydraulic components are
maintained, clean and free from leaks.
5 Lubricate all lubricating points regardless of intervals
stated.
6 When the sprayer is dry remove rust from scratches
or damages and touch up with paint.
7 Remove any Glycerine filled gauges and store them
in a frost free vertical position.
8 Apply a thin layer of anti-corrosion oil to all metal
parts, hoses and tyres. There are many factors that
affect the selection of protective oils, such as temperature and humidity during storage, exposure to
UV, salt and the effects of residual crop treatment
chemicals, and your local distributor of oil products
will be able to advise on the best specific formula for
your local conditions. Products that may be suitable
to protect your equipment until the next spraying
season are SHELL ENSIS fluid, or one of the
CASTROL RUSTILLO range of products, eg
DW9011M1.
9 Fold the boom to the transport position and relieve
pressure from all hydraulic functions.
10 All electric plugs and sockets are to be stored in a
dry plastic bag to protect them against damp, dirt and
corrosion.
11 Remove any control boxes (if fitted) from the tractor
and store them inside where it is clean and dry.
12 Wipe the hydraulic snap-couplers clean and fit the
dust caps.
13 Apply grease on all hydraulic ram piston rods that
are not fully retracted in the barrel, to protect against
corrosion.
14 Chock up the wheels, to prevent moisture damage
and deformation of the tyres. Tyre blacking can be
applied to the tyre walls to preserve the rubber.
15 To protect against dust the sprayer can be covered
by a tarpaulin. Ensure ventilation to prevent condensation.
After a storage period the sprayer should be prepared
for the next season the following way:
1 Remove the cover.
2 Remove the support from the wheel axle and adjust
the tyre pressure.
3 Wipe off the grease from hydraulic ram piston rods.
4 Fit any pressure gauges again (seal with teflon tape).
5 Connect the sprayer to the tractor including hydrau-
lics and electrics.
6 Check all hydraulic and electric functions.
7 Empty the remaining anti-freeze from the tank (If
used).
8 Rinse the entire liquid circuit of the sprayer with
clean water.
9 Fill with clean water and check all functions.
Page 16

16
EAGLE BOOM
Problem Probable cause Control / Solution
XY model hydraulics
Will not fold
Hydraulic lines not connected
properly
Check the lines for proper connection
Dirt in restrictors on cylinders Remove restrictors and clean them
Hydraulic oil bypassing safety valve
in control box
Remove safety valve and clean and replace
YZ model hydraulics
Will not fold
Hydraulic lines not connected
properly
Check the lines for proper connection
Dirt in restrictors on cylinders Remove restrictors and clean them
Hydraulic oil bypassing safety valve
in control box
Remove safety valve and clean and replace
Switches for hydraulic functions not
turned on
Turn proper switches on
Cable from sprayer not attached to
control box
Attach cable to control box
No power supply to control box Check all connections and cables in power
supply
Cable from control box to hydraulic
manifold is damaged
Replace cable
Boom wings
Boom won’t fold completely in or out
Fold cylinder needs adjustment Adjust fold cylinder
Shut switches off after unfolding boom (YZ
models only)
Boom won’t stay in
spray position
Switches on
Shut off switches not used (YZ models only)Boom folds when
activating tilt or vice
versa
Switches on
Boom must be completely unfolded, then fold
desired wing in (YZ models only)
Wing to be kept folded
swings out when unfolding other side
Boom not completely unfolded
Adjust breakaway, replace clutches if worn
Breakaway won’t hold
outer wing stable
Worn or improperly adjusted
clutches
Grease gantryBoom won’t go up or
down
Gantry needs greasing
Grease on gantry is dry and dirty
Clean grease off gantry and replace with fresh
grease
Centre is too tight to gantry
Re-adjust centre to gantry
Tractor out of hydraulic fluid
Check and fill hydraulic fluid
Page 17

17
EAGLE BOOM
Replacement Parts
This section is to be used to help you identify
the replacement part numbers of many
common parts on the EAGLE boom - it is not as comprehensive as the
Spare Parts
manual at your HARDI
dealer.
So if a part is not covered in this section, or is difficult to
determine, you will need to contact your HARDI dealer.
Every part illustrated in this section has a number or is
shown as part of a group of parts in a numbered kit.
This number is the HARDI parts number for the part or
kit of parts.
Note that drawing numbers used in this section do not
represent any HARDI parts drawing numbers - they are
simply used for cross-referencing within this manual.
Title Drawing Page
18-20 XY Boom Centre Drg 1 18
18-20 XY (Manual Fold) Boom
Wing - Navigator Only Drg 2 19
18-20 XY (Hydraulic Fold) / YZ Boom
Wing Drg 3 20
18-20 YZ Boom Centre Drg 4 21
18-20 XY Boom Hydraulics Drg 5 22
18-20 YZ Boom Hydraulics Drg 6 23
24-28 XY / YZ Boom Centre Drg 7 24
24-28 XY / YZ Boom Wing Drg 8 25
24-28 XY Boom Hydraulics Drg 9 26
24-28 YZ Boom Hydraulics Drg 10 27
Boom Hydraulic Cylinders Drg 11 28
Boom Tube Snap-Fit Drg 12 29
Boom Tube Triplet Snap-Fit Drg 13 30
Hardi Nozzles Drg 14 31
Specifications
1 Nm = 0.738 lbf-ft
Torque settings
BOLT TORQUE (Nm)
Break-away clutch cap screws 55
M12 bolts 77
M16 bolts 190
Materials and recycling
Hoses PVC
Fittings PA
When the equipment has completed its working life, it must
be thoroughly cleaned. The hoses and synthetic fittings can
be incinerated at an authorised disposal plant. The metallic
parts can be scrapped. Always follow local legislation regarding disposal.
XY model schematic
Fig 22
YZ model schematic
Fig 23
TO TRACTOR
RIGHT FOLD
LEFT FOLD
LIFT
TO TRACTOR
RIGHT TILT
RIGHT FOLD
LEFT FOLD
LEFT TILT
LIFT
Page 18

18
EAGLE BOOM
172109
420604
172108
440708
334135
171999
460585
637048
615213
283699
637064
210652
615221
390464
615211
220802
460806
460585
637065
440708
334135
421218
210652
460423
220867
284645
460423
281606
242281
460386
281912
146738
460327
460585
283699
615256
460585
637049
284873
284552
460342
460342
450317
220893
637663
440708
334135
194418
460585
430765
460261
615769
283699
430864
160196
471128
151872
480384
146324
637054
637062
471122
421214
430765
471128
151872
480384
147350
460423
480384
460585
144771
471129
Drg 5
480384
142144
240866
283876
146850
231906
410686
410362
172053
460261
615213
283699
18-20 XY Boom Centre
Drg 1
460423
XY (Man): Drg 2
XY (Hyd) & YZ: Drg 3
XY (Man): Drg 2
XY (Hyd) & YZ: Drg 3
XY (Man): Drg 2
XY (Hyd) & YZ: Drg 3
242089
390465
430721
194238
Page 19

19
EAGLE BOOM
615771 / 615772
146843
172213
460143
420847
173247
460143
450564
142881
280501
615767 / 615768
18-20 XY (Manual Fold) Boom Wing - Navigator Only
Drg 2
147347
420906
146587
480384
637806
730607
147346
220732
160311
480719
283699
460423
461198
615533
147348
460703
163074
166865
460423
160776
160776
421233
637387
461251
461228
144292
166246
460585
220771
111574
111344
637091
284127
220334
460703
460261
170512
160521
430846
430721
615357
172931
460703
194448
167156
410686
430721
460703
170512
637093
430932
460386
167156
242089
460423
18m: 637734 / 637735
20m: 637736 / 637737
166865
460423
420965
460342
614488
158892
461210
615770
615220
283699
430404
460703
637092
283699
460806
283699
Drg 1
637072 / 637067
Page 20

20
EAGLE BOOM
18-20 XY (Hydraulic Fold) / YZ Boom Wing
Drg 3
460585
166865
460423
160776
160776
421233
637387
461251
461228
144292
166246
460585
220771
111574
111344
637091
284127
220334
460703
460261
170512
160521
430846
430721
615357
172931
460703
194448
167156
410686
430721
460703170512
637093
430932
460386
167156
242089
460423
18m: 637734 / 637735
20m: 637736 / 637737
166865
460423
420965
460342
614488
158892
461210
615770
615220
283699
XY: Drg 5
YZ: Drg 6
430404
460703
637092
283699
460806
460143
471126
160887
420803 615658
163936
410347
480384
146587
460143
172213
471126
410605
283699
637072 / 637067
160181
471124
460261
XY: Drg 1
YZ: Drg 4
334603
460261
420567
Page 21

21
EAGLE BOOM
Page 22

22
EAGLE BOOM
750213
231906
283876
231907
283870
781040
L
240866
146850
283426 / 283415
724899
460261
411008
284086 230963
230963
284086
284494 / 283426
146839
461198
615533
146992
461249
781056
F
240866
146835
750255
F
L
240866
210728
18-20 XY Boom Hydraulics
Drg
5
Page 23

23
EAGLE BOOM
Page 24

24
EAGLE BOOM
24-28 XY / YZ Boom Centre
Drg
7
XY: Drg 9
YZ: Drg 10
XY: Drg 9
YZ: Drg 10
Drg 8
Drg 8
Drg 8
172737
460423
334135
440708
390465
284645
172673
460386
430721
460585
460327
615484
390464
220802
460806
637440
440708
334135
460585
210652
242089
637431
284552
284873
637443
420604
421218
460585
637430
615213
283699
615465
210652
220859
460423
210652
147099
461249
147100
461249
147099
480384
146450
146738
281912
283699
615213
334135
440708
480384
146450
334135
440644
430910
146124
460585
460806
637452 /
637451
460585
146124
460703
210652
460806
410281
172729
460261
410185
160677
460261
615477
440708
334135
460585
160640
615497
283699
430864
460585
440708
334135
242281
281606
440708
334135
460585
637429
480384
460423
637062
420604
615464
430706
146451
471129
430581
637432
460585
420663
460423
614402
Page 25

25
EAGLE BOOM
24-28 XY / YZ Boom Wing
Drg 8
Drg 7
24m: 637387
28m: 637587
460585
166865
460423
160766
421233
410443
160183
460261
471124
24m: 637448 / 637449
28m: 637491 / 637492
460261
410443
160656
471124
3/4": 172728
1": 171128
461251
461228
144292
166246
220771
111574
111344
430721
3/4": 615483
1": 615629
460261
460703
3/4": 172728
1": 171128
637453
430721
410583
637450 / 637444
421083
460423
430874
460386
430885
165557
160624
460703
460703
242089
283699
637454 / 637455
430721
615348
460327
151528
461230
615596
460703
637460
430721
615561
460327
461230
430721
172730
460703
615560
151473
480384
146589
615480
460423
460143
172213
430721
460703
637461
460806
3/4": 981538
1": 981488
410524
160655
460261
471124
283699
637063
471124
410347
334603
460261
421232
XY: Drg 9
YZ: Drg 10
460585
Page 26

26
EAGLE BOOM
755415
231906
283876
781011
240866
146850
283404230963
284086
283870
231907
724899
460261
284086
411008
230963
283788
146839
615535
461200
146672
147167
146671
240866
781023
750214
240866
146839
F
L
L
F
210730
24-28 XY Boom Hydraulics
Drg
9
Page 27

27
EAGLE BOOM
Page 28

28
EAGLE BOOM
Page 29

29
EAGLE BOOM
Page 30

30
EAGLE BOOM
Page 31

31
EAGLE BOOM
Page 32

32
EAGLE BOOM
NotesNotes
NotesNotes
Notes
 Loading...