

Page 1

Cyclapse Classic
User’s Guide
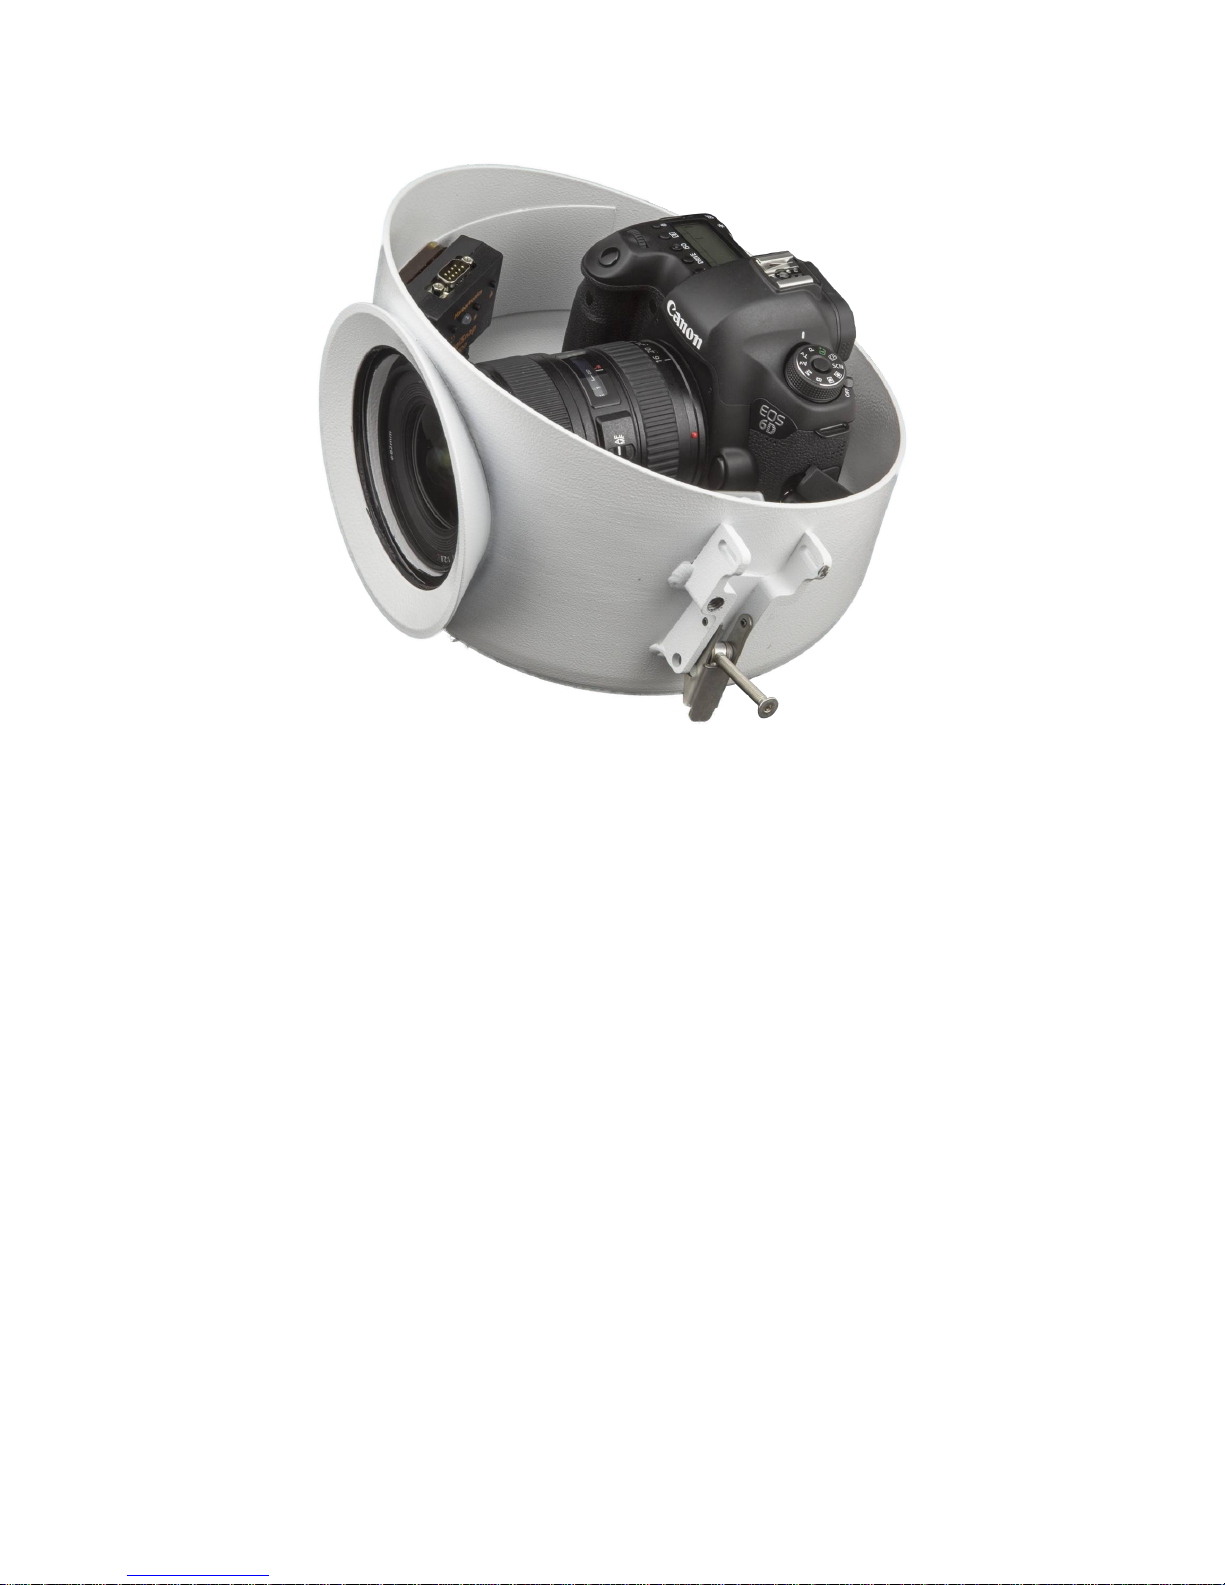
Cyclapse Classic. Optional Canon 6D Full-Frame Camera Bundle.
16-35mm Lens Option, (Housing Lid not shown)
Harbortronics Inc
7103 County Road 86
Fort Collins, CO 80524
970-232-9619 (Phone)
970-672-8729 (Fax)
http://www.harbortronics.com/
Sales & Service: Sales@Harbortronics.com
Technical & Customizing:Mark@Harbortronics.com
Page 2

Cyclapse Classic
Product Guide - Revision B
Overview ................................................................................................................................................................................................ 4
Quick Start ............................................................................................................................................................................................ 4
Configuring the DigiSnap ..................................................................................................................................................................... 4
Connecting to a terminal .................................................................................................................................................................. 4
Configuring for Advanced Time-Lapse .......................................................................................................................................... 5
System Components, Operation & Options ........................................................................................................................................... 5
Cameras ............................................................................................................................................................................................ 5
Camera Set-up .................................................................................................................................................................................. 5
Image Extraction .............................................................................................................................................................................. 6
Housing and related Mounts ............................................................................................................................................................ 7
Battery Pack ...................................................................................................................................................................................... 8
External Power Sources ................................................................................................................................................................... 8
Electronics ....................................................................................................................................................................................... 10
Tools and Accessories ..................................................................................................................................................................... 11
Standard System .................................................................................................................................................................................. 12
Specifications .................................................................................................................................................................................. 12
Items included: Standard System .................................................................................................................................................. 13
Extreme IQ System .............................................................................................................................................................................. 14
Items included: Extreme IQ System .............................................................................................................................................. 14
Camera Bundles .................................................................................................................................................................................. 15
Canon 750D (Rebel T6i) ................................................................................................................................................................. 15
Canon 1200D (Rebel T5) ................................................................................................................................................................ 15
Nikon D3300 .................................................................................................................................................................................... 15
Canon 6D ......................................................................................................................................................................................... 15
Nikon D610 ...................................................................................................................................................................................... 16
Nikon D810 ...................................................................................................................................................................................... 16
Canon 5D Series .............................................................................................................................................................................. 16
Pentax (Ricoh) 645Z ....................................................................................................................................................................... 17
Operating Temperature ................................................................................................................................................................. 18
Service / Warranty ............................................................................................................................................................................... 18
Philosophy: ...................................................................................................................................................................................... 18
Legal: ............................................................................................................................................................................................... 18
Harbortronics Inc 2 8/4/2015
Page 3

Cyclapse Classic
Product Guide - Revision B
Cyclapse Classic, illustrating the two mount arms, operating on a utility pole in the rain.
Harbortronics Inc 3 8/4/2015
Page 4

Cyclapse Classic
Product Guide - Revision B
Overview
The Cyclapse Classic is a fully integrated long term time-lapse camera system. Typical uses are for documenting construction
projects, environmental changes, crop growth, and an amazing variety of other long-term outdoor photographic tasks.
This equipment will yield significantly higher quality images than can be achieved with 'Web', 'Trail', 'Garden', 'Smartphone', or
'Action' camera equipment, and is designed to be completely autonomous—no connection to AC power, computers, networks, or
video recorders are required. You own the equipment, and there are no monthly charges! The system will support a great range of
cameras, from compact digital cameras to SLR and even medium format!
The 'Classic' version of the Cyclapse incorporates the DigiSnap 2700 controller, a tried-and-true intervalometer developed for long
term time-lapse operations. The DigiSnap 2000 series of controllers have been in continuous production since 1999.
A variety of mounts are available to suit your particular application, and the system can be installed in as little as as 15 minutes.
Quick Start
1. Turn the camera's power switch ON. You may leave this switch on at all times.
2. Flip the Power Module toggle switch to the ON (up) position. This will apply power to the camera and the controller.
3. The DigiSnap should immediately blink amber once, followed by a long green flash, and then a few moments later will
quickly blink four times green.
4. Press the * button on the DigiSnap, and the camera should take a picture. This verifies that everything is connected and
working properly. Each time you press the * button, it should take a picture.
5. The DigiSnap controller is already configured at the factory to take pictures on a daily schedule. The following
configuration was used for testing, and you may want to reconfigure the settings for your application.
The DigiSnap is preset to take pictures starting at 7AM (Mountain Time Zone / GMT-7), and every day afterward at the
same starting time. Ten pictures will be taken per day, at an interval of 1 hour between shots.
Configuring the DigiSnap
Now that you’ve verified that things are working, you may want to configure the DigiSnap for your particular application. The first
time you do this can be trying, but once you’ve gone through the process once, it’ll be easy the next time. If you get stuck, give
Harbortronics a call!
The DigiSnap is already configured properly for the camera. All you should need to configure are the time-lapse settings within the
DigiSnap, and adjust the camera lens zoom and focus for your site.
Please review the DigiSnap 2700 manual, which is on the CD Rom supplied with the equipment. This should help you to understand
how the DigiSnap works with a terminal window, and what sort of operations the DigiSnap can perform.
Connecting to a terminal
Each order will be supplied with a USB to Serial converter which includes the Null-Modem connections to connect directly to the
DigiSnap 2700 controller. You may need to install the drivers for this cable on your computer. This is a commonly overlooked
problem.
If you are using a standard USB/Serial converter, or a desktop PC with a built-in serial port, please use a null-modem cable or adapter
between your serial port and the DigiSnap. We are happy to provide this cable if needed.
You now need to run a program to open up a 'terminal' window. If you are running Linux, you already know how to do this! If you
have a windows PC you can use the DigiSnap_Terminal.exe program supplied on the CD Rom. If you are using a Mac we also have
an application on the CD-Rom that you may install. If you don't have a CD-Drive on your computer, you can download any of the
drivers and software from our website.
Once you have your terminal program running, and ‘connected’, cycle the power on the system (flip the toggle switch on the
Cyclapse Power Module off and on again), and you should see it present a menu on the screen. You can select the different menus
and particular commands. Once you have configured the DigiSnap via a terminal, the settings are saved forever, or until the next time
you change them using this same procedure.
Harbortronics Inc 4 8/4/2015
Page 5

Cyclapse Classic
Product Guide - Revision B
If you have problems getting the 'terminal' working with the DigiSnap, please refer to the support page on our website. If you suspect
any problem with our equipment, please call us!
Configuring for Advanced Time-Lapse
The majority of monitoring applications use the Advanced Time-Lapse (ATL) feature of the DigiSnap controller. With ATL, the
camera can be made to take pictures at specific times of the day, such as during daylight hours, or during construction hours. It's easy
to configure multiple sequences that take pictures at different rates, during various times of the day. Please refer to the DigiSnap 2700
manual on the CD-Rom for specific details regarding the configuration menus.
Please note that the DigiSnap 2700 controller has a 'real-time' internal clock. This is the clock used for scheduling pictures, not the
camera's internal clock. You may want to make sure the two clocks are roughly the same, so the time listed in the picture data is
consistent with the DigiSnap clock. As time progresses, the clocks will drift relative to each other—this drift should be small, but is
to be expected.
We would be happy to pre-configure the DigiSnap for your particular application, to ease your project by one more step. Also, feel
free to call us at your convenience for help in configuring the time-lapse sequence. Although the process is straightforward for some
people, others need a bit of hand-holding the first time—we understand this!
System Components, Operation & Options
Cameras
There are many camera models that can be used in the Cyclapse Classic system. Harbortronics has shipped thousands of time-lapse
camera systems using Nikon Coolpix, Pentax K100/K200, Canon 1000D (XS), Canon 1100D (T3), and Canon 1200D (T5) camera
models. In addition to these 'production' camera selections, we have created and built customized systems with another dozen camera
models. Most customers prefer that we supply the system with the camera pre-installed, and this is our strong preference as well, but
we can also provide the system without a camera. Customers have often had issues matching cable assemblies with cameras and
mechanical fit issues, which are eliminated when we install the camera at the factory and perform initial testing.
There are a host of considerations to evaluate when choosing a camera model for time-lapse photography, particularly one that is left
in the field for years. The ultimate goal of your project is to collect a series of images over a long period of time regardless of the
environmental conditions. Shutter life, image quality, power consumption, and of course reliability are major concerns. We have
done the research for you, and believe we have chosen some cameras that are well suited for the application. Please note that we may
change our recommendations periodically. We are constantly evaluating new cameras for suitability, and rest assured our goal is to
provide reliable and high quality equipment!
As with most endeavors, details count. For instance some customers have asked to use a camera they already own. While your
existing camera may certainly be perfectly suited to capturing images, we have encountered a variety of frustrations and outright
problems incorporating some camera models over the years when applied to long term time-lapse. For a long term time-lapse project,
we urge you to consider using the cameras we have tested and recommended. These cameras use industry standard connectors, draw
negligible power between pictures, some have proven reliability in harsh environments, and all will yield excellent image quality.
We list below the cameras that we have selected to offer with the Cyclapse Classic. Not all of these cameras have been evaluated by
Harbortronics as of the time of the release of the system, and this list will change as the manufacturers change camera models, and
we gain experience with the many camera models.
If you would like to discuss using a different camera than one we have listed, we would be happy to work further with you. While
Harbortronics is currently an official dealer for Canon and Ricoh (Pentax) equipment, we do not have any particular affinity for one
camera brand vs another. We have been very impressed with the reliability of the Canon Rebel series cameras for the last several
years, so they are models that we are happy to recommend. However, we can provide whatever camera makes the best sense for your
project. We typically charge 15% above the retail camera price, to acquire, install, test, and help with warranty issues that may occur.
Camera Set-up
Once the camera is installed, the zoom and manual focus set, please use gaffer tape, or some other tape with low adhesive residue, to
wrap around the lens rings, preventing movement over the life of your project. The Phase One iUX camera comes with locking lens
rings.
Our large battery pack(s) will power the entire system, and no other batteries are used in the equipment. If the power is turned off for
a long period of time, the clock in the camera may reset itself and need adjusting before use.
Please configure the camera to use the lowest power consumption. For most systems, this has been done for you at Harbortronics.
Refer to your camera operation manual. Instant Review: Off, Auto power off: 30 seconds, Manual focus, Image Stabilization: Off
Harbortronics Inc 5 8/4/2015
Page 6

Cyclapse Classic
Product Guide - Revision B
As far as photographic settings are concerned, we only have basic suggestions. For most applications you may find that using the
Program mode (P) is perfectly adequate. The camera will adapt the ISO setting, aperture, and shutter speed to suit the lighting
conditions. If your camera is close to your subject (for instance within 50 feet of a construction site detail) the aperture-priority mode
(A) may yield more consistent focus from picture to picture, as the depth of field will be fixed. We recommend against using fully
manual control of the exposure, unless you are an experienced photographer and have a scene with consistent lighting. The variation
in lighting in an outdoor scene is typically too extreme for any particular arrangement of exposure settings. There may be some
advantage to setting the camera for a fixed white balance, rather than using the camera’s auto white balance. We also suggest setting
the ISO to a relatively low value, for minimum noise. In many camera models, you can limit the ISO to some maximum value, which
could be even better than using a fixed ISO setting. A maximum ISO setting of 400 is suitable for most outdoor scenes. For most
applications, you can leave the exposure up to the camera and if absolutely needed, use post-production software to smooth out frame
to frame variation. Many cameras yield images with such a wide dynamic range that details can be lifted out of shadows, also in post
processing.
Our standing recommendation is to take pictures at the highest resolution of the camera, and take more pictures as you think you will
need. It’s very easy to downsize or discard images, but you can’t get more of them after the project has finished! Given high
resolution images, you can do some very interesting post-processing, such as in-frame pan and zoom effects. If the lighting at your
site has extreme contrasts, such as interior scenes with sun streaming through a window, you may be able to re-balance the lighting
more effectively if you capture the images in RAW format, rather than JPEG. There are file size and post-processing tradeoffs with
RAW, and if you are not already familiar with this distinction, you may want to consult with a professional photographer.
Ideally, you will set up the system a week or two ahead of time, collect lots of test images, and adjust the camera angle and exposure
(if manually set) before the ‘event’ you are monitoring actually begins. If you have this luxury, congratulate yourself for thinking
ahead—you are in the minority! For rush projects, we are happy to pre-configure the time-lapse parameters for you, so you can
simply mount and position the camera. There are always risks associated with communicating your needs, and technical issues, so we
urge you to work through the entire system configuration and installation yourself, and take time to test.
Image Extraction
Memory card swap
A second 16 GB memory card is also included with the standard system. Most cameras allow ‘hot swapping’ of cards during longterm applications, so you should not need to turn the system off, nor unplug any cables. The card access door on the camera must be
closed to operate, and the space is limited in the housing, so the camera is normally pulled free momentarily to swap cards. A hexkey is included in the housing to facilitate this. Given the positive stop on the slide rail, and the tight fit of the sled on the rail, the
camera will re-install with almost pixel-perfect registration.
It may also be possible to fit a memory card extender cable which would allow access to the memory card without touching the
camera. Some cameras may require slight modification to allow use of such a cable, but we would be happy to help.
USB Download
If you have access to the housing, but fear handling the camera periodically to swap memory cards, you can attach the USB cable
supplied by the camera manufacturer and leave it attached to the camera inside the housing. This would allow you to open the
housing and download the images to a laptop computer in the field without ever touching the camera. Please note that process can
take an hour or more with a full memory card!
We also offer a USB Extension option with the system which allows image download via an external cable. The weatherproof
polyurethane jacketed cable is installed using a watertight 'gland', allowing download from a distance without accessing the housing.
The USB Extension option provides a 16 ft passive USB cable. You may continue to extend the distance using active repeater cables.
In many cases, you can use multiple active repeater cables to extend to 80ft or more. Make sure to test these cables with the system
before installing on a pole!
Harbortronics Inc 6 8/4/2015
Page 7

Cyclapse Classic
Product Guide - Revision B
USB Extension Option, Canon 6D Bundle, 16-35mm Lens
The USB Extension option is designed to automatically wake a camera that is asleep between time-lapse pictures when you connect
the end of the cable to a computer. When the camera is awake, it will recognize that it is attached to a computer USB port, and you
can then download and subsequently erase the images from the camera memory card. Once disconnected from the USB port of the
computer, the camera will then again respond to the DigiSnap schedule.
Network Options
For the last few years, Harbortronics has offered network connection options in the Harbortronics Time-Lapse Package, based on the
EyeFi Pro X2 WiFi memory card. This card has been discontinued, and no other suitable alternative has yet been found to
automatically transfer images to an arbitrary network location and delete the images from the memory card. While designs are in
place to support the Pro X2 card with WiFi, LAN, and Cellular networking in the Cyclapse Classic, these options are not currently
listed here, but may be available. We will update our hardware designs and documents if we find another solution for these often
requested options.
Housing and related Mounts
The Cyclapse is a purpose-designed and manufactured housing, having an
aluminum base and molded fiberglass lid. A gasket in the lid makes the unit
airtight and water tight, and stainless steel hardware further eliminate any
concern for corrosion. The housing is a perfect size to accommodate almost
any format digital camera, from small micro 4/3 cameras, to relatively small
APS-C sensor SLR camera, 35mm full-frame SLR, and even some medium
format cameras! The Cyclapse will accept much larger cameras and longer
lenses than the legacy Harbortronics 'Time-Lapse Package, while maintaining
a very compact size. Unlike plastic housings, you may successfully modify,
weld to, repair and paint this enclosure if you want to camouflage it in the
field or have other custom needs.
The window is sealed and is made from borosilicate glass, using antireflective coating on the inside to reduce any possible interior light
reflections into the lens. The outside surface of the window is not coated,
preventing any optical issue with gradual coating erosion in the elements or
concerns for cleaning.
Harbortronics Inc 7 8/4/2015
Page 8

Cyclapse Classic
Product Guide - Revision B
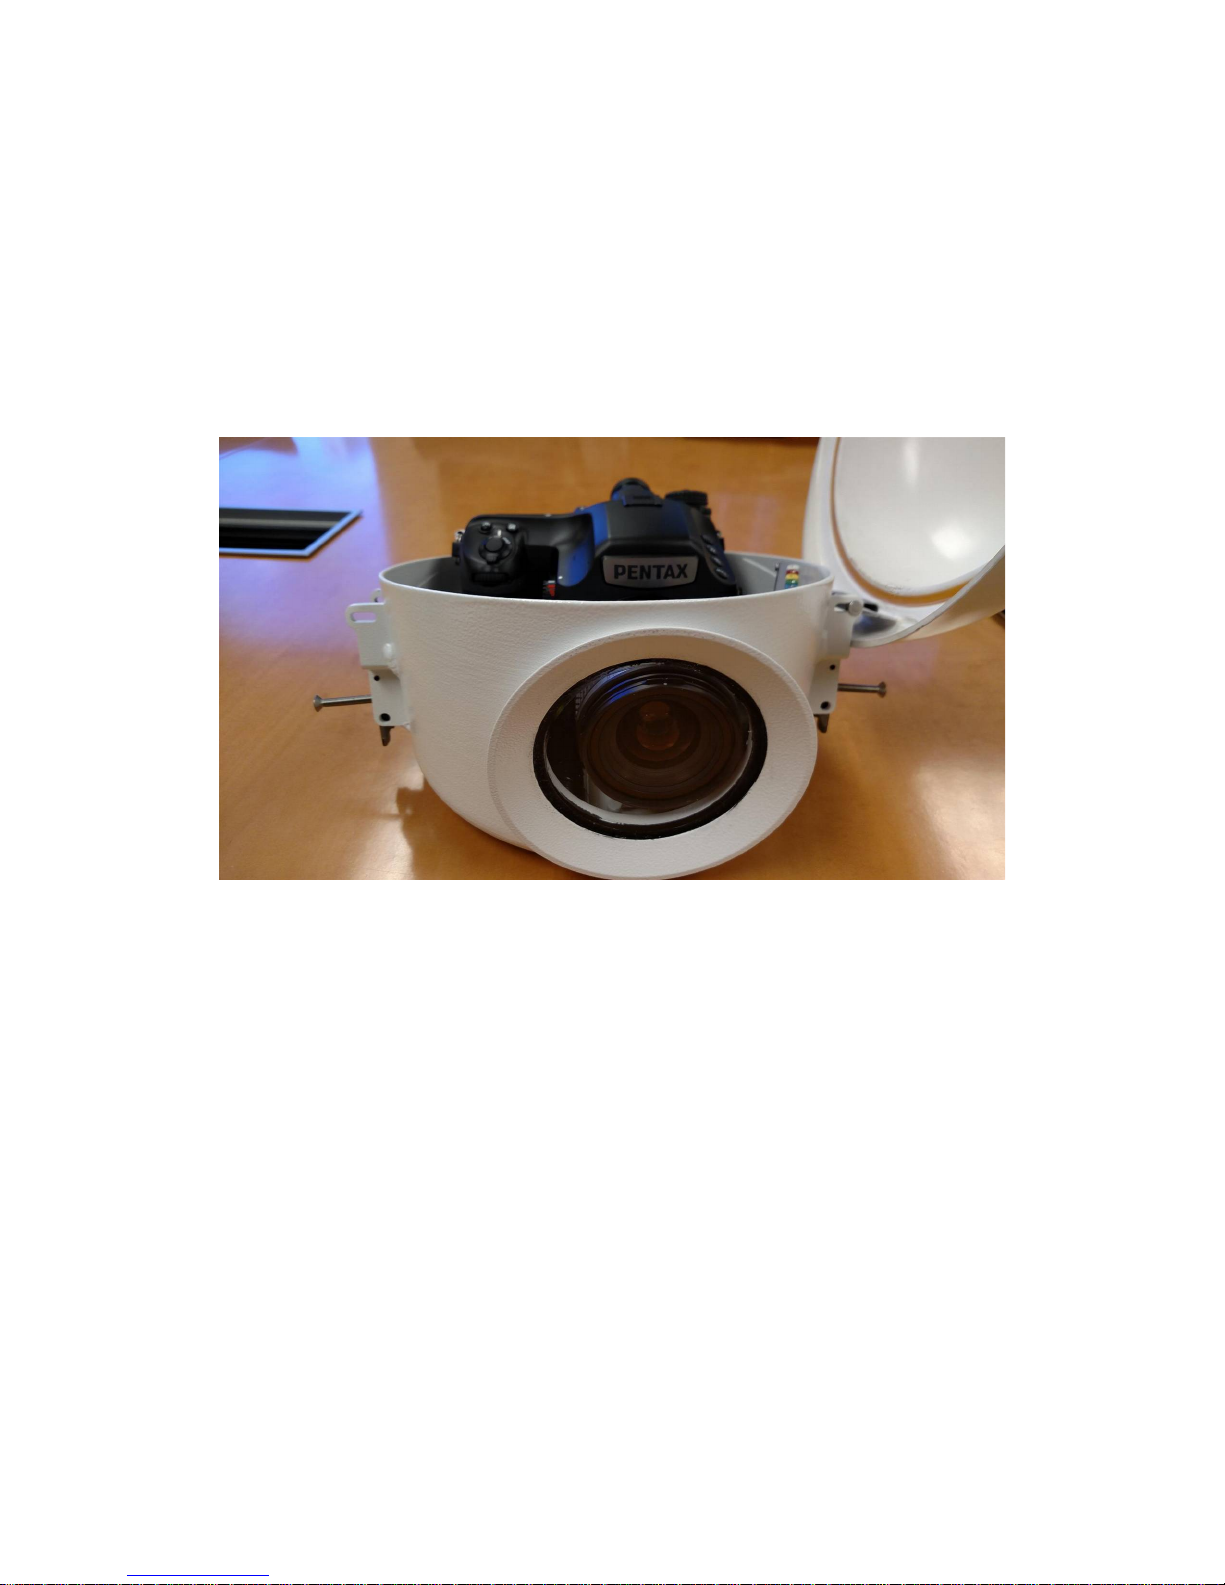
The lid can be hinged on either side, and is quickly removable using captive clamps. The clamps will accommodate small padlocks.
We have developed a robust and very simple method for removing the camera from the housing for maintenance or configuration,
and ensure replacement in exactly the same orientation each time. A sliding 'sled' is attached to the camera base. This sled should not
need to be removed from the camera when servicing the camera system. The camera sled will slide onto a rail in the base of the
housing, aligning the camera but allow movement fore and aft. A 'stop' is attached to the rail, to hold the front of the shoe down
against the rail, and positively locate the position of the shoe along the rail. A single retainer behind the camera on the shoe will slip
through the rail, and anchor the camera sled. It's a very simple system but also quite rigid. Given the variety of camera sizes, we have
developed a family of camera sleds and offer an appropriate model to suit the chosen camera.
There are a number of mounts developed specifically for the Cyclapse housing, as well as for solar panels. For additional detail on
the housing, and the optional external mounting solutions, please refer to the product guide for the camera housing, at
cyclapse.com/000292/product_guide.pdf.
Battery Pack
The Cyclapse Classic includes a high capacity Lithium-Ion Polymer (LiPoly) rechargeable battery pack (Harbortronics P/N 000457),
having a nominal voltage of 14.8V, and 92Wh capacity. A dual battery option is advised for systems that take more than 200 pictures
per day, or cameras that draw significant amounts of power. Like all rechargeable batteries, the effective capacity will gradually
decline over time and use. The battery packs should provide service for 3-5 years of constant use.
The most common battery chemistry for long term, remote applications
is lead-acid. Unfortunately, lead-acid batteries have a number of
drawbacks. An equivalent capacity lead acid battery would weight about
7 pounds, vs 0.8 lbs for the LiPoly pack, and would be almost as large as
the housing itself. ALL Lead acid batteries (even the sealed ones) can
vent gases during charge and discharge, making them dangerous to
install within a sealed housing. Most other secondary (rechargeable)
battery types have high self-discharge, meaning that they won’t work
well in a long term application. LiPoly batteries however, have low selfdischarge, are very light-weight, and quite compact. Good stuff, but not
cheap!
The advantages of the LiPoly battery pack for this application outweigh
the significantly higher price, and allow the high capacity battery to
reside inside the housing making the entire unit quite portable.
External Power Sources
There are a number of ways to keep the battery packs in the Cyclapse Classic charged during long term operation in remote locations.
When images are stored in the camera memory card, a single fully charged LiPoly battery pack has enough capacity for about two
months of operation while taking about a dozen pictures per day. Eventually though, the battery will need to be charged!
In most operations, rather than waiting for the battery to discharge before recharging, a low current charge power source is used to
keep the battery pack topped-off.
Solar power, AC mains, and external batteries are the primary means of providing power to most most remotely located equipment.
Wind power can certainly be used in some locations, but this has not been well developed to date.
Solar Panel
A 10 watt solar panel (Harbortronics P/N 000440) is the recommended charge power source for the Cyclapse Classic. This is
sufficient to keep the battery pack charged for the vast majority of installations when taking 200 or more pictures per day. If your
installation site does not get frequent full sun exposure, or you have other power concerns, please contact us. We can supply
extension cables to re-locate the solar panel at a distance from the camera.
A custom aluminum bracket with a ball-head mount is available, along with attachments for various installation structures. For
greatest charge power, orient the solar panel so that it faces toward the mid-day sun. For additional detail on the mounts, please refer
to the product guide for the camera housing, at cyclapse.com/000292/product_guide.pdf.
The solar panel cable is about 10 ft long, and is mated with the back of the Cyclapse housing via a water-tight connector. We are also
happy to provide any reasonable length Charge Power Extension cable (Harbortronics P/N 000673) to allow for remote installation of
the solar panel.
Harbortronics Inc 8 8/4/2015
Page 9
Cyclapse Classic
Product Guide - Revision B
Please note that the 10W solar panel may not provide enough power to keep the internal battery pack charged under all
circumstances. If you are taking many hundreds of shots per day or do not get frequent sunshine, then the battery voltage will fall,
albeit more slowly than if there were no solar panel connected. It's very difficult to estimate the maximum number of shots that can
be taken while keeping the battery fully charged! Different cameras will draw varying amounts of power, and solar power can
obviously vary dramatically with climate, weather, latitude, and positioning.
In excellent conditions (daily intense direct sun, temperatures above freezing) the 10 watt solar panel can keep the battery charged
while taking as many as 800 pictures per day. In most locations around the world, we estimate that the system can reliably take 200
or more pics per day. We can also provide larger solar panels for applications that require more pictures per day, or are in locations
with little direct sunshine.
AC Mains Power
Many sites have AC mains power available, and customers often think that this is an excellent alternative to using a solar panel. This
is typically not true! AC mains power on construction sites is generally unreliable, and if connected using a standard outlet, you may
find your camera system unplugged after someone decides that your outlet was a good place to power a drill. Dedicated AC power
connections require an electrician, conduit, and other expensive considerations. Once you receive a quote for a dedicated AC power
line, you will realize how inexpensive solar power can be! Solar panels are extremely reliable and quite inexpensive.
If however, your installation is indoors, with no simple way to route a solar panel cable outdoors, AC power may be the best source
available.
Please note that the Cyclapse Classic cannot operate directly from AC mains! The system requires a current limited DC voltage. To
operate from AC mains, a power converter must be used.
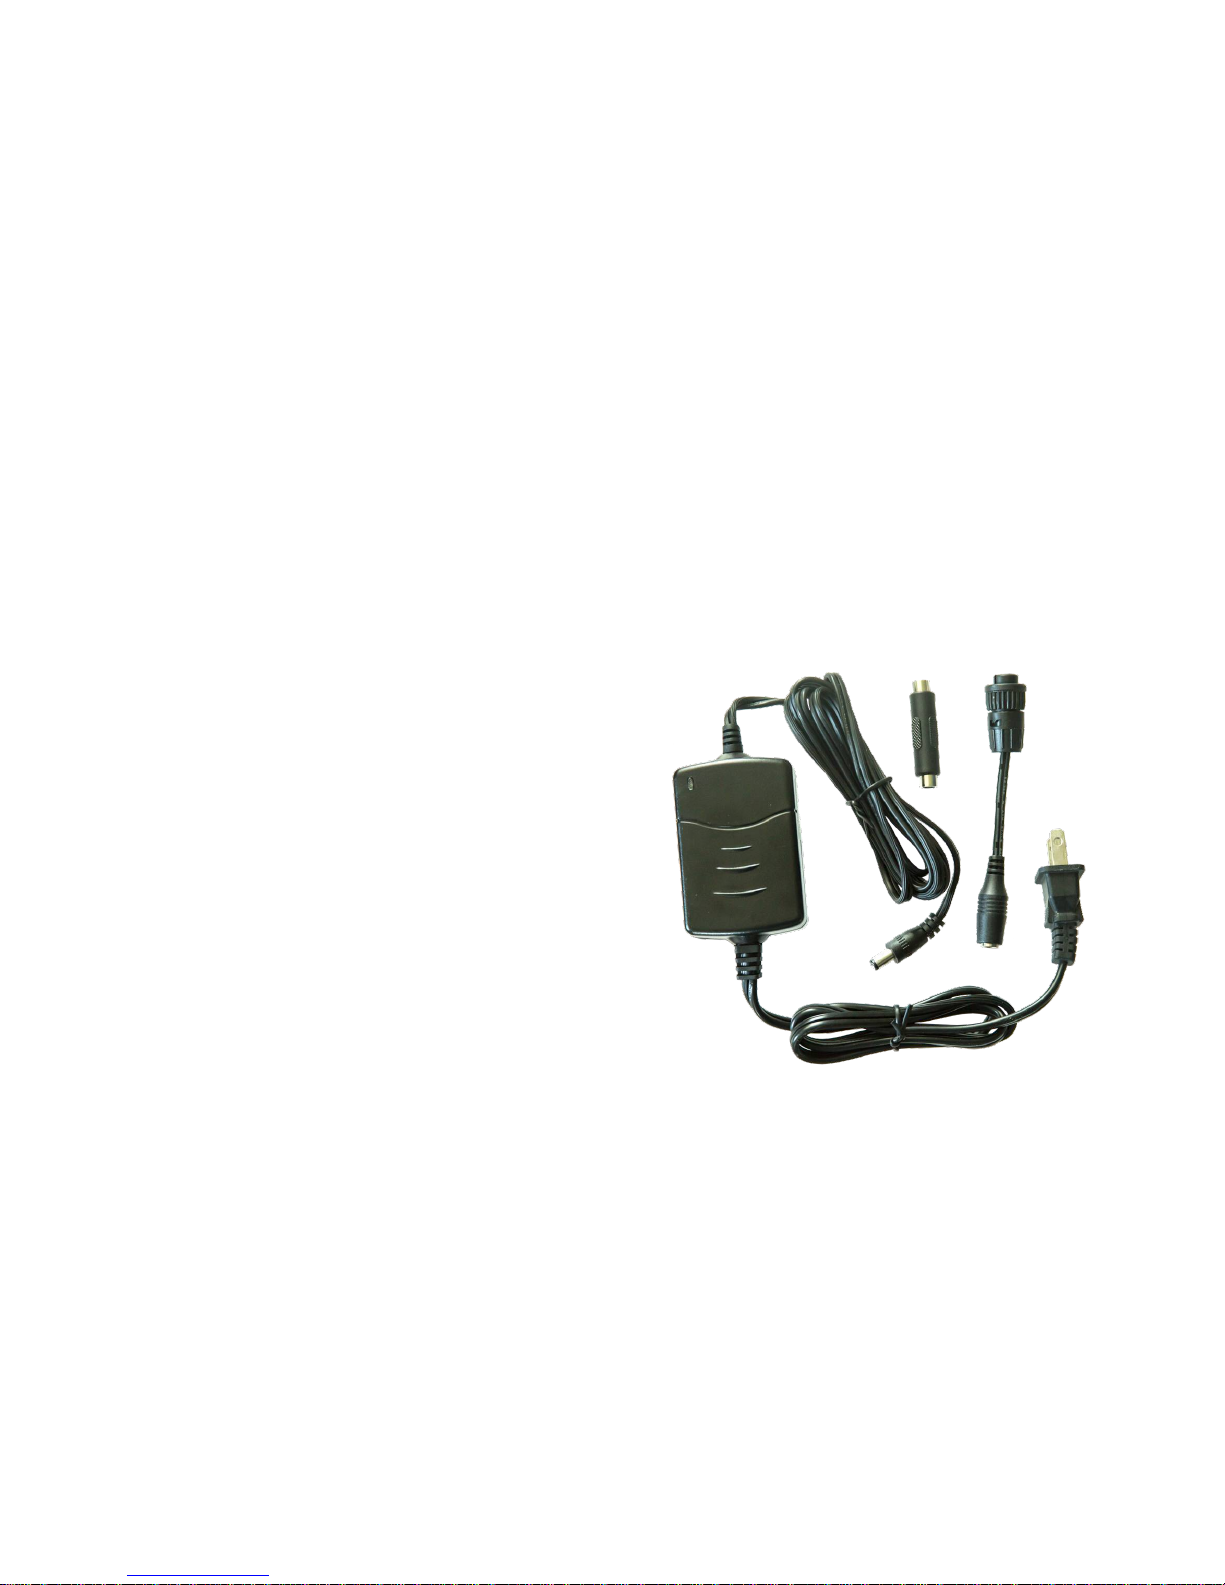
Indoor AC Installation
A UL approved ‘universal AC’ battery charger kit is a recommended
option (Harbortronics P/N 000716). It's primary use is to periodically
recharge battery packs removed from the system when testing indoors.
This is almost never required for most customers, but it can be frustrating
to find you don't have a charger in those rare times you need it! The low
current (0.7 amp) charger will require about 9 hours to charge a
completely drained battery pack. If you commonly need to charge a
battery pack faster than this, we would be happy to help you choose a
different charger.
This charger is perfectly suited to powering the system while in use, and
indeed includes an adapter to connect directly to the Cyclapse Classic.
The available power is sufficient for the vast majority of applications.
This AC battery charger is not intended to operate in an outdoor
environment.
The AC mains plug is the North American style, so a physical adapter will
be needed for use in other areas of the world, but the charger is
compatible with all AC voltages.
The kit includes a small adapter to work directly with the battery pack, and an adapter cable to mate with the Charge Power
Extension cord (Harbortronics P/N 000673), to power the system in place of a solar panel.
Outdoor AC Installation
Frequently a construction site will have AC power available, but with no protected location for an AC power source. We also offer an
AC power converter that is waterproof and intended for use outdoors (Harbortronics P/N 000754). This power source does not
include an AC plug. The black & white wires should be connected to your AC mains using industry standard techniques by a
qualified electrician. A Charge Power Extension Cable (Harbortronics P/N 000673) should be used to connect he output of the power
source to the camera housing.
Wind Power
In some locations such at the polar extremes, the only source of power during the winter months may be via a wind turbine.
Harbortronics can work with you to source a wind turbine which can be connected to the Cyclapse charge port in place of the solar
panel.
Please note however that there are additional complications in the polar winter. At low temperatures (below freezing), lithium ion
chemistry will not accept charge power. We discourage the use of heater elements, as they often create more problems than they
Harbortronics Inc 9 8/4/2015
Page 10

Cyclapse Classic
Product Guide - Revision B
solve. For instance, a heater may melt ice and snow in particular spots, but that melted water will then refreeze a few inches away and
often built up into a solid ice block. In most polar winter applications, the best practice is to use sufficient battery power and reduced
power usage to operate without needing to charge battery packs.
External Battery
Some remote locations do not receive enough solar power to keep the system battery packs charged, and alternative power sources
may not be available. While the internal battery packs may last sufficiently long for many applications, others may require operation
for many months or even an entire year, such as when overlooking glaciers in Greenland. Some applications require a huge number
of pictures per day, but larger solar panels may not be practical.
The best power source in some applications may be a large external battery pack, such as a deep cycle lead-acid battery. 12V
batteries are very common throughout the world, but are not directly compatible with the Cyclapse system electronics. 16V lead-acid
batteries are sometime available, and an 18V lead acid battery array (three 6 volt batteries for instance) will also work well. The
Cyclapse Classic can be connected to a 16V or 18V battery through use of a current limiting circuit, which can be as simple as an
inline resistor (please contact Mark if you plan to use this technique).
Given that the Cyclapse system uses a large internal battery pack which is maintained at an optimum charge level when connected to
external power sources, it is completely feasible to remove the external battery for charging, and then reconnect it at a later date.
We’ve heard from a number of researchers over the years that electrical cables are an attraction to a variety of wild animals (such as
Arctic Foxes). If you really need to hike in a big heavy lead-acid battery, you may want to also bring some armoring for the cable!
Charge Power Extension Cable
Harbortronics P/N 000673
In most cases the 10 ft long solar panel cable may be sufficient for your installation. If however the panel needs to be located
separately from the camera, or you are using a different charge power source for the system, we are happy to provide an extension
cable for the DC charge power. Our extension cables are made from very high quality materials, suitable for use in any location, and
are made with the appropriate connectors to connect to the power source, and the camera housing. Please specify the length needed
when ordering.
Electronics
There are two electronic 'boxes' used in the Cyclapse Classic. Both are magnetically attached to the housing, and easily removed for
service or replacement. Each interconnecting cable has unique connectors, so you won’t have to worry about miss-connecting cables.
Time-Lapse Controller
DigiSnap 2700: Harbortronics Part Number 000431
The’ brains’ of the Cyclapse Classic is one of the venerable DigiSnap 2000 series
controllers, specifically the DigiSnap 2700. This device, designed and manufactured
at Harbortronics, is a digital camera controller developed to work with a variety of
digital camera models. The DigiSnap can be configured to take pictures at any
interval desired, or to operate on a daily schedule.
The DigiSnap 2000 series of controllers have been in continuous production since
1999, and over 10,000 units are in use around the world. The DigiSnap time-lapse
configuration settings will be retained with or without power. There is a small
battery within the DigiSnap 2700 to maintain an internal real-time clock. This
battery is not user-replaceable, but should last many years, and can be replaced at
Harbortronics if needed in the future.
Please refer to harbortronics.com/000431/product_guide.pdf for details about the DigiSnap 2700.
Harbortronics Inc 10 8/4/2015
Page 11

Cyclapse Classic
Product Guide - Revision B
Cyclapse Power Module
Harbortronics Part Number 000468
There are three main functions of the Cyclapse Power Module:
1. While some small solar panels can be connected directly to large Lead Acid batteries, LiPoly batteries must be charged carefully,
monitoring the voltage and temperature.
The Cyclapse Power Module maintains the charge on the internal LiPoly battery packs at an optimum voltage for long life, given
external power from a solar panel, or other alternative power source.
2. Camera Power Supply
While the battery pack provides from 12 – 16 volts, newer SLR cameras typically require 8 volts. The Cyclapse Power Module
efficiently converts the higher battery voltage to a nominal 8V to power a digital camera. If a camera is installed that requires a
different voltage, we can adjust the voltage accordingly at the factory. The camera power may controlled by the DigiSnap, for
instance to minimize power drain when using a WiFi memory card, or for periodic resets for cameras that may be prone to lock-up.
3. Digital Power Supply
The Cyclapse Power Module also converts the LiPoly battery voltage into 5V, to power the DigiSnap 2700 time-lapse controller as
well as accessory devices. The DigiSnap controls the power to accessories synchronously with power to the camera, to minimize
power drain between pictures.
The Cyclapse Power Module is packaged
in a case that matches the inner curve of
the Cyclapse housing, and incorporates
magnets to secure it against the housing's
inner steel liners. This permits freedom of
positioning to suit the rest of the internally
installed equipment.
The Cyclapse Power Module incorporates
test points to allow a technician to quickly
check all of the voltages in the system,
using a digital or analog voltmeter (not
included). The charge power source,
battery pack, 5V power to the DigiSnap
and accessories, and the camera power
supply voltages can all be checked very
quickly.
Please refer to cyclapse.com/000468/product_guide.pdf for details about the Cyclapse Power Module.
Tools and Accessories
In order to save time during installation, and more importantly during occasional service on the Cyclapse system, tools are provided
and attached within the housing by a magnet. If you need to change the camera position or angle, replace the camera body, or any
other general service, the tools will be at hand.
A desiccant pack is included in the housing to minimize internal moisture, which can cause condensation during temperature
extremes. If the crystals eventually turn pink, bake the pack in an oven at 100C / 220F for a few hours, until they turn blue again. Be
careful not to melt the bag!
Harbortronics Inc 11 8/4/2015
Page 12

Cyclapse Classic
Product Guide - Revision B
Standard System
We have selected from our set of cameras, electronics, and mounts to develop a package that we feel will suit the majority of long
term time-lapse applications, in most locations around the world This recommended system comprises everything required to
perform completely autonomous time-lapse photography in the field. Each system is assembled and tested at our factory.
Cyclapse Classic -Standard System (solar panel, lid and mounts not shown)
Specifications
Standard Cyclapse Classic [Canon T6i (750D) w/18-55mm lens, single battery, 10W panel, mounts and arms]
Housing Weight (with camera, sled, lens, electronics & cables) 8.5 lbs [3.86 kg]
System Weight (including solar panel, mounts, and arms) 18.5 lbs [8.4 kg]
Cyclapse Housing Dimensions 10.9” [275mm] wide, 7.92” [200mm] tall
Shipping:
Box Dimensions 18” x 15” x 13”
Shipping Weight 21.8lbs [9.87kg]
Harbortronics Inc 12 8/4/2015
Page 13

Cyclapse Classic
Product Guide - Revision B
Items included: Standard System
Cyclapse Camera Housing (000292), with charge connection
High capacity battery pack (000457)
10 Watt Solar Panel (000440)
Cyclapse Power Module (000468)
Harbortronics DigiSnap 2700 (000431)
Canon T6i (750D) D-SLR and 18-55mm lens (000794)
Camera Sled D (000743)
Shutter Release Cable (000374)
Camera power adapter (000796)
2x, 32 GB memory card (000144) [Not Shown]
Cyclapse Ball Head Mount – Bolt (000460)
Solar Panel Ball Head Mount, 10 W – Bolt (000130)
2x, Mounting Arm, Flat, 12” (000461)
USB/Serial Converter cable, (000778)
Tools, cables, and manuals.
Harbortronics Inc 13 8/4/2015
Page 14

Cyclapse Classic
Product Guide - Revision B
Extreme IQ System
The Extreme IQ system is offered as a very high resolution & image quality alternative to the standard system, incorporating a
medium format camera. The potential quality of the images from this system may only be achieved through careful consideration of
the camera placement and setup. We recommend consulting with a professional photographer when deciding on a site location and
during initial setup. Each system is configured and tested at our factory.
Cyclapse Classic -Extreme IQ System (solar panel, lid, mounts not shown)
Items included: Extreme IQ System
Cyclapse Camera Housing (000292), with charge connection
High capacity battery pack (000457)
10 Watt Solar Panel (000440)
Cyclapse Power Module (000468)
Harbortronics DigiSnap 2700 (000431)
Pentax 645Z Medium Format camera (000797)
Pentax Lens, SMC-FA 645 45mm F2.8 (000798)
Camera Sled B (000741)
Shutter Release Cable (000374)
Harbortronics Inc 14 8/4/2015
Camera power adapter (000801)
2x, 64 GB memory card (000750)
Cyclapse Ball Head Mount – Bolt (000460)
Solar Panel Ball Head Mount, 10 W – Bolt (000130)
2x, Mounting Arm, Flat, 12” (000461)
USB/Serial Converter cable, (000778)
Tools, cables and manuals.
Page 15

Cyclapse Classic
Product Guide - Revision B
Camera Bundles
Each 'Camera Bundle' includes the specified camera model, a compatible camera 'sled' for attachment into the housing, the
appropriate shutter release cable, and the matching power adapter cable. We install a memory card in each camera, and include a
second card for swapping in the field.
Most camera bundles will not include a lens. There are lots of options available! The most critical piece of information needed is the
horizontal angle of view (HAOV) that will cover the site, from the intended camera position. Given this, and the desired camera
model, we can suggest a lens that may work well for you.
Canon 750D (Rebel T6i)
The Canon 750D is the standard/default camera used in the Cyclapse Classic -Standard. This Camera Bundle includes the Canon
750D, which uses a 24.2 MPixel, APS-C sized sensor, and the ‘kit’ lens from Canon, providing a good range of usable zoom. The
lens has a focal length of 18-55mm, which yields a Horizontal Angle Of View (HAOV) from 23º to 63º.
Sensor Specs: 26.7 mm diagonal, 6000 x 4000 Pixels (24.2.0MP), 3.7 um pixel pitch
Canon 1200D (Rebel T5)
The Canon 1200D Camera Bundle includes the Canon 1200D, which uses an 18 MPixel, APS-C sized sensor, and the ‘kit’ lens from
Canon, providing a good range of usable zoom. The lens has a focal length of 18-55mm, which yields a Horizontal Angle Of View
(HAOV) from 23º to 63º.
We have heard of anecdotal issues with older Canon Rebel cameras, such as the 350D and 1000D. Some of our, and other time-lapse
equipment customers have reported lock-ups with those cameras. We specifically developed the DigiSnap 2700 to address this
infrequent bug in the cameras, which is debilitating for a time-lapse project. The Canon 1200D have not shown to exhibit this lock-up
bug, to the best of our knowledge.
Our customers have installed systems with the Canon 1100D and 1200D in locations literally from pole to pole. These cameras have
proven to be quite reliable in all environments around the world.
Sensor Specs: 26.7 mm diagonal, 4896 x 3672 Pixels (18.0MP), 4.3 um pixel pitch
Nikon D3300
The Nikon D3300 Camera Bundle uses an APS-C sized sensor, which is comparable to the 'standard' Canon T6i. The included lens
has a focal length of 18-55mm, which yields a Horizontal Angle Of View (HAOV) from 24º to 66º.
We and our customers have experienced issues with the Nikon D3100 and D5100 with the older Harbortronics Time-Lapse Package,
but we are again offering the entry level Nikon camera for use with our system. We hope that the changes in the camera designs, as
well as the power supplies in our system will have solved the problems. If you have a strong preference for Nikon cameras, this may
be a good choice.
Harbortronics has found the reliability of the Canon APS-C cameras to be excellent in long term applications, and we recommend
them. Given our history of problems with earlier low-end Nikon D-SLR cameras, we have not supplied enough systems with the
newer cameras to know how well they will work in a long term time-lapse application, so we are not yet confident enough to
recommend them.
Sensor Specs: 28.3 mm diagonal, 5680 x 4256 Pixels (24.2MP), 3.9 um pixel pitch
Canon 6D
The Canon 6D Camera Bundle is an excellent option if your project can make use of the increased image quality of a full-frame
sensor. The 6D is Canon's most reasonable priced full-frame camera, and our recommendation if you want to step up to the image
quality possible with a full-frame camera, but don't need extreme image resolution. Of the suggested cameras, the 6D features the
largest area pixels, which may have some advantage for noise reduction.
Sensor Specs: 43.3 mm diagonal, 5720 x 3648 Pixels (20.9MP), 6.5 micron pixel pitch
Many lenses are available that will work successfully in this system. Lenses are not included with this Camera Bundle, and must be
selected separately, or supplied by the customer.
Harbortronics Inc 15 8/4/2015
Page 16
Cyclapse Classic
Product Guide - Revision B
Canon 6D camera in housing, with 16-35mm lens (lid removed)
Nikon D610
The Nikon D610 is our recommended full-frame Camera Bundle for customers who strongly prefer Nikon systems. While Nikon also
has other full-frame cameras, such as the D750 in particular, in many cases the difference is simply additional features. In a timelapse application, these features are not utilized, so we would recommend the D610 over the D750.
Sensor Specs: 43.2 mm diagonal, 6016 x 4016 Pixels (24.2MP), 5.9 micron pixel pitch
Many lenses are available that will work successfully in this system. Lenses are not included with this Camera Bundle, and must be
selected separately, or supplied by the customer.
Nikon D810
The D810 is a high resolution full-frame camera, which has been well accepted in the Nikon community. We offer this camera for
customers who require higher resolution, and strongly prefer Nikon cameras.
Sensor Specs: 43.2 mm diagonal, 7360 x 4912 Pixels (36.2MP), 4.8 micron pixel pitch
Many lenses are available that will work successfully in this system. Lenses are not included with this Camera Bundle, and must be
selected separately, or supplied by the customer.
Canon 5D Series
The Canon 5D series of cameras (5D, 5D Mark II, 5D Mark III, 5DS) are all compatible with the Cyclapse system. Harbortronics can
provide the system with the 5D Mark III, or the high resolution 5DS / 5DS-R cameras. In most applications, the Canon 6D is
preferred over the more feature-rich 5D Mark III, as those additional features are not used in a time-lapse installation. The 5DS
cameras offer the highest resolution full-frame sensor, indeed equaling some medium format cameras.
If your preference is a Canon Full Frame camera, we would recommend the Canon 6D over the 5D Mark III, simply for price and
simplification of features. If you can make use of extremely high resolution, the Canon 5DS may be an excellent choice.
Sensor Specs:
5D: 43.3 mm diagonal, 4368 x 2912 Pixels (12.7MP), 8.1 micron pixel pitch
Harbortronics Inc 16 8/4/2015
Page 17
Cyclapse Classic
Product Guide - Revision B
5D Mark II: 43.3 mm diagonal, 5616 x 3744 Pixels (21.0MP), 6.4 micron pixel pitch
5D Mark III: 43.3 mm diagonal, 5456 x 4096 Pixels (22.3MP), 6.25 micron pixel pitch
5DS(-R): 43.3 mm diagonal, 8688 x 5792 Pixels (50.3MP), 4.1 micron pixel pitch
Many lenses are available that will work successfully in this system. Lenses are not included with this Camera Bundle, and must be
selected separately, or supplied by the customer.
Pentax (Ricoh) 645Z
The 645Z is an attractively priced medium format camera, and the images from this camera can be outstanding. If your time-lapse
project will require extremely large printed media, 8K resolution video format, or will operate in extreme lighting environments, this
camera may be a good choice.
Sensor Specs: 54.7 mm diagonal, 8256 x 6192 Pixels (51.4MP), 5.3 micron pixel pitch
Given the size of this camera, the lens options are somewhat limited. Three lenses are believed to fit with this camera in the housing,
but not all combinations have been built and tested. Lenses are not included with this Camera Bundle, and must be selected
separately, or supplied by the customer.
1. SMC-FA 645 75mm F2.8 (33º HAOV)
2. SMC-FA 645 55MM F2.8 (43º HAOV)
3. SMC-FA 645 45MM F2.8 (52º HAOV)
64 GB memory cards included with the Pentax 645Z bundle.
Phase One iUX 80
The Phase One iUX camera was developed for professional aerial photography, and incorporates the largest sensor size and highest
resolution sensor available in a small commercial package. We are excited to see how this extraordinary camera can work for your
application.
Sensor Specs: 67.36 mm diagonal, 10328 x 7760 Pixels (80MP), 5.2 micron pixel pitch
Please note that this camera draws a significant amount of power relative to the other cameras on the recommended list. A 20 watt
solar panel and dual battery packs are recommended when choosing this camera bundle.
This camera bundle includes the iUX camera, 55mm lens (52º HAOV), and a single 128 GB memory card.
Harbortronics Inc 17 8/4/2015
Page 18

Cyclapse Classic
Product Guide - Revision B
Operating Temperature
The operating temperature range of most digital cameras is specified by the manufacturers as 0C to +40C. While neither we nor the
camera manufacturers can warrant operation beyond this range, you will undoubtedly find that they work just fine over much a wider
range! As of summer 2015, Harbortronics has shipped about 4000 time-lapse camera systems over a span of about 11 years, and we
have relatively few reports from customers of system failures. The failure rate is not perfect, but much better than expected for
commercial equipment used in harsh environments.
Our earlier generation systems have been used in locations literally from pole to pole. There are systems in use in Antarctica, dozens
in the Arctic, and there are huge number of systems operating in the Middle-East, Arizona, the Australian Outback, Africa, etc. Low
temperature problems are most often due to battery chemistry, and high temperatures have proven to be of absolutely no concern.
We are compelled however to say that the excellent performance of our systems over the years does not mean that we guarantee
operation of any particular system to these temperature extremes.
Service / Warranty
Philosophy:
Harbortronics is a small private company, and has been in business since 1998, starting in a small basement office, and now operating
out of a 3000 square foot facility with several employees. All of our sales have been derived from word-of-mouth and internet
searches. We realized early that customer feedback, either directly to us or to other people on the internet, is stimulated by one of two
reasons... either the customer is irritated by a problem, or they are excited about their experience. One of my goals as the Chief
Engineer of the company is to reduce the irritations, and try to stimulate excitement! Given the growth of the company, and high
number of repeat purchases, I'm encouraged that we may be doing things fairly well.
If you have a problem with our equipment, if you have difficulties getting things to work, or have any complaints about how we have
treated you, my philosophy is to do my absolute best to find a way to satisfy you. That may mean going beyond the legal obligations
of our warranty, suffer complete loss of profit on an occasional sale, or whatever it takes. It's been immensely satisfying to find that
over the last 17 years, this philosophy has created such satisfaction in our customers. We take great pride that of the countless
comments on the internet about Harbortronics, there are almost no negative comments! That's not to say that we haven't had our share
of problems with our equipment, but again, I will do my best to make it right in the end! -Mark Roberts
Legal:
All products manufactured at Harbortronics are warranted against any manufacturing defects for a period of one (1) year from the
date of purchase. Cameras and lens warranty service may be provided by Harbortronics, but Harbortronics does not warrant these
devices beyond the manufacturer's own warranty. Defective products should be returned prepaid to Harbortronics. Harbortronics will
at its discretion, repair or replace such products without charge, and will return to the customer prepaid. Except as mentioned above,
no other warranty expressed or implied, applies to this Harbortronics product. All other claims, of any nature, including but not
limited to camera damage are not covered. This warranty does not cover damage caused by misuse, accident, or abuse. This warranty
does not cover consequential damages or other incidental damages. Some states do not allow the exclusion or limitation of incidental
or consequential damages, so the above exclusions may not apply to you. Contact Harbortronics at www.Harbortronics.com for
service instructions.
Harbortronics Inc 18 8/4/2015
 Loading...