

Page 1
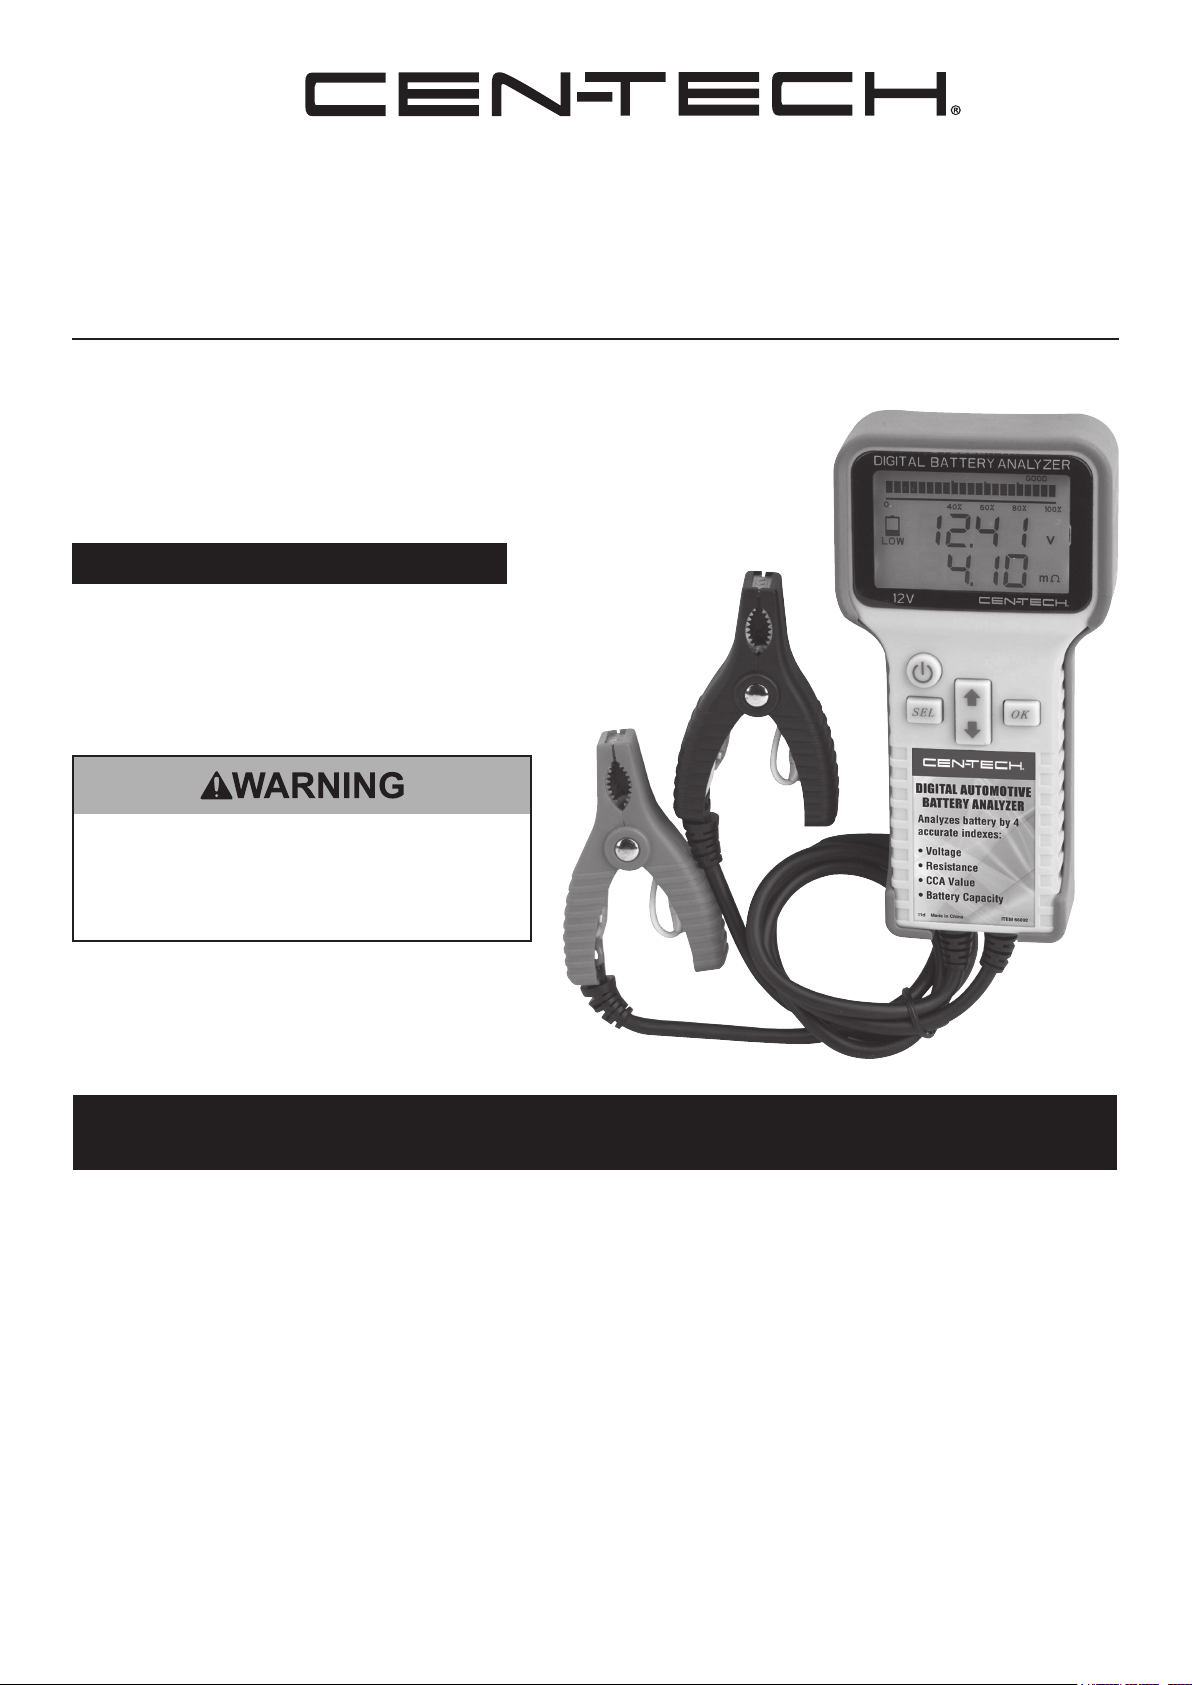
Digital Automotive Battery Analyzer
Item 66892
Read this material before using this product.
Failure to do so can result in serious injury.
SAVE THIS MANUAL.
When unpacking, make sure that the product is intact and undamaged.
If any parts are missing or broken, please call 1-800-444-3353 as soon as possible.
Visit our website at: http://www.harborfreight.com
Copyright© 2009 by Harbor Freight Tools®. All rights reserved. No portion of this manual or any artwork contained herein may be reproduced in any shape
or form without the express written consent of Harbor Freight Tools. Diagrams within this manual may not be drawn proportionally. Due to continuing
improvements, actual product may differ slightly from the product described herein. Tools required for assembly and service may not be included.
Manual Revised 11g
Page 2

Specications
Voltage
Functions
Power Source 12V Battery being tested
Resistance
CCA Value
Battery Capacity
Save This Manual
Keep this manual for the safety warnings and
precautions, assembly, operating, inspection,
maintenance and cleaning procedures. Write the
product’s serial number in the back of the manual near
the assembly diagram (or month and year of purchase
if product has no number). Keep this manual and the
receipt in a safe and dry place for future reference.
IMPORTANT SAFETY
INFORMATION
The warnings and precautions discussed in this
manual cannot cover all possible conditions and
situations that may occur. It must be understood
by the operator that common sense and caution
are factors which cannot be built into this product,
but must be supplied by the operator.
1. Use only according to these instructions.
Improper setup can create hazards.
2. Wear ANSI-approved safety goggles and
heavy-duty work gloves during setup and use.
3. Keep work area clean and well lit.
4. Keep bystanders out of the area
during setup and use.
5. Do not use when tired or when under the
inuence of drugs or medication.
6. This product is not a toy. Do not allow
children to play with or near this item.
7. Inspect before every use; do not use
if parts are loose or damaged.
8. Do not smoke or have open ames near the battery.
9. Do not connect the Analyzer to the battery while the
engine is running.
Turn the engine off before connecting.
10. Maintain product labels and nameplates.
These carry important safety information.
If unreadable or missing, contact Harbor
Freight Tools for a replacement.
SAVE THESE
INSTRUCTIONS.
Page 2 For technical questions, please call 1-800-444-3353. SKU 66892
Page 3

Operating Instructions
Read the ENTIRE IMPORTANT
SAFETY INFORMATION section at the
beginning of this manual including
all text under subheadings therein
before set up or use of this product.
Setup
Note: This Analyzer is powered by the battery
being tested. No additional battery is required.
1. The clip on the back of the tool can
be used to hang the tool.
2. The soft case can be used as a
stand while using the tool.
3. The battery should be rested 30 minutes
before testing. Vehicle should be turned
off with no accessories operating.
4. Attach clamps securely to the battery terminals.
Terminals should be cleaned prior to testing.
5. Test a single 12V battery only. Do not connect this
analyzer to a series of batteries or an electrical
system containing more than one 12V battery.
Do not connect to any other electrical system;
damage to the analyzer will result.
6. Be careful not to damage the analyzer.
Avoid dropping it or dropping items onto it.
Do not expose to moisture or chemicals.
7. The analyzer may be used continuously
without overheating.
Analyzing a Battery
1. Attach the Clamps to the battery terminals.
a. Attach the RED Clamp (2) to the
POSITIVE (+) terminal. Attach the BLACK
Clamp (3) to the NEGATIVE (–) terminal.
Note: There must be a good connection between the
clamps and the terminals. If there is a poor connection,
the Clamp sign will appear in the lower left corner of
the Display (1), and a “beeping” sound will be heard.
b. If poor connection signal is received,
reconnect the Clamps, and restart the Analyzer
(see next paragraph) to restart the test.
2. With the Clamps connected, turn on the ON / OFF
Button (4) and perform the following steps:
a. Press the ON / OFF (4) Button (4) for 1 second.
The Display (1) will light and a single “beep” tone
will be heard. All symbols on the Screen will briey
light as the Analyzer goes through test mode.
b. Press the OK Button (7) to enter
CCA (Cold Cranking Amp) test.
c. The numerical display will ash, for you to enter
the rated CCA of the Battery. Press the Up/Down
Arrow Button (6) to set the ashing digit.
Press the SEL button to move between digits.
Note: The lowest digit changes in increments of 5 only.
d. After the rated CCA is entered, press
the OK Button (7). The Analyzer
will test for 10 seconds.
e. The unit will beep when the test is complete.
Press any button to stop it from beeping.
f. If the voltage of the battery is too low for testing,
a LOW sign will appear at the lower left of the
Display. The battery must be charged and then
rested for 30 minutes before it can be tested.
Page 3For technical questions, please call 1-800-444-3353.SKU 66892
Page 4

Reading Test Results
1. The Display (1) shows Voltage and Resistance.
a. The rst column displays the
Voltage of the Battery.
b. The second column displays the
Resistance of the Battery.
2. Press the SEL button and the Display
will show input CCA and test CCA.
a. The rst column shows input CCA value.
b. The second column shows test CCA value.
3. The bar graph at the bottom of the
Display shows Battery Capacity.
a. If the reading is less than 40% the battery is
damaged or worn out and must be replaced.
b. If the reading is 40-60%, the battery is weak,
and replacement should be considered.
c. If the reading is 60-80% the battery is workable.
d. If the reading is 80-100% the
battery is in good condition.
4. To turn OFF the Analyzer, press the
ON / OFF Button (4) for 1 second.
5. Remove the Clamps from the battery terminals.
Understanding CCA
1. CCA (Cold Cranking Amp) values are marked on the
battery casing. The CCA rating denes how many
amps the battery can deliver at 0° F continuously for
30 seconds before the voltage drops to 7.2 VDC.
2. Temperature strongly affects battery performance.
As temperature goes down, the energy production
of the battery is reduced, and the amount of
energy required to start a vehicle is increased.
° F ° C
80° F 26.7° C 100% 100%
32° F 0.0° C 65% 165%
0° F -17.8° C 40% 250%
-20° F -28.9° C 25% 350%
Available
Battery Energy
Drain on
Battery
Battery Capacity
Battery Capacity can be indicated as
Amp Hours (Ah) or Watt Hours (WH).
1. An Amp Hour is measured by continuous discharge
for 20 hours.
For example, if a battery discharges
6 amps continuously for 20 hours before
dropping to 10.5 VDC, the Ah rating is
6 amps X 20 hours = 120 Ah.
2. A Watt Hour is simply Voltage times Ah.
For example, a 12 volt battery rated at 120 Ah
is 1440 WH. (12 VDC X 120 Ah = 1440 WH.)
Battery Resistance
1. Resistance (also called “impedance”) is a
measure of the resistance of free ow of electrons
within the battery. Lower resistance is better.
2. In a 12V lead-acid battery, 9-13 mOhms (milliOhms)
is a good range. Resistance levels over
20 mOhms may indicate a problem.
3. A battery that has just been charged shows
increased resistance, therefore the battery must
be rested before being tested. Low electrolytes
cause increased resistance. Resistance increases
during use as the battery is discharged.
Battery Function
There are four primary functions of a vehicle battery.
It is important to test and maintain your battery in good
condition to ensure your battery performs these functions:
1. Supplies energy to the starter and other
vehicle functions during starting.
2. Makes up for deciencies of energy supplied by
the generator or alternator during operation.
3. Stores excess energy created by the
generator or alternator during operation.
4. Buffers the voltage in the vehicle electrical
system, protecting components from damage.
3. A higher CCA rated battery is
desirable in colder climates.
Page 4 For technical questions, please call 1-800-444-3353. SKU 66892
Page 5

Battery Faults
SULFATE ACCUMULATION: Over the life of the battery the chemical reactions on
the surface of the plates which store and release energy cause sulfates to build up.
This slowly degrades battery performance until the battery must be replaced.
INSUFFICIENT ELECTROLYTE: If exposed to air, the battery plates will accumulate sulfates rapidly.
Also with low electrolyte, only the portion of the plates in the electrolyte can function.
SHORT CIRCUIT OF THE BATTERY PLATES: If the plate insulators are damaged or lead sludge
builds up on the bottom of the battery, the plates can short circuit and stop working.
OVER DISCHARGE OF THE BATTERY: Lead acid batteries should not be fully discharged.
If the battery becomes fully discharged, it may be damaged.
A fully discharged battery may be restored by trickle charging over a 36 hour period.
Note: This equipment has been tested and found to comply with the limits for a Class B digital device, pursuant to
part 15 of the FCC Rules. These limits are designed to provide reasonable protection against harmful interference
in a residential installation. This equipment generates, uses and can radiate radio frequency energy and, if not
installed and used in accordance with the instructions, may cause harmful interference to radio communications.
However, there is no guarantee that interference will not occur in a particular installation. If this equipment does cause
harmful interference to radio or television reception, which can be determined by turning the equipment off and on, the
user is encouraged to try to correct the interference by one or more of the following measures:
—Reorient or relocate the receiving antenna.
—Increase the separation between the equipment and receiver.
—Connect the equipment into an outlet on a circuit different from that to which the receiver is connected.
—Consult the dealer or an experienced radio/TV technician for help.
Record Product’s Serial Number Here:
Note: If product has no serial number, record month and year of purchase instead.
PLEASE READ THE FOLLOWING CAREFULLY
THE MANUFACTURER AND/OR DISTRIBUTOR HAS PROVIDED THE PARTS LIST AND ASSEMBLY DIAGRAM
IN THIS MANUAL AS A REFERENCE TOOL ONLY. NEITHER THE MANUFACTURER OR DISTRIBUTOR
MAKES ANY REPRESENTATION OR WARRANTY OF ANY KIND TO THE BUYER THAT HE OR SHE IS
QUALIFIED TO MAKE ANY REPAIRS TO THE PRODUCT, OR THAT HE OR SHE IS QUALIFIED TO REPLACE
ANY PARTS OF THE PRODUCT. IN FACT, THE MANUFACTURER AND/OR DISTRIBUTOR EXPRESSLY
STATES THAT ALL REPAIRS AND PARTS REPLACEMENTS SHOULD BE UNDERTAKEN BY CERTIFIED AND
LICENSED TECHNICIANS, AND NOT BY THE BUYER. THE BUYER ASSUMES ALL RISK AND LIABILITY
ARISING OUT OF HIS OR HER REPAIRS TO THE ORIGINAL PRODUCT OR REPLACEMENT PARTS
THERETO, OR ARISING OUT OF HIS OR HER INSTALLATION OF REPLACEMENT PARTS THERETO.
Page 5For technical questions, please call 1-800-444-3353.SKU 66892
Page 6

Parts List and Assembly Diagram
Part Description Qty
1 Display 1
2 Red (Positive) Battery Clamp 1
3 Black (Negative) Battery Clamp 1
4 ON / OFF Button 1
5 Select (SEL) Button 1
3
2
Part Description Qty
6 UP / DOWN Arrow Button 1
7 OK Button 1
8 Analyzer Body 1
9 Battery Clamp Leads 2
1
4
6
7
5
8
Note: Some parts are listed and shown for illustration purposes only,
and are not available individually as replacement parts.
Page 6 For technical questions, please call 1-800-444-3353. SKU 66892
9
Page 7

90 Day Warranty
Harbor Freight Tools Co. makes every effort to assure that its products meet high quality and durability standards,
and warrants to the original purchaser that this product is free from defects in materials and workmanship for the
period of 90 days from the date of purchase. This warranty does not apply to damage due directly or indirectly,
to misuse, abuse, negligence or accidents, repairs or alterations outside our facilities, criminal activity, improper
installation, normal wear and tear, or to lack of maintenance. We shall in no event be liable for death, injuries
to persons or property, or for incidental, contingent, special or consequential damages arising from the use of
our product. Some states do not allow the exclusion or limitation of incidental or consequential damages, so the
above limitation of exclusion may not apply to you. THIS WARRANTY IS EXPRESSLY IN LIEU OF ALL OTHER
WARRANTIES, EXPRESS OR IMPLIED, INCLUDING THE WARRANTIES OF MERCHANTABILITY AND FITNESS.
To take advantage of this warranty, the product or part must be returned to us with transportation charges
prepaid. Proof of purchase date and an explanation of the complaint must accompany the merchandise.
If our inspection veries the defect, we will either repair or replace the product at our election or we may
elect to refund the purchase price if we cannot readily and quickly provide you with a replacement. We will
return repaired products at our expense, but if we determine there is no defect, or that the defect resulted
from causes not within the scope of our warranty, then you must bear the cost of returning the product.
This warranty gives you specic legal rights and you may also have other rights which vary from state to state.
Page 7For technical questions, please call 1-800-444-3353.SKU 66892
Page 8

3491 Mission Oaks Blvd. • PO Box 6009 • Camarillo, CA 93011 • (800) 444-3353
 Loading...