

Page 1
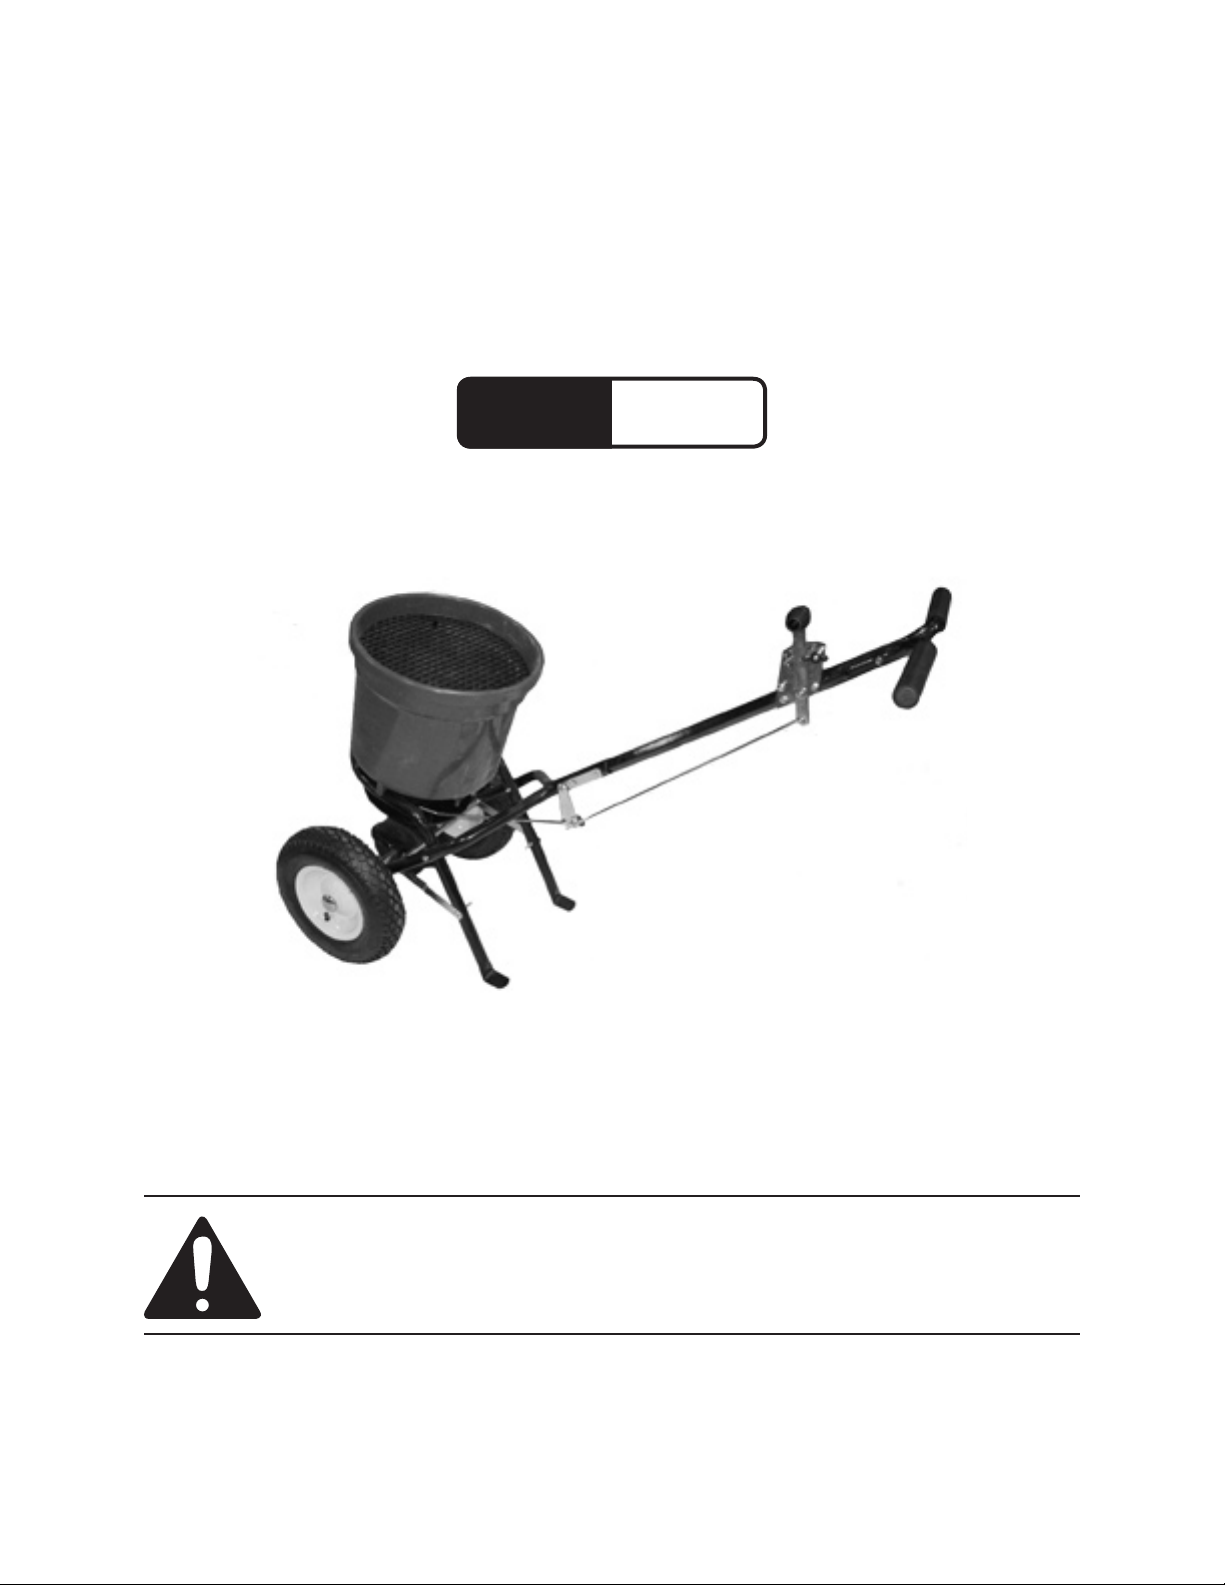
WALK-BEHIND SPREADER
Model
99623
50 LB. CAPACITY
ASSEMBLY, OPERATING, AND MAINTENANCE
INSTRUCTIONS
Diagrams within this manual may not be drawn proportionally.
Due to continuing improvements, actual product may differ slightly from the product described herein.
Distributed exclusively by Harbor Freight Tools®.
3491 Mission Oaks Blvd., Camarillo, CA 93011
Visit our website at: http://www.harborfreight.com
Read this material before using this product.
Failure to do so can result in serious injury.
SAVE THIS MANUAL.
Copyright© 2008 by Harbor Freight Tools®. All rights reserved. No portion of this
manual or any artwork contained herein may be reproduced in any shape or form
without the express written consent of Harbor Freight Tools.
For technical questions or replacement parts, please call 1-800-444-3353.
Page 2
SAVE THIS MANUAL
Keep this manual for the safety warnings and precautions, assembly, operating,
inspection, maintenance and cleaning procedures. Write the product’s serial number
in the back of the manual (or month and
year of purchase if product has no number). Keep this manual and the receipt in
a safe and dry place for future reference.
IMPORTANT SAFETY
INSTRUCTIONS
In this manual, on the labeling,
and all other information
provided with this product:
This is the safety alert
symbol. It is used to alert
you to potential personal
injury hazards. Obey all
safety messages that
follow this symbol to avoid
possible injury or death.
DANGER indicates
a hazardous
situation which, if not
avoided, will result in death or
serious injury.
NOTICE is used to
address practices
not related to personal injury.
CAUTION, without
the safety alert
symbol, is used to address
practices not related to
personal injury.
When using
gardening
equipment, basic safety
precautions should always be
followed to reduce the risk of
personal injury, including the
following:
READ ALL INSTRUCTIONS
Personal Safety
Dress properly - Do not wear loose 1.
clothing or jewelry. They can be
caught in moving parts. Use of rubber gloves and substantial footwear is
recommended when working outdoors. Wear protective hair covering
to contain long hair.
2. Wear ANSI-approved safety
goggles, NIOSH-approved
dust mask/respirator, and
heavy-duty work gloves.
WARNING
indicates a
hazardous situation which, if
not avoided, could result in
death or serious injury.
CAUTION, used
with the safety
alert symbol, indicates a
hazardous situation which, if
not avoided, could result in
minor or moderate injury.
Do not overreach - Keep proper foot-3.
ing and balance at all times.
Stay alert - Watch what you are do-4.
ing. Use common sense. Do not operate this product when you are tired.
Gardening Appliance Use and Care
Avoid a dangerous environment - Do 1.
not use this product in damp or wet
locations.
Page 2SKU 99623 For technical questions, please call 1-800-444-3353.
Page 3

Do not use in rain.2.
Keep children away - All visitors 3.
should be kept at a distance from
work area.
When servicing use only identical 4.
replacement parts.
Use the right equipment - Do not use 5.
appliance for any job except that for
which it is intended.
Do not force this equipment - It will do 6.
the job better and with less likelihood
of injury at the rate for which it was
designed.
Store idle equipment indoors - When 7.
not in use, gardening equipment
should be stored indoors in a clean,
dry location out of reach of children.
Maintain this product with care - Keep 8.
this product clean for best performance and to reduce the risk of
injury. Follow instructions for maintenance. If damaged, have this product
repaired by an authorized service
facility. Keep handle dry, clean, and
free from oil and grease.
Keep guards in place and in working 10.
order.
General Safety
Do not exceed the maximum weight 1.
capacity (50 pounds) of the Spreader.
Use this product only with powdered 2.
and granular fertilizers, seed, sand,
and ice-melt products.
Never leave contents in the Spreader. 3.
Pour leftover material back into its
package and seal the package tightly.
Never allow children or pets near any
materials you apply.
Always follow the fertilizer manufac-4.
turer’s instructions for proper use of
the fertilizer.
Do not use appliance for other than 5.
intended use.
Maintain labels and nameplates on 6.
the Spreader. These carry important
safety information. If unreadable or
missing, contact Harbor Freight Tools
for a replacement.
Check for damaged parts - Before 9.
further use of this product, a guard
or other part that is damaged should
be carefully checked to determine
that it will operate properly and perform its intended function. Check for
alignment of moving parts, binding of
moving parts, breakage of parts, and
any other condition that may affect its
operation. A guard or other part that
is damaged should be properly repaired or replaced by a qualied technician unless indicated elsewhere in
this manual.
The warnings, precautions, and in-7.
structions discussed in this instruction
manual cannot cover all possible conditions and situations that may occur.
It must be understood by the operator
that common sense and caution are
factors which cannot be built into this
product, but must be supplied by the
operator.
SAVE THESE
INSTRUCTIONS.
Page 3SKU 99623 For technical questions, please call 1-800-444-3353.
Page 4
SPECIFICATIONS
Designed for spreading
Product Applications
Hopper Capacity 50 Pounds (Dry)
Tires 4.10/3.50-6 / 24 PSI / Qty. 2
Construction Materials
powdered and granular fertilizer,
seed, sand, and ice-melt
products.
Molded Polypropylene Hopper &
Spreader Impeller.
Steel Tubular Frame & Handle.
Pneumatic Tires.
UNPACKING
When unpacking, check to make sure
that the item is intact and undamaged. If
any parts are missing or broken, please
call Harbor Freight Tools at the number
shown on the cover of this manual as soon
as possible.
ASSEMBLY INSTRUCTIONS
Read the ENTIRE IMPORTANT
SAFETY INSTRUCTIONS
section at the beginning of this
manual including all text under
subheadings therein before
assembly or use of this
product.
SCREWS
(43)
FRAME
(30)
HOPPER
(16)
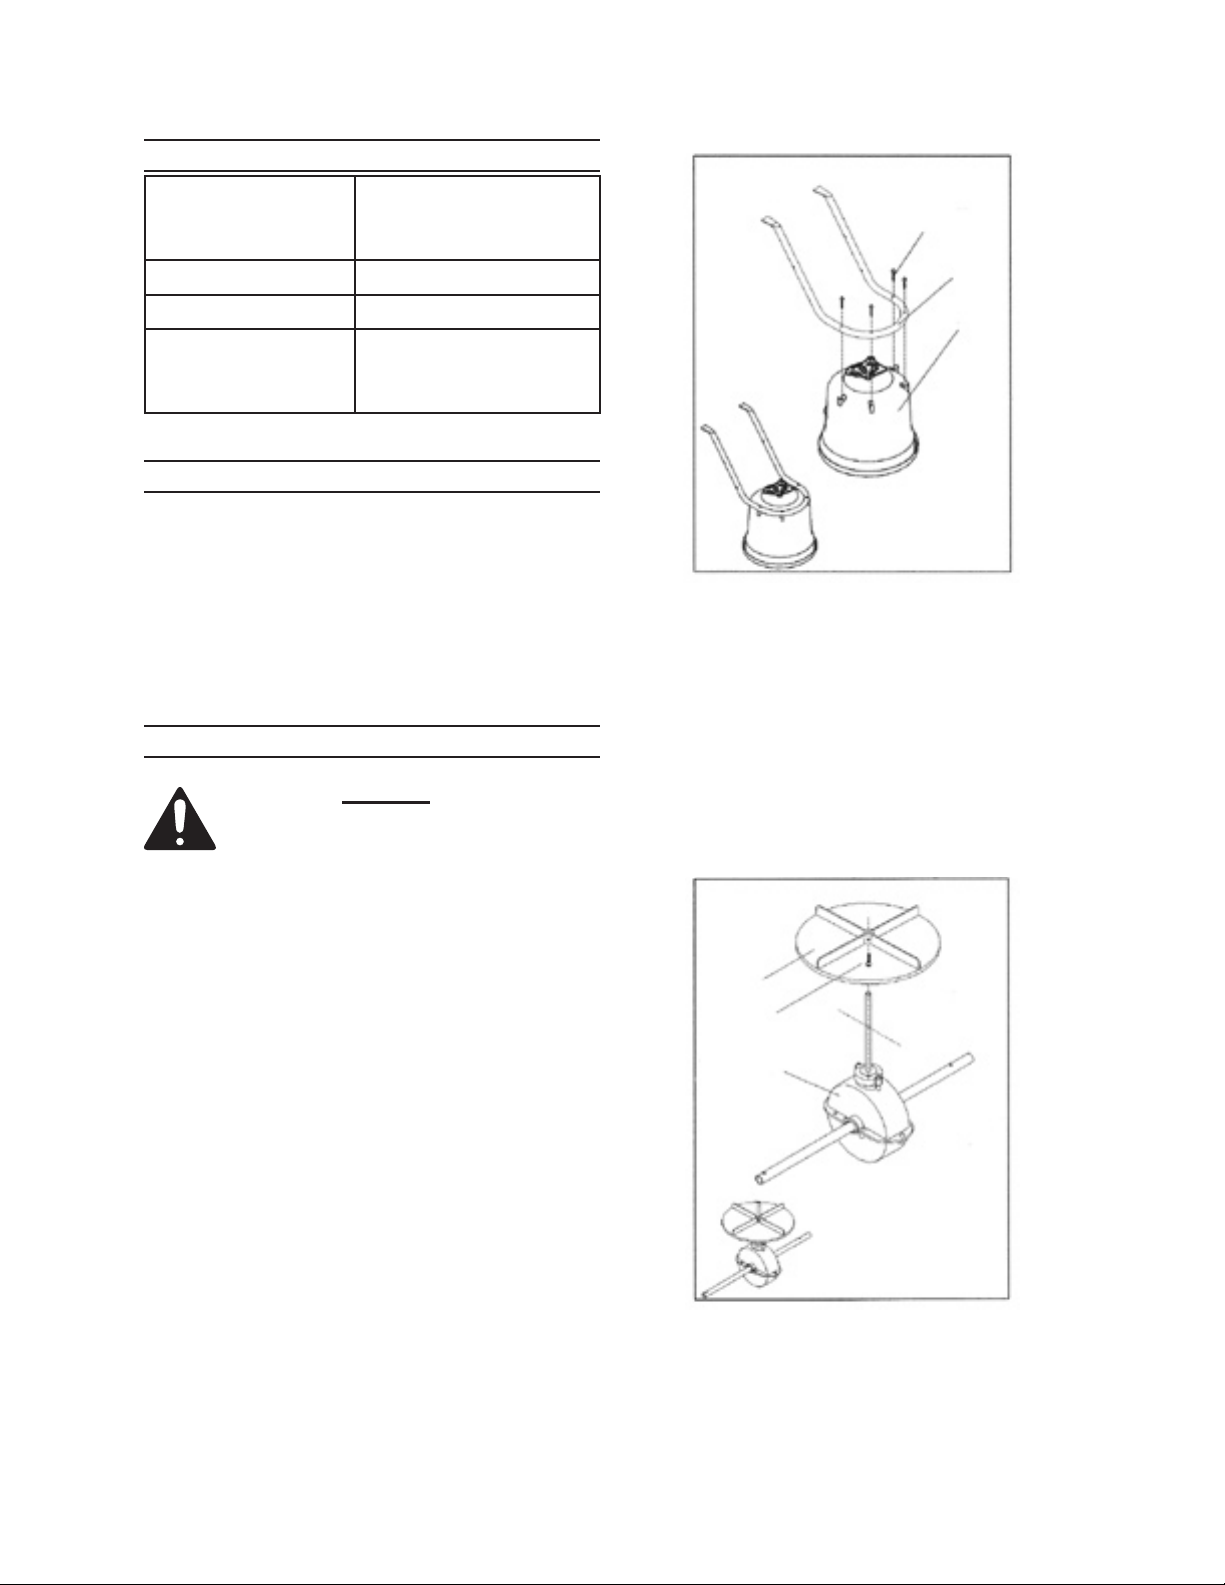
FIGURE A
Attach the Impeller (42) to the Gear 2.
Box & Axle Assembly (39). To do
so, insert the Screw (41) through the
Impeller, then through the Gear Box
Axle. Use the hole nearest the Gear
Box. Then tighten the Screw.
(See Figure B.)
IMPELLER
(42)
Note: For additional information regarding
the parts listed in the following pages, refer
to the Assembly Diagram near the end of
this manual.
Turn the Hopper (16) upside down 1.
and install the Frame (30), using four
Screws (43). (See Figure A.)
SCREW
(41)
GEAR BOX
&
AXLE ASSY.
(39)
FIGURE B
Install the Wheel Assembly Frames 3.
(20) on each side of the Gear Box
Page 4SKU 99623 For technical questions, please call 1-800-444-3353.
Page 5

Axle (39). Insert a Hex Bolt (32)
through both Wheel Assembly
Frames and the Hopper Frame (30).
Then secure the Wheel Assembly
Frames to the Hopper Frame, using
two Lock Nuts (24). NOTE: Do not
tighten hardware at this time.
(See Figure C.)
GEAR BOX & AXLE
(39)
WHEEL ASSY. FRAME
(20)
HEX BOLT
(32)
CROSS BRACE
(45)
FRAME BRACE
(31)
BOLT
(33)
BOLT
(11)
HOPPER
LOCK NUT
(24)
(16)
FIGURE D
LOCK NUT
(24)
HOPPER
(16)
FIGURE C
Attach one end of the Frame Braces 4.
(31) to the Hopper Frame (30), us-
ing two Bolts (33) and two Lock Nuts
(24). Then attach the other ends of
the Frame Braces, with the Cross
Brace (45) positioned between the
Frame Braces, to the Wheel Assem-
bly Frame (20), using two Bolts (11).
NOTE: Do not tighten hardware at
this time. (See Figure D.)
Slide an Axle Bushing (37) over the 5.
Axle (39) and into an Axle Bearing
(38) on both ends of the Axle. Install
a Wheel (36) on each end of the Axle
and secure the Wheels using two Hex
Bolts (47) and two Hex Lock Nuts (44).
Then install a Flat Washer (34) and
End Cap (35) for each Wheel.
(See Figure E.)
WHEEL
(36)
HEX BOLT
(47)
TH RE ADE D
HOLE
AXLE BUSHING
(37)
END CAP
(35)
FLAT
WASHER
(34)
Note: Find the threaded hole in one
side of Axle. Install a Wheel (36) on
this end of the Axle and secure the
Wheel using one Hex Bolt (47) and
one Lock Nut (44). Then install a Flat
Washer (34) and End Cap (35) for this
Wheel. Install the other Wheel on the
Axle and secure it in place with a Flat
Washer (34) and End Cap (35).
HEX
LOCK NUT
(44)
HOPPER
(16)
FIGURE E
REV 09b
Page 5SKU 99623 For technical questions, please call 1-800-444-3353.
Page 6

Insert the Handle Shaft (26) between 6.
the two Wheel Assembly Frames
(20). Attach the Pivot and Bracket
Assembly (19) to the Wheel Assem-
bly Frames and Handle Shaft, using
two Bolts (11) and two Nuts (21).
(See Figure F.)
HANDLE SPACER
UPPER
HANDLE
(23)
BOLT
(11)
(1)
FLAT WASHER (48)
NUTS (21)
GAUGE
& LEVER
ASSY.
(4)
HANDLE SHAFT
(26)
NUT
(21)
PIVOT
&
BRACKET
ASSY.
BOLT
(11)
WHEEL ASSY.
FRAME
(20)
(19)
HOPPER
(16)
FIGURE F
7. The Upper Handle (23) features
three positions for operating comfort.
To use the middle or upper positions,
place the Handle Spacer (1) between
the mounting holes nearest to the
Handle Covers (15). Insert a Bolt
(11) through the Upper Handle (23),
through the Handle Spacer, through
the other Upper Handle and secure
with a Flat Washer (48) and Nut (21).
Install the Gauge & Lever Assembly
(4) on the left hand side, using two
Bolts (11) and two Nuts (21).
(See Figure G.)
FIGURE G
Unscrew and remove 8. one Lock Nut
(24) from the Control Rod (25). Insert
the threaded portion of the Control Rod
into the hole in the Pivot and Bracket
Assembly (19). Then re-thread the
Lock Nut back onto the Control Rod.
(See Figure H.)
FIGURE H
CONTROL ROD
(25)
PIVOT & ASSY.
BRACKET
(19)
LOCK
NUT
(24)
Insert the Adjust Connect Rod (46) into 9.
the Shut Off Plate (27). Then secure
the Adjust Connect Rod to the Shut Off
Plate, using one Flat Washer (48) and
Page 6SKU 99623 For technical questions, please call 1-800-444-3353.
Page 7

one Lock Nut (24).
(See Figure I.)
HOPPER
(16)
FIGURE I
FLAT
WASHER
(48)
LOCK
NUT
(24)
SHUT OFF PLATE
(27)
Pull up on the Adjust Handle (6) to its 12.
upper position, making sure the holes
in the Hopper (16) and the holes in the
Shut Off Plate (27) are 100% open.
(See Figure J.)
Adjust the position of the Wing Nut 13.
(10). By doing so, you are able to control the size of the holes you need.
(See Figure J.)
Insert the “R” Pin (17) into the Pinion 14.
Shaft on the Gear Box and Axle Assembly (39). Make sure the Impeller
(42) is turning in the correct direction as
indicated by the arrow in the illustration.
(See Figure J.)
10. Push down on the Adjust Handle (6)
to its lowest position.
(See Figure J.)
“R” PIN
(17)
ADJUST
HANDLE
PINION
SHAFT
FIGURE J
PUSH FORWARD.
IMPELLER MUST TURN
IN THIS DIRECTION.
(6)
WING
LOCK NUTS
(24)
“R” PIN (17)
NUT
(10)
11. Adjust the position of the two Lock
Nuts (24) on the Control Rod (25),
making sure the holes at the bottom
of the Hopper (16) line up with the
holes in the Shut Off Plate (27) prop-
erly. (See Figures I and J.)
OPERATING INSTRUCTIONS
Read the ENTIRE IMPORTANT
SAFETY INFORMATION section
at the beginning of this manual
including all text under
subheadings therein before
assembly or use of this product.
Before operating the Spreader make 1.
sure to wear ANSI-approved safety
impact glasses, NIOSH-approved dust
mask/respirator, and heavy duty work
gloves.
Remove the Screen (14) on the Hopper 2.
(16) and ll the Hopper with the material you wish to apply. Do not exceed 50
pounds of material. Then replace the
Screen. (See Figure K, next page.)
Refer to the manufacturer’s recom-3.
mended ow rate (0 to 5, typically
shown on the bag/container of the
material being applied).
Adjust the ow rate on the Gauge and 4.
Lever Assembly (4) to that of the mate-
Page 7SKU 99623 For technical questions, please call 1-800-444-3353.
Page 8

rial manufacturer’s recommendation.
To do so, move the Wing Nut (10) to
the proper setting. (See Figure K.)
Suggested walking pattern at 10. full rate
settings: (See Figure L.)
Grip the Upper Handles (23) with 5.
both hands, pull the Adjust Handle
(6) back and immediately begin
pushing the Spreader at a slow and
even rate over the area you wish to
apply. (See Figure K.)
IMPORTANT: 6. Always PUSH the
Spreader when applying material.
When pulled backward while the
Hopper (16) is open, the Spreader
may apply an excessive amount of
material. (See Figure K.)
When nished applying the material, 7.
push the Adjust Handle (6) forward
to stop the release of material being
applied. (See Figure K.)
SCREEN
(14)
HOPPER
(16)
UPPER HANDLES
(23)
FIGURE L
START
FINISH
11. Suggested walking pattern at half rate
settings: (See Figure M.)
FIGURE M
START
(1ST PASS)
ADJUST HANDLE
(6)
WING NUT
(10)
FIGURE K
8. Never leave material in the Spreader.
Pour leftover material back into its
bag/container and seal the bag/container tightly.
To prevent accidents, wash thor-9.
oughly to remove all material in the
Spreader. Allow the unit to dry. Then
store the unit indoors out of children’s
reach.
FINISH
(1ST PASS)
(2ND PASS)
START
FINISH
(2ND PASS)
Page 8SKU 99623 For technical questions, please call 1-800-444-3353.
Page 9

MAINTENANCE AND
SERVICING
Procedures not specically
explained in this manual
must be performed only by a
qualied technician.
TO PREVENT
SERIOUS INJURY
FROM TOOL FAILURE:
Do not use damaged
equipment. If abnormal noise
or vibration occurs, have the
problem corrected before
further use.
AFTER USE,2. Never leave material in
the Spreader. Pour leftover material
back into its bag/container and seal the
bag/container tightly.
CLEANING AND STORAGE: wash 3.
thoroughly to remove all material in the
Spreader. Allow the unit to dry. Then
store the unit indoors out of children’s
reach.
NOTE: This Spreader does not require 4.
lubrication.
PLEASE READ THE
FOLLOWING CAREFULLY
Inspection, Maintenance, and
Cleaning
BEFORE EACH USE, inspect the 1.
general condition of the Spreader.
Check for loose screws, misalignment or binding of moving parts,
cracked or broken parts, and any
other condition that may affect its
safe operation.
TROUBLESHOOTING
Problem Possible Cause(s) Possible Solution(s)
Unit will not release material. Improper use of Adjust Handle.1.
Improper ow rate setting.2.
Wet, or wrong type of materal.3.
THE MANUFACTURER AND/OR DISTRIBUTOR HAS
PROVIDED THE PARTS LIST AND ASSEMBLY DIAGRAM IN
THIS MANUAL AS A REFERENCE TOOL ONLY. NEITHER
THE MANUFACTURER OR DISTRIBUTOR MAKES ANY
REPRESENTATION OR WARRANTY OF ANY KIND TO THE
BUYER THAT HE OR SHE IS QUALIFIED TO MAKE ANY
REPAIRS TO THE PRODUCT, OR THAT HE OR SHE IS
QUALIFIED TO REPLACE ANY PARTS OF THE PRODUCT.
IN FACT, THE MANUFACTURER AND/OR DISTRIBUTOR
EXPRESSLY STATES THAT ALL REPAIRS AND PARTS
REPLACEMENTS SHOULD BE UNDERTAKEN BY CERTIFIED
AND LICENSED TECHNICIANS, AND NOT BY THE BUYER.
THE BUYER ASSUMES ALL RISK AND LIABILITY ARISING OUT
OF HIS OR HER REPAIRS TO THE ORIGINAL PRODUCT OR
REPLACEMENT PARTS THERETO, OR ARISING OUT OF HIS
OR HER INSTALLATION OF REPLACEMENT PARTS THERETO.
Pull Adjust Handle backward to 1.
release material. Push forward
to stop ow of material.
Make sure Adjust Handle setting 2.
is adjusted to that of material
manufacturer’s recommended
setting.
Unit is designed only for dry, 3.
powered, and granular material.
Unit releases too much or too little
material.
Follow all safety precautions whenever diagnosing or servicing the Spreader.
Improper ow rate setting.1. Make sure Adjust Handle setting 1.
is adjusted to that of material
manufacturer’s recommended
setting.
Page 9SKU 99623 For technical questions, please call 1-800-444-3353.
Page 10

PARTS LIST
Part #
Description Qty.
Gear Box & Axle Assembly
2
REV 09b
Page 10SKU 99623 For technical questions, please call 1-800-444-3353.
Page 11

ASEMBLY DIAGRAM
Record Product’s Serial Number Here:
Note: If product has no serial number, record month and year of purchase instead.
Note: Some parts are listed and shown for illustration purposes only, and are not avail-
able individually as replacement parts.
Page 11SKU 99623 For technical questions, please call 1-800-444-3353.
 Loading...