

Page 1
BBQ FAN WITH
98625
LED LIGHT
INSTRUCTIONS AND PRECAUTIONS
Distributed exclusively by Harbor Freight Tools®.
3491 Mission Oaks Blvd., Camarillo, CA 93011
Visit our website at: http://www.harborfreight.com
SAVE THESE INSTRUCTIONS. READ ALL
PRECAUTIONS AND INSTRUCTIONS.
Copyright© 2008 by Harbor Freight Tools®. All rights reserved. No portion of this document or any artwork contained
herein may be reproduced in any shape or form without the express written consent of Harbor Freight Tools.
Diagrams within this document may not be drawn proportionally. Due to continuing improvements, actual product
may differ slightly from the product described herein. Tools required for assembly and service may not be included.
For technical questions or replacement parts, please call 1-800-444-3353.
SPECIFICATIONS
Clamp, Battery and Light/Fan Housing:
Constructon
L.E.D. 8 Lights (Non-Replaceable)
Power 3 - AA Batteries (Included)
ABS Thermoplastic.
Gooseneck: Tubular, Sheet Steel.
On/Off Switch: Black Rubber
UNPACKING
When unpacking, check to make sure that
the item is intact and undamaged. If any parts are
missing or broken, please call Harbor Freight Tools
at the number shown on the cover of this document
as soon as possible.
IMPORTANT SAFETY
INFORMATION
Use Precautions
Use caution when attaching this BBQ Fan 1.
and LIght. Plastic can melt or disgure with
heat. Attach to wood shelf or table adjacent
to BBQ and not to metal BBQ itself.
This product is not a toy. Do not allow chil-2.
dren to play with or near this item.
Use for intended purpose(s) only.3.
Inspect before use; do not use if parts are 4.
loose or damaged.
Maintain product labels and nameplates. 5.
These carry important safety information.
If unreadable or missing, contact Harbor
Freight Tools for a replacement.
ASSEMBLY INSTRUCTIONS
Read the ENTIRE IMPORTANT
SAFETY INFORMATION section at the
beginning of this document including
all text under subheadings therein
before set up or use of this product.
Assembly
No assembly required for this BBQ Fan and Light.
Page 2
OPERATION INSTRUCTIONS
Figure 1
Threaded Bolt (Large) (3)
Tabs
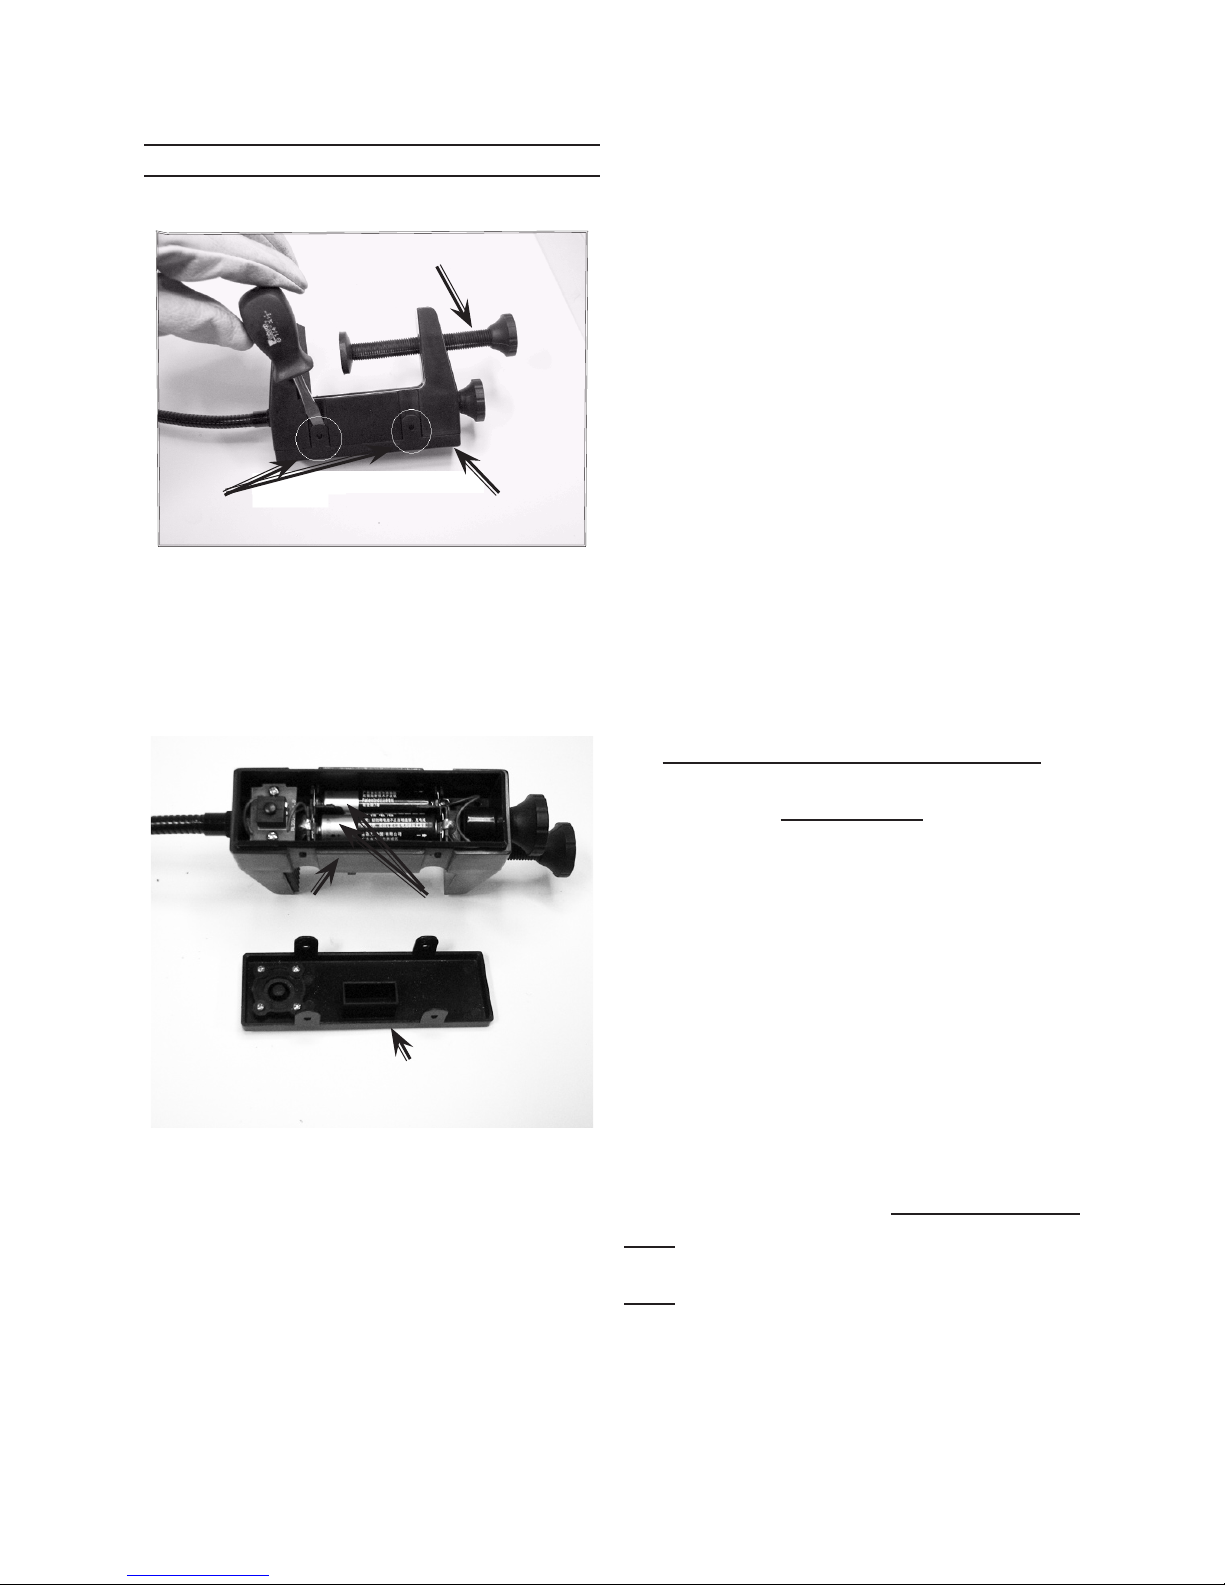
1. Remove Battery Compartment Cover (16)
using small straight slot screwdriver (not
supplied) to depress the four tabs attached to
the Battery Compartment Cover (16). Slide
it apart from the Battery Compartment (4).
See Figure 1.
Battery Compartment Cover (16)
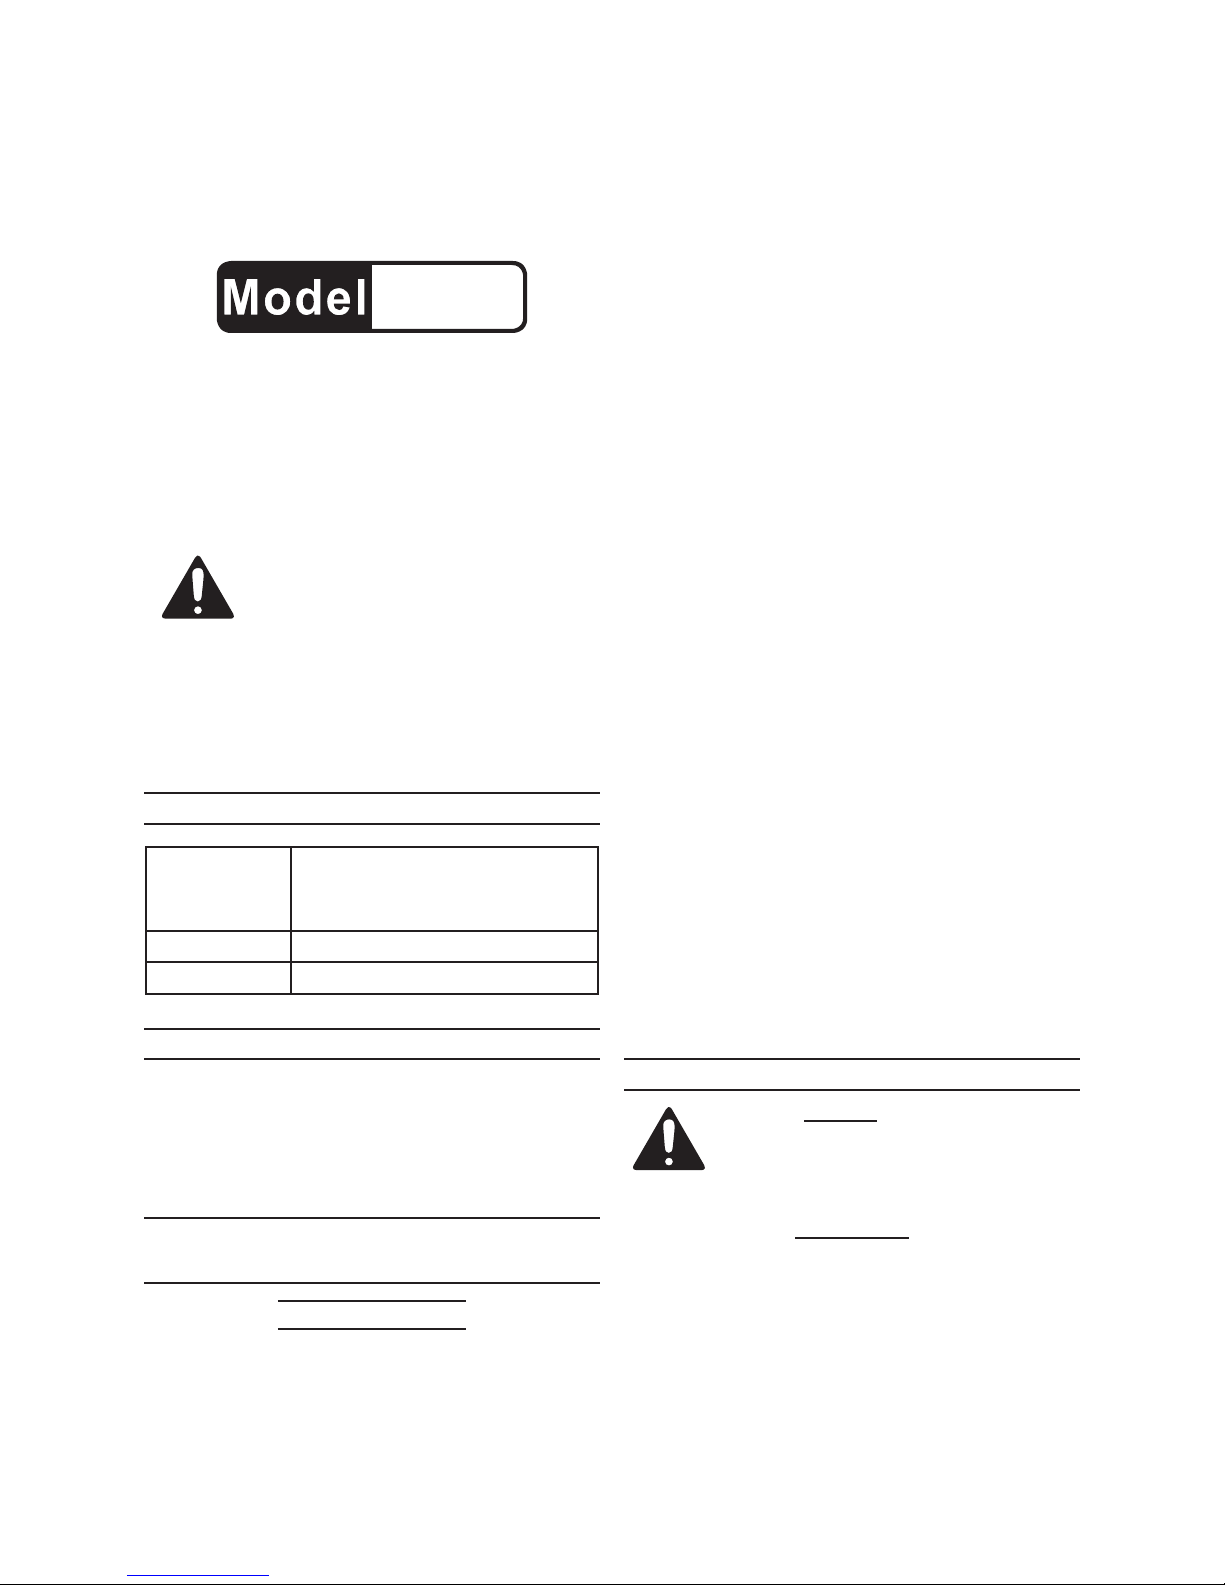
Figure 2
Loosen the Threaded Bolt (Large) (3) wide 4.
enough to slide the Mounting Socket (17)
onto a stable platform away from the heat of
the BBQ. Tighten the Threaded Bolt (Large)
(3) so the platform is held snugly in place.
See Figure 2.
The Flexible Shaft (18) allows a number of 5.
different positions so the BBQ Fan and/or
L.E.D. Light can be most effectively used.
Turn on the BBQ Fan With Light by de-6.
pressing the Push Button (15), once for just
LIGHT, twice for just FAN and three times for
both LIGHT and FAN.
Press once to turn off.7.
The BBQ Fan With Light can also be used 8.
indoors as a reading Fan/Light or in the
workshop if extra light is needed.
Dispose of Batteries properly in accordance 9.
with all local ordinances.
Battery Compartment (4) Batteries (7)
Battery Compartment Cover (16)
2. Insert the three AA Batteries (included) into
the Battery Compartment (4). Follow the
polarity markings stamped into the plastic
inside the Battery Compartment (4). Place
two Batteries (bunk bed style), with the bot-
tom Battery following the polarity markings
and the top Battery reversing the polarity of
the bottom Battery. See Figure 2.
Replace the Battery Compartment Cover (16) 3.
by snapping the four tabs into place.
PLEASE READ THE FOLLOWING
CAREFULLY
THE MANUFACTURER AND/OR DISTRIBUTOR HAS
PROVIDED THE PARTS LIST AND ASSEMBLY DIAGRAM
IN THIS DOCUMENT AS A REFERENCE TOOL ONLY.
NEITHER THE MANUFACTURER OR DISTRIBUTOR
MAKES ANY REPRESENTATION OR WARRANTY OF ANY
KIND TO THE BUYER THAT HE OR SHE IS QUALIFIED
TO MAKE ANY REPAIRS TO THE PRODUCT, OR THAT
HE OR SHE IS QUALIFIED TO REPLACE ANY PARTS OF
THE PRODUCT. IN FACT, THE MANUFACTURER AND/OR
DISTRIBUTOR EXPRESSLY STATES THAT ALL REPAIRS
AND PARTS REPLACEMENTS SHOULD BE UNDERTAKEN
BY CERTIFIED AND LICENSED TECHNICIANS, AND NOT
BY THE BUYER. THE BUYER ASSUMES ALL RISK AND
LIABILITY ARISING OUT OF HIS OR HER REPAIRS TO THE
ORIGINAL PRODUCT OR REPLACEMENT PARTS THERETO,
OR ARISING OUT OF HIS OR HER INSTALLATION OF
REPLACEMENT PARTS THERETO.
Record Serial Number Here:
Note: If product has no serial number, record
month and year of purchase instead.
Note: Some parts are listed and shown for illustra-
tion purposes only, and are not available
individually as replacement parts.
SKU 98625 For technical questions, please call 1-800-444-3353. Page 2
Page 3

PARTS LIST & ASSEMBLY
DIAGRAM
PARTS LIST & ASSEMBLY
DIAGRAM
Part Description Qty.
1 Magnet 2
2 Threaded Bolt (Small) 1
3 Threaded Bolt (Large) 1
4 Battery Compartment 1
5 Contact Plate “A” 2
6 Contact Plate “B” 1
7 AA Batteries 3
8 Screw Head 1
9 Contact Plate “C” 1
10 Switch Board 1
11 Self-Tapping Screw ST3X10 2
12 Switch Plate 1
13 Self-Tapping Screw ST2.5X5 4
14 Fixed Plate 1
15 Push Button (ON/OFF) 1
16 Battery Compartment Cover 1
17 Mounting Socket 1
18 Flexible Shaft 1
19 Screw Connector 1
PARTS DIAGRAM
Part Description Qty.
20 Lens 1
21 Reector “A” 1
22 Reector “B” 1
23 L.E.D. Board 1
24 Light Housing Left 1
25 Self-Tapping Screw ST3X10 1
26 Light Housing Right 1
27 Motor 1
28 Light Rear Cover 1
29 Fan Rear Cover 1
30 Fan 1
31 Fan Front Cover 1
32 Anti-Slip Pad 1
SKU 98625 For technical questions, please call 1-800-444-3353. Page 3
 Loading...