

Page 1

HAND CRANK
APPLE PEELER
98412
INSTRUCTIONS AND PRECAUTIONS
Visit our website at: http://www.harborfreight.com
Read this material before using this product.
Failure to do so can result in serious injury.
SAVE THIS MANUAL.
Copyright© 2008 by Harbor Freight Tools®. All rights reserved. No portion of this manual or any artwork
contained herein may be reproduced in any shape or form without the express written consent of
Harbor Freight Tools. Diagrams within this manual may not be drawn proportionally. Due to continuing
improvements, actual product may differ slightly from the product described herein. Tools required for
assembly and service may not be included.
For technical questions or replacement parts, please call 1-800-444-3353.
SPECIFICATIONS
Materials
Overall
Dimensions
Revised Manual 09k
Aluminum Frame; Stainless Steel
Gripping Fork
11-3/4” L x 7-11/16” W x 3-1/8 H”
(fully extended)
UNPACKING
When unpacking, check to make sure that
the item is intact and undamaged. If any parts are
missing or broken, please call Harbor Freight Tools
at the number shown on the cover of this document
as soon as possible.
Page 2
IMPORTANT SAFETY
INFORMATION
Assembly Precautions
Contains sharp blades; keep away from 1.
children.
Assemble only according to these instruc-2.
tions. Improper assembly can create hazards.
Clean thoroughly with warm water and soap 3.
before rst use and after each subsequent
use.
Do not use in dishwasher; hand wash only.4.
Use with apples only.5.
Wear ANSI-approved safety goggles during 6.
setup and use and heavy-duty work gloves
during blade replacement.
Do not overtighten clamp.7.
Mount only to at, level and stable surface to 8.
support weight of Apple Peeler.
Use only on one apple at a time.9.
Keep assembly/usage area clean and well lit.10.
Do not assemble when tired or when under 11.
the inuence of drugs or medication.
Use for intended purpose only.12.
Inspect before use; do not use if parts are 13.
loose or damaged.
Do not use with dull or worn blades.14.
Maintain product labels and nameplates. 15.
These carry important safety information.
If unreadable or missing, contact Harbor
Freight Tools for a replacement.
Read the ENTIRE IMPORTANT
SAFETY INFORMATION section at the
beginning of this document including
all text under subheadings therein
before set up or use of this product.
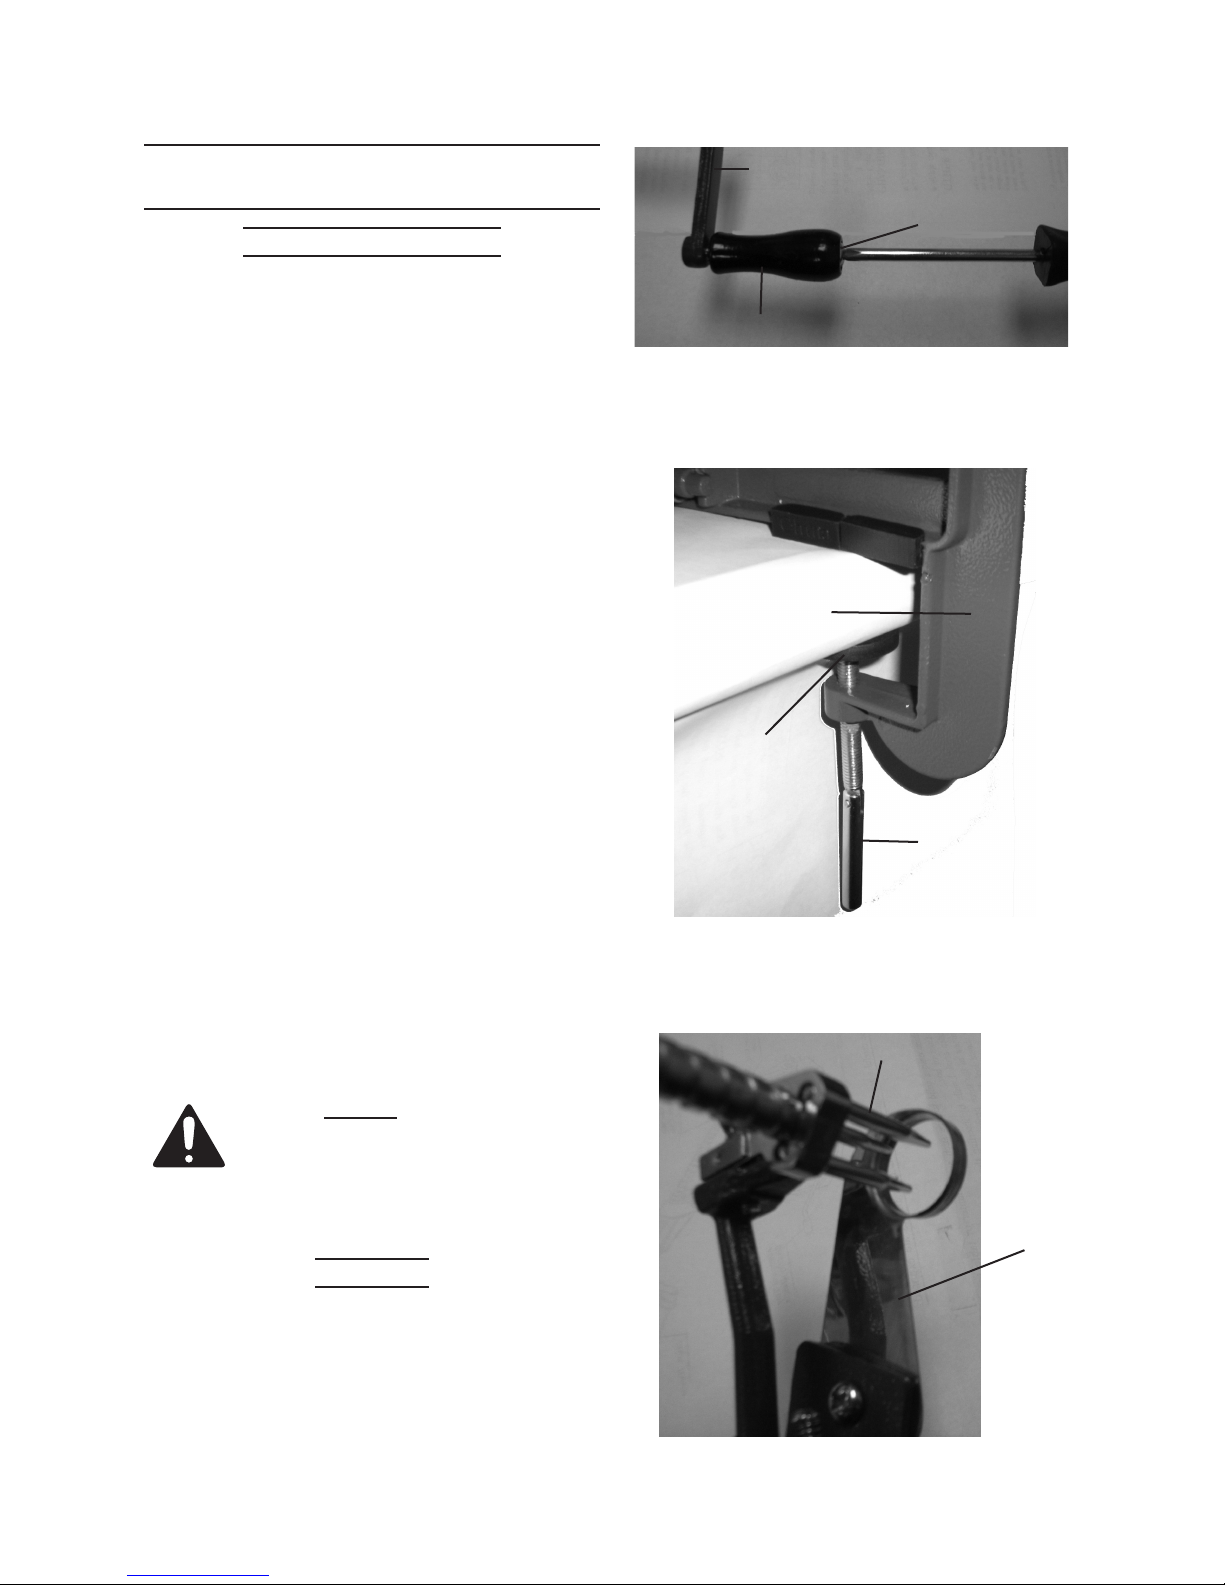
Assembly
Use a screwdriver (not included) to thread 1.
the Handle Screw (8) through the Crank
Handle (2) and fasten Handle to the Peeler
Frame (1). See Figure 1, above.
Mount Peeler Frame (1) to solid, stable sur-2.
face such as a counter or tabletop by tighten-
ing the Clamp (3) around table edge. See
Figure 2, below.
Figure 2
Check positions of Three-Prong Fork (4) and 3.
Core Slicer Blade (5). They should align with
Core Slicer Blade facing the centered Three-
Prong Fork. See Figure 3, below.
Peeler Frame (1)
Crank Handle (2)
Peeler Frame
(1)
Clamp (3)
Three-Prong Fork (4)
Handle Screw (8)
Figure 1
Clamp
Handle
Core Slicer
Blade (5)
Figure 3
SKU 98412 For technical questions, please call 1-800-444-3353. Page 2
Page 3

Operation
Release Groove Clamp (6) by pushing down 1.
on either end of Clamp and pull Crank Handle all the way back. See Figure 4, below.
Groove
Clamp (6)
Groove
Clamp (6)
Crank Handle
Figure 4
Align apple stem with Three-Prong Fork and 2.
push apple against fork.
Slide Crank Handle forward until apple touch-3.
es Core Slicer Blade (5). Release Groove
Clamp, locking Crank Handle in place.
To adjust depth of slice, loosen Adjusting 4.
Screw (7) and raise or lower Core Slicer
Blade. Start slicing by turning Crank Handle.
To peel, press down on Peeler Latch (11) and 5.
set Peeler Arm (10) to desired angle. Then
turn Crank Handle.
When nished, pull peeled apple off and 6.
remove apple core by pressing on Groove
Clamp and pulling back on Crank Handle.
Blade Replacement
When replacing the Core Slicer Blade, use 1.
the Groove Clamp to make sure the ThreeProng Fork is pushed all the way back.
Then loosen Adjusting Screw that keeps 2.
Core Slicer Blade fastened to Peeler Frame.
Please note: When installing new blade, al-
ways make sure that Blade ange faces out.
When replacing Peeler Blade (9), loosen the 3.
screw that keeps the Peeler Blade fastened
to the Peeler Frame.
Cleaning and Maintenance
After each use, rinse with soap and warm 1.
water. Do NOT clean in dishwasher.
(2)
Dry with soft towel and store out of reach of 2.
children.
PARTS LIST & ASSEMBLY
DIAGRAM
Part Description Qty.
1 Peeler Frame 1
2 Crank Handle 1
3 Clamp 1
4 Three-Prong Fork 1
5 Core Slicer Blade 1
6 Groove Clamp 1
7 Adjusting Screw 1
8 Handle Screw 1
9 Peeler Blade 1
10 Peeler Arm 1
11 Peeler Latch 1
5
7
10
4
9
6
11
Please note: Some parts are listed and shown
for illustration purposes only and are not available
individually as replacement parts.
Record Serial Number Here:
Note: If product has no serial number, record
month and year of purchase instead.
PLEASE READ THE FOLLOWING CAREFULLY
THE MANUFACTURER AND/OR DISTRIBUTOR HAS PROVIDED THE PARTS
LIST AND ASSEMBLY DIAGRAM IN THIS DOCUMENT AS A REFERENCE TOOL
ONLY. NEITHER THE MANUFACTURER OR DISTRIBUTOR MAKES ANY
REPRESENTATION OR WARRANTY OF ANY KIND TO THE BUYER THAT HE OR
SHE IS QUALIFIED TO MAKE ANY REPAIRS TO THE PRODUCT, OR THAT HE OR
SHE IS QUALIFIED TO REPLACE ANY PARTS OF THE PRODUCT. IN FACT, THE
MANUFACTURER AND/OR DISTRIBUTOR EXPRESSLY STATES THAT ALL REPAIRS
AND PARTS REPLACEMENTS SHOULD BE UNDERTAKEN BY CERTIFIED AND
LICENSED TECHNICIANS, AND NOT BY THE BUYER. THE BUYER ASSUMES ALL
RISK AND LIABILITY ARISING OUT OF HIS OR HER REPAIRS TO THE ORIGINAL
PRODUCT OR REPLACEMENT PARTS THERETO, OR ARISING OUT OF HIS OR
HER INSTALLATION OF REPLACEMENT PARTS THERETO.
1
8
3
2
SKU 98412 For technical questions, please call 1-800-444-3353. Page 3
 Loading...