

Page 1
DIGITAL THERMOMETER
Model
97698
OPERATING INSTRUCTIONS
Diagrams within this manual may not be drawn proportionally.
Due to continuing improvements, actual product may differ slightly from the product described herein.
Distributed exclusively by Harbor Freight Tools®.
3491 Mission Oaks Blvd., Camarillo, CA 93011
Visit our website at: http://www.harborfreight.com
Read this material before using this product.
Failure to do so can result in serious injury.
SAVE THIS MANUAL.
Copyright© 2008 by Harbor Freight Tools®. All rights reserved. No portion of
this manual or any artwork contained herein may be reproduced in any shape
or form without the express written consent of Harbor Freight Tools.
For technical questions or replacement parts, please call 1-800-444-3353.
Page 2
Page 2SKU 97698 For technical questions, please call 1-800-444-3353.
SAVE THIS MANUAL
Keep this manual for the safety
warnings and precautions, assembly,
operating, inspection, maintenance and
cleaning procedures. Write the product’s
serial number in the back of the manual
near the assembly diagram (or month and
year of purchase if product has no number). Keep this manual and the receipt in
a safe and dry place for future reference.
IMPORTANT SAFETY
INFORMATION
In this manual, on the labeling,
and all other information
provided with this product:
General Safety Instructions
Stay alert, watch what you are doing 1.
and use common sense when using
the thermometer. Do not use it while
you are tired or under the inuence
of drugs, alcohol or medication. A
moment of inattention while operating this product may result in serious
personal injury.
Maintain labels and nameplates on 2.
the thermometer. These carry important safety information. If unreadable
or missing, contact Harbor Freight
Tools for a replacement.
This product is not a toy. Keep it out 3.
of reach of children.
The warnings, precautions, and 4.
instructions discussed in this instruction manual cannot cover all possible
conditions and situations that may
occur. It must be understood by the
operator that common sense and caution are factors which cannot be built
into this product, but must be supplied
by the operator.
SAVE THESE
INSTRUCTIONS.
SPECIFICATIONS
Battery
Requirements
1.5V LR/SR-41 Battery
(included)
Temperature Range
Measured
89.6°F ~ 107.6°F +/- 0.2°
32°C ~ 42°C +/- 0.1°
Operating
Temperature
60.8°F ~ 95°F
16°C ~ 35°C
This product is FDA approved.
UNPACKING
When unpacking, check to make
sure that the item is intact and undamaged. If any parts are missing or broken,
please call Harbor Freight Tools at the
number shown on the cover of this manual
as soon as possible.
OPERATING INSTRUCTIONS
Read the ENTIRE IMPORTANT
SAFETY INFORMATION section
at the beginning of this manual
including all text under
subheadings therein before set
up or use of this product.
Remove the Thermometer from the 1.
protective case.
Push the Button to turn the unit on. 2.
The unit will ash the last temperature
taken.
Taking an Armpit Temperature
Taking a temperature in the armpit 1.
may not be as accurate as taking an
oral or rectal temperature.
Place the thermometer under the arm 2.
with the Probe in the center of the
armpit.
Page 3

Page 3SKU 97698 For technical questions, please call 1-800-444-3353.
Press the arm against the body and 3.
leave the thermometer in place for
two minutes. The unit will beep when
the temperature reading is complete.
Remove the thermometer and read it. 4.
An armpit temperature reading may
be as much as 1°F lower than an oral
temperature reading.
Taking an Oral Temperature
The most common method of taking 1.
a temperature is orally. It is more
accurate than taking the temperature
in the armpit. To get an accurate
temperature, the person must be able
to breathe through their nose. If the
subject cannot breathe through their
nose, take the temperature in the
rectum or armpit.
Place the Digital Thermometer under 2.
the tongue, to one side of the center,
and close the lips tightly around it.
Leave the thermometer in place for 3.
about two minutes. The Thermometer
will beep when the reading is done.
Remove the thermometer and read it.4.
Taking a Rectal Temperature
This is the location to measure body 1.
temperature most accurately. It is
recommended for babies, small
children, and people who cannot hold
a thermometer safely in their mouths.
It should also be used when getting
the most accurate temperature is essential.
Apply a lubricant on the bulb of the 2.
thermometer so that it can be inserted
easily.
When measuring the temperature of 3.
babies or small children, turn the child
face down on your lap or on a at,
covered or padded surface.
Spread the buttocks with one hand 4.
and gently insert the bulb end of the
rectal thermometer about 0.5” to 1”
into the anal canal with your other
hand. Do not force it into the rectum.
Hold the thermometer in place with 5.
two ngers close to the anal opening
(not near the end of the thermometer).
Pressing the buttocks together will
help keep the thermometer in place.
Leave the thermometer in place for 6.
about two minutes. The thermometer
will beep when the reading is complete.
Remove the Thermometer and read it. 7.
A rectal temperature reading may be
as much as 1°F (0.6°C) higher than
an oral temperature reading.
Never use a thermometer to take an 8.
oral temperature after it has been
used to take a rectal temperature.
This Thermometer only measures 9.
temperatures between 89.6°F and
107.6°F (35.5°C to 42°C). If the temperature is below 89.6°F the LED will
display an “L” for low. If the temperature is above 107.6°F the LED will
display an “H” for high. If the reading
yields an L or an H, seek medical
help immediately.
Normal human body temperature is 10.
about 98.6° +/- 1°. Any temperature
higher than 101°F is considered a
fever; the advice of a medical professional should be sought.
Carefully clean the tip of the ther-11.
mometer with cool, soapy water and
rinse it off before putting it away. The
Thermometer is not waterproof, getting the top part of the Thermometer
wet may ruin the unit.
To prevent accidents, turn off the unit. 12.
The unit will turn off automatically in
Page 4

Page 4SKU 97698 For technical questions, please call 1-800-444-3353.
10 seconds. Clean, then store the
thermometer in its protective case,
indoors out of children’s reach.
USER-MAINTENANCE
INSTRUCTIONS
Procedures not specically
explained in this manual must
be performed only by a qualied
technician.
Cleaning, Maintenance, and
Lubrication
BEFORE EACH USE,1. inspect the
general condition of the unit. Cracked
or broken parts, and any other condition that may affect its safe operation.
AFTER USE2. , sanitize with 70% iso-
propyl alcohol. Do not use with water,
Thermometer is not waterproof.
Have the Thermometer calibrated 3.
every two years by a qualied
technician.
Changing the Batteries
When the display shows , the 4.
battery will need to be changed. Pull
the cap off the unit (opposite the
Probe) and gently pull the inner part
of the Thermometer out to expose
the Battery. Remove the old battery
and dispose of it properly according
to type, following all State, local and
Federal laws and regulations. Paying
attention to polarity, place a new LR/
SR-41 battery in the compartment.
Replace and secure cover.
PLEASE READ THE
FOLLOWING CAREFULLY
THE MANUFACTURER AND/OR DISTRIBUTOR HAS PROVIDED THE PARTS LIST AND
ASSEMBLY DIAGRAM IN THIS MANUAL AS
A REFERENCE TOOL ONLY. NEITHER THE
MANUFACTURER OR DISTRIBUTOR MAKES
ANY REPRESENTATION OR WARRANTY
OF ANY KIND TO THE BUYER THAT HE OR
SHE IS QUALIFIED TO MAKE ANY REPAIRS
TO THE PRODUCT, OR THAT HE OR SHE
IS QUALIFIED TO REPLACE ANY PARTS OF
THE PRODUCT. IN FACT, THE MANUFACTURER AND/OR DISTRIBUTOR EXPRESSLY
STATES THAT ALL REPAIRS AND PARTS
REPLACEMENTS SHOULD BE UNDERTAKEN
BY CERTIFIED AND LICENSED TECHNICIANS, AND NOT BY THE BUYER. THE
BUYER ASSUMES ALL RISK AND LIABILITY
ARISING OUT OF HIS OR HER REPAIRS TO
THE ORIGINAL PRODUCT OR REPLACEMENT PARTS THERETO, OR ARISING OUT
OF HIS OR HER INSTALLATION OF RE-
PLACEMENT PARTS THERETO.
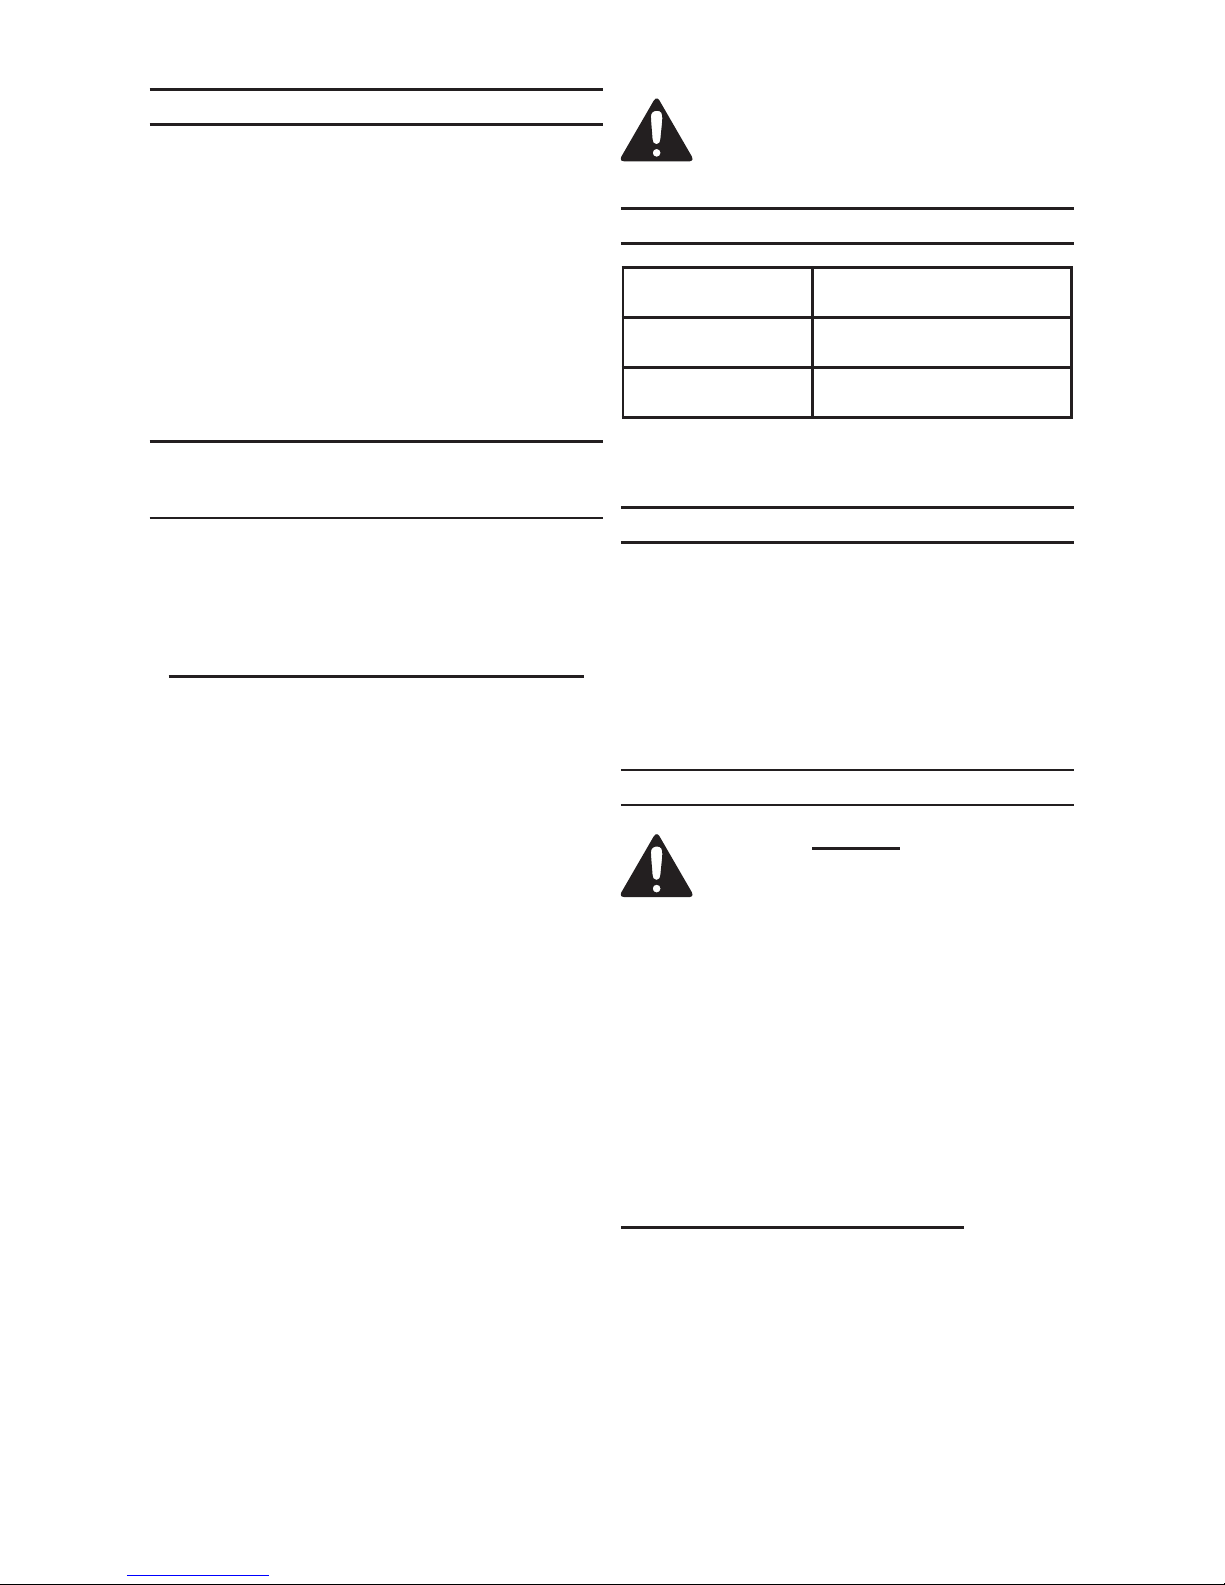
Probe
Power
Button
Cap
Protective
Case
Record Product’s Serial Number Here:
_________________________________
Note: If product has no serial number, record
month and year of purchase instead.
Note: No replacement parts.
 Loading...