

Page 1
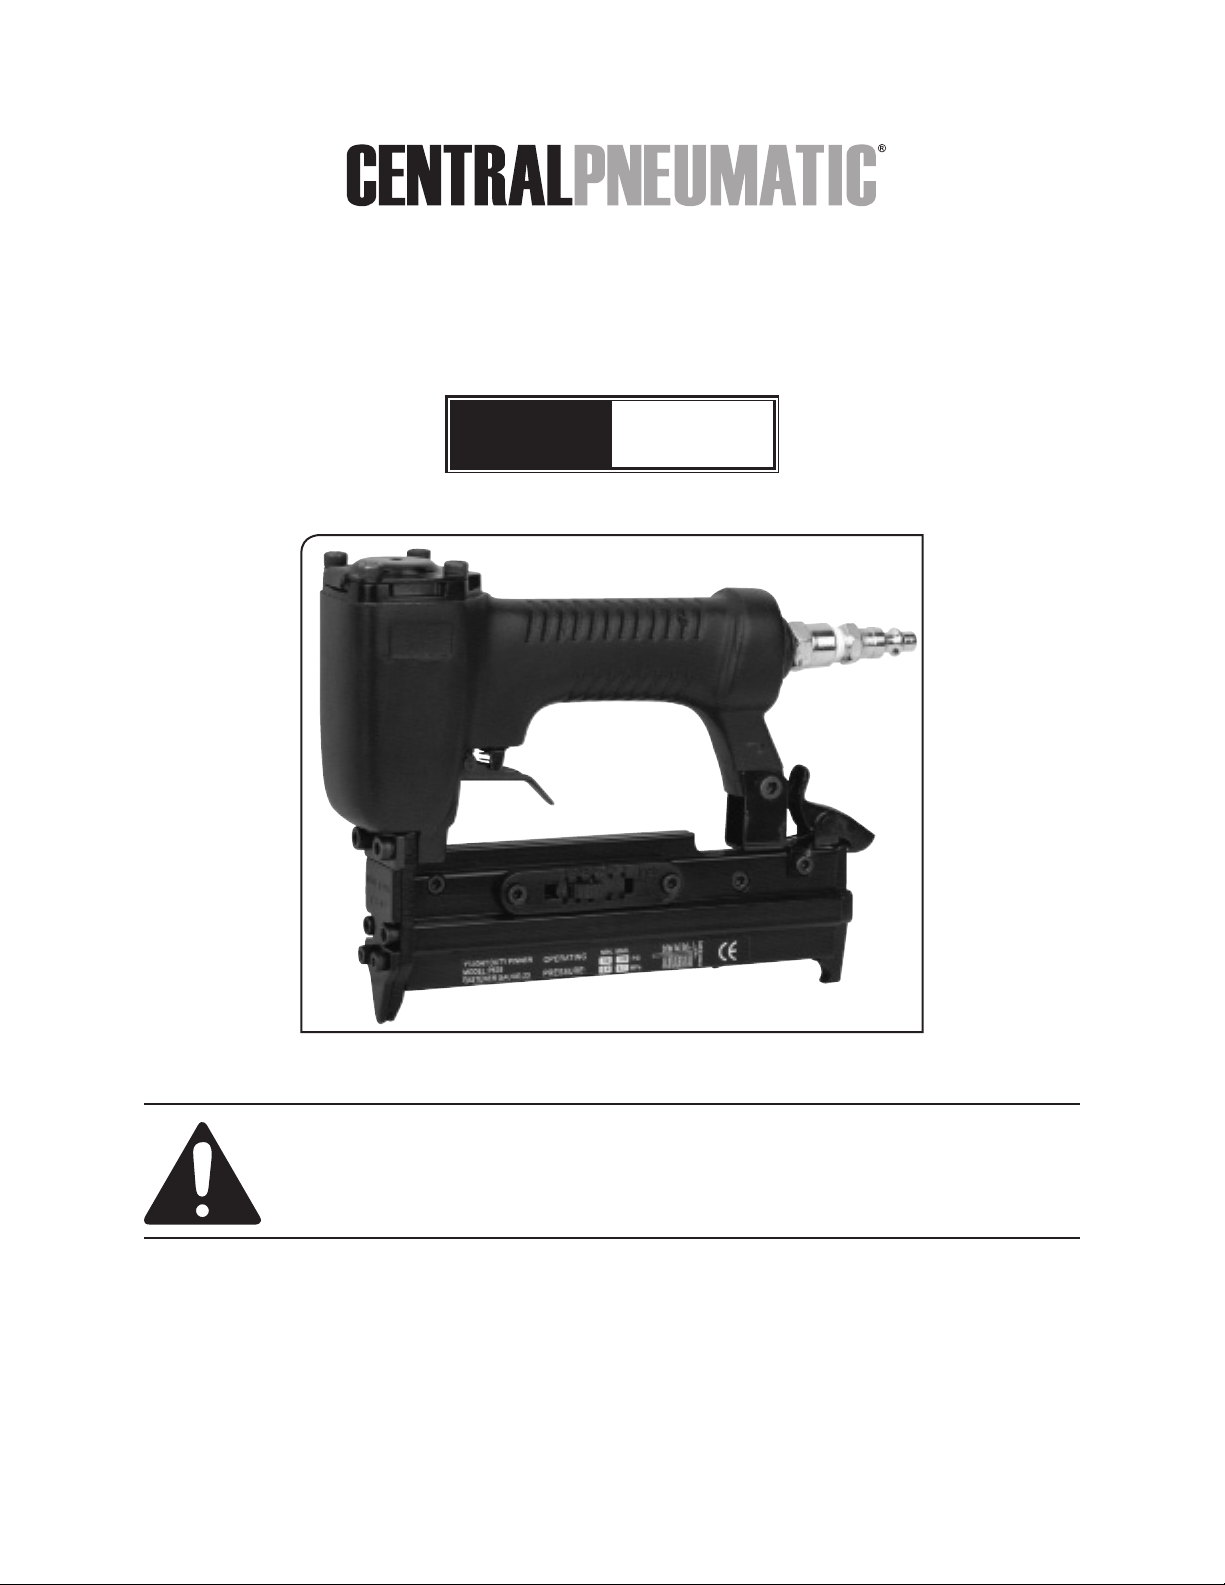
AIR PIN NAILER
23-GAUGE
Model
97526
ASSEMBLY AND OPERATING INSTRUCTIONS
Visit our website at: http://www.harborfreight.com
Read this material before using this product.
Failure to do so can result in serious injury.
SAVE THIS MANUAL.
Copyright© 2007 by Harbor Freight Tools®. All rights reserved. No portion of this manual or any artwork
contained herein may be reproduced in any shape or form without the express written consent of
Harbor Freight Tools. Diagrams within this manual may not be drawn proportionally. Due to continuing
improvements, actual product may differ slightly from the product described herein. Tools required for
assembly and service may not be included.
For technical questions or replacement parts, please call 1-800-444-3353.
Revised Manual 10g
Page 2
SPECIFICATIONS
Fastener Type/Gauge Headless Pins, 23 Gauge
oxygen, carbon dioxide, combustible
gases, or any other bottled gas as a
power source for this tool.
Magazine Capacity 100 Pins
Operating Pressure 60-100 PSI; 120 PSI Max.
Air Consumption 5.5 CFM @ 90 PSI
Air Inlet 1/4” - 18 NPT
Pin Length Settings 1/2”, 5/8”, 3/4”, 7/8”, 1’”
1 1/4”-18 NPT Air Coupler
Accessories
Net weight 2 lb.
1 3mm Hex Wrench
1 4mm Hex Wrench
Tool Oil
Save This Manual
You will need this manual for
the safety warnings and precautions,
assembly, operating, inspection,
maintenance and cleaning procedures,
parts list and assembly diagram. Keep
your invoice with this manual. Write the
invoice number on the inside of the front
cover. Write the product’s serial number in
the back of the manual near the assembly
diagram, or write month and year of
purchase if product has no serial number.
Keep this manual and invoice in a safe
and dry place for future reference.
GENERAL SAFETY RULES
WARNING!
READ AND UNDERSTAND ALL
INSTRUCTIONS
Failure to follow all instructions
listed below may result in serious
injury.
SAVE THESE INSTRUCTIONS
1. Use compressed air only: Clean,
dry, regulated compressed air at
no more than 100 PSI. Never use
2. Keep your work area clean and
well lit. Cluttered benches and dark
areas invite accidents.
3. Use protection: Always wear ANSI-
approved safety eye goggles, dust
mask/respirator, work gloves, hard
toed shoes, long sleeve shirt and
long pants when using or servicing
this Air Nailer.
4. Do not operate power tools in
explosive atmospheres, such as in
the presence of ammable liquids,
gases, or dust. Power tools create
sparks which may ignite the dust or
fumes.
5. Keep bystanders, children, and
visitors away while operating a
power tool. Distractions can cause
you to lose control. Protect others
in the work area from debris such as
chips and sparks. Provide barriers or
shields as needed.
6. Stay alert. Watch what you are
doing, and use common sense
when operating a power tool. Do
not use a power tool while tired
or under the inuence of drugs,
alcohol, or medication. A moment
of inattention while operating power
tools may result in serious personal
injury.
7. Dress properly. Do not wear loose
clothing or jewelry. Contain long
hair. Keep your hair, clothing, and
gloves away from moving parts.
Loose clothes, jewelry, or long hair
can be caught in moving parts.
SKU 97526
For technical questions, please call 1-800-444-3353.
Page 2
Page 3

8. Avoid accidental starting. Carrying
power tools with your nger on the
Trigger (27) invites accidents.
9. Be sure all tools and/or
attachments used with this Air
Nailer are secure before plugging
in or turning on the air supply.
10. Be careful when connecting/
disconnecting air supply. It
is recommended to use quick
disconnects (not included) rather than
screw-on air connections.
11. Always disconnect the air supply
when this Air Nailer is not being
used.
12. Use ONLY the attachments that
come with this Air Nailer. Using
or altering other parts/attachments
could damage this tool or cause
personal injury.
13. Remove adjusting keys or
wrenches before turning the power
tool on. A wrench or a key that is
left attached to a moving part of the
power tool may result in personal
injury.
14. Do not overreach. Keep proper
footing and balance at all times.
Proper footing and balance enables
better control of the power tool in
unexpected situations.
and safer at the rate for which it is
designed. Do not force the tool and
do not use the tool for a purpose for
which it is not intended.
17. Do not use the Air Nailer if the
Trigger (27) does not turn it on
or off. Any tool that cannot be
controlled with the Power Switch is
dangerous and must be replaced.
18. Disconnect the air supply before
making any adjustments, changing
accessories, or storing the tool.
Such preventive safety measures
reduce the risk of starting the tool
accidentally. Always unplug the
tool from its air supply before
performing any inspection,
maintenance, or cleaning
procedures.
19. Store idle tools out of reach of
children and other untrained
persons. Tools are dangerous in
the hands of untrained users. Never
allow children to come in contact with
this product.
20. Maintain tools with care. Keep
cutting tools sharp and clean.
Properly maintained tools with a
sharp cutting edge are less likely to
bind and are easier to control. Do not
use a damaged tool. Tag damaged
tools “Do not use” until repaired.
15. Use clamps (not included) or
other practical ways to secure and
support the workpiece to a stable
platform. Holding the work by hand
or against your body is unstable and
may lead to loss of control.
16. Do not force the tool. Use the
correct tool for your application.
The correct tool will do the job better
SKU 97526
For technical questions, please call 1-800-444-3353.
21. Check for misalignment or binding
of moving parts, breakage of
parts, and any other condition that
may affect the tool’s operation. If
damaged, have the tool serviced
before using. Many accidents are
caused by poorly maintained tools.
Page 3
Page 4

SERVICE
1. Tool service must be performed
only by qualied repair personnel.
Service or maintenance performed by
unqualied personnel could result in
a risk of injury.
2. When servicing, use only identical
replacement parts. Follow
instructions in the “Inspection,
Maintenance, And Cleaning”
section of manual. Use of
unauthorized parts or failure to follow
instructions may create a risk of
injury.
SPECIFIC SAFETY RULES
1. Maintain labels and nameplates on
the Air Nailer. These carry important
information. If unreadable or missing,
contact Harbor Freight Tools for a
replacement.
6. Never leave this Air Nailer
unattended when it is plugged into
an air supply. Turn off the tool, and
unplug it from an air supply before
leaving.
7. WARNING: This product contains
or, when used, produces a
chemical known to the State of
California to cause cancer and
birth defects or other reproductive
harm. (California Health & Safety
Code § 25249.5, et seq.)
2. Maintain a safe working
environment. Make sure there is
adequate surrounding workspace.
Do not use this product in a damp or
wet location.
3. When using this Air Nailer, always
maintain a rm grip on the tool
with both hands to resist starting
torque.
4. Avoid unintentional starting. Make
sure you are prepared to begin work
before turning on the air supply or
pressing the Trigger (27).
5. Never lay the tool down until it has
come to a complete stop. Moving
parts can grab the surface and pull
the tool out of your control.
SKU 97526
For technical questions, please call 1-800-444-3353.
Page 4
Page 5

UNPACKING AND SET UP
When unpacking, check to make sure
that the item is intact and undamaged. If
any parts are missing or broken, please
call Harbor Freight Tools at the number
shown on the cover of this manual as soon
as possible.
NOTE: READ ALL INSTRUCTIONS
BEFORE USING THIS PRODUCT
If you are not using an automatic
oiler system, before operation add a
few drops of Pneumatic Tool Oil (not
included) to the airline connection.
Add a few drops after each hour of
continual use.
Set the air pressure range on the
regulator so that it is between 60 and
100 PSI. Do not exceed 100 PSI.
Note: For additional information regarding
the parts listed in the following pages,
refer to the Assembly Diagram on
page 9 of this manual.
WARNING! Make sure the tool is
unplugged from its air supply before
making any adjustments to the tool.
Also make sure the Magazines (47
and 51) are empty before set up or
maintenance.
Coupler
Plug
Tool
Quick
Coupler
Valve FilterOiler
Coupler
Plug
Air Hose
on Reel
LOADING THE NAILER
1. Depress upper tip of the Click Lever
(59). The Side Cover (34) will pop
open.
2. Insert a row of fasteners (not
included) into the Upper Right
Magazine (47/51). Make sure the
pointed ends of the fasteners are
loaded with the points downward.
Also make sure fasteners are not
dirty or damaged.
3. Slide the Side Cover (34) back over
the Upper Magazine (47/51) and
press the upper tip of the Click Lever
(59) in ward to lock Side Cover (34)
in place.
Air
Compressor
Quick
Coupler
Regulator with
Pressure Gauge
Recommended Air Line Components
NOTE: For best service, you should
incorporate an oiler, regulator, and
in-line lter as shown above. Hoses,
couplers, oilers, regulators and lters
are all available at Harbor Freight
Tools.
SKU 97526
For technical questions, please call 1-800-444-3353.
Page 5
Page 6

OPERATION INSTRUCTIONS
1. Before use, add a few drops of
pneumatic tool oil (not included) into
the Inlet.
2. Attach the Air Coupler (61) to Air
Inlet using pipe thread seal tape (not
included). Then connect the 3/8” Air
Source Hose to the Nailer.
3. Set the working air pressure on the
regulator to between 60 and 100 PSI.
Do not exceed 100 Max. PSI.
9. In case of a fastener jam, take your
nger off the Trigger (27). Rotate the
Trigger Lock/Safety (60) clockwise
or counter-clockwise. For instance,
a “6 o-clock” position will lock the
Trigger (27) and the tool will not re.
However, “3 o-clock” and “9 o-clock”
positions unlock the Trigger (27),
allowing the tool to re.
Note: There is no contact safety for the
Trigger (27). When the Trigger Lock/
Safety (60) is disengaged, the Nailer
will re.
4. Set the Adjusting Dial (46) to match
the corresponding size (1/2”, 5/8”,
3/4”, 7/8” or 1”) of the fasteners
loaded in the Nailer.
Note: When changing pin size, turn the
Adjusting Dial to the new depth size
BEFORE inserting the new pins.
5. Slide the Safety (60) to the side so
that the Trigger (27) will function.
When ready, press down on the
Trigger (27) to operate.
6. Test before rst use by driving nails
into a sample piece of wood. If the
fasteners do not achieve the desired
penetration, adjust the air pressure
to a higher setting until desired
penetration is achieved.
7. Always make sure the Bracket (40)
is ush against the workpiece during
use. Always release the Trigger (27)
once the fastener is driven into the
workpiece.
10. Turn off the air supply and
disconnect the Nailer from the
regulator. Open the Nozzle (40) and
clear the jammed fasteners with a
pair of pliers (not included).
If a jam occurs inside the magazine,
depress the upper tip of the Click
Lever (59). The Side Cover (34)
will pop open. If needed, open the
Nozzle (40) to help clear the jam.
Once the jam is cleared, push the
Side Cover (34) back into place and
latch tight using the Click Lever (59).
8. When ready to operate the Nailer,
press down on the Trigger (27). Make
sure the Nailer does not cycle during
use. Never use the Nailer if a cycle
occurs.
Rev 10f
SKU 97526
For technical questions, please call 1-800-444-3353.
Page 6
Page 7

INSPECTION, MAINTENANCE, AND CLEANING
1. WARNING! Make sure air compressor is unplugged and that the Nailer is
disconnected from its Air Supply before performing any inspection, maintenance,
or cleaning procedures.
2. BEFORE EACH USE, inspect the general condition of this tool. Check for
loose screws, misalignment or binding of moving parts, cracked or broken parts,
damaged air hoses, and any other condition that may affect its safe operation. If
abnormal noise or vibration occurs, have the problem corrected before further use.
Do not use damaged equipment.
MAINTENANCE CHART
Maintenance Type
Inspect the Nailer for damage
(see #2, above)
Wipe off with clean, moist
cloth
Before
Use
X X
After
Use
Monthly
X X
TROUBLESHOOTING
Problem Possible Causes Probable Solutions
Air leak near top of
tool or in trigger area.
Nailer does not
operate or operates
sluggishly
Air leak near bottom
of Nailer
Nailer jam frequently 1. Incorrect fasteners.
Other See qualied service technician for
1. Loose screws.
2. Worn or damaged o-rings or seals.
1. Inadequate air supply.
2. Inadequate lubrication.
3. Worn or damaged o-rings or seals.
1. Loose screws.
2. Worn or damaged o-rings or
bumper.
2. Damaged fasteners.
3. Magazine or Nozzle screw loose.
4. Magazine is dirty.
5. Driver is worn or damaged.
1. Tighten screws.
2. See qualied service technician for
repairs.
1. Check screws.
2. See qualied service technician for
repairs.
1. Tighten screws.
2. See qualied service technician for
repairs.
1. Check fasteners for correct size.
2. Replace with undamaged
fasteners.
3. Tighten screws.
4. Clean screws.
5. See qualied service technician for
repairs.
repairs.
SKU 97526
For technical questions, please call 1-800-444-3353.
Page 7
Page 8

PLEASE READ THE FOLLOWING CAREFULLY
THE MANUFACTURER AND/OR DISTRIBUTOR HAS PROVIDED THE PARTS
LIST AND ASSEMBLY DIAGRAM IN THIS MANUAL AS A REFERENCE TOOL
ONLY. NEITHER THE MANUFACTURER OR DISTRIBUTOR MAKES ANY
REPRESENTATION OR WARRANTY OF ANY KIND TO THE BUYER THAT HE OR
SHE IS QUALIFIED TO MAKE ANY REPAIRS TO THE PRODUCT, OR THAT HE OR
SHE IS QUALIFIED TO REPLACE ANY PARTS OF THE PRODUCT. IN FACT, THE
MANUFACTURER AND/OR DISTRIBUTOR EXPRESSLY STATES THAT ALL REPAIRS
AND PARTS REPLACEMENTS SHOULD BE UNDERTAKEN BY CERTIFIED AND
LICENSED TECHNICIANS, AND NOT BY THE BUYER. THE BUYER ASSUMES ALL
RISK AND LIABILITY ARISING OUT OF HIS OR HER REPAIRS TO THE ORIGINAL
PRODUCT OR REPLACEMENT PARTS THERETO, OR ARISING OUT OF HIS OR
HER INSTALLATION OF REPLACEMENT PARTS THERETO.
PARTS LIST
Part Description Q’ty
1 Hex Bolt 1
2 Deector 1
3 Seal 1
4 Spring 1
5 Head cap 1
6 O-RIng 1
7 O-RIng 1
8 Head Valve Piston 1
9 O-Ring 1
10 O-Ring 1
11 Piston-Driver Unit 1
12 Lining Ring 1
13 O-Ring 1
14 Cylinder 1
15 Bumper 1
16 O-Ring 1
17 Body 1
18 Nozzle 1
19 Seal 1
20 Trigger Valve Head 1
21 Trigger Plunger 1
22 O-RIng 1
23 O-Ring 1
24 Trigger Valve Guide 1
25 Spring 1
26 E-Ring 1
27 Trigger 1
28 Retainer Pin 1
29 Hex Bolt 1
30 Washer 1
31 Pusher Unit 1
Part Description Q’ty
32 Spring Holder 1
33 Spring 1
34 Side Cover 1
35 Rear Plate 1
36 Hex Bolt 1
37 Hex Bolt 1
38 Hex Bolt 1
39 Spacer 1
40 Bracket 1
41 Hex Bolt 1
42 Driver Guide 1
43 Hex Bolt 1
44 Hex Bolt 1
45 Adjust Dial 1
46 Limiting Plate 1
47 Upper Right Magazine 1
48 Hex Bolt 1
49 Guide Piece 1
50 Pusher Plate 1
51 Upper Left Magazine 1
52 Pin 1
53 Limiting Plate 1
54 Hex Bolt 1
55 Hex Bolt 1
56 Tail Hanger 1
57 Lock Nut 1
58 Spring 1
59 Click Lever 1
60 Trigger Lock/Safety 1
61 Air Coupler 1/4”-18 NPT 1
SKU 97526
For technical questions, please call 1-800-444-3353.
Page 8
Page 9

ASSEMBLY DIAGRAM
Air Coupler (61) not shown.
SKU 97526
For technical questions, please call 1-800-444-3353.
Page 9
Page 10

90 Day Warranty
Harbor Freight Tools Co. makes every effort to assure that its products meet high quality
and durability standards, and warrants to the original purchaser that this product is free
from defects in materials and workmanship for the period of 90 days from the date of
purchase. This warranty does not apply to damage due directly or indirectly, to misuse,
abuse, negligence or accidents, repairs or alterations outside our facilities, criminal
activity, improper installation, normal wear and tear, or to lack of maintenance. We
shall in no event be liable for death, injuries to persons or property, or for incidental,
contingent, special or consequential damages arising from the use of our product.
Some states do not allow the exclusion or limitation of incidental or consequential
damages, so the above limitation of exclusion may not apply to you. THIS WARRANTY
IS EXPRESSLY IN LIEU OF ALL OTHER WARRANTIES, EXPRESS OR IMPLIED,
INCLUDING THE WARRANTIES OF MERCHANTABILITY AND FITNESS.
To take advantage of this warranty, the product or part must be returned to us with
transportation charges prepaid. Proof of purchase date and an explanation of the
complaint must accompany the merchandise. If our inspection veries the defect, we
will either repair or replace the product at our election or we may elect to refund the
purchase price if we cannot readily and quickly provide you with a replacement. We will
return repaired products at our expense, but if we determine there is no defect, or that
the defect resulted from causes not within the scope of our warranty, then you must
bear the cost of returning the product.
This warranty gives you specic legal rights and you may also have other rights which
vary from state to state.
3491 Mission Oaks Blvd. • PO Box 6009 • Camarillo, CA 93011 • (800) 444-3353
Record Product’s Serial Number Here:
Note: If product has no serial number, record month and year of purchase instead.
Note: Some parts are listed and shown for illustration purposes only, and are not
available individually as replacement parts.
SKU 97526
For technical questions, please call 1-800-444-3353.
Page 10
 Loading...