

Page 1
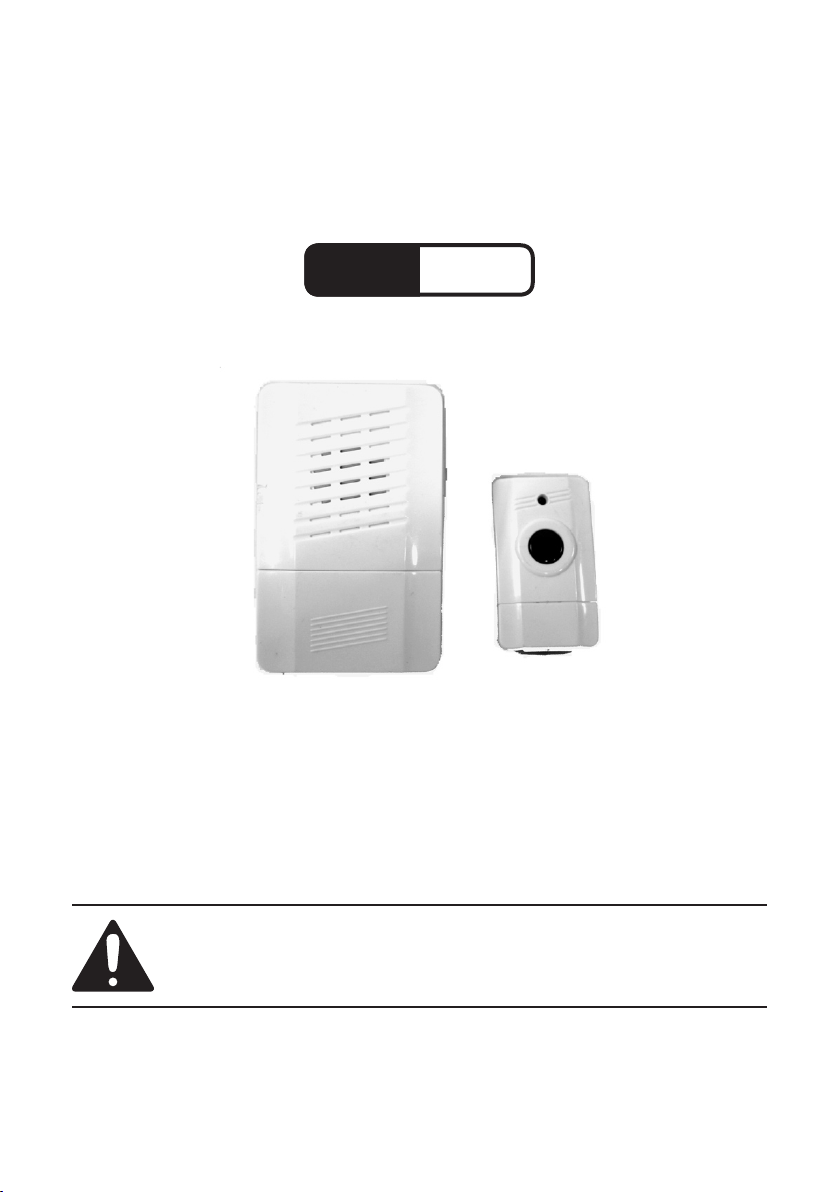
WIRELESS DOORBELL
Model
97004
SET UP AND OPERATING INSTRUCTIONS
Diagrams within this manual may not be drawn proportionally.
Due to continuing improvements, actual product may differ slightly from the product described herein.
Distributed exclusively by Harbor Freight Tools®.
3491 Mission Oaks Blvd., Camarillo, CA 93011
Visit our website at: http://www.harborfreight.com
Read this material before using this product.
Failure to do so can result in serious injury.
SAVE THIS MANUAL.
Copyright© 2007 by Harbor Freight Tools®. All rights reserved. No portion of
this manual or any artwork contained herein may be reproduced in any shape
or form without the express written consent of Harbor Freight Tools.
For technical questions or replacement parts, please call 1-800-444-3353.
Page 2
SAVE THIS MANUAL
Keep this manual for the safety warnings and precautions, assembly, operating,
inspection, maintenance and cleaning procedures. Write the product’s serial number in
the back of the manual near the assembly diagram (or month and year of purchase if
product has no number). Keep this manual and the receipt in a safe and dry place for
future reference.
IMPORTANT SAFETY INFORMATION
In this manual, on the labeling, and all other
information provided with this product:
This is the safety alert symbol. It is used to alert you to potential
personal injury hazards. Obey all safety messages that follow this
symbol to avoid possible injury or death.
DANGERDANGER
WARNINGWARNING
CAUTIONCAUTION
NOTICENOTICE
CAUTIONCAUTION
DANGER indicates a hazardous situation
which, if not avoided, will result in death or
serious injury.
WARNING indicates a hazardous situation
which, if not avoided, could result in death
or serious injury.
CAUTION, used with the safety alert
symbol, indicates a hazardous situation
which, if not avoided, could result in minor
or moderate injury.
NOTICE is used to address practices not
related to personal injury.
CAUTION, without the safety alert symbol,
is used to address practices not related to
personal injury.
Page 2SKU 97004 For technical questions, please call 1-800-444-3353.
Page 3

GENERAL SAFETY RULES
WARNING! Read all instructions
Failure to follow all instructions listed below may result in electric shock,
re, and/or serious injury.
SAVE THESE INSTRUCTIONS
Work area safety
1.
Keep work area clean and well lit. Cluttered or dark areas invite accidents.
a.
Keep children and bystanders away while installing the Wireless
b.
Doorbell. Distractions can cause you to lose control.
Personal safety
2.
Stay alert, watch what you are doing and use common sense when installing
a.
the Wireless Doorbell.
Use safety equipment. Always wear eye protection. Safety equipment such
b.
as hearing protection used for appropriate conditions will reduce personal
injuries.
Store idle tools out of the reach of children and do not allow persons
c.
unfamiliar with the Wireless Doorbell or these instructions to operate the
Wireless Doorbell.
Maintain the Wireless Doorbell. Check for breakage of parts and any other
d.
condition that may affect the Wireless Doorbell operation. If damaged, have
the Wireless Doorbell repaired before use. Many accidents are caused by
poorly maintained products.
Use the Wireless Doorbell and accessories, in accordance with these
e.
instructions and in the manner intended for this particular type of product.
Use of the Wireless Doorbell for operations different from those intended
could result in a hazardous situation.
SPECIFIC SAFETY RULES
Maintain labels and nameplates on the tool. These carry important safety
1.
information. If unreadable or missing, contact Harbor Freight Tools for a
replacement.
This product is not a toy. Keep it out of reach of children.
2.
Do not get the Wireless Doorbell wet as this will damage the unit.
3.
The warnings, precautions, and instructions discussed in this instruction manual
4.
cannot cover all possible conditions and situations that may occur. It must be
understood by the operator that common sense and caution are factors which
cannot be built into this product, but must be supplied by the operator.
Page 3SKU 97004 For technical questions, please call 1-800-444-3353.
Page 4

SAVE THESE INSTRUCTIONS.
SPECIFICATIONS
Construction
Transmitter Battery
Receiver Battery (2) AA, 1.5V (not included)
Working Distance Up to 200 Feet
Polystyrene transmitter and receiver,
steel mounting hardware and
thermoplastic anchors
(1) VA23A, MS21/MN21, A23S, 12V,
Alkaline (included)
UNPACKING
When unpacking, check to make sure that the item is intact and undamaged. If
any parts are missing or broken, please call Harbor Freight Tools at the number shown
on the cover of this manual as soon as possible.
SET UP INSTRUCTIONS
Read the ENTIRE IMPORTANT SAFETY INFORMATION section at the
beginning of this manual including all text under subheadings therein
before set up or use of this product.
WARNINGWARNING
Note: For additional information regarding the parts listed in the following pages, refer
to the Assembly Diagram near the end of this manual.
Risk of accidental starting; resulting in serious personal
injury. Turn the Power Switch of the tool to its “OFF”
position and unplug the tool from its electrical outlet before
assembling or making any adjustments to the tool.
Page 4SKU 97004 For technical questions, please call 1-800-444-3353.
Page 5

Assembly
Installing and Replacing Batteries
Figure 1
Receiver Battery
Compartment
Battery Cover
(3)
You will have to install 2 “AA” Batteries in the Receiver (2). Remove the Battery
1.
Cover (3) located on the back of the Receiver (2)-see Figure 1.
Insert Batteries making certain that the polarity lines up with the polarity
2.
indicated in the Battery Compartment. Replace Battery Cover (3).
Figure 2
Transmitter Battery
Cover (4)
Transmitter (1)
To replace Transmitter Battery, rst remove the Screw (9) holding the Battery
3.
Cover (4) on. Remove the Battery Cover by pulling it up and off.
Replace the Battery in the Battery Compartment so that the battery’s polarity
4.
lines up with that indicated-see Figure 2.
Replace Screw (9) to hold the Battery Cover (4) on.
5.
Mounting
Note that the Transmitter (1) and the Receiver (2) must be mounted within 200
1.
Feet of each other.
Page 5SKU 97004 For technical questions, please call 1-800-444-3353.
Page 6

The Wireless Doorbell can be mounted with two-sided Mounting Tape (5/6).
2.
Remove backing from the Mounting Tape (5/6). Attach the backing to the
Transmitter and/or Receiver and press it into place. Make certain that the
mounting surface is dry and free of debris. Remove the backing from the
second side of the Tape and press the unit onto the desired location.
Two Mounting Screws (8) and Anchors (7) are included to secure the
3.
Transmitter to walls. Before inserting Mounting Screws (8) with Anchors (7) into
any surface, make certain that the drilling path is clear of wiring. Drill holes for
Anchors. Insert Anchors (7) and thread in Mounting Screws (8).
Functions
Push button on Transmitter to cause Receiver to emit ringing tone.
1.
PLEASE READ THE FOLLOWING CAREFULLY
THE MANUFACTURER AND/OR DISTRIBUTOR HAS PROVIDED THE PARTS LIST AND
ASSEMBLY DIAGRAM IN THIS MANUAL AS A REFERENCE TOOL ONLY. NEITHER THE
MANUFACTURER OR DISTRIBUTOR MAKES ANY REPRESENTATION OR WARRANTY OF
ANY KIND TO THE BUYER THAT HE OR SHE IS QUALIFIED TO MAKE ANY REPAIRS TO
THE PRODUCT, OR THAT HE OR SHE IS QUALIFIED TO REPLACE ANY PARTS OF THE
PRODUCT. IN FACT, THE MANUFACTURER AND/OR DISTRIBUTOR EXPRESSLY STATES
THAT ALL REPAIRS AND PARTS REPLACEMENTS SHOULD BE UNDERTAKEN BY CERTIFIED
AND LICENSED TECHNICIANS, AND NOT BY THE BUYER. THE BUYER ASSUMES ALL RISK
AND LIABILITY ARISING OUT OF HIS OR HER REPAIRS TO THE ORIGINAL PRODUCT OR
REPLACEMENT PARTS THERETO, OR ARISING OUT OF HIS OR HER INSTALLATION OF
REPLACEMENT PARTS THERETO.
PARTS LIST
Part Description Q’ty
1 Transmitter 1
2 Receiver 1
3 Receiver Battery Cover 1
4 Transmitter Battery Cover 1
5 Small Mounting Tape 1
Part Description Q’ty
6 Larger Mounting Tape 1
7 Anchors 2
8 Screws 2
9 Battery Cover Screw 1
Page 6SKU 97004 For technical questions, please call 1-800-444-3353.
Page 7

ASSEMBLY DIAGRAM
2
4
5
1
7
6
8
Record Product’s Serial Number Here:
Note: If product has no serial number, record month and year of purchase instead.
Note: Some parts are listed and shown for illustration purposes only, and are not
available individually as replacement parts.
3
9
Page 7SKU 97004 For technical questions, please call 1-800-444-3353.
 Loading...