

Page 1
SOLDERING IRON
Model
94903
TORCH KIT
SET UP AND OPERATING INSTRUCTIONS
Diagrams within this manual may not be drawn proportionally.
Due to continuing improvements, actual product may differ slightly from the product described herein.
Distributed exclusively by Harbor Freight Tools®.
3491 Mission Oaks Blvd., Camarillo, CA 93011
Visit our website at: http://www.harborfreight.com
Read this material before using this product.
Failure to do so can result in serious injury.
SAVE THIS MANUAL.
Copyright© 2006 by Harbor Freight Tools®. All rights reserved. No portion of this
manual or any artwork contained herein may be reproduced in any shape or form
without the express written consent of Harbor Freight Tools.
For technical questions or replacement parts, please call 1-800-444-3353.
Cover revised 07j
Page 2

SPECIFICATIONS
Fuel Required Butane Torch Diameter 0.540” O.D. / 0.066” I.D.
Blade Temperature 500° F Igniter Piezo
This kit includes 5 soldering tips: Hot Knife, Pointed Tip, Slant Cut Tip, Cut Pointed
Tip and Rounded Tip.
Save This Manual
You will need the manual for the safety warnings and precautions, assembly instructions, operating and maintenance procedures, parts list and diagram. Keep your invoice
with this manual. Write the invoice number on the inside of the front cover. Keep the
manual and invoice in a safe and dry place for future reference.
SAFETY WARNINGS AND PRECAUTIONS
WARNING: When using tool, basic safety precautions should always be followed to reduce
the risk of personal injury and damage to equipment.
Read all instructions before using this tool!
ONLY USE BUTANE FUEL. NEVER USE ANY OTHER FUEL IN THIS TOOL.
1.
Keep work area clean. Cluttered areas invite injuries.
2.
Observe work area conditions. Do not use machines or power tools in damp
3.
or wet locations. Don’t expose to rain. Keep work area well lit. Do not use in the
presence of ammable gases or liquids.
Keep children away. Children must never be allowed in the work area. Do not let
4.
them handle machines, tools, or extension cords. Children should never be allowed
to use this tool.
Store idle equipment. When not in use, tools must be stored in a dry location to
5.
inhibit rust. Always lock up tools and keep out of reach of children.
Use the right tool for the job. Do not attempt to force a small tool or attachment
6.
to do the work of a larger industrial tool. There are certain applications for which
this tool was designed. It will do the job better and more safely at the rate for which
it was intended. Do not modify this tool and do not use this tool for a purpose for
which it was not intended.
Dress properly. Do not wear ammable clothes. Do not wear loose or baggy
7.
clothes. Protective, electrically non-conductive clothes and non-skid footwear are
recommended when working. Wear restrictive hair covering to contain long hair.
Heavy gloves should be worn to prevent burns.
Use eye and ear protection. Always wear ANSI-approved impact safety goggles.
8.
Wear a full face shield since solder and other materials can splatter. Wear an ANSI
approved dust mask or respirator when working around metal, wood, and chemical
dusts and mists.
SKU 94903 For technical questions please call 1-800-444-3353 Page 2
Page 3

Do not overreach. Keep proper footing and balance at all times. Do not reach over
9.
or across running machines.
Maintain tools with care. Keep tools maintained and clean for better and safer
10.
performance. The handles must be kept clean, dry, and free from oil and grease at
all times.
Avoid unintentional starting. Be sure the switch is in the Off position when not in
11.
use. Do not carry any tool with your nger on the start switch.
Stay alert. Watch what you are doing, use common sense. Do not operate any tool
12.
when you are tired.
Take caution as some woods contain preservatives such as copper chromium
13.
arsenate (CCA) which can be toxic. Some metals and other materials can be toxic
when burned. When cutting or burning these materials extra care should be taken to
avoid inhalation and minimize skin contact.
Check for damaged parts. Before using any tool, any part that appears damaged
14.
should be carefully checked to determine that it will operate properly and perform
its intended function. Check for alignment and binding of moving parts; any broken
parts or mounting xtures; and any other condition that may affect proper operation.
Any part that is damaged should be properly repaired or replaced by a qualied
technician. Do not use the tool if any switch does not turn On and Off properly.
Guard against burns. This tool and your work materials will become very hot when
15.
in use. Prevent body contact with hot surfaces by using safety equipment such as
gloves. Provide for cooling trays for tools and work materials.
Replacement parts and accessories. When servicing, use only accessories
16.
intended for this tool.
Do not operate tool if under the inuence of alcohol or drugs. Read warning
17.
labels on prescriptions to determine if your judgment or reexes are impaired while
taking drugs. If there is any doubt, do not operate the tool.
Maintenance. For your safety, service and maintenance should be performed regu-
18.
larly by a qualied technician.
The brass components of this product contain lead, a chemical known to the
19.
State of California to cause birth defects (or other reproductive harm). (Cali-
fornia Health & Safety code 25249.5, et seq.)
WARNING: The warnings, cautions, and instructions discussed in this instruc-
20.
tion manual cannot cover all possible conditions and situations that may
occur. It must be understood by the operator that common sense and caution
are factors which cannot be built into this product, but must be supplied by
the operator.
SKU 94903 For technical questions please call 1-800-444-3353 Page 3
Page 4

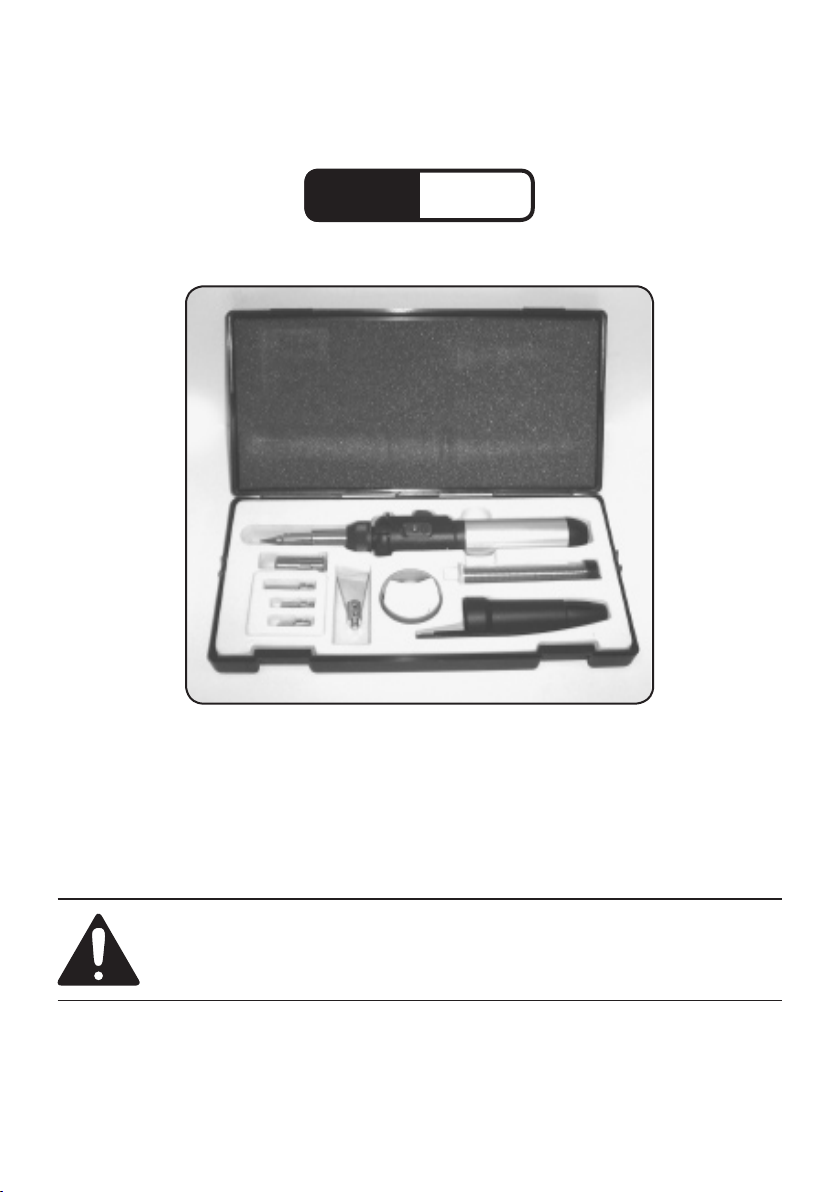
UNPACKING
When unpacking, check to make sure that all accessories listed below are included,
and that the product is intact and undamaged. If any parts are missing or broken, please
call Harbor Freight Tools at: 1-800-444-3353.
Storage Case
Adapter Lock Nut
Cut-Pointed Tip
Torch Adapter
Pointed Tip
Pencil Torch
0.6 oz. Lead
Free Solder
Poly Cap
Slant Cut Tip
Rounded Tip
Hot Knife Tip
Sponge
Note: No replacement parts are available for this tool. However, Harbor Freight
Tools offers a broad selection of solder, soldering tips, holding devices, etc.
which may be used with this tool.
SKU 94903 For technical questions please call 1-800-444-3353 Page 4
Page 5

OPERATION
Igniting and Extinguishing The Torch:
To ignite the torch push the Gas “On/Off” Switch forward towards the tip until the
1.
Gas “On” Lock button pops out. This will lock the Gas “On/Off” switch in the “On”
position.
Next push the “Piezo Igniter” button forward repeatedly until the torch is lit.
2.
To turn off the torch, push the Gas “On” Lock button. By doing this the Gas “On/Off “
3.
switch will slide to the off position and extinguish the flame. If the flame continues to
burn, press the “Flame Off Button”.
Allow the tool to cool down before setting it down. Only set the tool down after the
4.
stand has been opened. See page 7 for instructions regarding this.
WARNING: Never leave the tool unattended while in operation or while hot. Serious
personal injury and risk of re may result.
Soldering Iron Adapter
Piezo Igniter
Adapter Lock Nut
Soldering Iron Stand
Gas “ON” Lock Switch
Gas “ON” Lock Button
Setting up the Soldering Iron:
The Torch comes with the “Soldering Iron Adapter” already installed. It is the longer
1.
of the two adapters and has a threaded end that receives the soldering tips.
If you do need to install “Soldering Iron Adapter”, rst remove the “Adapter Lock
2.
Nut” then slide the “Soldering Iron Adapter” over the ceramic insulator, then thread
on the “Adapter Lock Nut”.
Pick the desired tip from the kit and screw it onto the end of the “Soldering Iron
3.
Adapter”.
REV 07j
SKU 94903 For technical questions please call 1-800-444-3353 Page 5
Page 6

Flame Adjustment:
To adjust the ame, move the “Flame Adjustment Lever”, located under the torch,
toward the “+” to increase the ame or toward the “-” to reduce the ame. See the
photo below.
Continuous Flame:
To keep the ame locked on, push in the Gas “ON” Lock Button during ignition to
1.
activate the Continuous Flame Mechanism.
To turn OFF the ame, push the Continuous Flame Switch forward. The Lock Button
2.
will pop out. Press the Flame OFF button.
Using The Torch as A Hot Blower:
To use the tool as a Hot Blower rst remove the soldering tip and sleeve assembly
1.
by rotating them counterclockwise. With no soldering tip attached, the tool can be
used as a Hot Blower.
Operate the tool as discussed on page 5, “Igniting and extinguishing the Torch”. Hot
2.
air, but no ame will be blown from the tip of the tool. The picture below shows what
the tool should look like when you use it as a Hot Blower.
Flame Adjustment Lever
WARNING: The hot air blowing from the tip of the tool will not be visible as ame,
but can cause severe burns. Be extremely cautious; do not cause injury to
yourself or others and do not point the blower at any person, animal or am-
mable object.
Using The Pencil Torch Feature:
To use the pencil torch feature rst remove the “ Adapter Lock Nut” and the “Solder-
1.
ing Iron Adapter”. See page 5.
Next install the “Torch Adapter” by sliding it over the ceramic insulator. Then rein-
2.
stall the “Adapter nut”.
SKU 94903 For technical questions please call 1-800-444-3353 Page 6
Page 7

Using The Soldering Iron Stand:
Soldering Iron Stand
The torch comes with a stand that can be pulled out to allow you to rest it on a at
surface. See photo below.
MAINTENANCE
Relling the Butane Canister:
WARNING: Do not use any other fuel other than butane which is specically de-
signed for this type of torch. Use of any other fuel may result in severe per-
sonal injury.
Be sure the tool is turned off and is cool.
1.
Hold the tool in an upside down position, with the end of the handle facing up.
2.
Insert and press down the lling tip of the butane canister.
3.
Stop relling once the butane starts to overow.
4.
Allow the relled tool to stabilize for a few minutes before resuming work.
5.
Cleaning and Storing
The tip should be cleaned periodically during use with a damp sponge.
1.
After use, allow the torch and all accessories to cool down to room temperature
2.
before maintenance.
Wipe the tool down with a damp cloth to remove any grease, ux or dirt.
3.
Be sure the Gas “ON/OFF” Switch Lock Button is in the OFF position.
4.
Store the tool and its accessories in the Storage Case provided.
5.
REV 07j
SKU 94903 For technical questions please call 1-800-444-3353 Page 7
Page 8

SOLDERING HINTS
The soldering process bonds two metal objects together using a metallic bonding
material (solder) which has a lower melting point than the items being joined. Sol-
dering is not appropriate for non-metallic objects such as plastic or wood.
Check to be sure the objects being joined will not be damaged by the heat of solder-
1.
ing. This tool generates a temperature of 500° F. Test a scrap piece or inconspicu-
ous area of your work piece with the soldering torch before proceeding.
Be sure the surfaces being soldered are clean before beginning. If necessary, use
2.
a soldering ux (not included) for cleaning. Apply the ux to the parts being joined,
and heat the parts until the ux burns away.
Heat the parts being joined with the soldering tool, not the solder. Once the parts
3.
being joined are sufciently heated, touch the solder to the workpieces. The solder
will melt and adhere to the workpieces. Remove the soldering tip from the work-
pieces, and hold the pieces together until they have cooled enough for the solder to
solidify.
Solder will “follow the heat”. Once a workpiece is sufciently hot to melt the solder,
4.
the solder can be dragged along the workpiece by moving the soldering tip. The
solder will follow the heat. This technique is helpful when soldering joints, such as a
tube in a coupling. By applying solder to the edge of the coupling and then moving
the soldering tip away from the edge, solder can be dragged into a concealed joint
as it follows the heat.
LEAD WARNING: Some solders contain lead and some do not. The solder supplied
5.
with this kit does not contain lead. Be extremely careful not to breathe vapors from
any solder, especially ones containing lead. Lead is a heavy metal which can ac-
cumulate in the body and may cause serious health problems.
Solder is available in various types. Some solders have a ux core and some do
6.
not. Flux core solders contain ux and reduce the need to clean the workpieces
before joining. Solid core solders do not contain ux, and require careful cleaning of
the work material, and application of ux for additional cleaning.
Solder is available in various melting points. The heat range of solder may be ex-
7.
pressed in temperature, or may be expressed as “easy,” “medium” or “hard”. When
making several solder joints on a single workpiece, you may use a mix of solder
temperatures. Easy solder will melt before medium, and hard will melt last. This can
allow you to sequentially assembly or disassemble various parts of an item, such as
jewelry.
SKU 94903 For technical questions please call 1-800-444-3353 Page 8
 Loading...