

Page 1
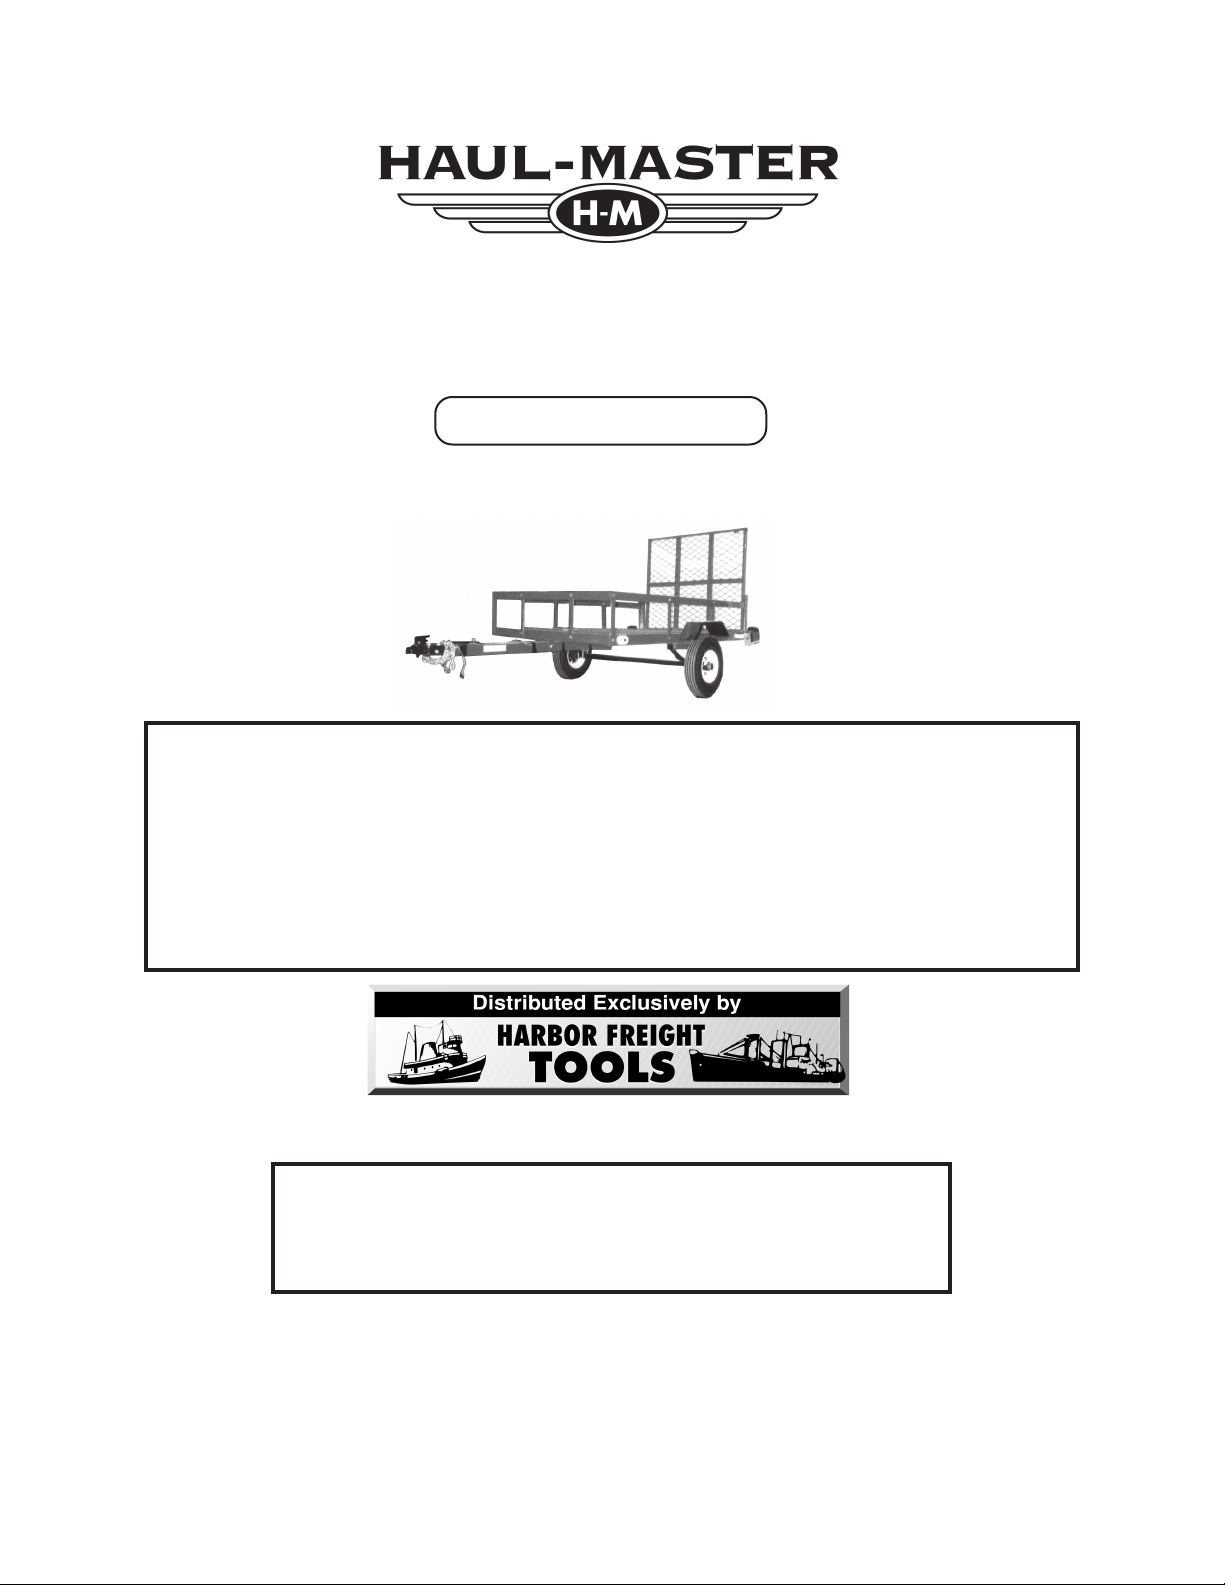
TRAILER WITH TAILGATE
®
5’ x 8’ WITH RAMP
MODEL 93747
ASSEMBLY AND OPERATING INSTRUCTIONS
WARNING!
IMPORTANT INFORMATION
This trailer’s Hitch Coupler MUST be properly secured to the hitch ball of the towing vehicle. After assembly and
attachment, pull up and down on the Hitch Coupler to make sure the hitch ball is fitting snugly in the Hitch Coupler.
There must be no play between the hitch ball and Hitch Coupler. If there is play, tighten the Adjustment Nut until
no play is present. If the Adjustment Nut is too tight, the Handle will not lock. Carefully read and follow the
complete instructions in this manual BEFORE setup or use.
If the Coupler is not secured properly, the ball could come loose while the trailer is in motion, possibly
causing property damage, SERIOUS PERSONAL INJURY, or DEATH.
3491 Mission Oaks Blvd., Camarillo, CA 93011
Visit our Web site at http//www.harborfreight.com
TO PREVENT SERIOUS INJURY OR DEATH,
READ AND UNDERSTAND ALL WARNINGS
AND INSTRUCTIONS BEFORE USE.
Copyright© 2006 by Harbor Freight Tools®. All rights reserved. No portion of this
manual or any artwork contained herein may be reproduced in any shape or form
without the express written consent of Harbor Freight Tools.
For technical questions or replacement parts,
please call 1-800-444-3353.
Page 2

PRODUCT SPECIFICATIONS
Item Description
Maximum Weight Capacity 1,500 Pounds
Maximum Towi ng Speed 55 MPH
Overall Dimensions 137” L x 76” W x 73-1/4” @ Top of Raised Ramp
137” L x 76” W x 31-1/2” @ Top of Rails
Main Frame Dimensi ons 95” L x 57-1/2” W x 12” H @ Top of Side/Front Rails
Ramp Dimensions 53-5/8” L x 57-3/8” W x 1-1/2” Thick
Ground Clearance 14” @ Tongue / 16-3/4” @ Rear / 9-1/4” @ Axle
Tires Qty. 2 / DOT Approved
Required Tire Pres sur e: 80 PSI
Load Range Rating: C
Type: Tubeles s
Size: 5.30-12 x 4” Wide
Hitc h Ty pe Cla s s II
Ball Si z e 2”
Light Voltage Requi re ment 12 Volts DC Negative Grou nd
Weight 398 Pounds
UNPACKING
When unpacking, make sure all the par ts and hardware shown on the Parts List/Hardware List (pag es 22, 23) are included. If any parts are missing or broken, please call
Harbor Freight Tools at the number shown on the cover of this man ual as soon as possible.
SA VE THIS MANUAL
You will need this manual for the safety warnings and precautions, assembly, operating,
inspection, maintenance and cleaning procedures, parts list and assembly diagram.
Keep your invoice with this manual. Write the invoice number on the inside of the front
cover. Keep this manual and invoice in a safe and dry place for future reference.
GENERAL SAFETY RULES
IMPORTANT SAFETY INSTRUCTIONS
WARNING!
Read and adhere to the following instructions. Failure to read and obey all of the
following instructions COMPLETELY will void the warranty and can result in dam-
age to the Trailer, property damage, SERIOUS PERSONAL INJURY, or DEATH.
SAVE THESE INSTRUCTIONS.
Page 2SKU 93747 For technical questions, please call 1-800-444-3353.
Page 3

WORK AREA
1. Keep work area clean and dry . Cluttered, damp, or wet w o rk areas invite inju-
ries.
2. Keep children away from work area. Do not allow children to play in, climb on
or ride in this product.
3. Store idle equipment. When not in use, tools and equipment should be stored in
a dry location to inhibit rust. Always lock up tools and equipment, and keep out of
reach of children.
4. Do not setup or use this product if under the influence of alcohol or drugs.
Read warning labels on prescriptions to determine if your judgement or reflexes
are impaired while taking drugs. If there is any doubt, do not attempt to setup or
use this product.
5. Use ey e protection. Wear ANSI-approved safety impact eye goggles when
assembling this product. ANSI-approved safety impact eye goggles are available
from Harbor F reight Tools.
6. Dress safely. Do not wear loose clothing or jew elry, as they can become caught
in moving parts. W ear a protective hair covering to prev ent long hair from becoming caught in moving part s. If wearing a long-sleeve shirt, roll sleeves up above
elbows.
7. Do not overreach. Keep proper footing and balance at all times to prevent
tripping, falling, back injury, etc.
8. Industrial applications must follow OSHA requirements.
9. Stay alert. W atch what you are doing at all times. Use common sense. Do not
setup or use this product when you are tired or distracted from the job at hand.
EQUIPMENT USE AND CARE
1. Check for damaged parts. Before using this product, carefully check that it will
operate properly and perform its intended function. Check for damaged parts and
any other conditions that may affect the operation of this product. Replace or
repair damaged or worn parts immediately.
2. Replacement parts and accessories: When servicing, use only identical replacement parts. Only use accessories intended for use with this product. Approved accessories are available from Harbor Freight Tools.
Page 3SKU 93747 For technical questions, please call 1-800-444-3353.
Page 4

3. Maintain this product with care. Keep this product clean and dry for better and
safer performance.
4. Maintenance: For your saf ety, service and maintenance should be performed
regularly by a qualified technician.
5. Use the right equipment for the job. Do not attempt to force small equipment to
do the work of larger industrial equipment. There are certain applications for
which this product was designed. It will do the job better and more safely at the
capacity for which it was intended. Do not modify this product, and do not use this
product for a purpose for which it was not intended.
SERVICE
1. Equipment service must be performed only by qualified repair personnel.
Service or maintenance performed by unqualified personnel could result in a risk
of injury .
2. When servicing equipment, use only identical replacement parts. Follow
instructions in the
manual. Use of unauthorized parts or failure to follow maintenance instructions
may create a risk of personal injury.
“Inspection, Maintenance, and Cleaning”
section of this
SPECIFIC PRODUCT WARNINGS AND PRECAUTIONS
1. T o avoid personal injury and/or property damage, do not exceed the T railer’s
maximum weight capacity of 1,500 pounds, evenly distributed.
Be aware of dynamic loading! Suddenly dropping or moving a load onto the
trailer bed or ramp may create, for a brief instant, an excess load which may result
in damage to the product and/or personal injury .
2. Before each use, always examine the Trailer for proper Tire air pressure (80
PSI), damaged tail lights, damaged side running lights, loose bolts and nuts,
structural cracks and bends, and any other condition that may affect its safe
operation. Do not use the Trailer even if minor damage appears.
3. Never allow adults, children, or pets to ride in or play on the T railer.
4. Before each use, alwa ys attach the Saf ety Chain of the Trailer to the towing
vehicle. Make sure the Safety Chain is attached to the towing vehicle with the
same length for each side. Do not allow the Safety Chain to drag on the ground.
Page 4SKU 93747 For technical questions, please call 1-800-444-3353.
Page 5

5. Always check to make sure the payload being transported is properly and
safely secured in the T railer. Load the Trailer evenly from side to side with 60%
of the load forward of the Axle.
6. Prior to using the Trailer, make sure to read and understand all instructions
and safety precautions as outlined in the owner’s manual for the towing
vehicle. Make sure the towing vehicle is capable of towing the Trailer and its
payload. Make sure the hitch on the towing vehicle is capable of towing the
Trailer and its payload. The towing capacity of the hitch is typically stamped on
the hitch dra wbar.
7. Make sure the Coupler and the vehicle’ s ball hitch (not included) are of
equal mating size (2”) and are rated equal to or greater than the weight of
the Trailer and its payload.
8. Do not exceed 55 miles per hour when towing the Trailer. Excess speed is a
major cause of vehicle-trailer accidents.
9. The Tail Light Bulbs supplied with this Trailer are f or a 12 v olt DC electrical
system only. Do not attempt to power the Light Bulbs with any other type or
voltage electrical current.
10. Whenever possible, park the Trailer on a flat, le vel, paved, surface and choc k
both Tires to keep the Trailer from accidently moving.
11.
12. Maintain labels and nameplates on the T railer. These carry important informa-
13. Reporting safety defects: If you believe your Trailer has a def ect which could
CA UTION! Care must be taken when backing up the Trailer. Onl y back
up the Trailer on a straight path. If the Trailer is allowed to turn off the straight
path while backing up, the Trailer could jackknife, causing severe damage to the
Trailer and towing vehicle.
tion. If unreadab le or missing, contact Harbor Freight Tools for a replacement.
cause a crash or could cause injury or death, you should immediately inform the
National Highway Traffic Safety Administration (NHTSA) in addition to notifying
the manufacturer, Changzhou Nanxiashu Tool Company. If NHTSA receives
similar complaints, it may open an investigation, and if it finds that a safety defect
exists in a group of vehicles, it may order a recall and remedy campaign. However, NHTSA cannot become involved in individual problems between you,
Harbor Freight Tools, or the manufacturer. To contact NHTSA, you may either call
the Auto Safety Hotline toll-free at 1-800-424-9393 or 202-366-0123 or write
NHTSA, U.S. Department, 400 7th Street SW NSA-11, W ashington, D.C. 20590.
Page 5SKU 93747 For technical questions, please call 1-800-444-3353.
Page 6
14. T railer licensing notice: Some states may consider this Trailer a vehicle requir-
ing registration, licensing, and titling. Check with your State Department of Motor
Vehicles for information and guidance on registering, licensing, and titling the
Trailer.
15. WARNING: The warnings, precautions, and instructions discussed in this manual
cannot cover all possible conditions and situations that may occur. The operator
must understand that common sense and caution are factors, which cannot be
built into this product, but must be supplied by the operator.
16. This Trailer must be securely connected to the towing vehicle bef ore loading.
17. Do not use this trailer on rough terrain. Excessively rough terrain, especially
when coupled with high speeds, could cause the trailer to become damaged or
cause the hitch coupler to fail.
ASSEMBLY INSTRUCTIONS
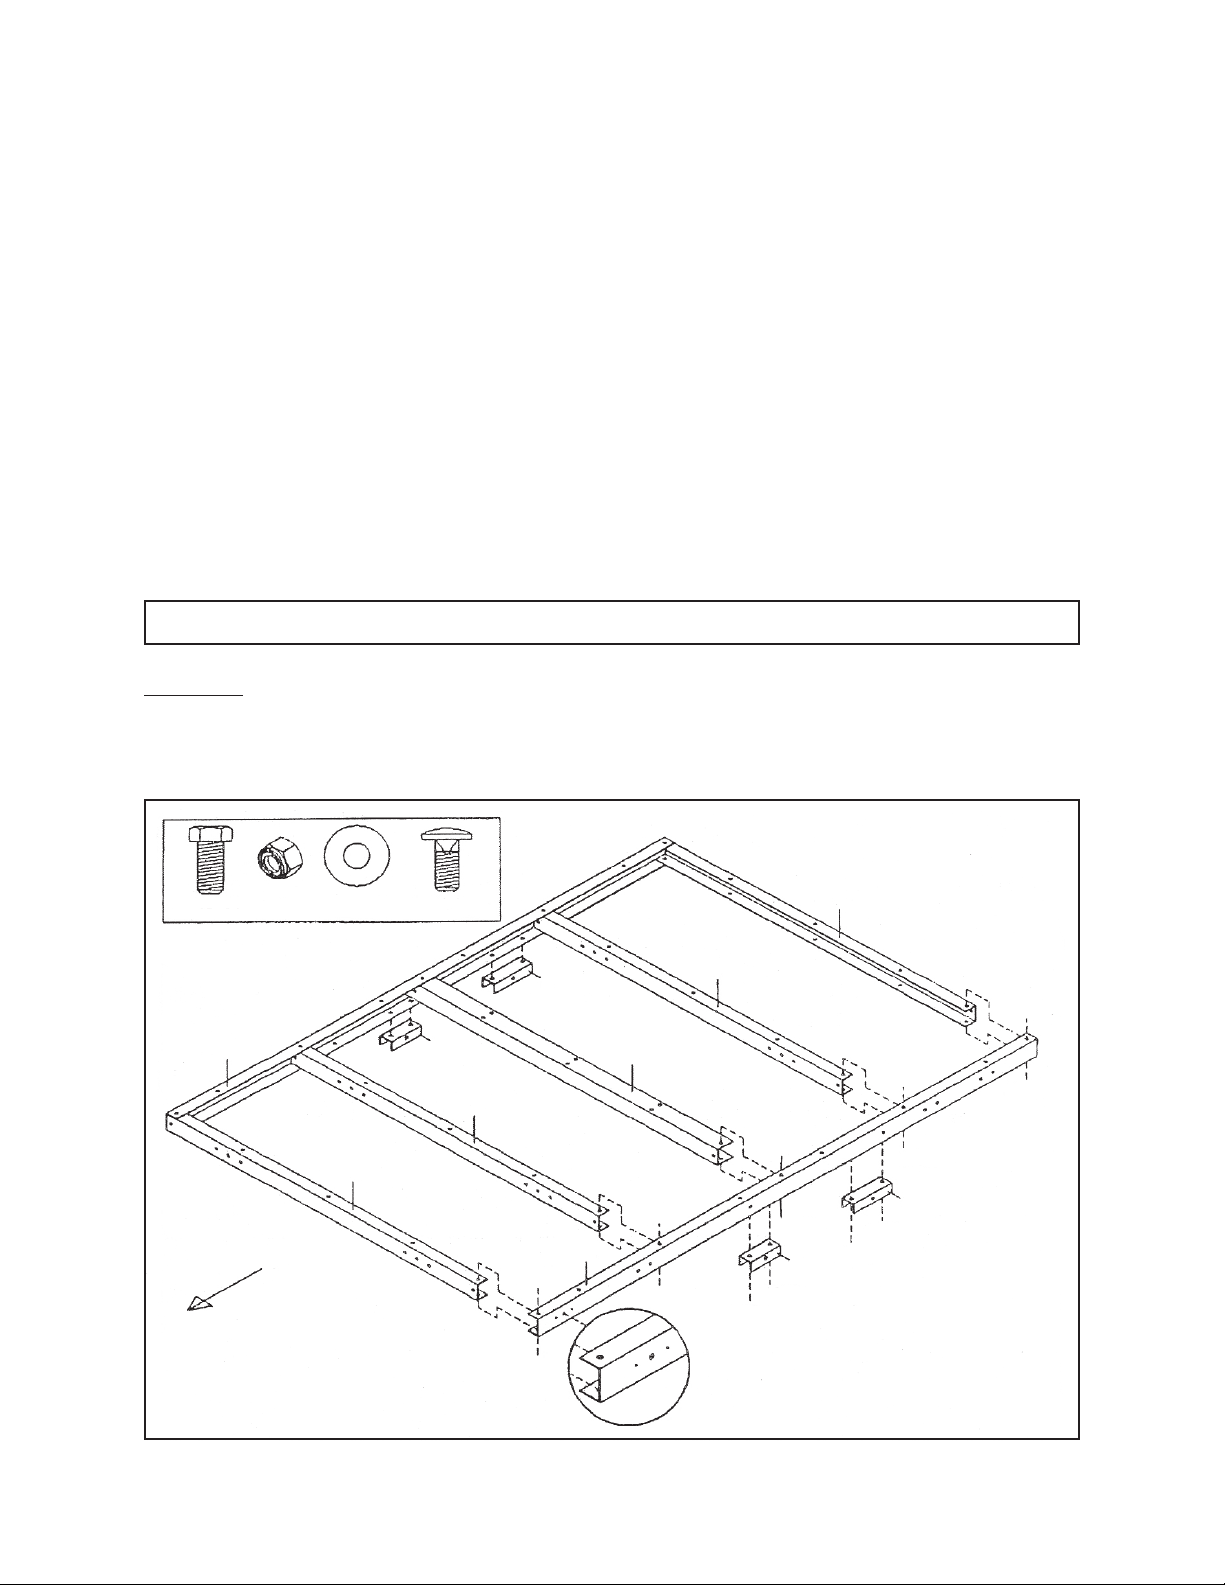
Phase 1:
1. Lay out the Right Side Rail (1R), Left Side Rail (1L), four Cross Members (2), and
Center Cross Member (3). (See Figure A.)
ACB
7
2
FCB
ACB
FCB
ACB
ACB
ACB
8
A: 3/8” x 1” B: 3/8” C: 3/8” F: 3/8” x 7/8”
1R
2
FRONT
7
2
ACB
8
3
ACB
1L
ACB
2
ACB
FCB
FCB
ACB
Page 6SKU 93747 For technical questions, please call 1-800-444-3353.
Page 7
2. IMPORTANT: There is a larger hole between two smaller holes located on one
end of the Left Side Rail (1L) and one end of the Right Side Rail (1R). The ends
of the Side Rails with the three holes must be positioned toward the
front
of the
Trailer.
(See circle illustration in Figure A.)
3. Attach the Side Rails (1L, 1R) to the four Cross Members (2) and Center Cross
Member (3), using the Hex Bolts (A), Flat Washers (C), and Nylon Nuts (B) as
shown in the illustration. (See Figure A.)
4. Attach the shorter Front Spring Hanger (7) and longer Rear Spring Hanger (8) to
the bottom of the Left Side Rail (1L) and Right Side Rail (1R), using the Carriage
Bolts (F), Flat Washers (C), and Nylon Nuts (B) as shown in the illustration.
(See Figure A.)
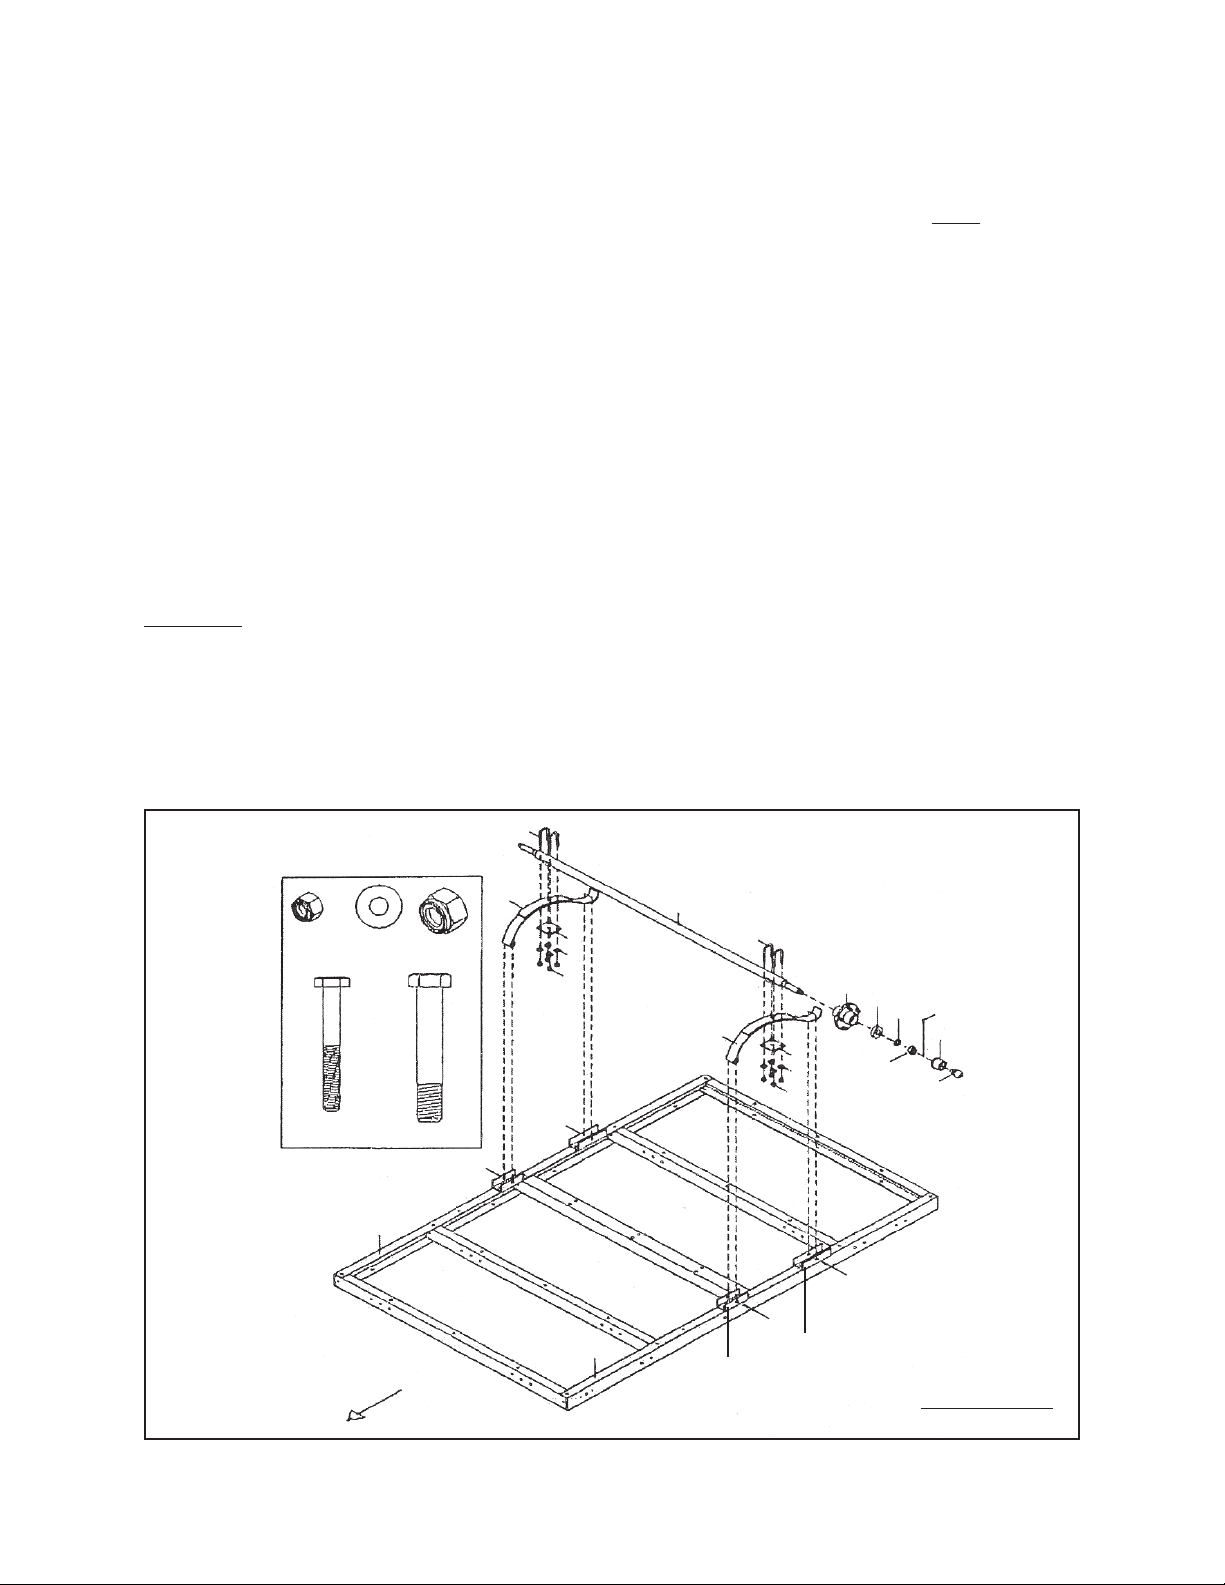
Phase 2:
1. With assistance, turn the Trailer upside down.
2. Place a Leaf Spring (20) on the Spring Hangers (7, 8) with the
forward. Secure the Leaf Spring to the Spring Hangers, using the Hex Bolts (G)
19
B: 3/8” C: 3/8”
E: 3/8” X 3”
G: 9/16” X 3-1/4”
1L
H: 9/16”
20
18
C
B
EB
GH
10
20
19
B
18
C
26
EB
spring eye
27
T
U
29
28
R
facing
FRONT
1R
GH
8
7
FIGURE B
Page 7SKU 93747 For technical questions, please call 1-800-444-3353.
Page 8

and Nylon Nuts (H) at the front portion. Use the Hex Bolts (E) and Nylon Nuts (B)
for the rear portion. Then, repeat this procedure for the remaining Leaf Spring.
(See Figure B.)
3. Place the Axle (10) on the Leaf Springs (20) with the grease fitting hole at each
end of the Axle facing
and place two U-Bolts (19) over each end of the Axle and through each Spring
Plate (18). Then secure the Axle to the Leaf Springs, using the Flat W ashers (C)
and Nylon Nuts (B). (See Figure B.)
4. IMPORTANT: Whenever a Hub (26) on a new Trailer requires assembly (or if a
Hub is disassembled for maintenance) the following procedures MUST be followed:
A. Using a suitable solvent, thoroughly clean the Hub Set (26), Outer Bearings
(27), Castle Nut (28), Dust Cap (29), and the rest of the parts of the Hub Assembly of all grease, dirt, metal shavings, and all other foreign objects. These
parts must be cleaned, even if they are new or appear to be clean.
(See Figure B.)
B. Allow all parts to dry completely.
downward
away from the Springs. Center the Axle (10)
C. Make sure your hands are clean and the bearing packer (not included) is
clean.
D. Place fresh, clean bearing grease in the bearing packer.
E. With the grease-filled bearing packer in one hand and the Outer Bearing (27)
in the other, press the Bearing into the grease, forcing the grease inside the
slots in the Bearing. Continue doing this until every slot in the Bearing is
completely full of grease. (See Figure B.)
F. Finish assembling the Hub Assembly as explained below, making sure not to
get dirt or debris on any part of the assembly.
5. Carefully slide the Hub Sets (26) over the spindles at each end of the Axle (10).
Insert the Outer Bearings (27) and Flat Washers (U) on the spindles. Screw a
Castle Nut (28) tightly onto each spindle. Then bac k the Castle Nut off slightly so
that the Hubs can just move freely. (See Figure B.)
6. Insert a Cotter Pin (T) through the Castle Nut (28) and hole at the end of each
spindle, and spread the Cotter Pins. (See Figure B.)
7. Fill the Dust Caps (29) with bearing grease. Then, press each Dust Cap onto the
Hub Sets (26). (See Figure B.)
8. Install a Grease Fitting (R) into each hole located at the ends of the Axle (10).
(See Figure B.)
Page 8SKU 93747 For technical questions, please call 1-800-444-3353.
Page 9

Phase 3:
1. Attach a Tow Bar (5) to the Left Side Rail (1L), Right Side Rail (1R), and front
Cross Member (2).
NO TE: The ends of the Tow Bars, with three square holes, must be facing toward
the front of the Trailer. Secure the Tow Bars, using the Hex Bolts (A), Flat Washers
(C), and Nylon Nuts (B) as shown in the illustration.
(See Figure C.)
2. Place the Stand Base (16) on the front of the two Tow Bars (5). Align the mounting holes in the Stand Base with the three square holes in the Tow Bars. Then
secure the Stand Base to the Tow Bars, using the Carriage Bolts (F), Flat Washers
(C), and Nylon Nuts (B). (See Figure C.)
16
FCB
5
ACB
FRONT
ACB
ACB
C: 3/8”B: 3/8”A: 3/8” X 1”
ACB
5
F: 3/8” X 7/8”
FIGURE C
Page 9SKU 93747 For technical questions, please call 1-800-444-3353.
Page 10

Phase 4:
1. With assistance, turn the Trailer right-side-up.
2. Attach the Spare Tire Bar (6) to both T o w Bars (5), using the Carriage Bolts (F),
Flat W ashers (C), and Nylon Nuts (B). (See Figure D.)
3. Attach the Coupler Base (15) to the front ends of both Tow Bars (5), using the
Carriage Bolts (F), Flat W ashers (C), and Nylon Nuts (B). (See Figure D.)
4. Locate the center link in the Safety Chain (17). Attach the Chain to the bottom of
the Coupler Base (15) by inserting a Carriage Bolt (D) downward through the
Coupler Base and through the center link in the Chain. Secure the Chain to the
Coupler Base, using a Flat Washer (C) and Nylon Nut (B). (See Figure D.)
N
17
DCB
14
Q
LK
FCB
JLK
IL
FCB
F: 3/8” X 7/8”
J: 1/2” X 1”
15
FCB
FCB
B: 3/8”
K: 1/2”
C: 3/8”
D: 3/8” X 1-1/2”
N
L: 1/2”
5
I: 1/2” X 3-3/4””
Q
6FRONT
FIGURE D
Page 10SKU 93747 For technical questions, please call 1-800-444-3353.
Page 11

5. Slide the Hitch Coupler (14) onto the Coupler Base (15), and align the two top
mounting holes of the Hitch Coupler with the two top mounting holes of the Coupler Base. Secure the Hitch Coupler to the Coupler Base, using the Hex Bolts (I),
Flat W ashers (L), and Nylon Nuts (K). (See Figure D.)
6. Lock the Coupler’s (14) Trigger by inserting the Safety Pin (N) through the hole in
the Trigger. Then, insert the “R” Pin (Q) through the hole in the Safety Pin.
(See Figure D.)
Phase 5:
1. Attach a Fender Bracket (30), with a Hole Spacer (9), in
the Left Side Rail (1L), using the Hex Bolts (O), Flat Washers (C), and Nylon Nuts
(B). Attach a Fender Bracket (31), with a Hole Spacer (9),
the Left Side Rail (1L), using the Hex Bolts (O), Flat Washers (C), and Nylon Nuts
(B). (See Figure E,
2. Attach a Fender Bracket (31), with a Hole Spacer (9), in
the Right Side Rail (1R), using the Hex Bolts (O), Flat Washers (C), and Nylon
Nuts (B). Attach a Fender Bracket (30), with a Hole Spacer (9),
(10) on the Right Side Rail (1R), using the Hex Bolts (O), Flat Washers (C), and
Nylon Nuts (B). (See Figure E,
3. Attach a Fender (11) to the Fender Brackets (30, 31) on the Left Side Rail (1L),
using the Hex Bolts (A), W ashers (C), and Nylon Nuts (B).
(See Figure E,
4. Attach the remaining Fender (11) to the Fender Brackets (30, 31) on the Right
Side Rail (1R), using the Hex Bolts (A), Washers (C), and Nylon Nuts (B).
(See Figure E,
5. Install a Tire/Wheel (12) assembly on each Hub Set (26). Then, secure the Tire/
Wheel assemblies, using the Lug Nuts (M).
next page.)
next page.)
next page.)
next page.)
front
of the Axle (10) on
behind
front
the Axle (10) on
of the Axle (10) on
behind
the Axle
NOTE: Use a lug wrench (not included) to tighten the Lug Nuts (in a crisscross
star pattern) to 90 Ft./Lbs.
Page 11SKU 93747 For technical questions, please call 1-800-444-3353.
Page 12

A: 3/8” X 1”
B: 3/8”
C: 3/8”
O: 3/8” X 1-1/4”
M: 1/2”
FRONT
FIGURE E
31
11
30
12
9
31
M
11
9
9
30
31
30
OCB
ACB
OCB
Phase 6:
1. Assemble the Tail Light Brackets (23) to the rear of the Left Side Rail (1L) and
Right Side Rail (1R), using the Hex Bolts (A), Flat Washers (C), and Nylon Nuts
(B). (See Figure F,
next page.)
2. Attach the License Plate Brack et (13) with the Left Tail Light (21) to the Left Side
Rail (1L), using the Hex Bolts (A), Flat W ashers (C), and Nylon Nuts (B).
NO TE: The Left T ail Light has a
(See Figure F ,
next page.)
clear
window at the bottom.
3. Attach the Right Tail Light (22) to the Right Side Rail (1R), using the Hex Bolts
(A), Flat W ashers (C), and Nylon Nuts (B). (See Figure F,
next page.)
Page 12SKU 93747 For technical questions, please call 1-800-444-3353.
Page 13

4. Open the Lens of the Side Running Lights (25). Run the Wire Lead of a Side
Running Light through the
center
hole located at the front end of the Left Side Rail
(1L). Then attach the Side Running Light to the Left Side Rail, using the Self
Tapping Screw (S). (See Figure F.)
5. Run the Wire Lead of the remaining Side Running Light (25) through the
hole located at the front end of the Right Side Rail (1R). Then attach the Side
Running Light to the Right Side Rail, using the Self Tapping Screw (S).
(See Figure F.)
6. Reinstall the Lens on the two Side Running Lights (25).
(See Figure F.)
22
ACB
23
25
center
13
23
ACB
21
FIGURE F
25
S
B: 3/8”
A: 3/8” X 1”
C: 3/8”
S
Page 13SKU 93747 For technical questions, please call 1-800-444-3353.
Page 14

Phase 7:
1. Have a qualified service technician install a 4-wire, 12 volt DC, Connector in the
trunk area of your vehicle.
2. Locate the vehicle’s Connector Plug near the Trailer’s Coupler (14) and lay out the
T railer’s Wiring Harness wires. (See Figure G.)
3. Connect the Brown Wire to the vehicle’s Left Tail Light by stripping, wrapping, and
taping the Connector Plug. (See Figure G.)
4. Connect the Yellow Wire to the vehicle’s Left Signal and Stop Light Wire.
(See Figure G.)
5. Connect the Green Wire to the vehicle’s Right Signal and Stop Light Wire.
6. NO TE: Some f oreign vehicles may require an adaptor to conve rt their 5-wire
system to a 4-wire vehicle Connector Plug. (See Figure G.)
7. Attach the White Ground Wire at the plug end of the Wiring Harness to the small
hole on the Coupler Base (15) with a 1/4” Tapping Screw (not included).
(See Figure G.)
SIDE RUNNING LIGHT (BROWN)
GROUND (WHITE)
GROUND (WHITE)
BROWN/YELLOW
D
E
D
D
D
C
D
LEFT STOP & TURN SIGNAL (YELLOW)
RIGHT STOP & TURN SIGNAL (GREEN)
E
BROWN/GREEN
D
D
D
D
D
D
D
E
WIRE CLIP
C
D
C
D
BROWN WIRE
WIRE (FROM SIDE LIGHT)
CONNECTOR
WIRE HARNESS
WIRE HARNESS
&
WIRE FROM TAIL LIGHT
FIGURE G
CONNECTOR
Page 14SKU 93747 For technical questions, please call 1-800-444-3353.
Page 15

8. Leave about 18” of wire beyond the Coupler (14). Then lay out the remaining
wires along the Tow Bars (5) and Left and Right Side Rails (1L, 1R).
(See Figure G.)
9. Secure the wires to the Tow Bars (5) and Left and Right Side Rails (1L, 1R), using
the Clips provided. (See Figure G,
Circle D
.)
10. Connect the Wire Lead from the Side Running Light (25) on each side of the
Trailer to the Brown Wire of the Wiring Harness, using a Wire Connector.
(See Figure G,
Circle E
.)
11. Strip about 3/4” of the ends of the Yellow/Brown and Green/Brown wires.
(See Figure G.)
12. Make the following connections (per color code). (See Figure G,
Circle C
.)
Left Side Right Side
Yellow-Red Wire Green-Red Wire
Brown-Two Black Wires Brown-Two Black Wires
Phase 8:
1. To install a Bed for the Trailer, cut tw o pieces of 3/4” thick plywood (not included)
to 48” x 60”. NOTE: It ma y be necessary to slightly trim the plywood to fit.
(See Figure H.)
FIGURE H
48”
48”
3/4” THICK PLYWOOD
60”
3/4” THICK PLYWOOD
PLYWOOD
*3/8”
HARDWARE
(NOT INCLUDED)
3/8”
CARRIAGE BOLT*
3/8”
WASHER*
3/8”
LOCK WASHER*
3/8”
NUT*
Page 15SKU 93747 For technical questions, please call 1-800-444-3353.
Page 16

2. Mark 7 locations in each piece of plywood to correspond with the 14 mounting
holes located on the front and rear Cross Members (2) and Left and Right Side
Rails (1L, 1R). Set the plywood aside, and drill the 14 marked locations with a
7/16” bit. Then, replace the plywood on the Trailer frame.
(See Figure H.)
W ARNING: Do not drill ad ditional Holes thr ough the ramp or structure of the Trailer.
Additional holes may weaken the structure of the Ramp, potentially causing it
to fail.
3. Secure the two pieces of plywood to the front and rear Cross Members (2) and
Left and Right Side Rails (1L, 1R), using 3/8” diameter, rust-resistant Carriage
Bolts, Washers, Lock W ashers, and Nuts (none included). Mak e sure the bolt
threads do not protrude up through the plywood. (See Figure H.)
Phase 9:
1. Lay out and assemble the Front Rack (1), Front Left Side Rack (2FL), Rear Left
Side Rack (3LR), Front Right Side Rack (2FR), and Rear Right Side Rack (3RR),
using the Hex Bolts (D), Flat Washers (E), and Nylon Nuts (F). (See Figure I.)
3FR
ABC
1
ABC
3RR
2FL
DEF
DEF
ABC
3RL
ABC
FIGURE I
Page 16SKU 93747 For technical questions, please call 1-800-444-3353.
Page 17

2. With assistance, set the Rack assembly on the Trailer and align the mounting
holes in the vertical supports on the Rack assembly with the mounting holes
located on the outer edges of the Trailer frame. Then secure the Rack assembly
to the Trailer frame, using the He x Bolts (A), Flat W ashers (B), and Nylon Nuts (C).
(See Figure I.)
Phase 10:
1. Lay out the Left Side Ramp (4L) and Right Side Ramp (4R) with their brackets on
the same end. Bolt each side together , using the Hex Bolts (A), Flat W ashers (B),
and Nylon Nuts (C).
(See Figure J.)
2. Attach the Angle Irons (8) to the assembled Ramp, using the Hex Bolts (A), Flat
Washers (B), and Nylon Nuts (C). (See Figure J.)
ABC
8
4R
ABC
ABC
ABC
ABC
ABC
8
4L
Phase 11:
1. Insert a Bushing (6) into each hinge of the Connecting Brackets (5).
(See Figure K,
next page.)
FIGURE J
2. Attach the Brackets (5) to the rear Cross Member (2), using the Hex Bolts (A), Flat
Washers (B), and Nylon Nuts (C). (See Figure K.)
Page 17SKU 93747 For technical questions, please call 1-800-444-3353.
Page 18

3. With assistance, raise the bottom of the Ramp assembly up to both hinges on the
rear Cross Member (2). Then insert a Hex Bolt (G) through the Ramp hinges and
Bushings (6) in the Connecting Bracket (5). Secure the Hex Bolts (6) to the rear
Cross Member, using the Nylon Nuts (C). (See Figure K.)
4. Raise the Ramp assembly all the way up. Insert a Lock Pin (7) through the side
bracket on each side of the Ramp and the Left and Right Rear Side Racks (3RL,
3RR). Then insert an “R” Safety Pin (H) through each of the Lock Pins.
(See Figure K.)
W ARNING:
Additional holes may weaken the structure of the Ramp, potentially causing it
to fail.
Do not drill additional Holes thr ough the ramp or structure of the Trailer.
7
ABC
H
5
GC
6
5
GC
6
7
H
ABC
FIGURE K
Page 18SKU 93747 For technical questions, please call 1-800-444-3353.
Page 19

OPERATING INSTRUCTIONS
WARNING!
IMPORTANT INFORMATION
This trailer’s Hitch Coupler MUST be properly secured to the hitch ball of the towing vehicle. After assembly and attachment, pull up and down on the Hitch Coupler to make sure
the hitch ball is fitting snugly in the Hitch Coupler. There must be no play between the
hitch ball and Hitch Coupler. If there is play, tighten the Adjustment Nut until no play is
present. If the Adjustment Nut is too tight, the Handle will not lock. Carefully read and
follow the complete instructions in this manual BEFORE setup or use.
If the Coupler is not secured properl y , the ball could come loose while the trailer is in
motion, possib ly causing property damage, SERIOUS PERSONAL INJUR Y , or DEATH.
1. Only use a 2” Ball Hitch (not included) on the towing vehicle. (See Figure L.)
2. NO TE: To reduce friction between the 2” Ball Hitch and Trailer Coupler (14), apply a
layer of heavy grease over the Ball Hitch. (See Figure L.)
3. Temporarily remove the “ R” Pin (Q) and Saf ety Pin (N). Then, pull
up on the Trigger and lift up on the Handle. (See Figure L.)
4. With assistance, place the Hitch Coupler (14) over the vehicle’s
Hitch Ball and, while holding the trigger, push down on the Handle
until the Trigger locks in the slot.
5. Pull up and down on the Coupler to make sure the Hitch Ball is
fitting snugly in the Coupler. There should be no pla y between the
Hitch Ball and Coupler . If there is pla y, tighten the Adjustment Nut
until no play is present. If the Adjustment Nut is too tight, the Handle
will not lock. (See Figure L.)
“R” PIN
HANDLE
SAFETY PIN
TRIGGER
Trigger on
locking handle
MUST latch in
place before
inserting
safety pin.
COUPLER
(14)
SLOT
ADJUSTMENT
NUT
2” BALL
HITCH
FIGURE L
HITCH
Page 19SKU 93747 For technical questions, please call 1-800-444-3353.
Page 20

6. Pull up on the handle without squeezing the trigger to ensure that it is properly
locked in place. Reinstall the Safety Pin (N) and “R” Pin (Q). (See Figure L.)
7. Make sure to attach each side of the Safety Chain (17) equally to the towing
vehicle’ s rear bumper or frame. (See Figure L.)
8. Connect the Tail Light Wiring Assembly to the towing vehicle’s 12 Volt DC wiring
connector.
vehicle for proper connection instructions.
NOTE: Make sure to consult the operator’ s manual of the towing
9.
10. When towing the Trailer over long distances, stop and check the tightness of all
11. Carry emergency flares and fire extinguisher, if required for operation in y our
12. It is recommended to carry extra b ulbs and fuses if towing the Trailer at night over
1. Ensure that the ramp is used only while the coupler is properly attached securely
2. The ramp must be used only on a solid, level surface that is stable enough to
CA UTION! Care must be taken when backing up the Trailer. Onl y back
up the Trailer on a straight path. If the Trailer is allowed to turn off the straight
path while backing up, the Trailer could jackknife, causing severe damage to the
Trailer and to the towing vehicle.
connections, Side Running Lights (25), and Tail Lights (21, 22)
miles.
state.
long distances.
RAMP USAGE
to the towing vehicle.
properly support the trailer’s wieght, the towing vehicle’s weight, and the weight of
any load to be placed on the trailer.
at least
every 100
3. Proper loading procedures and hazards associated with loading will vary
widely depending on the application that this trailer is used for . Follow all
loading instructions provided with vehicles, and always make sure that the
load is distributed evenly while loading or towing.
Page 20SKU 93747 For technical questions, please call 1-800-444-3353.
Page 21

INSPECTION, MAINTENANCE, AND CLEANING
1. The Chart below ser ves as a basic guideline for scheduling your trailer maintenance. Maintenance may be different based on your local conditions, trailer use
application, and frequency of trailer use.
2.
CAUTION! All maintenance, service, or repairs listed in this manual are only
to be attempted by a qualified service technician.
relpuoC
cehC
sleehW .gnillatsniretfaselim05tsrifretfadna,esuhcaeerofebstungulkcehC
/sbuH
ylretrauqsgniraebotesaergddA
sgniraeB
seriT
auqefildaertkcehC
/lacirtcelE
gnithgiL
aeerofebsthgilekarbkcehC
ELUDEHCSECNANETNIAM
.relpuocfotifreporperusneesuhcaeerofeB
.reliartfoegarotsretfa/erofebdnaylretrauqnoitacirbulrofk
.egarotsretfadna
.egarotserofebdnayllaunnasgniraebkcapeR
eerofeb)ISP08(erusserpehtkcehC
.esuhcaeretfadnaerofebserittcepsniyllausiV
.egarotsretfa/erofebdnaylretr
.egarotsretfadnaesuhcaeerofebsthgilliatkcehC
.egarotsretfadnaesuhc
.esuhcaeerofebgniriwdnuorglacirtcelekcehC
.egarotsretfa/erofebdnaesuhca
PLEASE READ THE FOLLOWING CAREFULLY
THE MANUFACTURER AND/OR DISTRIBUTOR HAS PROVIDED THE PARTS LIST
AND ASSEMBLY DIAGRAM IN THIS MANUAL AS A REFERENCE TOOL ONLY.
NEITHER THE MANUFACTURER OR DISTRIBUTOR MAKES ANY REPRESENTATION
OR WARRANTY OF ANY KIND TO THE BUYER THAT HE OR SHE IS QUALIFIED TO
MAKE ANY REPAIRS TO THE PRODUCT, OR THAT HE OR SHE IS QUALIFIED TO
REPLACE ANY PARTS OF THE PRODUCT. IN FACT, THE MANUFACTURER AND/
OR DISTRIBUTOR EXPRESSLY STATES THAT ALL REPAIRS AND PARTS
REPLACEMENTS SHOULD BE UNDERTAKEN BY CERTIFIED AND LICENSED
TECHNICIANS, AND NOT BY THE BUYER. THE BUYER ASSUMES ALL RISK AND
LIABILITY ARISING OUT OF HIS OR HER REPAIRS TO THE ORIGINAL PRODUCT
OR REPLACEMENT PARTS THERETO, OR ARISING OUT OF HIS OR HER
INSTALLATION OF REPLACEMENT PARTS THERETO.
Page 21SKU 93747 For technical questions, please call 1-800-444-3353.
Page 22

PARTS LIST & ASSEMBLY DIAGRAM - TRAILER
Par t # Desc ript ion Qty . Pa rt # Descri ption Qty .
1L Left Side Rail 1 27 Outer Bearing 2
1R Right Side Rail 1 28 Castle Nut 2
2 Cross Member 4 29 Dust Cap 2
3 Center Cross Member 1 30 Fender Brack et (A) 2
5 Tow Bar 2 31 Fender Bracket (B) 2
6 Spare Tire Bar 1 A 3/8” x 1” Hex Bolt 36
7 Front Spring Hanger (Short) 2 B 3/8” Nylon Nut 71
8 Rear Spring Hanger (Long) 2 C 3/8” Flat Washer 69
9 Hole Spacer (6mm) 4 D 3/8” x 1-1/2” Carriage Bolt 1
10 Axle 1 E 3/8” x 3” Hex Bolt 2
11 Fender 2 F 3/8” x 7/8” Carriage Bolt 20
12 Tire/Wheel Assy. 2 G 9/16” x 3-1/4” Hex Bolt 2
13 License Plate Bracket 1 H 9/16” Nylon Nut 2
14 Coupler 1 I 1/2” x 3-3/4” Hex Bolt 2
15 Coupler Base 1 J 1/2” x 1” Hex Bolt 1
16 St and Base 1 K 1/2” Nylon Nut 3
17 Safety Chain 1 L 1/2” Flat Washer 6
18 Spring Plate 2 M 1/2” Lug Nut 10
19 U-Bolt 4 N Safety Pin 1
20 Leaf Spring 2 O 3/8” x 1-1/4” Hex bolt 4
21 Left Tail Light 1 Q 2m m R Pin 1
22 Right Tail Light 1 R Grease Fitting 2
23 Tail Light Bracket 2 S 4m m Self Tapping Screw 4
25 Side Running Light 2 T 5/32” Cotter Pin 2
26 Hub Set 2 U 3/4” Flat Washer 2
ILK
JLK
FCB
ABC
ABC
ACB
ACB
ACB
FCB
ACB
ACB
ACB
NOTE:
Some parts are listed and shown for illustration purposes only,
and are not available individually as replacement parts.
ACB
U
T
R
Page 22SKU 93747 For technical questions, please call 1-800-444-3353.
Page 23

PARTS LIST & ASSEMBLY DIAGRAM - RAMP
Par t # Desc ript ion Qty. Part # De scr ipt ion Qty.
1 Front Rack 1 8 Angle Iron 2
2FR Front Right Side Rack 1 A 3/8” x 1” Hex Bolt 24
2FL Front Left Side Rack 1 B 3/8” Flat Washer 24
3RR Rear Right Side Rack 1 C 3/8” Nylon Nut 26
3RL Rear Left Side Rail 1 D 5/16” x 3” Hex Bolt 8
4R Right Side Ramp 1 E 5/16” Flat Washer 8
4L Left Side Ramp 1 F 5/16” Nylon Nut 8
5 Connecting Bracket 2 G 3/8” x 3” Hex Bolt 2
6 Bushing 2 H 3mm R Safety Pin 2
7 L Lock Pin 2
NOTE: If or dering parts for the Ramp assembly belo w,
make sure to specify “Ramp Part Numbers”.
H
ABC
GC
ABC
GC
H
Page 23SKU 93747 For technical questions, please call 1-800-444-3353.
Page 24

WARRANTY
LIMITED 90 DAY
WARRANTY
Harbor Freight T ools Co . makes e ve ry effort to assure that its products meet high quality and durability standards,
and warrants to the original purchaser that this product is free from defects in materials and workmanship for
the period of ninety days from the date of purchase. This warranty does not apply to damage due directly or
indirectly, to misuse, abuse, negligence or accidents, repairs or alterations outside our facilities, or to lack of
maintenance. W e shall in no ev ent be liable f or death, injuries to persons or property , or f or incidental, contingent,
special or consequential damages arising from the use of our product. Some states do not allow the exclusion
or limitation of incidental or consequential damages, so the abov e limitation of exclusion may not apply to you.
THIS WARRANTY IS EXPRESSLY IN LIEU OF ALL OTHER WARRANTIES, EXPRESS OR IMPLIED,
INCLUDING THE WARRANTIES OF MERCHANTABILITY AND FITNESS.
To take adv antage of this warranty, the product or par t must be retur ned to us with transportation charges
prepaid. Proof of purchase date and an explanation of the complaint m ust accompan y the merchandise. If our
inspection verifies the defect, w e will either repair or replace the product at our election or we may elect to
refund the purchase price if we cannot readily and quickly provide you with a replacement. We will return
repaired products at our expense, but if we determine there is no defect, or that the defect resulted from
causes not within the scope of our warranty, then you must bear the cost of returning the product.
This warranty giv es you specific legal rights and y ou may also have other rights which vary from state to state.
3491 Mission Oaks Blvd. • PO Box 6009 • Camarillo, CA 93011 • (800) 444-33533491 Mission Oaks Blvd. • PO Box 6009 • Camarillo, CA 93011 • (800) 444-3353
3491 Mission Oaks Blvd. • PO Box 6009 • Camarillo, CA 93011 • (800) 444-3353
3491 Mission Oaks Blvd. • PO Box 6009 • Camarillo, CA 93011 • (800) 444-33533491 Mission Oaks Blvd. • PO Box 6009 • Camarillo, CA 93011 • (800) 444-3353
Page 24SKU 93747 For technical questions, please call 1-800-444-3353.
 Loading...