

Page 1

7-INCH V7-INCH V
7-INCH V
7-INCH V7-INCH V
POLISHER / SANDERPOLISHER / SANDER
POLISHER / SANDER
POLISHER / SANDERPOLISHER / SANDER
ARIABLE SPEEDARIABLE SPEED
ARIABLE SPEED
ARIABLE SPEEDARIABLE SPEED
92623
ASSEMBLY AND OPERATING INSTRUCTIONS
3491 MISSION OAKS BLVD., CAMARILLO, CA 93011
VISIT OUR WEB SITE AT HTTP://WWW.HARBORFREIGHT.COM
Copyright© 2004 by Harbor Freight Tools®. All rights reserved. No portion of this
manual or any artwork contained herein may be reproduced in any shape or
form without the express written consent of Harbor Freight Tools.
For technical questions and replacement parts, please call 1-800-444-3353
Manual Revised 03/06
Page 2

SPECIFICATIONS
Item Description
Power Requirement 120 VAC, 10 amps (input), 60 Hz
Speed 200 to 3377 RPM; Variable
Disc Size 7 inches
Spindle Size 5/8 inches – 11 TPI
Line Cord 6 feet; Two-prong polarized plug
Weight 6.6 lbs.
Accessories 2 – Sanding Disks: 60 and 240 grit
1 – Foam Pad
1 – Terry Towel
1 – Polishing Bonnet
1 – Polishing Pad
E194601
SAVE THIS MANUAL
You will need the manual for the safety warnings and precautions, assembly instructions,
operating and maintenance procedures, parts list and diagram. Keep your invoice with this
manual. Write the invoice number on the inside of the front cover. Keep the manual and
invoice in a safe and dry place for future reference.
GENERAL SAFETY RULES
WARNING!
READ AND UNDERSTAND ALL INSTRUCTIONS. Failure to follow all instructions
listed below may result in electric shock, fire, and/or serious injury.
SAVE THESE INSTRUCTION
Work Area
1. Keep your work area clean and well lit. Cluttered benches and dark areas invite
accidents.
2. Do not operate power tools in explosive atmospheres, such as in the presence
of flammable liquids, gases, or dust. Power tools create sparks which may ignite the
dust or fumes.
3. Keep bystanders, children, and visitors away while operating a power tool.
Distractions can cause you to lose control. Protect others in the work area from debris
such as chips and sparks. Provide barriers or shields as needed.
SKU 92623
For technical questions, please call 1-800-444-3353
English
Page 2
Page 3

Electrical Safety
4. Grounded tools must be plugged into an outlet properly installed and grounded
in accordance with all codes and ordinances. Never remove the grounding
prong or modify the plug in any way. Do not use any adapter plugs. Check with
a qualified electrician if you are in doubt as to whether the outlet is properly
grounded. If the tools should electrically malfunction or break down, grounding
provides a low resistance path to carry electricity away from the user.
5. Double insulated tools are equipped with a polarized plug (one blade is wider
than the other). This plug will fit in a polarized outlet only one way. If the plug
does not fit fully in the outlet, reverse the plug. If it still does not fit, contact a
qualified electrician to install a polarized outlet. Do not change the plug in any
way. Double insulation
cord and grounded power supply system.
6. Avoid body contact with grounded surfaces such as pipes, radiators, ranges,
and refrigerators. There is an increased risk of electric shock if your body is
grounded.
7. Do not expose power tools to rain or wet conditions. Water entering a power tool
will increase the risk of electric shock.
eliminates the need for the three wire grounded power
8. Do not abuse the Power Cord. Never use the Power Cord to carry the tools or
pull the Plug from an outlet. Keep the Power Cord away from heat, oil, sharp
edges, or moving parts. Replace damaged Power Cords immediately. Damaged
Power Cords increase the risk of electric shock.
9. When operating a power tool outside, use an outdoor extension cord marked
“W-A” or “W”. These extension cords are rated for outdoor use, and reduce the risk of
electric shock.
Personal Safety
10. Stay alert. Watch what you are doing, and use common sense when operating a
power tool. Do not use a power tool while tired or under the influence of drugs,
alcohol, or medication. A moment of inattention while operating power tools may
result in serious personal injury.
11. Dress properly. Do not wear loose clothing or jewelry. Contain long hair. Keep
your hair, clothing, and gloves away from moving parts. Loose clothes, jewelry, or
long hair can be caught in moving parts.
12. Avoid accidental starting. Be sure the Power Switch is off before plugging in.
Carrying power tools with your finger on the Power Switch, or plugging in power tools
with the Power Switch on, invites accidents.
13. Remove adjusting keys or wrenches before turning the power tool on. A wrench
or a key that is left attached to a rotating part of the power tool may result in personal
injury.
SKU 92623
For technical questions, please call 1-800-444-3353
English
Page 3
Page 4

14. Do not overreach. Keep proper footing and balance at all times. Proper footing
and balance enables better control of the power tool in unexpected situations.
15. Use safety equipment. Always wear eye protection. Dust mask, nonskid safety
shoes, hard hat, or hearing protection must be used for appropriate conditions.
Tool Use and Care
16. Use clamps (not included) or other practical ways to secure and support the
workpiece to a stable platform. Holding the work by hand or against your body is
unstable and may lead to loss of control.
17. Do not force the tool. Use the correct tool for your application. The correct tool
will do the job better and safer at the rate for which it is designed.
18. Do not use the power tool if the Power Switch does not turn it on or off. Any tool
that cannot be controlled with the Power Switch is dangerous and must be replaced.
19. Disconnect the Power Cord Plug from the power source before making any
adjustments, changing accessories, or storing the tool. Such preventive safety
measures reduce the risk of starting the tool accidentally.
20. Store idle tools out of reach of children and other untrained persons. Tools are
dangerous in the hands of untrained users.
21. Maintain tools with care. Keep cutting tools sharp and clean. Properly maintained
tools with a sharp cutting edge are less likely to bind and are easier to control. Do not
use a damaged tool. Tag damaged tools “Do not use” until repaired.
22. Check for misalignment or binding of moving parts, breakage of parts, and any
other condition that may affect the tool’s operation. If damaged, have the tool
serviced before using. Many accidents are caused by poorly maintained tools.
23. Use only accessories that are recommended by the manufacturer for your
model. Accessories that may be suitable for one tool may become hazardous when
used on another tool.
Service
24. Tool service must be performed only by qualified repair personnel. Service or
maintenance performed by unqualified personnel could result in a risk of injury.
25. When servicing a tool, use only identical replacement parts. Follow instructions
in the
unauthorized parts or failure to follow maintenance instructions may create a risk of
electric shock or injury.
“Inspection, Maintenance, And Cleaning”
section of this manual. Use of
SKU 92623
For technical questions, please call 1-800-444-3353
English
Page 4
Page 5

SPECIFIC SAFETY RULES FOR POLISHER / SANDER
1. Accessories must be rated for at least the speed recommended on the tool
warning label. Wheels and other accessories running over rated speed can fly apart
and cause injury.
2. Hold tool by insulated gripping surfaces when performing an operation where
the cutting tool may contact hidden wiring or its own cord. Contact with a “live”
wire will make exposed metal parts of the tool “live” and shock the operator.
3. Maintain labels and nameplates on the Polisher/ Sander. These carry important
information. If unreadable or missing, contact Harbor Freight Tools for a replacement.
4. Always wear ANSI-approved safety impact eye goggles and heavy work gloves
when using the Polisher/ Sander. Using personal safety devices reduce the risk for
injury. Safety impact eye goggles and heavy work gloves are available from Harbor
Freight Tools.
5. Maintain a safe working environment. Keep the work area well lit. Make sure there is
adequate surrounding workspace. Always keep the work area free of obstructions,
grease, oil, trash, and other debris. Do not use a power tool in areas near flammable
chemicals, dusts, and vapors. Do not use this product in a damp or wet location.
6. Make sure to read and understand all instructions and safety precautions as
outlined in the manufacturer’s manual for the vehicle you will wax/polish.
7. When using a handheld power tool, always maintain a firm grip on the tool with
both hands to resist starting torque.
8. Always keep the extension cord away from moving parts on the tool. Keep it off the
ground and away from water.
9. Avoid unintentional starting. Make sure you are prepared to begin work before turning
on the Polisher/ Sander.
10. Do not force the Polisher/Sander. This tool will do the work better and safer at the
speed and capacity for which it was designed. Do not force the pads into the vehicle
being waxed/polished. Apply moderate pressure, allowing the Bonnet to rotate freely
without being forced.
11. When waxing/polishing a vehicle, do not operate the vehicle’s engine in an enclosed
area. Carbon monoxide is a colorless, odorless, vapor emitted from a vehicle’s
(1)
running engine that may cause severe injury or death if inhaled.
12. Never lay the Polisher/Sander down until the Polishing Pad (2) has come to a full
stop. The Backing Pad can grab the surface and pull the tool out of your control.
13. Make sure the vehicle being waxed/polished is free from burrs and any other foreign
matter which could damage the tool.
14. Never leave the Polisher/ Sander unattended when it is plugged into an electrical
outlet. Turn off the tool, and unplug it from its electrical outlet before leaving.
SKU 92623
For technical questions, please call 1-800-444-3353
English
Page 5
Page 6

15. Always unplug the Polisher/ Sander from its electrical outlet before performing
any inspection, maintenance, or cleaning procedures.
16. When sanding, only use 7” sanding pads with a hook and loop back that attaches
securely to the Backing Pad.
17. Connect to a GFCI. Always connect the Line Cord to a Ground Fault Circuit Interrupter
(GFCI) protected electrical outlet.
18. Never use accessories rated for less than 3500 RPM.
WARNING! Avoid serious injury. Never install carbide tipped or steel circular saw
blade for use on this Sander/Polisher. Never install a wood carving blade, carving disc
with saw chain cutters, or a cutting carving disc on this Sander/Polisher. Never install
abrasive cutoff discs and wheels, flap wheels, wire brushes, or wire wheel brushes.
WARNING! People with pacemakers should consult their physician(s) before using
this product. Operation of electrical equipment in close proximity to a heart pacemaker
could cause interference or failure of the pacemaker.
WARNING! Some dust created by power sanding, sawing, grinding, drilling, and other
construction activities, contain chemicals known (to the State of California) to cause
cancer, birth defects or other reproductive harm. Some examples of these chemicals
are: lead from lead-based paints, crystalline silica from bricks and cement or other masonry products, arsenic and chromium from chemically treated lumber. Your risk from
these exposures varies, depending on how often you do this type of work. To reduce
your exposure to these chemicals: work in a well ventilated area, and work with approved safety equipment, such as those dust masks that are specially designed to filter
out microscopic particles.
(California Health & Safety Code 25249.5, et seq.)
GROUNDING
WARNING!
Improperly connecting the grounding wire can result in the risk of electric shock.
Check with a qualified electrician if you are in doubt as to whether the outlet is
properly grounded. Do not modify the power cord plug provided with the tool or
product. Never remove the grounding prong from the plug. Do not use the tool if
the power cord or plug is damaged. If damaged, have it repaired by a service
facility before use. If the plug will not fit the outlet, have a proper outlet installed by
a qualified electrician.
Grounded Tools: Tools with Three Prong Plugs
1. Tools marked with “Grounding Required” have a three wire cord and three prong
grounding plug. The plug must be connected to a properly grounded outlet. If the tool
should electrically malfunction or break down, grounding provides a low resistance path
to carry electricity away from the user, reducing the risk of electric shock. (See Figure A.)
SKU 92623
For technical questions, please call 1-800-444-3353
English
Page 6
Page 7
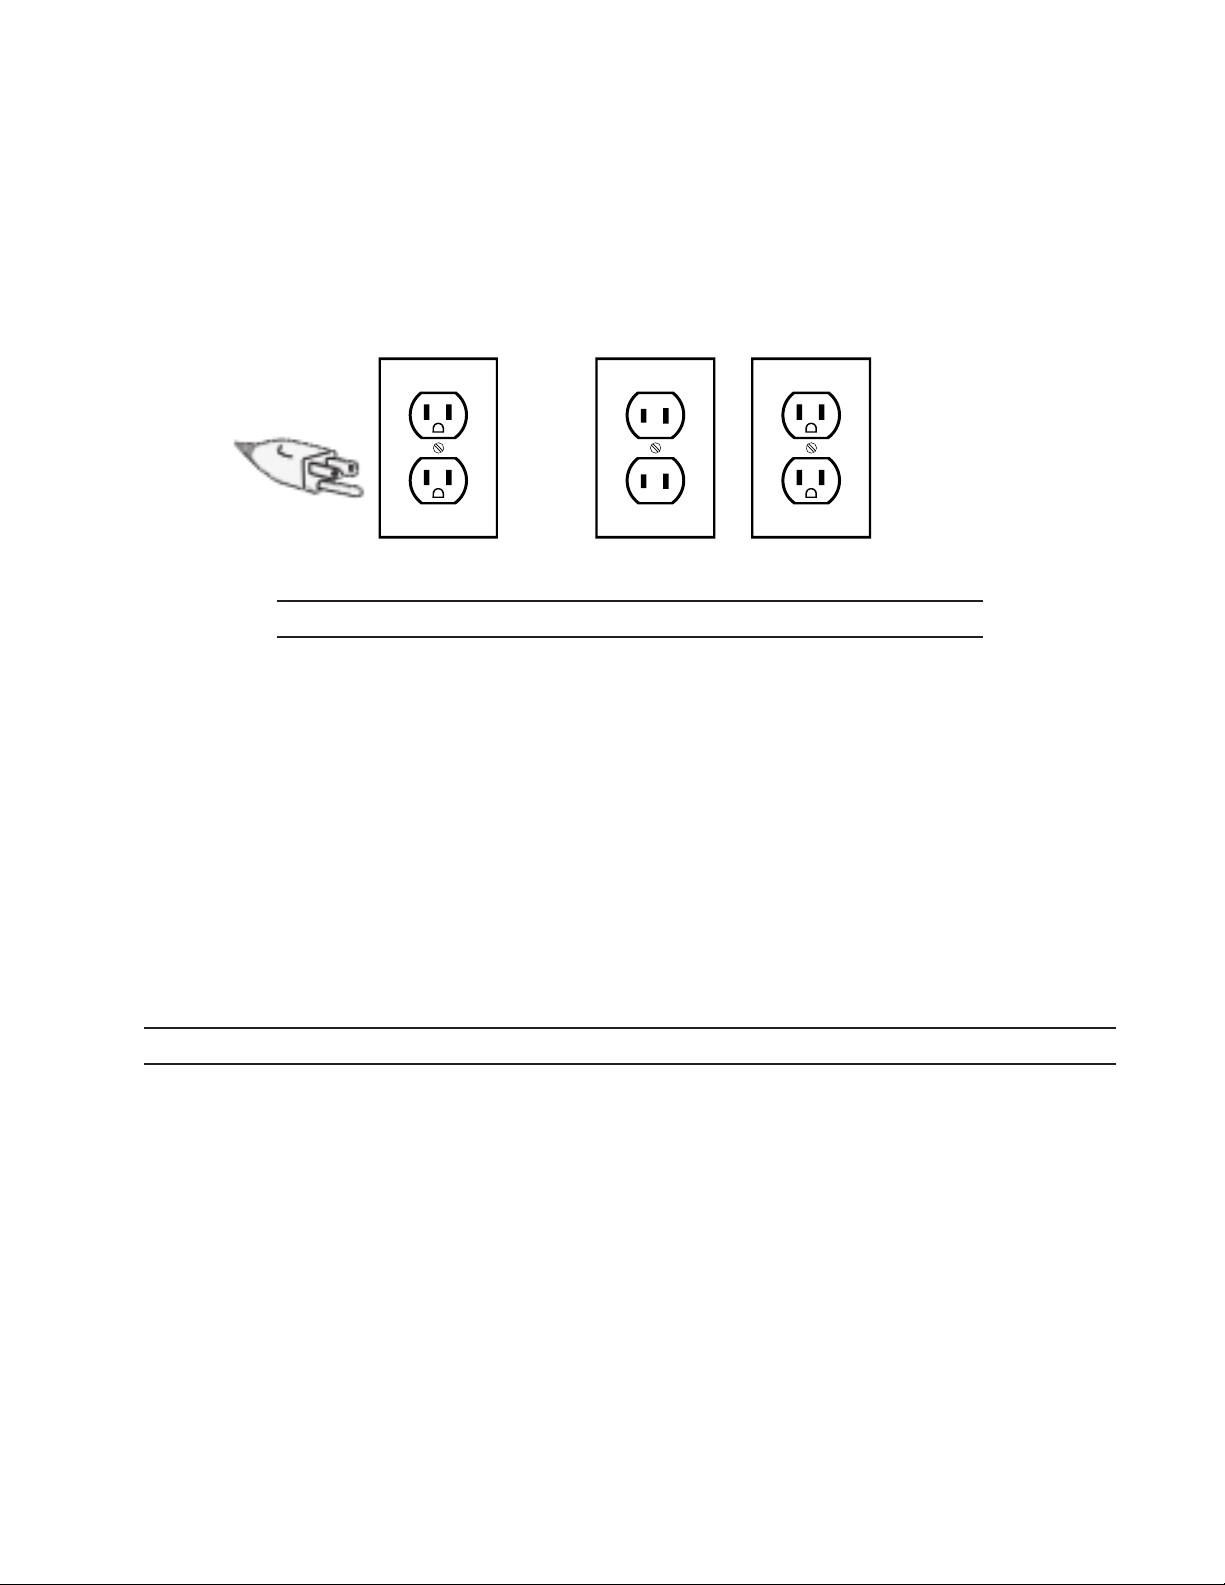
2. The grounding prong in the plug is connected through the green wire inside the cord to
the grounding system in the tool. The green wire in the cord must be the only wire
connected to the tool’s grounding system and must never be attached to an electrically
“live” terminal. (See Figure A.)
3. Your tool must be plugged into an appropriate outlet, properly installed and grounded
in accordance with all codes and ordinances. The plug and outlet should look like
those in the following illustration. (See Figure A.)
Figure A
Figure B
Double Insulated Tools: Tools with Two Prong Plugs
4. This product has a polarized plug (one blade is wider than the other) as a feature
to reduce the risk of electric shock. This plug will fit in a polarized outlet only one
way. If the plug does not fit fully in the outlet, reverse the plug. If it still does not fit,
contact a qualified electrician. Never use with an extension cord unless plug can be
fully inserted. Do not alter the plug.
5. Tools marked “Double Insulated” do not require grounding. They have a special double
insulation system which satisfies OSHA requirements and complies with the
applicable standards of Underwriters Laboratories, Inc., the Canadian Standard
Association, and the National Electrical Code. (See Figure B above.)
6. Double insulated tools may be used in either of the 120 volt outlets shown in the
following illustration. (See Figure B above.)
EXTENSION CORDS
1. Grounded tools require a three wire extension cord. Double Insulated tools can use
either a two or three wire extension cord.
2. As the distance from the supply outlet increases, you must use a heavier gauge
extension cord. Using extension cords with inadequately sized wire causes a serious
drop in voltage, resulting in loss of power and possible tool damage. (See Table A.)
3. The smaller the gauge number of the wire, the greater the capacity of the cord. For
example, a 14 gauge cord can carry a higher current than a 16 gauge cord. (See Table
A.)
4. When using more than one extension cord to make up the total length, make sure
each cord contains at least the minimum wire size required. (See Table A.)
SKU 92623
For technical questions, please call 1-800-444-3353
English
Page 7
Page 8
5. If you are using one extension cord for more than one tool, add the nameplate
amperes and use the sum to determine the required minimum cord size. (See Table A.)
6. If you are using an extension cord outdoors, make sure it is marked with the suffix “W-
A” (“W” in Canada) to indicate it is acceptable for outdoor use.
7. Make sure your extension cord is properly wired and in good electrical condition.
Always replace a damaged extension cord or have it repaired by a qualified
electrician before using it.
8. Protect your extension cords from sharp objects, excessive heat, and damp or wet
areas.
Table A
RECOMMENDED MINIMUM WIRE GAUGE FOR EXTENSION CORDS*
(120 VOLT)
NAMEPLATE
AMPERES
(At Full Load)
25
Feet
0 – 2.0 18 18 18 18 16
2.1 – 3.4 18 18 18 16 14
3.5 – 5.0 18 18 16 14 12
5.1 – 7.0 18 16 14 12 12
7.1 – 12.0 16 14 12 10
12.1 – 16.0 14 12 10 - -
16.1 – 20.0 12 10 - - * Based on limiting the line voltage drop to five volts at 150% of the rated amperes.
EXTENSION CORD LENGTH
50
Feet
75
Feet
100
Feet
150
Feet
-
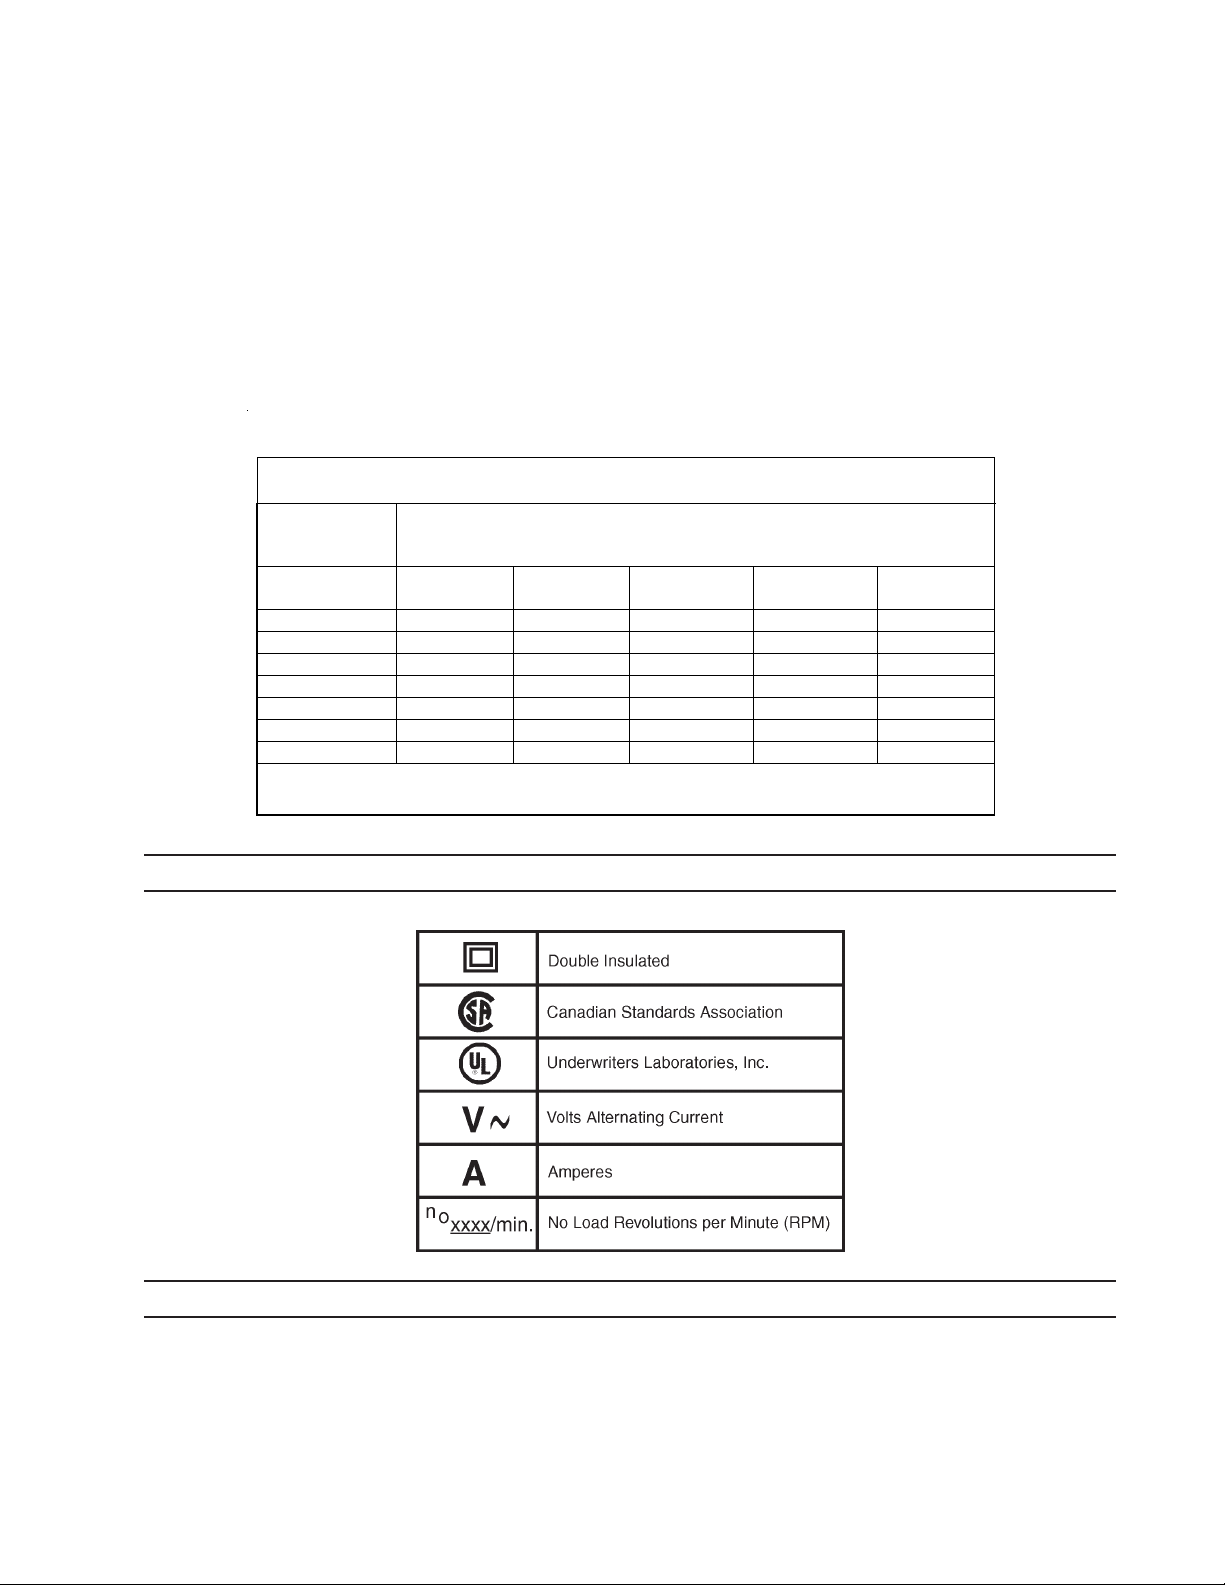
SYMBOLOGY
Table B
UNPACKING
When unpacking, check to make sure that all the parts are included. Refer to the Assembly
section, and the Assembly Drawing and Parts List at the end of this manual.
If any parts are missing or broken, please call Harbor Freight Tools at the number on the
cover of this manual as soon as possible.
SKU 92623
For technical questions, please call 1-800-444-3353
English
Page 8
Page 9
ASSEMBLY INSTRUCTIONS
Caution: Verify that the Power Cord (41) of the Sander/ Polisher is unplugged from its
extension cord or outlet prior to making any adjustments to the tool.
1. Press in the Spindle Lock Cap (17) to keep the Spindle shaft from turning.
2. Screw the Polishing Pad (2) counterclockwise onto the Spindle (3) until it is secure.
Release the Spindle Lock Cap (17).
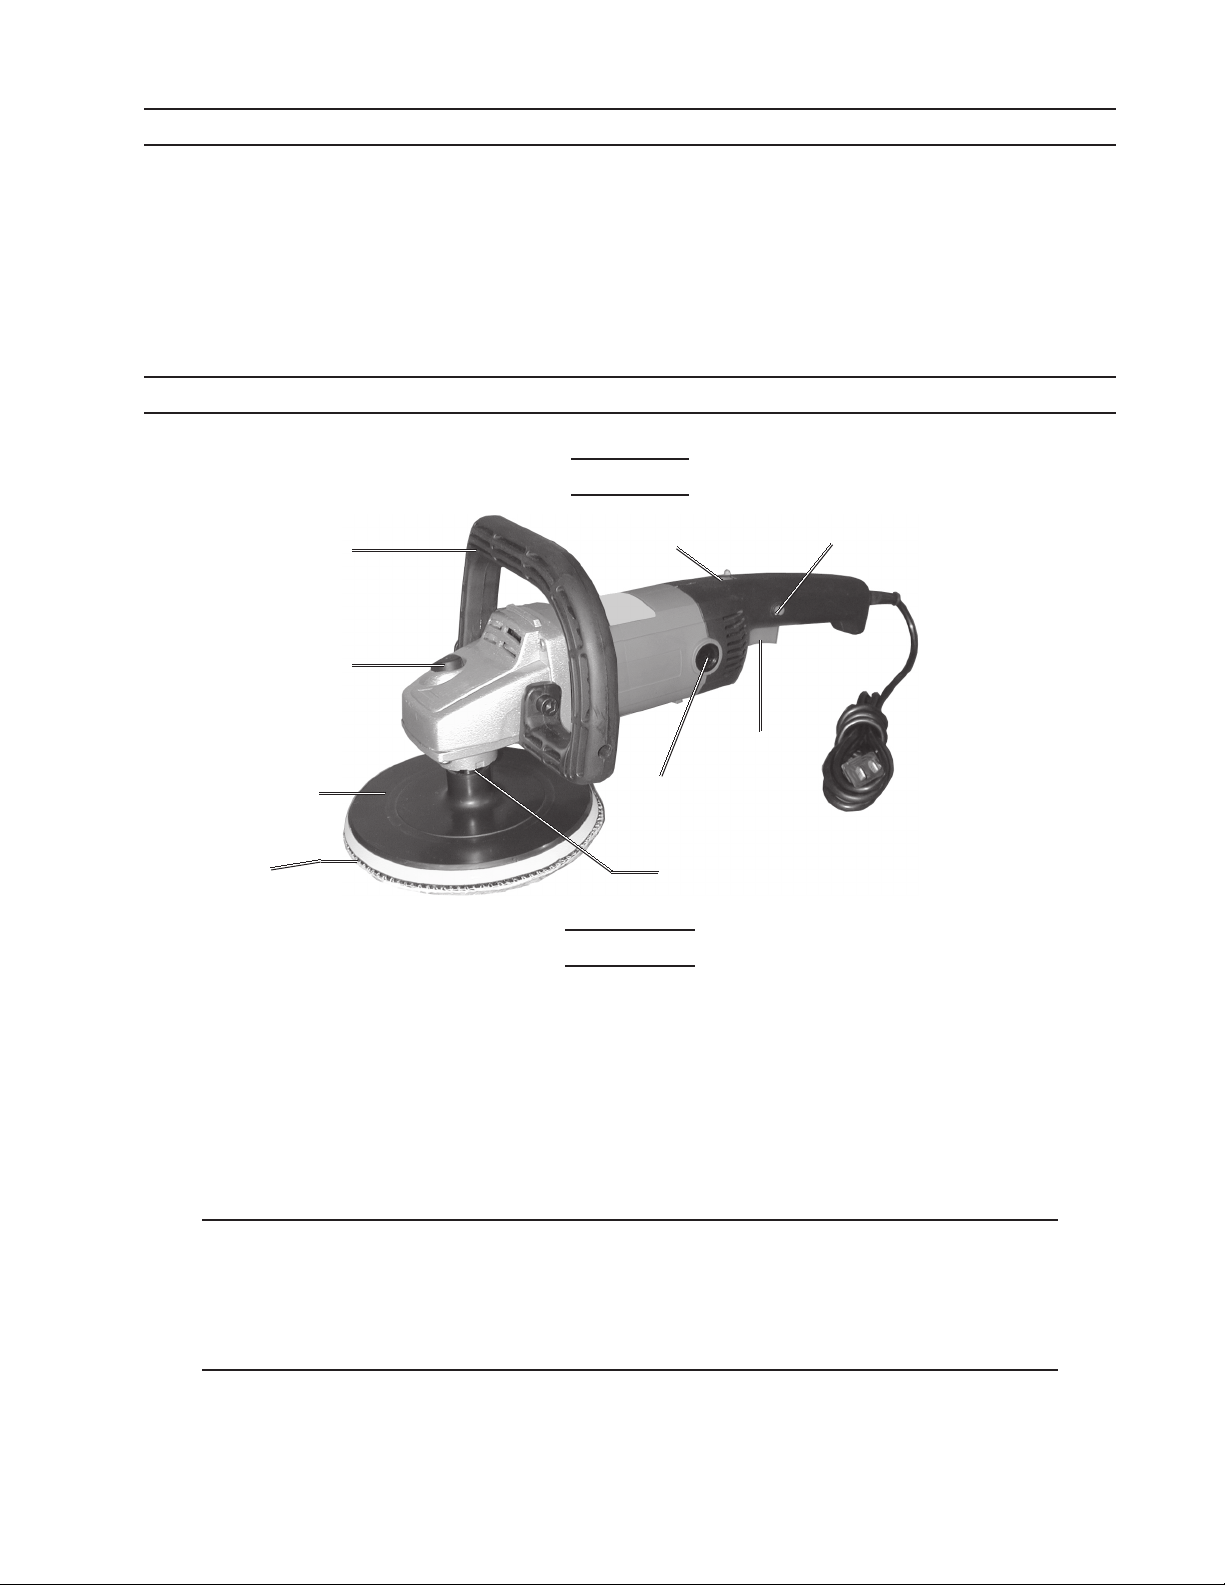
OPERATING INSTRUCTIONS
Controls
Handle (19)
Spindle Lock Cap (17)
Polishing Pad (2)
Sanding Disk (47 or 48)
Speed Adjustment (37)
Switch (36)
Brush Holder
Cover (30)
Spindle (3)
Lock-on Button
Power Cord (41)
Polishing
1. Place a clean Foam Pad (44) securely onto the Polishing Pad (2).
NOTE: Prior to waxing or polishing a vehicle, make sure it’s surface has been thoroughly
washed, and is free of dust, dirt, oil, grease, etc.
2. Apply about two tablespoons of wax (not included) evenly on the Foam Pad (44).
Do not apply the wax directly to the surface of the vehicle. The amount of wax needed
will vary according to the size of the vehicle being waxed.
IMPORTANT
Carefully inspect the condition of the accessory before use and check the accessory
continually during use. If any damage is noted, stop immediately and replace the accessory
with an undamaged one. Harbor Freight Tools cannot be held responsible for damage
caused by using a damaged accessory on this tool.
NOTE: Avoid using too much wax. For additional applications of wax to the Foam Bonnet,
reduce the amount of wax. The Foam Bonnet will not absorb as much wax in subsequent
applications.
REV 06/05
SKU 92623
For technical questions, please call 1-800-444-3353
English
Page 9
Page 10

3. Plug the Power Cord (41) into an electrical extension cord (not included). Then, plug the
extension cord into a grounded, GFCI, 120 volt, electrical outlet.
NOTE: Always start and stop the Polisher while it is held firmly against the surface of the
vehicle. Failure to do so may result in the Bonnet being thrown from the Polishing Pad (2).
4. To start, grip the Polisher firmly with both hands and press in on the Switch (36) trigger.
Press the Lock-on Button to lock the Switch in the On position. Press in on the Switch to
unlock again.
Position the unit on the area to be polished, select the desired speed by rotating the
Speed Adjustment (37) knob, and allow the Polishing Pad (2) to rotate until it has reached
that speed. Keep pressure off of the Polisher/Sander when operating. The Polishing
Bonnet should LIGHTLY contact the polishing surface.
Caution: Only use the lower speeds (1 through 4) for polishing. Otherwise, damage may
occur to the paint being polished. Harbor Freight Tools is not responsible for damage to
the vehicle’s finish due to improper use of this polisher.
5. Begin applying wax to the vehicle.
Apply the wax to all flat surfaces with broad, sweeping strokes in a crisscross pattern.
Apply the wax evenly over the surface of the vehicle, and add additional wax as needed.
6. After the wax has been applied to the vehicle’s surface, release the Switch (36) to its Off
position. Then unplug the Power Cord (41) from the electrical extension cord.
7. Remove the Foam Pad (44) from the Polishing Pad (2) and with your hand and the Foam
Pad (44), apply the wax to all hard to reach areas of the vehicle such as around lights,
door handles, under bumpers, etc.
8. Allow sufficient time for the wax to dry on the vehicle.
9. Place a clean Polishing Bonnet securely onto the Polishing Pad (2). Note: Always tightly
pull the string to secure the Polishing Bonnet. Secure the string and keep it out of the
way by tying several knots.
10. Plug the Power Cord (41) of the Polisher into the electrical extension cord.
NOTE: Always start and stop the Polisher while it is held firmly against the surface of the
vehicle. Failure to do so may result in the Bonnet being thrown from the Polishing Pad (2).
11. To start, grip the Polisher firmly with both hands and press in on the Switch (36) trigger.
Press the Lock-on Button to lock the Switch in the On position. Press in on the Switch to
unlock again.
12. Begin polishing the vehicle by lightly buffing off the wax residue in a circular pattern.
Continue polishing until all the wax residue is removed.
13. When finished, release the Switch (36) to its Off position. Then unplug the Power Cord
(41) from the electrical extension cord. Unplug the extension cord from the electrical
outlet.
14. Remove the Polishing Bonnet from the Polishing Pad (2). With the Polishing Bonnet or
Terry Cloth (46) in your hand, remove the wax from all hard to reach areas of the vehicle.
SKU 92623
For technical questions, please call 1-800-444-3353
English
Page 10
Page 11

Sanding
1. Attach the desired grit Sanding Disk (47 or 48) onto the Polishing Pad (2).
2. Plug the Power Cord (41) of the Polisher/Sander into the electrical extension cord. Then,
plug the extension cord into the grounded, GFCI, 120 volt, electrical outlet.
3. Identify the area you wish to sand. Make sure the power cord will reach that far without
stressing any connections. Place the Polisher/Sander onto the sanding area.
4. To start, grip the Polisher/Sander firmly with both hands and press in on the Switch (36)
trigger. Press the Lock-on Button to lock the Switch in the On position. Press in on the
Switch to unlock again.
5. Position the unit on the area to be sanded, select the desired speed by rotating the Speed
Adjustment (37) knob (1 through 6), and allow the Sanding Disk (1) to rotate until it has
reached that speed. Keep heavy pressure off of the Polisher/Sander when operating.
Allow the sanding disk to do the work.
6. Move the Polisher/Sander in a uniform pattern up and down or side to side as you sand
to ensure even sanding.
7. Periodically, stop the Polisher/Sander and check for possible disc wear. Replace used or
worn sanding discs when necessary.
8. When finished, release the Switch (6) to its Off position. Then unplug the Power Cord
(41) from the electrical extension cord. Unplug the extension cord from the electrical
outlet.
INSPECTION, MAINTENANCE, AND CLEANING
WARNING! Make sure the Power Switch of the Polisher/Sander is in its “OFF” posi-
tion and that the tool is unplugged from its electrical outlet before performing any
inspection, maintenance, or cleaning procedures.
1. Before each use, inspect the general condition of the Polisher/Sander. Check for loose
screws, misalignment or binding of moving parts, cracked or broken parts, damaged
electrical wiring, and any other condition that may affect its safe operation. If abnormal
noise or vibration occurs, have the problem corrected before further use. Do not use
damaged equipment.
2. Periodically recheck all nuts, bolts, and screws for tightness.
3. Store in a clean and dry location.
4. The most common error when waxing/polishing a vehicle is applying too much wax. If
the Foam Pad (44) becomes saturated with wax, polishing will be more difficult and will
take longer. Applying too much wax may also reduce the life of the Foam Pad. If the
Foam Pad continually comes off the Polishing Pad (2) during use, too much wax may
have been applied.
SKU 92623
For technical questions, please call 1-800-444-3353
English
Page 11
Page 12

5. Remove the Foam Pad (44) from the Polishing Pad (2) when the Polisher/Sander is not
in use. This will allow the Polishing Pad to dry and retain its original shape. Wash with
mild soap and water before storing.
6. To prolong Polishing Pad (2) life and shape, store the Polisher Pad face down to keep
the surface flat.
7. The Polishing Bonnet (45) may be machine washed in cold water with mild detergent.
Then hang dry.
8. Use only a clean cloth and mild detergent to clean the body of the Polisher. Do not use
solvents. Do not immerse any part of the tool in liquid.
9. Over time, if the performance of the tool diminishes, or it stops working completely, it may
be necessary to replace the Carbon Brushes (31) by removing the Brush Holder Cover
(30). This procedure should be completed by a qualified technician. If the Carbon Brushes
are not worn down, try cleaning the Carbon Brush tips with an ink eraser.
PARTS LIST
traPnoitpircseDyt'QtraPnoitpircseDyt'Q
1yeKxeH15281#,gniraeB1
2gnihsiloP,daP162dleihSdniW,gniR1
3eldnipS17255x5,paT,wercS2
431x4,elcriCflaH,yeK182rotatS1
561x5,wercS49
6gnirpS,rehsaW403redloHhsurB,revoC2
7tnorF,revoC1130014#,nobraC,hsurB2
8102#,gniraeB1230014#,hsurB,redloH2
92
01egraL,raeG1a43kcaBreppU,revoC1
1121,redneF,gniR15301x3,paT,wercS2
2101x8x21,B511,leetS
3103x5,paT,wercS4a73tnemtsujdAdeepS1
41llehSdaeH1a83kcaBrewoL,revoC1
51kcoL,niP19302x4,wercS4
61kcoL,gnirp
71kcoLeldnipS,paC114rewoP,droC1
8161x8,daeHxeH,wercS224draoBelbaCsserP1
91eldnaH13441x4,paT,wercS2
02101#,gn
12sserPelgnairT,revoC154tennoBgnihsiloP1
224,gnirpS,rehsaW364)nwohston(tennoBhtolCyrreT1
3201x4,wercS374t
42erutamrA184tirG042,ksiDgnidnaS1
,eveelS1a63hctiwS1
S104521#,htaehS1
iraeB144daPmaoF1
3,redneF,gniR133rotoM,gnisuoH1
2011#,gnirpS2
irG06,ksiDgnidnaS1
NOTE: Some parts are listed and shown for illustration purposes only and are not available
SKU 92623
individually as replacement parts.
For technical questions, please call 1-800-444-3353
REV 01/05
English
Page 12
Page 13

ASSEMBLY DIAGRAM
NOTE: Part 46 - Terry Cloth - not shown.
PLEASE READ THE FOLLOWING CAREFULLY
THE MANUFACTURER AND/OR DISTRIBUTOR HAS PROVIDED THE PARTS DIAGRAM IN THIS
MANUAL AS A REFERENCE TOOL ONLY. NEITHER THE MANUFACTURER NOR DISTRIBUTOR
MAKES ANY REPRESENTATION OR WARRANTY OF ANY KIND TO THE BUYER THAT HE OR
SHE IS QUALIFIED TO MAKE ANY REPAIRS TO THE PRODUCT OR THAT HE OR SHE IS QUALIFIED
TO REPLACE ANY PARTS OF THE PRODUCT. IN FACT, THE MANUFACTURER AND/OR
DISTRIBUTOR EXPRESSLY STATES THAT ALL REPAIRS AND PARTS REPLACEMENTS SHOULD
BE UNDERTAKEN BY CERTIFIED AND LICENSED TECHNICIANS AND NOT BY THE BUYER. THE
BUYER ASSUMES ALL RISK AND LIABILITY ARISING OUT OF HIS OR HER REPAIRS TO THE
ORIGINAL PRODUCT OR REPLACEMENT PARTS THERETO, OR ARISING OUT OF HIS OR HER
INSTALLATION OF REPLACEMENT PARTS THERETO.
SKU 92623
For technical questions, please call 1-800-444-3353
REV 01/05
English
Page 13
Page 14

LIMITED 1 YEAR
WARRANTY
Harbor Freight Tools Co. makes every effort to assure that its products meet high quality and durability standards,
and warrants to the original purchaser that this product is free from defects in materials and workmanship for
the period of one year from the date of purchase. This warranty does not apply to damage due directly or
indirectly, to misuse, abuse, negligence or accidents, repairs or alterations outside our facilities, or to lack of
maintenance. We shall in no event be liable for death, injuries to persons or property, or for incidental, contingent,
special or consequential damages arising from the use of our product. Some states do not allow the exclusion
or limitation of incidental or consequential damages, so the above limitation of exclusion may not apply to you.
THIS WARRANTY IS EXPRESSLY IN LIEU OF ALL OTHER WARRANTIES, EXPRESS OR IMPLIED,
INCLUDING THE WARRANTIES OF MERCHANTABILITY AND FITNESS.
To take advantage of this warranty, the product or part must be returned to us with transportation charges
prepaid. Proof of purchase date and an explanation of the complaint must accompany the merchandise. If our
inspection verifies the defect, we will either repair or replace the product at our election or we may elect to
refund the purchase price if we cannot readily and quickly provide you with a replacement. We will return
repaired products at our expense, but if we determine there is no defect, or that the defect resulted from
causes not within the scope of our warranty, then you must bear the cost of returning the product.
This warranty gives you specific legal rights and you may also have other rights which vary from state to state.
3491 Mission Oaks Blvd. • PO Box 6009 • Camarillo, CA 93011 • (800) 444-33533491 Mission Oaks Blvd. • PO Box 6009 • Camarillo, CA 93011 • (800) 444-3353
3491 Mission Oaks Blvd. • PO Box 6009 • Camarillo, CA 93011 • (800) 444-3353
3491 Mission Oaks Blvd. • PO Box 6009 • Camarillo, CA 93011 • (800) 444-33533491 Mission Oaks Blvd. • PO Box 6009 • Camarillo, CA 93011 • (800) 444-3353
SKU 92623
For technical questions, please call 1-800-444-3353
English
Page 14
Page 15

POLISSEUR/PONCEUSE DE
VITESSE VARIABLE DE 7 POUCES
92623
MONTAGE ET INSTRUCTIONS FONCTIONNANTES
IMPORTANT!
Cette édition de langue
française est une traduction
du manuel anglais original
accompagnant ce produit. Si
une partie du manuel anglais
original est inconsistante
avec cette traduction, le
manuel anglais original
gouvernera.
3491 BLVD DE CHÊNES DE MISSION, CAMARILLO, CA 93011
VISITEZ NOTRE SITE INTERNET À HTTP://WWW.HARBORFREIGHT.COM
Le Copyright © 2006 par le Harbor Freight Tools ®. Tous droits réservés. Aucune
portion de ce manuel ou de n’importe quel travail d’art contenu ici ne peut être
reproduite dans aucune forme ou forme sans le consentement rapidement écrit
de Harbor Freight Tools.
Pour les questions techniques et les pièces détachées, appelez-vous s’il vous plaît 1-800-444-3353
Page 16

SPÉCIFICATIONS
riovuoPedecnegixEzH06,)egrahcenucua(serèpma5.4,~V021
essetiVelbairaV;nim-rt7733à002
euqsiDedruednarGsecuop
7
uaesuFedruednarG11-8/5edecuoP
engiLednodroCtnaruocedesirpalésiralopatnedxueDal;sdeip6
sdioP.servil6.6
seri
osseccAelbas042te06:seuqsiDsedredoré'dtiaFel-2
essuoMedtenissuoC-1
lewoTegnopéussiT-1
tennoBudegassiloP-1
tenissuoCudegassiloP-1
E194601
SAUVEZ CE MANUEL
Vous aurez besoin du manuel pour les avertissements de sécurité et les précautions, les
instructions de montage, en fonctionnant et les procédures de maintenance, la liste de pièces
et le diagramme. Gardez votre facture avec ce manuel. Écrivez le nombre de facture sur
l’intérieur de la couverture première. Gardez le manuel et la facture dans un coffre-fort et un
endroit sec pour la référence future.
RÈGLES RÉPANDUES DE SÉCURITÉ
AVERTISSEMENT!
LISEZ ET COMPRENEZ TOUTES LES INSTRUCTIONS. L’échec de suivre toutes
les instructions énumérées peut ci-dessous s’ensuivre dans le décharge
électrique, le feu, et-ou la blessure sérieuse.
SAUVEZ CEUX-CI L’INSTRUCTION
Région de Travail
1. Garder votre région de travail propre et bien allumé. Les bancs encombrés et les
régions sombres invitent des accidents.
2. Ne faire pas marcher d’instruments de pouvoir dans les atmosphères explosives,
comme en présence des liquides inflammables, les gaz, ou la poussière. Les
instruments de pouvoir créent des étincelles qui peuvent enflammer la poussière ou les
exhalaisons.
3. Garder des spectateurs, des enfants et des visiteurs loin en faisant marcher un
instrument de pouvoir.
Les distractions peuvent vous faire perdre le contrôle. Protégez d’autres dans la région
de travail des débris comme les frites et les étincelles. Fournissez des barrières ou des
protecteurs comme nécessaire.
MODÈLE Pour les questions techniques, appelez-vous s’il vous plaît 1-800-444-3353.
92623
Français
Page 2
Page 17

Sécurité Électrique
4. Éviter le contact de corps avec les surfaces mises à la terre comme les tuyaux, les
radiateurs, les variétés et les réfrigérateurs. Il y a un risque augmenté de décharge
électrique si votre corps est mis à la terre.
5. Ne découvrir pas d’instruments de pouvoir pour pleuvoir ou les conditions
mouillées. L’eau entrant dans un instrument de pouvoir augmentera le risque de décharge
électrique.
6. Les instruments mis à la terre doivent être branchés à une prise de courant murale
correctement installée et mise à la terre conformément à tous les codes et aux
ordonnances. N’enlevez jamais la dent d’installer à la terre ou modifiez la prise de
courant de toute façon. N’utilisez pas de prises de courant d’adaptateur. Vérifiez
avec un électricien qualifié si vous êtes douteux quant à si la prise de courant
murale est correctement mise à la terre. Si les instruments devraient électriquement
mal fonctionner ou se décomposer, installer à la terre fournit un sentier de résistance
faible pour emporter l’électricité de l’utilisateur.
7. Les instruments isolés doubles sont équipés avec une prise de courant polarisée
(une lame est plus large que l’autre). Cette prise de courant correspondra dans
une prise de courant murale polarisée seulement à une voie. Si la prise de courant
ne va pas complètement dans la prise de courant murale, inverse la prise de
courant. S’il ne va pas toujours, contactez un électricien qualifié pour installer une
prise de courant murale polarisée. Ne changez pas la prise de courant de toute
façon. L’isolation double élimine le besoin pour le trois fil a mis le cordon de pouvoir à la
terre et a mis le système d’alimentation électrique à la terre.
8. N’abuser pas du Cordon de Pouvoir. N’utilisez jamais le Cordon de Pouvoir pour
porter les instruments ou tirer la Prise de courant d’une prise de courant murale.
Tenez le Cordon de Pouvoir à distance de la chaleur, les bords de pétrole, pointus,
ou les pièces bougeantes. Remplacez des Cordons de Pouvoir faits tort
immédiatement. Les Cordons de Pouvoir Faits tort augmentent le risque de décharge
électrique.
9. En faisant marcher un instrument de pouvoir à l’extérieur, utilisez “W-A” marqué
d’un cordon d’extension en plein air ou “W”. Ces cordons d’extension sont estimés
pour l’utilisation en plein air et réduisent le risque de décharge électrique.
Sécurité Personnalisée
10. Séjour vigilant. La surveillance que vous faites et utilisez le sens commun en faisant
marcher un instrument de pouvoir. N’utilisez pas d’instrument de pouvoir pendant
que fatigué ou sous l’influence de drogues, alcool, ou médication. Un moment
d’inattention en faisant marcher des instruments de pouvoir peut s’ensuivre dans la
blessure personnalisée sérieuse.
11. Robe correctement. N’usez pas de vêtements desserrés ou de bijouterie. Contenez
de longs cheveux. Gardez vos cheveux, vêtements et gants loin de déplacer des
pièces. Les vêtements desserrés, la bijouterie, ou les longs cheveux peuvent être attrapés
dans les pièces bougeantes.
MODÈLE Pour les questions techniques, appelez-vous s’il vous plaît 1-800-444-3353.
92623
Français
Page 3
Page 18

12. Éviter le commencement accidentel. Soyez sûrs que l’Interrupteur de Pouvoir est
éteient avant le fait de brancher. Le fait de porter des instruments de pouvoir avec
votre doigt sur l’Interrupteur de Pouvoir, ou en branchant des instruments de pouvoir
avec l’Interrupteur de Pouvoir sur, invite des accidents.
13. Enlever des clés s’adaptant ou des tourne-à-gauche avant le fait d’allumer
l’instrument de pouvoir. Un tourne-à-gauche ou une clé qui est laissée attachée à une
pièce tournante de l’instrument de pouvoir peuvent s’ensuivre dans la blessure
personnalisée.
14. Ne dépaser pas. Gardez la position nécessaire et l’équilibre à tous moments. La
position nécessaire et l’équilibre permettent le meilleur contrôle de l’instrument de pouvoir
dans les situations inattendues.
15. Utiliser l’équipement de sécurité. Usez toujours la protection d’oeil. Le masque de
filtre, les chaussures de sécurité antidérapantes, le chapeau dur, ou l’audition de la
protection doivent être utilisés pour les conditions appropriées.
Utilisation d’Instrument et Soin
16. Utiliser des attaches (non inclus) ou d’autres façons pratiques de stabiliser et
soutenir la pièce de fabrication à une plate-forme ferme. La possession du travail à
la main ou contre votre corps est instable et peut causer la perte de contrôle.
17. Ne forcer pas l’instrument. Utilisez l’instrument correct de votre application.
L’instrument correct fera le travail mieux et plus sûr au taux auquel il est conçu.
18. N’utiliser pas l’instrument de pouvoir si l’Interrupteur de Pouvoir ne l’allume pas
ou éteie. N’importe quel instrument qui ne peut pas être contrôlé avec l’Interrupteur de
Pouvoir est dangereux et doit être remplacé.
19. Débrancher la Prise de courant de Cordon de Pouvoir de la source de pouvoir
avant le fait de faire n’importe quels ajustages, accessoires changeants, ou le fait
de conserver l’instrument. De telles mesures de sécurité préventives réduisent le risque
de commencer l’instrument par hasard.
20. Le magasin les instruments à l’arrêt hors de portée des enfants et d’autres
personnes sans formation. Les instruments sont dangereux dans les mains
d’utilisateurs sans formation.
21. Maintenir des instruments avec le soin. Continuez à couper des instruments pointus
et propres. Les instruments correctement maintenus avec un tranchant pointu se lieront
moins probablement et sont plus faciles de contrôler. N’utilisez pas d’instrument fait tort.
L’étiquette a fait tort aux instruments “n’utilisent pas” jusqu’à ne réparé.
22. Vérifier pour le défaut d’alignement ou le fait d’attacher de pièces bougeantes, la
fracture de pièces et d’autre condition qui peut affecter l’opération de l’instrument.
Si fait tort, faites assurer l’entretien de l’instrument avant l’utilisation. Beaucoup
d’accidents sont causés par les instruments pauvrement maintenus.
23. Utiliser seulement des accessoires qui sont recommandés par le fabricant pour
votre modèle. Les accessoires qui peuvent être convenables pour un instrument peuvent
devenir les hasardeux quand utilisé sur un autre instrument.
MODÈLE Pour les questions techniques, appelez-vous s’il vous plaît 1-800-444-3353.
92623
Français
Page 4
Page 19

Entretien
24. L’entretien d’instrument doit être exécuté seulement par le personnel de réparation
qualifié. L’entretien ou la maintenance exécutée par le personnel disqualifié pourraient
s’ensuivre dans un risque de blessure.
25. En assurant l’entretien d’un instrument, utilisez des pièces détachées seulement
identiques. Suivez des instructions dans
section
Nettoyante
de ce manuel. L’utilisation de pièces faites sans autorisation ou
la “Inspection, la Maintenance Et la “
d’échec de suivre les instructions de maintenance peut créer un risque de décharge
électrique ou de blessure.
LES RÈGLES DE SÉCURITÉ SPÉCIFIQUES POUR LE POLISSEUR/PONCEUSE
1. Les accessoires doivent être estimés pour au moins la vitesse recommandée sur
l’instrument conseillant l’étiquette. Les roues et d’autres accessoires débordant la
vitesse évaluée peuvent voler à part et causer la blessure.
2. Tenez l’instrument par les surfaces de captage isolées en exécutant une opération
où l’instrument coupant peut contacter des circuits électriques cachés ou son
propre cordon. Contact avec un fil “électriquement stimulé” fera des pièces en métal
découvertes de l’instrument devient “électriquement stimulés” et choquent l’opérateur.
3. Maintenir des étiquettes et des plaques sur le Polisseur / Ponceuse. Ceux-ci portent
des renseignements importants. Si illisible ou l’absence, contactez le Harbor Freight
Tools pour un remplacement.
4. Usez toujours des lunettes de protection d’oeil d’impact de sécurité approuvées
d’ANSI et des gants de travail très résistants en utilisant le Polisseur / Ponceuse.
L’utilisation les artifices de sécurité personnalisés réduit le risque pour la blessure. Les
lunettes de protection d’oeil d’impact de sécurité et les gants de travail très résistants
sont en vente du Harbor Freight Tools.
5. Maintenir un cadre de travail sûr. Gardez la région de travail bien éclairée. Assurez-
vous qu’il y a le cadre de travail environnant adéquat. Gardez toujours la région de travail
sans obstructions, graisse, pétrole, déchets et d’autres débris. N’utilisez pas d’instrument
de pouvoir dans les régions près des produits chimiques inflammables, les poussières
et les vapeurs. N’utilisez pas ce produit dans un endroit humide ou mouillé.
6. Assurer pour lire et comprendre toutes les instructions et les précautions de
sécurité comme exposé dans le manuel du fabricant pour le véhicule que vous cirerez/
polirez.
(1)
7. En utilisant un instrument de pouvoir à main, maintenez toujours une prise ferme
sur l’instrument avec les deux mains pour résister au moment de torsion de départ.
8. Tenez toujours le cordon d’extension à distance de déplacer des pièces sur
l’instrument. Éloignez-le de la terre et loin de l’eau.
9. Éviter le commencement inconscient. Assurez-vous que vous êtes disposés à
commencer le travail avant le fait d’allumer le Polisseur / Ponceuse.
MODÈLE Pour les questions techniques, appelez-vous s’il vous plaît 1-800-444-3353.
92623
Français
Page 5
Page 20

10. Ne forcer pas le Polisseur/Ponceuse. Cet instrument fera le travail mieux et plus sûr à
la vitesse et à la capacité à laquelle il a été conçu. Ne forcez pas les coussinets contre le
véhicule étant ciré/poli. Appliquez la pression modérée, en permettant au Bonnet de
tourner librement sans être forcé.
11. En cirant/polissant un véhicule, ne faites pas marcher le moteur du véhicule dans
une région fermée. L’oxyde de carbone est un incolore, sans odeur, du gaz émis
du moteur de fait de faire marcher d’un véhicule qui peut causer la blessure sévère
ou la mort si inhalé.
12. Ne posez jamais le Polisseur/Ponceuse avant que le Coussinet de Polissage (2) ne
soit venu à un arrêt complet. Le Coussinet Soutenant peut saisir la surface et tirer
l’instrument de votre contrôle.
13. Assurer que le véhicule étant ciré/poli est libre des tesson en métaux et d’autre
matière étrangère qui pourrait faire tort à l’instrument.
14. Ne laissez jamais le Polisseur / Ponceuse sans surveillance quand il est branché à
une prise de courant murale électrique. Éteignez l’instrument et débranchez-le de sa
prise de courant murale électrique avant le départ.
15. Débranchez toujours le Polisseur / Ponceuse de sa prise de courant murale
électrique avant le fait d’exécuter n’importe quelle inspection, maintenance, ou le fait
de nettoyer des procédures.
16. Quand le fait d’éroder, utilisez seulement 7” coussinets de fait d’éroder avec un
crochet et une boucle en arrière qui fait partie solidement du Coussinet Soutenant.
17. Relier à un GFCI. Reliez toujours le Cordon de Ligne à une prise de courant murale
électrique protégée par un Interrupteur de Circuit de Faute de Terre (GFCI).
18. N’utilisez jamais des accessoires estimés de moins de 3500 tr-min.
AVERTISSEMENT! Évitez la blessure sérieuse. N’installez jamais la lame de scier
circulaire inclinée de carbure ou d’acier pour l’utilisation sur ce Ponceuse/Polisseur.
N’installez jamais une lame de gravure sur bois, en sculptant le disque avec les coupeurs
de chaîne de scier, ou une coupure sculptant le disque sur ce Ponceuse/Polisseur.
N’installez jamais des disques de coupe abrasifs et des roues, des roues de battement,
des balais métalliques, ou des balais de roue métalliques.
AVERTISSEMENT! Les gens avec les stimulateurs cardiaques devraient consulter leur
docteur (s) avant le fait d’utiliser ce produit. L’opération d’équipement électrique dans la
proche proximité à un stimulateur cardiaque du cœur pourrait causer l’interférence ou
l’échec du stimulateur cardiaque.
AVERTISSEMENT! Un peu de poussière créée par le fait d’éroder de pouvoir, le sciage,
le grincement, le forage et d’autres activités de construction, contient des produits
chimiques connus (à l’État de Californie) pour causer le cancer, les anomalies
congénitales ou d’autre mal reproducteur. Quelques exemples de ces produits
chimiques sont : le plomb des peintures à base de plomb, la silice cristalline des briques
et le ciment ou d’autres produits de maçonnerie, l’arsenic et le chrome du bois de
construction chimiquement traité. Votre risque de ces expositions varie, selon combien
de fois vous faites ce type de travail. Réduire votre exposition à ces produits chimiques
MODÈLE Pour les questions techniques, appelez-vous s’il vous plaît 1-800-444-3353.
92623
Français
Page 6
Page 21

: le travail dans une région bien aérée et un travail avec l’équipement de sécurité approuvé,
comme ces masques de filtre qui sont spécialement conçus pour éliminer des particules
microscopiques. (Le Code § 25249.5 de Sécurité et de Santé de Californie,
et seq.
)
INSTALLER À LA TERRE
AVERTISSEMENT!
Improprement le branchement du fil d’installer à la terre peut s’ensuivre dans le
risque de décharge électrique. Vérifiez avec un électricien qualifié si vous êtes
douteux quant à si la prise de courant murale est correctement mise à la terre. Ne
modifiez pas la prise de courant de cordon de pouvoir fournie avec l’instrument
ou le produit. N’enlevez jamais la dent d’installer à la terre de la prise de courant.
N’utilisez pas l’instrument si le cordon de pouvoir ou la prise de courant sont
faits tort. Si fait tort, faites-le réparer par un établissement d’entretien avant
l’utilisation. Si la prise de courant ne correspondra pas à la prise de courant murale,
faites installer une prise de courant murale nécessaire par un électricien qualifié.
Instruments Mis à la terre: Instruments avec Trois Prises de
courant de Dent
1. Les instruments marqués avec “Installer à la terre de Voulu” ont un trois cordon métallique
et trois dent mettant la prise de courant à la terre. La prise de courant doit être reliée à
une prise de courant murale correctement mise à la terre. Si l’instrument devrait
électriquement mal fonctionner ou se décomposer, installer à la terre fournit un sentier
de résistance faible pour emporter l’électricité de l’utilisateur, en réduisant le risque de
décharge électrique. (Voir l’Image A.)
2. La dent d’installer à la terre dans la prise de courant est reliée par le fil vert à l’intérieur
du cordon au système d’installer à la terre dans l’instrument. Le fil vert dans le cordon
doit être le seul fil relié au système d’installer à la terre de l’instrument et ne doit jamais
être attaché à un terminus électriquement “de force”. (Voir l’Image A.)
3. Votre instrument doit être branché à une prise de courant murale appropriée, a
correctement installé et a mis à la terre conformément à tous les codes et aux
ordonnances. La prise de courant et la prise de courant murale devraient ressembler à
ceux en illustration suivante. (Voir l’Image A.)
Image A
MODÈLE Pour les questions techniques, appelez-vous s’il vous plaît 1-800-444-3353.
92623
Image B
Français
Page 7
Page 22

Instruments Isolés Doubles : Instruments avec les Prises de courant de Deux dents
4. Ce produit a une prise de courant polarisée (une lame est plus large que l’autre)
comme une caractéristique pour réduire le risque de décharge électrique. Cette
prise de courant correspondra dans une prise de courant murale polarisée seulement à
une voie. Si la prise de courant ne va pas complètement dans la prise de courant murale,
inverse la prise de courant. S’il ne va pas toujours, contactez un électricien qualifié.
N’utilisez jamais avec un cordon d’extension à moins que la prise de courant ne puisse
être complètement insérée. Ne changez pas la prise de courant.
5. Les instruments marqués “Double Isolé” n’exigent pas installer à la terre. Ils ont un système
d’isolation double spécial qui satisfait des exigences OSHA et se plie aux normes
applicables d’Underwriters Laboratories, Inc., l’Association Standard canadienne et le
Code Électrique national. (Voir l’Image B.)
6. Les instruments isolés doubles peuvent être utilisés dans n’importe laquelle des prises
de courant murale de 120 volts montrées en illustration suivante.
(Voir l’Image B.)
CORDONS D’EXTENSION
1. Les instruments mis à la terre exigent un trois cordon d’extension métallique. Les
instruments Isolés doubles peuvent utiliser deux ou trois cordon d’extension métallique.
2. Comme la distance des augmentations de prise de courant murale d’alimentation, vous
devez utiliser un plus lourd cordon d’extension de calibre. L’utilisation des cordons
d’extension avec le fil insuffisamment de grandeur cause une baisse sérieuse dans le
voltage, en s’ensuivant dans la perte de pouvoir et de dommage d’instrument possible.
(Voir le Tableau A.)
3. Plus petit le nombre de calibre du fil, plus grand la capacité du cordon. Par exemple, un
14 cordon de calibre peut porter un plus haut courant qu’un 16 cordon de calibre.
(Voir le Tableau A.)
4. En utilisant plus qu’un cordon d’extension pour créer la longueur totale, assurez-vous
que chaque cordon contient au moins la grandeur métallique minimale exigée.
(Voir le Tableau A.)
5. Si vous utilisez un cordon d’extension de plus qu’un instrument, ajoutez les ampères de
plaque et utilisez la somme pour déterminer la grandeur de cordon minimale voulue.
(Voir le Tableau A.)
6. Si vous utilisez un cordon d’extension dehors, assurez-vous qu’il est marqué avec le
suffixe “W-A” (“W” au Canada) pour indiquer que c’est acceptable pour l’utilisation en
plein air.
MODÈLE Pour les questions techniques, appelez-vous s’il vous plaît 1-800-444-3353.
92623
Français
Page 8
Page 23

7. Assurer que votre cordon d’extension est correctement télégraphié et dans la bonne
condition électrique. Remplacez toujours un cordon d’extension fait tort ou faites-le
réparer par un électricien qualifié avant le fait de l’utiliser.
8. Protéger vos cordons d’extension des objets pointus, la chaleur excessive et les régions
humides ou mouillées.
Tableau A
LE CALIBRE MÉTALLIQUE MINIMAL RECOMMANDÉ POUR L'EXTENSION CORDS*
LES AMPÈRES
DE PLAQUE
(à la Pleine
charge)
0 – 2.0 18 18 18 18 16
2.1 – 3.4 18 18 18 16 14
3.5 – 5.0 18 18 16 14 12
5.1 – 7.0 18 16 14 12 12
7.1 – 12.0 16 14 12 10 -
12.1 – 16.0 14 12 10 - -
16.1 – 20.0 12 10 - - -
* Basé sur le fait de limiter le voltage de ligne tombe à cinq volts à 150 % des ampères évalués.
25
Pieds
(120 volts)
LONGUEUR DE CORDON D'EXTENSION
50
Pieds
75
Pieds
100
Pieds
150
Pieds
SYMBOLOGY
Tableau B
Double Isolé
Ass ociation de Normes
Canadienne
Underwriters Laboratories,
Inc.
V ~
A
no
xxxx/min.
Courant alternatif de Volts
Ampères
Aucune Révolut ion de Charge
par Minute (TR-MIN)
DÉFAISANT
En défaisant, vérifiez pour vous assurer que toutes les pièces sont incluses. Faites allusion à
la section de Montage et le Dessin de montage et la Liste de Pièces à l’extrémité de ce manuel.
Si des pièces manquent ou cassées, appelez s’il vous plaît le Harbor Freight Tools au nombre
sur la couverture de ce manuel aussitôt que possible.
MODÈLE Pour les questions techniques, appelez-vous s’il vous plaît 1-800-444-3353.
92623
Français
Page 9
Page 24

INSTRUCTIONS DE MONTAGE
Prudence : Vérifiez que le Cordon de Pouvoir (41) de Ponceuse / le Polisseur est non
branché de son cordon d’extension ou prise de courant murale avant de faire n’importe
quels ajustages à l’instrument.
1. Appuyer dans la Capsule de Serrure de Fuseau (17) pour empêcher l’arbre de Fuseau
de tourner.
2. Visser le Coussinet de Polissage (2) en sens inverse des aiguilles d’une montre sur le
Fuseau (3) jusqu’à ce que ce soit stable. Lâchez la Capsule de Serrure de Fuseau (17).
LE FAIT DE FAIRE MARCHER DES INSTRUCTIONS
Commandes
Poignée (19)
Capsule de Serrure
de Fuseau (17)
Polissage de
Coussinet (2)
Disque de Fait d'érode
(47 ou 48)
Ajustage de Vitesse (37)
Interrupteur
(36)
Balai de carbone
la Couverture de
Support (30)
Fuseau (3)
La serrure - sur le Bouton
Cordon de
Pouvoir (41)
Polissage
1. Placer un Coussinet de Mousse propre (44) solidement sur le Coussinet de Polissage
(2).
NOTEZ : Avant de cirer ou polir un véhicule, assurez-vous que c’est la surface a été tout à fait
lavé et est sans poussière, crasse, pétrole, graisse, etc.
2. Appliquer environ deux cuillères à soupe de cire (non inclus) uniformément sur le
Coussinet de Mousse (44).
N’appliquer pas la cire directement à la surface du véhicule. La quantité de cire nécessaire
variera selon la grandeur du véhicule étant ciré.
IMPORTANT
Inspectez soigneusement la condition de l’annexe avant l’utilisation et vérifiez l’annexe
constamment pendant l’utilisation. Si un dommage est noté, arrêtez-vous immédiatement et
remplacez l’annexe avec un non endommagé. Le Harbor Freight Tools ne peut pas être
tenu responsable du dommage causé en utilisant une annexe faite tort sur cet instrument.
MODÈLE Pour les questions techniques, appelez-vous s’il vous plaît 1-800-444-3353.
92623
Français
Page 10
Page 25

NOTEZ : Évitez d’utiliser trop de cire. Pour les applications supplémentaires de cire au Bonnet
de Mousse, réduisez la quantité de cire. Le Bonnet de Mousse n’absorbera pas si beaucoup
de cire dans les applications ultérieures.
3. Brancher le Cordon de Pouvoir (41) à un cordon d’extension électrique (non inclus).
Alors, branchez le cordon d’extension à un mis à la terre, GFCI-protégé, 120 volts, une
prise de courant murale électrique.
NOTEZ: Commencez Toujours et arrêtez le Polisseur pendant qu’il est tenu fermement contre
la surface du véhicule. L’échec de faire ainsi peut s’ensuivre dans le Bonnet étant lancé du
Coussinet de Polissage (2).
4. Commencer, serrer le Polisseur fermement avec les deux mains et presse dans sur
l’Interrupteur (36) la manette. Appuyez sur la Serrure - sur le Bouton pour enfermer
l’Interrupteur le Sur la position. Appuyez dans sur l’Interrupteur pour ouvrir de nouveau.
Placer l’unité sur la région à être polie, choisir le désiré passent à toute vitesse en faisant
tourner l’Ajustage de Vitesse (37) le bouton et permettent au Coussinet de Polissage (2)
de tourner jusqu’à ce qu’il ait atteint cette vitesse. Éloignez la pression du Polisseur/
Ponceuse en faisant marcher. Le Bonnet de Polissage devrait LÉGÈREMENT contacter
la surface de polissage.
Prudence: Utilisez Seulement les vitesses plus faibles (1 à 4) du polissage. Autrement,
le dommage peut se produire à la peinture étant polie. Le Harbor Freight Tools n’est pas
responsable du dommage à la fin du véhicule en raison de l’utilisation impropre de ce
polisseur.
5. Commencer à appliquer la cire au véhicule.
Appliquer la cire à toutes les surfaces plates avec les balayures, les larges coups dans
un mouvement sillonne. Appliquez la cire uniformément sur la surface du véhicule et
ajoutez la cire supplémentaire comme nécessaire.
6. Après que la cire a été appliquée à la surface du véhicule, lâchez l’Interrupteur (36) à
son Éteier la position. Débranchez alors le Cordon de Pouvoir (41) du cordon d’extension
électrique.
7. Enlever le Coussinet de Mousse (44) du Coussinet de Polissage (2) et avec votre main
et le Coussinet de Mousse (44), appliquez la cire à tous durement pour atteindre des
régions du véhicule comme environ les lumières, les pognées, sous les pare-chocs, etc.
8. Permettre au temps suffisant pour la cire de vous sécher sur le véhicule.
9. Placer un Bonnet de Polissage propre solidement sur le Coussinet de Polissage (2).
Notez: Tirez Toujours fermement la ficelle pour stabiliser le Bonnet de Polissage.
Stabilisez la ficelle et gardez-le de la voie en attachant plusieurs nœuds.
10. Brancher le Cordon de Pouvoir (de 41) du Polisseur dans le cordon d’extension électrique.
NOTEZ: Commencez Toujours et arrêtez le Polisseur pendant qu’il est tenu fermement contre
la surface du véhicule. L’échec de faire ainsi peut s’ensuivre dans le Bonnet étant lancé du
Coussinet de Polissage (2).
MODÈLE Pour les questions techniques, appelez-vous s’il vous plaît 1-800-444-3353.
92623
Français
Page 11
Page 26

11. Commencer, serrer le Polisseur fermement avec les deux mains et presse dans sur
l’Interrupteur (36) la manette. Appuyez sur la Serrure - sur le Bouton pour enfermer
l’Interrupteur le Sur la position. Appuyez dans sur l’Interrupteur pour ouvrir de nouveau.
12. Commencer à polir le véhicule en en polissant légèrement du résidu de cire dans un
mouvement circulaire. Continuez à polir jusqu’à ce que tout le résidu de cire ne soit
enlevé.
13. Quand fini, lâchez l’Interrupteur (36) à son “éteier” la position. Débranchez alors le Cordon
de Pouvoir (41) du cordon d’extension électrique. Débranchez le cordon d’extension de
la prise de courant murale électrique.
14. Enlever le Bonnet de Polissage du Coussinet de Polissage (2). Avec le Bonnet de
Polissage ou Tissu éponge Cloth (46) dans votre main, enlevez la cire de toutes les
régions dures-à-portée du véhicule.
Fait d’éroder
1. Attacher le sable désiré Érodant le Disque (47 ou 48) sur le Coussinet de Polissage (2).
2. Brancher le Cordon de Pouvoir (de 41) du Polisseur/Ponceuse dans le cordon d’extension
électrique. Alors, branchez le cordon d’extension au mis à la terre, GFCI, 120 volts, la
prise de courant murale électrique.
3. Identifier la région que vous voulez éroder. Assurez-vous que le cordon de pouvoir
l’atteindra loin sans insister sur n’importe quelles connexions. Placez le Polisseur/
Ponceuse sur la région de fait d’éroder.
4. Commencer, serrer le Polisseur/Ponceuse fermement avec les deux mains et presse
dans sur l’Interrupteur (36) la manette. Appuyez sur la Serrure - sur le Bouton pour enfermer
l’Interrupteur le Sur la position. Appuyez dans sur l’Interrupteur pour ouvrir de nouveau.
5. Placer l’unité sur la région à être érodée, choisir le désiré passent à toute vitesse en
faisant tourner l’Ajustage de Vitesse (37) le bouton (1 à 6) et permettent au Disque de
Fait d’éroder (1) de tourner jusqu’à ce qu’il ait atteint cette vitesse. Éloignez la lourde
pression du Polisseur/Ponceuse en faisant marcher. Permettez au disque de fait d’éroder
de faire le travail.
6. Déplacer le Polisseur/Ponceuse dans un dessin uniforme en haut et en bas ou un côté
au côté comme vous érodez pour garantir même le fait d’éroder.
7. Périodiquement, arrêtez le Polisseur/Ponceuse et vérifiez pour l’usure de disque possible.
Remplacez des disques de fait d’éroder utilisés ou usés si nécessaire.
8. Quand fini, lâchez l’Interrupteur (6) à son “Éteier” la position. Débranchez alors le Cordon
de Pouvoir (41) du cordon d’extension électrique. Débranchez le cordon d’extension de
la prise de courant murale électrique.
MODÈLE Pour les questions techniques, appelez-vous s’il vous plaît 1-800-444-3353.
92623
Français
Page 12
Page 27

L’INSPECTION, LA MAINTENANCE ET LE NETTOYAGE
AVERTISSEMENT! Assurez-vous que l’Interrupteur de Pouvoir du Polisseur/Ponceuse
est dans son “ÉTEIER” la position et que l’instrument est non branché de sa prise de
courant murale électrique avant le fait d’exécuter n’importe quelle inspection,
maintenance, ou le fait de nettoyer des procédures.
1. Avant chaque utilisation, inspectez la condition répandue du Polisseur/Ponceuse.
Vérifiez pour les vis desserrées, le défaut d’alignement ou le fait d’attacher de pièces
bougeantes, pièces craquées ou cassées, a fait tort aux circuits électriques et à autre
condition qui peut affecter son opération sûre. Si le bruit anormal ou la vibration se
produisent, faites corriger le problème avant l’utilisation de plus. N’utilisez pas
d’équipement fait tort.
2. Revérifiez périodiquement tous les écrous, les boulons et les vis pour l’étroitesse.
3. Magasin dans un endroit propre et sec.
4. L’erreur la plus commune en cirant/polissant un véhicule applique trop de cire. Si le
Coussinet de Mousse (44) devient saturé avec la cire, le polissage sera plus difficile et
prendra plus de temps. L’application de trop de cire peut aussi réduire la durée du
Coussinet de Mousse. Si le Coussinet de Mousse s’enlève constamment le Coussinet
de Polissage (2) pendant l’utilisation, trop de cire peut avoir été appliquée.
5. Enlever le Coussinet de Mousse (44) du Coussinet de Polissage (2) quand le Polisseur/
Ponceuse n’est pas dans l’utilisation. Cela permettra au Coussinet de Polissage de sécher
et retenir sa forme originale. Lavez-le avec le savon léger et l’eau avant le fait de
conserver.
6. Pour prolonger le Coussinet de Polissage (2) la durée et la forme, conservez le visage
en bas de Coussinet de Polisseur pour garder l’appartement de surface.
7. Le Bonnet de Polissage (45) peut être lavé de machine dans l’eau froide avec le détersif
léger. Suspendez-le alors sec.
8. Utiliser seulement du tissu propre et du détersif léger pour nettoyer le corps du Polisseur.
N’utilisez pas de solvants. Ne plongez pas de pièce de l’instrument dans le liquide.
9. Au cours du temps, si la performance de l’instrument diminue, ou il arrête de travailler
complètement, il peut être nécessaire de remplacer les Balais de carbone (31) en enlevant
la Couverture de Support de Balai de carbone (30). Cette procédure devrait être accomplie
par un technicien qualifié. Si les Balais de carbone ne sont pas usés, essayez de nettoyer
les bouts de Balai de carbone avec une gomme d’encre.
LISEZ S’IL VOUS PLAÎT LE SUIVANT SOIGNEUSEMENT
LE FABRICANT ET-OU LE DISTRIBUTEUR A FOURNI LA LISTE DE PIÈCES ET LE DIAGRAMME DE MONTAGE
DANS CE MANUEL COMME UN INSTRUMENT DE RÉFÉRENCE SEULEMENT. AUCUN LE FABRICANT OU
LE DISTRIBUTEUR FONT N’IMPORTE QUELLE REPRÉSENTATION OU GARANTIE DE N’IMPORTE QUELLE
SORTE À L’ACHETEUR QU’IL OU ELLE EST AUTORISÉ POUR FAIRE N’IMPORTE QUELLES RÉPARATIONS
AU PRODUIT, OU QU’IL OU ELLE EST AUTORISÉ POUR REMPLACER N’IMPORTE QUELLES PIÈCES DU
PRODUIT. EN FAIT, LE FABRICANT ET-OU LE DISTRIBUTEUR DÉCLARE EXPRESSÉMENT QUE TOUTES
LES RÉPARATIONS ET LES REMPLACEMENTS DE PIÈCES DEVRAIENT ÊTRE ENTREPRIS PAR LES
TECHNICIENS DIPLÔMÉS ET AGRÉÉS ET PAS PAR L’ACHETEUR. L’ACHETEUR SUPPOSE TOUT LE RISQUE
ET LA RESPONSABILITÉ SURVENANT DU FAIT DE SES RÉPARATIONS AU PRODUIT ORIGINAL OU AUX
PIÈCES DÉTACHÉES Y, OU SURVENANT DU FAIT DE SON INSTALLATION DE PIÈCES DÉTACHÉES Y.
MODÈLE Pour les questions techniques, appelez-vous s’il vous plaît 1-800-444-3353.
92623
Français
Page 13
Page 28

LISTE DE PIÈCES
ecèiPnoitpircseDétitnauQecèiPnoitpircseDétitnauQ
1enogaxeH'délC15281#reilaP1
2tenissuoCedegassiloP162tnevedruetcetorpeduaennA1
3uaesuF17255x5teniboRedsiV2
431x4elcrec-im
561x5siV492011#spmetnirP2
6erèinatnirPellednoR403troppuSederutrevuoCalenobracedialaB2
7erèimerPerutre
8102#reilaP1230014#troppuSenobracedialaB2
923euob-edraGeduaennA133elibomotuAnoitatibaH1
01e
1121euob-edraGeduaennA15301x3teniboRedsiV2
2101x8x21,B511reica'Det
3103x5teniboRedsiV4a73essetiVedegatsujA1
41etêtedllehS1a83erutrevuoCelbiaf-sulp-erèirrA1
51er
61erurreSedspmetnirP104521#uaerruoF1
71uaesuFederurreSedeluspaC114riovuoPednodroC1
8161x8enog
91eéngioP13441x4teniboRedsiV2
02101#reilaP144essuoMedtenissuoC1
12elgnairT
224erèinatnirPellednoR364)értnomnon(htolCegnopéussitedtennoBeL1
3201x4s
42erutamrA184elbaS042,redoré'dtiaFedeuqsiD1
eDedélC182rotatS1
vuoC1130014#enobracedialaB2
ganergnEdnarG1a43erutrevuoCerueirépus-erèirrA1
tehcoPaL1a63ruetpurretnI1
urreSedelgnipÉ19302x4siV4
axeH'detêTedsiV224eélbâCehcnalPalruszeyuppA1
edesserPederutrevuoC154tennoBudegassiloP1
iV374elbaS06,redoré'dtiaFedeuqsiD1
LIMITÉ GARANTIE
DE 1 ANNÉE
Harbor Freight Tools Co fait tout le possible pour assurer que ses produits rencontrent la haute qualité et les
normes de durabilité et les mandats à l’acheteur original que ce produit est libre des défauts dans les matériaux et
le travail professionnel pour la période d’un an de la date de l’achat. Cette garantie ne fait pas une demande au
dommage dû directement ou indirectement, au mauvais usage, l’abus, la négligence ou les accidents, les réparations
ou les modifications à l’extérieur de notre équipement, ou au manque de maintenance. Nous ne serons en aucun
cas responsables pour la mort, les blessures aux personnes ou à la propriété, ou pour les dommages accessoires,
contingents, spéciaux ou importants émanant de l’utilisation de notre produit. Quelques états fédéraux ne permettent
pas l’exclusion ou la restriction de dommages accessoires ou importants, donc la susdite restriction d’exclusion
peut ne pas s’appliquer à vous. CETTE GARANTIE EST EXPRESSÉMENT AU LIEU DE TOUTES LES AUTRES
GARANTIES, L’EXPRESS OU IMPLIQUÉE, EN INCLUANT LES GARANTIES DE VALEUR MARCHANDE ET DE
CONFORMITÉ.
Pour profiter de cette garantie, le produit ou la pièce doivent nous être rendus avec les charges de transport
payées d’avance. La preuve de date d’achat et d’une explication de la plainte dans l’anglais doit accompagner les
marchandises. Si notre inspection vérifie le défaut, nous ou réparerons ou remplacerons le produit à notre élection
ou nous pouvons choisir de rembourser le prix d’achat si nous ne pouvons pas sans hésiter et vite vous fournir un
remplacement. Nous rendrons des produits réparés à nos frais, mais si nous déterminons qu’il n’y a aucun défaut,
ou que le défaut est provenu des causes pas dans les limites de notre garantie, alors vous devez porter le prix de
rendre le produit.
Cette garantie vous donne des droits juridiques spécifiques et vous pouvez aussi avoir d’autres droits qui varient
d’état fédéral à l’état fédéral.
3491 Mission Oaks Blvd. • PO Box 6009 • Camarillo, CA 93011 • (800) 444-33533491 Mission Oaks Blvd. • PO Box 6009 • Camarillo, CA 93011 • (800) 444-3353
3491 Mission Oaks Blvd. • PO Box 6009 • Camarillo, CA 93011 • (800) 444-3353
3491 Mission Oaks Blvd. • PO Box 6009 • Camarillo, CA 93011 • (800) 444-33533491 Mission Oaks Blvd. • PO Box 6009 • Camarillo, CA 93011 • (800) 444-3353
MODÈLE Pour les questions techniques, appelez-vous s’il vous plaît 1-800-444-3353.
92623
Français
Page 14
Page 29

DIAGRAMME DE MONTAGE
NOTEZ : La pièce 46 - Tissu éponge Cloth - non montré.
NOTEZ: Quelques pièces sont énumérées et montrées pour les buts d’illustration seulement et ne sont pas en
vente individuellement comme les pièces détachées.
MODÈLE Pour les questions techniques, appelez-vous s’il vous plaît 1-800-444-3353.
92623
Français
Page 15
 Loading...