

Page 1
GRAVITY SPRAY GUN
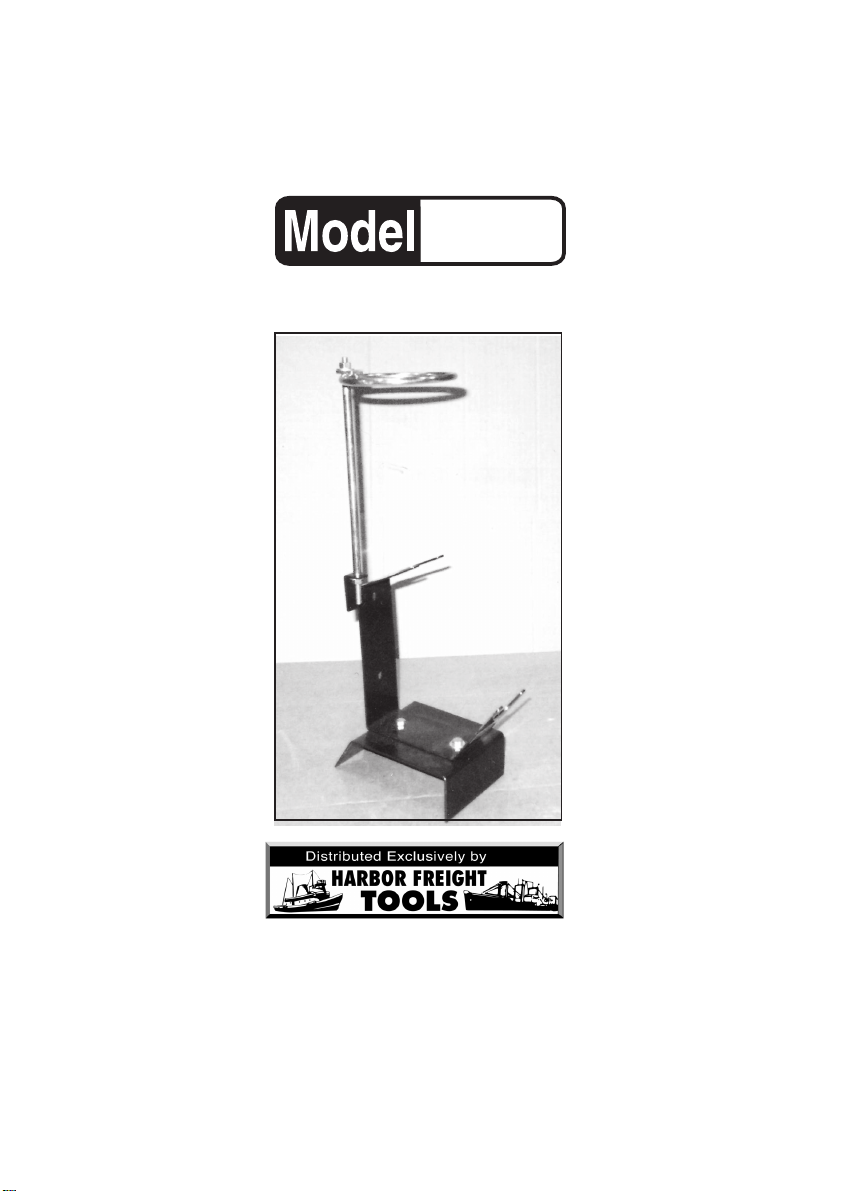
HOLDER
91603
ASSEMBLY AND OPERATING INSTRUCTIONS
®
3491 Mission Oaks Blvd., Camarillo, CA 93011
Visit our Web site at http://www.harborfreight.com
Copyright © 2004 by Harbor Freight Tools®. All rights reserved. No portion of this
manual or any artwork contained herein may be reproduced in any shape or form
without the express written consent of Harbor Freight Tools.
For technical questions and replacement parts, please call 1-800-444-3353
Page 2

Specifications
ITEM
Overall Dimensions
Construction
7-3/4” L X 4” W X 14-1/8” H X 20-5/8” Dia.
Alloy Steel Frame
DESCRIPTION
Zinc-Plated Spray Gun Holding Ring
Gun Holder Dimensions
Upper Holder 1-3/16” W X 1-1/2” D
Bottom Holder 1-3/16” W X 1-1/8” D
The Spray Gun Holder holds most cup style gravity feed spra y guns. Included is a
removable strainer holder to make refilling the spray cup faster and easier.
Save This Manual
You will need the manual for the safety warnings and precautions, assembly instructions, operating and maintenance procedures, parts list and diagram. K eep your in voice with
this manual. Write the inv oice n umber on the inside of the front cover. Keep the manual and
invoice in a safe and dry place for future reference.
Safety Warnings and Precautions
WARNING: When using tool, basic safety precautions should always be followed to
reduce the risk of personal injury and damage to equipment.
Read all instructions before using this product!
1. Keep work area clean. Cluttered areas invite injuries.
2. Keep children away. Children must ne ver be allowed in the work area. Do not let children
be near this product. This product can tip over and cause injury.
3. Dress properly. Do not wear loose clothing or je welry as they can be caught in moving
parts.
4. Use eye protection. Always wear ANSI approved impact safety goggles when using
this product. Use Paint Spraying equipment in well v entilated areas. Wear a face mask
and protective goggles when spraying. Avoid using near flame as most paints are
combustible.
5. Do not overreach. Keep proper footing and balance at all times when using this product.
Be sure this product is level after assembly.
6. Replacement parts. When servicing, use only identical replacement parts. Use of an y
other parts will void the warranty.
7. When spray painting always adhere to all the instructions and safety w arnings provided
in the painting manual of the spray gun and the paint being used.
8. Avoid sharp edges. Machined edges may cause injury if handled without caution.
Warning: The warnings, cautions, and instructions discussed in this instruction man ual cannot
cover all possible conditions and situations that may occur. It must be understood by
the operator that common sense and caution are factors which cannot be built into this
product, but must be supplied by the operator.
SKU 91603 Page 2
For technical questions, please call 1-800-444-3353.
Page 3

Unpacking
When unpacking, check to make sure the f ollowing parts are included that are listed
on Page 4. If any parts are missing or broken, please call Harbor F reight Tools at the
number on the cover of this manual.
Assembly and Usage Instructions
The Gravity Spray Gun Holder holds most cup style GRAVITY FEED spray guns.
1. At one end of the Steel Rod (4), attach Ring Holder (3) using a Washer (2) on
each side of the Ring Holder and Tighten with Nut (1). This Ring Holder is used
to hold a strainer (not included) as an aid when filling the spray gun cup with
paint.
2. Attach the other end of the Steel Rod (4) through the Holding Bracket (6) using
Washers (2) and Nuts (1). Attach Base (7) to the Holding Bracket (6) using
Bolts (5), Washers (2), and Nuts (1).
3. Your spray gun will rest on the Holding Bracket (6) as needed. Be careful not
to tip or bump the holder as it may fall.
IMPORTANT:
Refer to the manual of the paint spray gun and paint you will use
for necessary warnings and instructions before use.
See Figures 1 and 2.
Ring Holder (3)
Holding
Steel Rod (4)
Holding
Bracket (6)
.
1. Keep indoors to avoid rust.
2. Wipe surfaces with a damp cloth or paint thinner, depending on what type paint was
used. Rinse off and dry thoroughly . Use Caution: Paint thinner is flammab le and must be
disposed of and stored properly.
SKU 91603 Page 3
Figures 1 Figures 2
For technical questions, please call 1-800-444-3353.
Maintenance
Bracket (6)
Base (7)
Washer (2)
Bolt (5)
Page 4

PART # DESCRIPTION QTY
1
2
3
4
5
6
7
Parts Illustration
Parts List
Nut
Washer
Ring Holder
Steel Rod
Bolt
Holding Bracket
Base
Part 1
Part 2
Part 4
Part 1
4
8
1
1
2
1
1
Part 3
Part 5
Part 6
Part 7
Part 1
PLEASE READ THE FOLLOWING CAREFULLY
THE MANUFACTURER AND/OR DISTRIBUTOR HAS PROVIDED THE PARTS DIAGRAM IN THIS
MANUAL AS A REFERENCE TOOL ONLY. NEITHER THE MANUFACTURER NOR DISTRIBUTOR
MAKES ANY REPRESENTATION OR WARRANTY OF ANY KIND TO THE BUYER THAT HE OR SHE
IS QUALIFIED TO MAKE ANY REPAIRS TO THE PRODUCT OR THAT HE OR SHE IS QUALIFIED TO
REPLACE ANY PARTS OF THE PRODUCT. IN FACT, THE MANUFACTURER AND/OR DISTRIBUTOR
EXPRESSLY STATES THAT ALL REPAIRS AND PARTS REPLACEMENTS SHOULD BE UNDERTAKEN
BY CERTIFIED AND LICENSED TECHNICIANS AND NOT BY THE BUYER. THE BUYER ASSUMES
ALL RISK AND LIABILITY ARISING OUT OF HIS OR HER REPAIRS TO THE ORIGINAL PRODUCT
OR REPLACEMENT PARTS THERETO, OR ARISING OUT OF HIS OR HER INSTALLATION OF
REPLACEMENT PARTS THERETO.
NOTE: Some parts are listed and shown for illustration purposes only and are not available individually as
replacement parts.
SKU 91603 Page 4
For technical questions, please call 1-800-444-3353.
 Loading...