

Page 1
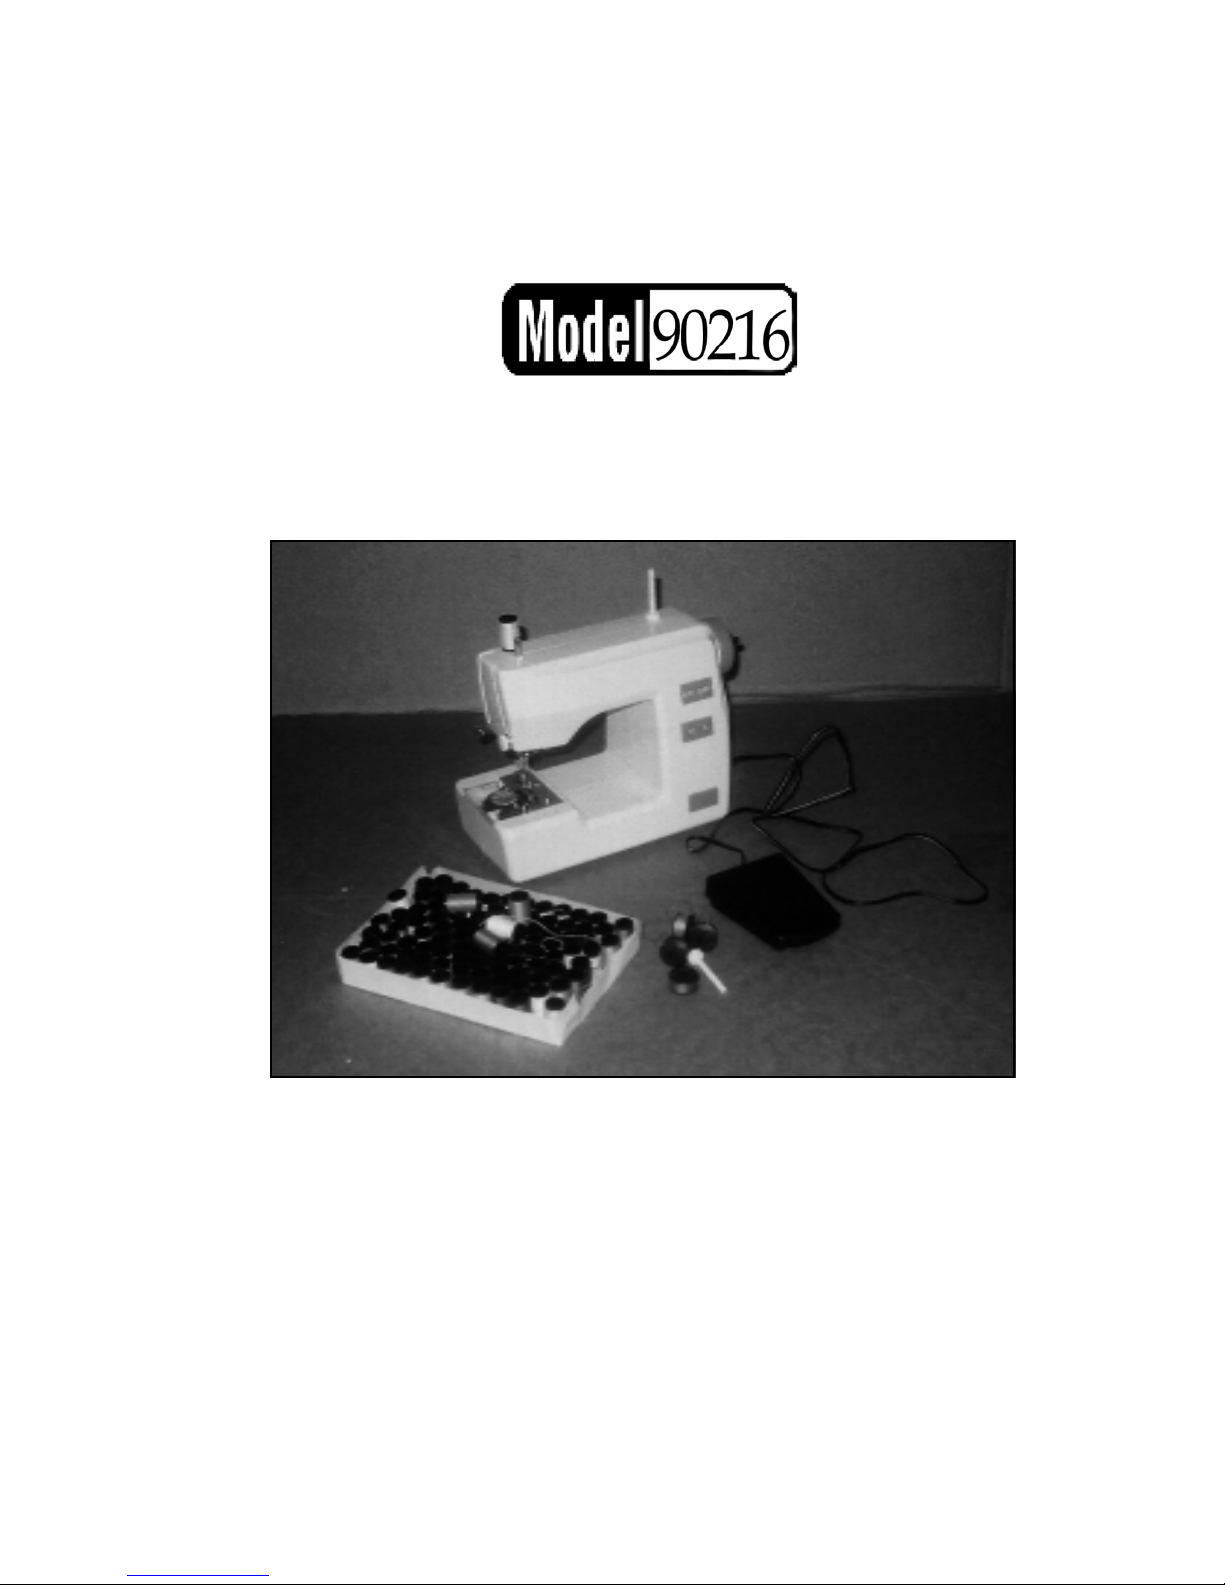
MINI SEWING MACHINE
ASSEMBLY & OPERATING INSTRUCTIONS
3491 Mission Oaks Blvd., Camarillo, CA 93011
Visit our Web site at http://www.harborfreight.com
Copyright © 2003 by Harbor Freight Tools®. All rights reserved. No portion of this manual
or any artwork contained herein may be reproduced in any shape or form without the
express written consent of Harbor Freight Tools.
For technical questions please call 1-800-444-3353
Page 2
SPECIFICATIONS
ITEM
Sewing Machine Model
Materials
Colors
Power/Speed Switch
Battery Requirements
Overall Dimensions
Net Weight
DESCRIPTION
#XJ-2K416
2-Piece Injected Mold ABS Case
ABS Knob, Switches, Foot Control, Low Carbon Steel
Components, Plastic Spools and Bobbin Housing.
White Case, Blue Knobs, Black Foot Pedal,
Purple Bobbins
On/Off
4 Double AA Batteries, 1.5 V D/C each (not included)
8-1/2” X 4”W X 7-1/4”H
2 Lbs.
SAVE THIS MANUAL
You will need the manual for the safety warnings and precautions, assembly
instructions, operating and maintenance procedures, parts list and diagram. Keep your
invoice with this manual. Write the invoice number on the inside of the front cover. Keep
the manual and invoice in a safe and dry place for future reference.
SAFETY WARNINGS AND PRECAUTIONS
1. KEEP PRODUCT USAGE AREA CLEAN. Cluttered areas invite injuries.
2. KEEP CHILDREN AWAY FROM PRODUCT USAGE AREA. This is not a toy and
may cause injury if not used with care. Do not allow children to handle this product
unsupervised.
3. TO AVOID RISK OF PERSONAL INJURY, EQUIPMENT DAMAGE, FIRE AND SHOCK,
make sure your work area is free of damp, wet or rainy conditions. Do not mix standard,
rechargeable or alkaline batteries and replace all batteries at the same time–do not mix old
and new batteries. Check batteries periodically and remove them from the machine when
not in use for an extended period of time.
6. CHECK FOR DAMAGED PARTS. Before using this product, carefully check that it
will operate properly and perform its intended function. Check for damaged parts and
any other conditions that may affect its operation. Replace or repair damaged or
worn parts immediately. Do not tug fabric while sewing as this may cause needle to break.
7. REPLACEMENT PARTS AND ACCESSORIES. When servicing, use only identical
replacement parts. Only use accessories intended for use with this product.
Approved accessories are available from Harbor Freight Tools.
8. MAINTAINING PRODUCT. This is a delicate/precision instrument. Keep clean and dry.
Any repairs should be done by qualified technicians only. Do not attempt to disassemble
this product as all its components are assembled and adjusted accurately in the factory.
Do not use this product for any purpose other than which it was intended.
SKU 90216 PAGE 2
Page 3
UNPACKING
When unpacking, check to make sure all parts shown on the Parts List (page #8) are included.
If any parts are missing or broken, please call Harbor Freight Tools at the number shown on the
cover of this manual as soon as possible.
Mini Sewing Machine
The Mini Sewing Machine is compact, lightweight and portable. It comes with 102 color spools of
thread, a foot control and a #14 sewing machine needle. This machine takes up very little storage
space and can meet all your basic sewing needs.
INSTRUCTIONS
Setting Up the Mini Sewing Machine
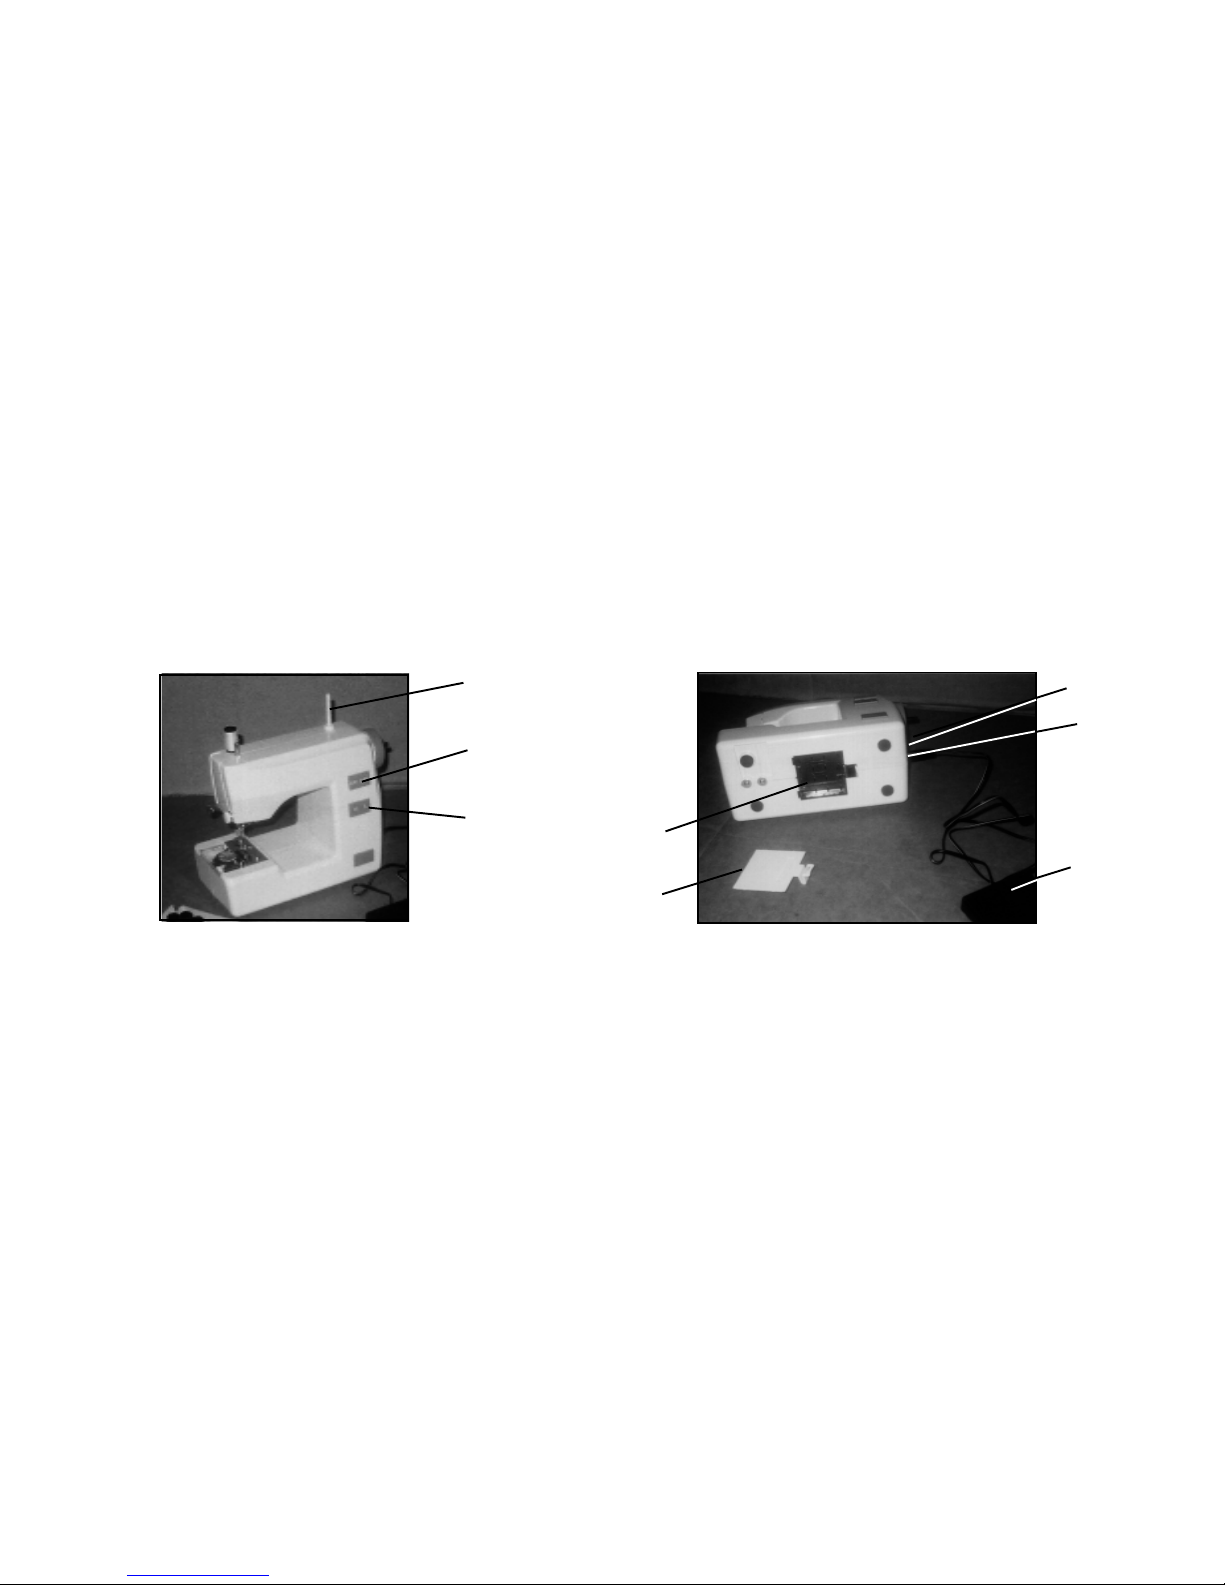
1. With the Mini Sewing Machine facing you, place on a sturdy, flat surface, making sure
it is in the “Off” position. See Figure 1.
DC Jack 6V
Spindle-Holder
for Thread
On/Off
Switch
Adapter
Jack
Foot
Petal
Jack
High/Low Switch
Figure 1
Batteries
Battery Door
Foot
Petal
Figure 2
2. To place batteries in the Mini Sewing Machine, tilt the machine on it’s side as shown
in Figure 2. Remove Battery Door on the underside of the machine and place 4 AA
batteries in the designated positions or you can use a Power Adapter (not provided)
and plug it into the 6V DC jack located on the right side of the machine. Replace
Battery Door.
3. When using the Foot Petal, plug in the Foot Petal Plug on the end of the cord into
the jack under the DC jack and place the Sewing Machine in an upright position.
Place Foot Petal on the floor under your table and within easy reach. Turn the
machine “On”.
Threading the Mini Sewing Machine
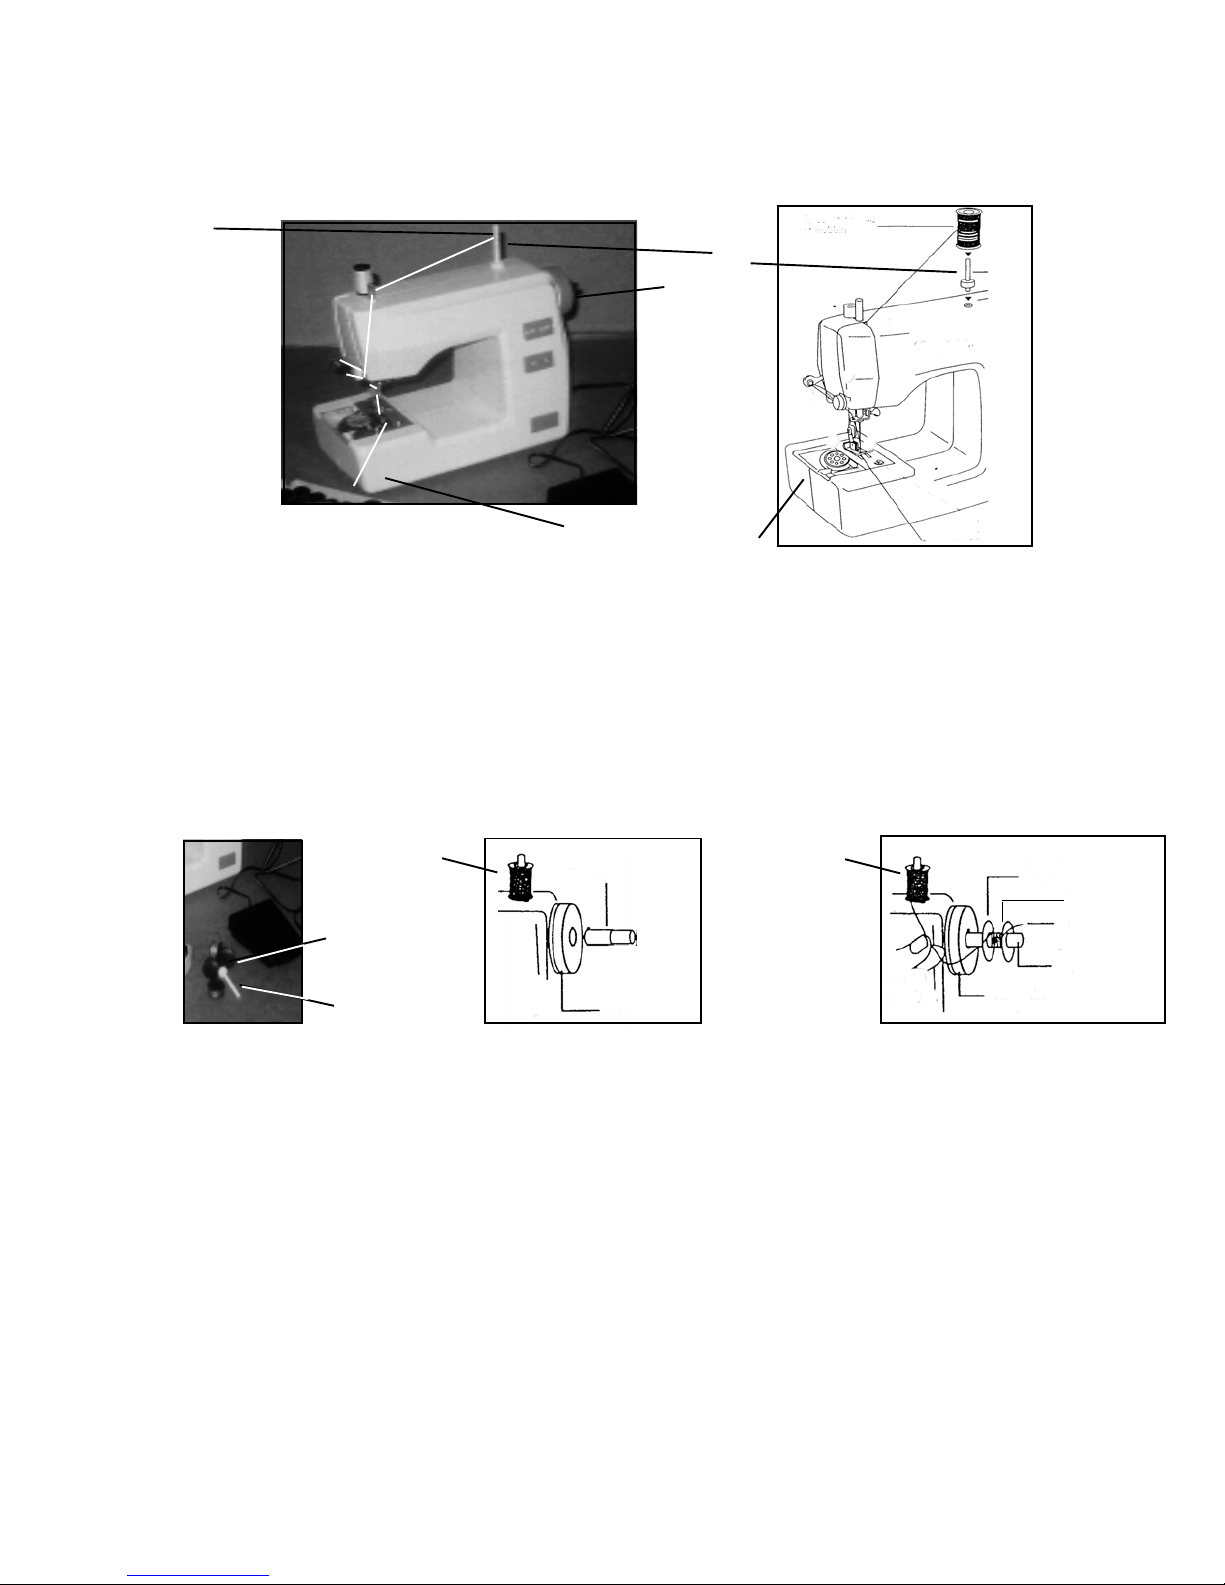
1. Place the white plastic Spindle in the Spindle hole located on the top of the Sewing
Machine. Place the Spool of Thread you wish to use on the Spindle. Give the
spool of thread a few turns in order to release at least 8 inches of thread.
See Figure 1. (Continued on next page).
SKU 90216 PAGE 3
Page 4
Threading the Mini Sewing Machine (continued)
2. See the 7 positions for threading the Mini Sewing Machine, indicated in Figure 3 below.
Step “F”: Thread needle from front to back in the “eye” of the needle. Then pull thread forward.
Spindle
“A” Place Spool of Thread
“B”
Hand
Wheel
“B”
“D”
“C”
“D”
“C”
“E”
Winding the Bobbin
“F”
▲
Figure 3
“G” After threading the Needle,
leave 4 inches of excess thread.
▲
“E”
“F”
Note: A pre-wound Bobbin is already in place in the Bobbin chamber under the
Presser Foot. This is for demonstration only. You will need to replace it with a full
Bobbin for your sewing project.
1. With the spool of thread on the white plastic Spindle on top of the machine, unwind
the thread approximately 8 inches.
2. Place the Purple Bobbin Pin into the hole in the center of the Hand Wheel and turn it to
lock it in position. See Figures 3 thru 6.
Spool of Thread
Bobbins
(Several
supplied)
Spindle
Purple Bobbin Pin
Thread
Hand Wheel
Spool of Thread
Purple Bobbin Pin
Bobbin
Thread
Bobbin Pin
Figure 4
3. Insert the loose thread from the top Spool of thread into one of the small holes in the
Bobbin. Insert the thread from the inner side to the outer side of the Bobbin and wind
the thread by hand in a counterclockwise fashion for approximately 4 turns.
4. Place the Bobbin onto the Purple Bobbin Pin. See Figure 6.
5. Hold the thread going from the spool of Thread to the Bobbin lightly as shown in Figure 6.
This will prevent tangling. Be sure the machine is in the “On” position. Turn the Hand
Wheel towards you to begin the spin and press the Foot Petal gently. The Bobbin will
begin to fill with thread from the spool of thread. Note: The Needle will be moving up
and down during this step. Keep fingers and objects away from the needle. When
the Bobbin is completely filled with thread, cut the thread and remove the Bobbin and the
Bobbin Pin from the Hand Wheel. Figure 6.
SKU 90216 PAGE 4
Figure 5
Figure 6
Page 5
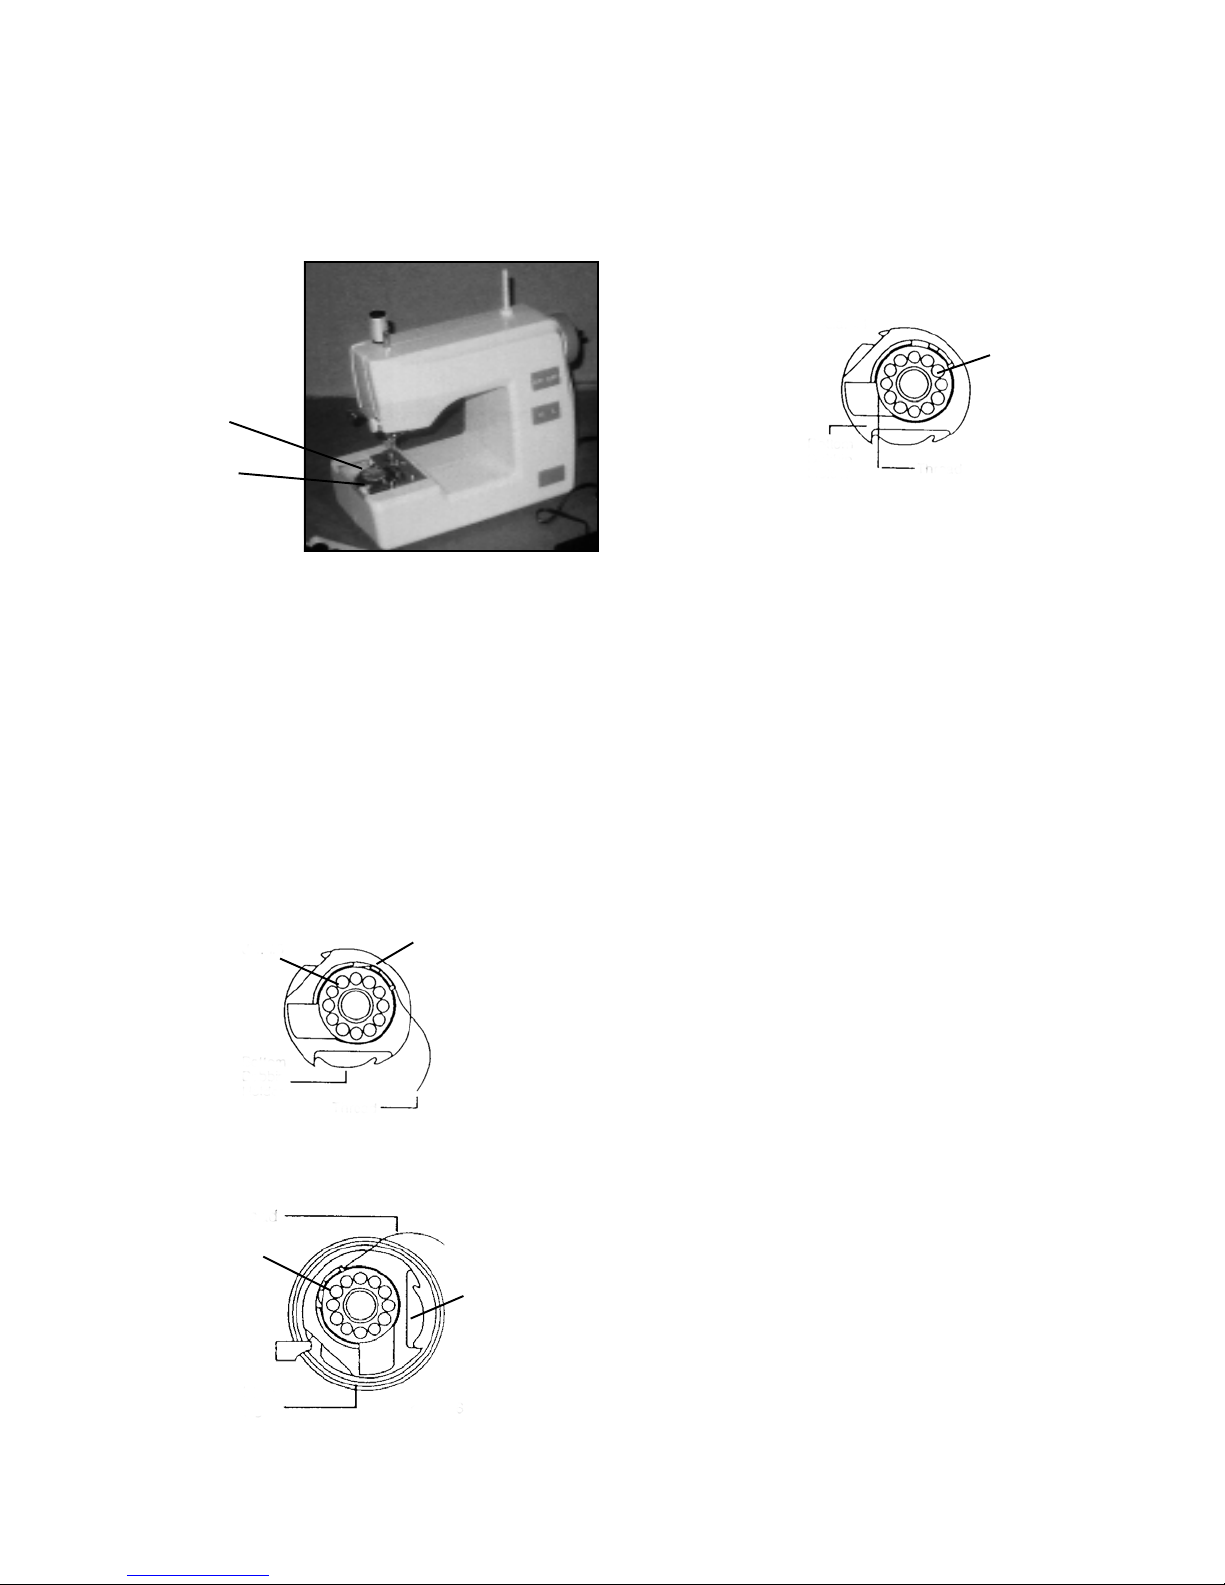
Bottom Treading Instructions with Bobbin
1. Remove the transparent Plastic Cover from the Bobbin Chamber. Slide it away from the
machine but do not remove. See Figure 7.
Metal
Bobbin
Bobbin Chamber
Plastic Cover
Bottom
Bobbin
Holder
Thread
Figure 8
Figure 7
2. Move the Needle to the upward position by turning the Hand Wheel towards you.
3. Remove the Black Bobbin Holder and place the metal Bobbin inside. See Figure 8.
The position of the Bobbin’s threading should be in a counterclockwise configuration when
placed in the holder. Note: The loose end of the thread should be hanging to the left of
the Bobbin.
4. Pull the thread out approximately 6 inches.
5. Slide the thread behind the “Notch” in the Bobbin Holder as shown in Figure 9.
Metal
Bobbin
Notch
6. Place the Bobbin Holder back into the Sewing Machine,
allowing the thread to remain in the Bobbin Chamber
but making sure that the thread is still secure in the
Bobbin Holder “Notch”. Figure 10.
Bottom
Bobbin
Holder
Thread
7. The bottom threading is now complete. Top and bottom
threading is critical to the operation of the Mini Sewing
Figure 9
Machine. The machine was pre-threaded correctly at
the factory. If you followed the above directions, it
Thread
Metal Bobbin
Bottom
Bobbin
Holder
should mimic the threading done by the factory. If you
find that this is not the case, try again to re-thread the
machine using the previous steps. With practice threading will become easier.
Bobbin
Case
Figure 10
SKU 90216 PAGE 5
8. If knotting occurs, try re-threading top and bottom
threading instructions.
Page 6
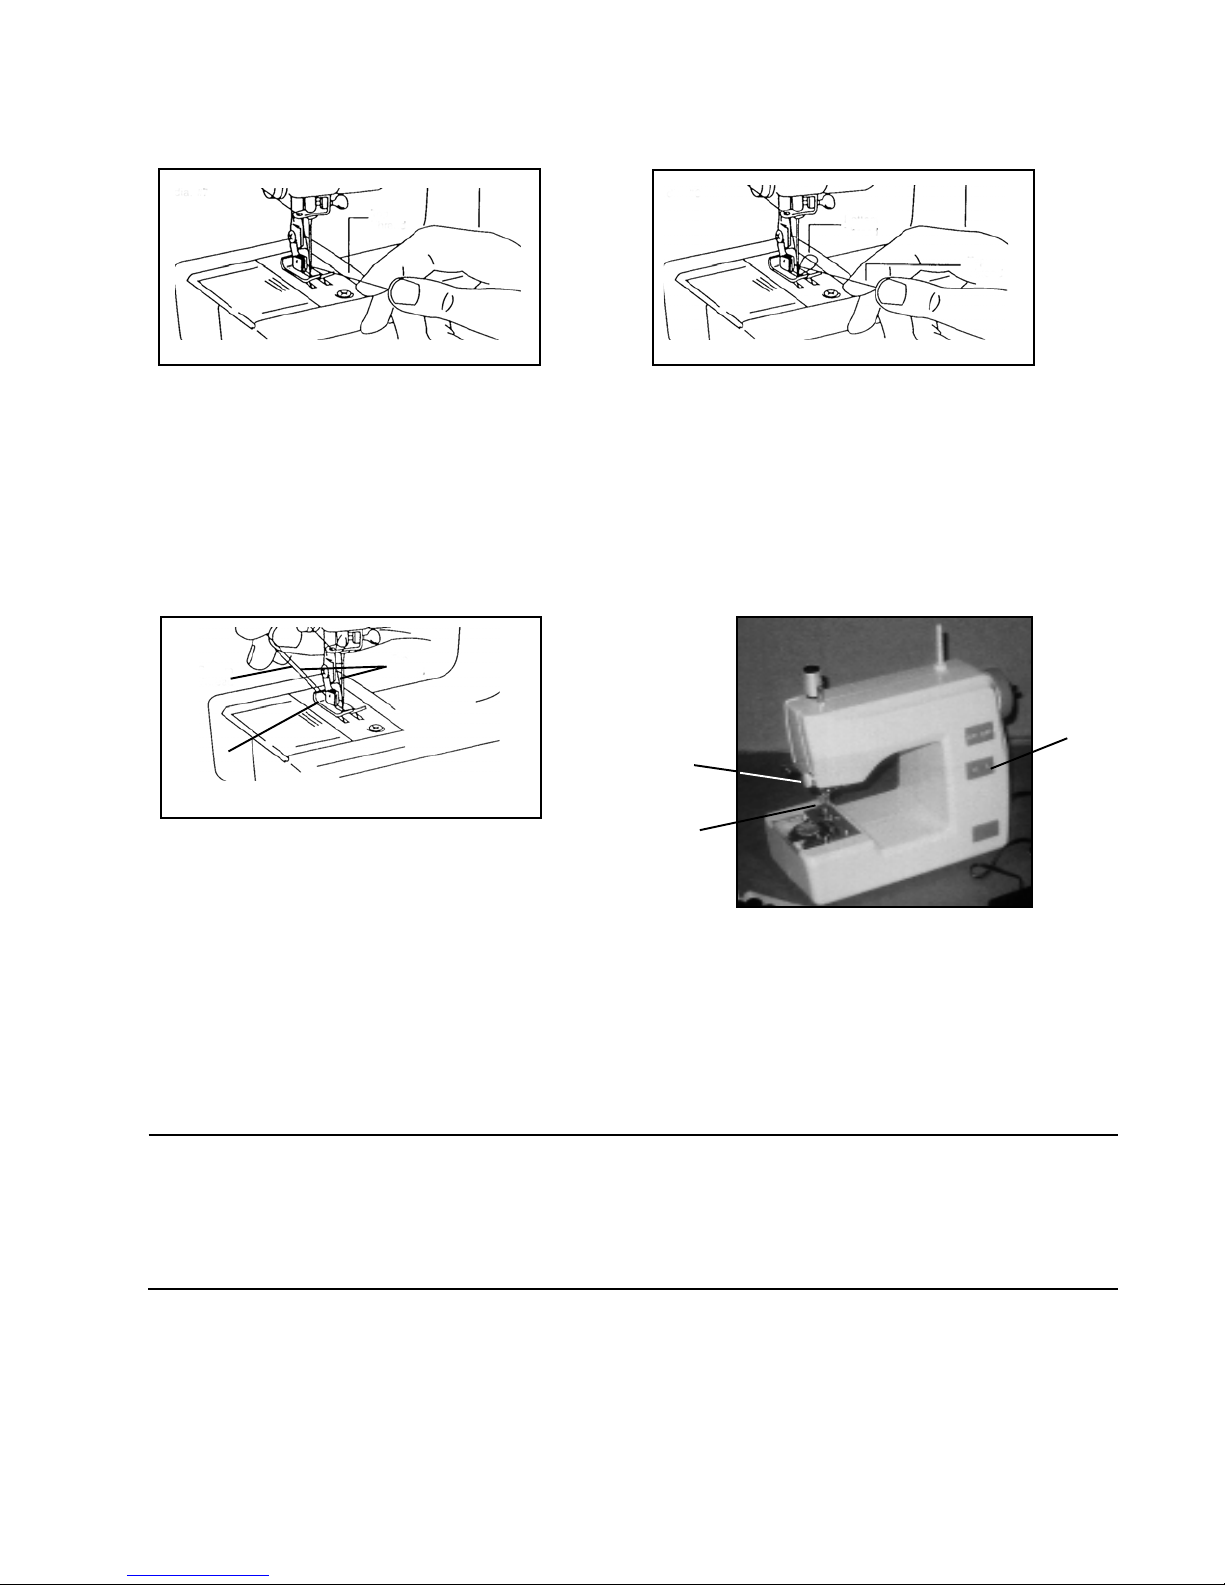
Before Stitching Fabric
Top Thread
Figure 11
Step 1: Pulling Bobbin thread up
from the bottom to the top of the
machine: Hold the end of the thread
from the top threading step and turn
the Hand Wheel clockwise one
complete turn. See Figure 11.
Bottom
Thread
Presser
Foot
Top
Thread
Step 2: Gently tug the top thread upward,
until the bottom thread is looped up and
out of the machine cavity as shown. See
Figure 12. Slide the transparent plastic
cover back in place.
Tension
Adjustment
Screw
Bottom
Thread
Top
Thread
Figure 12
“Hi” or
“Lo”
Switch
Figure 13
Step 3: Pull the looped bottom thread
Needle
Clamp
Screw
and top thread away from you toward
the rear of the machine. See Figure 13.
Step 4: The machine is ready to use
once the top and bottom threading is
complete and the threads are in the
Step 5: Place on the “Lo” setting for delicate
fabrics. Will help prevent puckering. Use “Hi”
setting for heavy fabrics. See Figure 14.
Figure 14
correct positions.
Thread Tension Adjustment
Tension Adjustment Screw was pre-set at the factory. You can manually adjust tension by
turning the round white plastic “Tension Adjustment Screw” directly above the Presser Foot
and Needle. See Figure 14. Bottom thread tension cannot be adjusted.
Changing Needles
1. Turn the Hand Wheel forward, lifting the Needle to it’s highest position.
2. Loosen the Needle Clamp Screw (Figure 14). Replace a broken or damaged needle.
3. When inserting a new needle be sure the flat side of the needle is facing the Clamp
Screw and push it as far upward as possible. Then tighten the Needle Clamp Screw.
SKU 90216 PAGE 6
Page 7
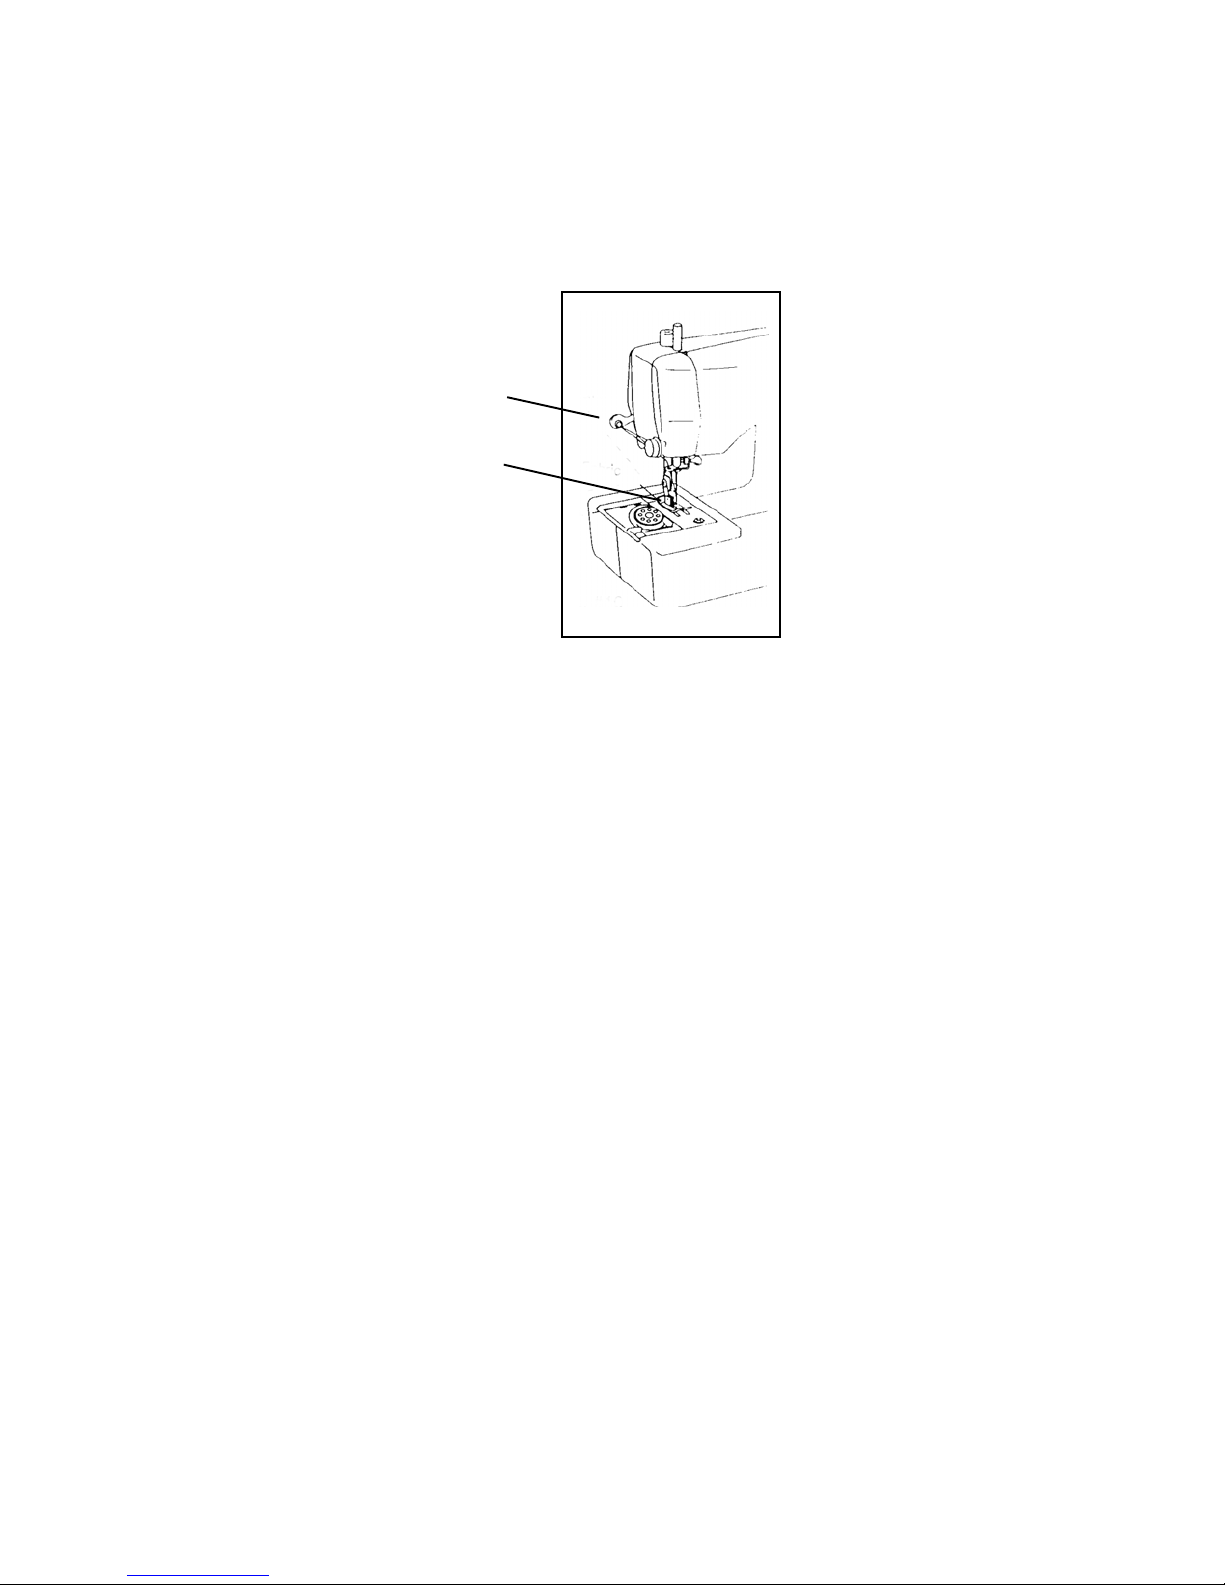
Beginning to Sewing
1. Position the Mini Sewing Machine on a flat, level surface such as a desk or table.
Sit directly in front of your Mini Sewing Machine. Turn the Hand Wheel toward you
one compete turn so that the needle is in an upward position.
2. Lift the Presser Foot using the Lever located directly above and behind the Presser
Foot. See Figure 15.
Lever
Presser
Foot
Figure 15
3. Place the fabric to be sewn under the Presser Foot and the needle above the area to
be stitched. Lower the Presser Foot. Turn the Hand Wheel one or two turns so needle
has engaged with fabric. With the power switch “On”, gently begin to push down on
the Foot Pedal and sew. The fabric will automatically be pushed forward.
CAUTION: Use your fingers to guide the fabric but keep them away from the needle
while machine is “On”.
4. Start and stop sewing as needed for stitching straight or curved areas. After each stop,
begin sewing again by tuning the Hand Wheel and then using the Foot Pedal. You will
notice, by using the Foot Pedal, you can sew faster. But gauge your speed carefully.
For sewing right angles, stop the Foot Pedal with the needle still in the fabric. Lift the
Lever. Turn (pivot) your fabric to the desired angle. Lower the Lever and begin sewing
again using the Hand Wheel and then the Foot Pedal. Release the Foot Pedal when
the area you wish to stitch is completed.
5. On completion turn Hand Wheel clockwise to lift needle. Lift Presser Foot with Lever
and push your fabric back and away from you. You will note that it is still attached by
the two threads (Bobbin thread and top thread). Cut thread leaving at least four inches
of thread coming from the Sewing Machine. Tie off your threads on your fabric to
prevent raveling. When all sewing is completed, turn “Off’ the Mini Sewing Machine
and store in a safe, dry space, preferably with some kind of cover. Remember this is a
delicate, precise instrument.
Note: Be sure the Sewing Machine is in the “off” position when not in use. This wil prevent
accidently starting the machine with the Foot Pedal. Be sure children are kept away from the
Sewing Machine unless under supervision.
SKU 90216 PAGE 7
Page 8
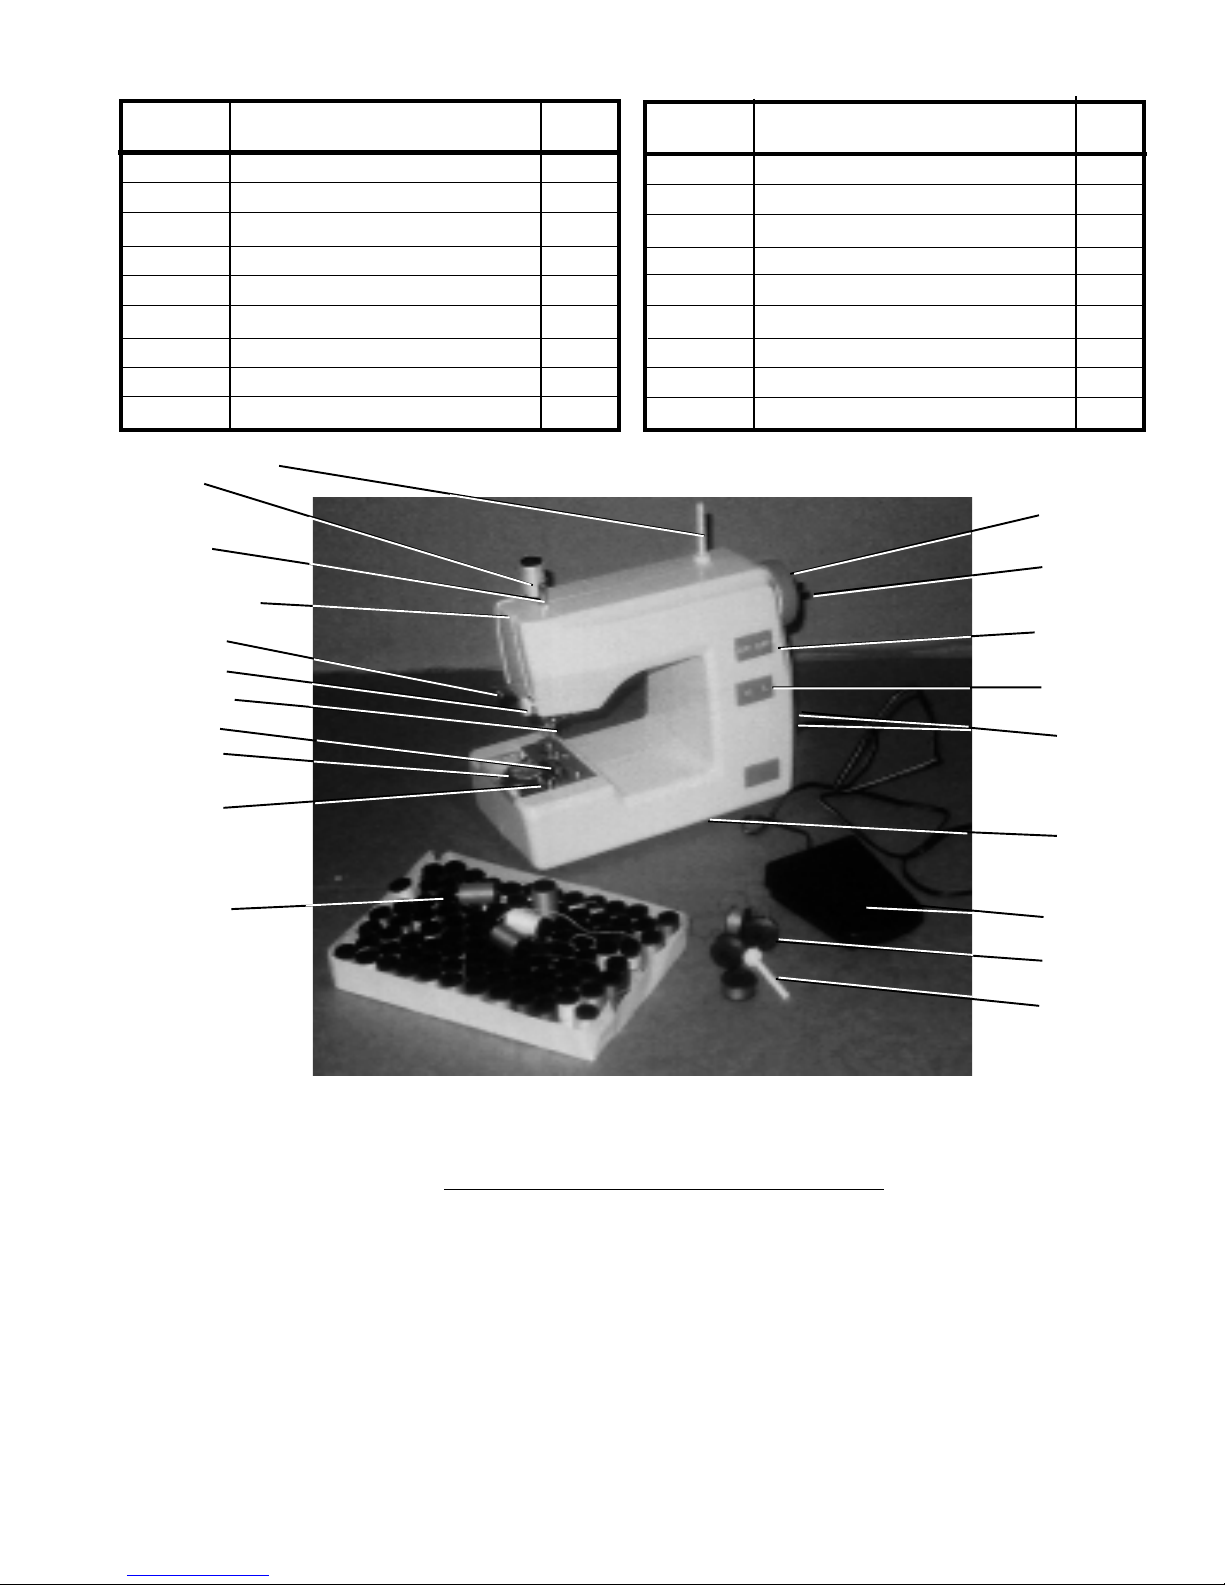
FEATURES LISTED
PART # DESCRIPTION QTY
1
2
3
4
5
6
7
8
9
Presser
Foot
Cover
#18
Needle
Holder
Bobbin
Case w/
Bobbin
Sewing Machine (assembled)
Foot Pedal with cord/plug
Bobbins
Colored Spools of Thread
Needles (#14)
Power Switch (On/Off)
Speed Switch ((Hi/Lo)
Hand Wheel
Spindle (Holds Thread)
#9
#1
#12
#11
#16
#5
#15
#3
1
1
4
102
1
1
1
1
2
FEATURES
PART # DESCRIPTION QTY
10
11
12
13
14
15
16
17
18
Bobbin Pin (purple)
Adjustable Tension Screw (white)
Lever
Jacks (for Foot Pedal or Adapter)
Presser Plate
Transparent Cover (Bobbin)
Needle Clamp Screw
Battery Installation Area
Needle Holder
#6
DC Jack 6V and
Foot Pedal Jack
Battery Installation
2
1
1
1
1
1
1
1
1
#8
#10
#7
#13
#17
Area
#4
#2
#3
#9
MAINTENANCE
1. For better and safer performance, keep all parts of this product clean and dry at all times.
PLEASE READ THE FOLLOWING CAREFULLY
THE MANUFACTURER AND/OR DISTRIBUTOR HAS PROVIDED THE PARTS DIAGRAM IN THIS
MANUAL AS A REFERENCE TOOL ONLY. NEITHER THE MANUFACTURER NOR DISTRIBUTOR
MAKES ANY REPRESENTATION OR WARRANTY OF ANY KIND TO THE BUYER THAT HE OR SHE IS
QUALIFIED TO MAKE ANY REPAIRS TO THE PRODUCT OR THAT HE OR SHE IS QUALIFIED TO
REPLACE ANY PARTS OF THE PRODUCT. IN FACT, THE MANUFACTURER AND/OR DISTRIBUTOR
EXPRESSLY STATES THAT ALL REPAIRS AND PARTS REPLACEMENTS SHOULD BE UNDERTAKEN
BY CERTIFIED AND LICENSED TECHNICIANS AND NOT BY THE BUYER. THE BUYER ASSUMES
ALL RISK AND LIABILITY ARISING OUT OF HIS OR HER REPAIRS TO THE ORIGINAL PRODUCT OR
REPLACEMENT PARTS THERETO, OR ARISING OUT OF HIS OR HER INSTALLATION OF REPLACEMENT PARTS THERETO.
SKU 90216 PAGE 8
 Loading...