

Page 1
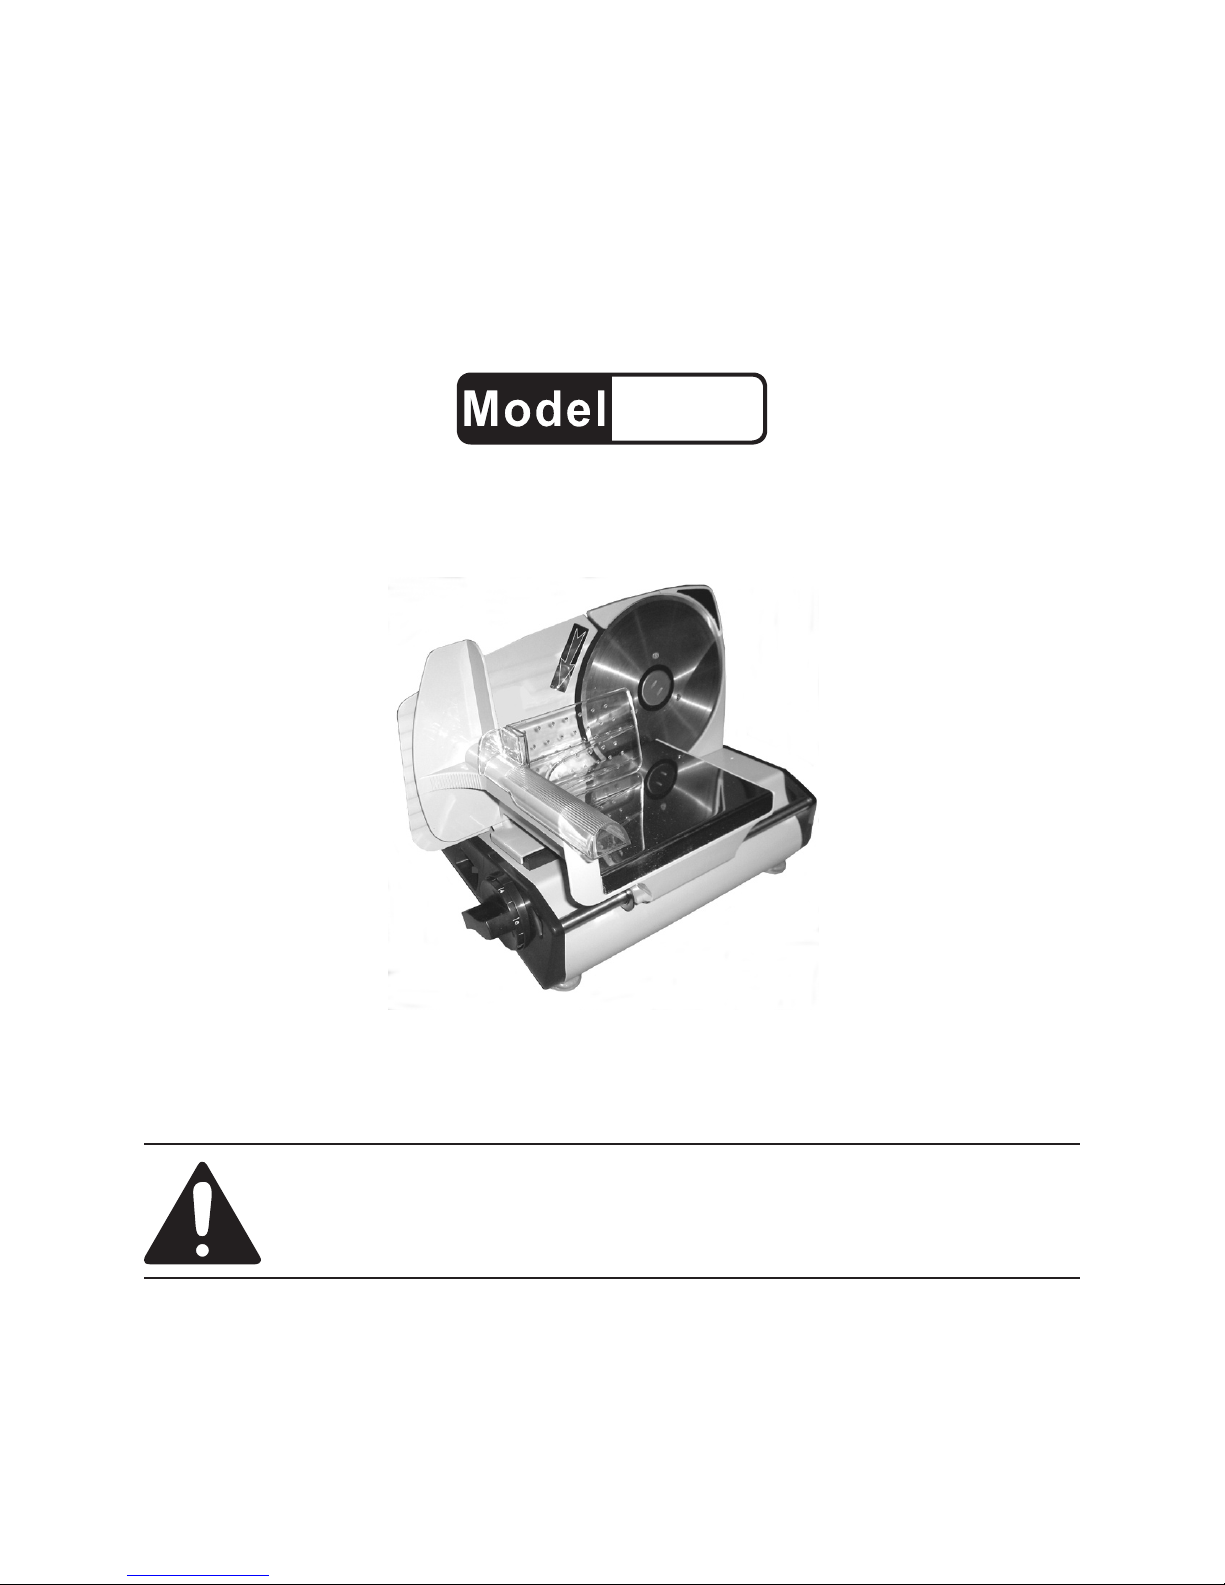
PROFESSIONAL ELECTRIC
FOOD SLICER
66928
CLEANING, ASSEMBLY, AND OPERATION
INSTRUCTIONS
Distributed exclusively by Harbor Freight Tools®.
3491 Mission Oaks Blvd., Camarillo, CA 93011
Visit our website at: http://www.harborfreight.com
Read this material before using this product.
Failure to do so can result in serious injury.
SAVE THIS MANUAL.
Copyright© 2009 by Harbor Freight Tools®. All rights reserved. No portion of this manual or any artwork
contained herein may be reproduced in any shape or form without the express written consent of
Harbor Freight Tools. Diagrams within this manual may not be drawn proportionally. Due to continuing
improvements, actual product may differ slightly from the product described herein. Tools required for
assembly and service may not be included.
For technical questions or replacement parts, please call 1-800-444-3353.
Page 2

SAVE THIS MANUAL
Keep this manual for the safety warnings and precautions, assembly, operating,
inspection, maintenance and cleaning procedures. Write the product’s serial number
in the back of the manual (or month and
year of purchase if product has no number). Keep this manual and the receipt in
a safe and dry place for future reference.
NOTICE is used to
address practices
not related to personal injury.
CAUTION, without
the safety alert
symbol, is used to address
practices not related to
personal injury.
IMPORTANT SAFEGUARDS
IMPORTANT SAFETY
INSTRUCTIONS
In this manual, on the labeling,
and all other information provided with this product:
This is the safety alert
symbol. It is used to alert
you to potential personal
injury hazards. Obey all
safety messages that
follow this symbol to avoid
possible injury or death.
DANGER indicates
a hazardous
situation which, if not
avoided, will result in death or
serious injury.
When using electrical appliances,
safety precautions should always
be followed including the following:
Work Area Safety
Do not use outdoors.1.
Close supervision is necessary when 2.
any appliance is used by or near
children.
Do not let cord hang over edge of 3.
table or counter, or touch hot surfaces.
Do not place on or near a hot gas or 4.
electric burner, or in a heated oven.
Extreme caution must be used when 5.
moving an appliance.
WARNING
indicates a
hazardous situation which, if
not avoided, could result in
death or serious injury.
CAUTION, used
with the safety
alert symbol, indicates a
hazardous situation which, if
not avoided, could result in
minor or moderate injury.
SKU 66928 For technical questions, please call 1-800-444-3353. Page 2
Keep the work area well lit. Make 6.
sure there is adequate surrounding
workspace. Keep the work area free
of obstructions and other debris.
Electrical Safety
1. To protect against electrical shock do not immerse
cord, plugs, or the main
unit in water or other
liquid. Only the non-elec-
Page 3

trical parts of the unit may be immersed for cleaning. Thoroughly
clean and dry these parts prior to rst
use and before every subsequent
use.
Unplug from outlet when not in use 2.
and before maintenance or cleaning.
Do not operate any appliance with 3.
a damaged cord or plug or after the
appliance malfunctions or has been
damaged in any manner. Have a
qualied service technician examine,
repair, or make adjustments.
This appliance has a polarized plug 4.
(one blade is wider than the other).
To reduce the risk of electric shock,
this plug is intended to t into a polarized outlet only one way. If the plug
does not t fully in the outlet, reverse
the plug. If it still does not t, contact
a qualied electrician. Do not change
the plug in any way.
Do not use this product in a damp or 5.
wet location.
Do not clean with metal scouring 6.
pads. Metal pieces can break off the
pads and touch electrical parts involving risk of shock.
extension cord should be at least as
great as the electrical rating of the
appliance,
if the appliance is of the grounded b.
type, the extension cord should be a
grounding type 3-wire cord, and
the longer cord should be arranged c.
so that it will not drape over the
counter top or tabletop where it can
be pulled on by children or tripped
over.
Foodborne Illness Safety
Before every use, thoroughly clean 1.
the appliance (see “Cleaning” section for instructions) and wash your
hands.
Follow Food and Drug Administration 2.
(FDA) food safety recommendations
for cooking and food handling (www.
fda.gov). Also, refer to the following
safety information, taken from FDA’s
website:
Cooking times (if provided) are a.
estimated. Verify that all food is
properly cooked. Steam, roast, or
otherwise heat all pieces of meat
and eggs to an internal temperature
of at least 160° Fahrenheit.
Power Cord Safety
1. A short power supply cord is to be
provided to reduce risks resulting
from becoming entangled in or tripping over a longer cord.
2. Longer extension cords are available
and may be used if care is exercised
in their use.
3. If a long extension cord is used,
the marked electrical rating of the a.
(detachable power supply cord or)
SKU 66928 For technical questions, please call 1-800-444-3353. Page 3
Keep hot food hot (above 140° F) b.
and cold food cold (below 40° F).
Do not let perishable food sit out
longer than 2 hours (1 hour in temperatures above 90° Fahrenheit).
General Safety
Never feed food by hand. Always 1.
use completely assembled slicer with
food platform and food grip.
Page 4

Blade is sharp. Handle carefully when 2.
cleaning.
Avoid contact with moving parts. 3.
Never feed food by hand. Always
use the Food Pusher (21).
Plug cord into the wall outlet. To 14.
disconnect, turn to “off”, then remove
plug from wall outlet.
Do not use appliance for other than 15.
intended use.
The Blade is sharp. Be extremely 4.
careful when cleaning the Blade and
when the Blade is spinning during
operation.
This Food Slicer is designed only for 5.
domestic use and not for commercial
purposes.
Always set the Food Slicer on a 6.
clean, dry, at, level, non-slip surface
capable of supporting the weight of
the Slicer and food products.
Use the Food Slicer only for slic-7.
ing normal household foods and not
for other purposes. Do not use the
Slicer for slicing deep-frozen foods,
bones, foods with large kernels or for
slicing packaged foods.
Never use the Food Slicer for more 8.
than ten minutes continuously.
Be aware, the Blade continues to 9.
rotate after the Food Slicer has been
switched off.
Avoid accidental cuts. Always turn 10.
the Thickness Adjustment Knob to its
“0” setting after use.
Do not wear loose clothing, long 11.
sleeves or jewelry, as they can get
caught in moving parts.
Wear restrictive hair covering to con-12.
tain long hair.
Maintain labels and nameplates on 16.
the appliance. These carry important
safety information. If unreadable or
missing, contact Harbor Freight Tools
for a replacement.
Do not store anything other than the 17.
manufacturer’s recommended accessories in this unit when not in use.
This product is not a toy. Keep it out 18.
of reach of children.
WARNING: Handling the cord on 19.
this product will expose you to lead,
a chemical known to the State of
California to cause cancer, and birth
defects or other reproductive harm.
Wash hands after handling.
(California Health & Safety Code §
25249.5, et seq.)
The warnings, precautions, and in-20.
structions discussed in this instruction
manual cannot cover all possible conditions and situations that may occur.
It must be understood by the operator
that common sense and caution are
factors which cannot be built into this
product, but must be supplied by the
operator.
SAVE THESE
INSTRUCTIONS.
The use of accessory attachments 13.
not recommended by the appliance
manufacturer may cause injuries.
SKU 66928 For technical questions, please call 1-800-444-3353. Page 4
Page 5
SPECIFICATIONS
Electrical
Requirements
Cutting Capacity Adjustable from 1/16” to 1/2” Thick
Blade Type
No Load
Blade Speed
Belt Type 170 L037
HOUSEHOLD USE ONLY
120 V~ / 60 Hz / 80 W
Power Cord Type: SPT-2 18 AWG
Power Plug Type: 2-Prong, Grounded
7-1/2” Diameter x 0.06” Thick
Stainless Steel
106 RPM
To prevent foodborne illness, wash 1.
the non-electrical parts of the unit
before assembly in hot, soapy water,
taking care to rinse completely.
Dry with a soft cloth. Wipe the motor/2.
heating element housing with a soft
clean cloth or sponge.
Allow unit to dry completely before 3.
assembly or use.
FS04
E250382
UNPACKING
When unpacking, make sure that the
item is intact and undamaged. If any parts
are missing or broken, please call Harbor
Freight Tools at 1-800-444-3353 as soon
as possible.
CLEANING
Read the ENTIRE IMPORTANT
SAFEGUARDS section at
the beginning of this manual
including all text under
subheadings therein before set
up or use of this product.
TO PREVENT
SERIOUS INJURY
FROM ACCIDENTAL
OPERATION OR ELECTRIC
SHOCK:
Before putting on or taking off
parts or cleaning appliance,
turn off the appliance, unplug
the cord, and allow the
appliance to come to a stop.
Do not immerse motor, cord,
or plug in water or any other
liquid.
ASSEMBLY
Read the ENTIRE IMPORTANT
SAFEGUARDS section at
the beginning of this manual
including all text under
subheadings therein before set
up or use of this product.
TO PREVENT
SERIOUS INJURY
FROM ACCIDENTAL
OPERATION OR ELECTRIC
SHOCK:
Before putting on or taking off
parts, turn off the appliance,
unplug the cord, and allow the
appliance to come to a stop.
Note: For additional information regarding
the parts listed in the following pages,
refer to the Assembly Diagram near
the end of this manual.
Clean the appliance thoroughly 1.
before assembly as explained in the
“Cleaning” section.
SKU 66928 For technical questions, please call 1-800-444-3353. Page 5
Page 6
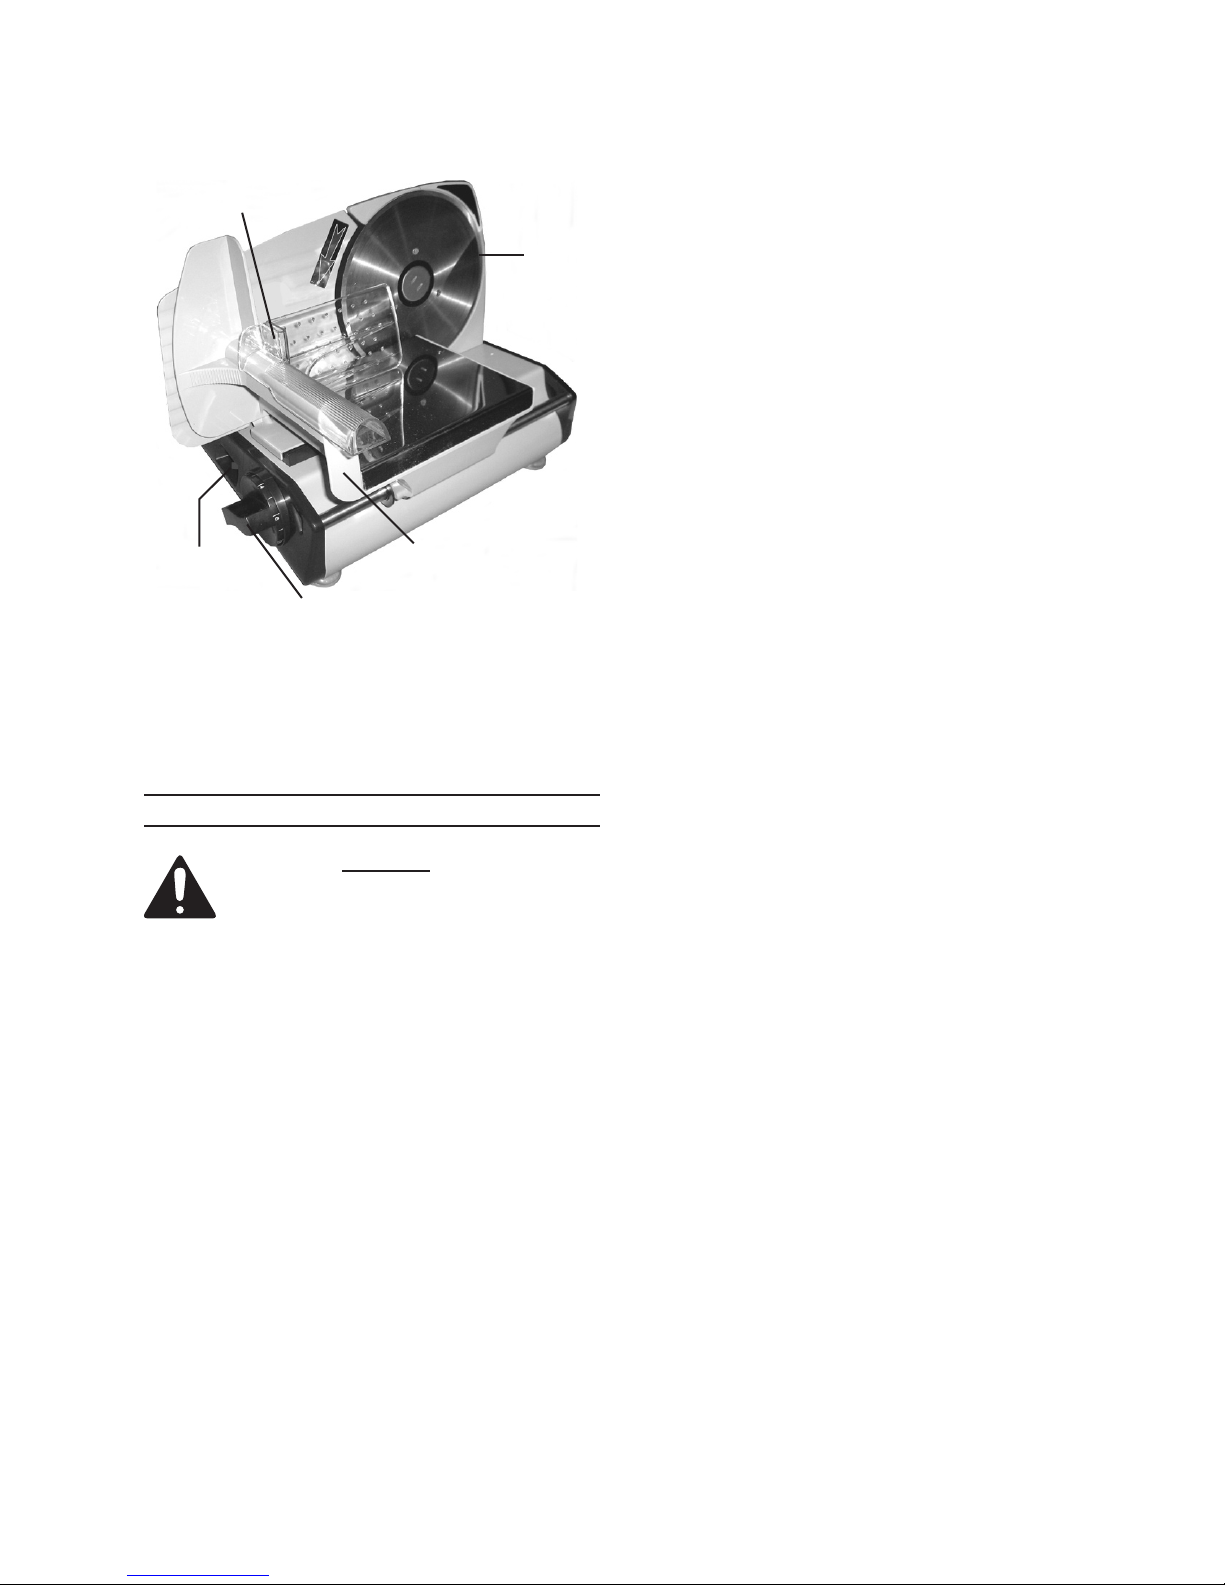
FOOD PUSHER
(21)
BLADE
(35)
O
POWER
SWITCH
(28)
THICKNESS
ADJUSTMENT
KNOB (26)
SLIDING FEED TABLE
(24)
2. Attach the clear plastic Food Pusher
(21) to the Sliding Feed Table (24).
(See Figure A.)
FIGURE A
Plug the unit’s Power Plug (42) into 4.
the nearest 120 volt, grounded, electrical outlet.
Pull the Sliding Feed Table (24) all 5.
the way back away from the Blade
(35). (See Figure A.)
Place the food to be sliced on the 6.
Sliding Feed Table (24), making sure
the food does not contact the Blade
(35). (See Figure A.)
Position the Food Pusher (21) so that 7.
it can hold the food as the Sliding
Feed Table (24) is moved towards the
Blade (35). (See Figure A.)
Turn the Power Switch (28) to its 8.
“ON” position to start the Food
Slicer. Make sure to allow the Blade
(35) to spin up to full speed.
(See Figure A.)
OPERATION
Read the ENTIRE IMPORTANT
SAFEGUARDS section at
the beginning of this manual
including all text under
subheadings therein before set
up or use of this product.
Clean the appliance thoroughly 1.
before each use as explained in the
“Cleaning” section.
NOTE: The operator should be fac-2.
ing the Power Switch (28) and Thickness Adjustment Knob (26) during
operation. (See Figure A.)
The slice thickness can be set to be-3.
tween 1/16” and 1/2”. Use the Thickness Adjustment Knob (26) to set the
desired slice thickness.
(See Figure A.)
Your hand should rest on the outer 9.
edge (furthest from the Blade) of the
Food Pusher (21) with your thumb
protected behind the thumb guard.
When slicing food, the Food Pusher
should push the food towards the
Blade as you move the Sliding Feed
Table (24) back and forth.
CAUTION! Always keep ngers
and hands behind the Food Pusher
(21) and clear of the spinning
Blade (35).
Place a plate or tray behind the 10.
pusher to catch the sliced food.
Continue moving the Food Pusher 11.
(21) and Sliding Feed Table (24) back
and forth until all of the food has been
sliced. (See Figure A.)
When nished, turn the Power Switch 12.
to its “OFF” position and wait until
SKU 66928 For technical questions, please call 1-800-444-3353. Page 6
Page 7
the Blade stops spinning.
(See Figure A.)
ing, and any other condition that may
affect its safe operation.
To avoid accidental cuts when han-13.
dling, cleaning, or transporting the
Food Slicer, set the Thickness Adjustment Knob (26) to “0”.
Unplug the Power Plug (42) from its 14.
electrical outlet. Clean, then store
the appliance indoors out of reach
of children and other unauthorized
persons.
Wash hands before and after han-15.
dling food.
INSPECTION AND
MAINTENANCE
TO PREVENT
SERIOUS INJURY
FROM ACCIDENTAL
OPERATION OR ELECTRIC
SHOCK:
Before putting on or taking off
parts, inspection or
maintenance, turn off the
appliance, unplug the cord,
and allow the appliance to
come to a stop.
TO PREVENT SERIOUS
INJURY FROM APPLIANCE
FAILURE:
Do not use damaged
appliances. If abnormal noise
or vibration occurs, have the
problem corrected before
further use.
BEFORE EACH USE, inspect the 1.
general condition of the appliance.
Check for loose screws, misalignment
or binding of moving parts, cracked or
broken parts, damaged electrical wir-
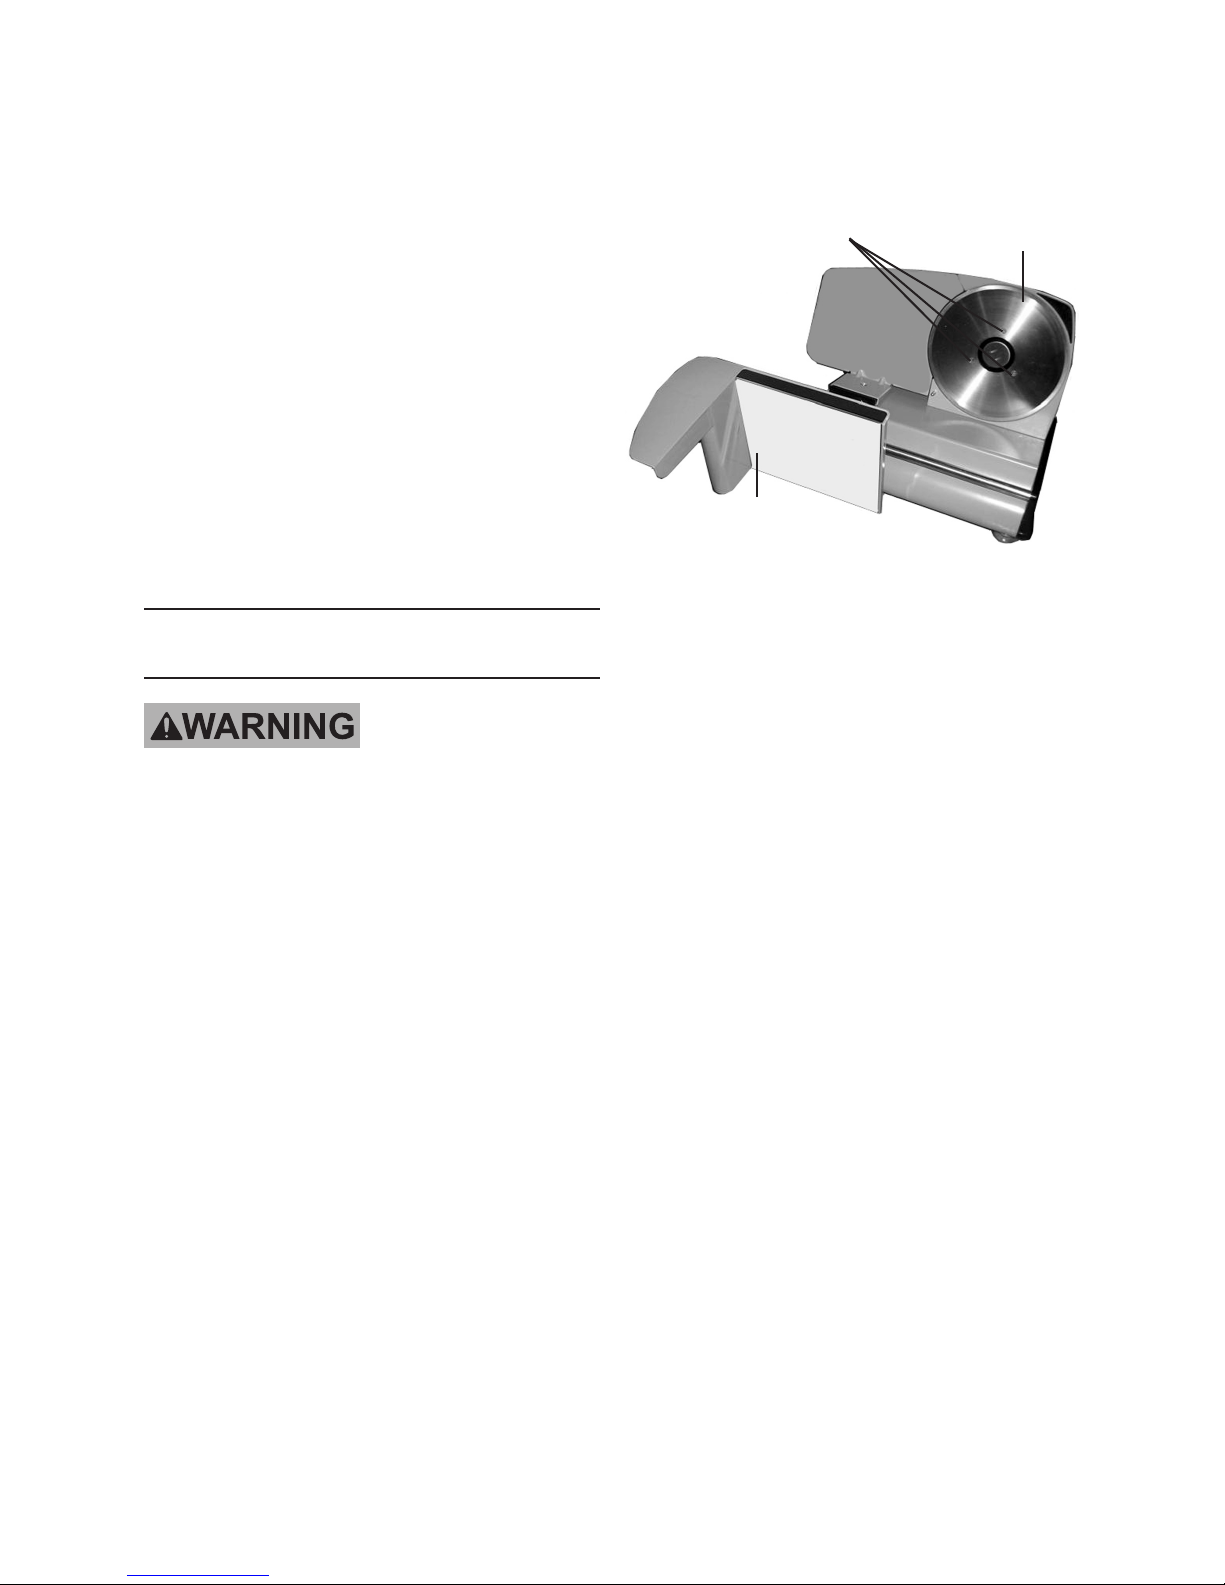
SCREWS
BLADE
(35)
FIGURE B
SLIDING FEED TABLE
(24)
2. TO REMOVE AND REPLACE THE
BLADE (35), rst remove Food Pusher (21) then rotate the Sliding Feed
Table (24) out from the unit. Remove
the three Screws from the Blade.
Remove the Blade from the unit. Replace with a new Blade
(size: 7-1/2” diameter x 0.06” thick).
Secure the new Blade in place with
the three Screws. (See Figure B.)
CAUTION! Avoid accidental cuts.
Wear heavy-duty work gloves
when removing the Blade (35).
Note: Do not sharpen the blade.
WHEN STORING, set the Thickness 3.
Adjustment Knob (26) to “0”. Move
the Sliding Feed Table (24) to its
working position. Wrap the Power
Cord and Plug (42) and store under
the Food Slicer. Store the entire unit
in a sealed, clean plastic bag. Then
keep the unit in a clean, dry, safe
location out of reach of children and
other unauthorized persons.
WARNING! If the Power Cord (42) 4.
of this appliance is damaged, it
must be replaced only by a quali-
ed service technician.
SKU 66928 For technical questions, please call 1-800-444-3353. Page 7
Page 8
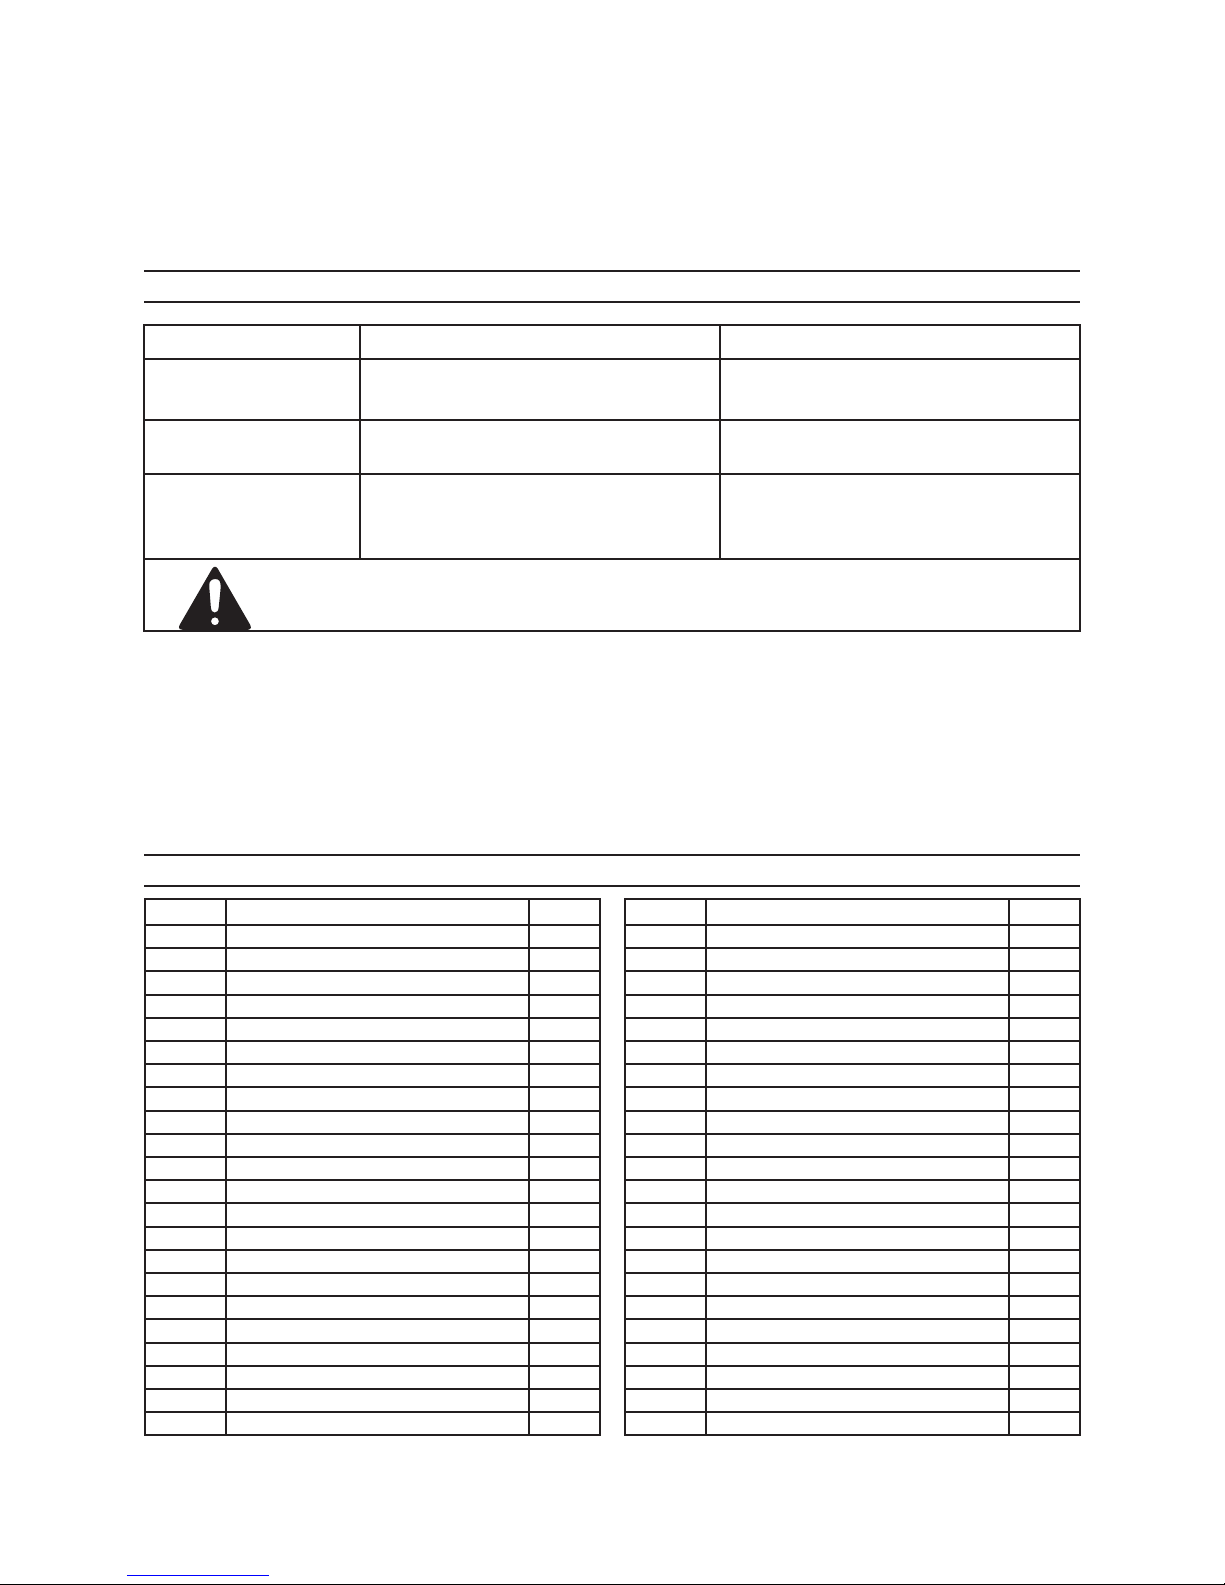
TROUBLESHOOTING
Problem Possible Causes Likely Solutions
Appliance will not start No power at outlet.1.
Appliance starts, but
Blade does not spin.
Undesirable cutting
quality.
Food is contacting the Blade. Allow Blade to spin at full speed
Follow all safety precautions whenever diagnosing or servicing the
appliance. Disconnect power supply before service.
Power Cord not connected.2.
Improper thickness adjustment.1.
Dull Blade.2.
Check power at outlet.1.
Plug in the Power Cord.2.
before feeding food into the Blade.
Set Thickness Adjustment Knob to 1.
desired cutting thickness.
Replace with a new Blade.2.
PARTS LIST
Part Description Qty.
1 Food Support Plate 1
2 Blade Support 1
3 Small Cover 1
4 Pulley 1
5 Belt 1
6 Motor Small Bracket 1
7 Motor Gear 1
8 Blade Connector 1
9 Silicone Washer 1
10 Washer 1
11 Motor 1
12 Blade Bracket Cover 1
13 Motor Large Bracket 1
14 Housing 1
15 Power Cord Side 1
16 Power Cord Side Cover 1
17 Bottom 1
18 Foot 4
19 Sliding Tube 1
20A Wheel 1
20B Wheel Shaft 1
21 Food Pusher 1
Part Description Qty.
22 Feed Table Tube 2
23 Feed Table Cover 1
24 Sliding Feed Table 1
25 Switch Side Cover 1
26 Thickness Adjustment Knob 1
27 Cam 1
28 Power Switch 1
29 Switch Side 1
30 Adjust Block 1
31 Support Block 1
32 Sliding Block (A) 1
33 Screw Lock 1
34 Support Block 1
35 Blade (7-1/2” x 0.06” thick) 1
36 Sliding Shaft 1
37 Sliding Rail 1
38 Support Block (B) 1
39 Support Plate Shaft 1
40 Pulley Shaft 1
41 Carriage Shaft 1
42 Power Cord & Plug 1
43 Blade Scraper 1
SKU 66928 For technical questions, please call 1-800-444-3353. Page 8
Page 9
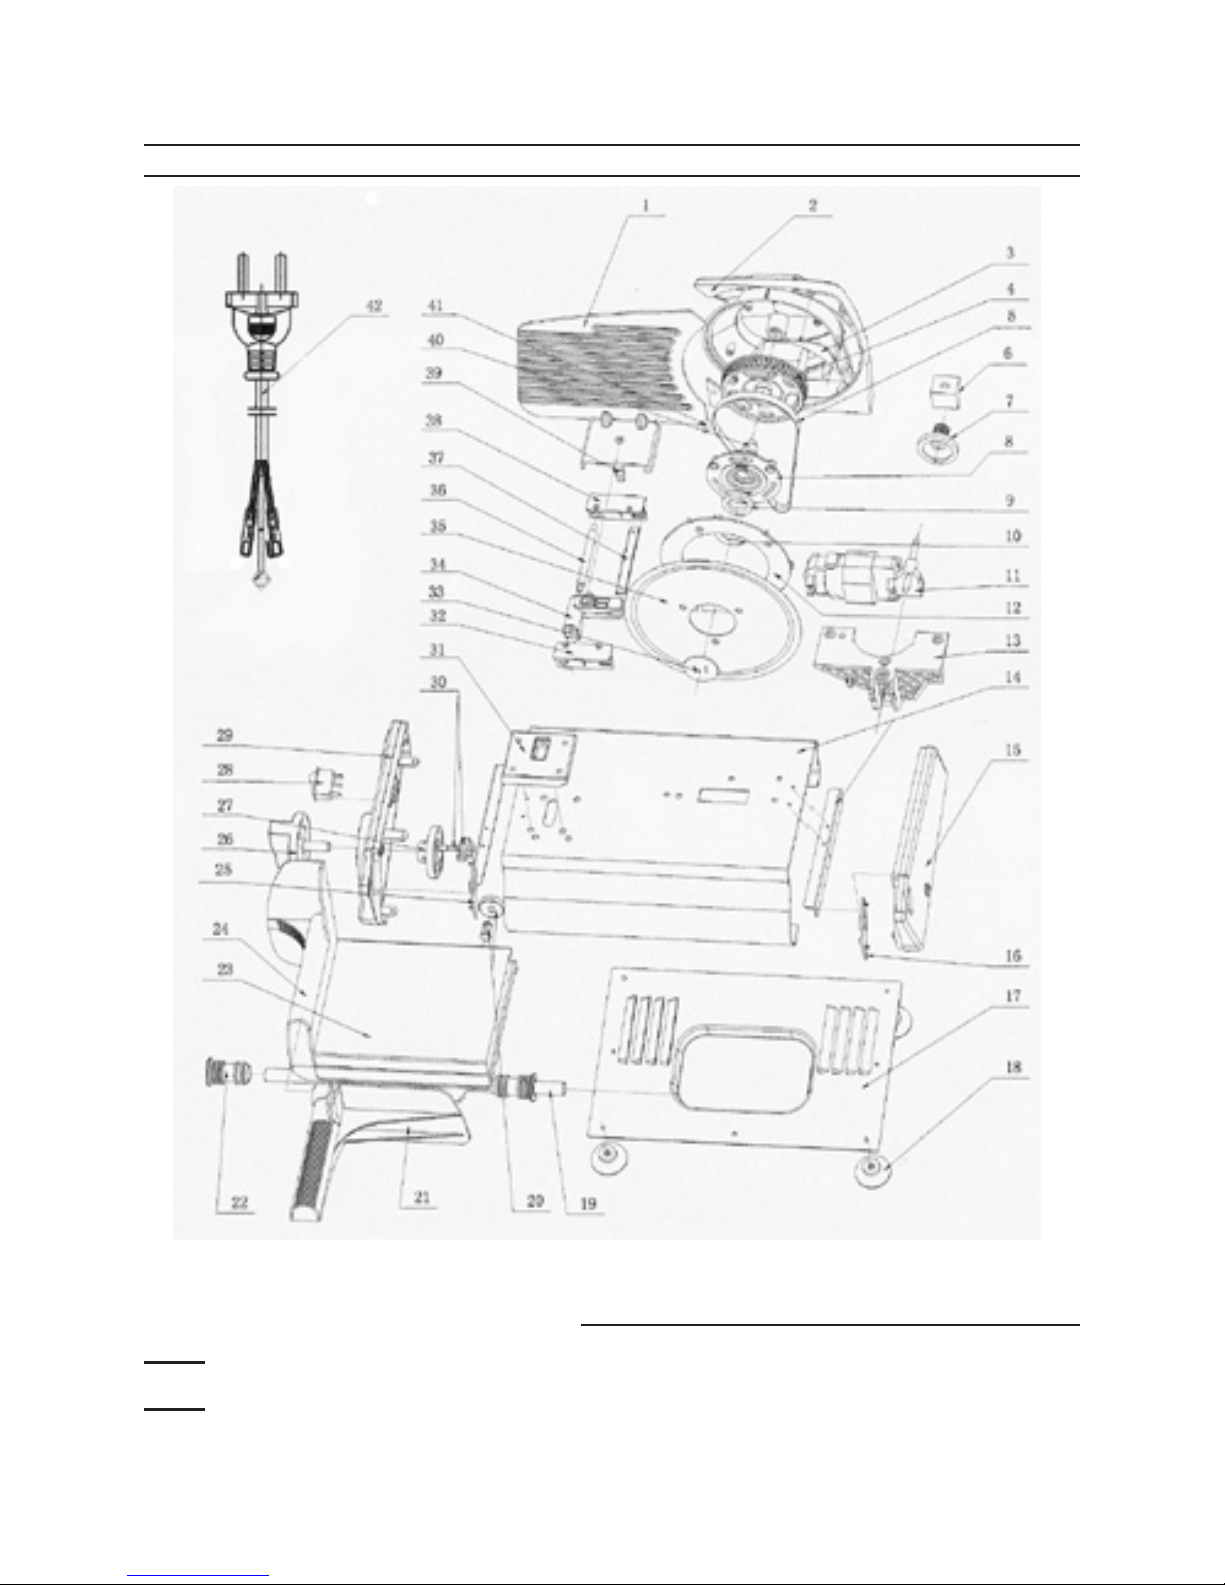
ASSEMBLY DIAGRAM
Record Product’s Serial Number Here:
Note: If product has no serial number, record month and year of purchase instead.
Note: Some parts are listed and shown for illustration purposes only, and are not avail-
able individually as replacement parts.
SKU 66928 For technical questions, please call 1-800-444-3353. Page 9
Page 10
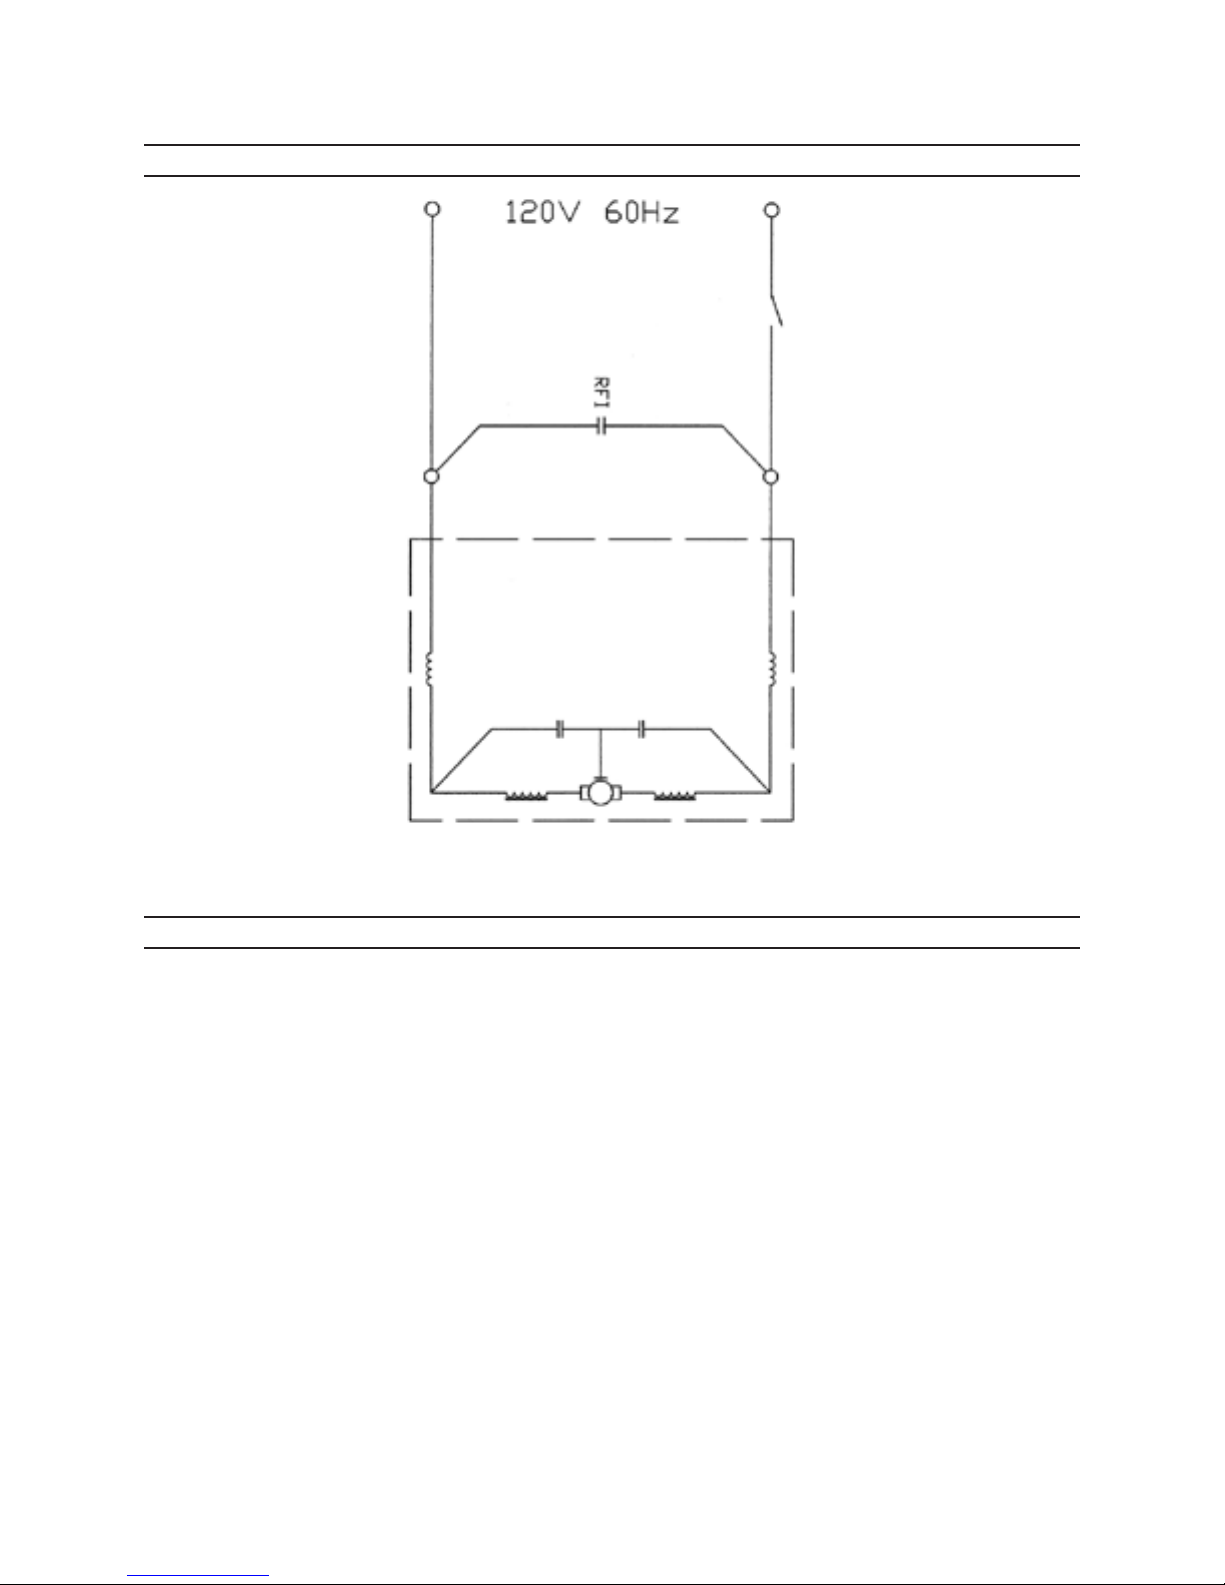
ELECTRICAL SCHEMATIC
PLEASE READ THE FOLLOWING CAREFULLY
THE MANUFACTURER AND/OR DISTRIBUTOR HAS PROVIDED THE PARTS
LIST AND ASSEMBLY DIAGRAM IN THIS MANUAL AS A REFERENCE TOOL
ONLY. NEITHER THE MANUFACTURER OR DISTRIBUTOR MAKES ANY
REPRESENTATION OR WARRANTY OF ANY KIND TO THE BUYER THAT HE OR
SHE IS QUALIFIED TO MAKE ANY REPAIRS TO THE PRODUCT, OR THAT HE OR
SHE IS QUALIFIED TO REPLACE ANY PARTS OF THE PRODUCT. IN FACT, THE
MANUFACTURER AND/OR DISTRIBUTOR EXPRESSLY STATES THAT ALL REPAIRS
AND PARTS REPLACEMENTS SHOULD BE UNDERTAKEN BY CERTIFIED AND
LICENSED TECHNICIANS, AND NOT BY THE BUYER. THE BUYER ASSUMES ALL
RISK AND LIABILITY ARISING OUT OF HIS OR HER REPAIRS TO THE ORIGINAL
PRODUCT OR REPLACEMENT PARTS THERETO, OR ARISING OUT OF HIS OR
HER INSTALLATION OF REPLACEMENT PARTS THERETO.
SKU 66928 For technical questions, please call 1-800-444-3353. Page 10
 Loading...