

Page 1
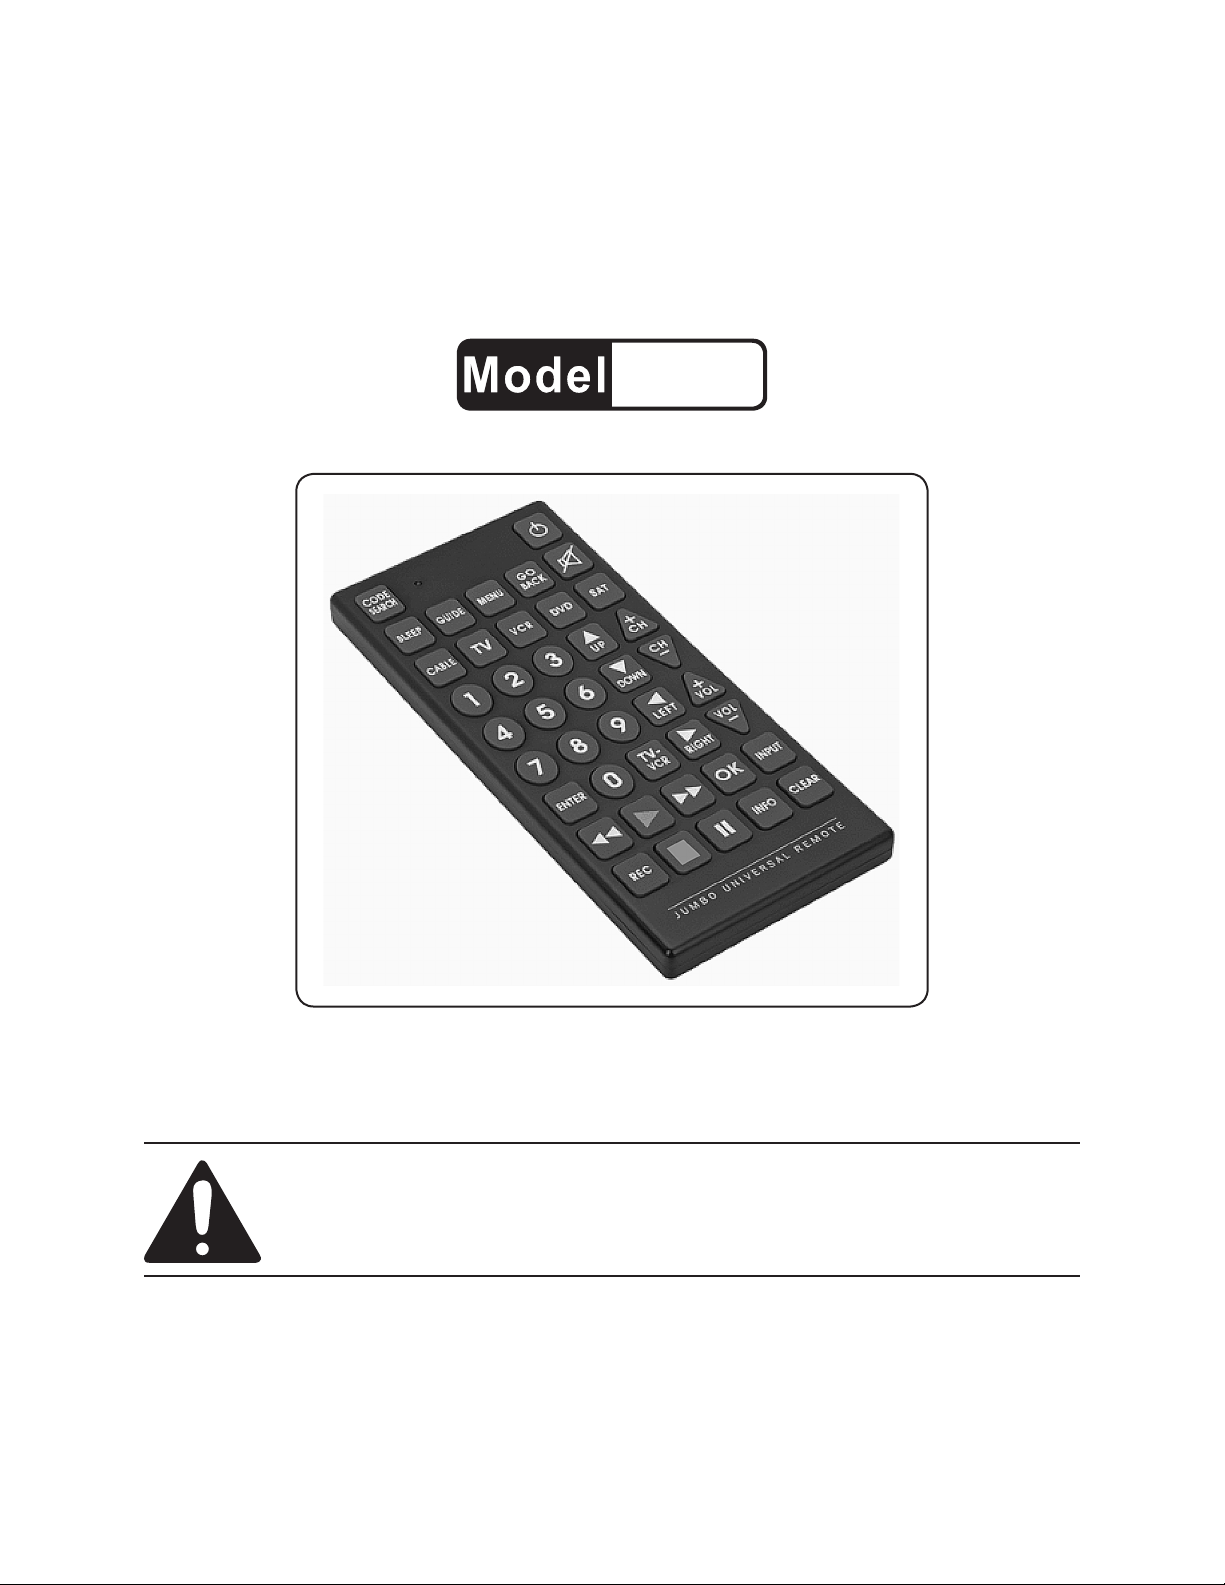
JUMBO UNIVERSAL
REMOTE CONTROL
66687
SET UP AND OPERATING INSTRUCTIONS
Distributed exclusively by Harbor Freight Tools®.
3491 Mission Oaks Blvd., Camarillo, CA 93011
Visit our website at: http://www.harborfreight.com
Read this material before using this product.
Failure to do so can result in serious injury.
SAVE THIS MANUAL.
Copyright© 2009 by Harbor Freight Tools®. All rights reserved. No portion of this manual or any artwork
contained herein may be reproduced in any shape or form without the express written consent of
Harbor Freight Tools. Diagrams within this manual may not be drawn proportionally. Due to continuing
improvements, actual product may differ slightly from the product described herein. Tools required for
assembly and service may not be included.
For technical questions or replacement parts, please call 1-800-444-3353.
Page 2

CONTENTS
IMPORTANT SAFETY
INFORMATION ............................ 3
SAFETY WARNINGS .........................3
SPECIFICATIONS .......................... 5
FCC COMPLIANCE ............................ 5
TRADEMARK
ACKNOWLEDGEMENTS ................5
UNPACKING .......................................5
PVR/DVD (DVD) CODE LIST ...........13
HDTV/SAT CODE LIST ....................13
VCR CODE LIST ..............................14
VCR CODE LIST (CONT.) ................15
CABLE CODE LIST .......................... 15
CABLE CODE LIST .......................... 16
AUDIO SYSTEMS LIST .................... 16
SATELLITE CODE LIST ...................17
TV/VCR, TV/DVD COMBO CODE
LIST ................................................18
INSTRUCTIONS FOR PUTTING
INTO USE .................................... 6
CONTROLS ........................................6
BUTTON FUNCTIONS ....................... 6
SET UP INSTRUCTIONS ............... 7
BATTERY INSTALLATION ................. 7
SETTING THE CODE FROM THE
CODE LISTS .................................... 7
FINDING THE CODE WITH THE
REMOTE ..........................................8
USING THE REMOTE ........................ 8
ON-SCREEN MENUS-
ACCESSING AND SELECTING
MENU ITEMS ...................................8
SLEEP TIMER .................................... 9
CODE LISTS ................................ 11
PERSONAL CODE REFERENCE .... 18
TRADEMARK
ACKNOWLEDGEMENTS ..............11
TV CODE LIST .................................11
TV CODE LIST (CONT.) ...................12
PVR/DVR-SAT COMBO CODE
LIST ................................................12
DVD CODE LIST ..............................13
VCR/DV D COMBO CODE LIST ......13
DVD LASER DISCS CODE LIST ..... 13
Page 2 For technical questions, please call 1-800-444-3353. SKU 66687
Page 3
SAVE THIS MANUAL
Keep this manual for the safety
warnings and precautions, assembly,
operating, inspection, maintenance and
cleaning procedures. Write the product’s
serial number in the back of the manual
near the assembly diagram (or month
and year of purchase if product has no
number). Keep this manual and the
receipt in a safe and dry place for future
reference.
not avoided, could result in
minor or moderate injury.
NOTICE is used to
address practices
not related to personal injury.
CAUTION, without
the safety alert
symbol, is used to address
practices not related to
personal injury.
Safety Warnings
IMPORTANT SAFETY
INFORMATION
In this manual, on the labeling,
and all other information
provided with this product:
This is the safety alert
symbol. It is used to alert
you to potential personal
injury hazards. Obey all
safety messages that
follow this symbol to avoid
possible injury or death.
DANGER indicates
a hazardous
situation which, if not
avoided, will result in death or
serious injury.
WARNING
indicates a
hazardous situation which, if
not avoided, could result in
death or serious injury.
WARNING Read all safety
warnings and instructions.
Save all warnings and
instructions for future reference.
Maintain labels and nameplates on 1.
the tool. These carry important safety
information. If unreadable or missing,
contact Harbor Freight Tools for a
replacement.
This product is not a toy. Do not allow 2.
children to play with this item.
Position batteries in proper polarity 3.
and do not install batteries of different
types, charge levels, or capacities
together.
Use for intended purpose(s) only.4.
Inspect before use; do not use if parts 5.
are loose or damaged.
Do not expose to liquids.6.
Do not place under direct sun light, or 7.
near or over heat sources.
CAUTION, used
with the safety
alert symbol, indicates a
hazardous situation which, if
The warnings, precautions, 8.
and instructions discussed in
this instruction manual cannot
cover all possible conditions and
situations that may occur. It must
Page 3For technical questions, please call 1-800-444-3353.SKU 66687
Page 4

be understood by the operator that
common sense and caution are
factors which cannot be built into this
product, but must be supplied by the
operator.
SAVE THESE
INSTRUCTIONS.
Page 4 For technical questions, please call 1-800-444-3353. SKU 66687
Page 5

SPECIFICATIONS
Batteries
Required
Dimensions 11”L x 5”W x 3/4” Thick
(2) AA 1.5V Batteries
outlet on a circuit different from that
to which the receiver is connected.
- Consult the dealer or an
experienced radio TV technician for
help.
FCC Compliance
This device complies with part
15 of the FCC Rules. Operation is
subject to the following two conditions:
(1) This device may not cause harmful
interference, and (2) this device must
accept any interference received, including
interference that may cause undesired
operation.
Note: This equipment has been tested
and found to comply with the
limits for a Class B digital device,
pursuant to part 15 of the FCC
Rules. These limits are designed
to provide reasonable protection
against harmful interference in
a residential installation. This
equipment generates, uses and
can radiate radio frequency energy
and, if not installed and used in
accordance with the instructions, may
cause harmful interference to radio
communications. However, there is
no guarantee that interference will
not occur in a particular installation.
If this equipment does cause harmful
interference to radio or television
reception, which can be determined
by turning the equipment off and
on, the user is encouraged to try to
correct the interference by one or
more of the following measures:
Trademark Acknowledgements
All brand names and trademarks are
the property of their respective holders.
Unpacking
When unpacking, make sure that the
item is intact and undamaged. If any parts
are missing or broken, please call Harbor
Freight Tools at 1-800-444-3353 as soon
as possible.
- Reorient or relocate the receiving
antenna.
- Increase the separation between
the equipment and receiver.
- Connect the equipment into an
Page 5For technical questions, please call 1-800-444-3353.SKU 66687
Page 6
INSTRUCTIONS FOR
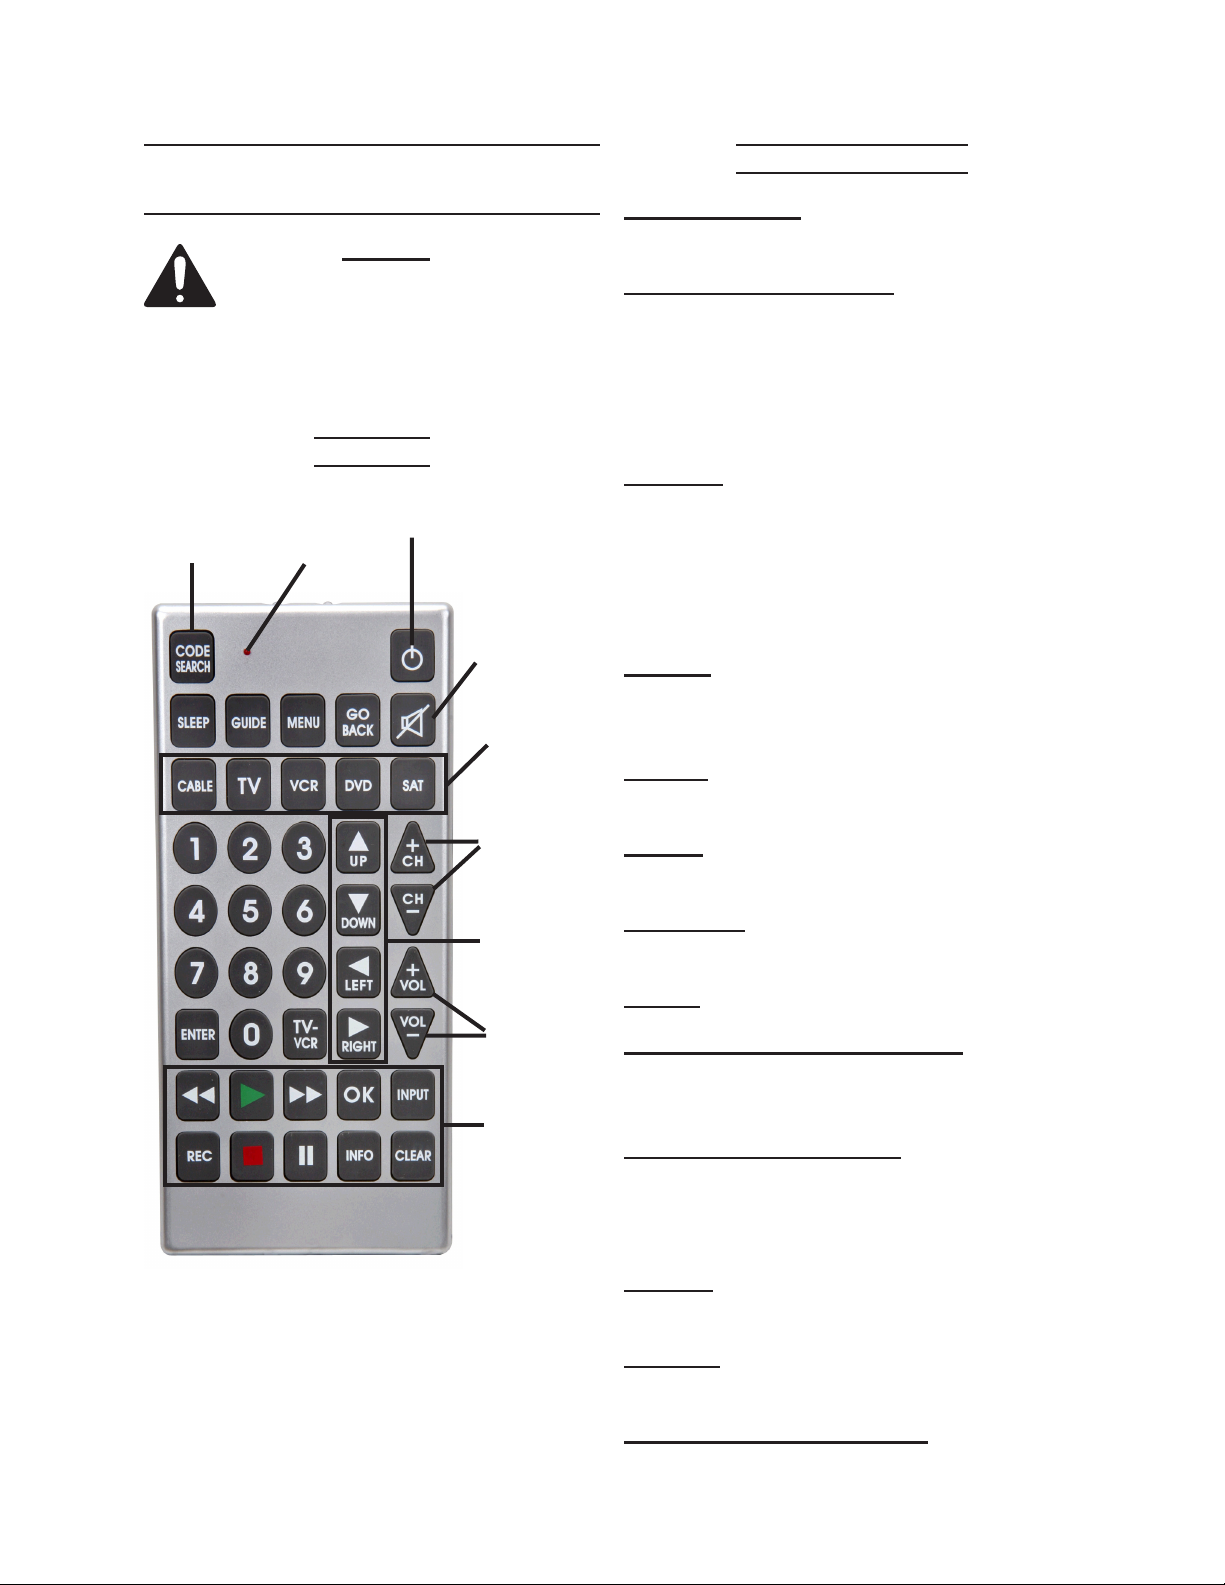
Button Functions
PUTTING INTO USE
Read the ENTIRE IMPORTANT
SAFETY INFORMATION
section at the beginning of this
manual including all text under
subheadings therein before set
up or use of this product.
Controls
Code
Search
Button
LED
Indicator
Light
ON/OFF
Button
Mute
Device
Select
Controls
Channel
Controls
CODE SEARCH: Used to program the
remote or to search through codes.
LED INDICATOR LIGHT: The LED
ashes to show that the remote is working
properly. The LED will light up whenever a
button is pressed and will turn off when the
button is released. The LED will also blink
when codes are entered into the Remote.
ON/OFF: Operates the same as your
original remote. Some RCA, GE and
ProScan models require you to press the
Code Search Button to turn on the unit
and press the remote Power button to turn
it off.
SLEEP: Allows you to set a time for
the remote to turn off your device
automatically.
GUIDE: Brings up the on-screen TV
program guide, if your TV has that feature.
MENU: Brings up the Main Menu of many
devices that have a built in menu system.
On Screen
Navigation
Buttons
GO BACK: Allows you to go to the
previous channel.
MUTE: Mutes volume on TV.
Volume
Controls
DEVICE SELECT CONTROLS (CABLE,
TV, VCR, DVD, SAT): Used to select the
Device
Controls
device you want to control.
0-9 NUMBER BUTTONS: The number
buttons operate the same as on your
original remote and are used to enter
channel numbers or device codes.
Figure 1
ENTER: Used to complete channel
selection for some brands of TV.
TV/VCR: Operates the TV/VCR function of
your VCR.
ON SCREEN NAVIGATION: Used to
Page 6 For technical questions, please call 1-800-444-3353. SKU 66687
Page 7

move though on screen menu and guide.
With some DBS (direct broadcast satellite)
models up and down. On some DBS
models the INFO button should be used to
select the highlighted item.
CHANNEL CONTROLS: Used for
changing the channels.
VOLUME: Increases or decreases the
volume.
DEVICE CONTROLS (REVERSE, PLAY,
FORWARD, REC, STOP, PAUSE): These
buttons are for DVD//VCR/DVR use and
operate the same as your original remote.
You must press the RECORD button twice
to start recording.
INFO: Shows the date and the time if your
TV or VCR has that feature.
Note: Some brands have more than one
code in the listings. You may need
to repeat the following steps, trying
several of the codes until you nd the
code that works with the Remote and
your device.
Turn on the device you want to 2.
program into the Remote.
Aim the Remote at the device and 3.
press and hold the Code Search
Button until the LED Indicator Light
turns on and stays solid red. Release
the button.
Press and release the Device Select 4.
Control button for the device that you
are programming (CABLE, TV, VCR,
DVD OR SAT). The LED will blink
once, then remain solid.
CLEAR: Removes the on screen display
to return to normal viewing.
SET UP INSTRUCTIONS
Battery Installation
Remove the battery compartment 1.
cover from the back of Remote.
Install (2) “AA” batteries, making 2.
sure to install according to indicated
polarity.
Slide battery compartment battery 3.
over batteries and snap into place.
Note: Reprogramming may be required
after batteries have been replaced.
Setting the Code from
the Code Lists
Find your device brand on pages 1.
11 through 18 and follow the steps
below.
Enter the corresponding 3-digit code 5.
using the number keys. The LED
will blink as each number is pushed,
then remain solid. You must enter the
3-digit code within 30 seconds.
If, after entering the code, the
LED turns off, then the remote has
recognized the entry. Go to the next
step.
If the LED ashes, the code is not
recognized and you will need to
repeat steps 3 - 5 for the next code
in the list, or use one of the following
alternate methods to nd the code
with the remote.
Note: The remote may recognize the code
but the device may not. You may
need to try more than one code to get
the device to function.
When the LED has turned off, 6.
meaning the Remote has recognized
Page 7For technical questions, please call 1-800-444-3353.SKU 66687
Page 8

the code, press ENTER. The LED will
ash.
you will be searching through all the
codes.
Press the Device Select Control 7.
button (CABLE, TV, VCR, DVD OR
SAT) that you programmed. The LED
will blink once.
Press the ON/OFF button. If the 8.
device you are programming turns
off, you may have found the correct
code. Press the ON/OFF button
again. If the device turns on, you
have found the correct code. If the
device does not turn back on, this
is not the correct code and you will
need to try again with a different code
from the list or use one of the other
following methods to nd the code
with the remote.
Use the Personal Code Reference 9.
chart at the back of this manual to
record your codes for easy reference.
Finding the Code with the Remote
Manually turn on the device to be 1.
controlled.
When the device turns off, 5.
immediately press and release the
ENTER button to store the code for
that device.
Press the ON/OFF button and the 6.
device should turn on (this ensures
that the code was properly stored in
the remote for that device).
Test all other buttons on the Remote 7.
to verify they work properly.
Note: When the Remote is set and no
keys have been pressed for fteen
seconds, the Code Search feature
will automatically turn off.
Using The Remote
Since the Remote controls more 1.
than one device, you must “tell” the
Remote which device you wish to
operate. If you wish to operate your
TV, you must rst press the TV key to
put the Remote in the TV mode.
Press and hold the Code Search 2.
Button until the LED stays on.
Release the Code Search Button.
Point the Remote at the device and 3.
press then release the Device Select
Control button (CABLE, TV, VCR,
DVD OR SAT) to select that unit.
Point the Remote at the device 4.
and press and release the ON/OFF
Button. The LED will ash once, each
time you press the ON/OFF Button.
Keep doing this slowly until the
device turns off. It may take up to 300
times to reach the correct code since
Page 8 For technical questions, please call 1-800-444-3353. SKU 66687
The Remote will stay in the selected 2.
mode (such as TV) until it is changed.
If your Remote is in TV mode, you
must change the mode to operate
other devices like DVD, VCR, satellite
receiver or cable box. For example, if
the Remote is in VCR mode and you
wish to turn off the TV, rst press the
TV key before pressing the ON/OFF
Button.
On-Screen Menus-Accessing And
Selecting Menu Items
Many devices have on screen menus
to help you navigate through their
features and functions. Although this
Page 9

remote can not access every menu
setting of every device, it does allow
access to some device’s menus.
on the Remote (TV, DVD, VCR, etc.)
The LED light will turn off.
To use a device’s on-screen menu 1.
system, rst turn on the TV and the
device you want to access.
Press and release the TV button to 2.
access TV mode.
Press and release the INPUT button 3.
several times to toggle through the
video sources until the TV is selected.
Press and release the Device Select 4.
Control button (CABLE, TV, VCR,
DVD OR SAT) of the menu you wish
to access.
Press and release the Menu button. 5.
The LED will blink, indicating you are
in Menu mode.
Use the Volume and Channel control 6.
buttons to navigate through the onscreen menu system.
To make a selection from the on-7.
screen Menu, press the MENU, OK,
INFO, and then ENTER keys to
select the highlighted item.
Sleep Timer
This feature allows the TV to turn off
automatically after a specied length
of time. It can range from 1 to 99
minutes.
Note: The Sleep Timer only works if you
are programmed to your TV mode
and have the Remote aimed at the
TV.
To program the Sleep Timer, rst 1.
press and release the TV Button.
Press and hold the Sleep Button for 2.
ve seconds. The LED light will turn
on.
Release the Sleep Button.3.
Using the number keys, enter the 4.
desired time in minutes (from 1 to
99). To set the Timer to a time that
is under ten minutes, press “0” and
then the desired number (“05” for
ve minutes.) The LED will blink with
each pressed key.
Note: If the Remote does not respond,
make sure the LED light is still
blinking. Remember, it times out
after fteen seconds. If this happens,
press the Menu Button again and
retry selection.
The Remote automatically times out 8.
of Menu mode after fteen seconds
without a key being pressed. Once
this happens, the Remote will clear
the displayed menu from the TV.
If you wish to exit the menu yourself, 9.
press the corresponding device key
Once the second number is entered, 5.
the LED turns off and the Sleep Timer
is now set.
Leave the remote aimed at the TV. 6.
Once the Sleep Timer is set, you can
continue to use the remote without
affecting the Sleep Timer. However,
because the timing mechanism
for the Sleep Timer is built into the
Remote itself, the remote must be
in TV mode and pointed at the TV to
activate the Sleep Timer.
Note: If you press any key other than the
numbers, they will be ignored. You
Page 9For technical questions, please call 1-800-444-3353.SKU 66687
Page 10

will have ten seconds to program the
Sleep Timer, otherwise the LED will
blink four times and exit the program.
Be sure to leave the Remote aimed at 7.
the TV. Once the Sleep Timer is set,
you can continue to use the Remote
without altering the Sleep Timer.
Please remember that the Remote 8.
must remain in TV mode for the
Sleep Timer to activate.
To cancel the Sleep Timer, press and 9.
release the Sleep Button and the
ON/OFF Button. This will reset the
program to zero. The LED will ash,
stating the time has been reset to
Zero.
Page 10 For technical questions, please call 1-800-444-3353. SKU 66687
Page 11

CODE LISTS
Trademark Acknowledgements
All brand names and trademarks are the property of their respective holders.
TV CODE LIST
Company Codes
ABEX 185
ACME 039,050
ADA 007,008
ADC 003
ADMIRAL 001,173
ADVENTURA 174
AIKO 058
AIWA 195,196
AKAI 002
ALLERON 051
AMARK 020
AMTRON 053
AMSTRAD 189
ANANATIONAL 003,025,042,053,193
AOC 004,005,007,009,014,132,156,175
APEX 214
ARCHER 020
AUDIOVOX 053
BANG&OLUFSEN 190
BELCOR 004
BELL&HOWELL 000,001,049
BRADFORD 053
BROKSONIC 136,147
BROKWOOD 004
CANDLE 004,008,009,174
CENTURION 009
CAPEHAPT 175
CELEBRITY 002
CENTURION 009
CENTRONIC 042
CHANGHONG 214
CITIZEN 001,004,008,009,042,053,058,105,
109,177
CLOIRTONE 014
CLASSIC 042,214
COLORTYME 004,009,010
CONCERTO 004,009
CONCIEREG 121
CONTEC/CONY 012,013,014,042,053
CRAIG 042,053
CROWN 042,053
CXC 042,053
DAEWOO 004,005,009,017,018,019,042,058,082,
085,097,100,126,127,130,138
DAYTRON 004,009
DIMENSIA 000,031
DUMONT 004,121
DYNASTY 042
ELEKTRA 001
ELECTROBAND 002,014
ELECTROHOME 003,004,009,022,133
Company Codes
EMERSON 004,009,014,023,024,025,035,036,037,
ENVISION 004,009
FISHER 013,049,180,209
FUJITSU 051,197
FUNAI 042,051,053,155,189,198
FUTURETEC 042,053
GE 000,003,004,009,015,022,031,044,052,
GIBRALTER 004,121
GRUNDY 051,053
HALLMARK 004,009
HARVARD 053
HITACHI 001,004,009,013,059,060,061,088,091,
HAIER 216,217
IMA 053
INFINITY 062
INTEQ 121
JANEIL 174
JBL 062
JCB 002
JC PENNY 000,004,005,008,009,015,022,030,031,
JENSEN 004,009
JVC 013,054,055,060,065,067,089
KAWASHO 002,004,009
KAYPANI 175
KEC 042
KENWOOD 004,009
KLOSS
NOVABEAM
KTV 014,021,042,053,070,116,177
LG (GOLDSTAR) 004,005,009,056,057,155,156,172
LODGENET 000,001
LOEWE 062,211
LOGIK 000,001
LUXMAN 004,009
LXI 000,004,009,015,031,049,062,107,109
MEGATRON 009,059
MAGNAVOX 004,008,009,062,068,069,074,075,077,
MAJESTIC 000,001
KONKA 016,047,066,157,148,176
MARANTZ 004,009,062
MEGATRON 004,009,059
MEI 014
MEMOREX 000,001,004,009,049,051,135
MGA 004,005,009,022,051,180
038,039,040,041,042,043,045,049,051,
053,116,135,147,155,177,179,189,198
054,055,087,092,103,107,125,164
137,139,140,141,142,143,144,145,
146,179,210
052,054,055,087,105,107,109,172
068,069,174
089,163,165
Page 11For technical questions, please call 1-800-444-3353.SKU 66687
Page 12

TV CODE LIST (CONT.)
Company Codes
MIDLAND 015,054,055,107,121,172
MINUTZ 052
MITSUBISHI 004,005,009,022,051,081,089,132,180
MONTGOMERY
WARD
MOTOROLA 003,173
MTC 004,005,009,014,105,109
MULTITECH 053
MULTIVISION 084
NAD 004,009,109,185
NEC 003,004,005,009,010,085,089,095
NIKEI 042
NIKKO 004,009,058
NTC 058
ONKING 042
ONWA 042,053
OPTIMUS 170,185
OPTONICA 095,173
ORION 035,121,135
PANASONIC 003,054,055,062,070,148,170,171
PHILCO 003,004,005,008,009,062,068,069,
PHILIPS 003,004,006,008,062,068,069,074,075,
PILOT 004
PIONEER 004,009,090,179,185
PORTLAND 004,005,009,058
PRICE CLUB 105
PRECISION 166
PRISM 055
PROSCAN 000,015,031,107
PROTON 004,009,093,175,186,192
PULSAR 121
PULSER 004
QUASAR 003,054,055,062,070,148,170,171
RADIO SHACK 000,004,009,031,041,042,048,049,053,
REALISTIC 000,004,009,031,041,042
RCA 000,003,004,005,007,009,011,015,048,
RHAPSODY 014
RUNCO 121
SAMPO 004,009,046,172,175
SAMSUNG 004,005,009,015,104,105,106,109,172
000,001
074,075,077
077,086,087,089,163,183,184,205,206,
207,208,212,213
095,155,170,172,194
082,092,094,096,098,101,102,103,107,
113,125,129,167,179,187,188,191,194
Company Codes
SAMSUX 009
SANSUI 135,136
SANYO 004,013,049,108,110,180,209
SCOTCH 004,009
SCOTT 004,009,024,035,042,051,053
SEARS 000,004,009,013,109,110,180,189
SPELTRAVISION 203
SHARP 004,009,079,173
SHOGUN 004
SIGNATURE 000,001,023
SIMPSON 008
SONIC 014
SONY 002,006,071,128
SOUNDESIGN 004,008,009,042,051,053
SQUAREVIEW 189
SSS 004,042,053
STARLITE 053
SUPRE-MACY 174
SUPREME 002
SYLVANIA 004,008,009,062,068,069,074,075,077,
SYMPHONIC 033,053,155,189,198
TANDY 173
TATUNG 003
TECHNICS 054,055
TECHWOOD 004,009,054,055
TEKNIKA 000,001,004,005,008,009,013,042,051,
TELECAPTION 117
TELERENT 000,001
TERA 004,186
TMK 004,009
TOSHIBA 013,049,089,105,109,117,118,120,159
UNIVERSAL 052,087
VICTOR 060
VIDTECH 004,005,009
VIKING 174
WARDS 000,001,004,005,008,009,024,031,
WHITE
WESTINGHOUSE
YAMAHA 004,005,009
ZENITH 000,001,004,023,038,058,059,064,073,
155,161,163,189,198
053,058,105,109,170,174
,178
033,051,052,062,068,069,074,075,
087,095,119
097,100,130,155
121,135,136,153
PVR/DVR-SAT
COMBO CODE LIST
Company Codes
BELL EXPRESSVU 195
DISH NETWORK 195
ECHOSTAR 195
RCA 176
Page 12 For technical questions, please call 1-800-444-3353. SKU 66687
Page 13

DVD CODE LIST
Company Codes
AIWA 189
AKAI 170
AMES 206
APEX 165,166,167,199,205,220,232,234
A-TREND 168
CLASSIC 206
CYBERHOME 168
DAEWOO 215,216,219
DENON 175,196
DIGITREX 220
ELTA 209,210
EMERSON 171,231,233
FISHER 191
FUNAI 231,233
GE 184,205
GOLDSTAR 171
GO-VIDEO 182,201
GRADIENTE 190
HARMAN/KARDON 202
HITACHI 179,194
HITEKER 220
INTEGRA 197
JVC 181,193
KENWOOD 175,204
KLH 205
KONKA 185,186,187,188
KOSS 190
LASONIC 229
LG 171
MAGNAVOX 173,183
MARANTZ 171,173,183
MICROSOFT 178
MINTEK 205
MITSUBISHI 177
Company Codes
MUSTEK 206
NAD 171,208
NAKAMICHI 207
ONKYO 197
OPTIMUS 179
ORITRON 190
PANASONIC 175
PHILIPS 173,183,198
PIONEER 179
PROLINE 190
PROSCAN 184
RADIOSHACK 218,224,228
REOC 226
RCA 178,184,205,218,224,228
SAMSUNG 182,230
SAMPO 192
SANYO 191
SEG 203
SHARP 172
SHERWOOD 200
SHINCO 205
SONY 009,174
SYLVANIA 231,233
SYMPHONIC 231,233
TEAC 179
TECHNICS 175
TEVION 221,223,225,226,227
THETA DIGITAL 179
TOSHIBA 173,211,222
WHARFEDALE 217
YAMAHA 175,195
YAMAKAWA 213
ZENITH 171,180,212
VCR/DV D COMBO CODE LIST
Company Codes
GO-VIDEO 230
JVC 151
PHILIPS 183
SAMSUNG 230
SANYO 042,191
DVD LASER DISCS CODE LIST
Company Codes
DENON 080
PIONEER 080
PROSCAN 083
RCA 083
SANYO 007
SONY 098
ZENITH 007
PVR/DVD (DVD) CODE LIST
Company Codes
PANASONIC 148
PHILLIPS 146
RCA 184
REPLAY TV 148
SONIC BLUE 148
SONY 147
TIVO 146,147
HDTV/SAT CODE LIST
Company Codes
HUGHES 169,170,172,178
PANASONIC 126
PHILIPS 156
RCA 190,198
SAMSUNG 134,153
SHARP 144
SONY 163
ZENITH 135,174
Page 13For technical questions, please call 1-800-444-3353.SKU 66687
Page 14

VCR CODE LIST
Company Codes
ADMIRAL 001
ADVENTURA 026
AIKO 027
AIWA 002,020,026,044
AKAI 003,004,005,006,008,009,111,112
ALLEGRO 018,022,104
AMERICAN HIGH 021,060
ASHA 134
AUDIO DYNAMICS 009,123
AUDIOVOX 014
BELL&HOWELL 043
BEAUMARK 134
BROKSONIC 012,025,031,064,085
CALIX 014
CANDLE 009,014,015,016,017,019,134
CANNON 021,060,114,115
CAPEHART 104
CARVER 062
CCE 027,061
CITIZEN 009,014,015,016,017,019,027,134
COLORTYME 009
COLT 061
CRAIG 014,036,074,134
CURTIS-MATHES 000,002,009,016,021,024,060,109,
CYBERNEX 134
DAEWOO 015,017,019,025,026,027,028,054,109
DBX 009,123
DIMENSIA 000
DYNATECH 002,026
ELECTROHOME 014,029
ELECTROPHONIC 014
EMERSON 002,006,008,012,014,015,021,024,025,
FISHER 009,023,042,043,048,049,050,062,079
FUJI 004,021,060
FUNAI 002,008,026
GARRARD 026
GE 000,021,053,060,115,117,120,134
GRADIENTE 026
GO-VIDEO 134,143
HARLEY
DAVIDSON
HARMAN KARDON 009,068
HARWOOD 061
HEADQUARTER 043
HITACHI 002,055,057,107,111,120,122,144,145
HI-Q 023
INSTANT REPLAY 008,021,060
INTEQ 014
JCL 021,060
JC PENNEY 009,014,043,055,060,107,123,111,115,
JENSEN 055,111
JVC 009,022,043,111,123,151,152
KENWOOD 009,016,043,111,123
KLH 061,131
KODAK 014,021,060
115,133,134
026,029,030,031,032,034,036,037,038,
039,040,041,043,044,045,047,060,065,
105,116,134
026
118,134
Company Codes
LLOYD 002,026
LOGIK 061
LXI 014
MAGNAVOX 021,060,062,104,106,115,124
MAGNIN 134
MARANTZ 009,016,021,043,060,062,064,114,123
MARTA 014
MASUSHITA 021,060
MEI 021,060
MEMOREX 001,002,014,021,023,026,043,060,
MGA 029,065
MGN
TECHNOLOGY
MIDLAND 053
MINOLTA 055,107
MITSUBISHI 029,051,052,055,065,066,068,069,070,
MONTGOMERY
WARD
MOTOROLA 001,021,060
MTC 002,026,134
MULTITECH 002,026,053,061,134
NEC 009,016,024,043,064,076,077,078,
NIKKO 014
NOBLEX 134
OLYMPUS 021,060
OPTIMUS 001,014,134,136,137,138,149
OPTONICA 075,134
ORION 031
PANASONIC 021,060,115,125,138,148,149
PENTAX 016,055,107,120
PENTAX
RESEARCH
PHILCO 021,060,062,115
PHILIPS 021,060,062,063,075,103,106,108,
PILOT 014
PIONEER 055,080,081,123
PORTLAND 016,017,019
PROSCAN 000
PROTEC 061
PULSAR 104
QUARTER 043
QUARTZ 043
QUASAR 021,060,115,125,149
RCA 000,003,021,055,060,082,083,084,086,
RADIOSHACK 000,001,002,014,021,023,026,029,
RADIX 014
RANDEX 014
RICOH 128
RUNCO 104
SAMSUNG 005,015,053,055,112,129,134
SANKY 001,104
SANSUI 111,123
104,112,134
013
071,073,074,123
001,075
111,123
009
124,146,153
087,088,089,090,091,107,110,115,120,
125,134,137
043,049,050,060,075,112,115,117,134,
136,137,138
Page 14 For technical questions, please call 1-800-444-3353. SKU 66687
Page 15

VCR CODE LIST (CONT.)
Company Codes
SANYO 023,042,043,079,134
SCOTT 012,015,025,032,038,065,093,116
SEARS 014,021,023,043,048,049,050,055,060,
SHARP 001,002,017,029,075,135,136,142
SHINTOM 004,055,061,128,132
SHOGUN 134
SIGNATURE 002
SINGER 021,060,061
SONY 004,099,128,139,140,141,147,154,155
STS 021,055,060,107
SYLVANIA 002,008,026,060,062,065,115,124,231
SYMPHONIC 002,008,011,026
TANDY 002,043
TASHIKO 014
TATUNG 111
TEAC 002,026,111
TECHNICS 021,060
062,107,118
CABLE CODE LIST
Company Codes
ADC 000
ADCOM 001,054
AIWA 002,003,047,182
AKAI 055,077,170
AUDIO TECHNICA 005
CALIFORNIA
AUDIO LABS
CAPETRONIC 009
CARVER 006,007,008,165
CASIO 117
CITIZEN 166
CURTIS MATHES 117
DENON 010
EMERSON 001,013
FISHER 007,015,016,017,058
GE 065
GENEXXA 013,018,059
GOLDSTAR 060
HARMON KARDON 020,031
HITACHI 018
INKEL 021
JC PENNEY 030,117
JVC 022,153
KENWOOD 019,023,025,067,068,168
KRELL 006
KYOCERA 000
LUXMAN 026,027,069,078
LXI 117
MAGNAVOX 006,071,140
MARANTZ 006,028,029,072
MCS 030,117
MGA 031
MISSION 006
MITSUBISHI 031,032
NAD 061,083
NAKAMICHI 033,034,171
056
Company Codes
TEKNIKA 002,014,021,026,060,100
TOSHIBA 015,049,055,062,065,093,116
TOTEVSION 014,134
TMK 024,047,134
UNITECH 134
VECTOR
RESEARCH
VICTOR 123
VIDEO CONCEPTS 009,015,016,029,123
VIDEOSONIC 134
WARDS 001,002,014,015,021,023,026,029,055,
WHITE
WESTINGHOUSE
XR-1000 021,026,060,061
YAMAHA 009,043,111,123
ZENITH 001,004,007,010,014,018,022,056,058,
009,015,016,123
060,061,075,101,107,116,134
002,008
059,085,104,119,123,128,133,145
Company Codes
NEC 030
NIKKO 005,013,016
NSM 006
ONKYO 035,036,062,151
OPTIMUS 007,008,018,024,037,038,039,040,
PANASONIC 056,073,080,160,202
PHILIPS 006,071,165
PIONEER 018,041,042,059,090,177,216
PROTON 006
QUASAR 056
RCA 043,063,090,135,184,185,214,216
REALISTIC 001,007,009,013,018,029,037,039
ROTEL 006
RADIOSHACK 008,046,090,126,208,214,216
SAE 006
SAMSUNG 081
SANSUI 006,044,063,074
SANYO 007,045,058,075,082
SCOTT 001,013
SEARS 024,029,117
SHARP 024,019,029
SHERWOOD 021,029,038,046,199
SHURE 030
SONY 047,048,132,134,140
STS 000
SYLVANIA 006
SYMPHONIC 049
TEAC 016,029,039,049,050,051,196
TECHNICS 056,073,160,202
THETA DIGITAL 071
TOSHIBA 061
VICTOR 022
YAMAHA 005,052,053,064,186
ZENITH 016,070,099,124,190
084,087,091
Page 15For technical questions, please call 1-800-444-3353.SKU 66687
Page 16

CABLE CODE LIST
Company Codes
ABC 001,002,003,004,005,006
ALLEGRO 064,065
AMERICAST 067
ANTRONIX 009,008
ARCHER 008,009,010,011
CABLETENNA 008
CABLEVIEW 008
CENTURY 011
CITIZEN 011
COLOUR VOICE 012,013
COMTRONICS 014,015
CONTEC/CONY 016
EASTERN 017
GARRAARD 011
GC ELECTRONICS 009
GEMINI 018,019,076
GE 089
GENERAL
INSTRUMENT
HAMLIN 020,021,022
HITACHI 003
HYTEX 002
JASCO 011
JERROLD 001,003,004,005,018,024,049,050,051,
MAGNAVOX 025
MEMOREX 026
MOVIE TIME 002,027
NSC 002,027
OAK 002,016,029
PANASONIC 000,048
PARAGON 026
PHILIPS 011,012,013,019,025,030,031,032
PIONEER 033,034,038
PULSAR 026
RADIO SHACK 045,065,074
RCA 000,047
003,049,051,053,054,058,068,069,
070,071
066,068,069
Company Codes
REALISTIC 009
REGAL 022
REGENCY 017
REMBRANDT 003
RUNCO 026
SAMSUNG 014,034
SCIENTIFIC
ATLANTA
SIGNAL 014,018
SIGNATURE 003
SL MARX 014
SPRUCER 000
STANDARD
COMPONENTS
STARCOM 001,018
STARGATE 014,018
STARSIGHT 060
STAR SIGHT
CABLE SERVICE
STARQUEST 018
STAR TRAK 056
TANDY 040
TELEVIEW 014
TEXSCAN 039
TOCOM 004,041,053
TOSHIBA 026
TUSA 018
TV86 027
UNIKA 008,009,011
UNITED ARTISTS 002
UNITED CABLE 001
UNIVERSAL 008,009,010,011,042
VIDEOWAY 044
VIEWSTAR 015,025,027,040
VIDEO TECH 090
ZENITH 026,028,043,057,059,060,061,062,063,
006,036,037,038,075,136,147
039
047
064,065,067,073
AUDIO SYSTEMS LIST
Company Codes
AIWA 179,182,191,200
CARVER 165
CITIZEN 166
DENON 143,157
FISHER 154,161
GOLDSTAR 106
HARMON KARDON 144,158
JVC 130,153,159
KENWOOD 023,148,156,168,172,209
NAD 061,079,083
MAGNAVOX 136,154
MARANTZ 028,164
MITSUBISHI 217
ONKYO 145,151,152
OPTIMUS 091,092,094,133,007,087,088,089
PANASONIC 056,076,131,150,155,163,203,204
PHILIPS 095,154,163,164,165
Page 16 For technical questions, please call 1-800-444-3353. SKU 66687
Company Codes
PIONEER 177,206,207,218
RADIOSHACK 046,094,133,146,205,206,207,208,
215,218,219
RCA 057,112,121,135,167,185,206,207,210,
211,212,215,218,219
REALISTIC 162
SANYO 045
SCOTT 108
SHARP 011,037,149
SHERWOOD 046,159,198,199
SONY 118,137,138,139,173,174,175,176,183
TEAC 050,147,195,196,197
TECHNICS 056,076,131,150,155,163,203,204
VENTURER 085
YAMAHA 141,142,178,180,181,186,187,188,189
ZENITH 016,070,089,099,105,106,124,154,190
Page 17

SATELLITE CODE LIST
Company Codes
AMPLICA 115
BELL EXPRESSVU 168,187,194
CHANNEL
MASTER
CHAPPARAL 100,101
CHEYENNE 101
DIRECT TV 200,201,202,203,204,205,206,207,208,
DISH NETWORK 128,129,130,168,187,188,194,195
DRAKE 102,114,127
DSS HITACHI 172,181
DSS HUGHES
SATELLITE
DSS MAGNAVOX 116,152,179
DSS PANASONIC 126,166
DSS RCA 176,189,192,193,198
DSS SONY 125,163
DX ANTENNA 108,122
ECHOSPHERE 168
ECHOSTAR 128,129,130,168,187,194
FUJITSU 131,132
GE 176,162
GEMINI 135
GENERAL
INSTRUMENTS
JERROLD 137
117,118,119
209,210,211,212,213,214,215,216,217
169,170,172,173,178
104,105,106,133,182,183,184,185
Company Codes
JVC 188
KENWOOD 138
LUXOR 139,179
MACOM STATE 140
NORSTAT 141,186
PACE 154,155
PHILIPS 116,152
PIONEER 124
PRIMESTAR 167,180,179
PROSCAN 162,176
REALISTIC 107,143
SAMSUNG 134,153
SHARP 144
SIERRA I,II,III 101
STAR SIGHT 173
STAR TRAK 148,111
STARCHOICE 167,180,185
STS 108,110
SUPER GUIDE 149
THOMSON 154
TOSHIBA 112
TOSHIBA DSS 164,165,171
UNIDEN 113,151
VIDEO CIPHER II 114
ZENITH 102,103,114,127,135,155,174,175,186
Page 17For technical questions, please call 1-800-444-3353.SKU 66687
Page 18

TV/VCR, TV/DVD COMBO CODE LIST
Company TV VCR/DVD
ADMIRAL 115 001
124 001
AIWA 155 002
155 008
BROKSONIC 136 085
CANDLE 153 014
CURTIS-MATHES 073 133
DAEWOO 039 027
097 027
138 054
EMERSON 036 041
039 027
155 002
155 008
198 231
FISHER 209 043
FUNAI 155 002
155 008
198 231
GE 102 117
194 117
GOLDSTAR 121 113
153 014
155 008
HITACHI 155 002
INFINITY 062 062
KONKA 157 187
158 188
LG 121 113
153 014
155 002
LXI 155 002
MAGNAVOX 062 062
115 001
MEMOREX 209 043
Company TV VCR/DVD
PANASONIC 148 138
PHILIPS 062 062
212 063
PHILIPS/
MAGNAVOX
QUASAR 148 138
RCA 102 117
RADIOSHACK 102 117
SAMSUNG 073 129
SANSUI 135 085
SANYO 209 043
SHARP 124 001
SONY 002 155
SYLVANIA 155 002
SYMPHONIC 155 002
TOSHIBA 178 115
WHITE
WESTINGHOUSE
ZENITH 036 041
213 103
194 117
194 117
073 133
128 155
155 008
198 231
155 008
198 231
155 002
155 008
073 133
097 027
121 104
121 113
136 085
153 014
Personal Code Reference
TYPE UNIT CODE
TV
VCR
SAT
DVD
CABLE
Record Product’s Serial Number Here:
Note: If product has no serial number, record month and year of purchase instead.
Note: Some parts are listed and shown for illustration purposes only, and are not
available individually as replacement parts.
Page 18 For technical questions, please call 1-800-444-3353. SKU 66687
 Loading...