

Page 1
BATTERY & ALTERNATOR TESTER
12 VOLT WITH RING TERMINALS
65928
SET UP AND OPERATING INSTRUCTIONS
Distributed exclusively by Harbor Freight Tools®.
3491 Mission Oaks Blvd., Camarillo, CA 93011
Visit our website at: http://www.harborfreight.com
Read this material before using this product.
Failure to do so can result in serious injury.
SAVE THIS MANUAL.
Copyright© 2008 by Harbor Freight Tools®. All rights reserved. No portion of this manual or any
artwork contained herein may be reproduced in any shape or form without the express written
consent of Harbor Freight Tools. Diagrams within this manual may not be drawn proportionally.
Due to continuing improvements, actual product may differ slightly from the product described
herein. Tools required for assembly and service may not be included.
For technical questions or replacement parts, please call 1-800-444-3353.
Page 2

SAVE THIS MANUAL
Keep this manual for the safety
warnings and precautions, assembly and
operating instructions. Write the product’s
serial number in the back of the manual
(or month and year of purchase if product
has no number). Keep this manual and
the receipt in a safe and dry place for
future reference.
IMPORTANT SAFETY
INFORMATION
Wear ANSI-approved safety goggles 1.
during set up and use of the Battery &
Alternator Tester.
Test in a well ventilated area. Explo-2.
sive gases may be produced during
testing. Do not smoke, cause sparks,
or strike matches near the battery
when testing.
Always refer to the user manual of 3.
the battery/alternator being tested for
testing instructions and precautions
prior to using the Battery Tester.
Do not reverse the polarity of the 4.
Battery & Alternator Tester’s Ring
Terminals or vehicle battery.
This product is not a toy. Keep it out 8.
of reach of children.
Maintain labels and nameplates on 9.
the unit. These carry important safety
information. If unreadable or missing, contact Harbor Freight Tools for a
replacement.
People with pacemakers should 10.
consult their physician(s) before use.
Electromagnetic elds in close proximity to heart pacemaker could cause
pacemaker interference or pacemaker
failure.
Caution is necessary when near coil,
spark plug cables, or distributor of
running engine. Engine should be off
during distributor adjustment.
The warnings, precautions, and 11.
instructions discussed in this instruction manual cannot cover all possible
conditions and situations that may
occur. It must be understood by the
operator that common sense and caution are factors which cannot be built
into this product, but must be supplied
by the operator.
Avoid dropping the Tester; this tool 12.
can be easily damaged.
Do not expose this product to rain or 5.
wet conditions.
Maintain this product. Check for 6.
breakage of parts and any other condition that may affect this product’s
operation. If damaged, have the unit
repaired before use.
Use this product in accordance with 7.
these instructions, taking into account
the working conditions and the work
to be performed. Use of this product
for operations different from those
intended could result in a hazardous
situation.
SKU 65928 For technical questions, please call 1-800-444-3353. Page 2
INSTALLATION
INSTRUCTIONS
Turn the vehicle engine and all acces-1.
sories off.
Disconnect the BLACK (--) Negative 2.
cable from the vehicle battery.
Select a convenient location on or 3.
near the battery to attach the Battery & Alternator Tester. Make sure
to clean the surface to which you will
attach the unit.
If your battery does not have a battery 4.
adapter (not included), you will need
REV 09f
Page 3

to attach one so that the lugs can be
attached to the adapter connectors.
Attach the Ring Terminal on the RED 5.
Wire to the Positive (+) terminal on
the battery.
Attach the Ring Terminal on the 6.
BLACK Wire to the Negative (--) part
of the battery.
Attach the Battery & Alternator Tester 7.
unit to the desired location using the
hook and loop strips provided.
Re-connect the BLACK (--) Negative 8.
battery cable to the Negative battery
terminal.
OPERATING INSTRUCTIONS
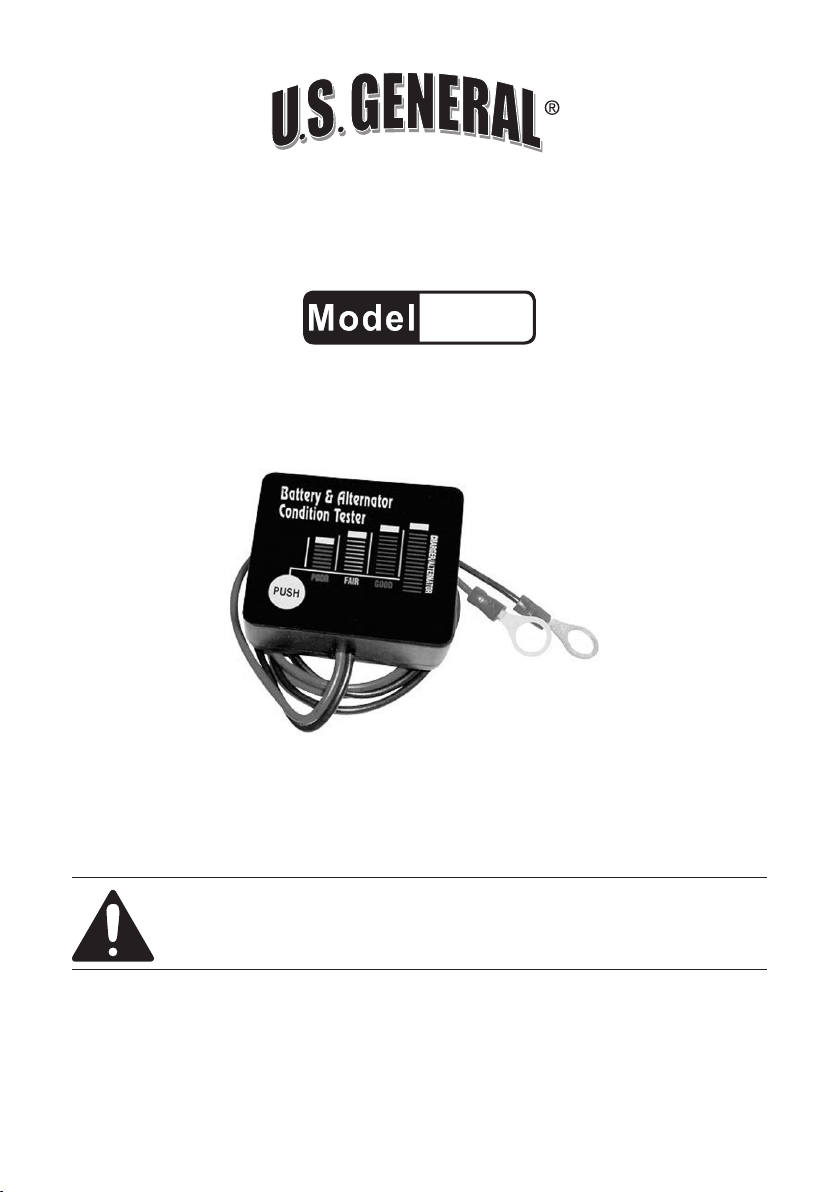
IMPORTANT NOTES:1.
For the most accurate readings a.
always allow the battery to “rest” for
a minimum period of twelve hours
without charging or discharging or
running the engine.
When testing a battery, test only b.
with the engine and all accessories
and lights turned off.
Test an alternator/charging system c.
only when the engine is running
and without lighting and accesso-
ries turned on.
To test a battery,2. the vehicle’s en-
gine, lighting, and accessories must
be off.
Press the area on the unit marked a.
“PUSH”.
If all three LED’s illuminate (red, b.
yellow, and green) the battery is in
“good” condition and fully charged
(12.3 to 12.7 volts).
If only the red and yellow LED’s c.
illuminate, the battery is in “fair”
condition (11.8 to 12.2 volts).
If only the red LED illuminates, the d.
battery is in “poor” condition (11.3 to
11.7 volts). The battery should be
desulphated fully before it can be
further evaluated to determine if it
can be returned to “good” condition.
When no LED’s illuminate, the bat-e.
tery can be considered “dead” and
unlikely to be restored.
To test an alternator/charging sys-3.
tem, the engine must be running at
2,000 RPM minimum.
Press the area on the unit marked a.
“PUSH”.
If all four LED’s illuminate, the alter-b.
nator/charging system is in “good”
condition.
If the green LED (marked “ALTER-c.
NATOR” does not illuminate, the
alternator/charging system is faulty
and must be repaired.
When “jump starting” 4. using booster
battery cables (not included):
Turn off all lights and power using a.
accessories.
Keep hands and body clear of all b.
hot and moving parts in the engine
compartment.
Attach the RED (+) battery cable c.
clamp to the Positive (+) battery
terminal of the “good” vehicle.
Attach the BLACK (--) battery cable d.
clamp to the Negative (--) battery
terminal of the “good” vehicle.
Attach the RED (+) battery cable e.
clamp to the Positive (+) battery
terminal of the “dead” vehicle.
Attach the BLACK (--) battery cable f.
clamp to a clean, non-painted,
metal, non-moving part of the
“dead” vehicle at least three feet
away from the battery.
SKU 65928 For technical questions, please call 1-800-444-3353. Page 3
Page 4

Run the “good” vehicle at a slightly g.
higher speed than idle.
While testing the battery using the h.
Battery/Alternator Tester, check the
condition of the “dead” battery. The
Battery/Alternator Tester must in-
dicate “fair” (Yellow LED) or “good”
(Green LED) before you attempt to
start the “dead” vehicle.
After the engine has started, care-i.
fully disconnect the battery cable
clamps from the batteries in the
exact reverse order they were at-
tached.
LIMITED 90 DAY WARRANTY
Harbor Freight Tools Co. makes every effort to assure that its products meet
high quality and durability standards, and
warrants to the original purchaser that this
product is free from defects in materials
and workmanship for the period of 90 days
from the date of purchase. This warranty
does not apply to damage due directly or
indirectly, to misuse, abuse, negligence or
accidents, repairs or alterations outside
our facilities, criminal activity, improper
installation, normal wear and tear, or to
lack of maintenance. We shall in no event
be liable for death, injuries to persons
or property, or for incidental, contingent,
special or consequential damages arising
from the use of our product. Some states
do not allow the exclusion or limitation
of incidental or consequential damages,
so the above limitation of exclusion may
not apply to you. THIS WARRANTY IS
EXPRESSLY IN LIEU OF ALL OTHER
WARRANTIES, EXPRESS OR IMPLIED,
INCLUDING THE WARRANTIES OF
MERCHANTABILITY AND FITNESS.
complaint must accompany the merchan-
dise. If our inspection veries the defect,
we will either repair or replace the product
at our election or we may elect to refund
the purchase price if we cannot readily
and quickly provide you with a replacement. We will return repaired products at
our expense, but if we determine there
is no defect, or that the defect resulted
from causes not within the scope of our
warranty, then you must bear the cost of
returning the product.
This warranty gives you specic
legal rights and you may also have other
rights which vary from state to state.
3491 Mission Oaks Blvd.
PO Box 6009, Camarillo, CA 93011
(800) 444-3353
Record Product’s Serial Number Here:
__________________________________
Note: If product has no serial number,
record month and year of purchase
instead.
Note: Replacement parts are not avail-
able for this item.
To take advantage of this warranty,
the product or part must be returned to us
with transportation charges prepaid. Proof
of purchase date and an explanation of the
SKU 65928 For technical questions, please call 1-800-444-3353. Page 4
 Loading...