

HAPRO LUXURA X5, LUXURA X7 Owner's Manual
Owner’s manual · Anleitung · Handleiding
Mode d’emploi · Mode de empleo · Kоводство
Per l'italiano, vedete www.hapro.com
Českou verzi naleznete www.hapro.com
Polska wersja dostępna na www.hapro.com
Magyar nyelvű változat érhető el www.hapro.com
For dansk version, www.hapro.com
Suomeksi käännettynä saatavilla www.hapro.com
For den norske versjonen, www.hapro.com
För svenska, www.hapro.com
ITA
CES
POL
HUN
DNK
FIN
NOR
SWE

2
Headquarters
Hapro International
P.O.Box 73
4420 AC Kapelle
The Netherlands
Tel.: +31(0)113-362362
Fax.: +31(0)113-362399
Office Germany
Hapro Deutschland GmbH
Südring 30
56412 Ruppach-Goldhausen
Germany
Tel: +49 (0)2602 – 9400-0
Fax: +49 (0)2602 – 940049

3
ENGFRASPARUS DEUNLD
Owner’s manual............................. 4
Anleitung .................................. 20
Handleiding ................................ 36
Mode d’emploi ............................. 52
Mode de empleo ........................68
Kоводство..............................84
This manual provides the required information on warnings, instructions and assembly. You should use this manual for more
than just the necessary sunbed assembly and/or maintenance instructions; you need to familiarize yourself with all of the
information provided. Persons who use the sunbeds need to be informed and supervised, and it is your duty to make sure they
receive proper assistance. (Translation of the original Dutch instructions)
Dieses Handbuch stellt alle notwendigen Informationen - Warnungen, Anweisungen und Zusammenbauanleitung - bereit.
Sie sollten dieses Handbuch nicht nur für die erforderlichen Anweisungen zum Zusammenbau der Sonnenbank und/oder
für Wartungsanweisungen verwenden, sondern Sie sollten sich mit allen bereitgestellten Informationen vertraut machen.
Personen, die eine Sonnenbank nutzen, müssen informiert und beaufsichtigt werden und es liegt in Ihrer Verantwortlichkeit,
dass sie die notwendige Hilfe erhalten. (Übersetzung der Niederländischen Original-Anleitung)
Deze handleiding geeft alleen de noodzakelijke informatie mbt waarschuwingen, instructie en opbouw. Gebruik deze
handleiding niet alleen voor de noodzakelijke opbouw en/of onderhoud van de zonnebank, u dient zich op de hoogte te
stellen van alle gegeven informatie. Personen die gebruik maken van de zonnebank dienen geïnformeerd en begeleid te
worden. Het is uw verantwoordelijkheid ervoor te zorgen dat dit gebeurd. (Originele handleiding)
Este manual contiene la información necesaria sobre advertencias, instrucciones y montaje. Debe usar este manual para otras
instrucciones, no solo para las instrucciones necesarias de montaje y mantenimiento de la cama solar; tendrá que familiarizarse
con toda la información que contiene. Aquellas personas que usen camas solares deben conocer su funcionamiento y estar
bajo supervisión. Es responsabilidad suya ofrecerles la ayuda necesaria. (traducción de las instrucciones originales en neerlandés)
Vous trouverez dans ce manuel les informations nécessaires concernant les mises en garde, les instructions et le montage.
Nous vous recommandons de ne pas utiliser ce manuel uniquement pour les instructions élémentaires de montage du banc
solaire/ou pour les instructions d’entretien ; vous devez vous familiariser avec les informations fournies. Les utilisateurs de banc
solaire doivent être informés et encadrés, et il est de votre devoir de vous assurer qu’ils reçoivent une assistance appropriée.
(Traduit sur le manuel original néerlandais)
Настоящее руководство содержит необходимую информацию о предупреждениях, инструкциях по эксплуатации и
сборке устройства. Следует использовать это руководство не просто как инструкцию по сборке и (или) техническому
обслуживанию солярия; необходимо тщательно ознакомиться со всей приведенной информацией. Пользователи
солярия должны быть проинформированы и находиться под присмотром, поэтому Ваша ответственность состоит в том,
чтобы оказать им необходимое содействие. (Перевод оригинальных инструкций на нидерландском языке.)
4
ENG
ENG
Congratulations on the purchase of your Hapro sunbed. Your new sunbed has been
manufactured with the utmost care and attention and consists of high-quality parts.
All Hapro sunbeds have been developed to give you the best possible tan, whilst
complying with the strictest applicable European standards.
Lamp information............................................ 5
Operation ..................................................6
Symbols ...................................................16
Warranty policy.............................................17
Declaration of Confirmity .....................................18
Removing the acryl sheets ...................................100
Removing the filter holders ..................................101
Removing the face tanners ..................................102
Empty conditioning container, Replace Qsens container ...........103
Contents
Model : XXXXX
Type : XXXXXXXX
Serial number : XXXXXXXXXX / 3
Rated voltage : XXXXXXXX
Rated power input : XXX W
With Airco : XXX W
Manufactured by: Hapro International B.V.
PO Box 73
4420 AC Kapelle, Netherlands
XXXXX_XX
UV type 3 (Total Erythema output limited at 0,3W/m3)
30 x maxlight 160W-R CE III
160-R-(21-28)/(2,2-3)
22 x maxlight XL180W-R CE III
180-R-(21-28)/(2-2,6)
22 x maxlight HP 500W S or maxlight HP 500W D
Main Filter: SPS (Art. nr. 15691) Ballast: 320W
Lamp information
The lamps listed below are those that are installed as standard equipment at the factory. These standard lamps have been selected for
optimal tanning results and to match the UV classi cation of your tanning unit. We recommend that when you replace a lamp you only
use lamps of the type currently installed in your tanning unit and which are listed in the table below and on the identi cation plate. If you
choose to install a di erent type of lamp, you must only use lamps that are marked with an equivalent code which indicates that the UV
component falls within the equivalence range listed on the identi cation plate.
Lamps Art nr equivalent code UV type (EU countries) UV type (non-EU countries)
maxlight 25W CE III 23023 30-O-(2-3)/(42,5-57,5) 3 3
maxlight 100W-R CE III 12797 100-R-(17-22)/(2,1-2,9) 3 3
maxlight 100W-R CE 0,3 16997 100-R-(20-27)/(2,3-3,1) 2 3
maxlight 100W-R High Intensive 12801 100-R-(38-50)/(5,1-6,9) may not be used 5
maxlight XL 120 W-R CE III 12810 120-R-(27-36)/(2,8-3,8) 3 3
maxlight XL 120 W-R High Intensive 15898 120-R-(68-90)/(7,9-10,7) may not be used 5
maxlight 160W-R CE III 12814 160-R-(21-28)/(2,2-3) 3 3
maxlight 160W-R CE 0,3 17001 160-R-(20-27)/(1,5-2,1) 2 3
maxlight 160W-R High Intensive 15899 160-R-(77-102)/(6,9-9,3) may not be used 5
maxlight XL 180W-R CE III 12818 180-R-(21-28)/(2-2,6) 3 3
maxlight XL 180W-R CE 0,3 17002 180-R-(24-32)/(1,7-2,3) 2 3
maxlight XL 180W-R High Intensive 12821 180-R-(86-114)/(6,7-9,1) may not be used 5
maxlight HP 400W D 12526 not applicable not applicable not applicable
Lamps (IP-control) Art nr equivalent code UV type (EU countries) UV type (non-EU countries)
maxlight 80-180W-R IPcontrol CE/N III 19446 180-R-(37-49)/(3,4-4,6) not applicable not applicable
maxlight XL 80-180W-R IPcontrol CE/N III 19447 180-R-(38-50)/(3-4) not applicable not applicable
Power facial tanner Glass lter UV type (EU countries) UV type (non-EU countries)
300W HPS 2 2
400W HPS may not be used 2
300W SPS 3 2
400W SPS 2 2
300W BPS 3 3
400W BPS 3 3
Note: The total erythema is limited to 0.3 W/m² for all UV types within the EU.
Note: The equivalent code is only applicable to low-pressure uorescent lamps.
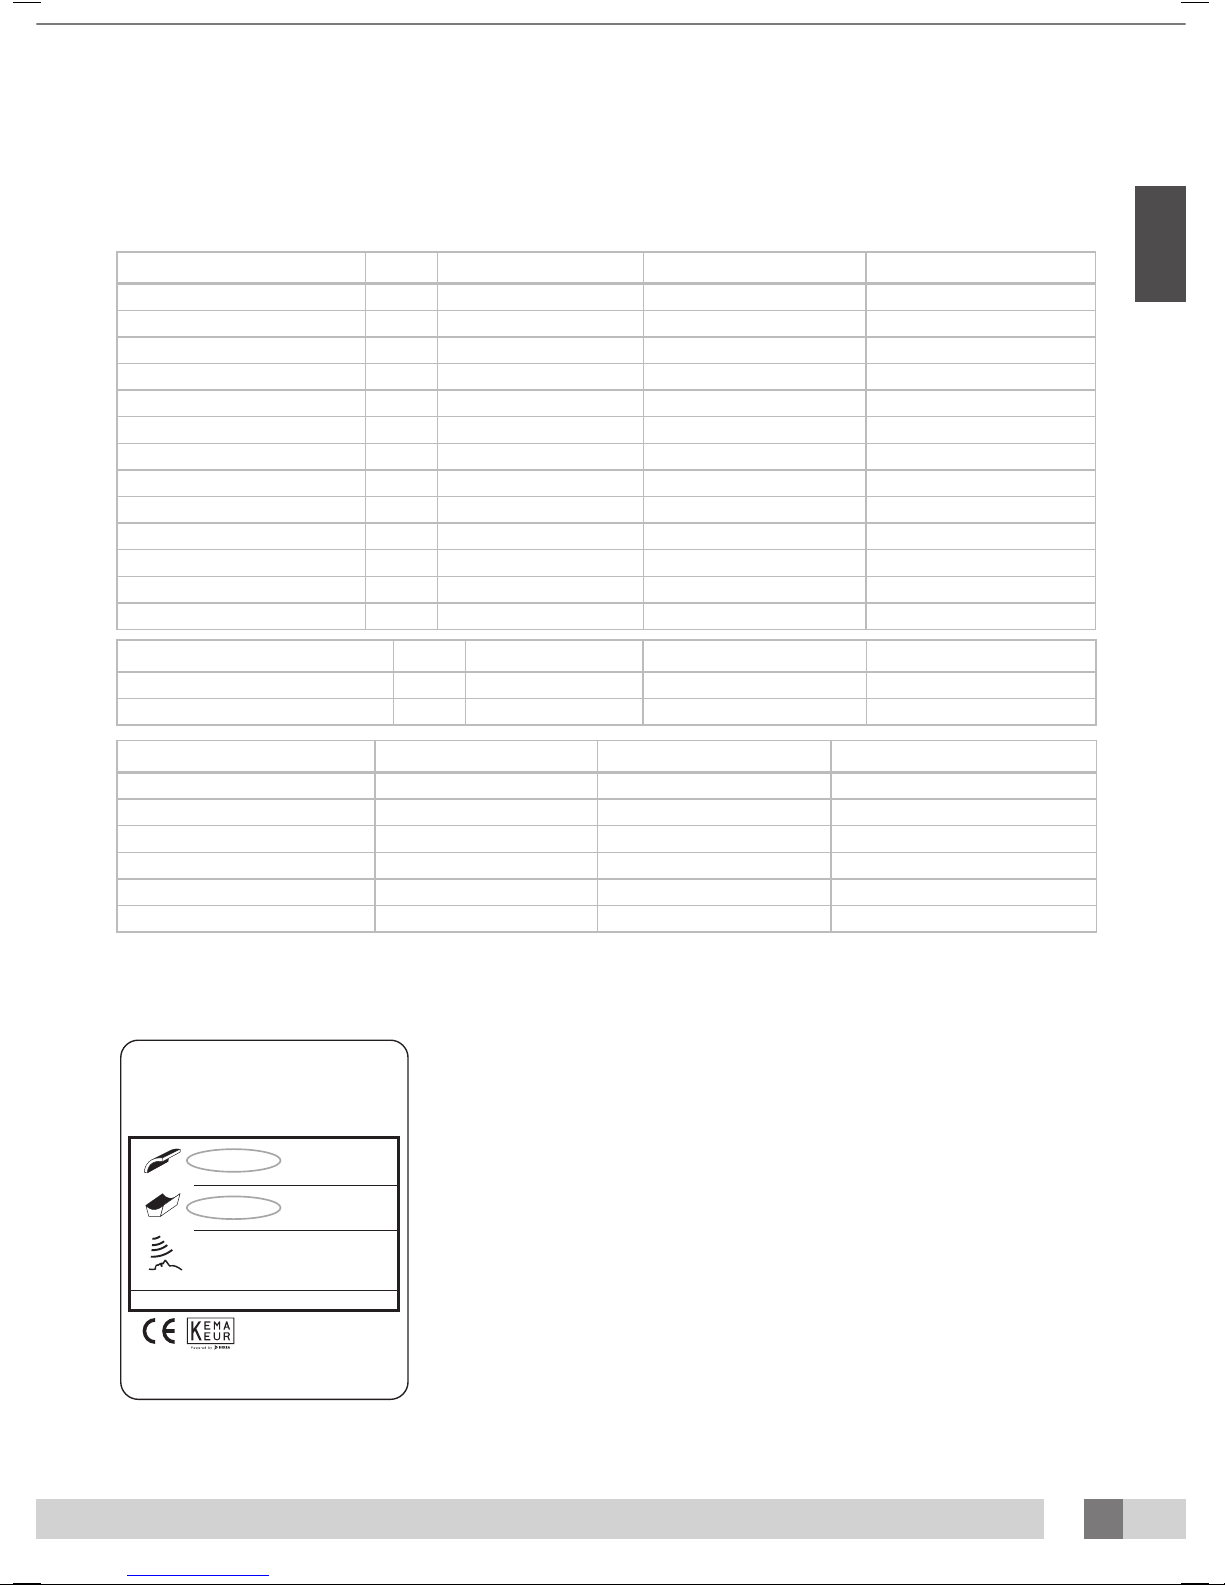
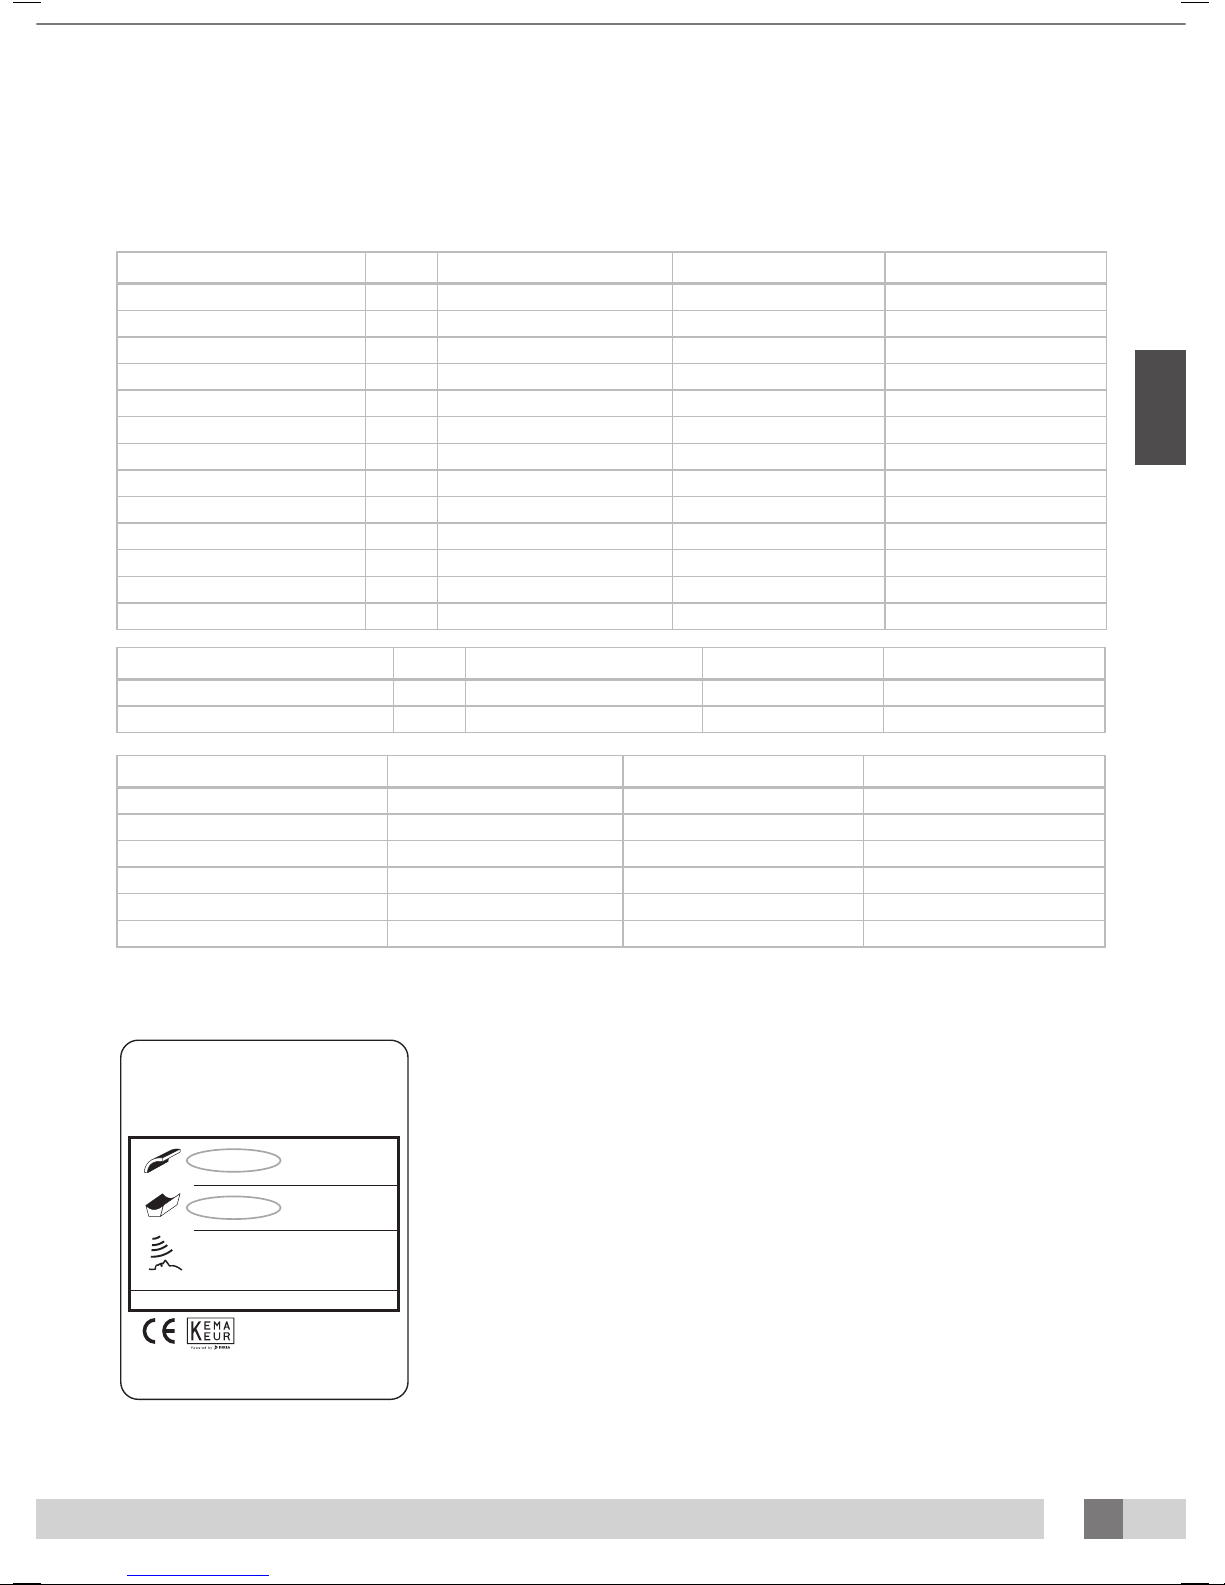
Example:
On the example identi cation plate shown below the equivalent codes for the installed canopy and bench
lamps are circled.
The equivalent code for the canopy is 160-R-(21-28)/(2.2-3)
160 = the wattage of the lamp
R = the re ector type
(21-28) = the equivalence range for the total e ective erythema
(2.2-3) = the equivalence range for the NMSC ratio
If you intend to install a new lamp, the wattage and re ector type must always match the equivalent code
on the identi cation plate. The e ective erythema and NMSC ratio must also match the speci ed range.
You may only use a lamp other than the recommended type if all of these criteria are met. You must also be
aware that:
a. The tanning unit is likely to be less e ective in terms of tanning performance.
b. The circuit protection for your tanning unit must be adapted because the electrical current
consumption will have changed.
c. The UV classi cation no longer matches the original classi cation shown on the identi cation plate.
d. We will not necessarily honour warranty claims arising from the use of lamps other than those we
recommend, because the technical operation of your tanning unit might be a ected.
5
ENG
Model : XXXXX
Type : XXXXXXXX
Serial number : XXXXXXXXXX / 3
Rated voltage : XXXXXXXX
Rated power input : XXX W
With Airco : XXX W
Manufactured by: Hapro International B.V.
PO Box 73
4420 AC Kapelle, Netherlands
XXXXX_XX
UV type 3 (Total Erythema output limited at 0,3W/m3)
30 x maxlight 160W-R CE III
160-R-(21-28)/(2,2-3)
22 x maxlight XL180W-R CE III
180-R-(21-28)/(2-2,6)
22 x maxlight HP 500W S or maxlight HP 500W D
Main Filter: SPS (Art. nr. 15691) Ballast: 320W
Lamp information
The lamps listed below are those that are installed as standard equipment at the factory. These standard lamps have been selected for
optimal tanning results and to match the UV classi cation of your tanning unit. We recommend that when you replace a lamp you only
use lamps of the type currently installed in your tanning unit and which are listed in the table below and on the identi cation plate. If you
choose to install a di erent type of lamp, you must only use lamps that are marked with an equivalent code which indicates that the UV
component falls within the equivalence range listed on the identi cation plate.
Lamps Art nr equivalent code UV type (EU countries) UV type (non-EU countries)
maxlight 25W CE III 23023 30-O-(2-3)/(42,5-57,5) 3 3
maxlight 100W-R CE III 12797 100-R-(17-22)/(2,1-2,9) 3 3
maxlight 100W-R CE 0,3 16997 100-R-(20-27)/(2,3-3,1) 2 3
maxlight 100W-R High Intensive 12801 100-R-(38-50)/(5,1-6,9) may not be used 5
maxlight XL 120 W-R CE III 12810 120-R-(27-36)/(2,8-3,8) 3 3
maxlight XL 120 W-R High Intensive 15898 120-R-(68-90)/(7,9-10,7) may not be used 5
maxlight 160W-R CE III 12814 160-R-(21-28)/(2,2-3) 3 3
maxlight 160W-R CE 0,3 17001 160-R-(20-27)/(1,5-2,1) 2 3
maxlight 160W-R High Intensive 15899 160-R-(77-102)/(6,9-9,3) may not be used 5
maxlight XL 180W-R CE III 12818 180-R-(21-28)/(2-2,6) 3 3
maxlight XL 180W-R CE 0,3 17002 180-R-(24-32)/(1,7-2,3) 2 3
maxlight XL 180W-R High Intensive 12821 180-R-(86-114)/(6,7-9,1) may not be used 5
maxlight HP 400W D 12526 not applicable not applicable not applicable
Lamps (IP-control) Art nr equivalent code UV type (EU countries) UV type (non-EU countries)
maxlight 80-180W-R IPcontrol CE/N III 19446 180-R-(37-49)/(3,4-4,6) not applicable not applicable
maxlight XL 80-180W-R IPcontrol CE/N III 19447 180-R-(38-50)/(3-4) not applicable not applicable
Power facial tanner Glass lter UV type (EU countries) UV type (non-EU countries)
300W HPS 2 2
400W HPS may not be used 2
300W SPS 3 2
400W SPS 2 2
300W BPS 3 3
400W BPS 3 3
Note: The total erythema is limited to 0.3 W/m² for all UV types within the EU.
Note: The equivalent code is only applicable to low-pressure uorescent lamps.
Example:
On the example identi cation plate shown below the equivalent codes for the installed canopy and bench
lamps are circled.
The equivalent code for the canopy is 160-R-(21-28)/(2.2-3)
160 = the wattage of the lamp
R = the re ector type
(21-28) = the equivalence range for the total e ective erythema
(2.2-3) = the equivalence range for the NMSC ratio
If you intend to install a new lamp, the wattage and re ector type must always match the equivalent code
on the identi cation plate. The e ective erythema and NMSC ratio must also match the speci ed range.
You may only use a lamp other than the recommended type if all of these criteria are met. You must also be
aware that:
a. The tanning unit is likely to be less e ective in terms of tanning performance.
b. The circuit protection for your tanning unit must be adapted because the electrical current
consumption will have changed.
c. The UV classi cation no longer matches the original classi cation shown on the identi cation plate.
d. We will not necessarily honour warranty claims arising from the use of lamps other than those we
recommend, because the technical operation of your tanning unit might be a ected.

6
ENG
ENG
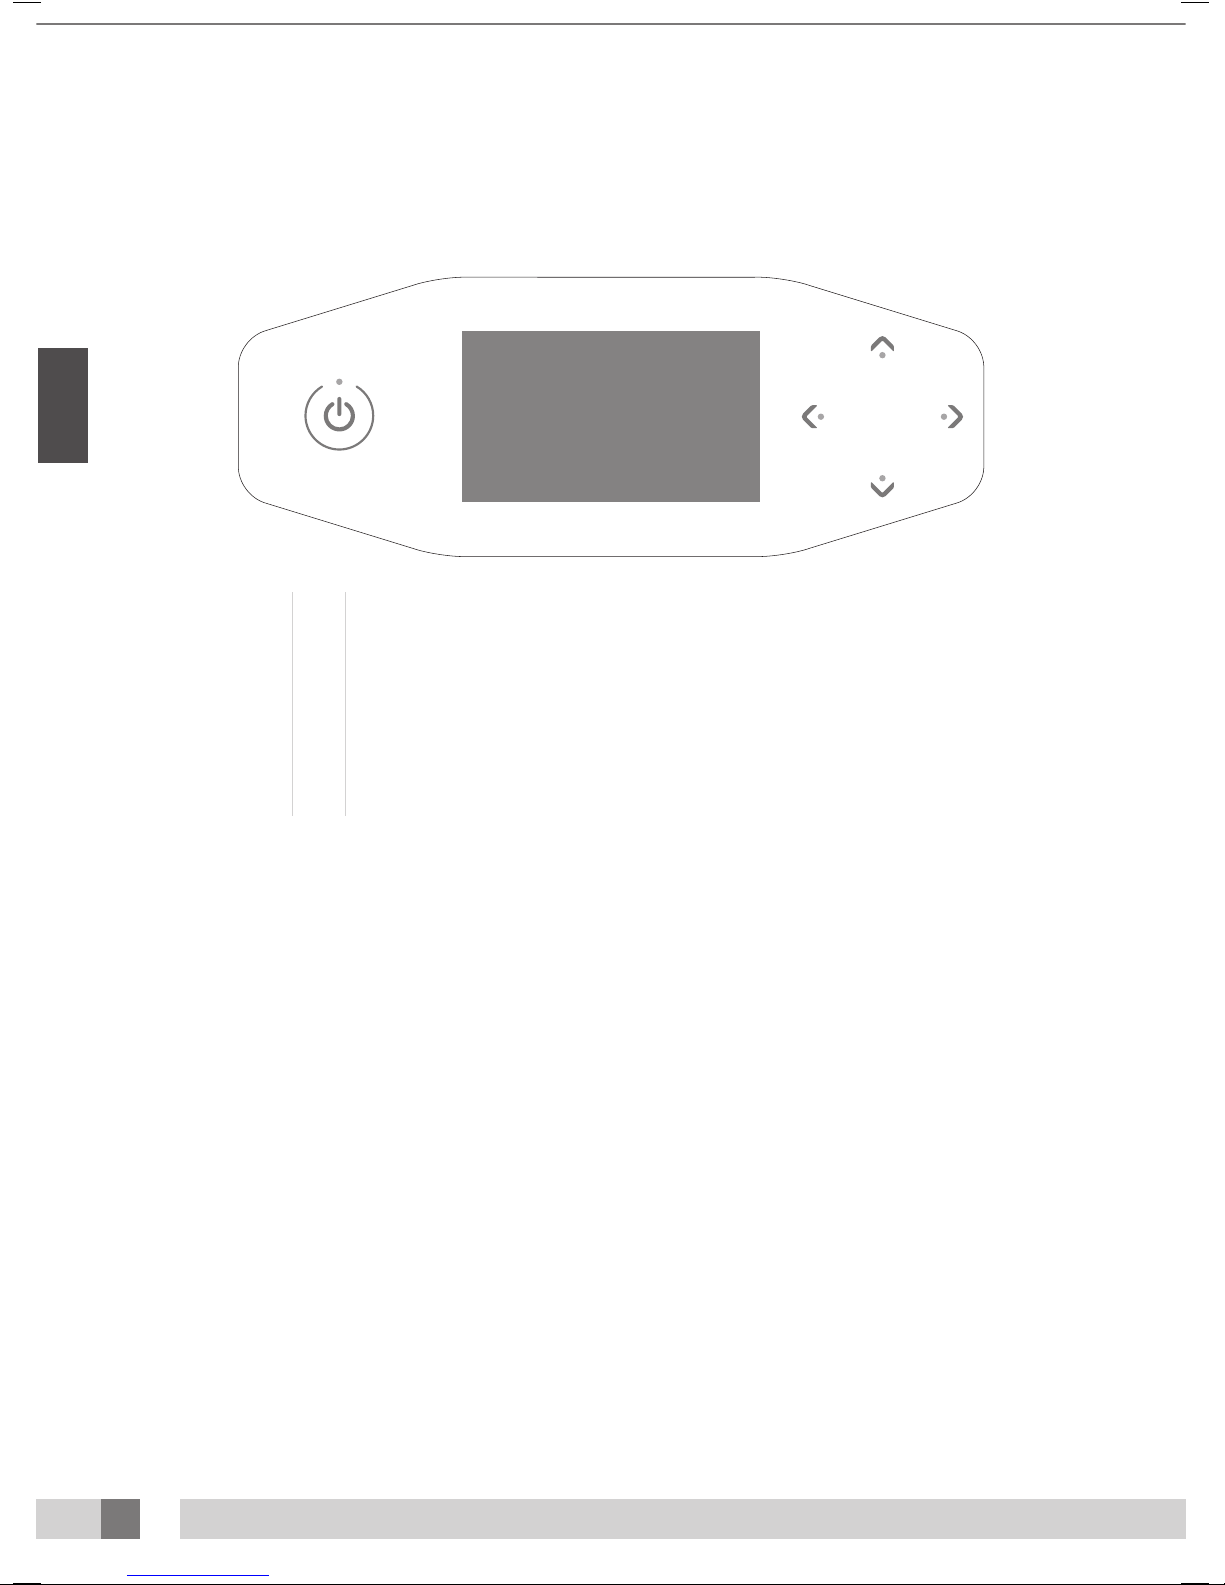
Operation
3
2
4
1
5
6
1
2
3
4
5
6
General:
08:19
15:00
select option at left
select option at right
scroll up in the selected option
scroll down in the selected option
Start/ Stop/ Pause
Display
7
08:19
15:00
Coin-operated mode without remote start
The machine will be started automatically if there is no ‘remote start’ present on the external
timer or coin unit. The ‘remote start’ can be congured by your dealer.
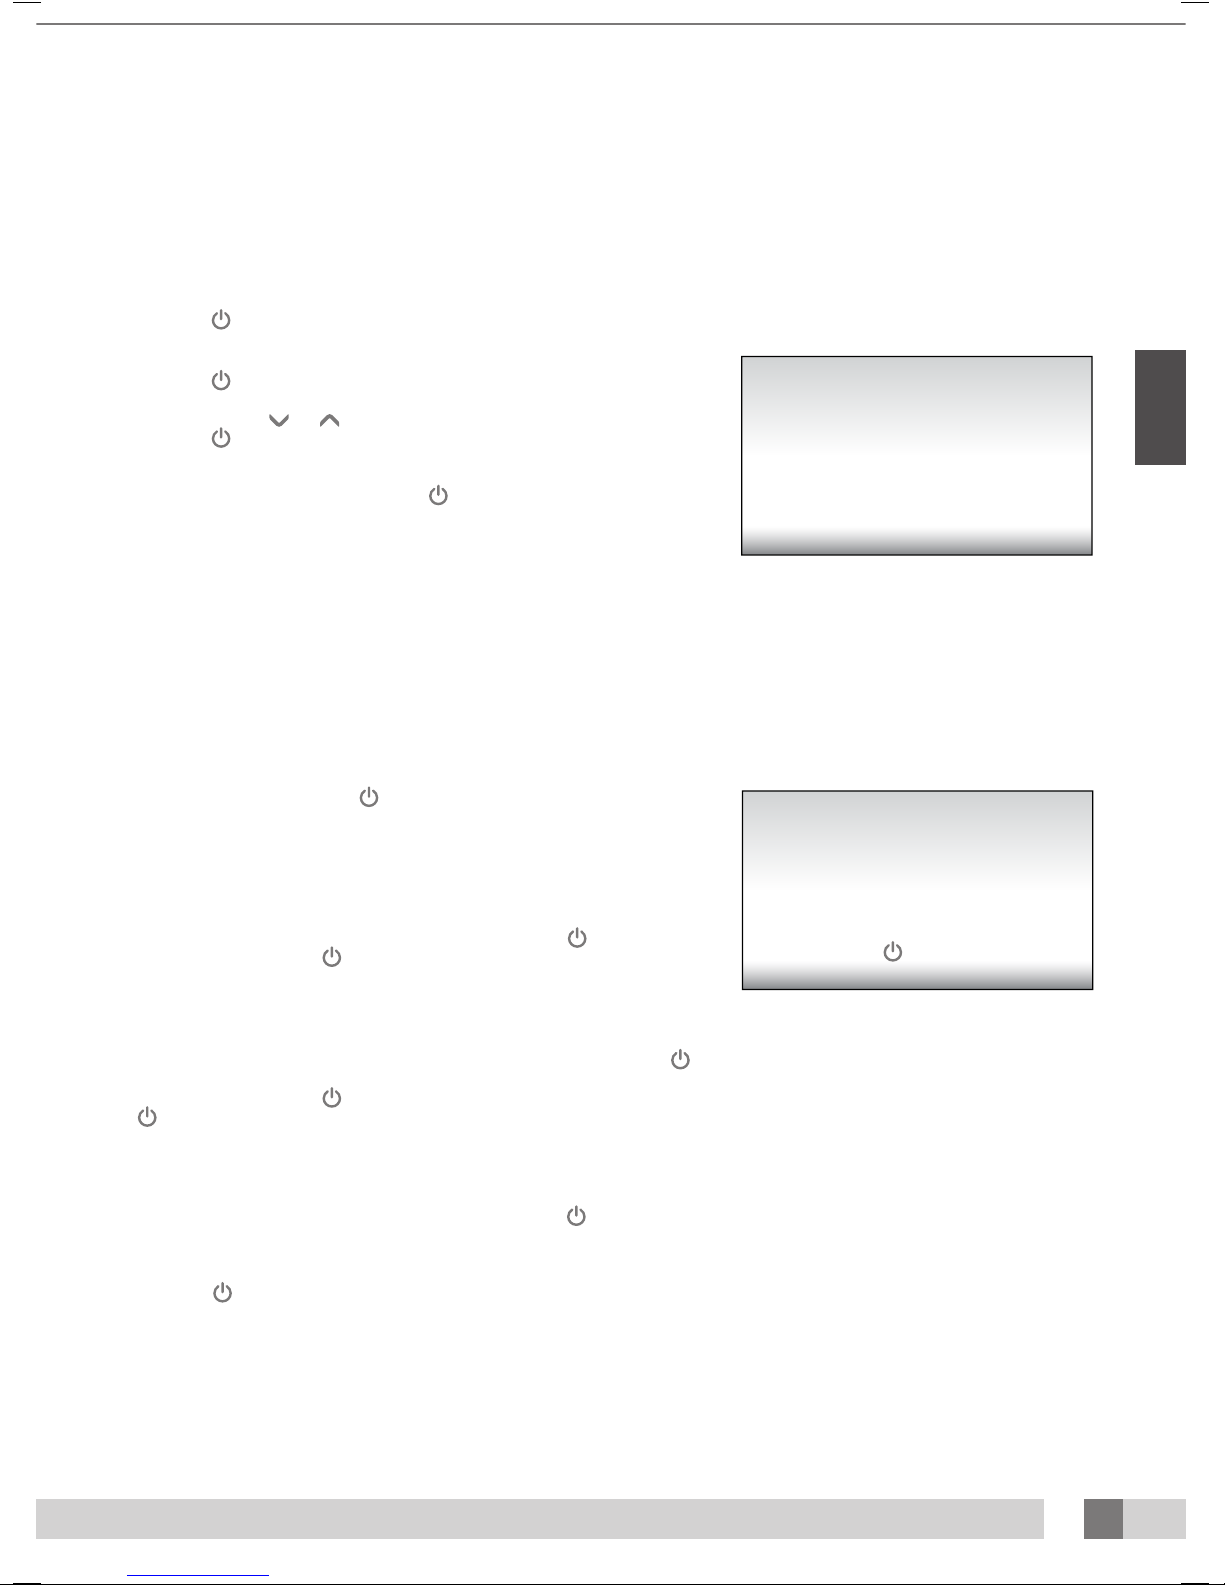
Coin-operated mode with remote start
Press 1x to start the machine.
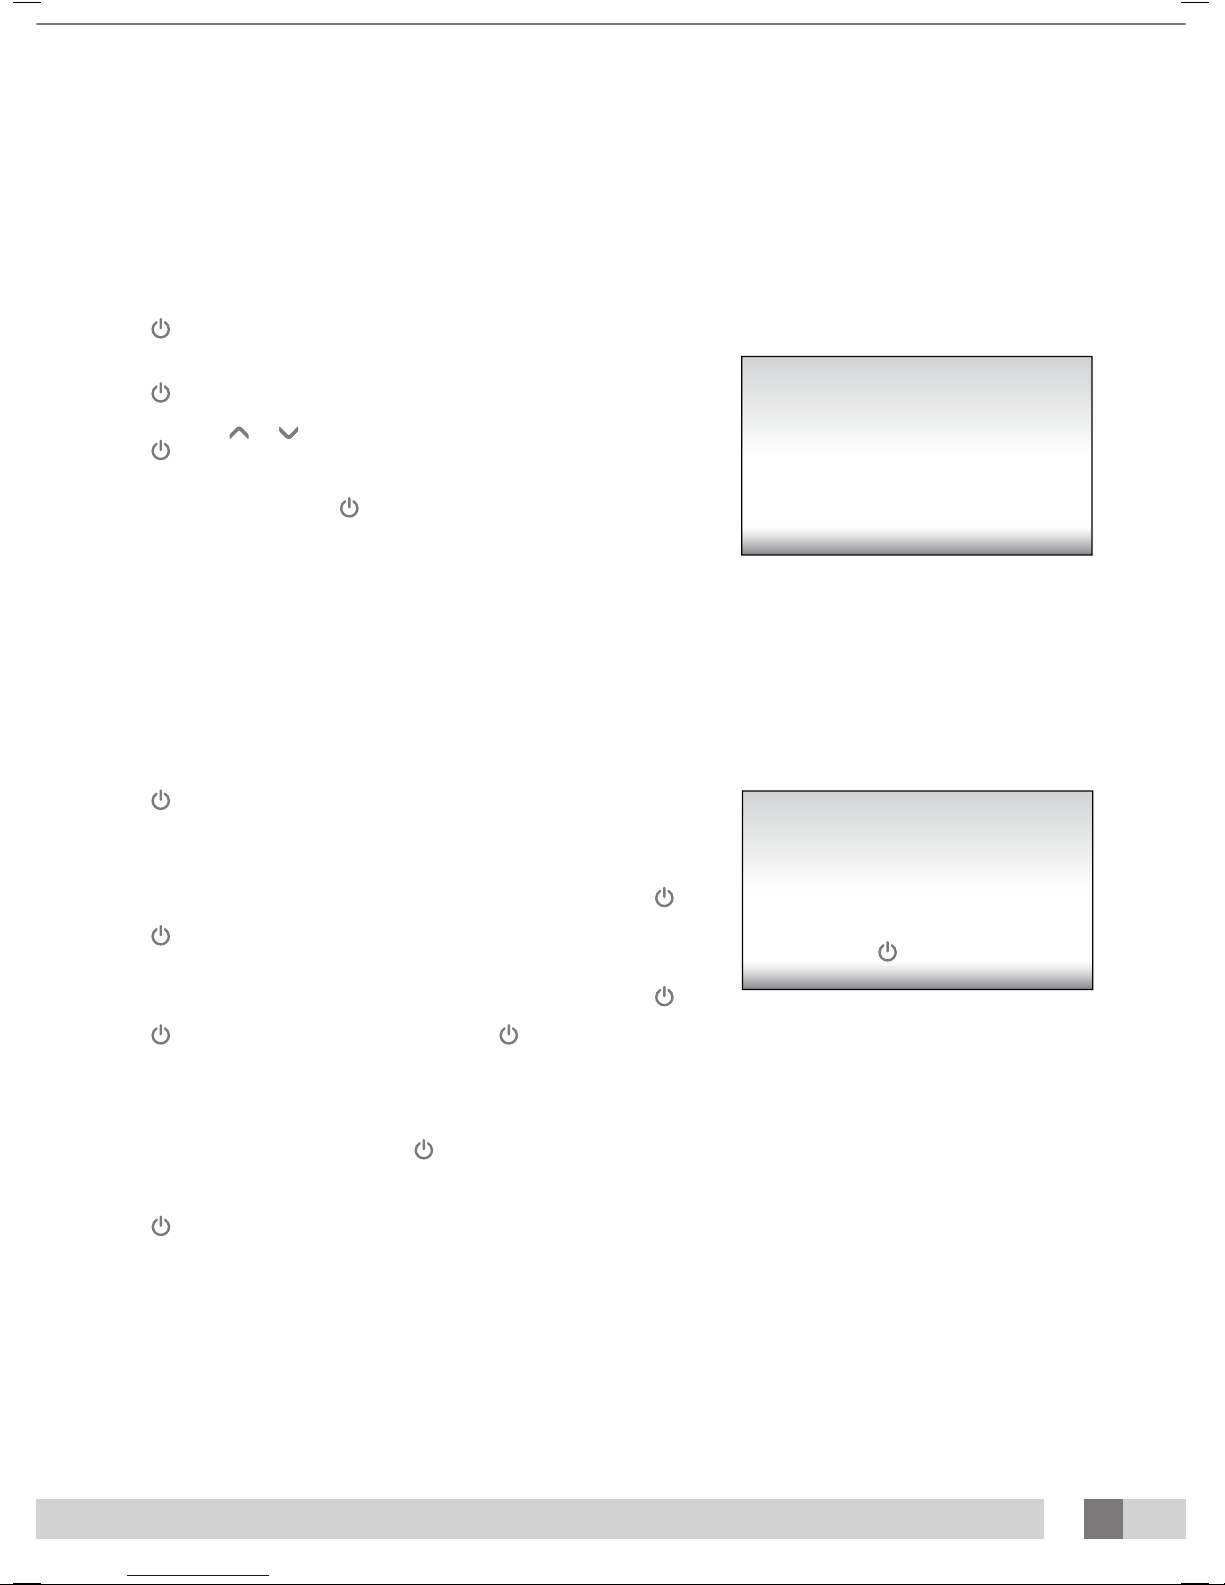
Stand-alone mode
Press 1x.
The maximum tanning time (start time) is shown on the display. The tanning time can be
changed with the
and buttons.
Press 1x to conrm the set time. The machine is switched on and the tanning time
begins.
After setting the tanning time, hold for 3 seconds to return to the standby screen. If no
button is pressed for 1 minute, the machine will return to the standby screen automatically.
Pause mode
Press 1x during tanning to put the machine in pause mode. The lamps are switched o.
The body cooling remains on (maximum 4 minutes). Xsens (optional) and Qsens (optional)
are paused.
Coin-operated mode
The remaining tanning time continues to be shown at the top of the display and ‘Press to
restart’ appears at the bottom.
Press 1x during pause mode to restart the sunbed.
Stand-alone mode
The remaining tanning time continues to be shown at the top of the display and ‘Press to
restart’ and ‘Hold button 3 seconds to end the session’ appear alternatingly at the bottom.
Press 1x during pause mode to restart the sunbed or hold for 3 seconds to switch
o the sunbed. This ends the tanning session, and the required 3 minute cool down period
begins.
Note:
The tanning time counter keeps running during ‘pause mode’.
If the sunbed is restarted within 4 minutes after is pressed, the facial tanners (SLi only)
do not go on. The facial tanners restart automatically after the required 4 minute cool down
period.
If the button is pressed, the air conditioning (optional) will continue running for 5
minutes before it switches o. After these 5 minutes, the air conditioning also has a required
3 minute cool down period.
Press to continue
Pause
Set time
8
ENG
ENG
Control functions
12:48
12:48
12:48
12:48
12:48
12:48
Xsens
12:48
Qsens
12:48
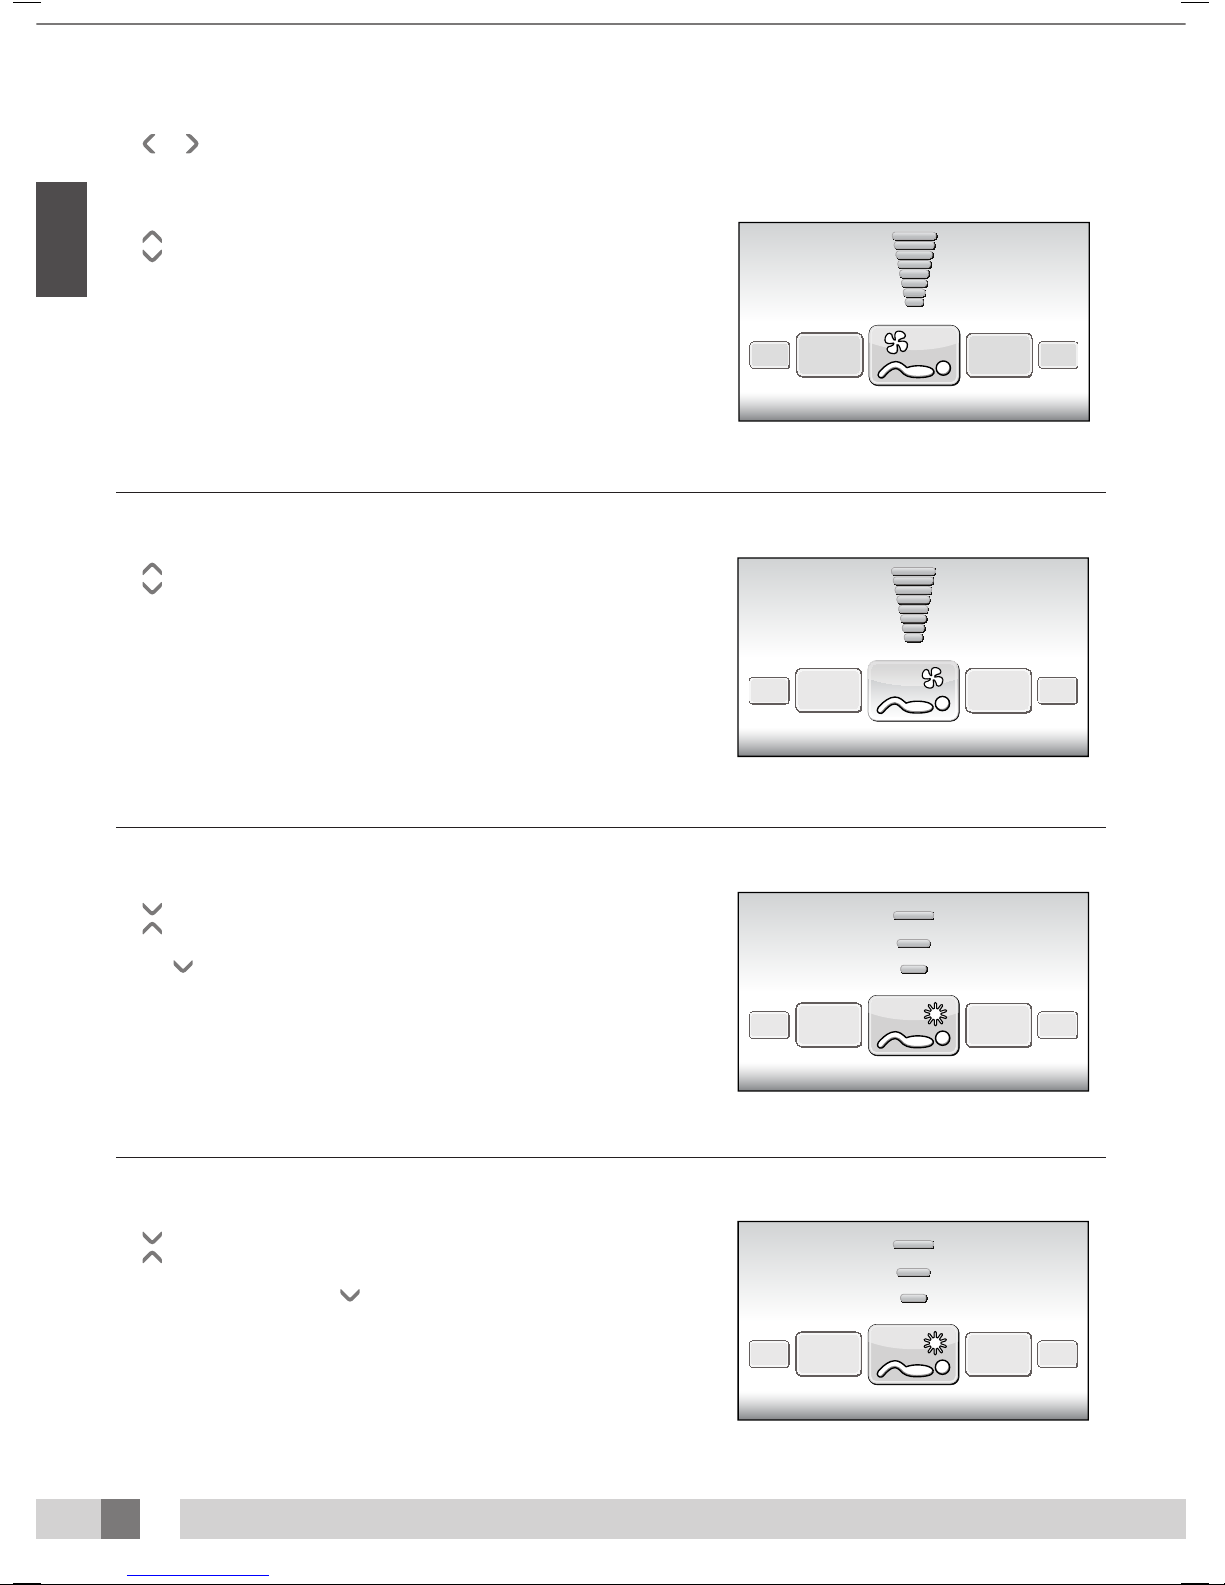
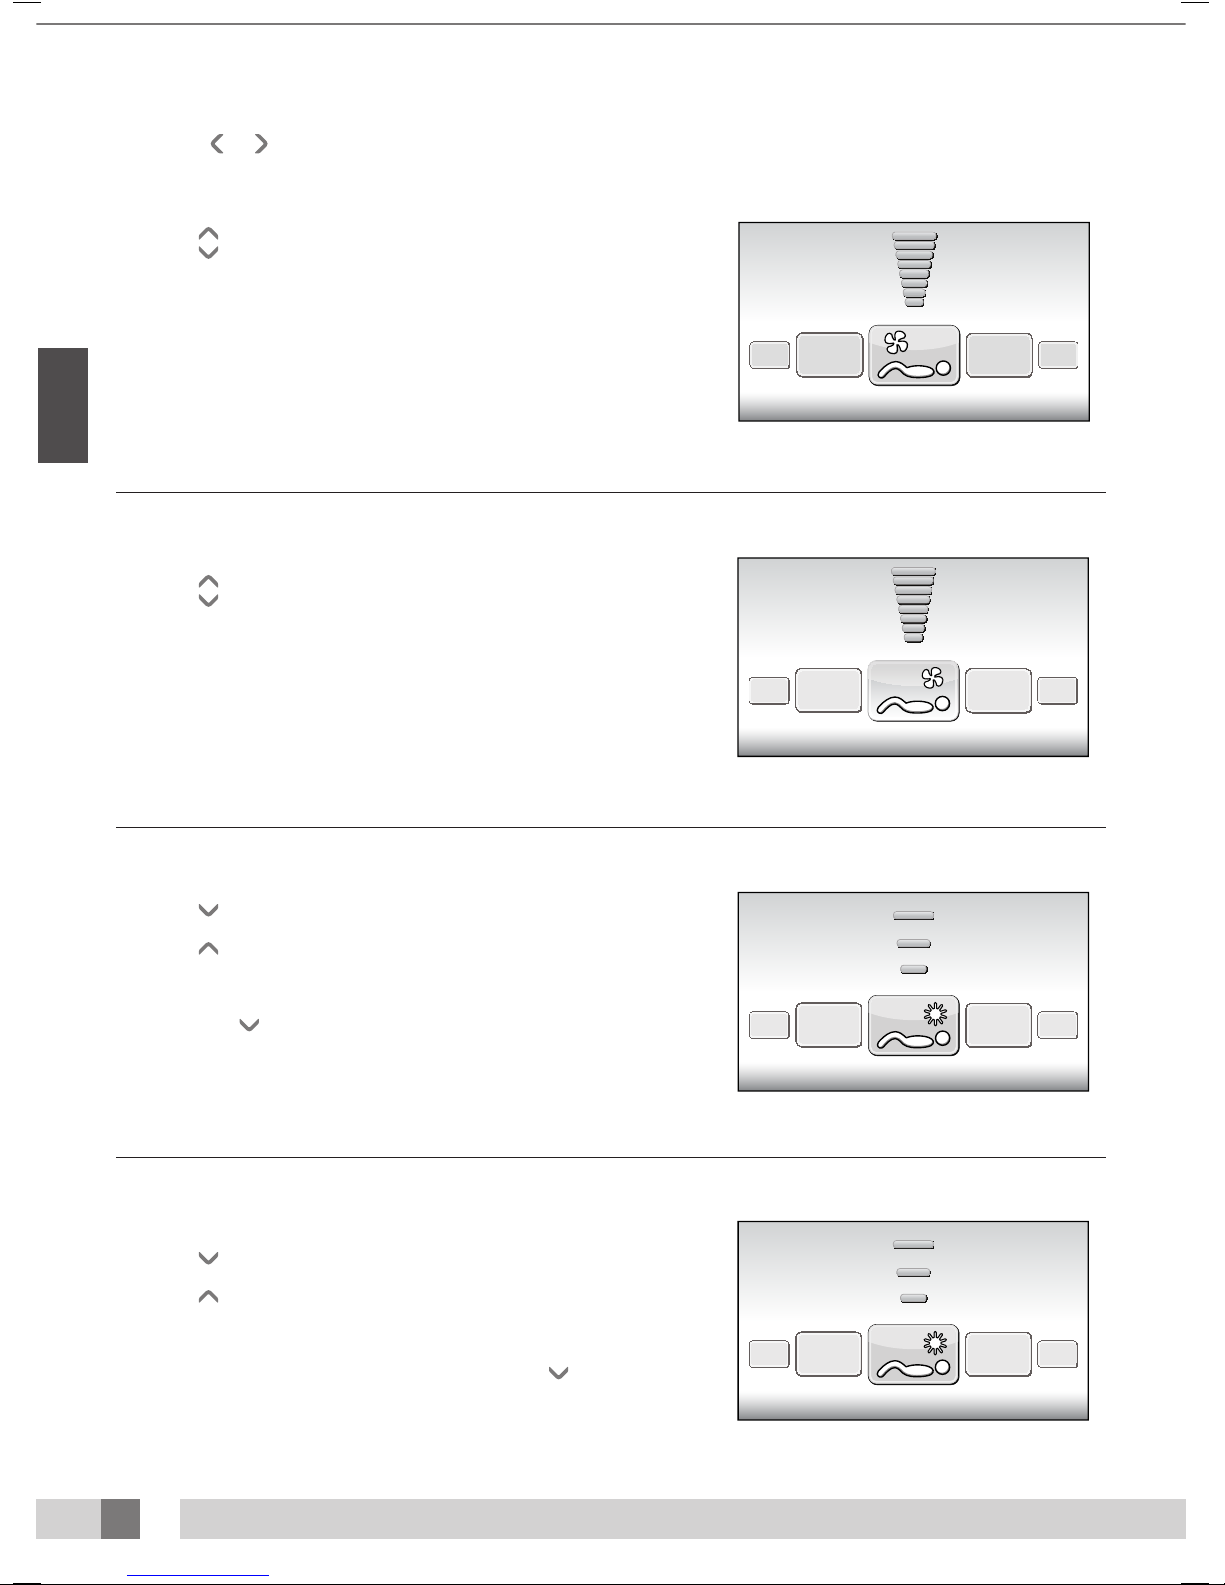
Body cooling
The button can be used to increase the cooling on the body.
The button can be used to decrease the cooling on the body.
The body cooling can be set to 8 levels.
The body cooling cannot be switched o.
Face cooling
The button can be used to increase the cooling on the face.
The button can be used to decrease the cooling on the face.
The face cooling can be set to 8 levels.
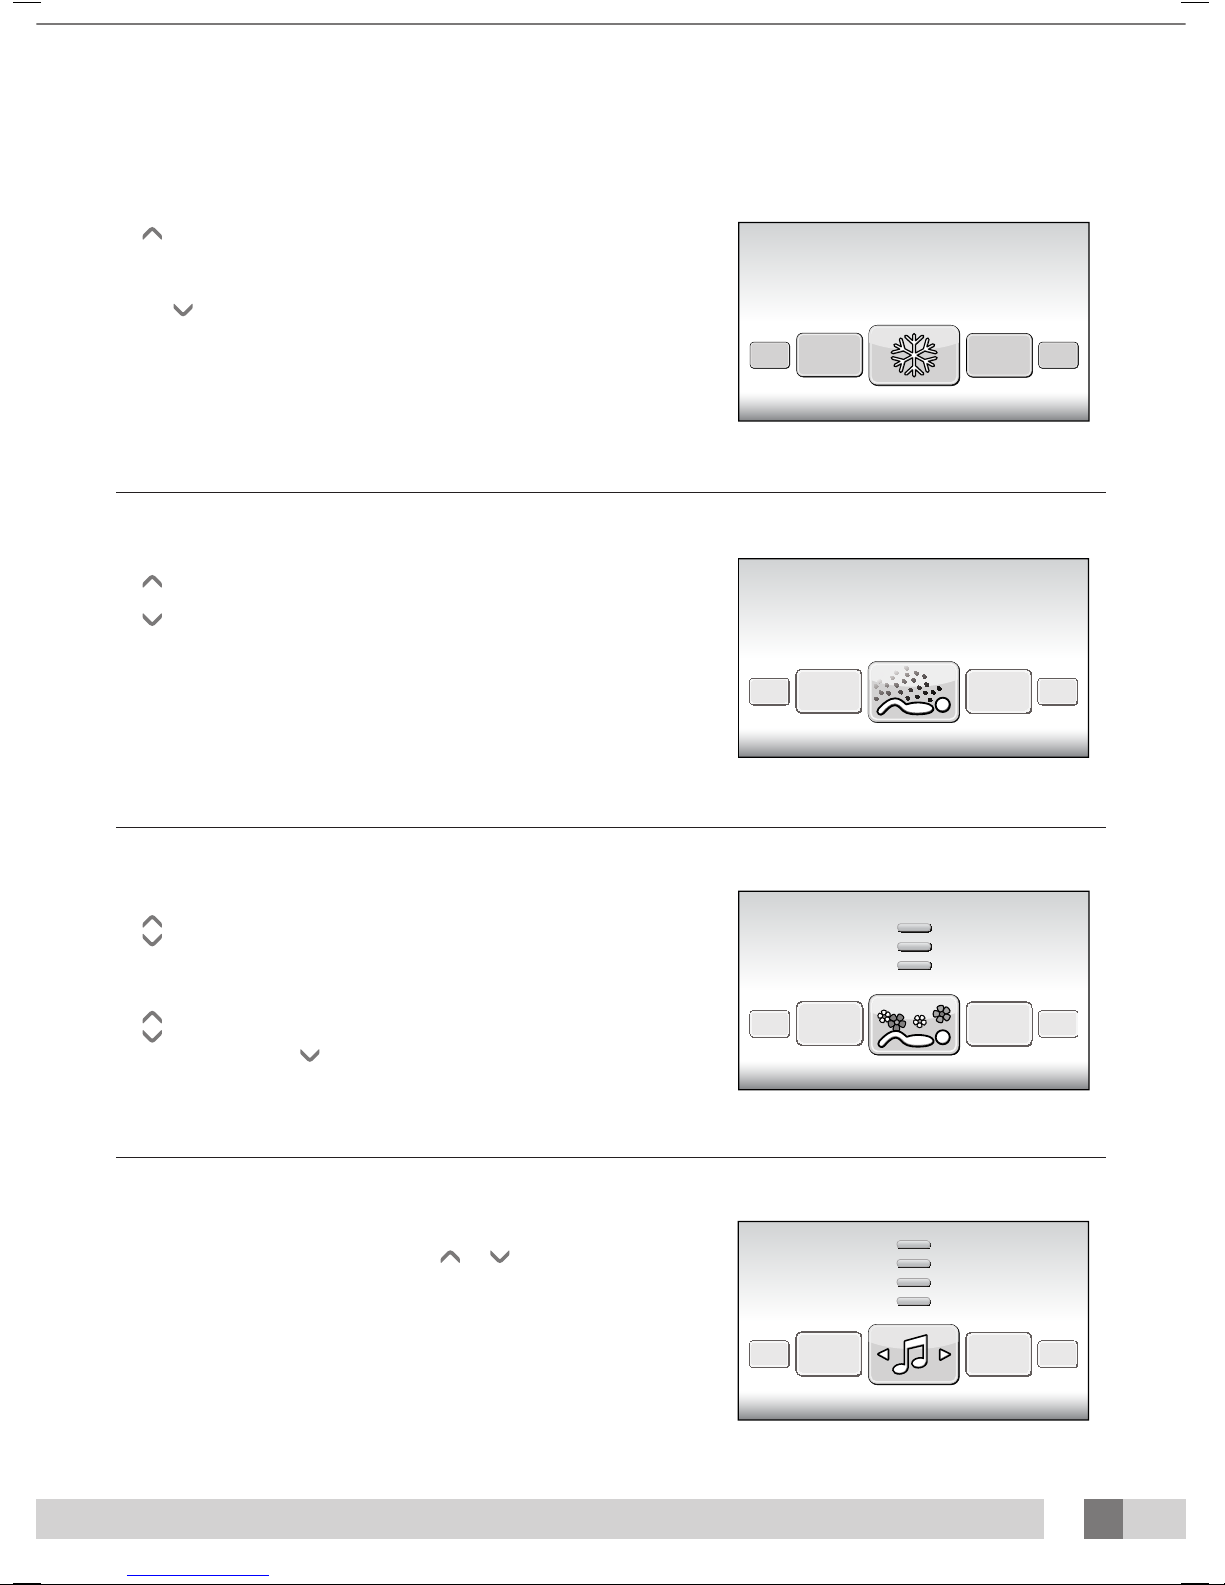
Facial tanner (SLi only)
The button can be used to set the facial tanner(s) to the minimum intensity.
The button can be used to set the facial tanner(s) to the maximum intensity.
The value appears at the top of the display and the text ‘Facial tanner’ appears at the bottom.
Hold the button for 3 seconds to switch o the facial tanner.
Once the facial tanner is switched o, it must rst cool down for 3 minutes before it can be
restarted.
The remaining cool down time is shown on the right side of the display.
Facial tanner (SPr only)
The button can be used to set the facial tanner(s) to the minimum intensity.
The button can be used to set the facial tanner(s) to the maximum intensity.
The value appears at the top of the display and the text ‘Facial tanner’ appears at the bottom.
To switch o the facial tanner, press
until ‘O ’ appears on the screen.
Body cooling
Face cooling
Facial tanner
Facial tanner
The and buttons can be used to select the desired control function. Only the installed options will be shown on the display.
Face tanners
cooling down
2:08
9
12:48
12:48
Xsens
12:48
Qsens
12:48
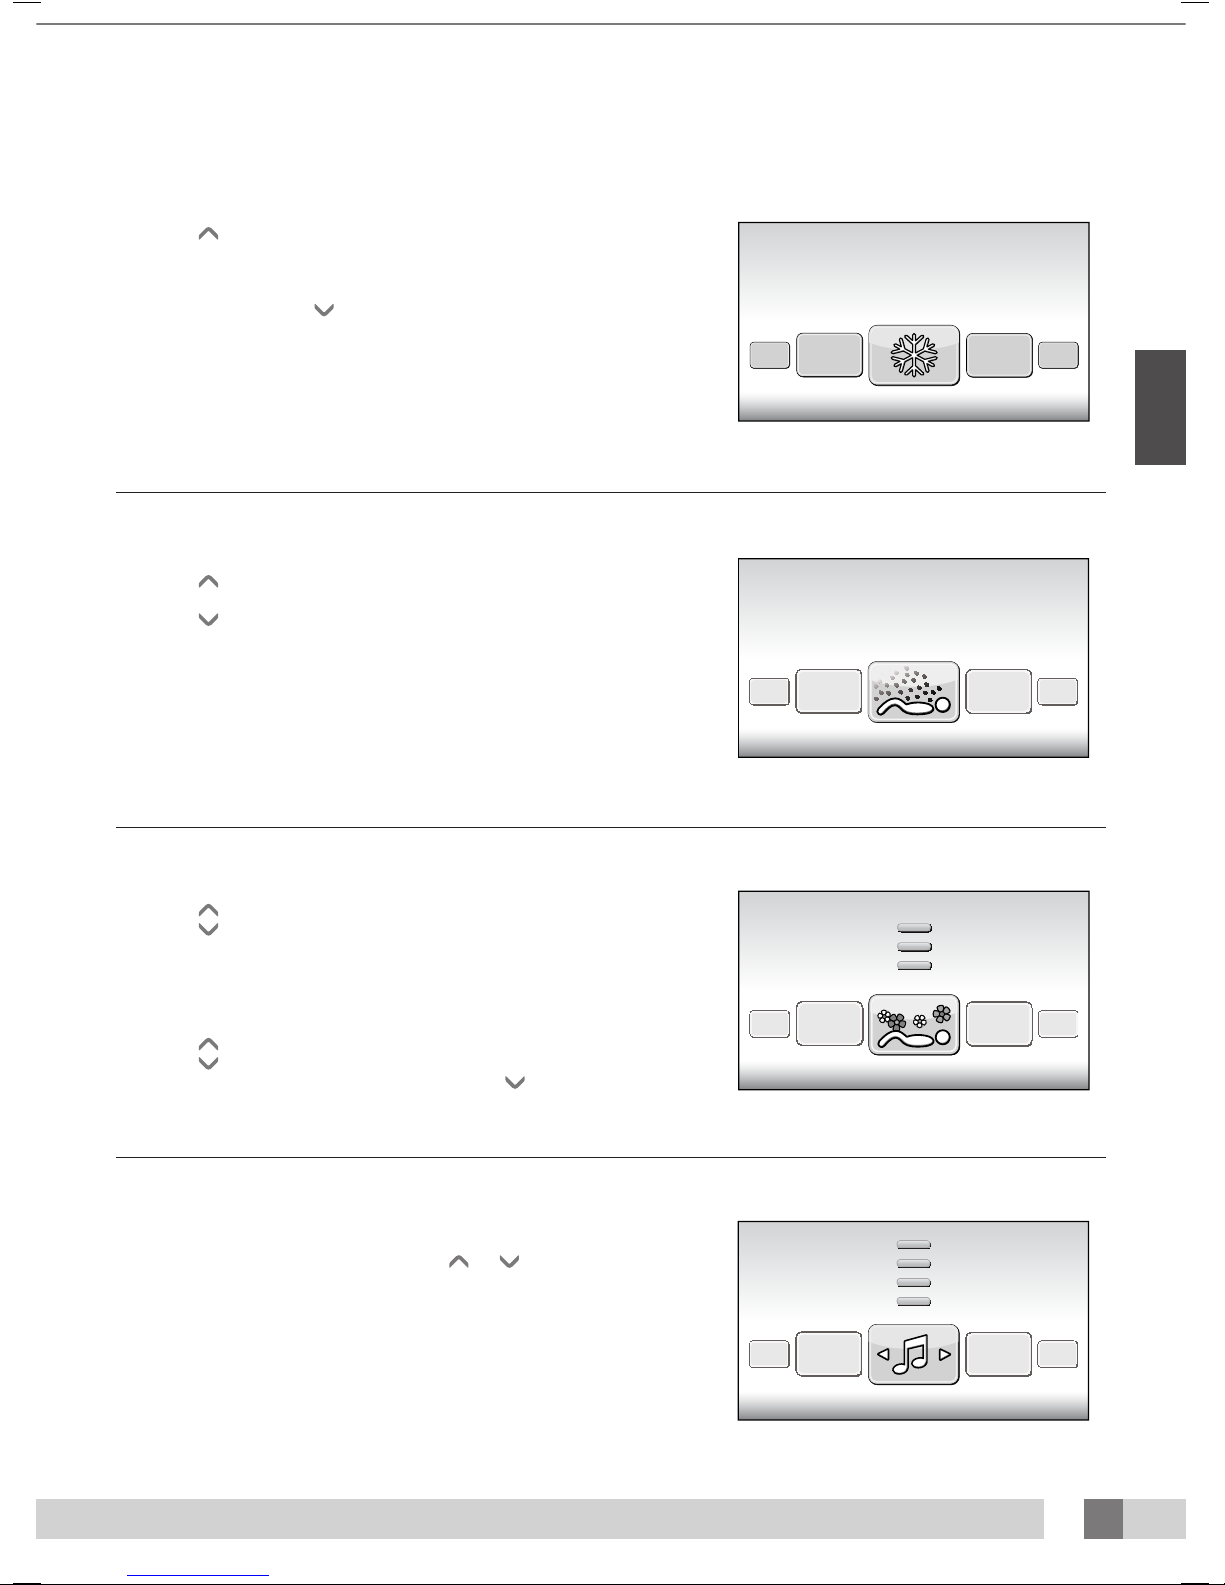
Air conditioning (optional)
The button is used to switch on the air conditioning.
On/O appears at the top of the display and the text ‘Air conditioning’ appears at the
bottom.
This switches on during each tanning session by default.
Hold the button for 3 seconds to switch o the air conditioning.
Once the air conditioning is switched o, it must rst cool down for 3 minutes before it can
be restarted.
The remaining cool down time is shown on the right side of the display.
If the text ‘Air conditioning service’ appears on the right side of the display, the air
conditioning will not function. For information about what to do when this fault message
appears, see the ‘Messages’ chapter in this manual.
Qsens (optional)
The button is used to switch on the Qsens (water mist is sprayed at 2 minute intervals
during tanning).
The
button is used to switch o the Qsens.
On/O appears at the top of the display and the text ‘Qsens’ appears at the bottom.
This switches on during each tanning session by default.
Xsens (optional)
Xsens I
The
button is used to switch on the Xsens.
The button is used to switch o the Xsens.
The value appears at the top of the display and the text ‘Xsens’ appears at the bottom.
Xsens III
When multiple Xsens scents are available, the scent is shown on the right side of the display.
The button can be used to select the next scent.
The button can be used to select the previous scent.
To switch o the Xsens, press until ‘O’ appears on the screen.
This switches on during each tanning session by default.
Music channel selection
(with sound system only)
The desired music channel can be selected with the and buttons. Only available
music channels are shown.
If all the music channels are connected, a choice can be made from the following channels:
‘My MP3’ and studio channel 1 through 6
If a SoundAround system is connected, the software will detect it automatically. The
associated buttons will be activated.
Airconditioning
Airconditioning
cooling down
2:08
On
Off
Aroma 1
On
Off
Channel 1
Music channel
10
ENG
ENG
12:48
12:48
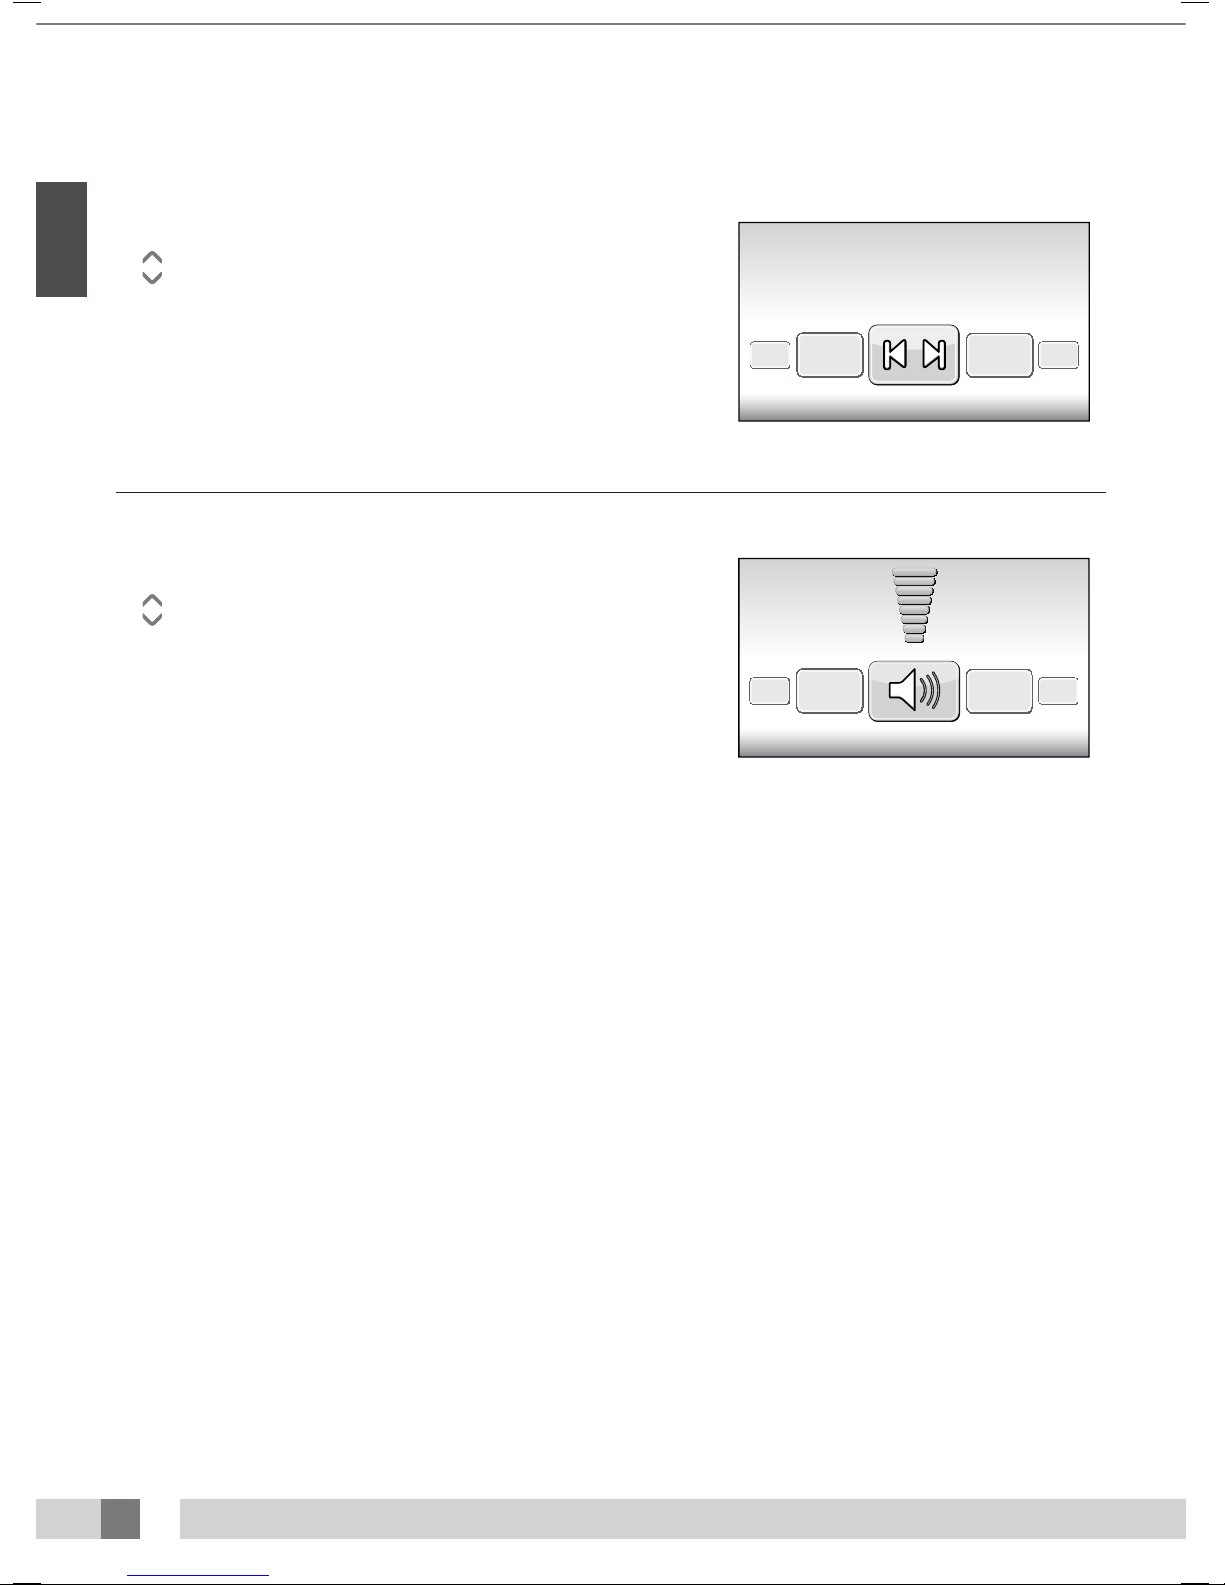
Switch song (with sound system only)
If ‘Channel 1’ or ‘Channel 2’ is selected, the ‘switch song’ function will be activated.
The button can be used to select the next song.
The button can be used to select the previous song.
Music volume (with sound system only)
The button can be used to increase the volume of the speakers.
The button can be used to decrease the volume of the speakers.
The text ‘Volume’ appears at the bottom of the display.
The volume can be set to 8 levels.
When the tanning session starts this is set to ‘4’ by default.
Volume
Switch song
Next
Prev.
11
Critical errors: Errors:
E1 = Internal timer has a defect E18 = Communicatiestoring temperatuursensor bank
E2 = Fan in bottom tray has a defect E19 = Communication error with temperature sensor canopy
E3 = Communication error between relay and switch part E20 = Airconditioning reservoir full
E6 = Unknown phase E21 = Clean airconditioning
E7 = Relay failure
E9 = Maximum temperature bench
E10 = Maximum temperature canopy
E11 = Communication error with fan board
Note:
When one of the above-mentioned fault messages appears on the display, you should no longer use the sunbed and the plug
should be removed from the mains outlet. Contact your dealer.
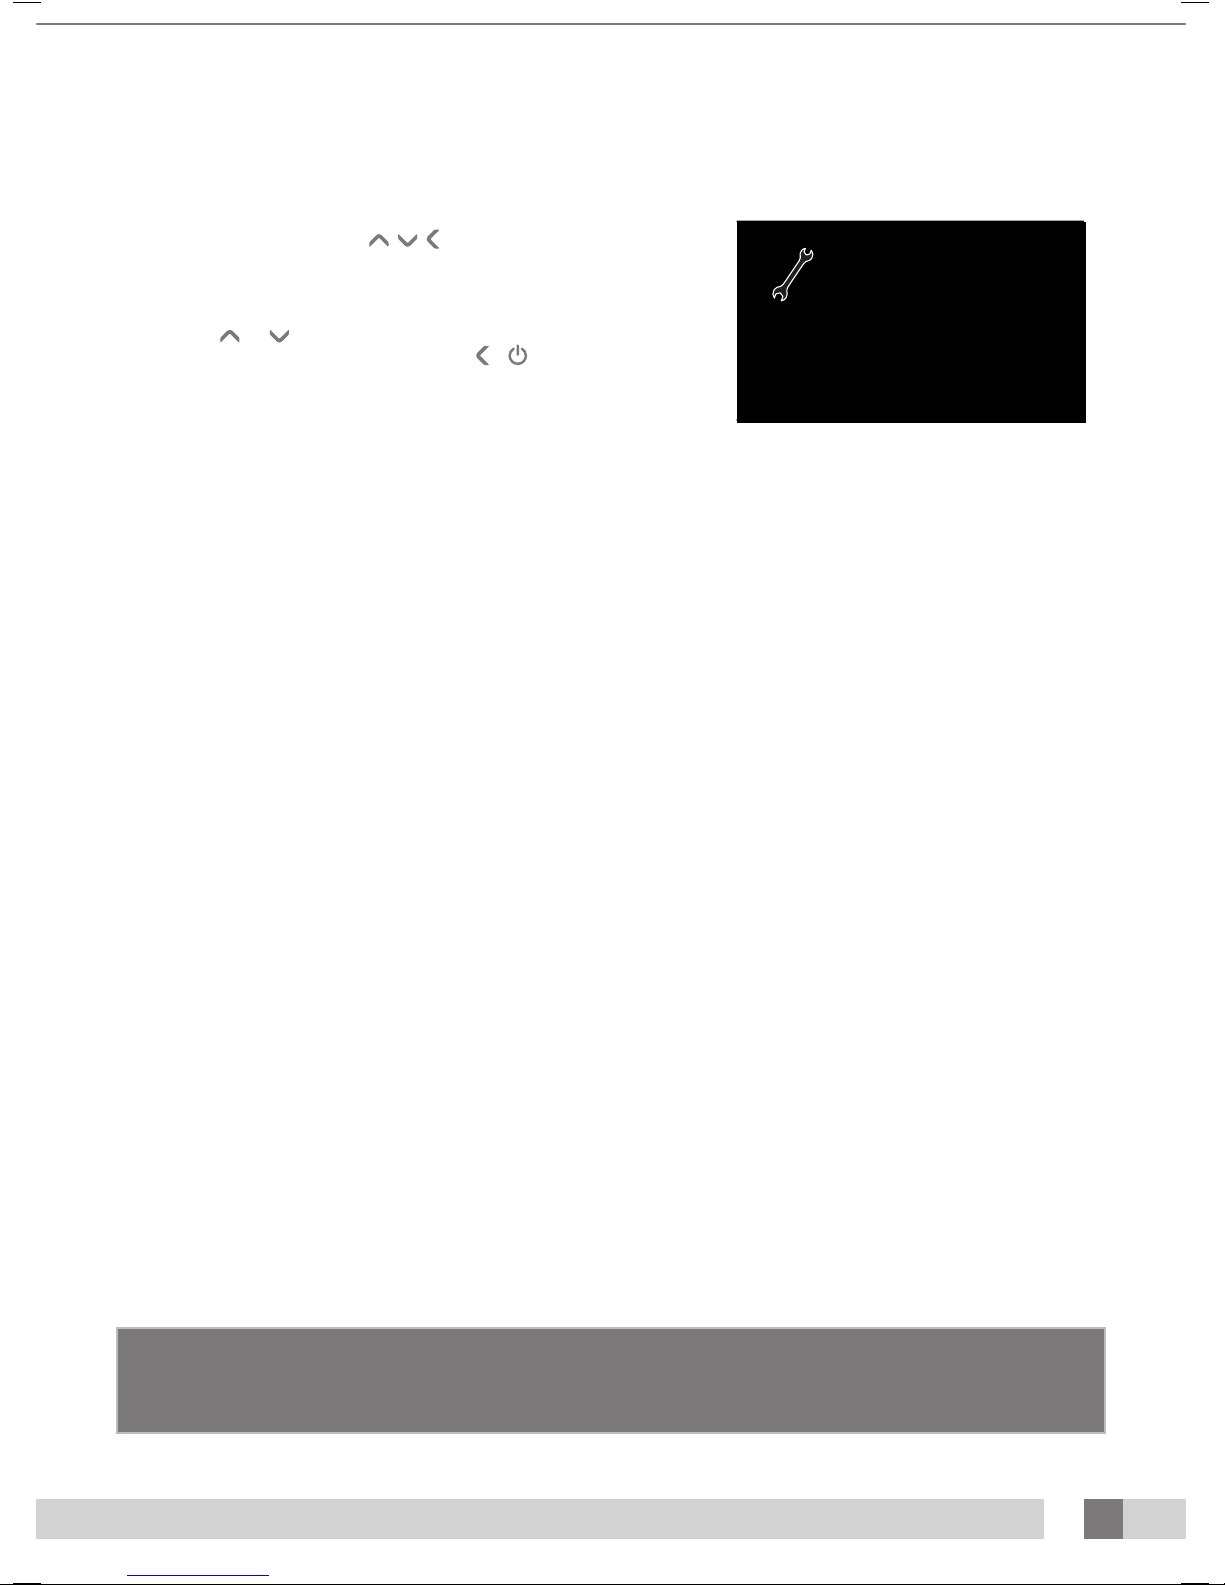
Malfunction
When a malfunction occurs, the buttons , , and O ash when the machine is in
standby. The machine also produces 3 rapid beeps once every minute. Press all four of the
buttons at the same time to see which fault or faults have occurred.
If a critical fault occurs, the malfunction screen appears automatically. The text ‘Malfunction’
appears at the top of the screen, and the fault code and an explanation appear at the
bottom. Use the and buttons to view the various fault messages. For faults E18, E19,
E20 and E21 you can exit the malfunction screen with the or button.
Note:
When one of the above-mentioned critical faults appears on the display, you should no longer use the sunbed and the plug should be removed from the
mains outlet. Contact your dealer.
If one of the other faults occurs, the machine will still function, but not all the functions will be fully available. During fault E18 and E19 the machine cooling
will run at maximum throughout the entire session. To correct this, contact your dealer.
E20: Air conditioning reservoir full
Check whether the reservoir for the air conditioning is full. If the reservoir is full, you should empty the reservoir (see section ‘Emptying air conditioning
reservoir’ in this manual). The fault message disappears after several seconds. If the fault message does not disappear, contact your dealer.
E21: Cleaning the air conditioning
The air conditioning must be thoroughly cleaned every 6 months. If the air conditioning has not been cleaned within the past 6 months, fault message ‘E21:
Clean the air conditioning’ will appear. You must thoroughly clean the air conditioning. After it has been cleaned, you must reset the ‘Airco service date’. For
more information, consult the ‘Cleaning’ section in this manual.
Error
E3 = Communication fault between the
I/O controller and switch board.
Messages
12
ENG
ENG
00:43
00:43
Cleaning
Unit status
>
>
1. Unit hours
2. Lamp hours
3. Facial tanner hours
4. Airco service date
Display software
Display pictures
Switch board
I/O Controller
Sens controller
Ventilation board
>
>
2461
237
237
01-01-2012
5.4
2.3
2.3
1.0
1.0
3.0
00:43
Cleaning
Unit status
>
>
1. Unit hours
2. Lamp hours
3. Facial tanner hours
4. Airco service date
Display software
Display pictures
Switch board
I/O Controller
Sens controller
Ventilation board
>
>
2461
237
237
01-01-2012
5.4
2.3
2.3
1.0
1.0
3.0
Status menu
Hold the , and buttons for 5 seconds.
You now see the ‘Quick status menu’.
The hour counters and software versions can be viewed here.
Resetting the hour counters
Navigate to ‘2. Lamp hours’ or ‘3. Facial tanner hours’ and press
.
Enter the PIN code and press
.
The hour counters are reset.
Maintenance
Cleaning
The sunbed is equipped with a touch panel control. To prevent accidental operation of the
machine during cleaning, you can temporarily switch o the control. It is also recommended
that you temporarily switch o the control before you open the acrylic screen canopy.
Hold and for 5 seconds.
The display shows the remaining time + ‘Cleaning’. During this period the display cannot be
operated.
The time you have to clean the machine can be changed. The standard cleaning time is 1
minute.
Cleaning the air conditioning (option)
Clean the air conditioning as explained in the instructions that accompanied your air
conditioning unit.
You must reset the service date after cleaning.
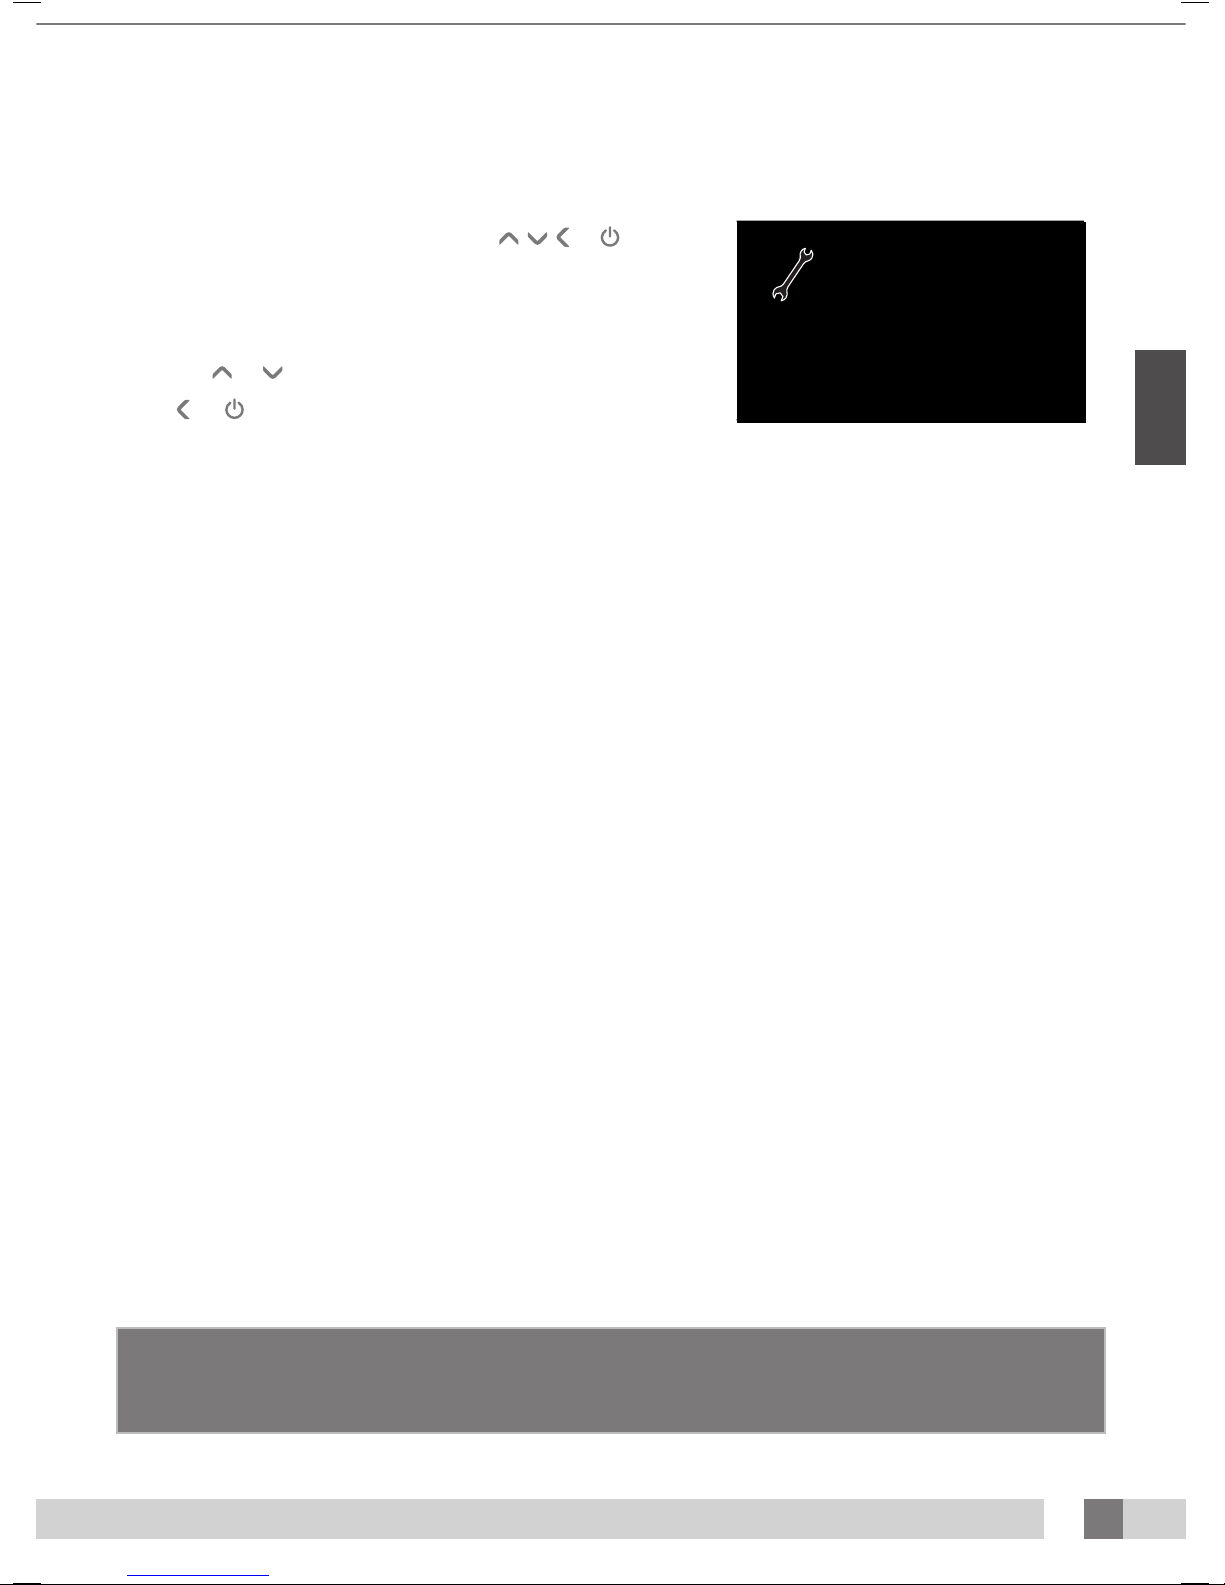
To reset the service date while a fault message is displayed, press to enter the ‘Quick
status menu’. From the standby screen, hold the , and buttons for 5 seconds to enter
the ‘Quick status menu’.
Navigate to ‘Airco service date’ and press .
Enter the PIN code and press .
The airco service date is increased by 6 months.
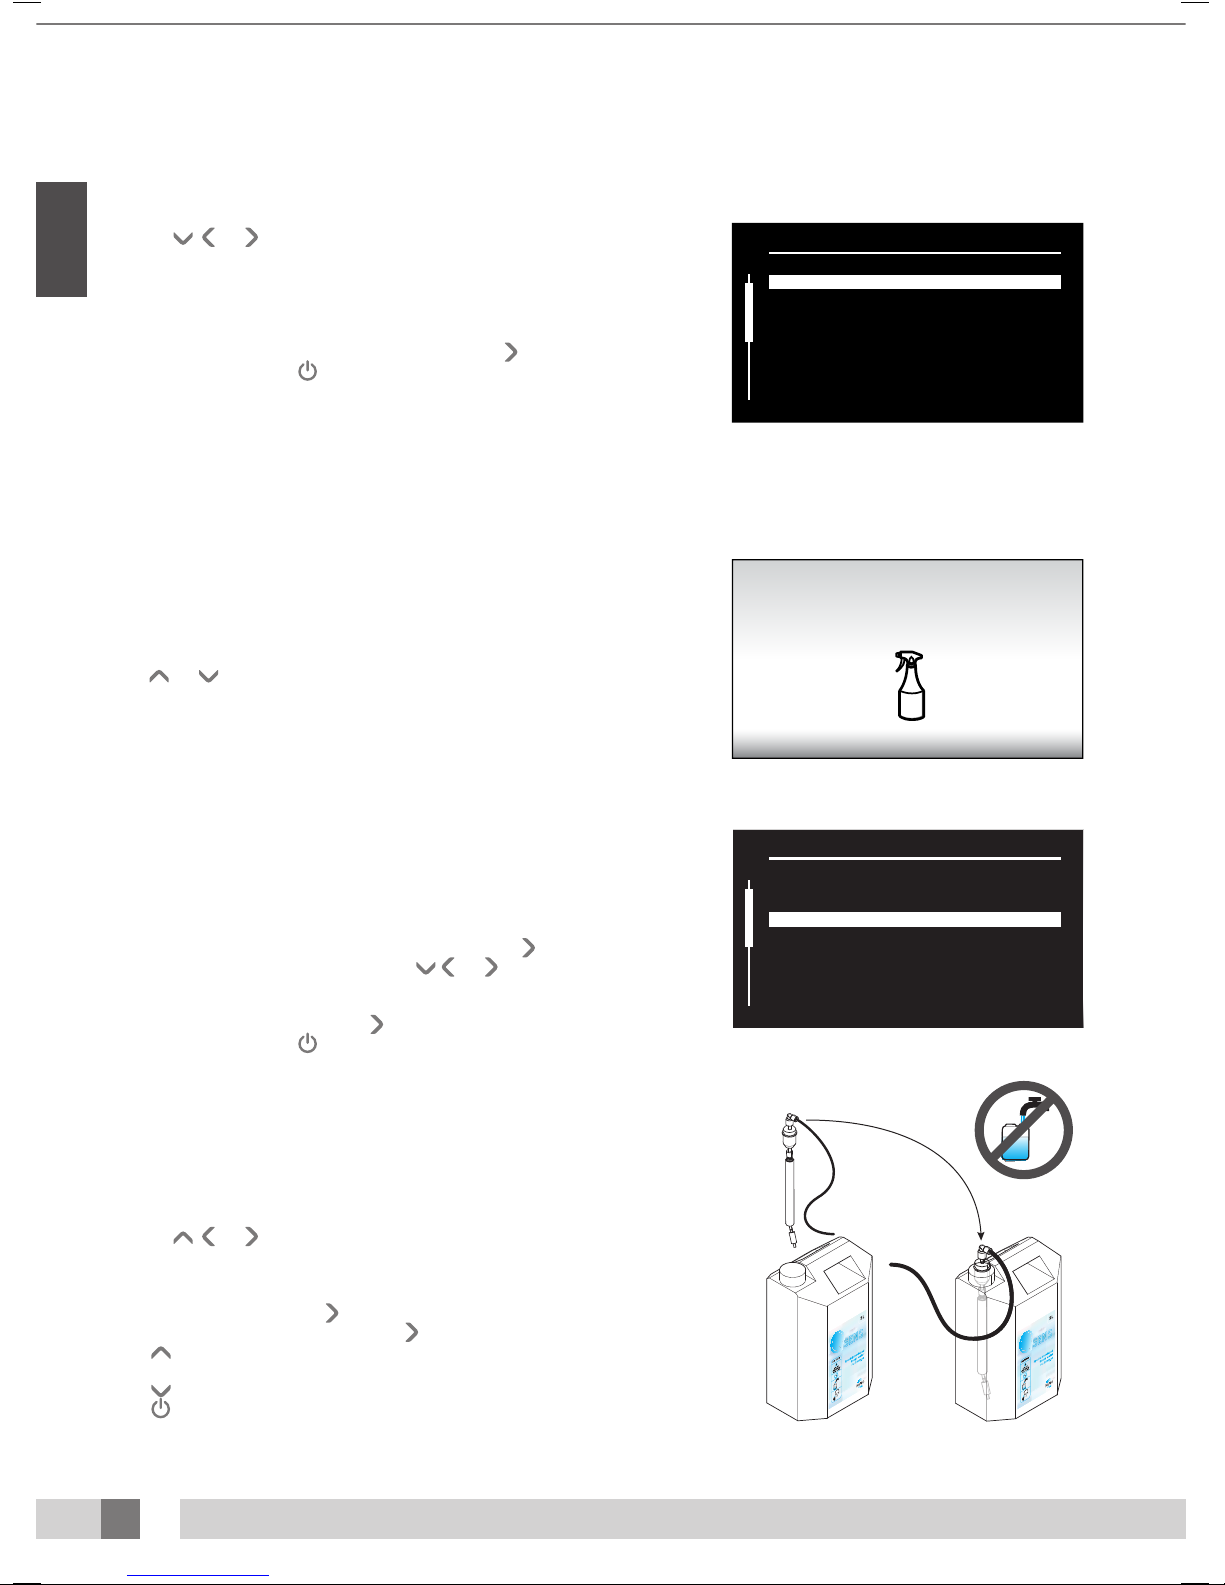
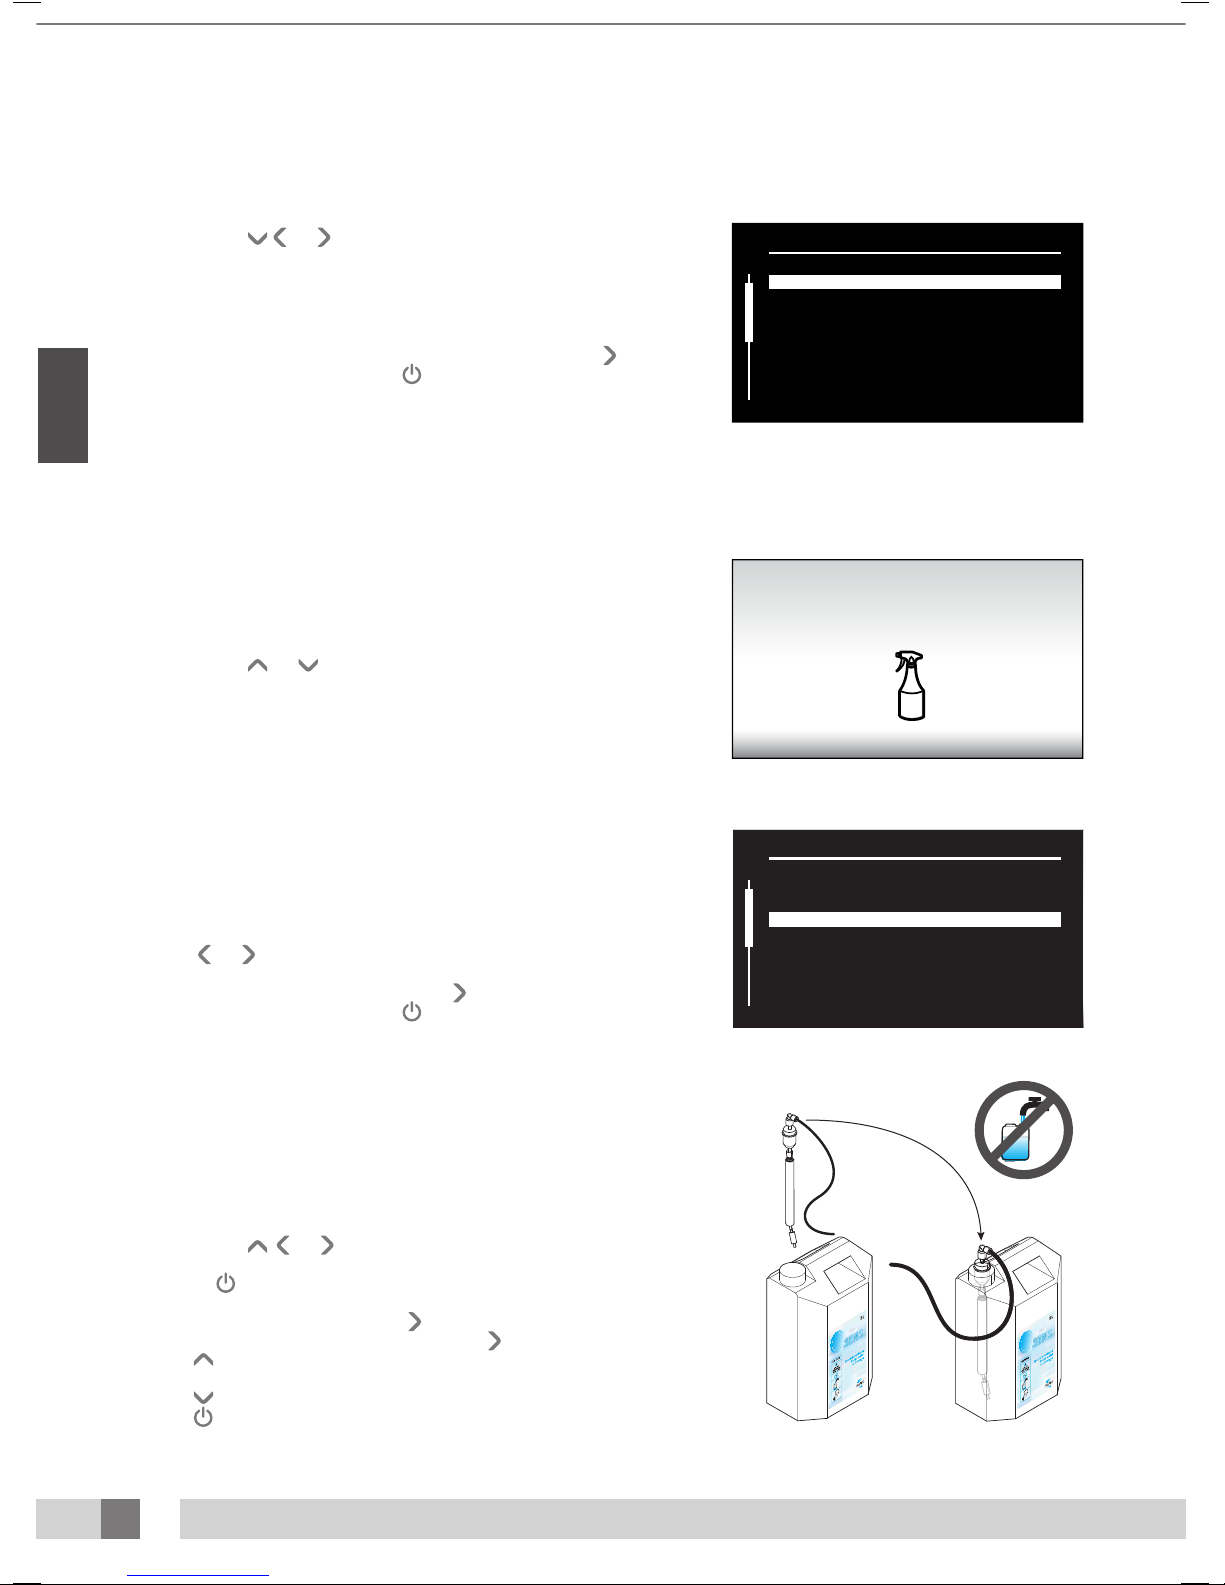
Replacing the Qsens (option) liquid jug
Never rell your Qsens liquid jug with regular tap water or any other liquid. Replace with an
original Hapro Qsens liquid jug. Remember to order the Qsens liquid jugs in time.
Before Qsens can be used for the rst time or after replacement of the liquid jug, the system
must be bled of air.
Hold the , and buttons for 10 seconds.
Enter the PIN code; it is set to 0000 by default. Press O to conrm. You are now in the
parameter menu.
Navigate to ‘09 - Qsens’ and press .
Navigate to ‘03 - Qsens initialization’ and press .
Press to start the initialization.
Wait until the Qsens nozzles produce a ne mist of water.
Press to stop the initialization.
Press to exit the parameter menu. Your Qsens set is now ready for use.
Reading the hour counters and software versions
Cleaning
1. 2. 3.
123
P
1. 2. 3.
Studio 2
Studio 1
SmartVoice
A B
13
1. 2. 3.
123
P
1. 2. 3.
Studio 2
Studio 1
SmartVoice
A B
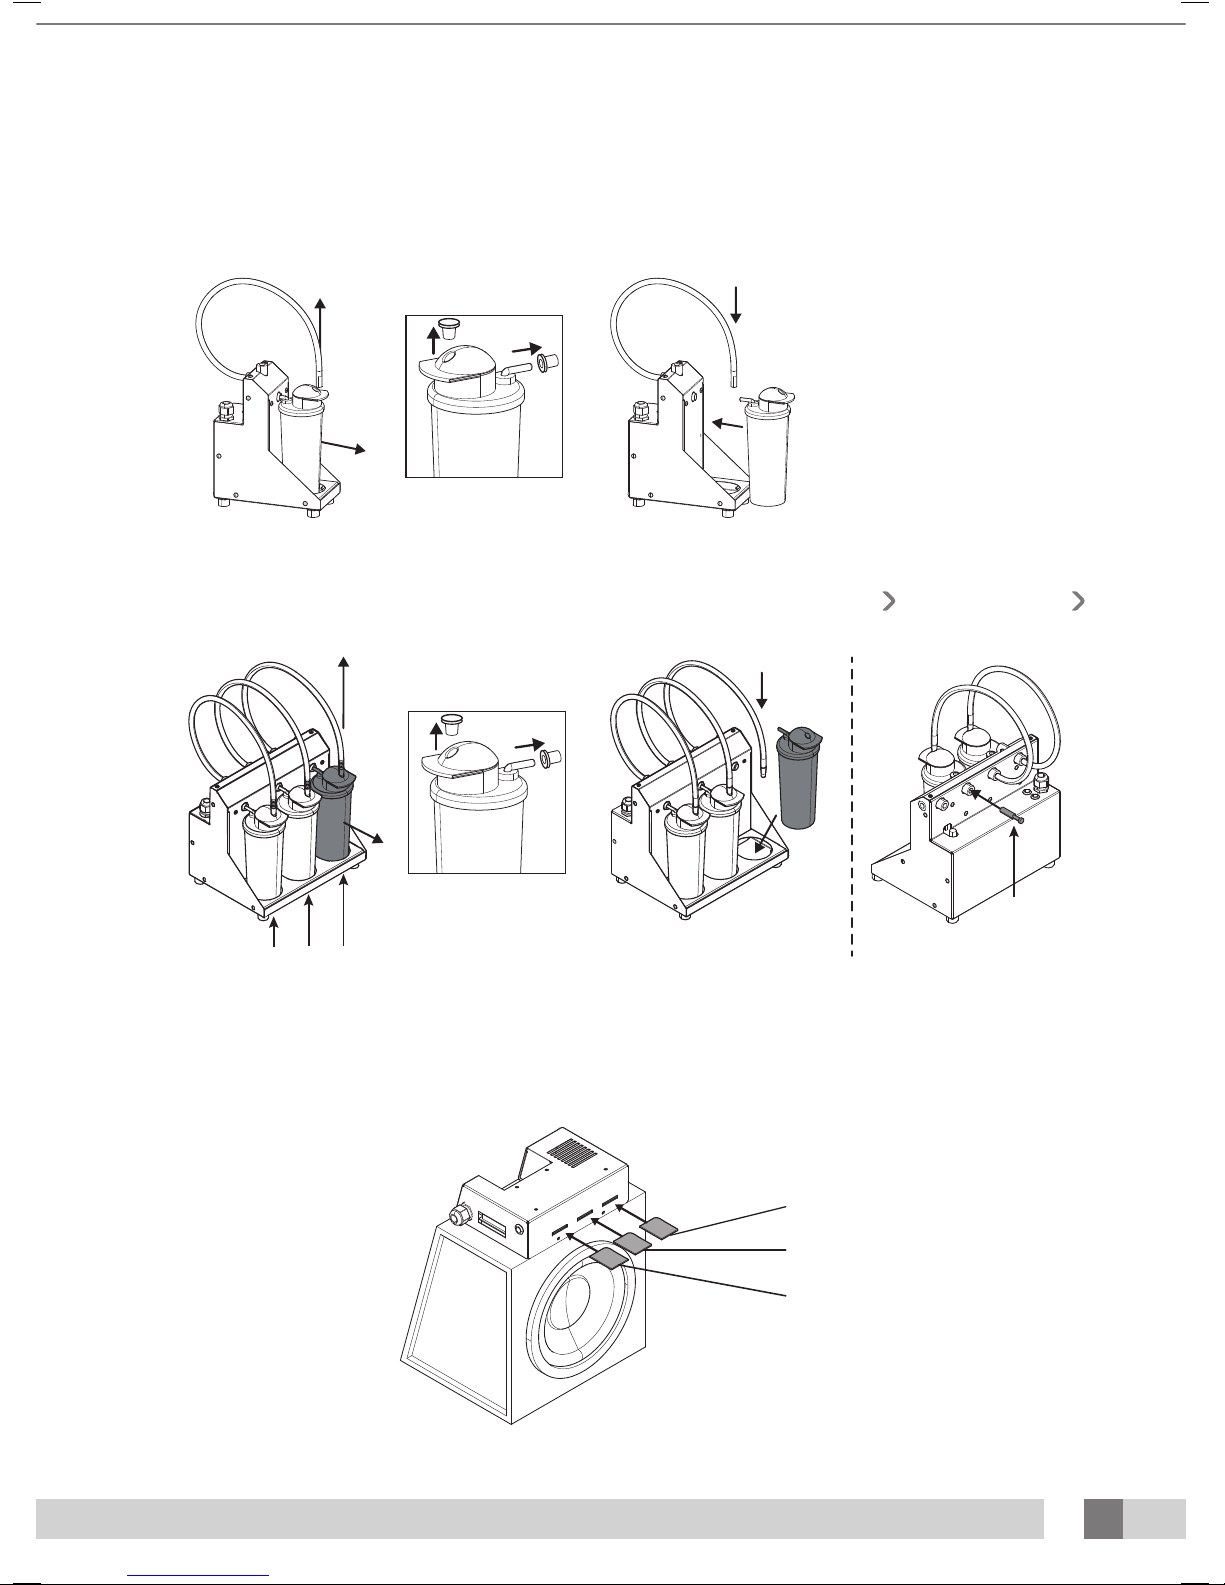
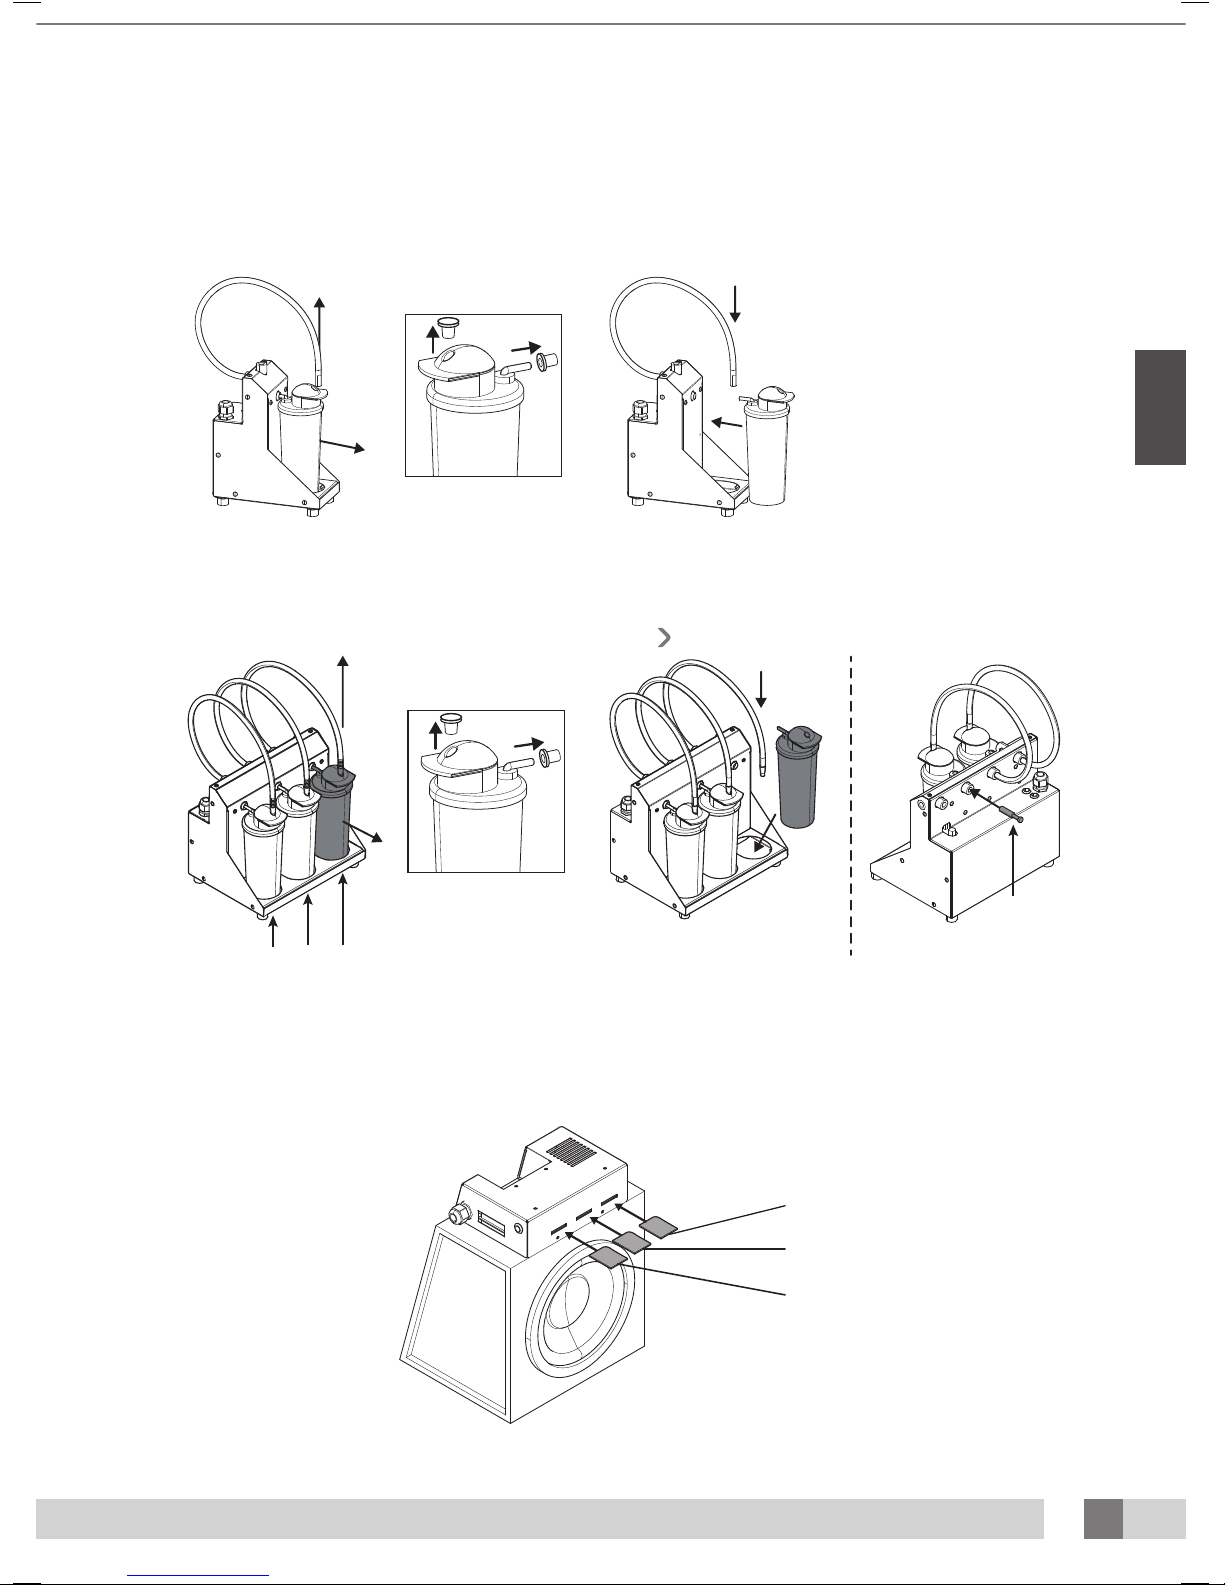
Replacing the Xsens (option) cans
If you purchased an Xsens I set, you can replace an empty can with a full one.
If you purchased an Xsens III set, you can replace an empty can with a full one (A). There must always be 3 cans connected.
If you wish to install fewer than 3 cans (B), you must disconnect the supply hose to the can and install the optional plug (P). Always place full cans as far as
possible to the left (position 1). In the parameter menu, set the number of full cans that are present by selecting ‘06 - Xsens’ ‘02 - Number of Xsens cans’.
Changing SoundAround (option) memory cards
You can replace your SmartVoice card with a dierent SmartVoice card.
You can place your own music on the Studio 1 and Studio 2 cards. Only use the supplied memory cards.
14
ENG
ENG
Note:
We recommend that you immediately change the code to a personal parameter code. Save this code carefully.
Sunbed settings
Parameter menu
Hold the , and buttons for 10 seconds.
Enter the PIN code; it is set to 0000 by default. Press to conrm.
Parameters
The sunbed can be set to your preferences by changing the parameters shown here. The parameters that are not shown in the table may only be changed by
your dealer.
Use the and buttons to navigate to the desired submenu and use to select it.
Use the and buttons to navigate to the desired parameter and use to select it.
Use the and buttons to change the value.
If you want to save the new value, press
; the text ‘OK’ is selected and the text ‘Press ^ to conrm’ appears at the bottom of the display. Press to conrm.
The value is saved and you now return to the submenu.
If you do not want to save the new value, press
; the new value is not saved and you now return to the submenu. Press to return to the main menu.
Press
to exit the parameter menu. If no button is pressed for 1 minute, you automatically return to the stand-by screen.
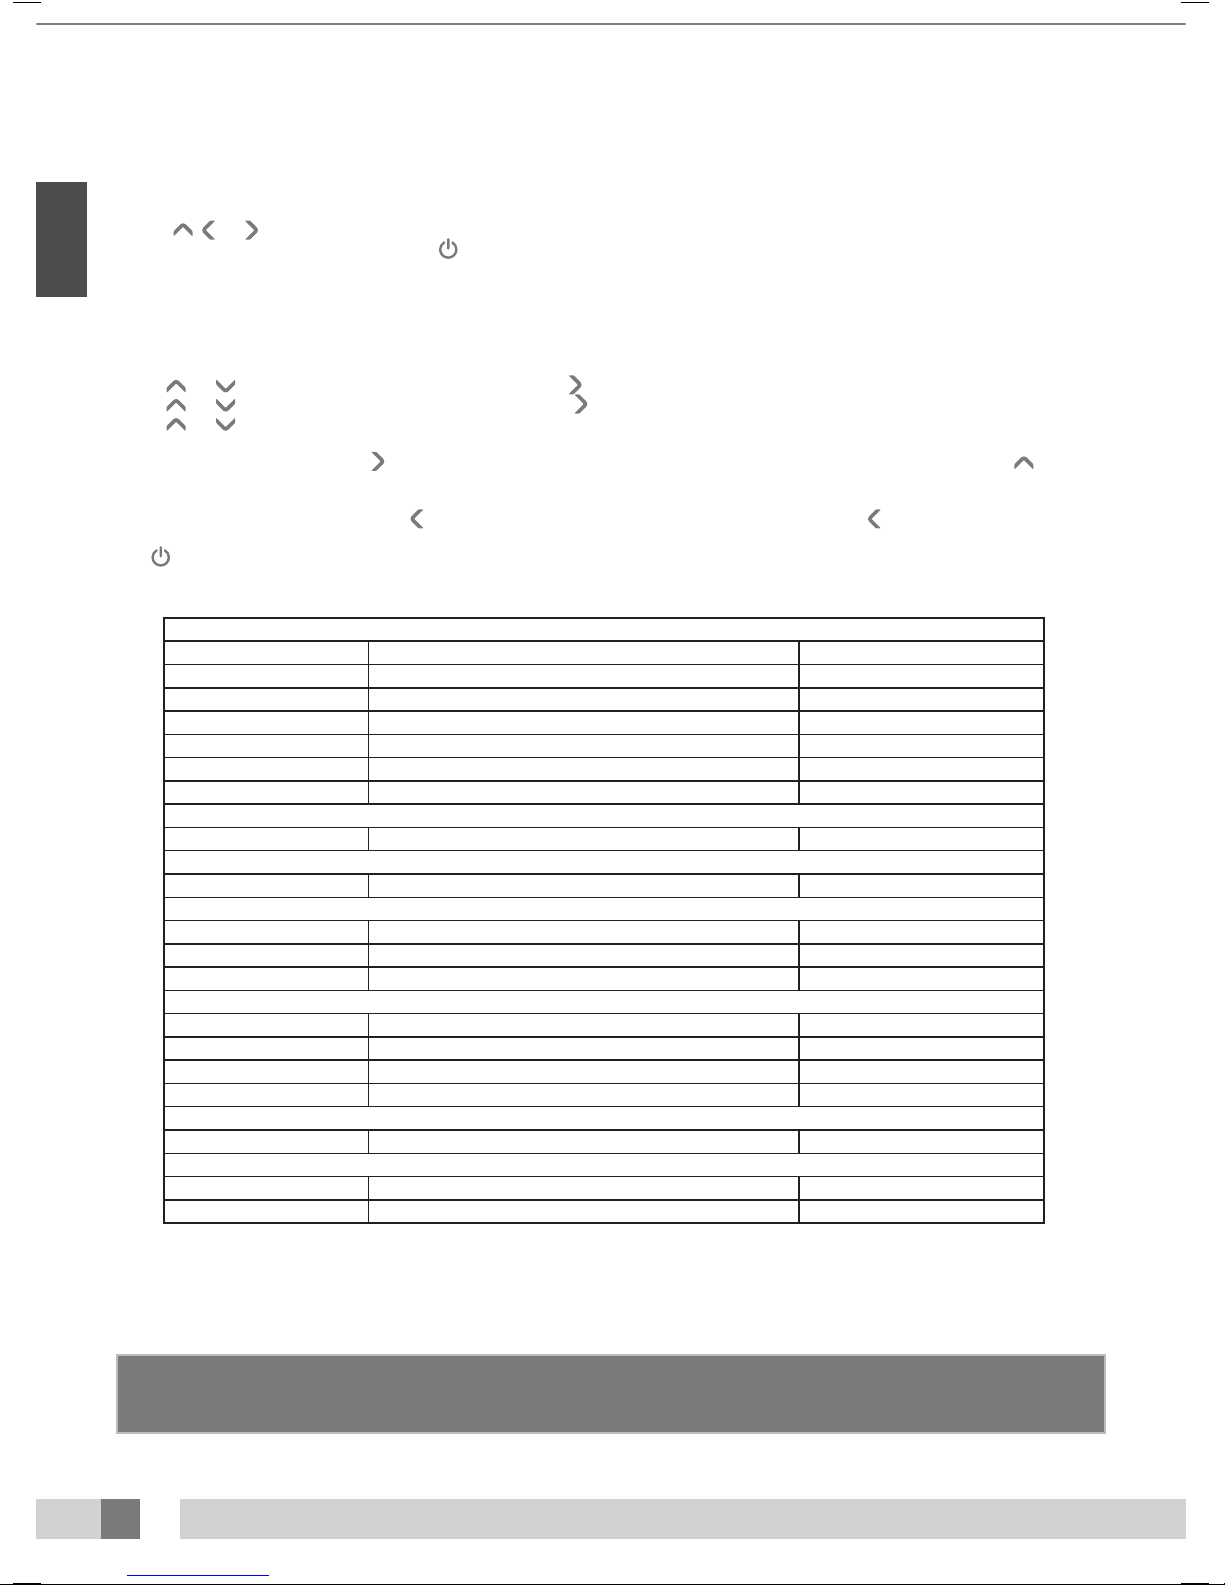
1. Unit
1. Start time (minutes) 0 = Coin unit / >0 = Stand-alone Default = 0 (Coin unit)
6. Time light on Time at which the decorative lighting is switched on Default = 07:00
7. Time light o Time at which the decorative lighting is switched o Default = 23:00
8. Unit time Current machine time Default = 00:00
9. Unit date Current machine date Default = 01-01-2012
12. Parameter code Unique code for entering the parameter menu Default = 0000
13. Clean time (minutes) The length of time the display is switched o for cleaning Default = 01:00
4. Body fan
1. Body fan at start Speed of the body fan at the beginning of the session
Default = 1
5. Head fan
1. Head fan at start
Speed of the head fan at the beginning of the session Default = 1
6. Xsens
2. Number of Xsens cans Number of installed Xsens cans Default = 1
3. Xsens at start Xsens scent at the beginning of the session (0 = o ) Default = 0
4. Xsens at standby Xsens scent during the stand-by period (0 = o ) Default = 0
7. Audio
16. Stand-by volume Music volume during the stand-by period (0 = o ) Default = 0
17. Stand-by channel Music channel during the stand-by period Default = 1
18. Start volume Music volume at the beginning of the session (0 = o) Default = 4
19. Start channel Music channel at the beginning of the session Default = 2
7. Airco
1. Airco at start
State of the airco at the beginning of the session Default = On
8. Qsens
1. Qsens at start State of the Qsens at the beginning of the session Default = On
3. Qsens initialization Bleeding of the Qsens system Default = O
15
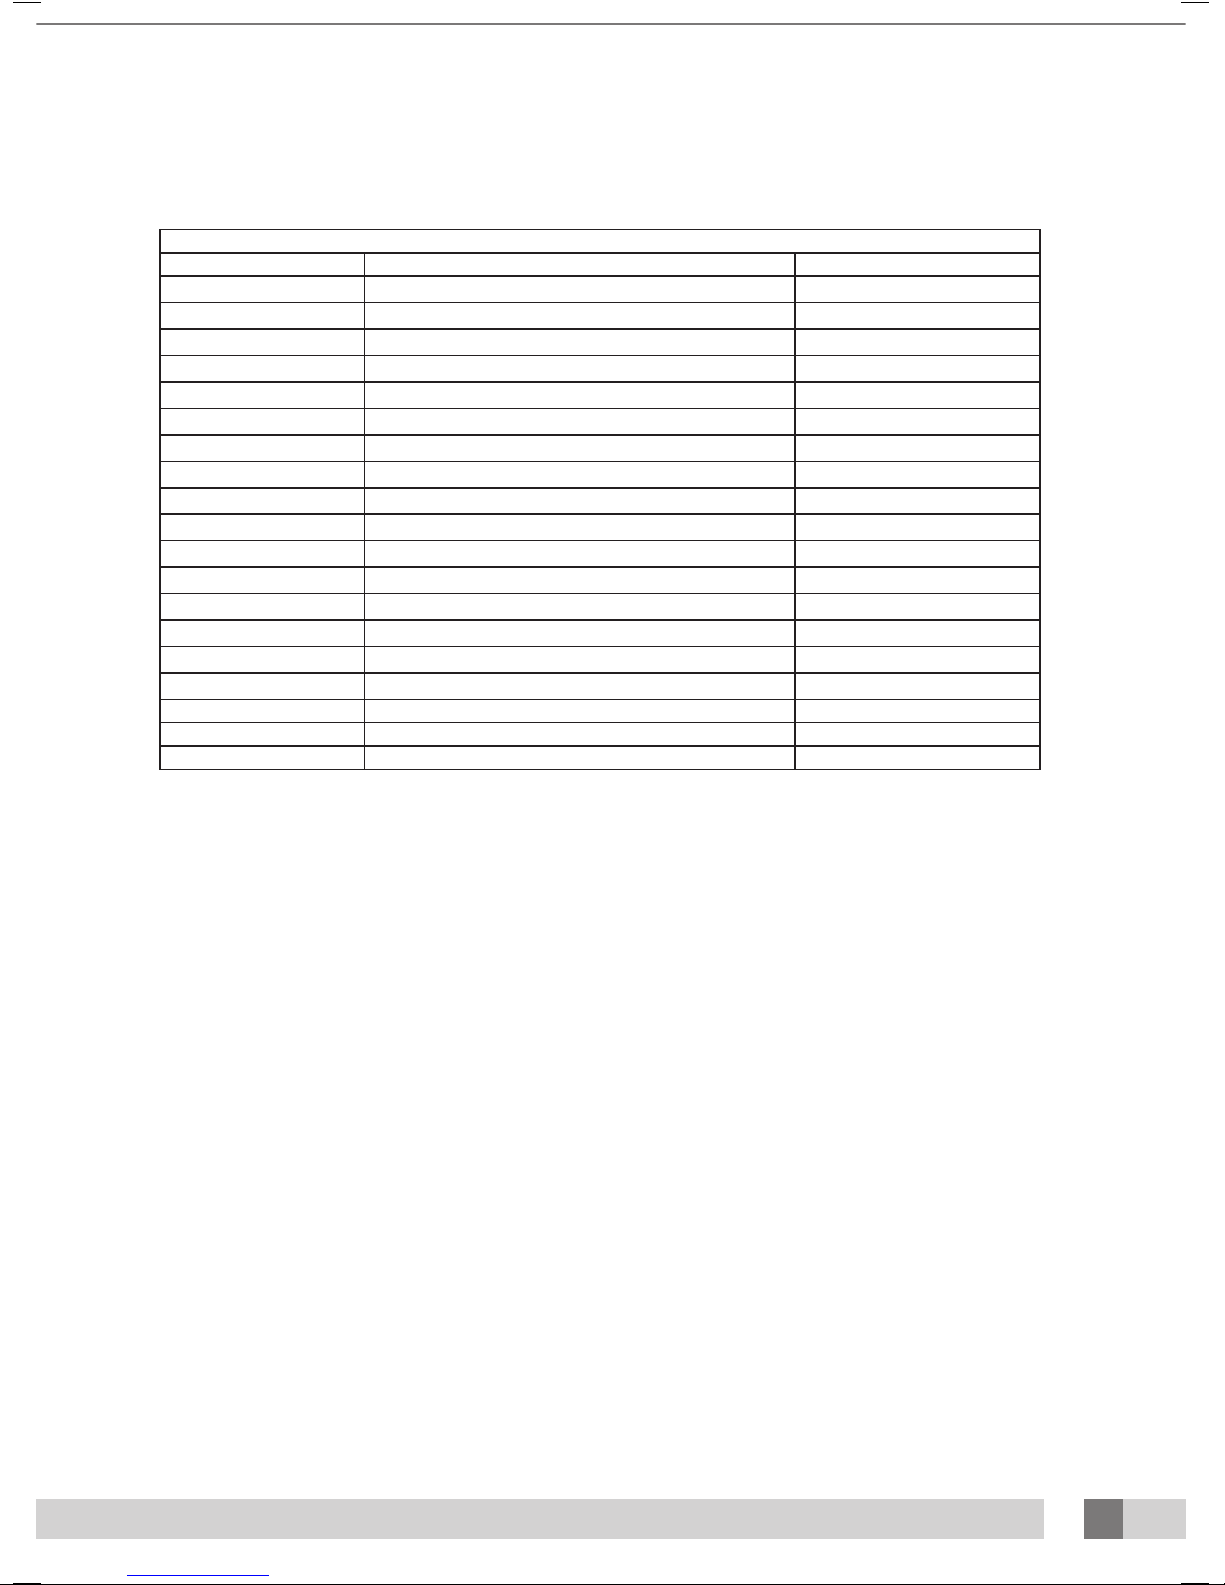
10. Deco light
1. Eect Colour programme Default = 1
0 = single color (see color sub: 4. color number)
1 = all colors
2 = base colors quickly
3 = base colors slowly
4 = shades of white
5 = soft colors
6 = shades of white (base white)
7 = shades of red, orange and yellow
8 = shades of purple and pink
9 = shades of red
10 = shades of orange
11 = shades of yellow
12 = shades of green
13 = shades of blue
14 = shades of purple
15 = shades of pink
2. Eect speed Speed at which the colour programme cycles (1-20) Default = 10
3. Deco light at start Decorative lighting at the beginning of the session Default = O
4. Colour number Colour Default = 27
16
ENG
ENG
OPTION
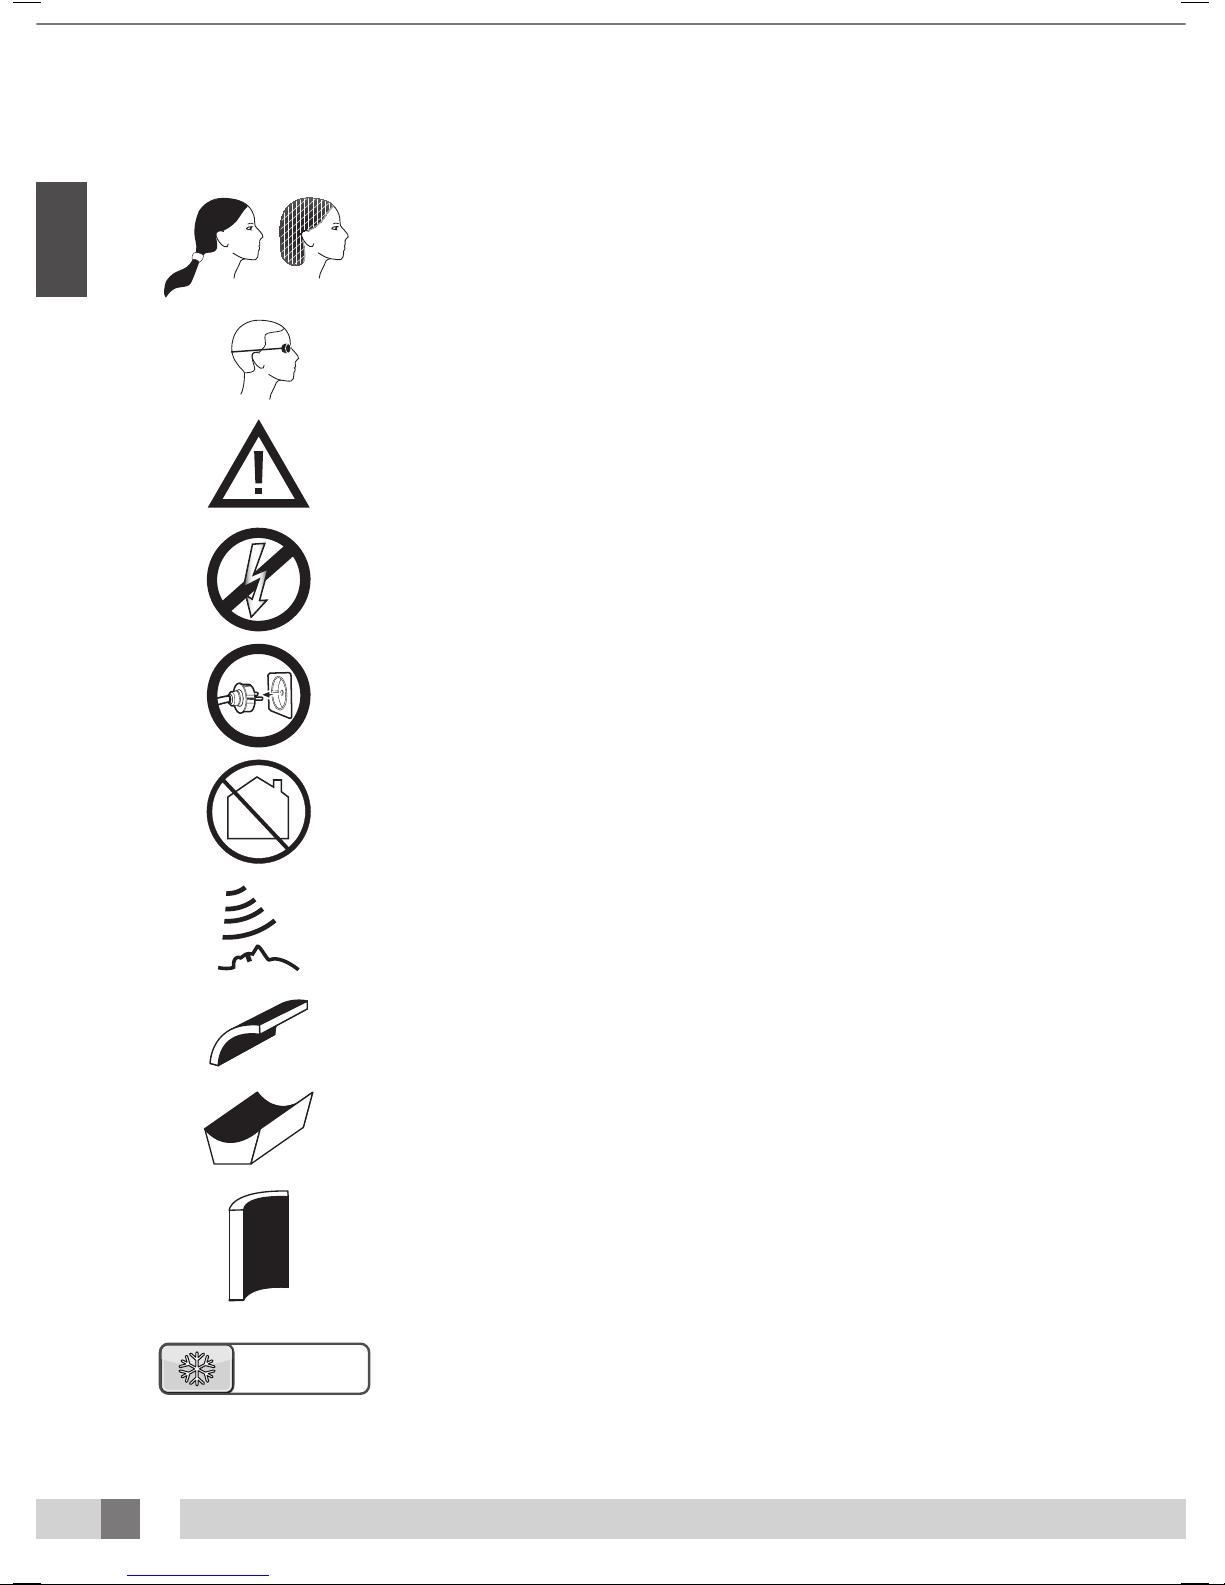
Symbols
Warning symbol:
People with long hair should wear a hairnet!
Warning symbol:
Wear the protective goggles provided
Warning symbol:
Attention please!
Warning symbol:
Sunbed should be disconnected from power source
Warning symbol:
Remove plug from socket
Warning symbol:
Not for household use
Symbol:
Facial tanner
Symbol:
Sunbed canopy
Symbol:
Sunbed bed
Symbol:
Vertical sunbed
Symbol:
Only applicable if this option is ordered
Our tanning units are manufactured with the
greatest attention and are of excellent quality.
Every Luxura is manufactured to meet the
international IEC/EN standards and carries the
Kema seal of approval. We provide a manufacturer’s
warranty of 1 year.
Your new sunbed has a manufacturer’s guarantee
of 1 year, which commences on the date of
installation. Within the warranty period all faults
that are the result of material or manufacturing
errors will be repaired at no cost. Please contact
your dealer for any warranty enquiries.
In order to make a claim under the terms of this
guarantee, you must be able to produce the
original invoice or receipt bearing the date of
purchase. The type and serial number of the
appliance should also be indicated.
The warranty is subordinate to the national
regulations on product warranties.
Warranty
Units which have the type, serial number and/or
other identi cation labels removed, damaged or
altered.
Lamps, starters and acrylic sheets.
Damage due to purchaser abuse, neglect,
transport, improper use or improper maintenance.
Damage due to use of accessories not originally
supplied by Hapro or inferior accessories.
Damage due to installation, repair or assembly not
done by Hapro authorised personnel.
Damage due to re, lightning, earthquakes or
other natural disasters.
Not covered under this warranty

17
Our tanning units are manufactured with the
greatest attention and are of excellent quality.
Every Luxura is manufactured to meet the
international IEC/EN standards and carries the
Kema seal of approval. We provide a manufacturer’s
warranty of 1 year.
Your new sunbed has a manufacturer’s guarantee
of 1 year, which commences on the date of
installation. Within the warranty period all faults
that are the result of material or manufacturing
errors will be repaired at no cost. Please contact
your dealer for any warranty enquiries.
In order to make a claim under the terms of this
guarantee, you must be able to produce the
original invoice or receipt bearing the date of
purchase. The type and serial number of the
appliance should also be indicated.
The warranty is subordinate to the national
regulations on product warranties.
Warranty
Units which have the type, serial number and/or
other identi cation labels removed, damaged or
altered.
Lamps, starters and acrylic sheets.
Damage due to purchaser abuse, neglect,
transport, improper use or improper maintenance.
Damage due to use of accessories not originally
supplied by Hapro or inferior accessories.
Damage due to installation, repair or assembly not
done by Hapro authorised personnel.
Damage due to re, lightning, earthquakes or
other natural disasters.
Not covered under this warranty
18
ENG
ENG
Declaration of Confi rmity
15314_10.1
Luxura X7
38 SLi, 38 SLi Intensive, 38 SLi High Intensive, 38 SLi IP Control,
40 SPr, 40 SPr Intensive, 40 SPr High Intensive,
42 SLi, 42 SLi Intensive, 42 SLi High Intensive, 42 SLi IP Control
EN 61000-6-3:2007; EN 55022:2006; EN 55014-1:2006;
EN 61000-6-1:2007; EN 61000-4-2:1995+A1:1998,A2:2001;
EN 61000-4-3:2006; EN 61000-4-4:2004;
EN 61000-4-5:2006; EN 61000-4-6:1996+A1:2001;
2112431.0551-QUA/EMC
EN 60335-1:2002+A11:2004+A1:2004+A12:2006+C1:2006+
A1:2004/C11:2007+A13:2008;
EN 60335-2-27:2010
EN 62233:2008+C1:2008
11-10-2011
Manufacturer
Hapro International b.v.
Fleerbosseweg 33
4420 AC Kapelle, The Netherlands
www.hapro.com
Product identification
Product: Tanning equipment
Model:
Type:
This document is valid for all above mentioned types produced as from 01/02/2007.
Means of conformity
The products are in conformity with Directive 2004/108/EC of the European Community and the Low-
Voltage Directive 2006/95/EC of the European Community.
Testing, Electro-Magnetic Compatibility
Carried out by: Hapro Laboratory
Fleerbosseweg 33
4420 AC Kapelle, The Netherlands
Standards used:
EMC Certi cate no.:
Testing, Low-Voltage Directive
Carried out by: Hapro Laboratory
Fleerbosseweg 33
4420 AC Kapelle, The Netherlands
Standards used:
Representative
Name: D.C. van de Linde
Function: Managing Director
Date:
Signature:
19
Declaration of Confi rmity
15314_10.1
Luxura X7
38 SLi, 38 SLi Intensive, 38 SLi High Intensive, 38 SLi IP Control,
40 SPr, 40 SPr Intensive, 40 SPr High Intensive,
42 SLi, 42 SLi Intensive, 42 SLi High Intensive, 42 SLi IP Control
EN 61000-6-3:2007; EN 55022:2006; EN 55014-1:2006;
EN 61000-6-1:2007; EN 61000-4-2:1995+A1:1998,A2:2001;
EN 61000-4-3:2006; EN 61000-4-4:2004;
EN 61000-4-5:2006; EN 61000-4-6:1996+A1:2001;
2112431.0551-QUA/EMC
EN 60335-1:2002+A11:2004+A1:2004+A12:2006+C1:2006+
A1:2004/C11:2007+A13:2008;
EN 60335-2-27:2010
EN 62233:2008+C1:2008
11-10-2011
Manufacturer
Hapro International b.v.
Fleerbosseweg 33
4420 AC Kapelle, The Netherlands
www.hapro.com
Product identification
Product: Tanning equipment
Model:
Type:
This document is valid for all above mentioned types produced as from 01/02/2007.
Means of conformity
The products are in conformity with Directive 2004/108/EC of the European Community and the Low-
Voltage Directive 2006/95/EC of the European Community.
Testing, Electro-Magnetic Compatibility
Carried out by: Hapro Laboratory
Fleerbosseweg 33
4420 AC Kapelle, The Netherlands
Standards used:
EMC Certi cate no.:
Testing, Low-Voltage Directive
Carried out by: Hapro Laboratory
Fleerbosseweg 33
4420 AC Kapelle, The Netherlands
Standards used:
Representative
Name: D.C. van de Linde
Function: Managing Director
Date:
Signature:

20
DEU
DEU
Herzlichen Glückwunsch zum Kauf Ihrer Hapro-Sonnenbank. Ihre neue Sonnenbank
wurde mit der größtmöglichen Sorgfalt hergestellt und besteht aus qualitativ
hochwertigen Einzelteilen. Alle Hapro-Sonnenbanken sind so entwickelt und
abgestimmt, dass die bestmögliche Bräunung Ihres Teints gewährleistet wird. Dies alles
erfolgt nach den strengsten geltenden, anzuwendenden europäischen Normen.
Information zu den Röhren ............................... 21
Bedienungsanleitung ....................................22
Symbol ................................................32
Garantiebestimmungen . . . . . . . . . . . . . . . . . . . . . . . . . . . . . . . . . . 33
Konformitätserklärung................................... 34
Demontage der Acrylplatten ............................. 100
Herausnehmen der Filterhalter ........................... 101
Herausnehmen der Gesichtsbräuner ....................... 102
Leeren Behälter Airco, Ändern Qsens Container .............. 103
Inhalt
Model : XXXXX
Type : XXXXXXXX
Serial number : XXXXXXXXXX / 3
Rated voltage : XXXXXXXX
Rated power input : XXX W
With Airco : XXX W
Manufactured by: Hapro International B.V.
PO Box 73
4420 AC Kapelle, Netherlands
XXXXX_XX
UV type 3 (Total Erythema output limited at 0,3W/m3)
30 x maxlight 160W-R CE III
160-R-(21-28)/(2,2-3)
22 x maxlight XL180W-R CE III
180-R-(21-28)/(2-2,6)
22 x maxlight HP 500W S or maxlight HP 500W D
Main Filter: SPS (Art. nr. 15691) Ballast: 320W
Informationen zu den Röhren
Die unten aufgeführten, sind die ab Fabrik installierten Standardröhren. Diese Röhren sorgen für ein optimales Bräunungsergebnis und
entsprechen der UV-Klasse Ihres Bräunungsgerätes. Wir empfehlen bei Röhrenwechsel nur den jeweils installierten Röhrentyp zu verwenden.
Diesen Röhrentyp können Sie in unten stehender Tabelle, sowie auf dem Typenschild Ihres Gerätes nden. Sollten Sie einen anderen
Röhrentyp installieren wollen, achten Sie darauf, dass dieser mit einer Gleichwertigkeitsnummer markiert ist, welche besagt, dass die Röhre
innerhalb des Bereiches fällt der auf dem Typenschild angegeben ist.
Lampen Art nr Gleichwertigkeitsnummer UV-Typ (EU Länder) UV-Typ (nicht EU Länder)
maxlight 25W CE III 23023 30-O-(2-3)/(42,5-57,5) 3 3
maxlight 100W-R CE III 12797 100-R-(17-22)/(2,1-2,9) 3 3
maxlight 100W-R CE 0,3 16997 100-R-(20-27)/(2,3-3,1) 2 3
maxlight 100W-R High Intensive 12801 100-R-(38-50)/(5,1-6,9) Darf nicht verwendet werden 5
maxlight XL 120 W-R CE III 12810 120-R-(27-36)/(2,8-3,8) 3 3
maxlight XL 120 W-R High Intensive 15898 120-R-(68-90)/(7,9-10,7) Darf nicht verwendet werden 5
maxlight 160W-R CE III 12814 160-R-(21-28)/(2,2-3) 3 3
maxlight 160W-R CE 0,3 17001 160-R-(20-27)/(1,5-2,1) 2 3
maxlight 160W-R High Intensive 15899 160-R-(77-102)/(6,9-9,3) Darf nicht verwendet werden 5
maxlight XL 180W-R CE III 12818 180-R-(21-28)/(2-2,6) 3 3
maxlight XL 180W-R CE 0,3 17002 180-R-(24-32)/(1,7-2,3) 2 3
maxlight XL 180W-R High Intensive 12821 180-R-(86-114)/(6,7-9,1) Darf nicht verwendet werden 5
maxlight HP 400W D 12526 Nicht zutre end Nicht zutre end Nicht zutre end
Power Gesichtsbräuner Glas Filter UV-Typ (EU Länder) UV-Typ (nicht EU Länder)
300W HPS 2 2
400W HPS Darf nicht verwendet werden 2
300W SPS 3 2
400W SPS 2 2
300W BPS 3 3
400W BPS 3 3
Achtung: Das gesamt Erythem ist für alle UV-Typen innerhalb der EU auf 0.3 W/m² limitiert.
Achtung: die Gleichwertigkeitsnummer ist nur für Niederdruck Lampen gültig.
Beispiel:
Auf dem unten stehenden Beispiel Typenschild sind die Gleichwertigkeitsnummern für Himmel und Bank
markiert.
Die Gleichwertigkeitsnummer für den Himmel ist 160-R-(21-28)/(2.2-3)
160 = Leistung der Röhre in Watt
R = Re ektortyp
(21-28) = Gleichwertigkeitsbereich für das gesamt e ektive Erythem
(2.2-3) = Gleichwertigkeitsbereich für das NMSC Verhältnis
Bei Röhrenwechsel muss die Leistung und der Re ektortyp immer mit der Gleichwertigkeitsnummer oder
dem Typenschild übereinstimmen. Das e ektive Erythem und NMSC Verhältnis muss ebenso in denselben
Bereich fallen.
Sie sollten, abgesehen von den empfohlenen, nur Röhren verwenden die alle diese Kriterien erfüllen.
Außerdem müssen Sie darauf achten, dass
a. Die Bräunungsleistung Ihres Gerätes wahrscheinlich geringer ist.
b. Die Schutzschaltungen Ihres Gerätes angepasst werden müssen, da sich der Stromverbrauch geändert
haben wird.
c. Die UV-Klasse nicht mehr mit dem Typenschild übereinstimmt.
d. Wir, wenn andere als die von uns empfohlenen Röhren verwendet werden, ewährleistungsansprüche
nicht automatisch anerkennen, da es den technische Betrieb Ihres Gerätes möglicherweise beein usst
hat.
Lampen (IP-control) Art nr Gleichwertigkeitsnummer UV-Typ (EU Länder) UV-Typ (nicht EU Länder)
maxlight 80-180W-R IPcontrol CE/N III 19446 180-R-(37-49)/(3,4-4,6) Nicht zutre end Nicht zutre end
maxlight XL 80-180W-R IPcontrol CE/N III 19447 180-R-(38-50)/(3-4) Nicht zutre end Nicht zutre end
21
DEU
Model : XXXXX
Type : XXXXXXXX
Serial number : XXXXXXXXXX / 3
Rated voltage : XXXXXXXX
Rated power input : XXX W
With Airco : XXX W
Manufactured by: Hapro International B.V.
PO Box 73
4420 AC Kapelle, Netherlands
XXXXX_XX
UV type 3 (Total Erythema output limited at 0,3W/m3)
30 x maxlight 160W-R CE III
160-R-(21-28)/(2,2-3)
22 x maxlight XL180W-R CE III
180-R-(21-28)/(2-2,6)
22 x maxlight HP 500W S or maxlight HP 500W D
Main Filter: SPS (Art. nr. 15691) Ballast: 320W
Informationen zu den Röhren
Die unten aufgeführten, sind die ab Fabrik installierten Standardröhren. Diese Röhren sorgen für ein optimales Bräunungsergebnis und
entsprechen der UV-Klasse Ihres Bräunungsgerätes. Wir empfehlen bei Röhrenwechsel nur den jeweils installierten Röhrentyp zu verwenden.
Diesen Röhrentyp können Sie in unten stehender Tabelle, sowie auf dem Typenschild Ihres Gerätes nden. Sollten Sie einen anderen
Röhrentyp installieren wollen, achten Sie darauf, dass dieser mit einer Gleichwertigkeitsnummer markiert ist, welche besagt, dass die Röhre
innerhalb des Bereiches fällt der auf dem Typenschild angegeben ist.
Lampen Art nr Gleichwertigkeitsnummer UV-Typ (EU Länder) UV-Typ (nicht EU Länder)
maxlight 25W CE III 23023 30-O-(2-3)/(42,5-57,5) 3 3
maxlight 100W-R CE III 12797 100-R-(17-22)/(2,1-2,9) 3 3
maxlight 100W-R CE 0,3 16997 100-R-(20-27)/(2,3-3,1) 2 3
maxlight 100W-R High Intensive 12801 100-R-(38-50)/(5,1-6,9) Darf nicht verwendet werden 5
maxlight XL 120 W-R CE III 12810 120-R-(27-36)/(2,8-3,8) 3 3
maxlight XL 120 W-R High Intensive 15898 120-R-(68-90)/(7,9-10,7) Darf nicht verwendet werden 5
maxlight 160W-R CE III 12814 160-R-(21-28)/(2,2-3) 3 3
maxlight 160W-R CE 0,3 17001 160-R-(20-27)/(1,5-2,1) 2 3
maxlight 160W-R High Intensive 15899 160-R-(77-102)/(6,9-9,3) Darf nicht verwendet werden 5
maxlight XL 180W-R CE III 12818 180-R-(21-28)/(2-2,6) 3 3
maxlight XL 180W-R CE 0,3 17002 180-R-(24-32)/(1,7-2,3) 2 3
maxlight XL 180W-R High Intensive 12821 180-R-(86-114)/(6,7-9,1) Darf nicht verwendet werden 5
maxlight HP 400W D 12526 Nicht zutre end Nicht zutre end Nicht zutre end
Power Gesichtsbräuner Glas Filter UV-Typ (EU Länder) UV-Typ (nicht EU Länder)
300W HPS 2 2
400W HPS Darf nicht verwendet werden 2
300W SPS 3 2
400W SPS 2 2
300W BPS 3 3
400W BPS 3 3
Achtung: Das gesamt Erythem ist für alle UV-Typen innerhalb der EU auf 0.3 W/m² limitiert.
Achtung: die Gleichwertigkeitsnummer ist nur für Niederdruck Lampen gültig.
Beispiel:
Auf dem unten stehenden Beispiel Typenschild sind die Gleichwertigkeitsnummern für Himmel und Bank
markiert.
Die Gleichwertigkeitsnummer für den Himmel ist 160-R-(21-28)/(2.2-3)
160 = Leistung der Röhre in Watt
R = Re ektortyp
(21-28) = Gleichwertigkeitsbereich für das gesamt e ektive Erythem
(2.2-3) = Gleichwertigkeitsbereich für das NMSC Verhältnis
Bei Röhrenwechsel muss die Leistung und der Re ektortyp immer mit der Gleichwertigkeitsnummer oder
dem Typenschild übereinstimmen. Das e ektive Erythem und NMSC Verhältnis muss ebenso in denselben
Bereich fallen.
Sie sollten, abgesehen von den empfohlenen, nur Röhren verwenden die alle diese Kriterien erfüllen.
Außerdem müssen Sie darauf achten, dass
a. Die Bräunungsleistung Ihres Gerätes wahrscheinlich geringer ist.
b. Die Schutzschaltungen Ihres Gerätes angepasst werden müssen, da sich der Stromverbrauch geändert
haben wird.
c. Die UV-Klasse nicht mehr mit dem Typenschild übereinstimmt.
d. Wir, wenn andere als die von uns empfohlenen Röhren verwendet werden, ewährleistungsansprüche
nicht automatisch anerkennen, da es den technische Betrieb Ihres Gerätes möglicherweise beein usst
hat.
Lampen (IP-control) Art nr Gleichwertigkeitsnummer UV-Typ (EU Länder) UV-Typ (nicht EU Länder)
maxlight 80-180W-R IPcontrol CE/N III 19446 180-R-(37-49)/(3,4-4,6) Nicht zutre end Nicht zutre end
maxlight XL 80-180W-R IPcontrol CE/N III 19447 180-R-(38-50)/(3-4) Nicht zutre end Nicht zutre end
22
DEU
DEU
Bedienung
Allgemein:
3
2
4
1
5
6
1
2
3
4
5
6
Option auf der linken Seite auswählen
Option auf der rechten Seite auswählen
innerhalb der ausgewählten Option nach oben navigieren
innerhalb der ausgewählten Option nach unten navigieren
Start/Stopp/Pause
Display
Bedienfunktionen
08:19
15:00
23
DEU
Bedienfunktionen
08:19
15:00
Münzeinwurf-Betriebsmodus ohne Fernstart
Das Gerät wird automatisch gestartet, wenn auf dem externen Timer oder am Münzeinwurf
kein „Fernstart“ angezeigt wird. Der „Fernstart“ kann von Ihrem Händler konguriert werden.
Münzeinwurf-Betriebsmodus mit Fernstart
Drücken Sie 1x , um das Gerät zu starten.
Einzelbetriebsmodus
Drücken Sie 1x .
Die maximale Bräunungszeit (Startzeit) wird auf dem Display angezeigt. Die Bräunungszeit
lässt sich mit den Tasten und ändern.
Drücken Sie 1x , um die geänderte Zeit zu bestätigten. Das Gerät wird eingeschaltet, und
die Bräunungszeit beginnt.
Nach dem Einstellen der Bräunungszeit halten Sie
3 Sekunden lang gedrückt, um zur
Standby-Anzeige zurückzukehren. Wenn länger als 1 Minute keine Taste gedrückt wird,
kehrt das Gerät automatisch zur Standby-Anzeige zurück.
Pausenmodus
Drücken Sie während der Bräunung 1x , um das Gerät in den Pausenmodus zu versetzen.
Die Lampen werden daraufhin ausgeschaltet. Die Körperkühlung läuft weiter (maximal 4
Minuten). Xsens (optional) und Qsens (optional) werden ebenfalls in den Pausenmodus
versetzt.
Münzeinwurf-Betriebsmodus
Im oberen Bereich des Displays wird weiterhin die verbleibende Bräunungszeit angezeigt,
und im unteren Bereich des Displays erscheint der Hinweis „Für Neustart drücken“.
Drücken Sie im Pausenmodus 1x , um die Sonnenbank wieder einzuschalten und die
Bräunung fortzusetzen.
Einzelbetriebsmodus
Im oberen Bereich des Displays wird weiterhin die verbleibende Bräunungszeit angezeigt,
und im unteren Bereich des Displays erscheinen abwechselnd die Hinweise „Für Neustart
“ und „ Zum Beenden der Sitzung diese Taste 3 Sekunden lang drücken“.
Drücken Sie im Pausenmodus 1x , um die Sonnenbank neu zu starten, oder halten
Sie 3 Sekunden lang gedrückt, um die Sonnenbank auszuschalten. Dadurch wird die
Bräunungssitzung beendet, und die erforderliche dreiminütige Abkühlzeit beginnt.
Hinweis:
Der Bräunungszeitzähler läuft auch im „Pausenmodus“ weiter.
Wenn die Sonnenbank innerhalb von 4 Minuten nach dem Drücken von neu
gestartet wird, werden die Gesichtsbräuner (nur beim Modell SLi) nicht eingeschaltet. Die
Gesichtsbräuner werden nach dem Ende ihrer erforderlichen vierminütigen Abkühlzeit
automatisch neu gestartet.
Wenn die Taste gedrückt wird, läuft die Klimaanlage (optional) 5 Minuten weiter, bevor
sie sich ausschaltet. Nach diesen 5 Minuten durchläuft die Klimaanlage außerdem ihre
erforderliche dreiminütige Abkühlzeit.
Drücken Sie , um fortzufahren
Stellen Sie die Zeit
Pause
24
DEU
DEU
12:48
12:48
12:48
12:48
Körperkühlung
Mit der Taste lässt sich die Intensität der Körperkühlung erhöhen.
Mit der Taste
lässt sich die Intensität der Körperkühlung verringern.
Die Körperkühlung lässt sich in 8 Stufen einstellen.
Die Körperkühlung lässt sich nicht abschalten.
Gesichtskühlung
Mit der Taste lässt sich die Intensität der Gesichtskühlung erhöhen.
Mit der Taste
lässt sich die Intensität der Gesichtskühlung verringern.
Die Gesichtskühlung lässt sich in 8 Stufen einstellen.
Gesichtsbräuner (nur beim Modell SLi)
Mit der Taste lässt/lassen sich der/die Gesichtsbräuner auf seine/ihre minimale Intensität
einstellen.
Mit der Taste lässt/lassen sich der/die Gesichtsbräuner auf seine/ihre maximale Intensität
einstellen.
Im oberen Bereich des Displays wird der Wert angezeigt, und im unteren Bereich des
Displays erscheint der Text „Gesichtsbräuner“.
Halten Sie die Taste 3 Sekunden lang gedrückt, um den/die Gesichtsbräuner
auszuschalten.
Nach dem Abschalten des Gesichtsbräuners muss dieser erst 3 Minuten lang abkühlen,
bevor er sich neu starten lässt.
Die verbleibende Abkühlzeit wird im rechten Bereich des Displays angezeigt.
Gesichtsbräuner (nur beim Modell SPr)
Mit der Taste lässt/lassen sich der/die Gesichtsbräuner auf seine/ihre minimale Intensität
einstellen.
Mit der Taste
lässt/lassen sich der/die Gesichtsbräuner auf seine/ihre maximale Intensität
einstellen.
Im oberen Bereich des Displays wird der Wert angezeigt, und im unteren Bereich des
Displays erscheint der Text „Gesichtsbräuner“.
Um den/die Gesichtsbräuner auszuschalten, drücken Sie so lange auf , bis „Aus“ auf dem
Display angezeigt wird.
Körperkühlung
Gesichtskühlung
Gesichtsbräuner
Gesichtsbräuner
Mit den Tasten und lässt sich die gewünschte Bedienfunktion auswählen. Auf dem Display werden nur die installierten Optionen angezeigt.
Gesichtsbräuner
kühlen ab
2:08
12:48
12:48
Xsens
12:48
Qsens
12:48
25
DEU
12:48
12:48
Xsens
12:48
Qsens
12:48
Klimaanlage (optional)
Mit der Taste lässt sich die Klimaanlage einschalten.
Im oberen Bereich des Displays wird „Ein/Aus“ angezeigt, und im unteren Bereich des
Displays erscheint der Text „Klimaanlage“.
Die Klimaanlage ist so voreingestellt, dass sie sich in jeder Bräunungssitzung automatisch
einschaltet. Halten Sie die Taste 3 Sekunden lang gedrückt, um die Klimaanlage
auszuschalten.
Nach dem Abschalten der Klimaanlage muss diese erst 3 Minuten lang abkühlen, bevor sie
sich neu starten lässt.
Die verbleibende Abkühlzeit wird im rechten Bereich des Displays angezeigt.
Wenn im rechten Bereich des Displays der Text „Klimaanlage Wartung“ erscheint, wird die
Klimaanlage nicht eingeschaltet. Wie Sie vorgehen müssen, wenn diese Fehlermeldung
erscheint, erfahren Sie in diesem Handbuch im Kapitel „Meldungen“.
Qsens (optional)
Mit der Taste lässt sich das Qsens-System (das während der Bräunung alle 2 Minuten
einen feinen Wassersprühnebel ausstößt) einschalten.
Mit der Taste
lässt sich das Qsens-System ausschalten.
Im oberen Bereich des Displays wird „Ein/Aus“ angezeigt, und im unteren Bereich des
Displays erscheint der Text „Qsens“.
Das Qsens-System ist so voreingestellt, dass es sich in jeder Bräunungssitzung automatisch
einschaltet.
Xsens (optional)
Xsens I
Mit der Taste
lässt sich das Xsens-System einschalten.
Mit der Taste lässt sich das Xsens-System ausschalten.
Im oberen Bereich des Displays wird der Wert angezeigt, und im unteren Bereich des
Displays erscheint der Text „Xsens“.
Xsens III
Wenn mehrere Xsens-Düfte verfügbar sind, wird der jeweils ausgewählte Duft im rechten
Bereich des Displays angezeigt.
Mit der Taste lässt sich der nächste Duft auswählen.
Mit der Taste lässt sich der vorherige Duft auswählen.
Um das Xsens-System auszuschalten, drücken Sie so lange auf
, bis „Aus“ auf dem Display
angezeigt wird.
Das Xsens-System ist so voreingestellt, dass es sich in jeder Bräunungssitzung automatisch
einschaltet.
Musikkanal auswählen
(nur bei Modellen mit Soundsystem)
Der gewünschte Musikkanal lässt sich mit den Tasten und auswählen. Es werden nur
die verfügbaren Musikkanäle angezeigt.
Wenn alle Musikkanäle verfügbar sind, lässt sich jeweils einer der folgenden Kanäle
auswählen:
„Mein MP3“ und Studiokanal 1 bis 6
Wenn ein SoundAround-System angeschlossen ist, wird dieses automatisch von der
Software erkannt. Alle zugehörigen Tasten werden daraufhin aktiviert.
Klimaanlage
Klimaanlage
kühlt ab
2:08
On
Off
Duft 1
On
Off
Kanal 1
Musikkanal

26
DEU
DEU
12:48
12:48
Zum nächsten oder vorherigen Titel springen (nur bei Modellen mit
Soundsystem)
Wenn „Kanal 1“ oder „Kanal 2“ ausgewählt ist, wird die „Titelsprung“-Funktion aktiviert.
Mit der Taste
gelangen Sie zum nächsten Titel.
Mit der Taste
gelangen Sie zum vorherigen Titel.
Musik-Lautstärke anpassen (nur bei Modellen mit Soundsystem)
Mit der Taste lässt sich die Lautsprecher-Lautstärke erhöhen.
Mit der Taste lässt sich die Lautsprecher-Lautstärke verringern.
Der Text „Lautstärke“ erscheint im unteren Bereich des Displays.
Die Lautstärke lässt sich in 8 Stufen einstellen.
Zu Beginn der Bräunungssitzung wird die Lautstärke automatisch auf „4“ eingestellt.
Musiklautstärke
Wechsel Song
Next
Prev.
27
DEU
Meldungen
Kritische Fehler: Fehler:
E1 = Interner Timer ist defekt E18 = Kommunikationsstörung Temperatursensor Liegeäche
E2 = Ventilator im Unterteil ist defekt E19 = Kommunikationsstörung Temperatursensor Himmel
E3 = Kommunikationsfehler zwischen Bedien- und Schaltteil E20 = Klimaanlage Behälter gefüllt
E6 = Unbekannte Phase E21 = Klimaanlage Reinigung
E7 = Relais ist defekt
E9 = Maximale Temperatur Liegeäche
E10 = Maximale Temperatur Himmel
E11 = Kommunikationsstörung Ventilatorsteuerung
Hinweis:
Wenn eine oder mehrere der vorgenannten Fehlermeldungen auf dem Display angezeigt wird bzw. werden, dürfen Sie die
betreende Sonnenbank nicht mehr benutzen und müssen deren Netzstecker aus der Steckdose ziehen.Wenden Sie sich an
Ihren Händler.
Störungen/Fehlfunktionen
Im Falle einer Störung oder Fehlfunktion blinken die 4 Tasten , , und , während
sich das Gerät im Standby-Modus bendet. Außerdem gibt das Gerät jede Minute 3 rasch
aufeinanderfolgende Pieptöne aus. Drücken Sie gleichzeitig alle 4 Tasten. Daraufhin werden
Ihnen alle betreenden Störungen und/oder Fehlfunktionen angezeigt.
Bei einer schwerwiegenden Störung und/oder Fehlfunktion erfolgt die betreende Anzeige
automatisch. Im oberen Bereich des Displays wird „Fehlfunktion“ angezeigt, und im unteren
Bereich des Displays erscheint der betreende Fehlercode zusammen mit einer Erläuterung.
Mit den Tasten und lassen sich die einzelnen Fehlermeldungen anzeigen. Bei den
Fehlern mit den Codes E18, E19, E20 und E21 lässt sich die jeweilige Anzeige durch Drücken
der Taste oder beenden.
Hinweis:
Wenn eine oder mehrere der vorgenannten schwerwiegenden Störungen und/oder Fehlfunktionen auf dem Display angezeigt wird bzw. werden, dürfen Sie
die betreende Sonnenbank nicht mehr benutzen und müssen deren Netzstecker aus der Steckdose ziehen. Wenden Sie sich an Ihren Händler.
Wenn eine oder mehrere der anderen Störungen oder Fehlfunktionen auftritt bzw. auftreten, können Sie die betreende Sonnenbank mit eingeschränktem
Funktionsumfang weiternutzen. Wenn eine Fehlfunktion mit den Codes E18 und E19 auftritt, läuft das Kühlsystem des Geräts während der gesamten
Bräunungssitzung mit maximaler Leistung. Um diese Fehlfunktion zu beheben, wenden Sie sich bitte an Ihren Händler.
E20: Klimaanlage Auangbehälter voll
Überprüfen Sie, ob der Auangbehälter der Klimaanlage voll ist. Wenn der Auangbehälter voll ist, müssen Sie ihn ausleeren. Nach dem Ausleeren des
Auangbehälters dauert es in der Regel noch einige Sekunden, bis diese Fehlermeldung nicht mehr angezeigt wird. . Falls diese Fehlermeldung weiterhin
angezeigt wird, wenden Sie sich an Ihren Händler.
E21: Klimaanlage reinigen
Die Klimaanlage muss alle 6 Monate gründlich gereinigt werden. Falls die Klimaanlage in den letzten 6 Monaten nicht gereinigt wurde, erscheint
die Fehlermeldung „E21: Klimaanlage reinigen“. In diesem Fall müssen Sie die Klimaanlage gründlich reinigen. Nach der Reinigung müssen Sie das
„Wartungsdatum der Klimaanlage“ zurücksetzen. Weitere Informationen hierzu nden Sie in diesem Handbuch im Kapitel „Reinigung“.
Fehler
E3 = Kommunikationsfehler zwischen
Bedien- und Schaltteil
28
DEU
DEU
00:43
00:43
Cleaning
Unit status
>
>
1. Unit hours
2. Lamp hours
3. Facial tanner hours
4. Airco service date
Display software
Display pictures
Switch board
I/O Controller
Sens controller
Ventilation board
>
>
2461
237
237
01-01-2012
5.4
2.3
2.3
1.0
1.0
3.0
00:43
Cleaning
Unit status
>
>
1. Unit hours
2. Lamp hours
3. Facial tanner hours
4. Airco service date
Display software
Display pictures
Switch board
I/O Controller
Sens controller
Ventilation board
>
>
2461
237
237
01-01-2012
5.4
2.3
2.3
1.0
1.0
3.0
Statusmenü
Halten Sie die Tasten , und 5 Sekunden lang gedrückt.
Dadurch gelangen Sie ins „Schnellstatusmenü“.
Hier werden Ihnen die Stundenzähler und Software-Versionen angezeigt.
Stundenzähler zurücksetzen
Navigieren Sie zu ‘2. Lamp hours’ oder ‘3. Facial tanner hours’ , und drücken Sie .
Geben Sie den PIN-Code ein, und drücken Sie
.
Dadurch werden die Stundenzähler zurückgesetzt.
Wartung
Reinigung
Die Sonnenbank ist mit einem Touchpanel zur Steuerung ihrer Funktionen ausgestattet.
Dieses Touchpanel lässt sich vorübergehend abschalten, um ein unbeabsichtigtes Bedienen
der Gerätefunktionen während der Reinigung zu vermeiden. Wir empfehlen Ihnen
außerdem, das Touchpanel ebenfalls vorübergehend abzuschalten, bevor Sie den DisplaySchutzdeckel aus Acrylglas önen.
Halten Sie die Tasten und 5 Sekunden lang gedrückt.
Auf dem Display wird die verbleibende Zeit + „Reinigung“ angezeigt. Während dieser
Zeitspanne ist das Display abgeschaltet und lässt sich nicht bedienen.
Die erforderliche Reinigungszeit für das Gerät lässt sich ändern. Die Standardreinigungszeit
beträgt 1 Minute.
Klimaanlage (Option) reinigen
Reinigen Sie die Klimaanlage gemäß der entsprechenden Anleitung, die Sie zusammen mit
der Klimaanlage erhalten haben.
Nach der Reinigung müssen Sie das Wartungsdatum der Klimaanlage zurücksetzen.
Um das Wartungsdatum zurückzusetzen, während eine Fehlermeldung angezeigt wird,
drücken Sie O, um das „Schnellstatusmenü“ aufzurufen. Halten Sie in der Standby-Anzeige
die Tasten O, und 5 Sekunden lang gedrückt, um das „Schnellstatusmenü“ zu önen.
Navigieren Sie zu ‘Airco service date’ , und drücken Sie .
Geben Sie den PIN-Code ein, und drücken Sie .
Dadurch rückt das Wartungsdatum der Klimaanlage um 6 Monate weiter.
Kartuschen mit Qsens-Flüssigkeit (Option) auswechseln
Befüllen Sie die Kartuschen für die Qsens-Flüssigkeit niemals mit Leitungswasser oder
anderen Flüssigkeiten. Ersetzen Sie leere Kartuschen nur durch die dafür zugelassenen
Kartuschen mit originaler Hapro Qsens-Flüssigkeit. Bestellen Sie stets rechtzeitig im Voraus
eine ausreichende Menge an neuen Kartuschen mit Qsens-Flüssigkeit.
Bevor Sie Qsens erstmals oder nach dem Austausch der Kartusche mit der Qsens-Flüssigkeit
nutzen können, müssen Sie das System entlüften.
Halten Sie die Tasten , und 10 Sekunden lang gedrückt.
Geben Sie den PIN-Code ein; dieser ist auf die Zahlenfolge 0000 voreingestellt. Drücken Sie
zum Bestätigen . Dadurch gelangen Sie ins Parametermenü.
Navigieren Sie zu ‘09 - Qsens’ , und drücken Sie .
Navigieren Sie zu ‘03 - Qsens initialization’ , und drücken Sie .
Drücken Sie , um die Initialisierung zu starten.
Warten Sie, bis die Qsens-Düsen einen feinen Wassersprühnebel ausstoßen.
Drücken Sie , um die Initialisierung zu beenden.
Drücken Sie , um das Parametermenü zu schließen. Ihr Qsens-System ist jetzt
einsatzbereit.
Stundenzähler und Software-Versionen anzeigen
Reinigung
1. 2. 3.
123
P
1. 2. 3.
Studio 2
Studio 1
SmartVoice
A B
29
DEU
1. 2. 3.
123
P
1. 2. 3.
Studio 2
Studio 1
SmartVoice
A B
Xsens-Behälter (Option) auswechseln
Wenn Sie ein Xsens I-Set gekauft haben, können Sie einen leeren Behälter durch einen vollen Behälter ersetzen.
Wenn Sie ein Xsens III-Set gekauft haben, können Sie einen leeren Behälter durch einen vollen Behälter (A) ersetzen. Es müssen stets 3 Behälter angeschlossen
sein.
Wenn Sie weniger als 3 Behälter (B) anschließen möchten, müssen Sie den Zufuhrschlauch für den/die betreenden Behälter, den/die Sie nicht mehr nutzen
möchten, abnehmen und mit dem optionalen Stopfen (P) verschließen. Bringen Sie volle Behälter stets so weit wie möglich links an (Position 1). Geben Sie im
Parametermenü die Anzahl der vorhandenen vollen Behälter ein, indem Sie ‘06 - Xsens’
‘02 - Number of Xsens cans’ auswählen.
Speicherkarten für das SoundAround-System (Option) austauschen
Sie können Ihre aktuelle SmartVoice-Karte jederzeit durch eine andere SmartVoice-Karte ersetzen.
Auf den Studio 1- und Studio 2-Karten können Sie Ihre eigene Musik speichern. Verwenden Sie ausschließlich die mitgelieferten Speicherkarten.
30
DEU
DEU
Hinweis:
Wir empfehlen Ihnen, den voreingestellten Parametercode sofort in einen persönlichen Parametercode zu ändern. Bewahren
Sie diesen Code sorgfältig auf, oder merken Sie ihn sich gut.
Sonnenbank-Einstellungen
Parametermenü
Halten Sie die Tasten , und 10 Sekunden lang gedrückt.
Geben Sie den PIN-Code ein; dieser ist auf die Zahlenfolge 0000 voreingestellt. Drücken Sie zum Bestätigen .
Parameter
Die Einstellungen der Sonnenbank lassen sich durch eine Veränderung der in dieser Tabelle enthaltenen Parameter an Ihre Vorlieben anpassen. Alle Parameter,
die nicht in dieser Tabelle aufgeführt sind, lassen sich nur von Ihrem Händler ändern.
Verwenden Sie die Tasten und , um zum gewünschten Untermenü zu navigieren, und verwenden Sie , um es auszuwählen.
Verwenden Sie die Tasten und , um zum gewünschten Parameter zu navigieren, und verwenden Sie , um ihn auszuwählen.
Verwenden Sie die Tasten und , um den Einstellungswert zu ändern.
Wenn Sie den neuen Wert speichern möchten, drücken Sie
; der Text ‘OK’ wird ausgewählt, und der Text ‘Press ^ to conrm’ erscheint im unteren Bereich des
Displays. Drücken Sie zum Bestätigen . Der Wert wird gespeichert, und Sie kehren ins Untermenü zurück.
Wenn Sie den neuen Wert nicht speichern möchten, drücken Sie
; Der Wert wird nicht gespeichert, und Sie kehren ins Untermenü zurück. Drücken Sie ,
um zurück ins Hauptmenü zu gelangen.
Drücken Sie
, um das Parametermenü zu schließen. Wenn 1 Minute lang keine Taste gedrückt wird, gelangen Sie automatisch zur Standby-Anzeige zurück.
1. Unit
1. Start time (Minuten) 0 = Münzeinwurf/>0 = Einzelbetrieb Voreinstellung = 0 (Münzeinwurf)
6. Time light on Uhrzeit, zu der die dekorative Beleuchtung eingeschaltet wird Voreinstellung = 07:00
7. Time light o Uhrzeit, zu der die dekorative Beleuchtung ausgeschaltet wird Voreinstellung = 23:00
8. Unit time Aktuelle Gerätezeit Voreinstellung = 00:00
9. Unit date Aktuelles Gerätedatum Voreinstellung = 01-01-2012
12. Parameter code Einzigartiger Code zum Aufrufen des Parametermenüs Voreinstellung = 0000
13. Clean time (Minuten) Zeitspanne, während der das Display zur Reinigung vorübergehend
abgeschaltet wird
Voreinstellung = 01:00
4. Body fan
1. Body fan at start Intensität des Körperlüfters zu Beginn der Bräunungssitzung
Voreinstellung = 1
5. Head fan
1. Head fan at start
Intensität des Kopüfters zu Beginn der Bräunungssitzung Voreinstellung = 1
6. Xsens
2. Number of Xsens cans Anzahl der installierten Xsens-Behälter Voreinstellung = 1
3. Xsens at start Xsens-Duft zu Beginn der Bräunungssitzung versprühen (0 = Aus) Voreinstellung = 0
4. Xsens at standby Xsens-Duft im Stand-by-Modus versprühen (0 = Aus) Voreinstellung = 0
7. Audio
16. Stand-by volume Musik-Lautstärke im Standby-Modus (0 = Aus) Voreinstellung = 0
17. Stand-by channel Musikkanal im Standby-Modus Voreinstellung = 1
18. Start volume Musik-Lautstärke zu Beginn der Bräunungssitzung (0 = Aus) Voreinstellung = 4
19. Start channel Musikkanal zu Beginn der Bräunungssitzung Voreinstellung = 2
7. Airco
1. Airco at start
Status der Klimaanlage zu Beginn der Bräunungssitzung Voreinstellung = On
8. Qsens
1. Qsens at start Status des Qsens-Systems zu Beginn der Bräunungssitzung Voreinstellung = On
3. Qsens initialization Entlüftung des Qsens-Systems Voreinstellung = O
 Loading...