

Page 1
HP8540
Page 2
ENGLISH 3
DEUTSCH 12
NEDERLANDS 22
FRANÇAIS 30
ITALIANO 38
ESPAÑOL 46
РУССКИЙ 54
Page 3

2 3 4 5
6 7 8 9
10
2
14
2
1
18
11 12 13
1
15
1
3
19
16 17
2
20
21
22
Page 4
1
J
I
K
L O N
MP
S
H
G
B
Q
E D
F
A
R F C
Page 5
Introduction
This full-body solarium allows you to obtain nice tanning results in the comfort of your own
home. The 3 HPA tanning lamps ensure a beautiful tan. The full-body tanning eld of 1.80 x
0.70m ensures that the light reaches your entire body.
The folding system makes it easy to unfold the appliance. The height of the full-body solarium
can be adapted to the height of your bed. The appliance has a compact size when folded, so
you can conveniently store it out of sight.
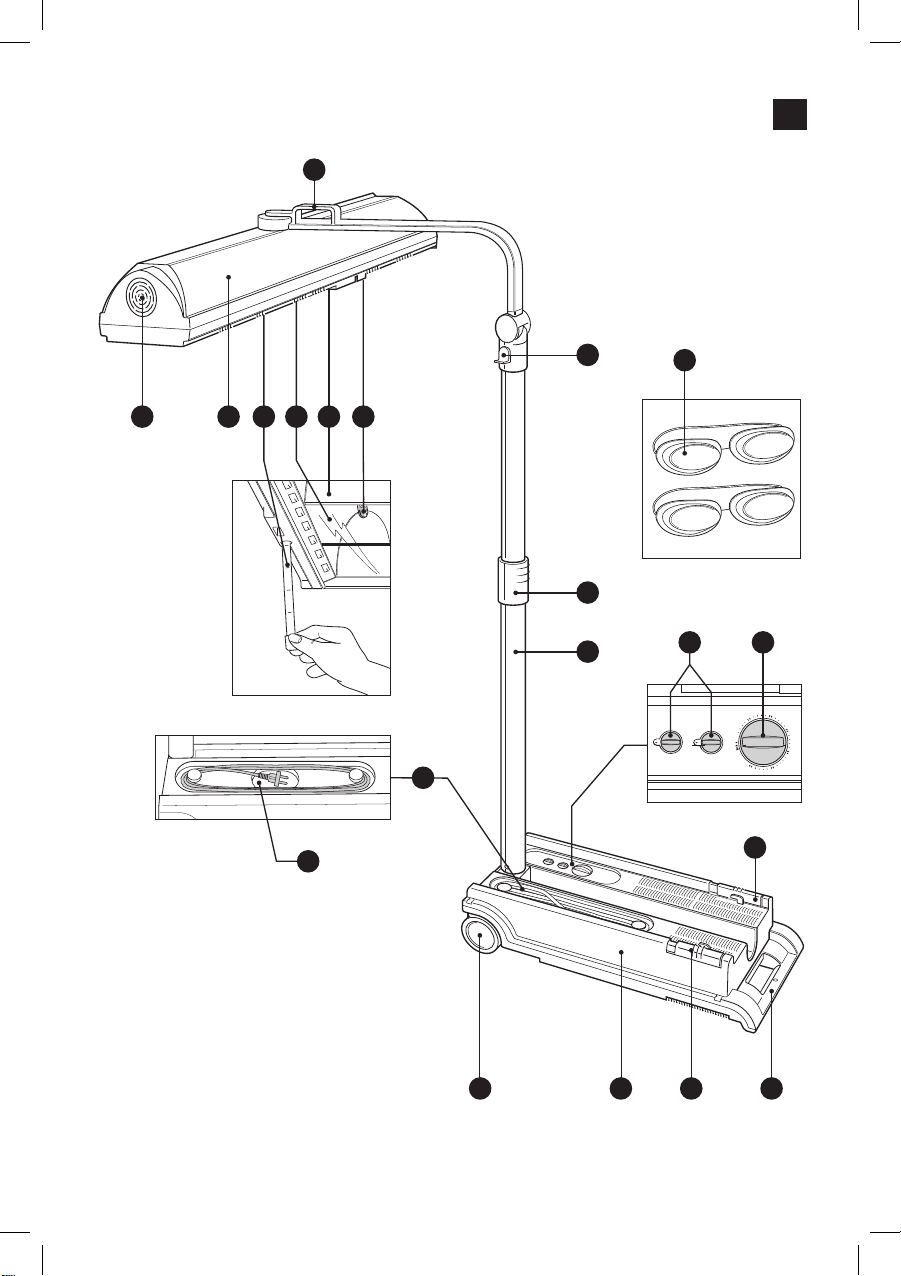
General description (Fig. 1)
A Wheels
B Mains cord in storage compartment
C Handgrip
D Timer
E Memory knobs (for two persons)
F Slides
G Stand
H Locking collar for height adjustment
I Locking collar for lamp unit
J Handgrip
K Fan (cooling)
L Lamp unit
M UV lter
N Tanning lamps
O Reector
P Measuring tape
Q Protective goggles (2 pairs)
R Base
S Type plate
3ENGLISH
Important
Read this user manual carefully before you use the appliance and save it for future reference.
- Check if the voltage indicated on the appliance corresponds to the mains voltage in your
home before you connect the appliance.
- If the wall socket used to power the appliance has poor connections, the plug of the
appliance becomes hot. Make sure you plug the appliance into a properly connected wall
socket.
- The appliance must be connected to a circuit that is protected with a 16A standard fuse or
a slow-blow automatic fuse.
- If the supply cord is damaged, it must be replaced by the manufacturer or service agent or
a similarly qualied person in order to avoid a hazard.
- Water and electricity are a dangerous combination! Do not use this appliance in wet
surroundings (e.g. in the bathroom or near a shower or swimming pool).
- If you have just been swimming or have just taken a shower, dry yourself thoroughly before
using the appliance.
- Make sure children do not play with the appliance.
- Always unplug the appliance after use.
- Let the appliance cool down after use for approx. 15 minutes before you fold it back into
transport position and store it.
- Only move the appliance when it is in transport position.
- Make sure the vents in the lamp unit and in the base remain open during use. Keep your
hair away from the air inlet of the lamp unit.
Page 6
4
ENGLISH
- The UV lter becomes very hot when you use the appliance. Do not touch it.
- The appliance contains hinging parts, so be careful not to get your ngers stuck between
these parts.
- Do not choose a tanning distance of less than 70cm.
- Do not exceed the recommended tanning times and the maximum number of tanning
hours (see section ‘Tanning sessions: how often and how long?’).
- Do not tan a particular part of your body more than once a day. Avoid excessive exposure
to natural sunlight on the same day.
Take the following precautions:
- Protect your eyes during tanning using the UV goggles provided. Contact lenses and sun
glasses are not a substitute for the goggles. The unprotected eye may develop surface
inammation. After excessive exposure in some cases damage may occur to the retina.
Many repeated exposures to the unprotected eye can lead to cataracts.
- Remove cosmetics well in advance of exposure. Do not use any sunscreens or products
that accelerate tanning.
- Do not take a tanning and/or relax session if you have a disease and/or use medication or
cosmetics that increase the sensitivity of your skin. Be extra careful if you are hypersensitive
to UV light or IR light. Consult your doctor in case of doubt.
- Do not sunbathe and use the appliance on the same day. The skin does not make any
distinction between UV-rays from the sun or from a tanning appliance.
- Protect sensitive skin parts such as scars, tattoos and genitals from exposure.
- If persistent lumps or sores appear on the skin or if there are changes in pigmented moles,
seek medical advice before resuming tanning.
- Never use the appliance when a UV lter is damaged, broken or missing.
- Never use the appliance when the control panel is defective.
- Make sure that non-users, especially children, are not present when the appliance is being
operated.
A tanning appliance is not to be used by:
- Persons with reduced sensory and/or mental capacity.
- Persons lacking knowledge of or experience with tanning appliances, with the exception of
individuals who are being supervised or have received instructions regarding the use of
the tanning appliance by a person who assumes responsibility for their safety.
- Persons younger than 18.
- Persons who tend to freckle.
- Persons having abnormal discolored patches on skin.
- Persons having more than 16 moles (2 mm or more) on the body.
- Persons having atypical moles (dened as asymmetrical moles larger than 5 mm in
diameter with variable pigmentation and irregular borders; in case of doubt, seek medical
advice).
- Persons with a natural red hair color.
- Persons whose skin is already sunburned.
- Persons not able to tan at all or not able to tan without burning when exposed to the sun.
- Persons that burn easily when exposed to the sun.
- Persons having a history of frequent severe sunburn during childhood.
- Persons (previously) suering from skin cancer or predisposed skin cancer.
- Persons having a rst-degree relative with a history of melanoma.
- Persons under a doctor’s care for diseases that involve photosensitivity and/or receiving
photosensitizing medications.
General
- The appliance is tted with an automatic protection against overheating. If the appliance is
insuciently cooled (e.g. because the vents are covered), the appliance switches o
Page 7
ENGLISH6
Tanning sessions: how often and how long?
- Do not take more than one tanning session a day, over a period of 5 to 10 days.
- Take a break of at least 48 hours between the rst and the second session.
- After this 5 to 10-day course, we advise you to stop tanning for a while.
- Approximately one month after a course, your skin will have lost much of its tan. You can
then start a new course.
- If you want to keep your tan, do not stop tanning after the course, but continue with one
or two tanning sessions a week.
- Whether you choose to stop tanning for a while or whether you continue tanning on a
lower frequency, always keep in mind that you must not exceed the maximum number of
tanning hours.
- For this appliance, the maximum is 17 tanning hours (= 1020 minutes) a year.
- If you have stopped a course and have not continued with it for a long period, do not
proceed with the remaining number of sessions of this course but start a new course.
Example
Suppose you take a 10-day tanning course, with a 7-minute session on the rst day and a
20-minute session on the nine following days.
The entire course then lasts (1 x 7 minutes) + (9 x 20 minutes) = 187 minutes.
This means you can take 5 of these courses in a year, as 5 x 187 minutes = 935 minutes
Of course, the maximum number of tanning hours applies to each separate part or side of the
body that is tanned (e.g. the back or front of the body).
Tip: For a beautiful all-over tan, turn your body slightly during the session so that the sides of your
body are better exposed to the tanning light.
Tip: If your skin feels slightly taut after tanning, you can apply a moisturising cream.
Table
As the table shows, the rst session of a tanning course must always last 7 minutes,
irrespective of the sensitivity of the skin.
If you think that the sessions are too long for you (e.g. because your skin feels taut and tender
after the session), we advise you to reduce the length of the sessions by e.g. 5 minutes.
Duration of the
tanning session for
each separate part of
the body
1st session 7 minutes 7 minutes 7 minutes
break of at least 48
hours
2nd session 10 minutes 20 minutes 30 minutes*
3rd session 10 minutes 20 minutes 30 minutes*
4th session 10 minutes 20 minutes 30 minutes*
5th session 10 minutes 20 minutes 30 minutes*
6th session 10 minutes 20 minutes 30 minutes*
7th session 10 minutes 20 minutes 30 minutes*
8th session 10 minutes 20 minutes 30 minutes*
For persons with
very sensitive skin
break of at least 48
hours
For persons with
normal sensitive
skin
break of at least 48
hours
For persons with
less sensitive skin
break of at least 48
hours
Page 8
ENGLISH 5
automatically. Once you have removed the cause of overheating and the appliance has
cooled down, it switches on automatically again.
- If your skin feels taut after the tanning session, you can apply a moisturising cream.
- To acquire an even tan, lie straight below the lamp unit.
- Colours fade under the inuence of the sun. The same eect may occur when you use this
appliance.
- Do not expect the appliance to yield better results than the natural sun.
Electromagnetic elds (EMF)
This Hapro appliance complies with all standards regarding electromagnetic elds (EMF). If
handled properly and according to the instructions in this user manual, the appliance is safe to
use based on scientic evidence available today.
Cosmetics and medication
Cosmetics and medication can contain substances that can cause a phototoxic reaction if
combined with UV radiation. The phototoxic chemicals occurring most frequently are:
Demeclocycline
Rolitetracycline
Nalidixic acid
Tretinoin
Methoxsalen
Monobenzone
Contact your dealer for a complete list of substances that can cause a phototoxic reaction.
Hydrochinone
Etretinate
Isotretinoin
Doxycycline
Amiodarone
Chlortetracycline
Oxytetracycline
Tetracycline
Azapropazone
Etretinate
Tretinoin
Hydrochinone
Pormer
Acitretine
Lomeoxacine
Tanning and your health
The sun supplies various types of energy. Visible light enables us to see, ultraviolet (UV) light
gives us a tan and the infrared (IR) light in sunrays provides the heat in which we like to bask.
Just as with natural sunlight, the tanning process takes some time. The rst eect only
becomes visible after a few sessions (see section ‘Tanning sessions: how often and how long?’).
Overexposure to ultraviolet light (natural sunlight or articial light from your tanning
appliance) can cause sunburn.
Besides many other factors, such as overexposure to natural sunlight, incorrect and excessive
use of a tanning appliance may increase the risk of skin and eye problems. The degree to which
these eects occur is determined by the nature, intensity and duration of the exposure on the
one hand and the sensitivity of the person involved on the other hand.
The more the skin and the eyes are exposed to UV light, the higher the risk of keratitis,
conjunctivitis, damage to the retina, cataracts, premature skin ageing and the development of
skin tumours will be. Some medications and cosmetics increase the sensitivity of the skin.
Therefore it is highly important:
- that you follow the instructions in chapter ‘Important’ and section ‘Tanning sessions: how
often and how long?’.
- that the tanning distance (distance between the UV lters and the body) is 70cm.
- that you do not exceed the maximum number of tanning hours per year (i.e. 17 hours or
1020 minutes).
- that you always wear the goggles provided while you are tanning.
Page 9
ENGLISH 7
Duration of the
tanning session for
each separate part of
the body
9th session 10 minutes 20 minutes 30 minutes*
10th session 10 minutes 20 minutes 30 minutes*
*) or longer, depending on your skin sensitivity.
Preparing for use
- You can easily move and store the appliance in transport position.
- The appliance is easier to lift if you do so together with another person (Fig. 2).
- If you have to lift the appliance by yourself, use the handle (Fig. 3).
1 To open the appliance, move the slides in the direction of the arrow (Fig. 4).
2 Pull up the stand and the lamp unit (Fig. 5).
3 Put the tanning appliance in the position indicated (Fig. 6).
4 Pull up the lamp unit to horizontal position. Use the handle to do this. (Fig. 7)
You hear clicks when you move the lamp unit past certain xed positions.
Note: Instead of using the above step-by-step method, you can also pull the lamp unit up by its
handgrip in one single movement (Fig. 8).
5 Turn the lamp unit a quarter turn (Fig. 9).
6 Place the tanning appliance beside a bed. (Fig. 10)
The distance between the UV lter and the surface on which you are lying down (e.g. the bed)
must be 90cm.
7 Slide the collar down the stand to unlock the height adjustment lock. Pull up the lamp
unit at the same time to a height of 90cm above the bed. Let go of the collar to lock the
lamp unit into position (Fig. 11).
- You can check the distance between the lamp unit and the bed by pulling out the
measuring tape.
- The measuring tape automatically rewinds when you move the red tab sideways.
The appliance is now ready for use.
For persons with
very sensitive skin
For persons with
normal sensitive
skin
For persons with
less sensitive skin
Using the appliance
1 Fully unwind the mains cord.
2 Put the plug in the wall socket.
3 Consult chapter ‘Tanning and your health’ and your own notes for the correct tanning
time.
4 Put on the protective goggles.
- Only use these protective goggles when you tan with a Hapro tanning appliance. Do not
use them for other purposes.
- The protective goggles comply with protection class II according to directive 89/686/EEC.
5 Set the timer to the appropriate time for the tanning session (Fig. 12).
The maximum tanning time that can be set is 45 minutes.
Page 10

ENGLISH8
6 Lie down under the lamp unit.
- The appliance beeps during the last minute of the session.
- During this minute, you can reset the timer to tan the other side of your body. If you reset
the timer during this minute, you avoid the 3-minute waiting time which is necessary to let
the tanning lamps cool down after they have switched o.
- The timer automatically switches o the tanning appliance when the set tanning time has
elapsed.
After the tanning session
1 Use the memory knobs to keep track of the number of tanning sessions you have had.
The appliance has two memory knobs: one for each person (Fig. 13).
Cleaning
Never use scouring pads, abrasive cleaning agents or aggressive liquids such as petrol or
acetone to clean the appliance.
Do not let any water run into the appliance.
1 Unplug the appliance and let it cool down before you clean it.
2 Clean the outside of the appliance with a damp cloth.
3 Clean the outside of the UV lter with a soft cloth sprinkled with some methylated
spirits.
4 Clean the protective goggles with a moist cloth.
Storage
1 Let the appliance cool down for 15 minutes before you put it in transport position and
store it.
2 In the meantime, you can wind up the cord and put it in the base of the appliance.
Note: Make sure the cord is stored properly and does not get stuck between the hinging parts
of the appliance when you put the appliance in transport position.
3 Slide the collar down the stand (1) to unlock the height adjustment lock. Push the stand
down at the same time (2). Then let go of the collar (Fig. 14).
4 Turn the lamp unit a quarter turn (Fig. 15).
5 Lift the lamp unit a little with one hand (1). Push down the two unlocking slides with
your other hand (2) to be able to fold the lamp unit (3) (Fig. 16).
6 Hold the two unlocking slides down with one hand and fold the lamp unit into vertical
position with your other hand. Then let go of the unlocking slides (Fig. 17).
7 Lower the stand and the lamp unit carefully onto the base of the appliance (Fig. 18).
8 Push the slides on the base in the direction of the arrow to lock the lamp unit onto the
base (Fig. 19).
9 Store the tanning appliance.
- You can store the tanning appliance under a bed (Fig. 20).
- You can also store the tanning appliance in a cupboard in upright position (Fig. 21).
Page 11

ENGLISH 9
Replacement
The light that the tanning lamps emit becomes less bright in time (i.e. after a few years in case
of normal use). When this happens, you notice a decrease in the tanning capacity of the
appliance. You can solve this problem by setting a slightly longer tanning time or by having
the tanning lamps replaced.
The UV lter protects against exposure to undesired UV light. It is therefore important to have
a damaged or broken lter replaced right away.
Have the tanning lamps, the UV lter and the mains cord replaced by a dealer or service
centre authorised by Hapro. Only they have the knowledge and skills required for this job
and the original spare parts for the appliance.
Environment
- The lamps of the appliance contain substances that can be harmful to the environment.
When you discard the lamps, do not throw them away with the normal household waste
but hand them in at an ocial collection point.
- Do not throw away the appliance with the normal household waste at the end of its life,
but hand it in at an ocial collection point for recycling. By doing this, you help to preserve
the environment (Fig. 22).
Guarantee & service
All defects resulting from material or production faults and which occur within the warranty
period, will be repaired free of charge on production of the original sales invoice. The warranty
period is 24 months. For warranty queries, please contact your dealer.
Your new tanning appliance is intended for domestic use and not for commercial purposes.
Damage as a result of commercial use, as well as tubes, starters, protective supports and acrylic
panels, are not covered by the Hapro warranty.
Malfunctioning as a result of assembly and or installation faults, improper use, lightning
damage and non-original parts are excluded from the Hapro warranty.
Check carefully if the equipment has been installed properly before claiming under the
warranty. In case of an unwarranted claim, you will be charged service costs.
Guarantee restrictions
The terms of the international guarantee do not cover the tanning lamps.
Troubleshooting
If problems should arise with this appliance and you are unable to solve them by means of the
information below, please contact the nearest Hapro dealer..
Problem Solution
The appliance does not
work.
The lamp unit may not be in the right position (see chapter
‘Preparing for use’. Put the lamp unit in the right position.
The plug may not be inserted properly in the wall socket.Put the
plug properly in the wall socket.
Page 12
ENGLISH10
Problem Solution
There may be a power failure. Test if the power supply works by
connecting another appliance.
The tanning lamps may still be too hot to go on. Let them cool
down for 3 minutes rst.
The overheat protection may have switched o the appliance
automatically because it overheated. Remove the cause of
overheating (e.g. a towel that blocks one or more vents). Let the
appliance cool down for a while and then switch the appliance
back on.
The fuse of the circuit
to which the appliance
is connected cuts o
the power when I
switch on or use the
appliance.
The tanning results are
not as good as I
expected.
The fuse of the circuit to which the appliance is connected must be
a 16A standard fuse or a slow-blow automatic fuse. You may also
have connected too many appliances to the same circuit.
You may have followed a tanning course that is not appropriate for
your skin type. Check the table in chapter ‘Tanning and your
health’, section ‘Tanning sessions: how often and how long?’.
The distance between the lamps and the surface you lie on may be
larger than prescribed. See chapter ‘Preparing for use’.
When the lamps have been used for a long time, the tanning
capacity decreases. This eect only becomes noticeable after
several years. To solve this problem, select a slightly longer tanning
time or have the lamps replaced.
Page 13
ENGLISH 11
Page 14
12 DEUTSCH
Einführung
Dieser Ganzkörperbräuner bringt natürliche Bräune direkt zu Ihnen nach Hause. Die 3 HPA-UVLampen bräunen Sie ganz nach Ihren Wünschen. Das Ganzkörperbräunungsfeld sorgt mit
einer Größe von 1,80 m x 0,70 m dafür, dass das UV-Licht Ihren gesamten Körper erreicht.
Durch das Faltsystem kann das Gerät einfach auseinandergeklappt werden. Die Höhe des
Ganzkörpersolariums kann Ihrer Betthöhe angepasst werden. Das Gerät kann auf eine
kompakte Größe zusammengeklappt und so problemlos außer Sichtweite gelagert werden.
Allgemeine Beschreibung (Abb. 1)
A Laufräder
B Netzkabel im Aufbewahrungsfach
C Handgri
D Timer
E Memo-Tasten (für zwei Personen)
F Schieber
G Ladestation
H Arretierung für Höheneinstellung
I Arretierung für Lampeneinheit
J Handgri
K Ventilator (Kühlung)
L Lampeneinheit
M UV-Filter
N Bräunungslampen
O Reektor
P Maßband
Q 2 Schutzbrillen
R Aufheizsockel
S Typenschild
Wichtig
Lesen Sie diese Bedienungsanleitung vor dem Gebrauch des Geräts aufmerksam durch und
bewahren Sie sie für eine spätere Verwendung auf.
- Prüfen Sie, bevor Sie das Gerät zum ersten Mal benutzen, ob die Spannungsangabe auf
dem Gerät mit der örtlichen Netzspannung übereinstimmt.
- Bei fehlerhafter Verkabelung der Steckdose, an der das Gerät betrieben wird, erhitzt sich
der Gerätestecker. Achten Sie darauf, dass Sie das Gerät an einer ordnungsgemäß
verkabelten Steckdose anschließen.
- Das Gerät muss an einen Stromkreis mit 16A-Standardsicherung oder mit träger
Automatiksicherung angeschlossen werden.
- Falls das Netzkabel beschädigt sein sollte, muss es zur Vorbeugung vor Unfällen durch den
Kundendienst des Herstellers oder einem qualizierten Fachmann ersetzt werden..
- Wasser und Strom sind eine gefährliche Kombination! Benutzen Sie das Gerät nicht in
feuchter Umgebung (z. B. im Badezimmer, in der Nähe einer Dusche oder eines
Schwimmbeckens).
- Trocknen Sie sich gründlich ab, wenn Sie das Gerät nach dem Duschen oder Baden
verwenden möchten.
- Lassen Sie Kinder nicht mit dem Gerät hantieren.
- Ziehen Sie nach jedem Gebrauch den Netzstecker aus der Steckdose.
- Lassen Sie das Gerät ca. 15 Minuten lang abkühlen, bevor Sie es in die Transportstellung
klappen und wegräumen.
Page 15
13DEUTSCH
- Achten Sie darauf, dass die Lüftungsschlitze in der Lampeneinheit und im Gerätefuß bei
eingeschaltetem Gerät frei bleiben und Ihr Haar nicht in die Nähe der Belüftungsönungen
der Lampeneinheit gerät.
- Der UV-Filter wird während des Gebrauchs sehr heiß. Vermeiden Sie jede Berührung.
- Achten Sie darauf, dass Sie Ihre Finger nicht zwischen den Klappvorrichtungen des Geräts
einklemmen.
- Bewegen Sie das Gerät ausschließlich in Transportstellung.
- Halten Sie beim Bräunen einen Abstand von mindestens 70 cm zum Gerät ein.
- Überschreiten Sie nicht die empfohlenen Bräunungszeiten und die maximale Anzahl
Bräunungsstunden (siehe “Das UV-Sonnenbad: Wie oft und wie lange?”).
- Bräunen Sie eine Körperpartie maximal einmal täglich. Vermeiden Sie es, sich am selben
Tag übermäßig dem natürlichen Sonnenlicht auszusetzen.
- Verschiedene Materialien können sich, genau wie beim natürlichen Sonnenlicht, auch im
Licht der UV-Lampen verfärben.
- Erwarten Sie vom Einsatz dieses Geräts keine besseren Ergebnisse als von natürlichem
Sonnenlicht.
Treen Sie die folgenden Schutzmaßnahmen:
- Schützen Sie während der Sitzung Ihre Augen mit der verfügbaren UV-Schutzbrille.
Kontaktlinsen und Sonnenbrillen sind kein Ersatz für die Schutzbrille. Ungeschützte Augen
können sich oberächlich entzünden. Nach intensiver Bestrahlung kann in einigen Fällen
die Netzhaut beschädigt werden. Häuge Bestrahlungen können am ungeschützten Auge
zu Linsentrübungen führen.
- Entfernen Sie vor der Bestrahlung alle Kosmetika. Benutzen Sie keinen Sonnenschutz oder
Produkte, die die Bräunung beschleunigen.
- Verzichten Sie auf eine Bräunungs- oder Entspannungssitzung, wenn Sie krank sind oder
Medikamente bzw. Kosmetika verwenden, die zu erhöhter Hautempndlichkeit führen.
Seien Sie besonders vorsichtig, wenn Sie überempndlich auf UV- oder Infrarot-Licht
reagieren. Wenden Sie sich im Zweifelsfall an einen Arzt.
- Sonnenbaden und Bestrahlungsanwendung nicht am gleichen Tag durchführen. Die Haut
unterscheidet nicht zwischen UV-Strahlen, die von der Sonne oder dem Bräunungsgerät
stammen.
- Schützen Sie empndliche Hautbereiche wie Narben, Tattoos und Genitalien vor der
Bestrahlung.
- Wenn bleibende Blasen oder Kerben auf der Haut entstehen oder wenn es Veränderungen
bei Pigmentecken gibt, holen Sie sich vor der nächsten Sitzung medizinischen Rat ein.
- Verwenden Sie das Gerät nicht, wenn ein UV-Filter beschädigt oder zerbrochen ist bzw.
ganz fehlt.
- Verwenden Sie das Gerät nicht, wenn das Bedienfeld defekt ist.
- Achten Sie darauf, dass während der Sitzung keine anderen Personen, insbesondere
Kinder, in der Nähe sind.
Ein Bräunungsgerät darf nicht benutzt werden von:
- Personen mit verminderter sensorischer und/oder mentaler Kapazität
- Personen ohne Erfahrung mit Bräunungsgeräten. Davon ausgenommen sind Personen, die
von einer für ihre Sicherheit verantwortlichen Person beaufsichtigt werden, oder
Anweisungen zum Gebrauch eines Bräunungsgerät erhalten haben.
- Personen unter 18 Jahren
- Personen mit Sommersprossen
- Personen, die ungewöhnliche Hautverfärbungen haben
- Personen, die mehr als 16 Pigmentecken (2 mm oder größer) am Körper haben
Page 16
14
DEUTSCH
- Personen mit atypischen Pigmentecken (asymmetrische Pigmentecken mit mehr als 5
mm Durchmesser und variabler Pigmentierung und unregelmäßigen Rändern; bei Zweifel
einen Arzt fragen)
- Personen, deren natürliche Haarfarbe Rot ist
- Personen, die bereits einen Sonnenbrand haben
- Personen, die nicht bräunen (können), ohne sich beim Sonnenbaden einen Sonnenbrand
zuzufügen
- Personen, die schnell einen Sonnenbrand bekommen
- Personen, die in ihrer Kindheit mehrfach einen Sonnenbrand hatten
- Personen, die (bereits) unter Hautkrebs leiden oder für Hautkrebs prädisponiert sind
- Personen, bei denen Verwandte ersten Grades Hautkrebs haben/hatten
- Personen unter ärztlicher Aufsicht mit Krankheiten, die eine Lichtsensitivität beinhalten
und/oder Medikamente einnehmen, die zu lichtbedingten Reaktionen führen können
Allgemeines
- Das Gerät hat einen automatischen Überhitzungsschutz. Wird es nicht ausreichend gekühlt
(z. B. weil die Lüftungsschlitze abgedeckt sind), schaltet es sich automatisch aus. Sobald die
Ursache der Überhitzung beseitigt und das Gerät abgekühlt ist, schaltet es sich
automatisch wieder ein.
- Spannt Ihre Haut nach dem Bräunungsbad, können Sie eine Feuchtigkeitscreme auftragen.
- Legen Sie sich für eine gleichmäßige Bräunung direkt unter die Lampeneinheit.
- Farben können, genau wie im natürlichen Sonnenlicht, auch bei Verwendung dieses Geräts
verblassen.
- Erwarten Sie vom Einsatz dieses Geräts keine besseren Ergebnisse als von natürlichem
Sonnenlicht.
Elektromagnetische Felder (EMF; Electro Magnetic Fields)
Dieses Hapro Gerät erfüllt sämtliche Normen bezüglich elektromagnetischer Felder (EMF).
Nach aktuellen wissenschaftlichen Erkenntnissen ist das Gerät sicher im Gebrauch, sofern es
ordnungsgemäß und entsprechend den Anweisungen in dieser Bedienungsanleitung
gehandhabt wird.
Kosmetika und Medikamente
Kosmetika und Medikamente können Substanzen enthalten, die in Kombination mit UVStrahlen zu einer phototoxischen Reaktion führen können. Die häugsten phototoxischen
Chemikalien sind:
Demeclocyclin
Rolitetracyclin
Nalidixinsäure
Tretinoin
Methoxsalen
Monobenzon
Hydrochinon
Etretinat
Isotretinoin
Doxycyclin
Amiodaron
Chlortetracyclin
Oxytetracyclin
Tetracyclin
Azapropazon
Etretinat
Tretinoin
Hydrochinon
Pormer
Acitretin
Lomeoxacin
Melden Sie sich bei Ihrem Händler, um eine ausführliche Liste von Substanzen zu erhalten, die
eine phototoxische Reaktion auslösen können.
UV und Ihre Gesundheit
Die Sonne liefert verschiedene Energiearten: das sichtbare Licht ermöglicht uns zu sehen, das
ultraviolette (UV) bräunt unsere Haut und das infrarote (IR-)Licht spendet die Wärme, bei der
wir uns wohl fühlen.
Page 17
DEUTSCH 15
Ebenso wie in natürlichem Sonnenlicht dauert der Bräunungsvorgang auch bei diesem Gerät
eine gewisse Zeit. Erste Eekte werden erst nach mehreren Bräunungsbädern sichtbar (siehe
Abschnitt “Das UV-Sonnenbad: Wie oft und wie lange?”)
Wer sich zu lange dem ultravioletten Licht aussetzt - ob natürlichem Sonnenlicht oder den
Strahlen eines Bräunungsgeräts - kann einen Sonnenbrand bekommen.
Neben vielen anderen Faktoren, etwa dem übermäßigen Kontakt mit natürlichem Sonnenlicht,
kann der unsachgemäße und zu häuge Gebrauch eines Bräunungsgeräts das Risiko von Hautund Augenproblemen erhöhen. Wie ausgeprägt sich solche Eekte zeigen, hängt einerseits
von der Art, der Intensität und der Dosis der UV-Strahlen ab und andererseits von der
Empndlichkeit der betreenden Person.
Je intensiver Haut und Augen dem UV-Licht ausgesetzt sind, desto größer ist die Gefahr einer
Horn- oder Bindehautentzündung, von Schäden an der Netzhaut, Grauem Star, vorzeitiger
Hautalterung und Hauttumoren. Einige Medikamente und Kosmetika führen zu größerer
Hautempndlichkeit. Deshalb ist es ganz besonders wichtig, dass Sie:
- die Anleitungen im Kapitel “Wichtig” und im Abschnitt “Das UV-Sonnenbad: Wie oft und
wie lange?” beachten;
- den Mindestabstand von 70 cm zwischen den UV-Filtern und Ihrem Körper einhalten;
- die maximale Bräunungszeit pro Jahr (17 Stunden = 1020 Minuten) nicht überschreiten
und
- während des Bräunungsbads immer die mitgelieferte Schutzbrille tragen.
Das UV-Sonnenbad: Wie oft und wie lange?
- Nehmen Sie über einen Zeitraum von 5 bis 10 Tagen nicht mehr als ein Bräunungsbad pro
Tag.
- Legen Sie zwischen dem ersten und dem zweiten Bräunungsbad eine Pause von
mindestens 48 Stunden ein.
- Nach dieser 5- bis 10-tägigen Bräunungskur empfehlen wir Ihnen, einige Zeit mit dem
Bräunen auszusetzen.
- Etwa einen Monat nach Abschluss der Bräunungskur hat Ihre Haut soviel von ihrer Bräune
verloren, dass Sie eine neue Bräunungskur beginnen können.
- Sie können aber auch im Anschluss an die Bräunungskur wöchentlich 1 oder 2
Bräunungsbäder nehmen, um die Bräunung aufrecht zu erhalten.
- Ob Sie eine Pause einlegen oder das Bräunen in größeren Abständen fortsetzen: Sie sollten
stets darauf achten, die maximale Anzahl an Bräunungsstunden nicht zu überschreiten.
- Für dieses Gerät gilt eine maximale Anzahl von 17 Bräunungsstunden (= 1020 Minuten) pro
Jahr.
- Wenn Sie eine Bräunungskur für längere Zeit unterbrochen haben, fahren Sie nicht mit der
verbleibenden Anzahl an Anwendungen fort, sondern beginnen Sie mit einer neuen
Bräunungskur.
Beispiel
Nehmen wir also an, Sie entscheiden sich für eine 10-tägige Kur mit einem 7-minütigen
Bräunungsbad am ersten Tag und 20-minütigen Sitzungen an den darauf folgenden neun
Tagen.
Die gesamte Kur dauert dann (1 x 7 Minuten) + (9 x 20 Minuten) = 187 Minuten.
Sie können also in einem Jahr 5 solcher Bräunungskuren machen, da 5 x 187 Minuten
insgesamt 935 Minuten ergeben.
Selbstverständlich gilt die maximale Anzahl der Bräunungsstunden für jede Körperpartie
gesondert, also z. B. jeweils für den Rücken oder die Vorderseite des Körpers.
Tipp: Eine gleichmäßig schöne Bräune erhalten Sie, indem Sie Ihren Körper während des Bräunens
immer wieder leicht drehen, damit das UV-Licht die Körperseiten besser erreichen kann.
Page 18
DEUTSCH16
Tipp: Wenn Ihre Haut nach dem Bräunungsbad etwas spannt, können Sie eine Feuchtigkeitscreme
auftragen.
Tabelle
Aus der Tabelle ist ersichtlich, dass jede neue Bräunungskur, unabhängig von der
persönlichen Hautempndlichkeit, mit einem ersten Bräunungsbad von 7 Minuten
beginnen sollte.
Wenn Sie die Bräunungsbäder als zu lang empnden, z. B. weil anschließend Ihre Haut spannt
oder empndlich ist, sollten Sie die Dauer (z. B. um 5 Minuten) reduzieren.
Bräunungszeit für
einzelne
Körperpartien
1. Tag 7 Minuten 7 Minuten 7 Minuten
Mindestens
48 Stunden Pause
2. Tag 10 Minuten 20 Minuten 30 Minuten*
3. Tag 10 Minuten 20 Minuten 30 Minuten*
4. Tag 10 Minuten 20 - Minuten 30 Minuten*
5. Tag 10 Minuten 20 Minuten 30 Minuten*
6. Tag 10 Minuten 20 Minuten 30 Minuten*
7. Tag 10 Minuten 20 Minuten 30 Minuten*
8. Tag 10 Minuten 20 Minuten 30 Minuten*
9. Tag 10 Minuten 20 Minuten 30 Minuten*
10. Tag 10 Minuten 20 Minuten 30 Minuten*
*) oder länger, je nach Hautempndlichkeit.
Für den Gebrauch vorbereiten
Das Gerät lässt sich in der Transportstellung leicht bewegen und aufbewahren.
- Das Gerät lässt sich leichter zu zweit anheben (Abb. 2).
- Kann Ihnen niemand helfen, heben Sie das Gerät am Gri an (Abb. 3).
1 Um das Gerät zu önen, schieben Sie die Schieber in Pfeilrichtung (Abb. 4).
2 Ziehen Sie das Stativ und die Lampeneinheit nach oben (Abb. 5).
3 Bringen Sie das Bräunungsgerät in die in der Abbildung gezeigte Position (Abb. 6).
4 Ziehen Sie die Lampeneinheit am Gri in eine waagrechte Stellung. (Abb. 7)
Dabei hören Sie Klick-Geräusche, wenn die Einheit bestimmte Einstellpositionen passiert.
Hinweis: Anstelle der vorstehend beschriebenen schrittweisen Methode können Sie die
Lampeneinheit aber auch in einer Bewegung am Handgri nach oben ziehen (Abb. 8).
5 Drehen Sie die Lampeneinheit um 90 Grad (Abb. 9).
6 Stellen Sie das Gerät neben ein Bett. (Abb. 10)
Der Abstand zwischen dem UV-Filter und der Liegeäche (z. B. einem Bett) muss 90 cm
betragen.
Bei sehr
empndlicher Haut
Mindestens
48 Stunden Pause
Bei normaler Haut Bei wenig
empndlicher Haut
Mindestens
48 Stunden Pause
Mindestens
48 Stunden Pause
Page 19

DEUTSCH 17
7 Schieben Sie die Manschette am Stativ entlang nach unten, um die Arretierung für die
Höheneinstellung zu entriegeln. Ziehen Sie zur selben Zeit die Lampeneinheit auf eine
Höhe von 90 cm über dem Bett. Lassen Sie die Manschette los, um die Lampeneinheit in
dieser Höhenposition zu arretieren (Abb. 11).
- Sie können den Abstand zwischen Lampeneinheit und Bett mithilfe des integrierten
Maßbands überprüfen.
- Das Maßband rollt sich automatisch wieder auf, wenn Sie die rote Lasche zur Seite
schieben.
Das Gerät ist nun einsatzbereit.
Das Gerät benutzen
1 Wickeln Sie das Netzkabel vollständig ab.
2 Stecken Sie den Stecker in die Steckdose.
3 Lesen Sie in dem Kapitel “UV und Ihre Gesundheit” und in Ihren eigenen
Aufzeichnungen mehr über die richtige Bräunungszeit.
4 Setzen Sie die Schutzbrille auf.
- Tragen Sie diese Schutzbrille nur zum Bräunen mit einem Hapro-Bräunungsgerät und nicht
für andere Zwecke.
- Die Schutzbrille erfüllt die Anforderungen der Schutzklasse II entsprechend der Richtlinie
89/686/EEC.
5 Stellen Sie die Zeitschaltuhr auf die empfohlene Bräunungsdauer ein (Abb. 12).
Die maximal einstellbare Bräunungszeit beträgt 45 Minuten.
6 Legen Sie sich unter die Lampeneinheit.
- Während der letzten Minute der Sitzung ertönt ein akustisches Signal.
- In dieser Zeit können Sie die Zeitschaltuhr zum Bräunen der anderen Körperseite neu
einstellen. Damit umgehen Sie die Wartezeit von 3 Minuten, die nach dem Abschalten zum
Abkühlen der Bräunungslampen erforderlich ist.
- Die Zeitschaltuhr schaltet das Gerät nach Ablauf der eingestellten Bräunungszeit
automatisch aus.
Nach dem Bräunungsbad
1 Verwenden Sie die Memo-Tasten, um Protokoll über die bisher genommenen
Bräunungsbäder zu führen. Das Gerät hat zwei Memo-Tasten: eine für jeden
Benutzer (Abb. 13).
Reinigung
Benutzen Sie zum Reinigen des Geräts keine Scheuerschwämme und -mittel oder
aggressive Flüssigkeiten wie Benzin oder Azeton.
Achten Sie darauf, dass kein Wasser in das Gerät gelangt.
1 Ziehen Sie vor dem Reinigen den Netzstecker aus der Steckdose, und lassen Sie das
Gerät abkühlen.
2 Reinigen Sie die Außenseiten des Geräts mit einem feuchten Tuch.
3 Die Außenseite des UV-Filters kann mit einem weichen Tuch gereinigt werden, auf das
Sie etwas Spiritus gegeben haben.
4 Reinigen Sie die Schutzbrille mit einem feuchten Tuch.
Page 20
DEUTSCH18
Aufbewahrung
1 Lassen Sie das Gerät 15 Minuten lang abkühlen, bevor Sie es in seine Transportstellung
klappen und wegräumen.
2 Zwischenzeitlich können Sie das Kabel aufwickeln und im Gerätefuß verstauen.
Hinweis: Achten Sie darauf, dass das Kabel richtig verstaut ist und nicht zwischen den
Scharnieren eingeklemmt wird, wenn Sie das Gerät zum Transport zusammen klappen.
3 Schieben Sie die Manschette am Stativ entlang nach unten (1), um die Arretierung für
die Höheneinstellung zu entriegeln. Drücken Sie dabei gleichzeitig das Stativ nach
unten (2). Lassen Sie anschließend die Manschette wieder los (Abb. 14).
4 Drehen Sie die Lampeneinheit um 90 Grad (Abb. 15).
5 Heben Sie die Lampeneinheit leicht mit einer Hand an (1). Drücken Sie die beiden
Entriegelungsschieber mit der anderen Hand nach unten (2), um die Lampeneinheit
zusammenfalten zu können (3) (Abb. 16).
6 Halten Sie die beiden Entriegelungsschieber mit einer Hand fest und bringen Sie die
Lampe mit der anderen in senkrechte Position. Lassen Sie dann die Schieber
los (Abb. 17).
7 Senken Sie Stativ und Lampeneinheit vorsichtig auf den Gerätefuß (Abb. 18).
8 Drücken Sie die Schieber auf der Gerätebasis in Pfeilrichtung, um die Lampeneinheit
auf dem Gerätefuß zu arretieren (Abb. 19).
9 Verstauen Sie das Bräunungsgerät.
- Sie können das Bräunungsgerät unter dem Bett verstauen (Abb. 20).
- Sie können das Bräunungsgerät auch senkrecht in einem Schrank lagern (Abb. 21).
Ersatz
Die Lichtintensität der UV-Lampen nimmt im Laufe der Zeit ab (bei normalem Gebrauch erst
nach einigen Jahren). Sie bemerken dies an der nachlassenden Bräunungsleistung des Geräts.
Verlängern Sie dann die Bräunungszeit, oder lassen Sie die UV-Lampen austauschen.
Der UV-Filter schützt vor übermäßigem UV-Licht. Daher sollte ein beschädigter oder
zerbrochener Filter unverzüglich ausgewechselt werden.
Die UV-Lampen, der UV-Filter und das Netzkabel dürfen nur durch eine von Hapro
autorisierte Werkstatt oder von einem Hapro Händler ausgetauscht werden. Nur dann ist
sichergestellt, dass diese Arbeiten fachgerecht und mit Original-Ersatzteilen ausgeführt
werden.
Umweltschutz
- Die in diesem Gerät installierten Lampen enthalten Substanzen, die die Umwelt gefährden
können. Werfen Sie die Lampen deshalb nicht in den Hausmüll, sondern geben Sie sie bei
einer oziellen Sammelstelle ab.
- Werfen Sie das Gerät am Ende der Lebensdauer nicht in den normalen Hausmüll. Bringen
Sie es zum Recycling zu einer oziellen Sammelstelle. Auf diese Weise helfen Sie, die
Umwelt zu schonen (Abb. 22).
Page 21

DEUTSCH 19
Garantie und Kundendienst
Alle Störfälle, die als Folge von Material- oder Herstellungsfehlern innerhalb der Garantiezeit
auftreten, werden nach Vorlage der Originalrechnung kostenlos repariert. Die Garantiezeit
beträgt 24 Monate. Für Fragen zur Garantie müssen Sie sich mit Ihrem Händler in Verbindung
setzen.
Ihr neues Bräunungsgerät ist für den privaten Gebrauch und nicht für kommerzielle Zwecke
gebaut. Schaden, der als Folge kommerzieller Nutzung entsteht sowie Röhren, Starter,
Endkappen und Acrylplatten fallen nicht unter die Hapro-Garantie.
Mängel, die als Folge von Montage- und/oder Installationsfehlern, zweckwidrigem Gebrauch,
Blitzschlag und nicht originalen Ersatzteilen gesehen werden, fallen nicht unter die HaproGarantie.
Prüfen Sie sorgfältig, ob das Bräunungsgerät ordnungsgemäß installiert ist, bevor Sie die
Garantie in Anspruch nehmen. Falls Sie unberechtigterweise die Garantie beanspruchen,
werden Ihnen die Servicekosten in Rechnung gestellt.
Garantieeinschränkungen
Die UV-Lampen unterliegen nicht den Bedingungen der internationalen Garantie.
Fehlerbehebung
Sollten Probleme auftauchen, die sich mithilfe der nachstehenden Informationen nicht
beheben lassen, setzen Sie sich bitte mit Ihrem Hapro Händler in Verbindung.
Problem Lösung
Das Gerät funktioniert
nicht.
Die Stromzufuhr wird
durch die Sicherung des
Geräts abgeschaltet, wenn
ich das Gerät einschalte
bzw. benutze.
Die Lampeneinheit bendet sich evtl. nicht in der richtigen
Position (siehe Kapitel “Für den Gebrauch vorbereiten”).
Bringen Sie sie in die richtige Position.
Möglicherweise ist der Netzstecker nicht richtig in die
Steckdose eingesteckt. Stecken Sie ihn richtig ein.
Möglicherweise liegt ein Stromausfall vor. Prüfen Sie mit einem
anderen Gerät, ob die Stromversorgung intakt ist.
Die Bräunungslampen sind möglicherweise noch zu heiß und
müssen erst 3 Minuten lang abkühlen.
Möglicherweise wurde das Gerät aufgrund des
Überhitzungsschutzes automatisch abgeschaltet, weil es zu
heiß war. Entfernen Sie die Ursache der Überhitzung (z. B. ein
Handtuch, das einen oder mehrere Lüftungsschlitze abdeckt).
Lassen Sie das Gerät einige Zeit abkühlen, und schalten Sie es
dann wieder ein.
Sie brauchen für das Gerät eine 16A-Standardsicherung oder
eine träge Automatiksicherung. Möglicherweise haben Sie
auch zu viele Geräte an denselben Stromkreis angeschlossen.
Page 22

DEUTSCH20
Problem Lösung
Die Bräunungsergebnisse
sind nicht so gut wie
erwartet.
Möglicherweise ist die von Ihnen gewählte Bräunungskur für
Ihren Hauttyp nicht geeignet. Sehen Sie in der Tabelle im
Kapitel “Gesundes Bräunen” im Abschnitt “Das UV-Sonnenbad:
Wie oft und wie lange?” nach.
Möglicherweise ist der Abstand zwischen den Lampen und der
Oberäche, auf der Sie liegen, größer als empfohlen. Siehe
Kapitel „Für den Gebrauch vorbereiten“).
Nach langer Gebrauchsdauer lässt die Bräunungsleistung der
Lampen nach. Dies macht sich jedoch erst nach mehreren
Jahren bemerkbar. Sie können zur Behebung des Problems
entweder eine etwas längere Bräunungsdauer wählen oder die
Lampen austauschen lassen.
Page 23

DEUTSCH 21
Page 24

22 NEDERLANDS
Inleiding
Met dit solarium voor het hele lichaam krijgt u gewoon thuis mooie bruiningsresultaten. De 3
HPA-bruiningslampen zorgen voor een mooie bruine kleur. Het bruiningsgebied voor het hele
lichaam van 1,80 x 0,70 m zorgt ervoor dat het licht uw hele lichaam bereikt.
Door het inklapsysteem is het apparaat eenvoudig uit te klappen. U kunt de hoogte van het
solarium voor het hele lichaam aanpassen aan de hoogte van uw bed. Het apparaat heeft een
compact formaat als het is ingeklapt, zodat u het eenvoudig uit het zicht kunt opbergen.
Algemene beschrijving (g. 1)
A Wielen
B Netsnoer in opbergruimte
C Handgreep
D Timer
E Geheugenknoppen (voor twee personen)
F Schuifknoppen
G Oplader
H Vergrendelkraag voor hoogte-instelling
I Vergrendelkraag voor de lampunit
J Handgreep
K Ventilator (koeling)
L Lampunit
M UV-lter
N Bruiningslampen
O Reector
P Meetlint
Q Beschermbrillen (2 stuks)
R Voet
S Typeplaatje
Belangrijk
Lees deze gebruiksaanwijzing zorgvuldig door voordat u het apparaat gaat gebruiken. Bewaar
de gebruiksaanwijzing om deze indien nodig te kunnen raadplegen.
- Controleer of het voltage aangegeven op het apparaat overeenkomt met de netspanning
in uw woning voordat u het apparaat aansluit.
- Als het stopcontact dat wordt gebruikt om het apparaat van stroom te voorzien, slecht is
aangesloten, wordt de stekker van het apparaat heet. Zorg ervoor dat u het apparaat
aansluit op een goed aangesloten stopcontact.
- Het apparaat moet worden aangesloten op een groep die beveiligd is met een gewone
zekering van 16A of een automatische trage zekering.
- Om ongelukken te voorkomen moet het netsnoer als dit beschadigd is, vervangen worden
door de fabrikant, haar service agent of een gelijkwaardige gekwaliceerde persoon.
- Water en elektriciteit vormen een gevaarlijke combinatie! Gebruik dit apparaat daarom niet
in een vochtige omgeving (bijv. in de badkamer of in de buurt van een douche of
zwembad).
- Als u zojuist hebt gezwommen of een douche hebt genomen, droogt u zich dan goed af
voordat u het apparaat gaat gebruiken.
- Zorg ervoor dat kinderen niet met het apparaat spelen.
- Haal na gebruik altijd de stekker uit het stopcontact.
- Laat het apparaat na gebruik ongeveer 15 minuten afkoelen voordat u het terugklapt in de
transportstand en opbergt.
Page 25

23NEDERLANDS
- Zorg ervoor dat de ventilatieopeningen in de lampunit en de voet tijdens gebruik open
blijven. Houd uw haar uit de buurt van de luchtinlaat van de lampunit.
- Het UV-lter wordt erg heet tijdens gebruik. Raak het daarom niet aan.
- Het apparaat bevat scharnierende delen. Zorg ervoor dat uw vingers niet bekneld raken
tussen deze delen.
- Verplaats het apparaat alleen in de transportstand.
- Kies nooit een bruiningsafstand van minder dan 70 cm.
- Houd u aan de aanbevolen bruiningstijden en het maximale aantal bruiningsuren (zie
‘Bruiningssessies: hoe vaak en hoe lang?’).
- Bruin een bepaald deel van het lichaam niet vaker dan één keer per dag. Vermijd diezelfde
dag overmatige blootstelling aan natuurlijk zonlicht.
Neem de volgende voorzorgsmaatregelen:
- Bescherm uw ogen gedurende de gehele zonnesessie door het bijgeleverde UV-werende
brilletje te dragen. Contactlenzen en zonnebrillen zijn geen doeltreende vervanging voor
het speciale brilletje. Een onbeschermd oog kan een ontsteking van het oogoppervlak
ontwikkelen. Na excessieve blootstelling kan in sommige gevallen schade optreden aan de
retina. Veel en herhaaldelijke blootstelling van het onbeschermde oog kan leiden tot staar.
- Verwijder ruim voor de bruiningssessie zorgvuldig alle cosmetische producten van uw
gezicht en lichaam. Gebruik geen antizonnebrandmiddelen of middelen die bruining van
de huid bevorderen in combinatie met zonneapparatuur.
- Neem geen bruinings- en/of relaxsessie als u een ziekte hebt en/of medicijnen of
cosmetica gebruikt die de gevoeligheid van uw huid vergroten. Wees extra voorzichtig als
u overgevoelig bent voor UV- of IR-licht. Raadpleeg in geval van twijfel uw arts.
- Zorg dat u niet in de buitenzon zont en gebruik maakt van de zonneapparatuur op
dezelfde dag. De huid maakt geen onderscheidt tussen de UV-stralen van de zon en de
UV-stralen uit een zonneapparaat.
- Bescherm gevoelige delen van de huid zoals littekens, tatoeages en genitaliën tegen de
UV-stralen.
- Indien er persistente bultjes of zweertjes ontstaan op de huid of wanneer er veranderingen
in moedervlekken optreden, dient u eerst medisch advies in te winnen voordat u verder
gaat met de zonnesessie.
- Gebruik het apparaat nooit als een UV-lter beschadigd of kapot is of als het ontbreekt.
- Gebruik het apparaat nooit als het bedieningspaneel defect is.
- Zorg dat er geen anderen – in het bijzonder kinderen – in de ruimte zijn wanneer het
zonneapparaat aan staat.
Een zonneapparaat mag nooit worden gebruikt door:
- personen met een mentale of zintuigelijke beperkingen;
- personen die geen kennis of ervaring hebben met zonneapparatuur, tenzij zij toezicht en
begeleiding krijgen over het juiste gebruik van de zonneapparatuur door iemand waarvan
verondersteld kan worden dat deze de verantwoordelijkheid over hun veiligheid kan
waarborgen;
- personen jonger dan 18 jaar;
- personen die veel sproeten hebben of krijgen na blootstelling aan de zon;
- personen met abnormale verkleuringen op de huid;
- personen die meer dan 16 moedervlekken (van 2 mm of groter) hebben over hun lijf;
- personen met atypische moedervlekken (gedenieerd als asymmetrische moedervlekken
groter dan 5 mm in doorsnede met gevarieerde pigmentatie en onregelmatige randen. Bij
twijfel, raadpleeg een arts);
- personen met, een van nature, rode haarkleur;
- personen van wie de huid een zonnebrand heeft;
- personen die niet of enkel na een zonnebrand bruin worden na blootstelling aan zonlicht;
- personen die zeer snel verbranden na blootstelling aan zonlicht;
Page 26

NEDERLANDS24
- personen met een geschiedenis van veelvuldige en ernstige zonnebrand tijdens de
kinderjaren;
- personen die lijden of hebben geleden aan huidkanker of gepredisponeerde huidkanker;
- personen waarbij in de eerstelijns familieband melanoma voorkomt/is voorgekomen;
- personen die onder toezicht van een arts staan voor een aandoening waarbij
lichtgevoeligheid een indicatie is en/of gebruik wordt gemaakt van medicatie met een
risico op lichtgevoelige reactie.
Algemeen
- Het apparaat is uitgerust met een automatische bescherming tegen oververhitting. Als het
apparaat onvoldoende wordt gekoeld, bijvoorbeeld doordat de ventilatieopeningen
afgedekt zijn, schakelt het apparaat automatisch uit. Als u de oorzaak van de oververhitting
hebt weggenomen en het apparaat is afgekoeld, schakelt het apparaat automatisch weer
in.
- Als uw huid strak aanvoelt na de bruiningssessie, kunt u een vochtinbrengende crème
aanbrengen.
- Voor een egale bruine kleur dient u recht onder de lampunit te gaan liggen.
- Kleuren verbleken door blootstelling aan de zon. Hetzelfde eect kan zich voordoen als u
dit apparaat gebruikt.
- Verwacht niet dat het apparaat een beter resultaat oplevert dan natuurlijk zonlicht.
Elektromagnetische velden (EMV)
Dit Hapro-apparaat voldoet aan alle richtlijnen met betrekking tot elektromagnetische velden
(EMV). Mits het apparaat op de juiste wijze en volgens de instructies in deze
gebruiksaanwijzing wordt gebruikt, is het veilig te gebruiken volgens het nu beschikbare
wetenschappelijke bewijs.
Cosmetica en medicatie
Cosmetica en medicatie bevatten soms stoen die een fototoxische reactie kunnen geven bij
het blootstelling aan ultraviolet licht. De meest voorkomende fototoxische chemicaliën zijn:
Demeclocycline
Rolitetracycline
Nalidixinezuur
Tretinoine
Methoxsaleen
Monobenzon
Hydrochinon
Etretinaat
Isotretinoine
Doxycycline
Amiodaron
Chloortetracycline
Oxytetracycline
Tetracycline
Azapropazon
Etretinaat
Tretinoine
Hydrochinon
Pormeer
Acitretine
Lomeoxacine
Neem contact op met uw dealer voor de complete lijst met stoen die een fototoxische reactie
kunnen geven.
Bruinen en uw gezondheid
De zon levert verschillende soorten energie: het zichtbare licht stelt ons in staat om te zien, het
ultraviolette licht (UV) bruint onze huid en het infrarode licht (IR) in zonlicht zorgt voor de
warmte waarin we ons zo graag koesteren.
Net als bij natuurlijk zonlicht heeft het bruiningsproces bij gebruik van dit apparaat wat tijd
nodig. De eerste resultaten worden pas na een aantal sessies zichtbaar (zie ‘Bruiningssessies:
hoe vaak en hoe lang?’).
Uw huid kan verbranden door overmatige blootstelling aan ultraviolet licht, of dat nu
geproduceerd wordt door de zon of door een bruiningsapparaat.
Naast vele andere factoren, zoals overmatige blootstelling aan natuurlijk zonlicht, kan onjuist
en overmatig gebruik van een bruiningsapparaat het risico van huid- en oogaandoeningen
Page 27

NEDERLANDS 25
vergroten. De mate waarin deze eecten optreden wordt aan de ene kant bepaald door de
aard, de intensiteit en de duur van de blootstelling en aan de andere kant door de
gevoeligheid van de betreende persoon.
Hoe vaker de huid en de ogen worden blootgesteld aan UV-licht, hoe groter de kans op
hoornvliesontsteking, bindvliesontsteking, beschadiging van het netvlies, staar, vroegtijdige
veroudering van de huid en de ontwikkeling van huidkanker. Bepaalde medicijnen en
cosmetica vergroten de gevoeligheid van de huid. Het is daarom zeer belangrijk:
- dat u de instructies volgt in hoofdstuk ‘Belangrijk’ en in ‘Bruiningssessies: hoe vaak en hoe
lang?’;
- dat de bruiningsafstand (de afstand tussen het lichaam en de UV-lters) minstens 70 cm is.
- dat u het maximale aantal bruiningsuren per jaar (17 uur ofwel 1020 minuten) niet
overschrijdt.
- dat u tijdens het bruinen altijd de bijgeleverde beschermbril draagt.
Bruiningssessies: hoe vaak en hoe lang?
- Neem niet meer dan één bruiningssessie per dag, gedurende 5 tot 10 dagen.
- Wacht na uw eerste bruiningssessie minstens 48 uur voordat u uw tweede bruiningssessie
neemt.
- Na deze 5-daagse tot 10-daagse kuur raden we u aan een tijdje te stoppen met de
bruiningssessies.
- Ongeveer een maand na aoop van de kuur zal uw huid veel van zijn bruine kleur hebben
verloren. U kunt dan met een nieuwe kuur beginnen.
- Als u uw bruine kleur wilt behouden, stop dan niet met de bruiningssessies na aoop van
de kuur, maar ga door met één of twee sessies per week.
- Onthoud dat u het maximale aantal bruiningsuren niet mag overschrijden, of u er nu voor
kiest een tijdje te stoppen met de bruiningssessies of doorgaat met minder sessies per
week.
- Voor dit apparaat geldt een maximum van 17 bruiningsuren (= 1020 minuten) per jaar.
- Als u met een kuur bent gestopt en deze gedurende een lange periode niet hebt
voortgezet, ga dan niet verder met het resterende aantal sessies, maar begin met een
nieuwe kuur.
Voorbeeld
Stel dat u een 10-daagse bruiningskuur volgt, met een sessie van 7 minuten op de eerste dag
en sessies van 20 minuten op de negen dagen die volgen.
De kuur duurt dan (1 x 7 minuten) + (9 x 20 minuten) = 187 minuten.
Dit betekent dat u 5 van deze kuren per jaar kunt volgen (5 x 187 minuten = 935 minuten).
Het maximale aantal bruiningsuren geldt natuurlijk voor elk afzonderlijk deel of elke
afzonderlijke zijde van het lichaam (bijv. de rug of de voorkant van het lichaam).
Tip Als u een mooie, egale bruine tint over uw hele lichaam wilt krijgen, draai dan uw lichaam
tijdens de sessie af en toe naar links en naar rechts zodat ook de zijkanten van het lichaam
gelijkmatig worden blootgesteld.
Tip Als uw huid wat strak aanvoelt na de bruiningssessie, kunt u een vochtinbrengende crème
opbrengen.
Tabel
Zoals staat aangegeven in de tabel dient de eerste sessie altijd 7 minuten te duren,
onafhankelijk van de gevoeligheid van de huid.
Als u denkt dat de sessies te lang voor u zijn (bijvoorbeeld omdat uw huid na de sessie trekt en
pijnlijk aanvoelt), raden we u aan de duur van de sessie met bijv. 5 minuten te verkorten.
Page 28

NEDERLANDS26
Duur van
bruiningssessie voor
ieder afzonderlijk
lichaamsdeel
1e sessie 7 minuten 7 minuten 7 minuten
onderbreking van ten
minste 48 uur
2e sessie 10 minuten 20 minuten 30 minuten*
3e sessie 10 minuten 20 minuten 30 minuten*
4e sessie 10 minuten 20 minuten 30 minuten*
5e sessie 10 minuten 20 minuten 30 minuten*
6e sessie 10 minuten 20 minuten 30 minuten*
7e sessie 10 minuten 20 minuten 30 minuten*
8e sessie 10 minuten 20 minuten 30 minuten*
9e sessie 10 minuten 20 minuten 30 minuten*
10e sessie 10 minuten 20 minuten 30 minuten*
*) of langer, afhankelijk van de gevoeligheid van uw huid.
Klaarmaken voor gebruik
U kunt het apparaat gemakkelijk verplaatsen en in de transportstand opbergen.
- Het apparaat is gemakkelijker te tillen als u dat samen met iemand anders doet (g. 2).
- Gebruik de handgreep als u het apparaat alleen tilt (g. 3).
1 Schuif de schuifknoppen in de richting van de pijl om het apparaat te openen (g. 4).
2 Trek de standaard en de lampunit omhoog (g. 5).
3 Zet het bruiningsapparaat in de aangegeven stand (g. 6).
4 Trek de lampunit aan de handgreep in horizontale stand. (g. 7)
U hoort klikjes als u de lampunit langs bepaalde vaste standen trekt.
Opmerking: In plaats van deze stap-voor-stapmethode kunt u de lampunit ook in één
beweging aan de handgreep omhoog trekken (g. 8).
5 Draai de lampunit een kwartslag (g. 9).
6 Zet het bruiningsapparaat naast een bed. (g. 10)
De afstand tussen het UV-lter en het oppervlak waarop u gaat liggen (bijv. het bed) moet 90
cm zijn.
7 Duw de kraag langs de standaard omlaag om het hoogte-instelmechanisme te
ontgrendelen. Trek tegelijkertijd de lampunit omhoog tot een hoogte van 90 cm boven
het bed. Laat de kraag los om de lampunit in deze stand te vergrendelen (g. 11).
- U kunt de afstand tussen de lampunit en het bed controleren door het meetlint naar
beneden te trekken.
- Het meetlint rolt automatisch op als u het rode lipje opzij beweegt.
Het apparaat is nu klaar voor gebruik.
Voor mensen met
een zeer gevoelige
huid
onderbreking van
ten minste 48 uur
Voor mensen met
een normaal
gevoelige huid
onderbreking van
ten minste 48 uur
Voor mensen met
een minder
gevoelige huid
onderbreking van
ten minste 48 uur
Page 29

NEDERLANDS 27
Het apparaat gebruiken
1 Wikkel het netsnoer helemaal af.
2 Steek de stekker in het stopcontact.
3 Raadpleeg hoofdstuk ‘Bruinen en uw gezondheid’ en uw eigen aantekeningen voor de
juiste bruiningstijd.
4 Zet de beschermbril op.
- Gebruik deze beschermbril alleen tijdens het bruinen met een Hapro-bruiningsapparaat.
Gebruik de bril niet voor andere doeleinden.
- De beschermbril voldoet aan beschermingsklasse II, overeenkomstig richtlijn 89/686/EEG.
5 Stel de timer in op de juiste bruiningstijd voor de sessie (g. 12).
De maximale bruiningstijd die kan worden ingesteld is 45 minuten.
6 Ga onder de lampunit liggen.
- Het apparaat piept tijdens de laatste minuut van de sessie.
- Tijdens deze minuut kunt u de timer opnieuw instellen om de andere kant van uw lichaam
te bruinen. Als u dit doet, voorkomt u dat u 3 minuten moet wachten om de
bruiningslampen te laten afkoelen nadat deze zijn uitgeschakeld.
- De timer schakelt het bruiningsapparaat automatisch uit nadat de ingestelde bruiningstijd
is verstreken.
Na de bruiningssessie
1 Gebruik de geheugenknoppen om het aantal bruiningssessies dat u hebt gehad bij te
houden. Het apparaat heeft twee geheugenknoppen voor twee gebruikers (g. 13).
Schoonmaken
Gebruik nooit schuursponzen, schurende schoonmaakmiddelen of agressieve vloeistoen
zoals benzine of aceton om het apparaat schoon te maken.
Voorkom dat er water in het apparaat loopt.
1 Haal de stekker uit het stopcontact en laat het apparaat afkoelen voordat u het gaat
schoonmaken.
2 Maak de buitenkant van het apparaat schoon met een vochtige doek.
3 Maak de buitenkant van het UV-lter schoon met een zachte doek besprenkeld met wat
spiritus.
4 Maak de beschermbril schoon met een vochtige doek.
Opbergen
1 Laat het apparaat ongeveer 15 minuten afkoelen voordat u het in de transportstand zet
en het opbergt.
2 Ondertussen kunt u het netsnoer oprollen en opbergen in de voet van het apparaat.
Opmerking: Zorg ervoor dat het snoer goed is opgeborgen en niet klem komt te zitten tussen
de scharnierende delen van het apparaat als u het in de transportstand zet.
3 Duw de kraag langs de standaard (1) omlaag om het hoogte-instelmechanisme te
ontgrendelen. Duw tegelijkertijd de standaard naar beneden (2) en laat dan de kraag
los (g. 14).
4 Draai de lampunit een kwartslag (g. 15).
Page 30

NEDERLANDS28
5 Til de lampunit met één hand een klein stukje op (1). Duw met uw andere hand de twee
schuifknoppen naar beneden (2) om de lampunit uit te klappen (3) (g. 16).
6 Houd de twee schuifknoppen met één hand naar beneden gedrukt en vouw de
lampunit met uw andere hand in de verticale stand. Laat dan de schuifknoppen
los (g. 17).
7 Laat de standaard en de lampunit voorzichtig op de voet van het apparaat
zakken (g. 18).
8 Duw de schuifknoppen op de voet in de richting van de pijl om de lampunit in de voet
te vergrendelen (g. 19).
9 Berg het bruiningsapparaat op.
- U kunt het bruiningsapparaat onder een bed opbergen (g. 20).
- U kunt het bruiningsapparaat ook rechtop in een kast opbergen (g. 21).
Vervangen
Het licht dat de bruiningslampen afgeven wordt in de loop der tijd minder fel (dit gebeurt bij
normaal gebruik na enige jaren). U merkt dit doordat het bruiningsvermogen van het apparaat
afneemt. U kunt dit probleem oplossen door een iets langere bruiningstijd in te stellen of door
de bruiningslampen te laten vervangen.
Het UV-lter beschermt u tegen blootstelling aan schadelijk UV-licht. Het is dus belangrijk dat
u een beschadigd of kapot lter direct laat vervangen.
Laat de bruiningslampen, het UV-lter en het netsnoer vervangen door een dealer of een
door Hapro geautoriseerd servicecentrum. Alleen daar heeft men de kennis en
vaardigheden die hiervoor nodig zijn en beschikt men over de originele reserveonderdelen
voor het apparaat.
Milieu
- De lampen van dit apparaat bevatten stoen die schadelijk kunnen zijn voor het milieu. Als
u de lampen afdankt, doe ze dan niet bij het huisvuil, maar lever ze apart in bij een ocieel
aangewezen inzamelpunt.
- Gooi het apparaat aan het einde van zijn levensduur niet weg met het normale huisvuil,
maar lever het in op een door de overheid aangewezen inzamelpunt om het te laten
recyclen. Op die manier levert u een bijdrage aan een schonere leefomgeving (g. 22).
Garantie & service
Alle storingen die het gevolg zijn van materiaal- of fabricagefouten en zich voordoen binnen
de garantietermijn, worden op vertoon van de originele factuur kosteloos gerepareerd. De
garantietermijn bedraagt 24 maanden. Voor garantiezaken dient u zich in verbinding te stellen
met uw dealer.
Dit solarium is alleen bedoeld voor huishoudelijk gebruik en niet voor commerciële
doeleinden. Schade als gevolg van commercieel gebruik alsmede lampen, starters,
eindkappen en acrylplaten, vallen niet onder de Hapro garantie.
Gebreken die het gevolg zijn van montage- en/of installatiefouten, oneigenlijk gebruik,
blikseminslag en niet originele onderdelen, vallen niet onder de Hapro garantie.
Onderzoek zorgvuldig of de zonneapparatuur goed is geïnstalleerd, voordat u een beroep
doet op de garantie. Indien u onterecht een beroep op garantie doet, worden de servicekosten
in rekening gebracht.
Page 31

NEDERLANDS 29
Garantiebeperkingen
De bruiningslampen vallen niet onder de voorwaarden van de internationale garantie.
Problemen oplossen
Als u een probleem hebt met dit apparaat en u er niet in slaagt dit probleem op te lossen met
behulp van onderstaande informatie, neem dan contact op met de dichtstbijzijnde Hapro
dealer.
Probleem Oplossing
Het apparaat werkt
niet.
De zekering van de
groep waarop het
apparaat is
aangesloten, sluit de
stroomtoevoer af als
ik het apparaat
inschakel of gebruik.
Het
bruiningsresultaat is
niet naar
verwachting.
De lampunit staat mogelijk niet in de juiste stand (zie hoofdstuk
‘Klaarmaken voor gebruik’). Zet de lampunit in de juiste stand.
Mogelijk is de stekker niet goed in het stopcontact gestoken. Steek
de stekker goed in het stopcontact.
Mogelijk is er een stroomstoring opgetreden. Controleer of dit zo is
door een ander apparaat aan te sluiten.
De bruiningslampen zijn mogelijk nog steeds te warm om te worden
ingeschakeld. De lampen moeten eerst 3 minuten afkoelen.
Mogelijk heeft de oververhittingsbeveiliging het apparaat
automatisch uitgeschakeld, omdat het te heet werd. Neem de
oorzaak van de oververhitting weg (bijv. een handdoek die een of
meer ventilatieopeningen blokkeert). Laat het apparaat afkoelen en
schakel het vervolgens weer in.
De zekering van de stroomgroep waarop het apparaat is
aangesloten moet een gewone zekering van 16A of een
automatische trage zekering zijn. Het is ook mogelijk dat u te veel
apparaten op deze groep hebt aangesloten.
Mogelijk hebt u een bruiningskuur gevolgd die niet geschikt is voor
uw huidtype. Raadpleeg de tabel in ‘Bruiningssessies: hoe vaak en
hoe lang?’ in hoofdstuk ‘Bruinen en uw gezondheid’.
De afstand tussen de lampen en het oppervlak waarop u ligt is
misschien groter dan aanbevolen. Zie hoofdstuk ‘Klaarmaken voor
gebruik’.
Als de lampen al lang in gebruik zijn, neemt het bruiningsvermogen
af. Dit eect merkt u pas na enige jaren. U kunt dit oplossen door een
iets langere bruiningstijd in te stellen of door de lampen te laten
vervangen.
Page 32

30
FRANÇAIS
Introduction
Ce solarium intégral permet d’obtenir d’excellents résultats de bronzage à domicile. Les
3 lampes HPA vous garantissent un superbe bronzage. La surface de bronzage intégrale
(1,80 x 0,70 m) assure une ecacité sur tout le corps.
Grâce à son système pliable, il est très facile de déplier l’appareil. La hauteur du solarium
intégral peut être adaptée à celle de votre lit. Une fois l’appareil plié, sa taille compacte permet
de le ranger en toute discrétion.
Description générale (g. 1)
A Roulettes
B Compartiment du cordon d’alimentation
C Poignée
D Minuteur
E Boutons de mémoire (pour deux personnes)
F Glissières
G Support
H Anneau de verrouillage (réglage de la hauteur)
I Anneau de verrouillage (bloc lampe)
J Poignée
K Ventilateur (refroidissement)
L Bloc lampe
M Filtre UV
N Lampes
O Réecteur
P Mètre à ruban
Q Lunettes de protection (2 paires)
R Socle
S Plaque signalétique
Important
Lisez attentivement ce mode d’emploi avant d’utiliser l’appareil et conservez-le pour un usage
ultérieur.
- Avant de brancher l’appareil, vériez que la tension indiquée sur l’appareil correspond à la
tension secteur locale.
- Si la prise secteur utilisée est en mauvais état, la che de l’appareil risque de surchauer.
Veillez à brancher l’appareil sur une prise secteur en bon état de marche.
- L’appareil doit être branché sur un circuit protégé par un fusible standard 16 A ou par un
fusible automatique à action retardée.
- Si le cordon d’alimentation est endommagé, il doit être remplacé par le fabricant ou une
personne qualiée, an d’éviter tout danger.
- L’eau et l’électricité ne font pas bon ménage ! N’utilisez jamais l’appareil dans un
environnement humide (dans la salle de bain ou près d’une douche ou d’une piscine par
exemple).
- Si vous venez de nager ou de prendre une douche, séchez-vous parfaitement avant
d’utiliser l’appareil.
- Veillez à ne pas laisser les enfants jouer avec l’appareil.
- Débranchez toujours l’appareil après utilisation.
- Laissez l’appareil refroidir pendant 15 minutes environ avant de le replier en position de
transport et de le ranger.
- Mettez toujours l’appareil en position de transport pour le déplacer.
Page 33

31FRANÇAIS
- En cours de fonctionnement, n’obturez pas les orices de ventilation du bloc lampe et du
socle. Évitez d’approcher vos cheveux de l’entrée d’air du bloc lampe.
- Évitez de toucher le ltre UV car il devient très chaud en cours d’utilisation de l’appareil.
- L’appareil est monté sur charnières. Veillez à ne pas vous y coincer les doigts.
- Ne placez pas le solarium à une distance inférieure à 70 cm.
- Ne dépassez pas les durées de bronzage recommandées, ni le nombre maximum d’heures
de bronzage (voir la section « Séances de bronzage : durée et fréquence »).
- Évitez de faire bronzer une même partie du corps plus d’une fois par jour et de vous
exposer au soleil le jour d’une séance de bronzage.
Prenez les précautions suivantes :
- Protégez vos yeux pendant l’exposition au moyen des lunettes anti-UV fournies. Les
lentilles de contact et les lunettes de soleil ne peuvent en aucun cas remplacer les lunettes
anti-UV. Si vous ne protégez pas vos yeux correctement, vous risquez de développer une
inammation de la surface oculaire. En cas d’exposition excessive, dans certains cas, la
rétine peut être endommagée. De nombreuses expositions répétées sans protection
oculaire peuvent entraîner l’apparition de cataractes.
- Démaquillez-vous soigneusement bien avant l’exposition. N’utilisez pas de crèmes de
protection solaire ni de produits destinés à accélérer le bronzage.
- N’utilisez pas l’appareil si vous sourez d’une maladie, prenez des médicaments ou utilisez
des produits cosmétiques susceptibles d’augmenter la sensibilité de la peau. Redoublez de
prudence en cas d’hypersensibilité aux UV ou aux IR. En cas de doute, consultez votre
médecin.
- Ne vous exposez pas au soleil et n’utilisez pas l’appareil de bronzage le même jour. La peau
ne fait pas la diérence entre les rayons UV du soleil ou d’un appareil de bronzage.
- Protégez les endroits sensibles comme les cicatrices, les tatouages et les parties génitales
pendant l’exposition.
- Si des grosseurs ou des lésions persistantes apparaissent sur la peau ou si vous observez un
changement d’aspect de vos grains de beauté, demandez conseil à un médecin avant de
reprendre les séances de bronzage.
- N’utilisez jamais l’appareil si un ltre UV est endommagé, cassé ou manquant.
- N’utilisez jamais l’appareil lorsque le bloc de commande est défectueux.
- Assurez-vous que toute personne n’utilisant par l’appareil, en particulier les enfants, ne se
trouve pas près de l’appareil pendant son fonctionnement.
Les appareils de bronzage ne doivent pas être utilisés par :
- Les personnes présentant une capacité sensorielle et/ou mentale réduite
- Les personnes ayant une connaissance ou une expérience des appareilles de bronzage
insusante, à l’exception des individus qui sont supervisés ou qui ont reçu des instructions
concernant l’utilisation de l’appareil de bronzage par une personne responsable de leur
sécurité.
- Les personnes âgées de moins de 18 ans
- Les personnes qui ont tendance à développer des taches de rousseur
- Les personnes dont la peau présente des zones dépigmentées anormales
- Les personnes qui ont plus de 16 grains de beauté (2 mm ou plus) sur le corps
- Les personnes qui ont des grains de beauté atypiques (à savoir des grains de beauté
asymétriques dont le diamètre est supérieur à 5 mm, avec une pigmentation variable et
des contours irréguliers ; en cas de doute, demandez conseil à votre médecin)
- Les personnes ayant naturellement les cheveux roux
- Les personnes dont la peau présente déjà des coups de soleil
- Les personnes qui ne bronzent pas ou qui ne bronzent pas sans prendre de coups de soleil
lorsqu’elles sont exposées au soleil
- Les personnes qui ont tendance à prendre facilement des coups de soleil lorsqu’elles sont
exposées au soleil
Page 34

FRANÇAIS32
- Les personnes ayant fréquemment pris de graves coups de soleil pendant leur enfance
- Les personnes sourant ou ayant souert d’un cancer de la peau ou prédisposées au
cancer de la peau
- Les personnes dont un proche direct a développé un mélanome
- Les personnes suivant un traitement médical pour une maladie qui implique une
photosensibilité et/ou qui prennent des médicaments photosensibilisants
Général
- L’appareil bénécie d’une protection intégrée contre les surchaues. Si le refroidissement
est insusant (en cas d’obstruction des aérations, par exemple), l’appareil s’éteint
automatiquement. Une fois la source de surchaue éliminée et la température revenue à
un niveau acceptable, il se rallume automatiquement.
- Si votre peau est sèche après la séance de bronzage, vous pouvez appliquer une crème
hydratante.
- Pour un hâle uniforme, allongez-vous directement sous le bloc lampe.
- Certaines couleurs pâlissent au contact des rayons du soleil. Le même phénomène peut se
produire lors de l’utilisation de l’appareil.
- Le solarium ne garantit pas de meilleurs résultats de bronzage par rapport à une exposition
au soleil.
Champs électromagnétiques (CEM)
Cet appareil Hapro est conforme à toutes les normes relatives aux champs électromagnétiques
(CEM). Il répond aux règles de sécurité établies sur la base des connaissances scientiques
actuelles s’il est manipulé correctement et conformément aux instructions de ce mode
d’emploi.
Produits cosmétiques et médicaments
Les produits cosmétiques et les médicaments peuvent contenir des substances susceptibles de
provoquer une réaction phototoxique si elles sont combinées à des rayons UV. Les produits
chimiques phototoxiques les plus courants sont :
Déméclocycline
Rolitétracycline
Acide nalidixique
Trétinoïne
Methoxsalene
Monobenzone
Contactez votre revendeur pour obtenir une liste complète des substances susceptibles de
provoquer une réaction phototoxique.
Hydrochinone
Etretinate
Isotrétinoïne
Doxycycline
Amiodarone
Chlortétracycline
Oxytétracycline
Tétracycline
Azapropazone
Etretinate
Trétinoïne
Hydrochinone
Pormère
Acitrétine
Loméoxacine
Bronzage et santé
Le soleil émet un rayonnement complexe : sa lumière nous permet de voir, ses rayons
ultraviolets (UV) font bronzer notre peau et ses rayons infrarouges (IR) génèrent de la chaleur.
Comme le bronzage naturel, le bronzage aux UV nécessite un certain temps. Les premiers
eets ne seront visibles qu’après quelques séances (voir la section « Séances de bronzage :
durée et fréquence »).
Une surexposition aux rayons ultraviolets (du soleil ou du solarium) peut engendrer des coups
de soleil.
Outre plusieurs autres facteurs, comme la surexposition au soleil, une utilisation incorrecte ou
excessive du solarium peut augmenter le risque de maladie de la peau ou des yeux. La gravité
Page 35

FRANÇAIS 33
de ces maladies dépend d’une part de la nature, de l’intensité et de la durée de l’exposition, et
d’autre part de la sensibilité de chacun.
Une exposition prolongée de la peau et des yeux aux UV augmente le risque d’aections telles
que la kératite, la conjonctivite, les dommages à la rétine, la cataracte, le vieillissement
prématuré de la peau et les tumeurs de la peau. Certains médicaments et produits
cosmétiques contribuent à augmenter la sensibilité de la peau. Il est dès lors important de
respecter les recommandations suivantes :
- suivre les instructions fournies dans le chapitre « Important » et dans la section « Séances
de bronzage : durée et fréquence » ;
- respecter la distance de bronzage de 70 cm (entre les ltres UV et le corps) ;
- ne pas dépasser le nombre maximum d’heures de bronzage par an (c.-à-d. 17 heures ou
1 140 minutes) ;
- toujours porter les lunettes fournies pendant le bronzage.
Séances de bronzage : durée et fréquence
- N’eectuez pas plus d’une séance de bronzage par jour pendant une période de cinq à
dix jours.
- Espacez les deux premières séances de bronzage d’au moins 48 heures.
- Après ce programme de cinq à dix jours, laissez reposer votre peau pendant un certain
temps.
- Environ un mois plus tard, votre peau aura perdu une grande partie du bronzage. Vous
pouvez alors commencer un nouveau programme.
- Pour entretenir votre bronzage, eectuez une ou deux séances d’UV par semaine, après
avoir suivi le programme initial.
- Que vous choisissiez de faire une pause pendant quelques jours ou de continuer le
bronzage à une intensité plus faible, il est impératif de ne pas dépasser le nombre
maximum d’heures de bronzage par an.
- Pour ce solarium, le nombre maximum d’heures de bronzage est de 17 heures (=
1 140 minutes) par an.
- Si vous avez interrompu un programme depuis une période assez longue, ne terminez pas
les séances de ce programme, mais commencez un nouveau programme.
Exemple
Supposons que vous suiviez un programme de bronzage de 10 jours avec une séance de
7 minutes le premier jour et des séances de 20 minutes les neufs jours suivants.
Ce programme comprend donc (1 x 7 minutes) + (9 x 20 minutes) = 187 minutes.
Vous pouvez suivre 5 de ces programmes par an (puisque 5 x 187 minutes = 935 minutes).
Bien entendu, le nombre maximum d’heures de bronzage est valable séparément pour chaque
face ou partie du corps traitée (comme l’avant ou le dos).
Conseil : Pour obtenir un bronzage uniforme, tournez-vous légèrement en cours de séance pour
mieux exposer les côtés aux rayons.
Conseil : Si votre peau tire un peu à la n de la séance de bronzage, vous pouvez appliquer une
crème hydratante.
Tableau
Dans le tableau ci-dessous, vous verrez que la durée de la première séance est toujours de
7 minutes, quelle que soit la sensibilité de la peau.
Si les séances vous semblent trop longues (si vous avez l’impression que votre peau tire en n
de séance par exemple), il est recommandé d’en réduire la durée d’environ 5 minutes.
Page 36

FRANÇAIS34
Durée de la séance de
bronzage pour chaque
partie du corps traitée
1re séance 7 minutes 7 minutes 7 minutes
pause d’au moins
48 heures
2e séance 10 minutes 20 minutes 30 minutes*
3e séance 10 minutes 20 minutes 30 minutes*
4e séance 10 minutes 20 minutes 30 minutes*
5e séance 10 minutes 20 minutes 30 minutes*
6e séance 10 minutes 20 minutes 30 minutes*
7e séance 10 minutes 20 minutes 30 minutes*
8e séance 10 minutes 20 minutes 30 minutes*
9e séance 10 minutes 20 minutes 30 minutes*
10e séance 10 minutes 20 minutes 30 minutes*
*) ou plus, en fonction de la sensibilité de la peau.
Avant utilisation
- Une fois l’appareil en position de transport, il est très facile à déplacer et à ranger.
- Vous aurez moins de dicultés à le soulever avec l’aide d’une autre personne (g. 2).
- Si vous devez soulever l’appareil seul, servez-vous de la poignée (g. 3).
1 Pour ouvrir l’appareil, déplacez les glissières dans le sens de la èche (g. 4).
2 Tirez le pied et le bloc lampe vers le haut (g. 5).
3 Placez le solarium dans la position indiquée (g. 6).
4 À l’aide de la poignée, tirez le bloc lampe vers le haut pour le placer en position
horizontale. (g. 7)
Vous entendrez des clics à chaque fois que le bloc lampe passera par certaines positions.
Remarque : Au lieu de suivre la procédure ci-dessous, vous pouvez également déployer
l’appareil en un seul mouvement en tirant le bloc lampe vers le haut à l’aide de la
poignée (g. 8).
5 Faites tourner le bloc lampe d’un quart de tour (g. 9).
6 Placez le solarium près d’un lit. (g. 10)
La distance séparant le ltre UV de la surface sur laquelle vous vous allongerez (le lit par
exemple) doit être de 90 cm.
7 Pour régler la hauteur du support, faites glisser l’anneau de verrouillage vers le bas.
Simultanément, tirez le bloc lampe vers le haut jusqu’à atteindre une hauteur de 90 cm
par rapport au lit. Relâchez l’anneau pour verrouiller le bloc lampe à la hauteur
souhaitée (g. 11).
- Vous pouvez vériez la distance séparant le bloc lampe du lit à l’aide du mètre à ruban.
- Le mètre à ruban s’enroule automatiquement dès lors que vous déplacez la languette
rouge sur le côté.
Pour personnes à
peau très sensible
pause d’au moins
48 heures
Pour personnes à
peau normale
pause d’au moins
48 heures
Pour personnes à
peau peu sensible
pause d’au moins
48 heures
Page 37

FRANÇAIS 35
L’appareil est désormais prêt à l’emploi.
Utilisation de l’appareil
1 Déroulez complètement le cordon d’alimentation.
2 Branchez le cordon d’alimentation sur la prise secteur.
3 Reportez-vous au chapitre « Bronzage et santé » et à vos notes pour connaître la durée
adéquate des séances de bronzage.
4 Mettez les lunettes de protection.
- Utilisez uniquement ces lunettes de protection pour les séances de bronzage avec un
appareil Hapro. Ne les utilisez pas à d’autres ns.
- Les lunettes de protection sont conformes à la directive 89/686/CEE, classe II.
5 Réglez la durée de la séance de bronzage à l’aide du minuteur (g. 12).
La durée maximale de bronzage programmable est de 45 minutes.
6 Allongez-vous sous les lampes.
- L’appareil émet des signaux sonores pendant la dernière minute de la séance.
- Pendant ce temps, vous pouvez réinitialiser le minuteur pour faire bronzer l’autre côté de
votre corps. En procédant de la sorte, vous évitez de devoir attendre 3 minutes, la durée
nécessaire pour refroidir les lampes une fois qu’elles se sont éteintes.
- Le solarium s’arrête automatiquement à la n de la durée dénie.
Après la séance de bronzage
1 À l’aide des boutons de mémoire, enregistrez le nombre de séances de bronzage
eectuées. L’appareil est équipé de deux boutons de mémoire pour suivre le
programme de deux utilisateurs (g. 13).
Nettoyage
N’utilisez jamais de tampons à récurer, de produits abrasifs ou de détergents agressifs tels
que de l’essence ou de l’acétone pour nettoyer l’appareil.
Veillez à ne pas faire pénétrer d’eau dans l’appareil.
1 Débranchez l’appareil et laissez-le refroidir avant de le nettoyer.
2 Nettoyez l’extérieur de l’appareil à l’aide d’un chion humide.
3 Nettoyez l’extérieur du ltre UV à l’aide d’un chion doux humecté d’alcool dénaturé.
4 Nettoyez les lunettes de protection à l’aide d’un chion humide.
Rangement
1 Laissez l’appareil refroidir pendant 15 minutes avant de le replier en position de
transport et de le ranger.
2 Pendant ce temps, vous pouvez enrouler le cordon et le ranger dans le socle.
Remarque : Veillez à ranger le cordon correctement pour éviter qu’il ne se coince dans les
charnières de l’appareil lorsque vous le repliez.
3 Pour régler la hauteur du support, faites glisser l’anneau de verrouillage vers le bas (1),
tout en poussant le pied vers le bas (2). Puis, relâchez l’anneau (g. 14).
4 Faites tourner le bloc lampe d’un quart de tour (g. 15).
Page 38

FRANÇAIS36
5 Soulevez légèrement la lampe avec une main (1), puis appuyez sur les deux glissières
avec l’autre main (2) pour replier le bloc lampe (3) (g. 16).
6 Maintenez les deux glissières vers le bas avec une main, puis placez le bloc lampe en
position verticale avec l’autre main. Ensuite, relâchez les deux glissières (g. 17).
7 Abaissez le pied et le bloc lampe avec précaution jusqu’au socle (g. 18).
8 Verrouillez le bloc lampe sur le socle en déplaçant les glissières dans le sens de la
èche (g. 19).
9 Rangez le solarium.
- Vous pouvez ranger le solarium sous un lit (g. 20).
- Vous pouvez également le ranger dans un placard, en position verticale (g. 21).
Remplacement
Avec le temps (après plusieurs années en cas d’utilisation normale), l’intensité de la lumière
émise par les lampes diminue, ainsi que leur ecacité. Vous pouvez compenser cette perte
d’ecacité en augmentant le temps d’exposition ou en remplaçant les lampes.
Le ltre UV vous protège contre les rayons nocifs. Il est dès lors impératif de le remplacer
immédiatement s’il est endommagé ou cassé.
Conez toujours le remplacement des lampes, du ltre UV et du cordon d’alimentation à un
distributeur Hapro ou à un Centre Service Agréé. Ils sont les seuls à disposer du personnel
qualié pour ce genre d’intervention, ainsi que des pièces de rechange d’origine pour
l’appareil.
Environnement
- Les lampes contiennent des substances qui peuvent nuire à l’environnement. Lorsque vous
mettez les lampes au rebut, ne les jetez pas avec les ordures ménagères, mais déposez-les
à un endroit assigné à cet eet.
- Lorsqu’il ne fonctionnera plus, ne jetez pas l’appareil avec les ordures ménagères, mais
déposez-le à un endroit assigné à cet eet, où il pourra être recyclé. Vous contribuerez ainsi
à la protection de l’environnement (g. 22).
Garantie et service
Toutes les pannes résultant de défauts de fabrication ou de vices du matériel et survenant
pendant la période de garantie sont réparées gratuitement sur présentation de la facture
originale. La période de garantie est de 24 mois. Pour les questions relatives à la garantie,
veuillez vous adresser à votre distributeur.
Votre nouveau solarium bien-être est exclusivement destiné à un usage privé et en aucun cas à
des ns commerciales. Les dommages survenus à la suite d’une utilisation à des ns
commerciales, ainsi que les lampes, démarreurs, renforts de protection et panneaux acryliques,
ne sont pas couverts par la garantie Hapro.
Les dommages dus à des erreurs de montage et/ou d’installation, à un usage impropre, à la
foudre et à l’utilisation de pièces non-originales, ne sont pas couverts par la garantie Hapro.
Avant d’invoquer la garantie, examinez attentivement si le solarium a été bien installé. Si vous
invoquez à tort la garantie, les frais de réparation vous seront portés en compte.
Limitation de garantie
La garantie internationale ne couvre ni les lampes de bronzage.
Page 39

FRANÇAIS 37
Dépannage
Si vous rencontrez des problèmes avec votre appareil et que vous ne pouvez pas les résoudre à
l’aide des informations ci-dessous, adressez-vous à votre Hapro distributeur..
Problème Solution
L’appareil ne
fonctionne pas.
Le fusible du circuit
auquel l’appareil est
connecté coupe le
courant lorsque je
mets l’appareil sous
tension ou que je le
fais fonctionner.
Le bronzage n’est pas
aussi réussi que
prévu.
Le bloc lampe n’a peut-être pas été placé dans la bonne position
(voir le chapitre « Avant utilisation »). Remettez le bloc lampe dans la
bonne position.
La che du cordon d’alimentation n’a peut-être pas été correctement
insérée dans la prise secteur. Branchez le cordon d’alimentation
correctement sur la prise secteur.
Il y a peut être une panne de courant. Vériez que l’alimentation
électrique fonctionne en branchant un autre appareil.
Les lampes de bronzage sont peut-être encore trop chaudes.
Laissez-les refroidir pendant 3 minutes.
La protection contre les surchaues a peut-être éteint l’appareil
automatiquement en raison d’une surchaue. Éliminez la cause de la
surchaue (une serviette obturant les orices de ventilation par
exemple), puis laissez l’appareil refroidir quelques instants avant de
le remettre en marche.
Le fusible du circuit auquel l’appareil est connecté doit être de type
standard 16 A ou automatique à action retardée. Vous avez peut-être
connecté un trop grand nombre d’appareils à un même circuit.
Le programme de bronzage que vous suivez n’est peut-être pas
adapté à votre type de peau. Consultez le tableau du chapitre
« Bronzage et santé », section « Séances de bronzage : durée et
fréquence ».
La distance entre les lampes et la surface sur laquelle vous êtes
allongé(e) dépasse peut-être la distance recommandée. Voir le
chapitre « Avant utilisation ».
Après une longue durée d’utilisation (plusieurs années), l’intensité de
la lumière émise par les lampes diminue. Pour compenser cette perte
d’ecacité, augmentez le temps d’exposition ou remplacez les
lampes.
Page 40

38
ITALIANO
Introduzione
Il solarium a gura intera vi consente di ottenere un’abbronzatura perfetta nel comfort di casa.
Le 3 lampade HPA assicurano un’abbronzatura ottimale. Il raggio di abbronzatura a gura
intera di 1,80 x 0,70 m assicura la copertura di tutto il corpo.
Il sistema pieghevole rende facile l’apertura dell’apparecchio. L’altezza del solarium a gura
intera può essere adattata a quella del letto. Quando è piegato, il solarium ha una forma
compatta che permette di riporlo con il minimo ingombro.
Descrizione generale (g. 1)
A Rotelle
B Cavo di alimentazione nel vano di avvolgimento
C Impugnatura
D Timer
E Manopole memo (per due persone)
F Parti scorrevoli
G Supporto
H Collare di blocco per la regolazione dell’altezza
I Collare di blocco per la lampada
J Impugnatura
K Ventola (di rareddamento)
L Lampada
M Filtro UV
N Lampade abbronzanti
O Riettore
P Rollina metrica
Q Occhiali di protezione (2 paia)
R Base
S Targhetta modello
Importante
Prima di utilizzare l’apparecchio, leggete attentamente il presente manuale e conservatelo per
eventuali riferimenti futuri.
- Prima di usare l’apparecchio, controllate che la tensione indicata corrisponda a quella della
rete locale.
- Se i connettori della presa di corrente a cui viene collegato l’apparecchio sono scadenti, la
spina dell’apparecchio potrebbe surriscaldarsi. Assicuratevi di collegare l’apparecchio a una
presa di corrente in buone condizioni.
- L’apparecchio deve essere collegato a un circuito protetto da un fusibile standard da 16A o
un fusibile automatico versione lenta.
- Per evitare qualsiasi pericolo, se il cavo di alimentazione é danneggiato, deve essere
sostituito dal costruttore o dal suo rivenditore autorizzato o comunque da personale
qualicato.
- Acqua ed elettricità costituiscono una combinazione pericolosa! Non usate l’apparecchio in
ambienti umidi (ad es. in bagno, vicino a docce o piscine).
- Al termine di una nuotata o dopo aver fatto la doccia, asciugatevi con cura prima di usare
l’apparecchio.
- Assicuratevi che i bambini non giochino con l’apparecchio.
- Scollegate sempre il cavo di alimentazione dopo l’uso.
Page 41

39ITALIANO
- Lasciate rareddare l’apparecchio per circa 15 minuti dopo averlo utilizzato e prima di
porlo in posizione da trasporto per conservarlo.
- Accertatevi che le ventole nella lampada e nella base rimangano aperte durante l’utilizzo.
Tenete lontani i capelli dall’uscita per l’aria della lampada.
- I ltri UV si surriscaldano durante l’uso. Non toccateli.
- L’apparecchio contiene parti provviste di cardini; prestate attenzione a non introdurre le
dita tra queste parti.
- Spostate l’apparecchio solo quando si trova in posizione da trasporto.
- Posizionate l’apparecchio a una distanza di almeno 70 cm.
- Non superate il numero di sedute o le ore di abbronzatura consigliate (vedere la sezione
“Sedute abbronzanti: quante volte e per quanto tempo?”).
- Non esponete una determinata parte del corpo per più di una volta al giorno. Evitate
un’eccessiva esposizione ai raggi di luce solare naturale nello stesso giorno.
Prendere le seguenti precauzioni:
- Proteggete sempre i vostri occhi durante le sedute utilizzando gli occhiali UV forniti. Le
lenti a contatto e gli occhiali da sole non possono sostituire questi occhiali speciali. Una
mancata protezione degli occhi potrebbe causare un’inammazione in supercie. In caso
di esposizioni eccessive, in alcuni casi, potrebbero vericarsi dei danni alla retina. Molte
esposizioni ripetute su occhi non protetti possono causare la cataratta.
- Togliere i cosmetici prima di abbronzarsi. Non utilizzare ltri solari o prodotti che
accelerano l’abbronzatura.
- Evitate di esporvi alle sedute abbronzanti e/o rilassanti in caso di patologie e/o terapie
farmacologiche o cosmetiche che potrebbero aumentare la sensibilità della pelle. Prestate
particolare attenzione nel caso di ipersensibilità ai raggi UV o IR. In caso di dubbi,
consultate un medico.
- Non esponetevi al sole lo stesso giorno in cui fate una seduta abbronzante. La pelle non fa
alcuna distinzione fra i raggi UV del sole e quelli di un apparecchio abbronzante.
- Proteggere dall’esposizione le parti della pelle più sensibili quali cicatrici, tatuaggi e
genitali.
- Se compaiono sulla pelle dei gonori o delle piaghe o se si notano cambiamenti nei nei
pigmentati, rivolgersi ad un medico prima di riprendere l’abbronzatura.
- Non utilizzate in nessun caso l’apparecchio se il ltro UV è danneggiato, rotto o assente.
- Non utilizzate l’apparecchio se il pannello di controllo non funziona correttamente.
- Accertarsi che le persone che non lo usano, specialmente i bambini, non siano presenti
quando l’apparecchio è in funzione.
Un apparecchio abbronzante non deve essere usato con:
- Persone con capacità sensoriale e/o mentale ridotta
- Persone che non conoscono o che non hanno mai utilizzato dispositivi abbronzanti, tranne
le persone sottoposte a supervisione o che hanno ricevuto istruzioni sull’uso del
dispositivo abbronzante da parte di un terzo che si assume la responsabilità della loro
sicurezza.
- Persone sotto i 18 anni di età
- Persone che tendono ad avere le lentiggini
- Persone che hanno delle macchie scolorate anomale sulla pelle
- Persone che hanno più di 16 nei (da 22 mm o più) sul corpo.
- Persone che hanno dei nei atipici (deniti come nei asimmetrici con un diametro superiore
ai 5 mm, con una pigmentazione irregolare e con dei bordi irregolari; in caso di dubbi,
consultate un medico)
- Persone con un colore dei capelli rosso naturale
- Persone la cui pelle è già scottata dal sole
- Persone che non riescono completamente ad abbronzarsi o che non riescono ad
abbronzarsi senza scottarsi se esposti al sole
Page 42

40 ITALIANO
- Persone che si scottano facilmente quando si espongono al sole
- Persone che hanno uno storico di scottature solari severe frequenti durante l’infanzia
- Persone che sorivano (in precedenza) di tumore della pelle o che hanno una
predisposizione per tale malattia
- Persone che hanno un parente di primo grado con una storia di melanoma
- Persone sotto cure mediche per disturbi che coinvolgono la fotosensibilità e/o l’utilizzo di
farmaci fotosensibilizzanti
Indicazioni generali
- L’apparecchio è dotato di un sistema automatico di protezione contro il surriscaldamento.
Se non è sucientemente rareddato (ad esempio, a causa dell’ostruzione dei fori di
ventilazione), l’apparecchio si spegne automaticamente. Dopo aver rimosso la causa del
surriscaldamento e una volta rareddato, l’apparecchio si accende automaticamente.
- Nel caso la pelle risultasse troppo secca dopo una seduta, potete applicare una crema
idratante.
- Per acquisire un’abbronzatura uniforme, stendetevi direttamente sotto la lampada.
- Alcuni colori sbiadiscono per eetto del sole. È possibile che il solarium provochi lo stesso
eetto.
- Il solarium non assicura risultati migliori rispetto a quelli ottenuti per eetto dei raggi
naturali del sole.
Campi elettromagnetici (EMF)
Questo apparecchio Hapro è conforme a tutti gli standard relativi ai campi elettromagnetici
(EMF). Se utilizzato in modo appropriato seguendo le istruzioni contenute nel presente
manuale utente, l’apparecchio consente un utilizzo sicuro come confermato dai risultati
scientici attualmente disponibili.
Cosmetici e farmaci
I cosmetici e i farmaci possono contenere delle sostanze che, in combinazione con i raggi UV,
possono causare una reazione fototossica. Le sostanze fototossiche più comuni sono:
Demecociclina
Rolitetraciclina
Acido nalidixico
Tretinoina
Metossisaline
Monobenzone
Idrochinone
Etretinato
Isotretinoina
Doxiciclina
Amiodarone
Clorotetraciclina
Ossitetraciclina
Tetraciclina
Azapropazone
Etretinato
Tretinoina
Idrochinone
Pormero
Acitretina
Lomeoxacina
Contattare il proprio rivenditore per ricevere un elenco completo di sostanze che possono
causare una reazione fototossica.
L’abbronzatura e la vostra salute
Il sole fornisce diversi tipi di energia. I raggi visibili ci permettono di vedere, quelli ultravioletti
(UV) permettono alla pelle di abbronzarsi, mentre quelli infrarossi (IR) ci riscaldano
piacevolmente.
Il processo di abbronzatura richiede un certo periodo di tempo, sia esso legato al sole o a un
solarium. I primi risultati sono visibili solo dopo alcune sedute (si veda la sezione: “Sedute
abbronzanti: quante volte e per quanto tempo?”)
Dopo un’eccessiva esposizione ai raggi ultravioletti (luce naturale o articiale del solarium), la
pelle può scottarsi.
Insieme a numerosi altri fattori, fra cui un’esposizione eccessiva ai raggi del sole, l’uso
improprio o eccessivo del solarium può aumentare il rischio di problemi alla pelle o agli occhi.
Page 43

41ITALIANO
Da una parte, la natura, l’intensità e la durata delle radiazioni e dall’altra la sensibilità
individuale sono fattori decisivi per stabilire il grado con cui questi problemi si possono
vericare.
Più gli occhi e la pelle sono esposti ai raggi UV, maggiore sarà il rischio di disturbi quali
inammazione della cornea, congiuntivite, lesione della retina, cataratta, invecchiamento
precoce e tumori della pelle. Alcuni farmaci e cosmetici possono inoltre aumentare la
sensibilità della pelle. È pertanto della massima importanza:
- attenersi alle istruzioni riportate nel capitolo “Importante” e nella sezione “Sedute
abbronzanti: quante volte e per quanto tempo?”;
- rispettare le distanza consigliata di 70 cm (fra i ltri UV e il corpo)
- non superare il numero annuo consigliato di ore di abbronzatura (ad esempio, 17 ore o
1020 minuti).
- indossare sempre gli occhiali di protezione forniti durante le sedute.
Sedute abbronzanti: quante volte e per quanto tempo?
- Non superate più di una seduta abbronzante al giorno nell’arco di 5/10 giorni.
- Lasciate trascorrere almeno 48 ore fra la prima e la seconda seduta.
- Dopo il primo ciclo di 5-10 sedute, vi consigliamo di lasciar riposare la pelle.
- Circa un mese dopo il ciclo di sedute, la pelle avrà perso gran parte dell’abbronzatura. A
questo punto potete iniziare un nuovo ciclo.
- Per mantenere l’abbronzatura non dovete sospendere il trattamento, ma continuare a
sottoporvi a una o due sedute settimanali.
- Nel caso decidiate di sospendere il trattamento per qualche tempo o di continuare le
sedute con una frequenza più bassa, fate sempre attenzione a non superare il numero
massimo di ore consentite per l’abbronzatura.
- Questo apparecchio vi consente di sottoporvi a un massimo di 17 ore di sessioni
abbronzanti (= 1020 minuti) all’anno.
- Se in precedenza avete iniziato un ciclo di sedute ma non lo avete portato a termine, non
eettuate il numero rimanente di sedute. Iniziate un nuovo ciclo.
Esempio
Immaginiamo che vi sottoponiate ad un ciclo di 10 giorni, con una sessione di 7 minuti il primo
giorno e di 20 minuti nei nove giorni successivi.
L’intero ciclo sarà quindi composto da (1 x 7 minuti) + (9 x 20 minuti) = 187 minuti.
Ciò signica che potete sottoporvi a 5 cicli in un anno, composti da 5 x 187 minuti = 935 minuti
Naturalmente il numero massimo di ore si applica a ogni singola parte del corpo abbronzata
(ad esempio, la parte posteriore o anteriore del corpo).
Consiglio Per un’abbronzatura completa, fate ruotare gradualmente il corpo durante la sessione, in
modo da esporre al raggio abbronzante anche i lati del corpo.
Consiglio Se la vostra pelle risulta leggermente tirata dopo la seduta, potete applicare della crema
idratante.
Tabella
Dalla tabella allegata risulta che la prima seduta di ciascun ciclo dovrebbe durare al
massimo 7 minuti, indipendentemente dalla sensibilità della pelle.
Se pensate che le sedute siano troppo lunghe per il vostro tipo di pelle (ad es. nel caso in cui la
pelle risulti tirata o eccessivamente sensibile al termine della seduta), vi consigliamo di ridurre
la durata della sessione, per esempio di 5 minuti.
Page 44

ITALIANO42
Durata della seduta
abbronzante per
ciascuna parte del
corpo.
1° seduta 7 minuti 7 minuti 7 minuti
intervallo di almeno 48
ore
2° seduta 10 minuti 20 minuti 30 minuti*
3° seduta 10 minuti 20 minuti 30 minuti*
4° seduta 10 minuti 20 minuti 30 minuti*
5° seduta 10 minuti 20 minuti 30 minuti*
6° seduta 10 minuti 20 minuti 30 minuti*
7° seduta 10 minuti 20 minuti 30 minuti*
8° seduta 10 minuti 20 minuti 30 minuti*
9° seduta 10 minuti 20 minuti 30 minuti*
10° seduta 10 minuti 20 minuti 30 minuti*
*) o di più, in base alla sensibilità della vostra pelle.
Predisposizione dell’apparecchio
- Potete spostare e riporre facilmente l’apparecchio nella posizione di trasporto.
- Potete sollevare facilmente l’apparecchio facendovi aiutare da un’altra persona (g. 2).
- Se dovete sollevarlo da soli, utilizzate le maniglie (g. 3).
1 Per aprire l’apparecchio, spostate le parti scorrevoli in direzione della freccia (g. 4).
2 Sollevate la lampada e il supporto (g. 5).
3 Ponete l’apparecchio abbronzante nella posizione indicata (g. 6).
4 Ponete la lampada in posizione orizzontale utilizzando la maniglia. (g. 7)
Man mano che spostate la lampada, sentirete degli scatti in corrispondenza di determinate
posizioni.
Nota Invece di utilizzare la procedura passo-passo, potete sollevare la lampada mediante la
maniglia in un unico movimento (g. 8).
5 Fate ruotare la lampada di 90° (g. 9).
6 Posizionate il solarium accanto a un letto. (g. 10)
La distanza tra il ltro UV e la supercie su cui ci si stende (ad es. il letto) deve essere pari a 90
cm.
7 Fate scorrere il collare di blocco in basso lungo il supporto per sbloccare il dispositivo di
regolazione dell’altezza. Allo stesso tempo alzate la lampada ad un’altezza di 90 cm dal
letto. Lasciate che il collare torni in posizione per bloccare la lampada (g. 11).
- Potete misurare la distanza tra la lampada e il letto estraendo la rollina metrica.
- Azionando la linguetta rossa lateralmente, il nastro di misurazione si riavvolge
automaticamente.
L’apparecchio è pronto all’uso.
Per persone con
pelle molto
sensibile
intervallo di almeno
48 ore
Per persone con
pelle normale
intervallo di almeno
48 ore
Per persone con
pelle poco sensibile
intervallo di almeno
48 ore
Page 45

Modalità d’uso dell’apparecchio
1 Srotolate completamente il cavo di alimentazione.
2 Inserite la spina nella presa di corrente a muro.
3 Consultate il capitolo “L’abbronzatura e la vostra salute” e le vostre annotazioni
personali sul tempo corretto di esposizione.
4 Indossate gli occhiali di protezione.
- Indossate gli occhiali di protezione in dotazione esclusivamente quando utilizzate il
solarium Hapro. Non utilizzateli per altri scopi.
- Gli occhiali di protezione sono conformi alla direttiva 89/686/CEE, classe di protezione II.
5 Programmate il timer con la durata appropriata per la sessione abbronzante (g. 12).
La durata massima regolabile sul timer è di 45 minuti.
6 Stendetevi sotto la lampada.
- Durante l’ultimo minuto di seduta, l’apparecchio emette un segnale acustico.
- Durante questo intervallo, è possibile reimpostare il timer per esporre l’altro lato del
corpo, evitando in tal modo i 3 minuti di attesa necessari al rareddamento delle
lampade dopo lo spegnimento.
- L’apparecchio abbronzante si spegnerà automaticamente una volta terminato il tempo
programmato sul timer.
Dopo la sessione abbronzante
1 Utilizzate le manopole memo per monitorare il numero di sessioni abbronzanti
eettuate. L’apparecchio è dotato di due manopole memo: una a persona (g. 13).
Pulizia
Non usate prodotti o sostanze abrasive o detergenti aggressivi, come benzina o acetone,
per pulire l’apparecchio.
Evitate il contatto diretto con l’acqua.
1 Prima di procedere alla pulizia, scollegate sempre la spina dalla presa di corrente e
lasciate rareddare l’apparecchio.
2 Usate un panno umido per pulire la parte esterna dell’apparecchio.
3 Pulite la supercie esterna del ltro UV con un panno morbido inumidito di alcool
metilico.
4 Pulire gli occhiali di protezione con un panno umido.
43ITALIANO ITALIANO
Come riporre l’apparecchio
1 Lasciate asciugare l’apparecchio per 15 minuti prima di porlo in posizione di trasporto e
conservarlo.
2 Nel frattempo, potete riavvolgere il cavo e riporlo nella base dell’apparecchio.
Nota Quando riponete l’apparecchio in posizione da trasporto, accertatevi che il cavo sia
avvolto correttamente e che non si incastri tra le parti cardine e l’apparecchio.
3 Fate scorrere il collare di blocco verso il basso lungo il supporto (1) per sbloccare il
dispositivo di regolazione dell’altezza. Spingete contemporaneamente il supporto
verso il basso (2). Inne, lasciate il collare (g. 14).
4 Fate ruotare la lampada di 90° (g. 15).
Page 46

ITALIANO44
5 Con una mano alzate leggermente la lampada (1). Con l’altra mano, spingete verso il
basso le due parti di scorrimento di sblocco (2) in modo da piegare la lampada
(3) (g. 16).
6 Tenete premute verso il basso le parti di scorrimento di sblocco con una mano e con
l’altra ponete la lampada in senso verticale, quindi lasciate le parti di scorrimento di
blocco (g. 17).
7 Spostate verso il basso il supporto e la lampada con attenzione no a porli nella base
dell’apparecchio (g. 18).
8 Spingete le parti di scorrimento sulla base in direzione della freccia per bloccare la
lampada in posizione (g. 19).
9 Riponete l’apparecchio abbronzante.
- L’apparecchio può essere riposto sotto il letto (g. 20)
- o in un armadio in posizione verticale (g. 21).
Sostituzione
Dopo un certo periodo di utilizzo dell’apparecchio (con un uso normale in genere dopo alcuni
anni), l’ecienza delle lampade inizierà a diminuire gradualmente. In questo caso, vi
accorgerete che la capacità abbronzante delle lampade risulterà minore. Sarà quindi
necessario aumentare leggermente la durata delle sedute oppure sostituire le lampade
abbronzanti.
Il ltro UV protegge dall’esposizione ai raggi UV nocivi. È pertanto necessario sostituire
tempestivamente il ltro in presenza di danneggiamenti o rotture.
Le lampade abbronzanti, il ltro UV e il cavo di alimentazione devono essere sostituiti
esclusivamente presso un rivenditore o un centro assistenza Hapro autorizzato da
personale in possesso della competenza necessaria e dei pezzi di ricambio originali per
eseguire il lavoro.
Tutela dell’ambiente
- Le lampade dell’apparecchio contengono sostanze potenzialmente nocive per l’ambiente.
Al momento dello smaltimento, non gettate le lampade insieme ai comuni riuti domestici
ma consegnatele a un centro di raccolta uciale.
- Per contribuire alla tutela dell’ambiente, non gettate l’apparecchio tra i riuti domestici
quando non viene più utilizzato, ma consegnatelo a un centro di raccolta uciale (g. 22).
Garanzia e assistenza
Tutti i guasti dovuti a difetti di materiale o di fabbricazione e che rientrano nel periodo di
garanzia, verranno riparati gratuitamente esibendo la fattura originale. Il periodo di garanzia è
di 24 mesi. Per ogni problema di garanzia dovete contattare il vostro rivenditore.
Il vostro nuovo dispositivo abbronzante è concepito per l’utilizzo domestico e non per un uso
commerciale. Gli eventuali danni derivanti da un uso commerciale, al pari di lampade, starter,
terminali e pannelli acrilici, non sono coperti dalla garanzia Hapro.
Eventuali guasti dovuti ad errori di montaggio e/o installazione, uso improprio, fulmini e
utilizzo di parti non originali, non rientrano nelle condizioni di garanzia Hapro.
Controllate attentamente che il dispositivo sia ben installato prima di fare appello alla garanzia.
In caso di richiesta non coperta da garanzia i costi di assistenza saranno a vostro carico.
Page 47

45ITALIANO
Limitazioni della garanzia
Le lampade abbronzanti sono escluse dalla garanzia internazionale.
Risoluzione dei guasti
Nel caso sorgessero problemi con l’apparecchio che non possono essere risolti con l’aiuto delle
informazioni sotto riportate, rivolgersi rivenditore Hapro più vicino.
Problema Soluzione
L’apparecchio non
funziona.
Il fusibile del circuito
a cui è collegato
l’apparecchio
interrompe
l’erogazione di
corrente quando
accendo o utilizzo
l’apparecchio.
Perché l’abbronzatura
ottenuta non è come
prevista?
La lampada potrebbe non trovarsi nella posizione corretta (vedere il
capitolo “Predisposizione dell’apparecchio”. Posizionarla in maniera
corretta.
È possibile che la spina non sia inserita correttamente nella presa di
corrente. Inserite correttamente la spina nella presa di corrente.
Potrebbe trattarsi di un problema di corrente. Vericate l’erogazione
di corrente collegando un altro apparecchio elettrico.
Le lampade abbronzanti sono ancora troppo calde per poterle
accendere. Lasciatele rareddare per 3 minuti.
La protezione contro il surriscaldamento potrebbe aver causato lo
spegnimento automatico dell’applicazione. Rimuovete la causa del
surriscaldamento (ad esempio, un asciugamano che blocca una o
più ventole). Lasciate rareddare l’apparecchio, quindi
riaccendetelo.
Il fusibile del circuito a cui è collegato l’apparecchio deve essere di
tipo standard 16 A o di tipo automatico ad accensione lenta. È
inoltre possibile che siano stati collegati troppi apparecchi allo
stesso circuito.
Il ciclo di abbronzatura seguito potrebbe non essere giusto per il
vostro tipo di pelle. Controllate la tabella nel capitolo “Sedute
abbronzanti: quante volte e per quanto tempo?’.
La distanza fra le lampade e la supercie su cui vi stendete potrebbe
essere superiore a quella consigliata. Vedete il capitolo
“Predisposizione dell’apparecchio”.
Dopo un certo periodo di utilizzo, la capacità abbronzante delle
lampade inizierà a diminuire. Questo fenomeno risulterà evidente
solo dopo alcuni anni. Per risolvere questo problema, aumentate la
durata della sessione o provvedete alla sostituzione delle lampade.
Page 48

46
ESPAÑOL
Introducción
Enhorabuena por la compra de este producto y bienvenido a Hapro. Para sacar el mayor
partido de la asistencia que Hapro le ofrece, registre su producto en www.Hapro.com/
welcome.
Este solárium de cuerpo entero le permite conseguir un atractivo bronceado en su propia casa.
Las 3 lámparas de bronceado HPA aseguran un bonito bronceado. El campo de bronceado de
cuerpo entero de 1,80 x 0,70 m garantiza que la luz llegue a todo el cuerpo.
El sistema de plegado facilita el despliegue del aparato. El solárium de cuerpo entero se puede
adaptar a la altura de la cama. El aparato tiene un tamaño compacto cuando está plegado para
poder guardarlo cómodamente.
Descripción general (g. 1)
A Ruedas
B Cable de red en compartimento de recogida
C Asa
D Temporizador
E Botones de memoria (para 2 personas)
F Correderas
G Base
H Aro de bloqueo para ajuste de altura
I Aro de bloqueo para la unidad de lámparas
J Asa
K Ventilador (para enfriar)
L Unidad de lámparas
M Filtro UV
N Lámparas de bronceado
O Reector
P Cinta medidora
Q Gafas protectoras (2 pares)
R Base
S Placa de modelo
Importante
Antes de usar el aparato, lea atentamente este manual de usuario y consérvelo por si
necesitara consultarlo en el futuro.
- Antes de enchufar el aparato, compruebe si el voltaje indicado en el mismo se corresponde
con el voltaje de red de su hogar.
- Si la toma de corriente donde se enchufa el aparato tiene una conexión defectuosa, la
clavija del aparato se calentará. Asegúrese de enchufar el aparato en una toma de corriente
con buena conexión.
- El aparato debe conectarse a un circuito que esté protegido con un fusible estándar de
16 A o un fusible automático de acción retardada.
- Si el cable de alimentación está dañado, debe ser reemplazado por el fabricante, un
técnico de servicio o una persona igualmente cualicada, con el n de evitar riesgos.
- El agua y la electricidad son una combinación peligrosa. No utilice este aparato en
ambientes húmedos (por ej., en el baño o cerca de una ducha o una piscina).
- Si ha estado nadando o acaba de darse una ducha, séquese completamente antes de usar
el aparato.
- Mantenga el aparato fuera del alcance de los niños.
- Desenchufe siempre el aparato después de usarlo.
Page 49

47ESPAÑOL
- Deje que el aparato se enfríe durante unos 15 minutos antes de plegarlo a su posición de
transporte y guardarlo.
- Asegúrese de que las rejillas de ventilación de la unidad de lámparas y de la base
permanezcan abiertas durante el uso. No acerque el pelo a la entrada de aire de la unidad
de lámparas.
- El ltro UV se calienta mucho durante el funcionamiento. No lo toque.
- El aparato tiene piezas articuladas. Tenga cuidado de no pillarse los dedos entre estas
piezas.
- Mueva el aparato sólo cuando esté en posición de transporte.
- La distancia de bronceado debe ser superior a 70 cm.
- No sobrepase los tiempos de bronceado recomendados ni el número máximo de horas de
exposición (consulte el capítulo “Sesiones de bronceado: frecuencia y duración”).
- No se broncee una misma parte del cuerpo más de una vez al día. Evite la exposición
excesiva a la luz solar natural en el mismo día.
Adopte las siguientes medidas de precaución:
- Protéjase los ojos durante el bronceado con las gafas para UV suministradas. Estas gafas
protectoras no deben sustituirse por lentes de contacto o gafas de sol. La ausencia de
protección en los ojos puede causar inamación de la córnea. En algunos casos, la
exposición excesiva puede provocar daños en la retina. Y las exposiciones continuadas sin
protección en los ojos pueden dar lugar a la aparición de cataratas.
- Elimine los productos cosméticos mucho antes de la sesión de bronceado. No utilice
protectores solares ni intensicadores del bronceado.
- No realice una sesión de bronceado o relajación si tiene alguna enfermedad o si toma
medicación o utiliza productos cosméticos que puedan aumentar la sensibilidad de la piel.
Ponga especial atención si es muy sensible a la luz ultravioleta o infrarroja. En caso de
duda, consulte a su médico.
- No tome el sol y use el aparato de bronceado en el mismo día. La piel no distingue entre
los rayos UV del sol y los de un aparato de bronceado.
- Proteja de la exposición las zonas de la piel más sensibles, como cicatrices, tatuajes y
genitales.
- En caso de aparecer bultos o irritaciones persistentes en la piel o si se observan cambios de
pigmentación en lunares, se deberá acudir a un médico antes de continuar con el
tratamiento de bronceado.
- No utilice el aparato si falta algún ltro UV o con un ltro dañado o roto.
- No utilice nunca el aparato si el panel de control está defectuoso.
- Asegúrese de que las personas que no vayan a utilizar el aparato de bronceado
(especialmente si son niños) no estén presentes durante su funcionamiento.
No deben usar un dispositivo de bronceado:
- Personas con capacidad sensorial o mental reducida
- Personas sin los conocimientos o la experiencia sucientes con aparatos de bronceado, a
menos que cuenten con supervisión o hayan recibido instrucciones sobre el uso del
aparato de bronceado de una persona que asuma la responsabilidad por su seguridad
- Personas menores de 18 años
- Personas con tendencia a tener pecas
- Personas con zonas decoloradas anómalas en la piel
- Personas con más de 16 lunares (de 2 mm o más) en el cuerpo
- Personas con lunares atípicos (denidos como lunares asimétricos mayores de 5 mm de
diámetro, con pigmentación variable y bordes irregulares; en caso de duda, se deberá
consultar a un médico)
- Personas pelirrojas naturales
- Personas cuya piel ya se ha quemado antes por el sol
Page 50

ESPAÑOL48
- Personas que no se llegan a broncear nunca o que no se llegan a broncear sin quemarse al
exponerse al sol
- Personas que se queman fácilmente al exponerse al sol
- Personas con un historial de quemaduras solares serias y frecuentes durante la infancia
- Personas que hayan padecido o padezcan cáncer de piel o tengan predisposición a dicho
tipo de cáncer
- Personas con algún familiar en primer grado con antecedentes de melanoma
- Personas en tratamiento médico por enfermedades que impliquen fotosensibilidad o que
estén tomando medicación que favorezca la fotosensibilidad
General
- El aparato está equipado con un dispositivo automático de protección contra
sobrecalentamiento. Si el aparato no se enfría lo suciente (por ejemplo, porque las rejillas
de ventilación estén tapadas), se apagará automáticamente. Una vez que se haya
eliminado la causa del sobrecalentamiento y el aparato se haya enfriado, volverá a
encenderse de forma automática.
- Si nota la piel tirante después de una sesión de bronceado, puede aplicarse una crema
hidratante.
- Para conseguir un bronceado uniforme, túmbese debajo de la unidad de lámparas.
- Los colores pierden intensidad con la luz del sol. Puede ocurrir lo mismo al utilizar este
aparato.
- No espere obtener mejores resultados con el aparato que con la luz solar natural.
Campos electromagnéticos (CEM)
Este aparato Hapro cumple todos los estándares sobre campos electromagnéticos (CEM). Si se
utiliza correctamente y de acuerdo con las instrucciones de este manual, el aparato se puede
usar de forma segura según los conocimientos cientícos disponibles hoy en día.
Cosméticos y medicamentos
Los cosméticos y las medicinas pueden contener sustancias que, combinadas con la radiación
UV, provoquen una reacción fototóxica. Las sustancias químicas más frecuentemente
fototóxicas son:
Demeclociclina
Rolitetraciclina
Ácido nalidixico
Tretinoina
Metoxaleno
Monobenzona
Hidroquinona
Etretinato
Isotretinoína
Doxiciclina
Amiodarona
Clorotetraciclina
Oxitetraciclina
Tetraciclina
Azapropazona
Etretinato
Tretinoina
Hidroquinona
Pormero
Acitretina
Lomeoxacina
Solicite a su distribuidor una lista completa de sustancias que pueden causar una reacción
fototóxica.
El bronceado y la salud
El sol proporciona varios tipos de energía. La luz visible nos permite ver, la luz ultravioleta (UV)
nos broncea, y la luz infrarroja (IR) de los rayos solares nos proporciona el calor que tanto nos
agrada.
Al igual que con la luz solar natural, el proceso de bronceado lleva su tiempo. Los primeros
efectos sólo serán visibles tras varias sesiones (consulte el capítulo “Sesiones de bronceado:
frecuencia y duración”).
Page 51

ESPAÑOL 49
La exposición excesiva a la luz ultravioleta (ya sea luz solar natural o luz articial del solárium)
puede provocar quemaduras solares.
Además de otros factores, como la exposición excesiva a la luz solar natural, el uso excesivo e
incorrecto de este aparato puede aumentar el riesgo de padecer enfermedades cutáneas y
oculares. La medida en que esto pueda ocurrir viene determinada, por un lado, por la
naturaleza, intensidad y duración de la exposición y, por otro, por la sensibilidad de la persona.
Cuanto más tiempo se expongan los ojos y la piel a los rayos ultravioleta, mayor será el riesgo
de padecer queratitis, conjuntivitis, cataratas, daños en la retina, envejecimiento prematuro de
la piel, o de desarrollar tumores cutáneos. Algunos medicamentos y cosméticos aumentan la
sensibilidad de la piel. Por lo tanto, es muy importante:
- que siga las instrucciones de los apartados “Importante” y “Sesiones de bronceado:
frecuencia y duración”;
- que la distancia de bronceado (distancia entre los ltros UV y el cuerpo) sea de 70 cm;
- que no supere el número máximo de horas de bronceado anuales (es decir, 17 horas o
1020 minutos);
- que utilice siempre las gafas que se suministran mientras se broncea.
Sesiones de bronceado: frecuencia y duración
- No realice más de una sesión de bronceado al día durante un periodo de cinco a diez días.
- Haga un descanso de al menos 48 horas entre la primera y la segunda sesión.
- Después de un ciclo de 5 a 10 días, recomendamos que deje de broncearse durante un
tiempo.
- Aproximadamente un mes después de un ciclo, la piel habrá perdido gran parte de su
bronceado. Entonces podrá comenzar otro ciclo.
- Si quiere mantener el bronceado, no deje de utilizar el solárium después de un ciclo; realice
una o dos sesiones por semana.
- Tanto si elige dejar de broncearse durante un tiempo, como si continúa haciéndolo con
menor frecuencia, recuerde que no debe superar el número máximo de horas de
bronceado.
- Para este aparato el número máximo de horas al año es 17 (=1020 minutos).
- Si ha detenido un ciclo y ha pasado mucho tiempo sin reanudarlo, no continúe con el
número restante de sesiones de dicho ciclo. Comience un ciclo nuevo.
Ejemplo
Supongamos que realiza un ciclo de bronceado de 10 días, con una sesión de 7 minutos el
primer día y de 20 minutos los nueve días siguientes.
El ciclo completo durará (1 x 7 minutos) + (9 x 20 minutos) = 187 minutos.
Esto signica que en un año podrá realizar 5 de estos ciclos, ya que 5 x 187 minutos =
935 minutos.
Lógicamente esta cantidad máxima de horas de bronceado es válida para cada parte o lado del
cuerpo que vaya a broncear (por ejemplo, de frente o de espaldas).
Consejo: Para conseguir un bronceado bonito y uniforme, gire el cuerpo ligeramente durante la
sesión para que los lados del cuerpo queden mejor expuestos a la luz bronceadora.
Consejo: Si siente la piel ligeramente tirante después del bronceado, puede aplicarse una crema
hidratante.
Tabla
En la tabla puede verse que la primera sesión de un ciclo debe tener siempre una duración
de 7 minutos, independientemente de la sensibilidad de la piel.
Si piensa que las sesiones son demasiado largas para usted (si siente la piel tirante y sensible
después de una sesión), le recomendamos que reduzca la duración de las sesiones 5 minutos,
por ejemplo.
Page 52

ESPAÑOL50
Duración de la sesión
de bronceado para
cada parte del cuerpo
por separado
1ª sesión 7 minutos 7 minutos 7 minutos
descanso de al menos
48 horas
2ª sesión 10 minutos 20 minutos 30 minutos*
3ª sesión 10 minutos 20 minutos 30 minutos*
4ª sesión 10 minutos 20 minutos 30 minutos*
5ª sesión 10 minutos 20 minutos 30 minutos*
6ª sesión 10 minutos 20 minutos 30 minutos*
7ª sesión 10 minutos 20 minutos 30 minutos*
8ª sesión 10 minutos 20 minutos 30 minutos*
9ª sesión 10 minutos 20 minutos 30 minutos*
10ª sesión 10 minutos 20 minutos 30 minutos*
*) o más, en función de la sensibilidad de su piel.
Preparación para su uso
- Puede mover y guardar el aparato fácilmente en la posición de transporte.
- Es más fácil levantar el aparato entre dos personas (g. 2).
- Si tiene que levantarlo solo, utilice el asa (g. 3).
1 Para abrir el aparato, desplace las correderas en la dirección de la echa (g. 4).
2 Tire del soporte y de la unidad de lámparas hacia arriba (g. 5).
3 Coloque el solárium en la posición indicada (g. 6).
4 Levante la unidad de lámparas hasta colocarla en posición horizontal. Utilice el asa para
hacerlo. (g. 7)
Oirá unos “clics” al mover la unidad de lámparas y pasar por ciertas posiciones jas.
Nota: En lugar de hacerlo paso a paso, también puede levantar la unidad de lámparas por su
asa en un sólo movimiento (g. 8).
5 Gire la unidad de lámparas un cuarto de vuelta (g. 9).
6 Coloque el solárium junto a una cama. (g. 10)
La distancia entre el ltro UV y la supercie sobre la que esté tumbado (por ejemplo, la cama),
debe ser de 90 cm.
7 Deslice el aro del soporte hacia abajo para liberar el bloqueo del ajuste de altura.
Levante la unidad de lámparas al mismo tiempo hasta una altura situada por encima de
90 cm de la cama. Suelte el aro para bloquear la unidad de lámparas en esa
posición (g. 11).
- Puede comprobar la distancia entre la unidad de lámparas y la cama con la cinta medidora.
- La cinta medidora se recoge automáticamente si mueve la pestaña roja hacia un lado.
El aparato está listo para usar.
Para personas con
piel muy sensible
descanso de al
menos 48 horas
Para personas con
piel de sensibilidad
normal
descanso de al menos
48 horas
Para personas con
piel poco sensible
descanso de al
menos 48 horas
Page 53

ESPAÑOL 51
Uso del aparato
1 Desenrolle completamente el cable de red.
2 Enchufe el aparato a la toma de corriente.
3 Consulte el capítulo “El bronceado y la salud” y sus propias anotaciones para establecer
el tiempo de bronceado correcto.
4 Póngase las gafas protectoras.
- Utilice estas gafas protectoras sólo cuando se esté bronceando con un solárium Hapro. No
las utilice para otros nes.
- Las gafas protectoras cumplen con la protección clase II de acuerdo con la directiva
89/686/EEC.
5 Establezca en el temporizador el tiempo adecuado para la sesión de bronceado (g. 12).
El tiempo máximo de bronceado que se puede establecer es de 45 minutos.
6 Túmbese bajo la unidad de lámparas.
- El aparato emite un pitido durante el último minuto de la sesión.
- Durante ese minuto, puede volver a programar el temporizador para broncear el otro lado
del cuerpo. Si lo hace, evitará tener que esperar los 3 minutos necesarios para que se
enfríen las lámparas después de apagarse.
- El temporizador apaga el solárium automáticamente cuando haya transcurrido el tiempo
de bronceado establecido.
Después de una sesión de bronceado
1 Utilice los botones de memoria para llevar un seguimiento del número de sesiones de
bronceado que ha realizado. El aparato dispone de dos botones de memoria que
pueden utilizar dos personas (g. 13).
Limpieza
No utilice estropajos, agentes abrasivos ni líquidos agresivos, como gasolina o acetona,
para limpiar el aparato.
No deje que entre agua en el aparato.
1 Desenchufe el aparato y deje que se enfríe antes de limpiarlo.
2 Limpie la parte exterior con un paño húmedo.
3 Limpie el exterior del ltro UV con un paño suave humedecido con unas gotas de
alcohol metílico.
4 Limpie las gafas protectoras con un paño húmedo.
Almacenamiento
1 Antes de poner el aparato en la posición de transporte y guardarlo, deje que se enfríe
durante 15 minutos.
2 Mientras tanto puede recoger el cable y colocarlo en la base del aparato.
Nota: Asegúrese de guardar correctamente el cable y de que no quede atrapado entre las
partes móviles del aparato cuando lo ponga en la posición de transporte.
3 Deslice el aro del soporte hacia abajo (1) para liberar el bloqueo del ajuste de altura. Al
mismo tiempo, empuje el soporte hacia abajo (2). Después, suelte el aro (g. 14).
4 Gire la unidad de lámparas un cuarto de vuelta (g. 15).
Page 54

ESPAÑOL52
5 Levante un poco la unidad de lámparas con una mano (1). Empuje hacia abajo las dos
correderas de desbloqueo con la otra mano (2) para poder plegar la unidad de lámparas
(3) (g. 16).
6 Mantenga las 2 correderas de desbloqueo abajo con una mano, y pliegue la unidad de
lámparas a su posición vertical con la otra. Después, suelte las correderas de
desbloqueo (g. 17).
7 Con cuidado, baje el soporte y la unidad de lámparas hasta la base del aparato (g. 18).
8 Empuje las correderas de la base en la dirección de la echa para bloquear la unidad de
lámparas en la base (g. 19).
9 Guarde el solárium.
- Puede guardar el solárium debajo de la cama (g. 20).
- También puede guardar el solárium en un armario en posición vertical (g. 21).
Sustitución
La luz de las lámparas de bronceado perderá intensidad con el tiempo (es decir, tras unos años
de uso normal). Cuando esto ocurra, notará que la capacidad de bronceado del aparato
disminuye. Para solucionar este problema programe un tiempo de bronceado ligeramente
superior o sustituya las lámparas.
El ltro UV protege contra la exposición a luz ultravioleta no deseada. Por lo tanto es muy
importante cambiar de inmediato el ltro si está dañado o roto.
Haga que cambien las lámparas de bronceado, el ltro UV y el cable de alimentación en un
distribuidor o centro de servicio autorizado por Hapro, ya que ellos tienen los
conocimientos y cualicación necesarios para realizar esta tarea, así como las piezas de
repuesto originales del aparato.
Medio ambiente
- Las lámparas de este aparato contienen sustancias que pueden ser perjudiciales para el
medio ambiente. Cuando deseche las lámparas, no las tire junto con la basura normal del
hogar, deposítelas en un punto de recogida ocial.
- Al nal de su vida útil, no tire el aparato junto con la basura normal del hogar. Llévelo a un
punto de recogida ocial para su reciclado. De esta manera ayudará a conservar el medio
ambiente (g. 22).
Garantía y servicio
Todas las averías que sean consecuencia de fallos en los materiales o de fabricación y que se
produzcan durante el periodo de garantía se repararán sin coste alguno tras la presentación de
la factura original. El periodo de garantía es de 24 meses. Para asuntos relacionados con la
garantía, póngase en contacto con su distribuidor.
Su nuevo solárium wellness está diseñado exclusivamente para uso particular y no para nes
comerciales. Los daños como consecuencia de un uso comercial, así como las lámparas, los
cebadores, las cubiertas y los paneles acrílicos, no están cubiertos por la garantía de Hapro.
Los defectos que sean consecuencia de fallos en el montaje o la instalación, el uso indebido, la
caída de un rayo o el uso de piezas no originales no están cubiertos por la garantía de Hapro.
Compruebe detenidamente si el equipo se ha instalado correctamente antes de recurrir a la
garantía. Si reclama la garantía injusticadamente, los costes del servicio correrán a su cargo.
Page 55

ESPAÑOL 53
Restricciones de la garantía
La garantía internacional no cubre las lámparas de bronceado.
Guía de resolución de problemas
Si surgiera algún problema con el aparato y no pudiera solucionarlo con la siguiente
información, póngase en contacto con el distribuidor Hapro más próximo.
Problema Solución
El aparato no
funciona.
El fusible del circuito
al que está
conectado el aparato
corta la corriente
cuando enciendo o
utilizo el aparato.
Los resultados de
bronceado no son
tan buenos como
esperaba.
Es posible que la unidad de lámparas no esté en la posición correcta
(consulte el capítulo “Preparación para su uso”). Ponga la unidad de
lámparas en la posición correcta.
Puede que la clavija no esté bien enchufada a la red eléctrica.
Enchufe correctamente la clavija a la toma de corriente.
Puede que haya un fallo en el suministro de energía. Compruebe si la
toma de corriente funciona conectando otro aparato.
Puede que las lámparas de bronceado estén demasiado calientes
para continuar. Deje que se enfríen primero durante 3 minutos.
Puede que la protección contra sobrecalentamiento haya apagado el
aparato automáticamente. Elimine la causa del sobrecalentamiento
(por ejemplo, una toalla que esté bloqueando una o más rejillas de
ventilación). Deje que el aparato se enfríe durante un rato y vuelva a
encenderlo.
El fusible del circuito al que esté conectado el aparato debe ser un
fusible estándar de 16 A o un fusible automático de acción retardada.
Puede que haya conectado demasiados aparatos a un mismo
circuito.
Puede que haya seguido un ciclo de bronceado que no sea
adecuado para su tipo de piel. Consulte la tabla que aparece en la
sección “Sesiones de bronceado: frecuencia y duración” del capítulo
“El bronceado y la salud”.
La distancia entre las lámparas y la supercie en la que se tumba es
superior a la aconsejada. Consulte el apartado “Preparación para su
uso”.
Si se han utilizado las lámparas durante mucho tiempo, la capacidad
de bronceado disminuye. Este efecto sólo será perceptible
transcurridos varios años. Para solucionar este problema, seleccione
un tiempo ligeramente superior o sustituya las lámparas.
Page 56

54
РУССКИЙ
Введение
Этот солярий для всего тела позволяет получить прекрасный загар в комфорте
собственного дома. З лампы для загара HPA обеспечивают красивый загар. Площадь
загара для всего тела (1,80 x 0,70 м) гарантирует ультрафиолет для всех частей тела.
Складывающаяся система позволяет с легкостью разобрать прибор. Высота
расположения солярия для всего тела регулируется в соответствии с высотой кровати. В
сложенном виде солярий имеет компактные размеры, что позволяет без проблем убрать
его для хранения.
Общее описание (Рис. 1)
A Колеса
B Сетевой шнур в отделении для хранения
C Ручка
D Таймер
E Ручки управления памятью (для двоих пользователей)
F Ползунковые фиксаторы
G Подставка
H Фиксирующее кольцо для настройки высоты
I Фиксирующее кольцо для лампового модуля
J Ручка
K Вентилятор (охлаждение)
L Ламповый модуль
M УФ фильтр
N Лампы для загара
O Рефлектор
P Мерная лента
Q Защитные очки (2 пары)
R Основание
S Заводская бирка
Внимание
До начала эксплуатации прибора внимательно ознакомьтесь с настоящим руководством
и сохраните его для дальнейшего использования в качестве справочного материала.
- Перед подключением прибора убедитесь, что указанное на нём номинальное
напряжение соответствует напряжению местной электросети.
- При подключении прибора к розетке электросети с плохими контактами вилка шнура
питания нагревается. Поэтому подключайте прибор только к установленной
надлежащим образом розетке электросети.
- Электросеть, к которой предполагается подключить прибор, должна быть защищена
стандартным плавким предохранителем на 16 А, либо автоматическим
предохранителем с задержкой срабатывания.
- Если сетевой шнур поврежден, то во избежание несчастных случаев он должен быть
заменен производителем, представителем сервисной службы или соответствующим
квалифицированным специалистом.
- Вода и электричество — это опасное сочетание! Не пользуйтесь прибором рядом с
водой (например, в ванной комнате, рядом с душем или бассейном).
- После купания или приема душа дайте телу высохнуть, прежде чем пользоваться
прибором.
- Не позволяйте детям играть с прибором.
- После завершения работы отключите прибор от розетки электросети.
Page 57

РУССКИЙ 55
- После использования дайте прибору остыть примерно 15 минут перед складыванием
для транспортировки или хранения.
- При использовании убедитесь, что вентиляционные отверстия лампового модуля и
основания остаются открыты. Следите, чтобы в воздухозабор лампового модуля не
попадали волосы.
- УФ фильтр включенного прибора очень сильно нагревается. Не прикасайтесь к нему!
- Будьте осторожны. Не прищемите пальцы между складывающимися составными
частями прибора.
- Перемещайте только сложенный прибор.
- Не рекомендуется загорать на расстоянии от ламп менее 70 см.
- Не превышайте рекомендованной продолжительности сеанса загара или
максимально допустимого количества часов загара (см. раздел “Сеансы загара: как
часто и как долго?”).
- Сеансы загара для отдельных участков тела следует проводить не чаще одного раза в
день. В дни проведения сеансов загара избегайте продолжительного воздействия
естественного солнечного излучения.
Примите следующие меры предосторожности:
- Защитите свои глаза во время загара, используя входящие в поставку защитные УФ
очки. Контактные линзы и солнечные очки не могут заменить защитные УФ очки. Если
глаза не будут защищены, это может вызвать воспаление поверхности глаз. Из-за
чрезмерного облучения в некоторых случаях может быть повреждена сетчатка глаза.
Многократные случаи чрезмерного облучения незащищенных глаз могут стать
причиной катаракты.
- Перед сеансом загара заблаговременно очистите лицо от косметики. Не используйте
солнцезащитные кремы или другие средства, которые способствуют загару.
- Во время болезни и/или при приеме препаратов или использовании косметических
средств, повышающих чувствительность кожи, не используйте прибор. Будьте
исключительно осторожны, если у вас повышенная чувствительность к
ультрафиолету или ИК-излучению. При возникновении сомнений обратитесь к врачу.
- Нельзя загорать на солнце и использовать данный прибор для загара в один и тот же
день. На кожу человека одинаково воздействуют УФ-лучи солнца и УФ-лучи минисолярия.
- Защищайте от воздействия чувствительные зоны, такие как шрамы, татуировки и
гениталии.
- Если на коже постоянно появляются покраснения или язвы, или изменились
пигментные невусы, проконсультируйтесь с врачом перед тем, как возобновить
сеансы загара.
- Запрещается использовать прибор с поврежденным, сломанным или отсутствующим
УФ фильтром.
- Запрещается пользоваться прибором, если панель управления неисправна.
- Убедитесь, что лица, не пользующиеся прибором, особенно дети, не находятся рядом,
когда используется солярий.
Солярий нельзя использовать:
- лицам с пониженной чувствительностью и/или пониженными интеллектуальными
способностями.
- лицам, не имеющим знаний об эксплуатации солярия или соответствующего опыта, за
исключением случаев, когда за ними наблюдает лицо, знающее правила эксплуатации
и несущее ответственность за их безопасность..
- лицам моложе 18 лет.
- лица, склонные к появлению веснушек.
- лица с нарушенной пигментацией кожи.
- лица, имеющие более 16 родинок (размером 2 мм или больше) на теле.
Page 58

РУССКИЙ56
- лица с нетипичными родинками или родимыми пятнами (ассиметричными родинками
более 5 мм в диаметре с различной пигментацией и неровными границами, в случае
сомнений необходимо проконсультироваться с врачом).
- лица, чей естественный цвет волос - рыжий.
- Лицам, чья кожа уже обгорела на солнце.
- лица, которые совсем не загорают или не могут загореть, не получая солнечных
ожогов.
- Лицам, чья кожа очень восприимчива к солнечным лучам и может легко обгореть на
солнце.
- Лицам, история болезни которых включает частые сильные солнечные ожоги в
детском возрасте.
- лица, генетически предрасположенные к меланоме
- Лица, ближайшие родственники которых имели меланому.
- лица, проходящие курс лечения от болезней, связанных со светочувствительностью,
или принимающие препараты, приводящие к повышенной светочувствительности .
Общее описание
- Прибор оснащен автоматической защитой от перегрева. Если прибор недостаточно
охлаждается (например, из-за блокирования вентиляционных отверстий),
он отключается автоматически. После устранения причины перегрева и охлаждения
прибора, он автоматически возобновит работу.
- Если после сеанса загара вы ощущаете некоторую сухость кожи, смажьте ее
увлажняющим кремом.
- Для получения ровного загара лягте под ламповый модуль.
- Под воздействием солнца краски могут выцветать. Такой эффект возможен и при
использовании данного прибора.
- Не следует ожидать, что солярий обеспечит лучший эффект, чем естественное
солнечное излучение.
Электромагнитные поля (ЭМП)
Данный прибор Hapro соответствует стандартам по электромагнитным полям (ЭМП). При
правильном обращении согласно инструкциям, приведенным в руководстве
пользователя, использование прибора безопасно в соответствии с современными
научными данными.
Косметика и лекарственные препараты
Косметика и лекарственные препараты могут содержать вещества, которые могут
вызвать фототоксичную реакцию, в совокупности с УФ-излучением. Наиболее часто
встречающиеся фототоксичные химические вещества:
Демеклоциклин
Ролитетрациклин
Налидиксовая кислота
Третиноин
Метоксален
Монобензон
Гидрохинон
Этретинат
Изотретиноин
Доксициклин
Амиодарон
Хлортетрациклин
Окситетрациклин
Тетрациклин
Азапропазон
Этретинат
Третиноин
Гидрохинон
Порфимер
Ацитретин
Ломефлоксацин
Обратитесь к своему дилеру, чтобы узнать полный перечень препаратов, которые могут
вызвать фототоксичную реакцию..
Page 59

РУССКИЙ 57
Загар и ваше здоровье
Солнце излучает энергию различных видов. Видимый свет позволяет нам видеть,
ультрафиолет (УФ) - загорать, а инфракрасное излучение (ИК), входящее в спектр
солнечного излучения, дарит приятное тепло.
При использовании прибора, так же как и при загаре под естественным солнечным
светом, приобретение загара требует некоторого времени. Первый видимый
эффект появится только через несколько сеансов (см. раздел “Сеансы загара: как часто и
как долго?”)
После продолжительного воздействия УФ лучей (как солнечных, так и в солярии) на коже
могут появиться ожоги.
Помимо ряда других факторов, таких как длительное пребывание на солнце,
неправильное и продолжительное использование солярия может увеличить риск
возникновения заболеваний кожи и глаз. Характер, интенсивность и продолжительность
облучения, с одной стороны, и чувствительность человека, с другой, являются
решающими при определении степени причиненного вреда.
Чем дольше УФ лучи воздействуют на глаза и кожу, тем больше вероятность появления
таких заболеваний, как воспаление роговицы глаза, конъюнктивит, повреждения
сетчатки, катаракта, преждевременное старение кожи и опухоли. Некоторые лекарства и
косметические средства повышают чувствительность кожи к УФ излучению. Поэтому
крайне важно:
- следовать инструкциям, изложенным в главе “Важные сведения” и разделе “Сеансы
загара: как часто и как долго?”;
- следить, чтобы расстояние до лампового модуля (расстояние между УФ фильтрами и
телом) было не менее 70 см;
- не превышать максимально допустимого количества часов загара в год (т.е. 17 часов
или 1020 минут);
- всегда надевать защитные очки во время сеанса загара.
Сеансы загара: как часто и как долго?
- Не проводите больше одного сеанса загара в день в течение периода от 5 до 10 дней.
- Между первым и вторым сеансом должно пройти не менее 48 часов.
- После 5 - 10-дневного курса на некоторое время прекратите сеансы.
- Примерно через месяц после прохождения курса большая часть загара сойдет. После
этого вы можете начать новый курс.
- Если вы хотите поддерживать загар, не прекращайте сеансы загара после завершения
курса, продолжайте принимать один или два сеанса в неделю.
- Независимо от того, решили ли вы прекратить сеансы загара на время или
продолжить их с меньшей частотой, помните, что нельзя превышать максимальное
количество часов загара.
- Для данного прибора максимально допустимое количество составляет 17 часов
(=1020 минут) в год.
- Если курс загара был прерван на длительный период, не продолжайте использовать
оставшееся количество сессий курса, а начните новый курс.
Например
Предположим, вы проводите 10-дневный курс загара, состоящий из 7-минутного сеанса в
первый день и 20-минутных сеансов в последующие девять дней.
Продолжительность всего курса составит (1 х 7 минут) + (9 х 20 минут ) = 187 минут.
Это значит, что вы можете провести 5 таких курсов в год, т.к. 5 х 187 минут = 935 минут
Естественно, максимальное количество часов загара относится к каждой части тела
отдельно (например, спереди или сзади).
Page 60

58
РУССКИЙ
Совет. Для получения красивого загара всего тела необходимо слегка поворачиваться во
время сеанса, так, чтобы тело по бокам было доступно УФ лучам.
Совет. Если после приема сеанса загара вы ощущаете некоторую стянутость кожи,
можно нанести увлажняющий крем.
Таблица
Из таблицы видно, что первый сеанс загара всегда составляет 7 минут, независимо от
чувствительности кожи.
Если вы считаете, что продолжительность сеанса слишком велика для вас (например,
после сеанса кожа стягивается и становится слишком чувствительной), мы рекомендуем
вам уменьшить время сеанса, например, на 5 минут.
Продолжительность
сеанса загара
указана для
отдельных частей
тела
1-й сеанс 7 минут 7 минут 7 минут
перерыв не менее 48
часов
2-й сеанс 10 минут 20 минут 30 минут*
3-й сеанс 10 минут 20 минут 30 минут*
4-й сеанс 10 минут 20 минут 30 минут*
5-й сеанс 10 минут 20 минут 30 минут*
6-й сеанс 10 минут 20 минут 30 минут*
7-й сеанс 10 минут 20 минут 30 минут*
8-й сеанс 10 минут 20 минут 30 минут*
9-й сеанс 10 минут 20 минут 30 минут*
10-й сеанс 10 минут 20 минут 30 минут*
*) или дольше, в зависимости от чувствительности кожи.
Подготовка прибора к работе
- Прибор легко переставлять и удобно хранить в сложенном виде.
- Прибор легче перемещать вместе с помощником (Рис. 2).
- Если нужно поднять прибор в одиночку, пользуйтесь ручкой (Рис. 3).
1 Чтобы открыть прибор, отодвиньте ползунковые фиксаторы по направлению
стрелки (Рис. 4).
2 Поднимите подставку и ламповый модуль (Рис. 5).
3 Поставьте прибор в указанное положение (Рис. 6).
4 Поднимите ламповый модуль в горизонтальное положение. Пользуйтесь
рукояткой. (Рис. 7)
Для очень
чувствительной
кожи
перерыв не менее
48 часов
Для нормальной
кожи
перерыв не менее
48 часов
Для менее
чувствительной
кожи
перерыв не менее
48 часов
Page 61

РУССКИЙ 59
При прохождении лампового модуля через определенные положения фиксации будут
слышны щелчки.
Примечание. Вместо вышеизложенного пошагового способа можно вытащить ламповый
модуль одним движением, взявшись за рукоятку (Рис. 8).
5 Поверните ламповый модуль на четверть оборота (Рис. 9).
6 Разместите прибор рядом с кроватью или диваном. (Рис. 10)
Расстояние между УФ фильтром и поверхностью, на которой вы лежите (например,
кровать) должно быть 90 см.
7 Сдвиньте кольцо по подставке вниз, чтобы ослабить фиксатор настройки высоты.
Одновременно вытяните ламповый модуль вверх на высоту 90 см над кроватью.
Отпустите кольцо, чтобы зафиксировать ламповый модуль в данном
положении (Рис. 11).
- Проверить расстояние между ламповым модулем и кроватью можно, вытягивая
мерную ленту.
- Мерная лента автоматически свернется, если сдвинуть красный выступ в сторону.
Теперь прибор готов к эксплуатации.
Использование прибора
1 Полностью размотайте сетевой шнур.
2 Вставьте вилку сетевого шнура в розетку электросети.
3 Для установки правильного времени сеанса загара см. главу “Загар и ваше
здоровье” и собственные записи.
4 Наденьте защитные очки.
- Пользуйтесь защитными очками только при загаре в солярии Hapro. Не пользуйтесь
ими для других целей.
- Защитные очки соответствуют классу защиты II директивы 89/686/EEC.
5 Установите на таймере выбранную продолжительность сеанса (Рис. 12).
Максимальное устанавливаемое время загара составляет 45 минут.
6 Лягте под ламповый модуль.
- В течение последней минуты сеанса раздается звуковой сигнал.
- В течение этой минуты можно переустановить таймер для загара другой части тела.
Таким образом можно избежать 3-х минутного ожидания, которое необходимо
для остывания ламп после того, как их выключили.
- По истечении установленного времени загара сработает таймер автоматического
отключения прибора.
После сеанса загара
1 С помощью ручек управления памяти фиксируйте количество сеансов загара.
Прибор оснащен двумя ручками управления памяти: по одной на
пользователя (Рис. 13).
Очистка
Запрещается использовать для чистки прибора губки с абразивным покрытием,
абразивные чистящие средства или растворители типа бензина или ацетона.
Следите, чтобы внутрь прибора не попала вода.
Page 62

РУССКИЙ60
1 Перед тем как приступить к очистке прибора, обязательно отключите его от
электросети и дайте ему остыть.
2 Очищайте наружную поверхность прибора влажной тканью.
3 Внешнюю поверхность УФ фильтра можно очищать мягкой тканью, слегка
смоченной спиртосодержащей жидкостью.
4 Очищайте защитные очки с помощью влажной ткани.
Хранение
1 Дайте прибору остыть 15 минут перед его складыванием для перемещения или
хранения и хранением.
2 Сетевой шнур можно смотать и уложить в основание прибора.
Примечание. Убедитесь, чтобы шнур сложен правильно и не застрянет между
складывающимися частями прибора при его складывании.
3 Ослабьте фиксатор настройки высоты, сдвигая кольцо по подставке (1) вниз.
Одновременно толкайте подставку вниз (2). Затем отпустите кольцо (Рис. 14).
4 Поверните ламповый модуль на четверть оборота (Рис. 15).
5 Одной рукой слегка приподнимите ламповый модуль (1). Другой рукой
освободите его, сдвигая два ползунковых фиксатора вниз (2), чтобы сложить
ламповый модуль (3) (Рис. 16).
6 Одной рукой придерживайте ползунковые фиксаторы, другой сложите ламповый
модуль в вертикальное положение. Затем отпустите ползунковые
фиксаторы (Рис. 17).
7 Аккуратно опустите подставку и ламповый модуль на основание прибора (Рис. 18).
8 Сдвиньте ползунковые фиксаторы на основании по направлению стрелки, чтобы
зафиксировать ламповый модуль в основании (Рис. 19).
9 Хранение солярия.
- Солярий можно хранить под кроватью (Рис. 20).
- Его также можно хранить в вертикальном положении в шкафу (Рис. 21).
Замена
Со временем (через несколько лет при обычном использовании прибора) излучающая
способность УФ ламп постепенно снижается, что приводит к снижению эффективности
работы прибора. Для компенсации старения ламп вы можете несколько увеличить
продолжительность сеансов либо заменить УФ лампы.
УФ фильтр защищает от излишнего УФ излучения. Поэтому важно сразу заменить
поврежденный или неработающий фильтр.
Замена ламп для загара, УФ фильтра и сетевого шнура должна производится только в
торговой организации Hapro или в авторизованном сервисном центре Hapro. Только
работники такого центра имеют достаточные опыт и квалификацию, необходимые
для выполнения данной работы, а также оригинальные запасные части для вашего
прибора.
Page 63

РУССКИЙ 61
Защита окружающей среды
- Лампы данного прибора содержит вещества, которые могут причинить вред
окружающей среде. После извлечения, не выбрасывайте лампы вместе с бытовыми
отходами. Передайте их в специализированный пункт для дальнейшей утилизации.
- После окончания срока службы не выбрасывайте прибор вместе с бытовыми
отходами. Передайте его в специализированный пункт для дальнейшей утилизации.
Этим Вы поможете защитить окружающую среду (Рис. 22).
Гарантия и обслуживание
Все неисправности, возникшие в результате дефектов материала или производства,
которые возникают во время гарантийного периода, будут устранены бесплатно при
предъявлении оригинального счета-фактуры. Гарантийный период составляет 24 месяца.
С вопросами по гарантии, пожалуйста, обращайтесь к Вашему дилеру.
Ваш новый солярий для предназначен для домашнего использования, но не для
коммерческих целей. Повреждение в результате коммерческого использования, а также
трубки, пускатели, защитные опорные стойки и акриловые панели не включены в
гарантию Hapro.
Неисправная работа в результате ошибок во время сборки или установки, ненадлежащее
использование, повреждение разрядом молнии или в связи с использованием
неоригинальных деталей исключены из гарантии Hapro.
Внимательно проверьте, правильно ли установлен прибор перед тем, как предъявить
претензию по гарантии. В случае предъявления безгарантийной претензии Вам будет
необходимо оплатить затраты по обслуживанию.
Ограничение действия гарантии
Условия международной гарантии не распространяются на лампы для загара.
Поиск и устранение неисправностей
Если возникнут проблемы, связанные с данным прибором, и Вы не сможете решить их с
помощью информации, указанной далее, пожалуйста, обратитесь к ближайшему дилеру
Hapro.
Проблема Способы решения
Прибор не работает. Ламповый модуль установлен неправильно (см. главу
“Подготовка прибора к работе”. Правильно установите ламповый
модуль.
Возможно неправильно вставлен штекер в розетку электросети.
Правильно вставьте штекер в розетку электросети.
Возможен сбой питания в сети. Проверьте исправность сети
питания, подключив какой-нибудь другой электроприбор.
УФ лампы еще слишком горячие для возобновления работы.
Сначала дайте им остыть 3 минуты.
Page 64

РУССКИЙ62
Проблема Способы решения
Возможно, прибор перегрелся, сработала защита от перегрева и
прибор был автоматически отключен. Устраните причину
перегрева (например, уберите полотенце, закрывающее
вентиляционные отверстия). Дайте прибору остыть в течение
нескольких минут. Снова включите прибор.
Плавкий
предохранитель
цепи, в которую
включен прибор,
срабатывает, когда я
включаю прибор
или пользуюсь им.
Результаты загара
не такие, как я
ожидал.
Электросеть, к которой подключен прибор, должна быть
защищена стандартным плавким предохранителем на 16 А, либо
автоматическим предохранителем с задержкой срабатывания.
Также возможно, что к электросети было подключено слишком
много приборов.
Выбранный режим сеансов загара не соответствует вашему типу
кожи. Сверьте режим по таблице в разделе “Сеансы загара: как
часто и как долго?” главы “Загар и ваше здоровье”.
Расстояние между лампами и поверхностью, на которой лежат во
время загара, возможно, превышает указанное в руководстве.
См. главу “Подготовка прибора к работе”.
После длительной эксплуатации прибора излучающая
способность ламп снижается. Это становится заметным только
после нескольких лет эксплуатации. Для компенсации старения
ламп можно ненадолго увеличивать продолжительность сеансов
загара либо заменить лампы.
Page 65

a VDL Company
www.hapro.com
Manufacturer
Hapro International b.v.
Fleerbosseweg 33
4420 AC Kapelle, The Netherlands
www.hapro.com
Product identification
Hapro Mobile Sun HP8540
This document is valid for all above mentioned
types produced from 04/04/2011.
Means of conformity
The products are in conformity with Directive 2004/108/EC of the European
Community and the Low-Voltage Directive 2006/95/EC of the European Community.
Testing, Electro-Magnetic Compatibility
Carried out by: Hapro Laboratory
Declaration of Confi rmity
Fleerbosseweg 33
4420 AC Kapelle, The Netherlands
Standards used:
Testing, Low-Voltage Directive
Carried out by: Hapro Laboratory
Fleerbosseweg 33
4420 AC Kapelle, The Netherlands
Standards used:
Representative
Name: D.C. van de Linde
Function: Managing Director
Date:
Signature:
EN 61000-6-3:2007; EN 55022:2006; EN 55014-1:2006;
EN 61000-6-1:2007; EN 61000-4-2:1995+A1:1998,A2:2001;
EN 61000-4-3:2006; EN 61000-4-4:2004;
EN 61000-4-5:2006; EN 61000-4-6:1996+A1:2001;
EN 62233:2008; EN 60335-1:2002;
EN 60335-2-27:2003+A1:2008, A2:2008
EN 62471
04/04/2011
Hersteller
Hapro International b.v.
Fleerbosseweg 33
4420 AC Kapelle, Niederlande
www.hapro.com
Produktidenti zierung
Hapro Mobile Sun HP8540
Dieses Dokument ist für alle oben erwähnten Arten
gültig die produziert wurden vom 04/04/2011.
Konformitätserklärung
Die Produkte sind konform mit den Richtlinien 2004/108/EC und 2006/95/EC (über
Niederspannung) der Europäischen Gemeinschaft.
Prüfungen, elektromagnetische Verträglichkeit
Konformitätserklärung
Ausgeführt von: Hapro Laboratory
Fleerbosseweg 33
4420 AC Kapelle, Niederlande
Zugrunde liegende Normen:
Prüfungen, Richtlinie über Niederspannung
Ausgeführt von: Hapro Laboratory
Fleerbosseweg 33
4420 AC Kapelle, Niederlande
Zugrunde liegende Normen:
Vertreter
Name: D. C. van de Linde
Funktion: Geschäftsführer
Datum:
Unterschrift:
EN 61000-6-3:2007; EN 55022:2006; EN 55014-1:2006;
EN 61000-6-1:2007; EN 61000-4-2:1995+A1:1998,A2:2001;
EN 61000-4-3:2006; EN 61000-4-4:2004;
EN 61000-4-5:2006; EN 61000-4-6:1996+A1:2001;
EN 62233:2008; EN 60335-1:2002;
EN 60335-2-27:2003+A1:2008, A2:2008
EN 62471
04/04/2011
©2011 Hapro International, 34062 rev. 00
Producent
Hapro International b.v.
Fleerbosseweg 33
4420 AC Kapelle, Nederland
www.hapro.com
Product identificatie
Hapro Mobile Sun HP8540
Dit document geldt voor alle bovenstaande
typen geproduceerd vanaf 04/04/2011.
Conformiteitsverklaring
De producten zijn in overeenstemming met de Richtlijn 2004/108/EC van de Europese
Gemeenschap en met de Laagspanning Richtlijn 2006/95/EC van de Europese
Gemeenschap.
Test, Electro-Magnetische Compatibiliteit
Uitgevoerd door: Hapro Laboratory
Conformiteitsverklaring
Fleerbosseweg 33
4420 AC Kapelle, Nederland
Gebruikte standaarden:
Test, Laagspanning richtlijn
Uitgevoerd door: Hapro Laboratory
Fleerbosseweg 33
4420 AC Kapelle, Nederland
Gebruikte standaarden:
Vertegenwoordigend
Naam: D.C. van de Linde
Functie: Algemeen directeur
Datum:
Handtekening:
EN 61000-6-3:2007; EN 55022:2006; EN 55014-1:2006;
EN 61000-6-1:2007; EN 61000-4-2:1995+A1:1998,A2:2001;
EN 61000-4-3:2006; EN 61000-4-4:2004;
EN 61000-4-5:2006; EN 61000-4-6:1996+A1:2001;
EN 62233:2008; EN 60335-1:2002;
EN 60335-2-27:2003+A1:2008, A2:2008
EN 62471
04/04/2011
34061_00.1
34061_00.2
34061_00.3
Page 66

Fabricant
Hapro International b.v.
Fleerbosseweg 33
4420 AC Kapelle, Pays-Bas
www.hapro.com
Produttore
Hapro International b.v.
Fleerbosseweg 33
4420 AC Kapelle, Paesi Bassi
www.hapro.com
Identification du produit
Hapro Mobile Sun HP8540
Ce document est valable pour tous les types
fabriqués à partir de 04/04/2011.
Moyens de conformité
Les produits sont conformes à la Directive 2004/108/CE de la Communauté
européenne et à la Directive “Basse Tension” 2006/95/CE de la Communauté
européenne.
Essai d’épreuve, compatibilité éléctromagnétique
Réalisé par : Laboratoire Hapro
Fleerbosseweg 33
Déclaration de conformité
4420 AC Kapelle, Pays-Bas
Normes utilisées :
Essai d’épreuve, Directive Basse Tension
Réalisé par : Laboratoire Hapro
Fleerbosseweg 33
4420 AC Kapelle, Pays-Bas
Normes utilisées :
Représentant
Nom : D.C. van de Linde
Fonction : Administrateur délégué
Date :
Signature:
EN 61000-6-3:2007; EN 55022:2006; EN 55014-1:2006;
EN 61000-6-1:2007; EN 61000-4-2:1995+A1:1998,A2:2001;
EN 61000-4-3:2006; EN 61000-4-4:2004;
EN 61000-4-5:2006; EN 61000-4-6:1996+A1:2001;
EN 62233:2008; EN 60335-1:2002;
EN 60335-2-27:2003+A1:2008, A2:2008
EN 62471
04/04/2011
Identificazione del prodotto
Hapro Mobile Sun HP8540
Questo documento è valido per tutti i modelli
menzionati prodotti dal 04/04/2011.
Strumenti di conformità
I prodotti sono conformi alla Direttiva 2004/108/EC della Comunità Europea e alla
Direttiva Bassa Tensione 2006/95/EC della Comunità Europea.
Collaudo, Compatibilità elettromagnetica
Eseguito da: Hapro Laboratory
Fleerbosseweg 33
Dichiarazione di conformità
4420 AC Kapelle, Paesi Bassi
Standard utilizzati:
Collaudo, Direttiva Bassa Tensione
Eseguito da: Hapro Laboratory
Fleerbosseweg 33
4420 AC Kapelle, Paesi Bassi
Standard utilizzati:
Rappresentante:
Nome: D.C. van de Linde
Funzione: Direttore Generale
Data:
Firma:
EN 61000-6-3:2007; EN 55022:2006; EN 55014-1:2006;
EN 61000-6-1:2007; EN 61000-4-2:1995+A1:1998,A2:2001;
EN 61000-4-3:2006; EN 61000-4-4:2004;
EN 61000-4-5:2006; EN 61000-4-6:1996+A1:2001;
EN 62233:2008; EN 60335-1:2002;
EN 60335-2-27:2003+A1:2008, A2:2008
EN 62471
04/04/2011
Fabricante
Hapro International b.v.
Fleerbosseweg 33
4420 AC Kapelle, Países Bajos
www.hapro.com
Identificación del producto
Hapro Mobile Sun HP8540
Este documento es valido para todos los
tipos fabricados a partir de 04/04/2011.
Medios de conformidad
Los productos cumplen la Directiva 2004/108/CE de la Comunidad Europea y la
Directiva de baja tensión 2006/95/CE de la Comunidad Europea.
Prueba de compatibilidad electromagnética
Efectuada por: Hapro Laboratory
Fleerbosseweg 33
Declaración de conformidad
4420 AC Kapelle, Países Bajos
Normas utilizadas:
Prueba de conformidad con la Directiva de baja tensión
Efectuada por: Hapro Laboratory
Fleerbosseweg 33
4420 AC Kapelle, Países Bajos
Normas utilizadas:
Representante
Nombre: D.C. van de Linde
Función: Director general
Fecha:
Firma:
EN 61000-6-3:2007; EN 55022:2006; EN 55014-1:2006;
EN 61000-6-1:2007; EN 61000-4-2:1995+A1:1998,A2:2001;
EN 61000-4-3:2006; EN 61000-4-4:2004;
EN 61000-4-5:2006; EN 61000-4-6:1996+A1:2001;
EN 62233:2008; EN 60335-1:2002;
EN 60335-2-27:2003+A1:2008, A2:2008
EN 62471
04/04/2011
34061_00.4
Производитель
Hapro International b.v.
Fleerbosseweg 33
4420 AC Kapelle, The Netherlands
www.hapro.com
Идентификационный код изделия
Hapro Mobile Sun HP8540
Настоящий документ действителен для всех
вышеперечисленных типов,
произведенных с 04/04/2011.
Средства соответствия
Изделия соответствуют Директиве 2004/108/ЕС Европейского сообщества и
Директиве по низковольтной аппаратуре 2006/95/EC Европейского сообщества.
Тестирование, электромагнитная совместимость
Проведено: Hapro Laboratory
Fleerbosseweg 33
Заявление о соответствии
4420 AC Kapelle, The Netherlands
Использованные
стандарты:
Тестирование, Директива по низковольтной
аппаратуре
Проведено: Hapro Laboratory
Fleerbosseweg 33
4420 AC Kapelle, The Netherlands
Использованные
стандарты:
Представитель
Имя: D.C. van de Linde
Должность: Исполнительный директор
Дата:
Подпись:
EN 61000-6-3:2007; EN 55022:2006; EN 55014-1:2006;
EN 61000-6-1:2007; EN 61000-4-2:1995+A1:1998,A2:2001;
EN 61000-4-3:2006; EN 61000-4-4:2004;
EN 61000-4-5:2006; EN 61000-4-6:1996+A1:2001;
EN 62233:2008; EN 60335-1:2002;
EN 60335-2-27:2003+A1:2008, A2:2008
EN 62471
04/04/2011
34061_00.5
34061_00.6
34061_00.7
Page 67

a VDL Company
www.hapro.com
©2011 Hapro International, 34040 rev. 00
 Loading...