

Happymodel Snapper 6 FRSKY BNF User Manual
Sna pper 6 Mi cro FPV R acing D rone FR SKY BN F Versi on
Bin ding pr oce dure
Arm/Disa rm th e Mot or
1. The Defaul t Arm/Di sarm switch for is AUX1(Chan nel 5),and you can also custo mize it Snappe r 6
with Betaf light Configura tor.
VT X Ban ds an d Cha nne ls se tup
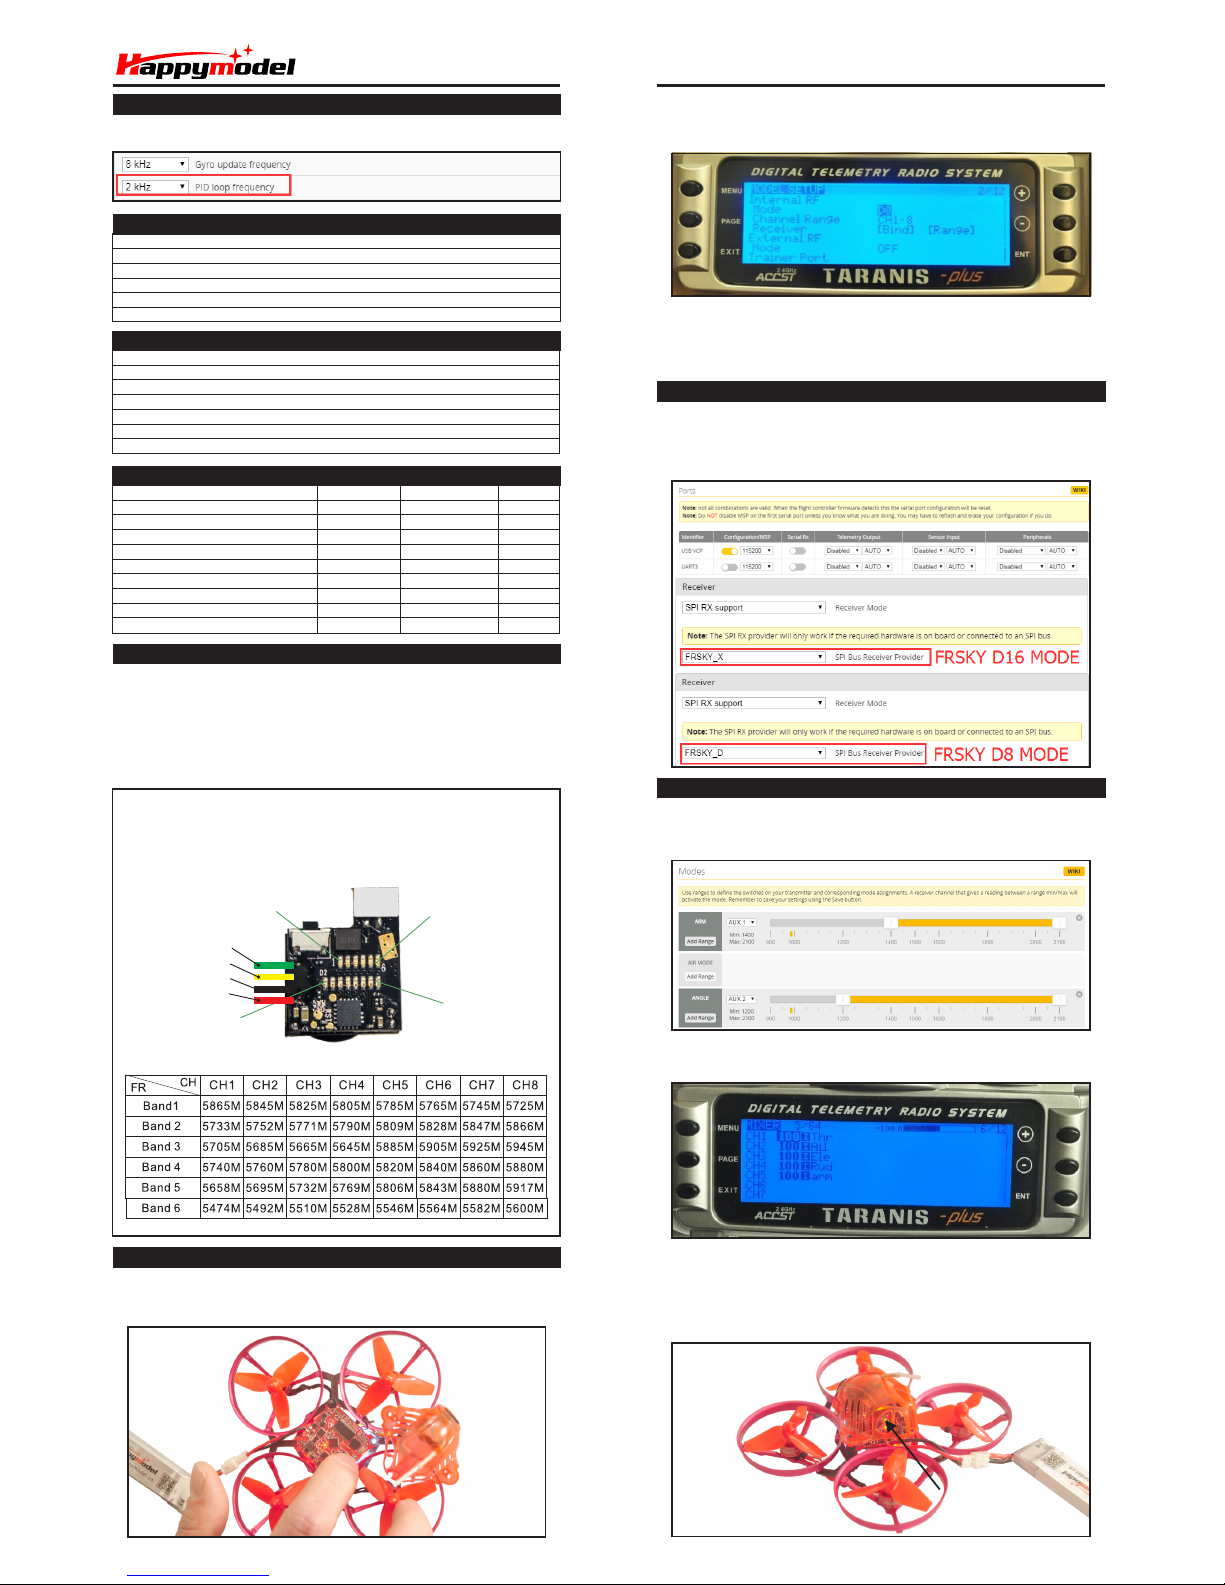
Fre quency swi tch ing:
By on e button, Sh ort p ress the bu tton to cha nge chann el, 1- 8 adj ust able.
Pre ss and hold t he bu tton f or 2s to c han ge ban ds, 1- 6 adj ust able.
Two gr oups of LE Ds:
Gro up 1: 6 BLUE LED st and for ban ds
Gro up 2: 8 RED L ED sta nd fo r channel s
Blu e LED1 an d Red L ED1 l ight on,indic ati ng frequ enc y
586 5MHZ( BAN D1 and CH 1)
Blu e LED1 an d Red L ED2 l ight on,indic ati ng frequ enc y
584 5MHZ( BAN D1 and CH 2)
Blu e LED6 an d Red L ED8 l ight on,indic ati ng frequ enc y
560 0MHZ( BAN D6 and CH 8)
Fre qu enc y and c ha nne l fr equ en cy ta ble :
Blu e LED 1
Blu e LED 6
Red L ED 8
Red L ED 1
Vid eo In
Vid eo Out
GND
3.3 -5.5V
Spe cific ations
Fea tures
Bet aflig ht supp ort , mul ti flig ht mode : ACRO/ AIR/A NGLE
Powe rful B rush less mo tor and S mooth E SC
CNC a lumin um allo y prope ller gu ard
Bet aflig ht OSD su ppor t ,eas y to get RS SI , Volta ge and ot her inf o from you r goggl es
Frs ky vers ion sup port b oth EU LBT a nd NON- EU Frsk y trans mitte r
Hea d light s ready
Cam era ang le adju stabl e
1. Power f or the Sn apper 6 a nd the LE D Combo (2 red le d and 2 whi te LED) w ill bl inkin g slowl y,
the n Press a nd hold t he bind b utton f or 2 sec onds, t he LED Co mbo(2 r ed led an d 2 white l ed)
wil l getti ng to be so lid, th is indi cate th e Snapp er 6 Quad copter i s in bind ing mod e
2. Turn on yo ur Frsk y Tara nis tra nsmit ter, and m ove to BIN D OPTIO N from SE TUP MEN U,
Cho ose rec eiver m ode D16 o r D8 acco rdin g to your B etaf light r eceiv er conf igura tion
(Fr sky_X = D 16 mode , Frsky _D=D8 m ode)
3.E NT [Bin d] to bin ding wi th the Sn apper 6 , the LED C ombo( 2 red led an d 2 white l ed) wil l
bli nking s lowly o n the fli ght con troll er ,thi s indic ate bin ding s ucces sfull y, and the n exist
bin ding mo de of you r Frsk y trans mitte r, the LED C ombo( 2 red le d and 2 whi te led) w ill get ting
to be s olid ag ain, th is indi cate wo rkin g norma l.
3.T he defau lt chan nel map fo r Snapp er 6 Frsk y versio n is TAER12 34, ple ase make s ure your
tra nsmit ter is ma tched , other wise it w ill can't b e armed . Toggl e the AUX 1 Switc h ,the Gre en
LED o n the flig ht cont roller w ill get ting to be s olid, t his in dicate s the mot or was a rmed . And
als o you can fo und “Arme d” displ ayed on y our FP V Goggle s or the FP V Monito r. Ple ase make
sur e keep the S napper 6 l evel be fore a rmin g .Be care ful and e njoy y our flig ht now !
Toggle the AUX1 Swit ch, t he Gr een L ED on Toggle the AUX1 Swit ch, t he Gr een L ED on
the F light c ontrol ler w ill get ting to b e sol idthe F light c ontrol ler w ill get ting to b e sol id
Toggle the AUX1 Swit ch, t he Gr een L ED on
the F light c ontrol ler w ill get ting to b e sol id
Rec eiv er co nfi gur ati on
Ple ase set R ecei ver mod e to be SPI R X Suppo rt from t he Conf igura tion ta b of the Be tafl ight
Con figur ator, the n selec t FRSKY _X Prov ider fo r FRSKY D 16 MODE o r Selec t FRSKY _D Prov ider
for F RSKY D8 M ODE, do n't enab le Seri al RX sin ce the CR AZYB EE Fli ght con troll er is int egrate d
SPI B US Rece iver
2.Tur n on the Fr sky tr ansm itter ( Use X9D + as an exa mple) a nd move t o the MI XER int erfac e,
Set “ SA” or “SB” s witch e tc. for C h5 to ARM /DIS ARM the m otor.
Notes:
1.The rec eiver signal wil l be unsta ble while the MSP (Connect to Beta flight) Conne ction establi shed
2.The PI D loop frequen cy must be 2kHZ at this firm ware versio n, will update soon .
Bra nd Name : Happy model
Mod e Name: S nappe r6
Ite m Name: 1 S Brush less Wh oop rac er dron e BNF
Whe elbas e: 65mm
Siz e: 81mm *81mm *36mm
Wei ght: 23 g(wi thout b atter y)
1
1
4
1
1
1
1
0
1
1
Com ponen ts
Basic Version
1
1
4
1
1
3
0
1
1
1
Standard Version
SP6 01
SP6 02FR
SP6 03
SP6 04
SP6 05
SP6 06
SP6 07
SP6 08
SP6 09
SP6 10
Par t. NO.
Sna pper 6 Fr ame
Cra zybee F 3 Fligh t contr oller F rsky
SE0 603 KV1 9000 Mo tor 0.8 mm shaf t
31m m 3-bla des pro pelle r(4cw +4ccw )
AIO C amera & V TX
3.8 v 250ma h 30C/6 0C batt ery
USB L ipo/L IHV Cha rger
1S0 6 6 way Lip o/LIH V charg er
Pro pelle r disas sembl e tool
Scr ewdri ver
Boo t Pad
BAT+
BAT-
+5V o ut
GND
Vid eo out
Vid eo in
Onl y Suppo rt Max 2 5mw V TX
1S LI PO Inpu t(Su ppo rt H V 4. 35V)
Fli ght con tro ller co nnect ion dia gram
M4 Mo tor
CW
M3 Mo tor
CCW
M2 Motor
CCW
LED C omboLED C omboLED C ombo
USB
Bin d butto n
Buz zer+
Buz zer
-
BAT+
BAT-
Led s Blink ing slo wly-- -No RC In put sig nal or bi nding s ucces sfulLed s Blink ing slo wly-- -No RC In put sig nal or bi nding s ucces sful
Led s are sol id--- RC Inpu t sign al conn ectedLed s are sol id--- RC Inpu t sign al conn ected
Or Ge t into Bi nding m odeOr Ge t into Bi nding m ode
Led s Blink ing slo wly-- -No RC In put sig nal or bi nding s ucces sful
Led s are sol id--- RC Inpu t sign al conn ected
Or Ge t into Bi nding m ode
FRO NT
Boo t Pad
M1 Motor
CW
4.2 V Charg er indi cates L ED
4.2 V/4.3 5V swit chabl e butto n
4.3 5V Char ger ind icate s LED
Sol id RED LE D---C hargi ng
LED O FF--- Charg e compl ete
CAUTION: Onc e charging is comp lete,
immedia tely remove the batter y. Never leave a battery con nected to the charger.
4.2V/4.35V charging switch
Cha rging c urren ts swi tch
2-6 S Lipo In put
DC 12 V Input
Sol id LED- --Cha rging
LED O FF--- Charg ing com plete
USB 5 V out
Cha rger th e Lip o Batte ry
Sna pper 6 Mi cro FPV R acing D rone FR SKY BN F Versi on
3. Open th e Device M anager o f your com puter, fin d the Port s, pleas e make sur e the Com p ort
Ser ial Numb er is unde r 255, oth erwis e it will ca n't conne ct to the BL HELISU ITE. You can c hange
the p ort se rial num ber like t he bello wing ste p :
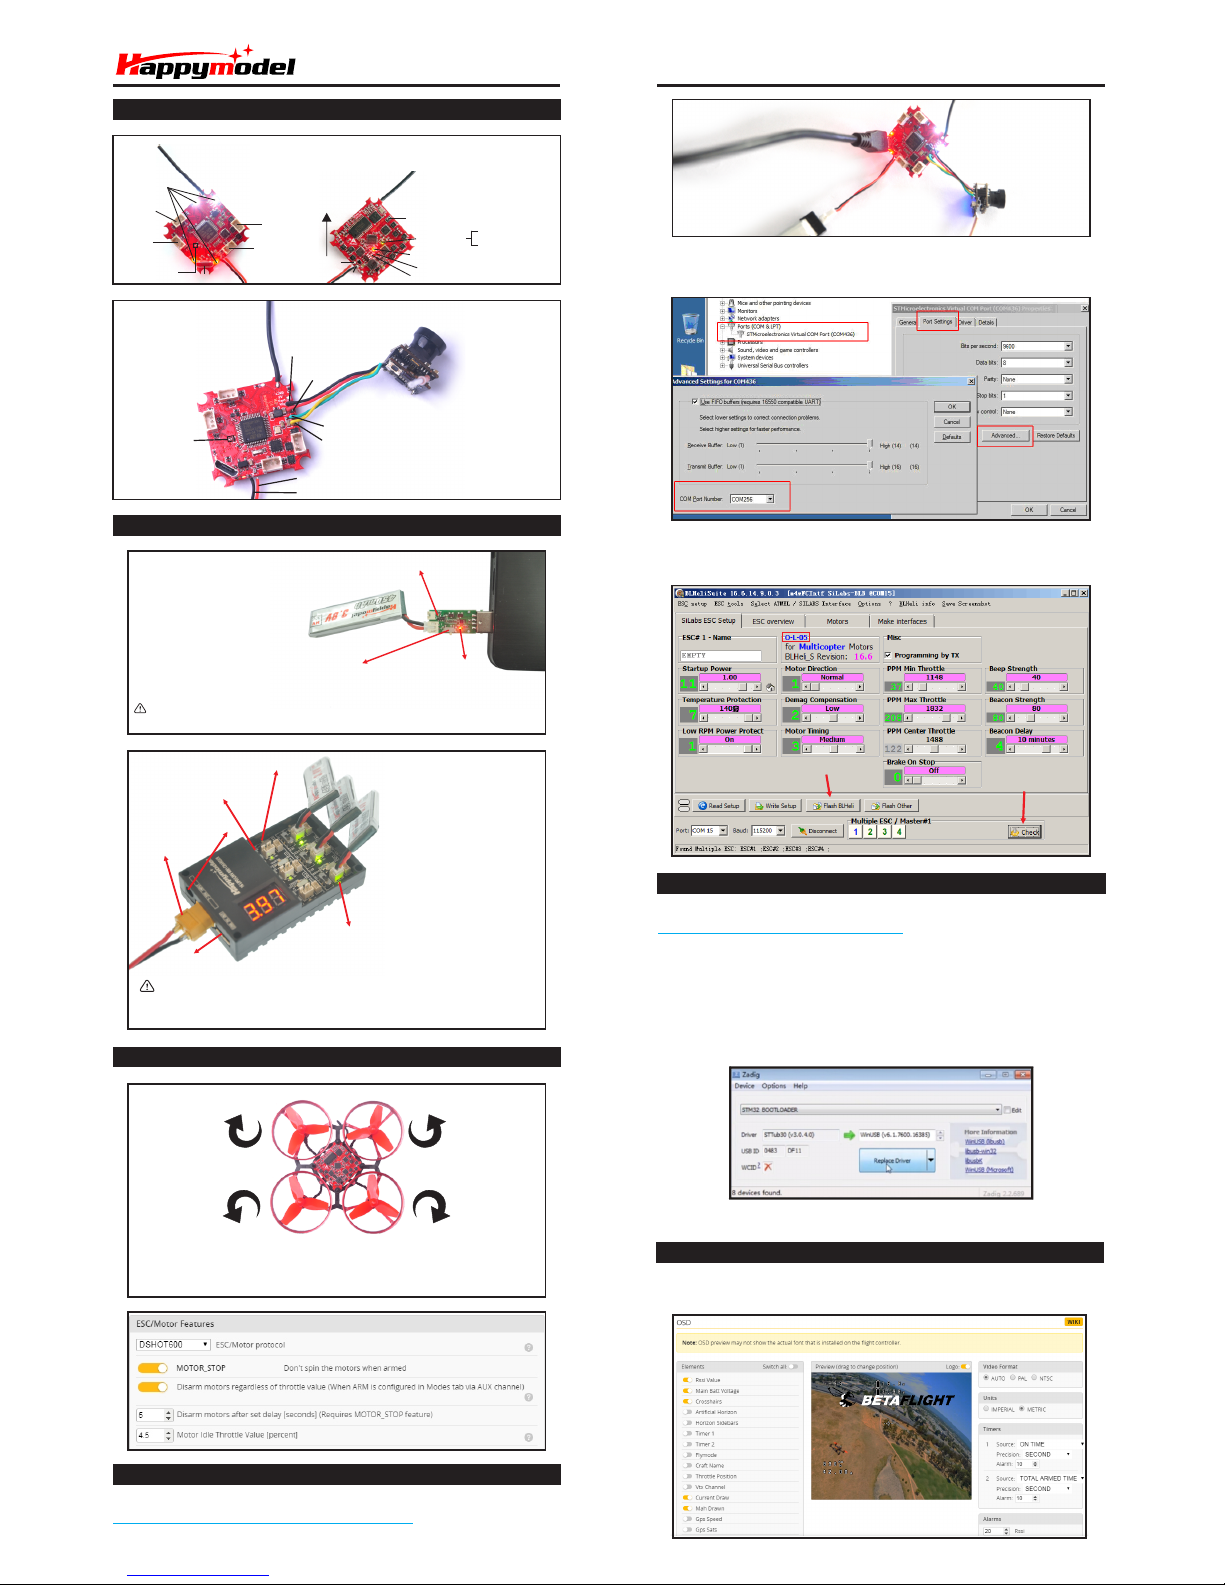
4. Open t he BLHE LISUI TE, Sel ect SIL ABS BLH eli Boo tload er (Cle anfli ght) fr om the th ird tab o n
the t op side . Then Se lect th e right S erial c om port a nd Clic k conne ct. You ca n also Fl ash the
new r eleas e BLHel i_s fir mware vi a the BLH EILIS UITE, t he firm ware Targ et is “O- L-05”
Cli ck chec k to see the
det ails of th e 4in1 ES C
Fir mware ta rget
Fla sh firm ware
Fir mware u pdate
Mix er type a nd ESC/ motor p rotoc ol
M4 M2
M3 M1
Fix the C W prop eller s onto the M 1 and M 4 mot or (C W mot ors)
Fix t he CCW pro pelle r onto th e M2 and M3 m otor (CC W motor s)
1. Down load Ne w releas e Blhel isuit e from:
htt ps:// www.me diafi re.co m/fol der/d x6kfa asyo2 4l/BL HeliS uite
2. Conn ect the C RAZYB EE flig ht cont rolle r to comp uter an d power f or it wit h 1S Lipo ba tter y
ESC C heck an d Flash firm war e
Por ts are nu mbered 1 -6. Do no t put mor e than on e batte ry on a sin gle por t. For
exa mple: d o not ins ert on e batt ery on th e Picob lade 1. 25 plug a nd anot her on th e
sam e port w ith th e PH 2.0 pl ug.
*We w ill up date th e firmw are for C razyb ee F3 and re lease t o our web site in t ime.
Flight controller firm ware update
1. Install l atest STM32 V irtua l COM Por t Driv er
http ://www. st.com/w eb/en/ catalog/ tools/PF 257938
2. Install S TM BOOTLOAD Driv er (STM Devic e in DFU MO DE)
3. Open Beta flight conf igurator a nd choos e firmwar e targ et “Crazybe eF3FR”,th en select the
firm ware vers ion.
4. There are 2 way s to get in DF U Mode : 1). so lder the boot pa d and the n plug USB to comp uter 2).
loadi ng betafli ght firmwar e and hit “ flash”, then it w ill getting i nto DFU Mode aut omatical ly.
5. Open Zadi g tool s to repl ace the dri vers from STM 32 Bootl oader to WIN USB Driver.
6. Reconne ct the flig ht controll er to the comput er after repl ace driver do ne , and op en
Beta flight C onfigu rator, loadin g firm ware and flash .
Conn ect the fl ight cont roller to t he compu ter , ope n Betaf light Co nfigu rator , mov e to the OSD
opti on, then y ou can co nfigure t he layout o f the O SD.
Bet aflight OSD Co nfi gur ati ons
Red -Powe r LED
Armed-Solid
Disarmed-blinking
Green LED
 Loading...