

Page 1
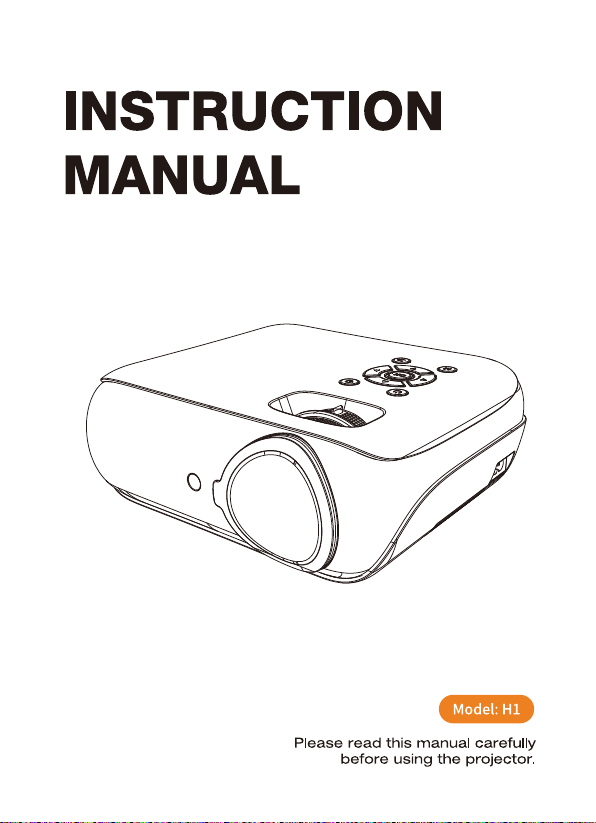
INSTRUCTION
MANUAL
Model: HI
Please read this manual carefully
before using the projector.
Page 2
Important Safety Considerations
Attentions:
Thank you for purchasing this series of video projectors.
Please read through this User's manual for proper useof this product.
Friendly Reminder:
O Do not look directly into the lens while the projector is running, as
strong light may damage your eyes.
O Donot block the air outlet to preventthe projector from cooling
down because internal electronics are damaged.
O Keepthe projector and accessoriesout of the reachof children.
O Pleasemakesurethat the working environment of the projector is
dry and ventilated.
To prevent electric shock, please keep the projector out of the rain
and away from moisture, It is recommended to switch off the
projector after it has run for 6 hours non-stop.
O Do not press hard on the projector, as it may damage the product.
Do not throw, hit, or shake the projector to avoid damaging the
circuit board.
O Anyquestionsafter receivingthe projector, pleasecontact us, we
will quickly and correctly solve your problem within 24 hours and
give you a satisfactory answer.
Package contents
AV cable *1
HDMI cable *1
Power cord * 1
Remote control * 1
Projector screen * 1
User Manual *1
1
Page 3
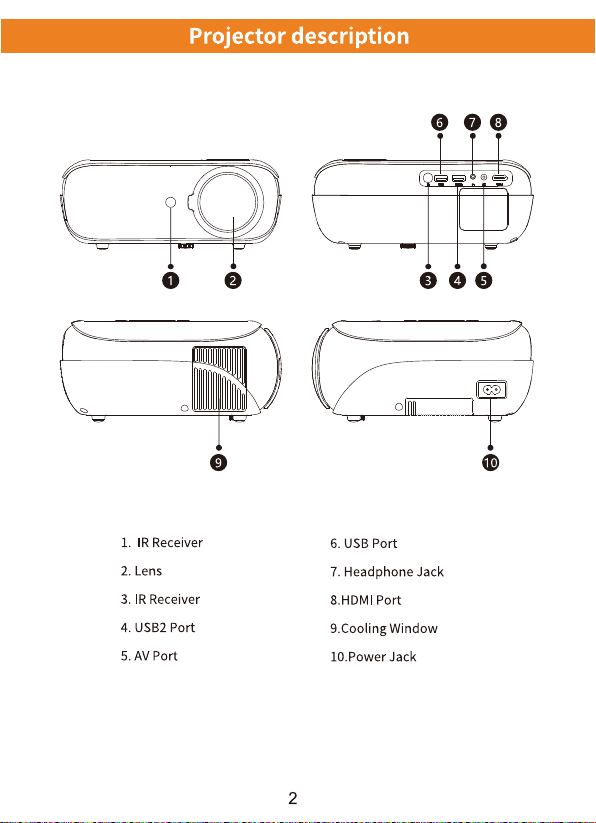
Projector description
0
R Receiver
1.
2. Lens
3. R Receiver
4. USB2 Port
5. AV Port
ooo
o
6. USB Port
7. Headphone Jack
8.HDMl Port
9.Cooling Window
10.Power Jack
2
Page 4
oo
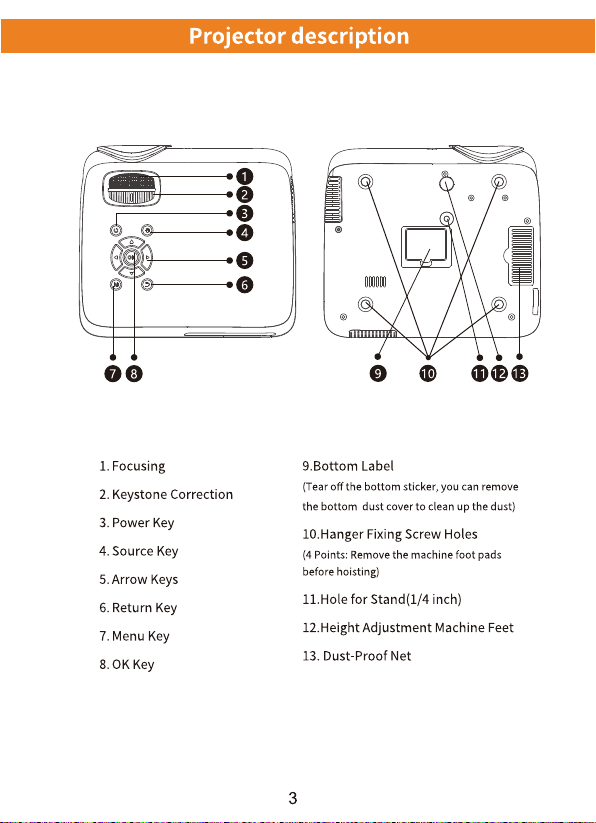
Projector description
o
o
o
o
o
o
1. Focusing
2. Keystone Correction
3. Power Key
4. Source Key
5. Arrow Keys
6. Return Key
7. Menu Key
8.0K Key
9.Bottom Label
(Tear off the bottom sticker, you can remove
the bottom dust cover to clean up the dust)
10.HangerFixing Screw Holes
(4 Points: Remove the machine foot pads
before hoisting)
11.Hole for Stand(1/4 inch)
12.Height Adjustment Machine Feet
13. Dust-Proof Net
3
Page 5
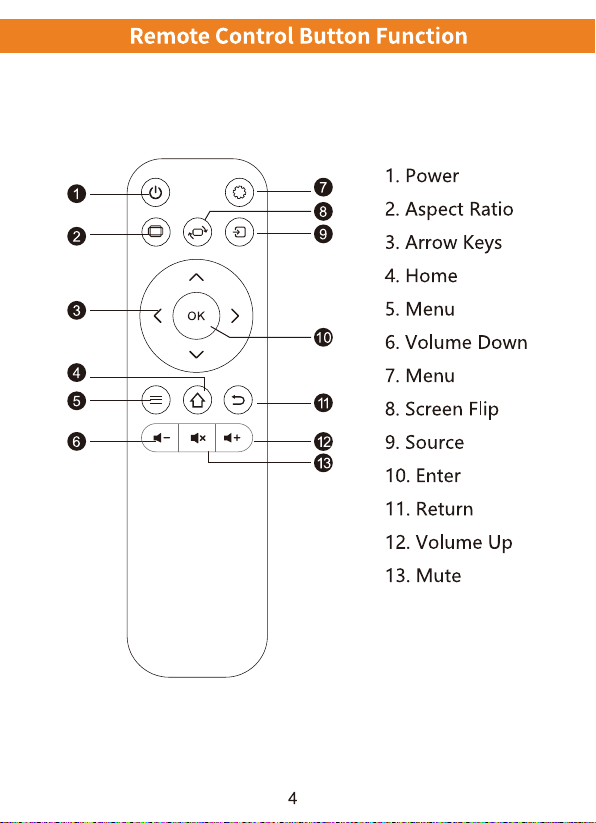
Remote Control Button Function
o
O
O
O
1. Power
2. Aspect Ratio
3. Arrow Keys
4. Home
5. Menu
C
O
O
O
6. Volume Down
7. Menu
8. Screen Flip
9. Source
10. Enter
11. Return
12. Volume Up
13. Mute
4
Page 6
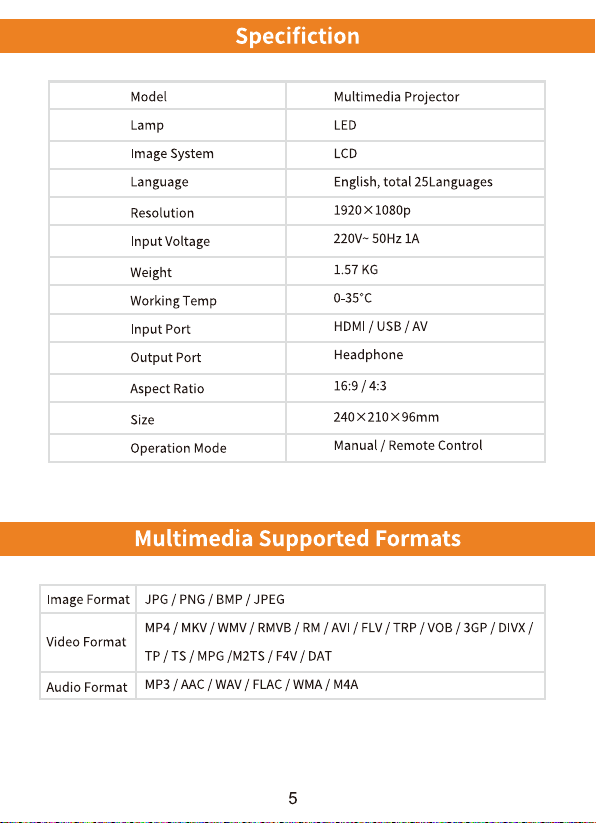
Specifiction
mage Format
Video Format
Audio Format
Model
Lamp
Image System
Language
Resolution
Input Voltage
Weight
Working Temp
Input Port
Output Port
Aspect Ratio
Size
Operation Mode
Multimedia Projector
LED
LCD
English, total 25Languages
1920 x 1080p
220V- 50Hz IA
1.57 KG
0-350C
HDMI / USB/AV
Headphone
16:9 /
Manual / Remote Control
Multimedia Supported Formats
JPG / PNG / BMP / JPEG
MP4/ MKV / WMV/ RMVB / RM/ AVI / FLV/ TRP / VOB / 3GP/ DIVX/
TP / TS / MPG /M2TS/F4V/DAT
MP3 / AAC / WAV/ FLAC/ WMA/ M4A
5
Page 7
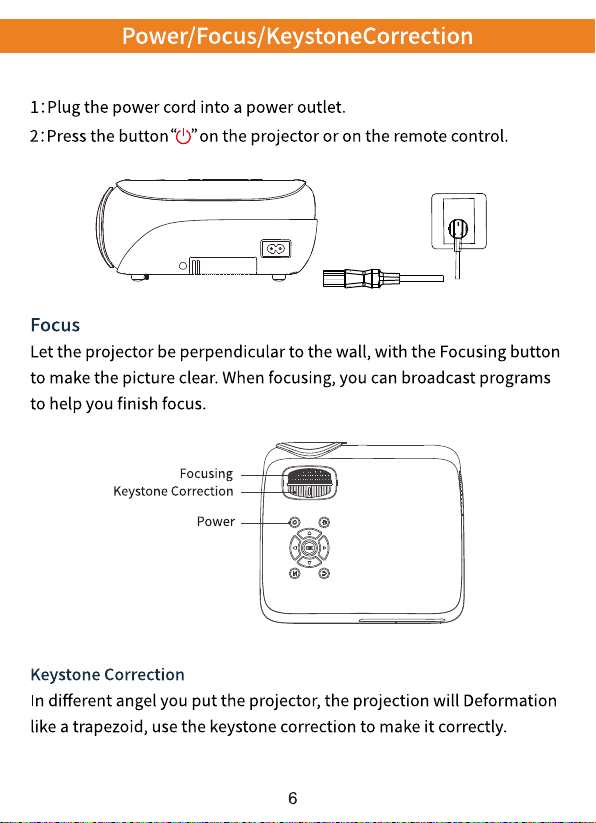
Power/Focus/KeystoneCorrection
I: Plug the power cord into a power outlet.
2: Press the button "(J)"on the projector or on the remote control.
Focus
Let the projector be perpendicular to the wall, with the Focusing button
to make the picture clear. When focusing, you can broadcast programs
to help you finish focus.
Keystone Correction
Focusing
Power
Keystone Correction
In different angel you put the projector, the projection will Deformation
like a trapezoid, use the keystone correction to make it correctly.
6
Page 8
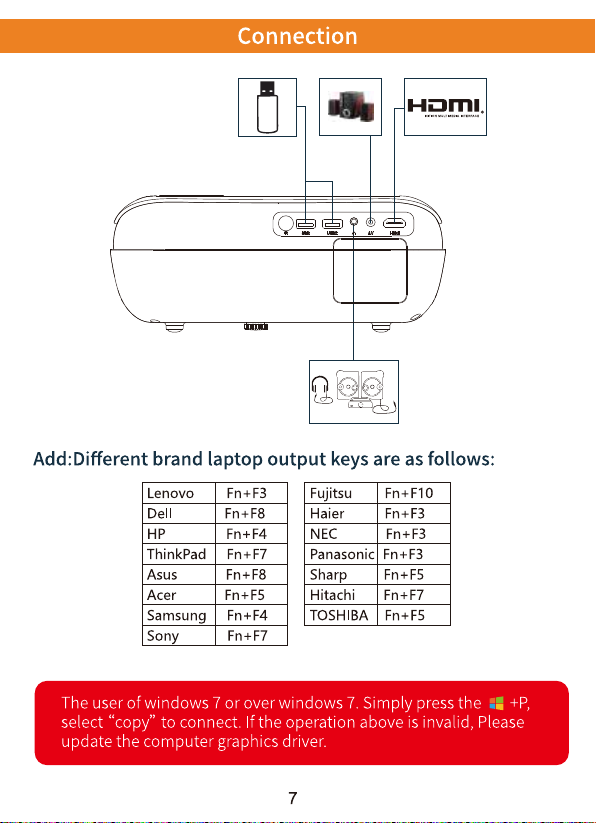
Connection
Hornu
Add:Different brand laptop output keys are as follows:
Lenovo
Dell
ThinkPad
Asus
Acer
Samsung
Sony
Fn+F3
Fn+F4
Ft-I+ F7
Fn+F8
Fn+F5
Fujitsu
Haier
NEC
Panasonic
Sharp
Hitachi
TOSHIBA
Fn+F3
Fri + F 3
Fn+F3
Fn+F5
Fn+F7
Fn+F5
The user of windows 7 or over windows 7. Simply pressthe
select "copy" to connect. If the operation above is invalid, Please
update the computer graphics driver.
7
Page 9
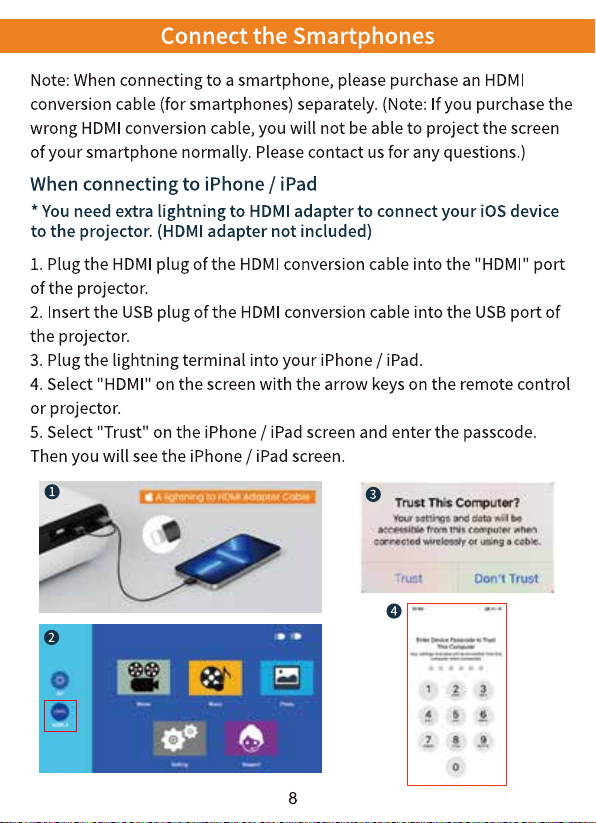
Connect the Smartphones
Note: When connecting to a smartphone, please purchase an HDMI
conversion cable (for smartphones) separately. (Note: If you purchase the
wrong HDMI conversion cable, you will not be able to project the screen
of your smartphone normally. Pleasecontact usfor any questions.)
When connecting to iPhone / iPad
* You need extra lightning to HDMI adapter to connect your iOS device
to the projector. (HDMI adapter not included)
1. Plug the HDMI plug of the HDMIconversion cable into the "HDMI" port
of the projector.
2. Insert the USB plug of the HDMI conversion cable into the USBport of
the projector.
3. Plug the lightning terminal into your iPhone / iPad.
4. Select "HDMI" on the screen with the arrow keys on the remote control
or projector.
5. Select "Trust" on the iPhone / iPad screen and enter the passcode.
Then you will see the iPhone / iPad screen.
0
8
Trust
oomt
Page 10
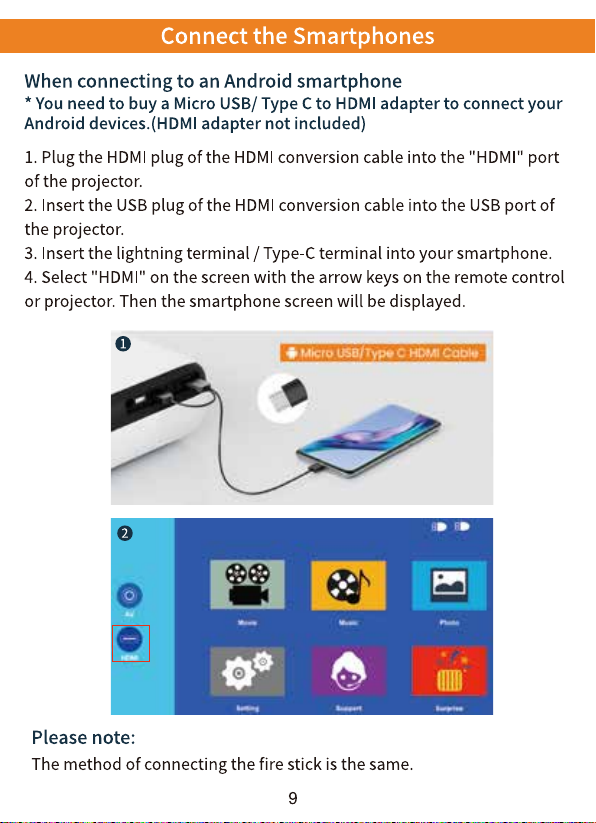
Connect the Smartphones
When connecting to an Android smartphone
* You need to buy a Micro USB/ Type C to HDMI adapter to connect your
Android devices.(HDMl adapter not included)
I. Plug the HDMI plug of the HDMI conversion cable into the "HDMI" port
of the projector.
2. Insert the USBplug of the HDMIconversion cable into the USBport of
the projector.
3. Insert the lightning terminal / Type-Cterminal into your smartphone.
4. Select "HDMI" on the screen with the arrow keys on the remote control
or projector. Then the smartphone screen will be displayed.
o
Please note:
The method of connecting the fire stick is the same.
9
Page 11
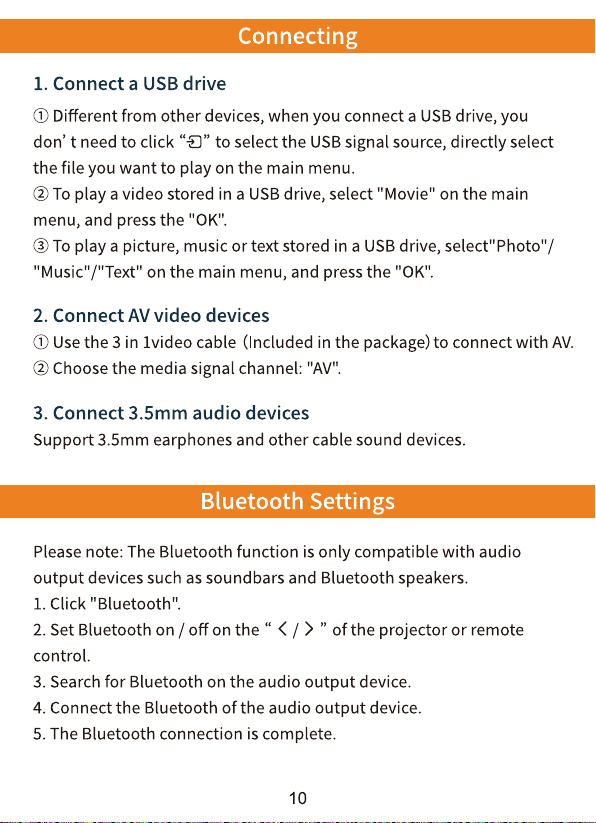
Connecting
1. Connect a USB drive
(j) Different from other devices, when you connect a USB drive, you
don' t need to click "O" to select the USBsignal source, directly select
the file you want to play on the main menu.
@To play a video stored in a USBdrive, select "Movie" on the main
menu, and press the "0K".
@To play a picture, music or text stored in a USBdrive, select"Photo"/
on the main menu, and press the "0K".
2. Connect AV video devices
(j) Usethe 3 in lvideo cable (Included in the package) to connect with AV.
@ Choose the media signal channel: "AV".
3. Connect 3.5mm audio devices
Support 3.5mm earphones and other cable sound devices.
Bluetooth Settings
Please note: The Bluetooth function is only compatible with audio
output devices such as soundbars and Bluetooth speakers.
1. Click "Bluetooth".
2.Set Bluetooth on / off on the " < / > " of the projector or remote
control.
3. Search for Bluetooth on the audio output device.
4. Connect the Bluetooth of the audio output device.
5. The Bluetooth connection is complete.
10
Page 12
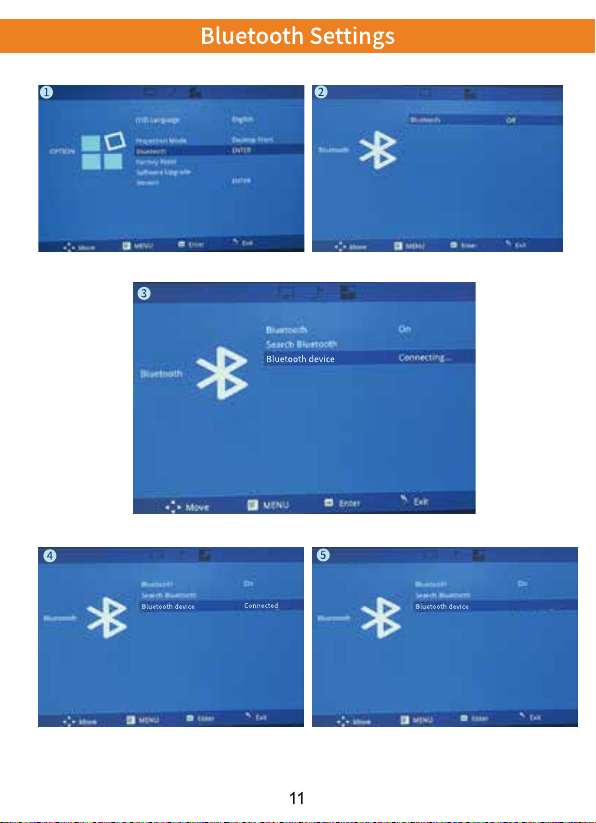
Bluetooth Settings
Bluetooth device
Bluetooth
Bluet.x.th device
11
Page 13
Connecting
More Tips about Netflix, Prime video, Hulu, etc
It works with youtube, chrome, safari, facetime when you connect it to a
smartphone directly.
And it doesn 't support play protected video via APPwhen you connect
it to your smartphone directly. (Netflix, Prime video, Hulu, etc) Due to
these video have an encryption protocol, the projector has no right to
recognized when it is connected directly to the phone via the USB
interface.You can try play protected video via browser when connect to
your iphone.
But it works with Netflix, Amazon prime video or any other copyright
videos when connecting this projector to a laptop, fire tv stick, Roku or
Chrome cast. The reason why the fire stick or other HDMI device can
play Netflix is because the HDMI interface encryption protocol includes
Netflix's.
Last but not least this projector does not support Dolby sound. So there
will be no sound when you play Dolby sound videos, (Amazonfire stick,
Netflix, Blue ray movies and so on). In this case, please kindly turn off
the Dolby sound on your device or apps.
The indtruction for your reference to turn off the Dolby sound
(Settings > Display & Sounds > Audio > Dolby Digital Output > and then
turn Dolby Digital (OFF)
12
Page 14
Projector Settings
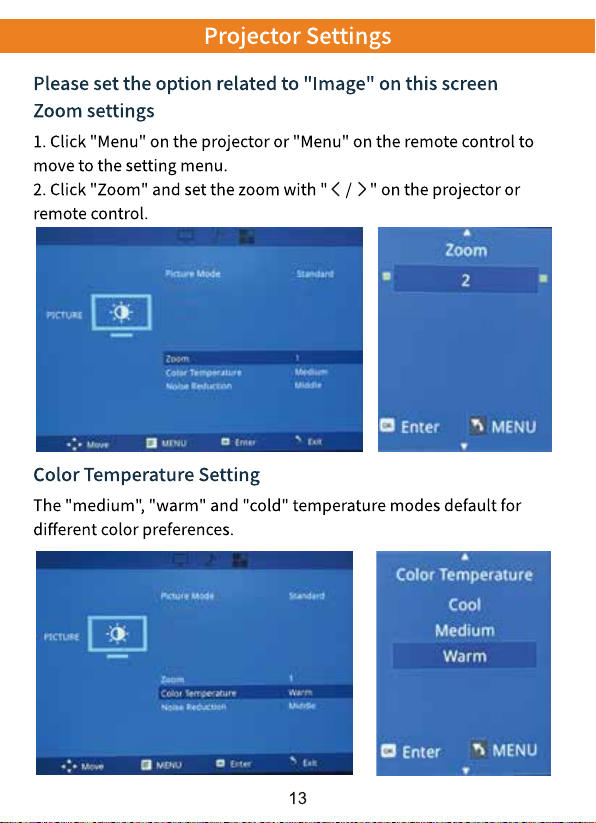
Please set the option related to "Image" on this screen
Zoom settings
I. Click "Menu" on the projector or "Menu" on the remote control to
move to the setting menu.
2. Click "Zoom" and set the zoom with " < / > " on the projector or
remote control.
Zoom
vruu
Enter MENU
Color Temperature Setting
The "medium", "warm" and "cold" temperature modes default for
different color preferences.
Color Temperature
cool
Medium
Warm
Enter
13
MENU
Page 15
Projector Settings
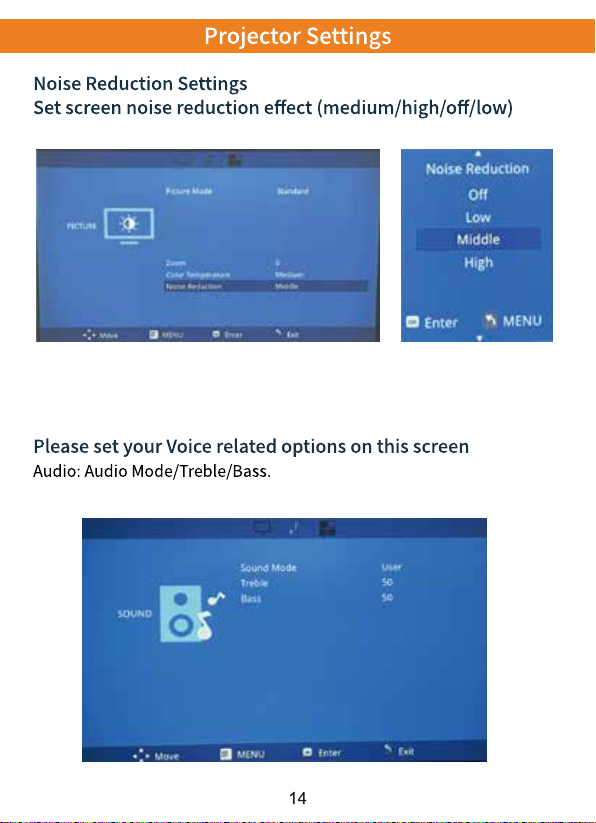
Noise Reduction Settings
Set screen noise reduction effect (medium/high/off/low)
Noise Red
Middle
High
Please set your Voice related options on this screen
Audio: Audio Mode/Treble/Bass.
MENU
O
14
Page 16
Projector Settings
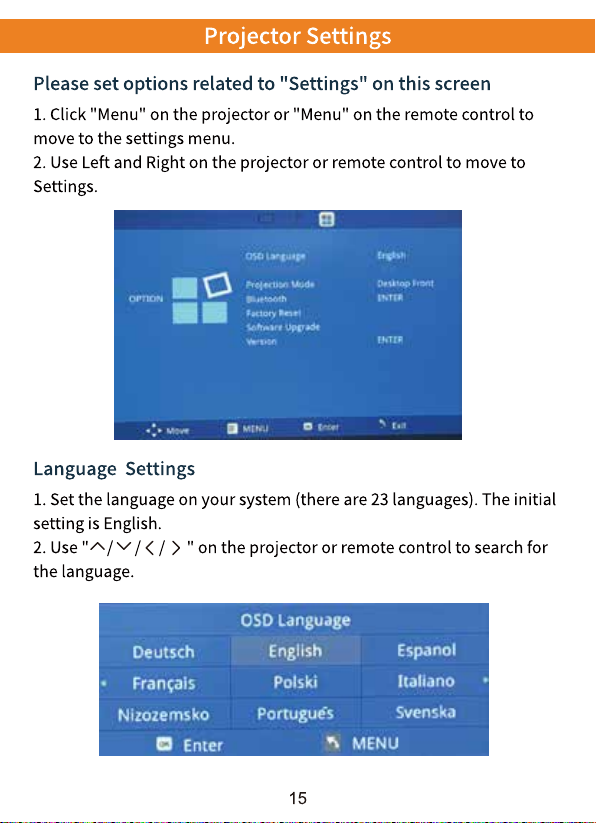
Please set options related to "Settings" on this screen
1. Click "Menu" on the projector or "Menu" on the remote control to
move to the settings menu.
2. Use Left and Right on the projector or remote control to move to
Setti ngs.
Language Settings
I. Setthe language on your system (there are 23 languages). The initial
setting is English.
2. Use "A/ v / < / > " on the projector or remote control to search for
the language.
Deutsch
Franeis
Nizozemsko
Enter
OSD Language
English
Polski
Portugués
15
Espanol
Italiano
Svenska
MENU
Page 17
Projector Settings
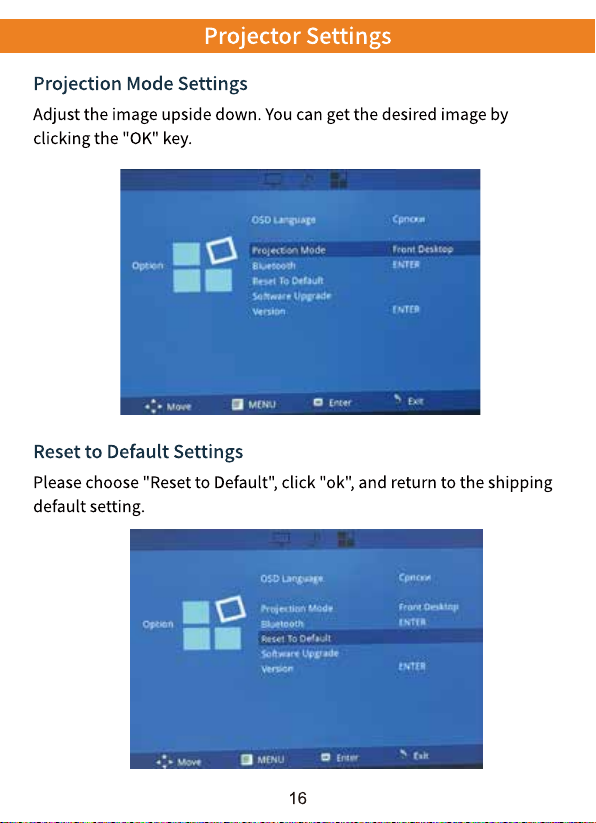
Projection Mode Settings
Adjust the image upside down. You can get the desired image by
clicking the "0K" key.
Reset to Default Settings
Please choose "Reset to Default", click "0k", and return to the shipping
default setting.
16
Page 18

 Loading...