

Page 1

OWNER’S MANUAL
.......................................................................................................................................................
HAPPATIO
Outdoor Patio Gazebo
"Making Happy Living Easier"
Page 2

In the following pages, you’ll find
a detailed installation
guide for your reference.
If you have any questions,
please contact customer service:
E-mail: [email protected]
Facebook: @happatio
Page 3

Gazebo installation steps
WARNING
Please read and make sure you understand this entire manual before attempting to assemble
or install this product.
Some parts may have sharp edges. Please wear protective gloves when assembling and
installing this product.
Keep all children and pets away from your assembly area.
This item is heavy. Please handle with care. Two or more people are required to assemble
this gazebo.
...............................................................................................................................................................
!
CAUTION
Firmly secure all bolts, screws, and knobs before use. Every 90 days, check to make sure that
all bolts, screws, and knobs are still secure.
If any parts are missing, broken, damaged, or worn, stop using this product until repairs are
made and/or factory replacement parts are installed.
...............................................................................................................................................................
!
ATTENTION
Check every part against the part list before assembly. If any parts are missing or damaged,
do not attempt to assemble the product. Instead, please contact us.
We care about your experience. Please feel free to contact us if you have any advice for us
about how we can do better. We will do our best to offer you ecient solutions to any
...............................................................................................................................................................
issues ASAP.
√
WARRANTY COVERAGE REQUIREMENTS
Pictures of the damaged parts.
The order number of your product.
Please gather this information BEFORE you contact us.
Do not use this item in a way inconsistent with the manufacturer's instructions, as this could
void the product warranty.
...............................................................................................................................................................
Page 4
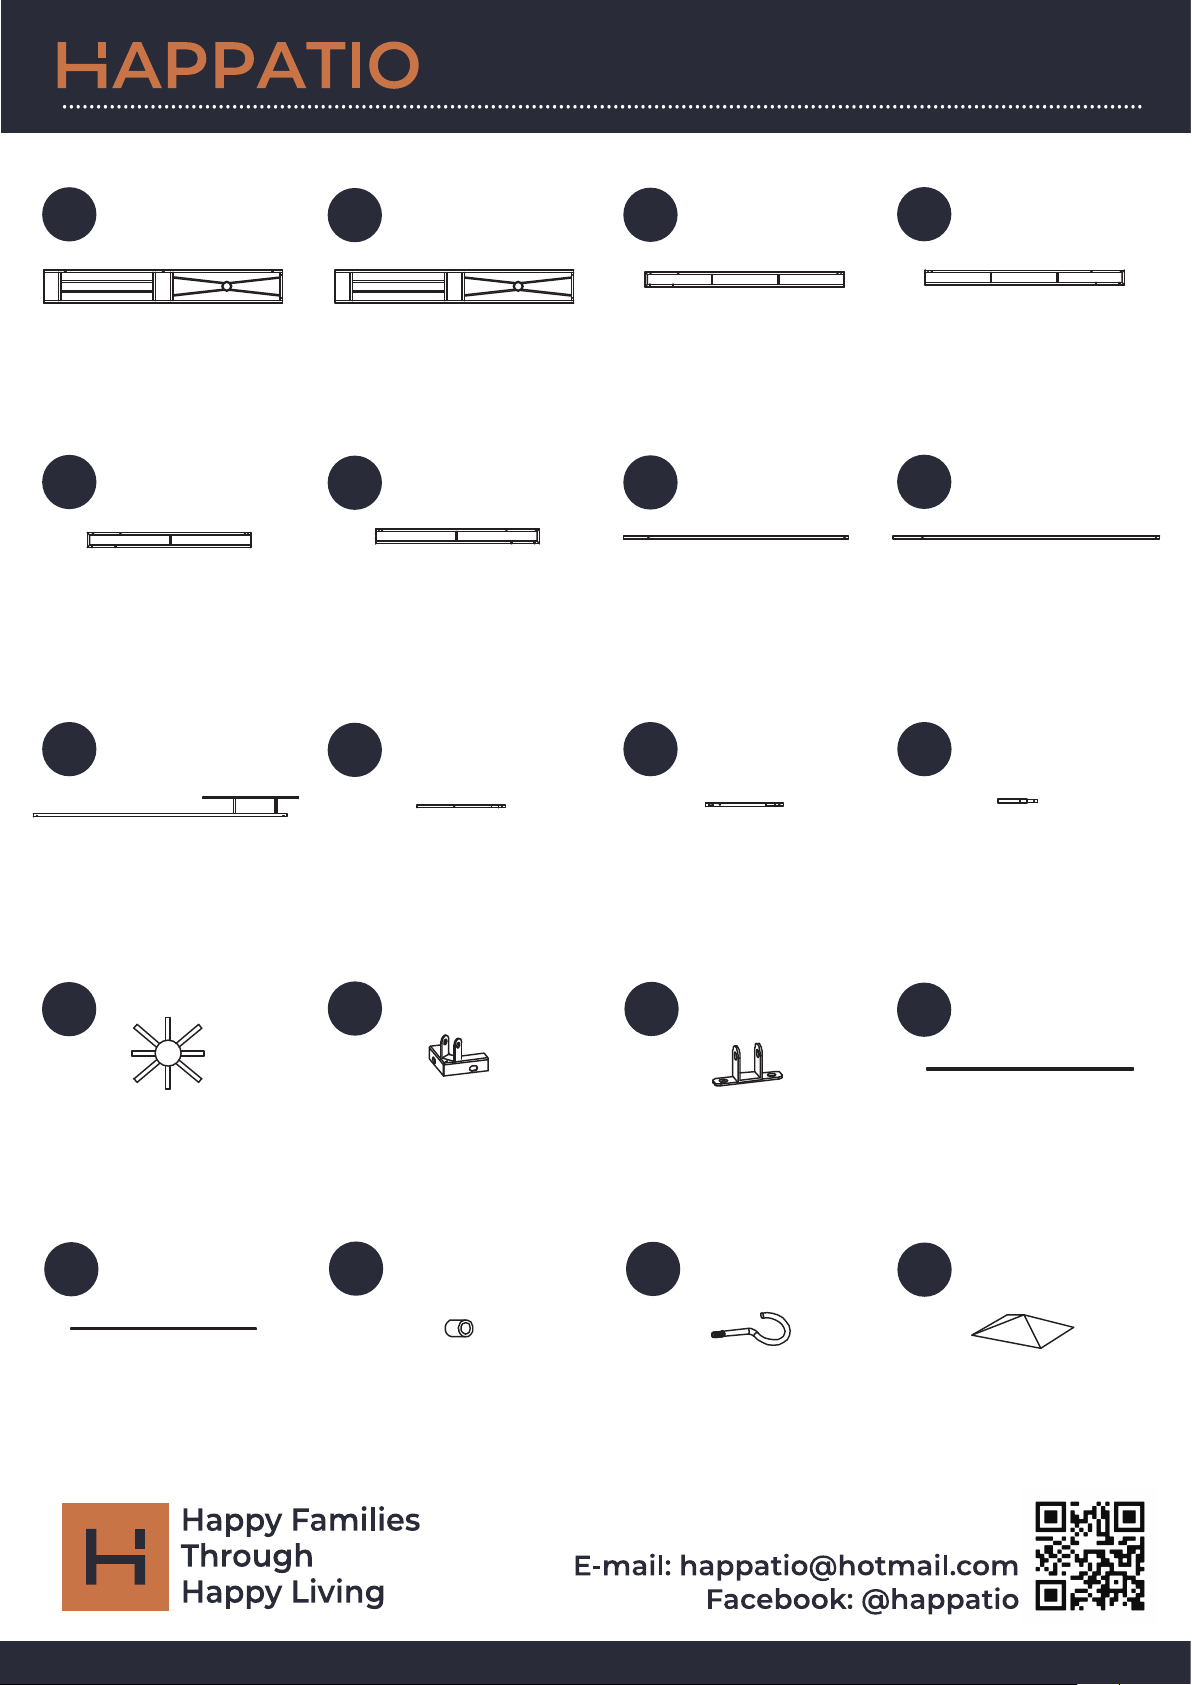
Gazebo installation steps
Table installation steps
...............................................................................................................................................................
A
4PC
B
..........................
4PC 2PC 2PC
C
..........................
C1
..........................
...............................................................................................................................................................
D
2PC
D1
..........................
2PC 2PC 2PC
E
..........................
F
..........................
...............................................................................................................................................................
G K K1
G1
4PC
..........................
3PC 1PC 1PC
..........................
..........................
...............................................................................................................................................................
H
I
..........................
1PC 4PC
J
..........................
4PC
R
..........................
4PC
...............................................................................................................................................................
R1
4PC
L
..........................
16PC
S
..........................
1PC
M
..........................
1PC
...............................................................................................................................................................
111
Page 5
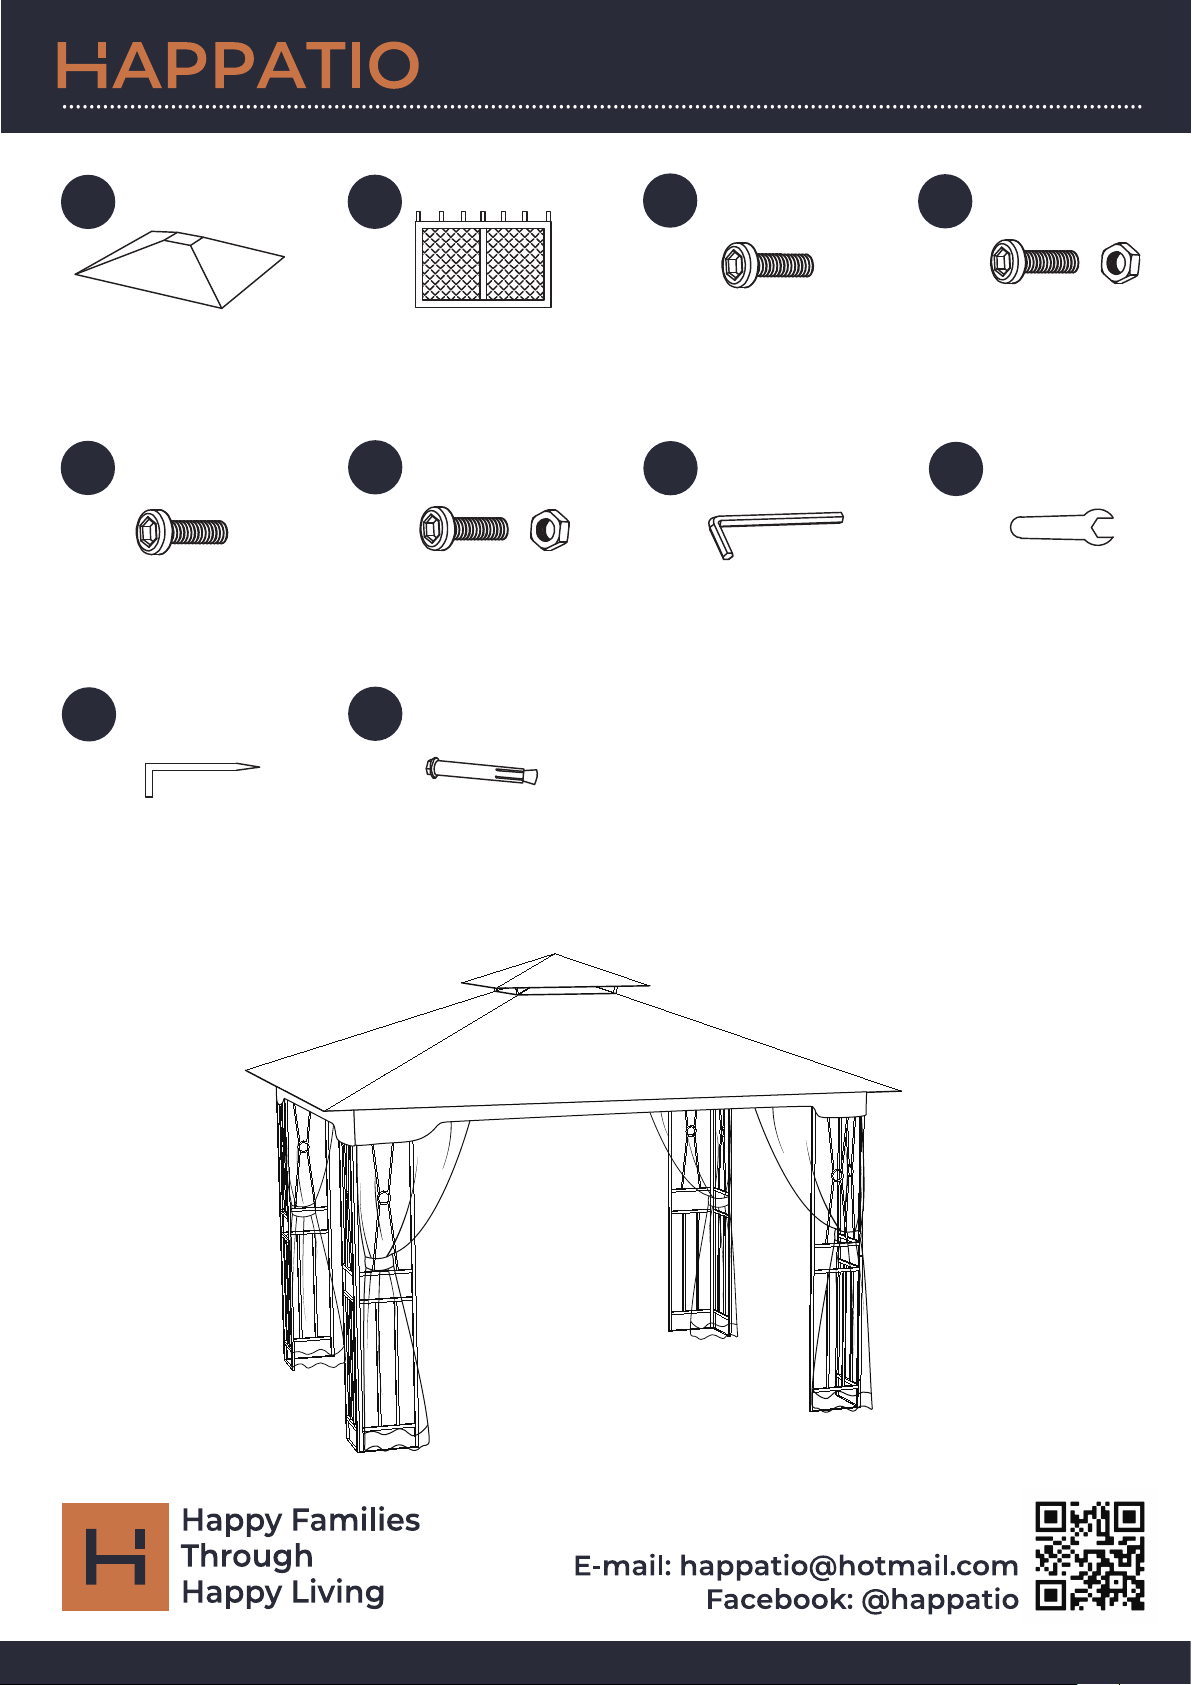
Gazebo installation steps
Table installation steps
...............................................................................................................................................................
M6*15 M6*30
M1
N
X
X1
1PC 4PC
..........................
..........................
16PC
..........................
8PC
...............................................................................................................................................................
M6*30 M6*15
X2
32PC 8PC
X3
..........................
O
..........................
1PC
P
..........................
1PC
...............................................................................................................................................................
Q
8PC 8PC
Q1
..........................
..........................
...............................................................................................................................................................
2
Page 6
Gazebo installation steps
STEP 1
X2
M6*30
12PC
O
1PC
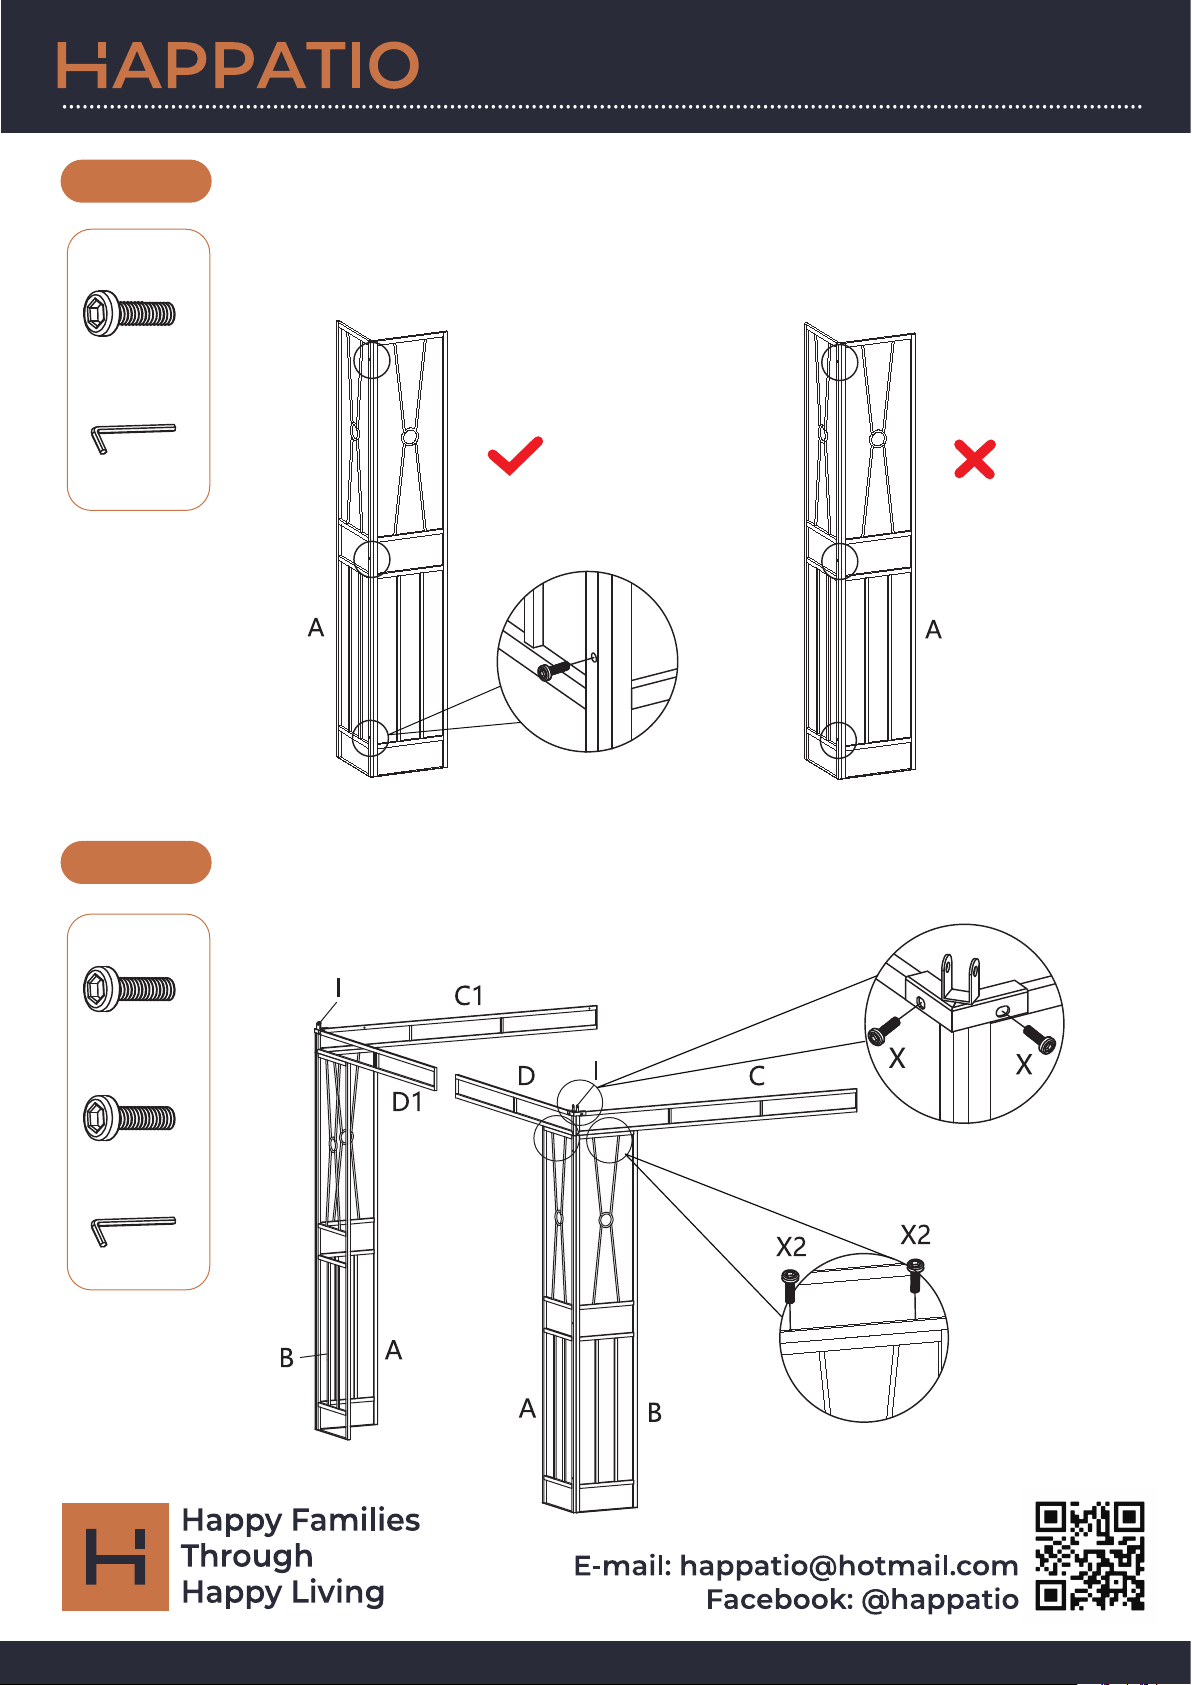
Connect "A" and "B", making sure they look exactly as they do in the figure
below.
Make sure “A”s and “B”s are not reversed. If these pieces are reversed, you
won’t be able to complete the assembly later on.
B
X2
B
X4
...............................................................................................................................................................
STEP 2
X2
M6*30
16PC
X
M6*15
8PC
O
1PC
1. Connect "A" and "D" to "X2", and then connect "B" and "C" to "X2".
Connect "A" and "C1" to "X2", and then connect "B" and "D1" to "X2".
2. Then ax "I" to the corner position.
2.
3
1.
X2
Page 7
STEP 3
>
-
,
-
-
0
0
8
8
8
S
1
1
1
1
X
M6*15
8PC
X3
M6*15
8PC
O
Gazebo installation steps
1PC
P
1PC
...............................................................................................................................................................
STEP 4
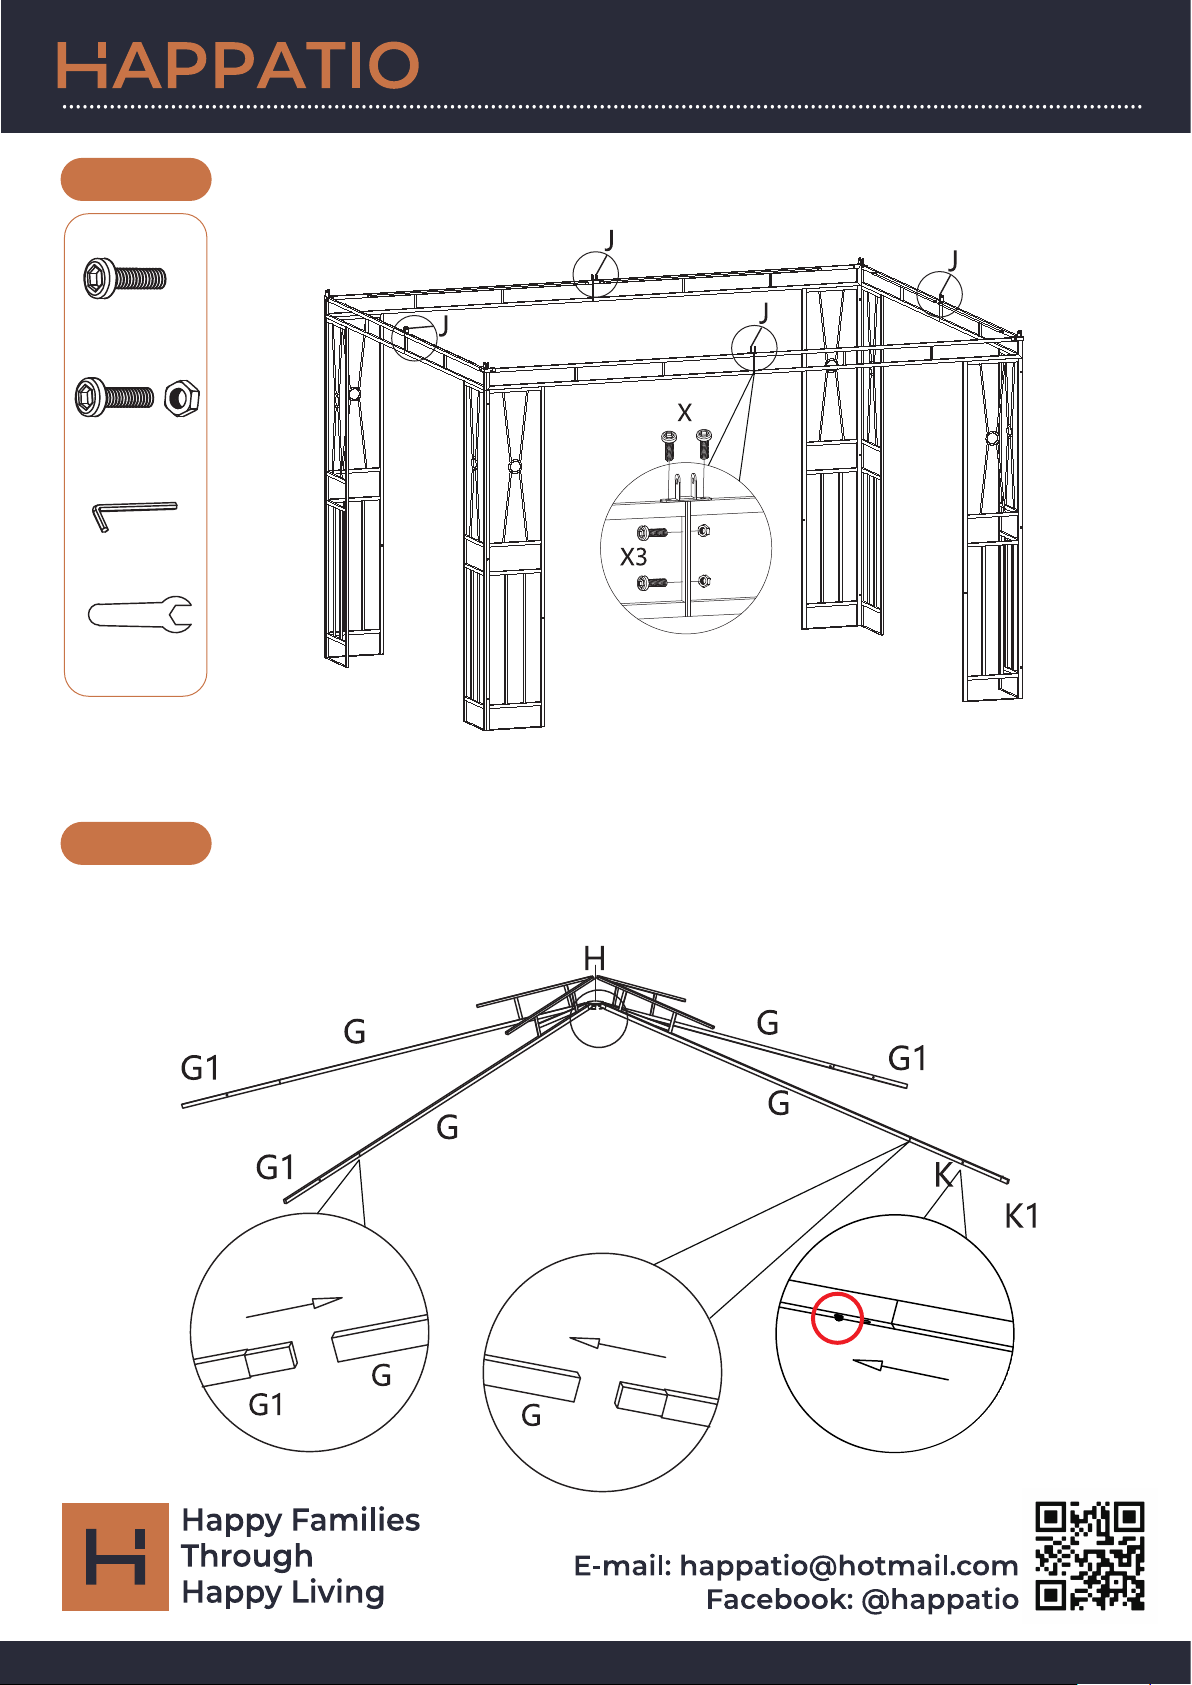
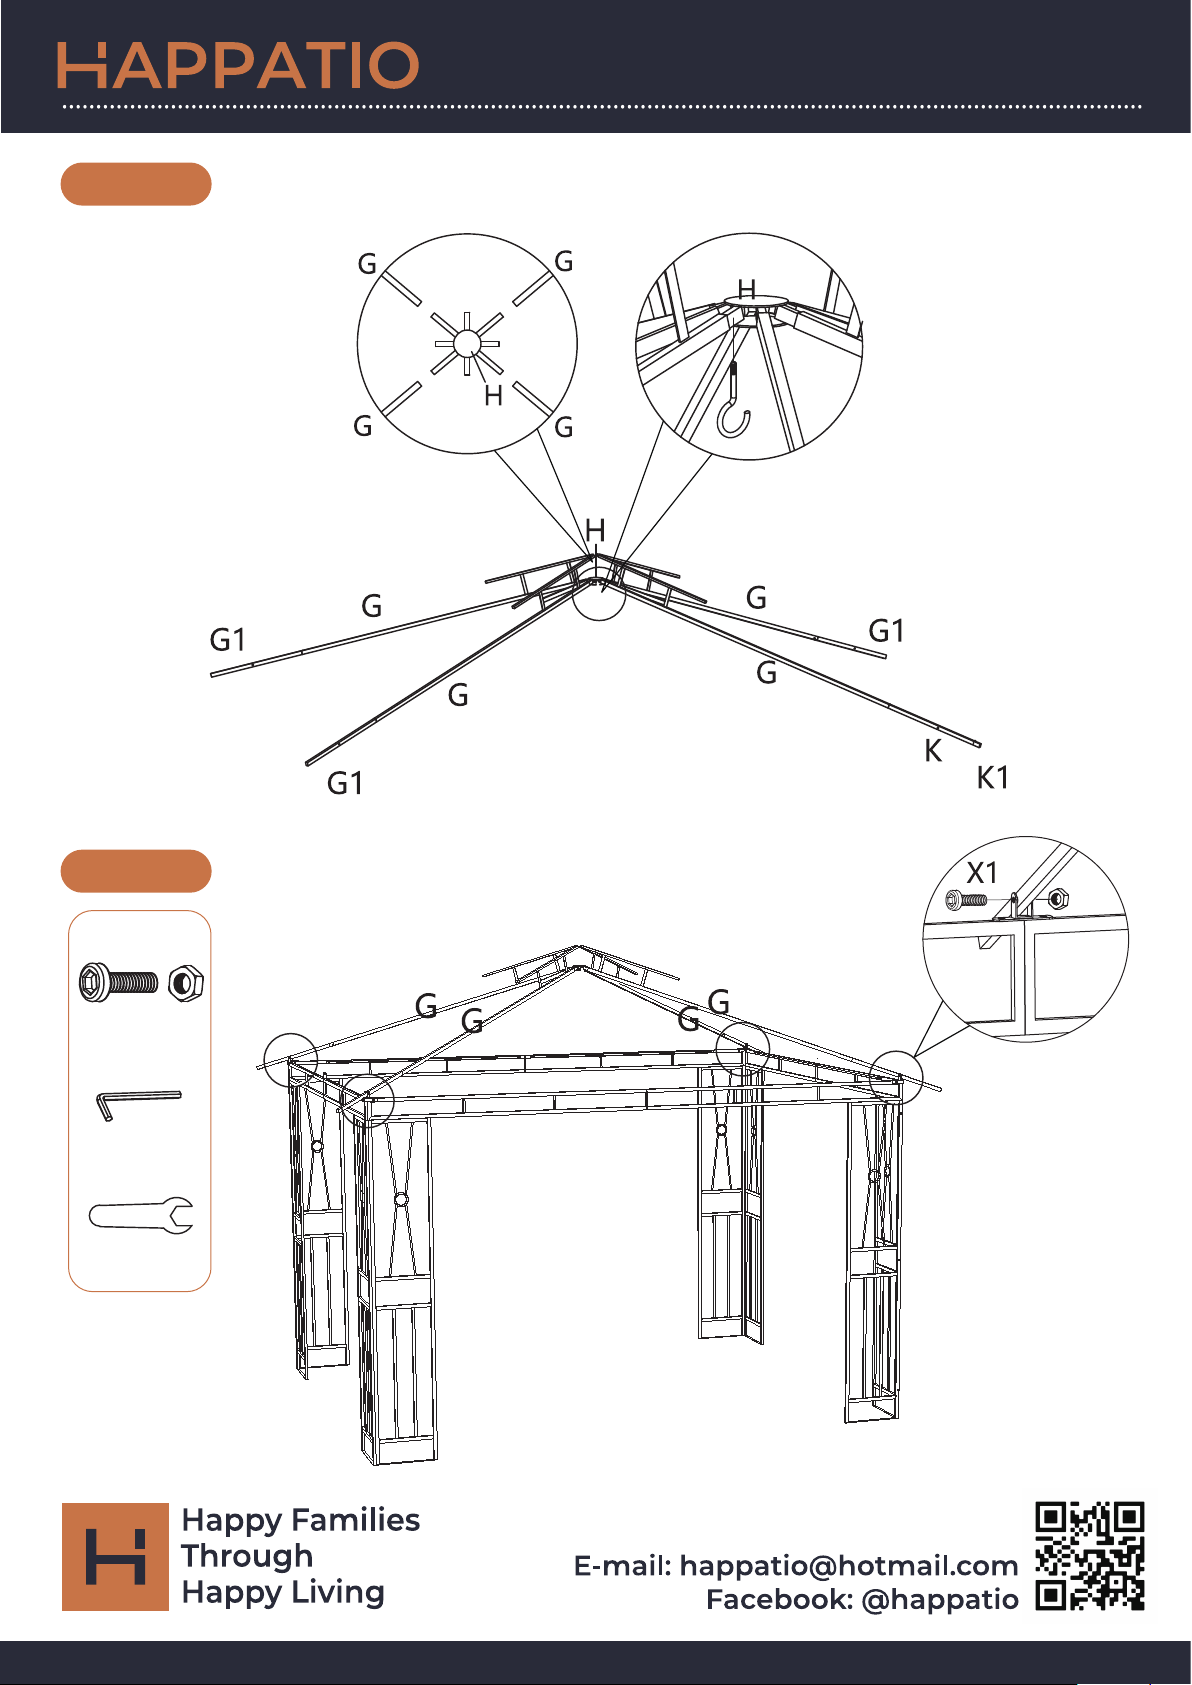
1.Connect the "G1" piece to the "G" piece, as shown in the figure below.
2.Connect the "K1" piece to the "K" piece, as shown in the figure below, make
sure that K1 fits into the place marked by the red circle.
3.Connect the "K" piece to the "G" piece, as shown in the figure below.
1
K
2
3
4
Page 8
Gazebo installation steps
STEP 5
Connect the four "G" pieces to the "H" piece, as shown in the figure below.
S
1 2
...............................................................................................................................................................
STEP 6
X1
M6*30
4PC
O
1PC
P
1PC
5
Page 9
Gazebo installation steps
STEP 7
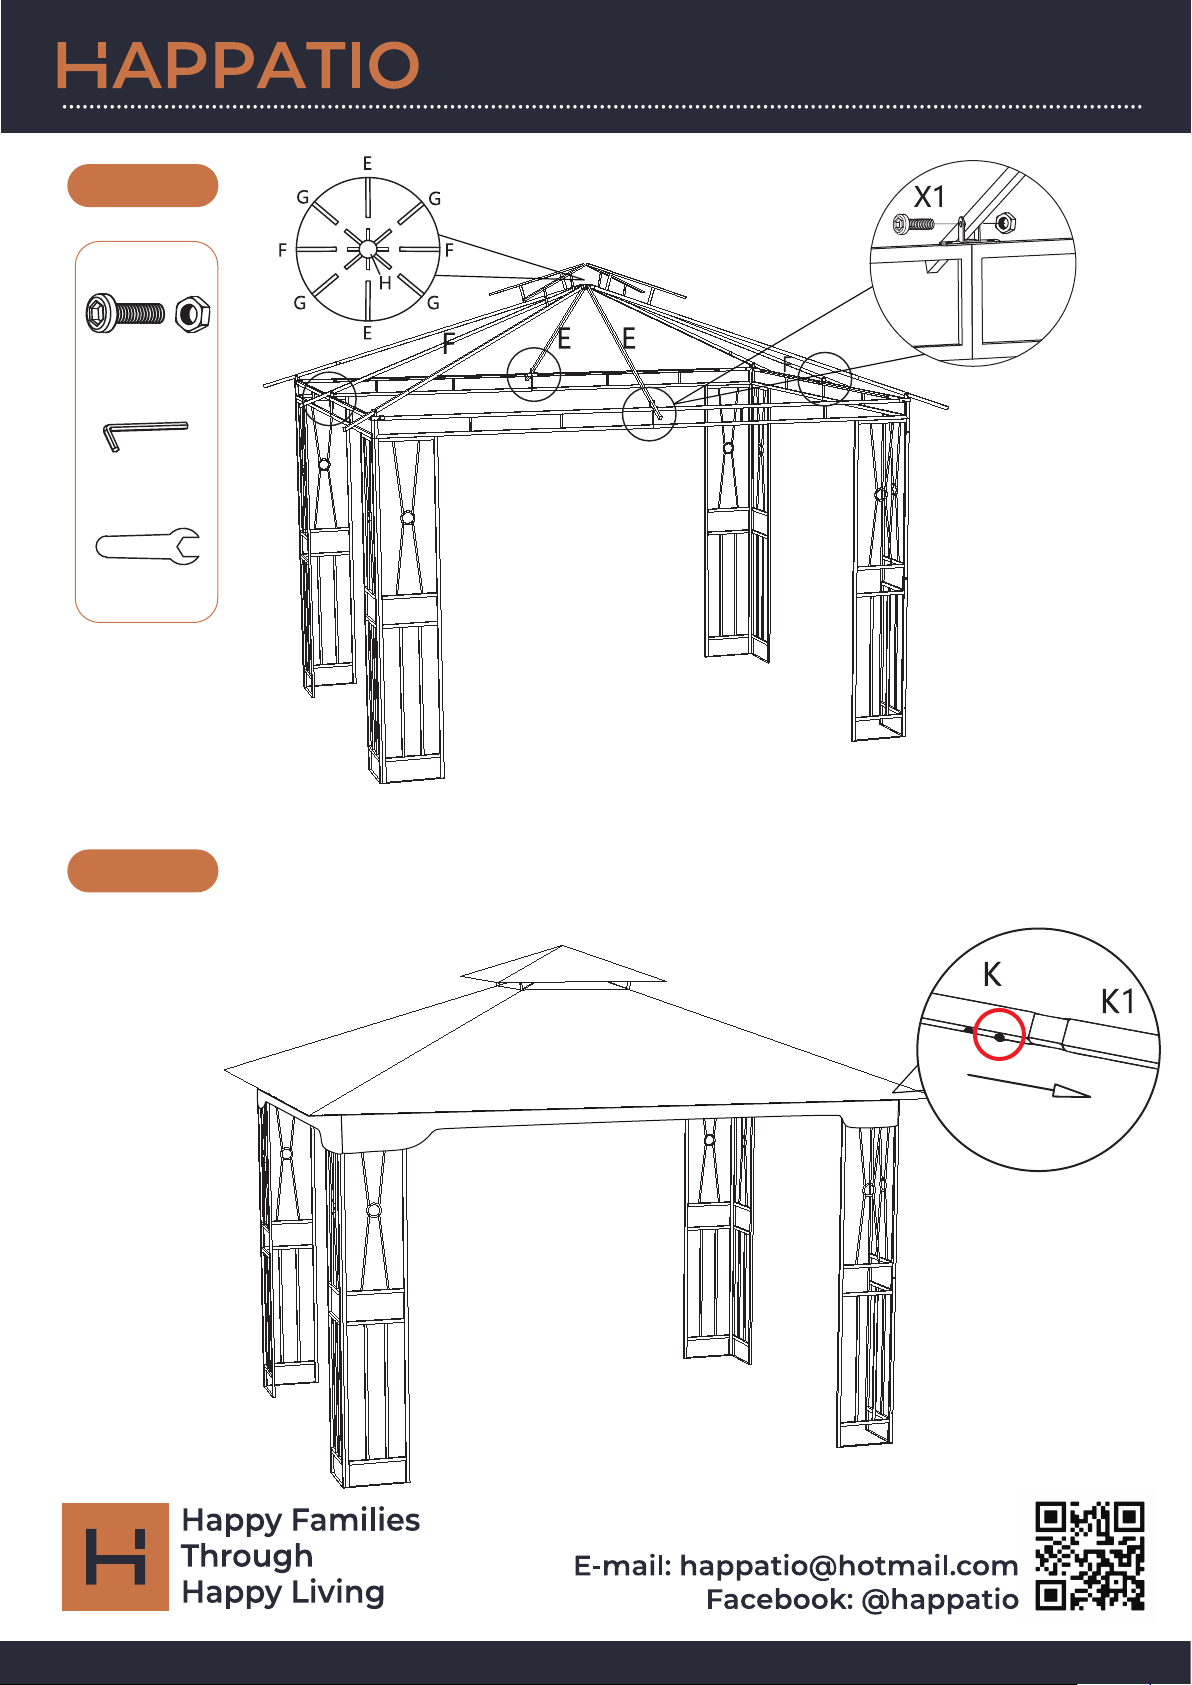
X1
M6*30
4PC
O
1PC
P
1PC
1.
2.
...............................................................................................................................................................
STEP 8
1.First, install “M1” as shown in the figure. Once “M1” is in place, install “M”.
2.Slide K1 outwards to make sure it is stuck at the place marked by the red
circle.
M
M1
6
Page 10
Gazebo installation steps
STEP 9
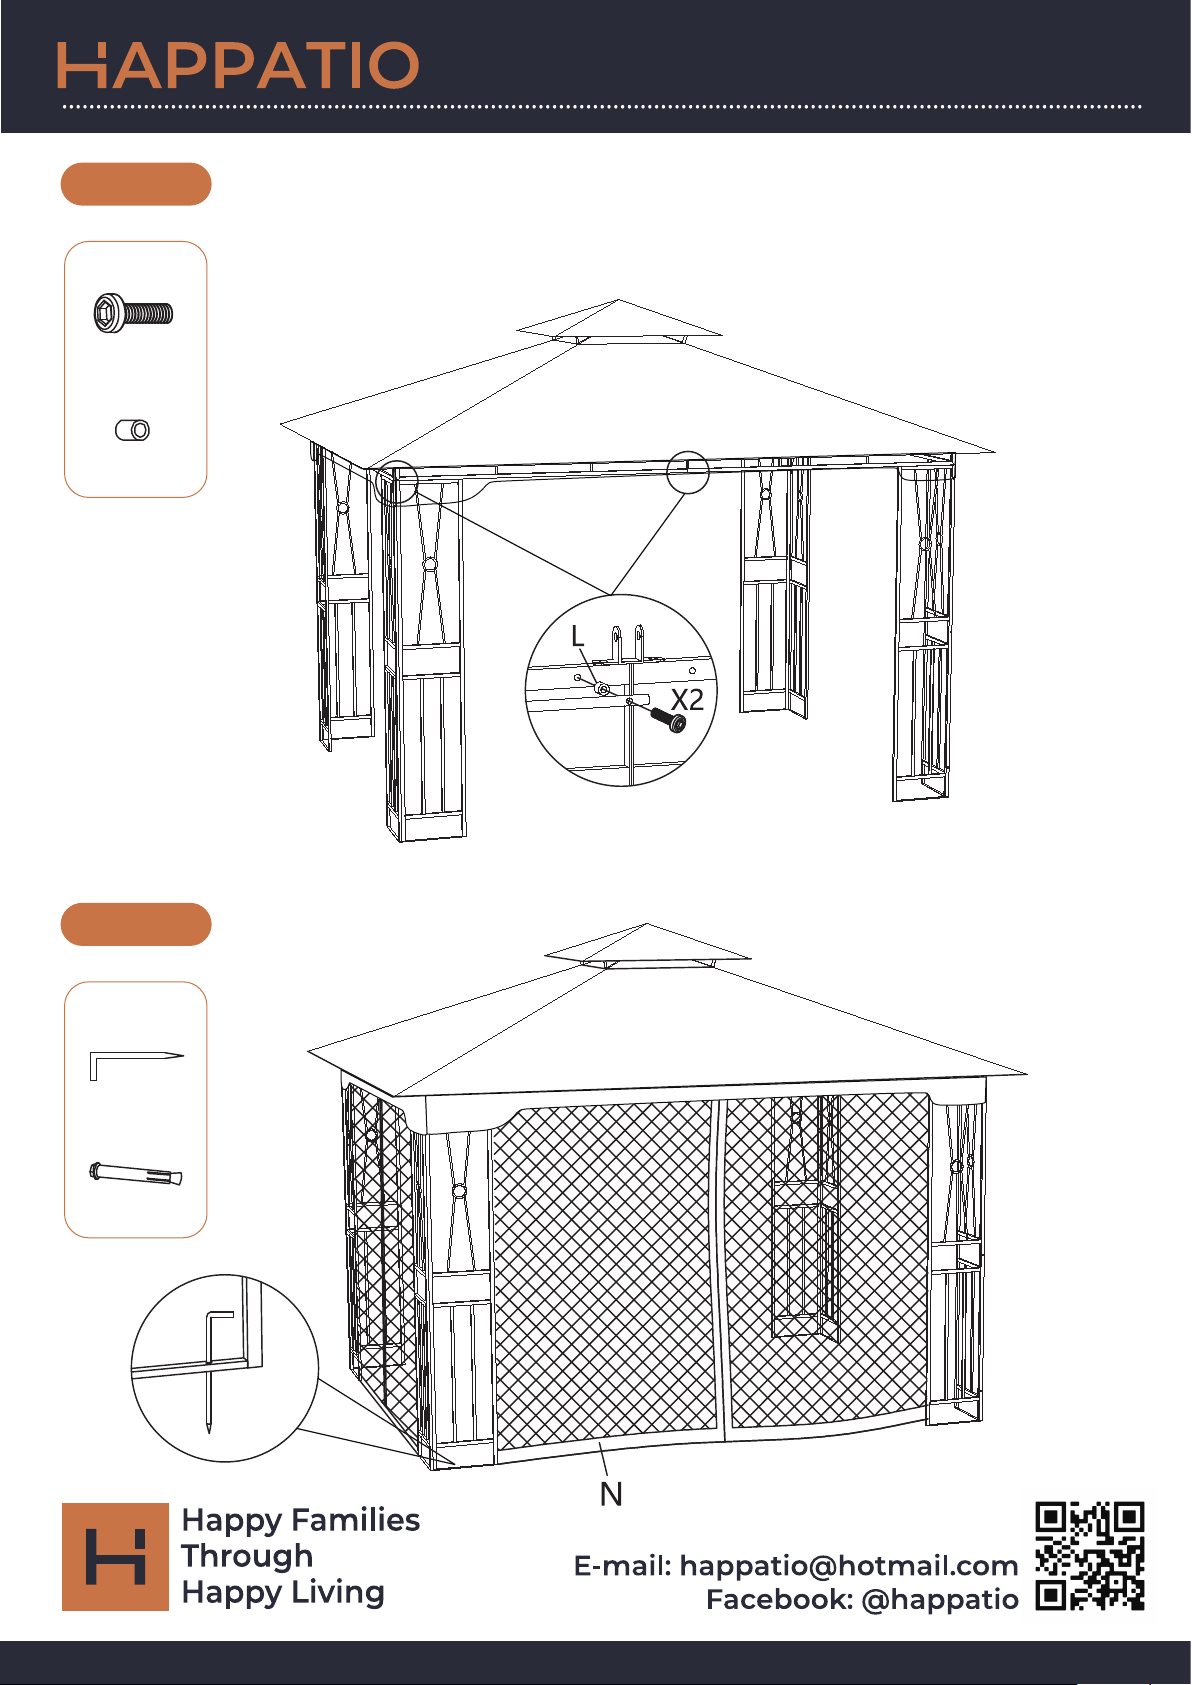
X2
M6*30
16PC
L
16PC
Place one "L" between "R" and "C", and then fix it in place using another "X2". Next,
place another "L" between "R" and "C1", and then fix it in place using another "X2".
Place one “L” between “R1” and “D”, and then fix it in place using an "X2". Next,
place another "L" between "R1" and "D1", and then fix it in place using another "X2".
M
M1
...............................................................................................................................................................
STEP 10
Q
8PC
Q1
8PC
Q/Q1
M
M1
7
 Loading...