

Page 1
Thank you for buying a Samsung Camera.
This manual will guide you through using the Digimax 430, including capturing images, downloading images and using
the Photo Impression software. Please read this manual carefully before using your new camera.
ENGLISH
Page 2
2
Use this camera in the following order
Instructions
Insert the
USB cable
Set up the
camera driver
Before connecting the camera to a PC, via the
USB cable, you will need to set up the camera
driver. Install the camera driver that is contained in
the Application S/W CD-ROM.(p.76)
Take a picture (p.21)
Insert the supplied USB cable into the PC’s USB
port and the camera’s USB connection
terminal.(p.82)
Check the camera’s power
If the power is turned off, press the camera button
to power it on.(p.24)
Take a picture
Check the
camera’s power
Check
[Removable Disk]
Open Window s EXPLORER and search for
[Removable Disk].(p.83)
If you use a card reader to copy the images on the memory card to your PC, the images
could be damaged. When transferring the images taken with the camera to your PC, be sure
to use the supplied USB cable to connect the camera to your PC. Please note that the
manufacturer holds no responsibility for loss or damage of images on the memory card due
to the use of a card reader.
Page 3
5
Getting to know your camera
Thank you for buying a Samsung Digital Camera.
Prior to using this camera, please read the user manual thoroughly.
When you require After Sales service, please bring the camera and the cause of the camera
malfunction (such as Batteries, Memory card etc.) to the A/S center.
Please check that the camera is operating properly prior to when you intend to use it (e.g. for
a trip or an important event) to avoid disappointment. Samsung camera takes no
responsibility for any loss or damages that may result from camera malfunction.
Keep the manual in a safe place.
Microsoft, Windows and Windows logo are registered trademarks of Microsoft Corporation
incorporated in the United States and/or other countries.
All brand and product names appearing in this manual are registered trademarks of their
respective companies.
This manual contains instructions on using this camera that will help you to use this camera
safely and correctly. This will help prevent danger and injury to others.
About the icons
DANGER
DANGER indicates an imminently hazardous situation which, if not avoided,
will result in death or serious injury.
WARNING
WARNING indicates a potentially hazardous situation, which, if not avoided,
could result in death or serious injury.
CAUTION
CAUTION indicates a potentially hazardous situation, which, if not avoided,
may result in a minor or moderate injury.
Page 4

6
Danger
Do not attempt to modify this camera in any way. This may result in fire, injury, electric shock
or severe damage to you or your camera. Internal inspection, maintenance and repairs
should be carried out by your dealer or Samsung Camera Service Center.
Please do not use this product in close proximity to flammable or explosive gases, as this
could increase the risk of explosion.
Should any form of liquid or a foreign object enter the camera, do not use it. Switch off the
camera, and then disconnect the power source (batteries or AC Power Adapter). You must
contact your dealer or Samsung Camera Service Center. Do not continue to use the camera
as this may cause a fire or electric shock.
Do not insert or drop metallic or inflammable foreign objects into the camera through access
points e.g. the memory card slot and battery chamber. This may cause a fire or electric
shock.
Do not operate this camera with wet hands. This could pose a risk of electric shock.
Do not use the flash in close proximity to people or animals. Positioning the flash too close to
your subject’s eyes, may cause eyesight damage.
When taking photographs, never point the lens of the camera directly into very strong light.
This may result in permanent damage to your eyesight.
For safety reasons keep this product and accessories out of reach of children or animals to
prevent accidents e.g.:
Swallowing batteries or small camera accessories. If an accident should occur, please
consult a doctor immediately.
There is the possibility of injury from the camera’s moving parts.
Batteries and camera may become hot during prolonged use and it may result in camera
malfunction. Should this be the case, allow the camera to sit idle for a few minutes to allow it
time to cool.
Do not recharge non rechargeable batteries. This may cause an explosion.
Do not leave this camera in places subject to extremely high temperatures, such as a sealed
vehicle, direct sunlight or other places of extreme variances in temperature.
Exposure to extreme temperatures may adversely affect the camera s internal components
and could cause a fire.
When in use, do not cover the camera or AC Power Adapter. This may cause heat to build up
and distort the camera body or cause a fire. Always use the camera and its accessories in a
well-ventilated area.
Warning
Page 5

7
Caution
Leaking, overheating, or burst batteries could result in fire or injury.
Use batteries with the correct specification for the camera.
Do not short circuit, heat or dispose of batteries in fire.
Do not insert the batteries with the reverse polarities.
Remove the batteries when not planning to use the camera for a long period of time.
Batteries may leak corrosive electrolyte and irreparably damage the camera's components.
Do not fire the flash while it is in contact with hands or objects. Do not touch the flash after
using it continuously. It may cause burns.
Do not move the camera while it is switched on, if you are using the AC Power Adapter.
After use, always switch off the camera before unplugging the adapter from the wall socket.
Then make sure that any connector cords or cables to other devices are disconnected before
moving the camera. Failure to do so may damage the cords or cables and cause a fire or
electric shock.
An FCC warning
This device has been tested in accordance with the limits of a class B digital device
under item 15 of the FCC rules. These limits are designed to provide protection against
harmful interference in commercial installation. This equipment generates, absorbs and
can emit radio frequency energy. If it is not installed and used in accordance with the
instructions, it may cause harmful interference to radio communication. There is
however, no guarantee that interference will not occur in some situations. Should any
interference occur when this device is in operation, please try one or more of the
following measures.
Change the location and direction of any aerial.
Increase distance between the camera and the affected device.
Use a different socket away from the affected device.
Please contact a Samsung agent or a radio/TV engineer.
This device complies with part 15 of the FCC Rules.
Changes or modifications not expressly approved by the party responsible for
compliance could void user's authority to operate the equipment.
Page 6
8
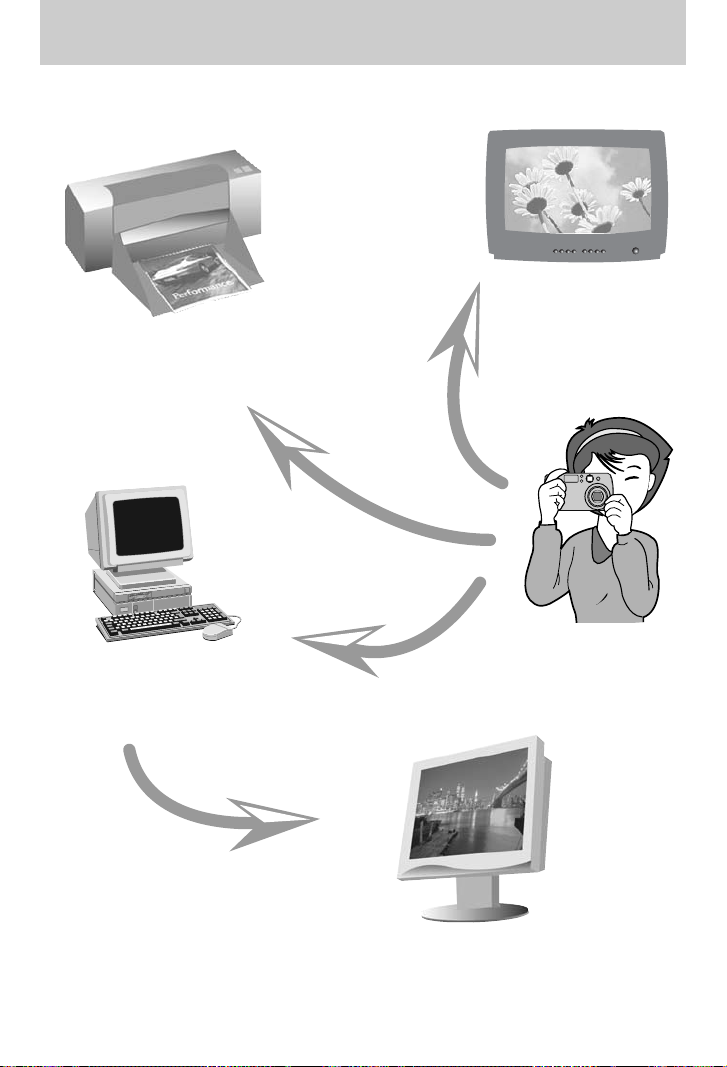
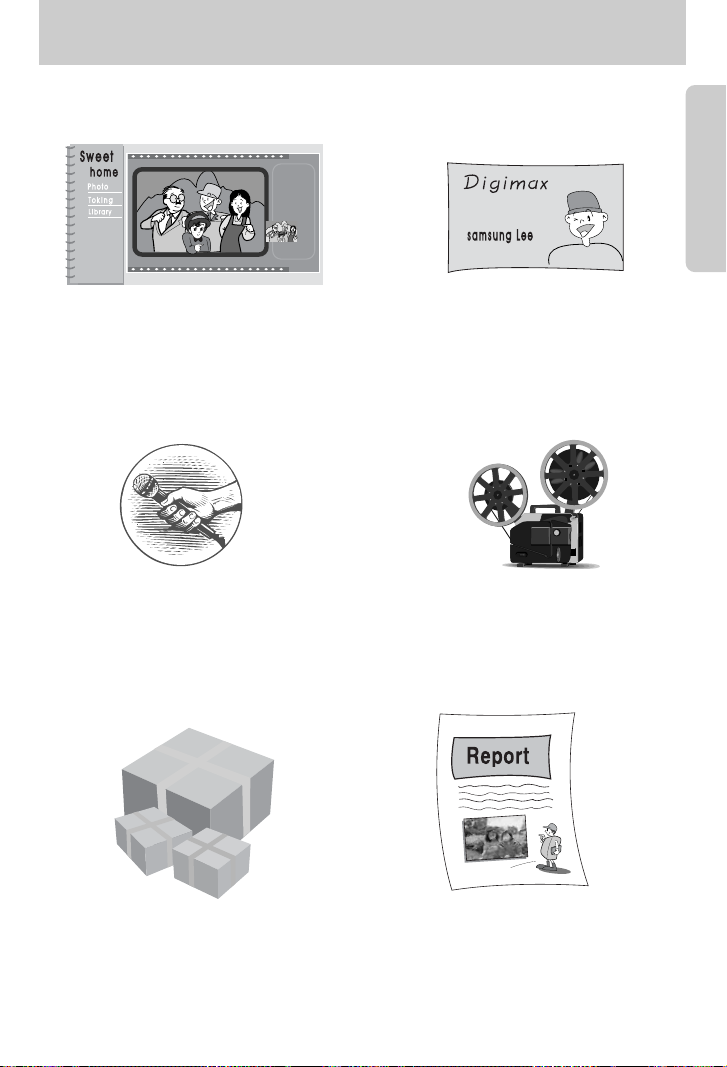
This digital camera can be used for
Printing images using a dedicated printer,
DPOF and PictBridge compatible printer or a
DPOF-equipped photo lab.
(refer to page 55~62)
Down loading image files from
camera to computer.
(refer to page 84)
Editing images on a PC.
(refer to page 115)
Viewing images on a TV.
(refer to page 70)
Taking a picture.
(refer to page 20~41)
Page 7
9
This digital camera can be used for
Inserting images directly into any
electronic document.
Taking a self-portrait and using the image
to personalize name cards.
You can even create your own unique gift
wrap paper by using your digital images.
Creation of a digital photo album.
Recording your voice.
(refer to page 22)
Recording a movie clip
(refer to page 21)
Page 8
10
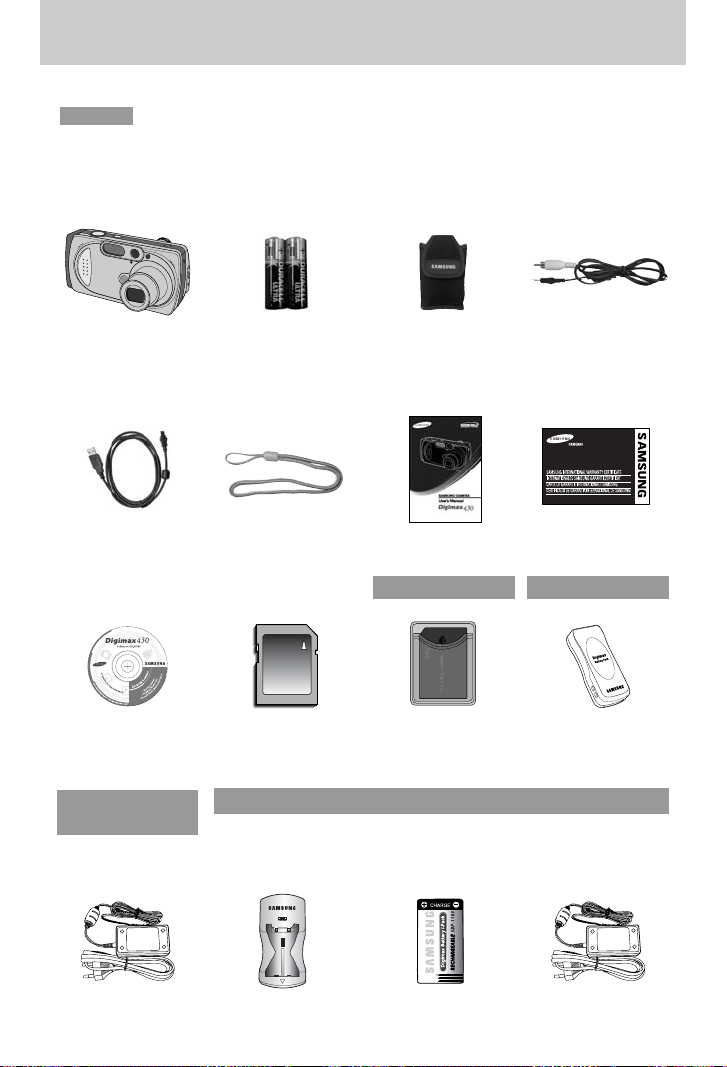
Manufacturer's contents
Please check that you have the correct contents before using this product.
marked contents are optional.
Digital Camera AV cablePouch
2 AA Alkaline
Batteries
USB cable Product warrantyUser manualCamera strap
Software CD
AC adapter (3.3V)
Battery pack (SBP-3603)
SD memory card Memory Stick Duo
Battery charger AC adapter(5V)Rechargeable battery
Digimax Battery I-Pack : SBP-1103 KIT
Page 9
11
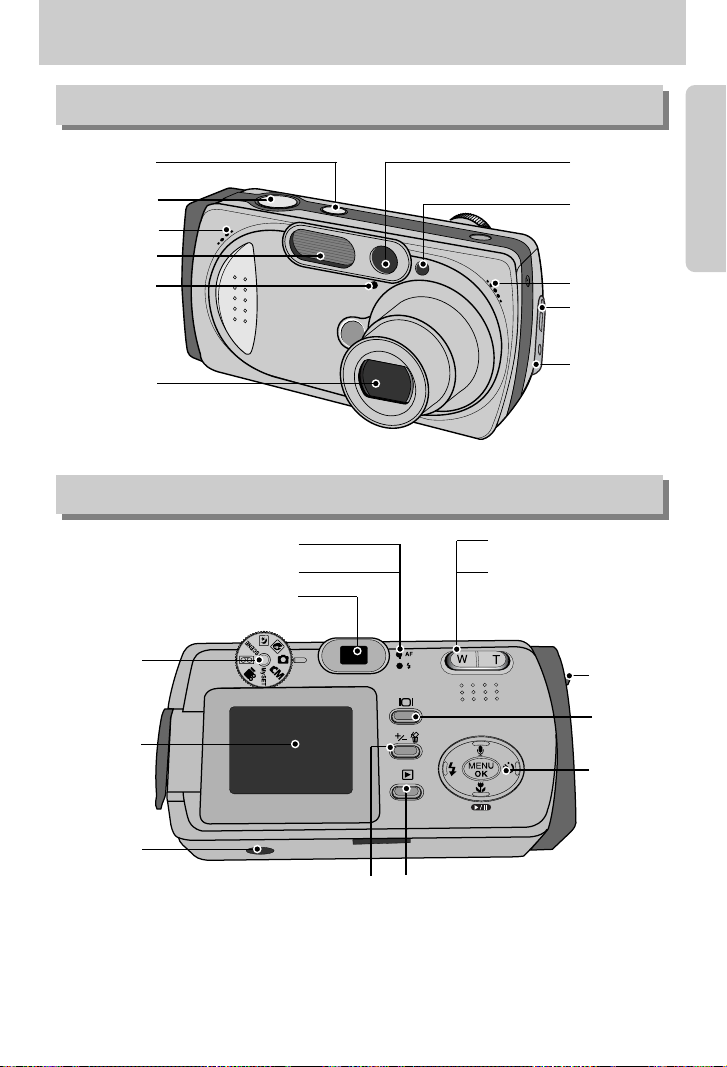
Identification of features
Front & Top
Back & Bottom
Shutter button
Self-timer lamp
Flash light
amount sensor
Viewfinder
DC input
connection point
USB/ AV
connection terminal
Lens
Microphone
Flash
Power button
LCD monitor
Mode dial
Viewfinder
Autofocus indicator lamp(Green)
Flash indicator lamp(Red)
Zoom W button (Thumbnail)
Zoom T button (Digital zoom)
LCD button
Tripod socket
+&-/ DELETE button
Play mode button
5-function
button
* When using the digital zoom to take a picture, the composition of the picture may be different
depending on whether you are using the LCD monitor or the viewfinder.
The picture will be taken in the composition of the picture as it appears on the LCD monitor.
Strap eyelet
Speaker
Page 10
12
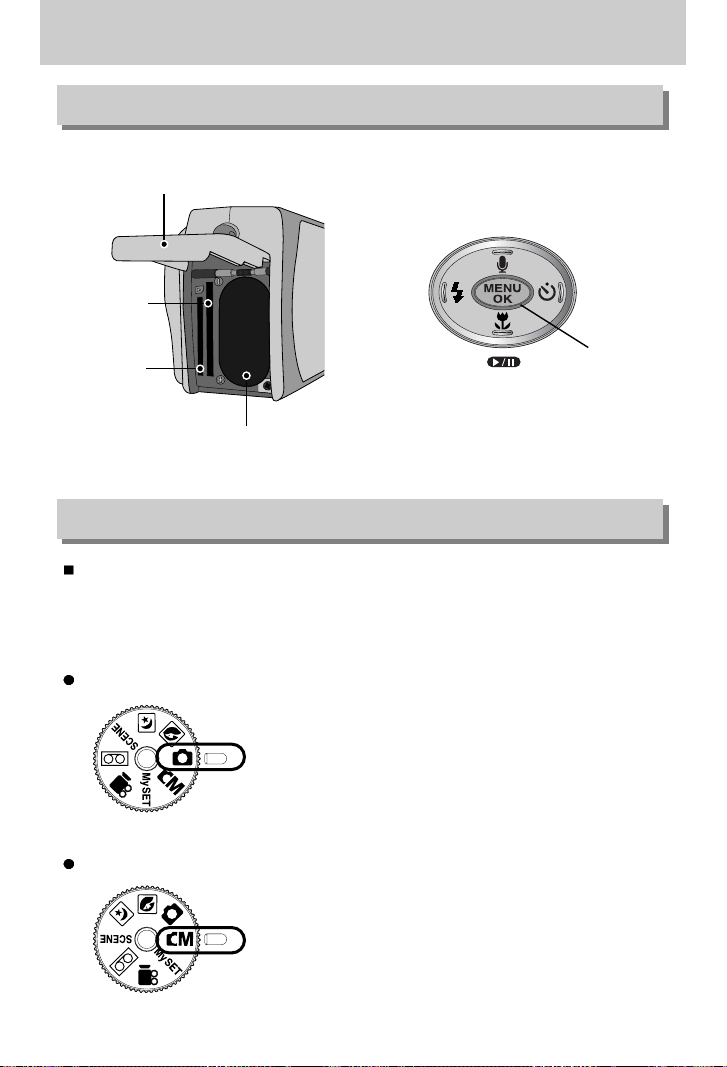
Identification of features
MANUAL mode
Please select this mode for quick and easy picture taking
with minimal user interaction.
Selecting automatic mode will configure the camera with
optimal settings. You can still manually configure all
functions except the iris and shutter speed.
AUTO mode
You can select the desired working mode by using the mode dial located on the back of the
camera. This digital camera has 8 recording modes. These are listed below.
SD memory
card slot
Memory Stick
DUO slot
Battery chamber
Battery chamber cover
FLASH/
LEFT button
MENU/ OK button
Macro / DOWN
Play & Pause button
SELF-TIMER/
RIGHT button
Voice memo/ UP button
Side/ 5-function button
Mode dial
Page 11
13
Identification of features
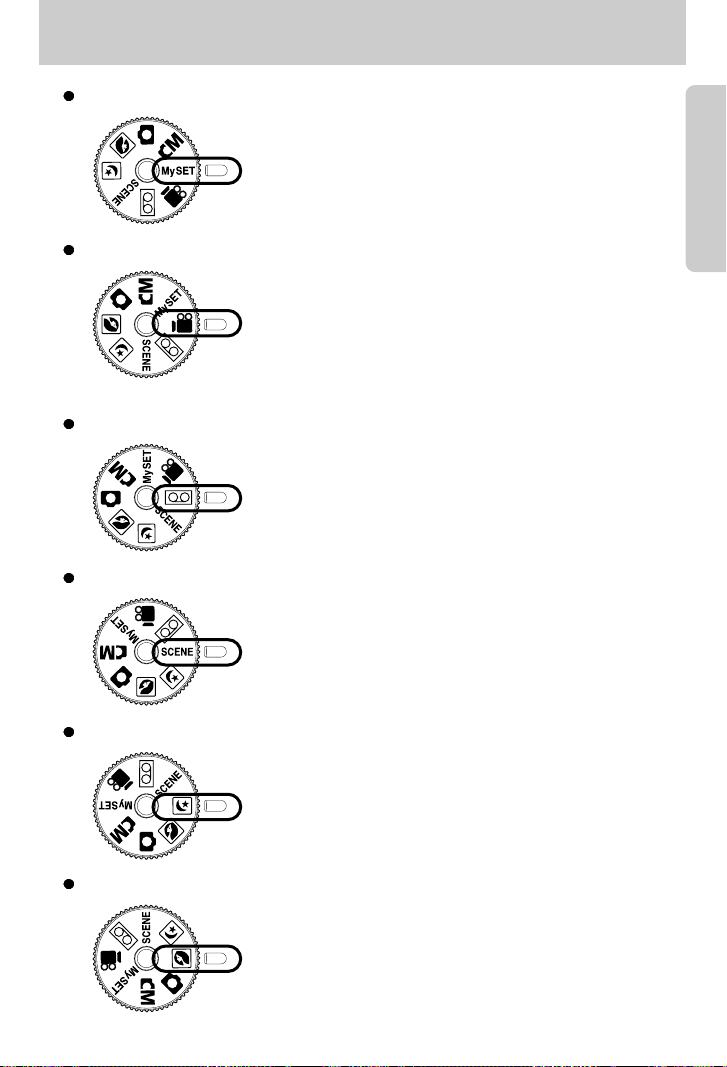
This mode allows users to save frequently used shooting
settings for later use.
MySET mode
A movie clip can be recorded for as long as the available
recording time of the memory capacity allows.
- Image size : 640X480, 320X240(user selectable)
- Movie clip file type : *.avi
MOVIE CLIP mode
A voice recording can be recorded for as long as the available
recording time of the memory capacity allows.(Max : 1 hour)
- Voice recording file type : *.wav
VOICE RECORDING mode
Use the menu to easily configure optimal settings for a variety
of situations including children, landscape, close-up, sunset,
dawn, backlight, fireworks, beach scenes, and snowscape.
SCENE mode
This mode is used at night or against a dark background.
NIGHT SCENE mode
This is used for just portrait or both portrait and landscape
shots.
PORTRAIT mode
Page 12
14
Identification of features
Self-timer lamp(Based on 10-second Self-timer; see p. 26)
Color Status Camera Status
Blinking
For the first 7 seconds, the LED blinks at 1 second intervals.
For the final 3 seconds, the LED blinks quickly at 0.5-second
intervals.
When the camera power is on / when the shutter button is released from pressing.
Blinking 1 time
Red
Color Status Camera Status
Blinking
Recording Mode (lightly press the shutter button): Not focused
PC Mode: Transmitting Data
Recording Mode (lightly press the shutter button): Focused
PC Mode: Turned off the LCD with the LCD button.
On
Green
Color Status Camera Status
Blinking
Flash in the process of charging
Flash ready
On
Red
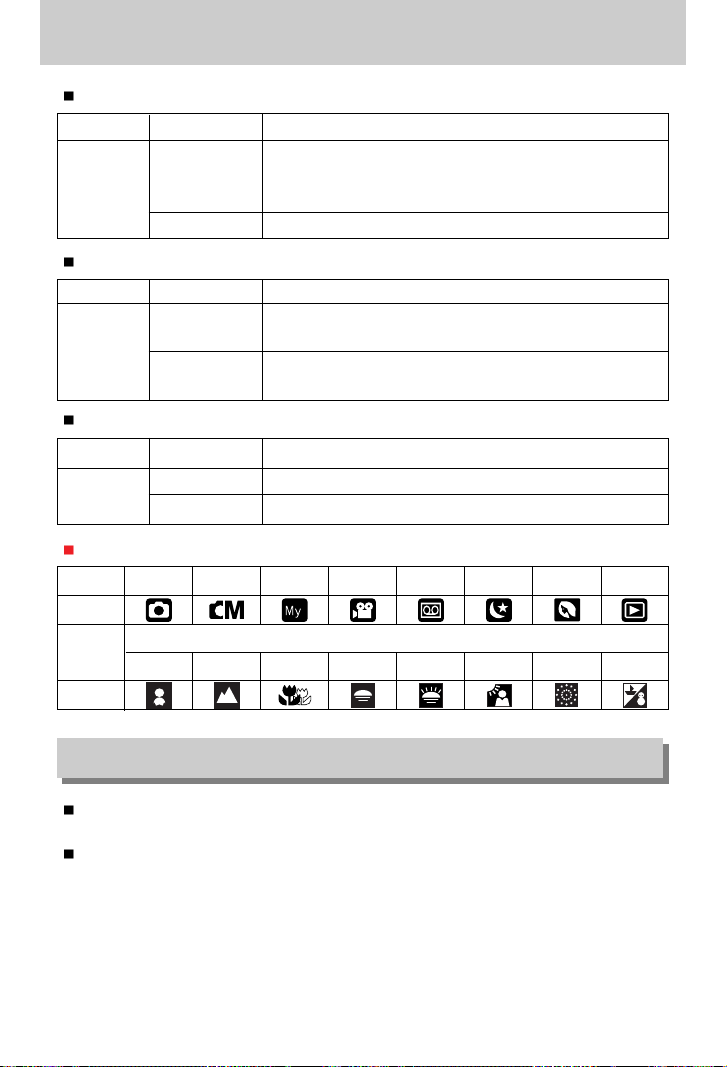
MODE
Icon
Icon
MODE
SCENE
AUTO MANUAL MySET
MOVIE CLIP
VOICE RECORDING
NIGHT SCENE
PORTRAIT
PLAY
CHILDREN
LANDSCAPE
CLOSE-UP
SUNSET DAWN
BACKLIGHT
FIREWORKS
BEACH&SNOW
Auto focus indicator lamp(Green)
Flash indicator lamp(Red)
Mode icons
Connecting to a Power Source
There are two ways in which to provide the camera with power. You can use batteries or
alternatively, you can use an AC(100 ~ 250V) Adapter (DC 3.3V 2.0A).
We recommend using batteries for a digital camera. (Within a year from the date of
manufacture) The batteries are listed below.
Non rechargeable batteries : AA type – Alkaline, Ni-Mn, Ni-Zn, Lithium
CR-V3 type – Lithium
Rechargeable batteries : AA type – Ni-MH, Ni-Cd (over 1000mA)
CR-V3 type – Digimax Battery I-Pack(SBP-1103)
Battery pack – Digimax Battery Pack(SBP-3603)
Page 13
15
Connecting to a Power Source
Important information about battery usage
It is easy to buy alkaline batteries. However, the duration for using batteries varies in
accordance with the battery manufacturer or the photographic conditions.
When the camera is not used, turn off the camera power.
Do not recharge the non rechargeable batteries. It may cause an explosion.
Please remove the batteries if the camera will not be used for long periods.
Batteries can lose power over time and are prone to leaking if kept inside the camera.
We recommend high capacity ALKALINE batteries as manganese batteries cannot
deliver sufficient power.
Low temperatures (below 0 ) can affect the performance of the batteries and you
may experience reduced battery life.
Batteries will usually recover at normal temperatures.
Do not use old and new batteries at the same time.
During extended use of the camera, the camera body may become warm.
This is perfectly normal.
Always turn off the power before taking the AC adapter out of the mains supply.
As with all mains powered devices, safety is important. Ensure that neither the camera
nor adapter comes into contact with water or metallic materials.
Please ensure that you use an AC adapter (3.3V 2.0A) with the correct specification
for the camera. Failure to do so may affect your warranty.
INFORMATION
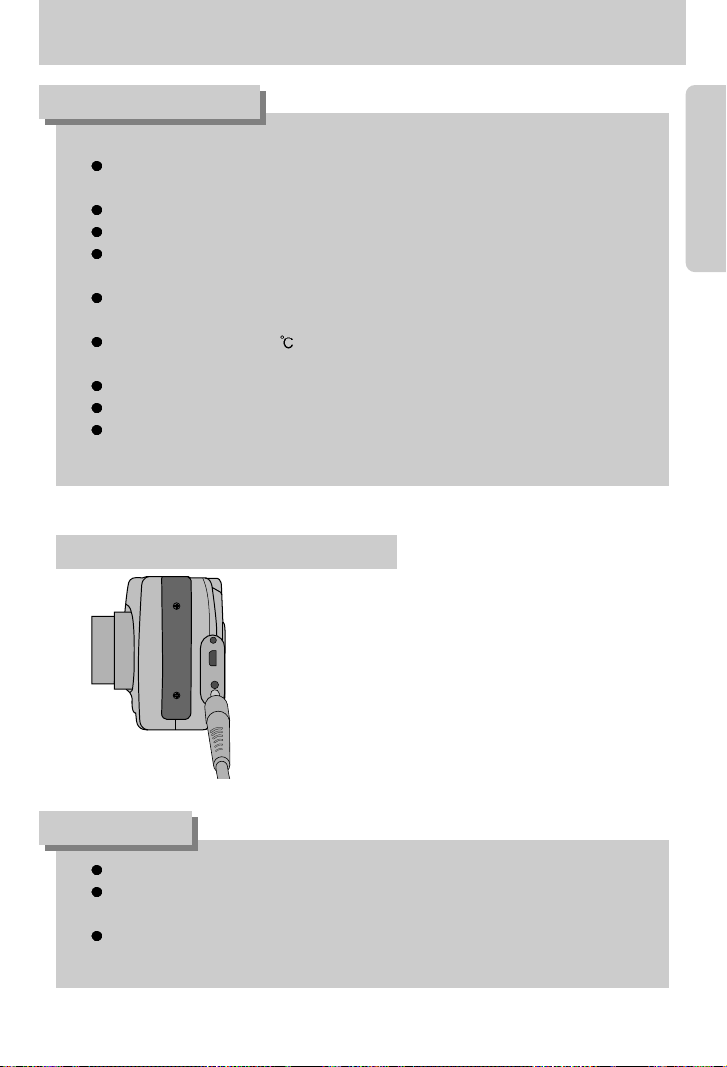
DANGER
If you have access to a mains supply, using an AC
Adapter (3.3V 2.0A) allows the camera to be used for
long periods of time.
Plug the adapter into the connection point
(DC IN 3.3V) on the camera.
Remove the batteries from the camera when using an
AC adapter.
Using the AC power adapter (3.3V 2.0A)
Page 14
16
Connecting to a Power Source
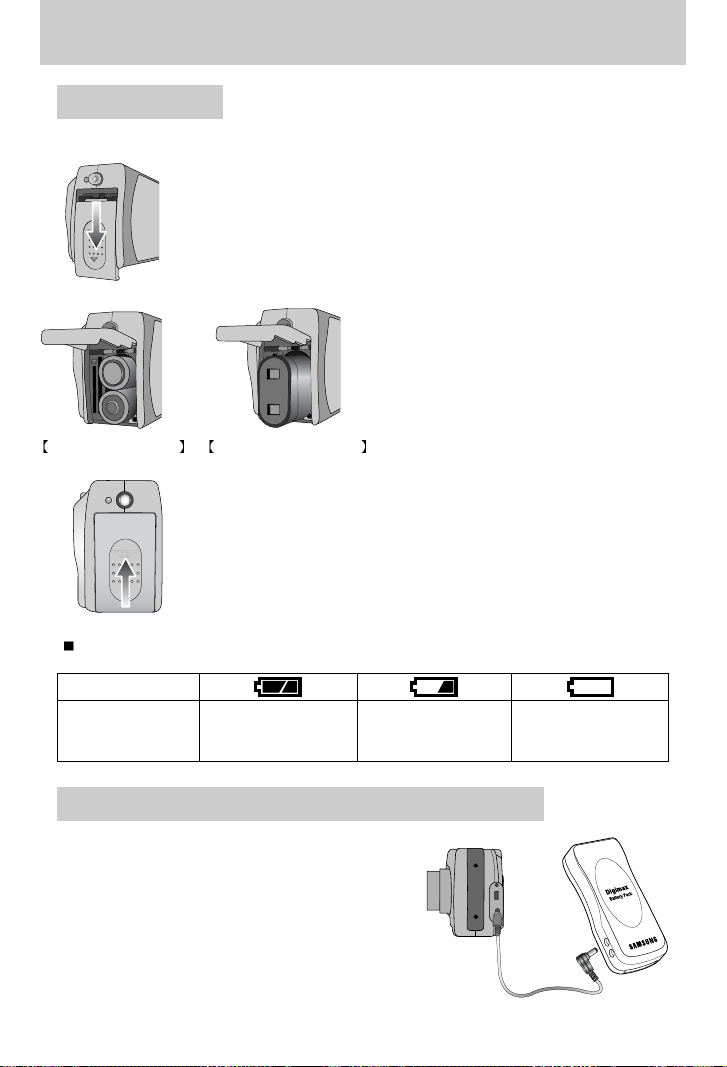
Battery status
Battery indicator
The batteries are fully
charged.
Prepare new batteries.
There is no battery capacity.
Replace with new batteries.
There are 3 indicators for battery condition that are displayed on the LCD monitor.
3. To close the battery chamber cover, push it until it clicks.
2. Insert the batteries taking note of the polarity
(+ / -).
1. Open the battery chamber cover by pushing in the direction of the
arrow.
: If the camera does not turn on after you have inserted batteries,
please check whether the batteries are inserted with the correct
polarity(+ and-).
Using the batteries
Inserting the AA type battery Inserting the CR-V3 type battery
The Digimax Battery Pack is a rechargeable external
Li-ion battery for use with most digital cameras.
These optional battery packs provide long lasting
power and their operating performances are much
improved over Ni-MH and Alkaline batteries.
This is due to the mass storage lithium ion cell.
Refer to the illustrations.
Using the Digimax battery pack ( Optional : SBP-3603, 3.3V)
Page 15

17
Instructions on how to use the memory card
Be sure to format the memory card (see p. 59) if you are using a newly purchased memory
for the first time, if it contains data that the camera cannot recognize, or if it contains images
captured with a different camera.
Turn off the camera power whenever the memory card is being inserted or removed.
Repeated use of the memory card will eventually reduce the memory card’s performance.
Should this be the case, you will need to purchase a new memory card.
Wear and tear on the memory card is not covered by the Samsung warranty.
The memory card is an electronic precision device.
Do not bend, drop or subject the memory card to any heavy impact.
Do not store the memory card in an environment with strong electronic or magnetic fields,
e.g. near loud speakers or TV receivers.
Please do not use or store in an environment where there are extremes in temperature.
Do not allow the memory card to become dirty or to come into contact with any liquid.
Should this happen, clean the memory card with a soft cloth.
Please keep the memory card in its case when not in use.
During and after periods of extended use, you may notice that the memory card is warm.
This is perfectly normal.
Do not use a memory card that is used in another digital camera or memory card reader.
Do not use a memory card formatted by another digital camera or memory card reader.
Maintenance of the memory card
If the memory card is subjected to any of the following, the recorded data may become
corrupted :
- When the memory card is used incorrectly.
- If the power is switched off or the memory card is removed while recording, deleting
(formatting) or reading.
Samsung cannot be held responsible for lost data.
It is advisable to copy important data onto other media as back-up e.g. floppy disks, hard
disks, CD etc.
If there is insufficient memory available :If you press the shutter button for the shot, a [CARD
FULL !] message will appear and the camera will not operate. To optimize the amount of
memory in the camera, replace the memory card or delete unnecessary images stored on
the memory.
Preserving the memory card data
Page 16
18
Precautions on Using the Memory Stick Duo
If you open the battery chamber cover when the camera power is turned on, the
power will turn off automatically.
Don t remove the memory card when the Auto focus lamp(Green) is blinking as this
may cause damage to data in the memory card.
INFORMATION
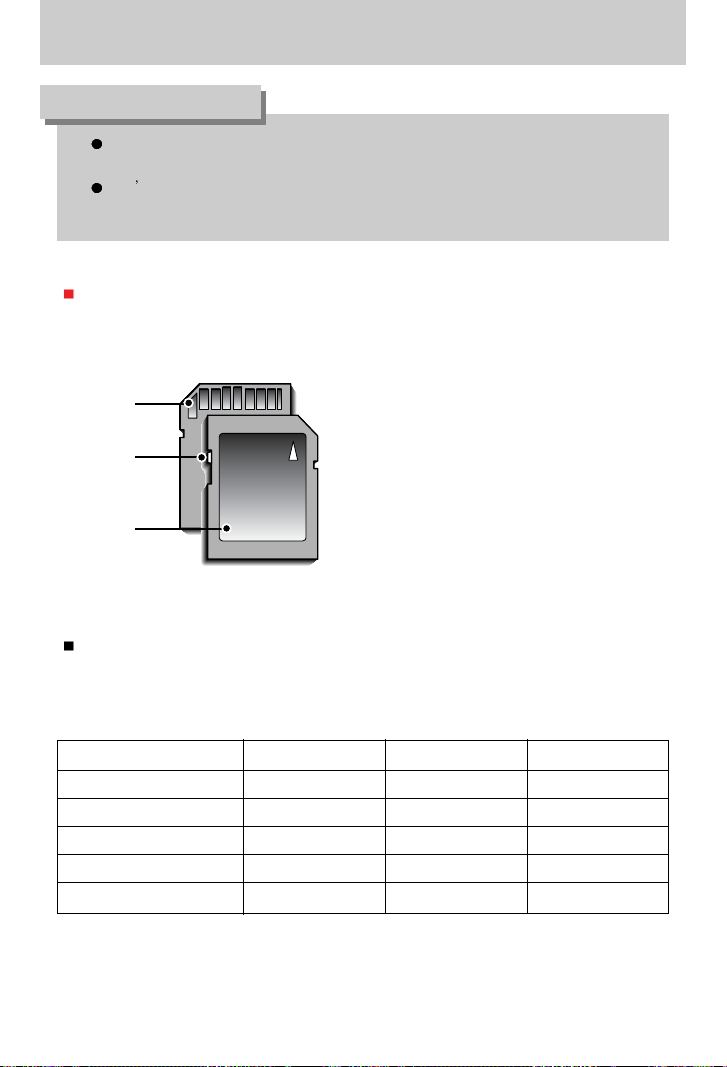
[ SD(Secure Digital) memory card ]
Write protect
switch
Label
Card pins
Recorded image size Super fine Fine Normal
2272x1704
2048x1536
1600x1200
1024x768
640x480
The camera can use SD Memory Cards, MMC (Multi Media Card), and Memory Stick Duo.
Please consult the enclosed manual for using the MMC and Memory Stick Duo.
The SD memory card has a write protect
switch that prevents image files from being
deleted or formatted.
By sliding the switch to the bottom of the SD
memory card, the data will be protected. By
sliding the switch to the top of the SD memory
card, the data protection will be canceled.
Slide the switch to the top of the SD memory
card before taking a picture.
When using a 32MB SD memory card, the specified shooting capacity will be as follows.
(These figures are intended as an indication of expected performance). These figures are
approximate as image capacities can be affected by variables such as subject matter.
Page 17
19
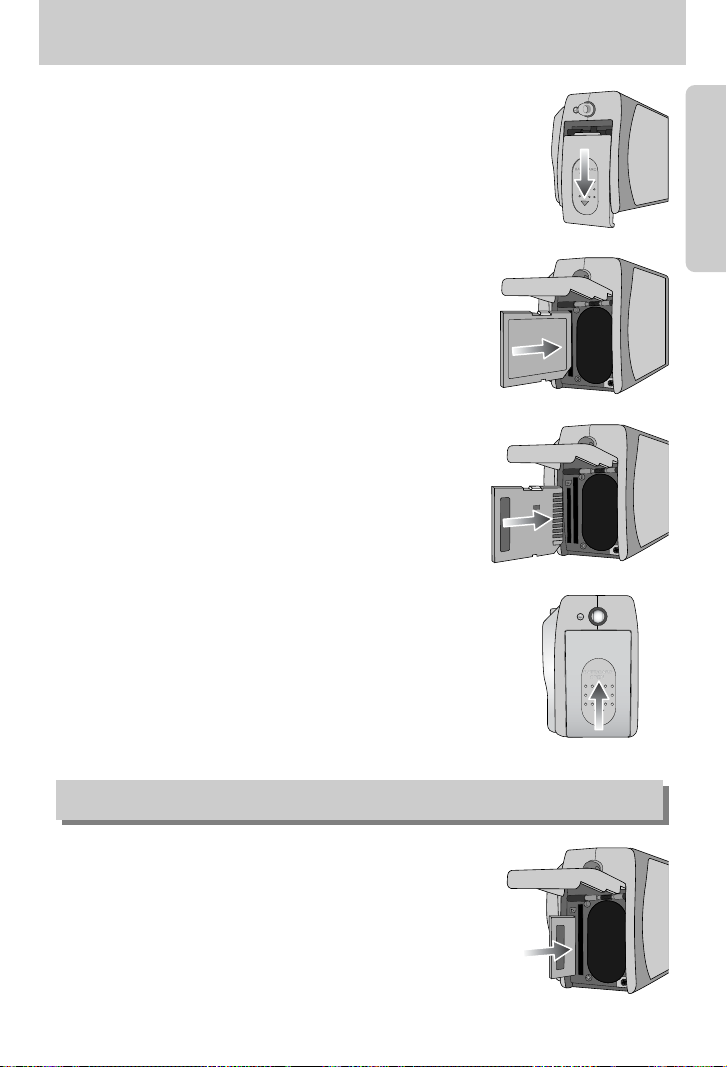
Inserting the memory card
1. Turn the power off using the power button.
Open the battery chamber cover and press the memory
card as shown in the image and release.
2. Remove the memory card and close the battery chamber
cover.
3. To close, push the battery chamber cover until you hear a
click. If the memory card does not slide in smoothly, do not
attempt to insert it by force. Check the direction of insertion,
and then insert it correctly. Do not insert the memory card
the wrong way round. Doing so may damage the memory
card slot.
2. Have the front of the memory card facing toward the front of
the camera (lens) and the card pins toward the back of the
camera (LCD monitor), and then push the memory card into
the card slot until you hear a click.
* When inserting the Memory Stick Duo, please have the label
side facing down (toward the LCD) and the other side up
(toward the lens).
1. Turn off the camera’s power and pull the battery chamber
cover in the direction of the arrow to open.
Removing the memory card
Page 18
20
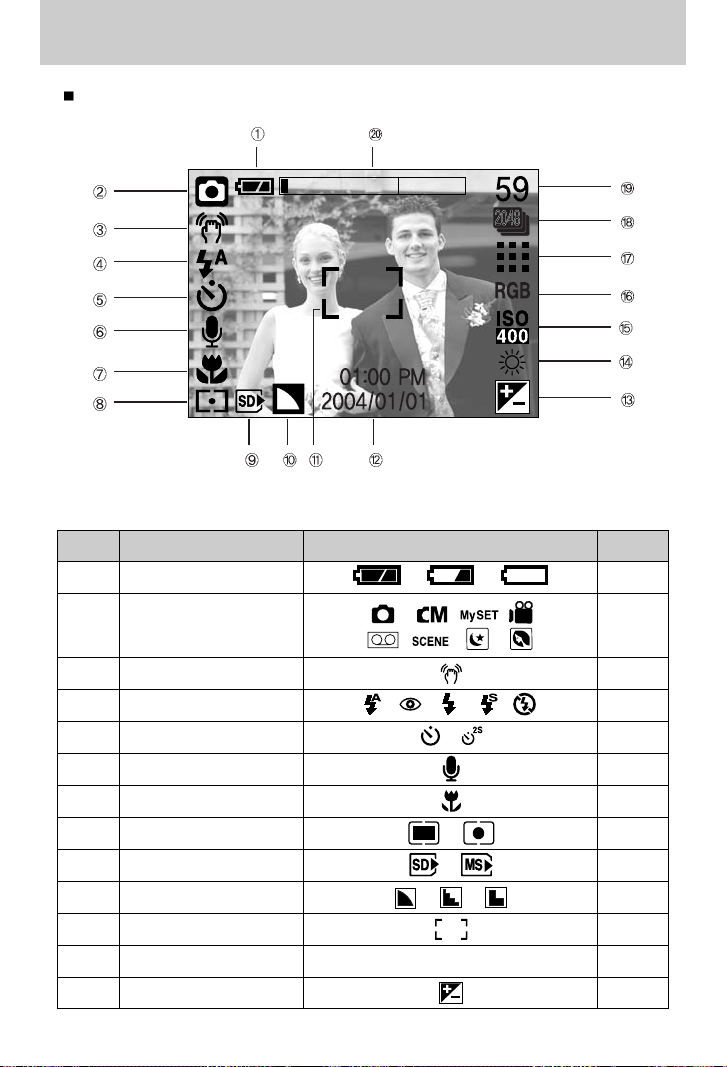
LCD monitor indicator
[ Image & Full Status ]
No. Description Icons Page
1 Battery p.16
3 Camera shake warning p.23
4 Flash p.28
5 Self-timer p.29
6 Voice memo p.26
7 Macro p.31
8 Metering p.36~37
9 SD card/ MS DUO indicator p.61
10 Sharpness p.61
11 Auto focus frame p.30
12 Time/ Date 01:00 PM 2004/01/01 p.38
13 Exposure compensation p.19
The LCD monitor displays information about the shooting functions and selections.
Recording mode2
p.12~13
Page 19
21
LCD monitor indicator
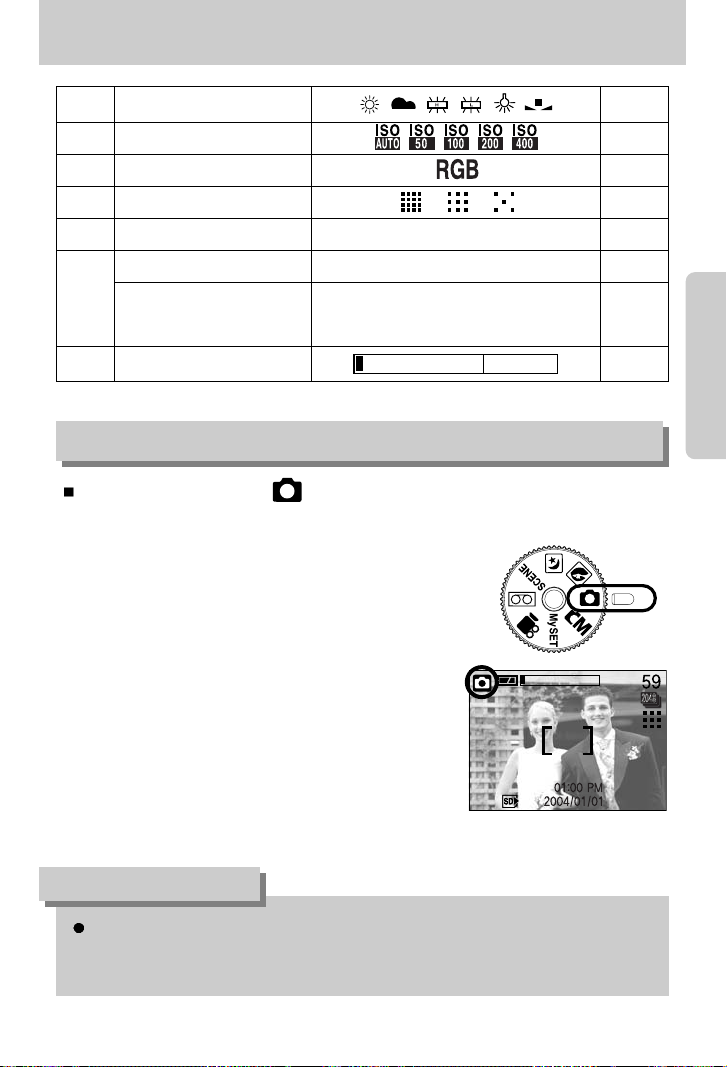
14 White Balance p.56
15 ISO p.56
16 RGB p.56
17 Image quality p.56
18 Image size/ Continuous shot 2272, 2048, 1600, 1024, 640 p.56
Number of available shots remaining
54 p.56
20 Optical/ Digital Zoom rate
Starting the recording mode
1. Insert the batteries. (p.18)
Insert the batteries taking note of the polarity (+ / -).
2. Insert the memory card. (p.22)
3. Close the battery chamber cover.
4. Press the power button to turn on the camera.
(If the date/time that is displayed on the LCD monitor is
incorrect, reset the date/time before taking a picture.)
5. Select the AUTO mode by rotating the mode dial.
6. Point the camera towards the subject and compose the
image by using either the viewfinder or LCD monitor.
7. Press the shutter button to capture an image.
How to use the AUTO mode ( )
[ AUTO mode ]
19
If the auto focus frame turns to red when you press the shutter button down half way, it
means that the camera cannot focus on the subject. Should this be the case, the camera
is unable to capture an image clearly.
INFORMATION
Remaining time
(Movie clip/ Voice recording)
02:00/00:05:00
p.56
p.56
Page 20
22
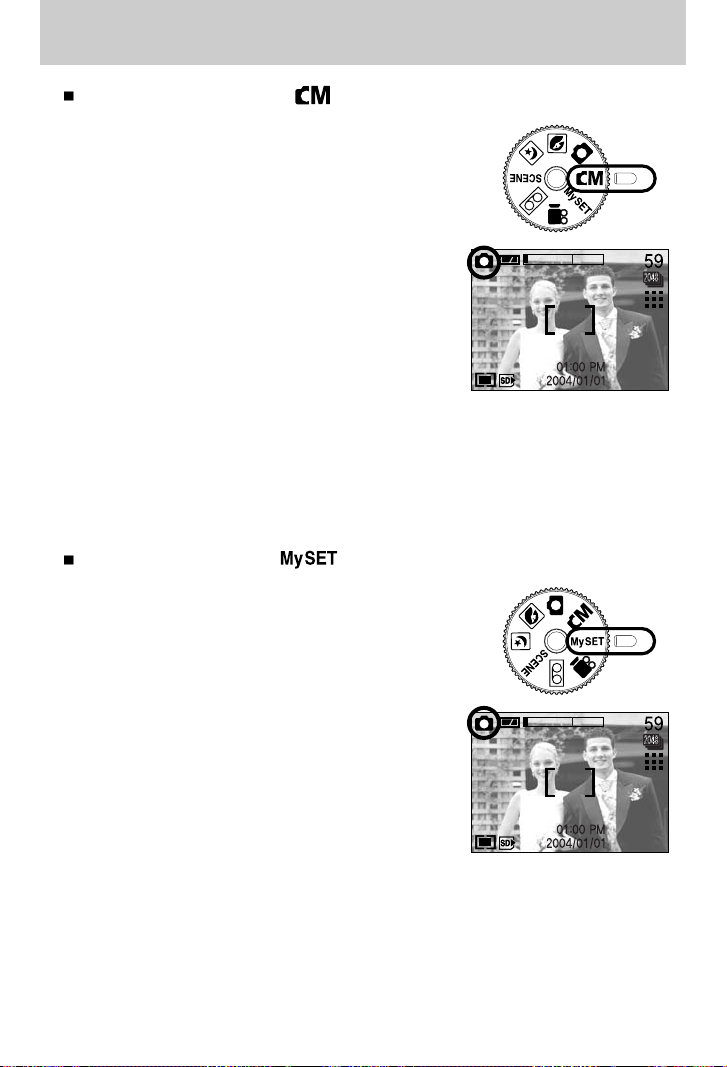
How to use the MANUAL mode ( )
Selecting automatic mode will configure the camera with
optimal settings. You can still manually configure all functions
except the iris and shutter speed.
Steps from 1-4 are the same as those for AUTO mode.
5. Select the MANUAL mode by rotating the mode dial.
6. Press the menu button to configure advanced functions
such as image size (p.34), number of pictures in
sequential shooting (p.34), picture effects (p.34),
sharpness (p.34).
7. Point the camera towards the subject and compose the
image by using either the viewfinder or LCD monitor.
8. Press the shutter button to capture an image.
Starting the recording mode
[ MANUAL mode ]
How to use the MySET mode ( )
This mode allows users to save frequently used shooting
settings for later use.
Steps from 1-4 are the same as those for AUTO mode.
5. Select the MySET mode by rotating the mode dial.
6. You can use the menus that appear when you press
camera and menu buttons to change the desired
camera functions.
The last changed function(s) will automatically be saved
as MySET mode.
7. If you rotate the Mode Dial to MySET mode while in
another camera operation mode, the camera settings
will switch to the settings you changed in Step 6.
8. Point the camera towards the subject and compose the
image by using either the viewfinder or LCD monitor.
9. Press the shutter button to capture an image.
[ MySET mode ]
Page 21
23
Starting the recording mode
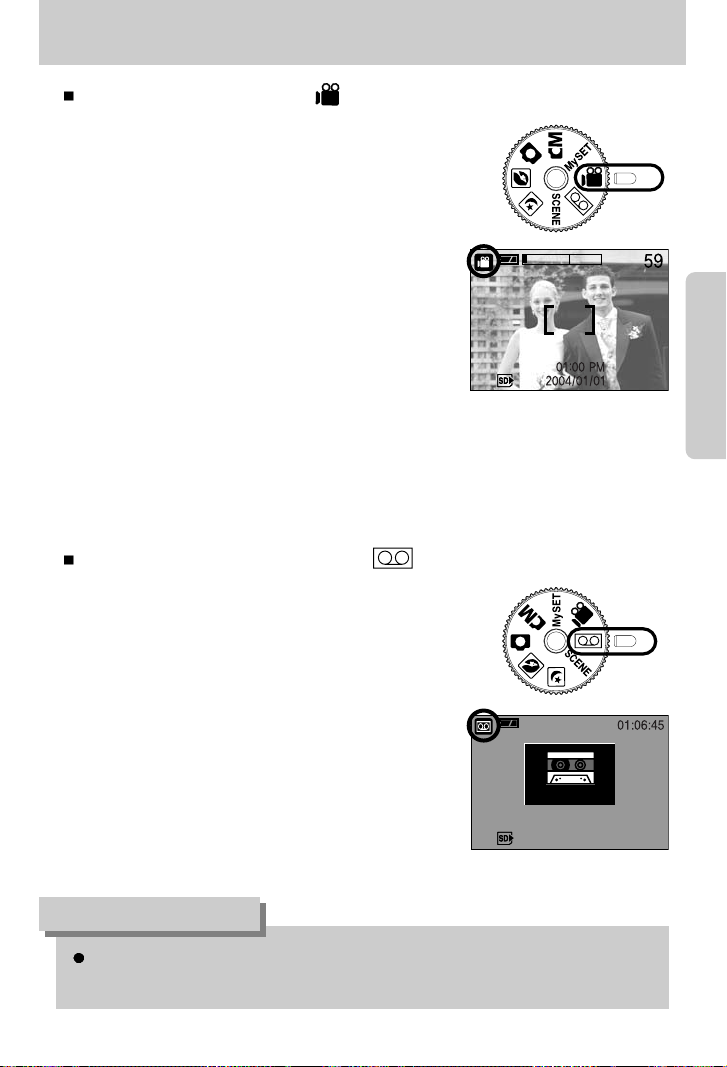
How to use the MOVIE CLIP mode ( )
Steps from 1-4 are the same as those for AUTO mode.
5. Select the MOVIE CLIP mode by rotating the mode dial.
6. The MOVIE CLIP mode icon and available recording time
will display on the LCD monitor.
7. Point the camera towards the subject and compose the
image by using either the viewfinder or LCD monitor.
Press the shutter button and movie clips are recorded
for as long as the available recording time.
Movie clips will still be recorded if the shutter button is
released.
The auto focus lamp(green) will blink during the movie
clip recording.
* If you wish to stop recording, press the shutter button
again.
* Image size and type are listed below.
- Image size : 640x480, 320 x 240(Selectable)
- File type : *.avi
[ MOVIE CLIP mode ]
How to use the VOICE RECORDING mode ( )
Steps from 1-4 are the same as those for AUTO mode.
5. Select the VOICE RECORDING mode by rotating the
mode dial.
6. Press the shutter button to record a voice.
- Press the shutter button once and voice is recorded for
as long as the available recording time(Max : 1 hour)
allows. The recording time will be displayed on the
LCD monitor.
Voice will still be recorded if the shutter button is
released.
- If you wish to stop recording, press the shutter
button again.
- File type : *.wav
[ VOICE RECORDING mode ]
A distance of 40cm between you and the camera (microphone) is the best distance to
record sound.
INFORMATION
Page 22
24
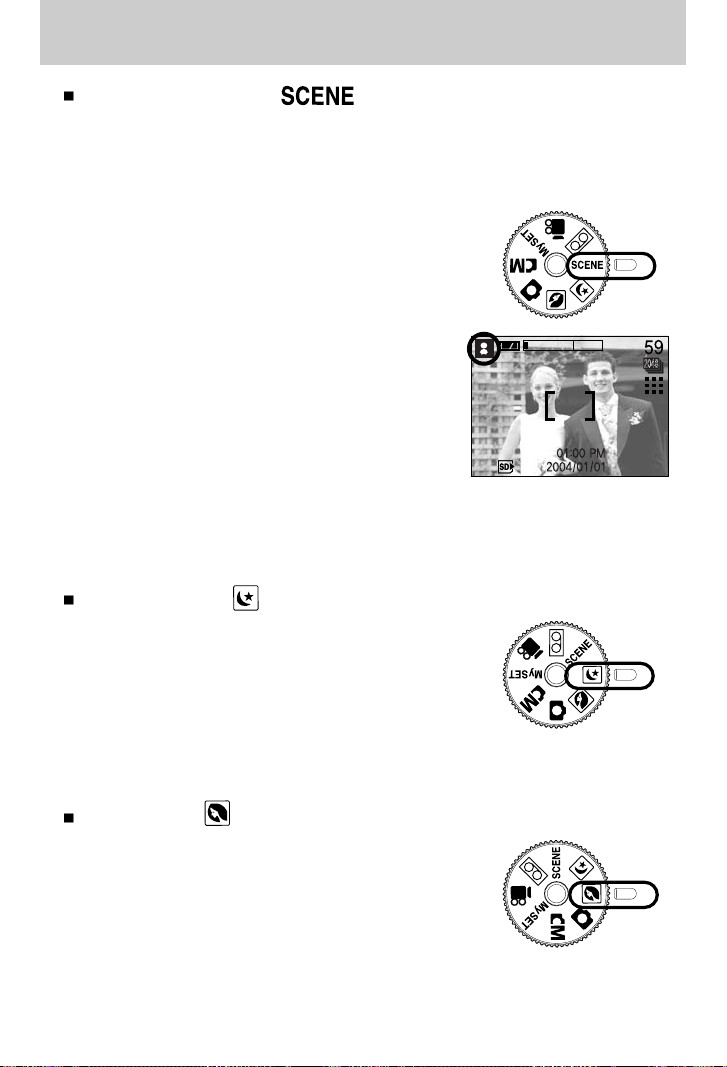
How to use the SCENE mode ( )
Use the menu to easily configure optimal settings for a variety of situations including children,
landscape, close-up, sunset, dawn, backlight, fireworks, beach scenes, and snowscape.
Steps from 1-4 are the same as those for AUTO mode.
5. Select the SCENE mode by rotating the mode dial.
6. Press the MENU button and the SCENE mode menu will
be displayed.
7. Use the LEFT and RIGHT buttons to select the [SCENE]
menu tab.
8. Use the UP and DOWN buttons to select the desired
[SCENE] sub menu. Please see page 34 for detailed
descriptions for each screen.
9. Current scene icon is displayed at the top left of the
LCD.
10. Point the camera towards the subject and compose
the image by using either the viewfinder or LCD
monitor.
11. Press the shutter button to capture an image.
Starting the recording mode
[SCENE mode]
PORTRAIT mode ( )
This is used for just portrait or both portrait and landscape
shots.
NIGHT SCENE mode ( )
This mode is used at night or against a dark background.
Configure shutter speed by zoom scale (Long Time
shutter) with the +/- button. Please see page 45 for a
detailed description for Long Time shutter.
Page 23

25
Things to Watch Out for When Taking Pictures
Pressing the shutter button down half way
Lightly press the shutter button to confirm focus and flash battery charge. (See page 20)
Press the shutter button all way down to take the picture.
The available recording time may vary depending on shooting conditions and camera
settings.
When the Flash Off or Slow synchro mode is selected in a low lighting condition, the camera
shake warning indicator ( ) may appear on the LCD monitor. In this case, use a tripod,
support the camera on a solid surface or change the flash mode to flash shot mode.
Backlight compensated shots : When taking an outdoor shot, avoid facing the sun, as the
image may be dark because of the strong backlight.
In backlight conditions, please use Fill-in flash(p.28), Spot
metering(p.37) or Exposure compensation(p.30).
Avoid obstructing the lens or the flash when you capture an image.
As there can be some differences between what is seen through the Viewfinder and the
resulting image when taken at a range closer than 1.5m, it is recommended that you use the
LCD monitor to compose these shots.
Using the LCD monitor extensively will drain the batteries.
We recommend turning off the LCD monitor and using the optical viewfinder as often as
possible in order to extend battery life.
Under certain conditions the auto focus system may not perform as expected.
When photographing a subject that has little contrast.
- If the subject is highly reflective or shiny.
- If the subject is moving at high speed.
- When there is strong reflected light, or when the background is very bright.
- When the subject matter has only horizontal lines or the subject is very narrow
(such as a stick or flagpole).
- When the surroundings are dark.
Page 24
26
Using the camera buttons to adjust the camera
The RECORDING(AUTO, MANUAL, MySET, MOVIE CLIP, VOICE RECORDING, SCENE,
NIGHT SCENE, PORTRAIT) mode function can be set up by using the camera buttons.
Used for turning the camera s power on / off.
If there is no operation during the specified time, the
camera s power will be turned off automatically to save
battery life. Pressing the power button for over 3 seconds
will deactivate the start-up sound function.
POWER button
Used for taking an image or recording voice in the
RECORDING mode.
In MOVIE CLIP mode : Pressing the shutter button down
fully starts the process for recording
a movie clip.
Press the shutter button once and
the movie clip is recorded for as long
as the available recording time in the memory allows.
If you wish to stop recording, press the shutter button again.
In STILL IMAGE mode
Pressing the shutter button down halfway activates the auto focus and checks the condition
of the flash.
Pressing the shutter down fully takes the image and stores the relevant data regarding the
shot. If you select voice memo recording, the recording will start after the camera has finished
storing the image data.
SHUTTER button
If the menu is displayed in RECORDING mode, pressing the
ZOOM W/T button will skip 5 menu tabs at a time.
If the menu is not displayed, this button works as the
OPTICAL ZOOM or DIGITAL ZOOM button.
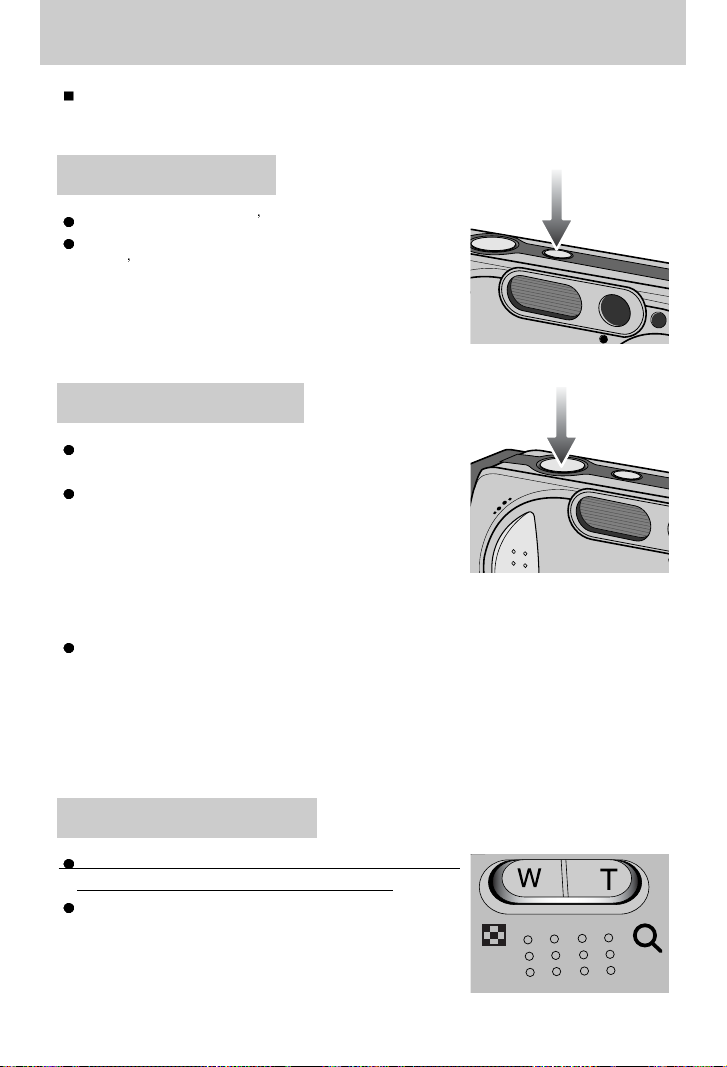
ZOOM W/ T button
Page 25

27
ZOOM W/ T button
This camera has a 3X optical zoom and a 4X digital zoom function.
Using both will offer a total zoom ratio of 12X. When you press the ZOOM W/T button, the
zoom bar will display in the upper center part of the LCD monitor.
TELE Zoom
Optical zoom TELE : Pressing the ZOOM T button. This will zoom into the subject i.e. the
subject will appear nearer.
Digital zoom TELE : When the maximum (3X) optical zoom is selected, pressing the
ZOOM T button activates the digital zoom software.
Releasing ZOOM T button stops the digital zooming at the required
setting. Once the maximum digital zoom (4X) is achieved, pressing
the ZOOM T button will have no effect.
[ WIDE zoom ] [ TELE zoom ] [ Digital zoom 2.0X ]
Pressing the
ZOOM T button
Pressing the
ZOOM T button
WIDE Zoom
Optical zoom WIDE : Pressing the ZOOM W button. This will zoom out from the subject
i.e. the subject will appear further away. Pressing the ZOOM W
button continuously will set the camera to its minimum zoom setting
i.e. the subject appears at its furthest from the camera.
Digital zoom WIDE : When the digital zoom is in operation, pressing the ZOOM W button
will reduce the digital zooming in steps. Releasing ZOOM W button
stops digital zooming. Pressing the ZOOM W button will reduce the
digital zoom and then it will continue to reduce the optical zoom until
the minimum setting is reached.
[ TELE zoom ] [ Optical zoom 2X ] [ WIDE zoom ]
Pressing the
ZOOM W button
Pressing the
ZOOM W button
[ Digital zoom 4.0X ] [ Digital zoom 2.0X ] [ Optical zoom 3X ]
Pressing the
ZOOM W button
Pressing the
ZOOM W button
Optical zoom
Digital zoom
Page 26

28
ZOOM W/ T button
To use the digital zoom the LCD monitor has to be turned on.
Images taken using the digital zoom may take a little longer for the camera to process.
Allow time for this to take place.
Digital Zoom will not work in Night Scene mode.
You may notice a decrease in image quality when using the digital zoom.
When the maximum(3X) optical zoom is selected, pressing the ZOOM T button
increases the digital zoom ratio by 0.1 steps.
Do not use the zoom button while recording video, to avoid accidentally recording the
clicking sound. Please adjust the zoom before starting to record.
Take care not to touch the lens to avoid taking an unclear image and possibly causing
camera malfunction.
If the image is dim, turn the camera power off and on again to modify the lens position.
Take care not to press the lens as this may cause a camera malfunction.
When the camera is turned on, take care not to touch the camera s moving lens parts as
this may cause the resulting image to be dim and unclear.
Take care not to touch the lens during zoom operation as this may cause damage.
INFORMATION
Voice memo( ) / UP button
While the menu is showing, press the UP button to move up the submenu cursor.
When the menu is not displayed on the LCD monitor, the UP button operates as the voice
memo ( ). You can add your voice-over to a stored still image.
Recording a voice memo
1. Rotate the MODE DIAL to select a RECORDING mode with the exception of MOVIE
CLIP and VOICE RECORDING modes.
2. Press the VOICE MEMO ( ) button.
If the voice memo indicator is displayed on the LCD monitor, the setting is completed.
[ Recording Voice Memo ][ Preparing for Voice Memo ]
Page 27

29
Voice memo ( ) / UP button
3. Press the shutter button and take a picture. The picture is stored on the memory card.
4. Voice memo will be recorded for ten seconds from the moment the picture is stored.
In the middle of the sound recording, pressing the shutter button will stop the voice memo.
A distance of 40cm between you and the camera (microphone) is the best distance to
record sound.
INFORMATION
When the macro mode is selected, it is possible that camera shake will occur.
If this is the case, use a tripod to eliminate this.
INFORMATION
While the menu is showing, press the DOWN button to move from the main menu to a
submenu, or to move down the submenu cursor.
When the menu is not showing, you can use the MACRO/ DOWN button to take macro
pictures (within the distance range of 5cm - 80 cm).
Types of focus mode and focus range(W: Wide, T: Tele)
Macro ( ) / Down button (Focusing)
Focus type Auto
Focus range 80cm ~ Infinity W : 5 ~ 80cm T : 50 ~ 80cm
[ Auto focus ] [ Macro ]
Macro ( )
Page 28

30
Macro ( ) / Down button (Focusing)
Available focusing method, by recording mode
Focus lock
To focus on the subject positioned outside of the center, use the focus lock function.
Using the Focus Lock
1. Ensure the subject in the center of the autofocus frame.
2. Press the SHUTTER button halfway. When the green auto lights up, it means the camera
is focused on the subject. Be careful not to press the SHUTTER button all the way down to
avoid taking an unwanted pictured.
3. With the SHUTTER button still pressed down only halfway, move the camera to
recompose your picture as desired, and then press the SHUTTER button completely to
take the picture. If you release your finger from the SHUTTER button, the focus lock
function will be canceled.
[ The image to be captured ] [ Press the SHUTTER button ]
halfway and focus on the subject
[Recompose the picture and fully ]
depress the SHUTTER button
OOOOXOOOOXOOOOO
OOOOXXXXXOXXXXX
Auto
Page 29

31
FLASH ( ) / LEFT button
WIDE TELE WIDE TELE
0.8~3.0 0.8~2.0 0.3~0.8 0.5~0.8
Unit : m
[Selecting the Auto flash]
Flash range
When the menu is displayed on the LCD monitor,
pressing the LEFT button makes the cursor shift to the
left tab.
When the menu is not displayed on the LCD monitor,
the LEFT button operates as the FLASH ( ) button.
Selecting the flash mode
1. Rotate the MODE DIAL to select a RECORDING
mode with the exception of MOVIE CLIP and VOICE
RECORDING modes.
2. Press the Flash button until the desired flash mode indicator displays on the LCD monitor.
3. A flash mode indicator will be displayed on the LCD monitor.
Use the correct flash to suit the environment.
ISO
AUTO
MACROAUTOFOCUS
Using the flash frequently will reduce the life of the batteries.
Under normal operating conditions the charging time for the flash is normally within 7
seconds. If the batteries are weak, the charging time will be longer.
During the continuous shot, movie clip mode, the flash function will not operate.
Take photographs within the flash range.
The image quality is not guaranteed if the subject is too close or highly reflective.
The LCD monitor is turned off for a while after using the flash to recharge it.
INFORMATION
Page 30

32
FLASH ( ) / LEFT button
ICON Flash mode Description
Flash mode indicator
Available flash mode, by recording mode
If the subject or background is dark, the camera flash will
operate automatically.
Auto flash
Red eye
reduction
Fill in flash
Slow synchro
Flash off
If a subject or background is dark, the camera flash will work
automatically and will reduce the red-eye effect by using the redeye reduction function.
The flash will operate in conjunction with a slow shutter speed in
order to obtain the correct exposure. We recommend using a
tripod for this function. When you take an image in a condition
with poor light, the camera shake warning indicator ( ) will
display on the LCD monitor.
The flash fires regardless of available light.
The intensity of the flash will be controlled, according to the
prevailing conditions. The brighter the background or subject is,
the less intense the flash will be.
The flash does not fire. Select this mode when capturing images in
a place or situation where flash photography is prohibited.
When you capture an image in a poorly lit condition, the camera
shake warning indicator ( ) will display on the LCD monitor.
XOOXXXOXXXXXXXO
OOOXXXOOXXXXXXX
XOOXXXOXXXXXOXX
XOOXXOOXXXXXXXX
XOOOXOOXOOOOXOX
Page 31

33
Self-timer ( ) / Right button
Selecting the self-timer
1. Rotate the MODE DIAL to select a RECORDING mode
with the exception of VOICE RECORDING mode.
2. Press the SELF-TIMER button until the desired mode
indicator displays on the LCD monitor.
A 2 second self-timer or 10 second self-timer icon ( )
appears on the LCD monitor.
2SEC self-timer ( ) :
Pressing the shutter button will allow an interval of 2
seconds before the image is taken.
10SEC self-timer ( ) :
Pressing the shutter button will allow an interval of 10
seconds before the image is taken.
3. When you press the SHUTTER button, the picture will
be taken after the specified time has elapsed.
When the menu is displayed on the LCD monitor, pressing the Right button makes the cursor
shift to the sub tab.
When the menu is not displayed on the LCD monitor, the RIGHT button operates as the Selftimer ( ) button. This function is used when the photographer would also like to be in the
image.
[Selecting the 10 SEC self-timer]
When taking a picture using the self-timer, the self-timer lamp works as follows:
2 second self-timer setting : The function lamp blinks at 0.25 second interval for 2
seconds.
10 second self-timer setting : The function lamp blinks at 1 second interval for the first
7 seconds. It blinks at 0.5 second interval for the
remaining 3 seconds.
If you operate the Mode dial and Self-timer button during the self-timer operation, the
self-timer function is cancelled.
Use a tripod to prevent the camera from shaking.
INFORMATION
Page 32

34
MENU/ OK button
If the menu is displayed, use the 5-Function buttons to change the data values and for your
changes to be accepted
If the menu is not displayed, press the MENU/OK button to display a menu for the current
camera mode on the LCD monitor. Press the button again to return to the previous state.
You can use the +/- button to adjust the values for the RGB, ISO, white balance, exposure
compensation and Long Time shutter speed.
- There is no menu for VOICE RECORDING mode.
- Menu screen may not show on the LCD when another button is pressed or image data is
being processed. (Green LED next to the view finder blinks)
- When the menu is showing on the LCD monitor, it is not possible to operate the shutter
button i.e. capture an image. To capture an image, simply cancel the menu display by
pressing the MENU button.
[ Menu on ]
[ Menu off ]
Pressing
the MENU
button
+/- button
Main menu Sub menu Available camera mode
RGB
ISO
Shutter speed/ Aperture value
Changed by zoom scale
-2.0~0.0~+2.0(0.5EV steps)
Exposure compensation
WHITE BALANCE
R (Red), G (Green), B (Blue)
AUTO, 50, 100, 200, 400
AUTO, DAYLIGHT, CLOUDY,
FLUORESCENT H, FLUORESCENT L,
TUNGSTEN, CUSTOM.
SIZE
2272X1704 2272
2048X1536
1600X1200
1024X768
Page 33

35
+/- button
RGB : Allows the user to adjust the R (Red), G (Green), and B (Blue) values of the images to
be captured.
Setting RGB Values
1. Press the +/- button, and then use the UP and DOWN
buttons to select the RGB icon ( ).
The RGB menu bar will appear as shown.
2. Use the UP/ DOWN/ LEFT and RIGHT buttons to select
the desired RGB value.
- Up/Down Button: Navigates between R, G,
and B icons.
- Left/Right Button: Changes value of each icon
3. When you press the +/- button again, the value you set will be saved and RGB setup
mode will end.
ISO : You can select the ISO sensitivity when taking pictures.
The speed or specific light-sensitivity of a camera is rated by ISO numbers.
Selecting an ISO Sensitivity
1. Press the +/- button, and then use the UP and DOWN
buttons to select the ISO icon ( ).
The ISO menu bar will appear as shown.
2. Use the LEFT and RIGHT buttons to select the desired
ISO sensitivity value.
- AUTO : The camera's sensitivity is
automatically changed by
variables such as lighting value or subject brightness.
- 50, 100, 200, 400 : You can increase the shutter speed while the same amount of light
is present, by increasing the ISO sensitivity.
However, the image may be saturated in high luminance.
The higher the ISO value, the higher the camera sensitivity to light is and therefore the
greater its capacity to take pictures in dark conditions. However, the noise level in the image
will increase as the ISO value increases, making the image appear coarse.
3. When you press the +/- button again, the value you set will be saved and ISO setup mode
will end.
Page 34

36
+/- button
White balance : The white balance control allows you to
adjust the colours to appear more natural
looking.
Selecting a White Balance
1. Press the +/- button, and then use the UP and DOWN
buttons to select the white balance icon ( ).
The white balance menu bar will appear as shown.
2. Use the LEFT and RIGHT buttons to set the white balance to the desired value.
The value you set will be displayed on the LCD monitor.
AUTO : The camera automatically selects the appropriate white balance
settings, depending on the prevailing lighting conditions.
DAYLIGHT : For taking images outside.
CLOUDY : For taking images under a cloudy and overcast sky.
Fluorescent H : Shooting under daylight fluorescent or daylight fluorescent type
three-way fluorescent lighting
Fluorescent L : Shooting under white fluorescent lighting
TUNGSTEN : For shooting under tungsten (standard light bulb) lighting.
CUSTOM : Allows the user to set the white balance according to the shooting
condition.
Different lighting conditions may cause a colour cast on your images.
3. Press the +/- button again. The value you set will be saved and White Balance setup mode
will end.
Using the Custom White Balance
White balance settings may vary slightly depending on the shooting environment.
You can select the most appropriate white balance setting for a given shooting environment by
setting up the custom white balance.
1. Select the CUSTOM ( ) menu of the White Balance.
2. Place a sheet of white paper in front of the camera so that
the LCD monitor shows only white, and then press the
SHUTTER button ( ).
3. Your custom white balance value is stored.
- The custom white balance value will be applied, starting
with the next picture you take.
- User configured white balance will be remain effective until
it is overwritten.
[ White paper ]
MEASURE:SHUTTER
Page 35

37
+/- button
Exposure compensation : This camera automatically adjusts the exposure according to the
ambient lighting conditions.
You can also select the exposure value by using the +/- button.
Compensating Exposure
1. Press the +/- button, and then use the UP and DOWN
buttons to select the exposure compensation icon ( ).
The exposure compensation menu bar will appear as
shown.
2. Use the LEFT and RIGHT buttons to set the desired
exposure compensation factor.
3. Press the +/- button again. The value you set will be
saved and the Exposure Compensation setup mode will close. If you change the exposure
value, the exposure indicator ( ) will be displayed on the bottom of the LCD monitor.
* A negative exposure compensation value reduces the exposure.
Note that a positive exposure compensation value increases the exposure and the LCD
monitor will appear white or you may not get good pictures.
Long Time shutter : This camera automatically adjusts the shutter speed and aperture values
to the shooting environment. However, in NIGHT SCENE mode, you can
set the shutter speed and aperture values to your preference.
Adjusting the shutter speed and aperture values
1. Select the NIGHT SCENE mode by rotating the mode dial.
2. Press +/- button and select Long Time shutter menu
with the up/down button to open the shutter speed / iris
configuration window.
3. Configure the Long Time shutter value with the
up/down/left/right button.
Up/Down Button: Select the iris / shutter speed
Left/Right Button: Change the value. Available iris value
options, depending on zoom step will
be displayed on the menu.
4. Press the +/- button again. The value you set will be saved and the mode will switch to
NIGHT SCENE mode. Press the SHUTTER button to take the picture.
Page 36

38
+/- button
zoom0 zoom1 zoom2 zoom3 zoom4 zoom5 zoom6 zoom7
5.8 7.4 9.1 10.7 12.4 14.0 15.7 17.4
2.8 3.1 3.4 3.7 4.0 4.3 4.6 4.8
5.8 6.4 7.1 7.8 8.3 8.9 9.5 10.1
Optical Zoom
Small
Aperture
Value
Zoom Position
Focusing range(mm)
(Press left button)
Aperture Value SmallLarge
(Press right button)
Shutter Speed
Fast
(Press left button)
Slow
(Press right button)
[ Image & full information ] [ Image & basic information ] [ LCD off ]
You can check the recording status in the LCD monitor.
Pressing the LCD button in the RECORDING mode will
change the display as shown below.
If the LCD monitor is turned off, the auto focus lamp will light up.
Aperture values that can be selected for each zoom position are as follows :
Pressing the
LCD button
Pressing the
LCD button
Pressing the LCD button
LCD button
Page 37

39
Using the LCD monitor to adjust the camera settings
You can use the menu on the LCD monitor to set up recording functions.
In any mode with the exception of VOICE RECORDING mode, pressing the MENU button
displays the menu on the LCD monitor.
The following functions are available, depending on the mode you have selected.
Menu tab Main menu Sub menu
Camera working mode
Page
2272X1704
2048X1536
1600X1200
1024X768
640X480
640X480
320X240
S.FINE
FINE
NORMAL
30FPS
15FPS
MULTI
SPOT
SINGLE
2 SHOTS
4 SHOTS
8 SHOTS
The menu will not be displayed on the LCD monitor in the following circumstances:
- When another button is being operated.
- While image data is being processed. ( when the green LED next to the viewfinder blinks)
- When there is no battery capacity.
When the menu is showing on the LCD monitor, it is not possible to operate the shutter
button i.e. capture an image.
To capture an image, simply cancel the menu display by pressing the MENU button.
INFORMATION
The items indicated by are default settings.
Metering
Continuous shot
Size
Quality
p.58
p.58
p.58
p.58
p.58
Page 38

40
Using the LCD monitor to adjust the camera settings
How to use the menu
3. Use the UP and DOWN buttons to select a sub menu.
4. Select a sub menu, and then press the OK button.
The value you set will be saved and the menu will disappear.
1. Turn on the camera and press the MENU button. A menu for each camera mode appears.
However, there is no menu for Voice Recording mode ( ).
2. Use the LEFT and RIGHT buttons to navigate through the menus.
Press the
LEFT or
RIGHT button.
Menu tab Main menu Sub menu
Camera working mode
Page
NORMAL
B&W
SEPIA
SOFT
NORMAL
VIVID
Effect
Sharpness
Scene
p.58
p.58
p.58
QUALITY
S.FINE
FINE
NORMAL
SIZE
2272X1704 2272
2048X1536
1600X1200
1024X768
SHOTTING
SINGLE
2 SHOTS
4 SHOTS
8 SHOTS
Press the
LEFT or
RIGHT button.
Press the UP
or DOWN
button.
SIZE
2272X1704 2272
2048X1536
1600X1200
1024X768
SIZE
2272X1704
2048X1536
2048
1600X1200
1024X768
Press the UP
or DOWN
button.
SIZE
2272X1704
2048X1536
1600X1200
1600
1024X768
CHILDREN LANDSCAP CLOSE-UP
SUNSET DAWN BACKLIGHT
FIREWORKS BEACH&SNOW
Page 39

41
Size
You can select the image size appropriate for your application. You can select from AUTO,
MANUAL, MySET, MOVIE CLIP, NIGHT SCENE, PORTRAIT and SCENE modes.
Mode
Icon 2272 2048 1600 1024 640
Size 2272X1704 2048X1536 1600X1200 1024 768 640 480 640X480 320X240
STILL IMAGE mode MOVIE CLIP mode
640 320
[ AUTO mode ] [ MOVIE CLIP mode ]
The higher the resolution, the lower the number of available shots will be because high
resolution images require more memory than lower resolution images.
INFORMATION
Quality
You can select the compression ratio appropriate for your application of the captured images.
The higher the compression ratio, the lower the picture quality. You can select from AUTO,
MANUAL, MySET, MOVIE CLIP, NIGHT SCENE, PORTRAIT and SCENE modes.
Mode
Icon
Sub menu S.FINE FINE NORMAL 30FPS 15FPS
File Format jpeg jpeg jpeg avi avi
STILL IMAGE mode MOVIE CLIP mode
[ AUTO mode ] [ MOVIE CLIP mode ]
SIZE
2272X1704
2272
2048X1536
1600X1200
1024X768
SIZE
640X480
320X240
320
FRAME RATE
640X480
320X240
320
320
NOR
QUALITY
S.FINE
FINE
NORMAL
2272
Page 40

42
Quality
STILL IMAGE mode
MOVIE CLIP mode
Number of available shots(Still image) & Available recording time(Movie clip)
(When using a 32MB SD memory card; based on Samsung's own testing)
Mode
Quality/Size 2272 2048 1600 1024 640 640 320
S.FINE 17 19 27 66 169 - -
FINE 33 38 54 132 336 - -
NORMAL 50 56 82 198 501 - -
30FPS - - - - 4 MIN 8 MIN
15FPS - - - - 7 MIN 12 MIN
S.FINE is the highest quality and NORMAL is the lowest setting. Choose the setting
appropriate for your needs.
This file format complies with the DCF(Design rule for Camera File system).
JPEG (Joint Photographic Experts Group): JPEG is the image compression standard
developed by the Joint Photographic Experts Group. This type of compression is most
commonly used for compressing photos and graphics because it can compress the files
efficiently without damaging the data.
INFORMATION
If you cannot obtain suitable exposure conditions, you can change the metering method to
take brighter pictures. You can select either MANUAL or MySET mode.
MULTI ( ) : Exposure will be calculated based on an
average of the available light in the image
area. However, the calculation will be
biased towards the centre of the image
area. This is suitable for general use.
SPOT ( ) : Only the rectangular area in the center of
the LCD monitor will be metered for light.
This is suitable when the subject in the
center is exposed correctly,
regardless of the back lighting.
Metering
[ MANUAL mode ]
2048
METERING
MULTI
SPOT
2048
Page 41

43
Select the number of pictures in sequential shooting
You can select from AUTO, MANUAL and MySET modes.
- [1 Picture] : Take one picture only
- [2~8 Pictures] : Take a specified number of pictures per
shooting
Continuous shot
If configured pictures are fewer than available pictures for currently memory drive
displayed in LCD sentence incomplete and doesn t make sense,
High resolution and picture quality increases file saving time, which increases stand-by
time.
Select [SHOOTING] menu to inactivate the flash
INFORMATION
Effect
By using the camera s digital processor, it is possible to add special effects to your images.
You can select from MANUAL, MySET, MOVIE CLIP and PORTRAIT modes.
[ MANUAL mode ]
[ MOVIE CLIP mode ]
NORMAL : No effect is added to the image.
B & W : Converts the image to black and white.
SEPIA : Captured images will be stored in a sepia tone
(a gradient of yellowish brown colours).
2048
SHOOTING
SINGLE
2 SHOTS
4 SHOTS
8 SHOTS
2272
2048
EFFECT
NORMAL NOR
B&W
SEPIA
2048
EFFECT
NORMAL NOR
B&W
SEPIA
320
30FPS
Page 42

44
Sharpness
You can adjust the sharpness of the picture you want to
take. You cannot check the sharpness effect on the LCD
monitor before you take a picture, because this function is
applied only when the captured image is stored on the
memory. You can select from MANUAL, MySET and
NIGHT SCENE modes.
[ MANUAL mode ]
Sub menu Icon Description
VIVID
NORMAL
SOFT
Sub menu Icon Description
CHILDREN
LANDSCAPE
CLOSE-UP
SUNSET
DAWN
BACKLIGHT
FIREWORKS
BEACH&SNOW
2048
SHARPNESS
SOFT
NORMAL
VIVID
320
30FPS
Select the [SCENE] submenu to automatically configure
optimal settings, depending on the selected scene.
Only available in the Scene Mode
Scene
Take a still picture of capturing moving children
Close-up shooting for small objects such as plants and insects
Splendor of the setting sun.
Scenery with green woods or blue sky. Portrait with scenery
background.
Daybreak scenes.
Portrait without shadows caused by back light.
Firework scenes.
For ocean, lake, and beach scenes, and snowscapes.
2048
SHOOTING
SINGLE
LANDSCAPE
CLOSE-UP
SUNSET
2272
The edges of the image are softened.
This effect is suitable for editing images on your PC.
The edges of the image are emphasized. The edges will
appear sharp, but noise may occur in the recorded image.
The edges of the image are sharp.
This is suitable for printing.
Page 43

45
Starting play mode
Turn the camera on and select Play mode by pressing the play mode button ( ).
The camera can now play back the images stored in the memory.
If you have turned on the camera by pressing the POWER button, you can press the PLAY
MODE button once to switch to Play mode and press it again to switch to Recording mode.
You can turn the power on with the play mode button.
You can set up the PLAY mode function by using the camera buttons and LCD monitor.
Playing back a still image
1. Select the PLAY mode by pressing the play mode
button ( ).
2. The last image stored on the memory is displayed on
the LCD monitor.
3. Select an image that you want to play back by
pressing the LEFT / RIGHT button.
Press and hold the LEFT or RIGHT button to
play back the images quickly.
Manner mode : Pressing the power button for more than 3 seconds changes the buzzer
and start-up sound setting to OFF, even though you may have set these
to ON. If you wish to hear the buzzer sound and startup sound, set the
[SOUND](SETUP mode) and [S.SOUND](MySET mode) settings to ON.
Even if the camera s power is off, you can start the play mode by pressing the play
mode button.
INFORMATION
Page 44

46
Starting play mode
Playing back a movie clip
Steps from 1-2 are the same as those to play back a still
image.
3. Select the recorded movie clip that you want to play back
by using the LEFT/RIGHT button. If you select a movie
clip, the movie clip indicator ( ) will be displayed on the
LCD monitor.
4. Press the play & pause button ( ) to play back a
movie clip file.
- To pause a movie clip file while playing it back, press the
play & pause button again.
- Pressing the play & pause button again will cause the
movie clip file will restart.
- To rewind the movie clip while it is playing, press the
LEFT button. To fast forward the movie clip, press the
RIGHT button.
- To stop playback of the movie clip, press the play & pause button ( ), and then
press the LEFT or RIGHT button.
Playing back a recorded voice
Steps from 1-2 are the same as those to play back a still
image.
3. Select the recorded voice that you want to play back by
using the LEFT/RIGHT button. If you select a recorded
voice file, the voice indicator ( ) will be displayed on
the LCD monitor.
4. Press the play & pause button ( ) to play back a
recorded voice file.
- To pause a recorded voice file, while playing it back,
press the play & pause button again.
- To resume playback of the voice file, press the play & pause button.
- To rewind the voice file while it is playing, press the LEFT button. To fast forward the
voice file, press the RIGHT button.
- To stop playback of the voice file, press the play & pause button, and then press the
LEFT or RIGHT button.
PLAYING
REW FF
PLAYING
REW
FF
Page 45

47
LCD monitor indicator
The LCD monitor displays information about the shooting conditions.
No. Description Icon Page
1 Battery P.15
2 Play mode
3 File Type
4 Voice memo P.46
5 Protect indicator P.52
6 DPOF indicator P.56
7 Stored image number 9
SIZE : 2048X1536 Size
AV : F2.8 Aperture value
TV : 1/60 Shutter speed
ISO : 100 ISO sensitivity
FLASH : OFF Whether or not the
flash is used.
DATE : 03/09/01 Recording date
SIZE : 2048X1536
AV : F2.8
TV : 1/60
ISO : 100
FLASH : OFF
DATE : 04/01/01
If you press the LCD button, you can check the following recording information:
Page 46

48
Using the camera buttons to adjust the camera
In Play mode, you can use the buttons on the camera to conveniently set up the Play mode
functions.
Image enlargement
1. Select an image that you want to enlarge and press the enlargement button.
2. Different parts of the image can be viewed by pressing
the 5 function button.
3. Pressing the thumbnail button will zoom back to the
original full sized image.
- You can tell whether the image displayed is an
enlarged view by checking the image enlargement
indicator shown at the bottom left of the LCD monitor.
(If the image is not an enlarged view, the indicator will
not be displayed.) You can also check the area of
enlargement.
- Movie clips and WAV files can’t be enlarged.
- If an image is enlarged, a loss of quality may occur.
Thumbnail ( ) / Enlargement ( ) button
[ Normal display mode ] [ Thumbnail display mode ]
Pressing the thumbnail
button ( )
Pressing the enlargement
button ( )
Highlighted image
You can view multiple pictures, enlarge a selected picture, and crop and save a selected area
of an image.
Thumbnail display
1. While an image is displayed full screen, press the
thumbnail button.
2. The thumbnail display will highlight the image that had
been showing at the time the thumbnail mode was
selected.
3. Press the 5 function button to move to a desired image.
4. To view an image separately, press the enlargement button ( ).
Page 47

49
Thumbnail( ) / Enlargement( ) button
The maximum enlargement rate in proportion to the image size.
Trimming : You can extract part of the image that you
want and save it separately.
1. Select an image that you want to enlarge and press the
enlargement button.
2. Different parts of the image can be viewed by pressing
the 5 function button.
3. Press the MENU button and a message will be
displayed as shown alongside.
4. Press the OK button to save the trimmed image with a
new file name. The trimmed image will be displayed on the LCD monitor. Press the LEFT
button to return to the image before it was selected.
- If there is little memory space to save the trimmed image, the image can t be trimmed.
Image size 2272 2048 1600 1024 640
Maximum enlargement rate
8.8 8.0 5.3 4.0 2.2
Voice ( ) memo / Up button
When the menu is displayed on the LCD monitor, pressing the UP button makes the menu
cursor move up.
When the menu is not displayed on the LCD monitor, the UP button operates as the voice
memo button. You can add your audio to a stored still image.
Adding a Voice Memo to a Still Image
1. Press the LEFT/ RIGHT button to select an image that
you wish to add sound to.
2. Press the voice memo button ( ) and the voice memo
indicator will display. The camera is now ready to record
a voice memo.
STOP.SHUTTER
REC
Page 48

50
Voice ( ) memo / Up button
3. Press the shutter button to start recording. The [REC]
message will be displayed on the LCD monitor (as
shown) and voice will be recorded to the still image for
10 seconds.
4. The recording can be stopped by pressing the shutter
button again.
5. The ( ) icon will be displayed on the LCD monitor
after voice memo recording has finished.
- Voice memos can’t be recorded onto movie clip files.
- A distance of 40cm between you and the camera
(microphone) is the best distance to record sound.
- The voice memo will be saved in *.wav format, but has
the same file name as the still image to which it
corresponds.
- If you add a new voice memo to the still image that
already has a voice memo, the existing voice memo will be erased.
Play & Pause ( )/ Down button
In Play mode, the play & pause/ down button works as follows:
- If the menu is displayed
Press the DOWN button to move from the main menu to a sub menu, or to move down the
sub menu cursor.
- If a still image with a voice memo, a voice file, or a movie clip is playing
In Stop mode : Plays a still image with a voice memo, a voice file, or a movie clip.
During playback : Temporarily stops playback.
In Pause mode : Resumes playback
[ Voice recording is stopped ] [ Voice recording is paused ][ Voice file is playing ]
PLAY
REW
FF
PAUSE
REW
FF
PLAY
REW
FF
Page 49

51
LEFT / RIGHT/ MENU/ OK button
LEFT / RIGHT/ MENU/ OK buttons activate the following.
- LEFT button : While the menu is showing, press the LEFT button to select the menu
tab to the left of the cursor.
- RIGHT button : While the menu is showing, press the RIGHT button to select the menu
tab to the right of the cursor, or to move an auxiliary menu.
- MENU button : When you press the MENU button, the play mode menu will be
displayed on the LCD monitor. Pressing it again will return the LCD to
the initial display.
- OK button : When the menu is displayed on the LCD monitor, the OK button is used
for confirming data that is changed by using the 5 function button.
The shooting information will be displayed on the LCD monitor.
The last image stored in the memory is displayed on the
LCD monitor by pressing the play mode button.
Pressing the LCD button in the PLAY ( ) mode will
change the display as shown below. [Image & Icons]
[Image & Information] [Image only]
[ Image & Icons ] [ Image & Information ] [ Image only ]
Pressing the LCD button
Pressing
the LCD
button
Pressing
the LCD
button
LCD button
Page 50

52
Delete ( ) button
This deletes images stored on the memory card.
Before deleting images from the camera, you should protect ( p.52) or download images
( p.84) to your computer that you wish to keep.
INFORMATION
Deleting Images in Play Mode
1. Select an image that you want to delete by pressing the
LEFT / RIGHT button and press the DELETE ( )
button.
2. A message will display as shown alongside on the LCD
monitor.
3. Press the OK button to delete the image.
The image that precedes the deleted one will then be
displayed on the LCD monitor.
Page 51

53
Setting up the play back function using the LCD monitor
PLAY mode functions can be changed by using the LCD monitor.
In the PLAY mode, pressing the MENU button displays the menu on the LCD monitor.
The menus you can set up in Play mode are as follows.
To capture an image after setting up the play menu, press the PLAY button.
Menu tab Main menu Sub menu Secondary menu Page
PROTECT
DELETE
RESIZE
ROTATE
SLIDE
COPY TO MS
COPY TO SD
DPOF
p. 57
p. 54
p. 54
p. 59
p. 53
p. 59
p. 69
SELECT
ALL PICS
SELECT
ALL PICS
OFF/ 1~10SEC
ON/OFF
CANCEL/ EFFECT1, 2, 3, 4
UNLOCK/ LOCK
UNLOCK/ LOCK
1280X960
800X600
LOGO
CANCEL
RIGHT
LEFT
UPDOWN
INTERVAL
REPEAT
EFFECT
SIZE
SELECT
ALL PICS
SELECT
ALL PICS
STANDARD
INDEX
SELECT/ ALL PICS/ CANCEL
NO/ YES
DEFAULT, 3X5, 4X6,
5X7, 8X10, CANCEL
The items indicated by are default settings.
* Menus are subject to change without prior notice.
Page 52

54
Starting the slide show
Images can be displayed continuously at pre-set intervals.
You can view the slide show by connecting the camera to an external monitor.
Configure the interval for the slide show: Configure the
length of time to display each picture in the slide show.
1. Press the play mode button and press the menu button.
2. Press the LEFT/ RIGHT button and select the [SLIDE]
menu tab.
3. Select the [INTERVAL] sub menu by pressing the UP/
DOWN button and press the RIGHT button.
4. Use the Up/Down Button to establish the display interval.
- Slide Show Display Interval : OFF, 1 ~10 seconds
5. Use the Right Button to start the slide show. Use the Pause ( ) Button to pause
and resume the slide show.
The loading time depends on the image size and quality.
The slide show will start from an image that was displayed on the LCD monitor.
The [PWR OFF] function can t be activated.
While the slide show is playing, only the first frame of an MOVIE file is displayed.
INFORMATION
Configure slide show repeat mode: Automatically restart the slide show after displaying all
pictures.
Steps 1 and 2 are the same as for the [INTERVAL] section.
3. Select the [REPEAT] sub menu by pressing the UP/
DOWN button and press the RIGHT button.
4. Use the Up/Down Button to select the repeat mode.
[ON] : The slide show will repeat until turned off.
[OFF] : The slide show will not repeat after the first
showing.
5. Press the OK button to confirm the setting.
* Please reset the play interval to start the slide show.
SLIDE
INTERVAL
REPEAT
EFFECT
MOVE: CHANGE:
OFF
SLIDE
INTERVAL
REPEAT
EFFECT
BACK:
SET:OK
ON
OFF
Page 53

55
Starting the slide show
Protecting images
Configure slide show effects: Unique screen effects can be used for the slide show.
Steps 1 and 2 are the same as for the [INTERVAL] section.
3. Select the [EFFECT] sub menu by pressing the UP/
DOWN button and press the RIGHT button.
4. Use the Up/Down Button to select the type of effect.
[OFF] : Normal display
[EFFECT 1] : Image is displayed slowly
[EFFECT 2] : Image is displayed slowly from the center
outwards
[EFFECT 3] : Image moves from the top left
[EFFECT 4] : Image moves from the bottom right
5. Press the OK button to confirm the setting.
* Please reset the play interval to start the slide show.
This is used to protect specific shots from being accidentally erased (LOCK).
It also unprotects images that have been previously protected (UNLOCK).
Protecting Images
1. Press the play mode button and press the menu button.
2. Press the LEFT/ RIGHT button and select the [PROTECT]
menu tab.
3. Select a desired sub menu by pressing the UP/ DOWN
button and press the OK button.
[SELECT]: Selection window for an image to
protect/release is displayed.
Up/Down/Left/Right: Select an image
Zoom W/T Button: Protect/release the image
Menu Button: The menu screen is changed to the play
mode screen
[ALL PICS]: Protect/release all saved images
Zoom WT Button: Protect/release the images
Menu Button: The menu screen is changed to the play
mode screen
SLIDE
INTERVAL
REPEAT
EFFECT
BACK:
SET:OK
CANCEL
EFFECT1
EFFECT2
PROTECT
SELECT PICS
ALL PICS
EXIT:MENU MOVE:
EXIT:MENU
W
UNLOCK T
EXIT:MENU
W
UNLOCK T
Page 54

56
Protecting images
- If you protect an image, the protect icon will be displayed on
the LCD monitor. (An unprotected image has no indicator)
- An image in LOCK mode will be protected from the delete
function or [DEL. ALL] functions, but will NOT be protected
from the [FORMAT] function.
Deleting images
Of all the files stored in the memory card, the unprotected files in the DCIM subfolder will be
deleted. Remember that this will permanently delete unprotected images. Important shots
should be stored on a computer before deletion takes place. The startup image is stored in
the camera's internal memory (i.e., not on the memory card) and it will not be deleted even if
you delete all files on the memory card.
Deleting images
1. Press the play mode button and press the menu button.
2. Press the LEFT/ RIGHT button and select the [DELETE]
menu tab.
3. Select a desired sub menu by pressing the UP/ DOWN
button and press the OK button.
[SELECT]: Selection window for an image to delete is
displayed.
Up/Down/Left/Right: Select an image
Zoom T Button: Select the image for deletion.
OK Button: Press the Ok Button to display confirmation
message
Press the OK Button again to delete all unprotected
images
If there aren t protected images, all the images are deleted
and a [NO IMAGE!] message will display.
[ALL PICS]: Displays confirmation window
Press the OK Button again to delete all unprotected
images
If there aren t protected images, all the images are deleted
and a [NO IMAGE!] message will display.
4. After the deletion, the screen will be changed to the play
mode screen.
DELETE
SELECT PICS
ALL PICS
EXIT:MENU MOVE:
DELETE:MENU
SELECT:T
Page 55

57
Resize
Change resolution (size) of pictures taken. Select [Logo] to save an image for the start-up
image. The resized image will have a new file name.
1. Press the play mode button and press the menu button.
2. Press the LEFT/ RIGHT button and select the [RESIZE]
menu tab.
3. Select a desired sub menu by pressing the UP/ DOWN
button and press the OK button.
[RESIZE] sub menu : 1280X960, 800X600, LOGO
A large sized image can be resized to a smaller sized image, but not vice versa.
Only still image(JPEG) images can be resized. Movie clip (AVI) and Voice
recording(WAV) files can t be resized.
You can change the resolution of only those files compressed in the JPEG 4:2:2 format.
The resized image will have a new file name. The [LOGO] image is stored not on the
memory card but on the internal memory.
Only one [LOGO] image can be saved. If you save a new [LOGO] image, the existing
startup image will be deleted.
If the memory capacity is insufficient to store the resized image, a [CARD FULL!]
message will display on the LCD monitor and the resized image will not be stored.
INFORMATION
Size 1280X960 800X600 LOGO
2272 O O O
2048 O O O
1600 O O O
1024 X O O
640 X X O
Image Resize Types
RESIZE
1280X960
800X600
LOGO
EXIT:MENU MOVE:
Page 56

58
Rotating an image
DPOF
DPOF(Digital Print Order Format) allows you to embed printing information on your memory
card’s DCIM/MISC folder. Select the pictures to be printed and how many prints to make.
The DPOF indicator will display on the LCD monitor when an image that has DPOF
information plays back. Images can then be printed on DPOF printers, or at an increasing
number of photo labs.
This function is not available for Movie clips and Voice recording files.
You can rotate the stored images by 90, 180, or 270 degrees.
1. Press the play mode button and press the menu button.
2. Press the LEFT/ RIGHT button and select the [ROTATE]
menu tab.
3. Select a desired sub menu by pressing the UP/ DOWN
button.
[CANCEL] : Cancel rotation
[RIGHT] : Rotate picture in a clock-wise direction
[LEFT] : Rotate picture in a counter-clock-wise direction
[UPDOWN] : Rotate picture 180 degrees
Picture after 90 degrees CCW
rotation
Picture after 180 degrees
rotation
[Picture after 90 degrees CW
rotation]
4. Press the OK button. The rotated image will be displayed and the menu will disappear.
If you display the rotated image on the LCD monitor, empty spaces may appear to the left
and right of the image.
ROTATE
CANCEL
RIGHT
LEFT
EXIT:MENU MOVE:
Page 57

59
DPOF : STANDARD
Images (except for movie clips and voice file) are printed as index type.
1. Press the play mode button and press the menu button.
2. Press the LEFT/ RIGHT button and select the [DPOF]
menu tab.
3. Select the [INDEX] menu by pressing the UP/ DOWN
button and press the RIGHT button.
4. Select a desired sub menu by pressing the UP/ DOWN
button.
If [NO] is selected : The image will be printed in standard print format.
If [YES] is selected : The image will be printed in index format.
5. Press the OK button to confirm the setting.
DPOF : INDEX
This function allows you to embed print quantity information on a stored image.
1. Press the play mode button and press the menu button.
2. Press the LEFT/ RIGHT button and select the [DPOF]
menu tab.
3. Select the [STANDARD] menu by pressing the UP/
DOWN button and press the RIGHT button.
4. Select a desired sub menu by pressing the UP/ DOWN
button and press the OK button.
[SELECT]: Selection window for an image to print is
displayed.
Up/Down/Left/Right: Select an image to print
Zoom W/T Button: Select the number of prints
[ALL PICS] : Configure number of prints for all pictures
except movie and voice.
[CANCEL] : Cancel the print setup
5. Press the OK button to confirm the setting.
If an image carries DPOF instructions, the DPOF
indicator ( ) will show.
DPOF
STANDARD
INDEX
SIZE
EXIT:MENU MOVE:
ONE PIC
NO
DEFAULT
SET:OK
W
0 T
DPOF
STANDARD
INDEX
SIZE
BACK:
SET:OK
0 PRINTS
DPOF
STANDARD
INDEX
SIZE
BACK:
SET:OK
Page 58

60
DPOF : PRINT SIZE
You can specify the print size when printing images stored on the memory card.
The print size you set will be applied to all pictures stored on the memory card.
Setting the Print Size
1. Press the play mode button and press the menu button.
2. Press the LEFT/ RIGHT button and select the [DPOF]
menu tab.
3. Select the [PRINT SIZE] menu by pressing the UP/
DOWN button and press the RIGHT button.
4. Select a desired sub menu by pressing the UP/ DOWN
button.
PRINT SIZE : DEFAULT, 3X5, 4X6, 5X7, 8X10, CANCEL
The [DEFAULT] print size varies depending on the printer manufacturer.
For your printer's default value, please refer to the user's guide that came with your printer.
5. Press the OK button to confirm the setting.
DPOF
STANDARD
INDEX
SIZE
BACK:
SET:OK
DEFAULT
3X5
4X6
Page 59

61
The camera has multi memory slots for both SD Memory Cards (Multimedia Card) and
Memory Stick DUO. Copy contents from one memory card to another while both memory
slots are loaded. [COPY TO MS] menu will be displayed if the current card is an SD Memory
Card (Multimedia Card). [Copy to SD (MMC)] menu will be displayed if the current card is a
Memory Stick DUO. This description is for copying images from an SD Memory Card to
Memory Stick DUO.
Copy Picture
Copy Pictures
1. Press the play mode button and press the menu button.
2. Press the LEFT/ RIGHT button and select the [COPY TO
MS] menu tab.
3. Select a desired sub menu by pressing the UP/ DOWN
button and press the OK button.
[SELECT]: Selection window for an image to copy is
displayed.
Up/Down/Left/Right: Select an image
Zoom T Button: Confirm the selection
Menu Button: Start copying
[ALL PICS] All images are copied after displaying
[PLEASE WAIT!]
4. After copying, the screen will returnk to play mode.
All memory slots need to be loaded for the function.
If the destination is smaller than the source, the remaining files are not copied. Please
delete unneeded files to free up enough memory space before copying.
A 101SSCAM folder will be created for the copying, to avoid duplication of the
100SSCAM folder.The number in front of the SSCAM will increase for each copying
operation (ex. 100SSCAM, 101SSCAM, 102SSCAM )
INFORMATION
COPY TO MS DUO
SELECT PICS
ALL PICS
EXIT:MENU MOVE:
COPY TO MS DUO
SELECT PICS
ALL PICS
EXIT:MENU MOVE:
COPY TO MS DUO
SELECT PICS
ALL PICS
EXIT:MENU MOVE:
Page 60

62
PictBridge
You can use the USB cable to connect this camera to a printer that supports PictBridge (sold
separately) and print the stored images directly. Movie clips and voice files cannot be printed.
Connecting the Camera to a Printer
1. Press the POWER button to turn on the camera.
2 In a mode with the exception of Voice Recording mode,
press the MENU button.
3. Press the LEFT/ RIGHT button and select [SETUP]
menu tab.
4. Select [USB] menu by pressing the UP/ DOWN button
and press the RIGHT button.
5. Select [PRINTER] menu by pressing the UP/ DOWN
button and press the OK button.
6. Press the menu button twice and the menu will
disappear.
7. Use the supplied USB cable to connect the camera to the printer as shown below.
8. Turn on the printer to connect the camera to the printer.
If [COMPUTER] is selected at step 5, the camera will not connect to the printer, and the autofocus LED will just blink green.
If this happens, disconnect the USB cable and start over from step 2.
Page 61

63
PictBridge
Print pictures
1. Connect the camera to the printer to display the screen.
If [USB] submenu in the Setup menu is configured as
[COMPUTER], the previous screen will remain and the
camera will not connect to the printer.
If this happens, change the [USB] submenu to
[PRINTER] (See page 62)
2. After a successful connection, the PictBridge icon will
show at the top left of the LCD and the file to print is
displayed (still image)
Press the Left/Right button to select a picture to print
Press the OK button to print the selected picture
Print Error
Printing is available even if this message is displayed while
printing. Please check the camera and the printer after
printing.
If this message is displayed while printing, please press the
OK button and repeat step 2.
CONNECTING...
USB I/F : PRINT
PRINT:OK
MOVE
:
NOW PRINTING
WARRNING
ERROR
BACK:OK
Page 62

64
Setup menu
In this mode, you can set up basic settings.
You can use the setup menu in all camera modes, except Voice Recording mode.
The items indicated by are default settings.
Menu tab Main menu Sub menu Secondary menu Page
RESET
SERIES
OFF, 1 ~ 3 ~ 10MIN p.65
KOREAN
ENGLISH
FRENCH
GERMAN
SPANISH
ITALIAN
S.CHINESE
T.CHINESE
NO
YES
YY/MM/DD
MM/DD/YY
DD/MM/YY
OFF
DATE
D&TIME
OFF
LOW
MEDIUM
HIGH
04 / 01 / 01 13:00
FILE
PWR OFF
LANGUAG
FORMAT
D & TIME
IMPRINT
SOUND
Page 63

65
Setup menu
Menu tab Main menu Sub menu Secondary menu Page
NTSC
PAL
SD/MMC
MS DUO
This function allows the user to select the file naming format.
Assigning File Names
1. In any mode with the exception of Voice Recording mode,
press the MENU button.
2. Press the LEFT/ RIGHT button and select the [SETUP]
menu tab.
3. Select the [FILE NAME] menu by pressing the UP/
DOWN button and press the RIGHT button.
4. Select a desired sub menu by pressing the UP/ DOWN
button and press the OK button.
[RESET] : After using the reset function, the next file name
will be set from 0001 even after formatting, deleting all or inserting a new
memory card.
[SERIES] : Under this system, the file name will directly follow the last stored file name,
regardless of any actions such as file deletion or formatting.
5. Press the menu button twice and the menu will disappear.
File name
SETUP
FILE
PWR OFF
LANGUAGE
BACK:
SET:OK
RESET
SERIES
NOR 2272
Page 64

66
File name
The first stored folder name is 100SSCAM, and the first file name is S4300001.
Whenever you store an image, the file number is increased by 1.
The file numbers are named from S4300001 to S4309999 automatically, 9999 files will
be stored in a folder.
The folder number is assigned sequentially from 100 to 999 as follows :
100SSCAM 101SSCAM .... 999SSCAM.
The files used with the memory card conform to the DCF(Design rule for Camera File
systems) format.
INFORMATION
Even if the batteries or AC adapter are removed and inserted again, the power off setting
will be preserved.
Note that the automatic power off function will not operate if the camera is in PC mode,
slide show, playing back a voice recording or movie clip.
INFORMATION
Auto power off
Setting Power Off
1. In any mode with the exception of Voice Recording mode,
press the MENU button.
2. Press the LEFT/ RIGHT button and select the [SETUP]
menu tab.
3. Select the [PWR OFF] menu by pressing the UP/ DOWN
button and press the RIGHT button.
4. Select a desired sub menu by pressing the UP/ DOWN
button and press the OK button.
Selecting [OFF] : The power off function will not operate.
[1~10 MIN]: The power will turn off automatically if not
used for the period of time specified.
5. Press the menu button twice and the menu will disappear.
This function switches the camera off after a set amount of time in order to prevent unnecessary
battery drainage.
SETUP
FILE
PWR OFF
LANGUAGE
BACK:
SET:OK
OFF
NOR 2272
Page 65

67
Language
Setting Language
1. In any mode other than Voice Recording mode, press the MENU button.
2. Press the LEFT/ RIGHT button and select the [SETUP]
menu tab.
3. Select the [LANGUAGE] menu by pressing the UP/
DOWN button and press the RIGHT button.
4. Select a desired sub menu by pressing the UP/ DOWN
button and press the OK button.
LANGUAGE sub menu: Korean, English, French,
German, Spanish, Italian, T.Chinese, S.Chinese, Japanese, Russian, Portuguese, Dutch,
Danish, Swedish, Finnish, Thai.
5. Press the menu button twice and the menu will disappear.
Formatting a Memory Card
1. In any mode other than Voice Recording mode, press the MENU button.
2. Press the LEFT/ RIGHT button and select the [SETUP]
menu tab.
3. Select the [FORMAT] menu by pressing the UP/ DOWN
button and press the RIGHT button.
4. Select a desired sub menu by pressing the UP/ DOWN
button and press the OK button.
If [No] is selected : The memory card will not be formatted.
Press the menu button twice and the menu display will disappear.
If [Yes] is selected : A [PLEASE WAIT!] message appears and the memory card will be
formatted. If you ran FORMAT in Play mode, a [NO IMAGE!]
message will appear.
There is a choice of languages that can be displayed on the LCD monitor. Even if the batteries or
AC adapter are removed and inserted again, the language setting will be preserved.
Formatting a memory card
This is used for formatting the memory card. If you run [FORMAT] on the memory card, all
images, including the protected images, will be deleted. Be sure to download important
images to your PC before formatting the memory card.
Be sure to run [FORMAT] on the following types of memory card.
- A new memory card, or an unformatted memory card.
- A memory card that has a file this camera can t recognize or one that has been taken
from another camera.
Always format the memory card using this camera. If you insert a memory card that has
been formatted using other cameras, memory card readers, or PCs, you will get a
[CARD ERROR!] message.
INFORMATION
SETUP
FILE
PWR OFF
LANGUAGE
BACK:
SET:OK
ENGLISH0
ENGLISH1
ENGLISH2
NOR 2272
SETUP
PWR OFF
LANGUAGE
FORMAT
BACK:
SET:OK
YES
NO
NOR 2272
Page 66

68
Setting up the Date/ Time/ Date type
You can change the date and time that will be displayed on the captured images and set up
the date type.
Setting Date/Time & Selecting Date Format
1. In any mode with the exception of Voice Recording mode, press the MENU button.
2. Press the LEFT/ RIGHT button and select the [SETUP] menu tab.
3. Select the [D&TIME] menu by pressing the UP/ DOWN
button and press the RIGHT button.
4. Use the UP, DOWN, LEFT, and RIGHT buttons to select
the desired submenu value, and then press the OK button.
RIGHT button: Selects the year/month / day/hour / minute
date format.
LEFT button: Moves the cursor to the [D&TIME] main
menu if the cursor is at the first item of the date and time setup.
In all other cases, the cursor will be shifted to the left of its current position.
UP and DOWN buttons: Changes the setting value.
- Date type : [YY/MM/DD] /[MM/DD/YY]/[DD/MM/YY]
5. Press the menu button twice and the menu will disappear.
There is an option to include DATE/TIME on still images.
Date Imprinting
1. In any mode with the exception of Voice Recording mode, press the MENU button.
2. Press the LEFT/ RIGHT button and select the [SETUP]
menu tab.
3. Select the [IMPRINT] menu by pressing the UP/ DOWN
button and press the RIGHT button.
4. Use the UP and DOWN buttons to select the desired date
imprint type, and then press the OK button.
[OFF] : The DATE & TIME will not be imprinted on
the image file.
[DATE] : Only the DATE will be imprinted on the image file.
[D&TIME] : The DATE & TIME will be imprinted on the image file.
5. Press the menu button twice and the menu will disappear.
Imprinting the recording date
The Date & Time are imprinted at the bottom right side of the still image.
The date will be imprinted as a DATE TYPE setting.
TIME is imprinted in the following way : [Hour : Minute] and hours are shown using the
12 hour clock.
The imprint function is applied only to still images.
INFORMATION
SETUP
LANGUAGE
FORMAT
D & TIME
BACK:
SET:OK
04/ 01/ 01
YY/MM/DD
NOR 2272
SETUP
FORMAT
D & TIME
IMPRINT
BACK:
SET:OK
OFF
DATE
D & TIME
NOR 2272
Page 67

69
Sound
If you set the operation sound to ON, various sounds will be activated for camera startup,
when button are pressed, and if there is a card error, so that you can be aware of the camera
operation status.
Setting Operation Sounds
1. In any mode other than Voice Recording mode, press the
MENU button.
2. Press the LEFT/ RIGHT button and select the [SETUP]
menu tab.
3. Select the [SOUND] menu by pressing the UP/ DOWN
button and press the RIGHT button.
4. Select a desired sub menu by pressing the UP/ DOWN
button and press the OK button.
- [SOUND] sub menu : OFF/LOW/MEDIUM/HIGH
5. Press the menu button twice and the menu will disappear.
You can adjust the LCD brightness.
Adjusting LCD Brightness
1. In any mode other than Voice Recording mode, press the
MENU button.
2. Press the LEFT/ RIGHT button and select the [SETUP]
menu tab.
3. Select the [LCD] menu by pressing the UP/ DOWN button
and press the RIGHT button.
4. Select a desired sub menu by pressing the UP/ DOWN
button and press the OK button.
- [LCD] sub menu : DARK, NORMAL, BRIGHT
5. Press the menu button twice and the menu will disappear.
LCD brightness
SETUP
D & TIME
IMPRINT
SOUND
BACK:
SET:OK
ON
OFF
NOR 2272
SETUP
IMPRINT
SOUND
LCD
BACK:
SET:OK
DARK
NORMAL
BRIGHT
NOR 2272
Page 68

70
Selecting Video out type
The Movie output signal from the camera can be NTSC or PAL.
Your choice of output will be governed by the type of device (monitor or TV, etc.) to which the
camera is connected. PAL mode can support only BDGHI.
Setting the Video Out Type
1. In any mode other than Voice Recording mode, press the
MENU button.
2. Press the LEFT/ RIGHT button and select the [SETUP]
menu tab.
3. Select the [VIDEO] menu by pressing the UP/ DOWN
button and press the RIGHT button.
4. Select a desired sub menu by pressing the UP/ DOWN
button and press the OK button.
- [VIDEO] sub menu : NTSC, PAL
5. Press the menu button twice and the menu will disappear.
NTSC : U.S.A, Canada, Japan, South Korea, Taiwan, Mexico.
PAL : Australia, Austria, Belgium, China, Denmark, Finland, Germany, U.K., Holland,
Italy, Kuwait, Malaysia, New Zealand, Singapore, Spain, Sweden, Switzerland,
Thailand, Norway.
When using a TV as an external monitor, you will need to select the external or AV
channel of the TV.
There will be a digital noise on the external monitor, but it is not a malfunction.
If the image is not in the centre of the screen, use the TV controls to centre it.
When the camera is connected to an external monitor, the menu will be visible on the
external monitor and the menu functions are the same as those indicated on the LCD
monitor.
INFORMATION
Connecting to an external monitor
In RECORDING/ PLAY mode, you can
view the stored still images or movie
clips by connecting the camera to an
external monitor via the A/V cable.
When the camera is connected to an
external monitor, the LCD monitor will
be turned off automatically.
Yellow color-Video
White color-Voice
SETUP
SOUND
LCD
VIDEO
BACK:
SET:OK
NTSC
PAL
NOR 2272
Page 69

71
Quick view
If you enable Quick View before capturing an image, you can view the image you just
captured on the LCD monitor for the duration set in the [Q.VIEW] setup. Quick view is
possible only with still images.
Setting Quick View
1. In any mode other than Voice Recording mode, press the
MENU button.
2. Press the LEFT/ RIGHT button and select the [SETUP]
menu tab.
3. Select the [Q.VIEW] menu by pressing the UP/ DOWN
button and press the RIGHT button.
4. Select a desired sub menu by pressing the UP/ DOWN
button and press the OK button.
[OFF] : The quick view function can’t be activated.
[1 ~ 5 SEC] : The captured image is briefly displayed during the selected time.
5. Press the menu button twice and the menu will disappear.
Initialization(RESET ALL)
SETUP
LCD
VIDEO
Q.VIEW
BACK:
SET:OK
2 SEC
NOR 2272
All camera menu and function settings will be restored to their default values. However,
values for DATE/TIME, LANGUAGE, and VIDEO OUT will not be changed.
Initializing the Camera
1. In any mode other than Voice Recording mode, press the
MENU button.
2. Press the LEFT/ RIGHT button and select the [SETUP]
menu tab.
3. Select the [RESET] menu by pressing the UP/ DOWN
button and press the RIGHT button.
4. Select a desired sub menu by pressing the UP/ DOWN
button and press the OK button.
If [NO] is selected : Settings will not be restored to their defaults.
If [YES] is selected : All settings will be restored to their defaults.
5. Press the menu button twice and the menu will disappear.
SETUP
VIDEO
Q.VIEW
RESET
BACK:
SET:OK
NO
YES
NOR 2272
Page 70

72
Select card
The camera has multi memory slots for an SD Memory Card (Multi Media Card) and Memory
Stick Duo. Select memory card to use when both memory slots are loaded with a memory
card.
Memory card selection
1. In any mode with the exception of Voice Recording mode,
press the MENU button.
2. Press the LEFT/ RIGHT button and select the [SETUP]
menu tab.
3. Select the [SEL.CARD] menu by pressing the UP/ DOWN
button and press the RIGHT button.
4. Use the UP and DOWN buttons to select the desired date
imprint type, and then press the OK button.
[SD/MMC] : Selects SD card or Multi Media Card
[MS DUO] : Selects Memory Stick DUO
5. Press the menu button twice and the menu will disappear.
Where only an SD Memory Card or Multi Media Card is loaded, the camera will use the
SD Memory Card or Multimedia Card even if the [MS DUO] option is selected.
Configure the submenu of the [CARD SEL.] menu to use the free space in the auxiliary
memory card when a [CARD FULL !] message is displayed.
INFORMATION
SETUP
Q.VIEW
RESET
CARD SEL
BACK:
SET:OK
SD/MMC
MS DUO
NOR 2272
Connecting an External Device (USB)
You can select an external device to which you want to connect the camera using the USB cable.
Selecting an External Device
1. In any mode other than Voice Recording mode, press the
MENU button.
2. Press the LEFT/ RIGHT button and select the [SETUP]
menu tab.
3. Select the [USB] menu by pressing the UP/ DOWN button
and press the RIGHT button.
4. Select a desired sub menu by pressing the UP/ DOWN
button and press the OK button.
COMPUTER : Select this if you want to connect the camera to your PC. Refer to page 83
for instructions on how to connect the camera to your PC.
PRINTER : Select this if you want to connect the camera to your printer. Refer to page
58 for instructions on how to connect the camera to your printer.
5. Press the menu button twice and the menu will disappear.
SETUP
RESET
CARD SEL
USB
BACK:
SET:OK
COMPUTER
PRINTER
NOR 2272
Page 71

73
Setting up the MYCAM menu
You can set up a start up image, start up sound and shutter sound. Every camera working
mode (with the exception of Voice recording mode) has the MyCAM menu.
Menu tab Main menu Sub menu Page
P.75
P.76
P.76
You can select the image that is first displayed on the LCD monitor whenever the camera is
turned on.
Setting a Startup Image
1. In any mode with the exception of Voice Recording mode,
press the MENU button.
2. Press the LEFT/ RIGHT button and select the [MyCAM]
menu tab.
3. Select the [S.IMAGE] menu by pressing the UP/ DOWN
button and press the RIGHT button.
4. Select a desired sub menu by pressing the UP/ DOWN
button and press the OK button.
5. Press the menu button twice and the menu will disappear.
Start up image
Use a saved image for the start-up image with the [LOGO] in the [RESIZE] menu in the
play mode.
The start-up image will not be deleted by deleting all images or [FORMAT] menu.
INFORMATION
MYCAM
S.IMAGE
S.SOUND
SH.SOUD
BACK:
SET:OK
2272
Page 72

74
Start up sound
You can select the shutter sound.
Selecting the Shutter Sound
1. In any mode other than Voice Recording mode, press the
MENU button.
2. Press the LEFT/ RIGHT button and select the [MYCAM]
menu tab.
3. Select the [SH.SOUND] menu by pressing the UP/
DOWN button and press the RIGHT button.
4. Select a desired sub menu by pressing the UP/ DOWN
button and press the OK button.
5. Press the menu button twice and the menu will disappear.
Shutter sound
You can select the sound that is activated whenever the
camera is turned on.
Setting the Startup Sound
1. In any mode other than Voice Recording mode, press the
MENU button.
2. Press the LEFT/ RIGHT button and select the [MYCAM]
menu tab.
3. Select the [S.SOUND] menu by pressing the UP/ DOWN
button and press the RIGHT button.
4. Select a desired sub menu by pressing the UP/ DOWN
button and press the OK button.
5. Press the menu button twice and the menu will disappear.
MYCAM
S.IMAGE
S.SOUND
SH.SOUD
BACK:
SET:OK
2272
OFF
SOUND 1
SOUND 2
MYCAM
S.IMAGE
S.SOUND
SH.SOUD
BACK:
SET:OK
2272
OFF
SOUND 1
SOUND 2
Page 73

75
Important notes
Be sure to observe the following precautions!
This unit contains precision electronic components. Do not use or store this unit in the
following locations.
- Areas exposed to severe changes in temperature and humidity.
- Areas exposed to dust and dirt.
- Areas exposed to direct sunlight or the inside of a vehicle in hot weather.
- Environments where there is high magnetism or excessive vibration.
- Areas with high explosives or highly flammable materials.
Do not let the unit come into contact with dust, vinyl goods, or chemicals, such as
insecticides, for an extended period of time.
Sand can be particularly troublesome to cameras.
- Do not let sand get inside the unit when using it on beaches, coastal dunes, or other areas
where there is lots of sand.
- Doing so may result in failure or may permanently render the unit unusable.
Extremes in temperature may cause problems.
- If the camera is transferred from a cold to a warm and humid environment, condensation
can form on the delicate electronic circuitry. If this occurs, turn the camera off and wait for at
least 1 hour until all moisture is dispersed. Moisture build up can also occur in the memory
card. If this happens, turn off the camera and remove the memory card. Wait until the
moisture has dispersed.
Caution on Using the Lens
- If the lens is subjected to direct sunlight, it could result in discoloration and deterioration of
the image sensor.
- Pay attention not to get fingerprints or foreign substances on the surface of the lens.
If the digital camera is not used for a long period, an electric discharge can occur. It is a good
idea to remove the batteries and the memory card if you do not intend using the camera for
an extended period of time.
Page 74

76
Important notes
If the camera is exposed to an electronic interference, it will turn itself off to protect the
memory card.
Camera Maintenance
- Use a soft brush (available from photo stores) to gently clean the lens and LCD assemblies.
If this does not work, lens-cleaning paper with lens cleaning fluid can be used.
Clean the camera body with a soft cloth. Do not allow this camera to come into contact with
solvent materials such as benzol, insecticide, thinners etc. This may damage the body shell
of the camera and also affect its performance. Rough handling can damage the LCD
monitor. Take care to avoid damage and keep the camera in its protective carry case at all
times when not in use.
Do not attempt to disassemble or modify the camera.
Under certain conditions, static electricity can cause the flash unit to fire. This is not harmful to
the camera and is not a malfunction.
When images are uploaded or downloaded, the data transfer may be affected by static
electricity. In this case, disconnect and re-connect the USB cable before trying the transfer
again.
Page 75

77
Warning indicator
There are several warnings that may appear on the LCD display
Warning indicator Causes Remedy
- Turn off the camera power and turn it
on again
- Insert the memory card again
- Format the memory card (p.66)
- Memory card error
- There is insufficient
memory capacity to take
an image
- There are no images
stored on the memory
card
- A memory card is not
inserted
- The camera can
t
recognize the memory
card
- File error
- Memory card error
- There is low battery
capacity
- The memory card is
locked
CARD ERROR !
CARD FULL !
NO IMAGE !
NO CARD !
FILE ERROR !
LOW BATTERY !
CARD LOCKED !
- Insert a new memory card
- Delete unnecessary image files to free
up some memory
- Take images
- Insert a memory card that is holding
some images
- Insert a memory card
- Insert the memory card again
- Turn off the camera power and turn it
on again
- Format the memory card
- Contact a camera service center
- Insert fresh batteries
- MS DUO : Slide the write protect switch to
the bottom of the memory card.
- SD : Slide the write protect switch to the top
of the memory card.
- When taking pictures in
dark places
LOW LIGHT !
- Use a tripod and take pictures in Flash
Photography mode
Page 76

78
Before contacting a service center
Please check the following
Symptom Causes Remedy
- Insert fresh batteries
- Connect an AC Power Adapter
- Insert the batteries according to the
polarity marks (+, -).
- There is low battery
capacity
- An AC Power Adapter is
not connected
- Batteries are inserted
incorrectly with the
reverse polarities.
-
The batteries are exhausted
- The Camera is turned off
automatically.
- The Adapter plug is not
connected securely
- The Camera is being
used in low temperatures
- The memory card is not
inserted
- There is insufficient
memory capacity
- The memory card has
not been formatted
- The memory card is
exhausted
-
The camera’s power is off
-
The batteries are exhausted
- The memory card is
locked
- Batteries are inserted
incorrectly with the
reverse polarities.
The camera
doesn
t switch
on
The camera
power ceases
whilst in use
Batteries drain
quickly
Camera does
not take images
when pressing
the Shutter
button
- Insert fresh batteries
- Slide the power switch to reactivate
camera
- Remove and re-insert the plug
- Keep the camera in warm conditions
(i.e. inside a coat or jacket) and only
remove it in order to take images
- After turning the camera off, insert a
new memory card
- Delete unnecessary image files
- Format the memory card (p.66)
- Insert a new memory card
- Turn the camera power on
- Insert fresh batteries
- Refer to [CARD LOCKED!] error
message(p.82)
- Insert the batteries according to the
polarity marks (+, -).
- The camera was stopped
due to a malfunction
The camera
suddenly stops
working while in
use.
- Remove /re-insert batteries and switch
the camera on
Page 77

79
Before contacting a service center
Symptom Causes Remedy
- A picture was taken
within 0.8 m from the
subject without setting an
appropriate macro mode.
- Taking a picture beyond
the flash range
- The lens is smudged or
dirty.
- Flash off mode has been
selected
The images are
unclear
The flash does
not fire
- If the subject is closer than 0.8m,
select macro shot mode.
- Take a picture within the flash range
- Clean the lens
- Dis-engage flash off mode
- Reset the date and time correctly- The date and time have
been set incorrectly or
the camera has adopted
the default settings
- Camera malfunction
- Incorrect memory card
format
Incorrect date
and time is
displayed
The camera
buttons do not
operate
A card error has
occurred while
the memory
card is in the
camera.
- Remove /re-insert batteries and switch
the camera on
- Re-format the memory card (p.66)
- Incorrect file name.
(Violation of DCF format)
The images
don't play back
- Do not change the image file name.
Page 78

80
Before contacting a service center
Symptom Causes Remedy
- White balance setting is
incorrect.
- Exposure is excessive.
- Cable connection is
incorrect.
- The camera is off.
- There are no batteries,
the batteries are
exhausted or the AC
adapter is not connected.
- The operating system is
not Windows 98, 98SE,
2000, ME, XP/ Mac OS
9.0~10.2. Alternatively
the PC does not support
USB.
- The USB driver is not
installed.
Colour of image
is different to
the original
scene
Images are too
bright
When using the
PC’s explorer,
the [Removable
Disk] file does
not show
- Select appropriate White balance.
- Reset exposure compensation.
- The external monitor has
not been connected
properly with the camera.
- There are incorrect files
in the memory card.
No image on
external
monitor
- Check the connection cables.
- Insert a memory card that has correct
files.
- Check the connection.
- Turn the camera on.
- Insert new batteries or check the
adapter connection.
- Install Windows 98, 98SE, 2000, ME,
XP/ Mac OS 9.0~10.2 to PC that
supports USB.
- Install a [USB Storage Driver].
 Loading...