

Page 1

User's Guide for the Hanvon B10 TouchPad
Page 2

HANWANG TECHNOLOGY CO., LTD
May, 2010
Page 3

Preface
Preface
Copyright© 1999 – 2010 HANWANG TECHNOLOGY CO., LTD
Hanwang is committed to improving and updating its products. The product you receive therefore may
differ slightly from that depicted in the user manual.
Error or the inability to use this product, whether or not caused by direct, indirect, intended or accidental
actions, is not the responsibility of the manufacturer.
This manual contains information protected by copyright law, and retains all legal rights. No part of this
manual may be copied, electronic or otherwise, without the written permission of Hanwang Technology Co.,
Ltd.
Safety Tips
1. Please read the safety instructions carefully.
2. All precautions and warnings on the equipment should be adhered to.
3. Please unplug the AC adapter from power socket before cleaning the computer.
4. Do not pour any liquid into any opening of the equipment or directly onto the computer. It may cause fire
or electric shock, and may damage your computer.
5. Please make sure the power socket voltage range is between 100V to 240V before connecting the device.
Page 4

Preface
If greater than 240V, the adapter or computer may be damaged and may result in fire or electric shock.
6. Do not place the device in temperatures lower than 4 ℃ or above 35 ℃.
To reduce the risk of electric shock, please follow all safety precautions.
Lithium can be dangerous if treated incorrectly and may cause an explosion if the battery is replaced
incorrectly. If you need to replace the battery, please contact Hanwang Technology Co., Ltd. or the dealer
of Hanwang Technology Co., Ltd.
Under no circumstances should the user attempt to open the power adapter. The high-voltage nature of
adapter may result in physical harm. Faulty power adapters should be returned to the retailer.
Power Line Safety Precautions
The AC adapter automatically recognizes and provides suitable voltage between 100-240 volts. The adapter
also charges the battery (as indicated by the green light).
Page 5

Preface
1. AC power cord; 2. AC adapter; 3. DC power cord.
If the power cord is damaged, please contact the retailer for a suitable replacement.
For countries except the United States and Canada, the plug must be 250VAC, 2.5 amps minimum, and
must contain a logo indicating approval by the international certification agency. Power cord specifications
must comply with the provisions of the users country. If you are not sure which power cord should be used,
please contact the retailer.
Page 6

Contents
Contents
Before Using .................................................................................................................. 1
Introduction ................................................................................................................... 3
Know Your Computer ................................................................................................... 3
Computer Setting .......................................................................................................... 8
Connect the Computer to an External Power Supply .................................................. 8
Battery Power Usage ..................................................................................................... 9
Adjust the Screen Display ........................................................................................... 11
Power ........................................................................................................................... 11
Touch Panel Input ....................................................................................................... 12
Pen and Touch Settings ............................................................................................... 20
Using the Camera ........................................................................................................ 23
Using the Multi-Touch Screen .................................................................................... 23
Backup and Recovery .................................................................................................. 24
Create System Images ................................................................................................. 31
Using Hanvon’s Restoring Software ........................................................................... 36
General hardware problems / possible causes and solutions ..................................... 58
Contact Distributors .................................................................................................... 61
Technical Support Information .................................................................................. 61
Page 7

Contents
CPU ................................................................ .............................................................. 63
Video ............................................................................................................................ 63
Audio ............................................................................................................................ 63
Memory ........................................................................................................................ 64
HDD ............................................................................................................................. 64
BIOS............................................................................................................................. 64
Built-in Battery ............................................................................................................ 65
Screen ........................................................................................................................... 65
Camera......................................................................................................................... 65
Dimensions ................................................................................................................... 65
Wireless ........................................................................................................................ 66
Input/Output Devices .................................................................................................. 66
I/O Transferring Interface .......................................................................................... 66
Power Specification ..................................................................................................... 67
Outer Dimensions ........................................................................................................ 67
Safety Certification ..................................................................................................... 67
Page 8

Before Start
Chapter
Ⅰ
Before Using
the Computer
Please read this manual carefully before using the computer.
Preparation before starting up the computer
Let the computer adjust to the environment
Rapid temperature changes such as moving the computer from a cold to warm room may cause startup
problems. Avoid extreme temperatures and humidity.
Note: If the computer is too hot or cold please do not immediately start it. Wait three to four hours to let
the machine adjust to room temperature.
Placement of the computer
When indoors, please make sure there is sufficient air circulation around the computer.
Do not block ventilation openings as it may cause the computer to overheat.
1
Page 9

Before Start
Do not place the computer in direct sunlight – the glare will make it difficult to use.
Suitable Environment
Your computer can run very well in most of the environment, but need to avoid extreme temperature and
humidity.
There are some things that you can put up but the computer can not tolerate: such as static electricity, dust,
water, steam and oil.
When use the power adapter to charge please pay attention to the power adapter output voltage is at 19V.
When used, please note if your power adapter output voltage meet the requirements.
2
Page 10

Start Operation
Chapter II Introduction
Introduction
Your computer is a fully featured portable wireless multimedia device which combines an ultra-light body,
with the most advanced multimedia features and multi-touch capabilities.
Package contents
Computer
Manual
AC Adapter
Power Cord
Driver and Software CD
Know Your Computer
3
Page 11
Start Operation
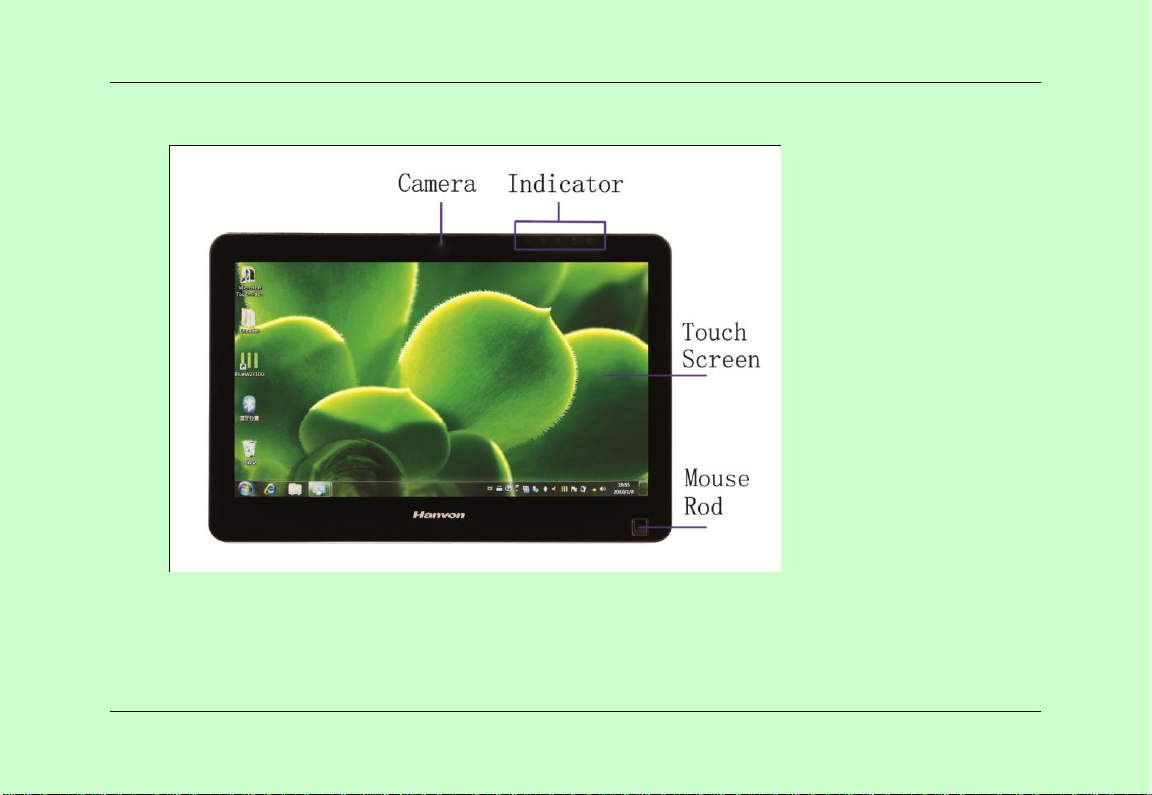
External Interface and Function Keys
1. Built-in camera
The built-in camera can be used for video conferencing or online chats.
2. Indicator lights
4
Page 12
Start Operation
Used to indicate the status of the computer such as boot light, hard drive, battery indicator etc..
3. Touch Screen
Multi-touch LCD touch screen gives you fingertip control of the computer.
4. Mouse Rod
Built-in touch sensitive mouse controller.
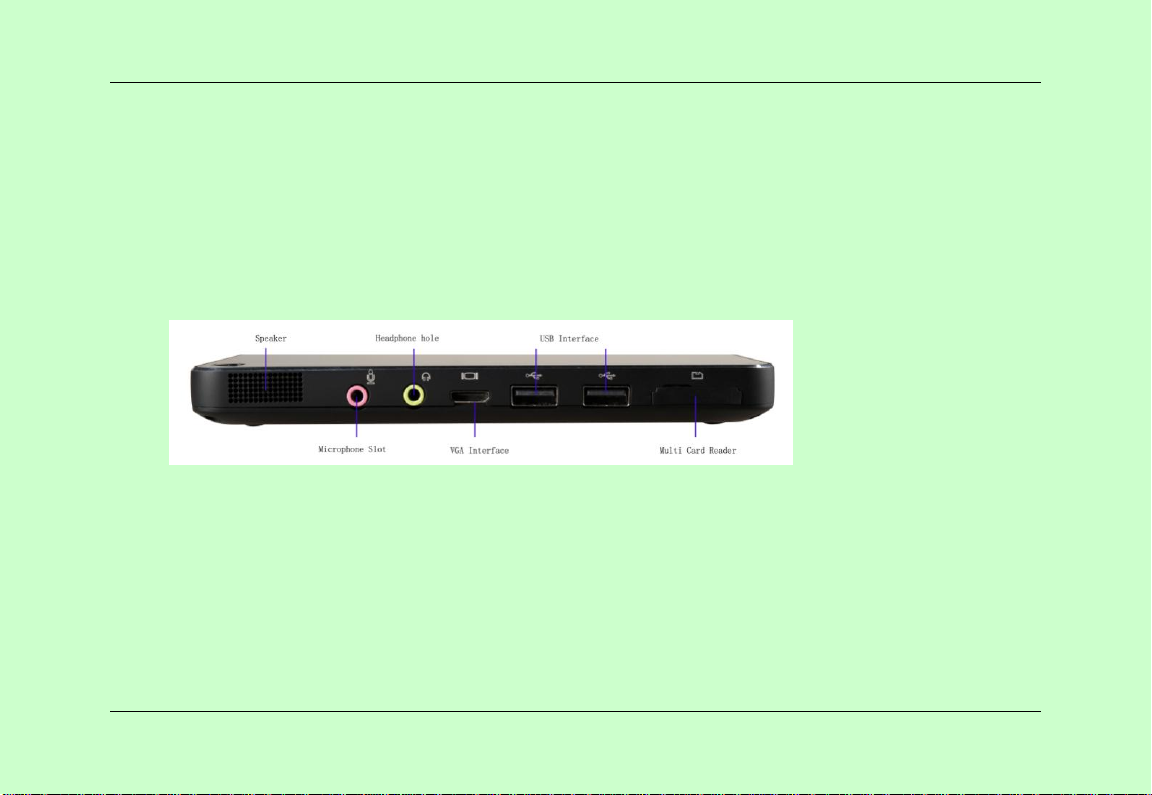
Right Side
1. Speaker
It is used for computer sound.
2.Microphone Slot
It is used to connect the microphone with this socket.
3.Headphone Hole
It is used to connect earphone with this socket. (The hole of 3.5mm in diameter)
4.VGA Interface
5
Page 13
Start Operation
It is used to connect an external monitor.
5.USB Interface
This device has two built-in USB interface.
6.Multi Card Reader
It is used to read a variety of Memory Cards, such as SD card, MMC card, when connecting with this socket
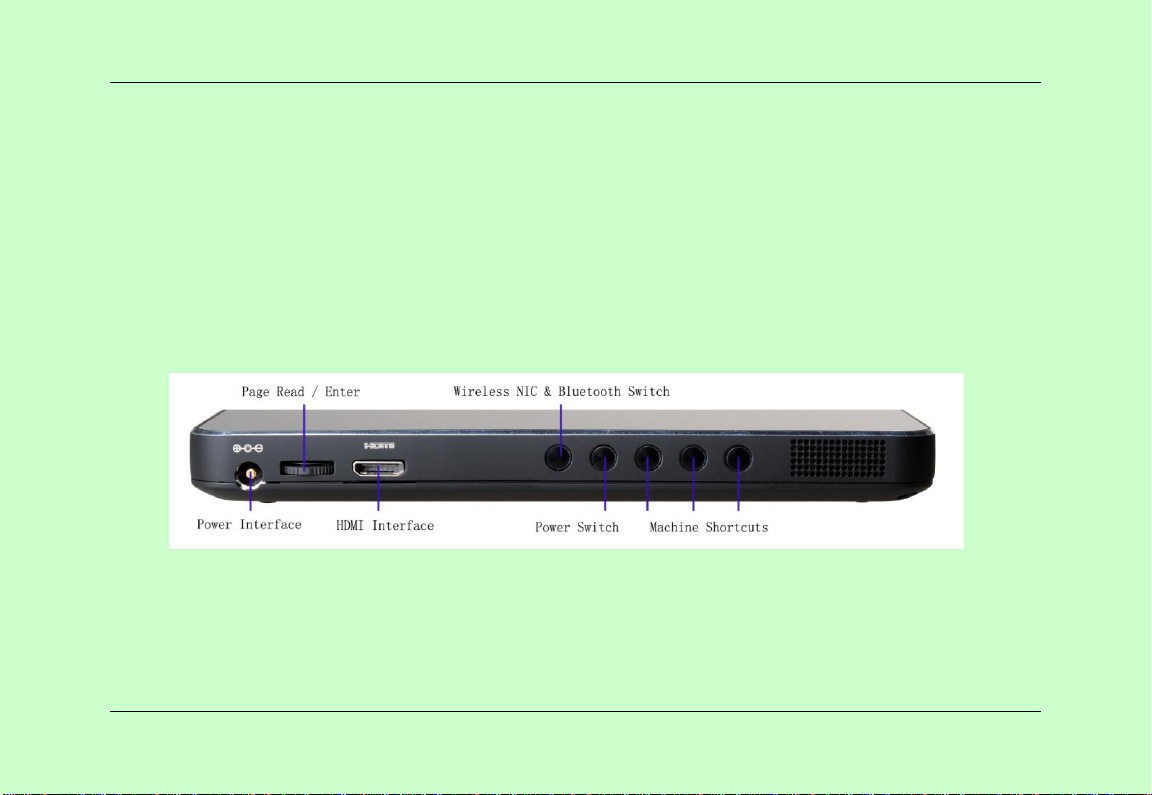
Left Side
1.Power Interface
Connect this socket for Computer charge.
2.Page Read/Enter
This Knob can move the page up and down; the function is the same as the up/down button on the normal
keyboard. The function of pressing this knob is the same as the Enter key on the keyboard.
6
Page 14

Start Operation
3.HDMI Interface
Use this socket to connect an external monitor.
4.WIFI &Bluetooth
Press this button to turn on/off the WIFI or Bluetooth, the default status is on.
5.Power Switch
Press this button to start the computer. Click the button for 4seconds long, the machine will be forced
shutdown.
6.Shortcut Button
Multiple shortcut buttons are used to start different programs or specific operation. The default function is
Screen Darkness, Brightness and ESC.
7
Page 15

Start Operation
Chapter III Startup
Computer Setting
Remove the computer from the packaging.
Connect the computer to the external power source via the AC adapter.
Notice: On first use, please make sure the battery is completely discharged before charging. When fully
charged, disconnect the AC adapter and run the computer till the battery is fully drained. This will
prolong the life of the battery.
Connect the Computer to an External Power Supply
Using the AC adapter to connect the computer to an external power supply:
Insert the AC adapter into the computer AC power socket.
Insert one end of the power cord into an electrical outlet and the other end into the AC adapter.
8
Page 16

Start Operation
In order to avoid damage to your computer, do not use inferior extension cords. Your computer is supplied
with an AC adapter (output voltage 19V). Please do not use the computer's AC adapter to start the other
computer or other electronic devices, or use other AC adapters to connect to the computer.
When the hard disc is in use, please don’t reboot the drive. This may result in data loss or damage.
Battery Power Usage
Operating Power Supply Unit
Your computer comes with a built-in rechargeable lithium battery. The battery cannot be removed and must
be serviced by Hanwang or an authorised dealer if you encounter any issues.
Battery Charging
When the computer is connected to an external power source, the battery will automatically charge. When
first using the battery, please make sure the battery is completely discharged before charging. When fully
charged disconnect the AC adapter.
9
Page 17

Start Operation
Please keep the computer away from water and fire to avoid battery damaged. Do not disassemble or
attempt to repair the equipment.
10
Page 18

Computer Usage
Chapter IV Computer Usage
Adjust the Screen Display
External Monitor
You can connect an external monitor through HDMI or VGA output port.
Power
Battery Life
In order to fully optimize the life of the battery, you may want to calibrate the battery. To calibrate, follow
below instructions:
Shut down the computer, connect it to the AC power adapter and charge the battery to capacity. When
the battery is full, the battery-charging indicator will change color.
Turn on your computer and use it until you hear a continuous warning beep. The system will now
automatically enter standby mode. Plug in the AC power adapter.
11
Page 19

Computer Usage
The battery has now been properly calibrated.
In general, fully draining the battery prior to a full recharge will prolong its life.
Battery Status
Windows 7 displays the battery status in the icon tray at the bottom left of the screen. The icon
displays the remaining power level.
Clock Battery
A small secondary built-in battery is used for the internal clock and for various other purposes. If the
computer is not charged for a long period of time, the small built-in battery will drain and may cause data
loss.
Touch Panel Input
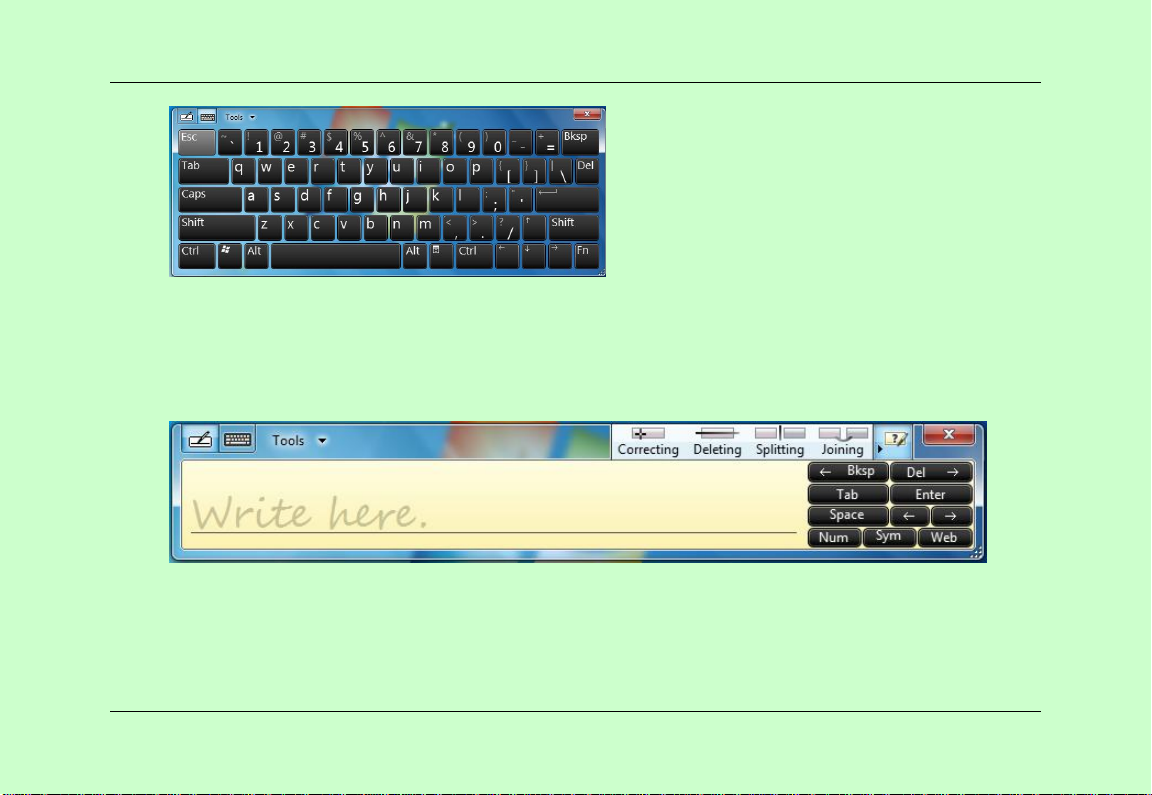
On-Screen Keyboard
The on-screen keyboard is the main input panel used to enter textual content.
12
Page 20
Computer Usage
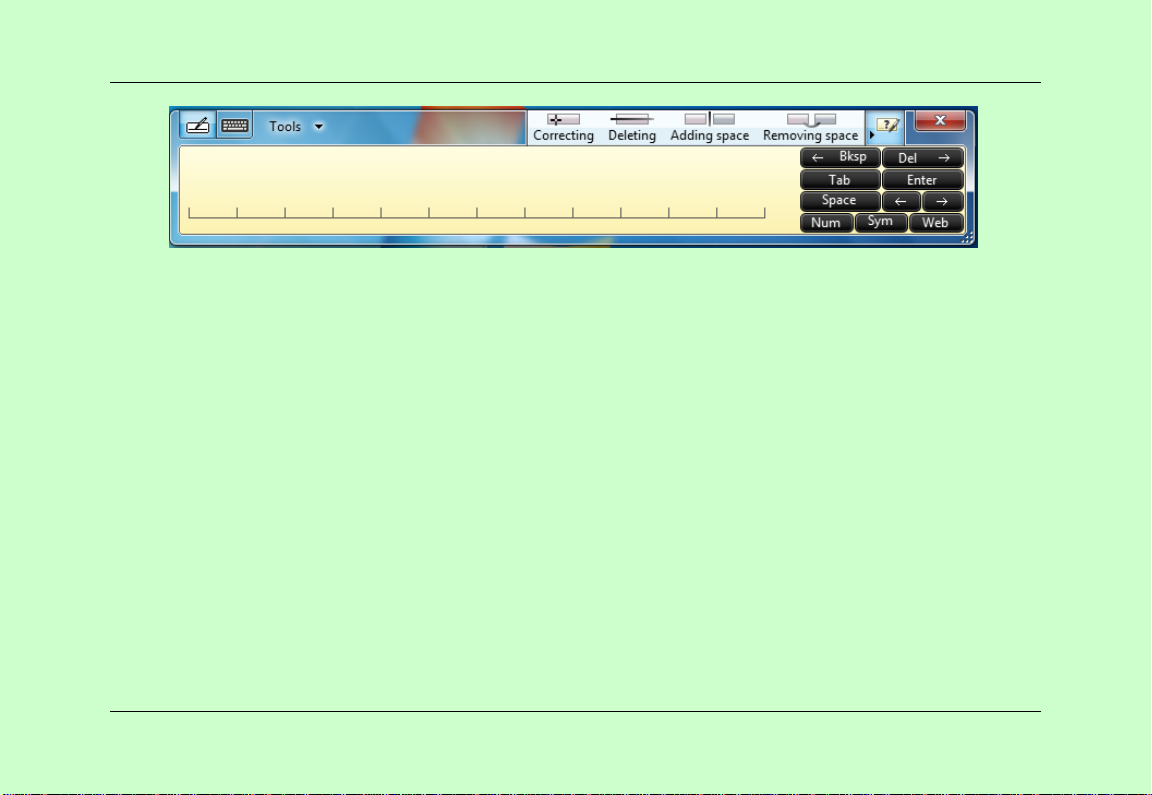
Writing Board
There is also a Writing Board that captures handwriting and converts it to printed text. There are two
methods for capturing hand writing: Free writing or Write to Grid.
1. Free writing
2. Write to Grid
13
Page 21
Computer Usage
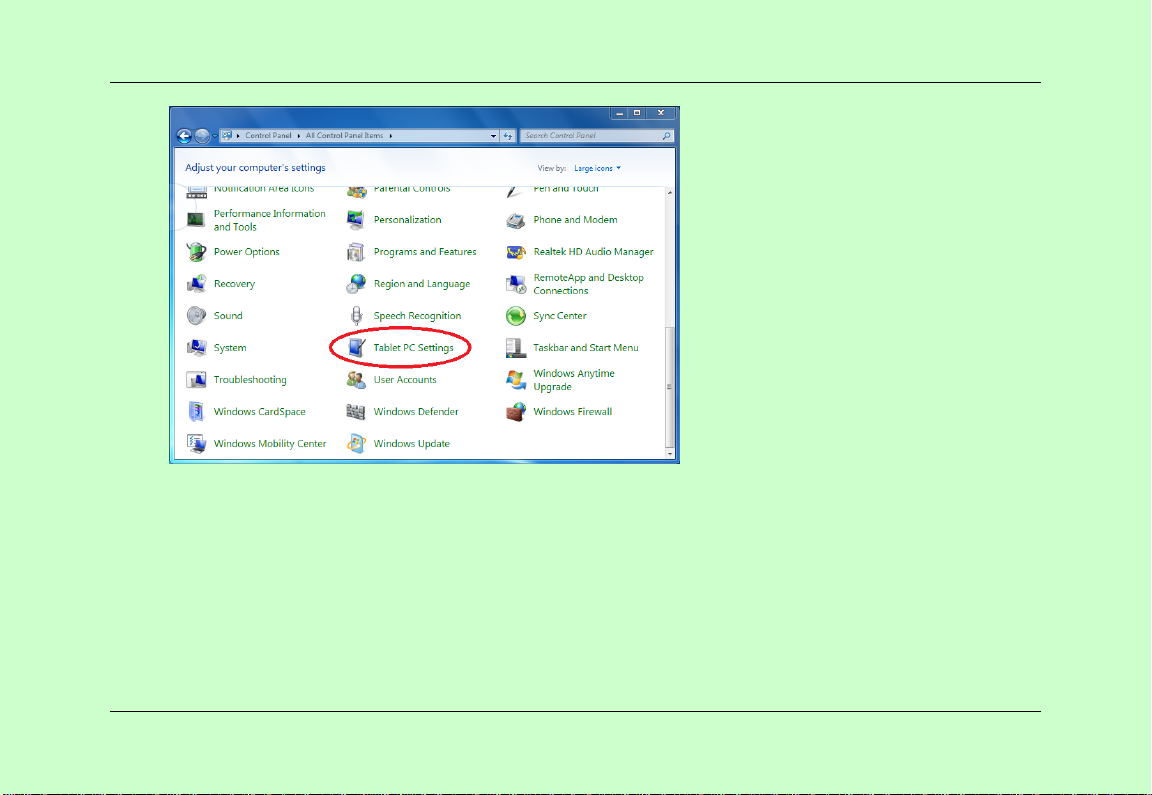
Tablet PC Settings
In order to fully exploit all the Touch features of this system, you should go to "Start" > "Control Panel"
and then select “Tablet PC Settings".
14
Page 22
Tablet PC Settings Introduction
Display
Computer Usage
15
Page 23
Computer Usage
16
Page 24

Computer Usage
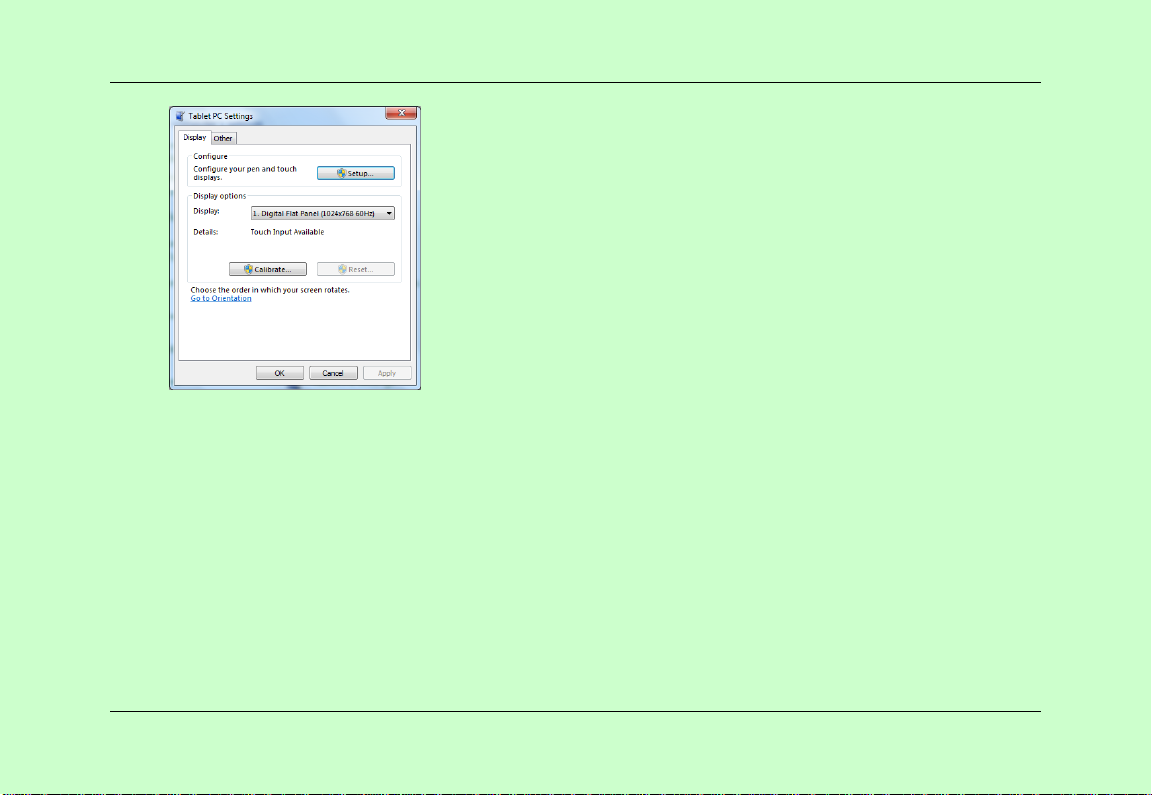
1. Configuration
To configure the pen and touch screen, click the Setup button. Then touch the screen with your finger to
complete the touch-screen identification settings.
2. Display Options
Display: Select the output display device
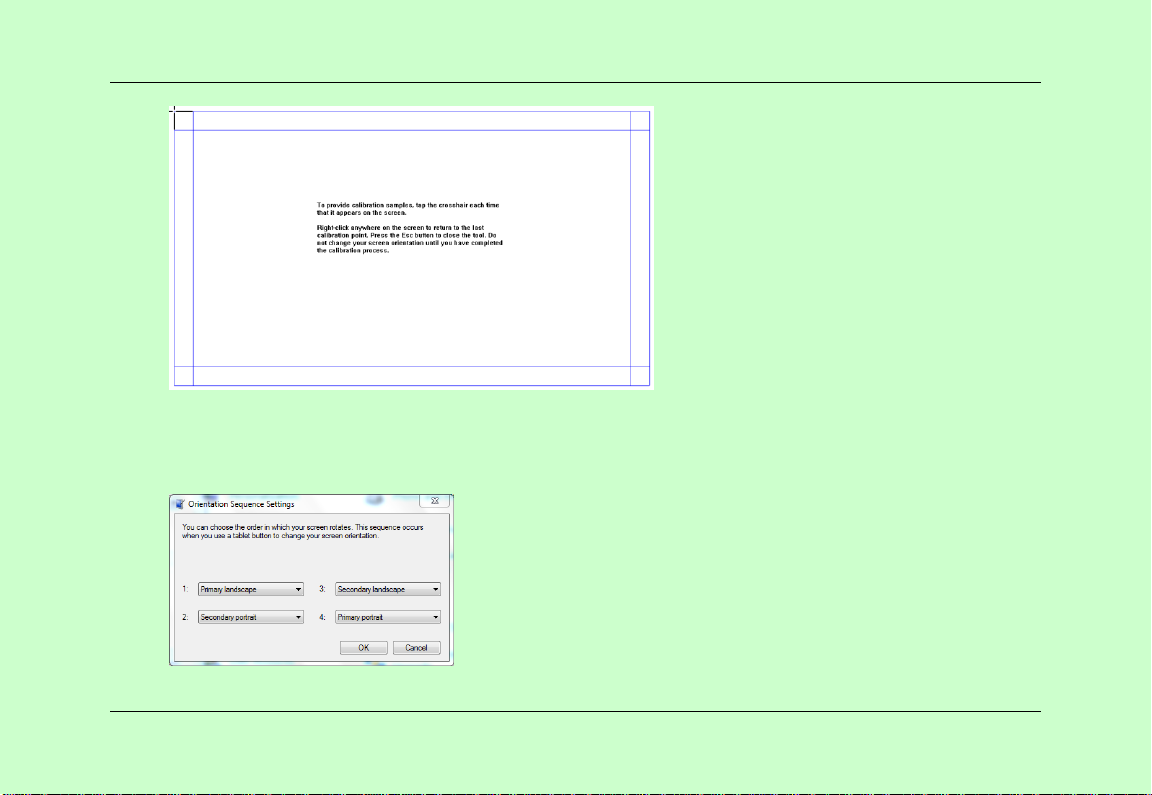
Calibration: Click on the calibration button, and proceed according to the prompts.
17
Page 25
Computer Usage
Reset: If you’re not satisfied with the calibration results, you can click the Reset button to restore the
default.
18
Page 26
Computer Usage
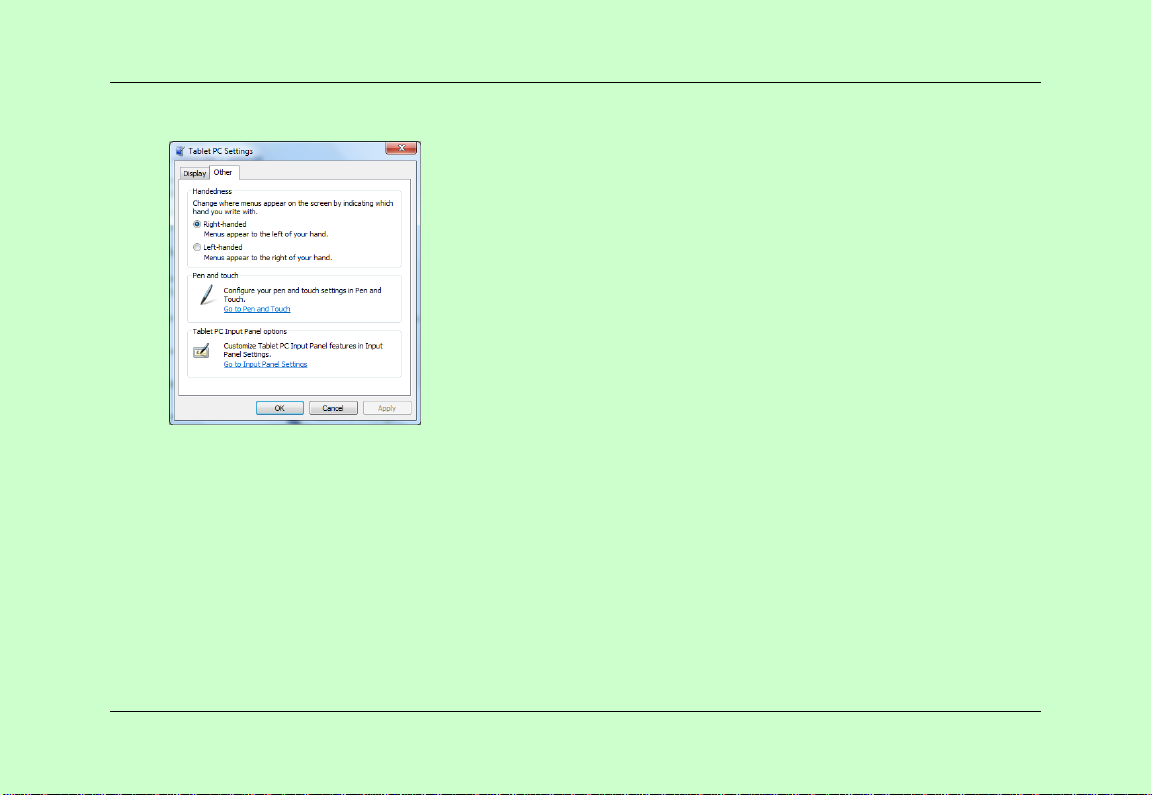
Others
1. Handedness
Select the preferred position of menus based on whether you’re right or left handed. If you select the
left-handed setting, menus appears on the right; if you select the right-handed setting, menus appears on the
left.
2. Pen and Touch
Click the “Go to Pen and Touch” link in the Pen and Touch box.
3. Tablet PC Input Panel Options
Click the “Go to Input Panel Settings” link in the Tablet PC Input Panel options.
19
Page 27
Computer Usage
Pen and Touch Settings
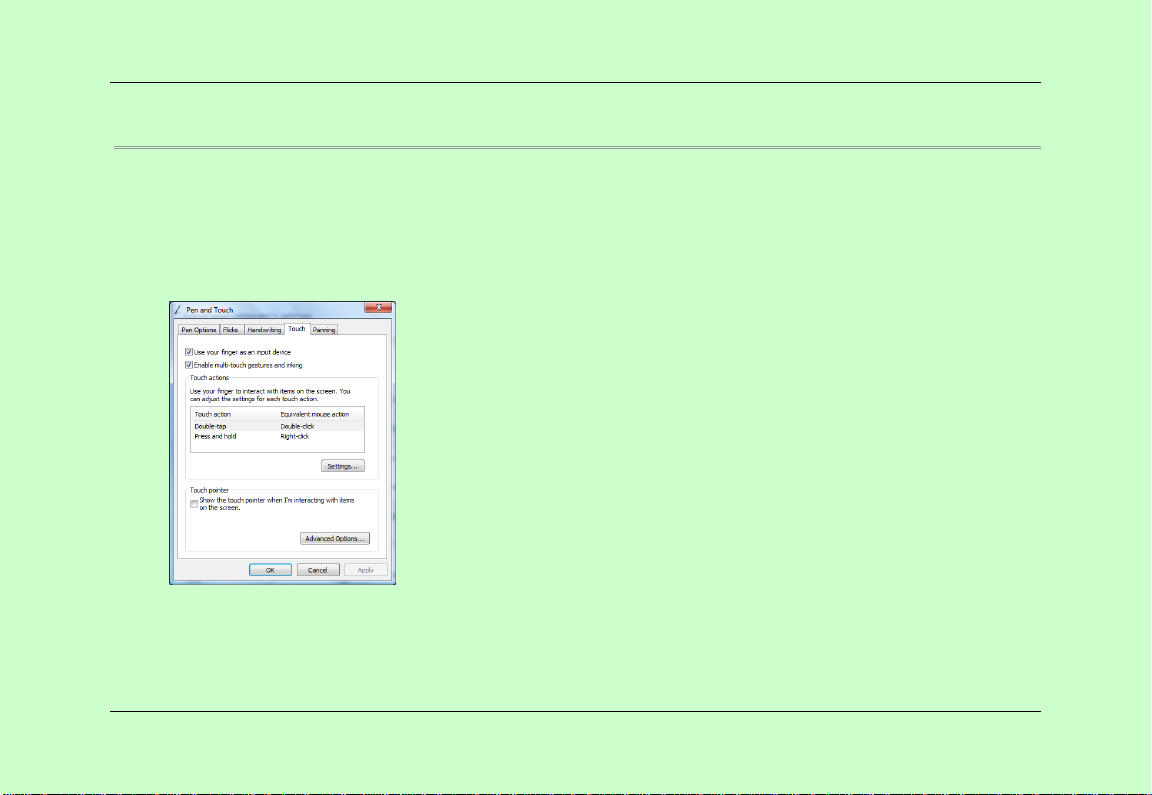
Enable Touch
1. Select the checkbox “Use your finger as an input device” to enable the touch interface.
2. Select the checkbox “Enable multi-touch gestures and inking” to enable multi-touch gestures such as 2
finger zooming.
Settings
Click the "Settings" button to adjust double tap speed and spatial tolerance, and to test your settings.
20
Page 28
Computer Usage
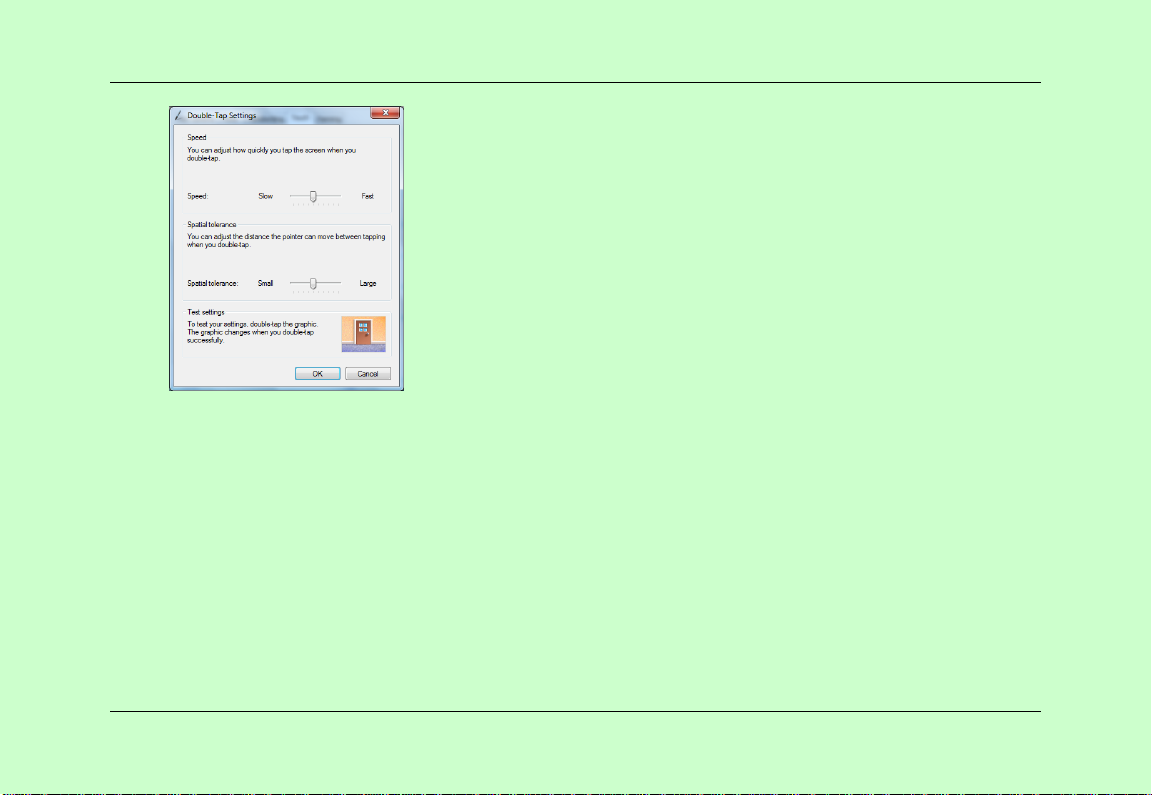
Touch Pointer
Select the “Touch pointer” check box to show the touch pointer when fingers interact with items on the
screen.
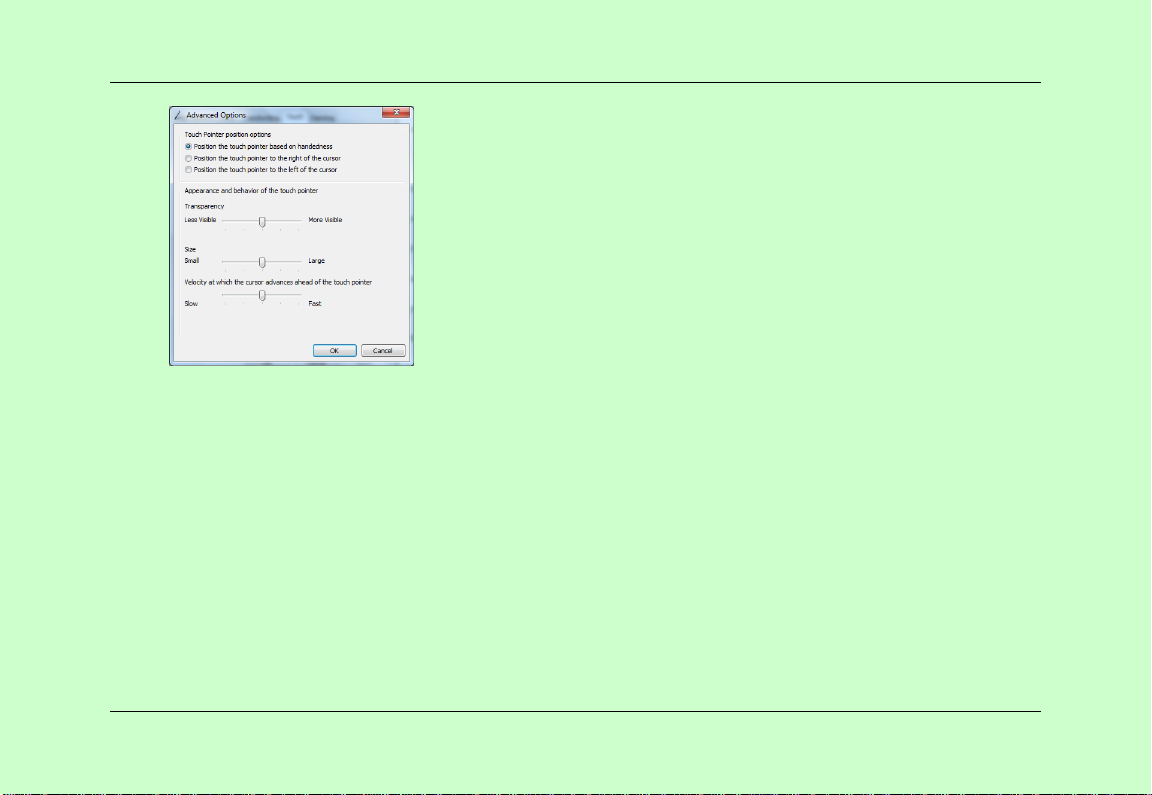
In the Advanced Option, you can set the "Touch Pointer Location Option" and "Touch Pointer Appearance
and Behavior".
21
Page 29
Computer Usage
Panning
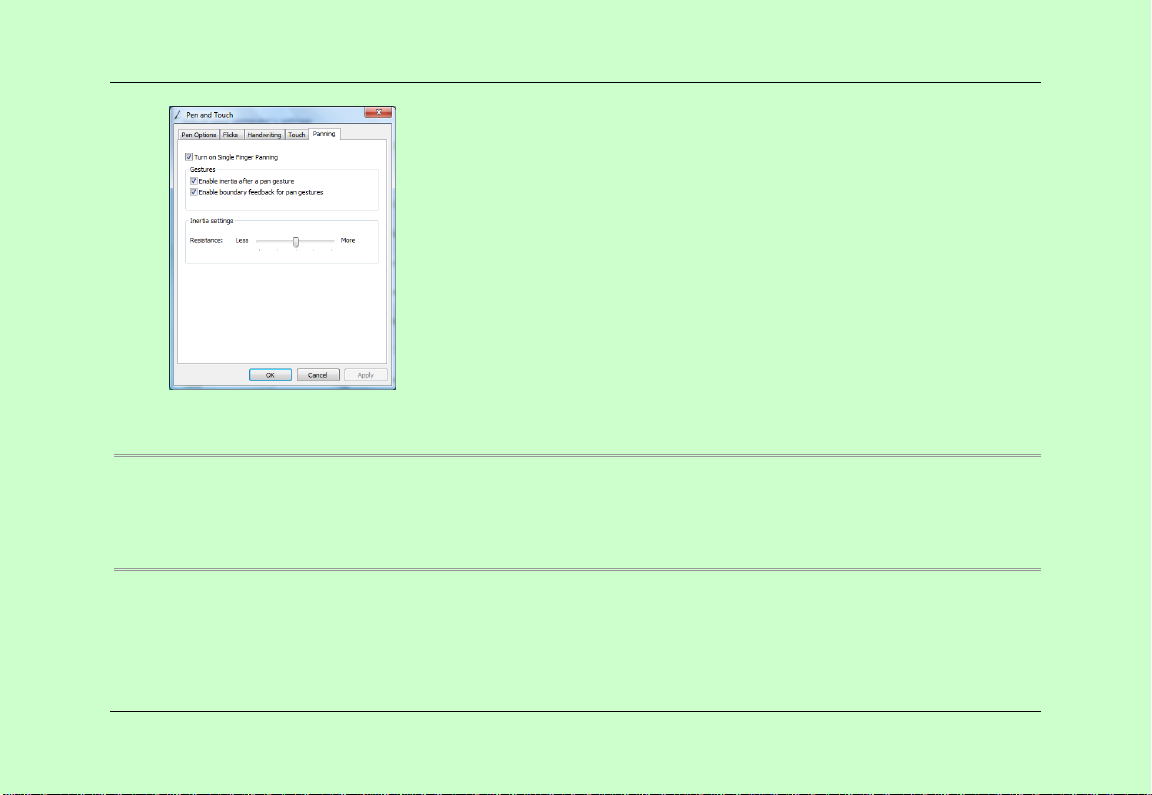
In the “Panning” tab, select the “Turn on Single Finger Panning” checkbox to enable single finger panning.
Select both checkboxes in the “Gestures” box and select the desired Inertia settings.
22
Page 30
Computer Usage
Using the Camera
The built-in camera allows to participate in video calls and to take pictures.
Using the Multi-Touch Screen
Multi touch technology allows you to control your computer with one or two fingers simultaneously. A
double click is equivalent to tapping a finger twice. Scrolling web pages is as intuitive as moving your
finger up and down a page. Use two fingers to zoom in and out of pictures – pinch to zoom out, separate to
zoom in.
23
Page 31
Computer Usage
Backup and Recovery
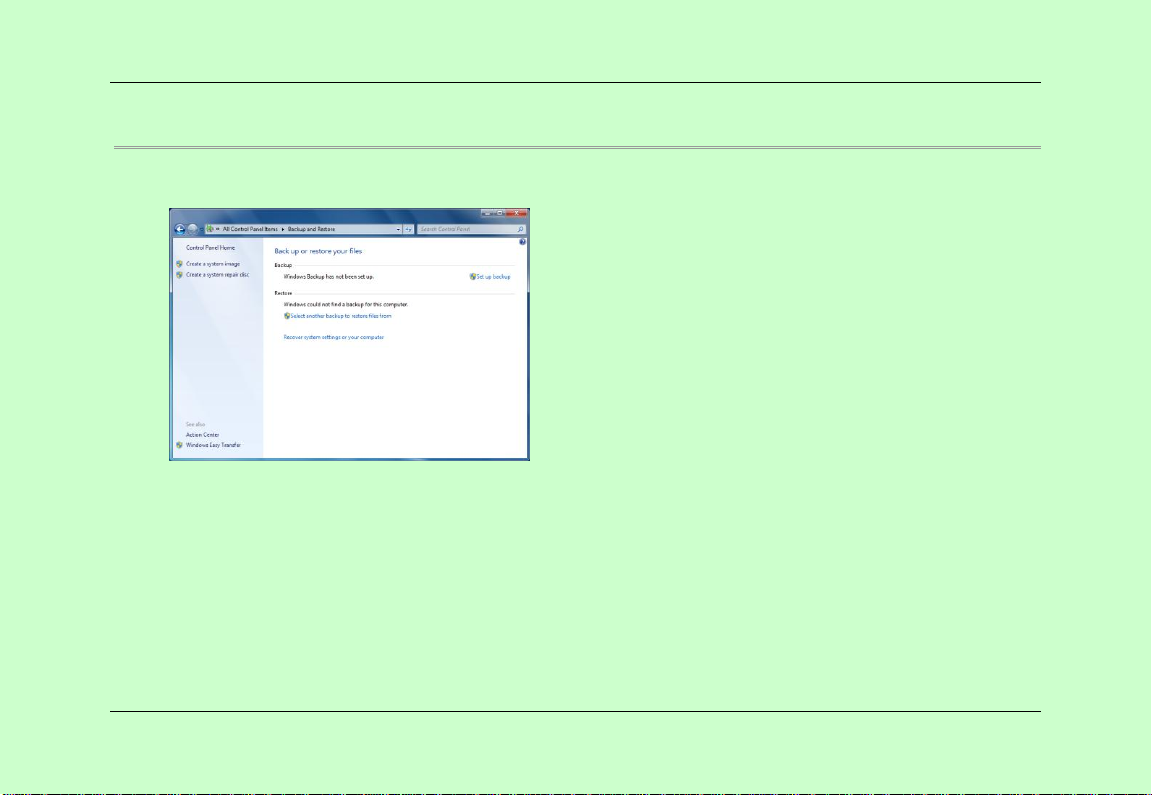
Start the computer, select the "Start" - "All Programs" - "Maintenance" and select "Backup and Restore".
Set Backup
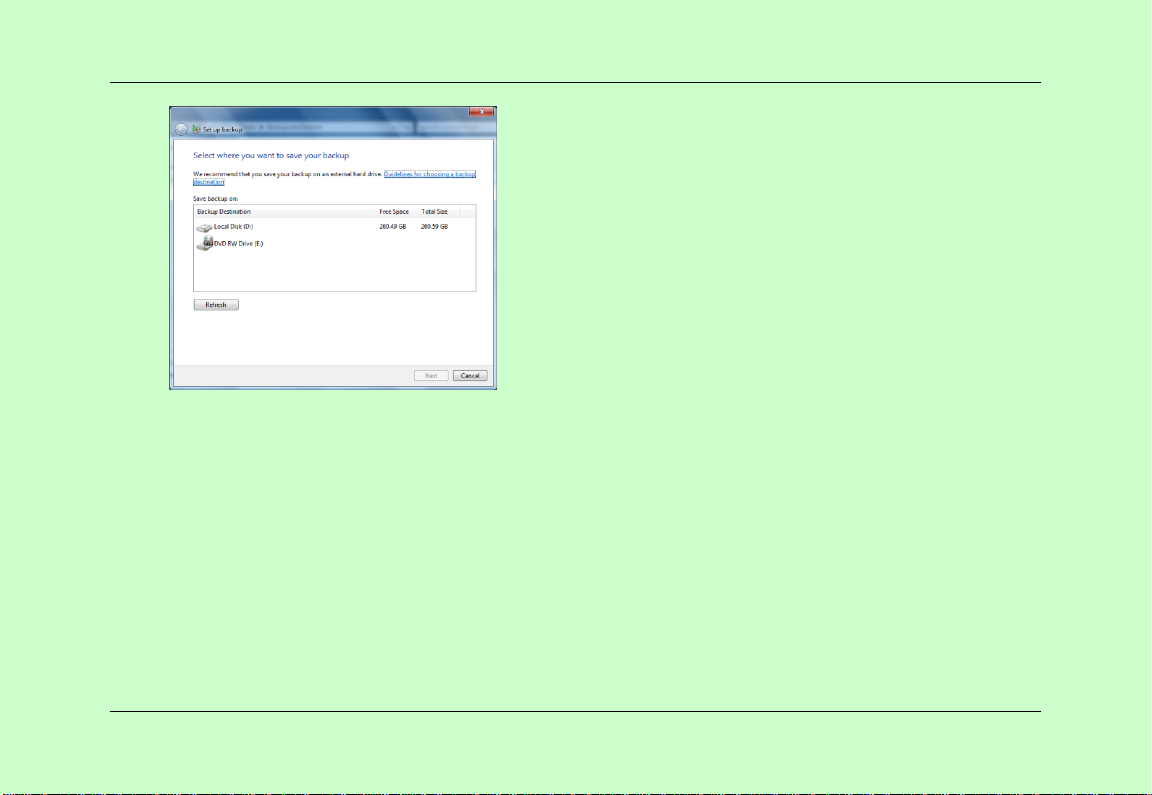
Select "Set Backup" button. Then select the location to save the backup.
24
Page 32
Computer Usage
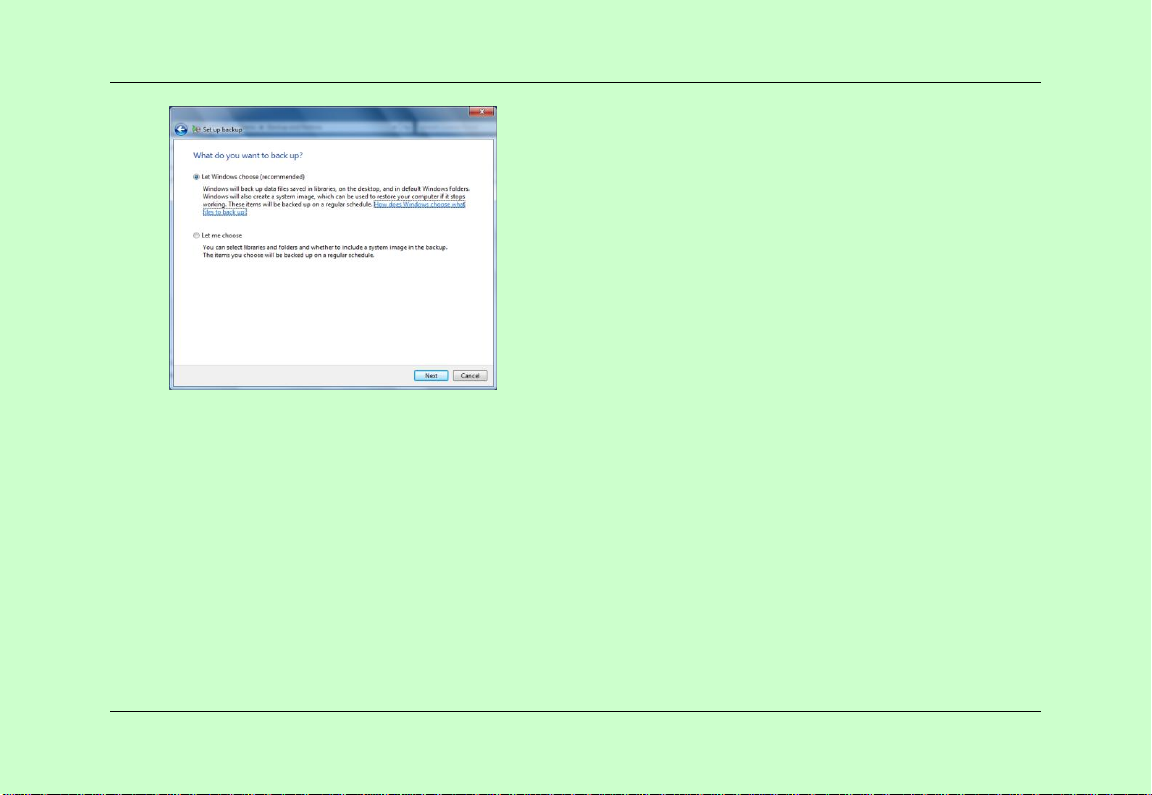
Then select the desired backup files. The preferred option is the "Let Windows Choose" option.
25
Page 33
Computer Usage
26
Page 34
Computer Usage
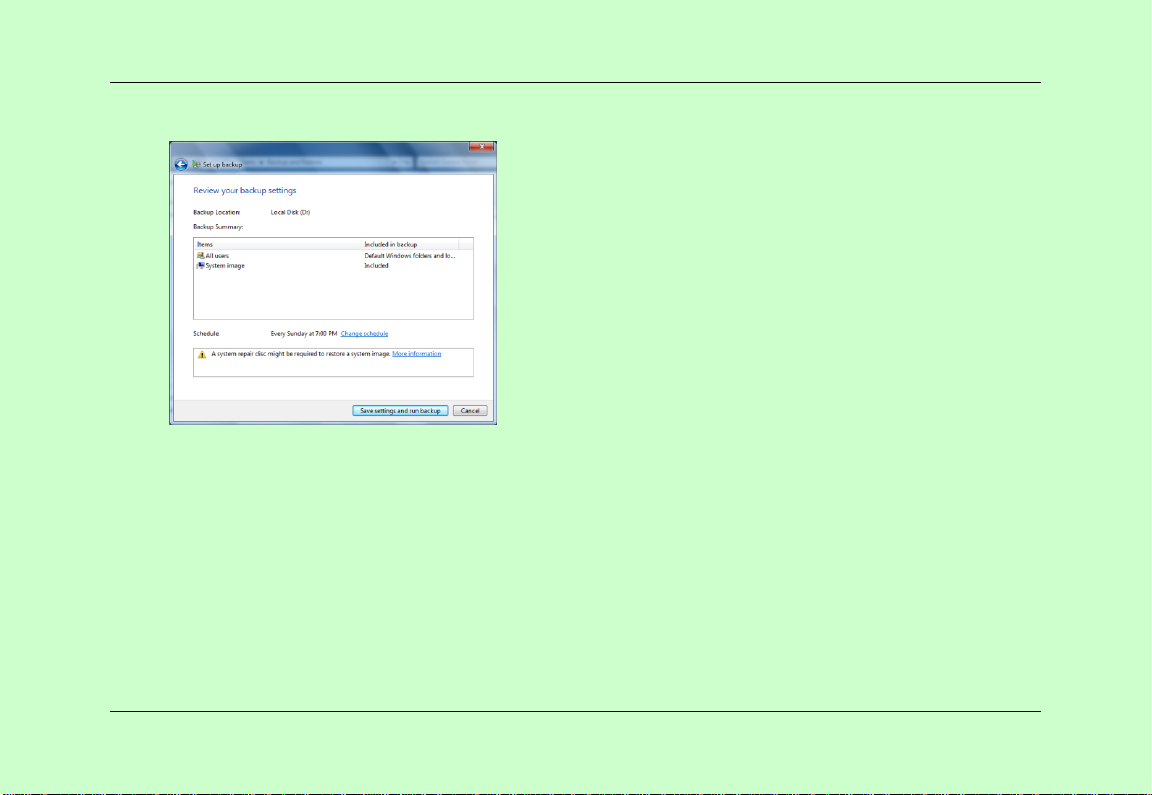
Then select "Save Settings and Run the Backup" to start the backup process.
27
Page 35
Computer Usage
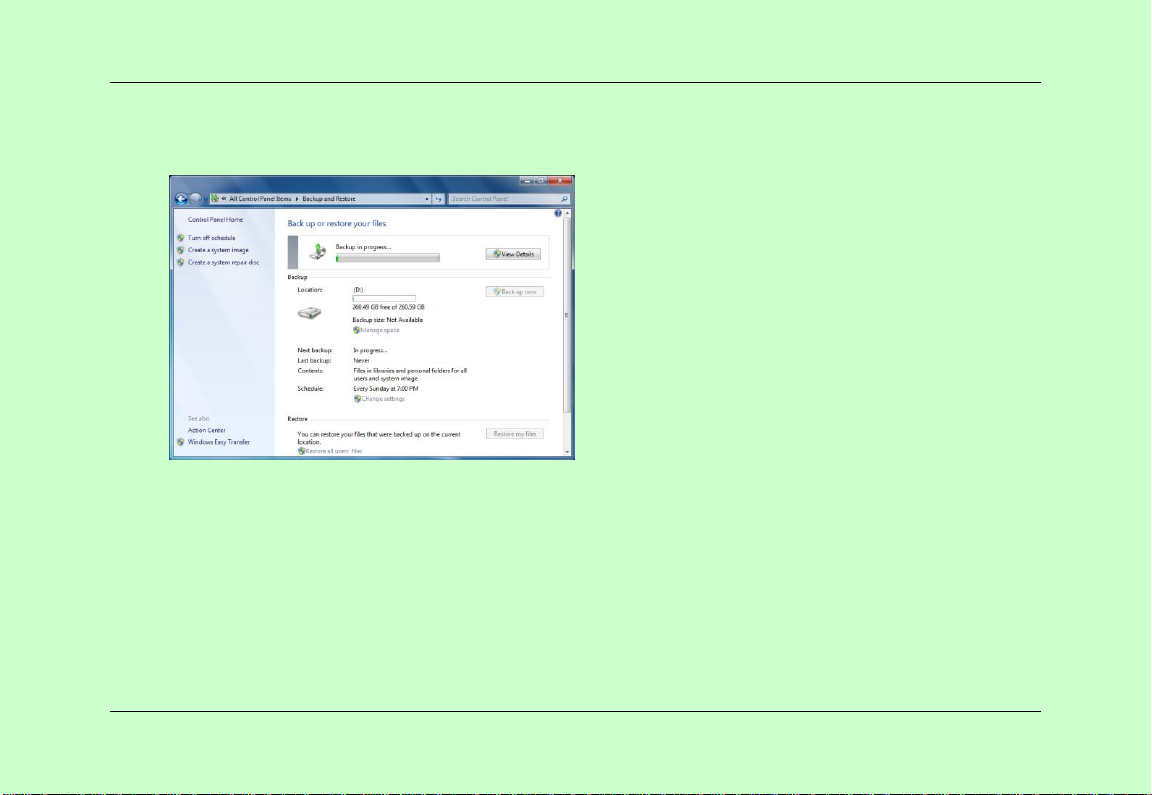
Wait for the backup to complete.
Note: You can back up files to a portable hard drive to avoid data loss caused by damage to the machine
hard drive.
Restore My Files
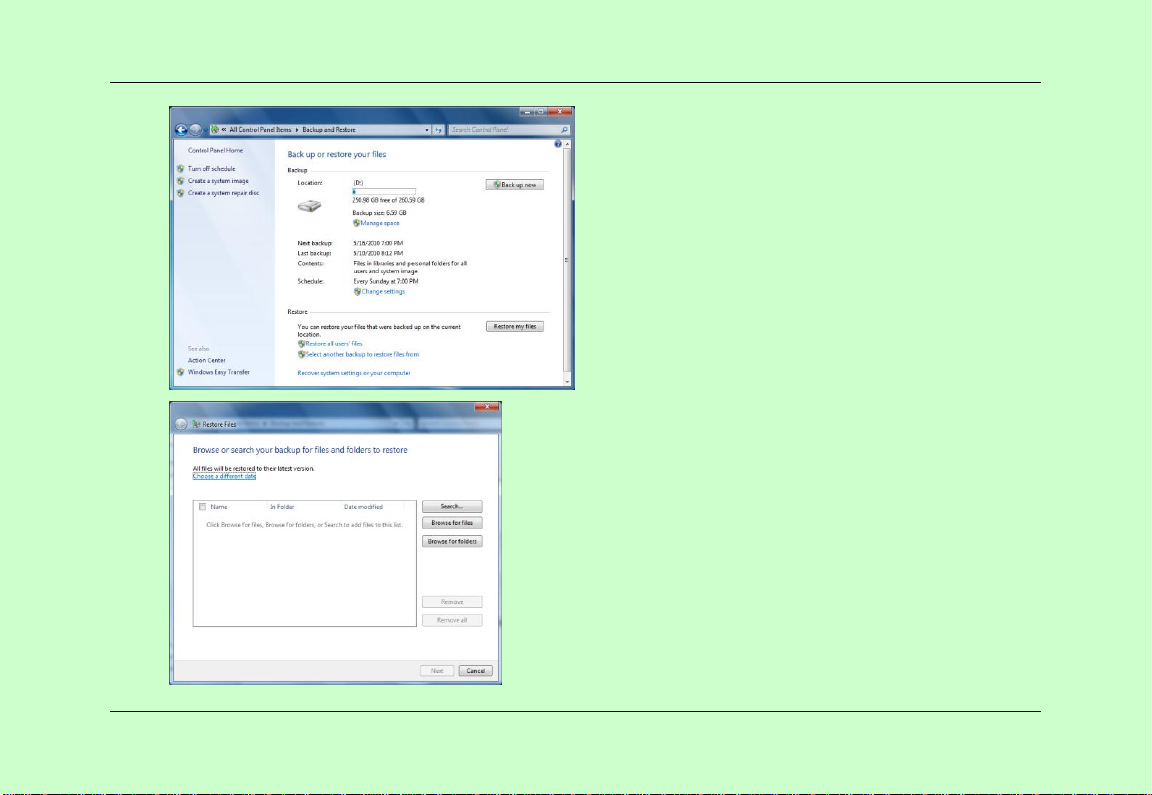
Select "Restore My Files" button to access the restore function.
28
Page 36
Computer Usage
29
Page 37
Computer Usage
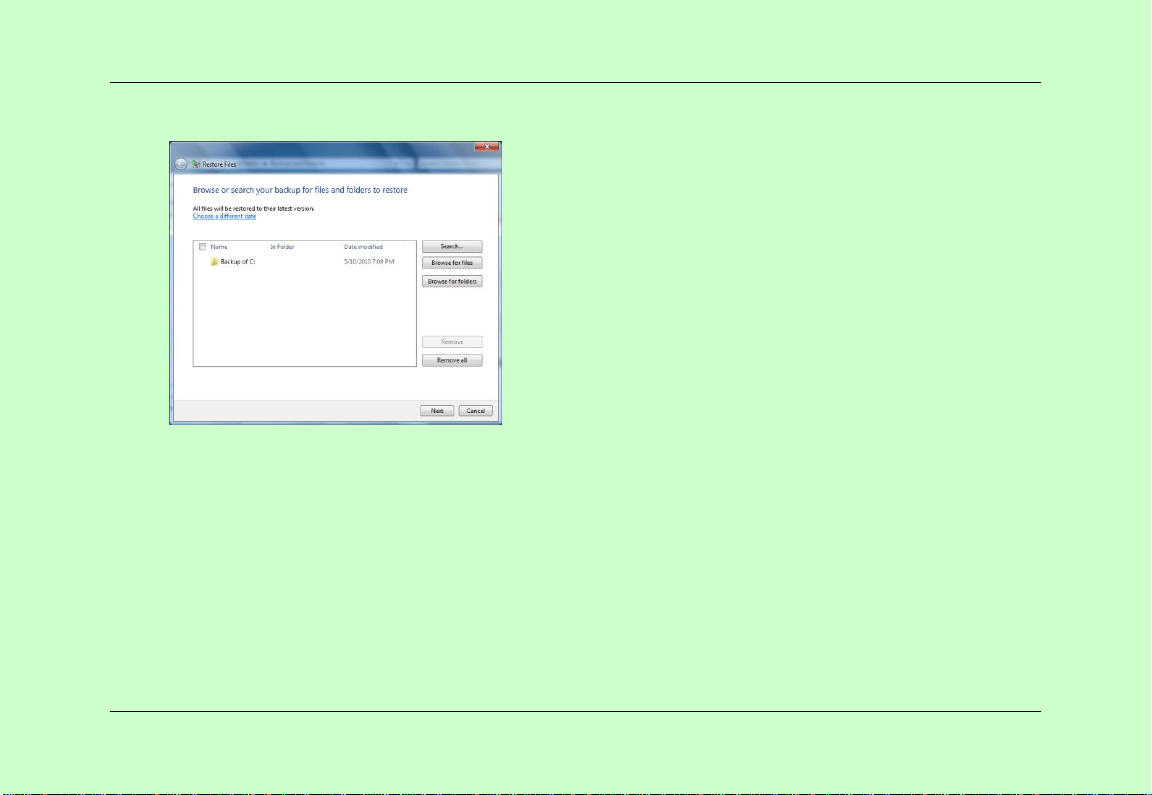
Then select browse or navigate to the folder to find the files to restore.
30
Page 38
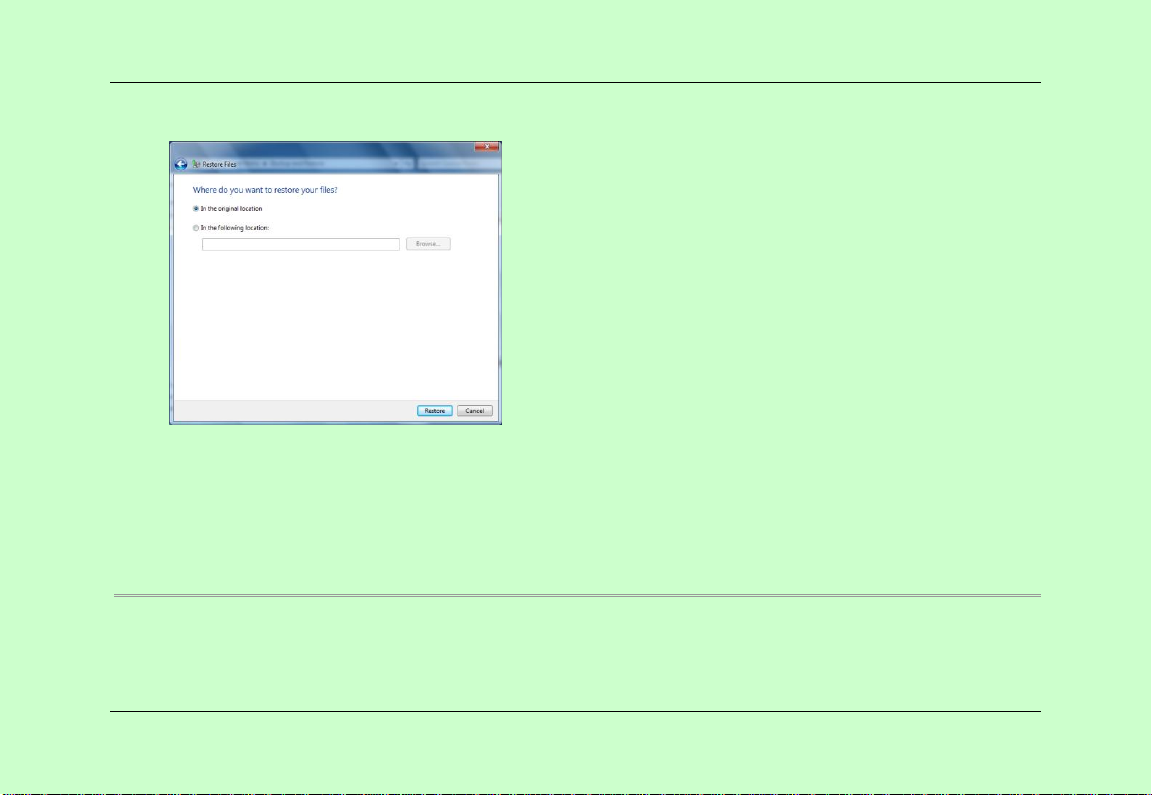
Select "Next" and then select the restored file location.
Select "Restore" to begin restoration.
Create System Images
System Images
Computer Usage
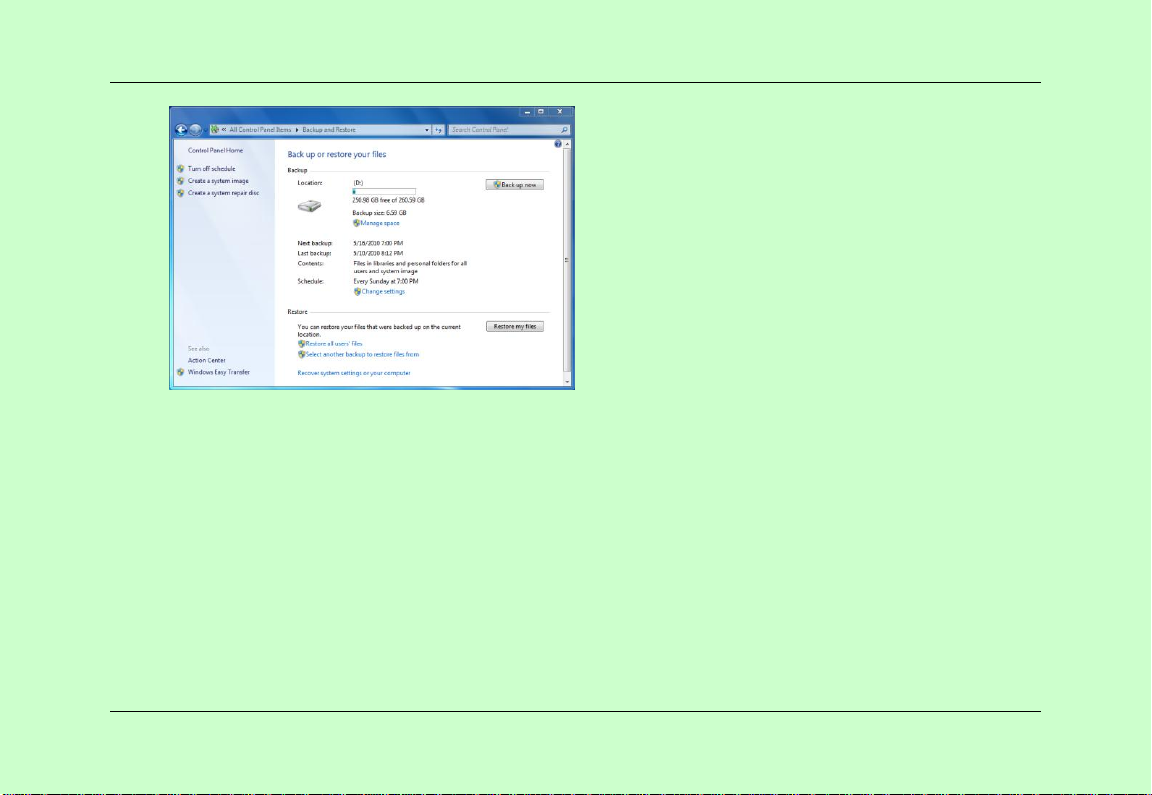
Start the computer, select "Start" - "All Programs" - "Maintenance" and then select "Backup and Restore".
31
Page 39
Computer Usage
Creation of System Image
Select "Create a system image" and then select the location to save the system image.
32
Page 40
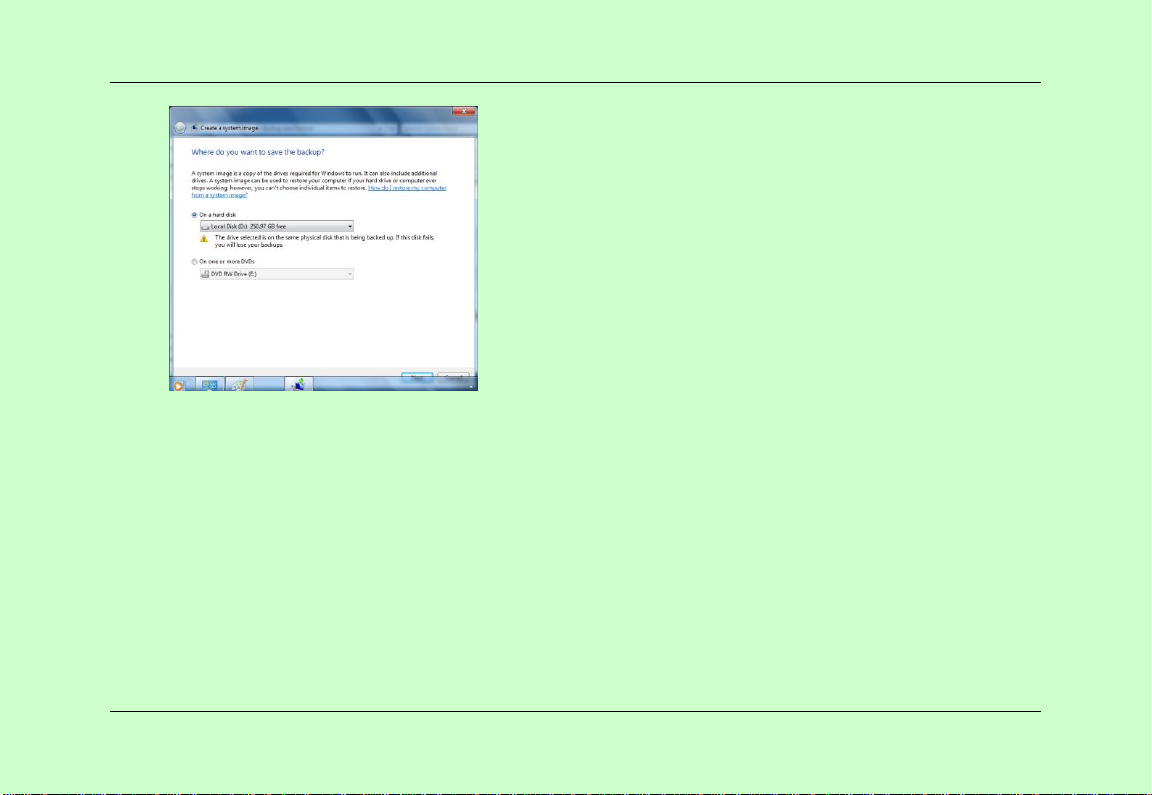
Computer Usage
Then select the desired backup drive. The preferred drive is generally the C Drive.
Select "Next" to confirm the backup file location.
33
Page 41
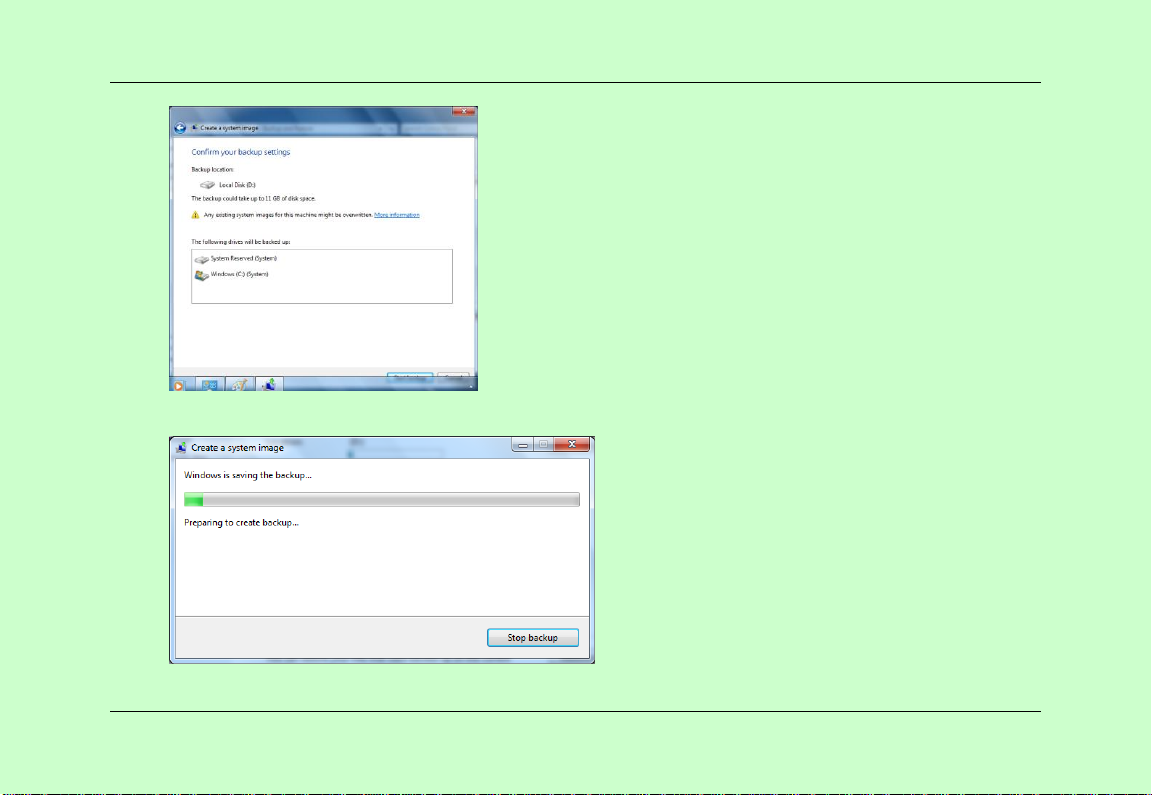
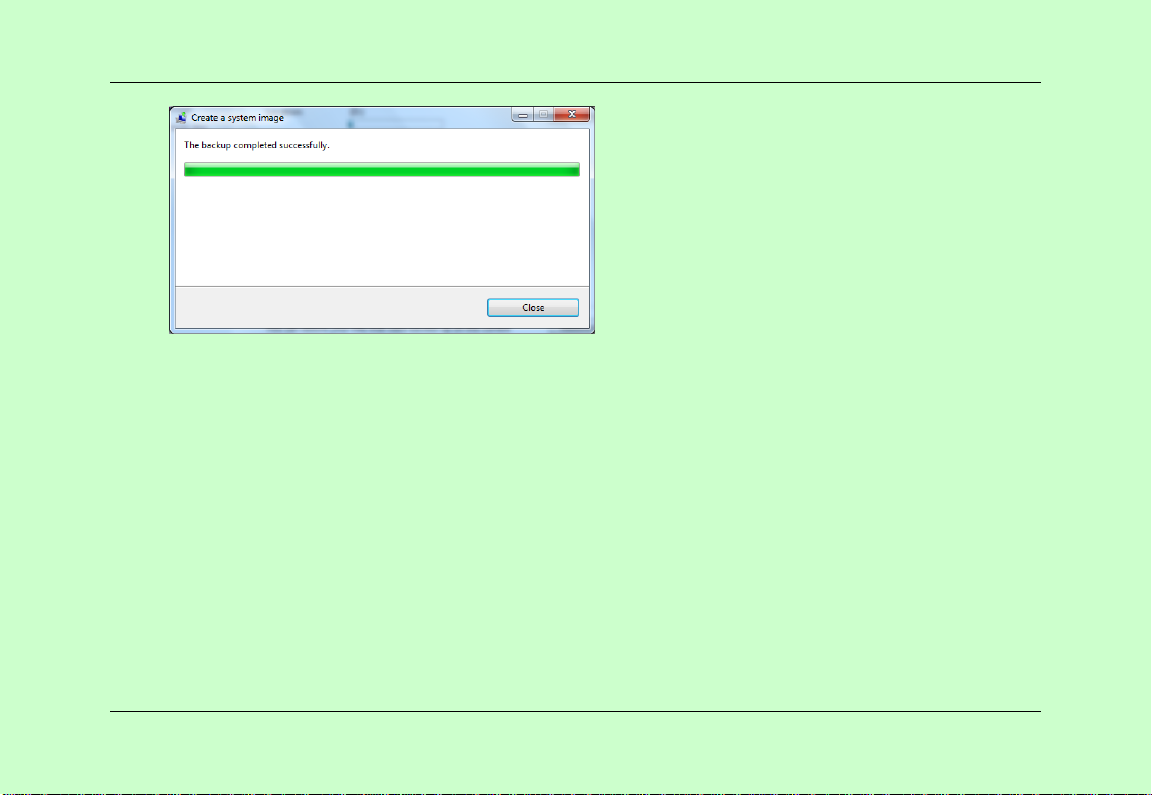
Then select the "Start Backup",
Computer Usage
34
Page 42
Computer Usage
Notice: You can backup files to removable hard disk or larger USB disk to avoid data loss caused by the
machine hard disk damage.
Notice: When drive space is exhausted, the system will delete earlier images to help save disk space. You
can also manually delete earlier system images.
Restore My System
1. Open the Control Panel, click "Restore".
2. Click "Advanced Recovery Methods".
3. Click the "Use System Image Created before to Restore the Computer", then follow the steps.
Notice: Restoring the system may need the system recovery CD.
35
Page 43

Computer Usage
If the above steps do not work, please follow the steps below. This method requires the Windows
installation disc or system recovery CD to restore.
1. Insert the installation disc or system recovery CD.
2. Press the computer power button to restart your computer.
3. If prompted, press any key from the installation CD or System Recovery CD-ROM to start the computer.
4. Choose the language setting, and then click "Next".
5. Click "Repair Your Computer".
6. Select restore option, and then click "Next" to start system recovery.
Notice: If the computer is not configured to boot from a CD or DVD, please check the information that
came with your computer. You may need to change the computer's BIOS settings.
Notice: Restoring the computer from the system image will be a full restore. We can not choose the
individual items to restore; all your programs, system settings and files will be correspondingly replaced
by the contents of the system images.
Using Hanvon’s Restoring Software
Select the Hanvon System Backup Software for backup purposes:
Turn on the laptop, select “Start”-“Hanvon”-“Hanvon System Backup”,select “backup current system
status” to back up the current system.
36
Page 44
Computer Usage
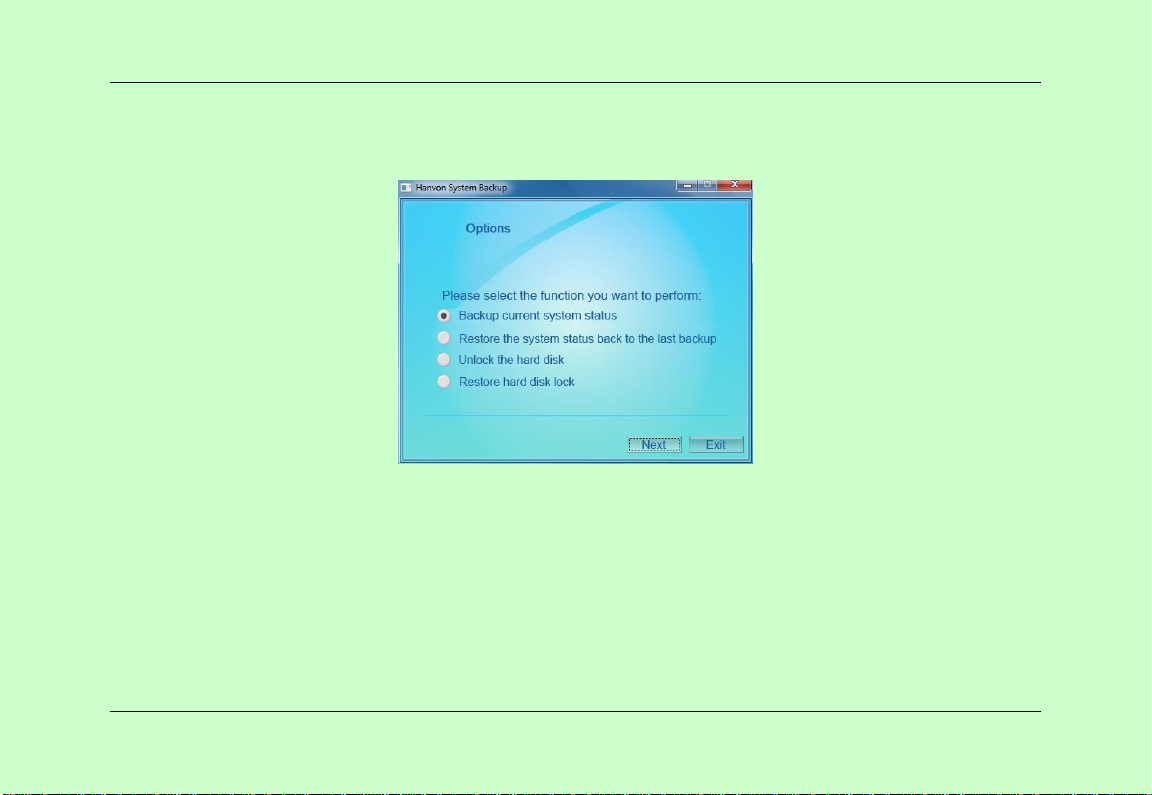
1、 Start Hanvon System Backup Software and the following interface will appear:
2、Select “Backup current system status” and click on “Next”.
37
Page 45
Computer Usage
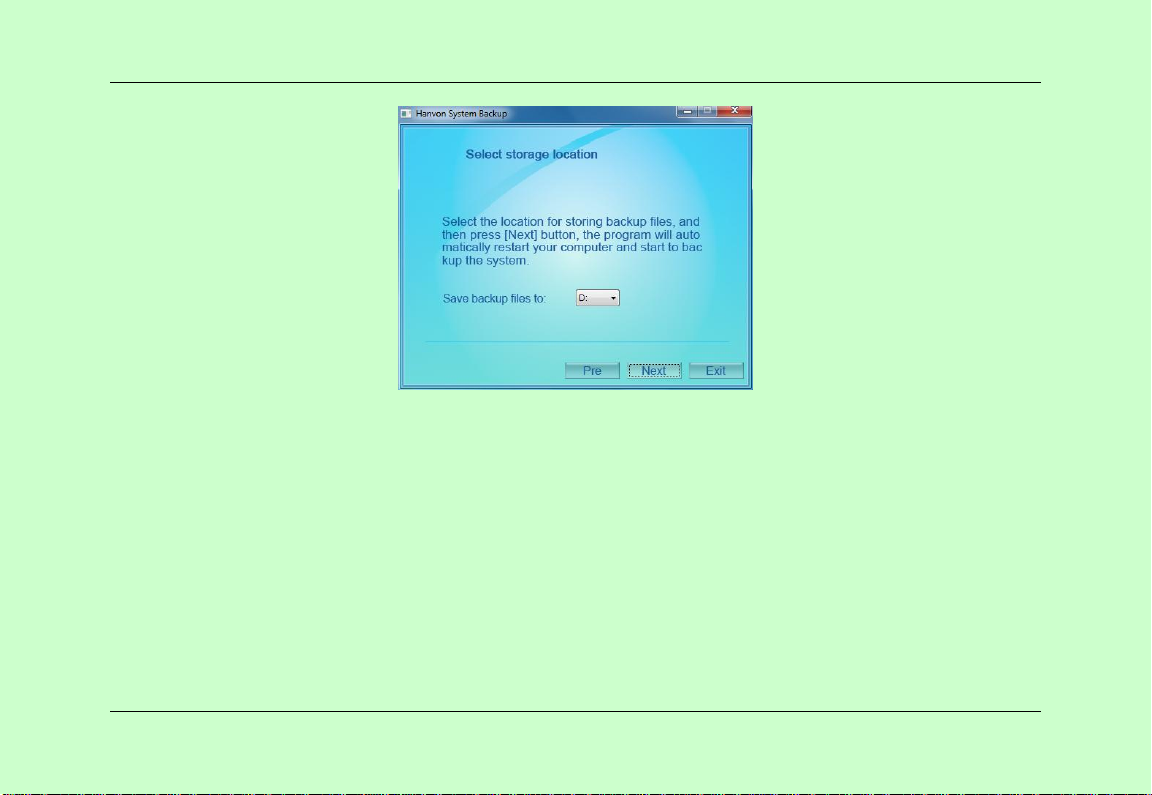
3、Select the desired storage location and click “Next”.
38
Page 46
Computer Usage
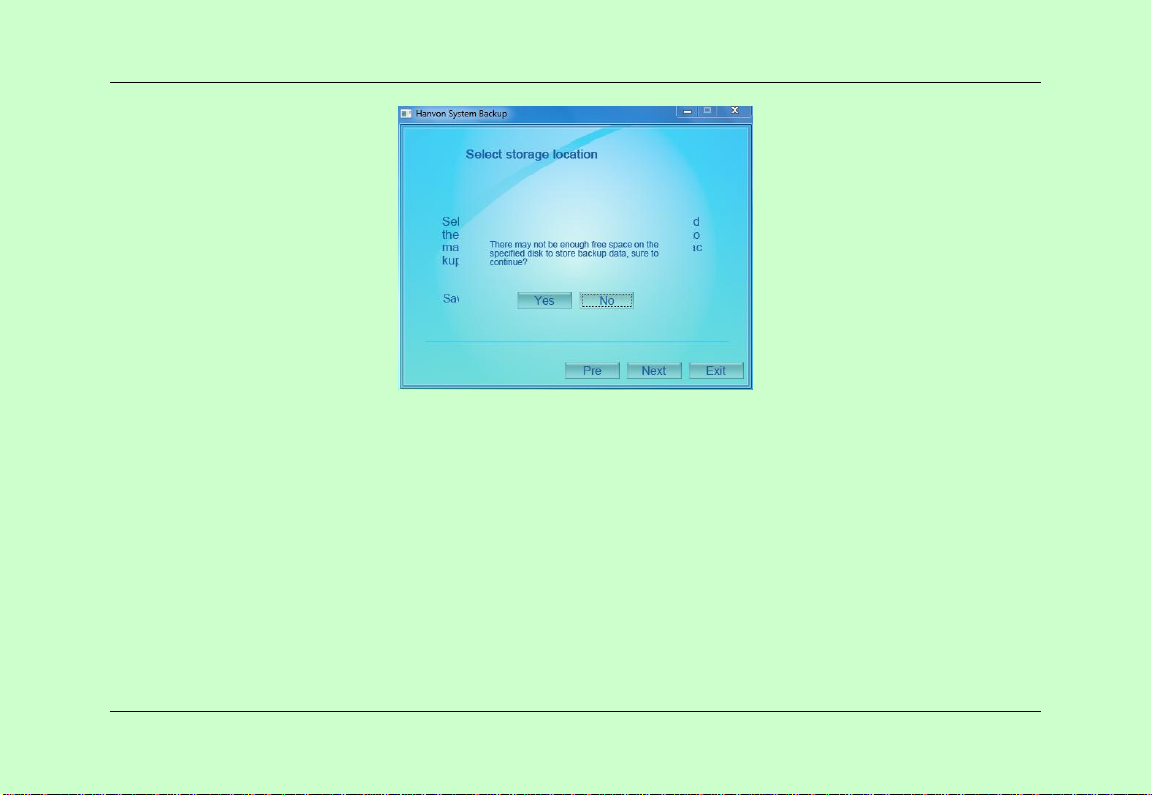
4、Please ensure that there is sufficient disk space for the backup data,then select “Yes”. At this time,
the system will automatically restart and initiate the backup mode.
39
Page 47
Computer Usage
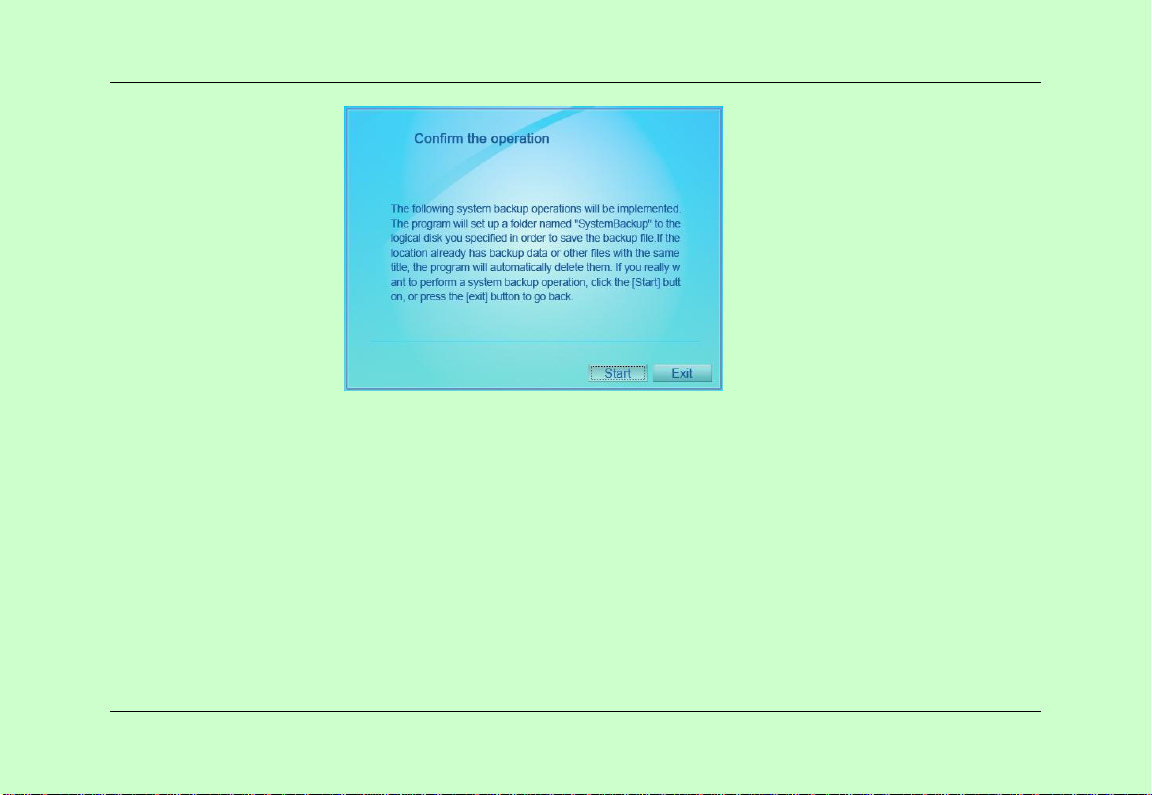
5、Select “Start” and the system backup will begin.
40
Page 48
Computer Usage
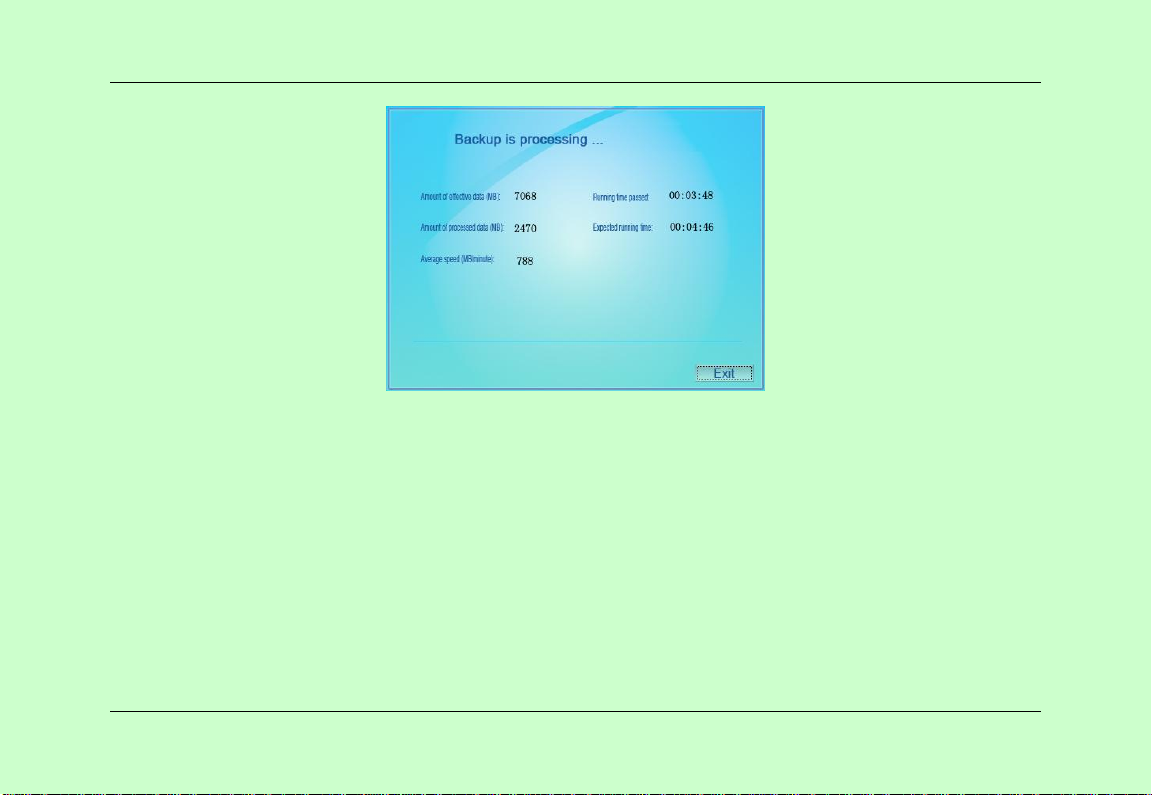
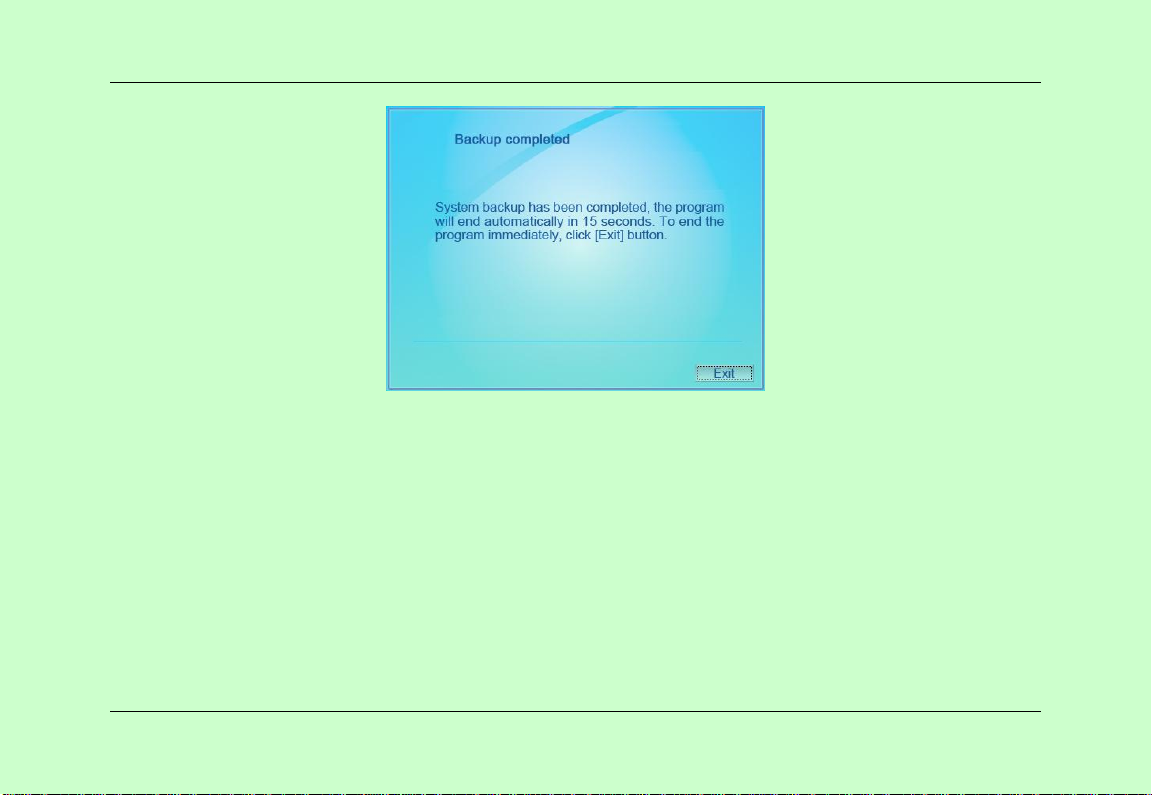
6、A few moments later, select “Exit” to complete the backup operation. The system will restart
automatically in 15 seconds if “Exit” is not selected.
41
Page 49
Computer Usage
Notice: Before initiating backup, please ensure there is enough space in the destination drive.
Notice: Backup data must be stored in the selected drive; otherwise it would not be functional while
restoring the system.
Using Hanvon System Backup to restore the system status back to the last backup
Turn on the laptop,select “start” -“Hanvon” - “Hanvon System Backup”, select “restore the system
status back to the last backup”
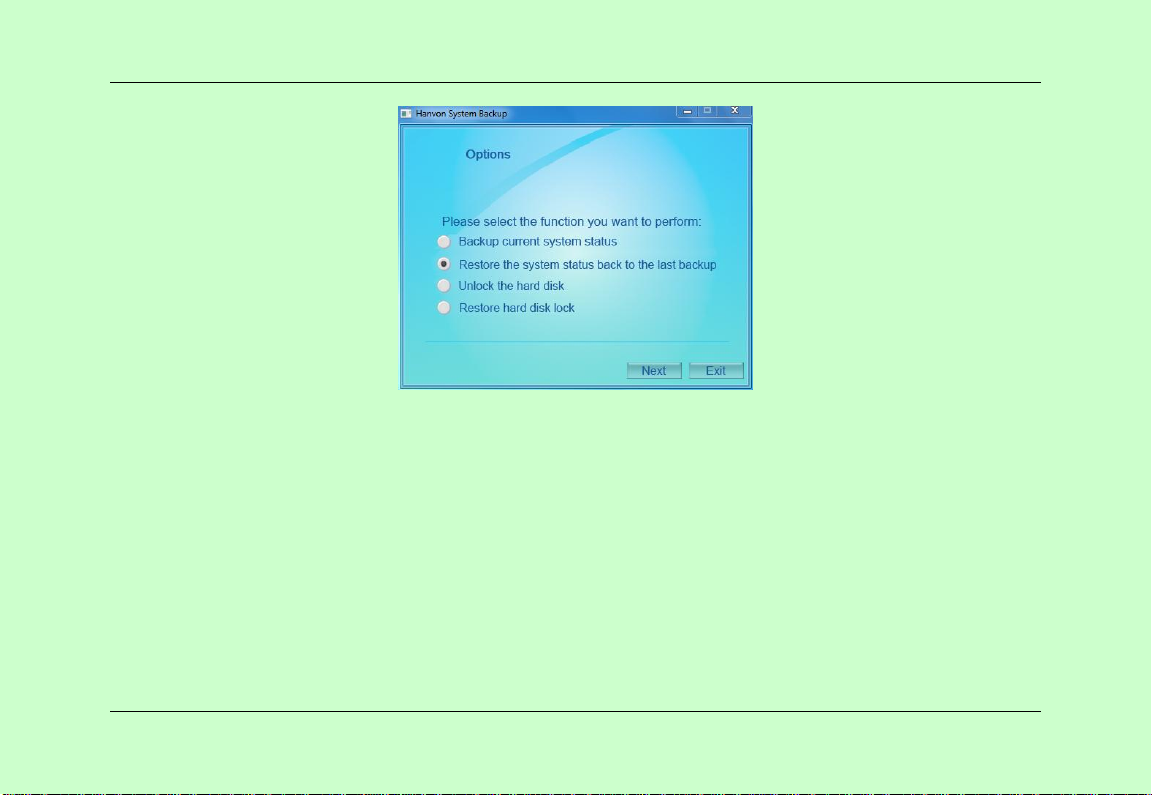
1、Start the Hanvon System Backup software and the following interface will appear
42
Page 50
Computer Usage
2、Select “Restore the system status back to the last backup” and click “Next”.
43
Page 51
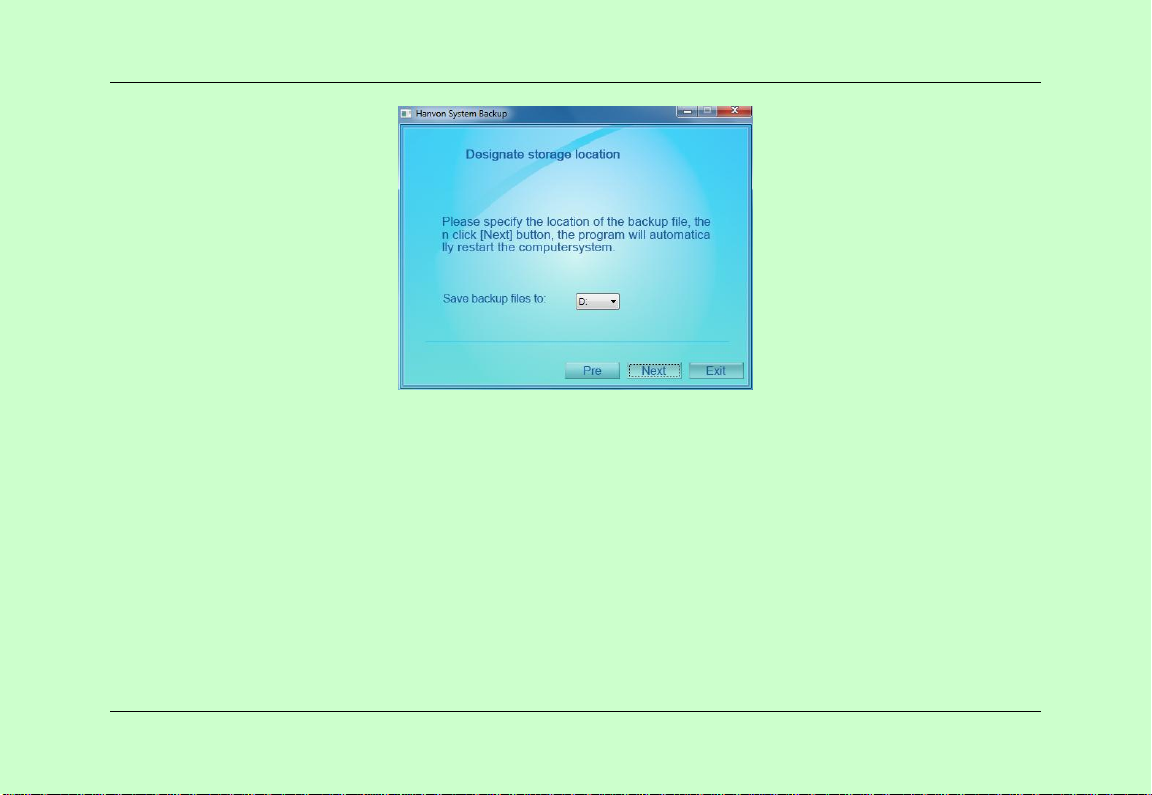
Computer Usage
3、Select the desired storage location and click “Next”. At this time, the system will automatically
restart and initiate the backup mode.
44
Page 52
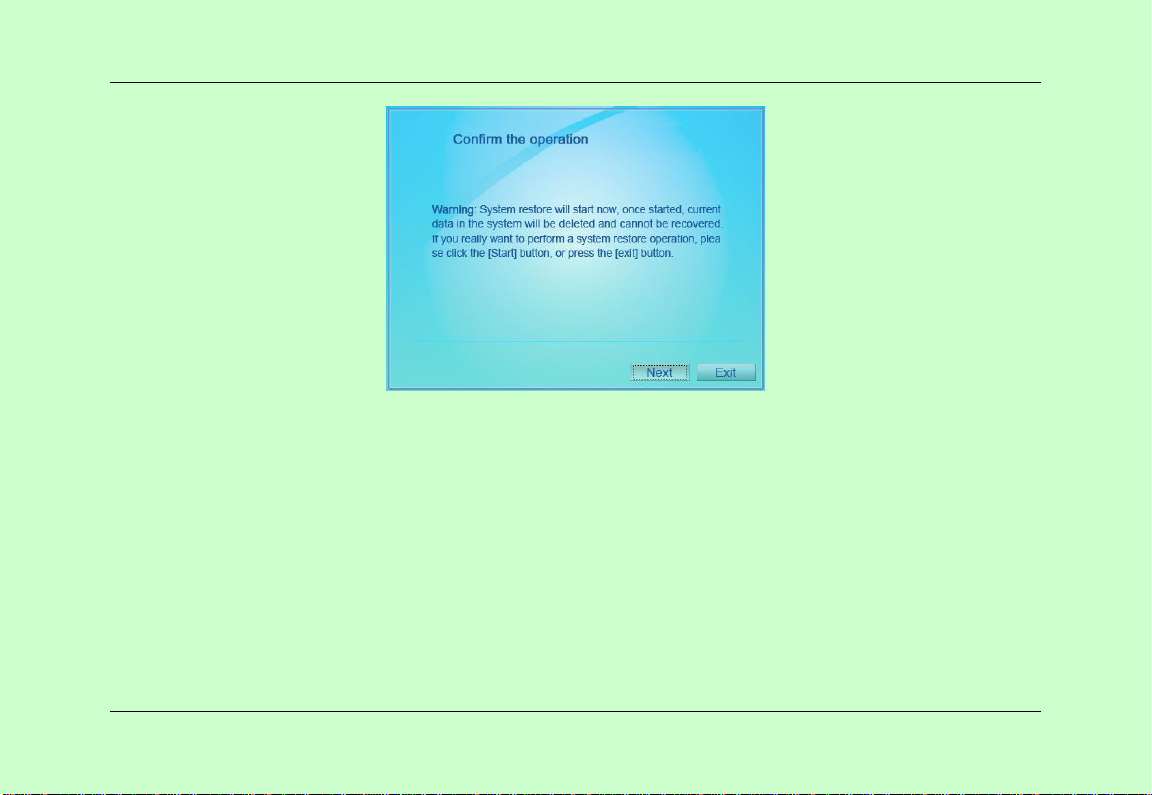
Computer Usage
4. Confirm before proceeding with system restore, then select “Next” to start the system restore.
45
Page 53
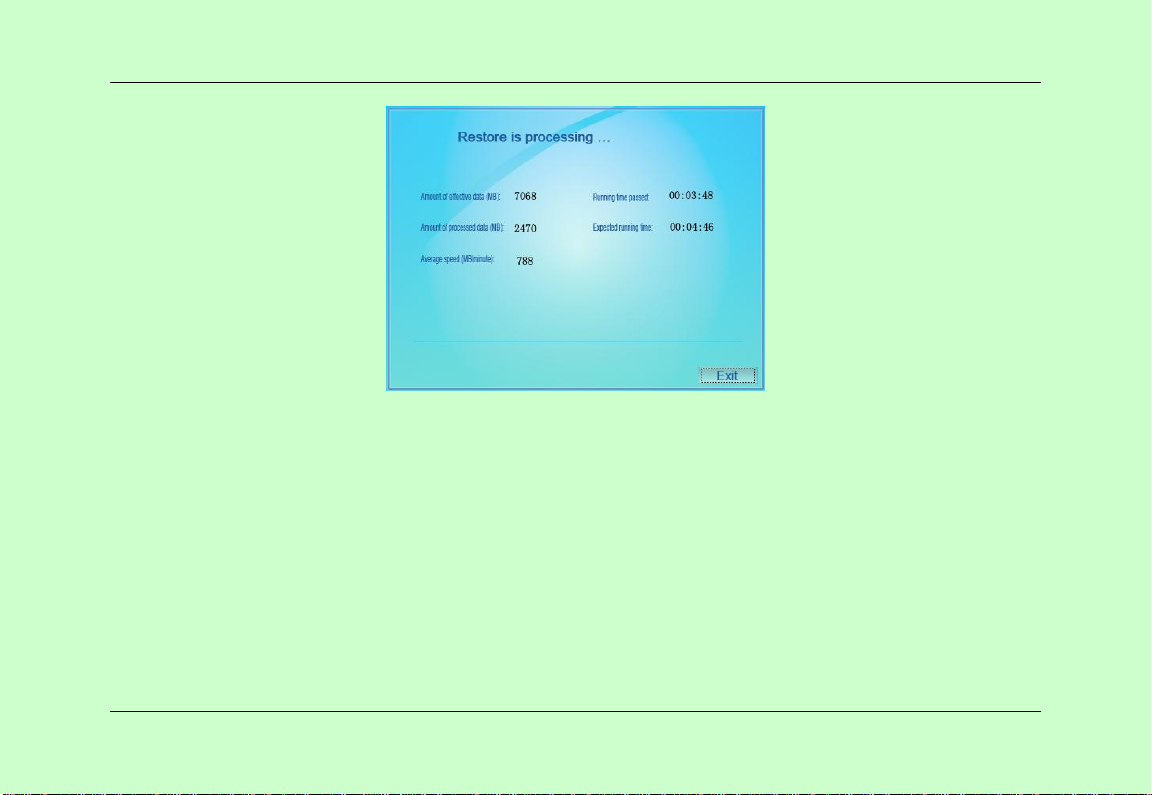
Computer Usage
5、In a few moments, select “Exit” to finish the system restore. The system will restart automatically
in 15 seconds if “Exit” is not selected.
46
Page 54
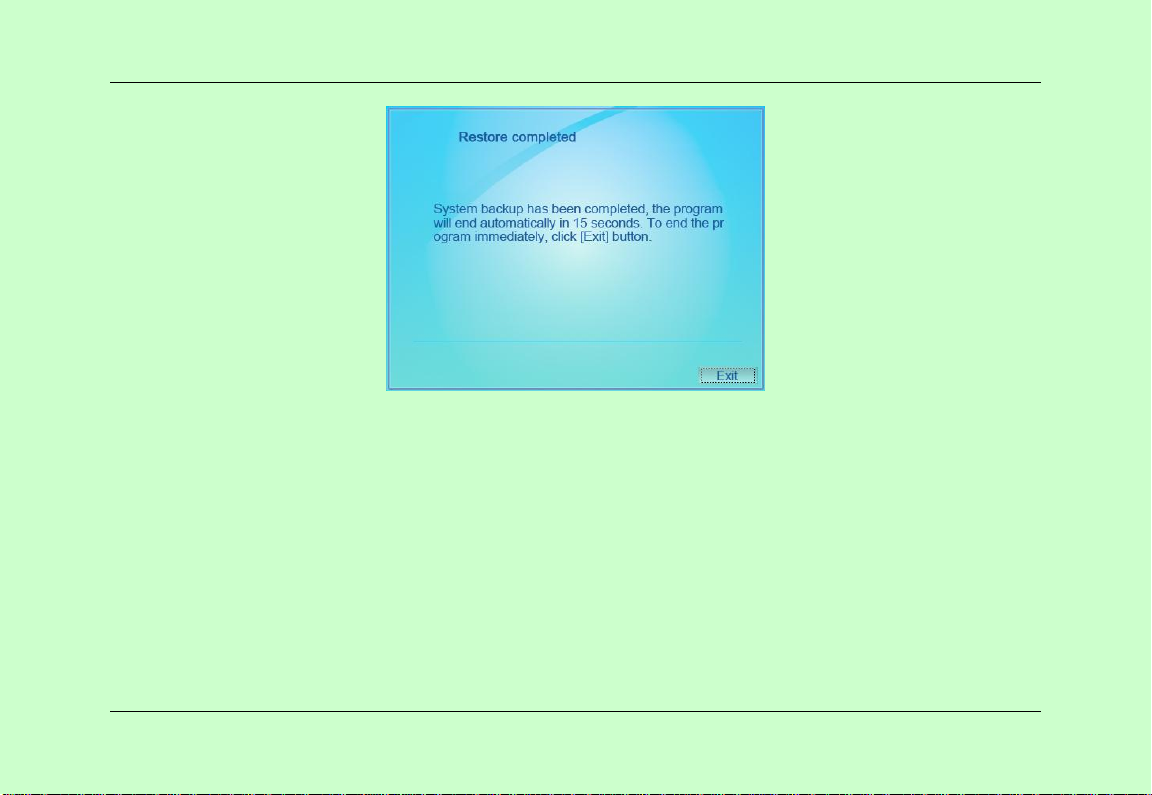
Computer Usage
Notice: Before initiating the System Restore, please ensure that there is already a backup file in the
destination drive. The aforementioned drive must be within the root menu.
Notice: System Restore will overwrite all the data within the system
,
and the overwritten data cannot be
recovered. Please prepare backup data before proceeding.
Notice: Please do not interrupt the backup process during system restore, as such intervention will
prevent proper system function.
Using Hanvon System Backup Software to restore factory status.
Start your TouchPad, and the Hanvon logo will appear. Press “Enter” when the monitor signals
“Press hotkey to restore system”. The System will initiate factory status backup.
47
Page 55
Computer Usage
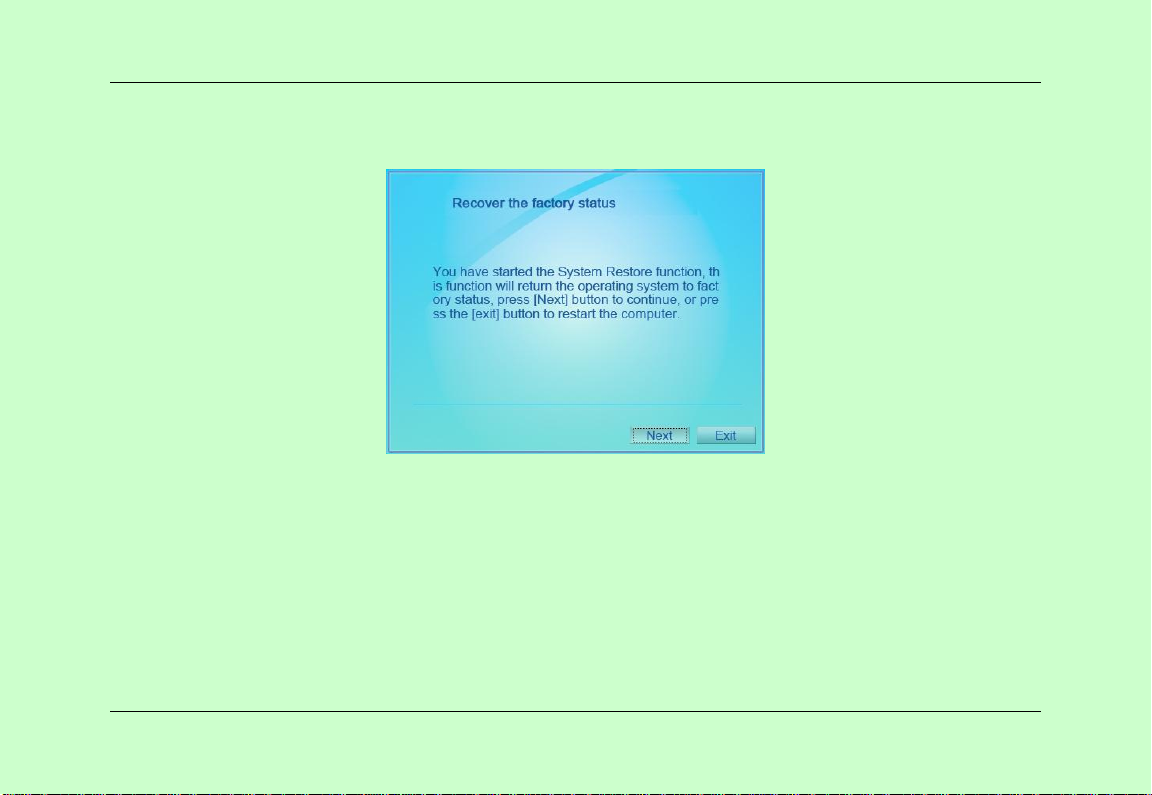
2、As “Windows Setup [EMS Enabled] comes up,press “Enter”。In a few moments, the following
interface will appear.
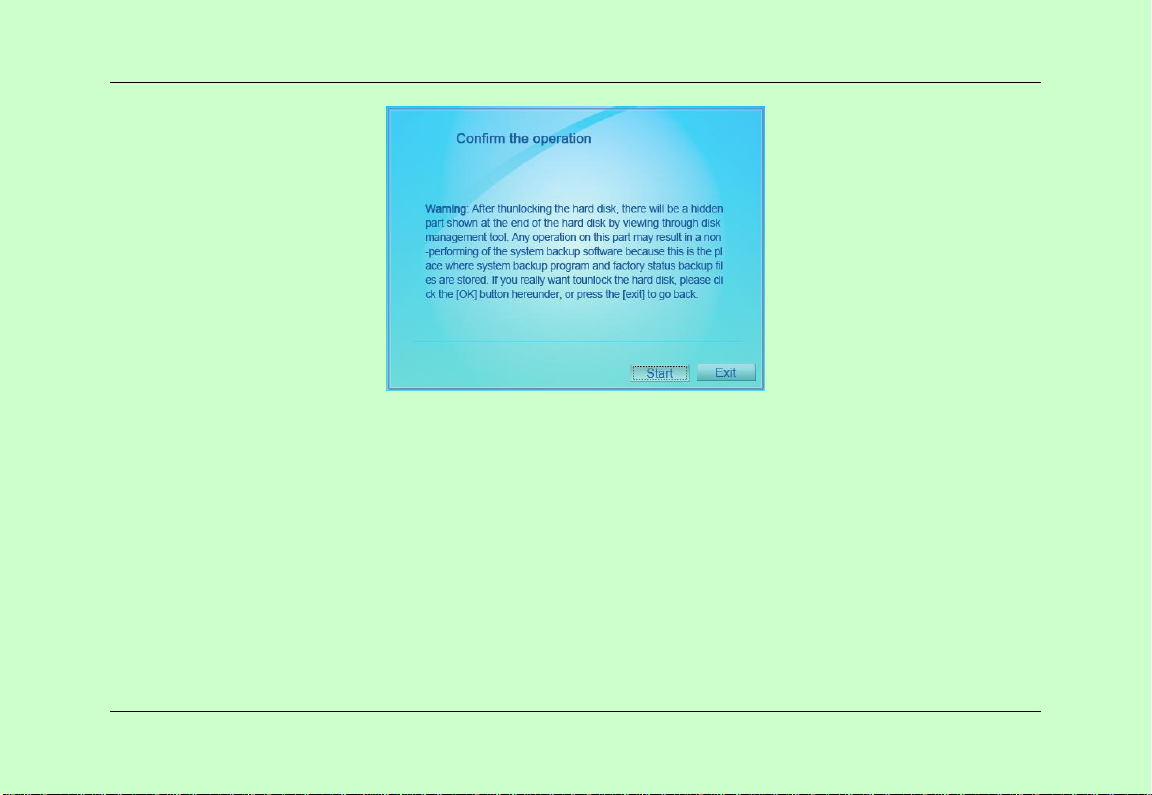
3、Select “Next” and the following interface will appear:
48
Page 56
Computer Usage
4、Select “Start” and the following interface will appear:
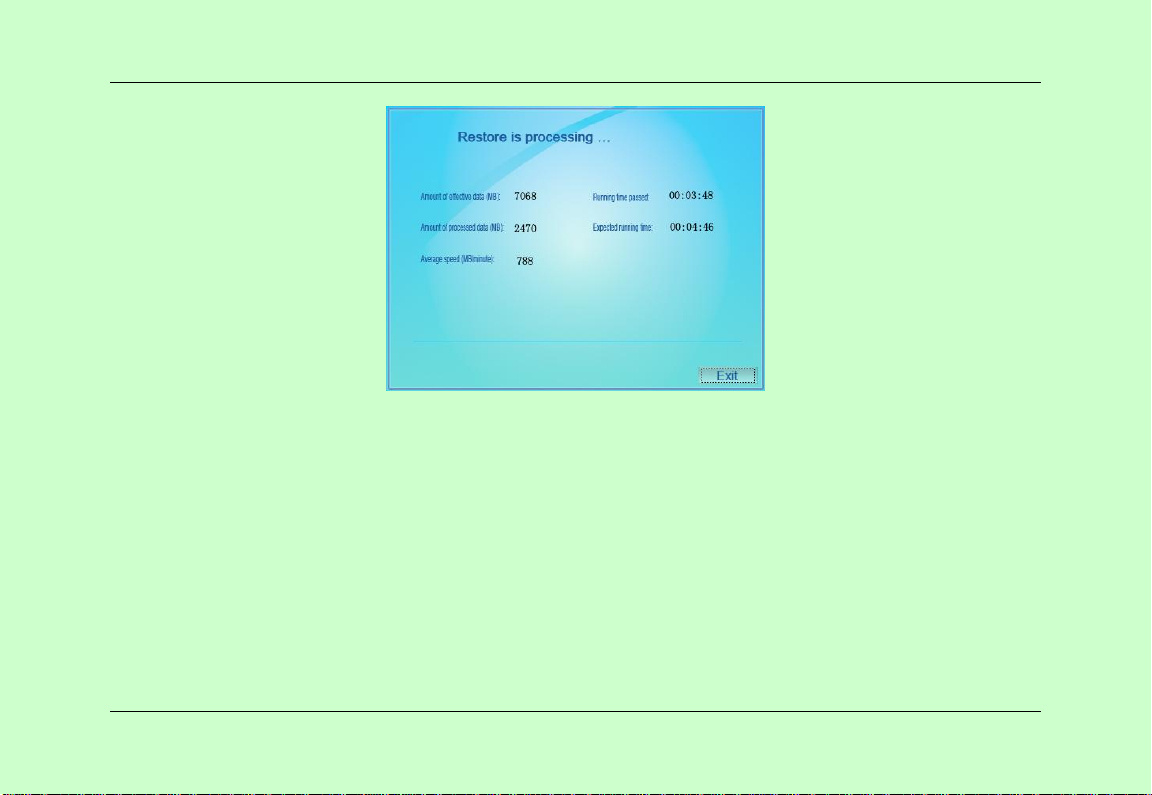
49
Page 57
Computer Usage
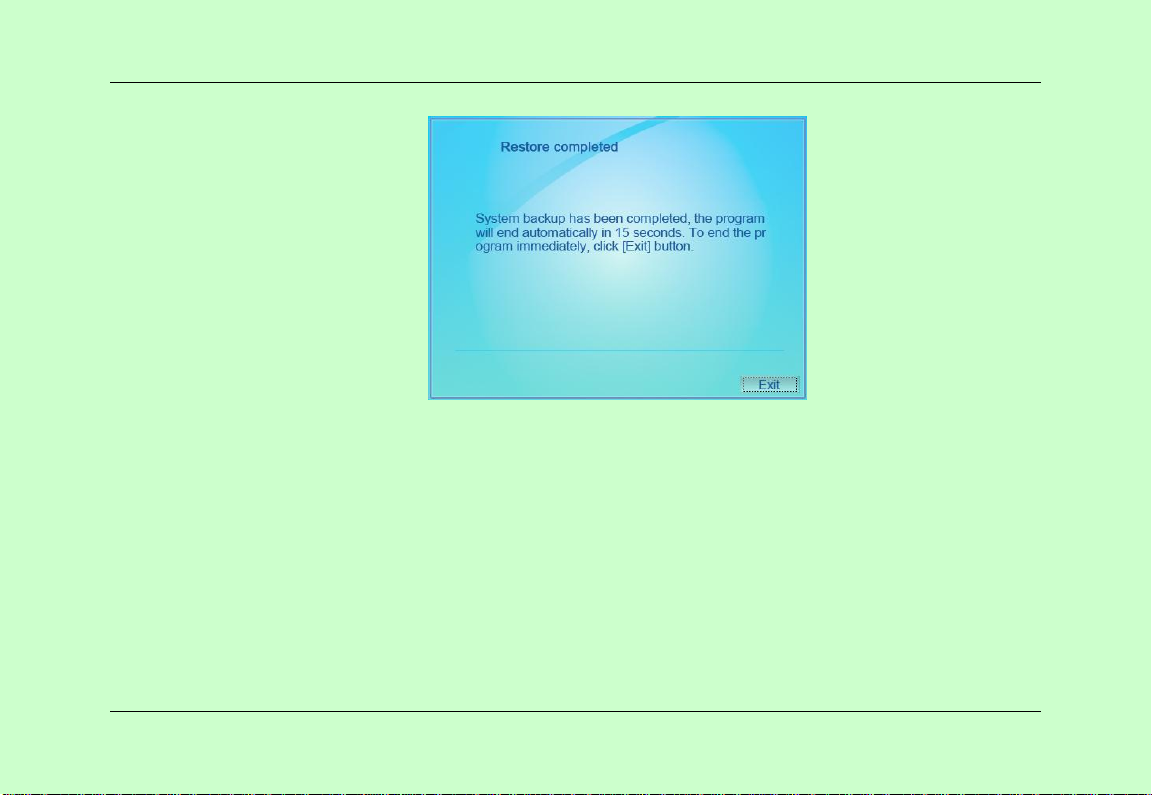
5、In a few moments, select “Exit” to complete the system backup. The program will end
automatically in 15 seconds if “Exit” is not selected.
50
Page 58
Computer Usage
Note: The System backup will overwrite all the data within the system and the overwritten data cannot
be recovered. Please prepare backup data before proceeding.
Notice: Please do not interrupt during system restore, as such intervention will prevent proper system
function
Notice: Once the original factory condition is restored, the user will need to register a new Windows user
ID. Please follow any software direction to convert any data or file locked to the existing user.
51
Page 59
Computer Usage
Using Hanvon System Backup to unlock the hard disk
As a factory setting, Hanvon has locked its laptop’s hard drive during production. Unless users
unlock their hard disk, the hard disk will not be operational. Please ensure that the hard disk is
unlocked before division to prevent file and system corruption.
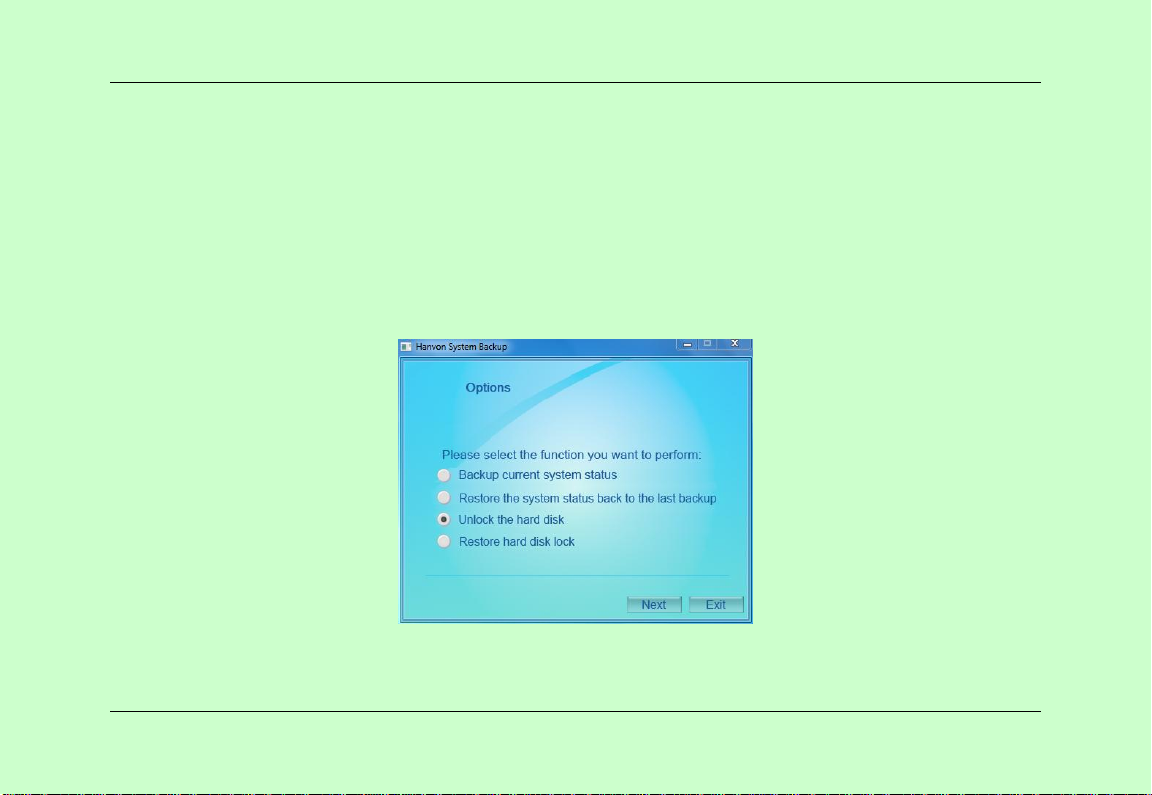
Turn on the laptop, select “Start” - “Hanvon”- “Hanvon System Backup”; Select “Unlock the hard
disk”
1、Start the Hanvon System Backup Software and the following interface will appear:
2、Select “Unlock the hard disk” , then select “Next”。
52
Page 60
Computer Usage
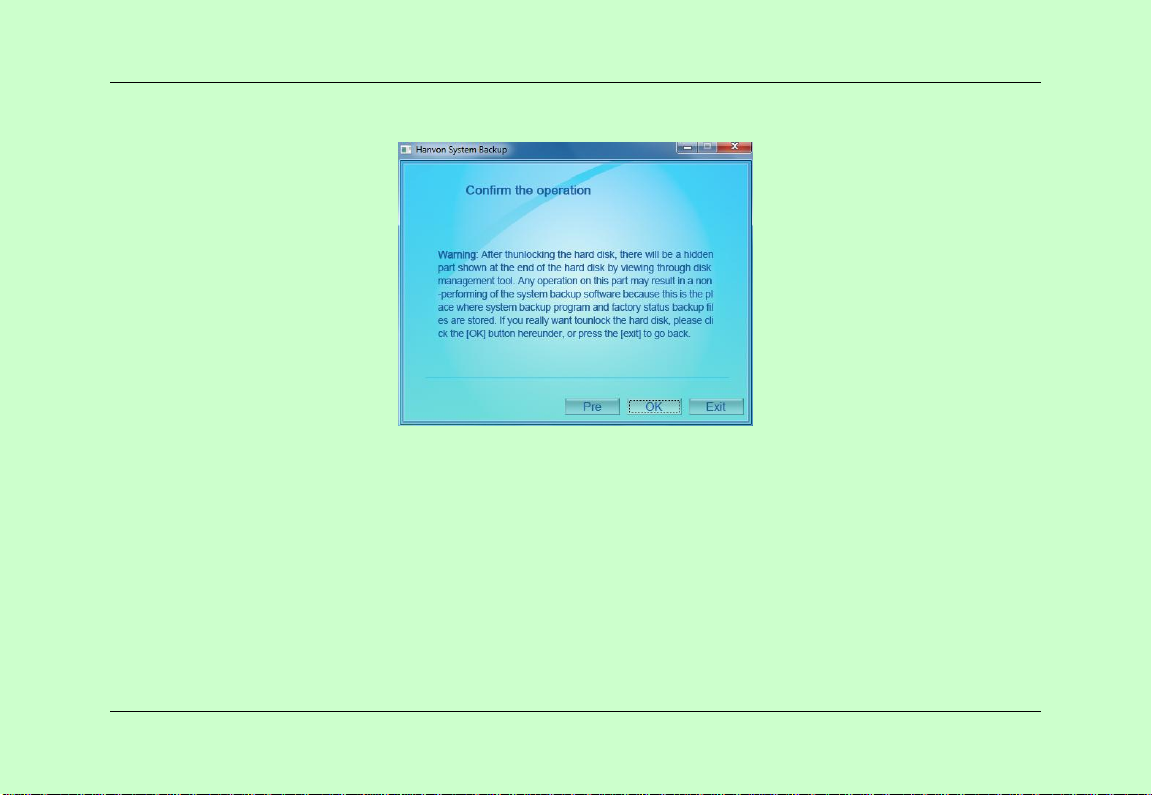
3、To confirm unlocking the hard disk, select “OK”. Once the system is unlocked, the system will
restart automatically.
53
Page 61
Computer Usage
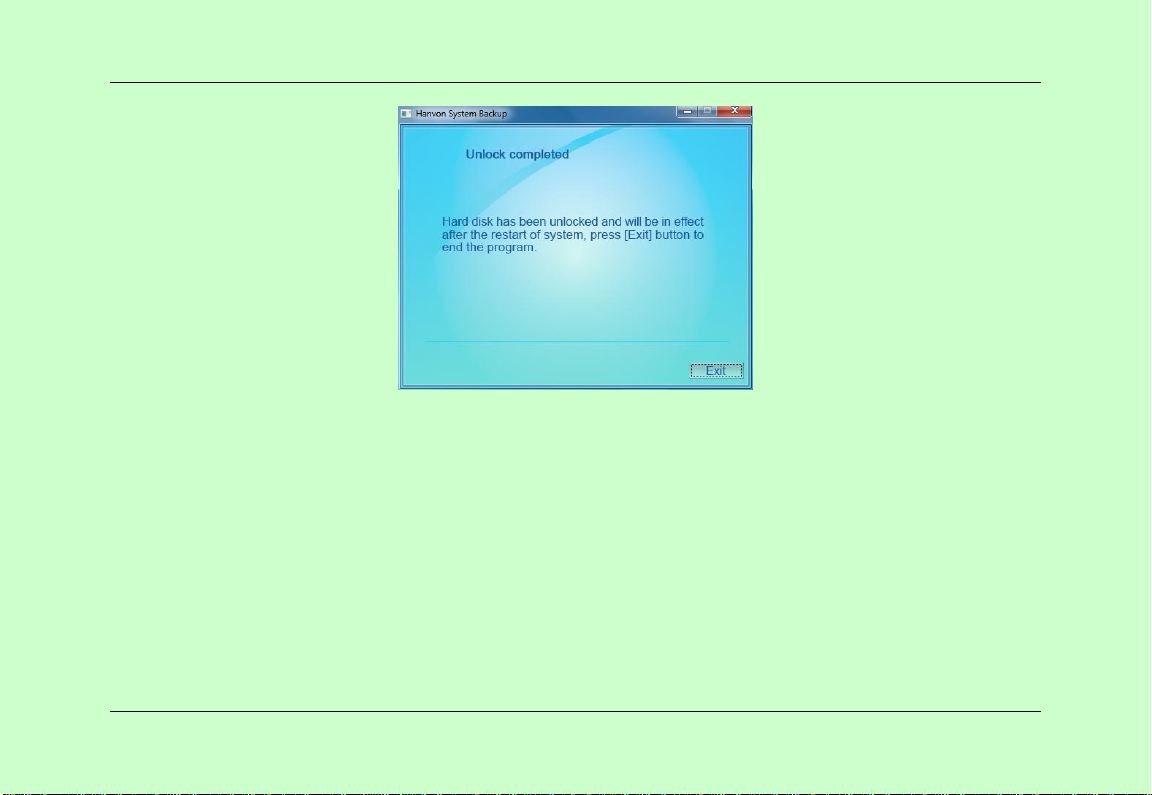
Note: Once the hard disk is unlocked, one can operate under hard disk management
Note: During hard disk operation
,
please do not change the setting under partition, nor system
recovery division to prevent system malfunction。
Note: Users can execute the operation of deleting partition, rebuilding partition, compressing partition
and etc. As Windows only supports 4 primary partitions, please create a logical partition when you create
new partitions (simple volume).
54
Page 62
Computer Usage
Using Hanvon System Backup Software to restore hard disk lock
The following action is designed to re-lock the disk after the disk has already been unlocked in order
to prevent loss of data from improper execution.
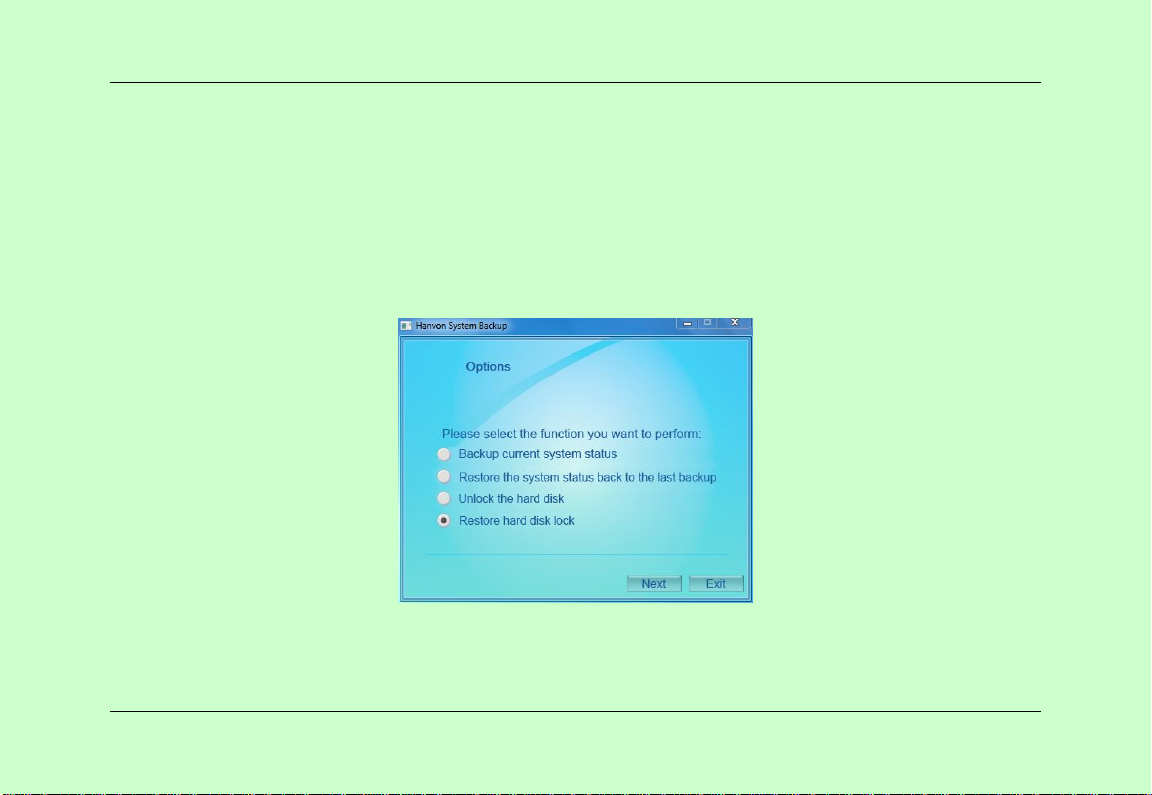
Turn on the laptop, select “Start” - “Hanvon” - “Hanvon System Backup”,select “Restore hard disk
lock”.
1、Initiate the Hanvon System Backup software and the following interface will appear:
2、Select “Restore hard disk lock”, then click on “Next”.
55
Page 63
Computer Usage
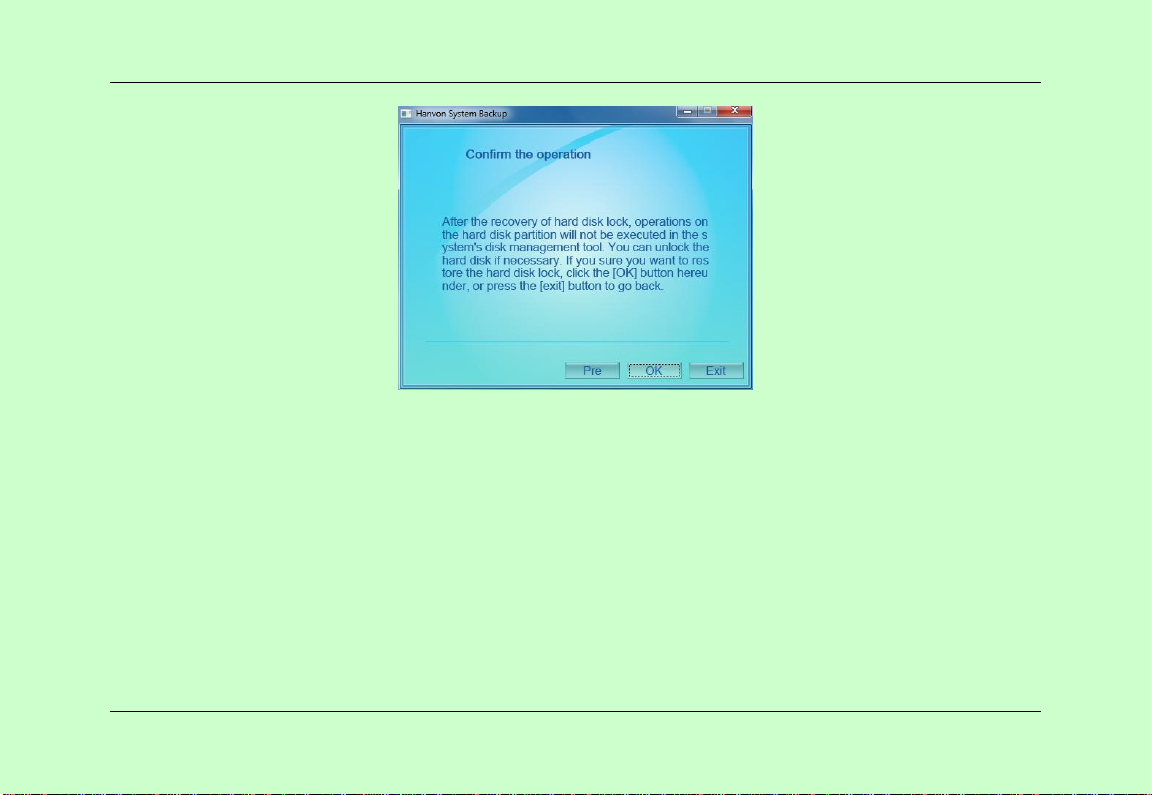
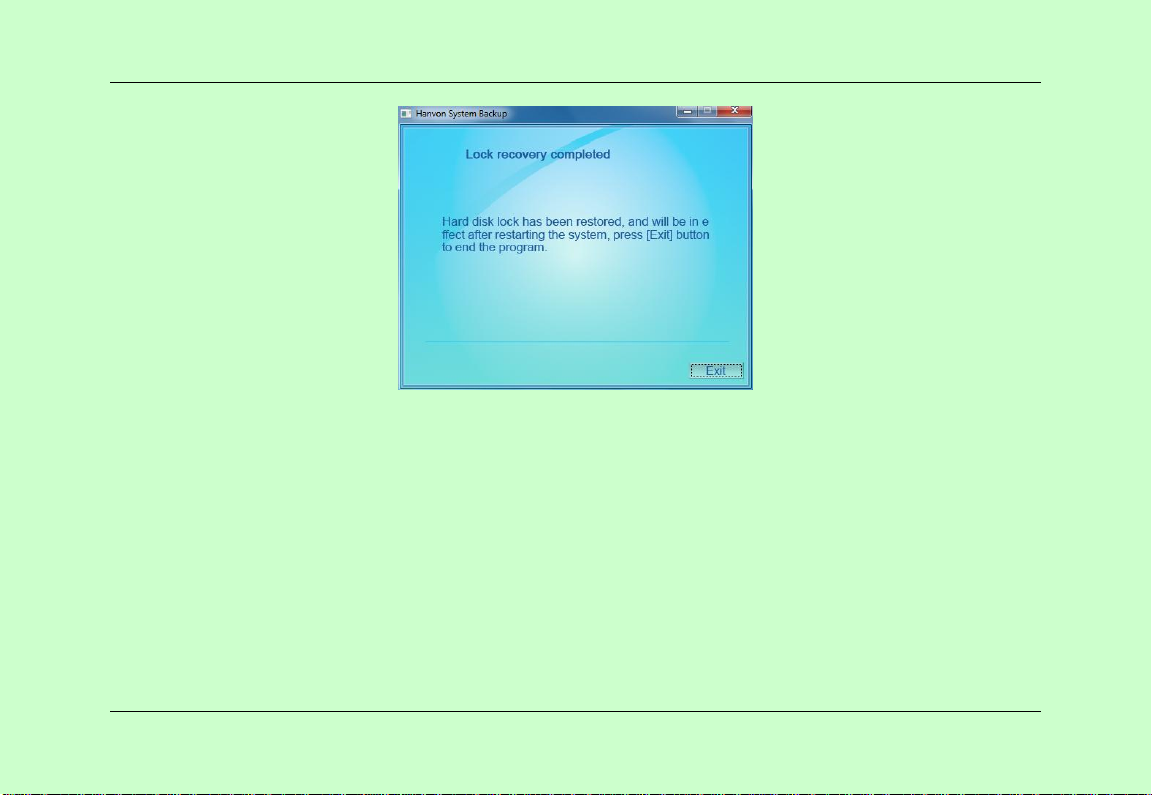
3、To Confirm whether to lock the disk, select "OK", a prompt window will be shown as below to
inform you the disk is locked. After system restart, the operation will be in effect.
56
Page 64
Computer Usage
Notice: After unlocking the disk, you can use the disk management to implement disk operations.
Notice: While the disk is in operation, please do not change the boot partition, the operating system
partition and system recovery backup partition, in case the system recovery cannot be used.
Notice: Users can execute the operation of deleting partitions, rebuilding partitions, compressing
partitions and etc. As Windows only support 4 primary partitions, please create a logical partition when
you create new partitions (simple volume).
57
Page 65

Computer Usage
Chapter V Q&A
This chapter explains how to identify and resolve computer problems that may arise.
General hardware problems / possible causes and solutions
Some common hardware problems and recommended solutions are in the table below:
System Ceased Operation during the Execution of the Program
Cause: error by using the current procedure. Solution: Click <Ctrl>, <Alt> and <Del> keys. Windows
operating system causes error; restart the system by using the power supply.
Operating System cannot be Restored to the Using State.
If the operating system can not resume operation after a pause, please check the following possible causes:
■ The battery may have a malfunction, or the current power level may be very low. To solve this problem,
please connect an external power supply such as the AC adapter.
The System cannot Shutdown Normally.
Hold down the power button 4-6 seconds, until the system shuts down.
58
Page 66

Computer Usage
After Shutdown, if the System cannot reboot:
Connect the AC power adapter immediately; as it means that the battery did not have sufficient power to
reboot.
Measures to Extend Battery Life?
Adjust the screen brightness to the minimum possible level.
Adjust the computer screen to the normal standard.
Remove the PC card if not often used.
Turn off the PC Bluetooth function.
Turn off the PC wireless network function.
Ensure that the power configuration setting is in the "Save power" mode.
Wireless Network Breaks after 2 to 3 Minutes on line, and cannot resume on-line.
This may be due to interference caused by channel, please change the AP's channel and re-line.
Computer cannot connect to the Internet Network.
Internet service providers (ISP) account is not setup; please contact your network service company for
assistance.
59
Page 67

Computer Usage
The PC has been online via a Wireless Network, but still cannot connect to another
Computer.
Please check the device driver is installed correctly. If the driver is not installed correctly, press the [Start]
-> [Control Panel] -> [System] -> [Device Manager] -> [Network Adapters], you will find a yellow
exclamation mark on the network tag. If a yellow exclamation mark occurs, please use the driver CD to
reinstall the device driver.
Good Signal Strength, but cannot connect to the Network.
Please check the TCP / IP address settings are correct or not.
If water accidentally penetrates the computer, how to solve this problem?
At this point, do not connect the computer's power supply, or it will cause more serious damage to the
computer. Unplug the power supply and power cord, remove any attached external devices (such as: drive).
Dry any liquid that was spilled on the computer; wipe stains with a soft cloth to reduce potential damage to
the unit. Dry the body and other equipment with fans, and then send it to the nearest computer repair center
to diagnose and repair the PC by qualified engineers, in order to reduce the damage to the computer.
The computer cannot continue running.
An external or internal storage device could be the cause of this problem as it is not operating properly
when storing the content.
60
Page 68

Computer Usage
External peripheral devices may not compatible with the computer - such as external USB devices, rapid
flash, MMC, smart media memory cards that are belong to precision devices; if incorrectly used, they can
easily cause the computer to move to a standby situation when connected to the computer.
Incompatible software or drivers - the driver which is not compatible will cause .dll, .sys and .exe extension
files and will put the computer into standby or hibernation mode.
Contact Distributors
After reading the previous section, if the problem persists, the next step is to contact the distributor.
Distributors can determine whether the computer needs to be sent back to the store. Before you call the
distributor, please prepare the following information:
What configuration/model is your computer? Distributors need to know what peripherals you use.
Is there any error message on the screen?
When operation failure occurs, which software are you trying to use?
What steps have you tried to solve the problem? If you omit some steps, distributors may be able to
help you over the phone to complete the steps.
Technical Support Information
Technical service telephone: 02-8752-7888
61
Page 69

Computer Usage
National number: 1300-761-811
Hanvon Website: http://www.hanwang.com.cn ; http://www.hanvon.com .
62
Page 70

Appendix A
Appendix A Specification
CPU
Intel Celeron
BGA956
Cooling Fans
Maximum 1 group of fans
Video
Intel GMA X4500 Display Chip
Mini HDMI to VGA and Mini HDMI to HDMI Interface
Audio
63
Page 71

Built-in Speaker
Built-in Microphone
External Microphone Interface
External Earphone Interface
Memory
1 Memory Slot
DDR2 Memory
2GB Memory
HDD
320GB 2.5inch HDD
BIOS
Contains Computer and Video BIOS
Appendix A
Start PC by USB
64
Page 72

Built-in Battery
Rechargeable Lithium Battery Unit
High Polymer Battery
4800mAh or 5200mAh
Screen
10.1" Extra Thin Wide Viewing Angle
LED Backlight Screen
Maximum Resolution 1024*600
Camera
Built-in 1.3 MP Camera
Dimensions
Appendix A
253*168*18mm
65
Page 73

Appendix A
Wireless
Wireless 802.11B/G
Built-in Bluetooth
Input/Output Devices
Capacitive Touch Tablet
Support Double Spots Touching
I/O Transferring Interface
1 x DC – IN Jack
1 x Earphone Jack(3.5mm)
1x Microphone Jack
2 x 4-pin USB 2.0 Interface
1 x Mini HDMI to VGA and Mini HDMI to HDMI Interface
66
Page 74

Power Specification
AC 100~240 Volt 50/60Hz
Output: 19V 3.42A
Adaptor
Outer Dimensions
253*168*18 mm
0.96 kg
Safety Certification
CCC, CE, FCC, C-tick
Appendix A
67
 Loading...