

Page 1

Graphics Tablet
User’s Manual
Hanwang Technology Co., Ltd.
Page 2

Copyright © Hanwang Technology Co., Ltd, 2009
All rights reserved. No part of this manual may be reproduced except for your
express personal use. Hanwang Technology Co., Ltd reserves the rights to revise
this publication without obligation to provide notification of such changes.
Hanwang Technology Co., Ltd does its best to provide current and accurate
information in this manual. However, Hanwang Technology Co., Ltd reserves the
right to change any specifications and product configurations at its discretion,
without prior notice and without obligation to include such changes in this manual.
Art Master, Graphicpal, Rollick and Hanvon are registered trademarks of
Hanwang Technology Co., Ltd.
Microsoft, Windows, and Vista are either registered trademarks or trademarks of
Microsoft Corporation in the United States and/or other countries. Apple, the
Apple logo, and Macintosh are registered trademarks of Apple Computer, Inc.,
registered in the U.S. and other countries. Any additional company and product
names mentioned in this documentation may be trademarked and /or register ed
as trademarks. Mention of third-party products is for information purposes on ly
and constitutes neither an endorsement nor a recommendation.
Hanwang Technology Co., Ltd assumes no responsibility with regard to the
performance or use of these products.
Page 3

Contents
CHAPTER 1 GRAPHICS TABLET INTRODUCTION ................................ 1
1.1 GENERAL INTRODUCTION ................................................................ 1
1.2 FEATURES ............................................................................................. 1
1.3 QUICK-START TUTORIAL ................................................................... 2
CHAPTER 2 INSTRUCTION FOR WINDOWS SYSTEMS ....................... 7
2.1 SYSTEM REQUIREMENTS ................................................................. 7
2.2 INSTALLATION ...................................................................................... 7
2.3 UNINSTALLING...................................................................................... 8
2.4 CONFIGURATION ................................................................................. 8
CHAPTER 3 INSTRUCTION FOR MAC SYSTEMS................................. 19
3.1 SYSTEM REQUIREMENTS ............................................................... 19
3.2 INSTALLATION .................................................................................... 19
3.3 UNINSTALLING.................................................................................... 21
3.4 CONFIGURATION ............................................................................... 21
CHAPTER 4 BUNDLED SOFTWARE ........................................................ 27
4.1 HANVON SHELL ................................................................................. 27
4.2 PENWRITE ........................................................................................... 32
4.3 PENSIGN .............................................................................................. 38
4.4 PENMAIL ............................................................................................... 39
4.5 PENMARK ............................................................................................ 41
4.6 WHITEBOARD ..................................................................................... 43
CHAPTER 5 MAINTENANCE ...................................................................... 47
Page 4

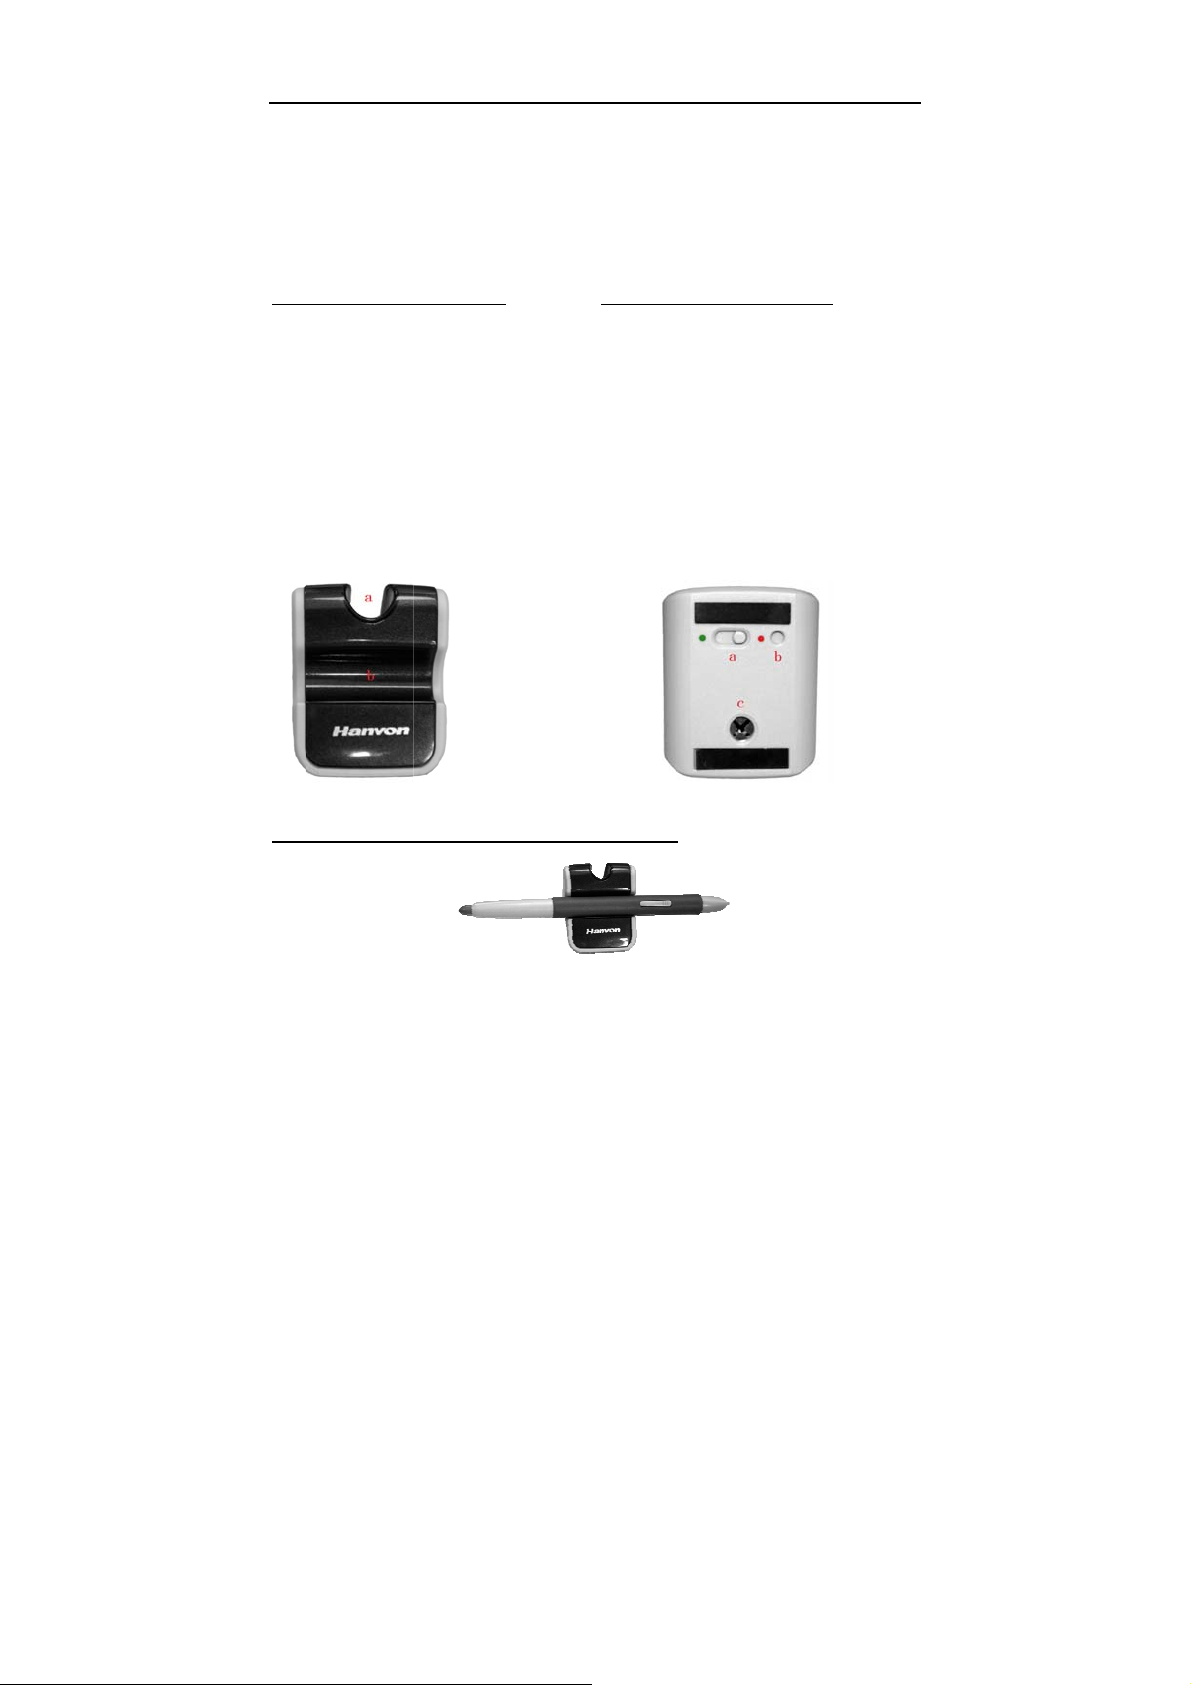
5.1 PEN HOLDER ...................................................................................... 47
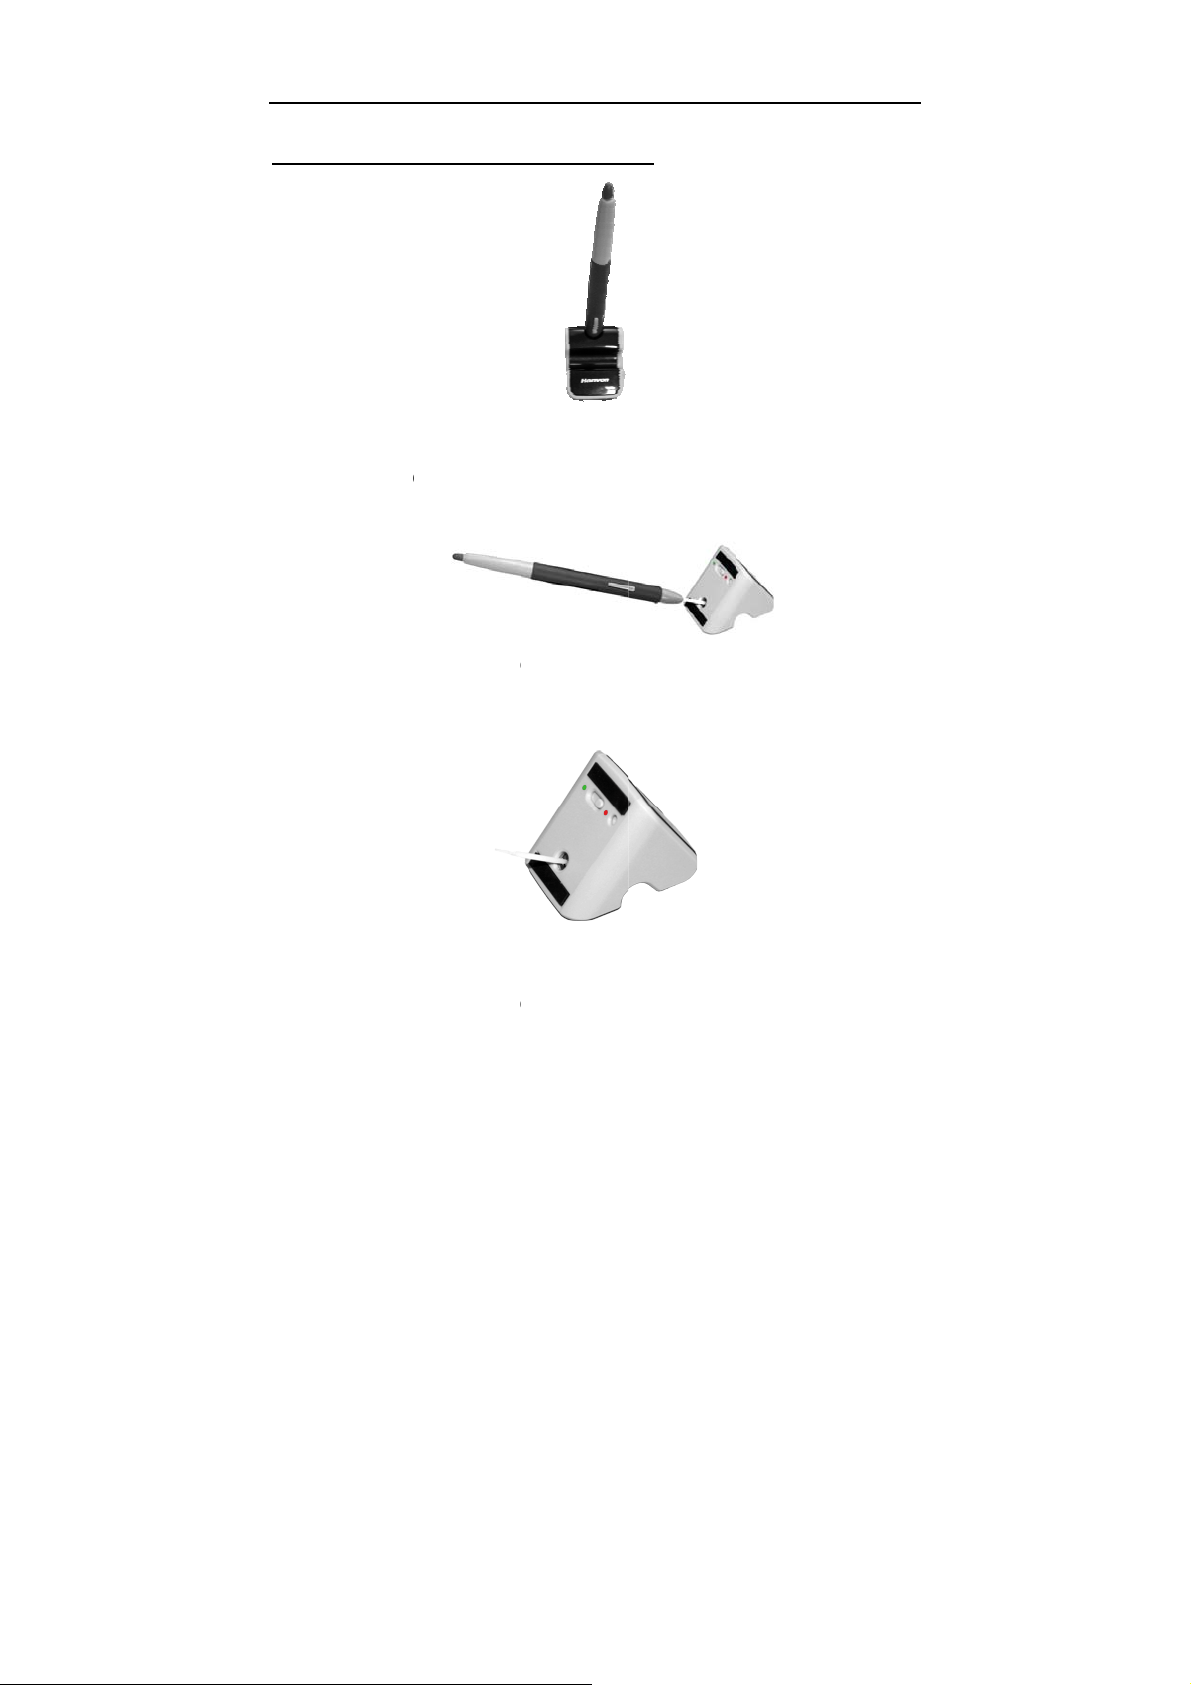
5.2 EXCHANGE PEN NIB ......................................................................... 48
5.3 CAUTIONS ............................................................................................ 49
APPENDIX ....................................................................................................... 50
WARRANTY ................................................................................................ 50
This User’s Manual provides quick access to information about Hanvon®
Drawing Tablet or Hanvon
®
Graphics Tablet.
This User’s Manual does not contain detailed information of any software
from third party.
Due to our continuous updates on the product, all figures in this manu al are
only for reference, the actual item is the standard.
Page 5

INTRODUCTION
Chapter 1 Graphics Tablet
Introduction
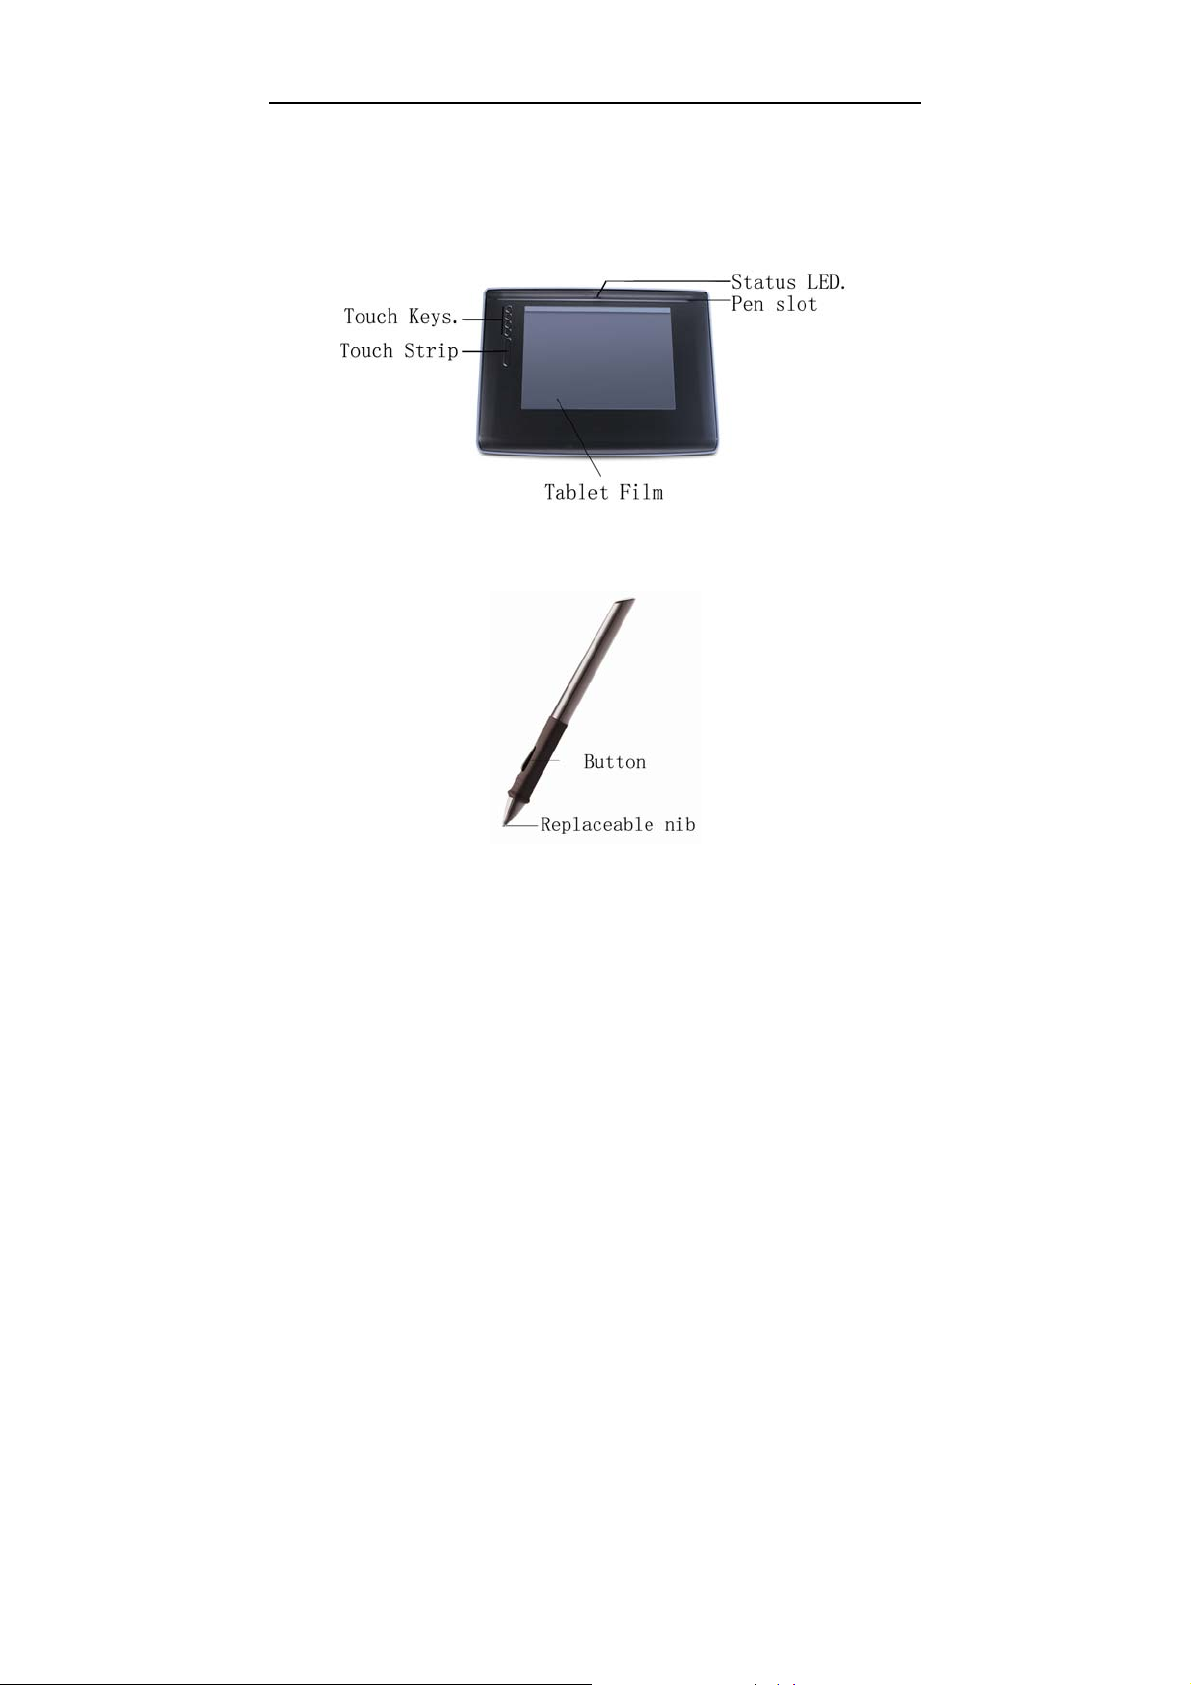
1.1 General Introduction
The Hanvon Graphics Tablet allows you to create graphics on a
computer using a cordless and battery-free pen. It is very easy to use.
You don’t need to be an experienced graphic artist to use it. This USB
graphics tablet supports a variety of professional painting and photo
editing software including Painter, Photoshop, Ulead Photolmpact,
Flash, Dabbler, Maya, PaintShop and more.
1.2 Features
z Express Touch Keys and Touch Strip
z Uses standard USB without the need for an external power
adapter
z Cordless and Battery-free pen
z Pressure Sensitive technology
z Windows & Mac compatible
z Software Supported: Painter / Photoshop / Ulead PhotoImpact /
Flash / CorelDraw / Dabbler / Maya and a variety of graphic
processing software
1
Page 6
INTRODUCTION
1.3 Quick-Start Tutorial
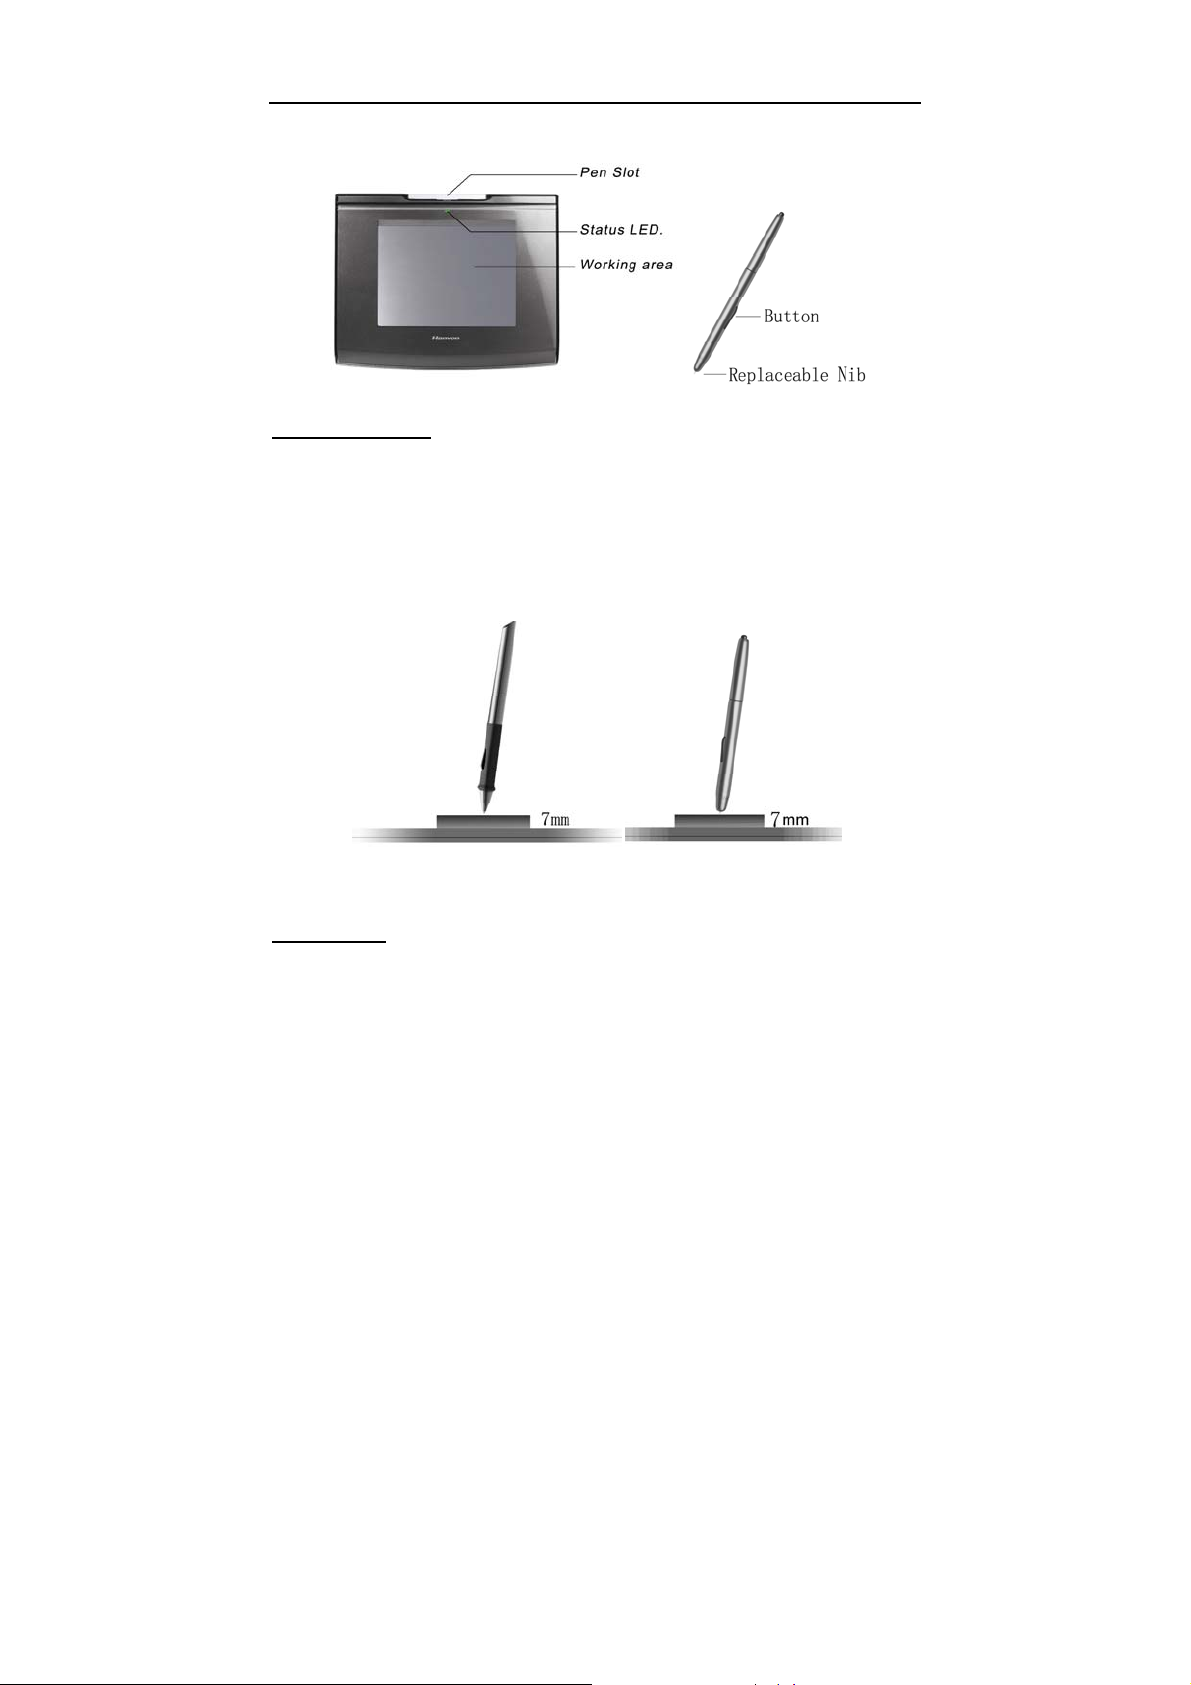
Note: Some series of graphics tablets have no pen slot and do not
support touch keys and strip. For example as follow:
2
Page 7
INTRODUCTION
Holding the pen
Hold the pen as usual.
z The pen will take effect when it comes within 7mm above the
tablet.
z
While using the pen, be sure that your thumb or index finger can
easily control the button on the pen, which acts as the right-click
key of a mouse.
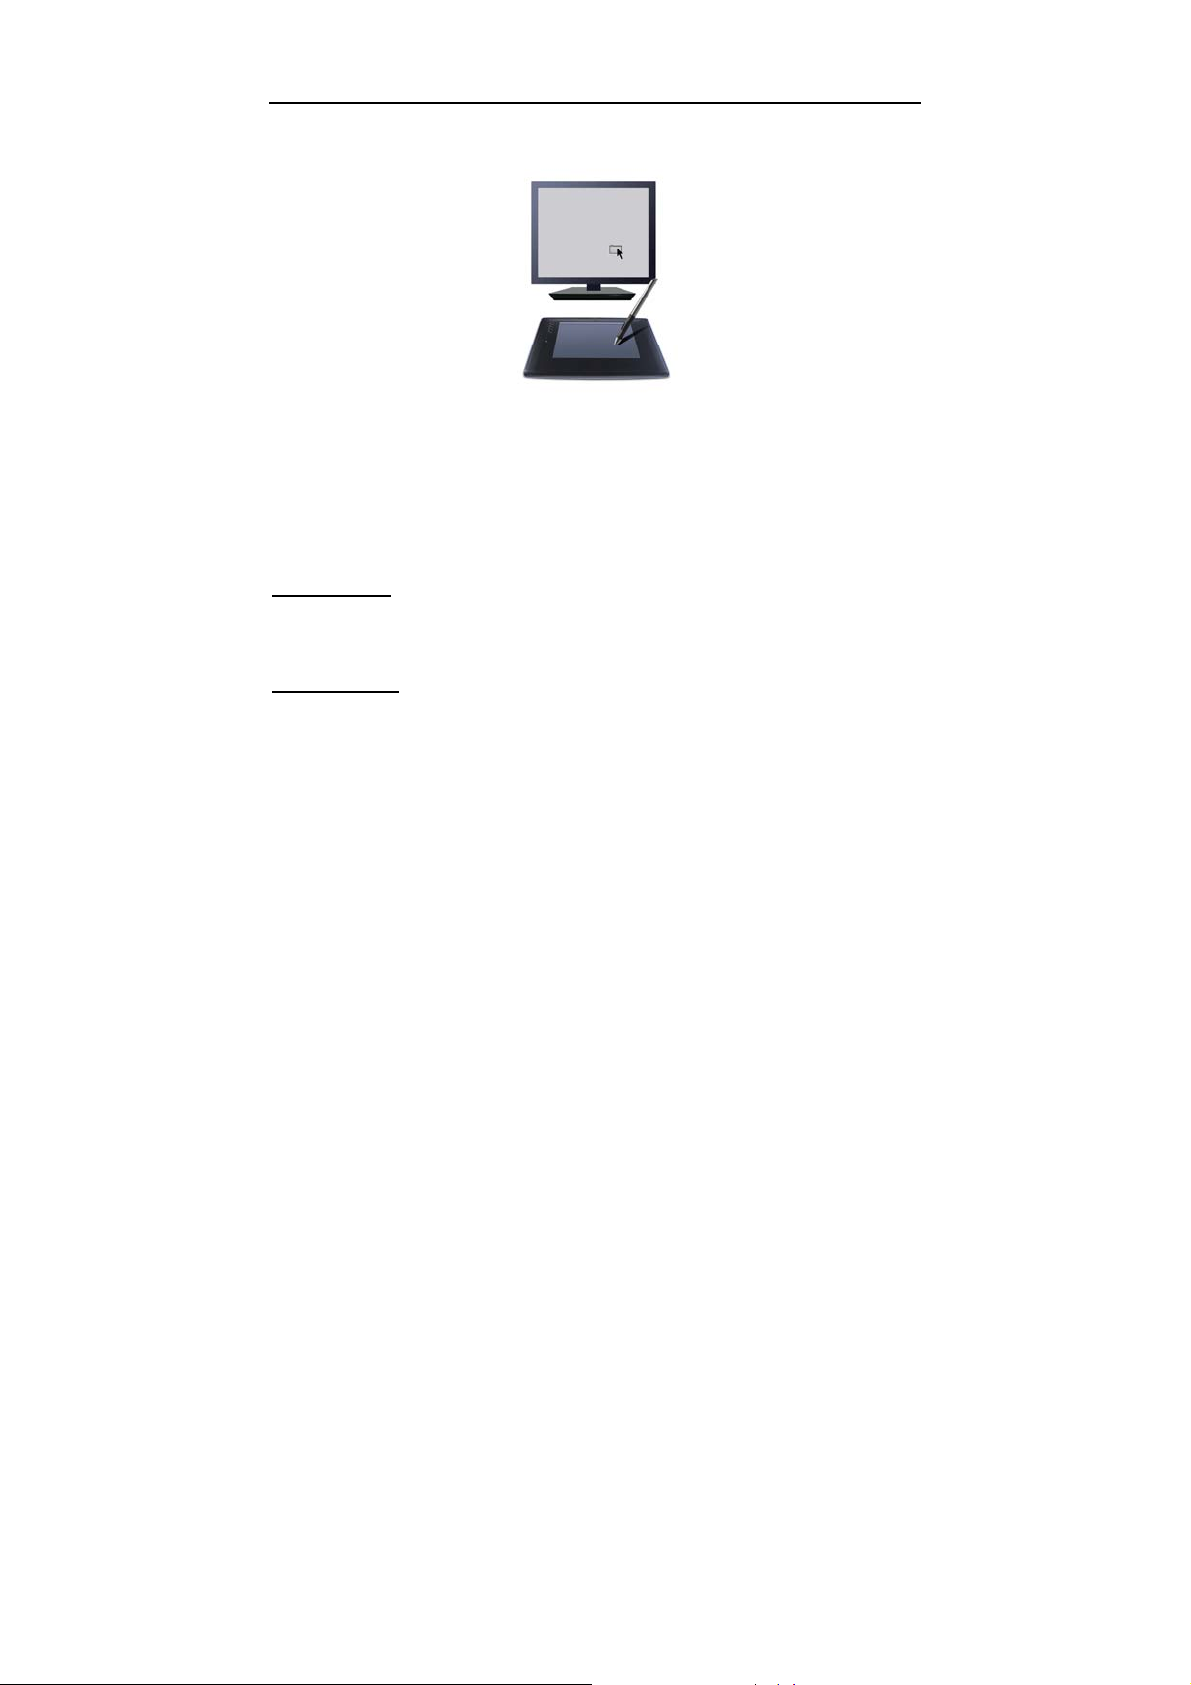
Positioning
Moving the pen in the active area of the tablet will control the cursor’s
position on the computer screen.
3
Page 8
INTRODUCTION
The pen and tablet use the Absolute Coordination method. This
means the active area of the tablet represents the entire computer
screen. Moving the pen on the tablet creates a corresponding
movement of the cursor on the screen.
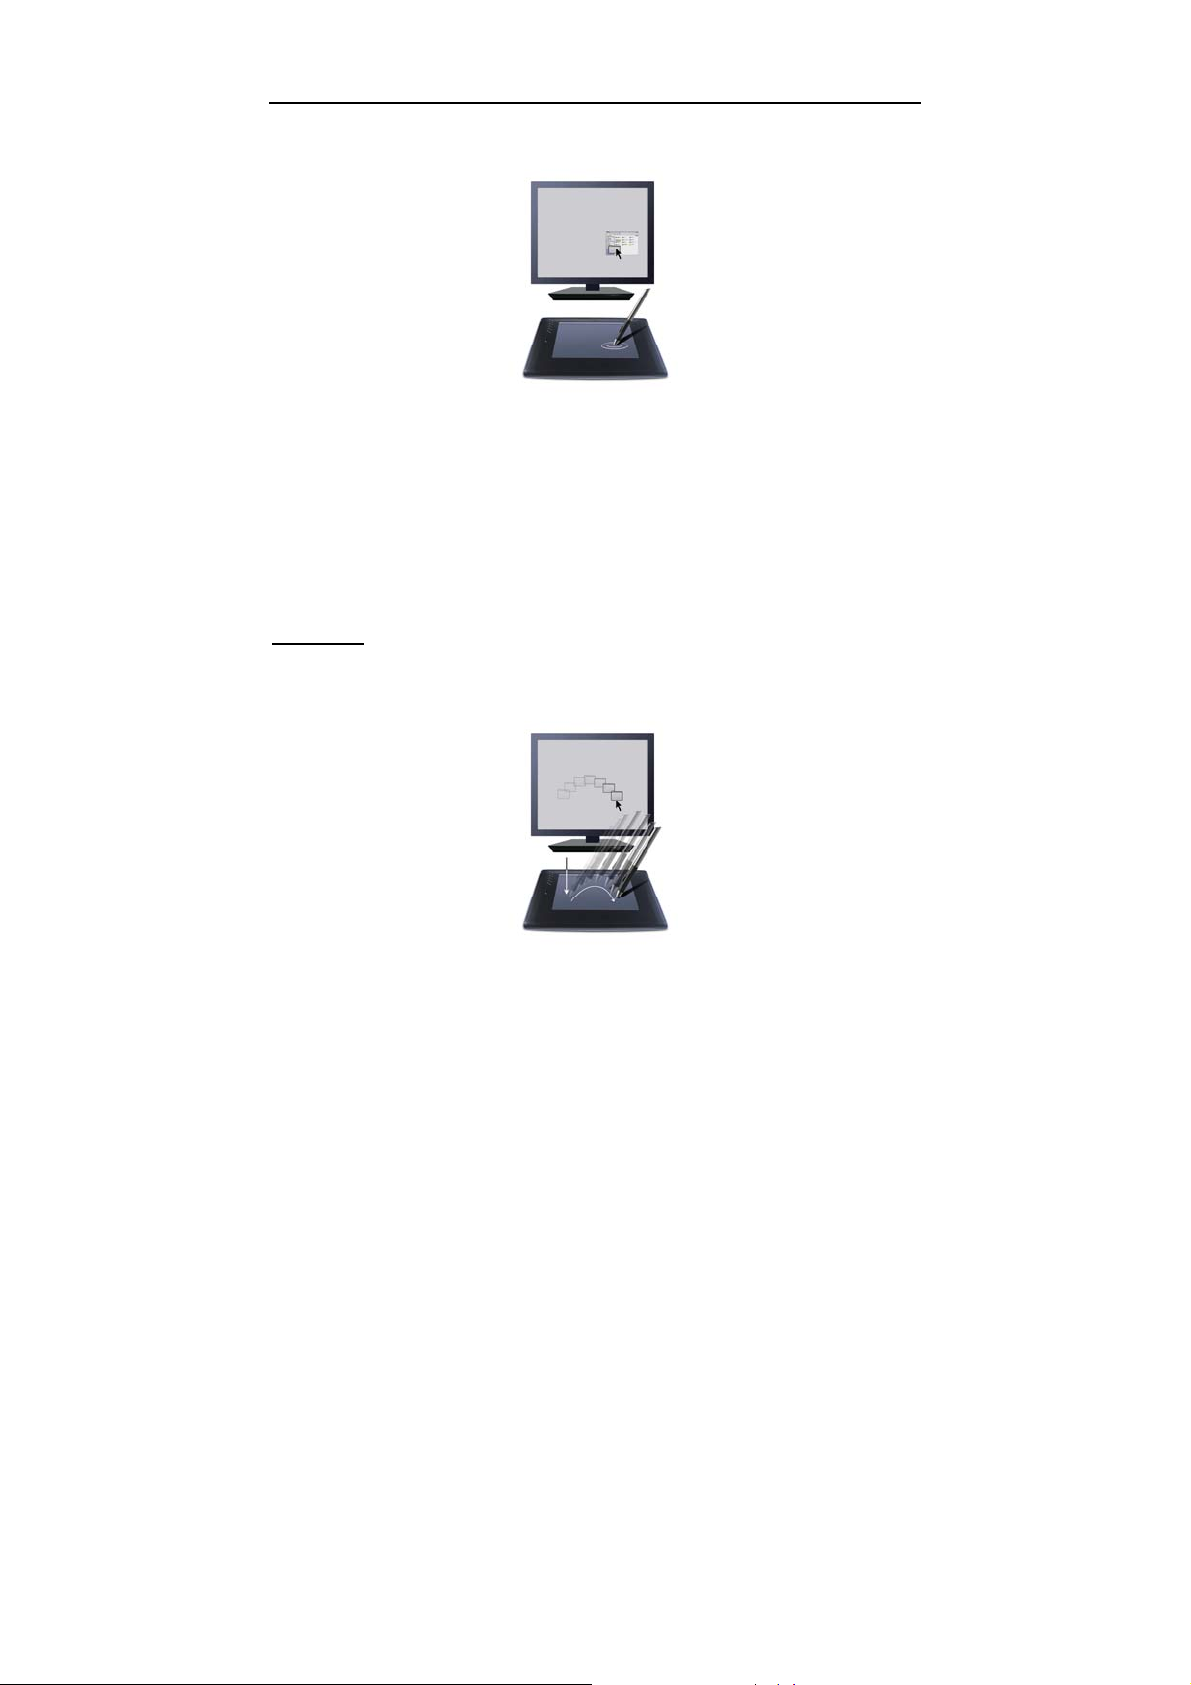
Single Click
One slight touch of the pen on the tablet has the same effect as a
single left-click of the mouse.
Double Click
Two immediate clicks on the tablet have the same effect as a double
left-click of the mouse.
4
Page 9
INTRODUCTION
Double Click Technique
When the cursor is positioned, press the tablet twice immediately with
the pen tip, making sure that you do not move the pen tip. The
response for the double click can be slow for beginners. You can
solve this problem by adjusting the double click speed from the
normal setting of the tablet.
Dragging
Select a target by pressing the pen down on it, and do not release the
pen till you have moved the target to the new position you want.
5
Page 10

INTRODUCTION
Pressure Sensitive Painting
In applicable software, you can use the pressure sensitivity of the pen
to control the painting brushwork for different effects such as direction,
stroke width, color and thickness.
The software that supports pressure sensitivity includes Adobe
Photoshop, Painter, Flash, Ulead PhotoImpact, Art Dabbler etc.
Touch key and Touch Strip
Touch keys are programmable for modifier keys, keyboard shortcuts,
mouse clicks, open/run applications, and pop-up menus. The default
is Rubber, Alt, Shift and Space.
The touch strip is used for quick scrolling, zooming, controlling brush
size, and other functionality by user configuration.
6
Page 11
INSTRUCTION FOR WINDOWS SYSTEMS
Chapter 2 Instruction for Windows
Systems
2.1 System Requirements
CPU Pentium III 1GHz or later
RAM 256MB
Hard-disk 200MB
OS WINDOWS 2000/XP/Vista X86/Vista X64
Port USB1.1 or 2.0
2.2 Installation
Connect the drawing tablet’s USB cable to the computer’s USB port.
Step 1
Insert the driver CD into the CD-ROM drive. The Installation Menu
should pop-up automatically. If the menu does not appear,
double-click the My Computer icon on the Desktop, find the
AutoRun.exe file under the CD-ROM’s root directory, and double-click
it.
Step 2
Click on Install Driver for Graphic Tablet button to install the driver and
click on Install Hanvon Soft to install the bundled software.
Step 3
After installing the driver and the bundled software, read this manual
for detailed information on using and customizing your graphics tablet.
7
Page 12
INSTRUCTION FOR WINDOWS SYSTEMS
Note: If the tablet cannot be used after driver installation, please
restart your computer.
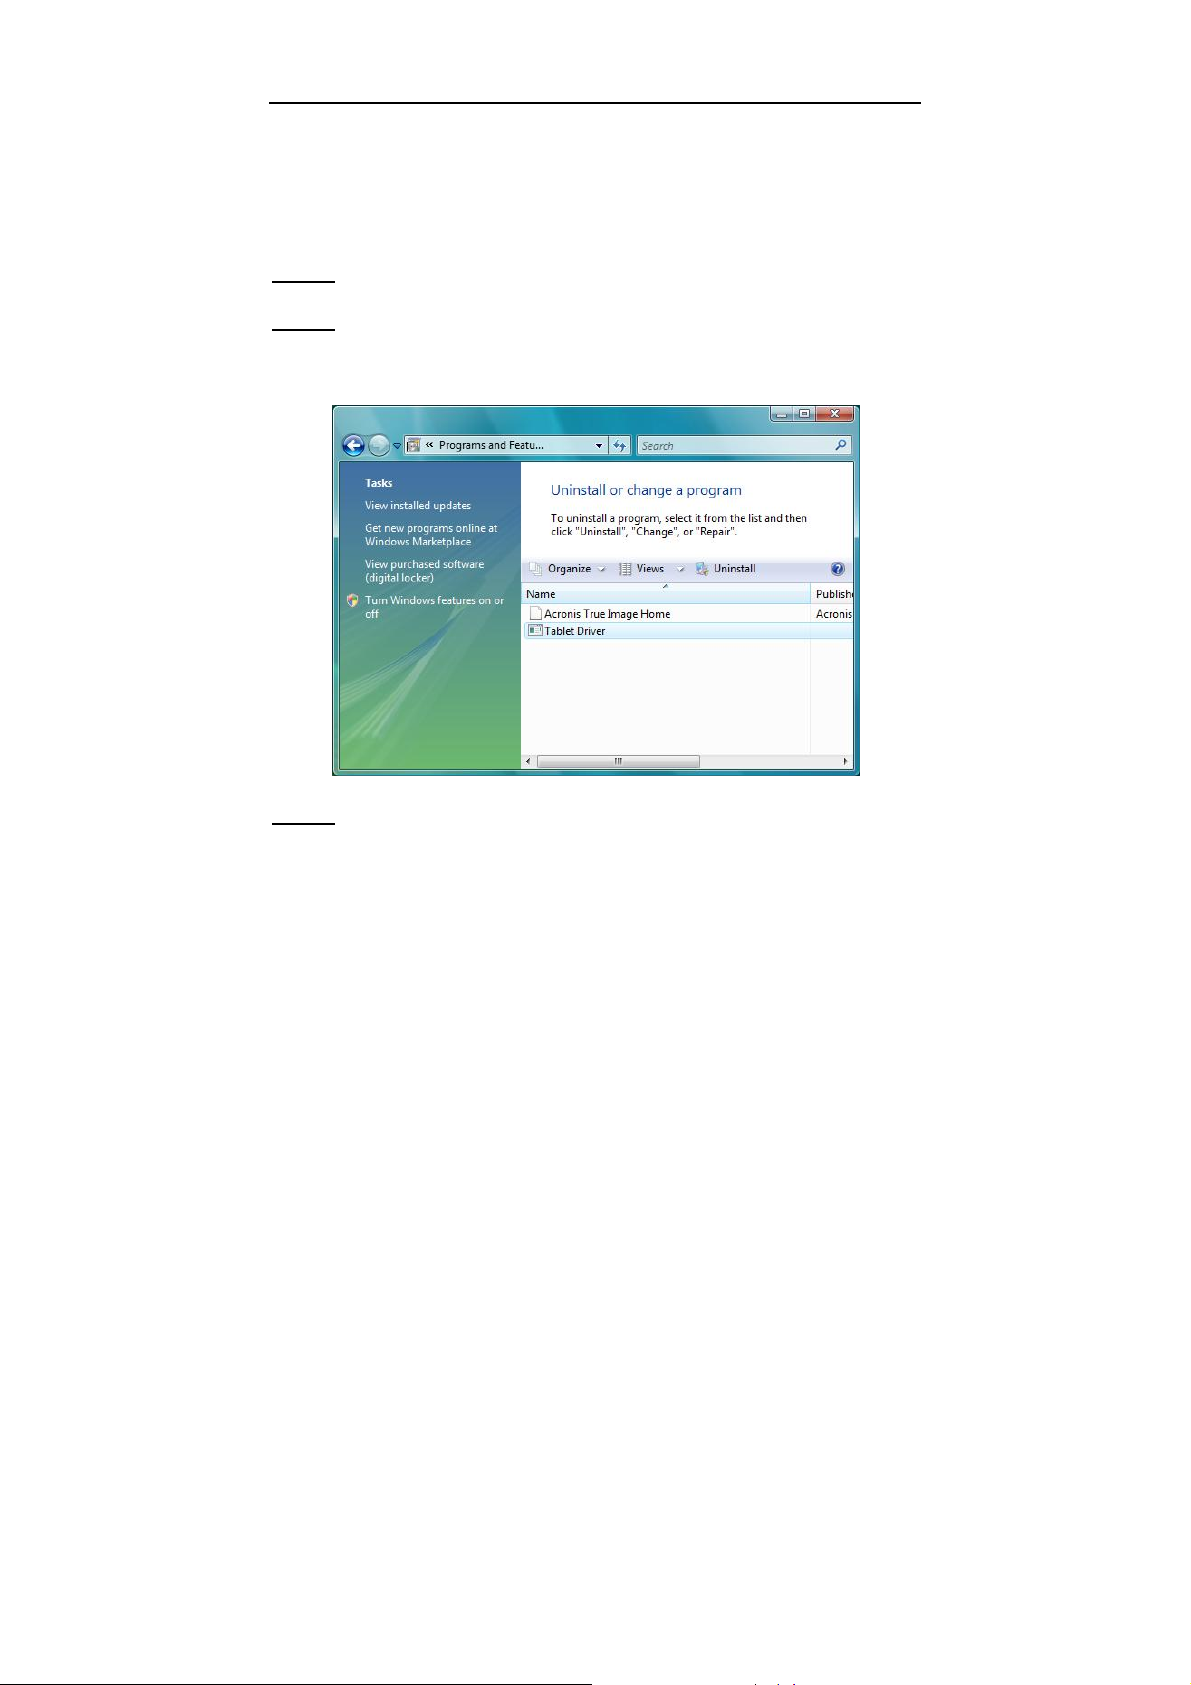
2.3 Uninstalling
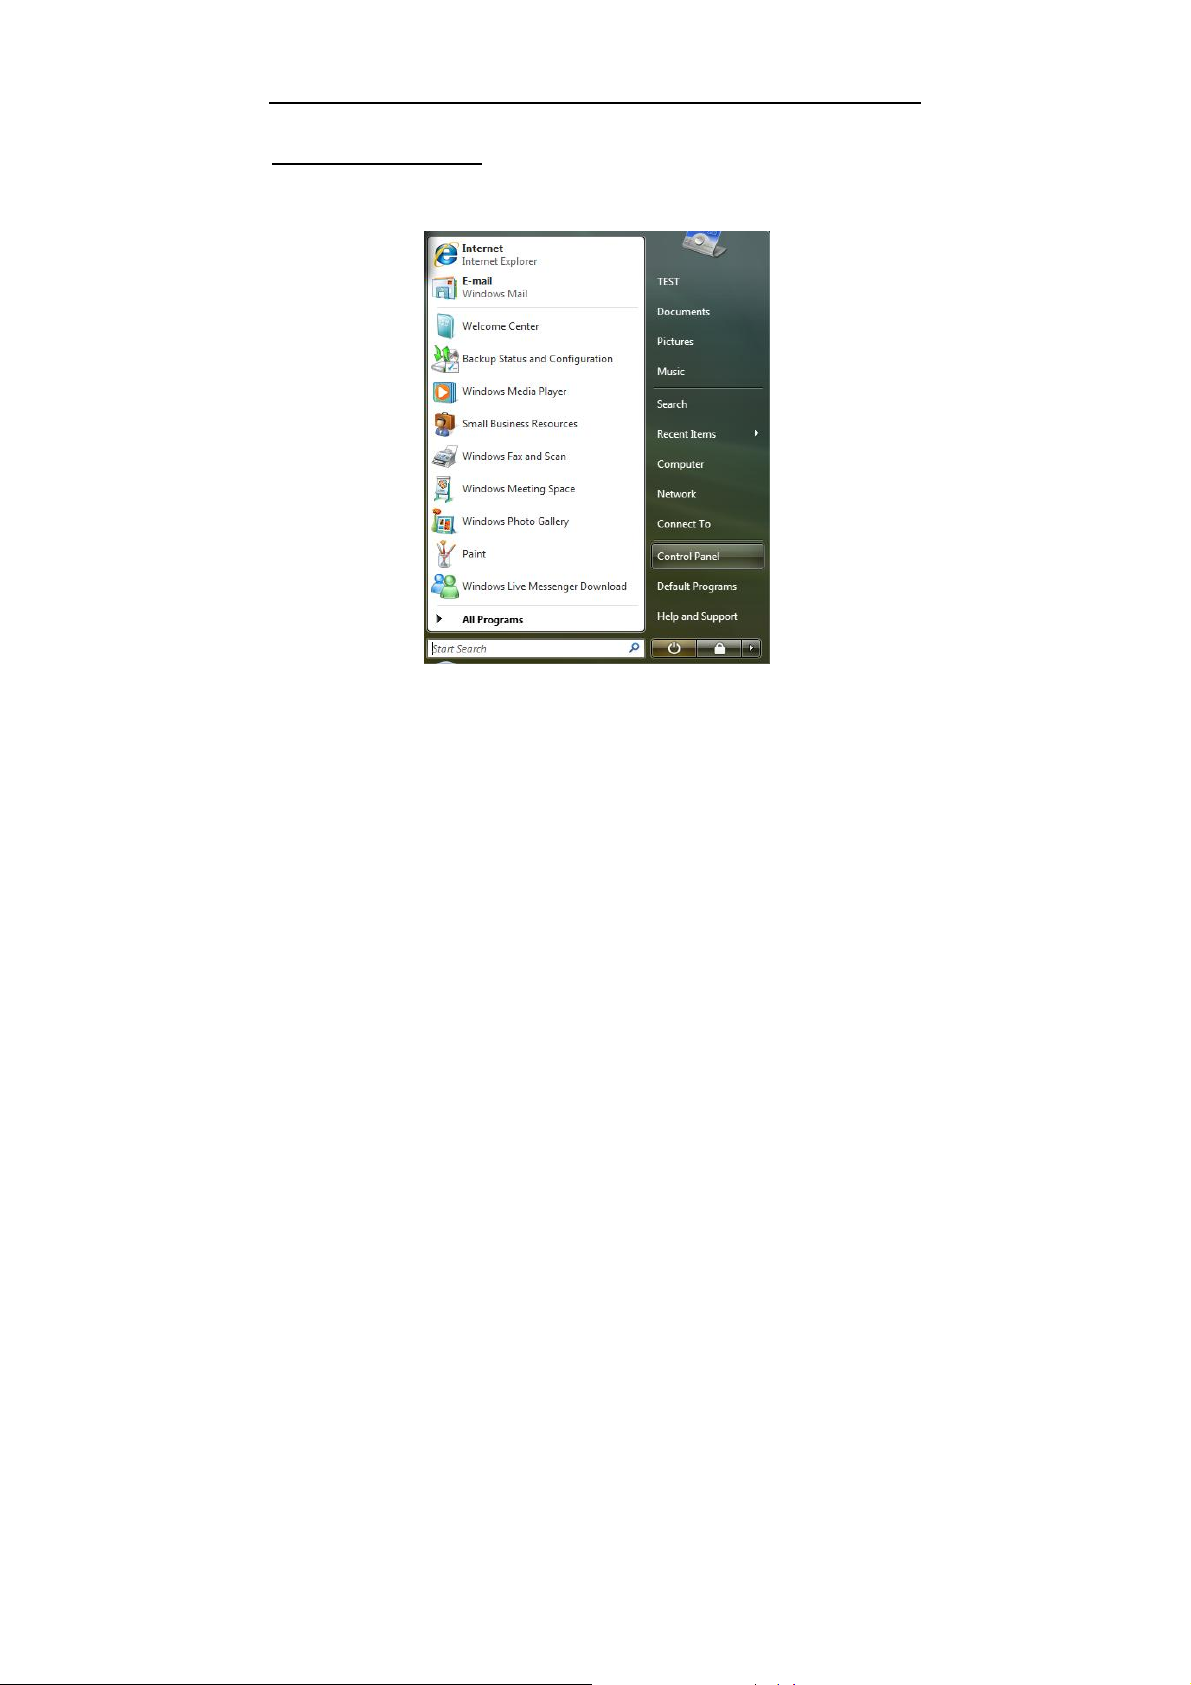
Step 1
Click the Windows Start button and then select Control panel.
Step 2
Double click Add/remove program in the control panel window and
find Tablet Driver.
Step 3
Click Uninstall and follow the prompts to remove the tablet driver.
2.4 Configuration
Hanvon tablet driver provides a configuration window to set pen
pressure, working area, dual-monitors, double-click speed, express
touch keys, etc.
8
Page 13
INSTRUCTION FOR WINDOWS SYSTEMS
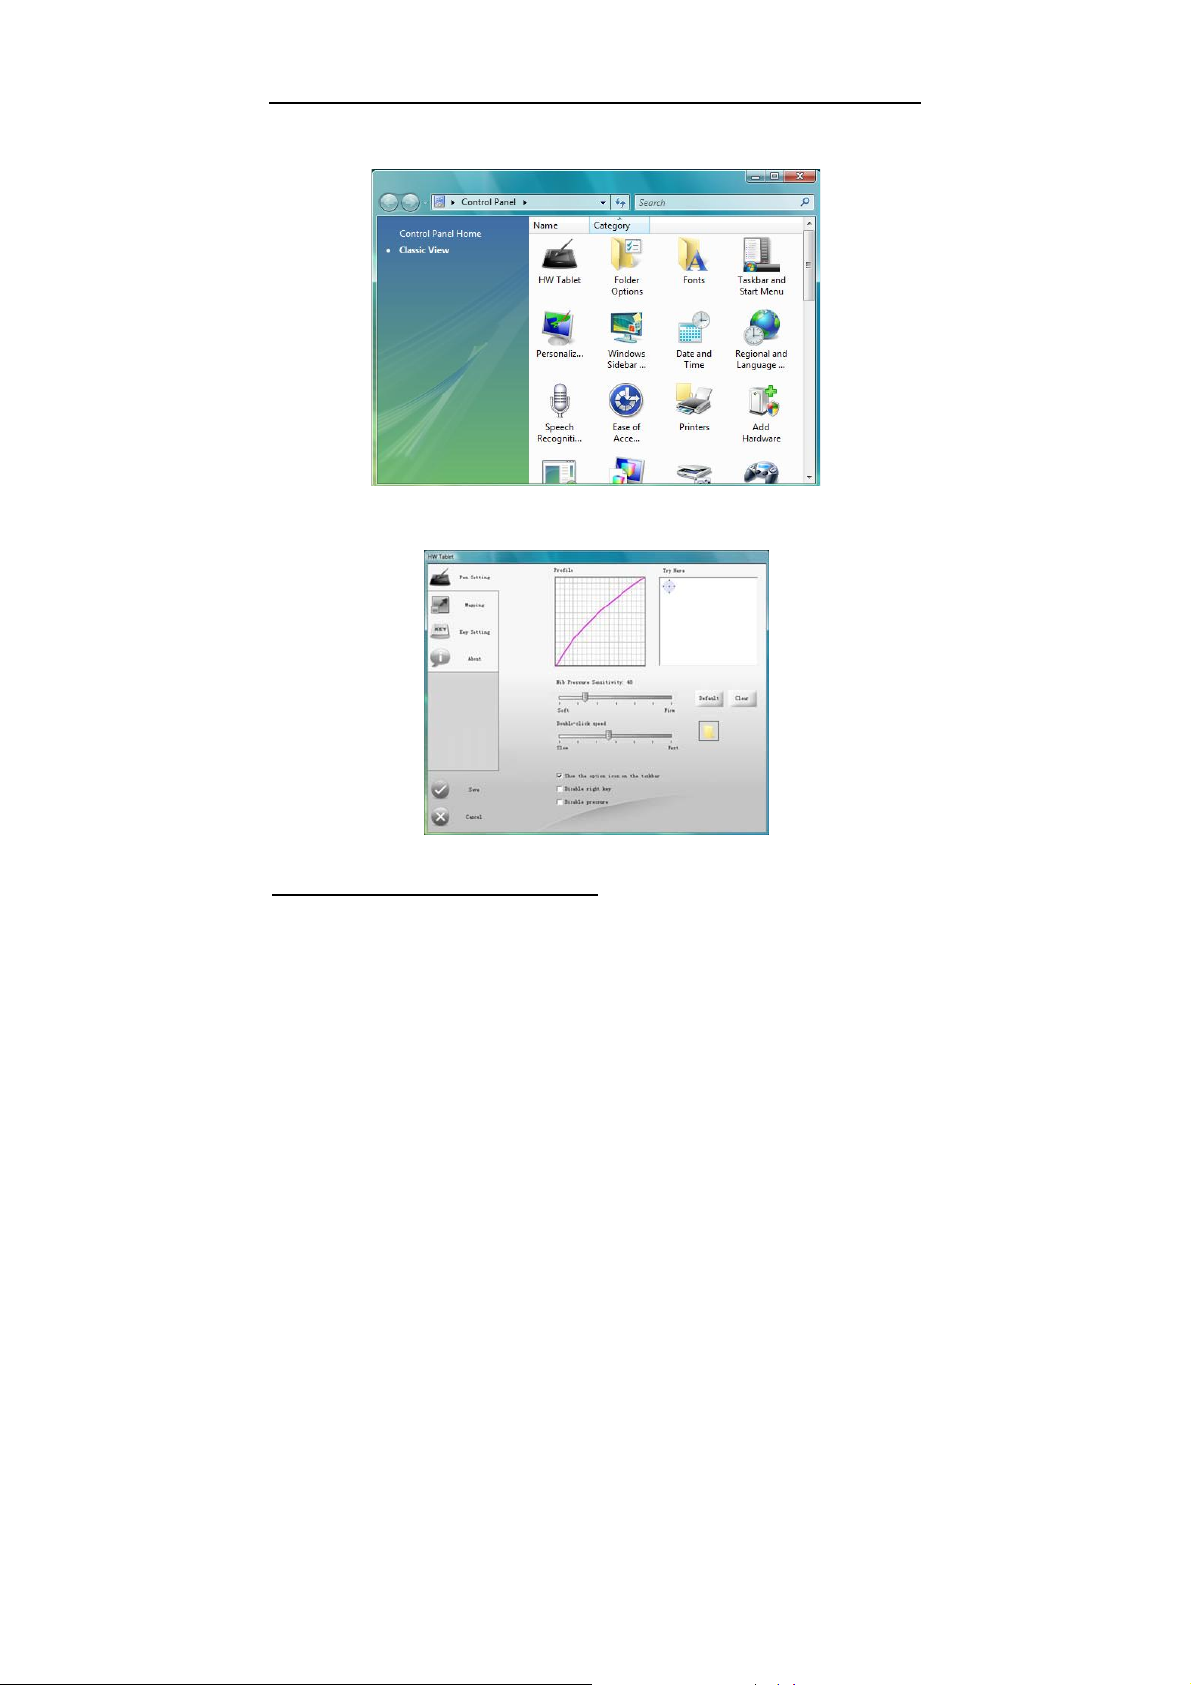
Before Configuration
z Connect the graphics tablet to the USB port on your computer.
z Go to control panel.
z Double-click the HW Tablet icon to open the configuration
interface.
9
Page 14
INSTRUCTION FOR WINDOWS SYSTEMS
2.4.1 General Configuration
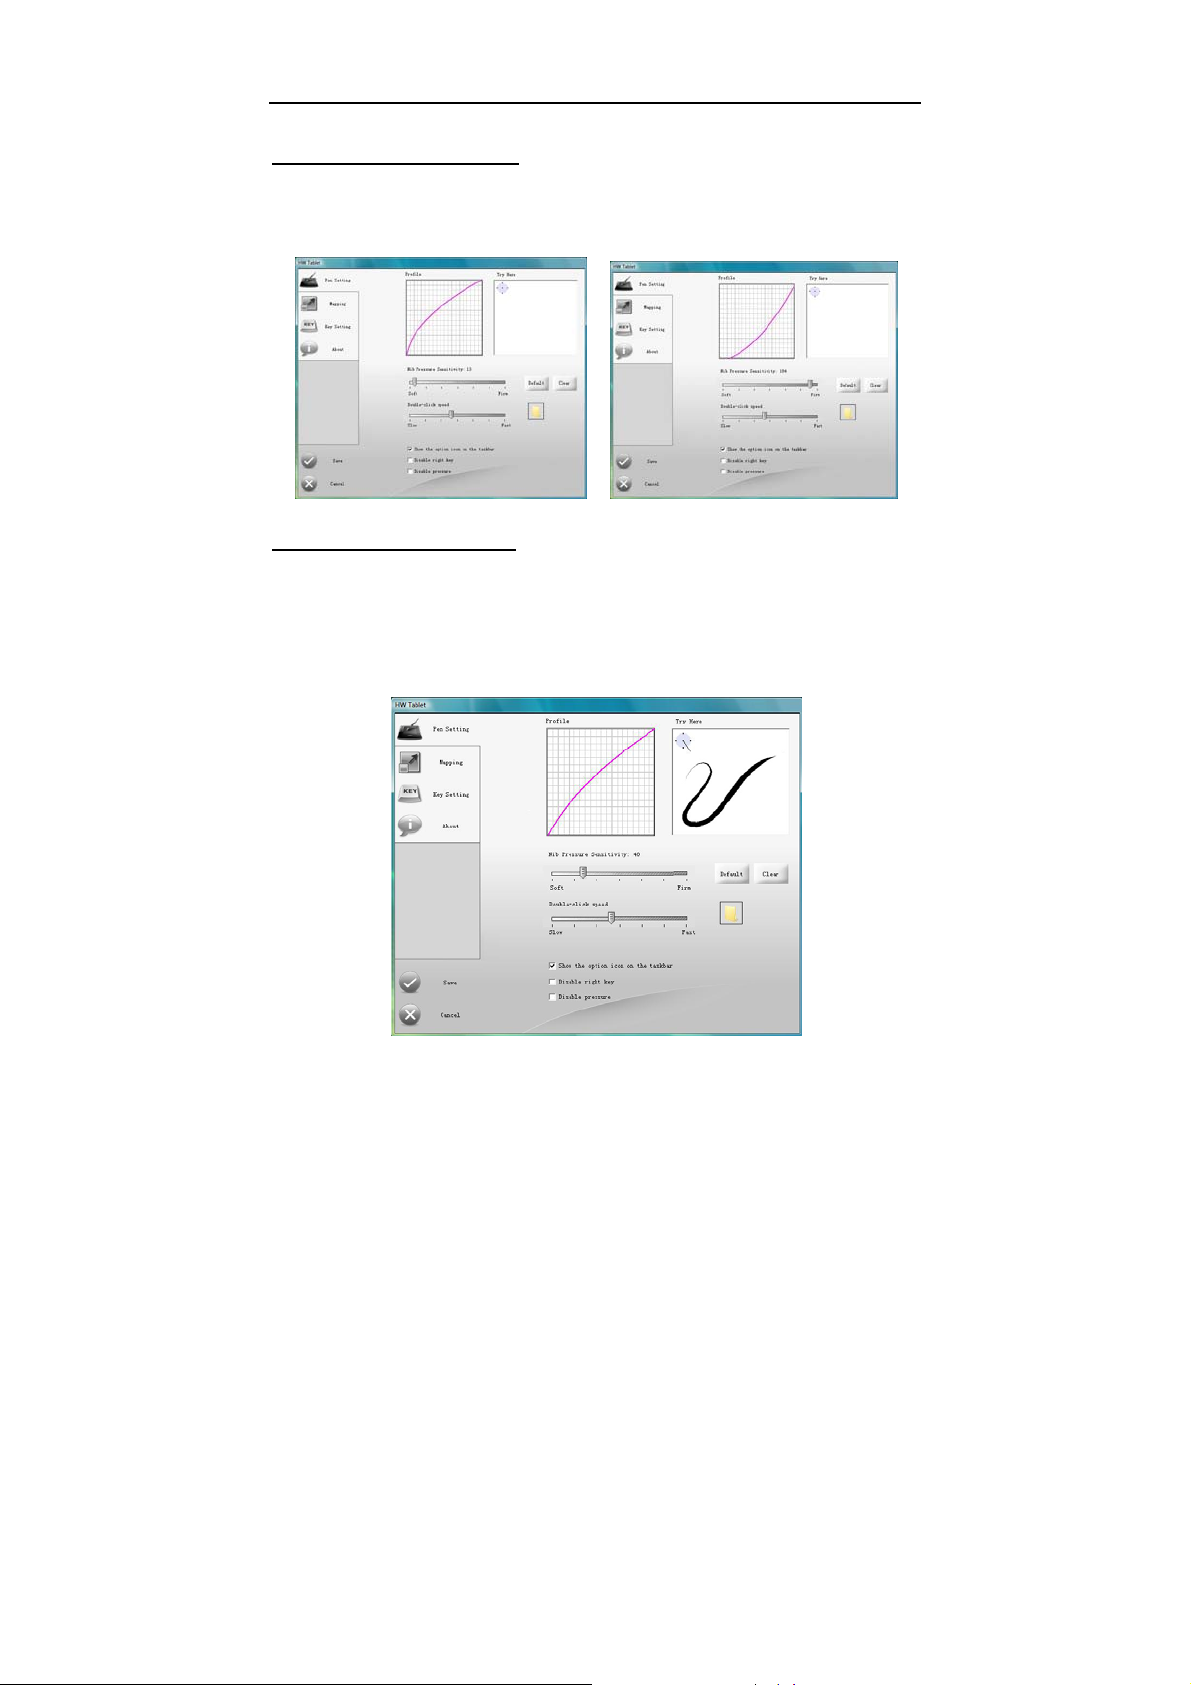
a. Adjusting Pressure Sensitivity
Pen pressure sensitivity can be adjusted by dragging the slider
between soft and hard. To create broad strokes, use a soft tip. To
draw thin lines, use a hard tip. The factory setting can be restored by
clicking the Default button. Adjustments can be saved by clicking the
Save button or can be canceled by clicking the Cancel button.
10
Page 15
INSTRUCTION FOR WINDOWS SYSTEMS
b. Pressure Curve Graph
Pen pressure sensitivity changes are displayed on the Pressure
Curve Graph. The images below show the graphs for light and heavy
pen pressure respectively.
c. Pressure Testing Area
The right area is the pressure test area which is use to test the pen tip
feel. The round circle at the upper left corner represents the tile angle
between the drawing pen and the tablet surface. All the writing and
drawing in the test area can be cleared by clicking the Clear button.
Note: Only Windows 2000/XP/Vista X86/Vista X64 support tilt angle.
11
Page 16
INSTRUCTION FOR WINDOWS SYSTEMS
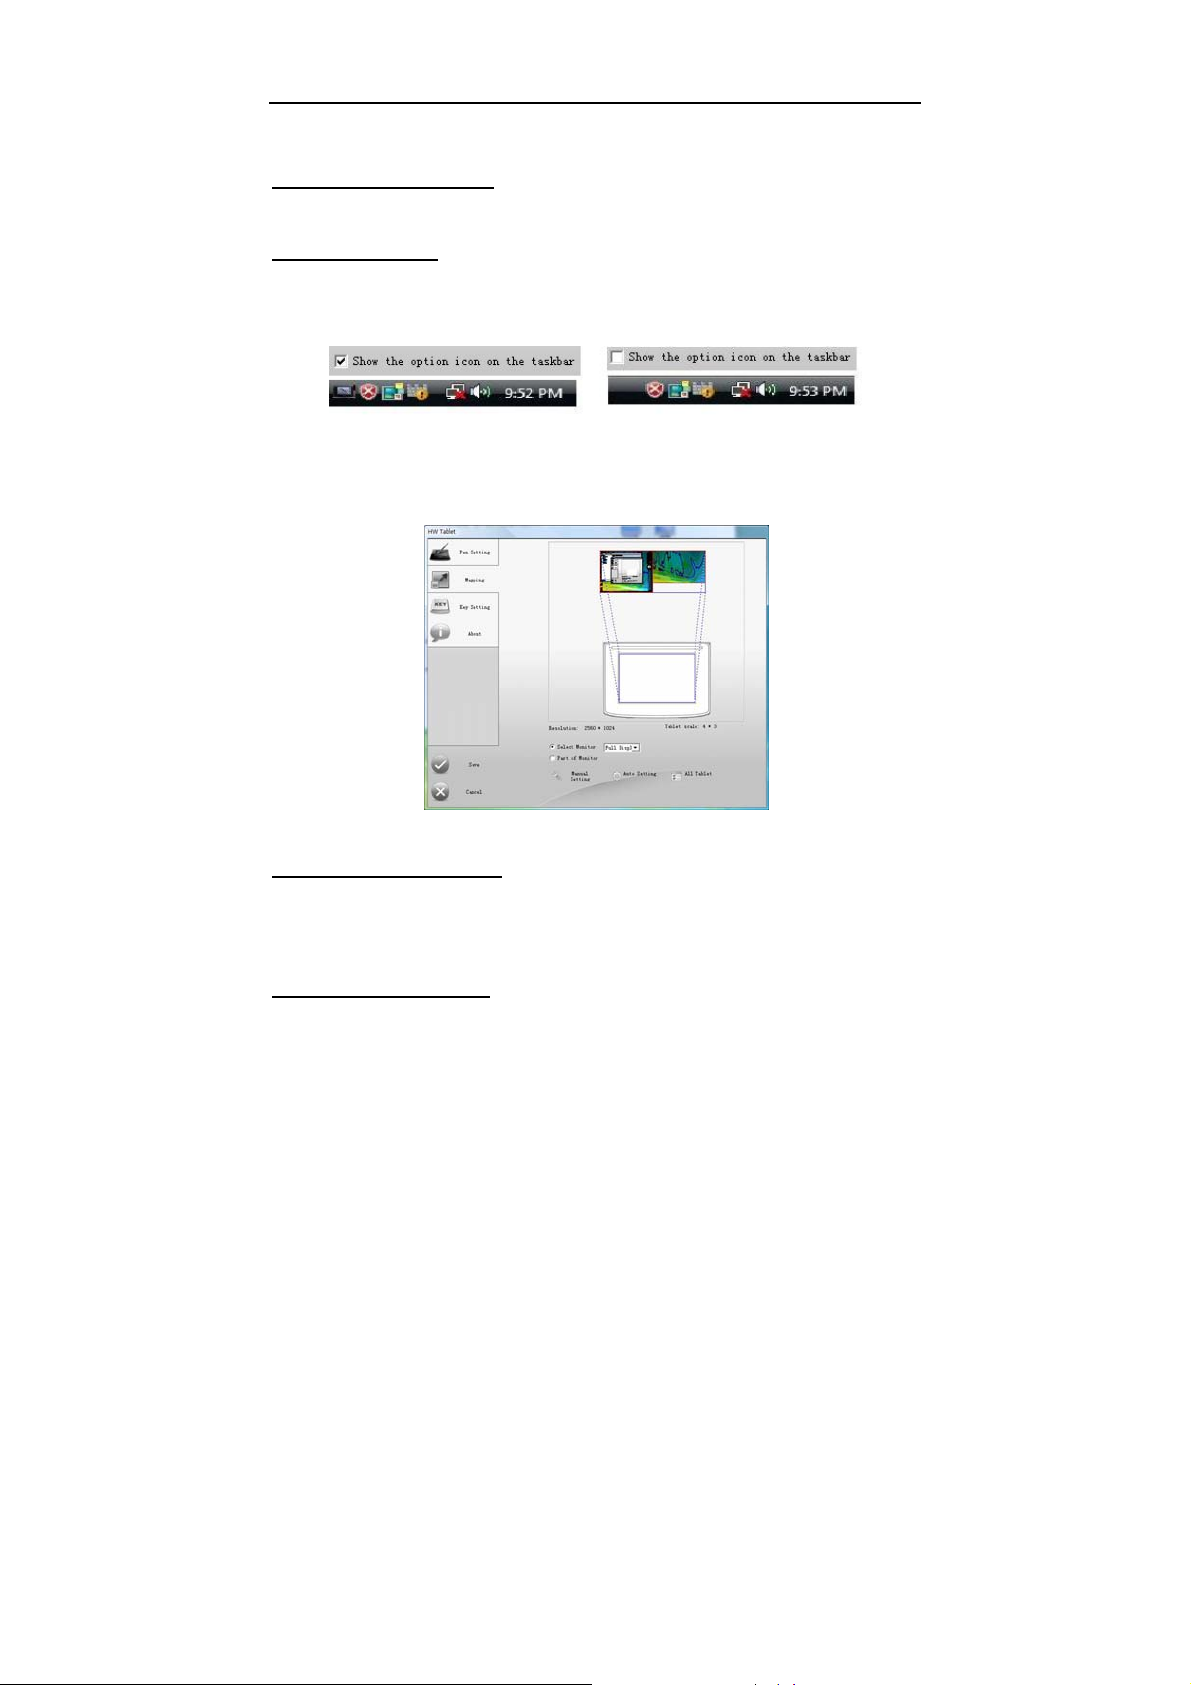
d. Double-Click Speed
Dragging the slider to adjust the double-click speed and then you can
test the double click speed on the folder icon.
e. Other settings
z When you select the option to display the icon on taskbar, the
user can configure the tablet by right-clicking on the icon.
Uncheck option not to show HW Tablet icon on the taskbar.
z Check the option Disable right key, the pen button acting as
right-click of mouse button will not be functional.
2.4.2 Mapping
a. Single Monitor Mode
The entire active area of the tablet maps to the entire monitor by
default. If your computer has more than one monitor, see
Multi-Monitor Mode.
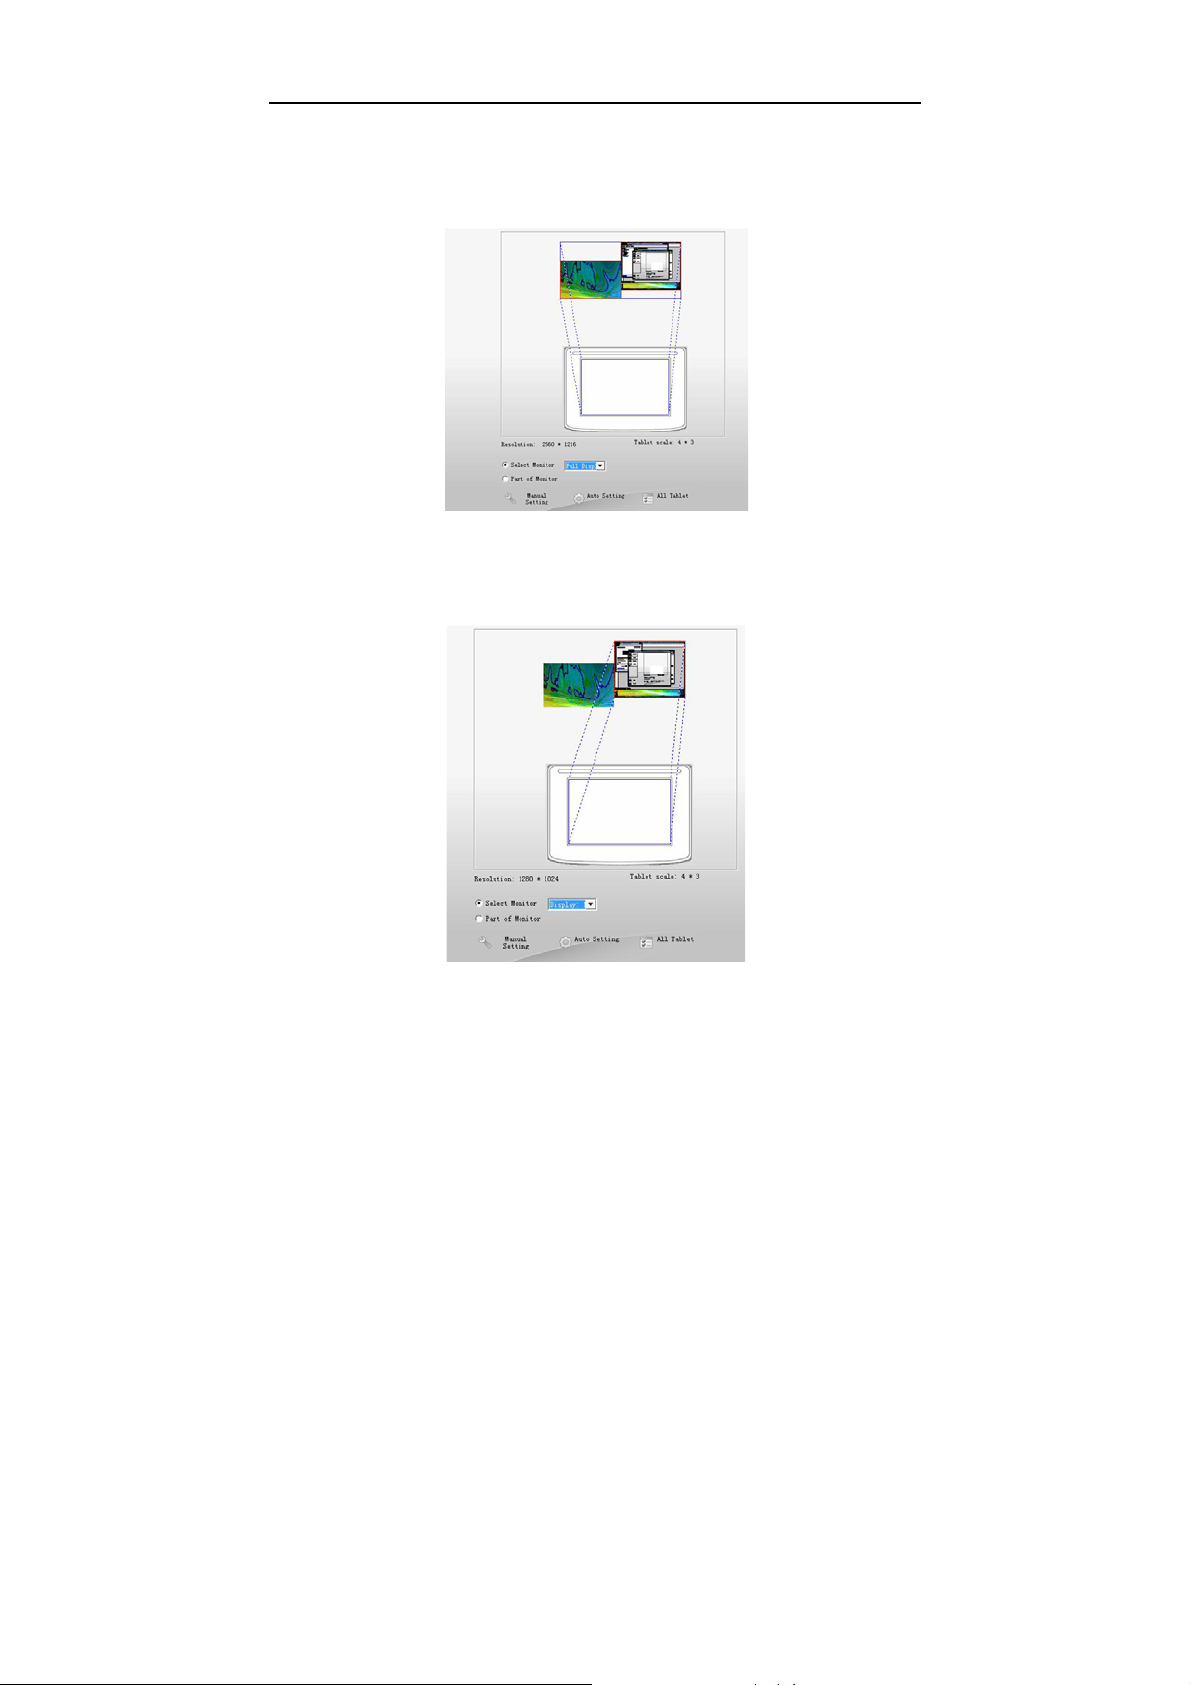
b. Multi-Monitor Mode
a) Full Screen
12
Page 17
INSTRUCTION FOR WINDOWS SYSTEMS
Choose Select Monitor and then select Full Display from the
drop-down menu. You will see the screen area corresponding to the
active area of the tablet is mapped.
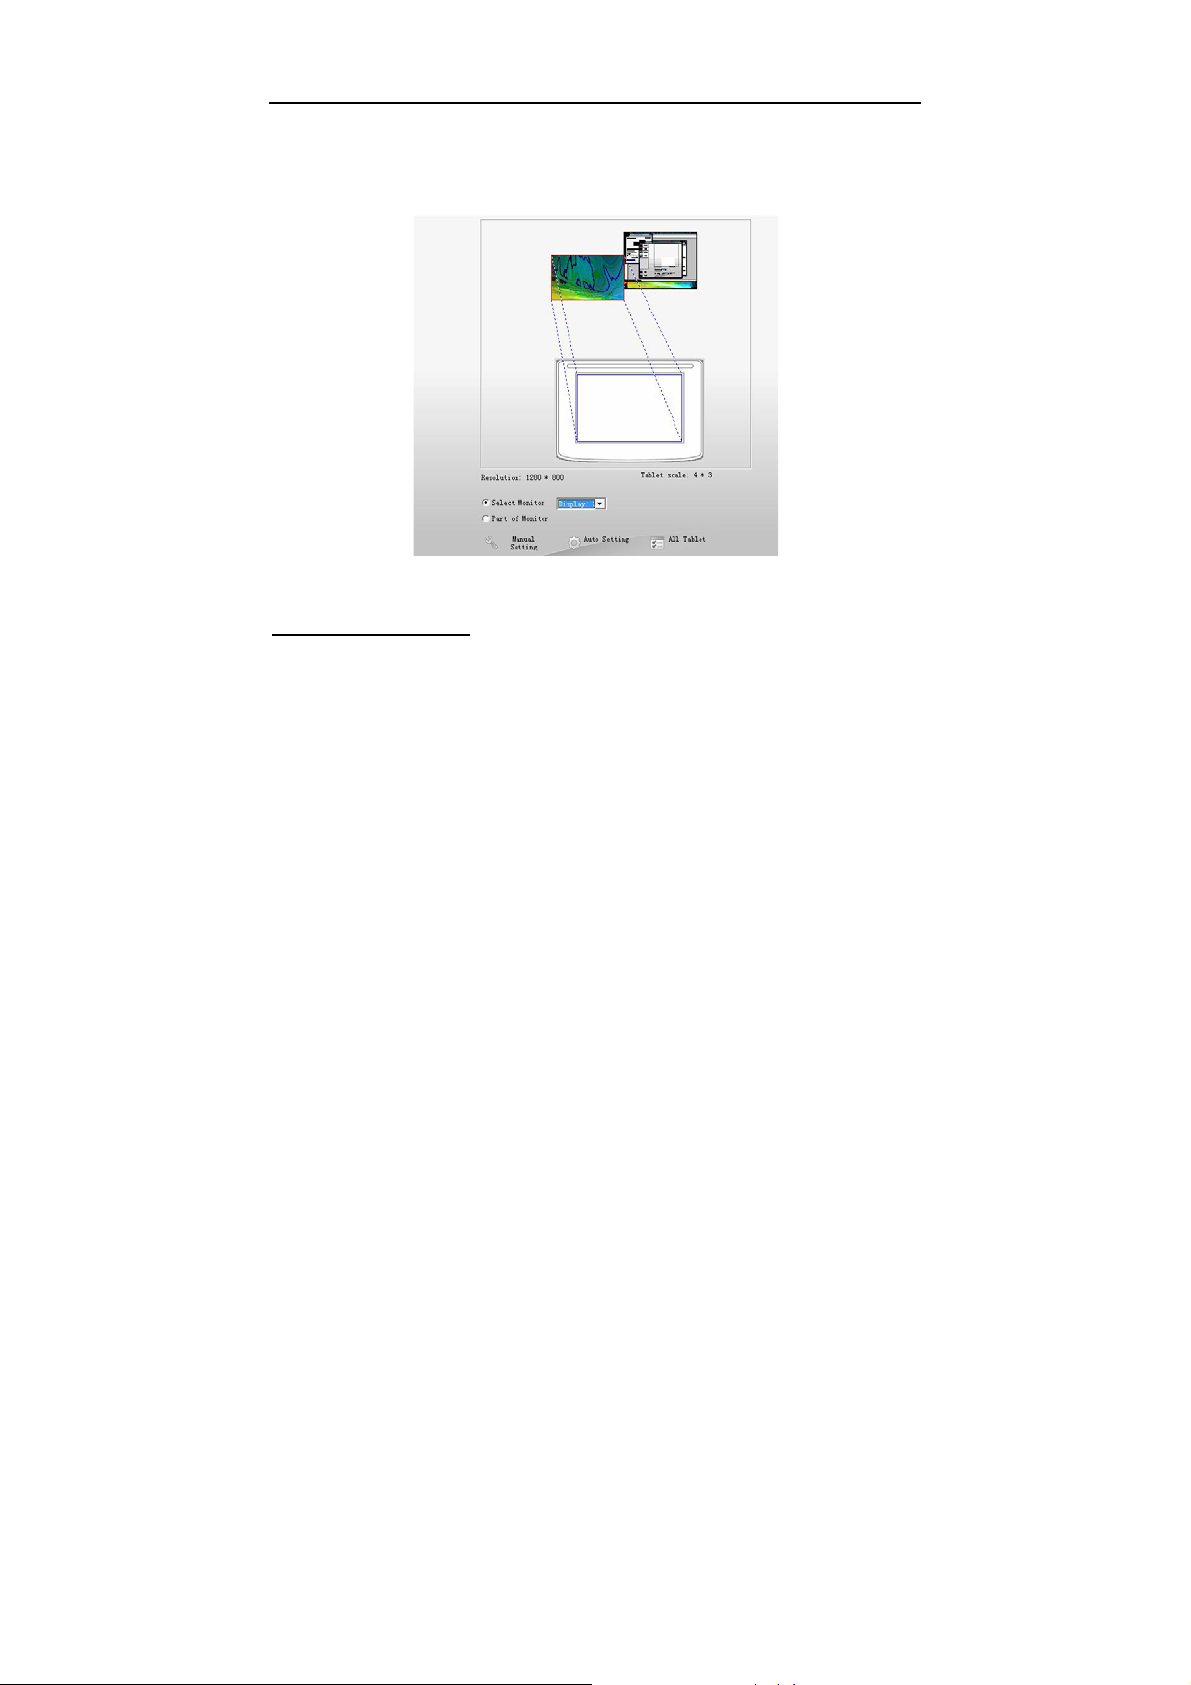
b) Screen #1
Choose Select Monitor and select Display 1 from the drop-down
menu to set the area only Display 1can be controlled by the tablet.
13
Page 18
INSTRUCTION FOR WINDOWS SYSTEMS
c) Screen #2
Choose Select Monitor and select Display 2 from the drop-down
menu to set the area only Display 2 can be controlled by the tablet.
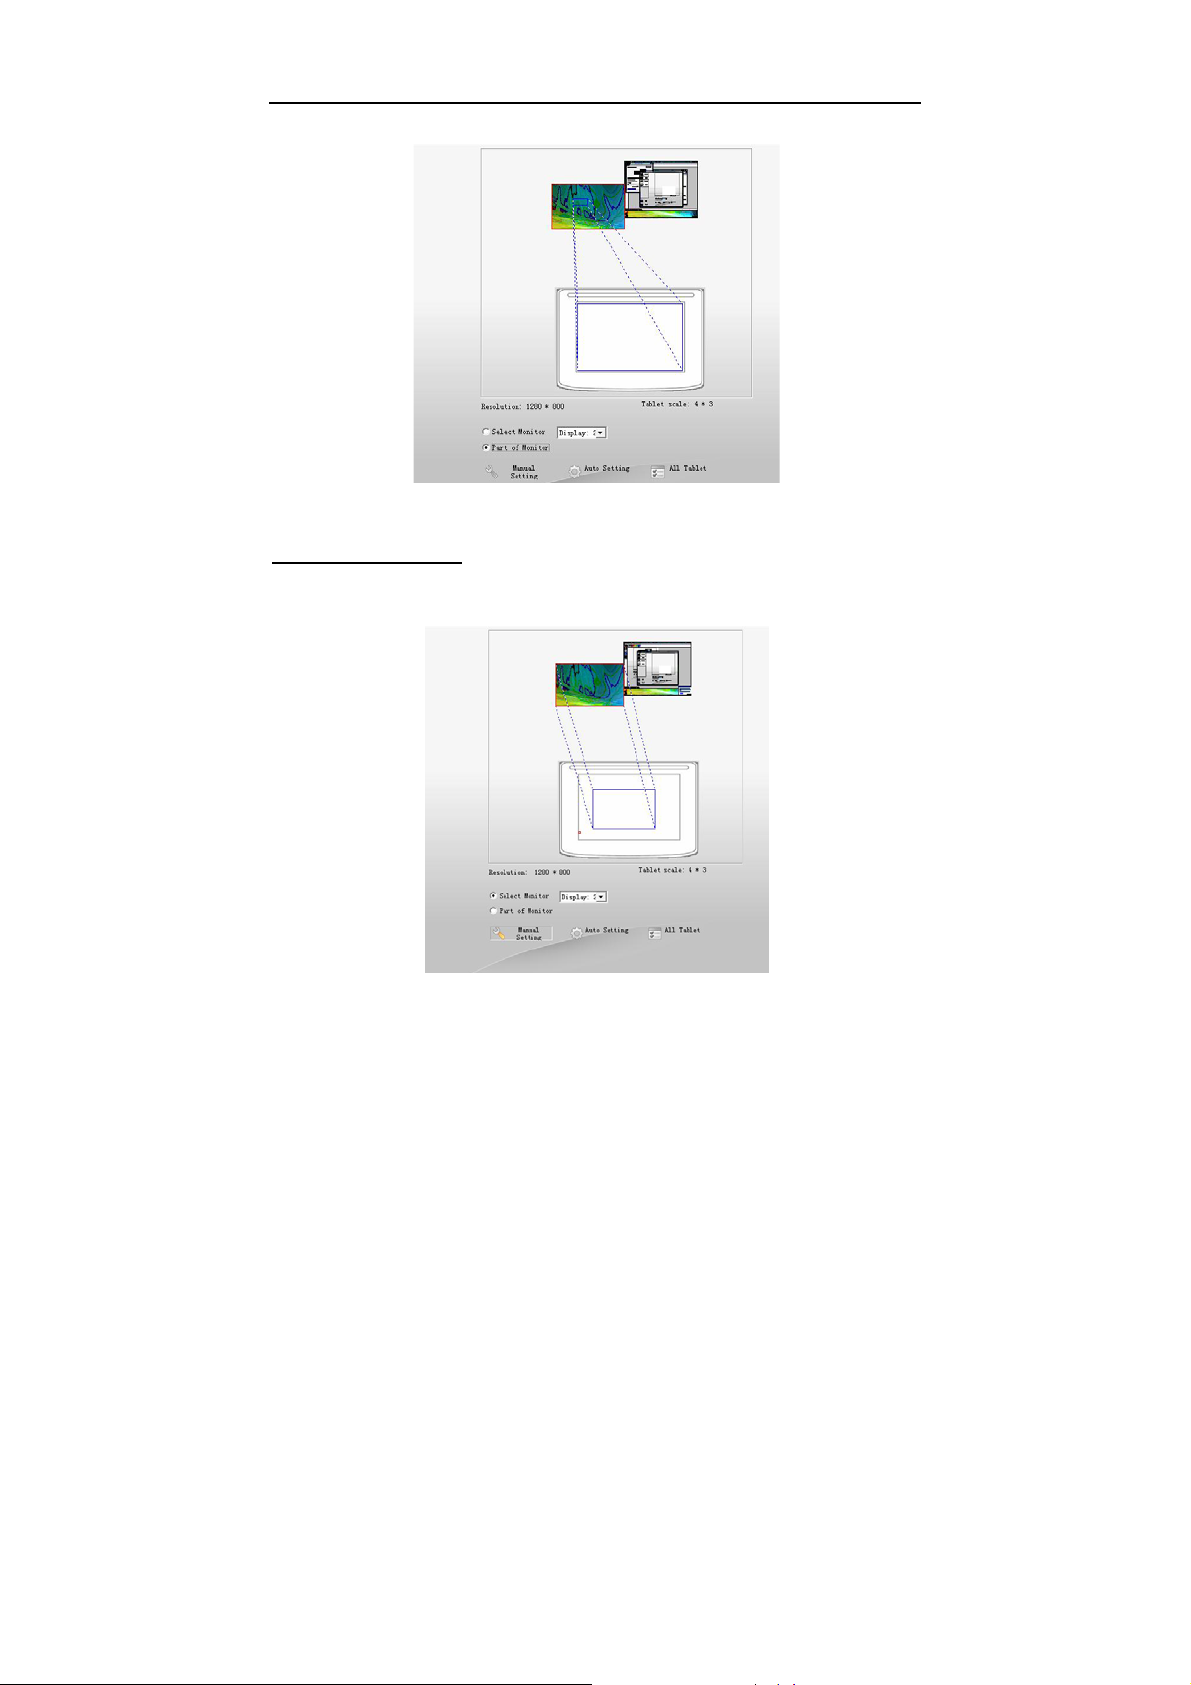
c. Portion of Screen
Choose Part of Monitor, and then click the upper left corner and lower
right corner for the expected area of screen which will be mapped to
the full tablet.
14
Page 19
INSTRUCTION FOR WINDOWS SYSTEMS
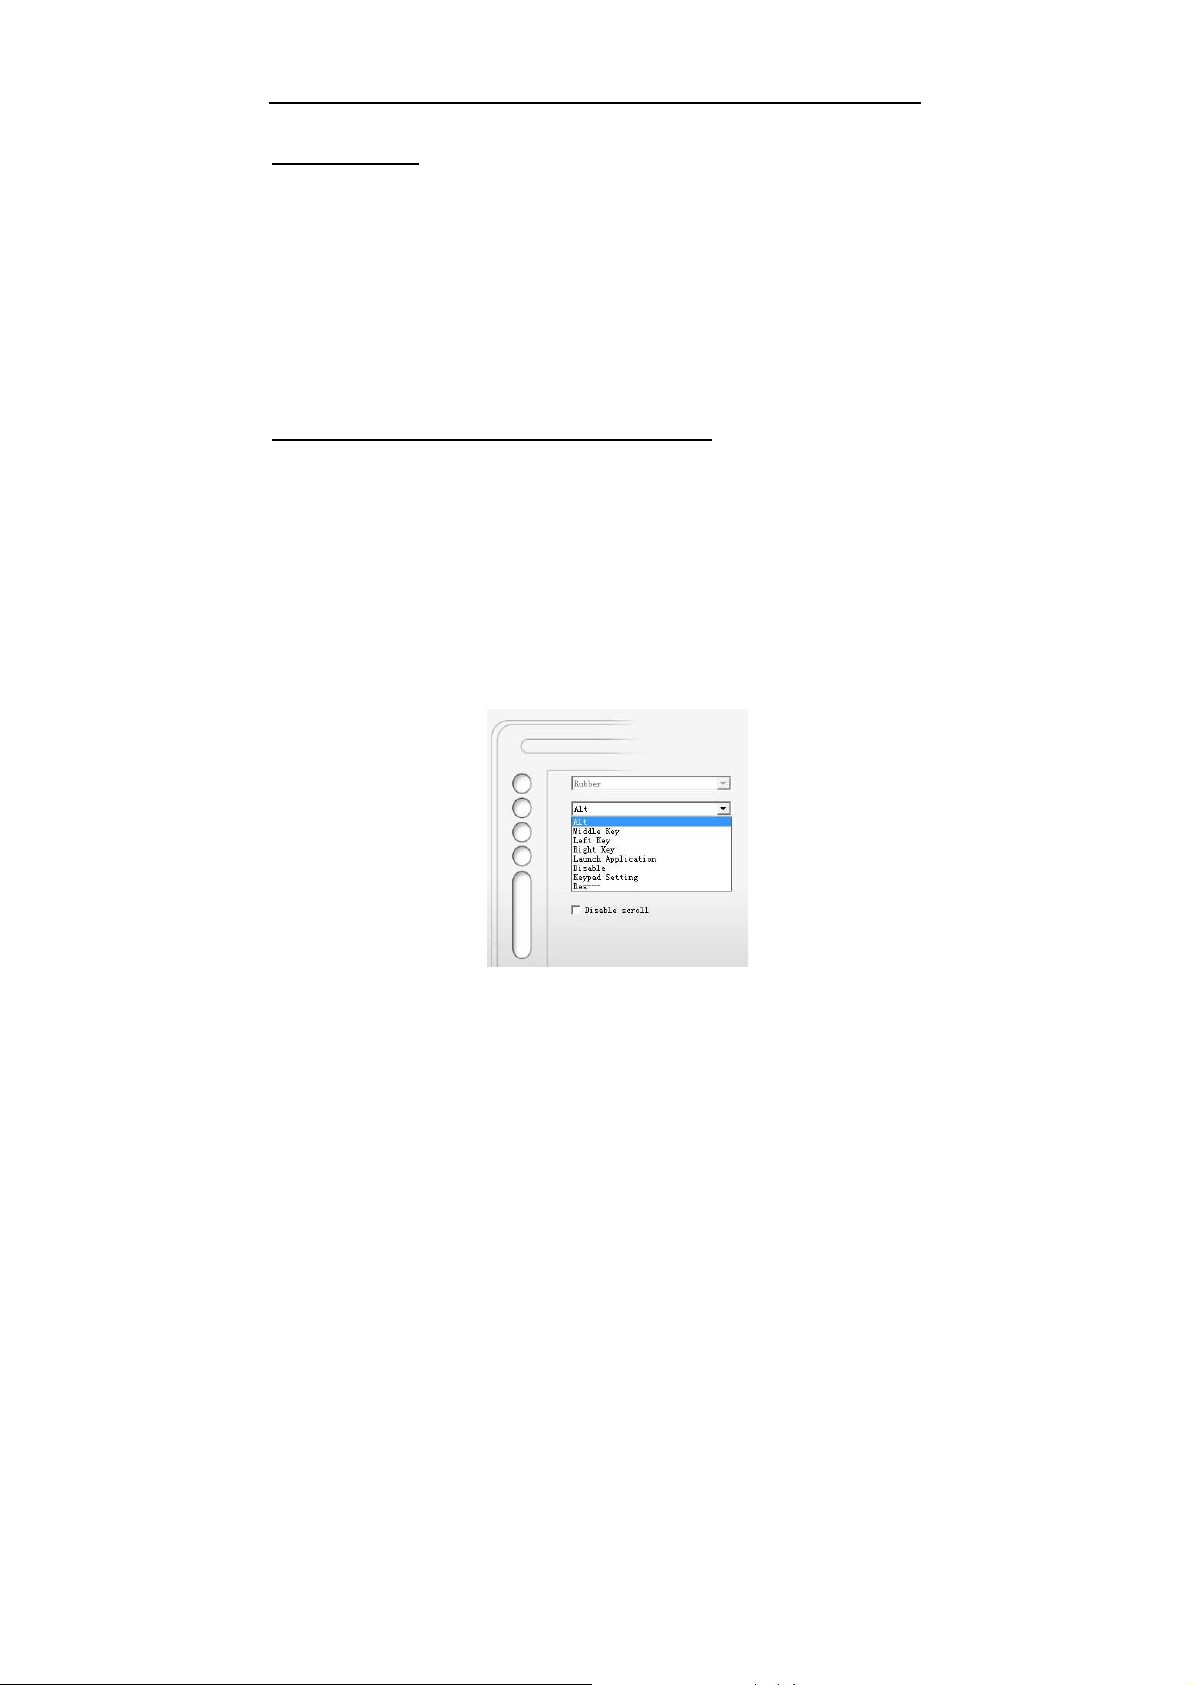
d. Portion of Tablet
Manual Setting enables you to select part of the active area of the
tablet mapped to the full screen.
15
Page 20
INSTRUCTION FOR WINDOWS SYSTEMS
e. Auto Setting
The tablet active area can be automatically set by clicking the Auto
Setting button. The active area can be set when the user have single
monitor, multi-monitor or wide screen monitor (16:9).
2.4.3 Express Touch Key Setting
Express Touch Keys can be used for modifier keys, keyboard
shortcuts, mouse clicks, to open/run applications, and to display
pop-up menus. The defaults from top to down are Eraser, Alt, Shift
and Space. The Touch Strip is for quick scrolling, zooming, controlling
brush size, and more.
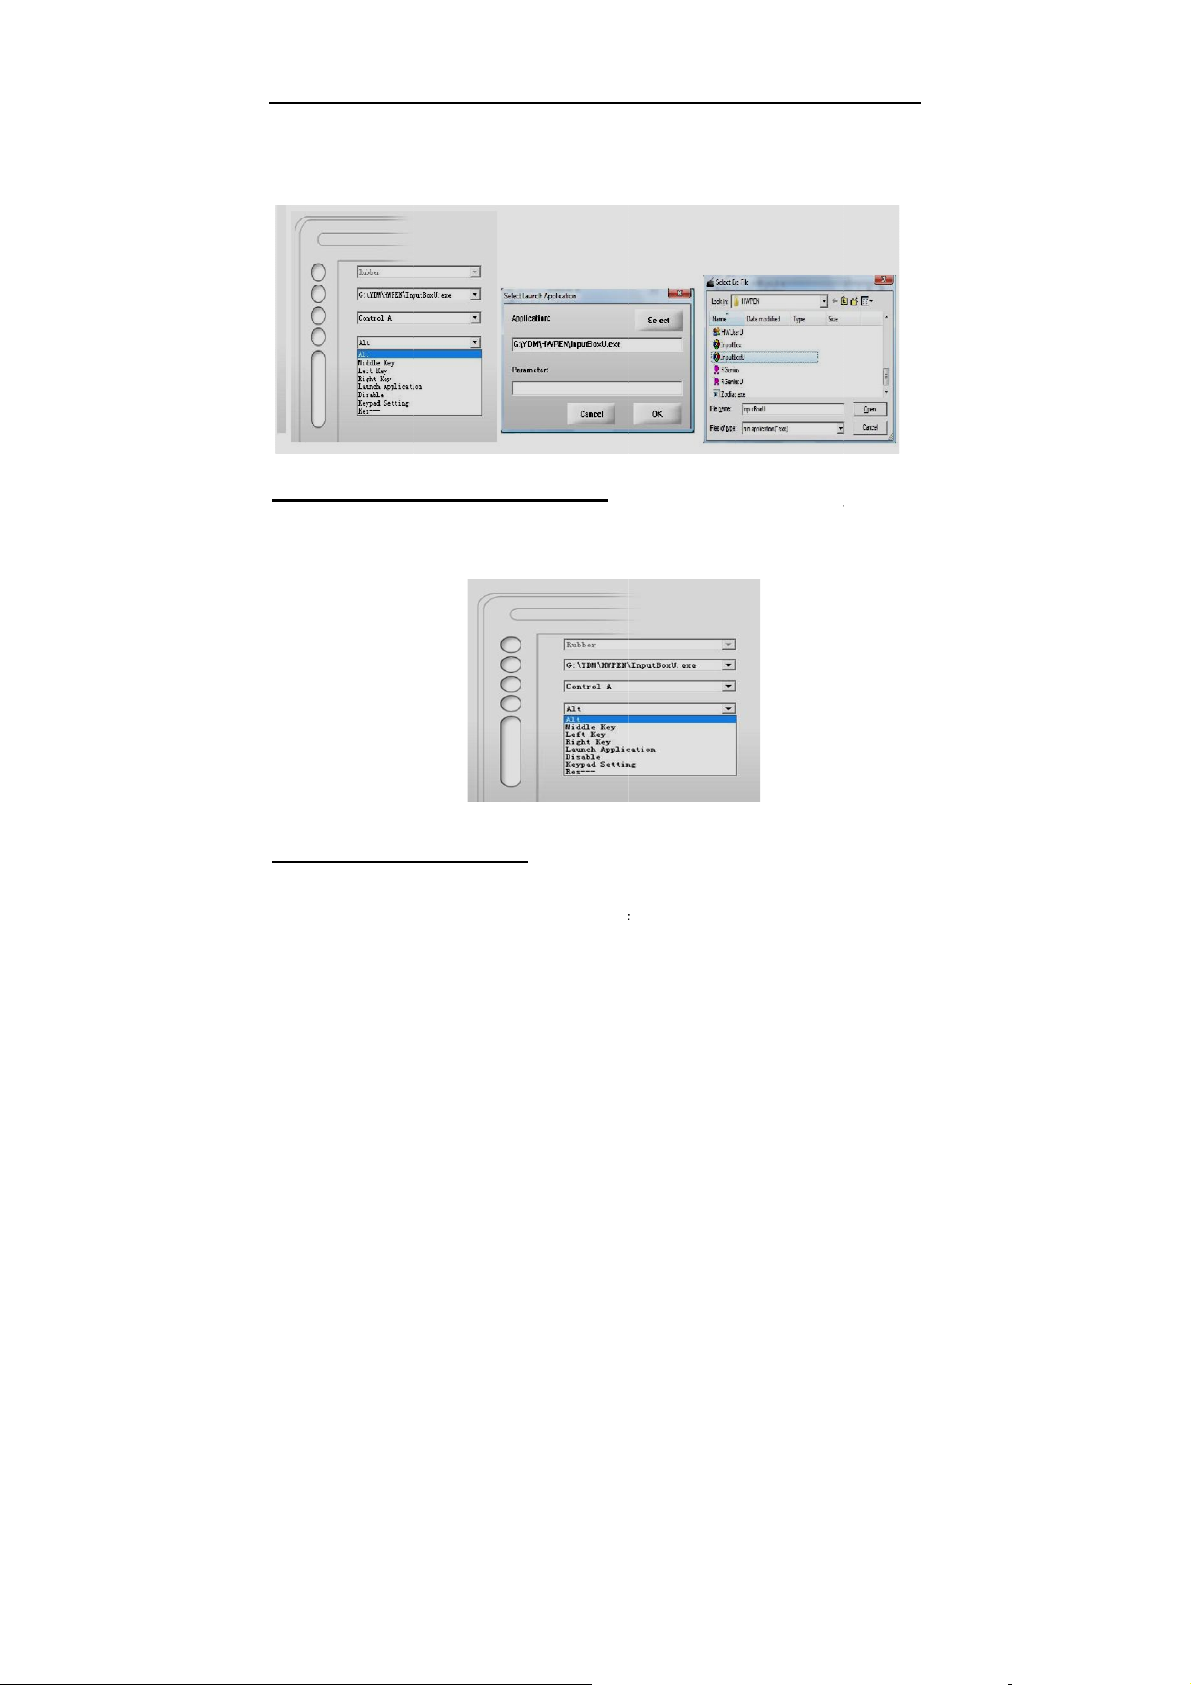
a. Define the function of express touch keys
There are four express touch keys on the tablet. When you configure
the key function, there are two ways to define it. One is to choose the
options from the drop-down menu for each key and another way is
defined by pressing the keyboard of your computer. After assignment,
click Save to save the setting or click Cancel to discard the changes.
Example 1
If you want to assign CTRL+A to one of the express touch keys, select
the key you want to set, then press CTRL and A simultaneously on the
computer keyboard.
Example 2
Select Launch Application from the drop-down menu then Select
16
Page 21
u
DExp
p
DCho
t
INSTR
U
a
p
n
e
h
p
o
o
e
p
N
a
w
o
f
t
h
g
n
u
s
M
t
K
f
w
s
La
nch Applic
cho
ose one ap
CTION
tion will po
lication pr
FOR WI
up autom
gram you
DOWS
tically. Clic
ant to run t
SYSTE
k Select bu
en click O
S
ton and
.
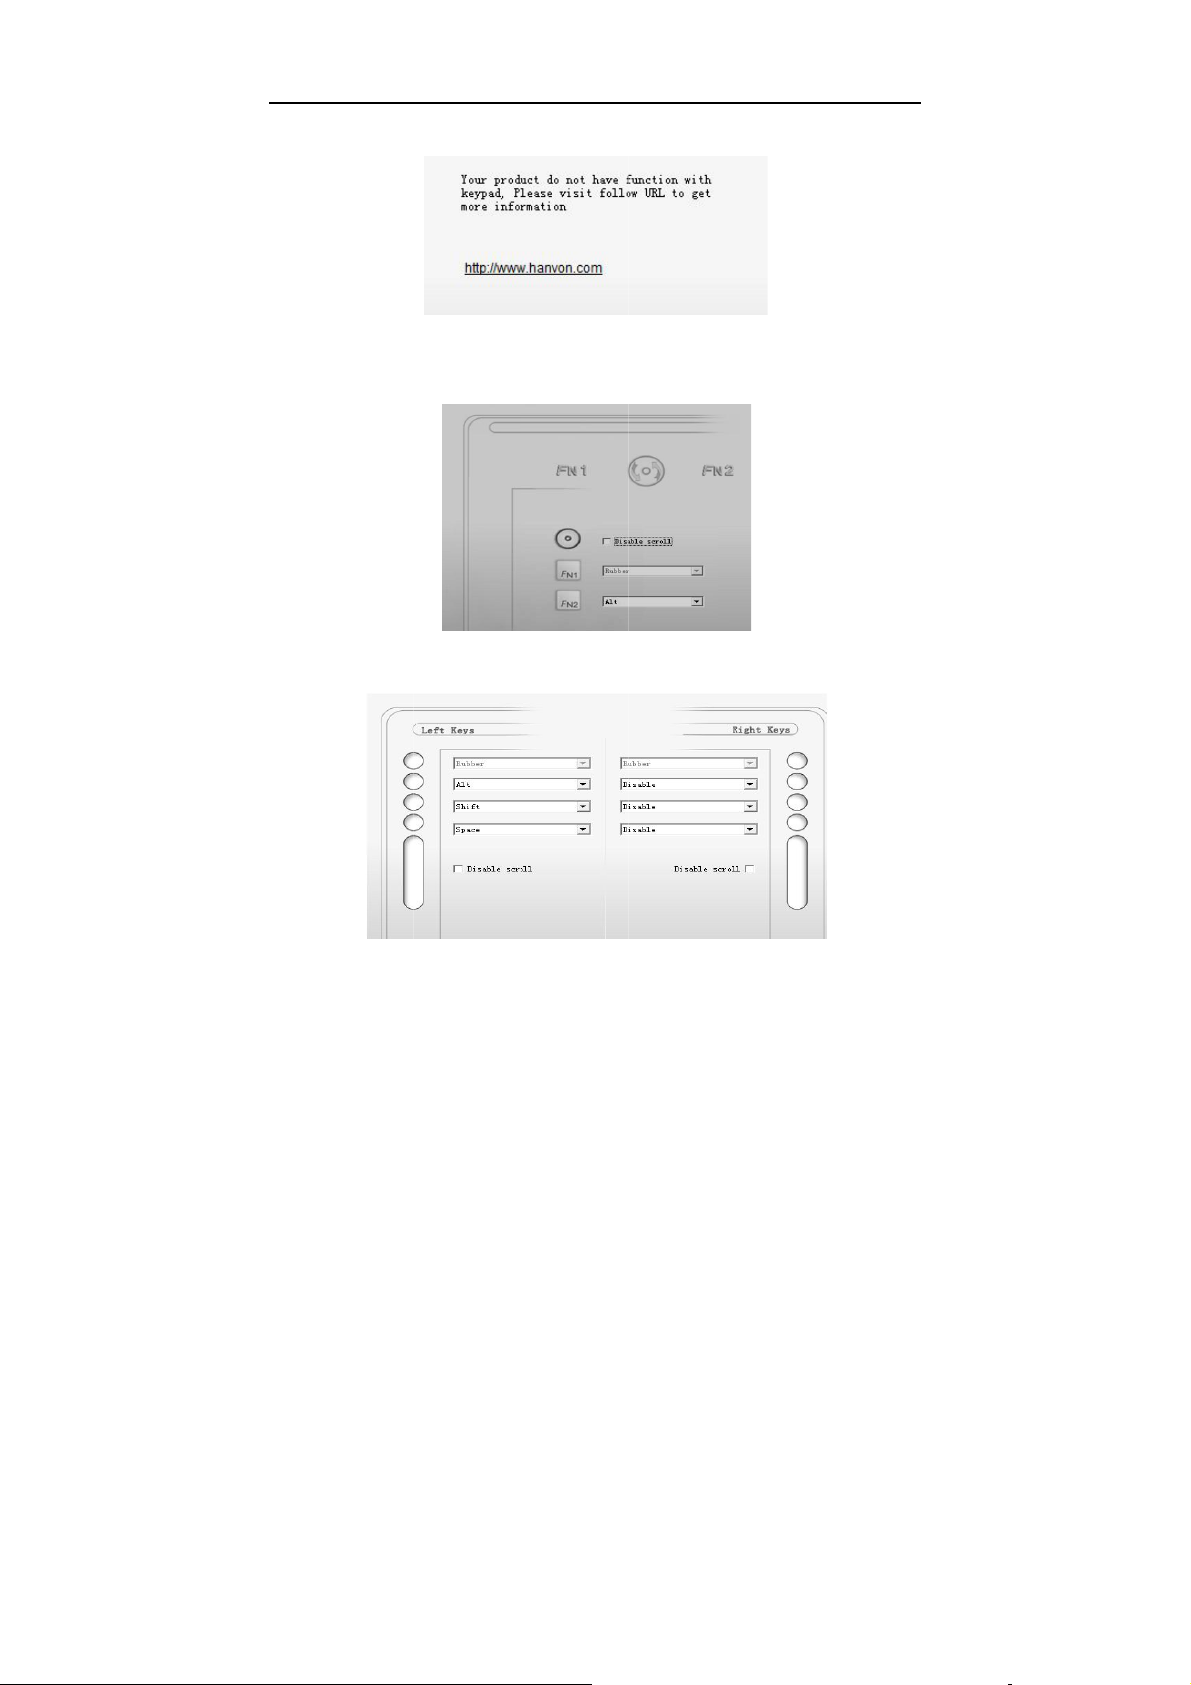
isable the
b.
ress touch
dro
-down me
isable the
c.
ose Disabl
e:Y ou will
No
tabl
et you purc
Express T
key can b
u.
Touch Stri
Scroll to d
see the info
ased does
uch Key
disabled
isable the t
rmation as
not suppor
by choosin
uch strip o
ollowing fig
the expres
Disable
the tablet.
re shown
touch key
rom the
hen the
.
17
Page 22
tKeyNot
e
INSTR
U
b
g
g
o
a
N
y
-
y
s
e
M
s
No
e: If your ta
Set as the
e:If the ta
the
following fi
CTION
blet has onl
following fi
let has tw
ure shown.
FOR WI
y two expre
ure shown.
rows of ke
DOWS
ss touch ke
s, you will
SYSTE
s, you will
ee the Key
S
ee the
Set as
Th
key set for
single-row
nd double
18
row is sam
.
Page 23
INSTRUCTION FOR MAC SYSTEMS
Chapter 3 Instruction for Mac
Systems
3.1 System Requirements
RAM Minimum is 128MB (256MB is recommended)
Hard-disk 200MB
OS MAC-OS 10.4 or later
Port USB1.1or 2.0
3.2 Installation
Connect the graphic tablet’s USB cable to the computer’s USB port.
Step 1
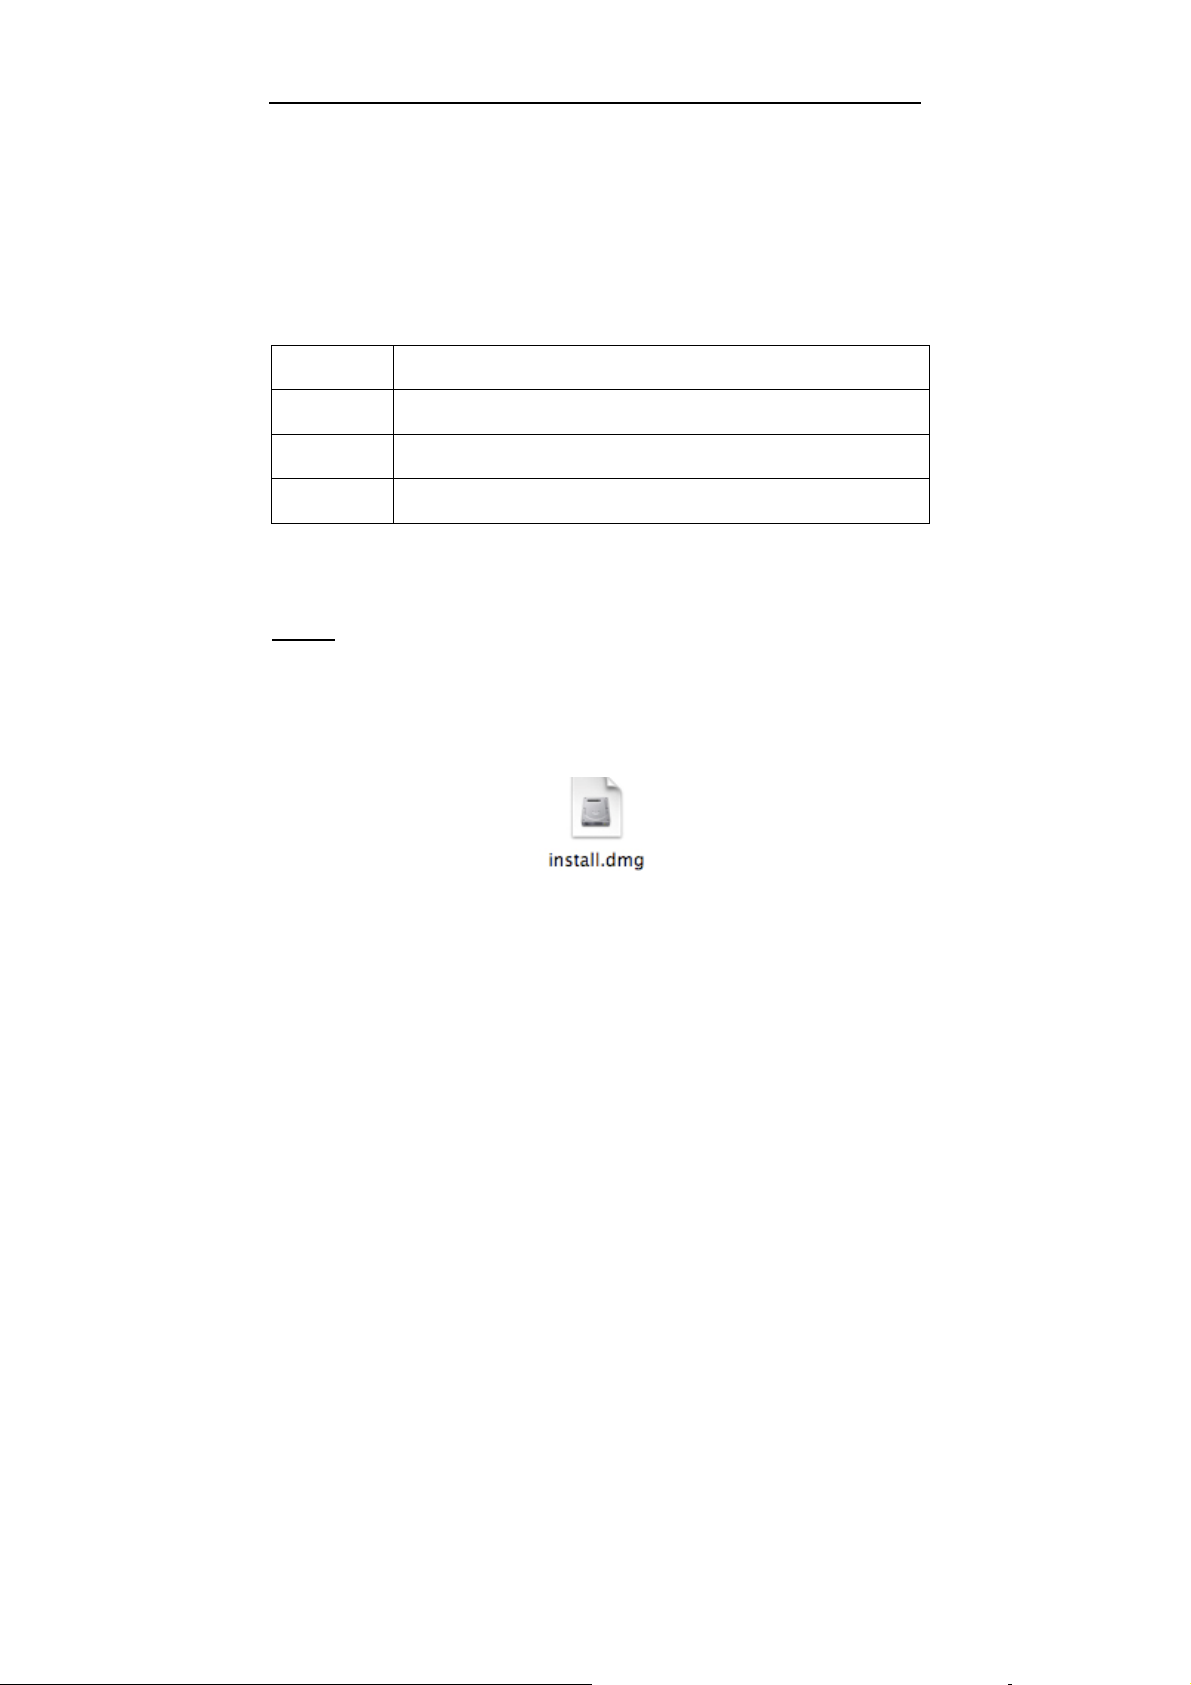
Insert the driver CD into the CD-ROM drive then find the install file in
MacOS X/Mac104/Install.dmg (Note:For MacOS 10.4 or later) or
MacOS X/Mac103/Hwinstall.dmg (Note: For MacOS 10.3.X and it
does not support express touch keys of graphics tablet), click on the
Install.dmg or Hwinstall.dmg icon to run the file.
Note: If you installed driver for Mac OS 10.3.X, you need to uninstall it
before driver installation for Mac OS 10.4.X or later. For removing the
driver, please open "System-Library-Extensions" and delete
"HYTabletDriver.kext" file.
19
Page 24
INSTRUCTION FOR MAC SYSTEMS
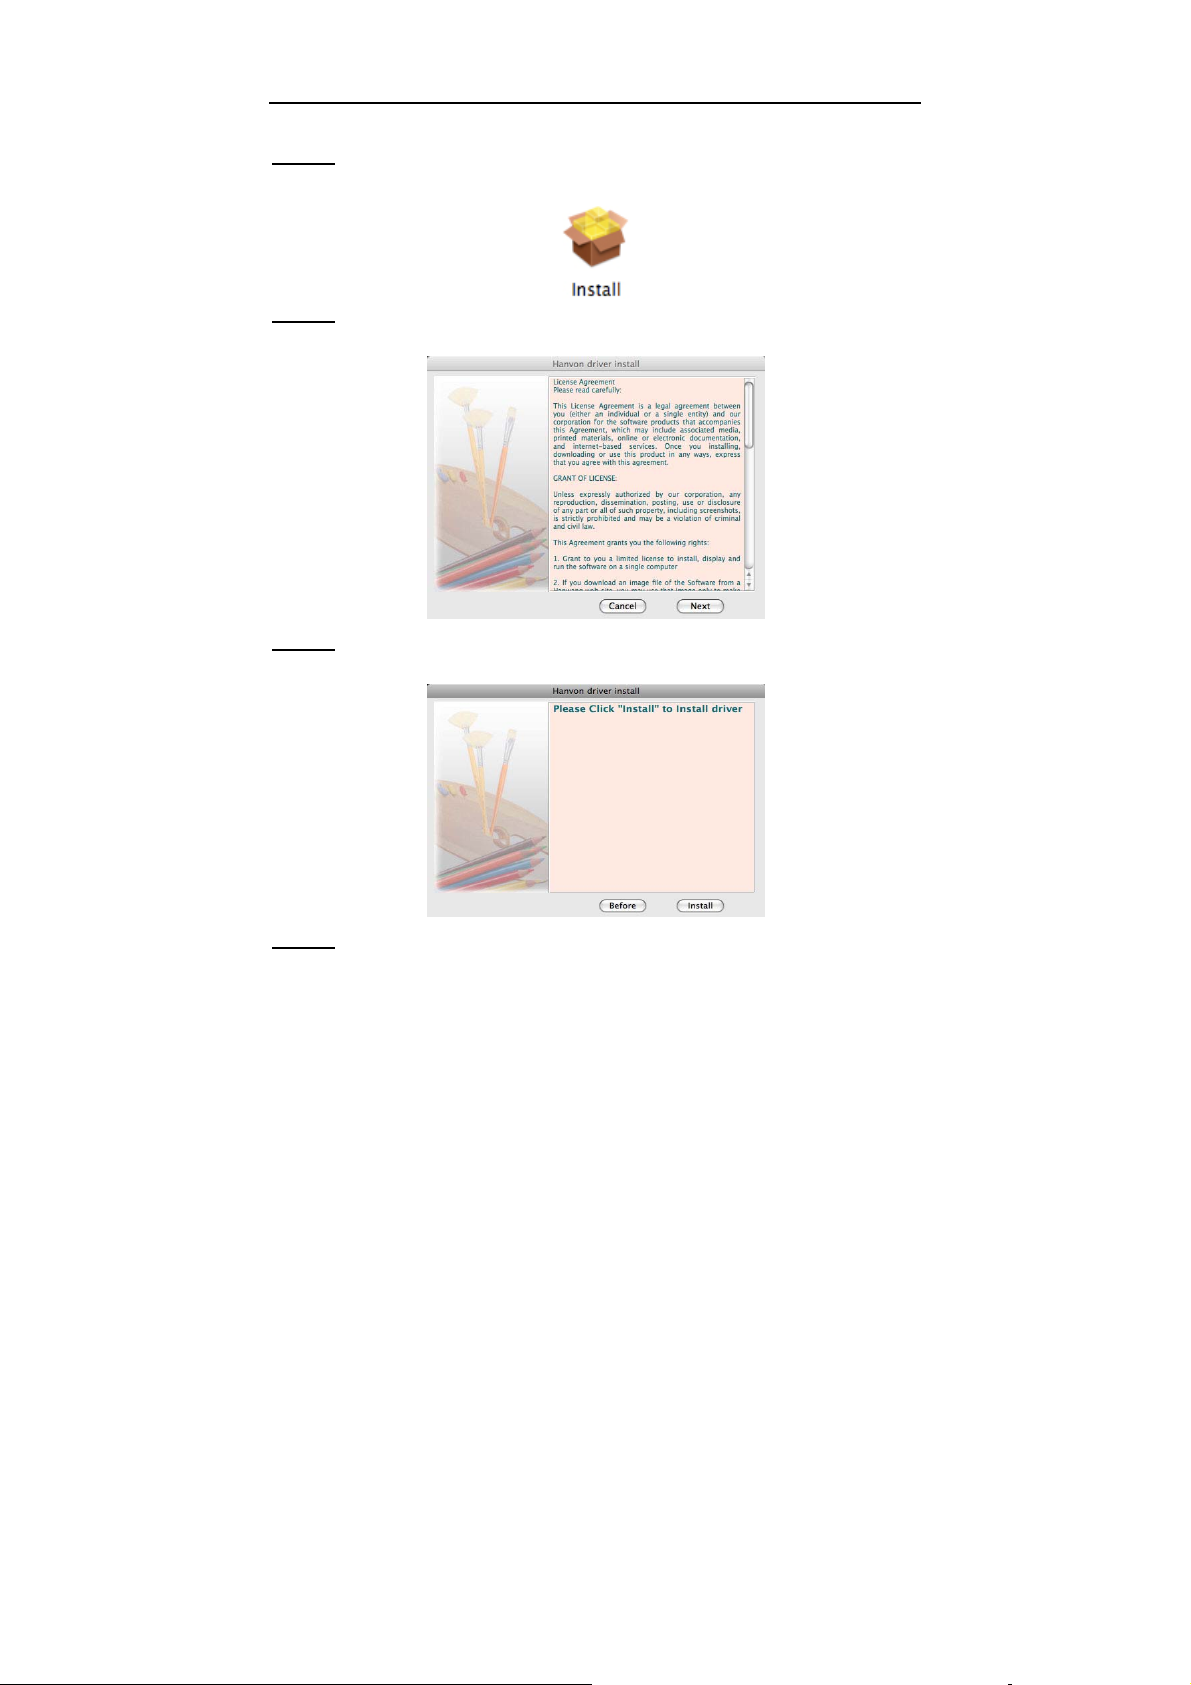
Step 2
Double-click the Install icon.
Step 3
Please read the license agreement carefully then click Next.
Step 4
Click Install to install the tablet driver.
Step 5
Click OK and reboot your computer when the install process is
finished.
20
Page 25
INSTRUCTION FOR MAC SYSTEMS
3.3 Uninstalling
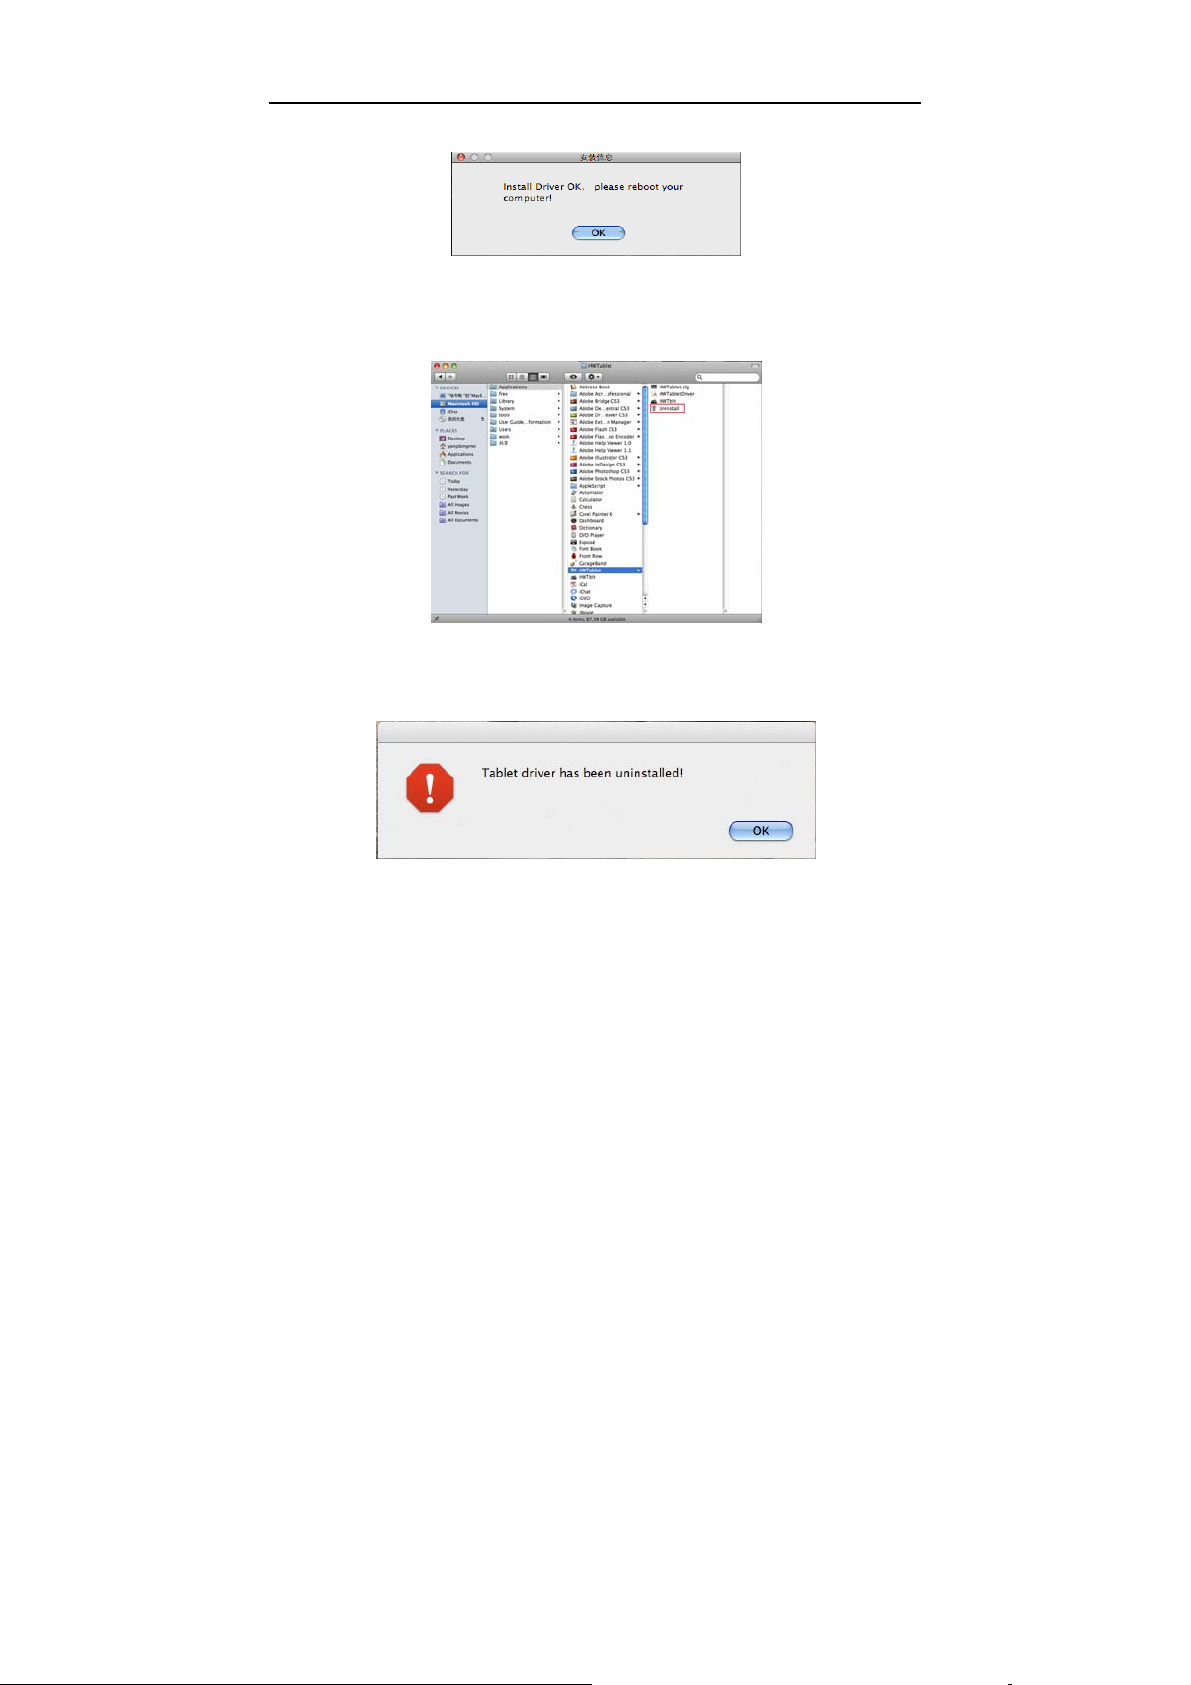
Open HWTablet in Applications.
Choose Uninstall to remove the tablet driver. Please click OK when
the driver has been removed.(Suggestion: Reboot the computer).
3.4 Configuration
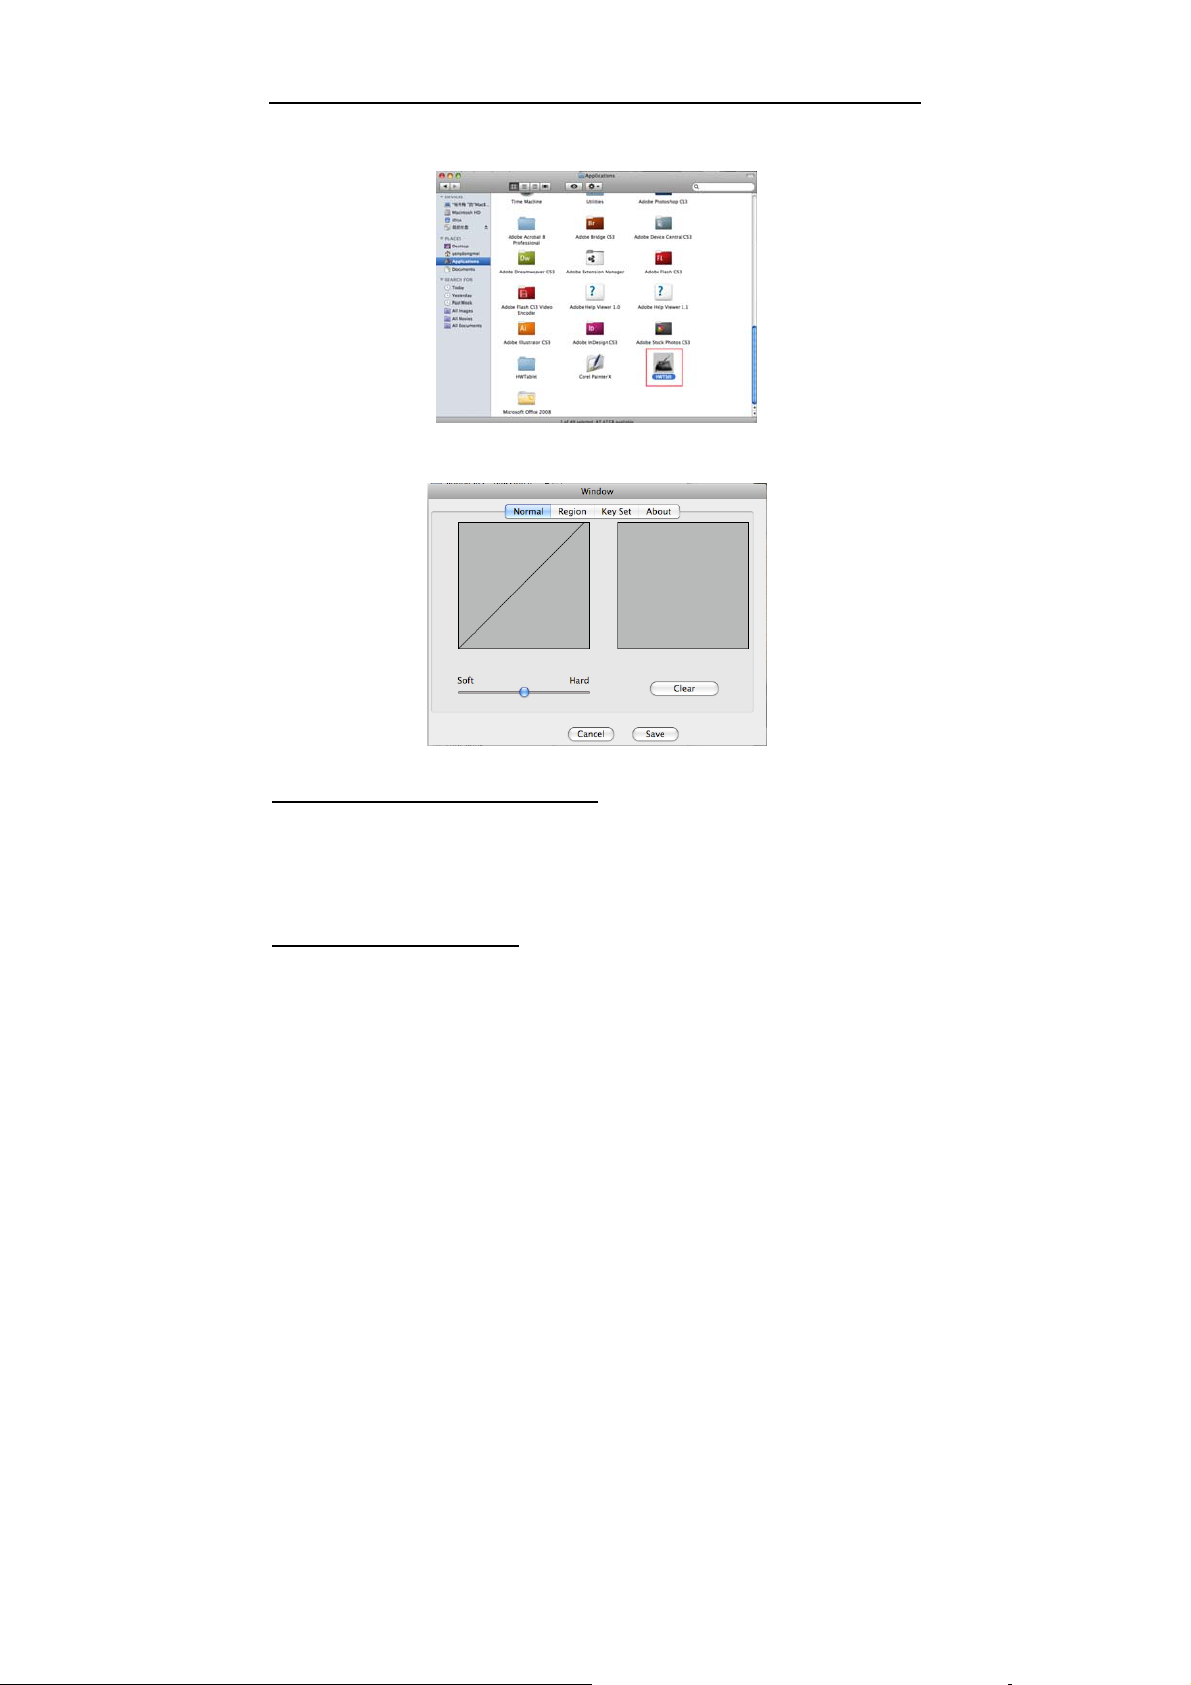
Connect the tablet to your computer by USB cable and port.
The HWTblt icon has been added in the applications. Double-click the
HWTblt icon to open the tablet control panel.
21
Page 26
INSTRUCTION FOR MAC SYSTEMS
3.4.1 General Configuration
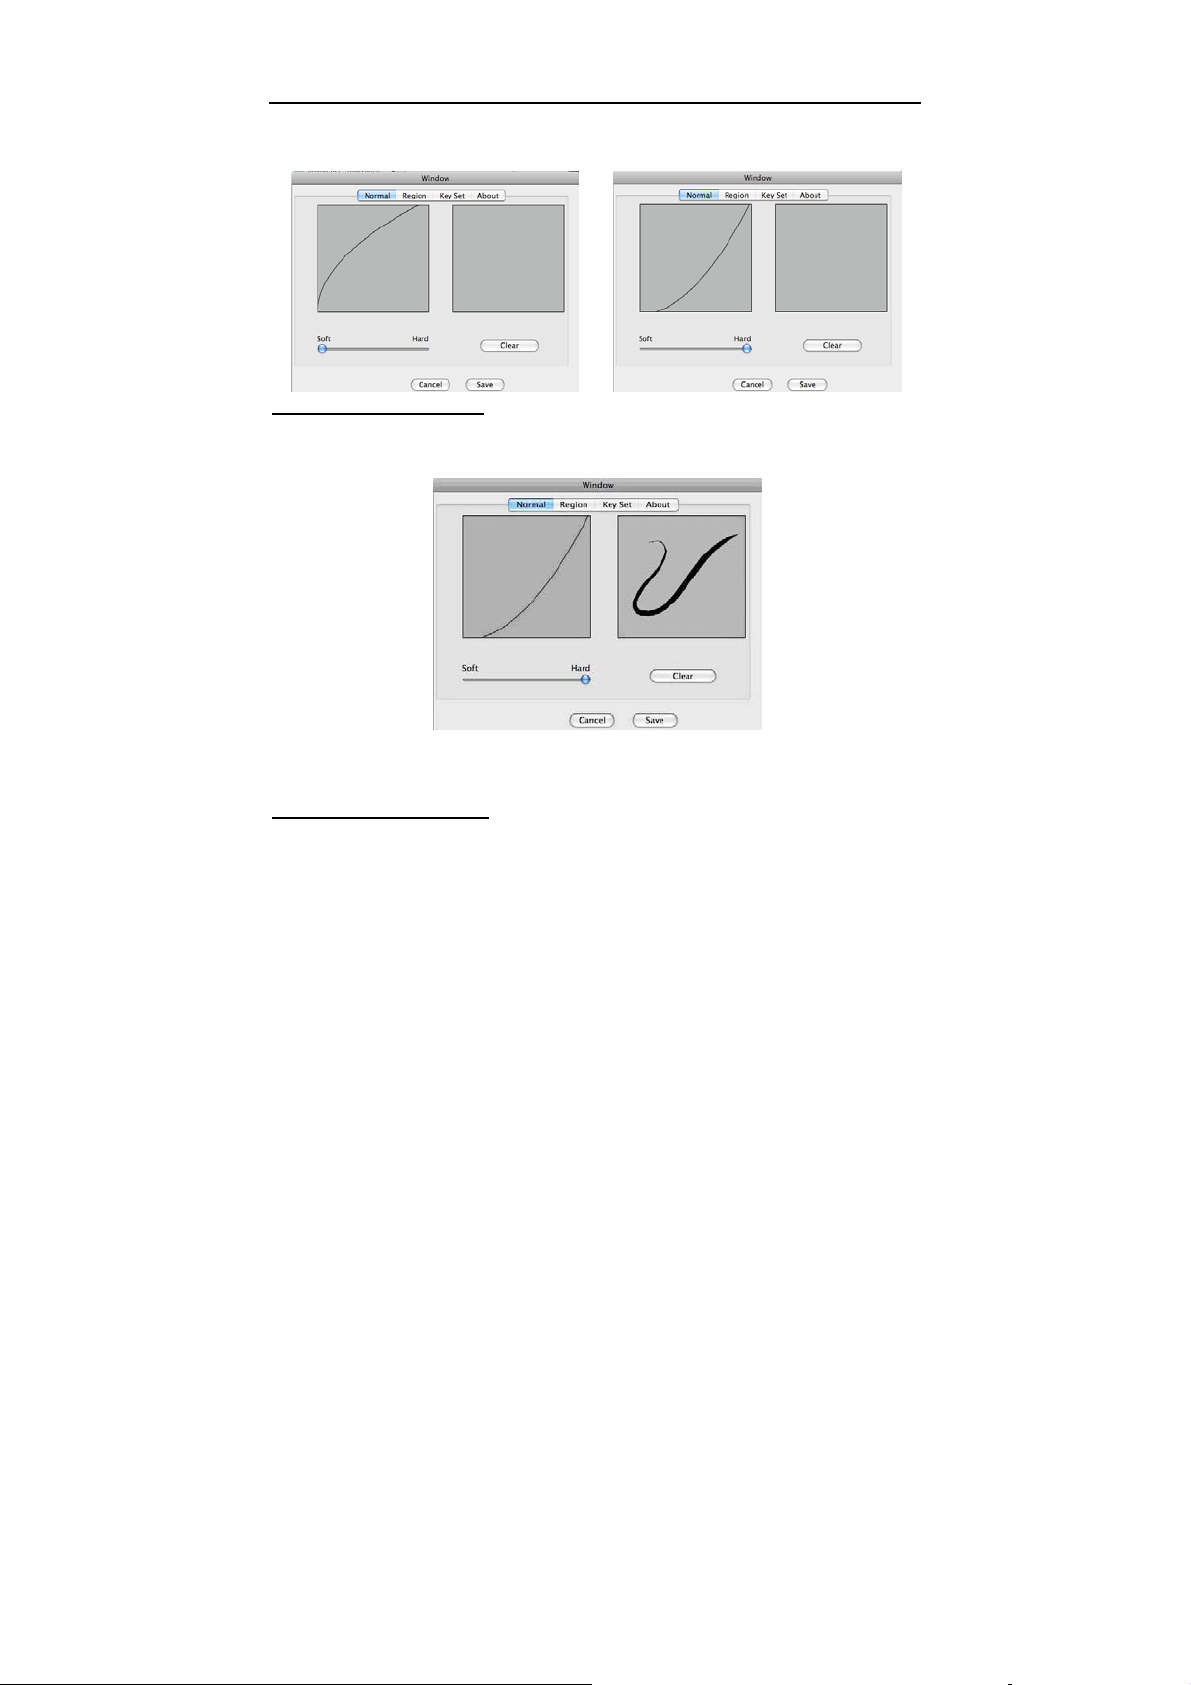
a. Adjusting Pressure Sensitivity
Pen pressure sensitivity can be adjusted by dragging the slider
between soft and hard. The right area is the pressure test area.
Adjustment can be saved by clicking the Save button, or can be
canceled by clicking the Cancel button.
b. Pressure Curve Graph
Pen pressure sensitivity changes are displayed on the Pressure curve
graph. The images below show the graphs for light and heavy pen
pressure respectively.
22
Page 27
INSTRUCTION FOR MAC SYSTEMS
c. Pressure Test Area
All the writing and drawing in the test area can be cleared by clicking
Clear button.
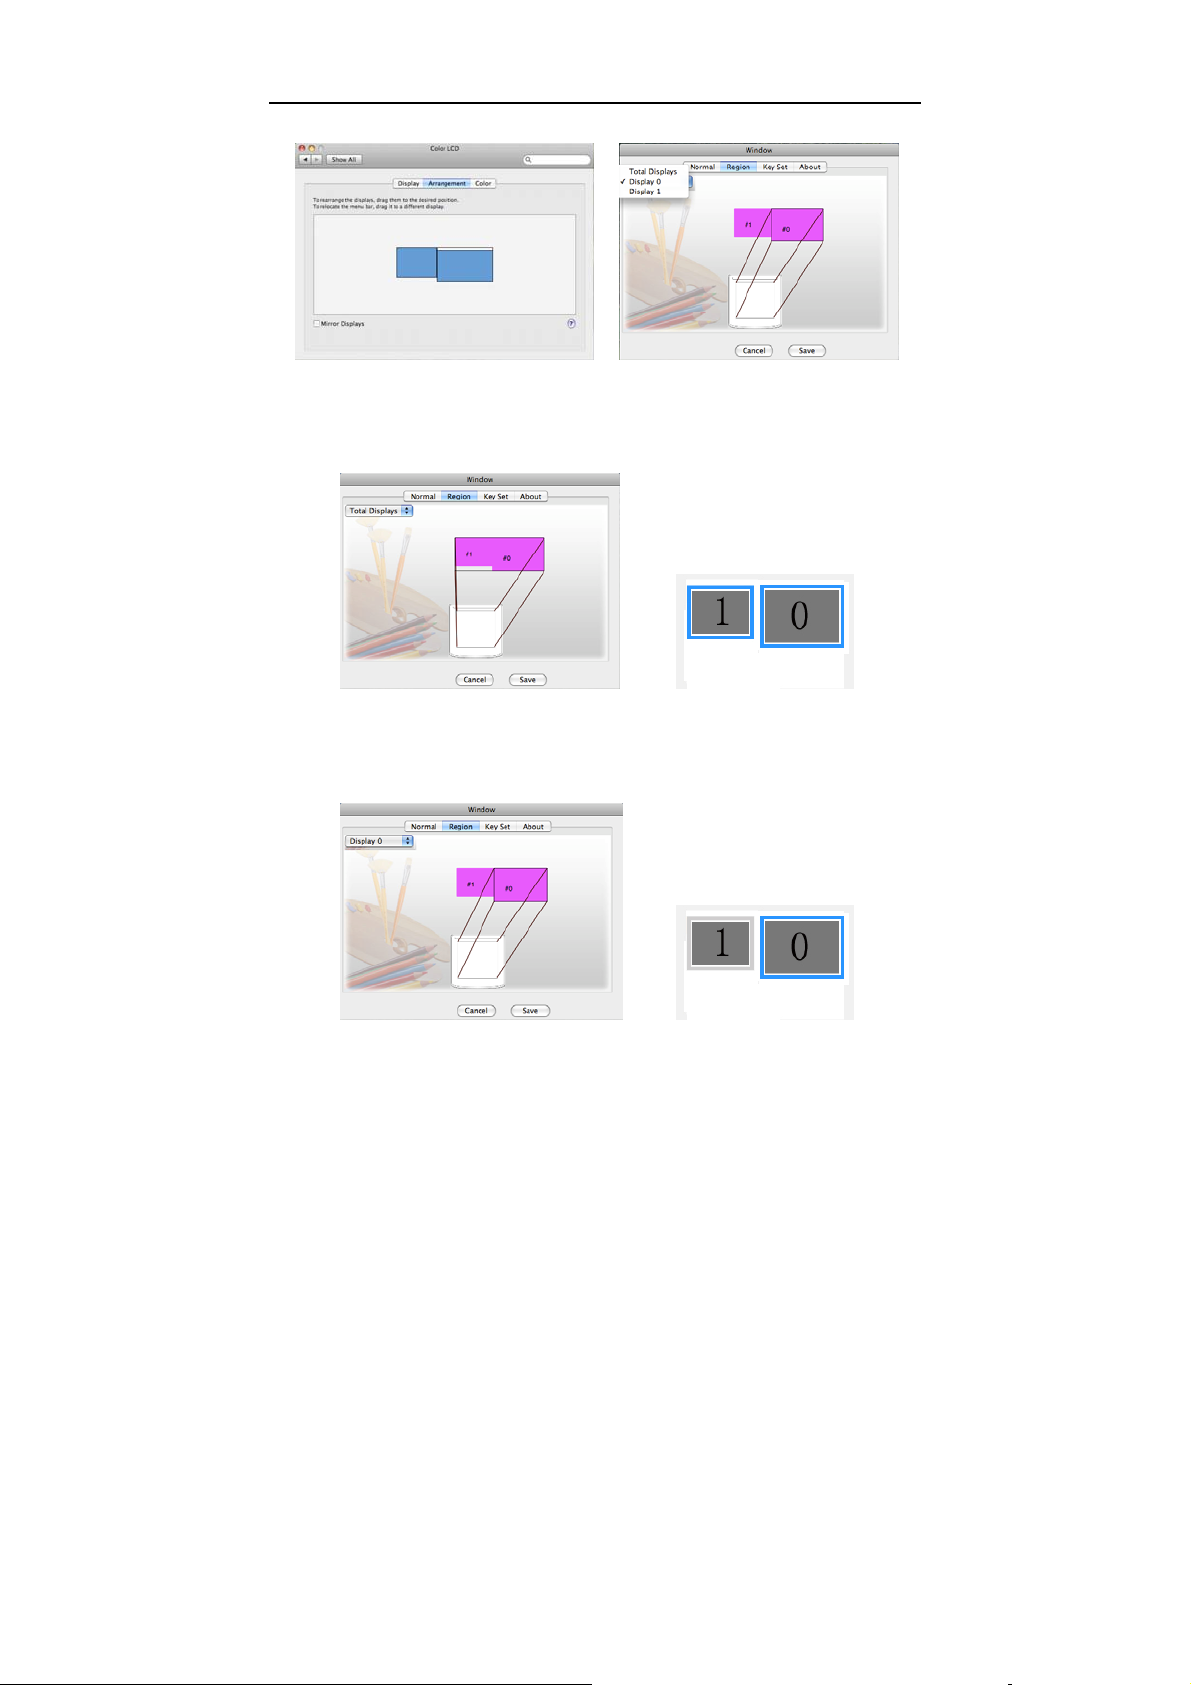
3.4.2 Mapping
a. Multi-Monitor Mode
You can drag the displays to the desired order if you computer has
more than one monitor.
23
Page 28
INSTRUCTION FOR MAC SYSTEMS
a) Full screen
Choose Region and select T otal Displays from the drop-down menu.
You will see the active area of the monitors corresponding to the
area in table is mapped.
b) Display #0
Select Display 0 from the drop-down menu to set the area in tablet to
control Display 0.
24
Page 29
INSTRUCTION FOR MAC SYSTEMS
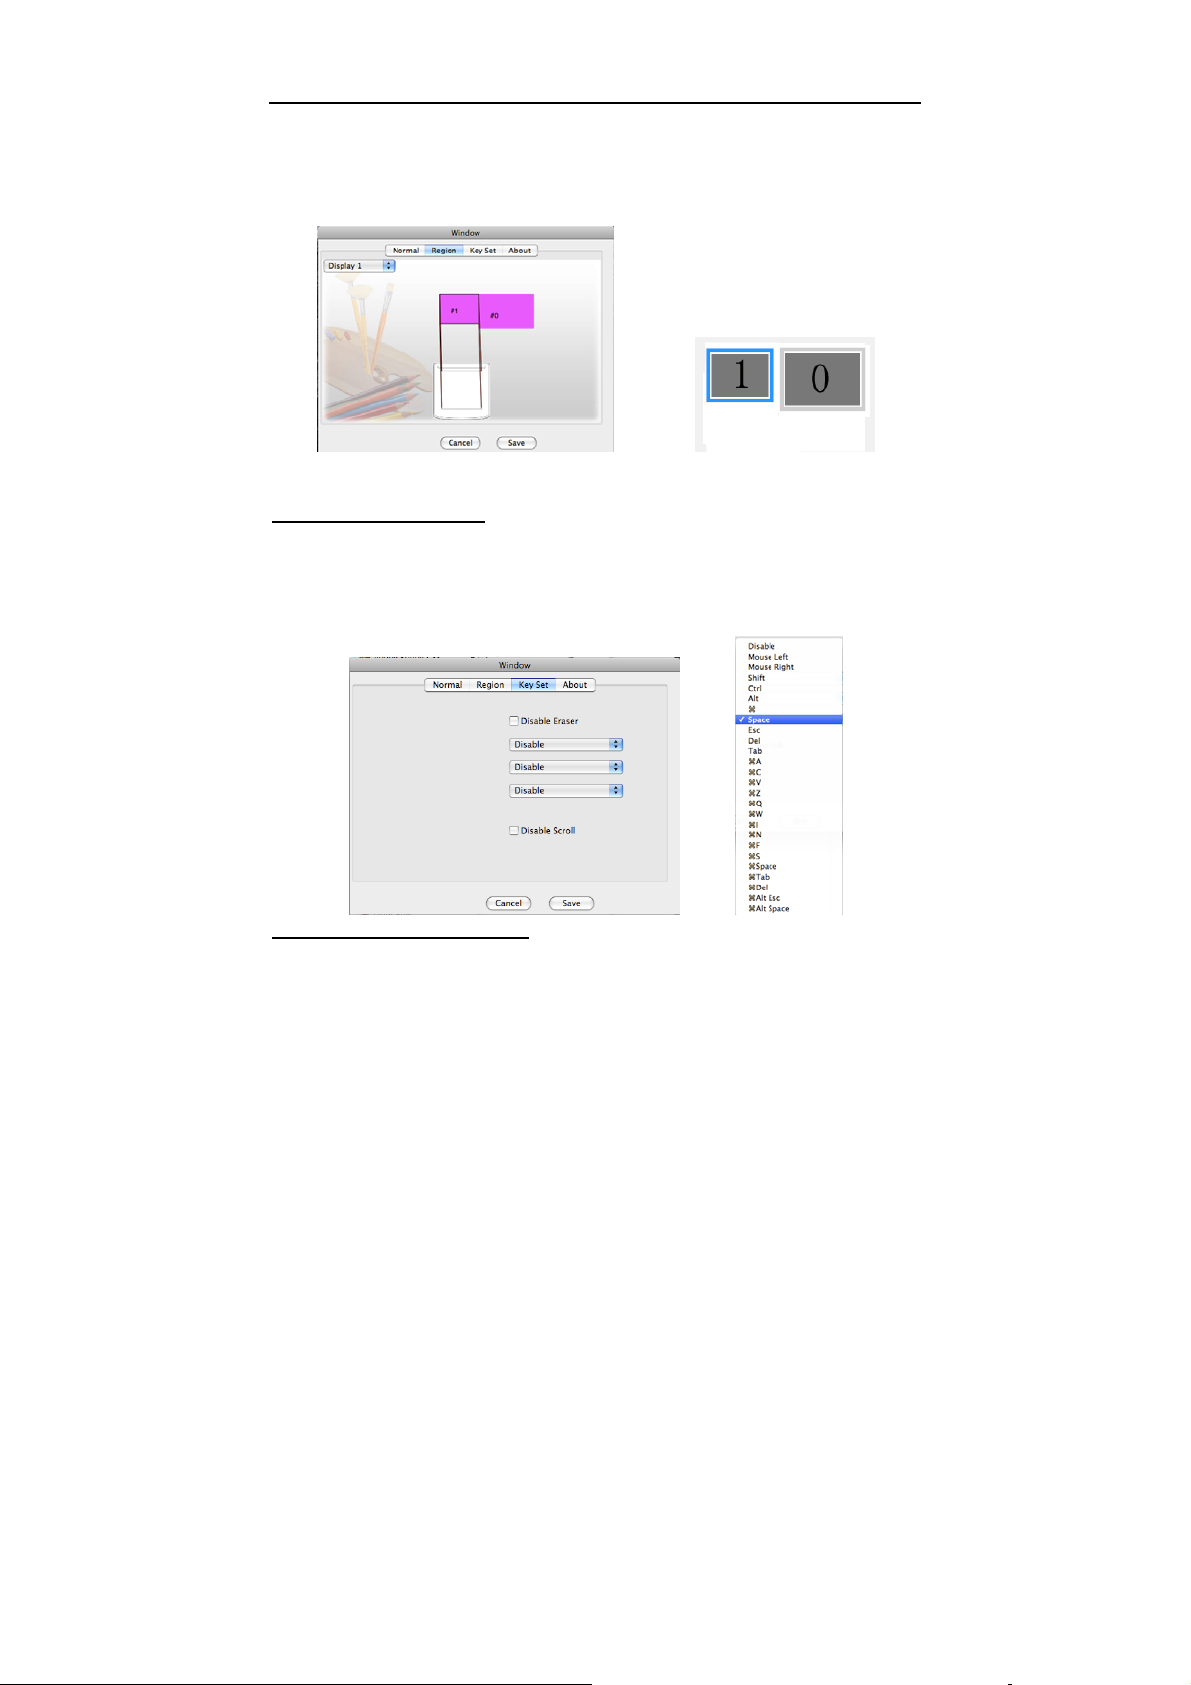
c) Display #1
Select Display 1 from the drop-down menu to set the area in tablet to
control Display 1.
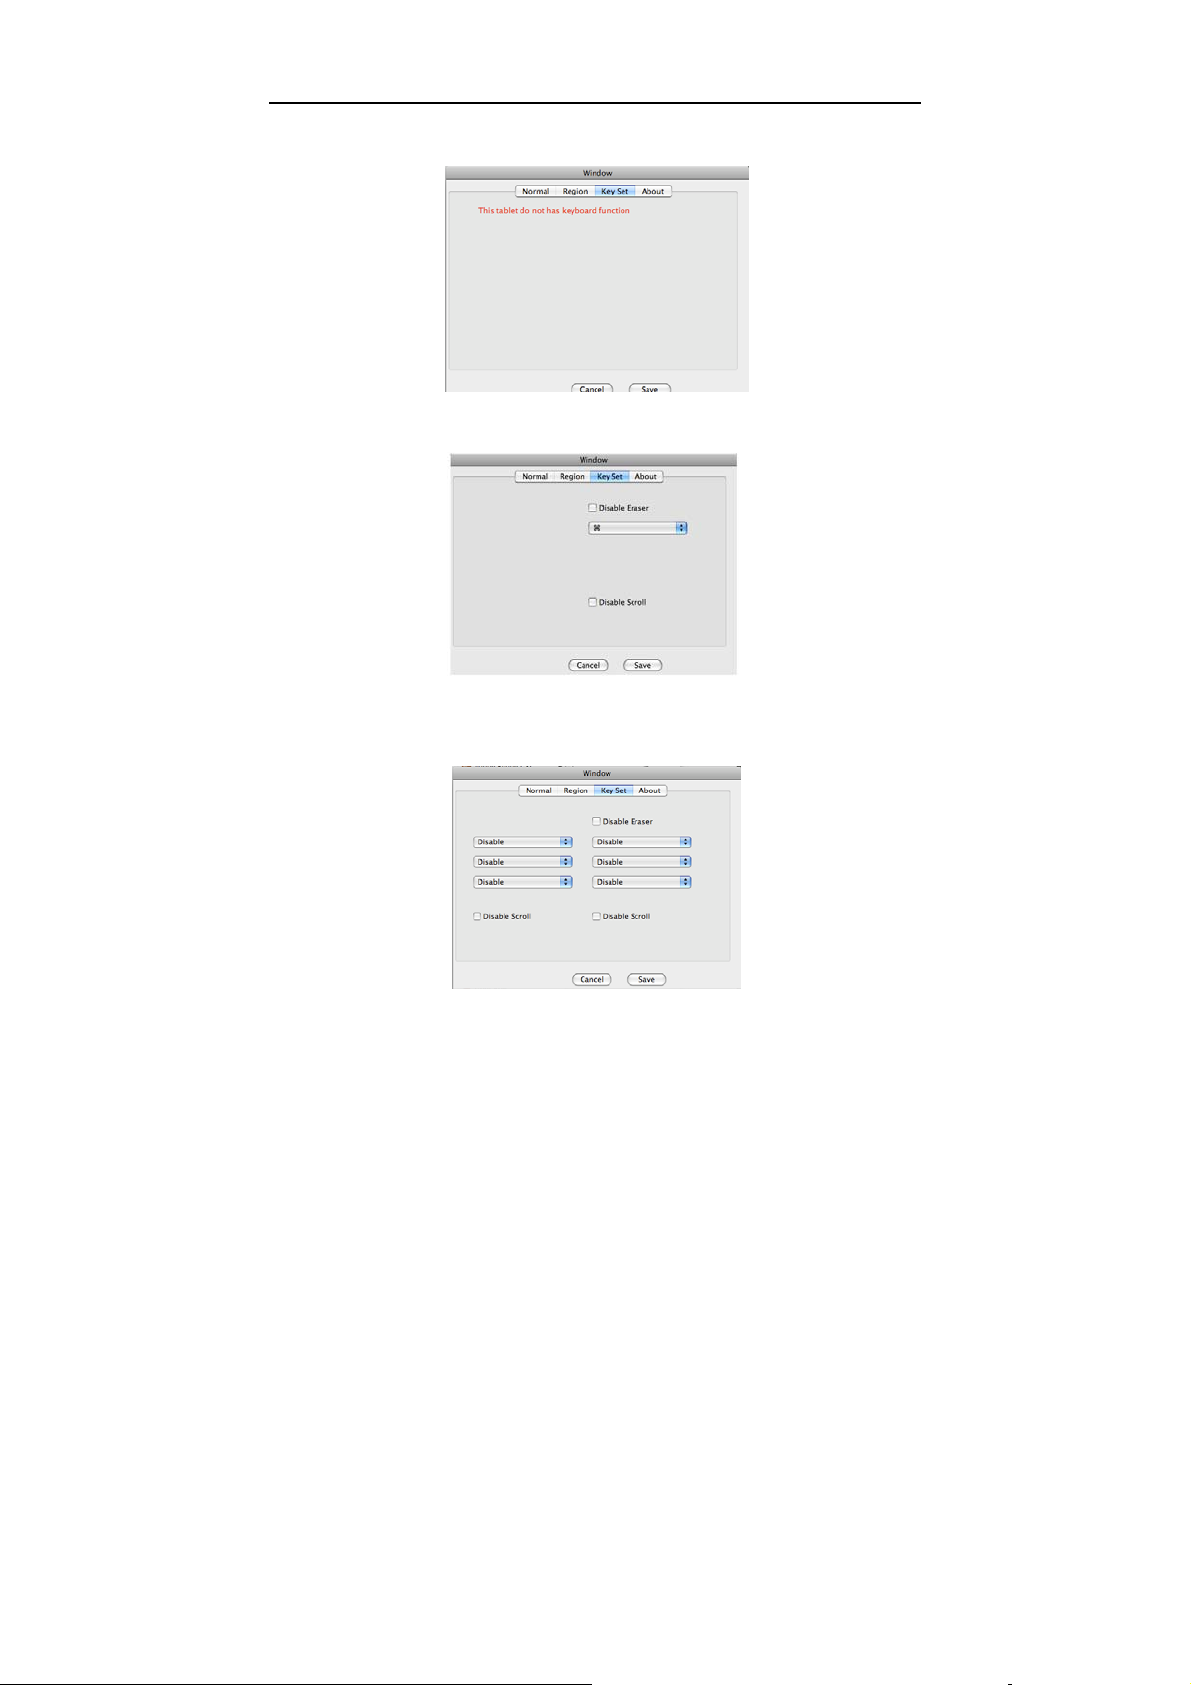
3.4.3 Express Touch Key
a. Express Touch key
There are four express touch keys on the tablet. The first key is
defaulted as eraser .You can set the functions for other three keys
from each drop-down menu in Key Set. Click Save to save the setting
or click Cancel to quit.
b. Disable the Touch Strip
Choose Disable Scroll to disable the touch strip on the tablet.
Note:Y ou will see the information as following figure shown when the
tablet you purchased does not support the express touch keys.
25
Page 30
INSTRUCTION FOR MAC SYSTEMS
Note: If your tablet has only two express touch keys, you will see the
Key Set as the following figure shown.
Note:If the tablet has two rows of keys, you will see the Key Set as
the following figure shown.
The key set for single-row and double-row is same.
26
Page 31
BUNDLED SOFTWARE
Chapter 4 Bundled Software
4.1 Hanvon Shell
4.1.1 Shell Summary
Hanvon Shell is a shortcut startup application for starting bundled
Hanvon Software or other software.
Default startup style: it will be operated automatically when you
startup your computer; if user exits shell from the application, it will
switch to the manual startup style; double click the shortcut icon on
the desktop to startup the Shell toolbar.
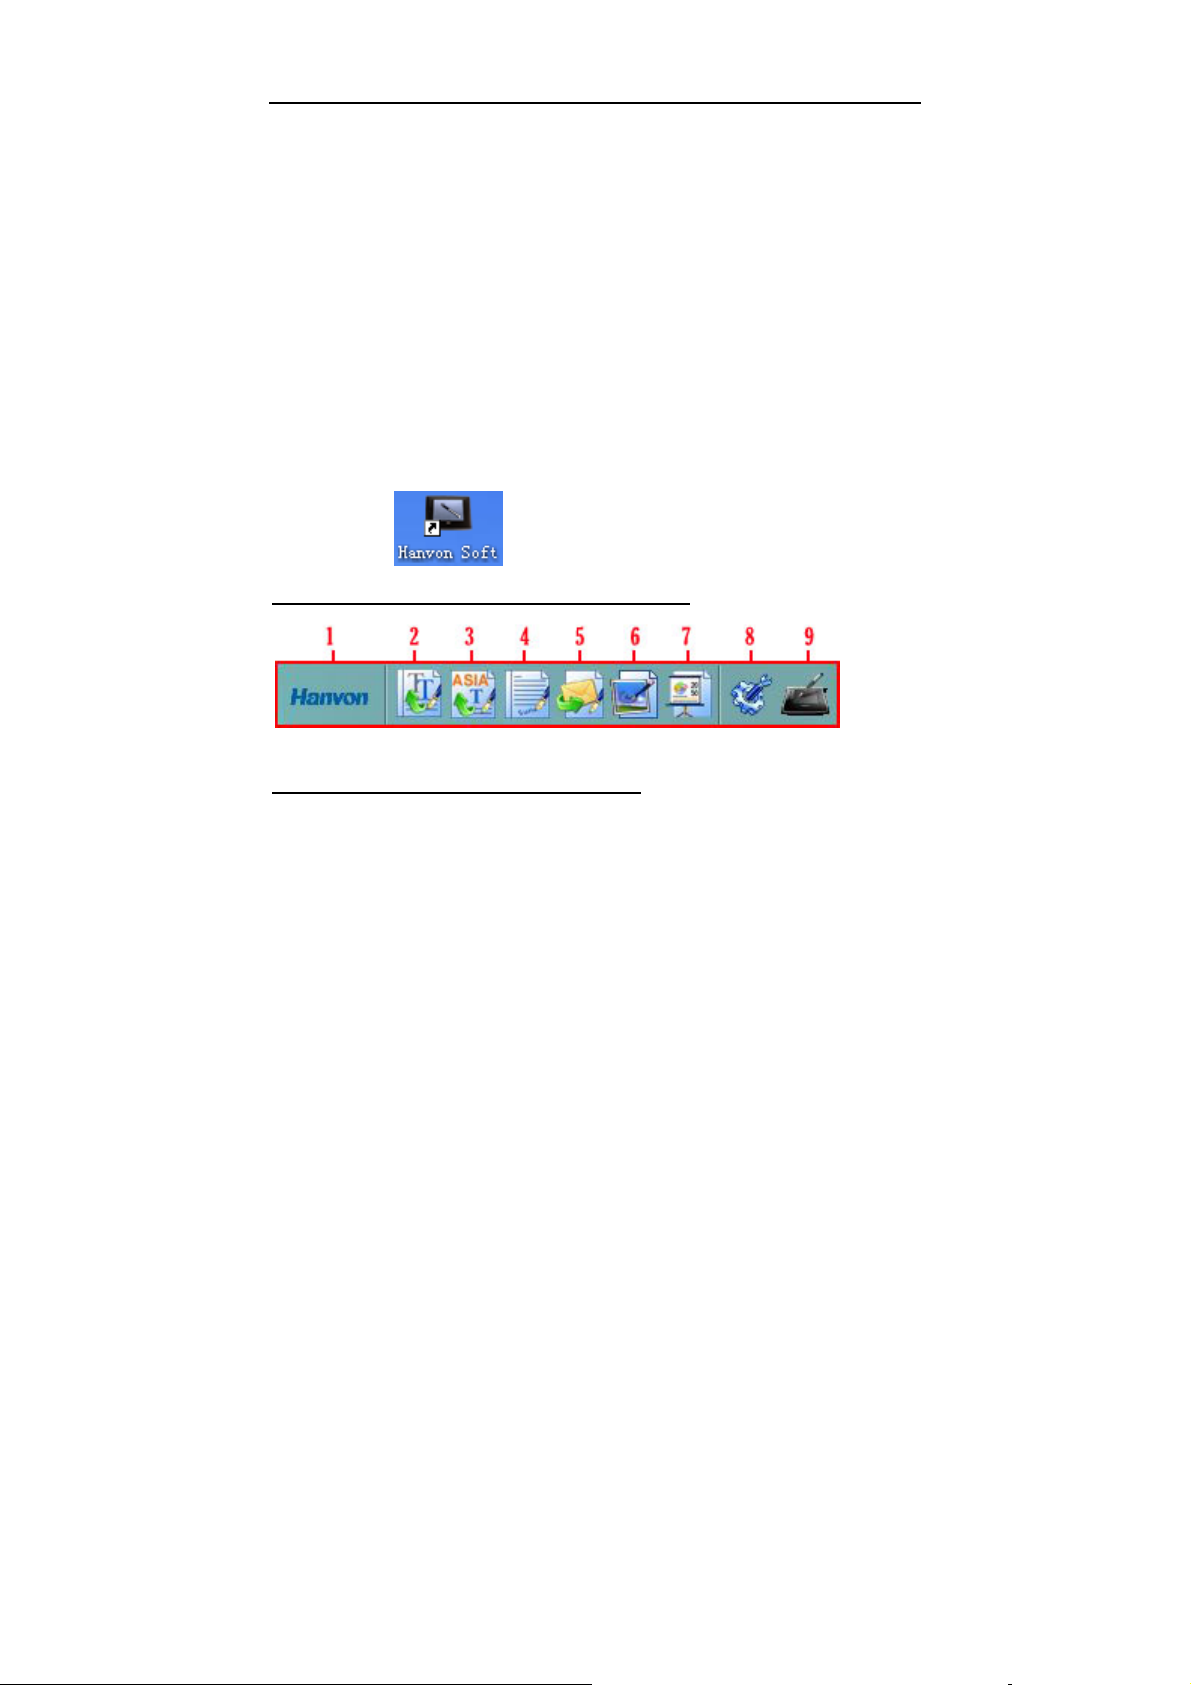
Main interface will be shown as following:
Icons explanations as following:
1. Area for Dragging Shell
After opening shell toolbar, you can drag the icon to adjust the
positions at up, down, left and right locations on computer’s screen;
When cursor have been left the toolbar for 5 seconds or later, Shell
toolbar will be hided, Single-click it to display the main interface;
27
Page 32

BUNDLED SOFTWARE
2. PenWrite
Editing Microsoft Office documents formatted as: Word、Txt、Excel
and PPT by handwriting directly;
PenWrite Provides English、German、French、Italian、Dutch、Spanish、
Swedish、Portuguese (Portugal)、Portuguese (Brazil) multi-languages
recognition
3. PenWrite Asia
Editing Microsoft Office documents formatted as: word、Txt、Excel and
PPT by handwriting directly;
PenWrite Asia Provides Simplified Chinese 、Traditional Chinese
(Hong Kong) 、Traditional Chinese (Taiwan) 、Japanese and Korean
languages recognition
4. PenSign
This program enables you to add your handwriting signature in a
document such as Microsoft Office word /PPT;
5. PenMail
Providing handwrite email in Outlook Express or Windows Mail.
6. PenMark
Providing handwrite mark on desktop or pictures;
7. WhiteBoard
A software application simulates Electronic Whiteboard. The monitor
is like a marker board in front of users and become a simplified
Electronic Whiteboard through a projector.
28
Page 33
BUNDLED SOFTWARE
8. System Menu
Configure shell setting
9. Tablet Setting
Configure tablet setting
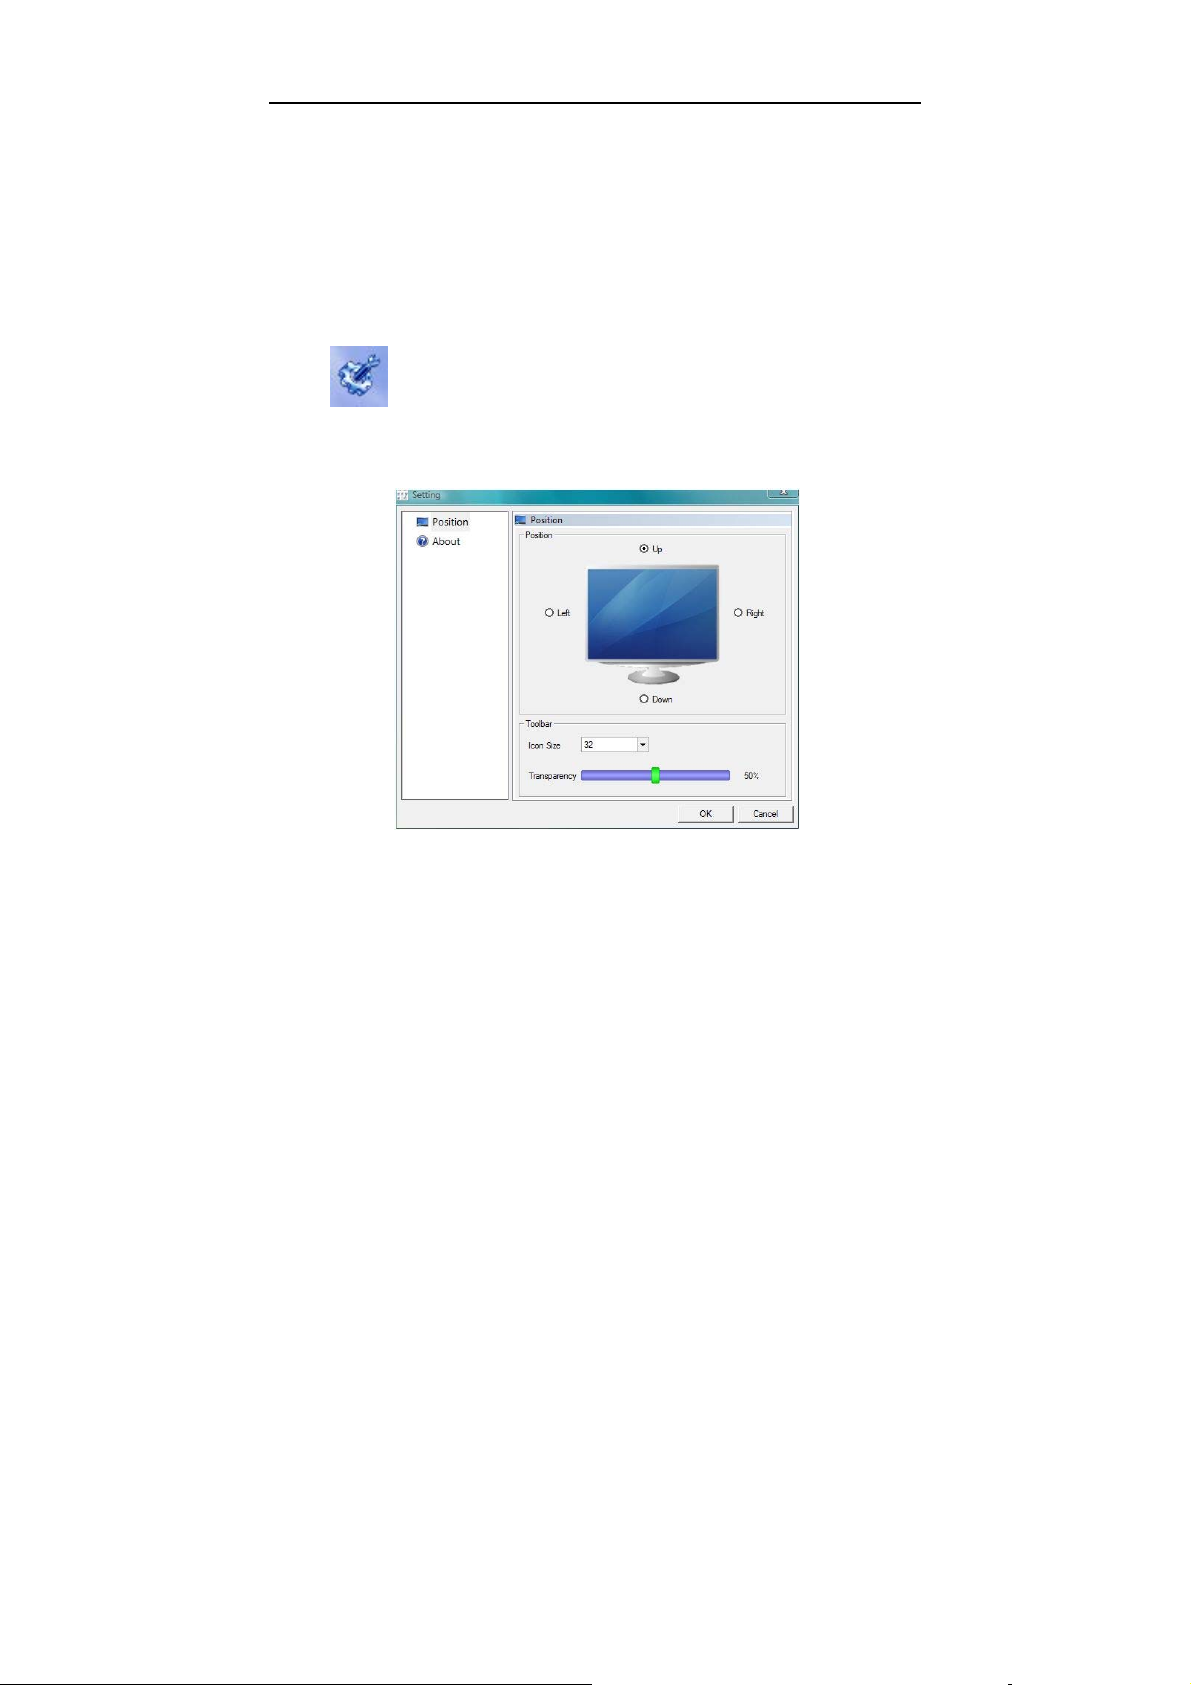
4.1.2 System Menu Shell
Click to enter Shell configuration interface shown as following
figure:
Position: Set the position for Hanvon Shell on the screen;
Icon Size: Set the icon size shown in the Hanvon startup toolbar;
Transparency: Set the transparency for Hanvon startup toolbar.
29
Page 34
BUNDLED SOFTWARE
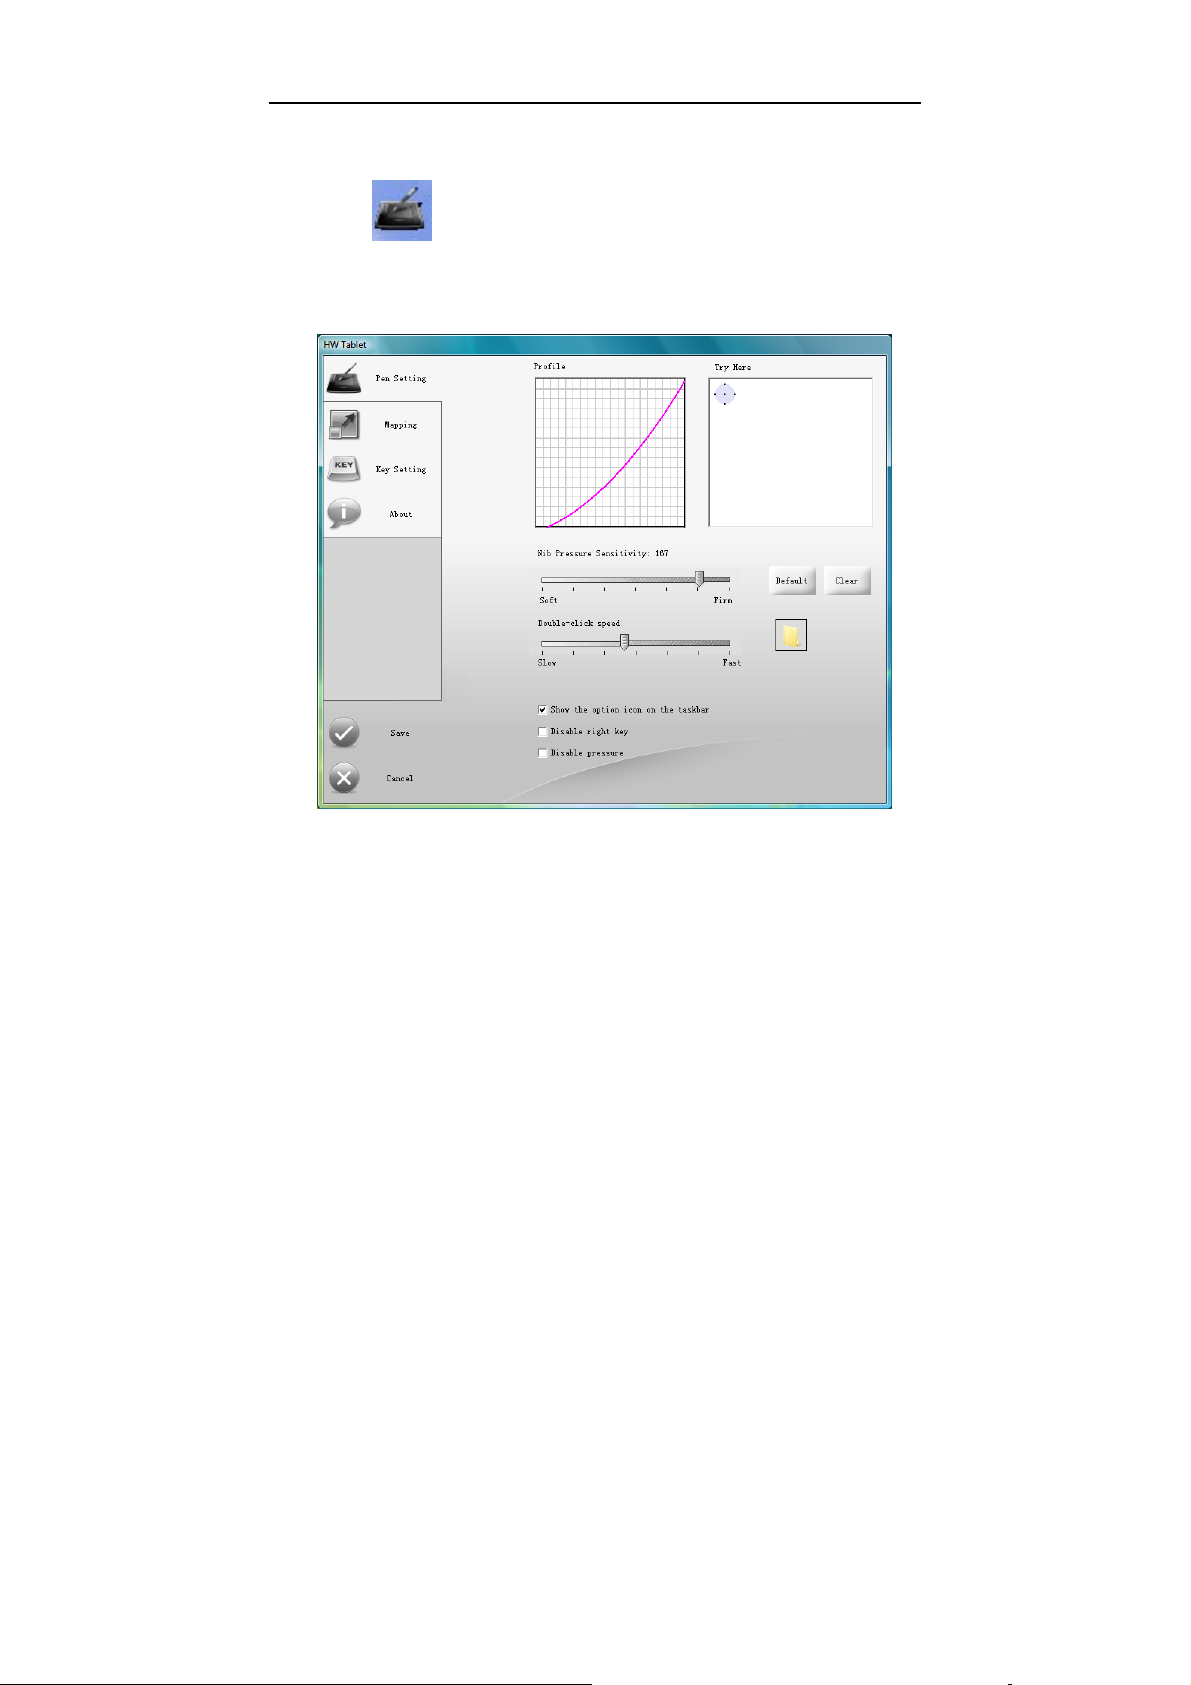
4.1.3 Tablet Setting
Click to enter tablet setting interface shown as followin g
figure:
30
Page 35
BUNDLED SOFTWARE
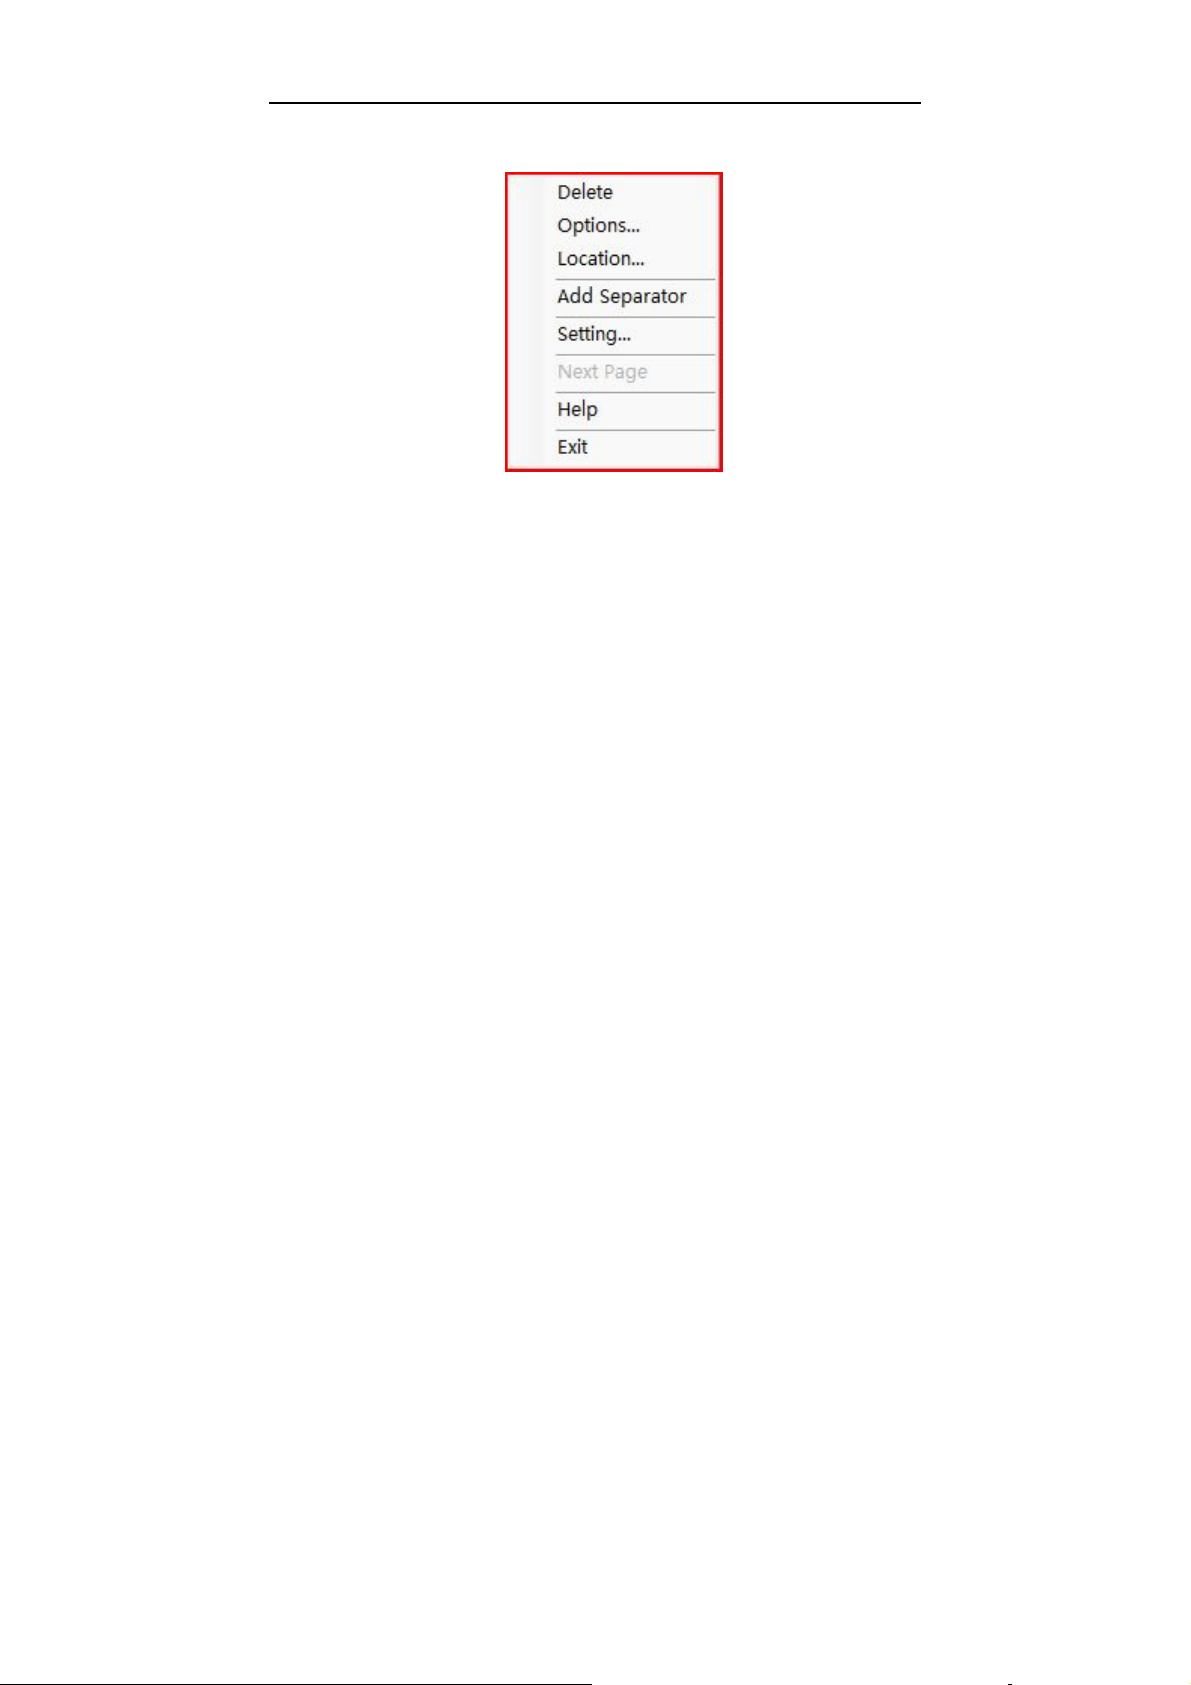
4.1.4 Shell right key menu
Delete: Delete the current icon or separator;
Options: Change name and icon of the current software
Location: Find the target file position which the software is saved
Add Separator: Add the separator in the location where the cursor
is placed.
Setting: ( the function is the same as System Menu)
Next Page: Turn to next page
31
Page 36
BUNDLED SOFTWARE
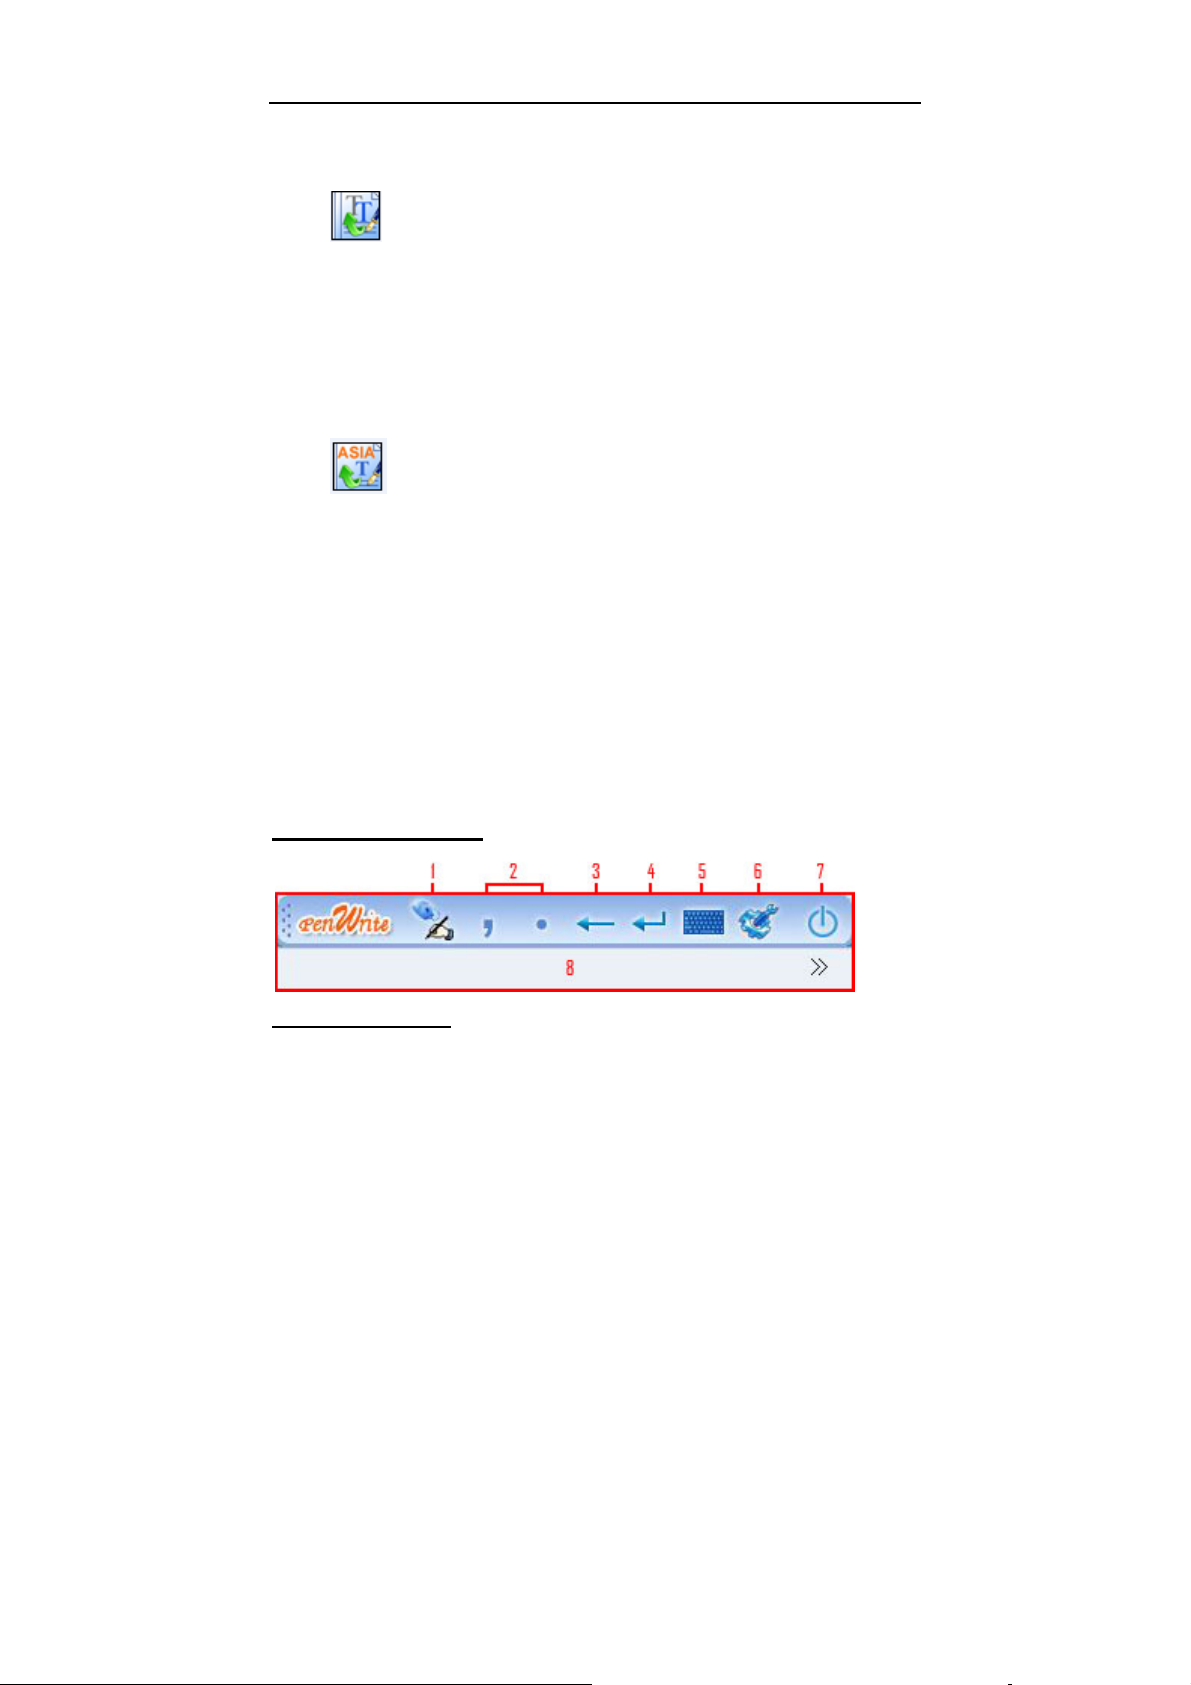
4.2 PenWrite
Click on the shell to open PenWrite application.
Open WORD application for editing, Then users may handwriting
input words ,sentences, punctuation&symbol and numbers in
English、German、French、Italian、Dutch、Spanish、Swedish、
Portuguese (Portugal) 、 Portuguese (Brazil).The handwriting
characters would be turn to be text automatically to the location where
the cursor was placed.
Click on the shell to open PenWrite Asia application.
Open WORD application for editing, Then users may handwriting
input characters、 punctuation&symbol and numbers in Simplified
Chinese 、 Traditional Chinese (Hong Kong) 、 Traditional
Chinese(Taiwan) 、Japanese and Korean.
Note: Please confirm the cursor’s location firstly, and then start
handwriting.
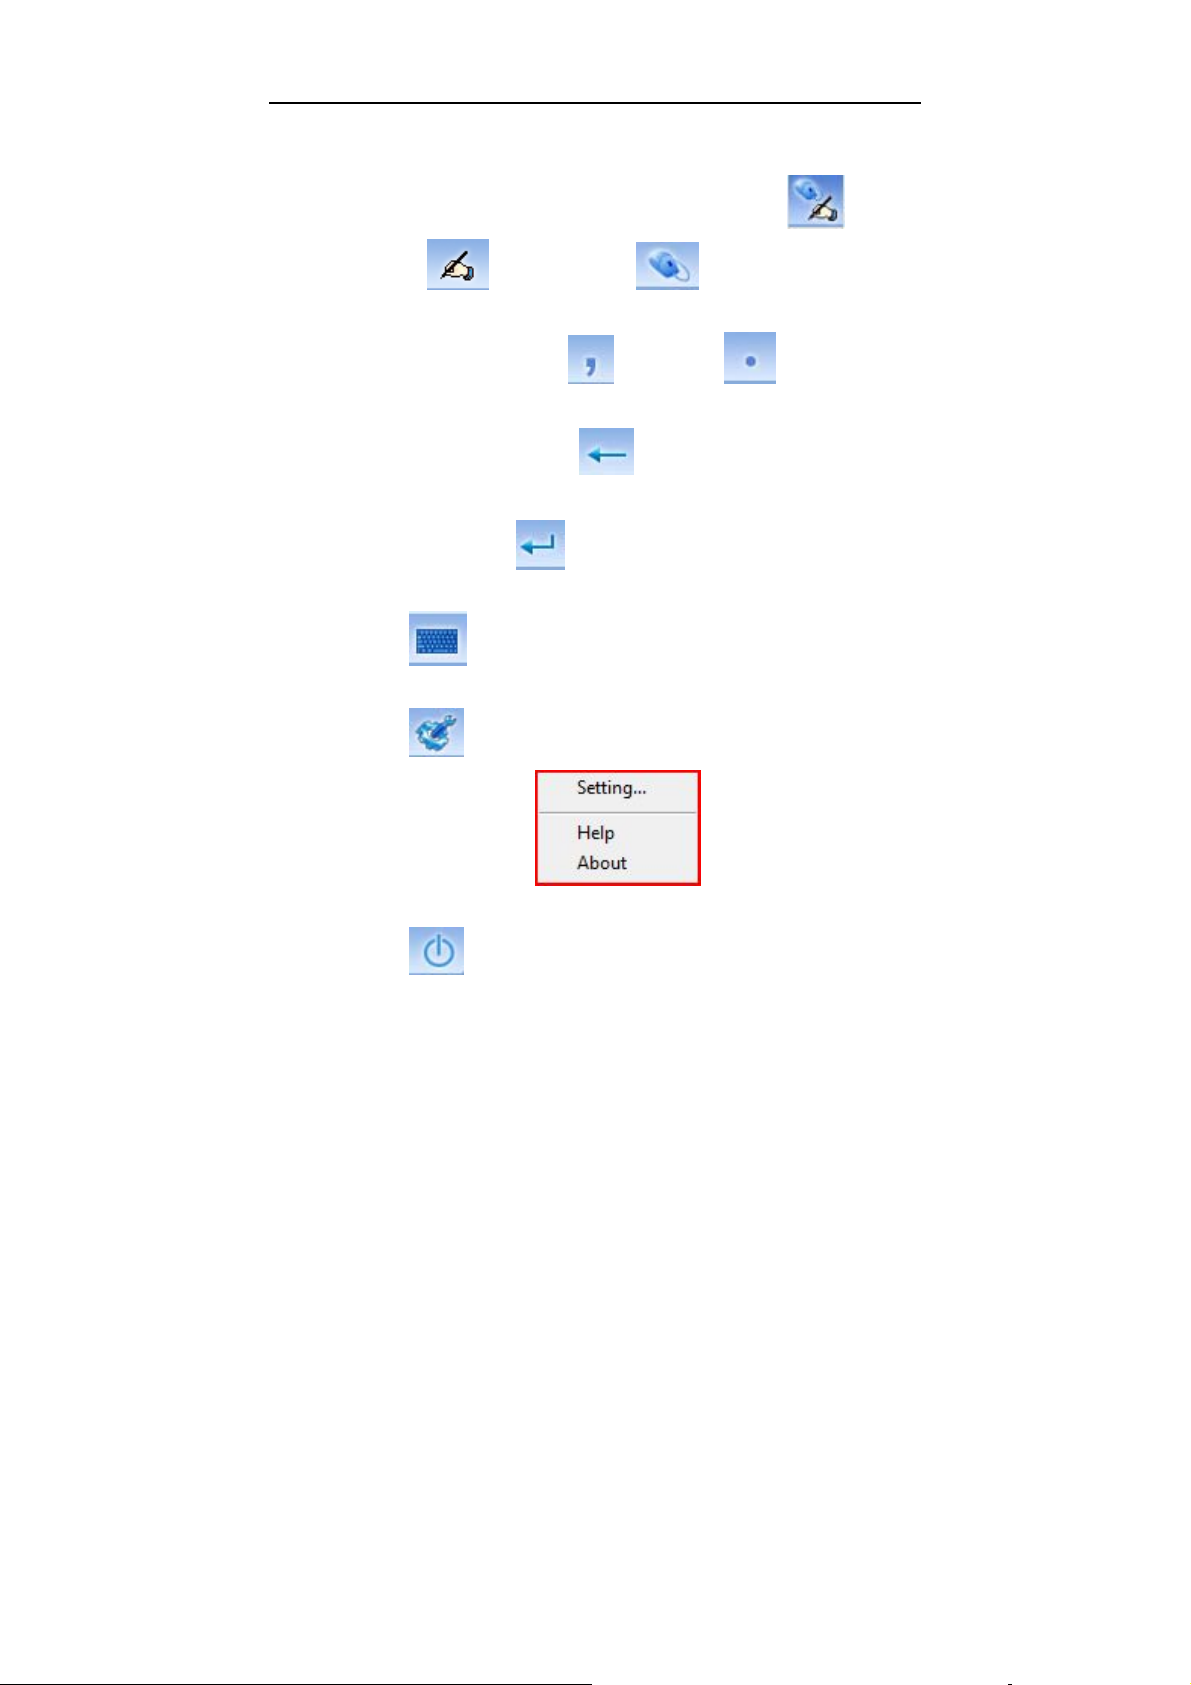
PenWrite and PenWrite Asia have the same main interface.
Instruction as following:
Icon explanations:
Basic functions
32
Page 37
BUNDLED SOFTWARE
1. Pen & Mouse Mode
Switch the status between Pen & Mouse Mode \ Pen
Mode \ Mouse Mode
2. Comma & Period
Edit”,” or “.” by clicking Comma or Period
3. Backspace
Backspace by clicking
4. Enter
Enter by clicking
5. Keyboard
Click to startup software keyboard
6. System Menu
Click to enter an interface shown as following figure:
7. Exit
Click to exit
33
Page 38
BUNDLED SOFTWARE
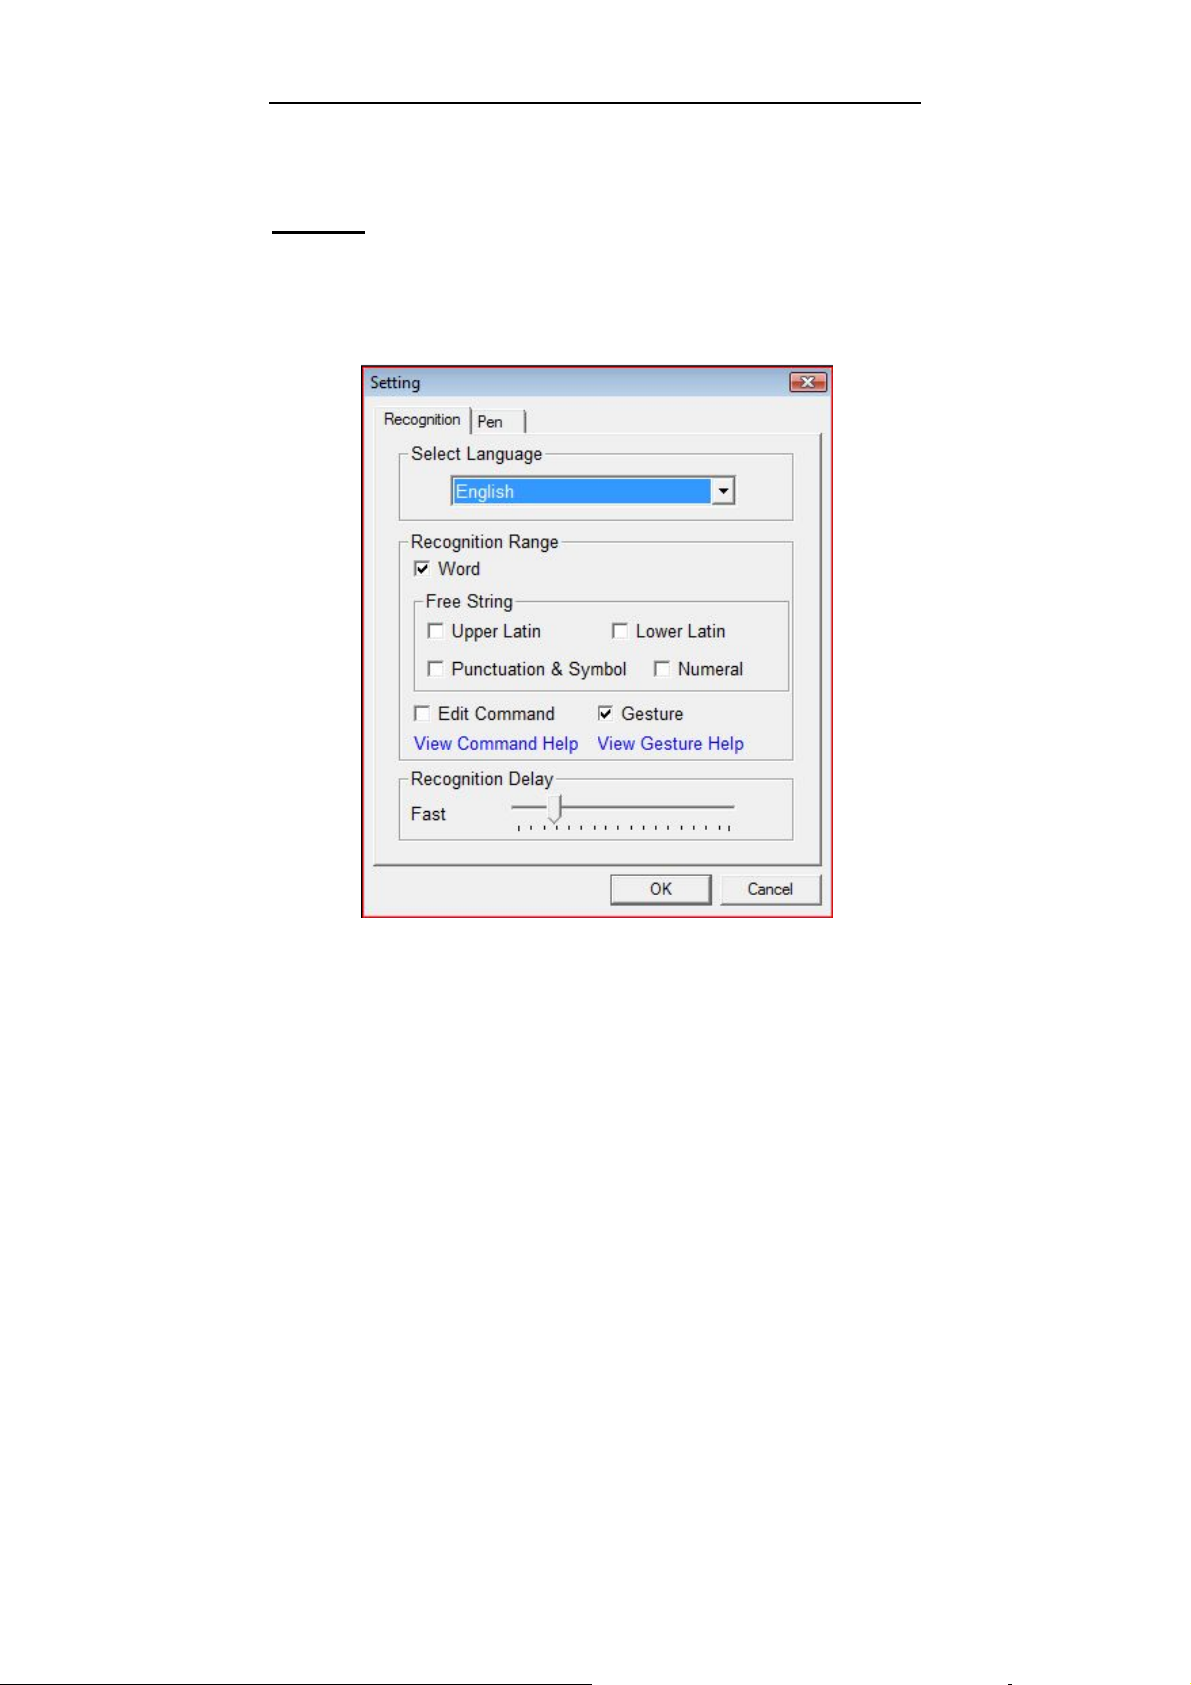
8. the candidate area for recognized results
Setting
Click “setting…” shown as following figure:
Setting for PenWrite—Recognition
[Select Language] Choose recognition language between 9
kinds of languages;
34
Page 39
BUNDLED SOFTWARE
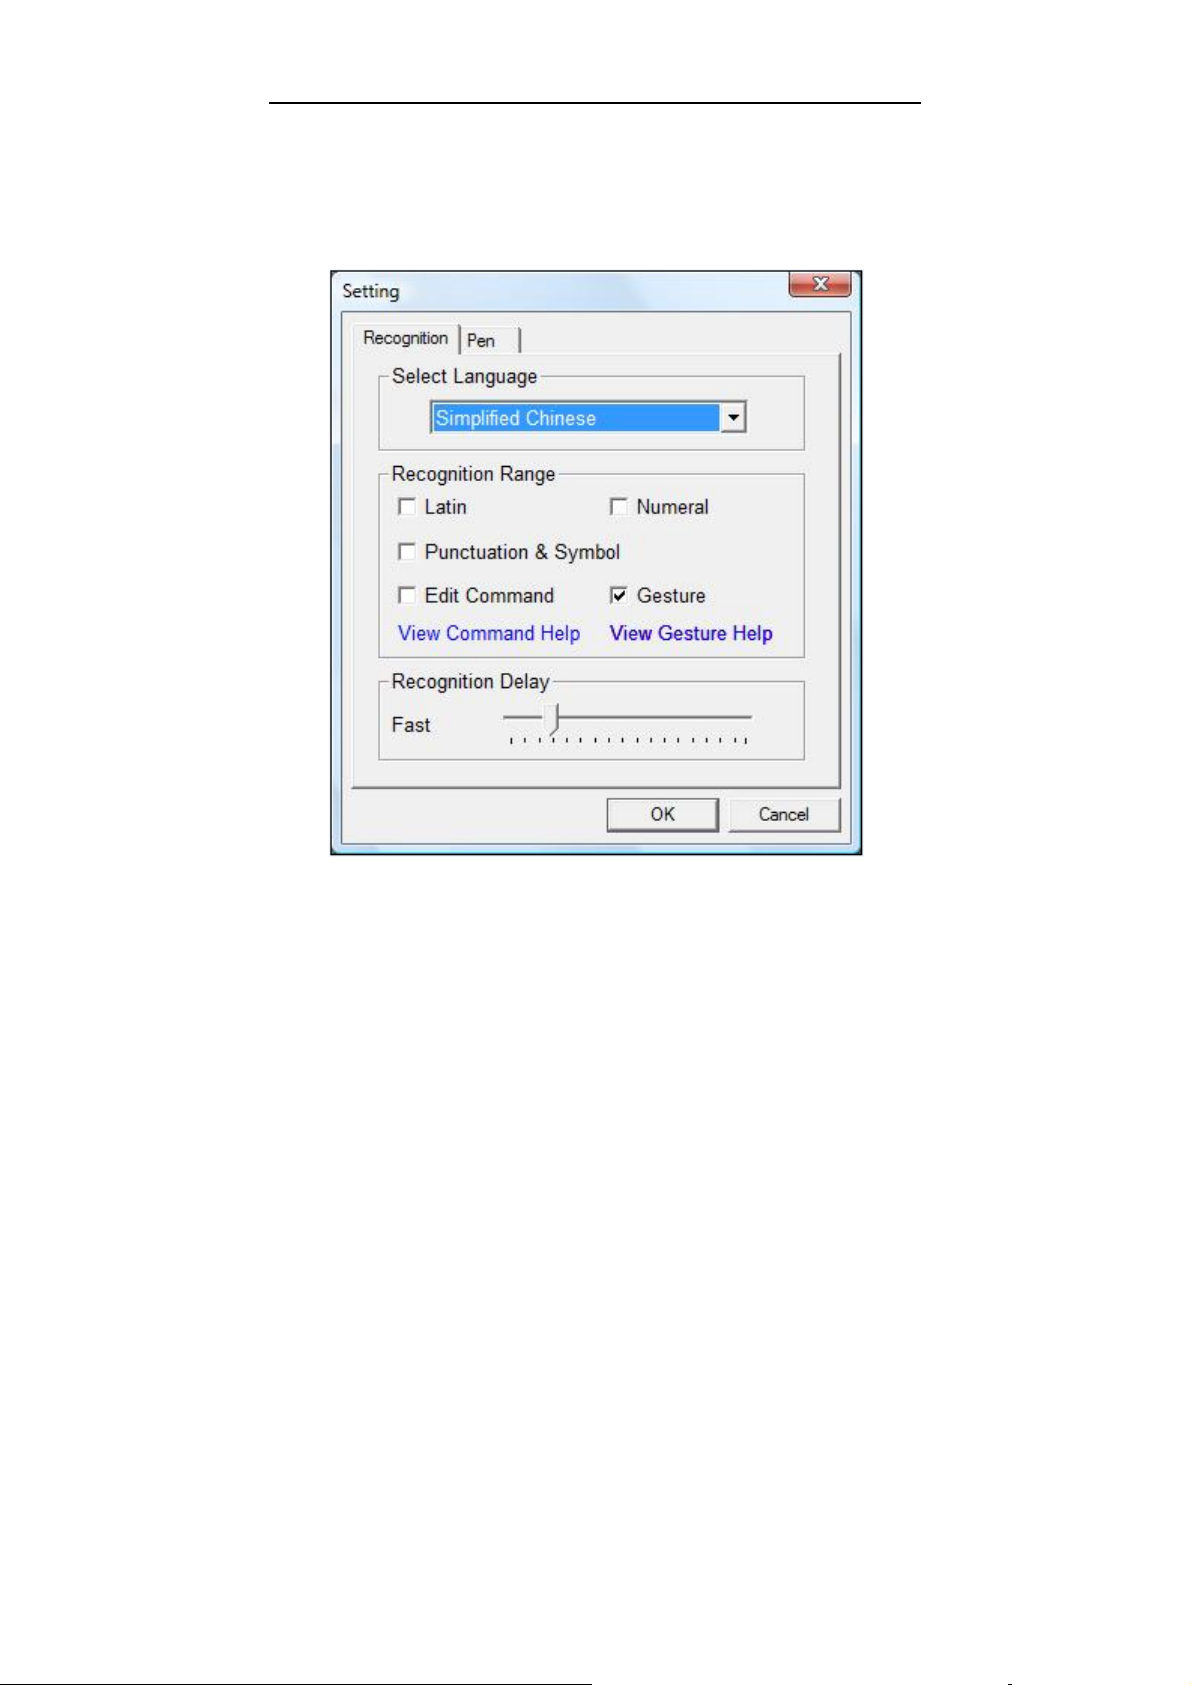
[Recognition Range] Choose the recognition range;
[Recognition Delay] Adjust the recognition interval time.
Setting for PenWrite Asia—Recognition
[Select Language] Choose recognition language between
Simplified Chinese、Traditional Chinese (Hong Kong) 、
Traditional Chinese (Taiwan) 、Japanese and Korean.
[Recognition Range] Choose the recognition range;
[Recognition Delay] Adjust the recognition interval time.
35
Page 40
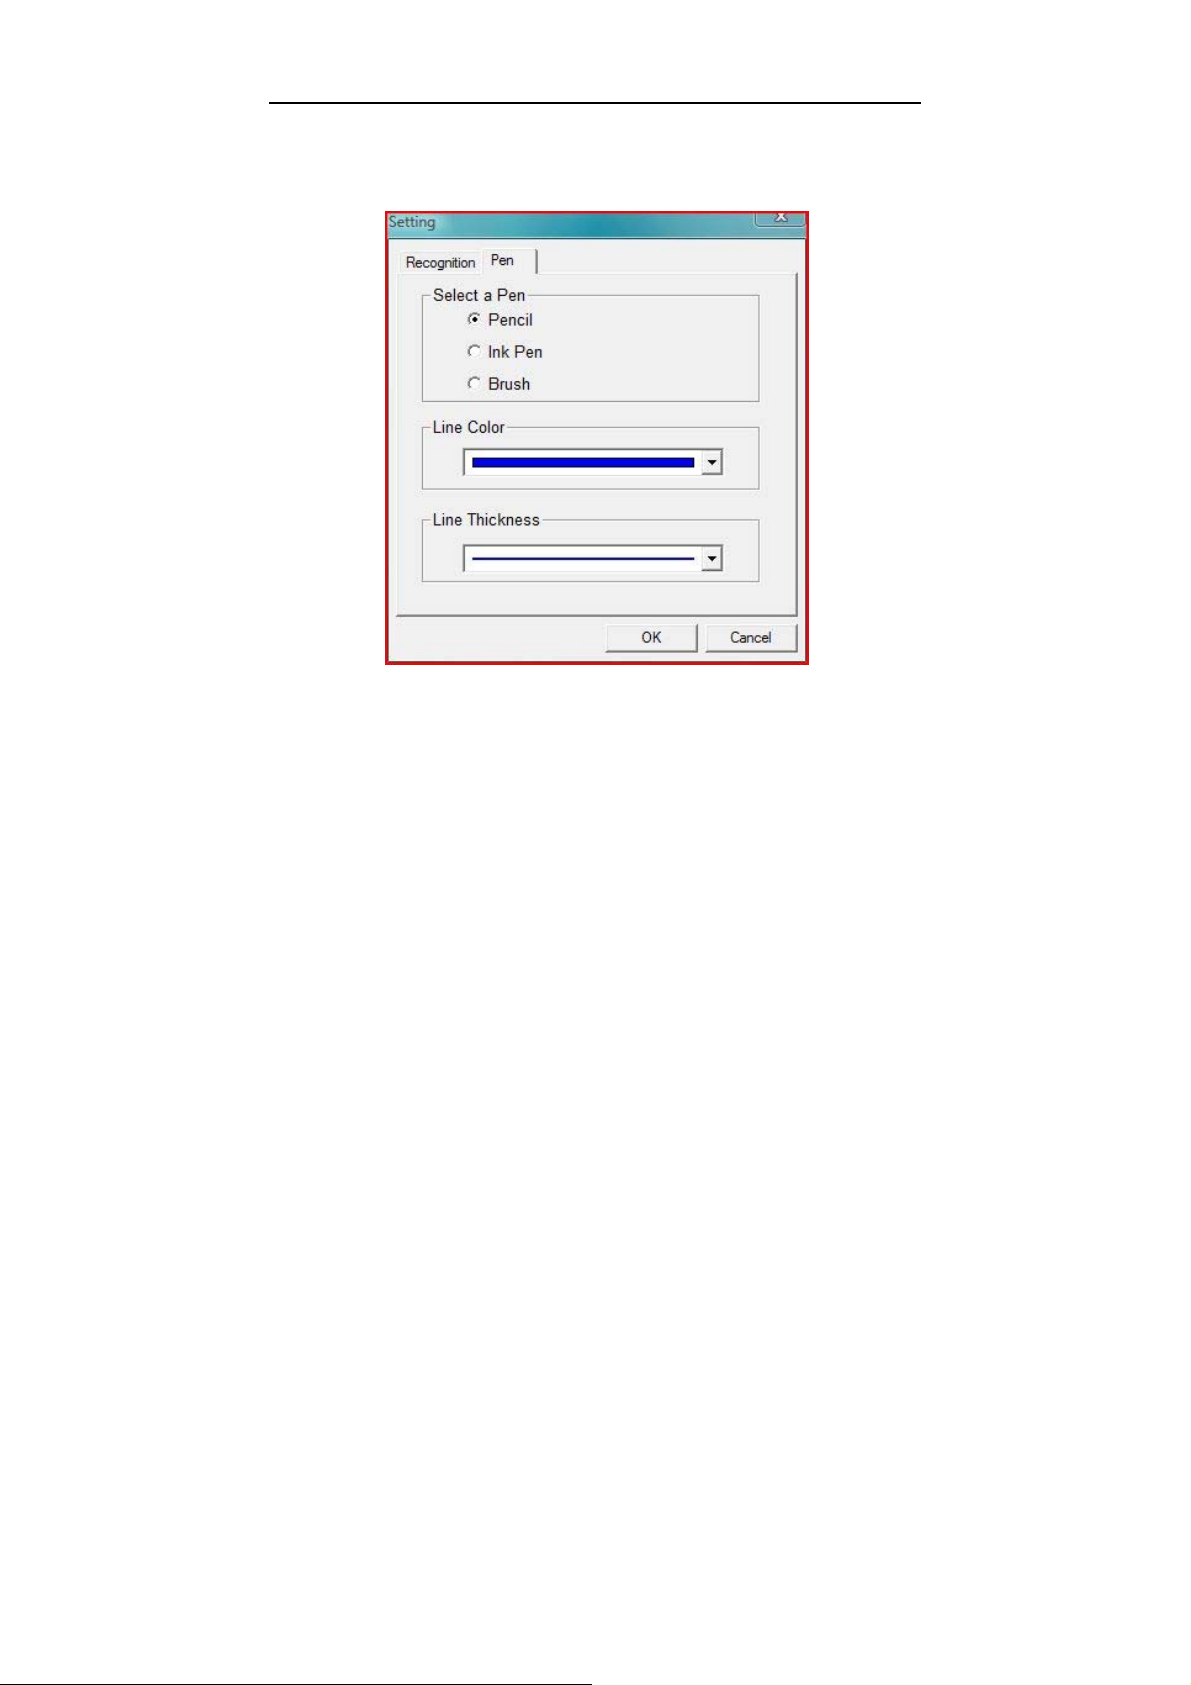
Setting—Pen
Selecting the pen type, line colors or line thickness
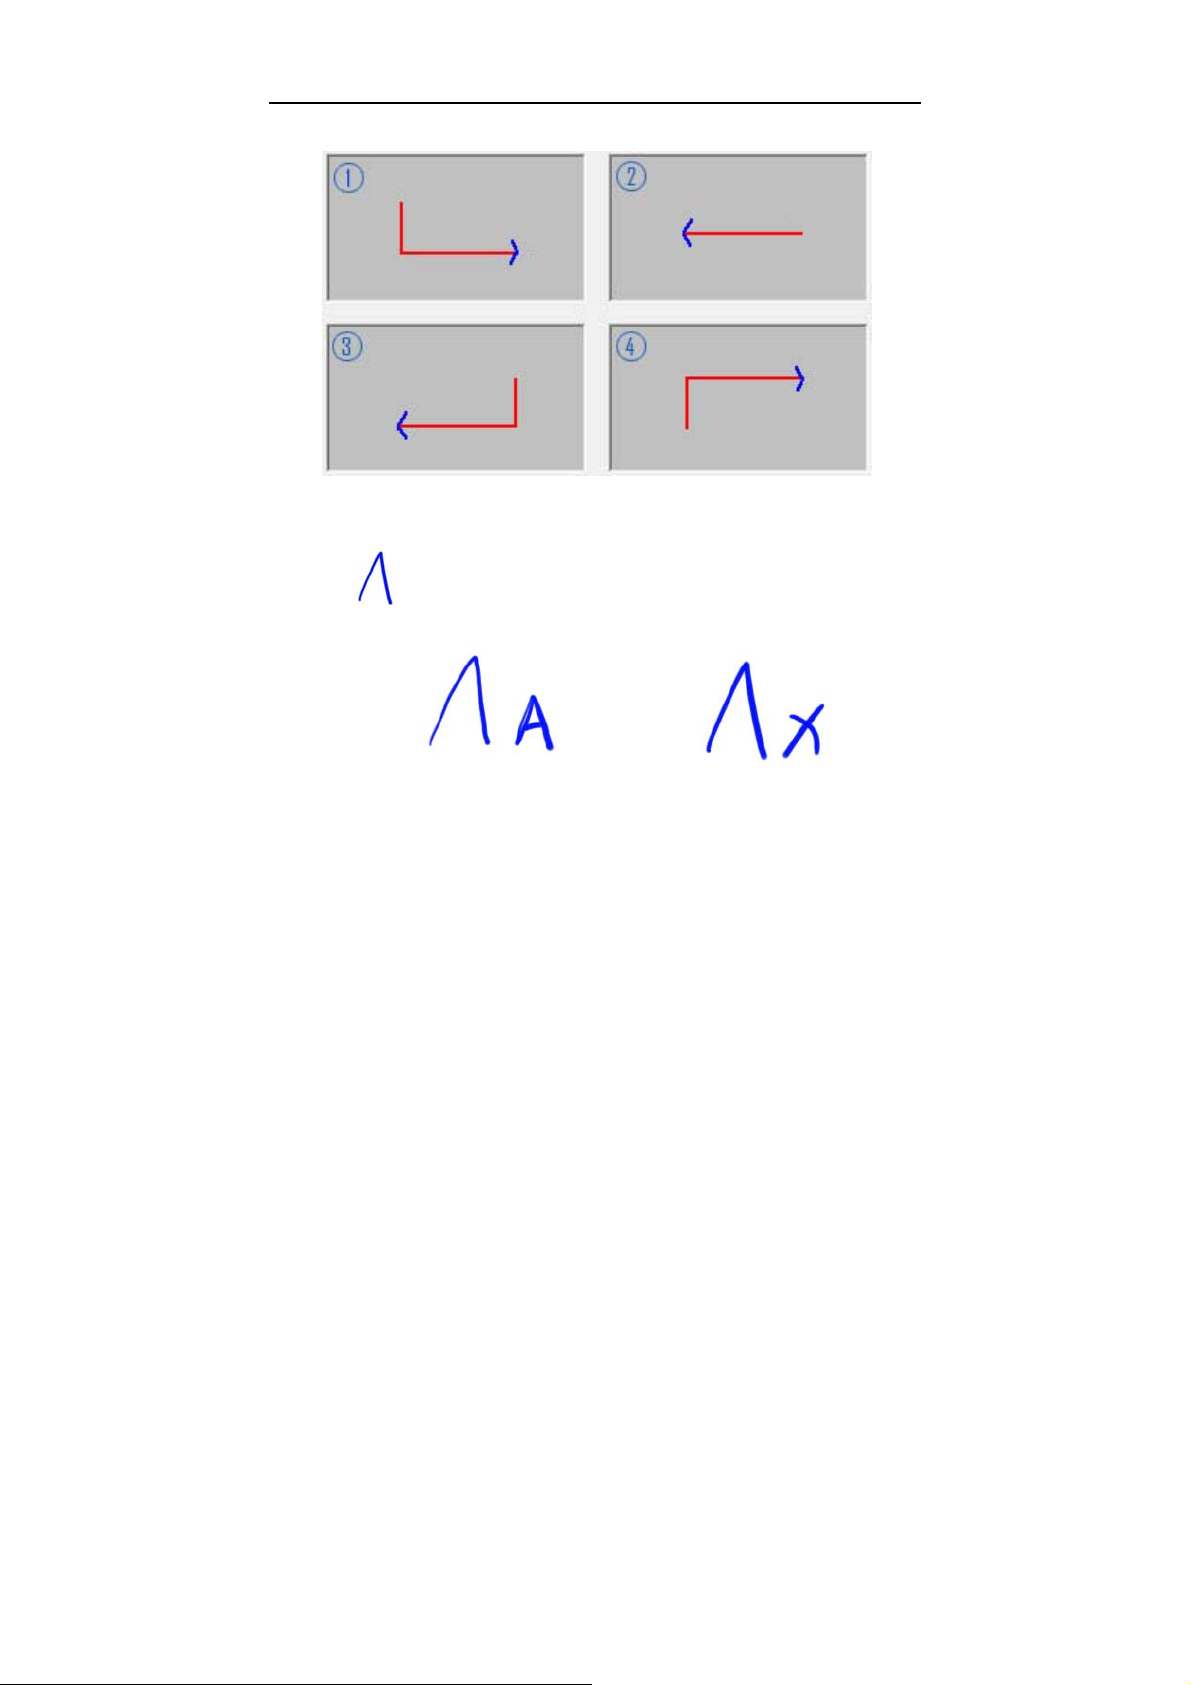
Gesture:
Space、②Backspace、③Enter、④T ab
①
BUNDLED SOFTWARE
36
Page 41
BUNDLED SOFTWARE
Edit Command:
=Ctrl
For example:
Ctrl+A Ctrl+X
Edit Command supported as bellow:
Ctrl + A
Ctrl +C
Ctrl +V
Ctrl +X
Ctrl +Z
37
Page 42
BUNDLED SOFTWARE
4.3 PenSign
Click to open PenSign application
z The program can be used in Microsoft Office 2000 and the
version higher, Word、Excel、PowerPoint ( Notice: please don’t
write directly in Word outline\Excel pagination preview\
PowerPoint insert images );
z Support the Word Pad and Windows Draw (when the script will
be shown opacity, it wouldn’t support “Hide Sign & Show Sign”
and “Delete Sign” functions).
z The signature size and position can be adjusted freely.
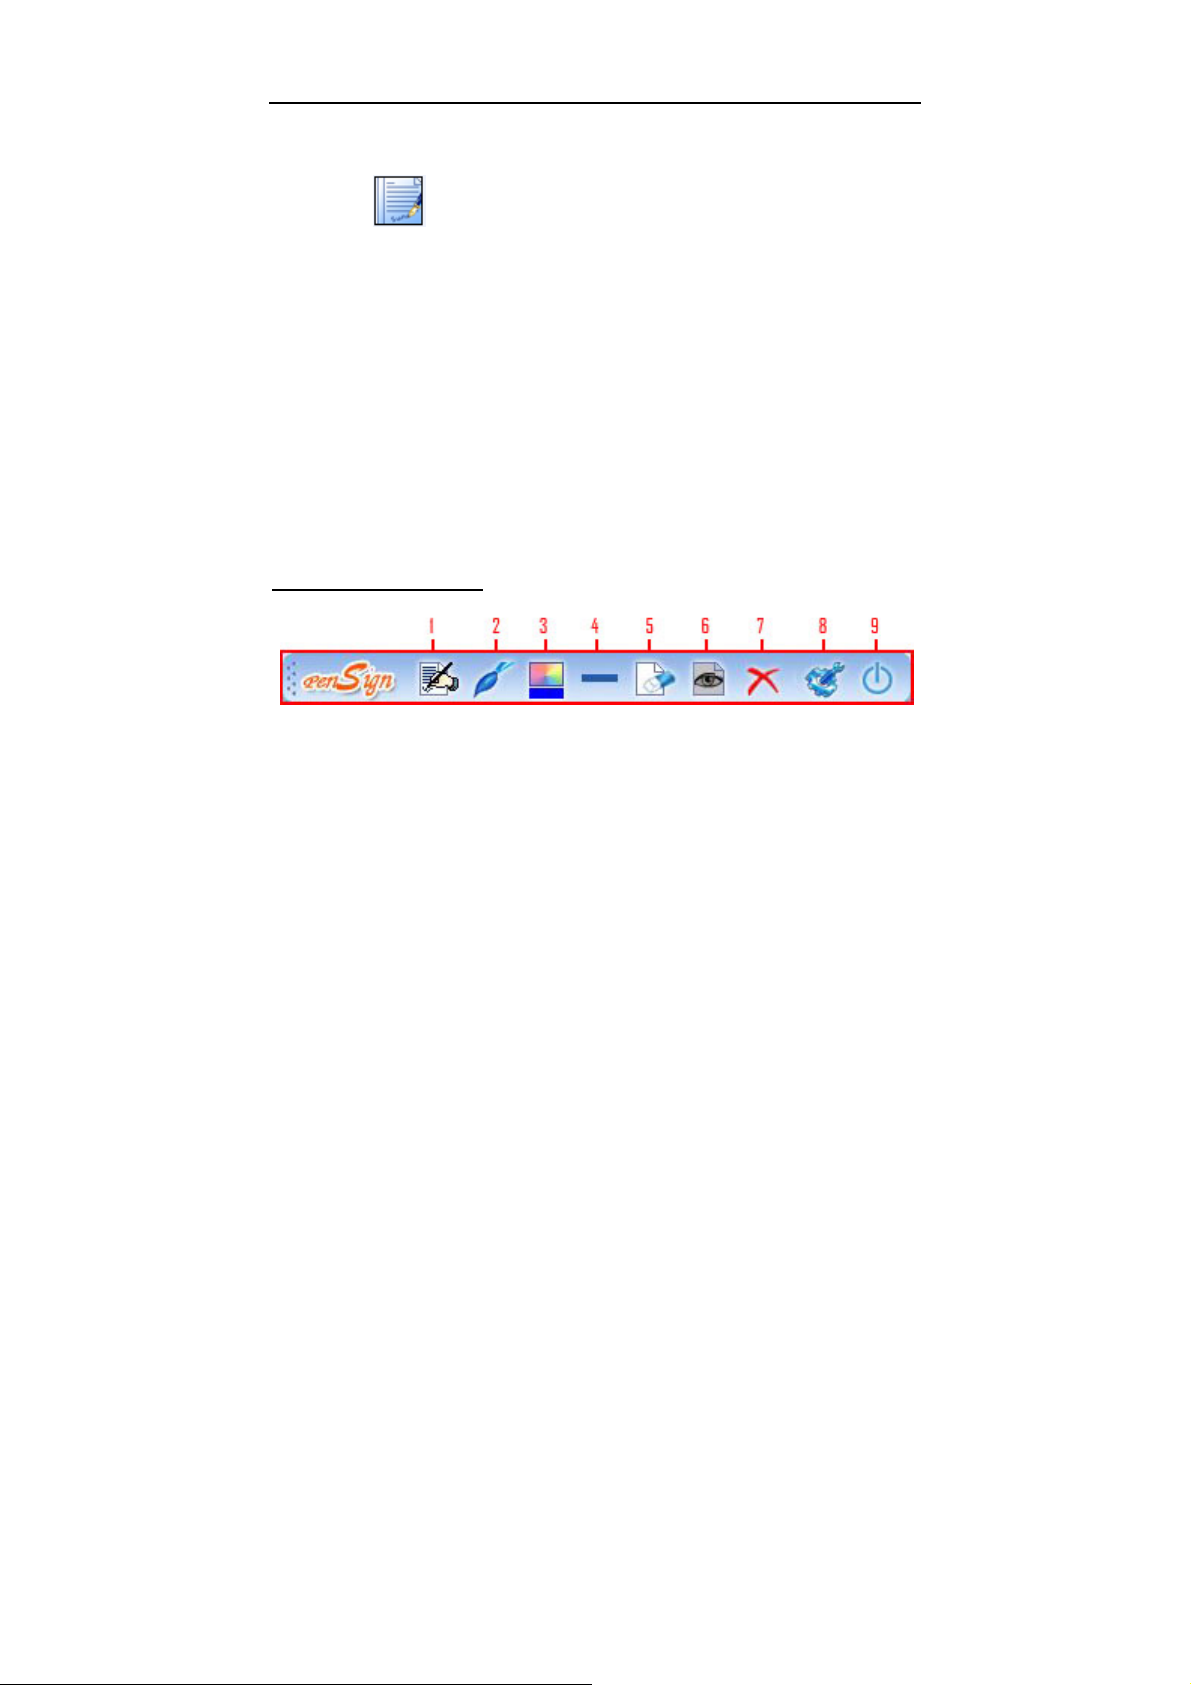
Icon explanations:
1. Start Sign & End Sign;
Start and end to sign;
2. Pen(Brush \ pencil \ Ink Pen)
Select pen type
3. Color
Select line color
4. Width
Select line thickness
5. Clear all
Clear current script
38
Page 43
BUNDLED SOFTWARE
6. Hide Sign & Show Sign
Show or hide your signature
7. Delete Sign
Delete all script
8. System Menu
Help & About
9. Exit
4.4 PenMail
Click to open PenMail application.
39
Page 44

BUNDLED SOFTWARE
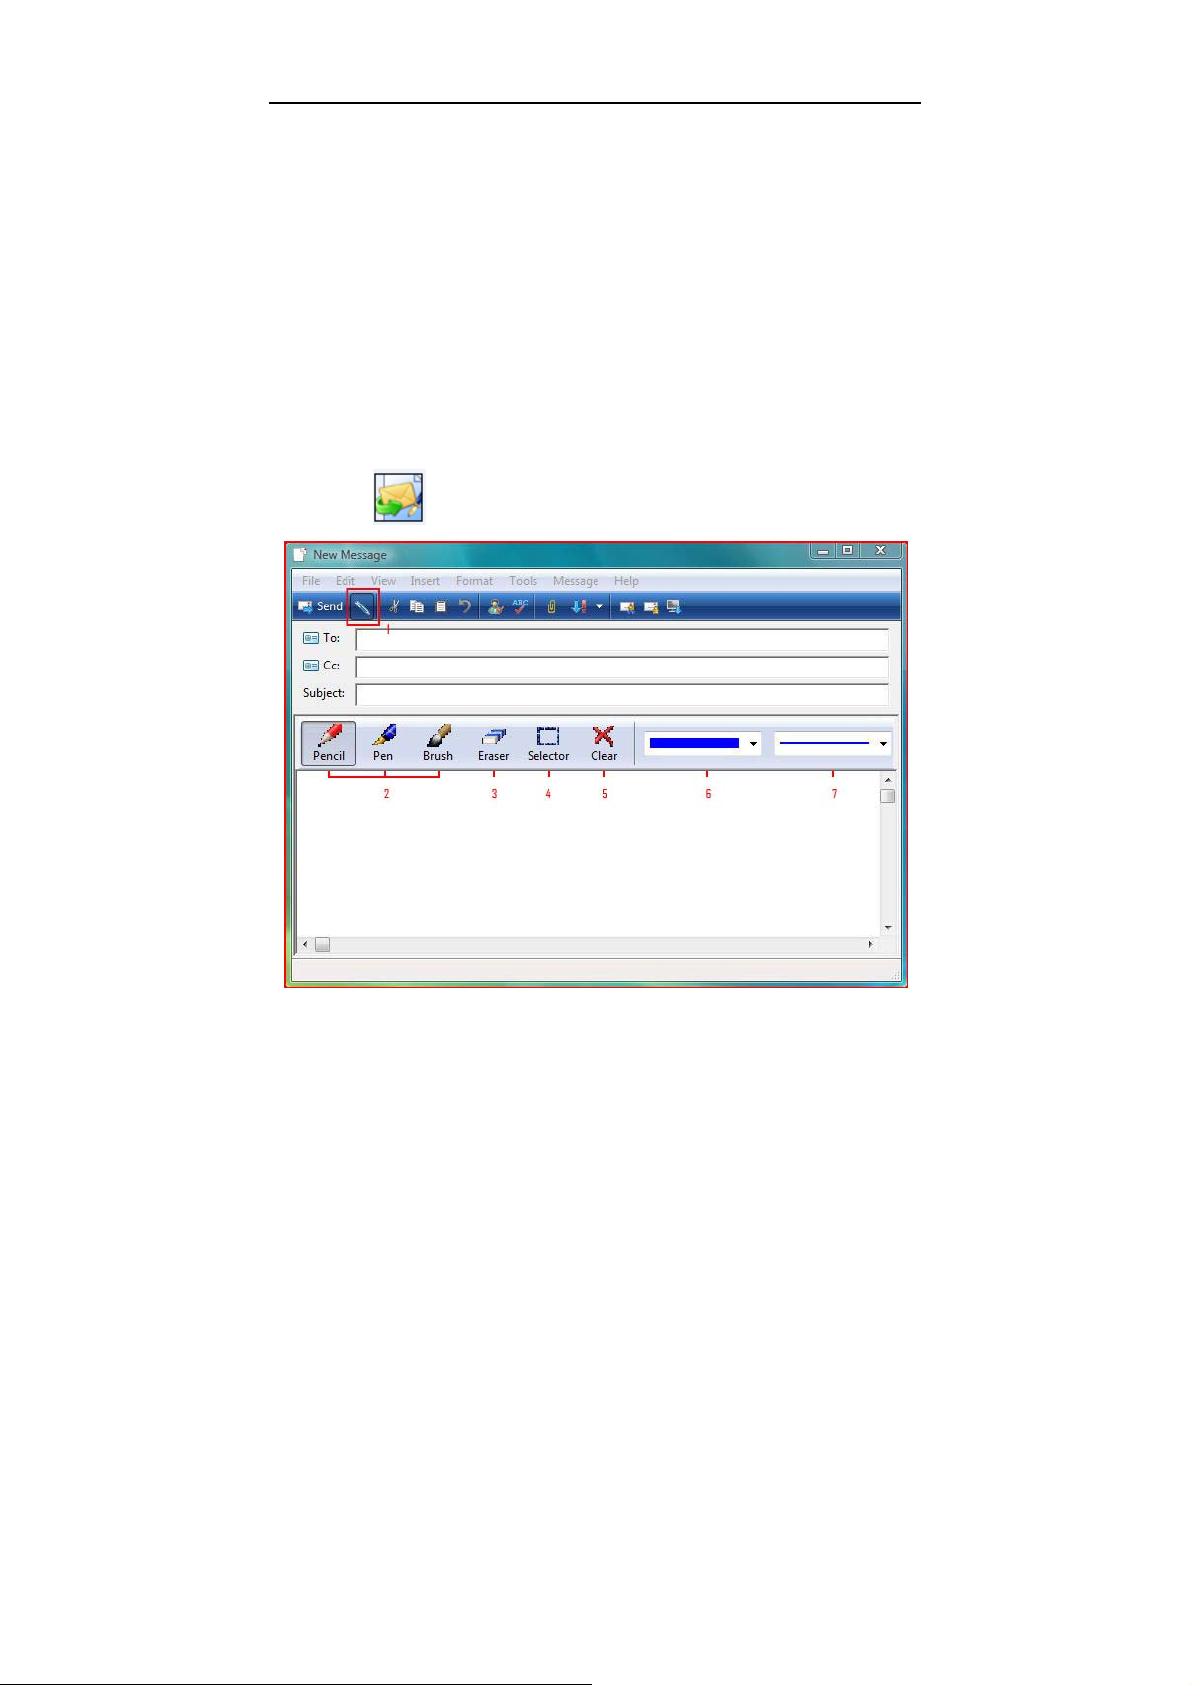
Icon explanations:
1. PenMail
When pressing icon down, it will switch to handwriting
status; and it will return to text editor status when lifting icon
.
2. Pen(Brush \ pencil \ Ink Pen)
Select pen type
3. Eraser
Erase the individual script
4. Selector
Select part script
5. Clear
Clear all script
6. Colors
Select line color
7. Width
Select line thickness
The program can be used in Outlook Express 6.0 and the version
higher in Windows 2000/XP OS, and Windows Mail in Windows Vista
OS. When the system operating is Windows 2000, please install IE6
and Outlook Express 6 or higher version before applying PenMail.
PenMail can also support Vista x32 but not Vista x64;
40
Page 45
BUNDLED SOFTWARE
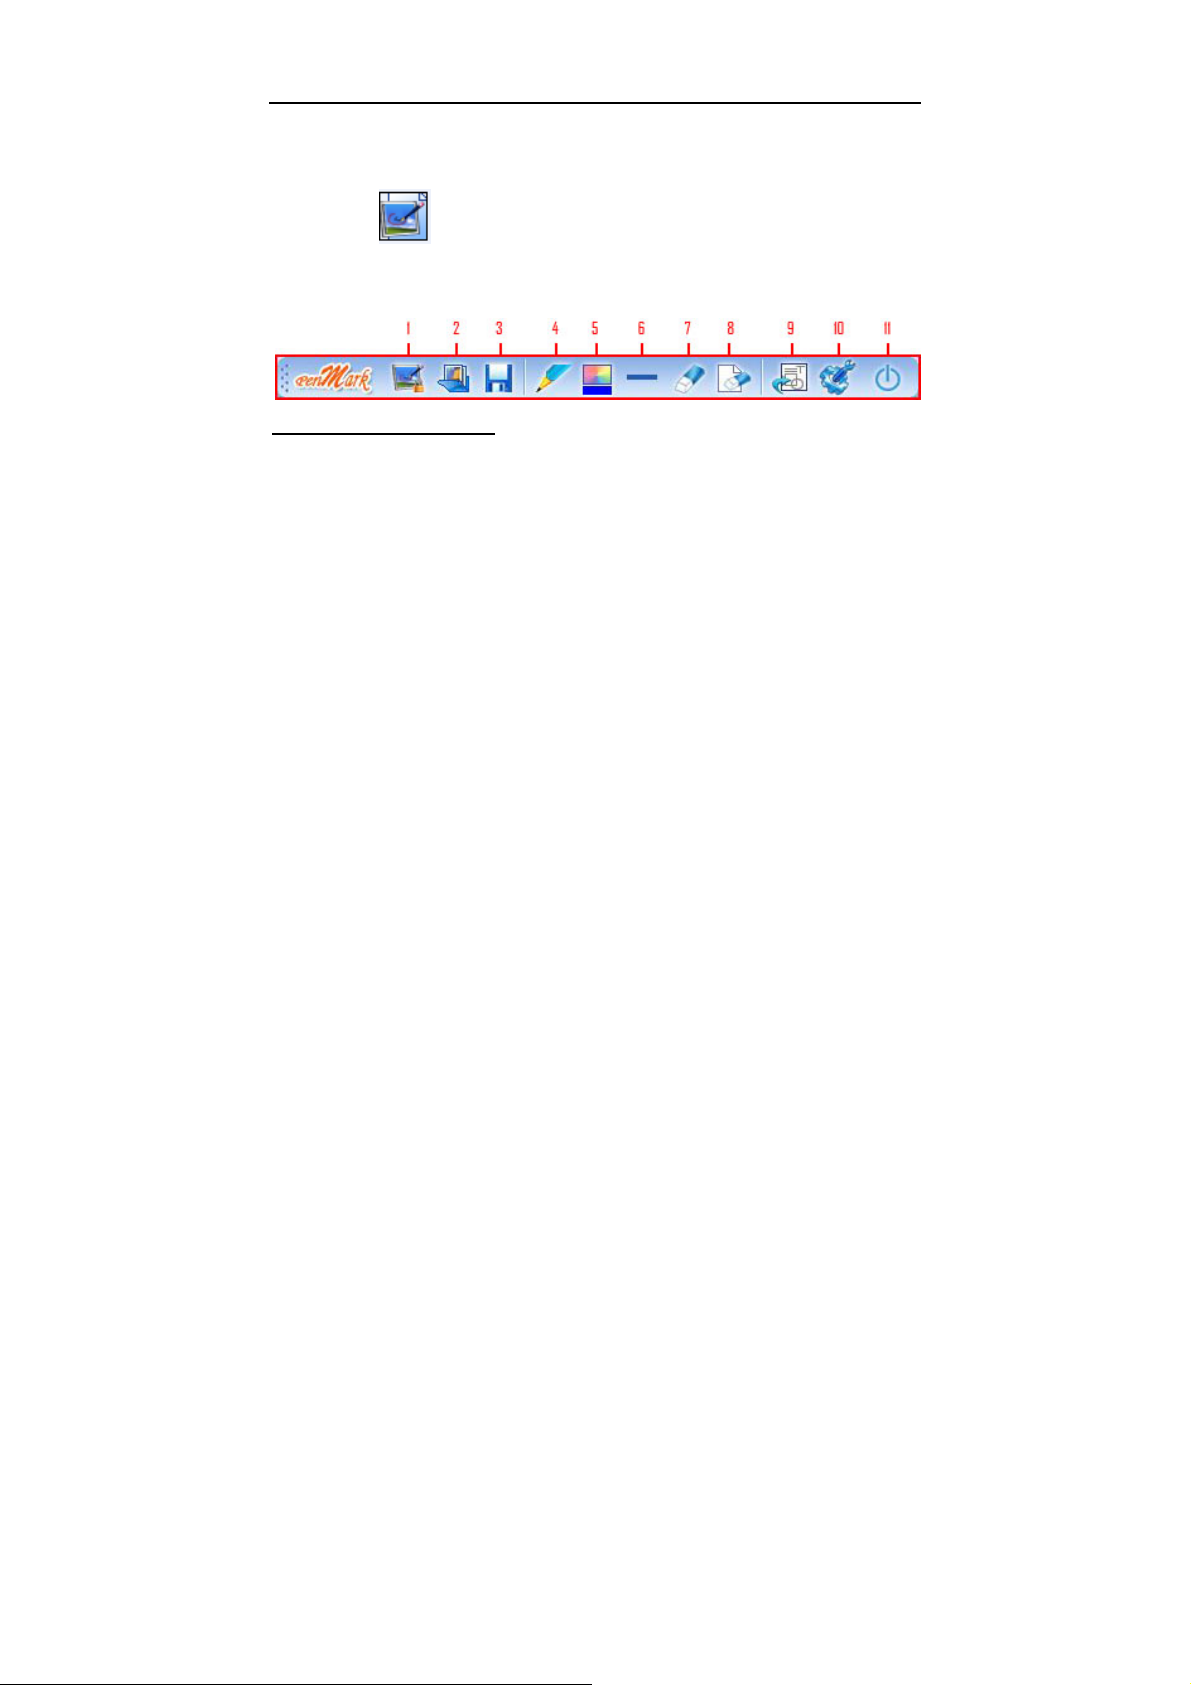
4.5 PenMark
Click to open PenMark application; you can handwrite
marks on the screen or pictures.
Icon explanations:
1. Start\exit screen annotation
2. Open picture
3. Save
z Files can be saved as BMP、JPG、TIF、PNG or GIF format
z Suggest you to select TIF format when the file has several
pages.
z Default saving path:
Settings\Administrator\My Documents\My Pictures.
4. Pen(Brush \ pencil \ Ink Pen\ High Lighter)
Select Pen type
5. Color
Select line color
6. Width
Select line thickness
7. Eraser
Clear part script
8. Clear all
Clear all script
9. Tools
C:\Documents and
41
Page 46
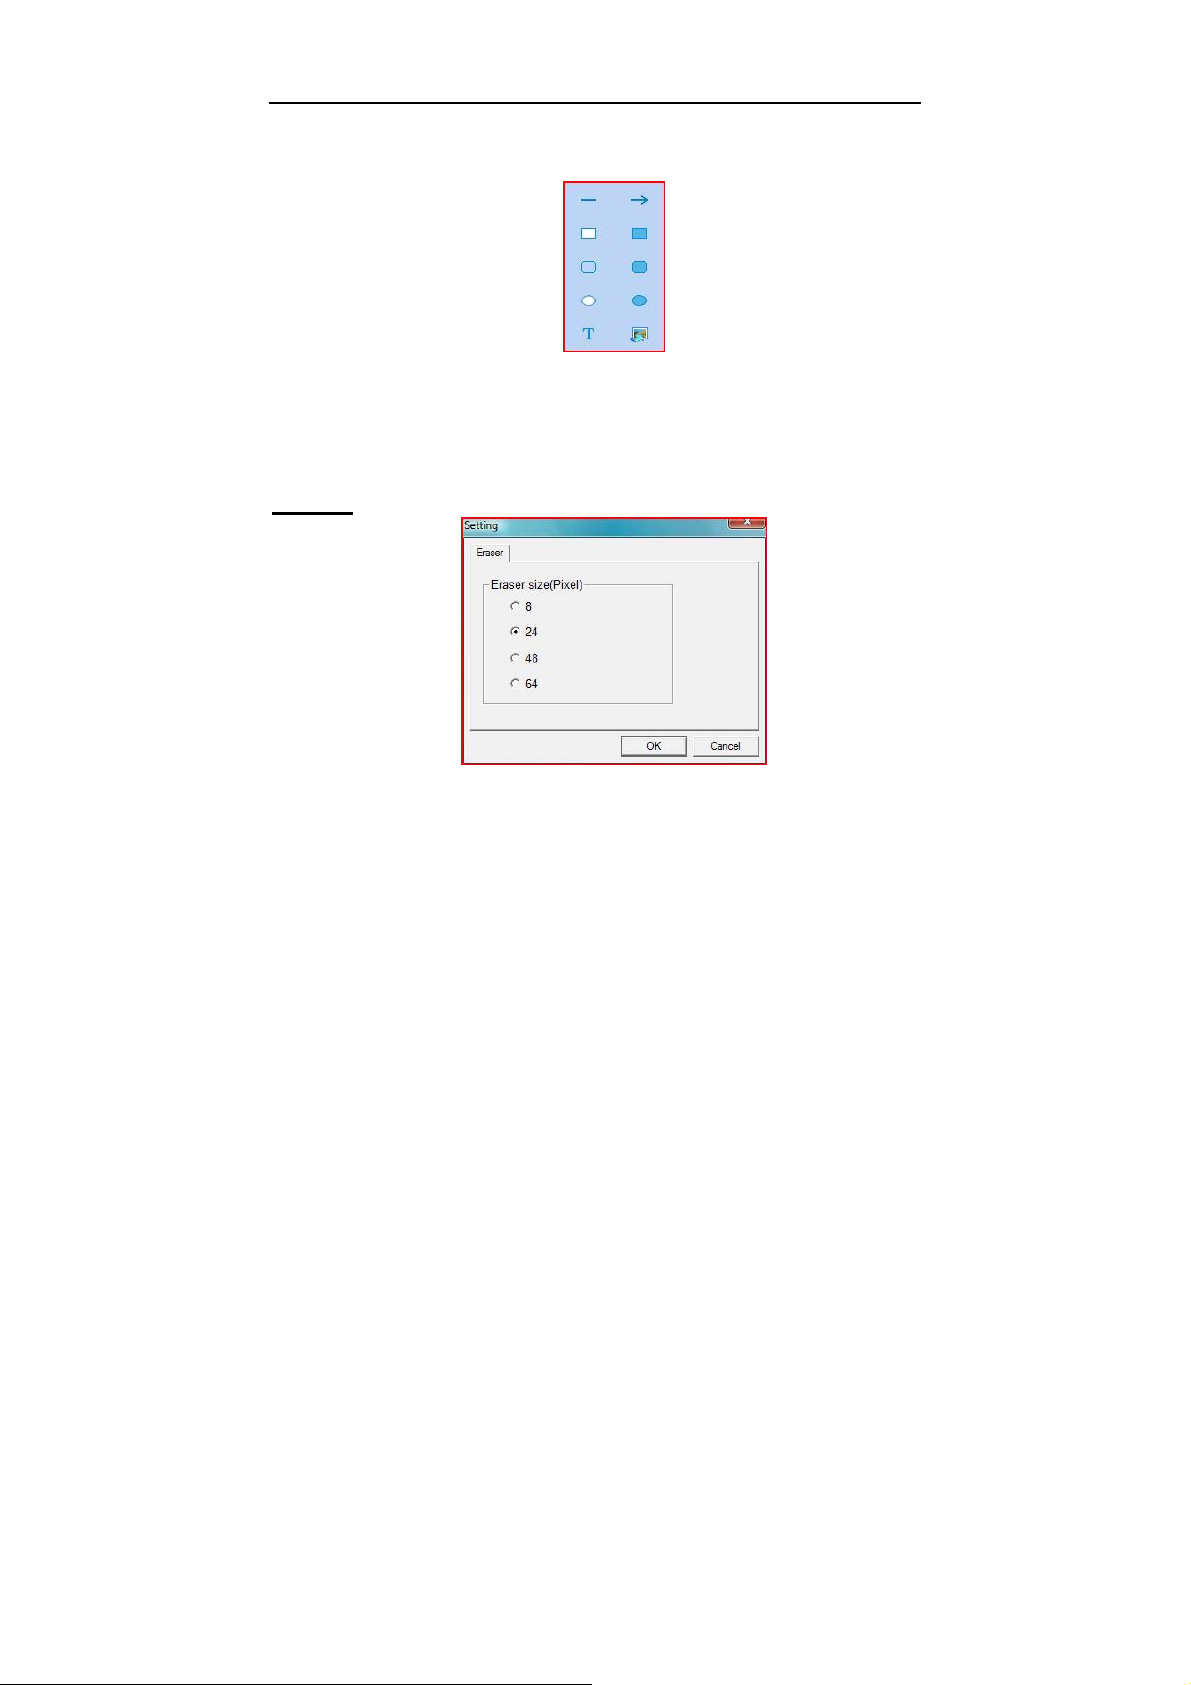
BUNDLED SOFTWARE
Insert line\figure\text\pictures
10. System Menu
Setting、Help、About
11. Exit
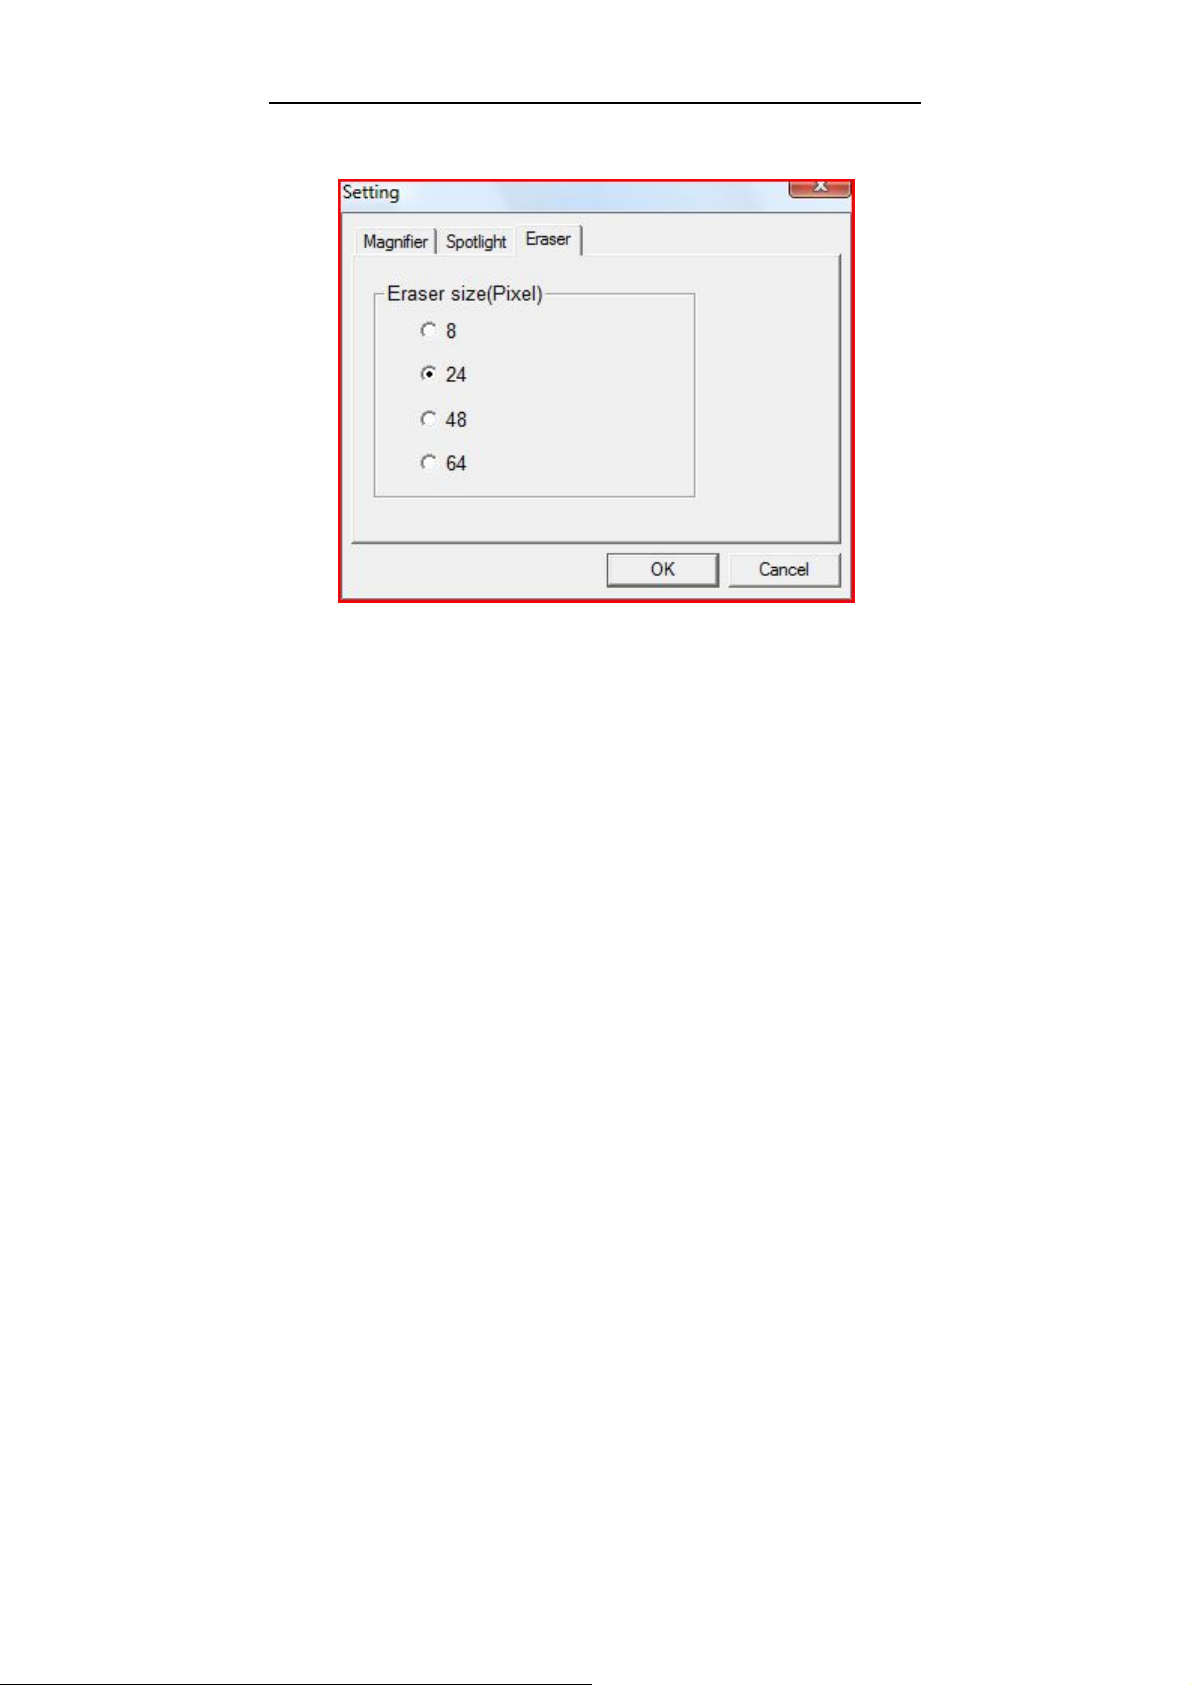
Setting
Setting the size of eraser
42
Page 47
BUNDLED SOFTWARE
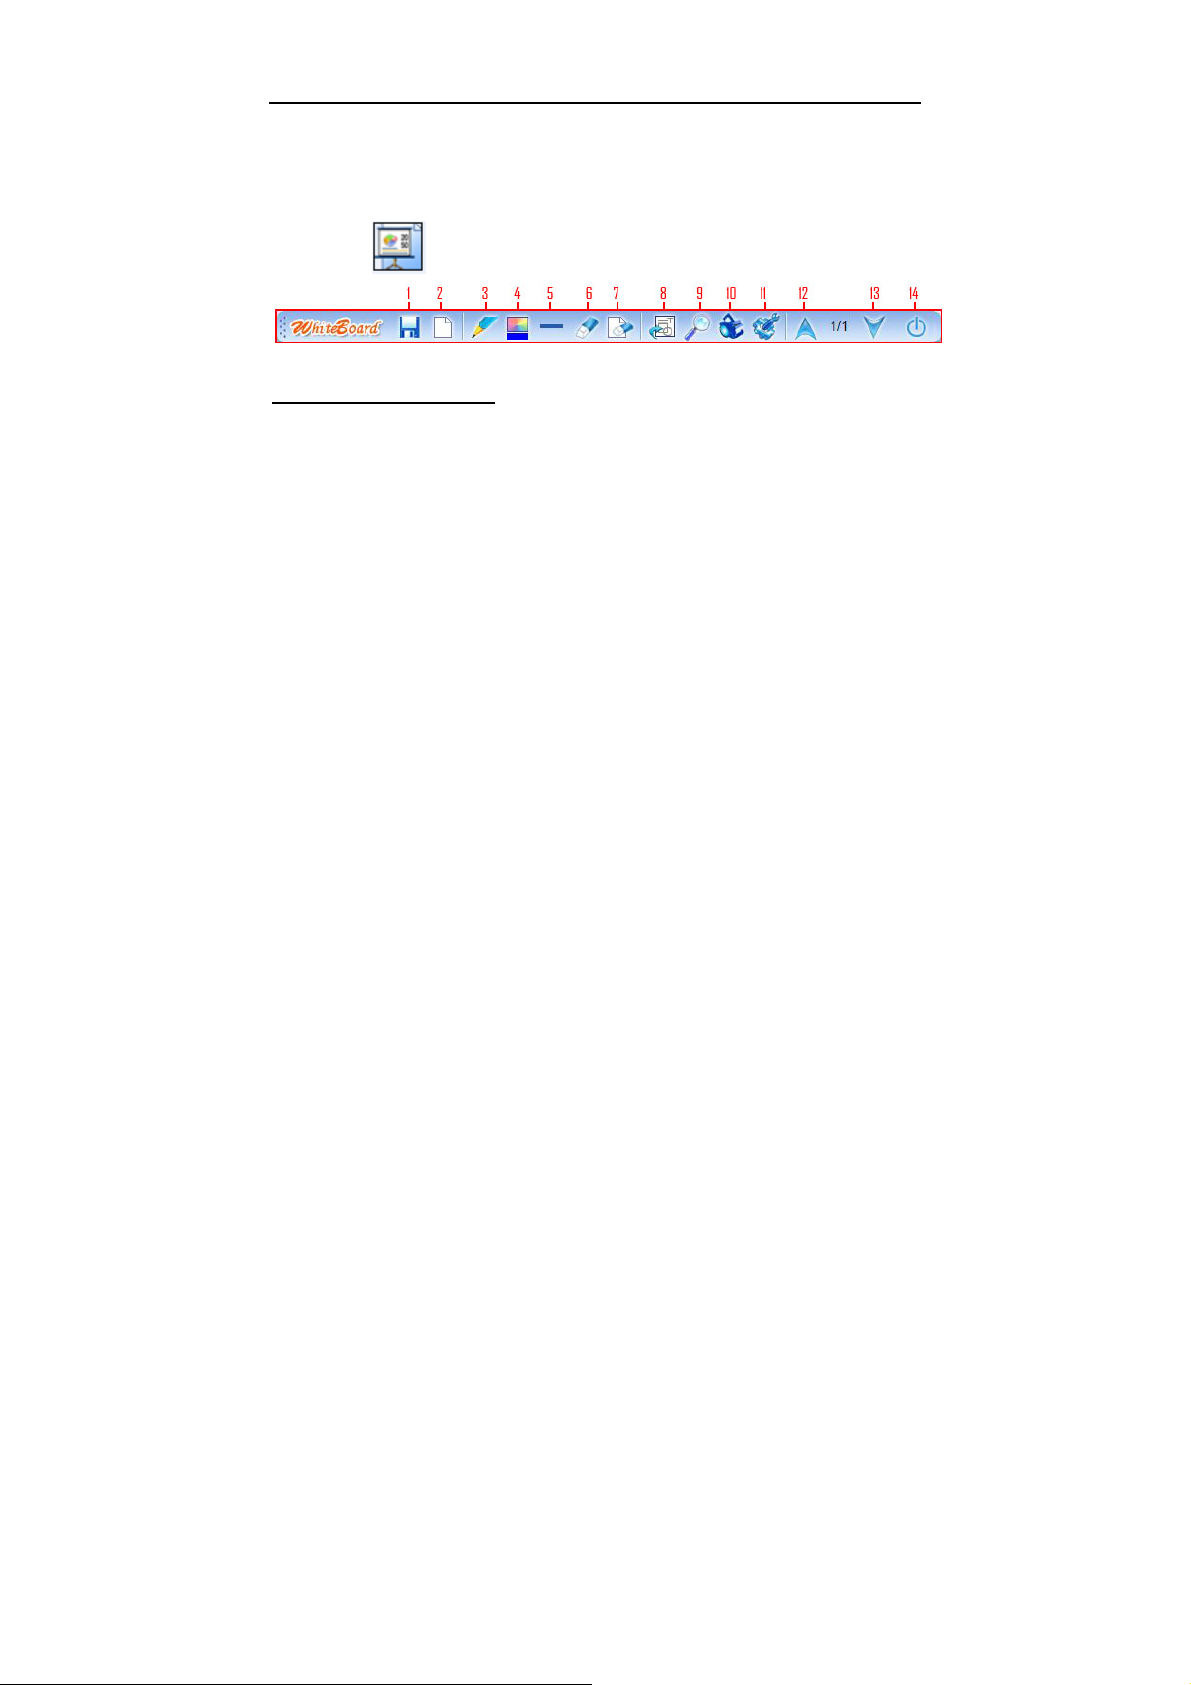
4.6 WhiteBoard
Click to open WhiteBoard application.
Icon explanations:
1. Save
z The document can be saved as BMP、JPG、TIF、PNG or GIF
format
z Suggest you to select TIF format when the document has
multiple pages.
z Default saving path: C:\Documents and
Settings\Administrator\My Documents\My Pictures.
2. New Page
Add a new page
3. Pen (Brush \ pencil \ Ink Pen\ High Lighter)
Select pen type
4. Color
Select line color
5. Width
Select line thickness
6. Eraser
Clear part script
7. Clear all
Clear all script
8. Tools
43
Page 48
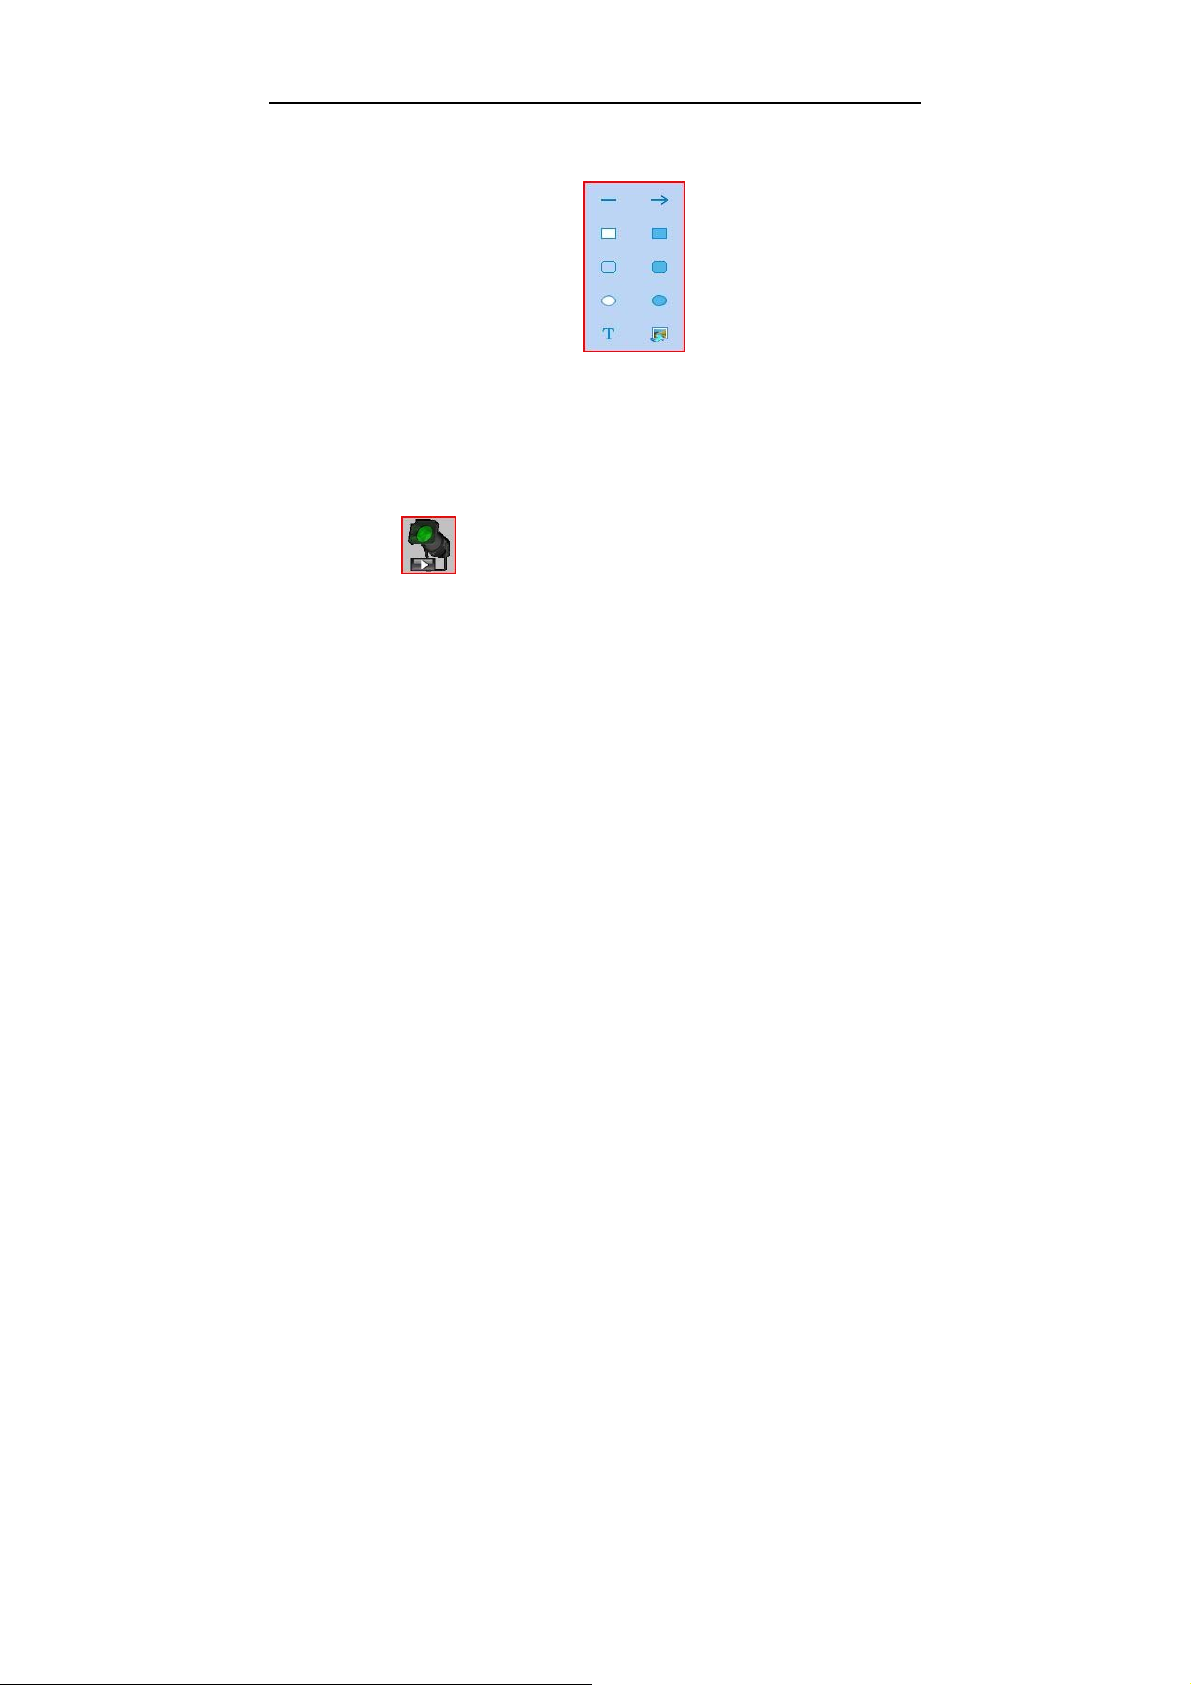
BUNDLED SOFTWARE
Insert Line\figure\text\pictures
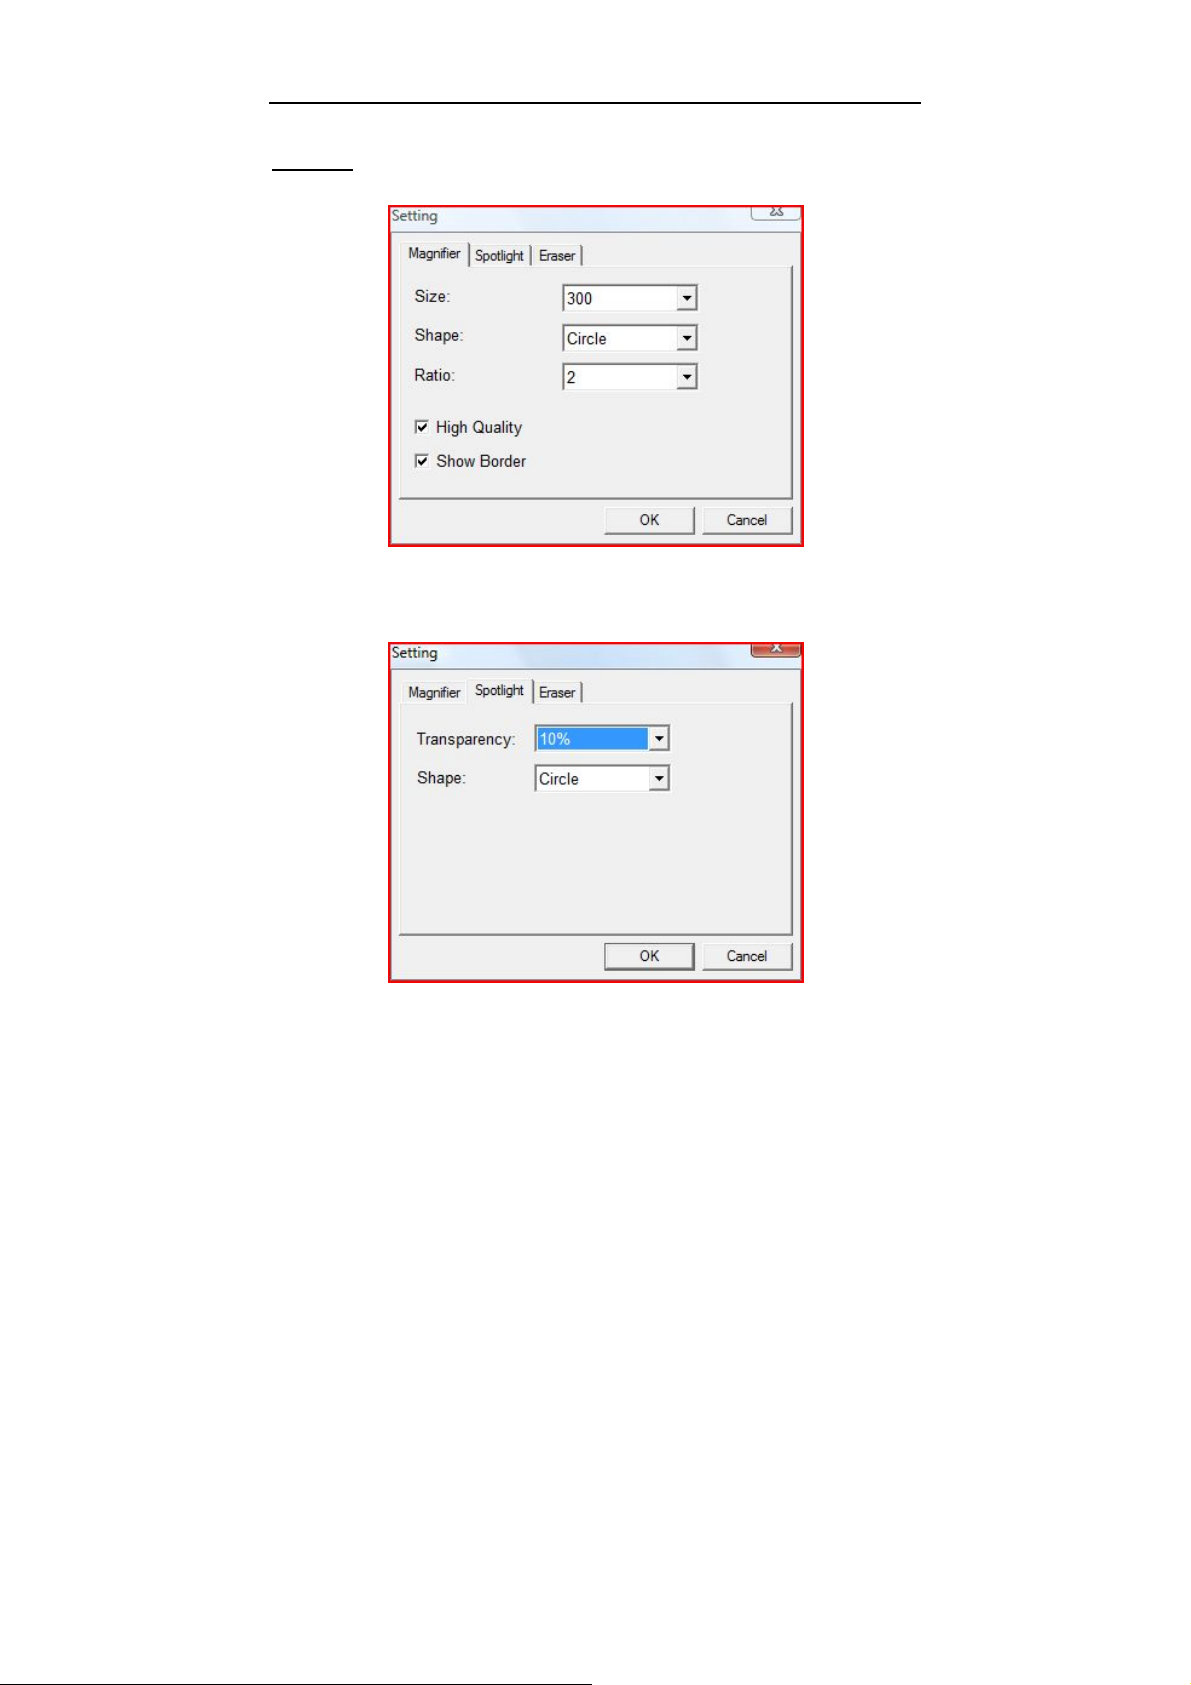
9. Magnifier
z Click the right key, the menu will popup, you can set spotlight
size, shape, radio, high quality display, show border and exit
z Exit the application directly by pressing ESC
10. Spotlight
z Click down arrow, the menu will popup, you can set
spotlight transparency, shape and exit.
z Exit the application directly by pressing ESC
11. System Menu
Setting、Help、About
12. Previous
Turn to previous page
13. Next
Turn to next page
14. Exit
44
Page 49
BUNDLED SOFTWARE
Setting
Setting--Magnifier
Setting magnifier size, shape, ratio, high quality display and show
border
Setting—Spotlight
Setting spotlight transparency and shape
45
Page 50
BUNDLED SOFTWARE
Setting—Eraser
Setting the size of eraser
46
Page 51
1
n
V
H
n
C
o
P
e
M
A
A
i
c
P
d
oPentow
S
e
a
n
P
r
c
g
e
r
r
e
t
r
INTEN
NCE
5.
Pen H
Fro
t View of
ertical Pen
a.
b.
orizontal P
Fro
t view with
hapte
lder
en Holder
Slot
n Slot
pen placed
r 5 Ma
Ba
a.
Sli
to
Nib
b.
c. P
in horizont
ntena
k View of
en Nib Sto
e the swit
pen, then
Nib Stora
ard red do
Storage
torage hol
n Nib Exch
l slot
ce
en Holde
age
h toward g
pick pen ni
e; slide th
t to close
for extra p
ange
een dot
bs from
switch
he Pen
en nibs
47
Page 52
Fro
n
2
t
n
o
A
N
P
b
n
o
A
s
c
c
e
s
b
s
t view with
5.
Excha
z
Insert the
pen out of
z
Pulling out
After pullin
in Pen Nib
M
pen placed
ge Pen
ld nib to
the pen nib
the pen ni
g the pen o
Exchanger.
INTEN
in vertical
ib
en Nib Ex
exchanger.
ut of the ex
NCE
lot
hanger, hol
hanger, th
d tight and
old pen ni
pull the
stayed
z
Insert a ne
No
e: The pen
w pen nib i
holder is n
to the pen.
t included
48
in all serie
of product
. If you
Page 53

MAINTENANCE
purchased the product does not have the pen holder as mentioned
above, please using tweezers, grasp the nib and draw it out. Once
removed, a new nib may be inserted into the pen.
5.3 Cautions
Do not put the tablet on a metal surface, such as iron or aluminum
alloys.
Due to a CRT monitor’s electromagnetic radiation, do not use the
drawing tablet too close to a CRT monitor.
49
Page 54

APPENDIX
Appendix
Warranty
Limited Warranty
Hanvon Corporation warrants that this product is free from any
defects in workmanship or materials under normal use and conditions
for a period of two (2) years for Europe and one (1) year for other
region from the date of original purchase. If such a defect is
discovered within this warrant’s limitations, Hanvon agrees, at its sole
discretion, to repair or replace the same item with one of equal value,
free of charge to the original consumer purchaser.
This warranty shall not apply if this product is modified, misused,
tampered with, subject to abnormal working conditions, or transferred
to someone other than the original consumer purchaser.
Warranty Redemption for US Market Only
Should this product fail to function in a satisfactory manner, please
return it to the store where it was originally purchased. Please be sure
to contact us at [email protected] to obtain a Return Merchandise
Authorization Number before you return it, and within your email
please include your name, address, phone number, a copy of the
original receipt, serial number and the reasons for returning the
product.
Should this fail to resolve the matter and service is still required by
reason of any defect or malfunction during the warranty period,
Hanvon Corporation will repair or replace this product without charge
(except for a charge for handling, packing, return UPS/postage, and
insurance).
50
Page 55

APPENDIX
Technical Support
Should you have any questions or comments, please contact us via
[email protected], or visit our website at:
Global site: http://www.hanvon.com
US site: http://usa.hanvon.com
Online Registration for US Market Only
To better serve our customers, please take the time to register online
at http://usa.hanvon.com. This information is for internal use only. No
information provided will be distributed to soliciting organizations.
The registration also allows you to receive valuable information and
enjoy special savings on upgrades for products.
Thank you for choosing Hanvon products.
51
 Loading...