

Page 1
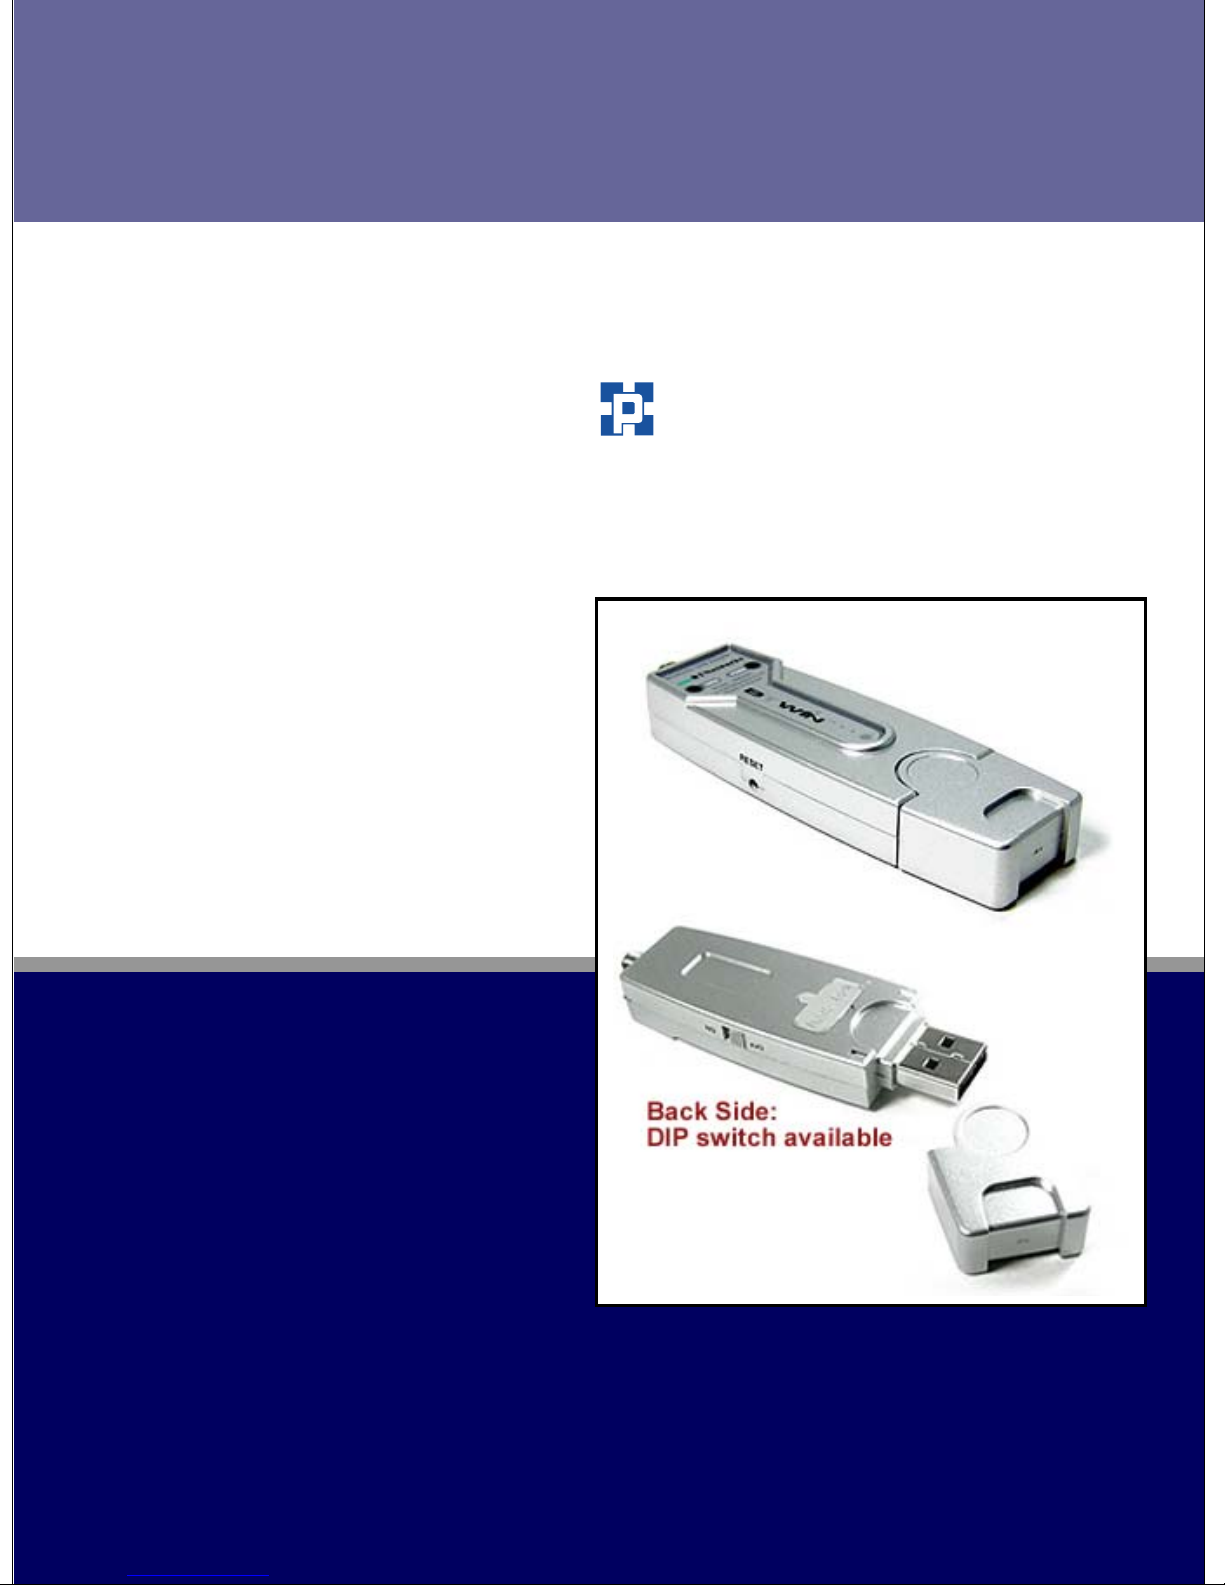
Bluetooth USB
Serial Adaptor
HANTZ + PARTNER
The Upgrade Company! www.hantz.com
Model name: BM2001
User Manual ver 3.2
BTNetworks Co., LTD 2005 08.24 Ver 3.0
ABOUT BM2001
Class 1 / USB Interfac
DIP switch is available for a second setting
4dBi Dipole Antenna provided
e
:
Page 2

Contents
1. About BM2001 (Bluetooth USB Serial Adaptor)......................... 3
2. Comparison with General Bluetooth USB dongle ..................... 5
3. External View ................................................................................ 6
4. Range information with External Antennas ............................... 7
5. Specification & Power Consumption.......................................... 7
6. Description on DIP Switch ........................................................... 8
6.1 Function Selection Switch .......................................................................... 9
6.1.1 Selection of Role (Master / Slave) .................................................... 9
6.1.2 Selection of Configuration Method.................................................. 10
6.2 Baud Rate Switch....................................................................................... 11
6.2.1 Selection of Baud Rate ................................................................... 11
7. LED indication / Reset Switch ................................................... 12
7.1 LED indication............................................................................................ 13
7.2 Reset Switch............................................................................................... 13
8. Installation of BM2001 device driver......................................... 14
8.1 Installation of device driver ...................................................................... 14
8.1.1 Windows 98 & Windows 2000 ........................................................ 14
8.1.2 Windows XP.................................................................................... 19
8.2 Uninstallation of device driver.................................................................. 23
8.3 Setting-up COM Port for BM2001 ............................................................. 24
8.3.1 Windows 98..................................................................................... 24
8.3.2 Windows 2000 & Windows XP........................................................ 25
9. Configuration of BM2001 ........................................................... 27
9.1 Configuration By DIP Switch .................................................................... 27
9.1.1 Communication Test at 9600bps (default setting)........................... 28
9.1.2 Communication Test at 115,200bps (buad rate change) ................ 30
9.2 Configuration By PC Software.................................................................. 32
9.2.1 Pre-setting....................................................................................... 32
9.2.2 How to do PC configuration ............................................................ 34
Appendix: Bluetooth Operation Mode of BM series ...................... 43
Page 3
1. About BM2001 (Bluetooth USB Serial Adaptor)
Bluetooth USB Serial Adapter, BM2001 is a product that is developed, designed and
produced by Firmtech Co, ltd. (formerly BTnetworks Inc.). It is for replacement of standard
RS232 cable perfectly, with USB interface, so can be easily adopted for upcoming
industrial machines which do not have legacy RS232 interface.
Security of Bluetooth wireless communication is very strong because it use the
frequency hopping and 128bit encryption in 2.4Ghz frequency range.
Hardware setting is very easy and simple.
- The maintenance is very convenience.
- One pair of BM2001 will try to connect automatically whenever powered up.
It needs an installation of the USB device driver.
- Doesn’t need to install the application software.
You can choose various configuration with DIP Switch (In DIP-Switch mode)
- Set Baud Rate (1,200 bps ~ 115,200 bps)
- Set the Role as Master or Slave
- Select Mode: DIP-Switch Configuration mode or PC configuration mode
BM2001 does not required external power supply as it gets power from USB port.
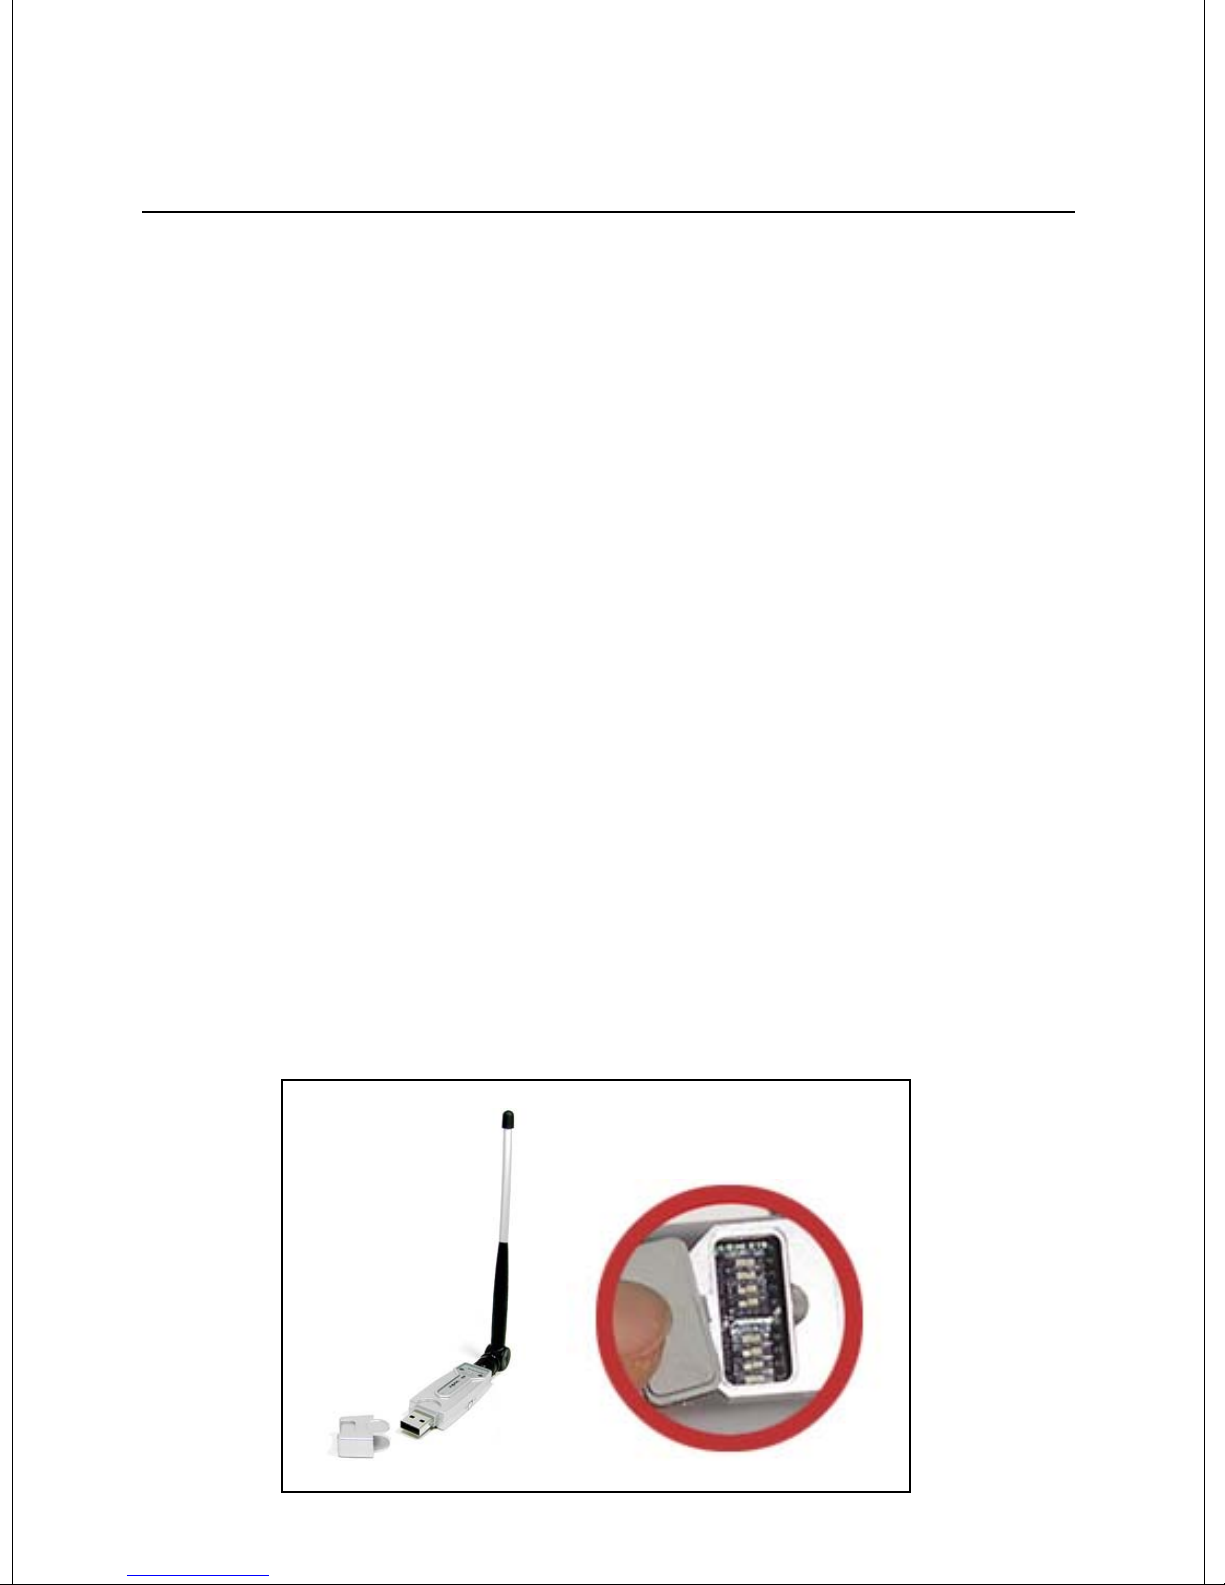
<Fig.1.1 BM2001 with default Dipole (4dBi) antenna & DIP switch>
Page 4
Configuartion by DIP switch or by PC software.
Users may do configuration either via DIP switch on the backside of BM2001, or via
AT commands in Hyperterminal in PCs.
By DIP switch By PC software
Device Name = BTNetworks
Baud rate = 9600 bps
Data Bit = 8 Bit
Default
Setting
Selectable
Values
*NOTE: DIP witch mode is Default for configuration.
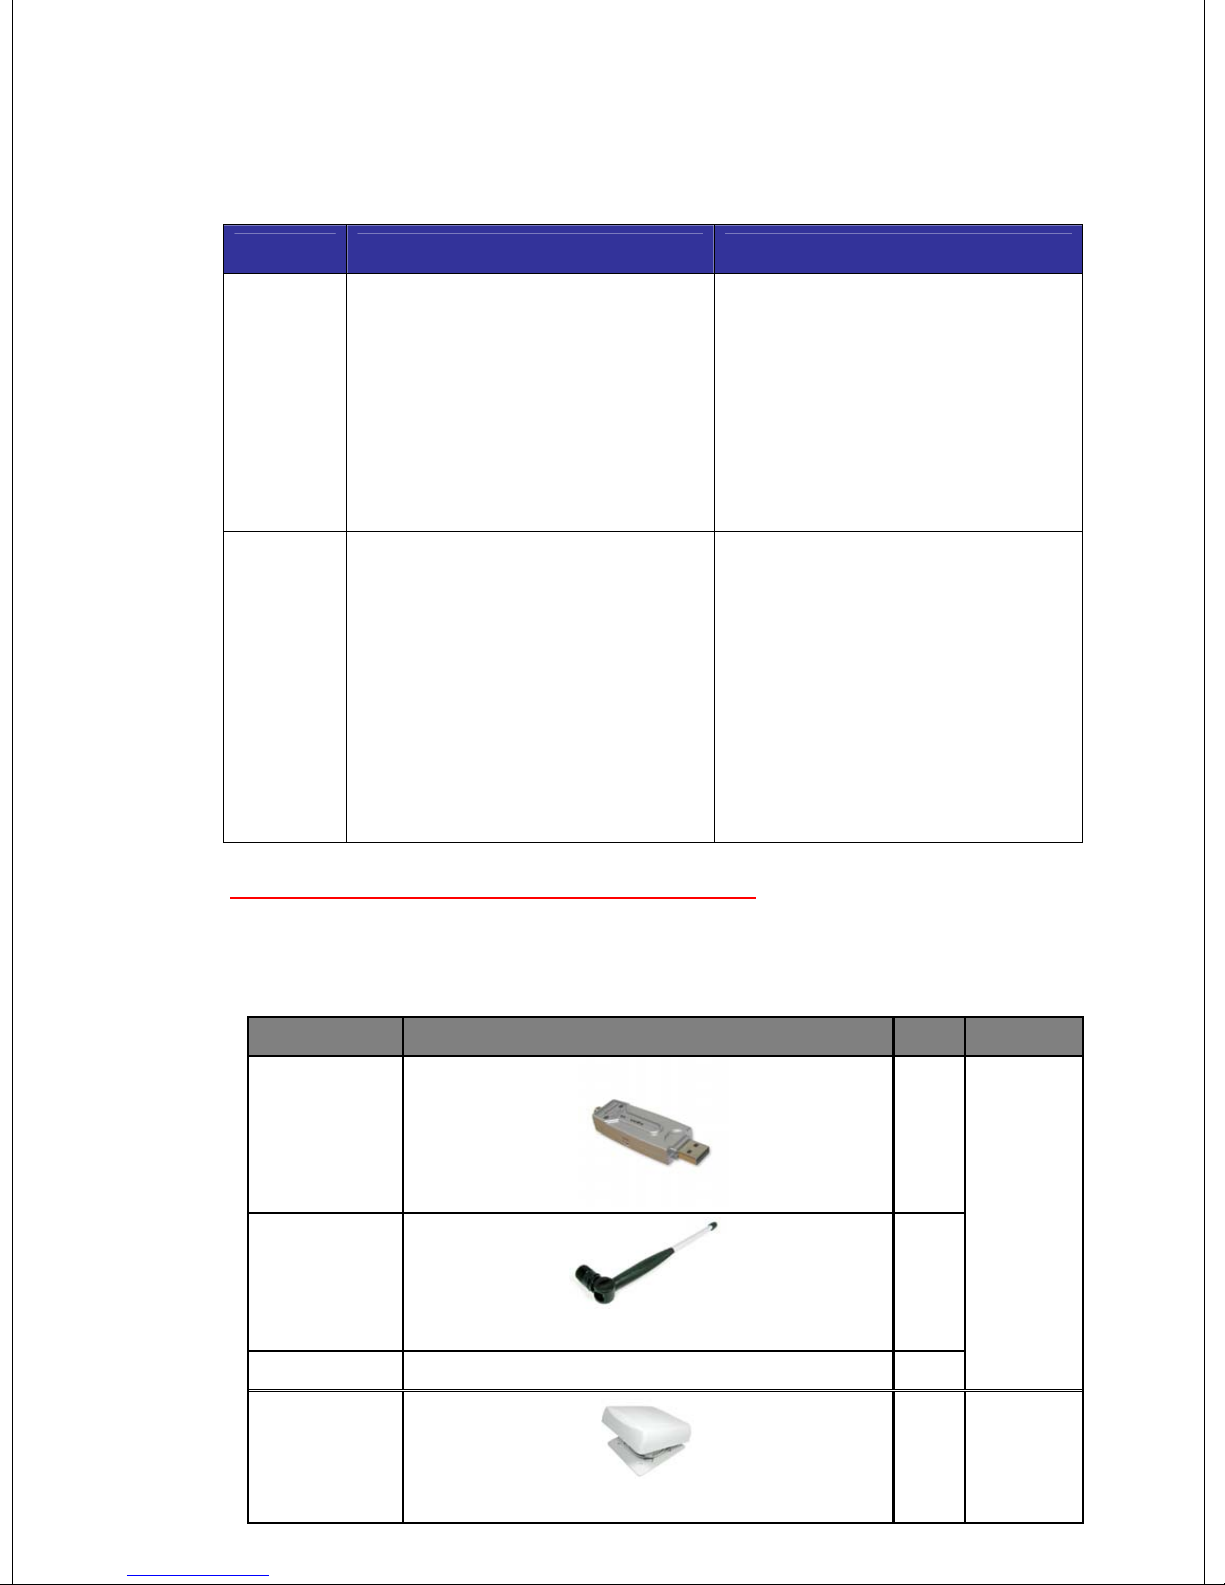
Package Constitution
Stop Bit =1 Bit
Parity Bit =No Parity Bit
Hardware flow Control = None
Role = MASTER or SLAVE
Set Baud rate
Select Role
- Master
- Slave
Select Mode
- DIP Switch Mode
- PC Configuration Mode
PIN Code = BTWIN
Operating Mode = MODE1
Baud rate = 9600 bps
Data Bit = 8 Bit
Stop Bit =1 Bit
Parity Bit =No Parity Bit
Hardware flow Control = None
ROLE = MASTER
Set device name
Set Pin Code
View Local BD Address
Set Remote BD Address
Select Role (Master/ Slave)
Search for bluetooth device and
Connect new device
Set Baud rate
Set Stop bit
Set Parity bit
Set Hardware flow control
Model no. Pictures Q’ty Ramarks
BM2001
BM-DiANT
CD BTWIN™ BM2001User’s Guide CD
BM-PANT
(4 dBi)
External Antenna (8 dBi)
1ea
1ea
1ea
Default
Optional
Buy
Page 5
2. Comparison with General Bluetooth USB dongle
Items
Limitation -
Hardware View
Software View
Device driver
Application Software
Bluetooth Profile
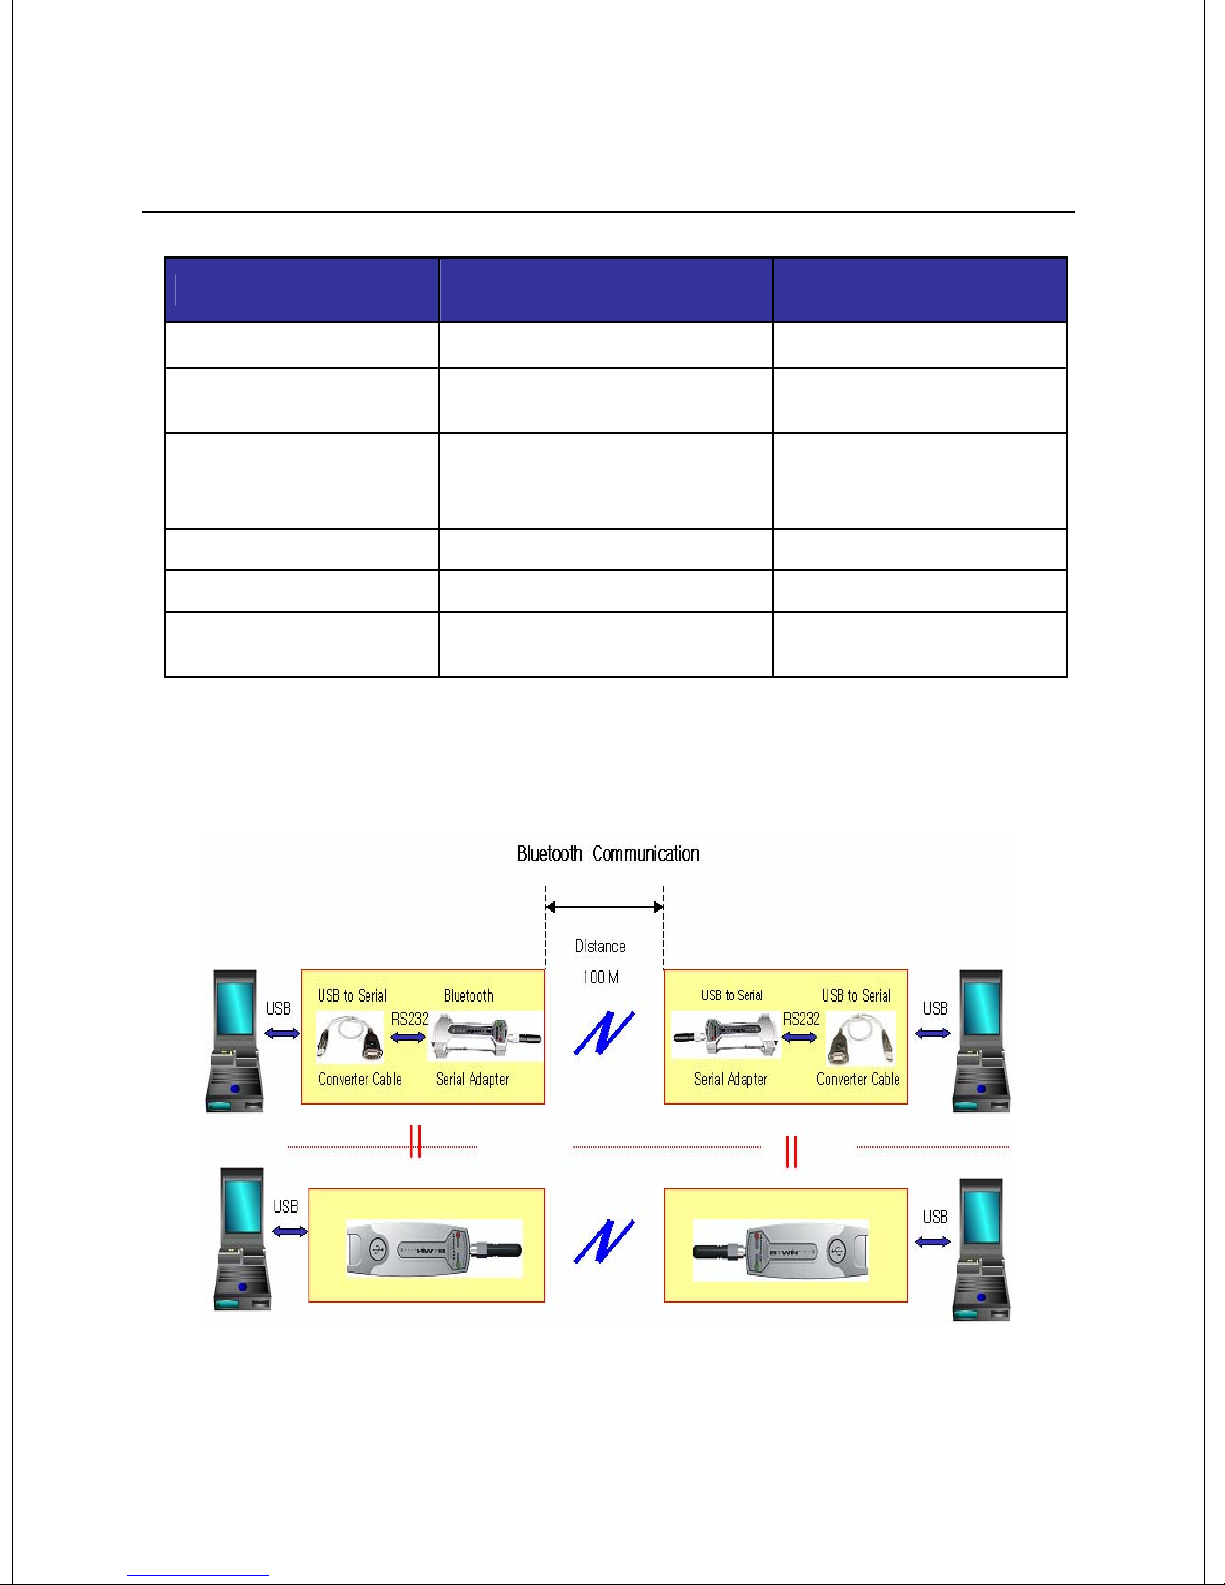
As Bluetooth USB serial adaptor (BM2001) has USB-to-Serial conversion feature, users may
simply plug in to the USB port of the machine with USB interface. BM2001 does not require
application software like WIDCOMM stack.
Bluetooth USB Serial Adapter
(BM2001)
Included USB-to-Serial
Convertion feature.
Included SPP firmware
to act as Stand-alone Bluetooth
Serial Adaptor.
Requires Requires
Does NOT require
SPP
General Bluetooth USB
Dongle
Works only with PC
Bluetooth Application
software works on the PC.
Requires
SPP, PAN, DUN, LAN, HID
etc
<Figure 2.1 Bluetooth communication by BM2001>
Page 6
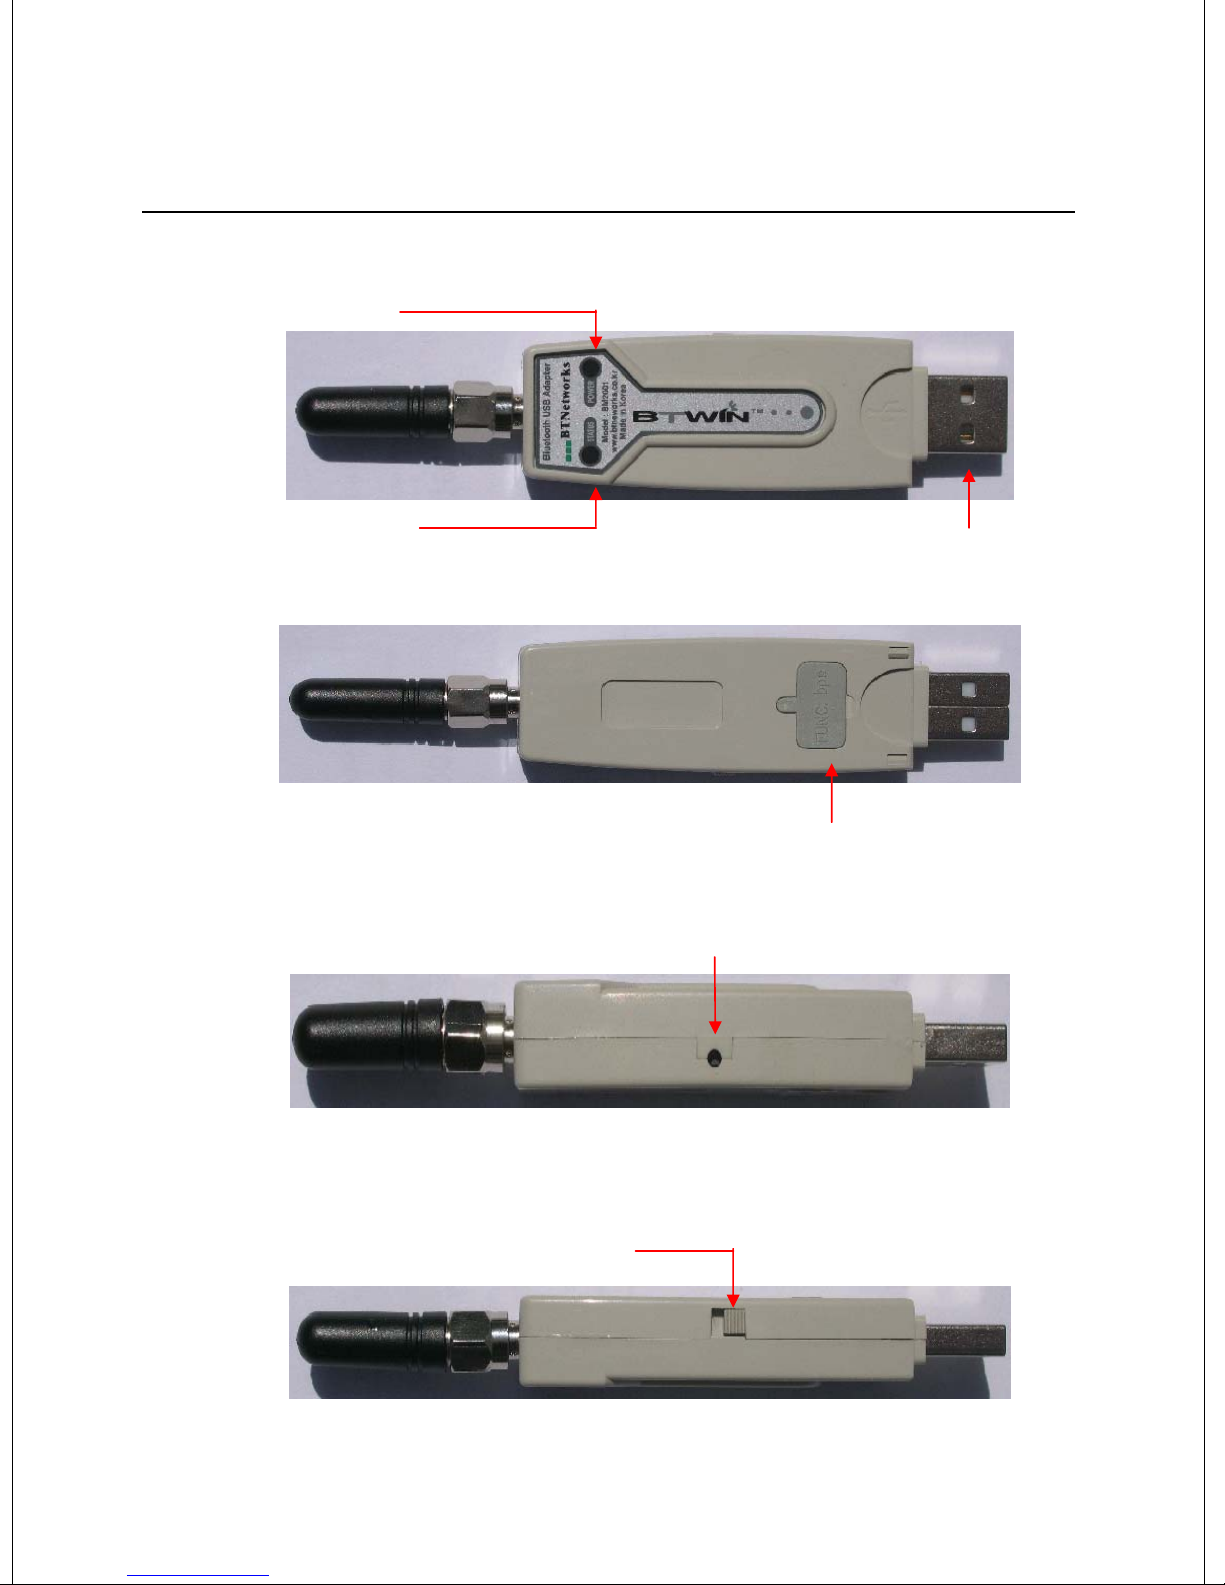
3. External View
Power LED
Status LED
USB Port
<TOP View>
<Bottom View>
<Left View>
Power Switch
Reset Switch
DIP Switch Cover
<Right View>
Page 7
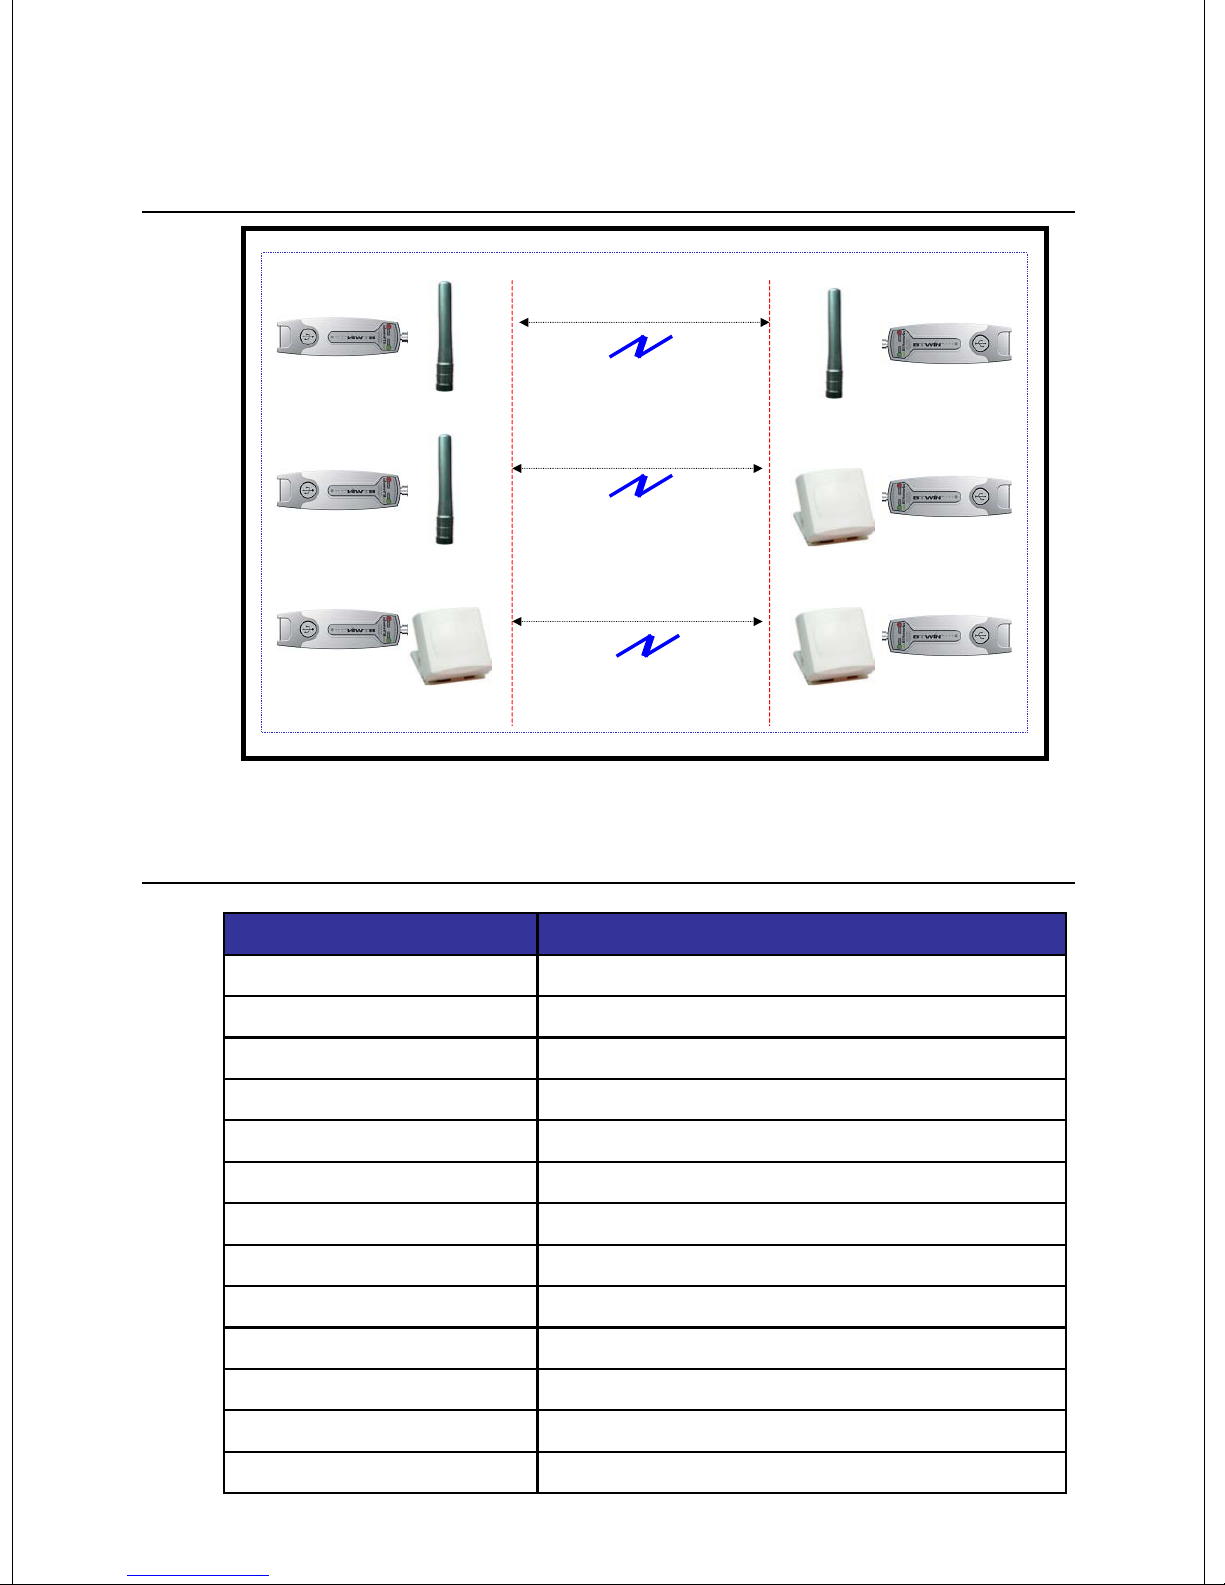
4. Range information with External Antennas
BM2001
Dipole Antenna
Antenna gain : 4dB
BM2001
Dipole Antenna
Antenna gain : 4dB
Blueooth Communication
BM2001
Blueooth Communication
Patch Antenna
Antenna gain : 8dB
100 m
Blueooth Communication
100 - 300 m
300 - 600 m
5. Specification & Power Consumption
Dipole Antenna
Antenna gain : 4dB
Patch Antenna
Antenna gain : 8dB
Patch Antenna
Antenna gain : 8dB
BM2001
BM2001
BM2001
Part Specification
Bluetooth Spec. Bluetooth Specification V1.2
Communication distance 100 M
Frequency Range 2.4 GHz ISM Band
Sensitivity -83dBm (Typical)
Transmit Power 10dBm (Typical)
Size 66 * 31 mm
Support Bluetooth Profile SPP
Input Power 4 - 15 V
Current Consumption Maximum 100 mA
Operating Temperature
-10℃ ~ 70℃
Communication Speed 1,200bps ~ 115,200bps
Antenna Dipole Antenna (4 dBi)
PC interface USB
Page 8
Power Consumption
Mode Current Remark
Standby 20 ㎃
Device Searching 73 ㎃
Pairing 55 ㎃
Before Connection 73 ㎃
After Connection 50 - 55 ㎃
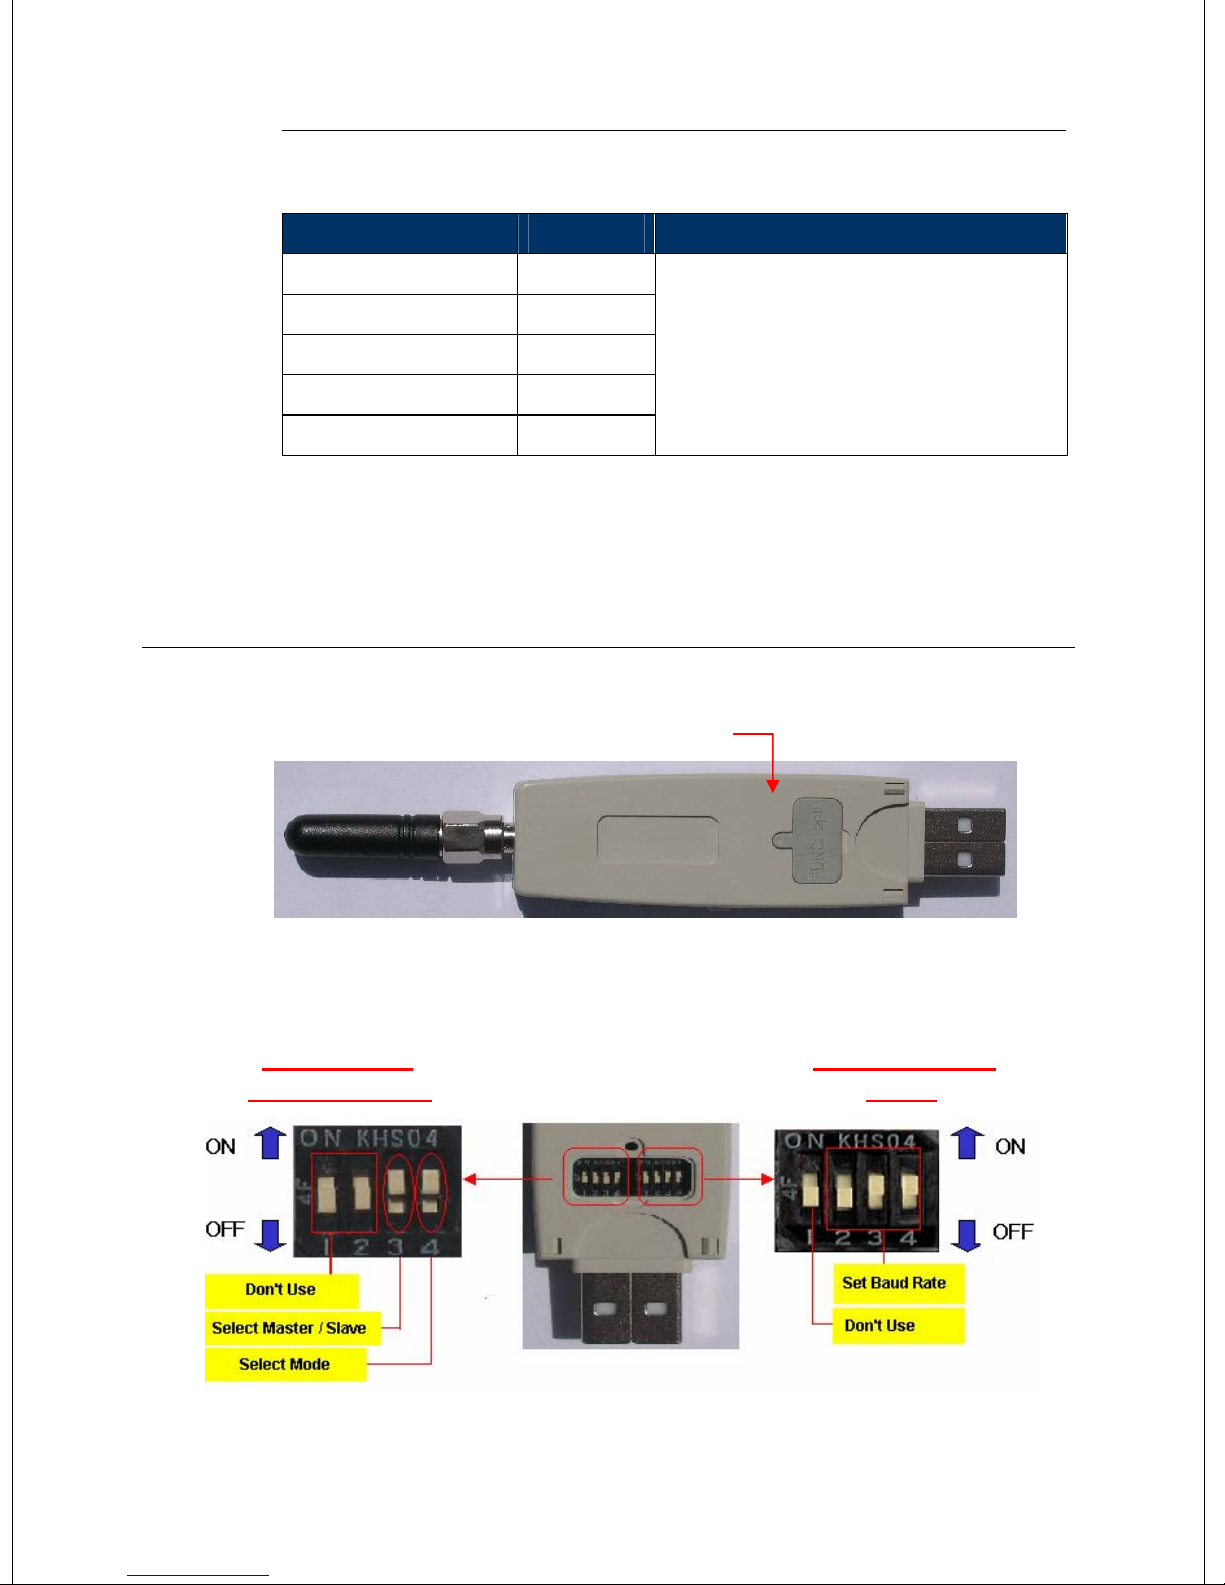
6. Description on DIP Switch
DIP Switch Cover
Test Environment
- Baud rate is 9600 bps
- Input Voltage is 5V.
Power consumption depends on
communication speed and the environment.
<Bottom View>
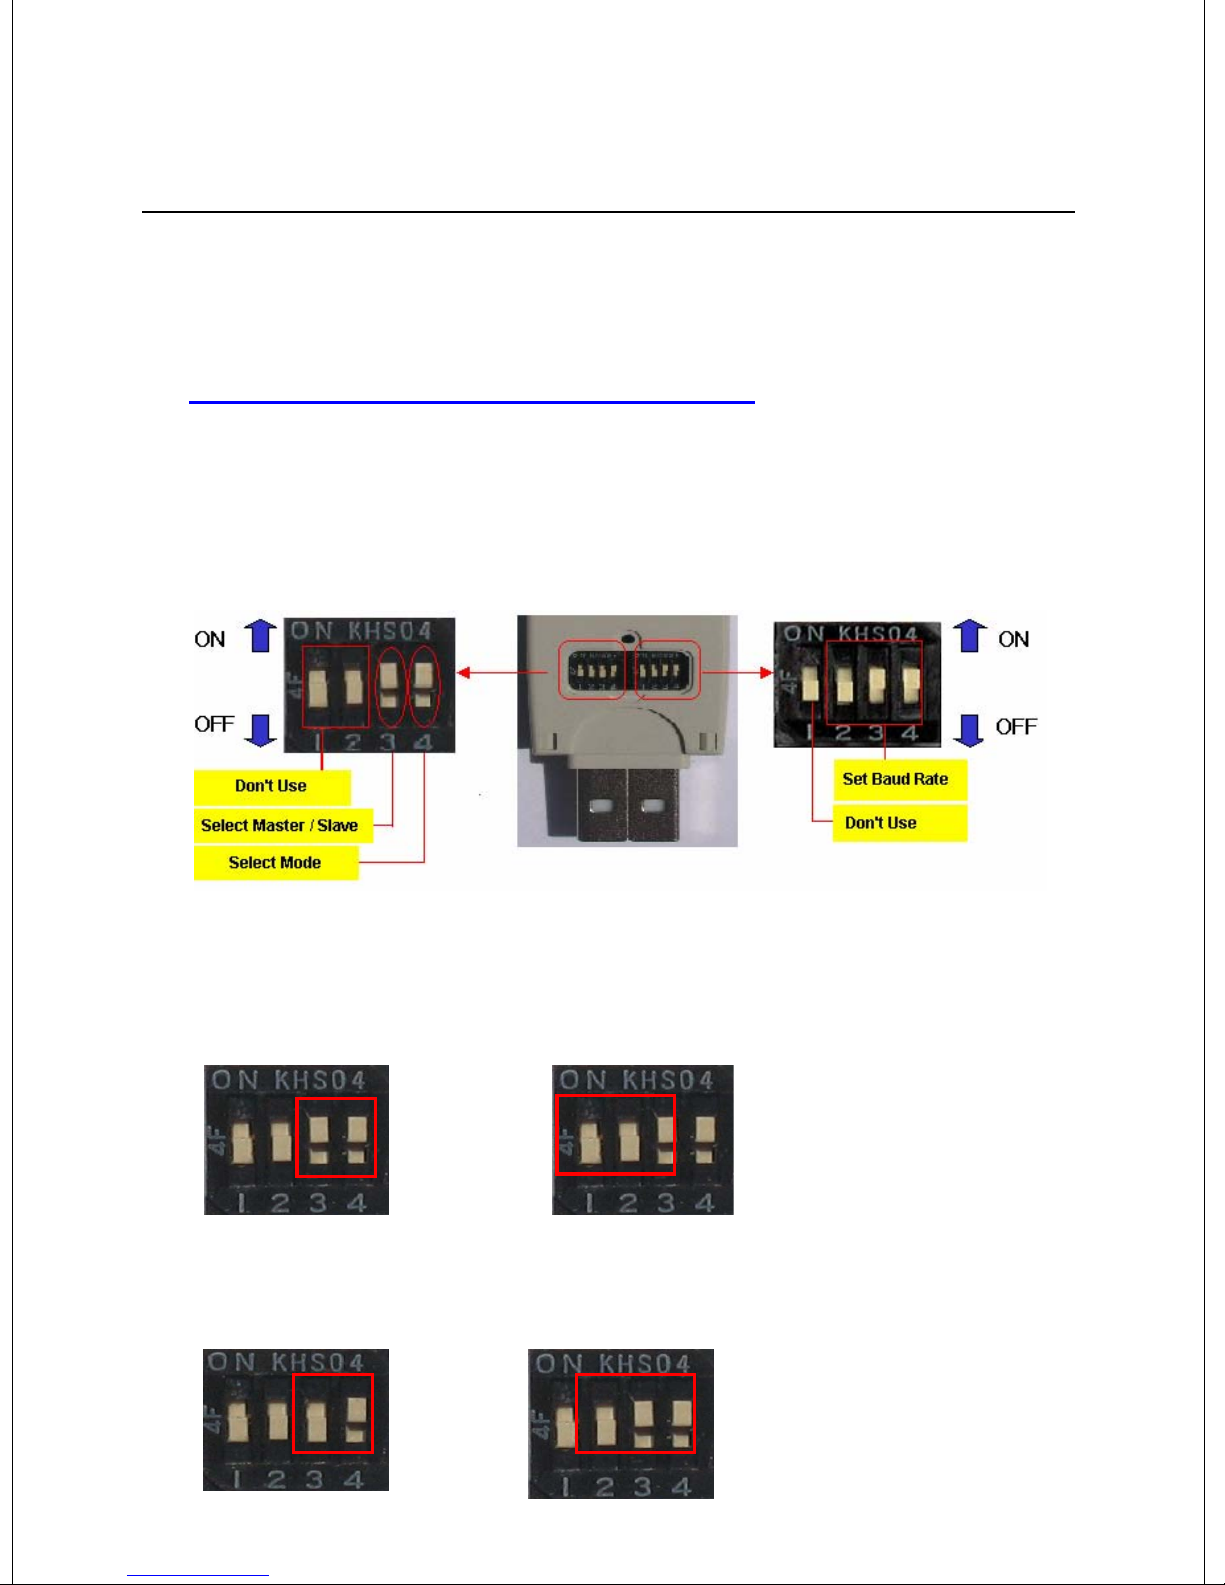
Open the DIP-switch cover, and you can see the below picture.
Left: Function
Selection Switch
<Fig. 6.1. Descripton of DIP switch>
Right: Baud Rate
Switch
Page 9
6.1 Function Selection Switch
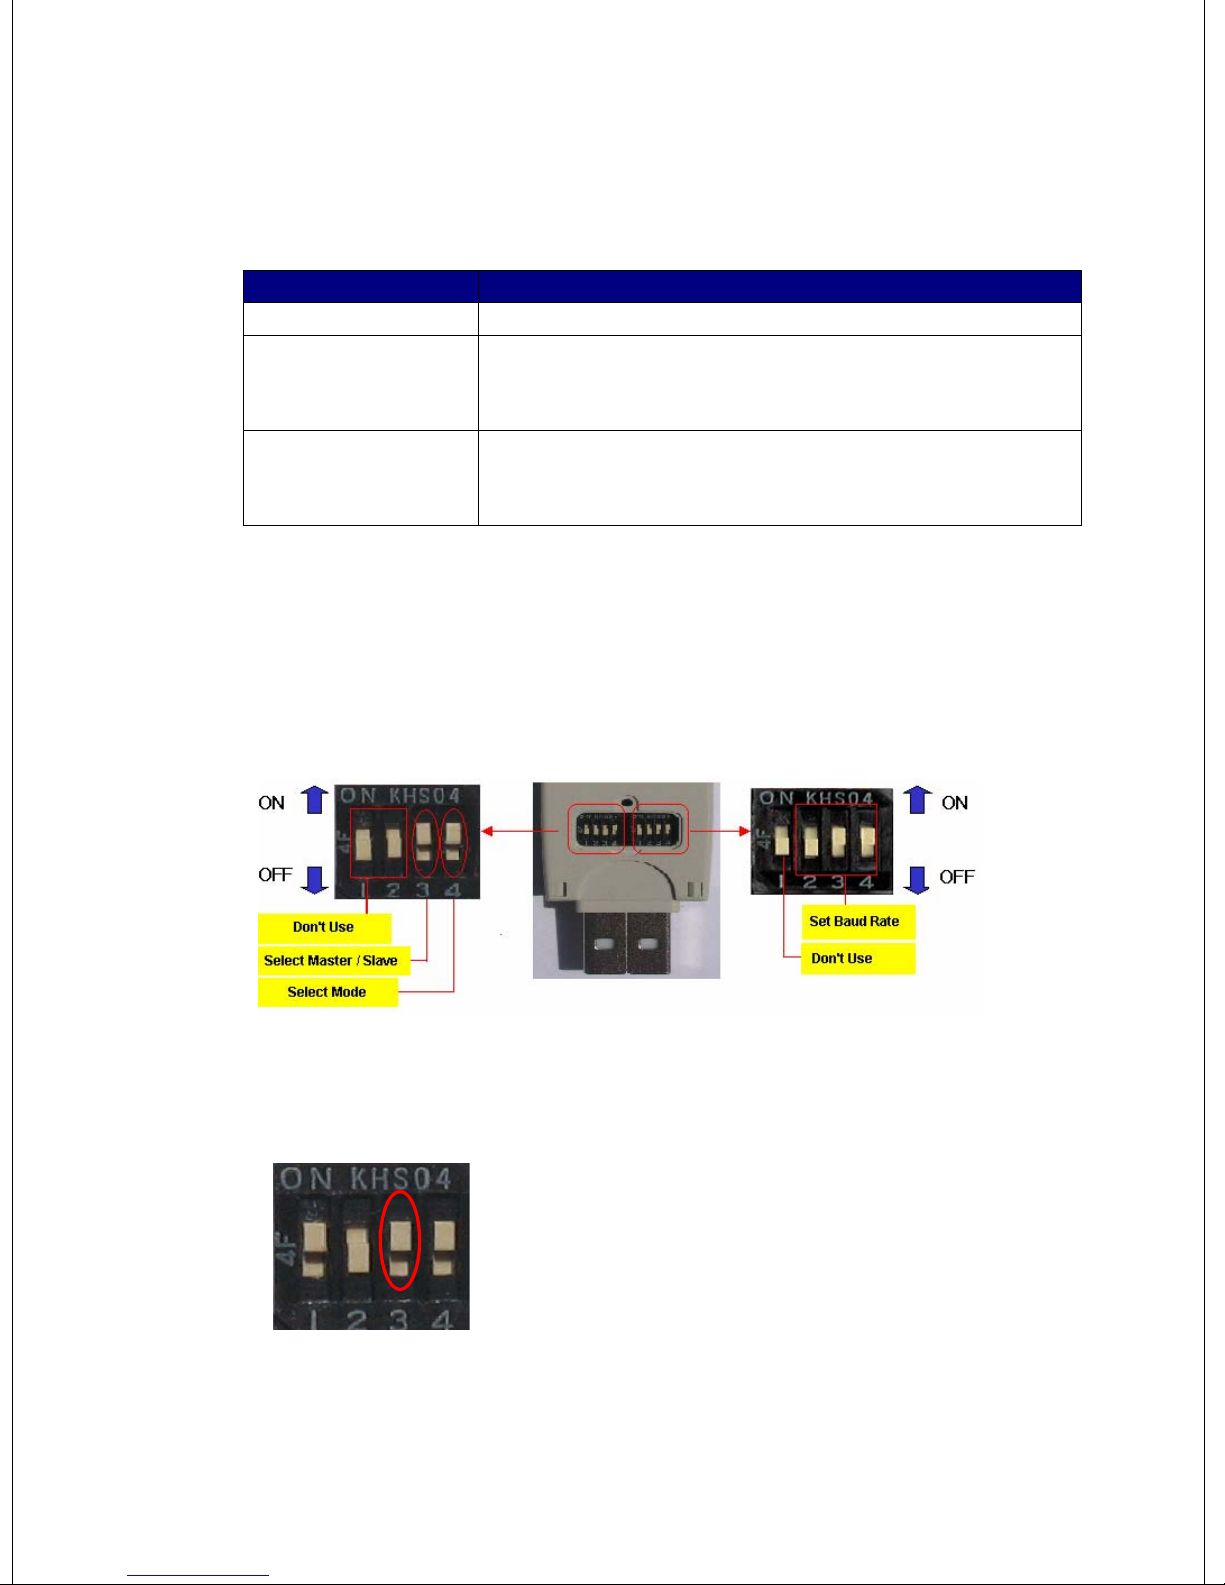
Function selection switch is left side of the Fig. 6.1
Pin no. Description
Pin #1 and #2 N/A
For selection of Role (Master or Slave)
Pin #3
Pin #4
6.1.1 Selection of Role (Master / Slave)
In order to communicate between two BM2001, one should be a Master and another
should be a Slave. You may set the role with pin#3 of the function select switch.
- To be master: Switch should be upward
- To be slave: Switch should be downward.
For selection of Configuration Mode
- To use DIP switch: s/w should be up.
- To use PC software: s/w should be down.
Function Select Switch
a) Set the Role as a MASTER
Move up the pin#3 of the function selection
switch, to work as MASTER.
Baud Rate Switch
b) Set the Role as a SLAVE
Page 10
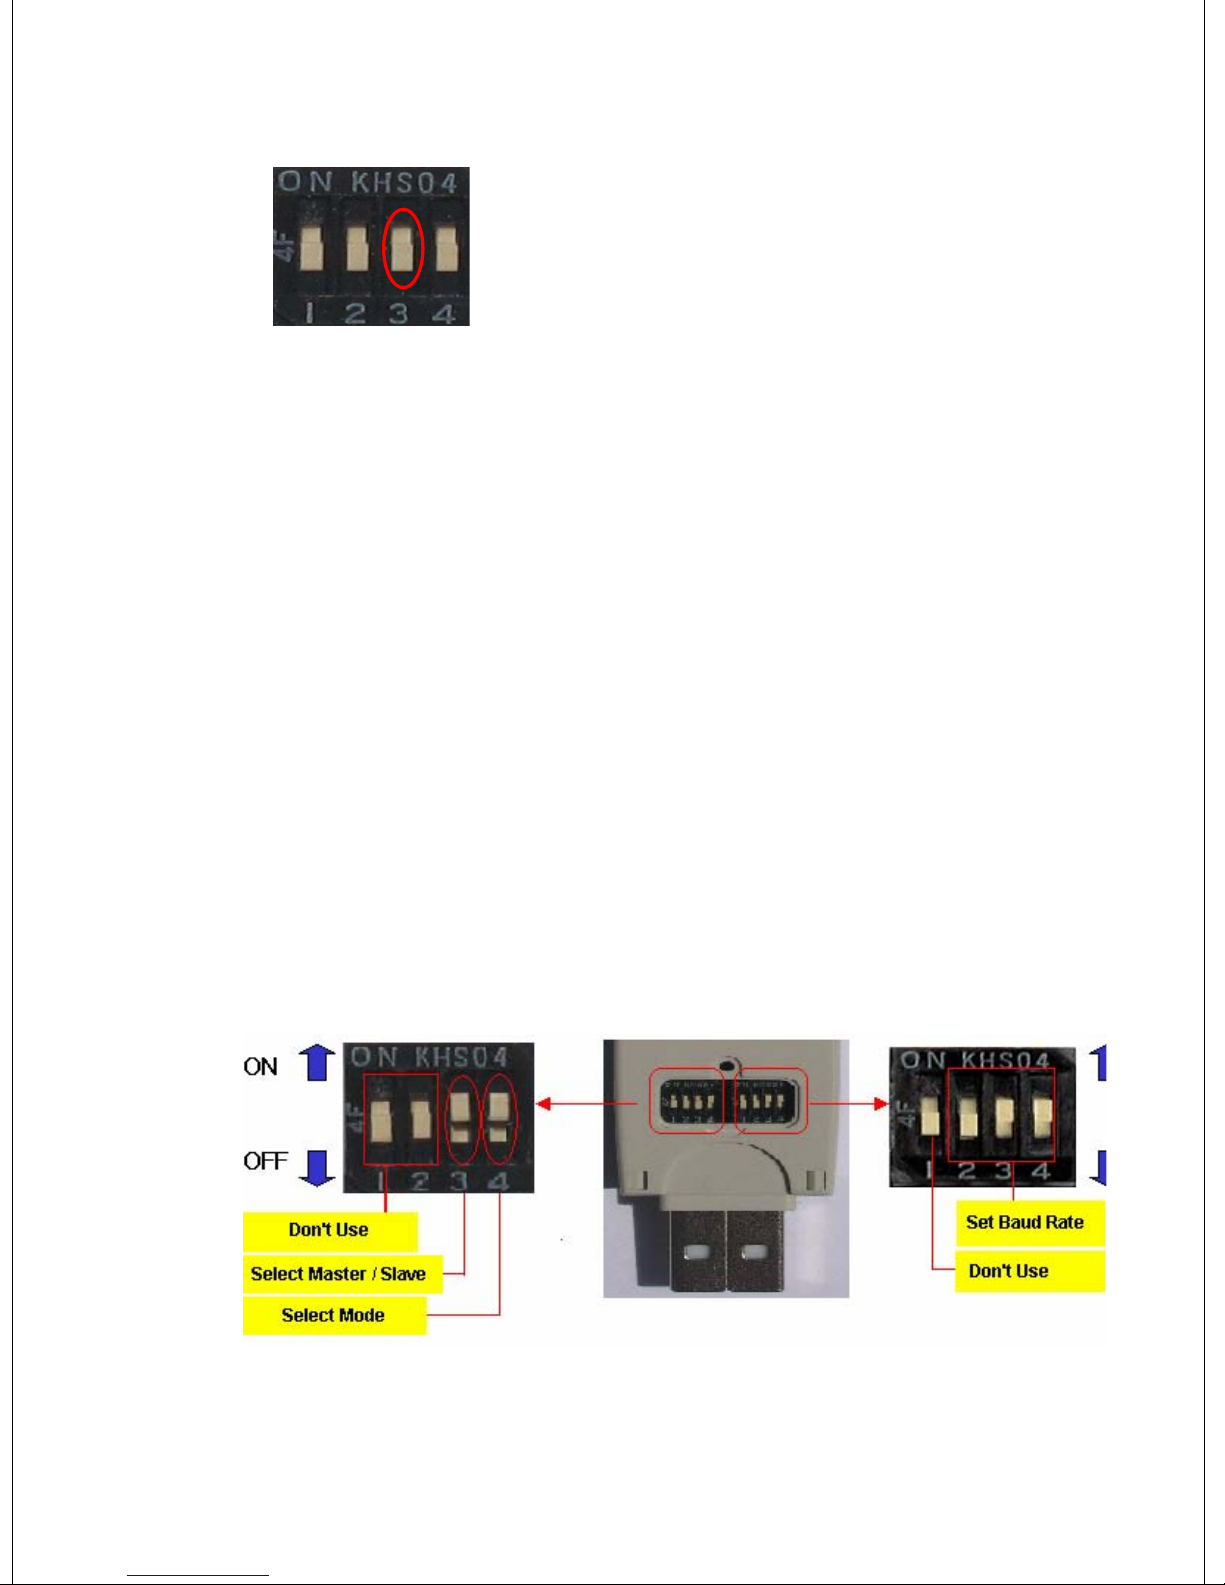
Move down the pin #3 of the function selection
switch, to work as SLAVE.
6.1.2 Selection of Configuration Method
BM2001 provides two kinds of configuration methods. One way is using DIP switch on
the back side of BM2001, and the other way is via HyperTemrinal in PC.
Users may choose one as prefer.
1) By DIP Switch
You may set the baud rate and Role with only DIP Switch.
If you want to set them, BM2001’s mode must be a DIP Switch mode.
2) By PC software
You may set the various values with Hyperterminal of the windows. .
You can set every configuration values in PC configuration mode.
Function
Select Switch
Baud Rate
Switch
Set the Mode with pin #4 of Function Select Switch.
i) DIP Switch Mode
Page 11
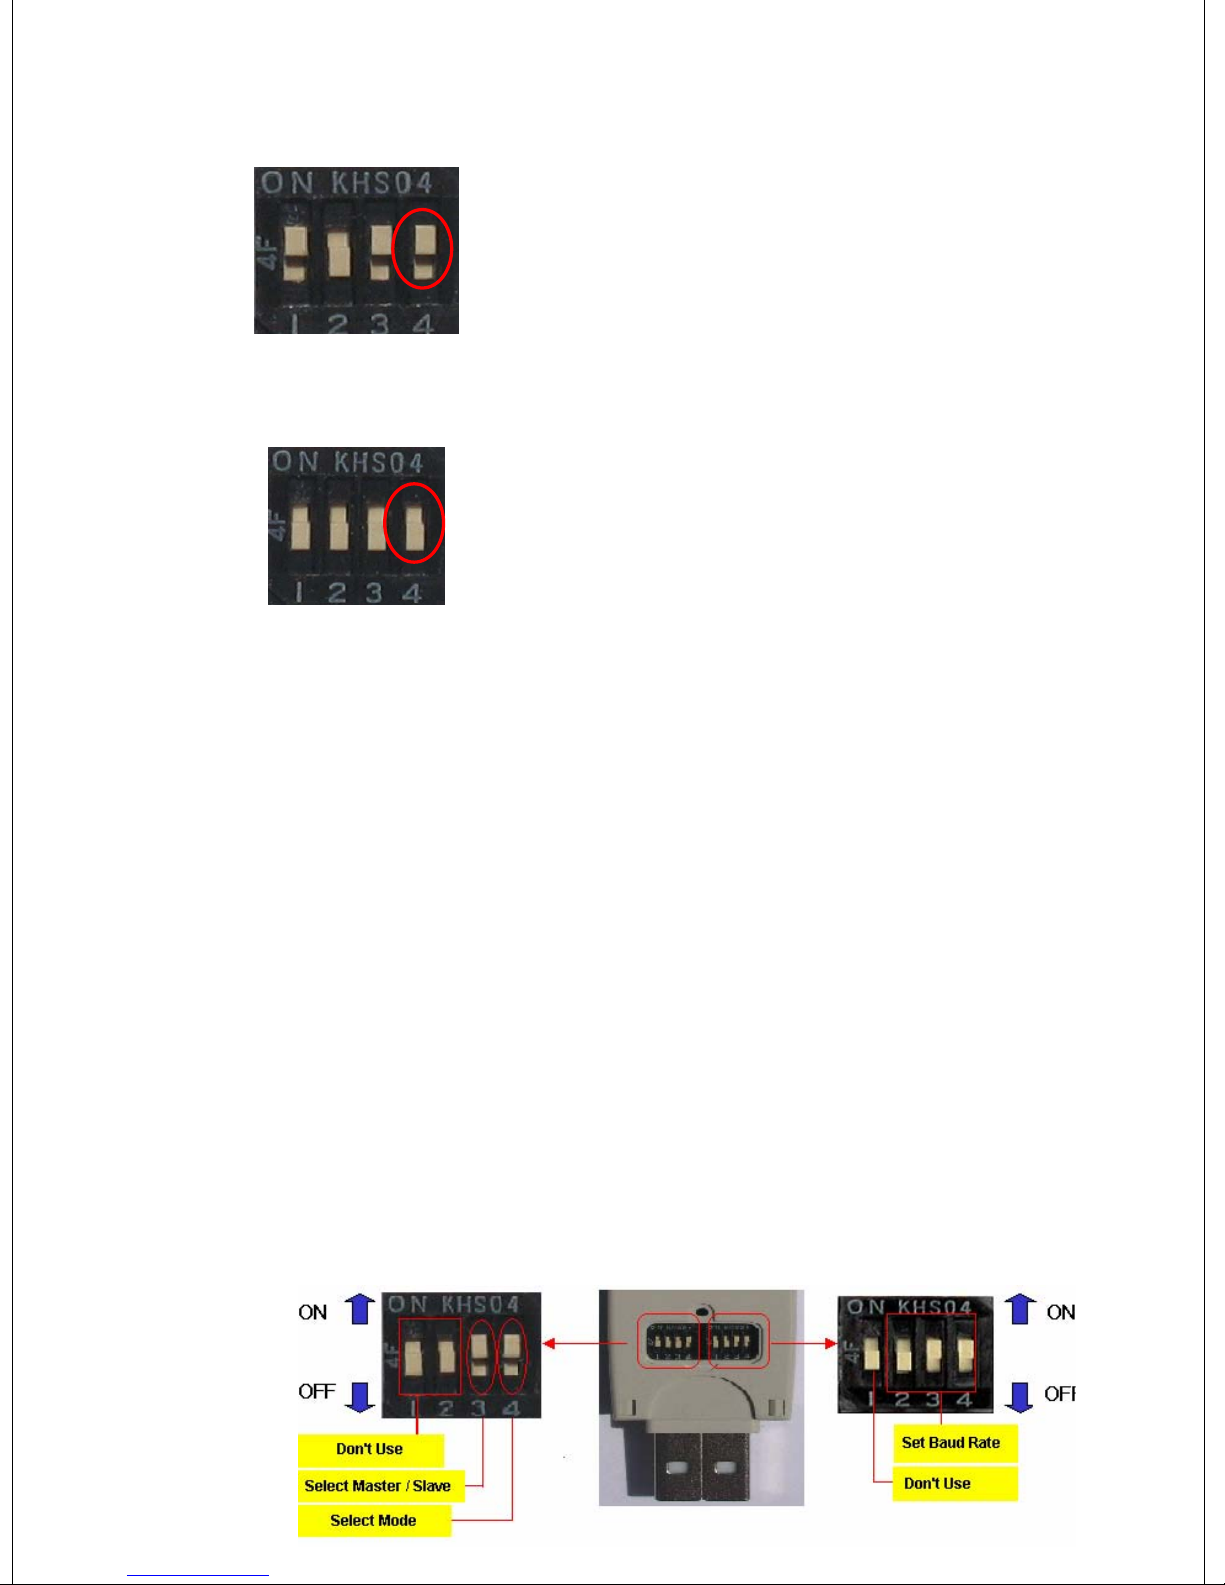
ii) PC Configuration Mode
6.2 Baud Rate Switch
Move Up the pin#4 of the Function Select Switch,
and the Mode is DIP Switch mode.
Move down the pin#4 of the Function Select
Switch, and the mode is PC Configuration mode.
You may set the baud rate with this DIP Switch.
- Pin #2,3,and 4 are used to set the baud rate in boud rate switch.
- You can choose the baud rate from 1,200 bps to 115,200 bps.
* Caution: If you want to set the baud rate with DIP Switch, pin #4 of the Function
select switch must be up.
6.2.1 Selection of Baud Rate
BM2001supports various communication speed from 1200 bps to 230,400 bps.
You can set the baud rate with DIP-Switch from 1,200 bps to 115,200 bps.
Check on the baud rate switch.
Function Select Switch Baud Rate Switch
Page 12
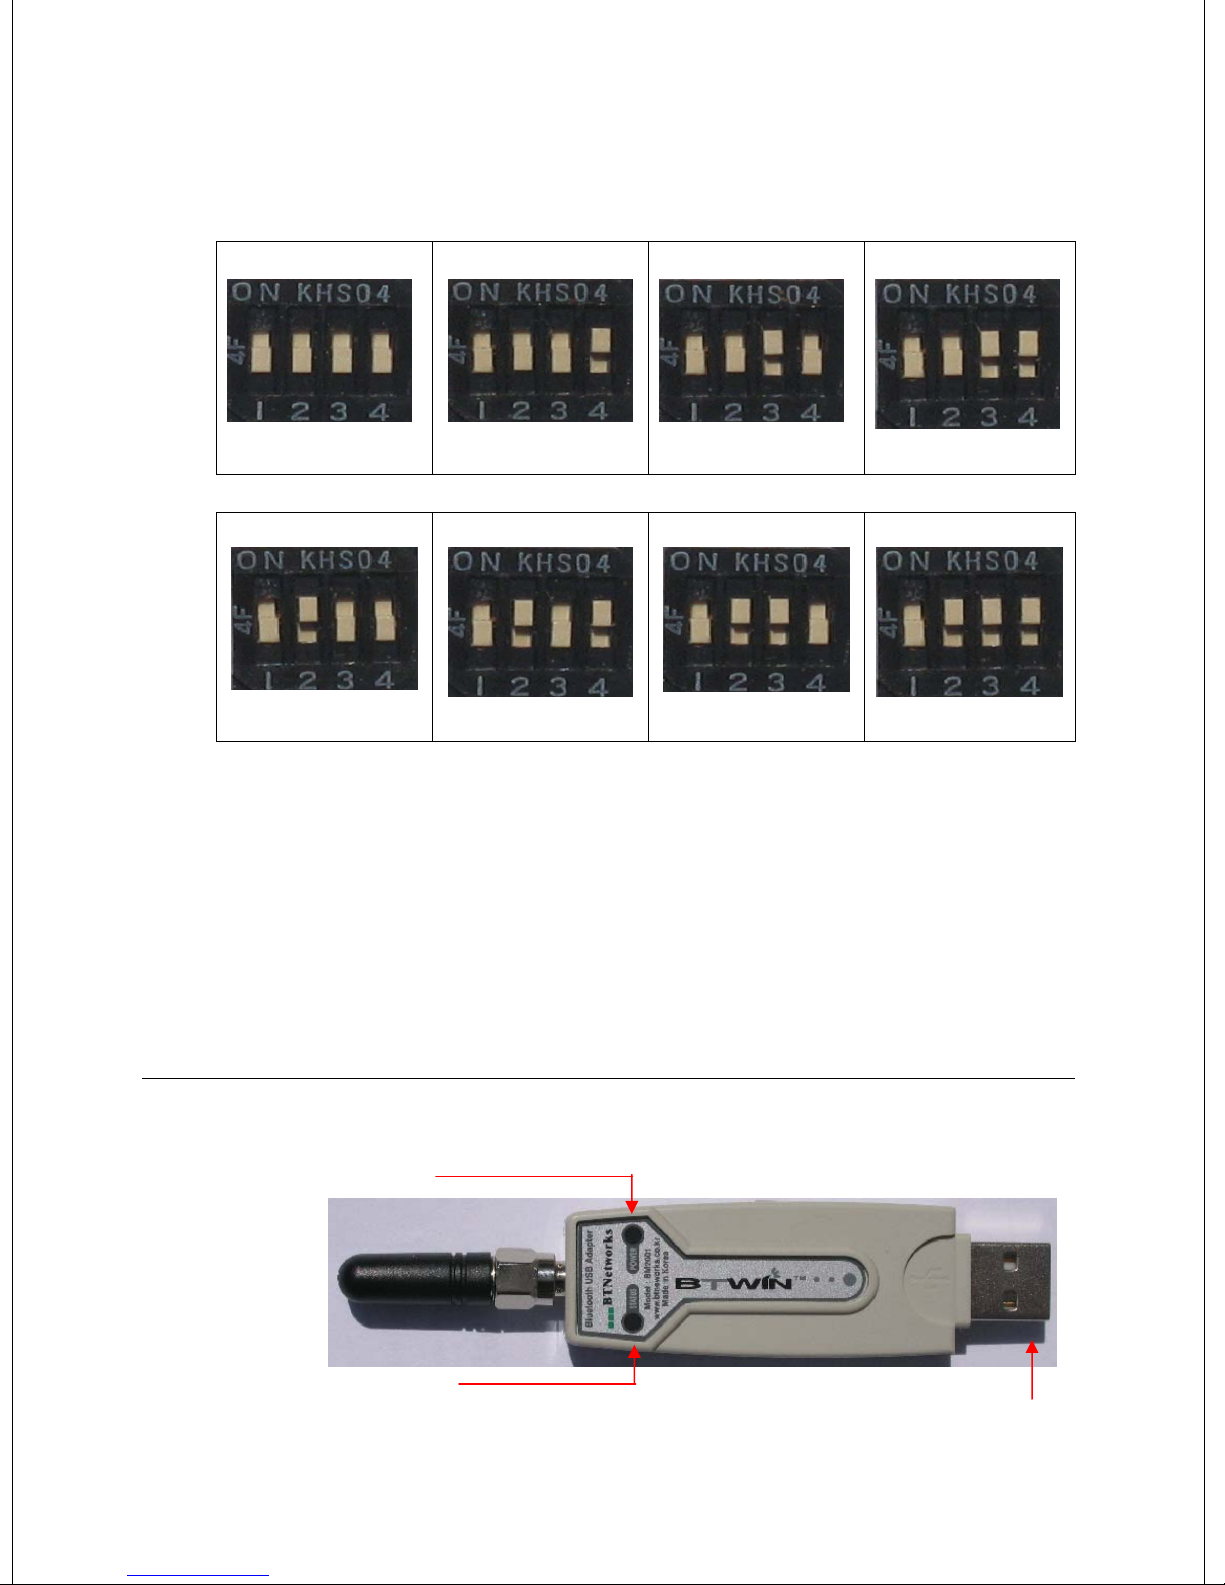
Setting the baud rate with the Baud Rate Switch.
Set the Baud Rate Switch
1200 bps 2400 bps 4800 bps 9600 bps
19200 bps 38400 bps 57600 bps 115200 bps
** Caution **
- Pin #1 of the Baud Rate Switch is no-working pin.
- Pin #4 of the Function Select Switch must be up (DIP Switch Mode).
- If you want higher speed than 115,200 bps, Use the PC configuration mode.
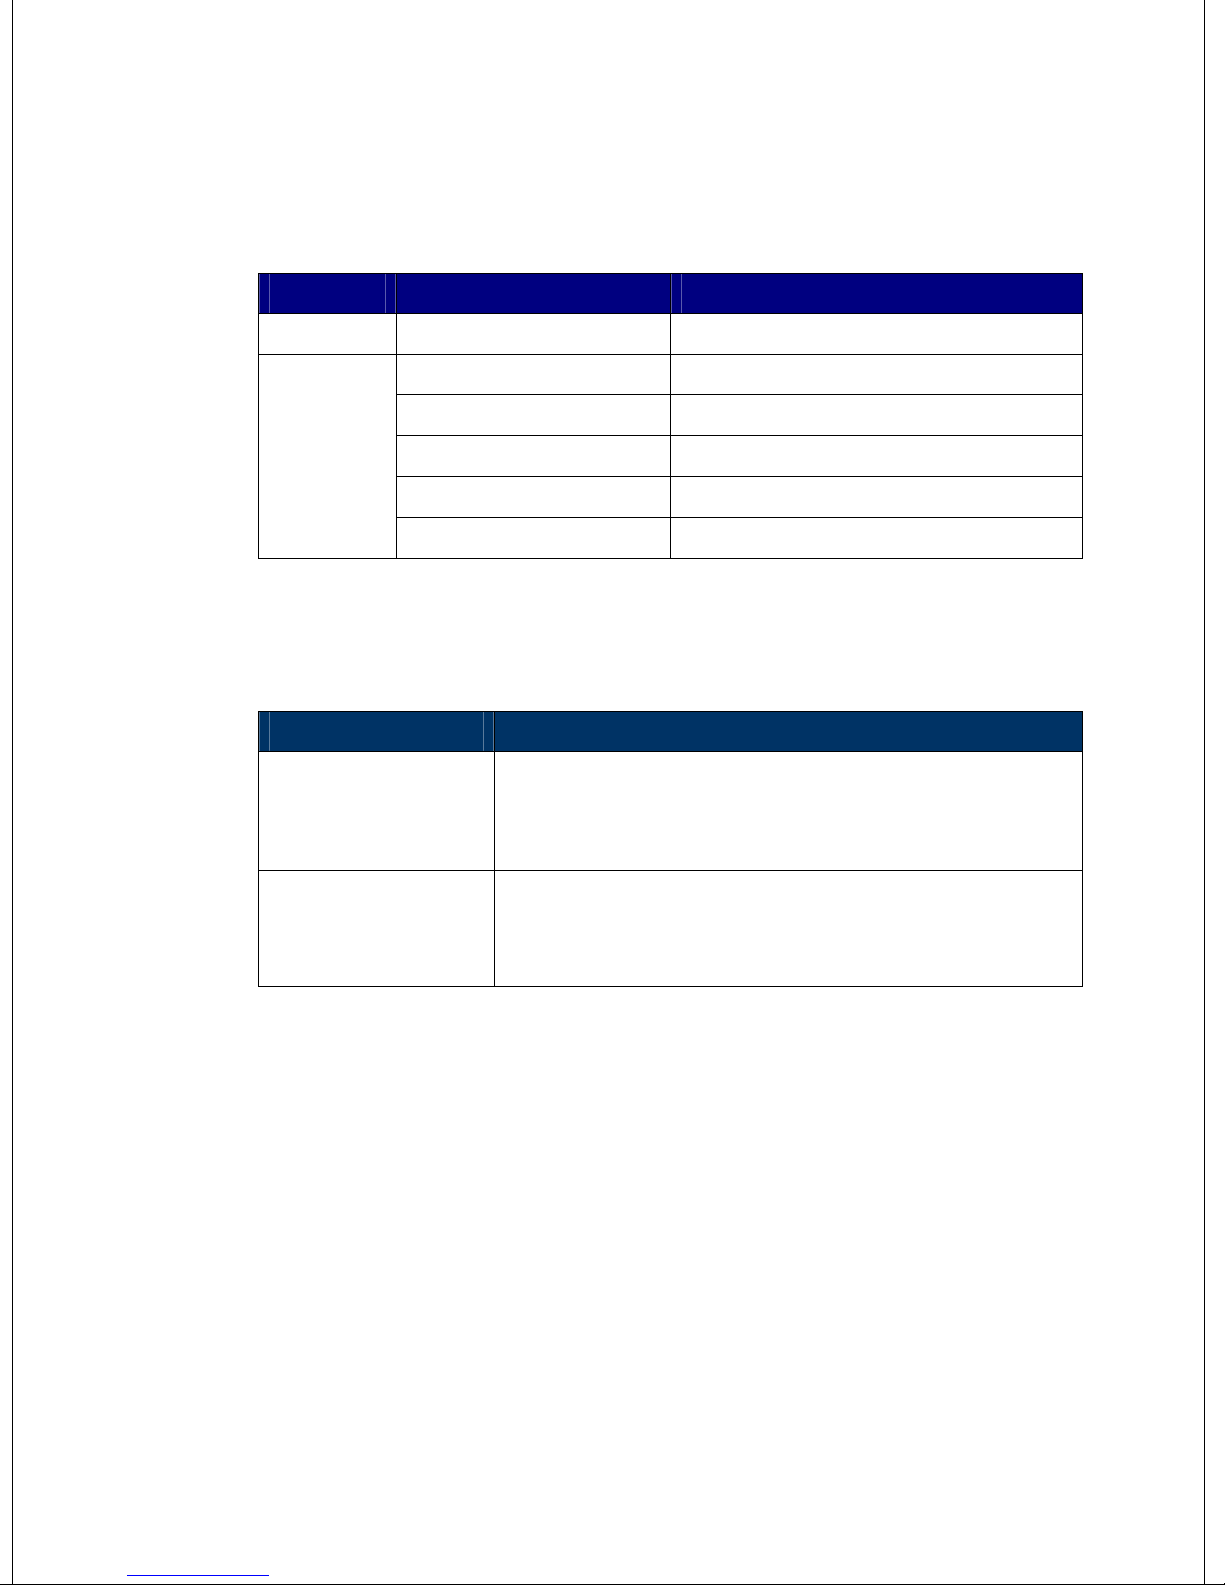
7. LED indication / Reset Switch
Power LED
Status LED
<TOP View>
USB Port
Page 13
7.1 LED indication
- Power indication LED / Status indication LED
You can find the status of BM2001 with Red and Green LED indicator.
LED Status Description
Power LED Power ON Red LED is On (Stable)
Connecting Green LED is flashing twice per second.
Connection Green LED is On (Stable)
Status LED
Connection Error Red LED is flashing every 0.05-second.
Enter Configuration Setting Red LED is flashing twice per second.
Configuration Setting Red LED is flashing three times per second.
7.2 Reset Switch
Status LED Result After Reset
1) Current connection will be disconnected.
Green is On
Red is flashing
2) Releases the latest connection informs.
3) Try to reconnect
1) Getting back to factory setting.
2) Reboot of BM2001
Page 14
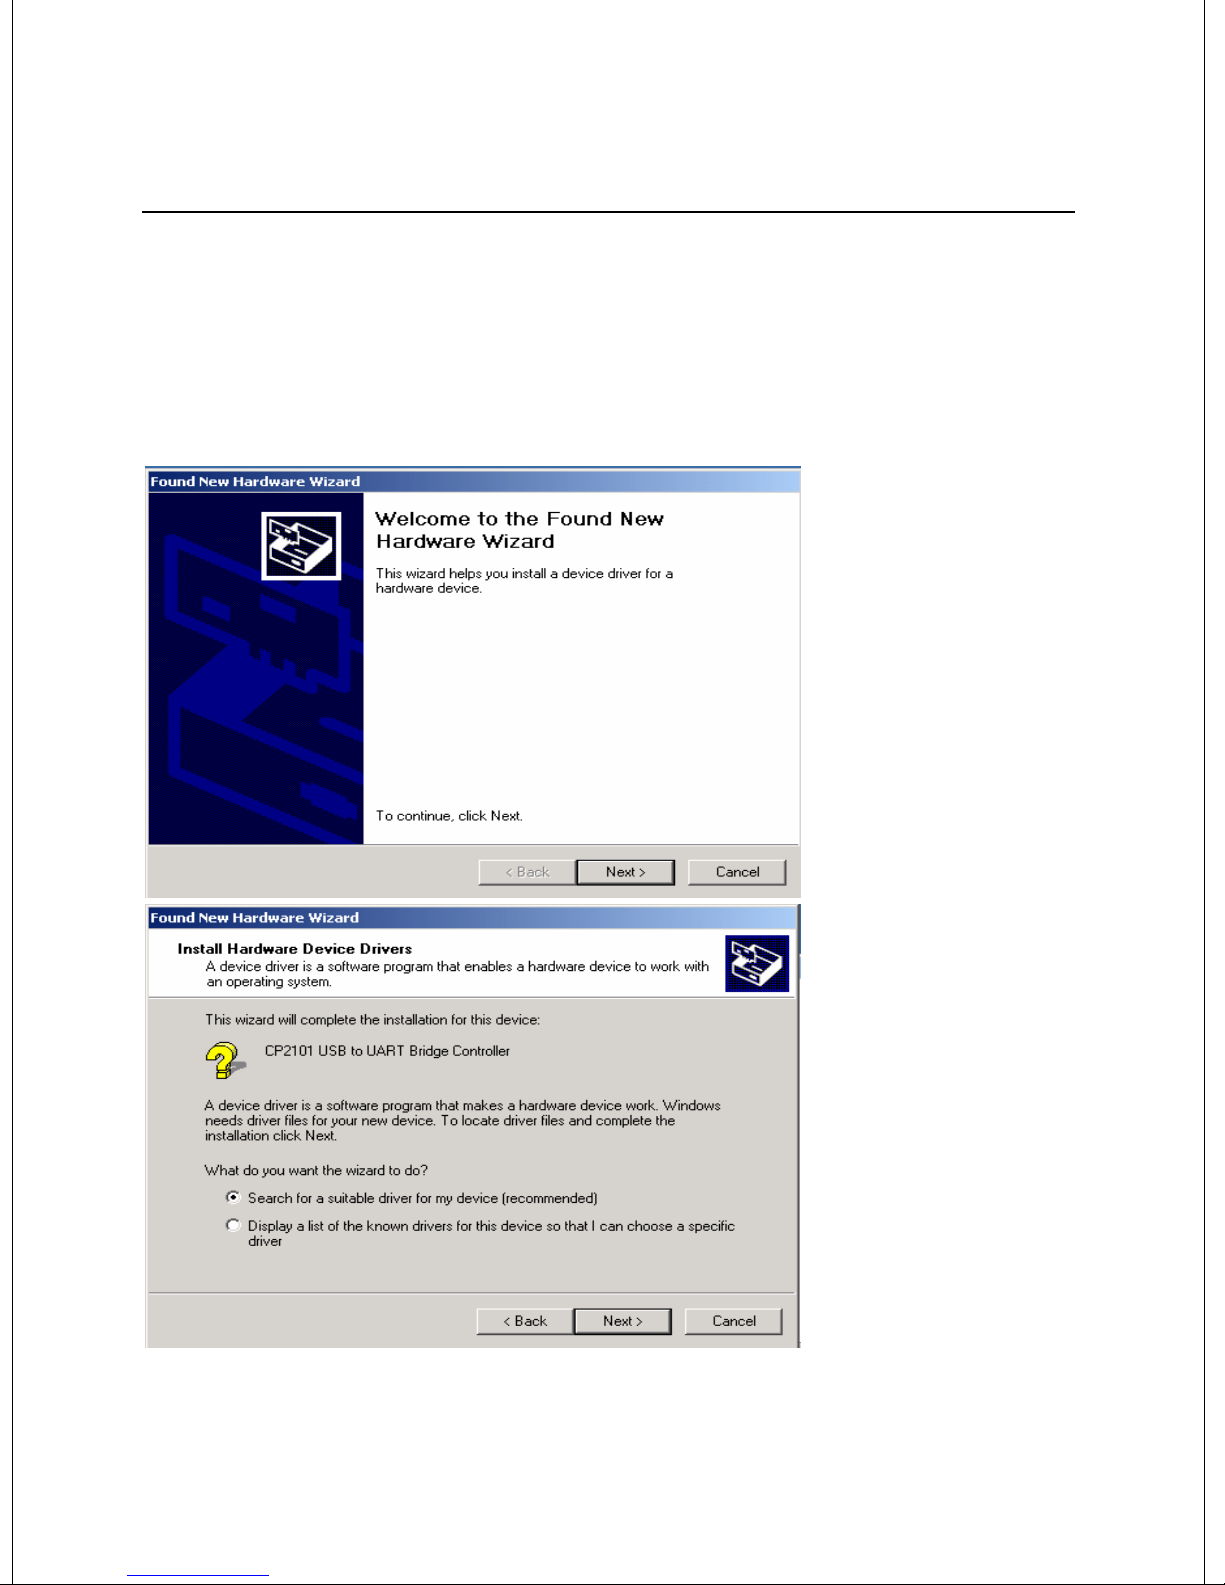
8. Installation of BM2001 device driver
8.1 Installation of device driver
8.1.1 Windows 98 & Windows 2000
1) Attach BM2001 to USB
port of PC and turn on
the BM2001.
2) The pop up window
will appear for new
hardware device.
3) Click Next button
4) Select “Search for a
suitable driver for my
device [recommended]”
and click Next button.
.
Page 15
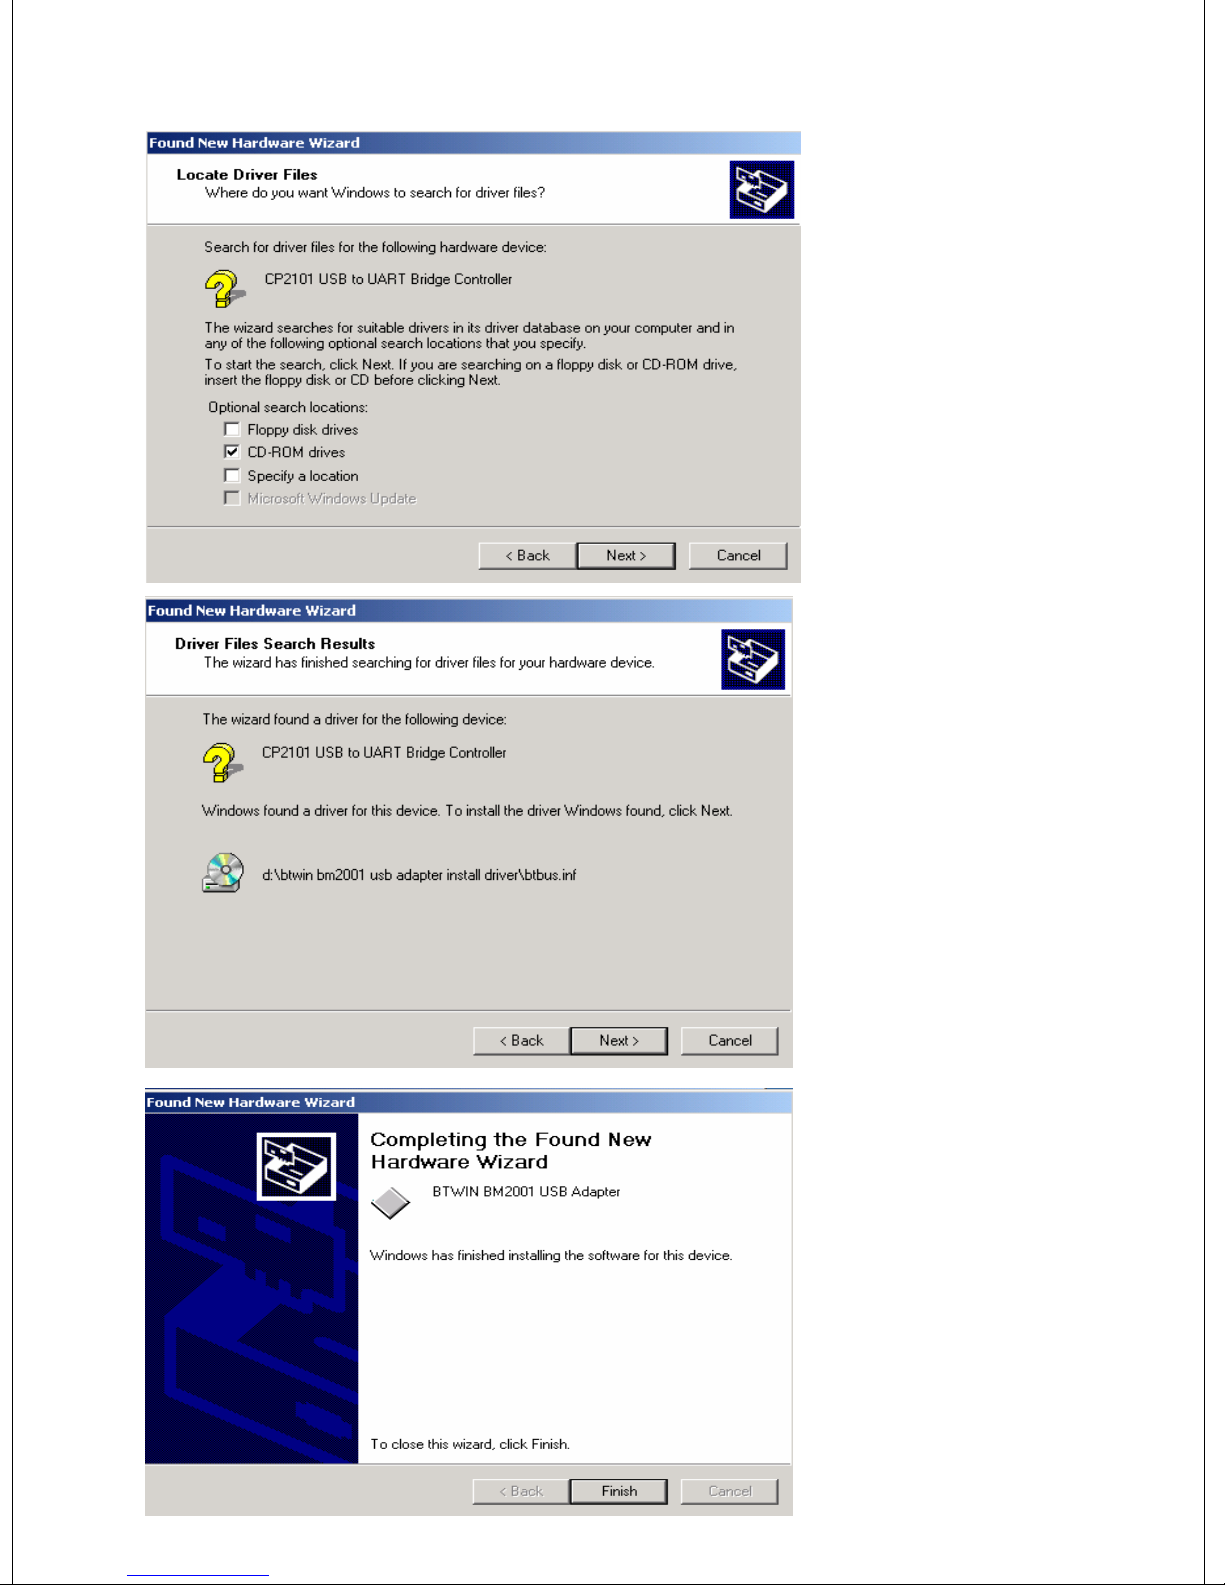
5) Select “CD-ROM
drivers” and click Next
button.
6) Windows found a
driver for BM2001.
Click Next button.
7) First driver
Installing procedure
has finished. Click
Finish button.
* You should do driver
installing procedure
one more time
Page 16
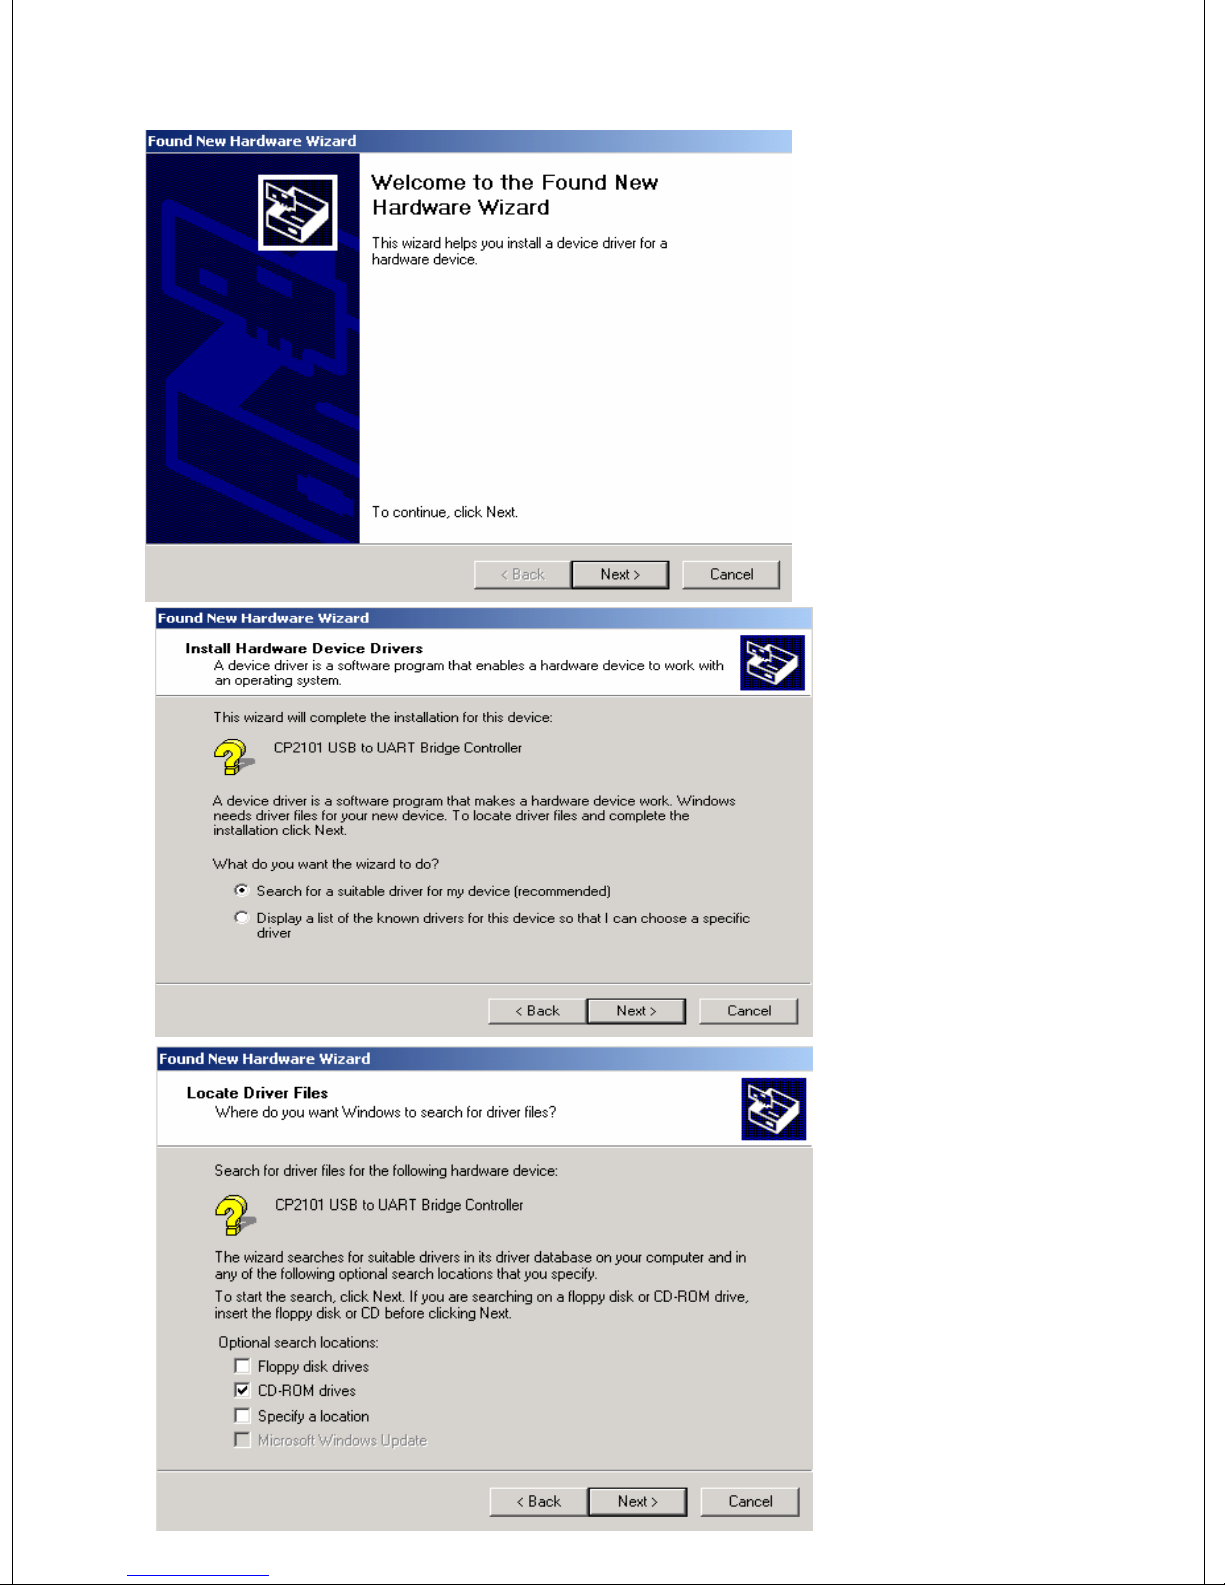
8) You may see new
pop up window.
Click Next button.
Select “Search for a
suitable driver for
my device
[recommended]”
and click Next
button.
5) Select “CD-ROM
drivers” and click
Next button.
Page 17
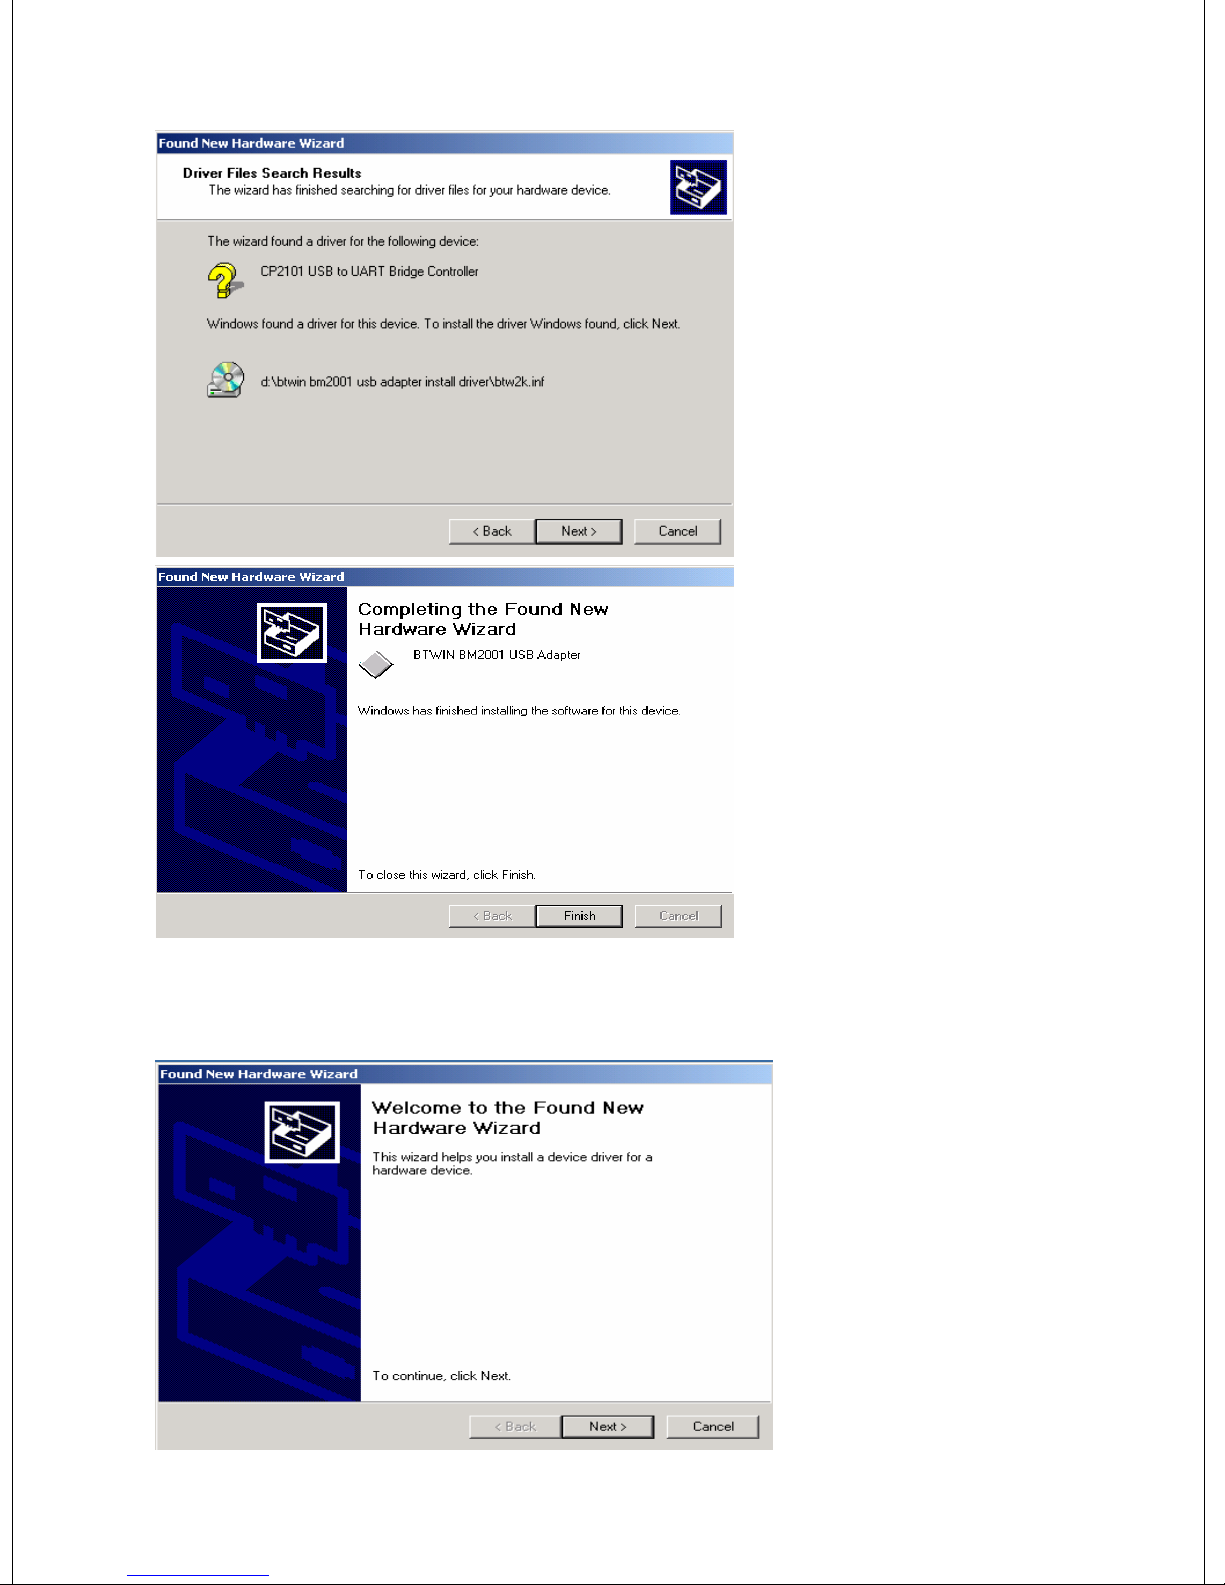
6) Windows found a
driver for BM2001.
Click Next button.
7) All driver
Installing procedure
has finished. Click
Finish button.
If you have any troubles installiong the driver, you may try another way. Here is
another way you may follow.
1) Attached BM2001 to
USB port of PC and
turn on the BM2001.
2)”Found new hardware
device” message will be
displayed.
3) Click next button.
Page 18
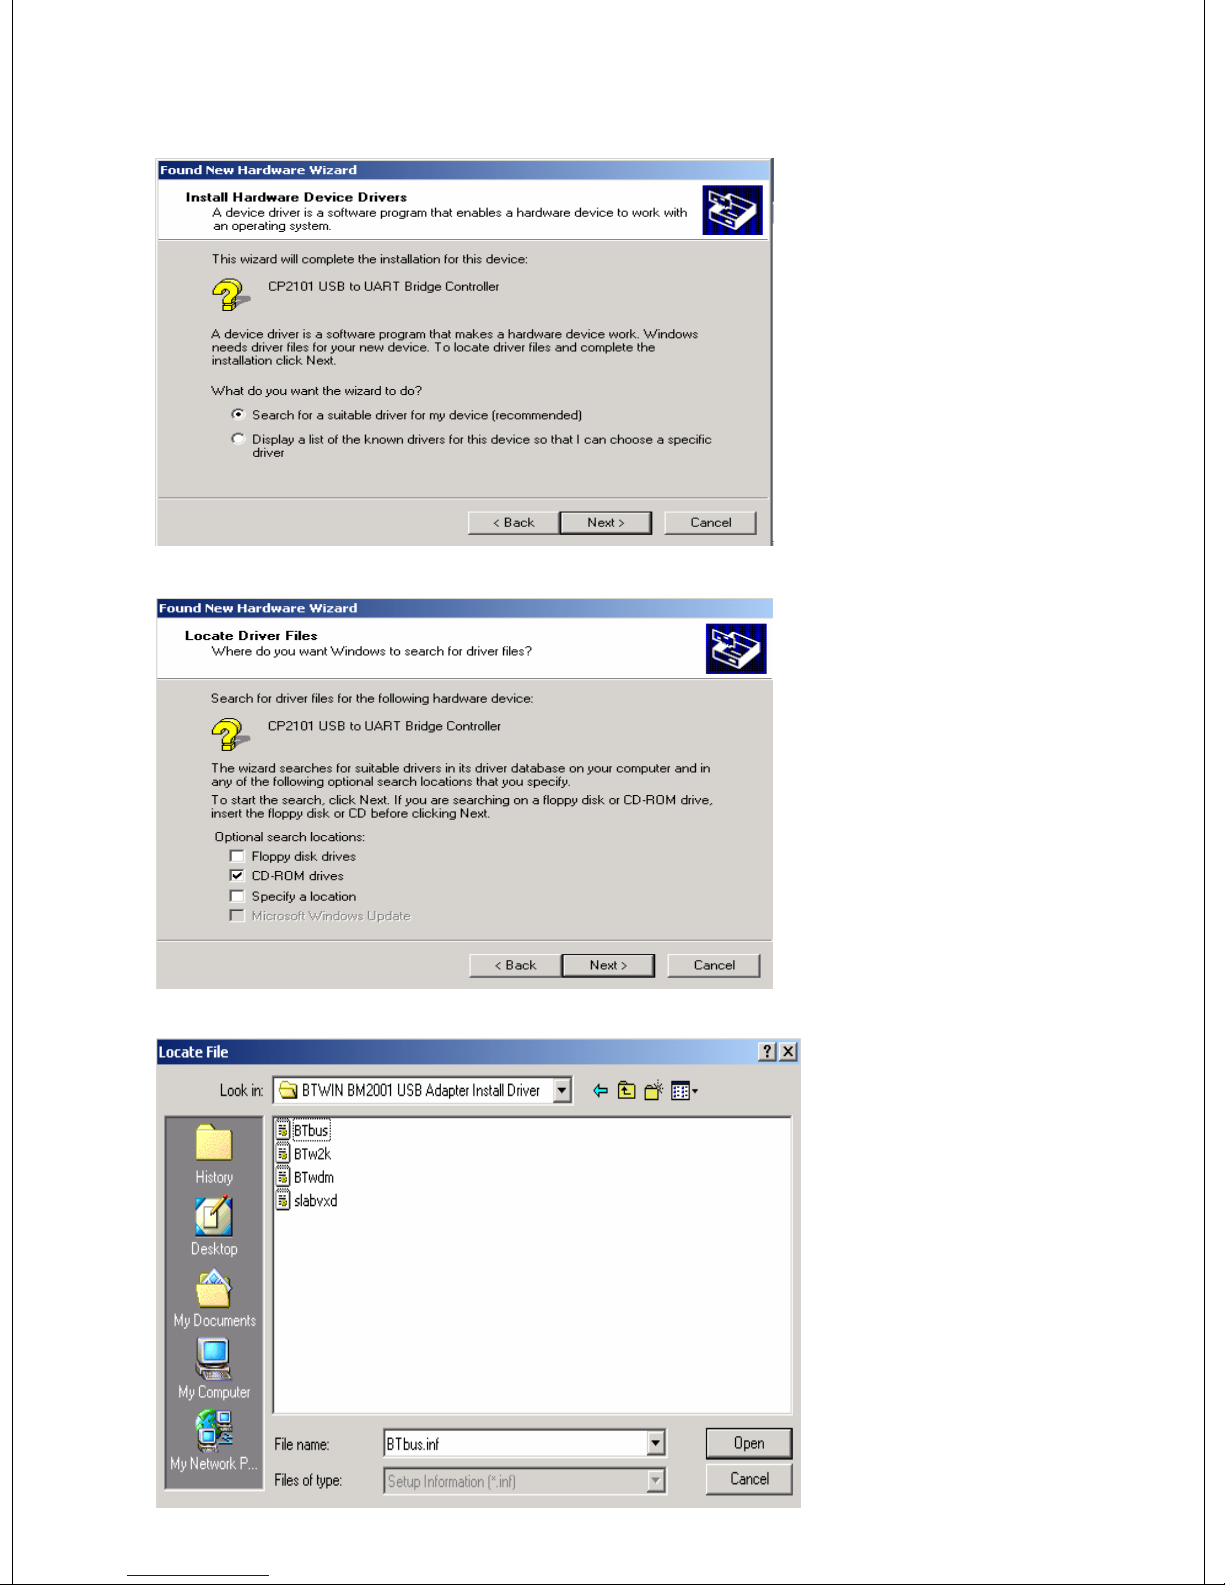
4) Select “Search for a
suitable driver for my
device [recommended]”
and click Next button.
5) Select “Specify a
location” and click Next
button.
6) Move to CD-ROM’s
BTWIN BM2001 USB
Adapter install driver.
7) Select “Btbus” file
and click “Open” button.
Page 19
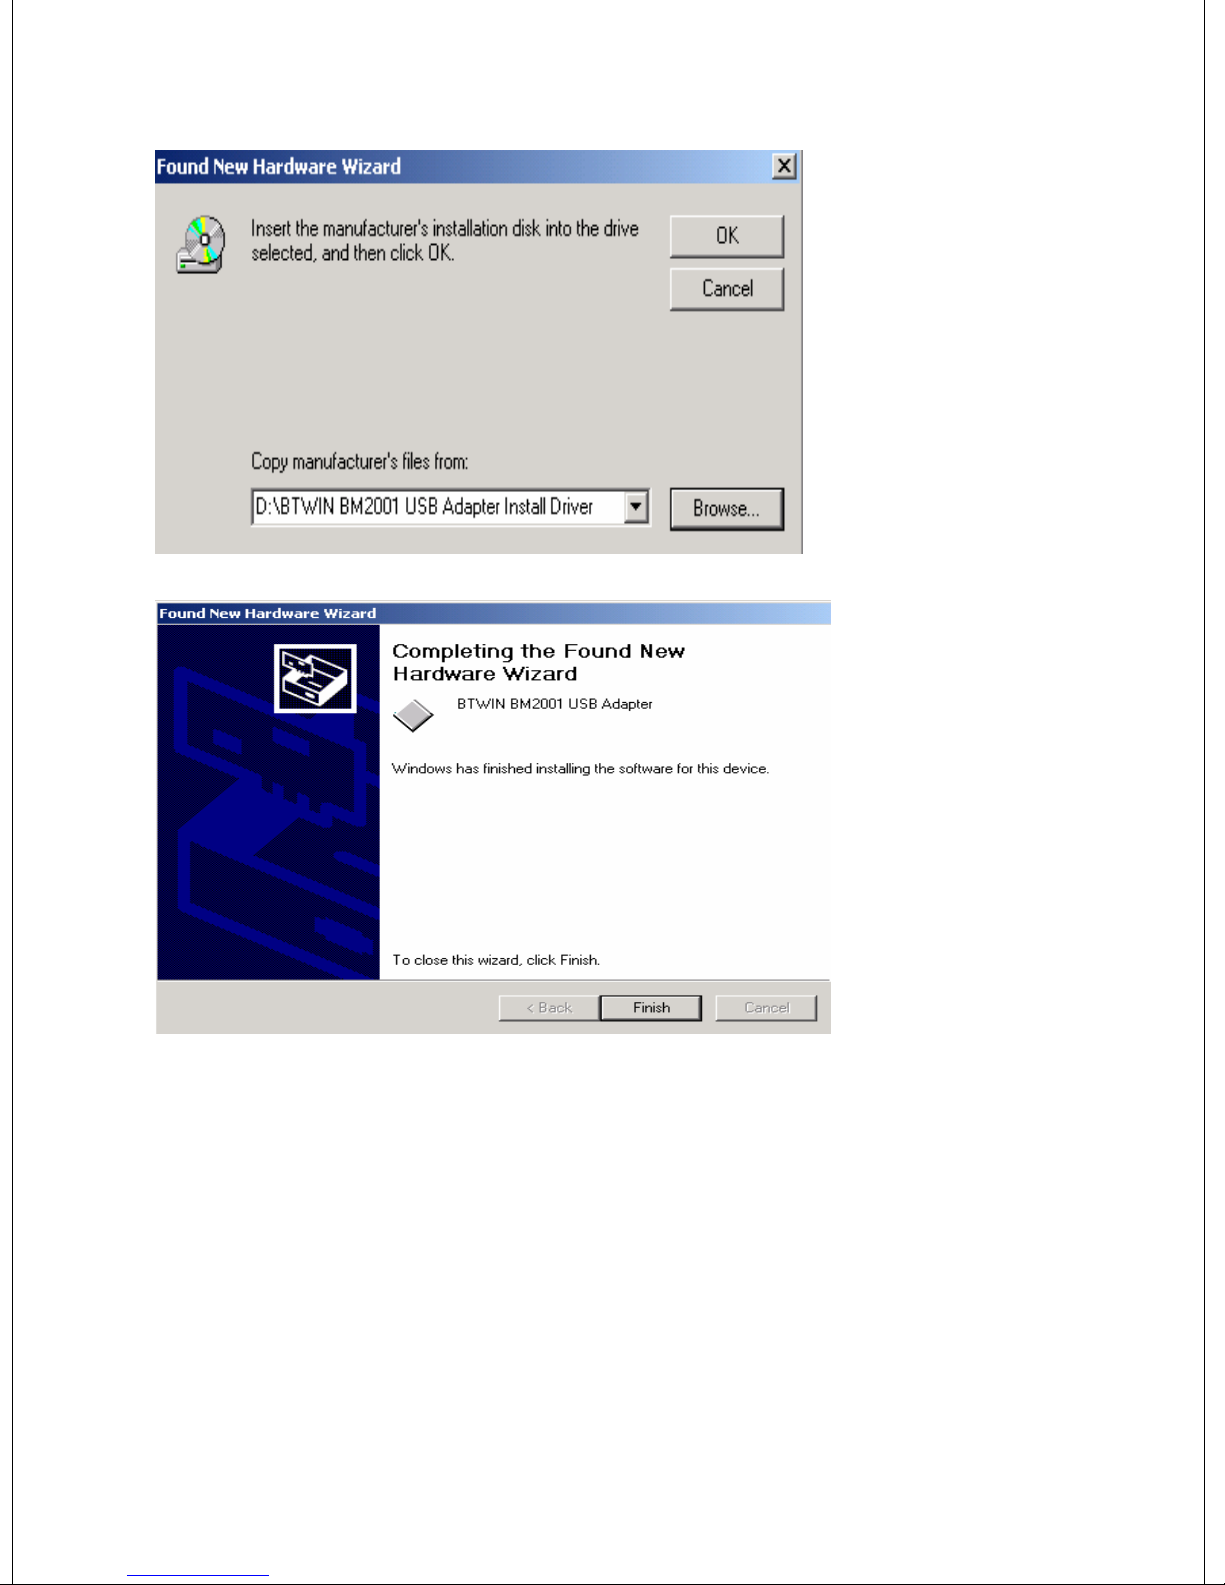
8) Windows found a
driver for BM2001.
Click Next button
.
9) Driver installing has
finished. Click Finish
button.
8.1.2 Windows XP
Before set up the device driver, turn off the BM2001’s power switch.
The device driver install procedures are separated two steps.
The first step is making the driver folder in the Windows.
[1] Move to “BTWIN BM2001 USB Adapter driver “ folder on CD be provided,
and you can see below window.
[My Computer]Î[CD Rom Drive]Î[BTWIN BM2001 USB Adapter driver]
Page 20
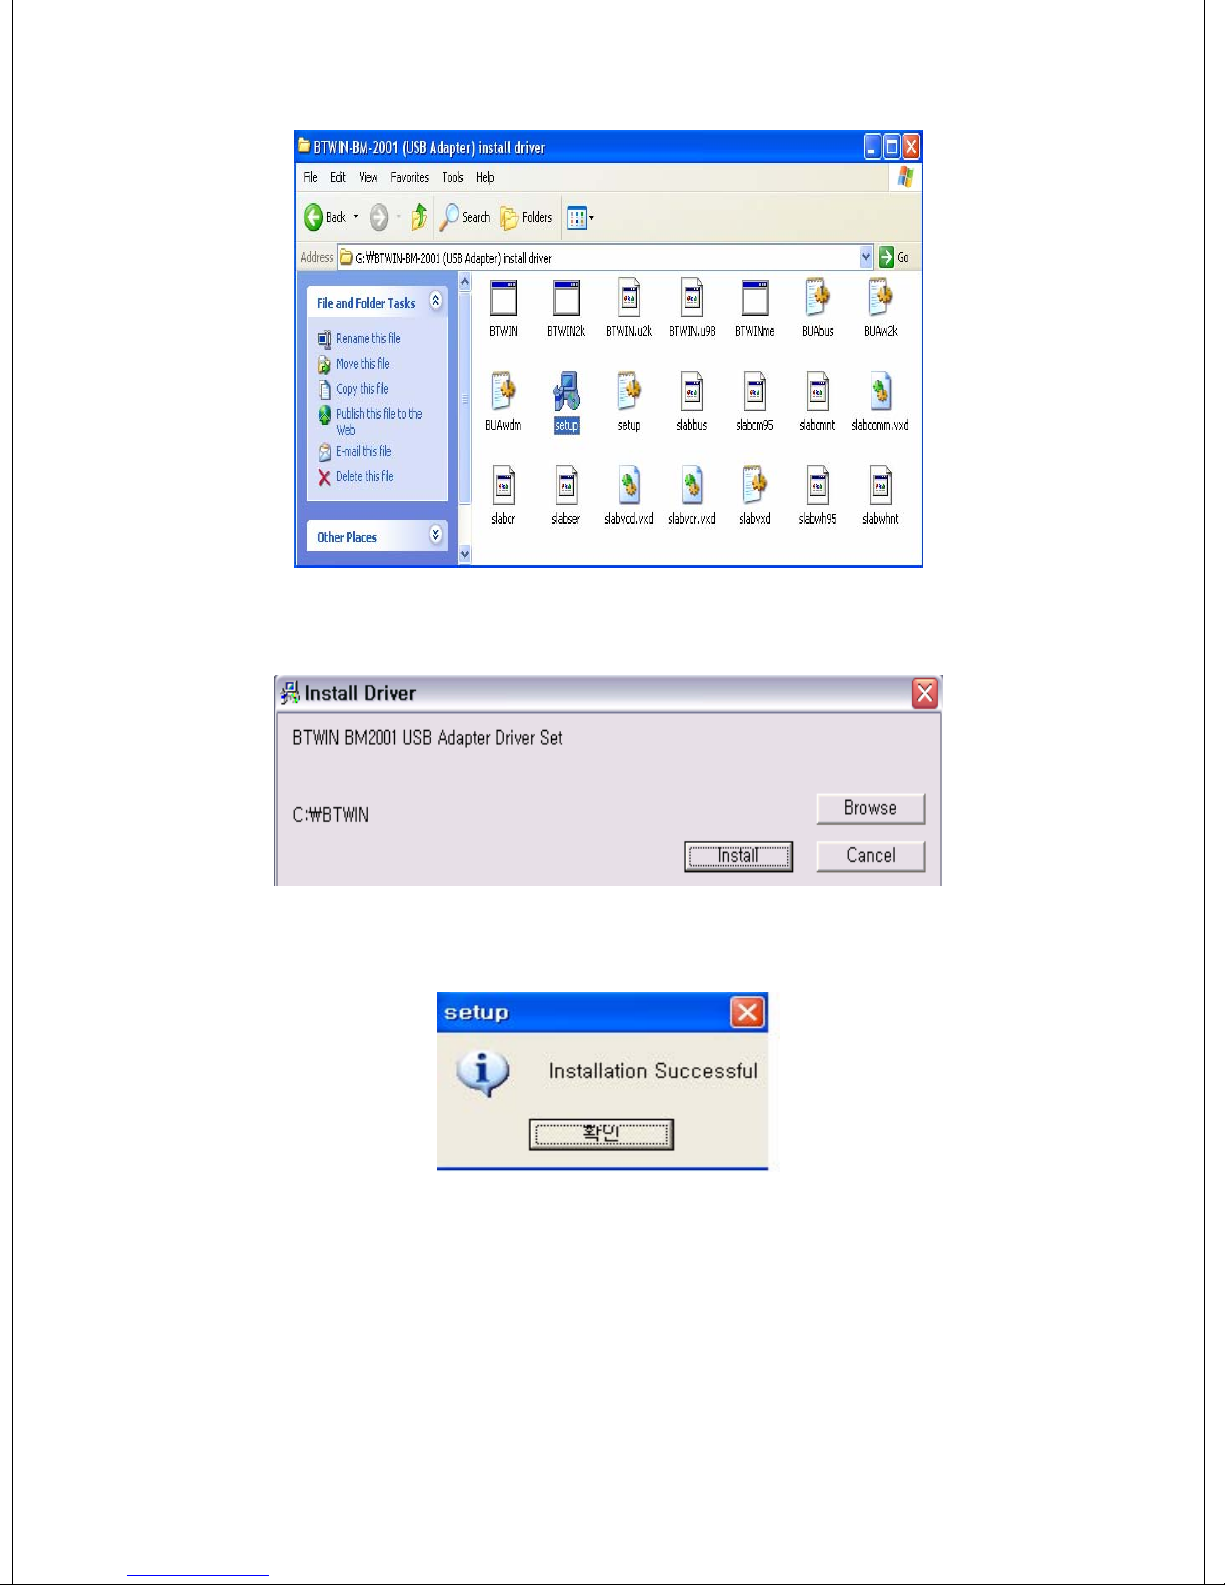
[2] Double click the “Setup” icon, and the pop-up window will appear.
[3] Click the "install" button, and installing procedure will start.
[4] Ok, first step has finished. Open the C drive of your computer, and you can find
“BTWIN” folder.
[5] Now, the installing procedure will begin from here for the BM2001’s device driver.
Turn on the power switch of BM2001.
Page 21
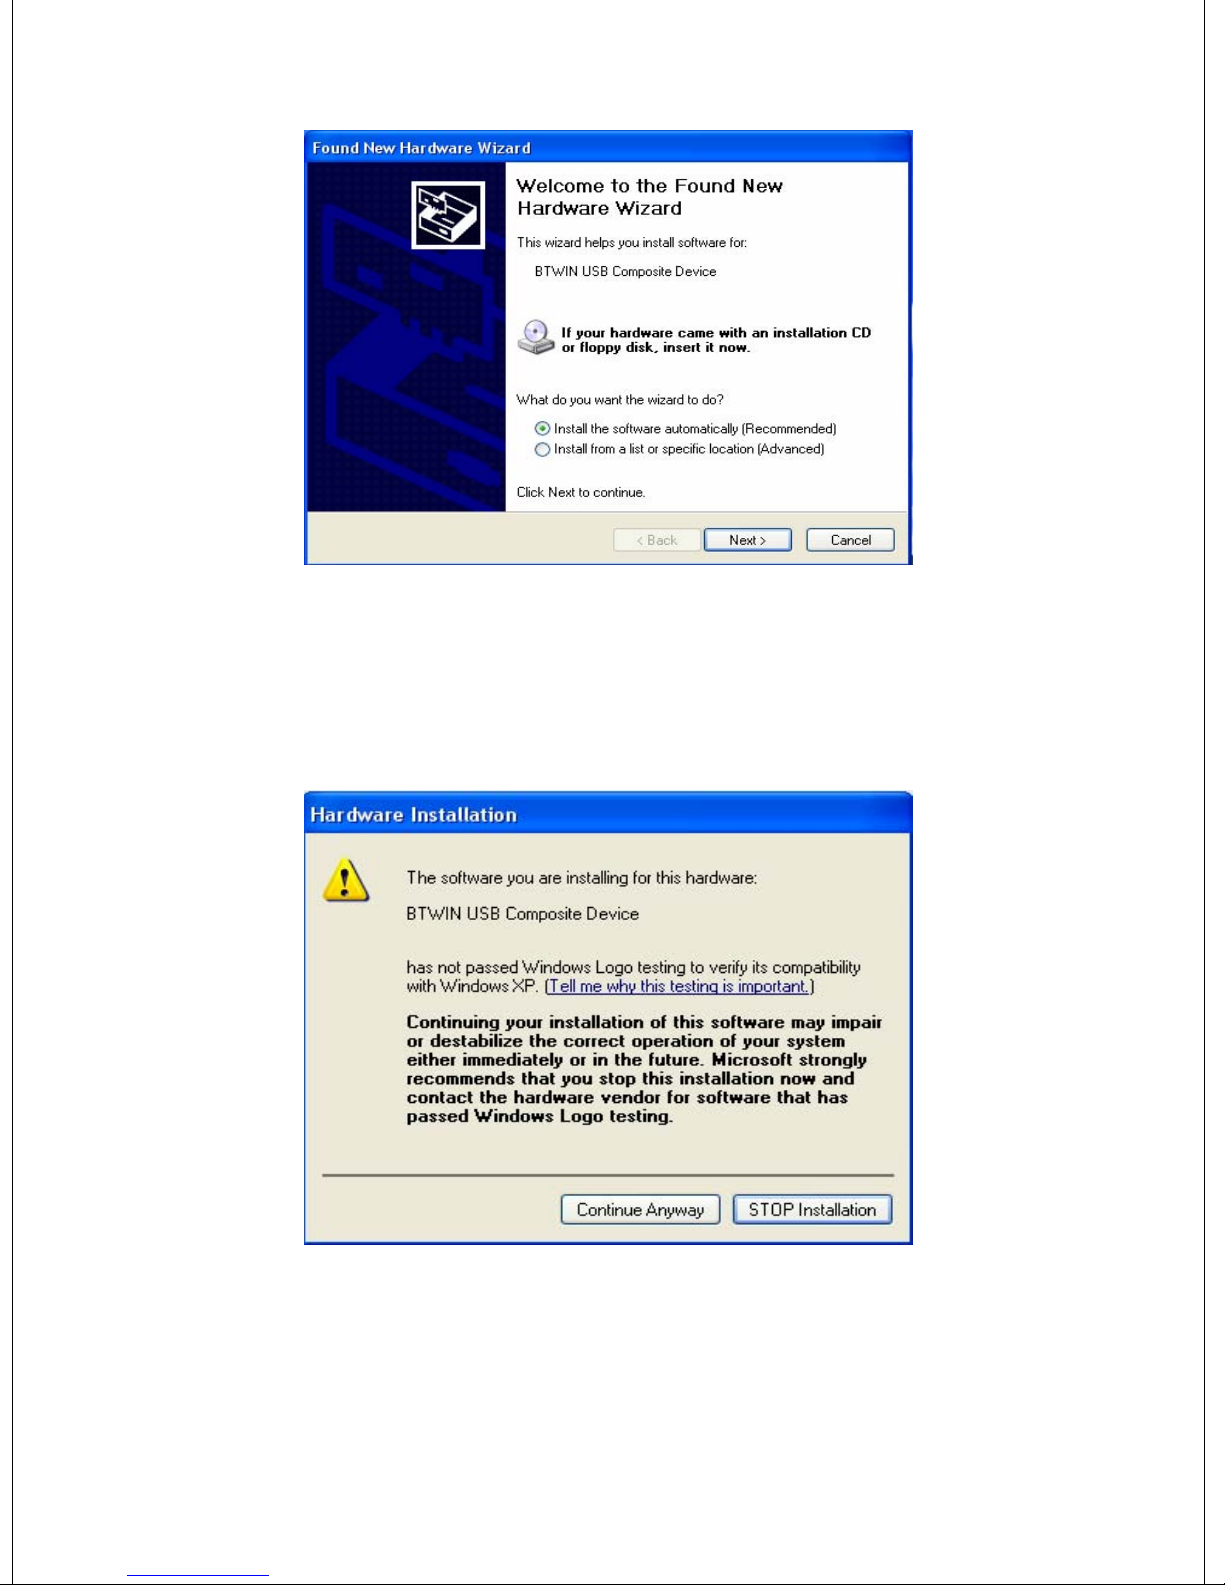
[6] The windows shall find the new device and you will see the pop-up window.
[7] Select “Install the software automatically [Recommended]” and press “Next” button.
[8] If your OS is a Windows XP, you will see the below windows.
But you can ignore that massage, click “Continue Anyway” button.
[9] Click “Finish” button, and window will disappear.
[10] The first installation procedure has been finished.
[11] New windows will appear, but it is not a problem. You will do one more same
procedure for the driver installing.
Page 22
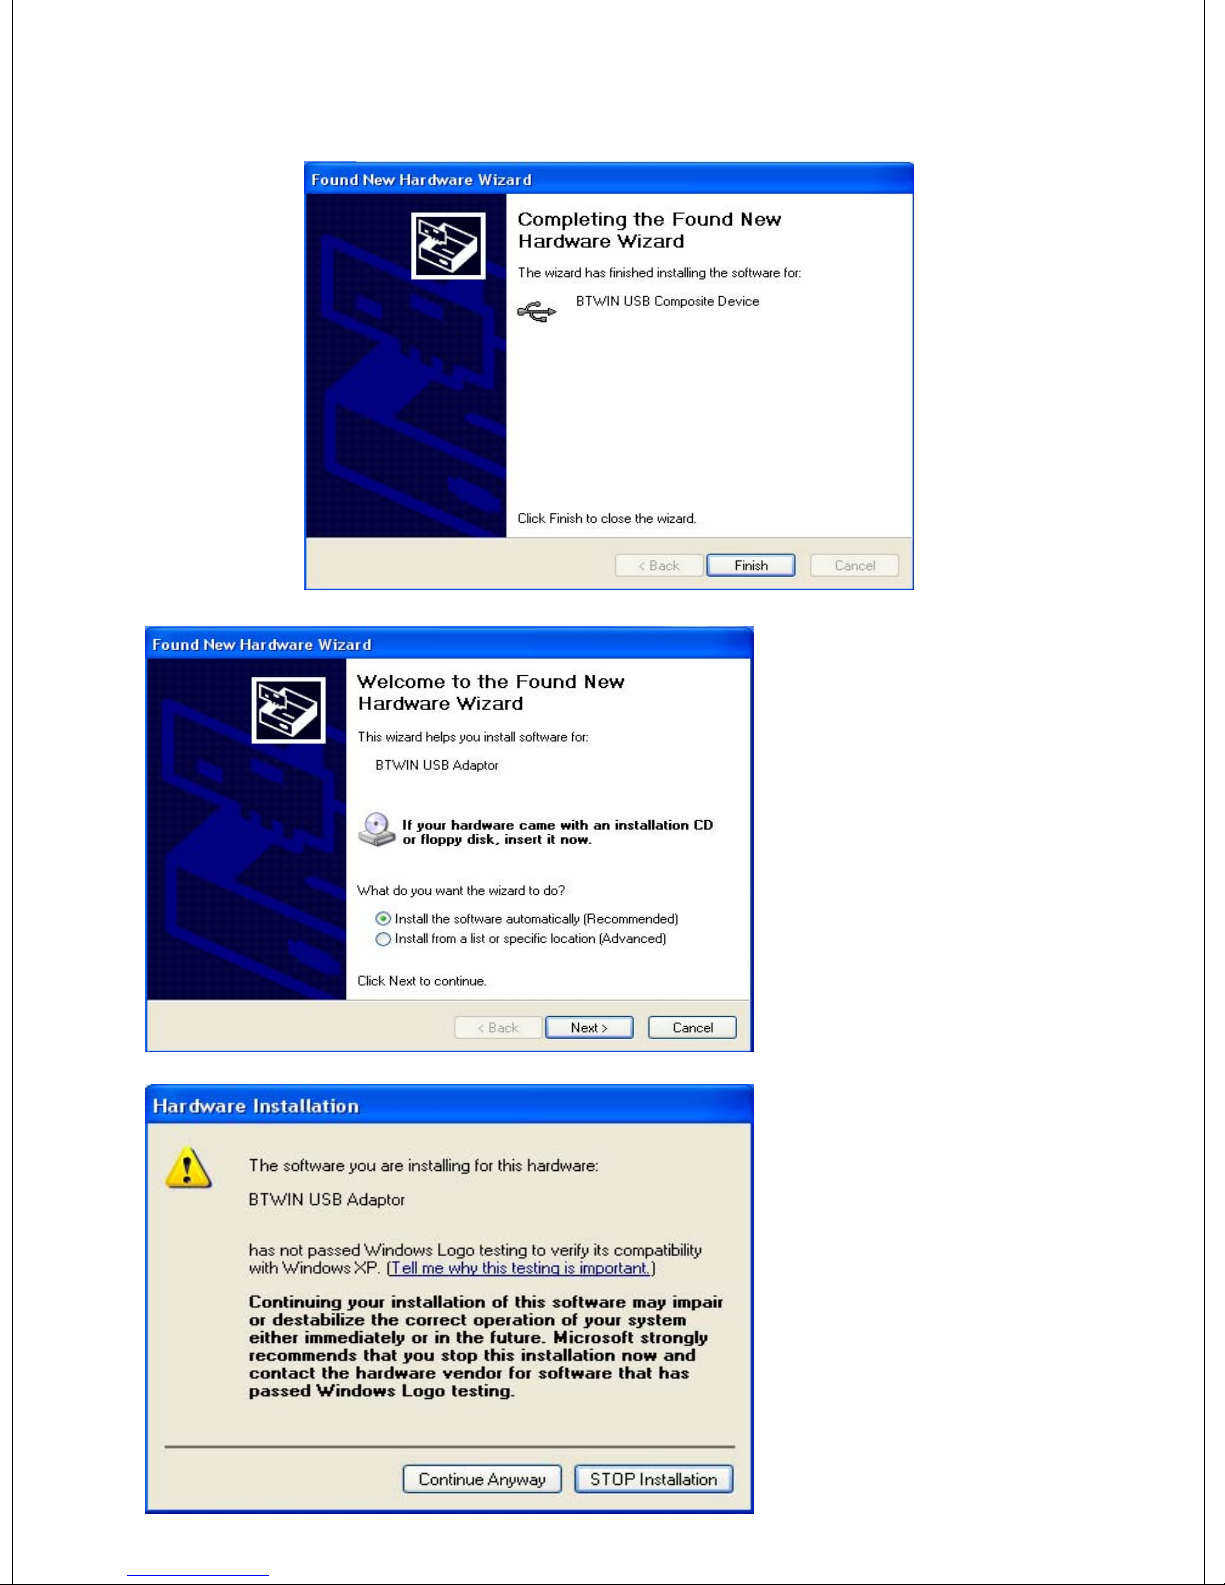
[11] Select “Install the
software automatically
[Recommended]” and
press “Next” button.
[12] If your OS is a
Windows XP, you will see
the below windows.
But you can ignore that
massage, click “Continue
Anyway” button.
Page 23
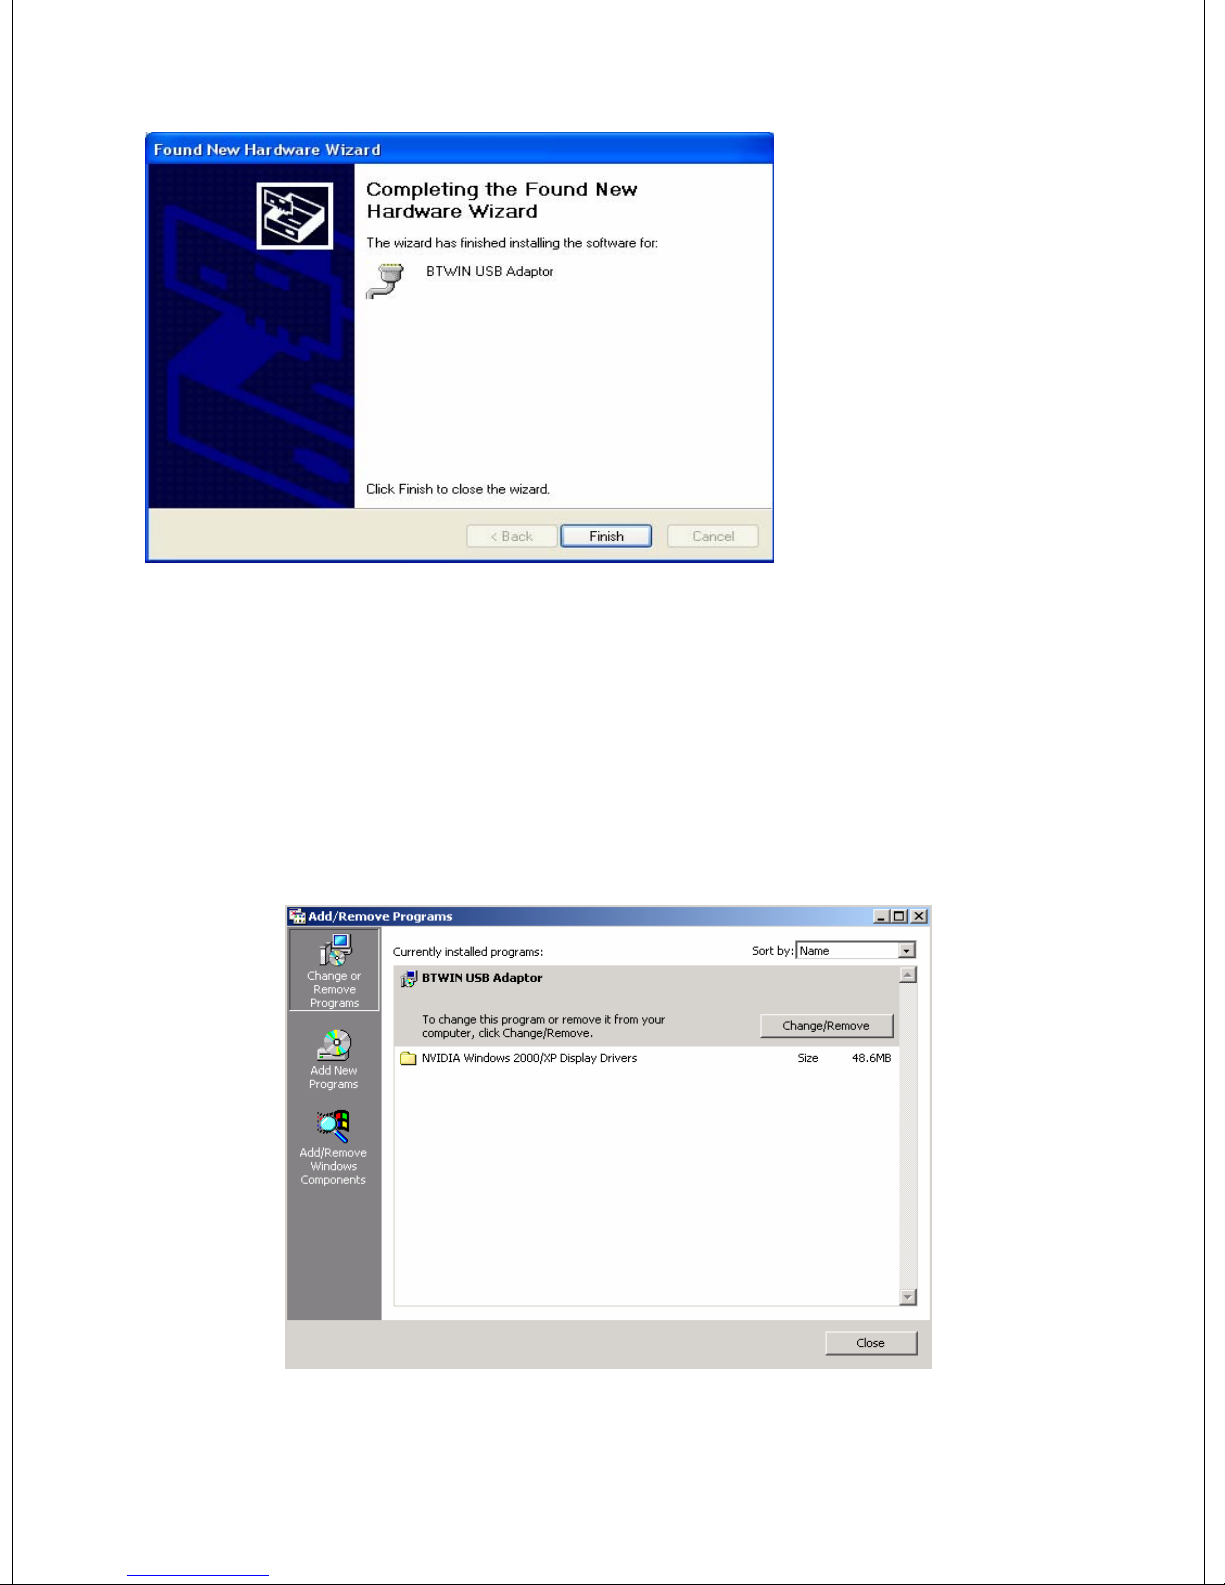
8.2 Uninstallation of device driver
(Windows 98, Windows 2000 and Windows XP)
1) Move to [My computer]Î[Control Panel]Î[Add/Remove programs]
2) You may see “BTWIN USB Adapter”.
[13] Click “Finish” button,
and window will
disappear.
All installations have been
finished.
3) Select that and click “Change/Remove”
4) Click “Yes” button.
Page 24
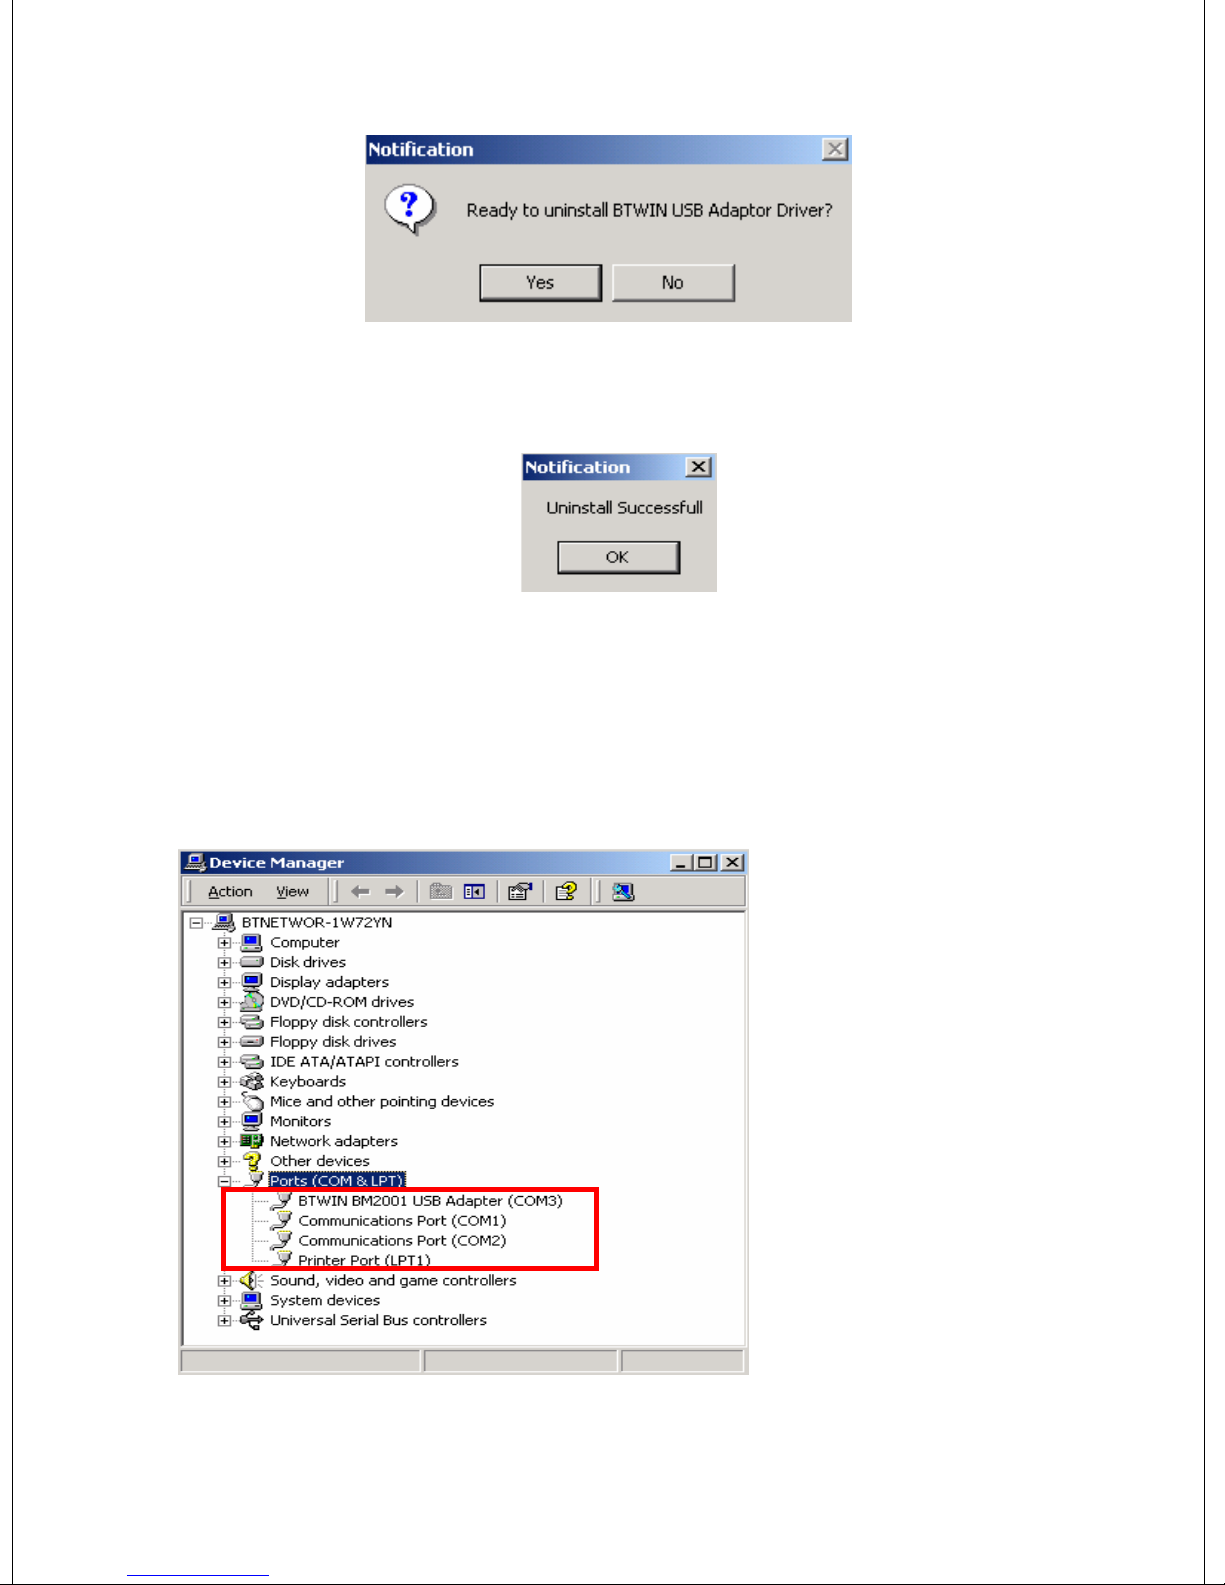
5) Click “OK” button.
8.3 Setting-up COM Port for BM2001
8.3.1 Windows 98
[1] Move to [My computer]
Î[Control Panel]Î[System]
Î[Hardware]
Î[Device Manager]
[2] Click Port, and you may see
“BTWIN BM2001 USB Adapter”
[3] Double click BM2001 to see
its property.
Page 25
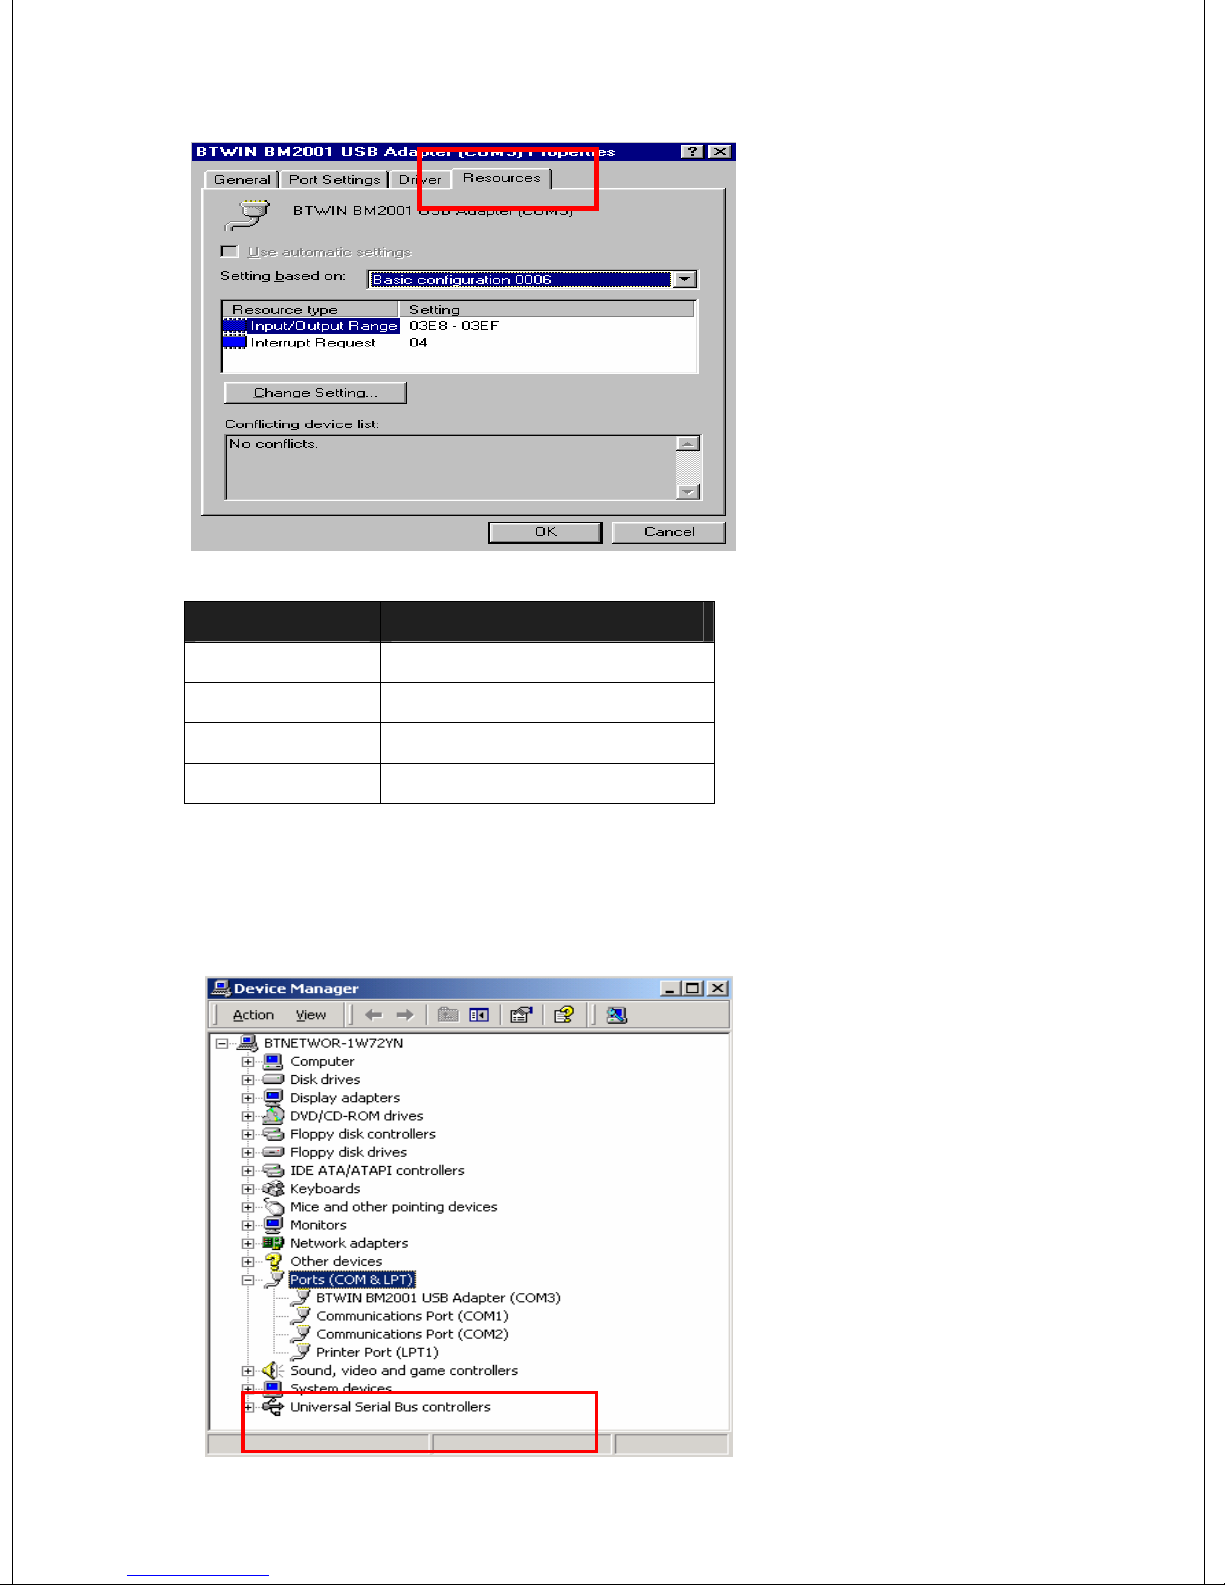
[3] Select the Resources Tab.
[4] If you want to change COM port
for BM2001, you should change the
Setting based on.
[5] Please refer to below table.
COM Port No Input / Output Range
COM 1 03F8 – 03FF
COM 2 02F8 – 02FF
COM 3 03E8 – 03EF
COM 4 02E8 – 02EF
8.3.2 Windows 2000 & Windows XP
COM port Number is assigned by
Input / Output Range.
[1] Move to [My computer]
Î[Control Panel]
Î[System]
Î[Hardware]
Î[Device Manager]
[2] Click Port, and you may
see “BTWIN BM2001 USB
Adapter”
[3] Double click BM2001 to
see its property.
[4] Select “Port Setting” Tab.
[5] Click “Advanced” button.
Page 26
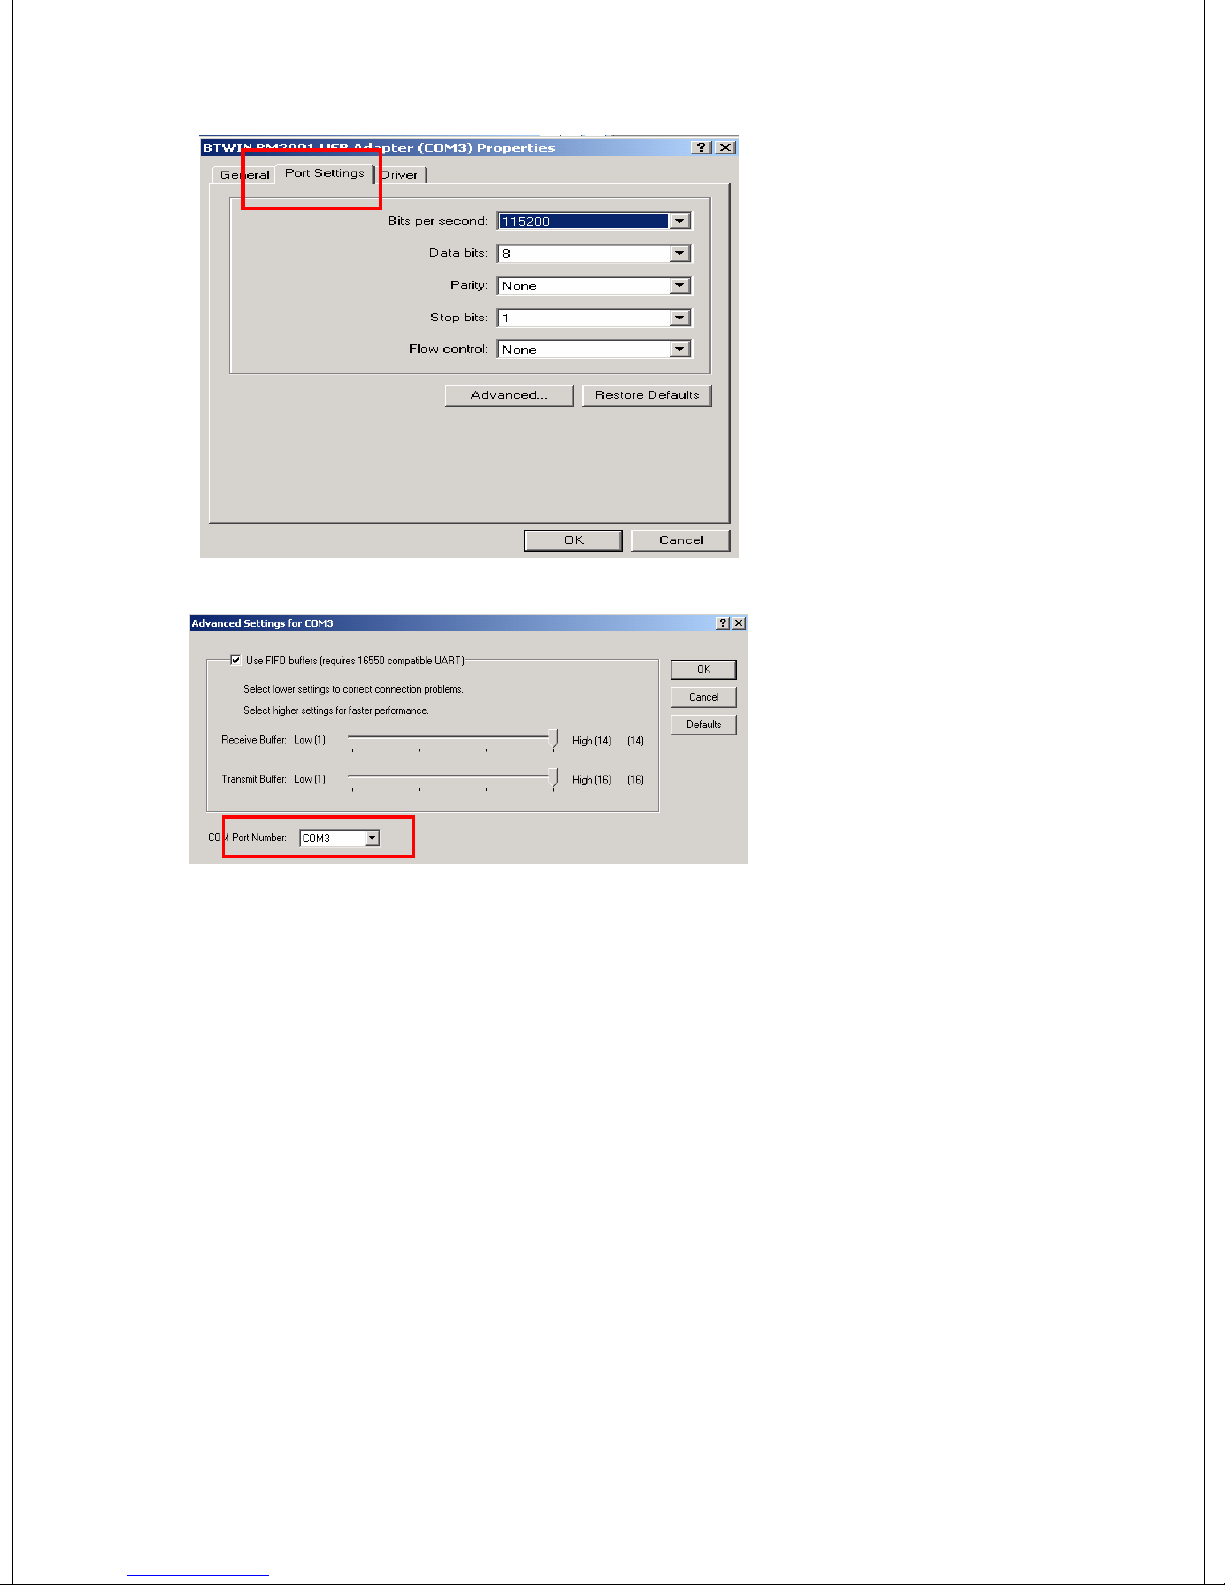
[6] Set COM port No.
Page 27
9. Configuration of BM2001
9.1 Configuration By DIP Switch
NOTE: Check on default setting before testing BM2001
1) If there are two BM2001s. One should be a Master and opposite side should be a
Slave. * BM2001 is set either master or slave at factory.
2) Mode selection should be DIP-Switch Configuration mode.
3) Baud rate is 9600 bps
.
Function Select Switch
Let’s set the DIP Switch
i) Set as a MASTER
Function Select Switch Baud Rate Switch Setting
ii) Set as a SLAVE
Baud Rate Switch
Role: Master
bps: 9600 bps
Mode: DIP Switch
Configuration Mode
Function Select Switch Baud Rate Switch Setting
Role: Slave
bps: 9600 bps
Mode: DIP Switch
Configuration Mode
Page 28
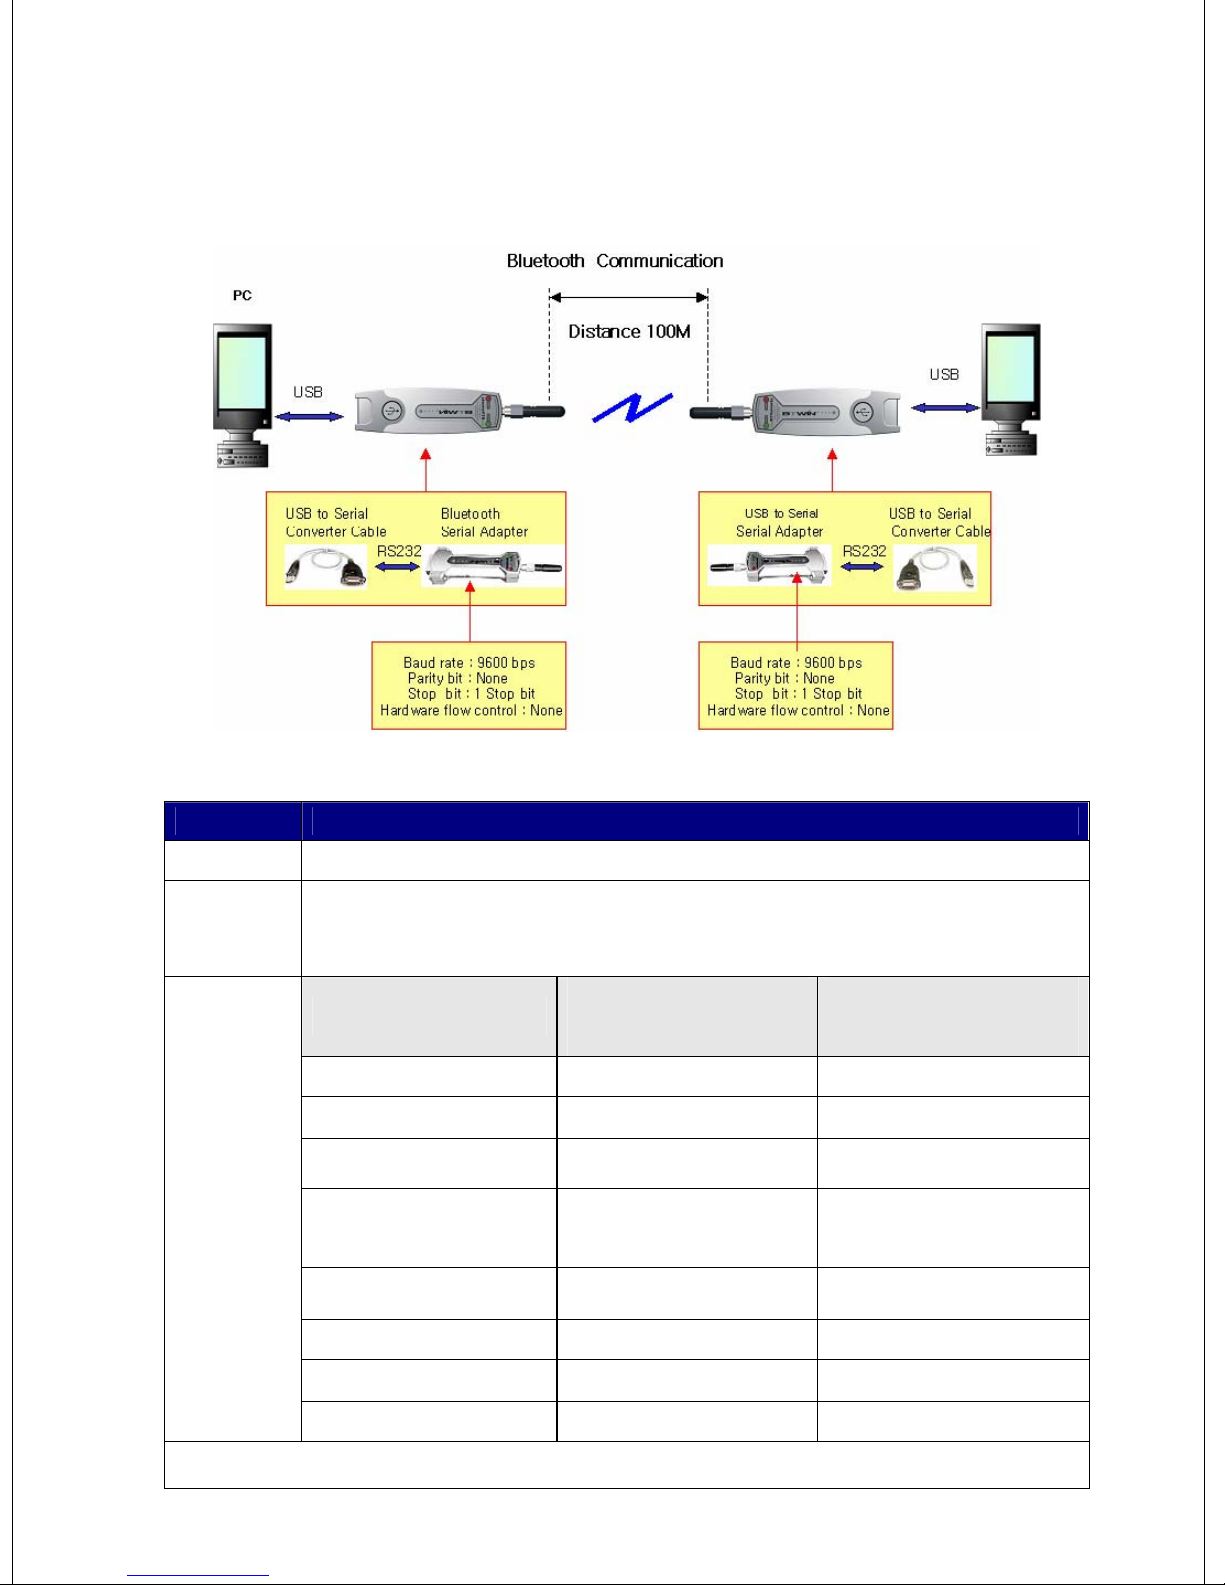
9.1.1 Communication Test at 9600bps (default setting)
Ex.)
Part Description
Equipment PC: 2 ea BM2001: 2 ea
Test
Environment
Setting
Values
PC is power on and OS is the Windows.
Use USB port of each PC.
Default
Part
(Before change)
External Power Select Don’t Use
Select RI Signal Line Don’t Use
Master/Slave Select Master or Slave
Dip switch
Mode Select
Configuration mode
Baud rate 9600 bps
Parity None None
Stop bit 1 bit
User Select
(After Change)
Don’t Use
Don’t Use
Master or Slave
Dip switch
Configuration mode
9600 bps
1 bit
Hardware flow control None None
* If use Default setting, You don’t have to change the setting.
Page 29
Follow these procedures.
[1] Attach BM2001 to USB port of each PC.
[2] Turn on the power switch.
♦ Whenever turn on the power switch, BM2001will start working.
[3] Check on the power LED color is red.
♦ It means B2001 is supplied power stable.
[4] Check on status LED color is green.
♦ When Status LED is green, it means is established connection between two
BM2001s.
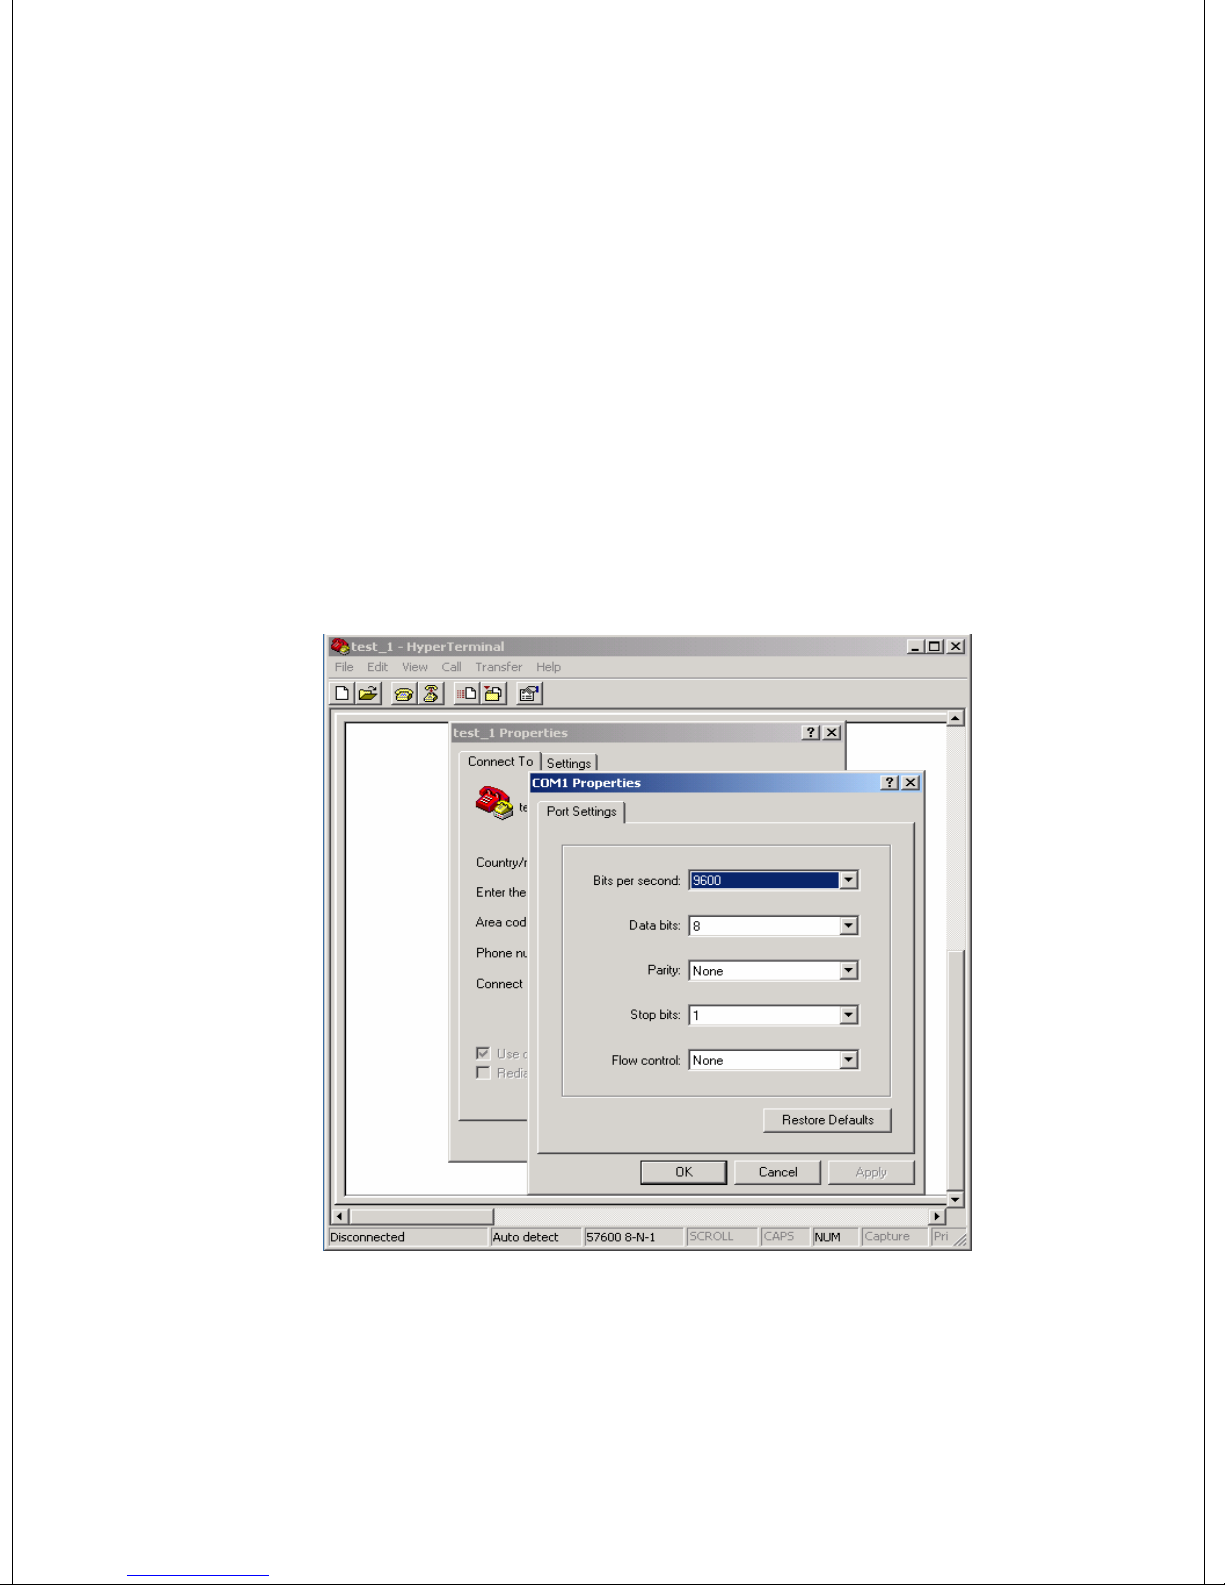
[5] Run the hyper terminal at each PC. And then set the parameters as below picture.
[6] Enter the characters via keyboard at each PC in order to transmit the data between
two PCs.
Page 30
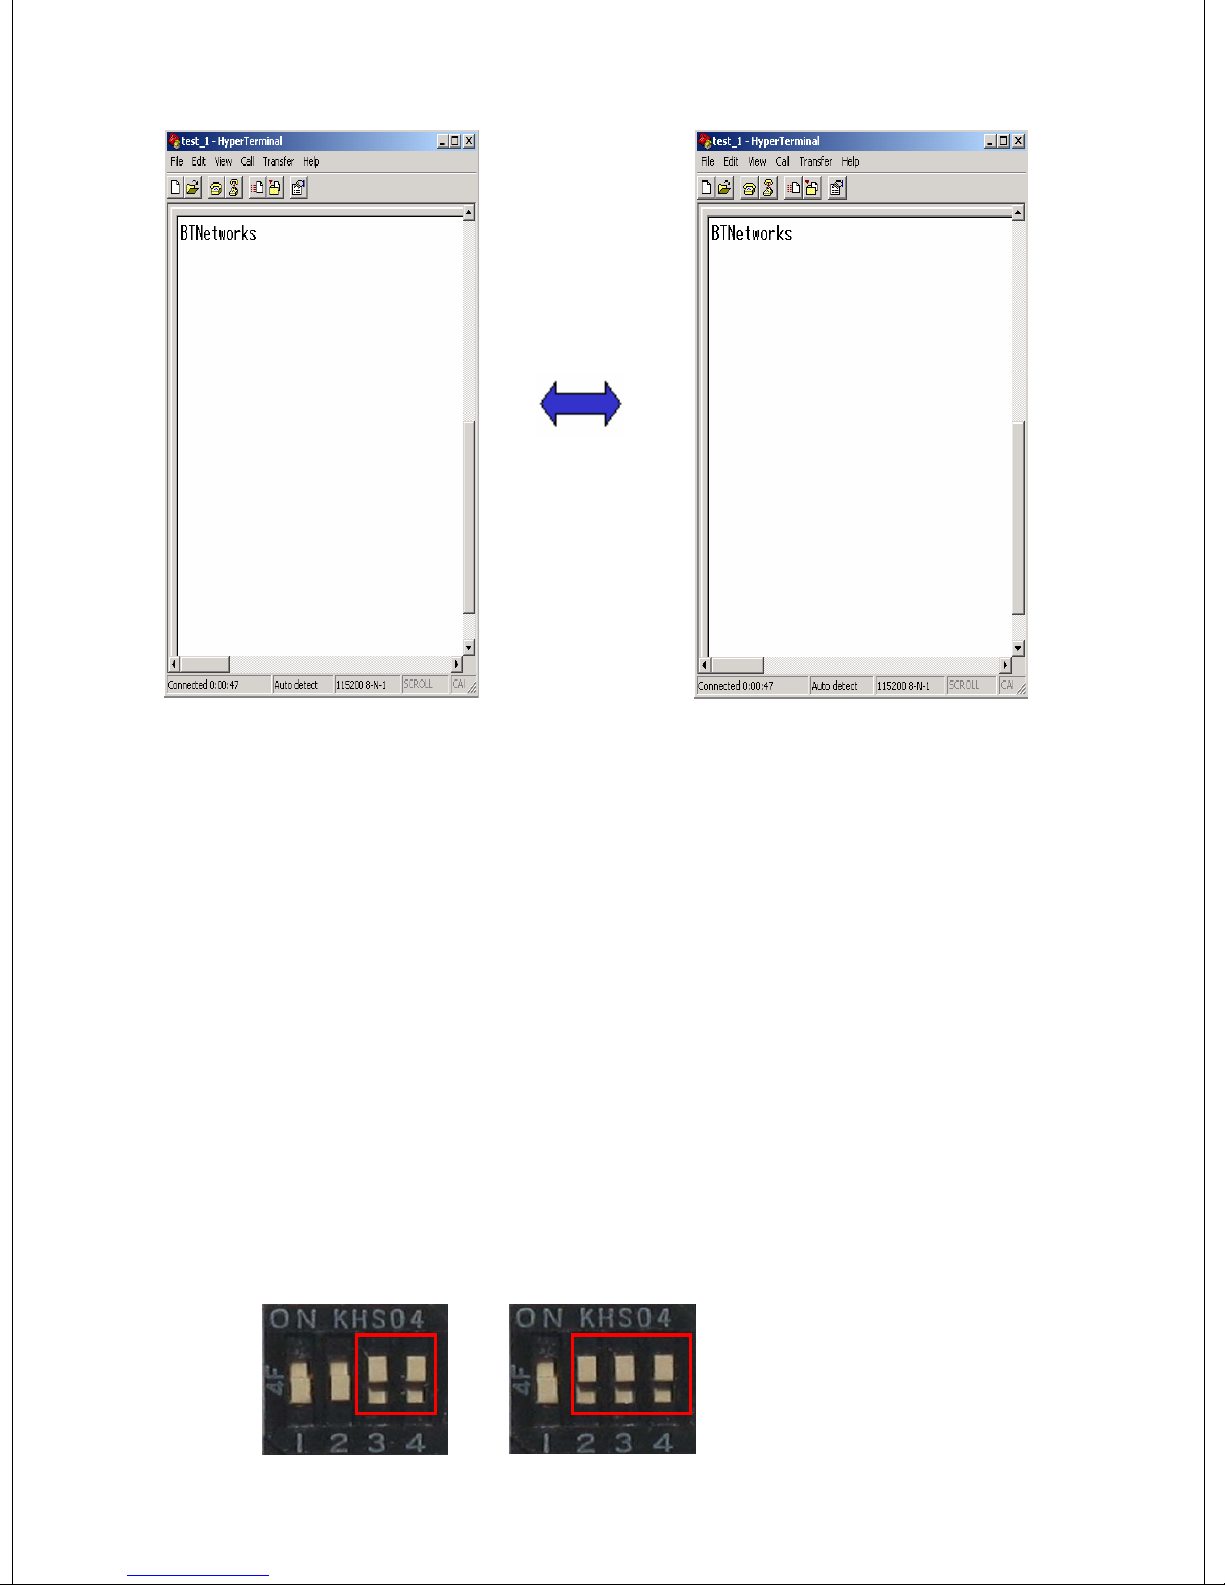
Full Duplex
Communication
PC1
PC2
[7] If users may see the characters on both windows, it means data communication both
way through BM2001s and setup is successful.
9.1.2 Communication Test at 115,200bps (buad rate change)
Change the baud rate switch as 115200 bps. Pin 2,3 and 4 are up before test.
After change, please try with HyperTerminal to confirm the successful data
communication with changed buad rate.
♦ BM2001 should be either master or slave. If one is a master, another should be a
slave.
I) Set as a MASTER
Function Select Switch Baud Rate Switch Setting
Role: Master
Bps: 115200 bps
Mode: DIP Switch
Configuration Mode
Page 31
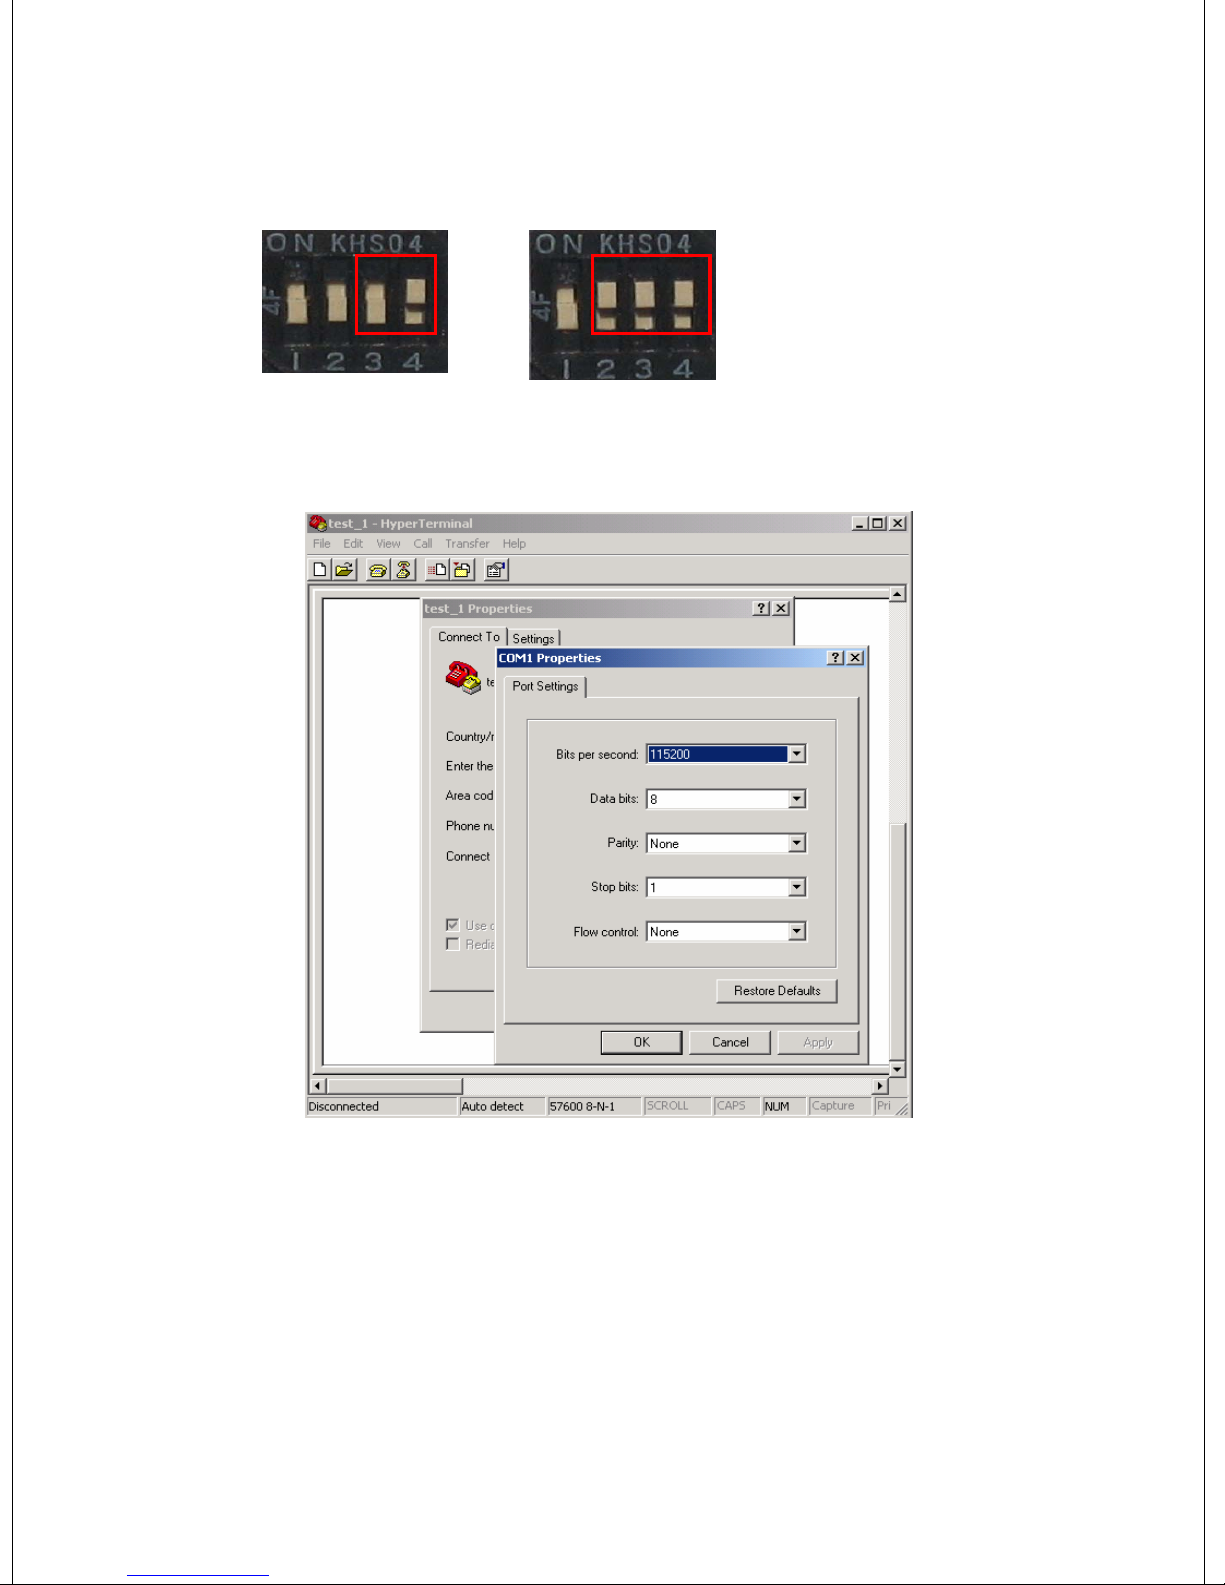
ii) Set as a SLAVE
Function Select Switch Baud Rate Switch Setting
Role: Slave
Bps: 115200 bps
Mode: DIP Switch
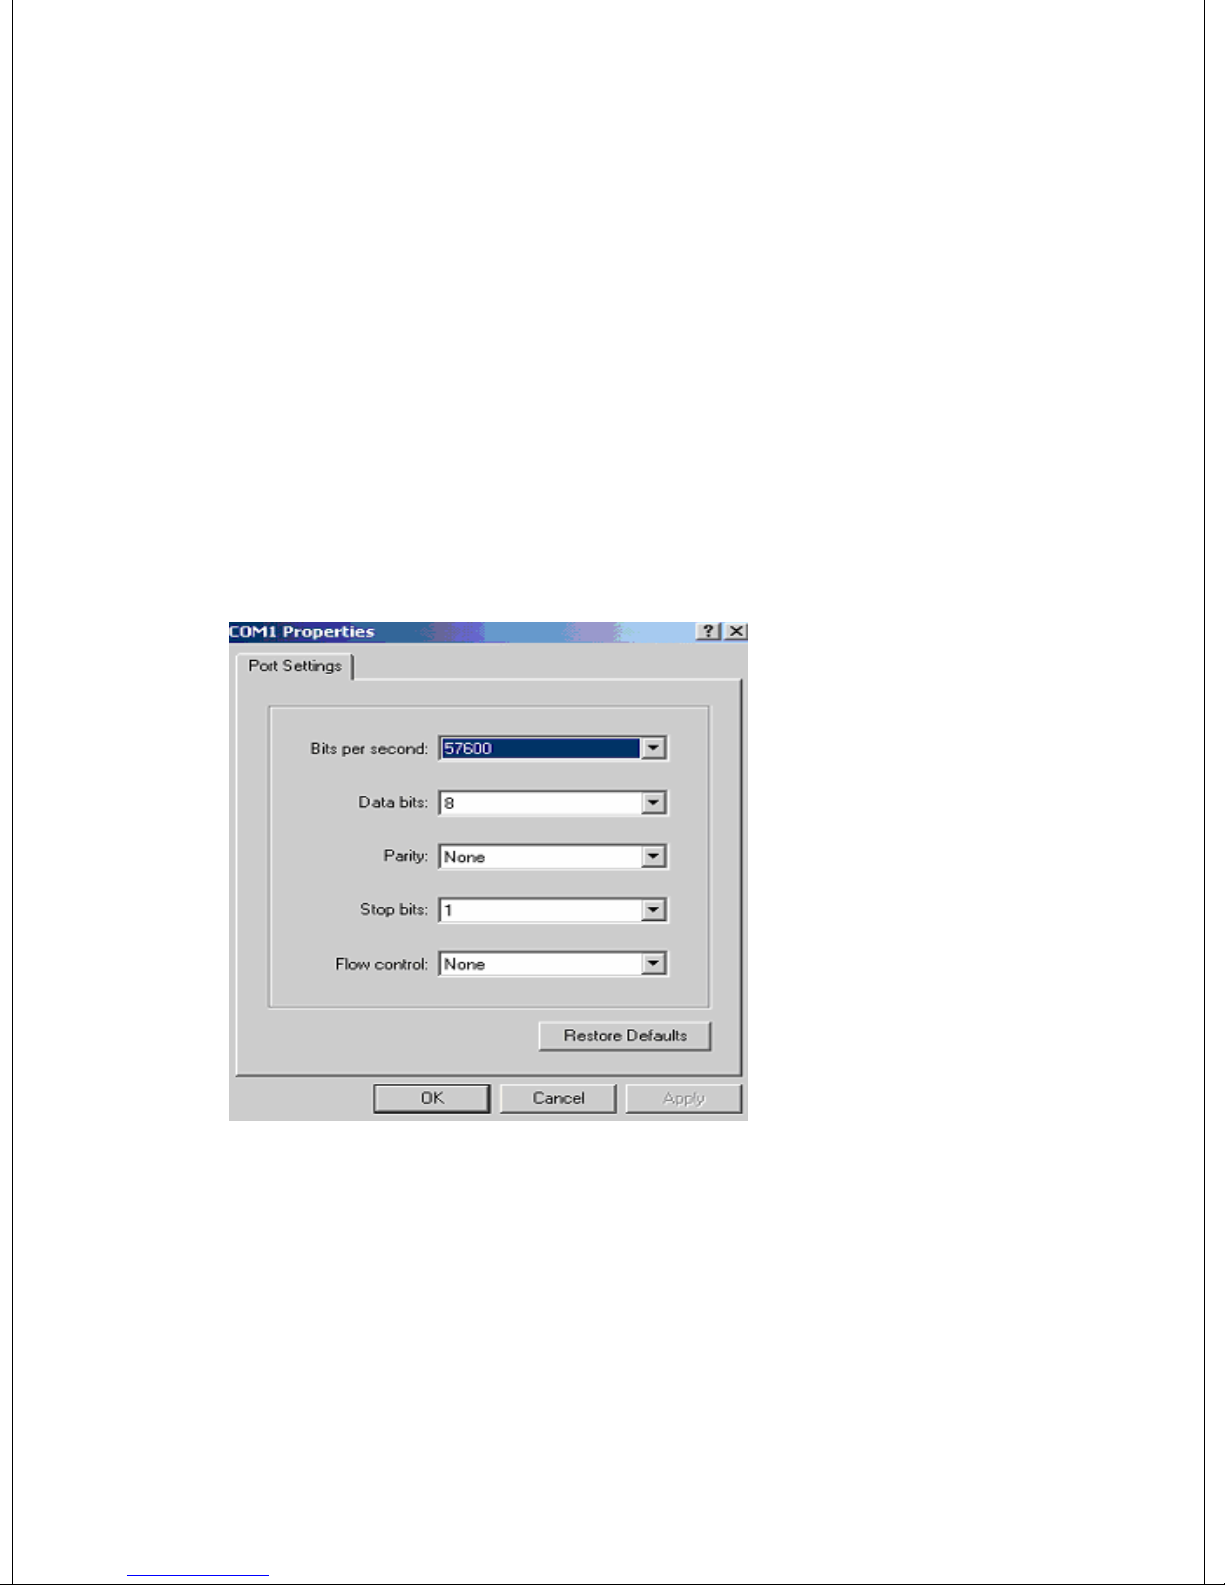
After the change of DIP switch to use 115.2Kbps, please test with Hyperteminal with Port
settings with new baud rate as in below.
Configuration Mode
Page 32
9.2 Configuration By PC Software
9.2.1 Pre-setting
You should below procedures in order to use the PC Configuration mode before turn
on the BM2001.
[1] In order to use PC Configuration Mode, you need the serial communication
software.
Here we explain the usage scenario with HyperTerminal of Windows.
[2] Run the Hyper Terminal and then disconnect current connection.
[3] Open the menu [FileÎPropertyÎConfiguration] at Menu Bar.
Port Setting
Communication Speed:
Should be matched to
DIP switch setting if
setted. Default:
9600bps.
Data Bit: 8
Parity Bit: None Parity
Stop Bit: 1
Flow Control: None
Page 33
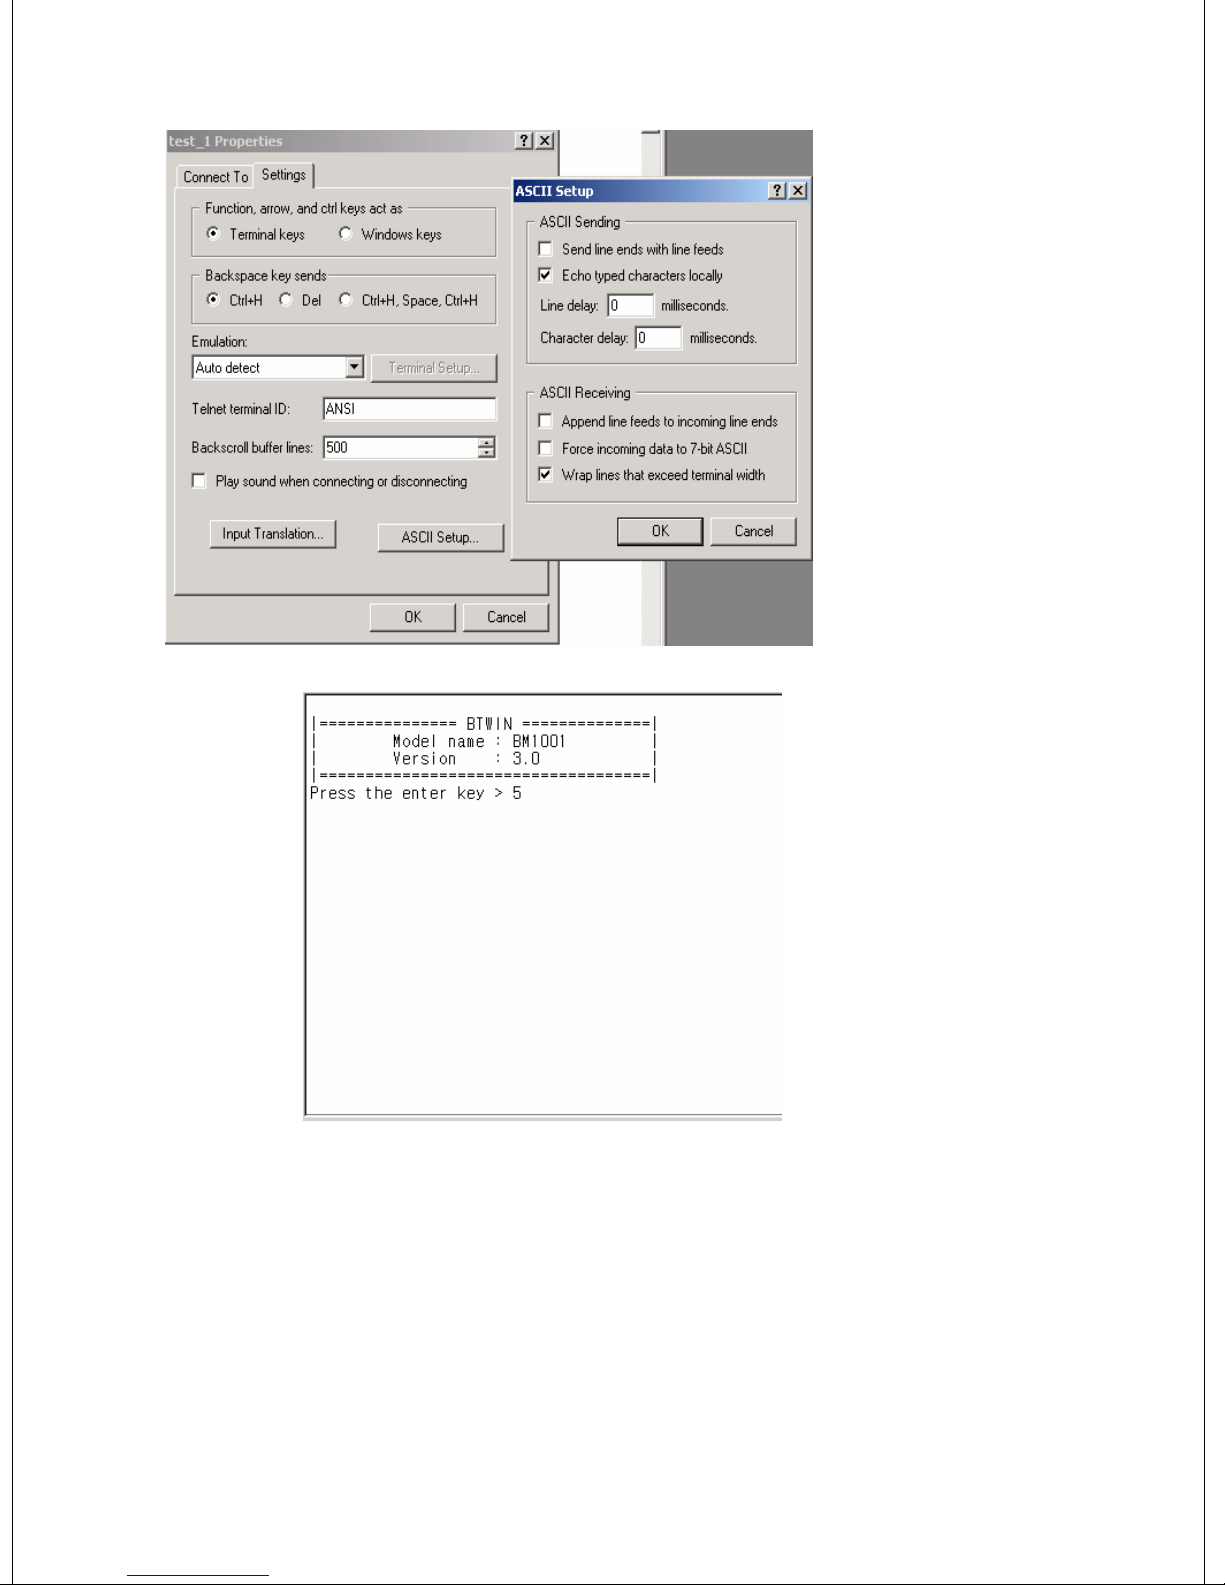
Click to “ASCII Setup”
button of Setup tab in
the properties to into
ASCII setup mode.
Check the “Echo typed
characters locally” box
in the ASCII Sending.
[4] Afterward above set up,
turn on the BM2001 and
then click the connect
button.
It will appear the message
like left picture then it will
start the count down.
Page 34
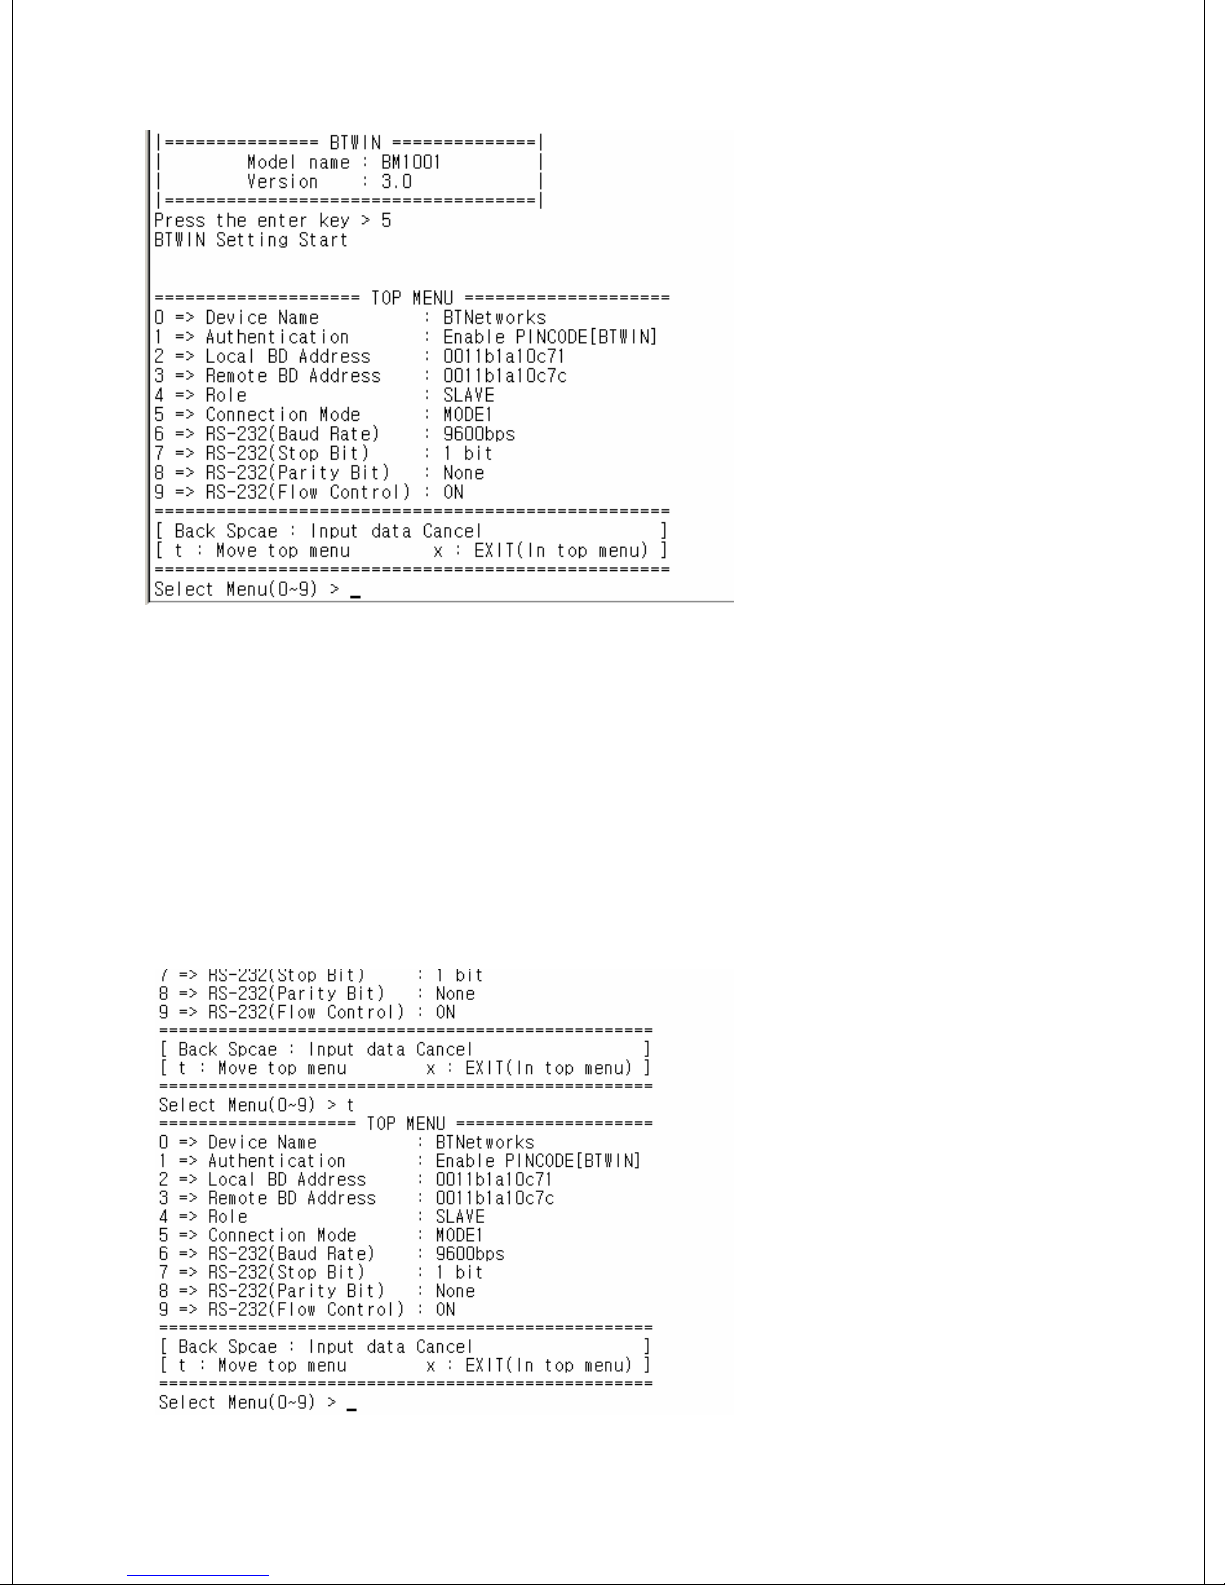
[5] Press the enter key
within 5 seconds, and
appear the TOP menu to
configure.
[6] If you do not press the enter key within 5 seconds, BM2001 will try to communicate
at default setting.
[7] If you need more detail information for PC Configuration Mode, refer below
documents.
9.2.2 How to do PC configuration
1) After enter the character,
Press the enter key.
2) Small “t” always moves
to TOP MENU.
3) Small “x” closes the PC
configuration utility.
3) To move to other menu
you should input the left
first number of menus.
4) To cancel current input
character use the “Í”
Back Space key and “ESC”
key.
Page 35
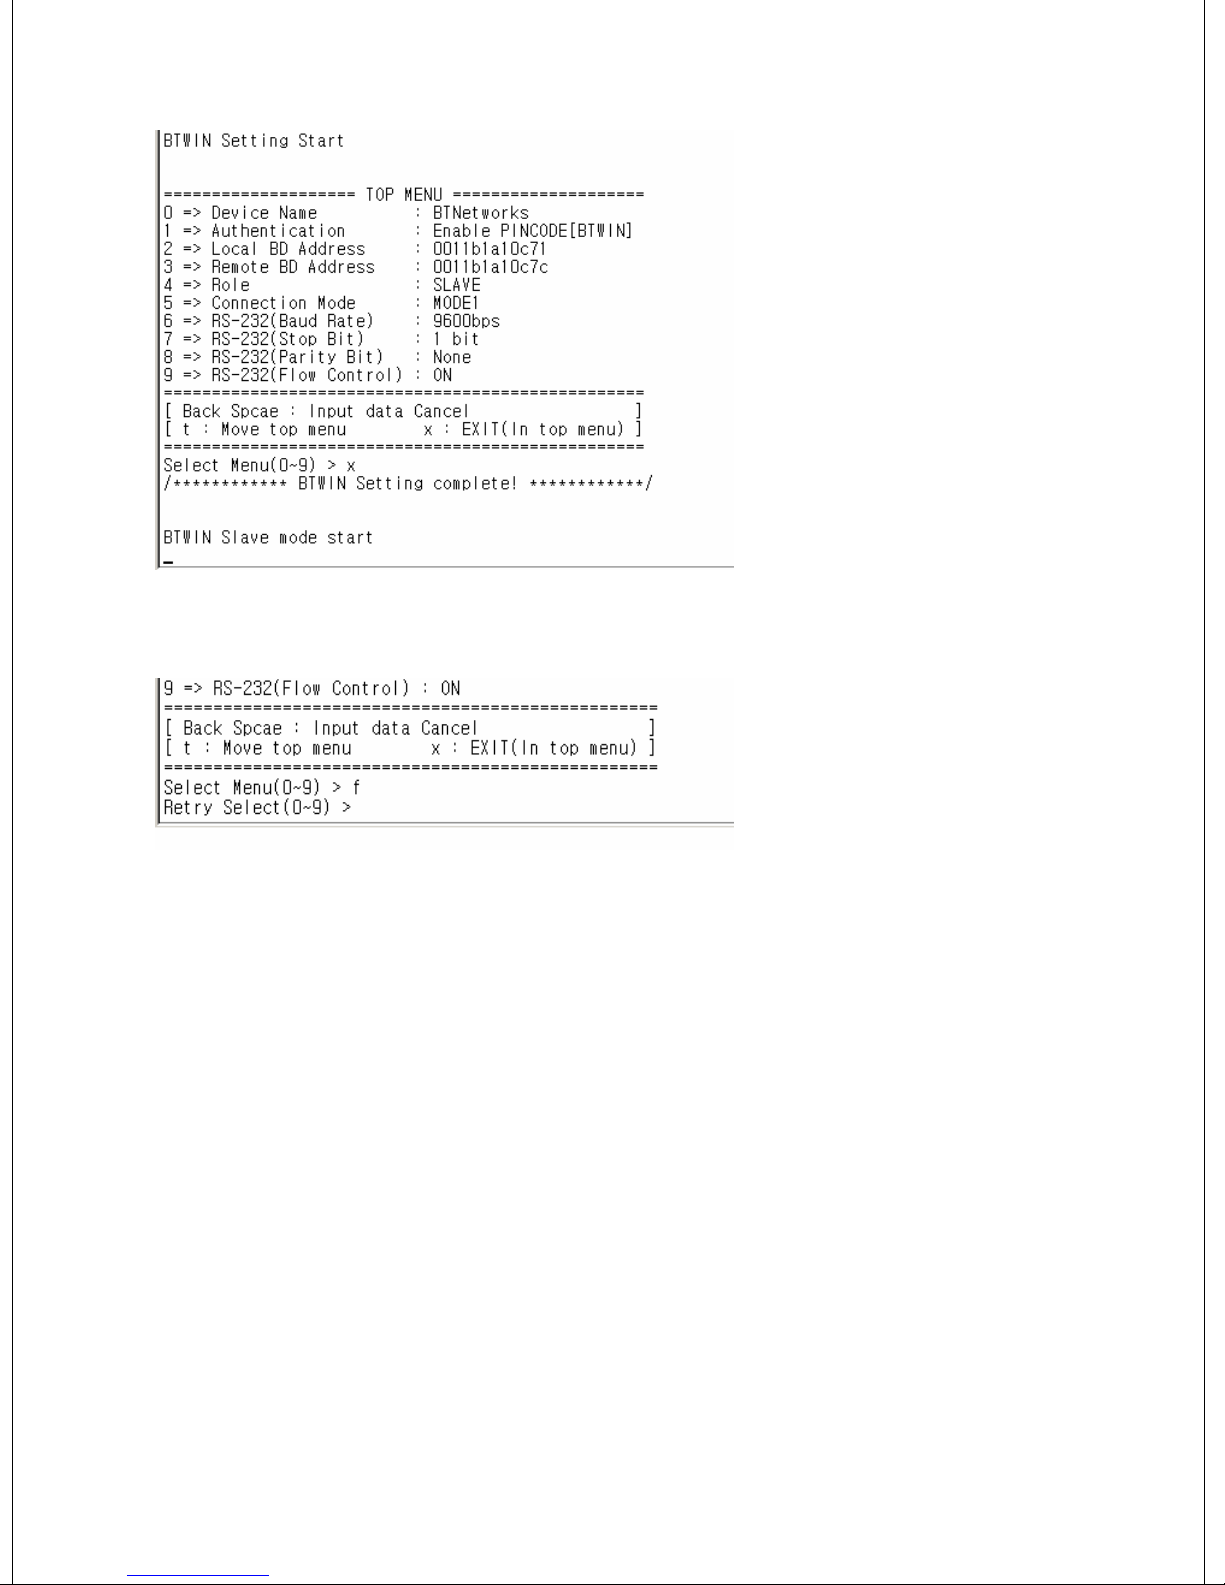
5) If the entered character
is wrong, “Retry > “
message will be displayed.
6) You can enter the
character until maximum
12 characters.
If the entered characters
exceed than 12 characters,
it will display “Overflow
buffer” message.
And then it will display
“Retry > “ message.
Page 36
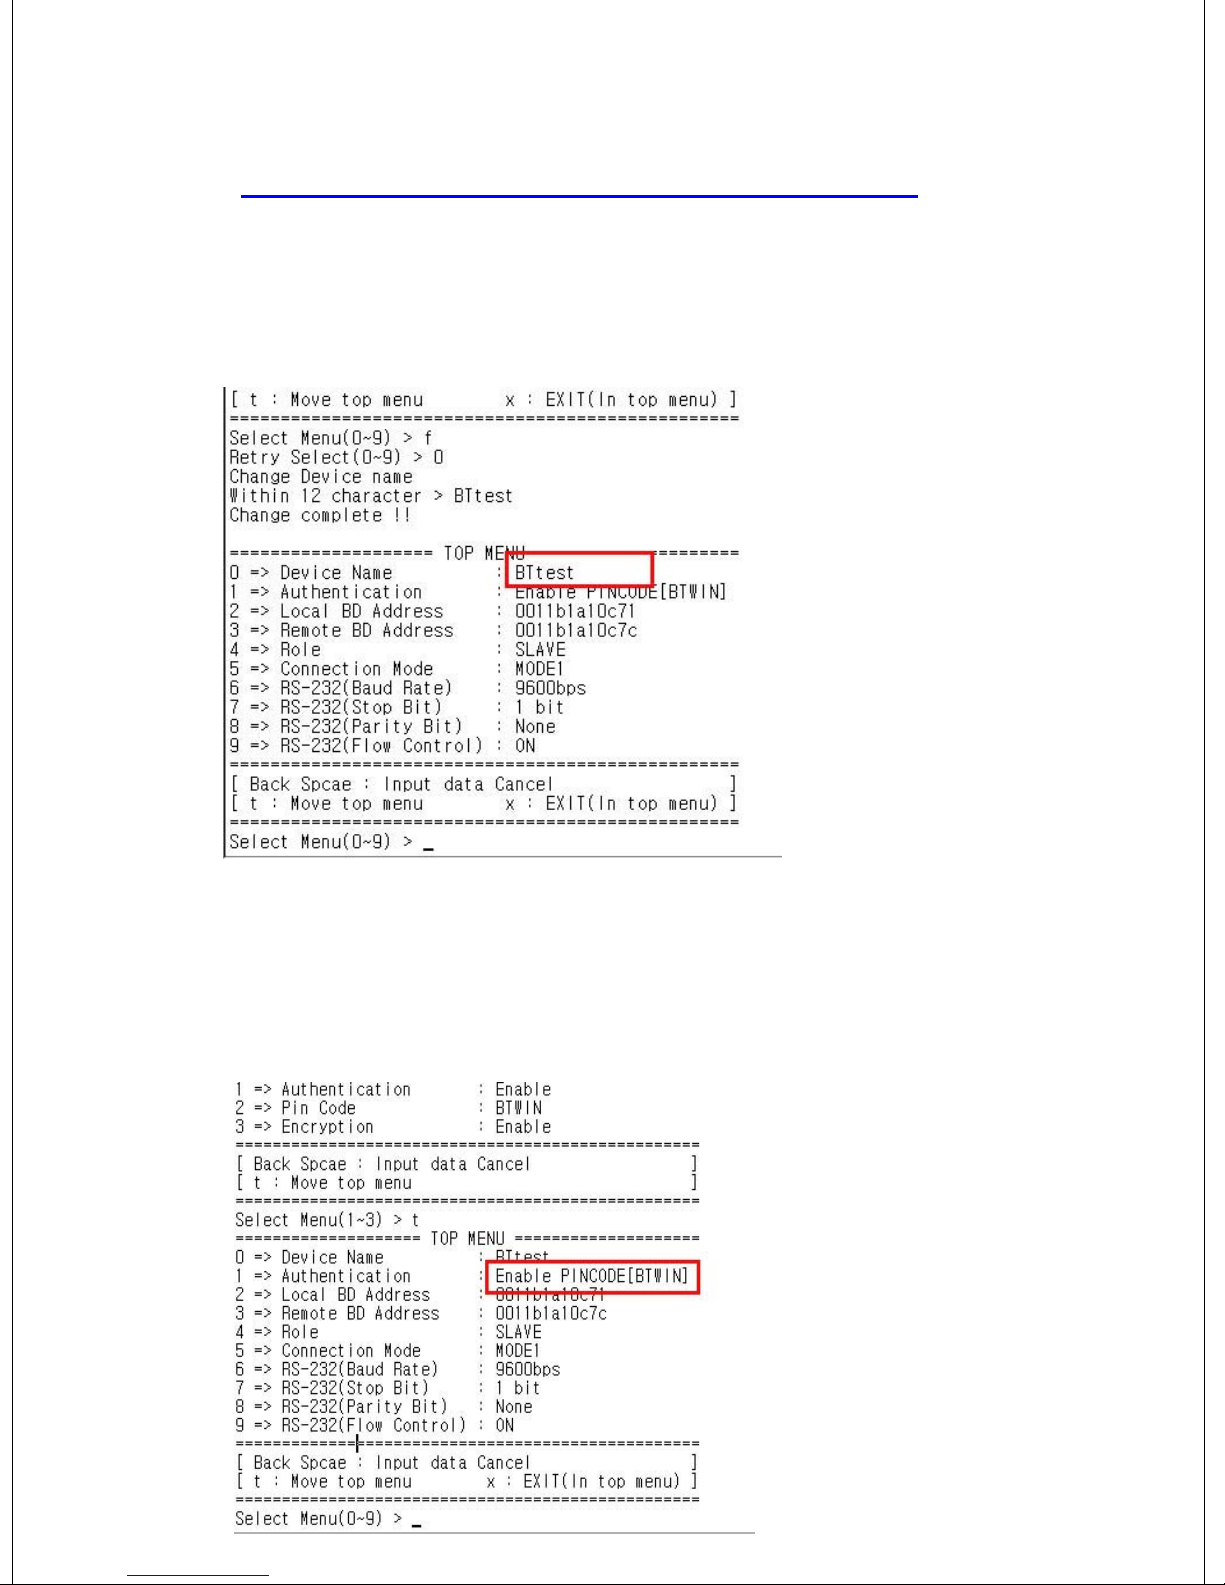
* Explanation on menu of the PC configuration interface
[1] Device Name: Bluetooth device’s name
[1-1] You can change the device name within 12 characters.
[1-2] Afterward input the name then press the enter key.
Appear “Change Complete!!” message and then move to TOP MENU.
The device name is changed from BTNetworks to BTtest.
[1-3] You can see the changed device name at TOP menu.
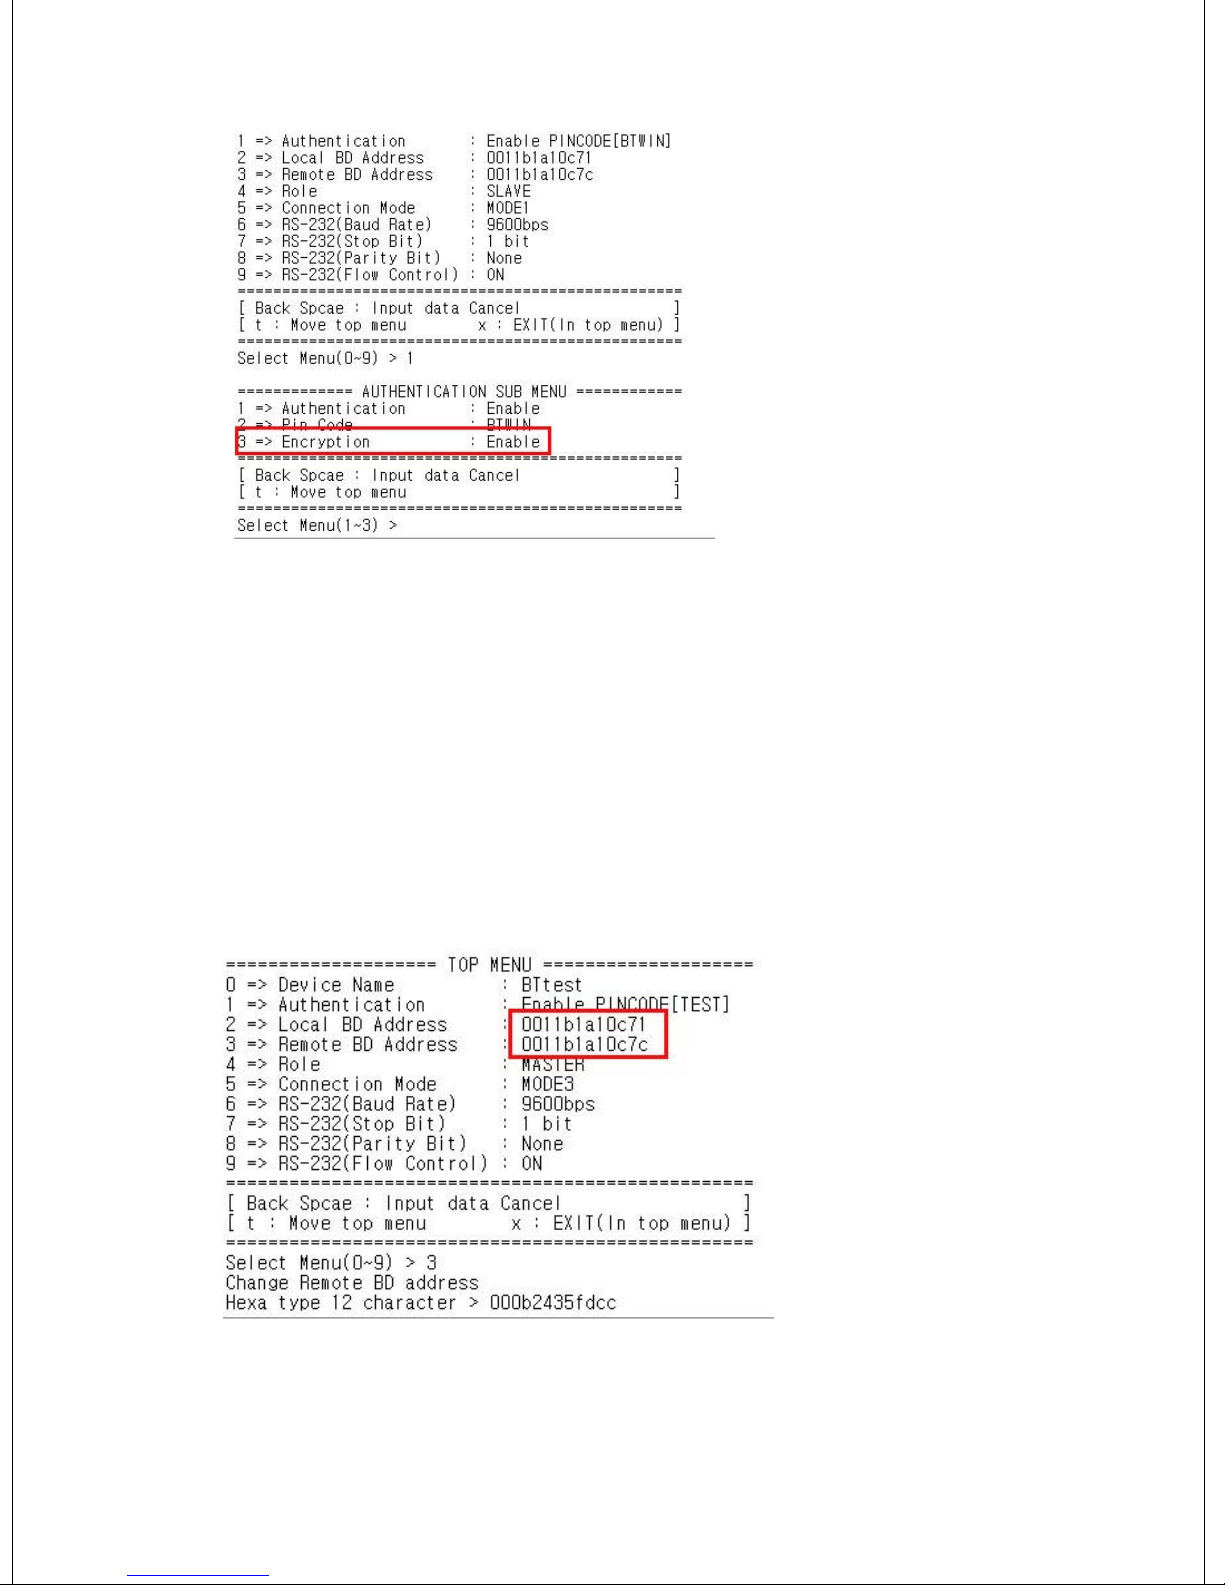
[2] Authentication
To connect other bluetooth devices it needs an authentication, pin code, encryption.
User may set them in this menu.
Authentication is set as enable
Pin Code is set as BTWIN
Page 37
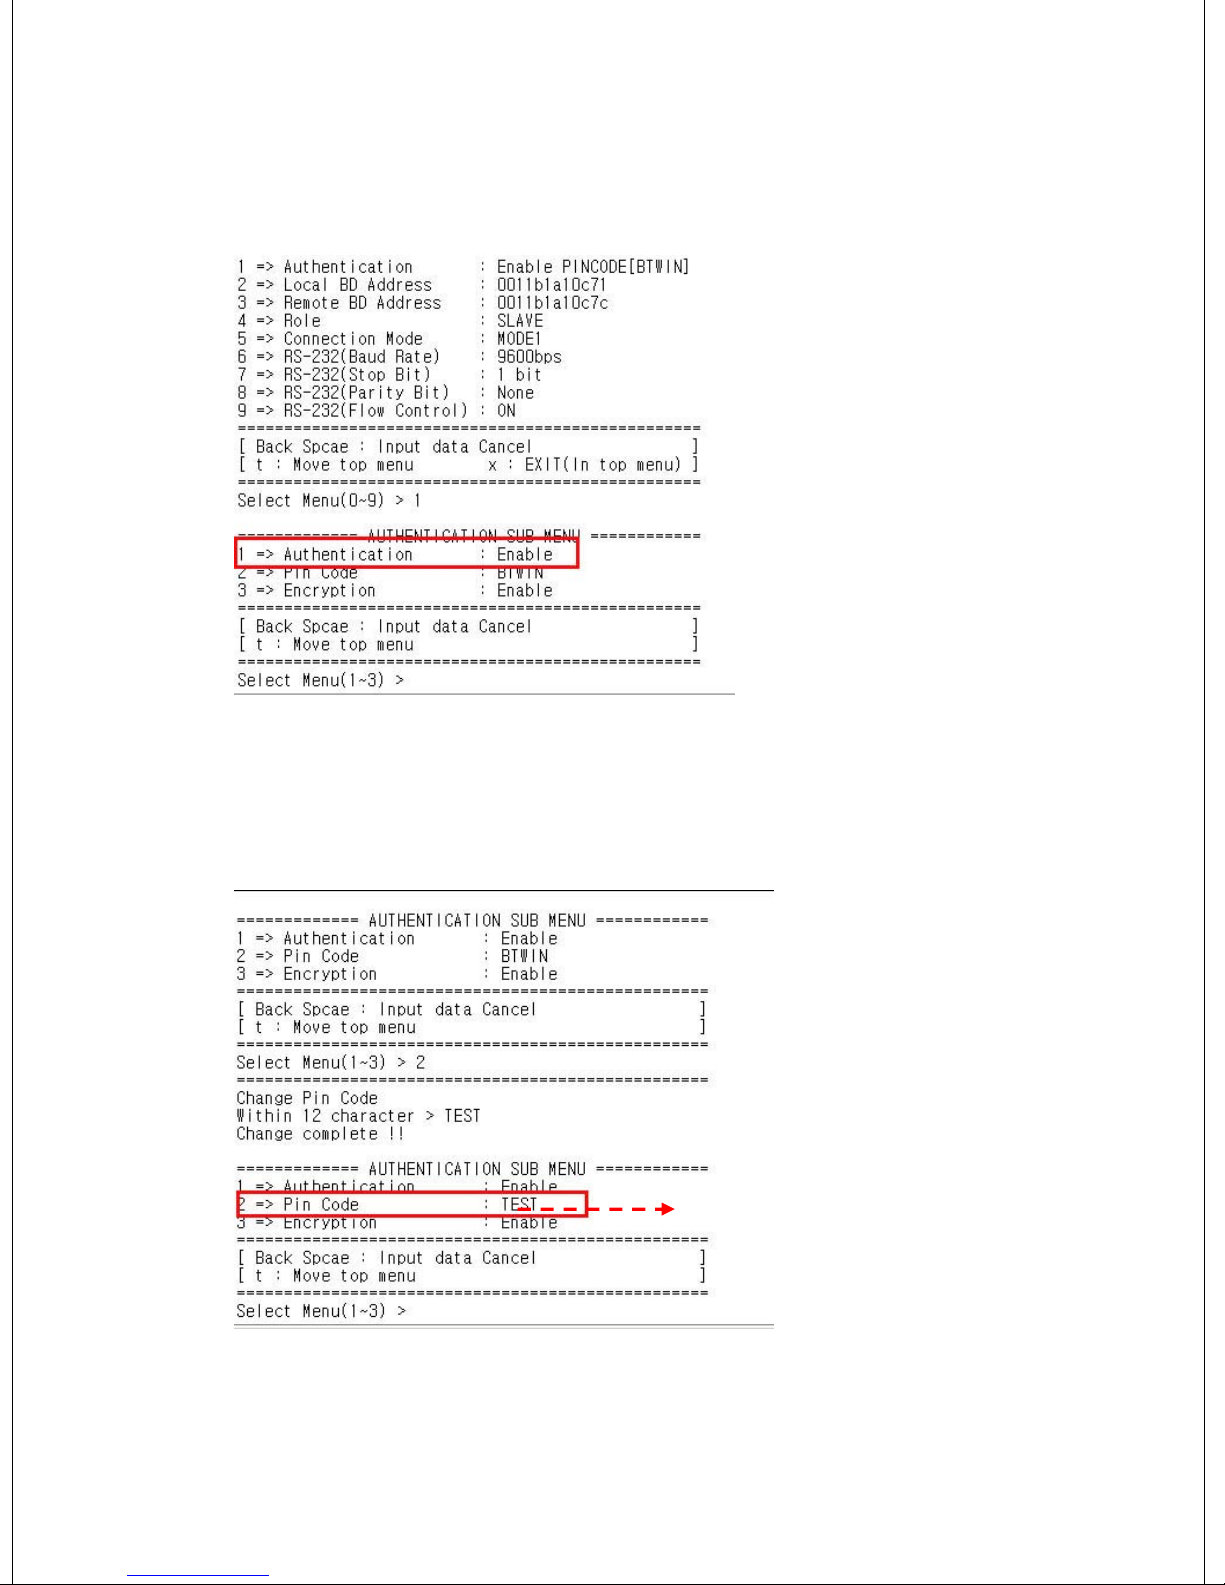
[2-1] Authentication
[2-1-1] User may set to request the authentication procedure.
[2-1-2] When it is disable, the encryption feature is disable too.
[2-1-3] The default setting is enable.
[2-2] Pin Code
[2-2-1] It is like a password.
[2-2-2] To connect between two devices, they have to have a same pin code.
[2-2-3] You can enter the pin code within 12 characters.
[2-2-4] After enter the pin code, “Change complete !!” message will be displayed.
And then move to AUTHENTICATION SUB MENU.
[2-3] Encryption
[2-3-1] This encrypt the data between two bluetooth devices.
[2-3-2] The default setting is enable.
[2-3-3] If the authentication is disable, this is disable too.
Pin code is changed.
Page 38
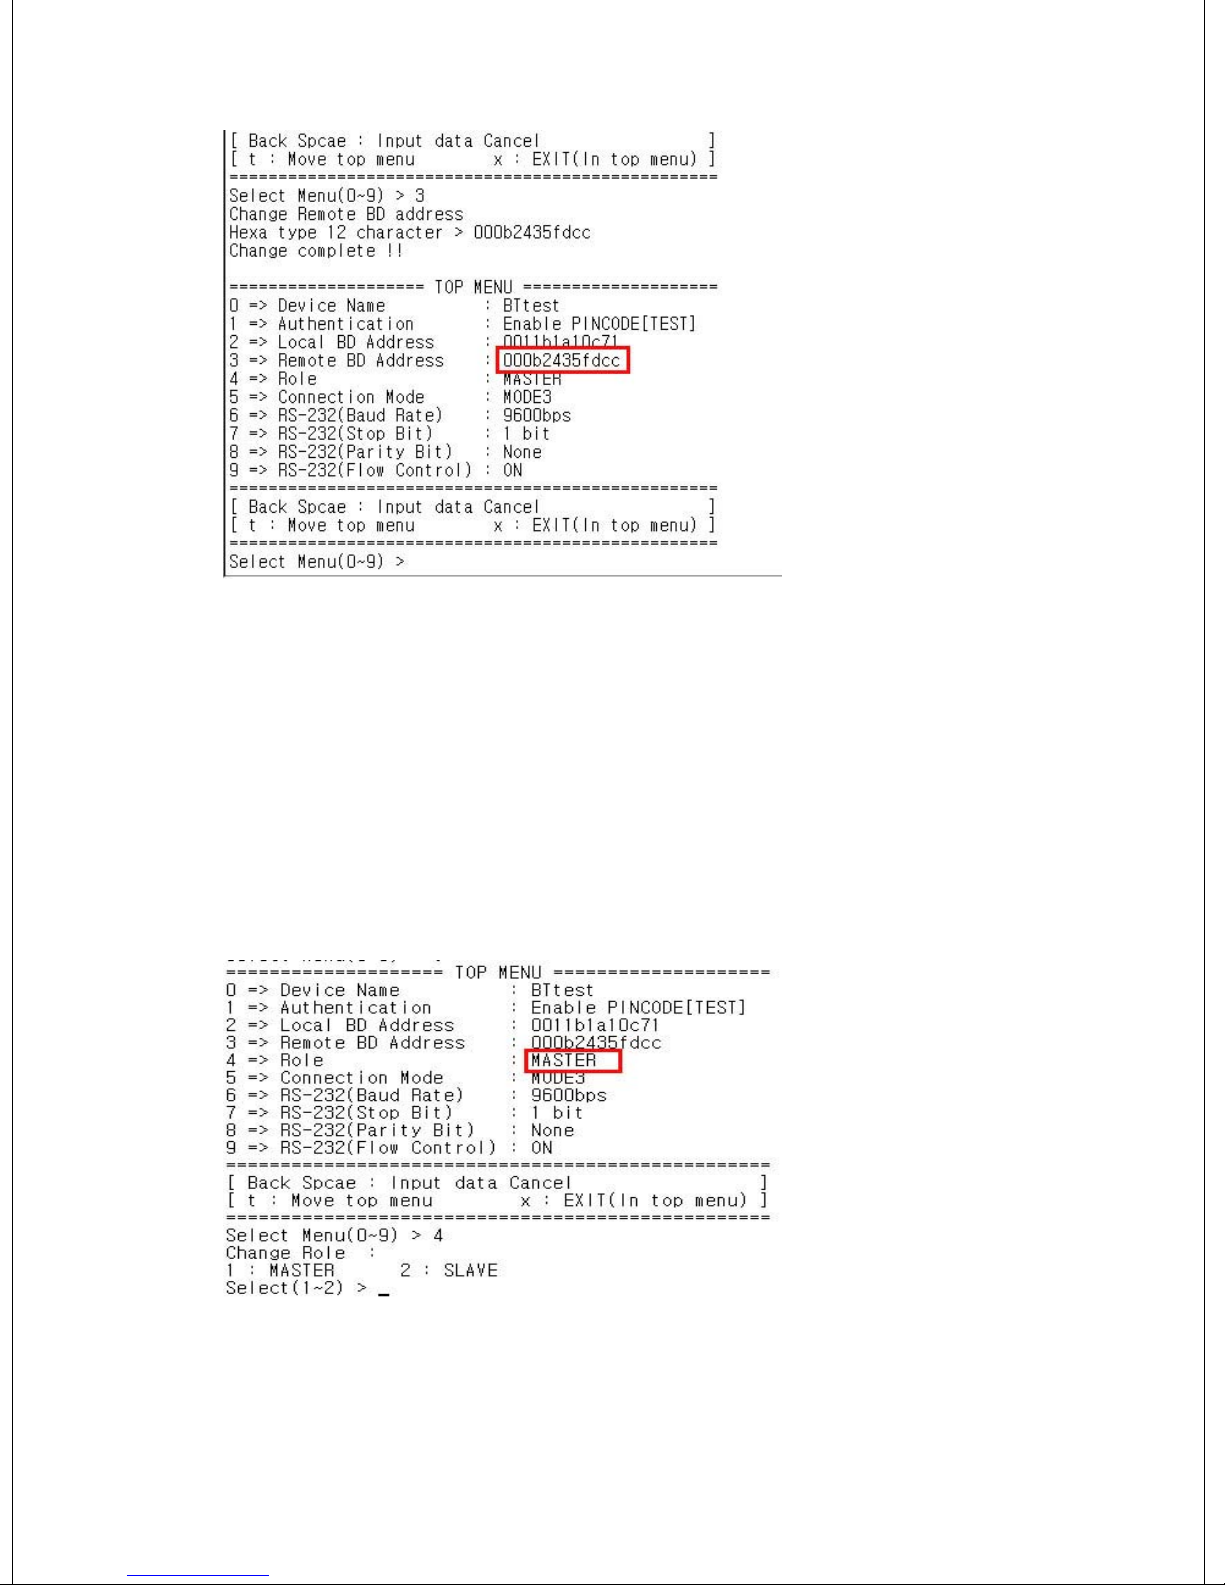
[3] Local BD Address:
[3-1] This is a MAC address of Bluetooth Device. It is fixed parameter. You can’t change
it.
[3-2] If you choice this menu, “No change local BD address” message will be displayed
and then move to Top menu automatically.
[4] Remote BD Address
[4-1] This is the latest paired bluetooth device address.
[4-2] If you want to connect new bluetooth device, delete the latest paired bluetooth
device address and then enter new bluetooth address.
1) To use this feature enter “3” and then press the enter key at menu select status.
2) Input the new bluetooth device address in a hexadecimal that you want to connect it.
3) It will be displayed “Change complete!!” and then move to Top menu automatically.
4) You can see the changed Remote BD address.
Page 39
[4-3] When you want to delete the Remote BD address, input twelve zeros
“000000000000”
If you delete the Remote BD address, it is able to connect the first bluetooth device has
same PIN code in MODE1.
[4-4] BM1001 must have a Remote BD address in MODE3.
[5] Role
[5-1] Bluetooth device has to be an either master or slave.
[5-2] In order to connect between two bluetooth devices one has to be a master and
another has to be a slave.
[5-3] Select menu 4 at TOP MENU, and you can select the role.
MASTER is 1 and SLAVE is 2.
[5-4] Select the role and press the enter key.
Page 40
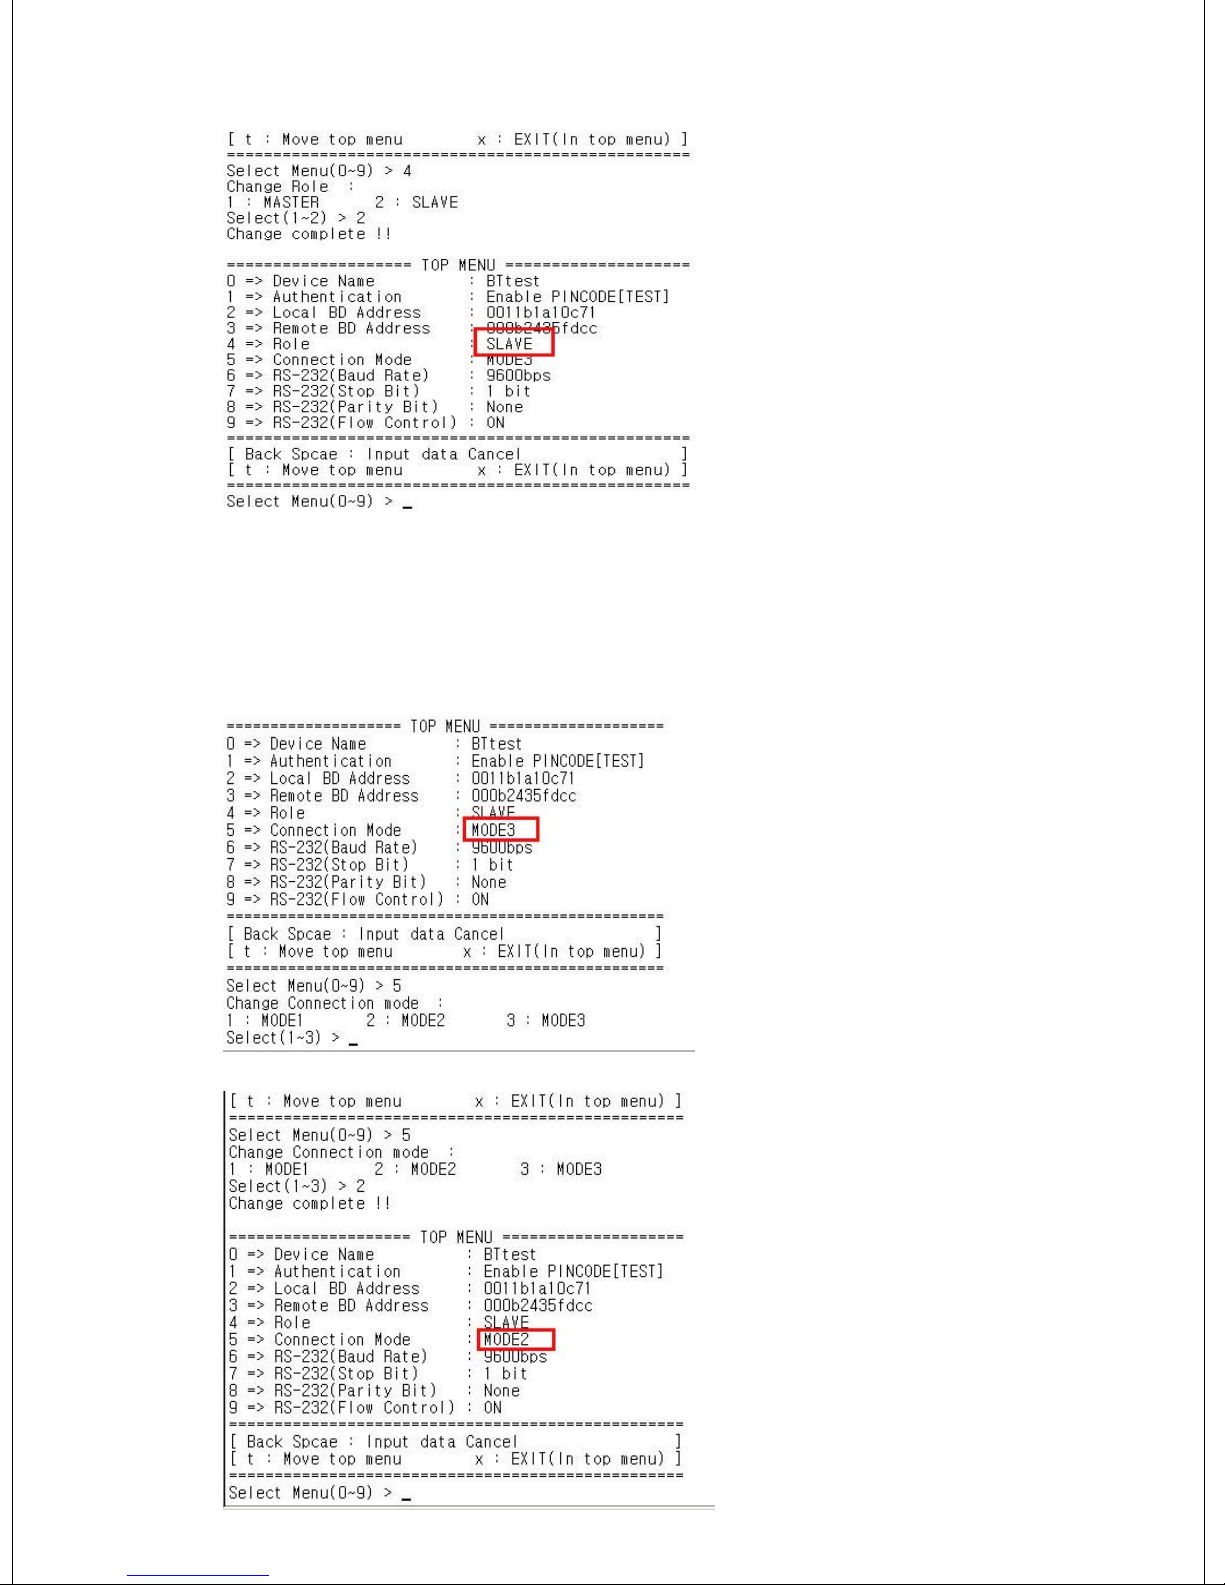
* You can see the changed Role.
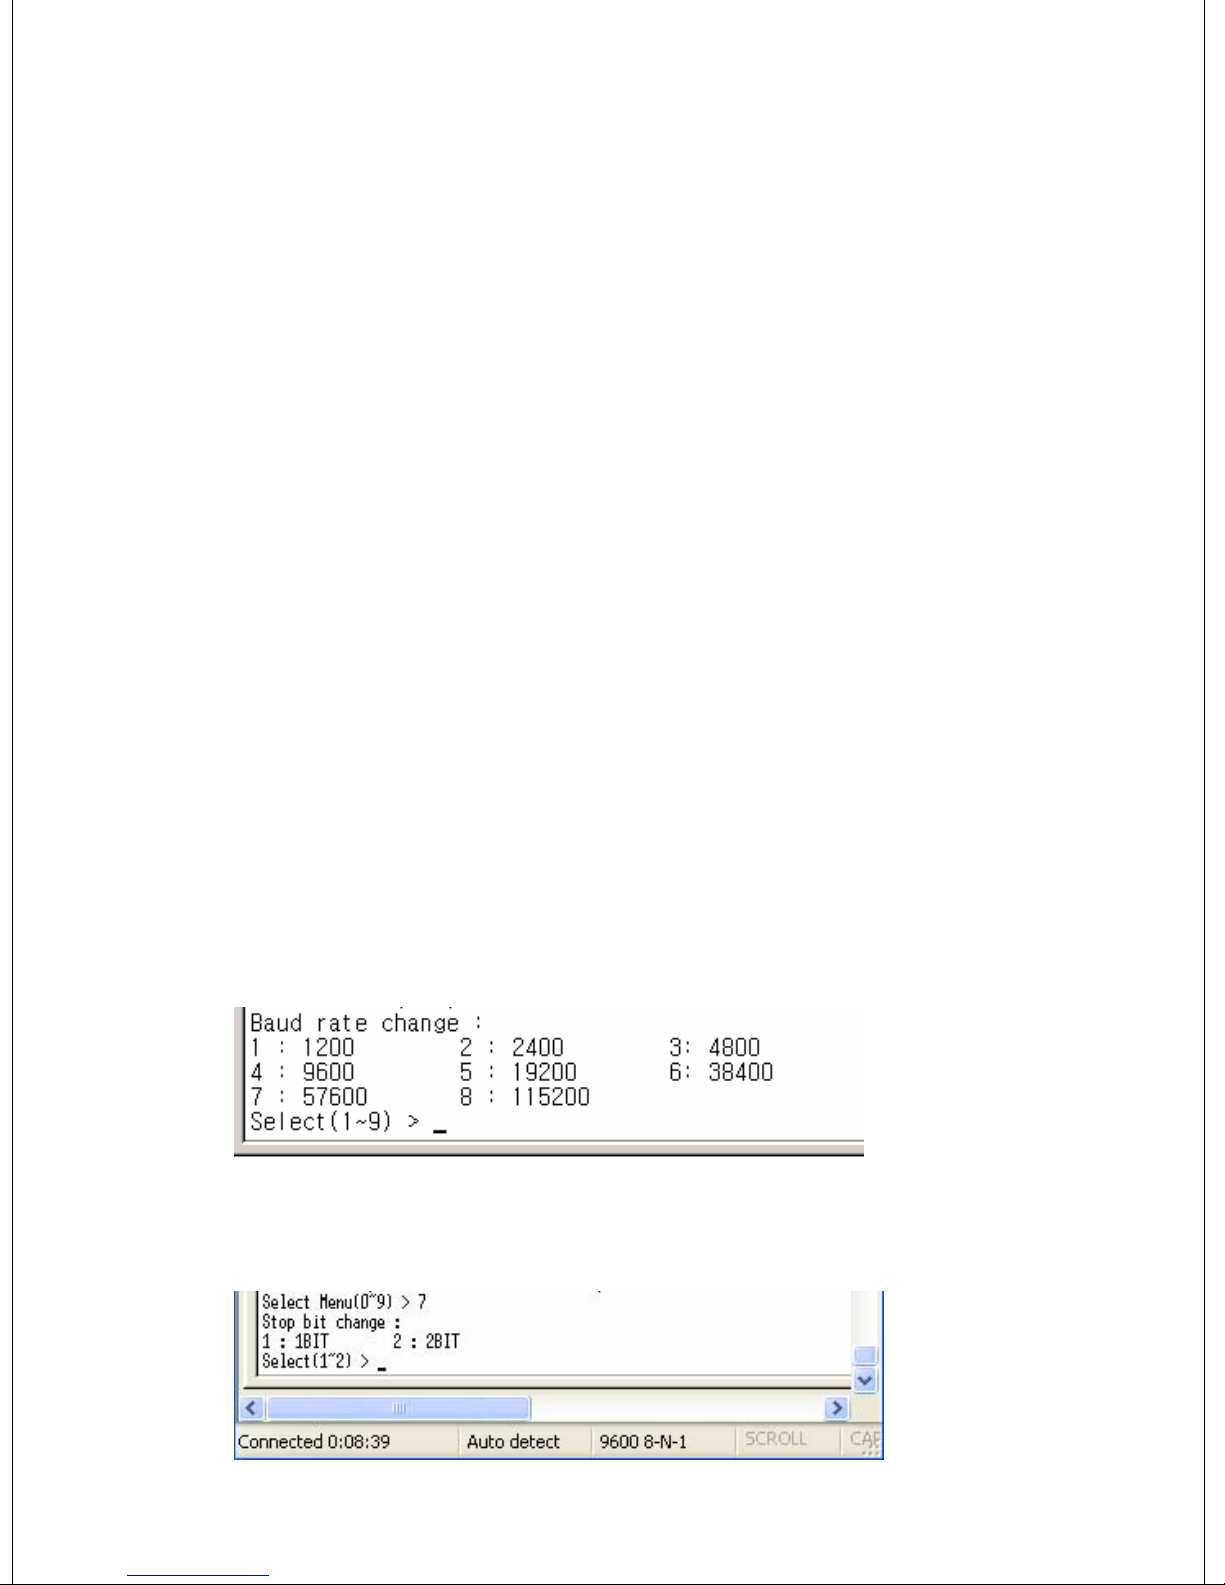
[6] Connection Mode
There are three connection modes. You may select connection mode.
1) Select menu 5 at TOP MENU.
2) Choice the mode. And press the enter key.
3) You can see the changed mode.
Page 41
About the modes
MODE 1
In this mode, BM2001 always connect the latest paired bluetooth device.
If BM2001 has not the Remote BD address, try to connect the first bluetooth device is
searched.
At this time, two bluetooth devices must have same PIN code.
MODE 2
1) In MASTER Case
You can search the bluetooth devices have same PIN code round it.
And the bluetooth devices list will be displayed.
You can select one among the bluetooth devices list.
2) In SLAVE case
when it received the connection request from the Master has same PIN code, it connect
the master.
MODE 3
If you know the Remote BD address, you can change the Remote BD address in
Mode3.
Enter the BD address of Remote device to “Remote BD Address”.
*Caution: BM2001 must have a Remote BD Address in mode3.
[7] RS-232 (Baud Rate)
[7-1] It is UART communication speed.
[7-2] BM2001 supports Baud Rate from 1,200 until 230,400 bps.
[8] RS-232 (Stop Bit)
STOP Bit is 1 Bit and 2 Bit.
Page 42
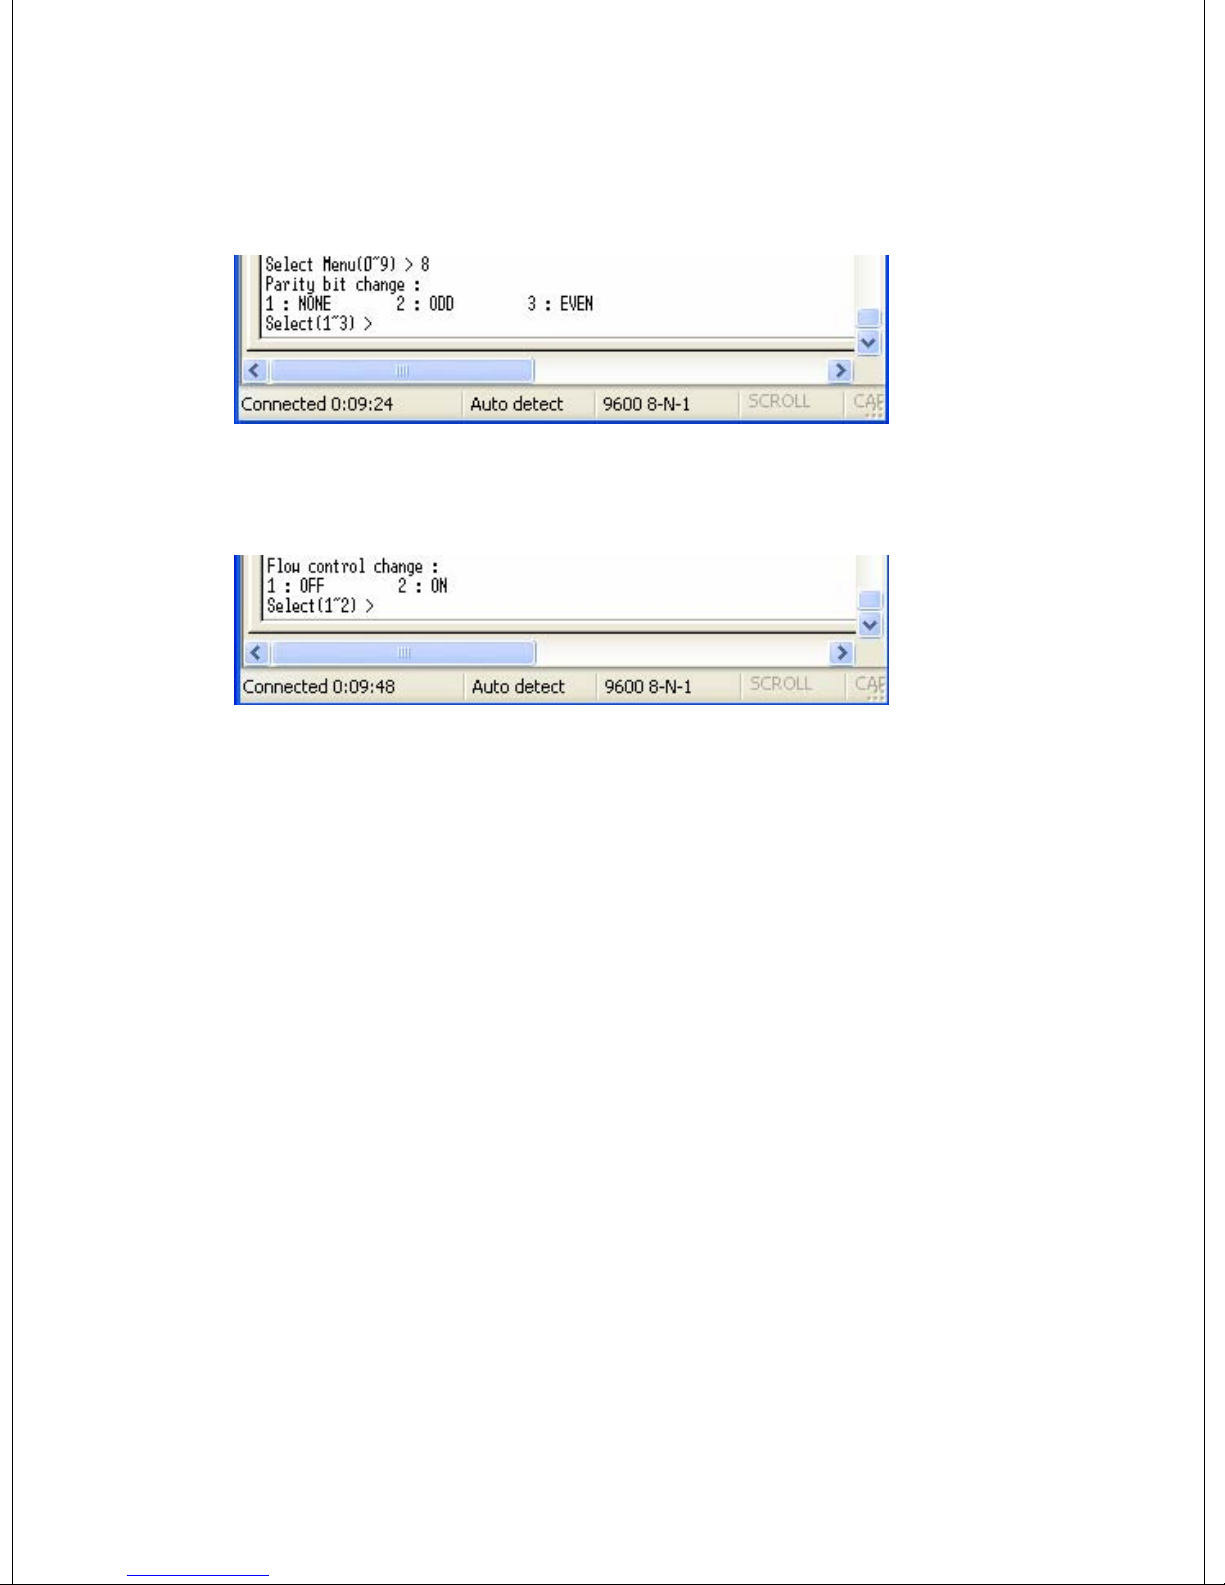
[9] RS-232 (Parity Bit)
Parity Bit is NONE, ODD and EVEN.
[10] RS-232 (Flow control)
BM2001 supports Hardware Flow control. Default setting is OFF.
Page 43
Appendix: Bluetooth Operation Mode of BM series
MODE 1 (Default Mode)
This is the default seeting.
Before user change the connection mode, BM2001 use this mode always.
[1] it communicates with the latest paired bluetooth device.
- The latest paired bluetooth device address is memorized to the Remote BD Address.
[2] If it has not the Remote BD Address,
Master: It tries to connect the first bluetooth device is searched.
At this time, remote device should be a SLAVE mode and must have same
PIN code.
SLAVE: When it received the connection request from the Master has same PIN code,
it connect the master.
MODE 2
If you want to connect the new bluetooth device, use this mode.
Using method
[1] Turn off BM2001 and move down the pin#4 of the function select switch. Then
BM2001 will be a PC configuration Mode.
[2] Run the Hyperterminal program of the windows. Refter to “PC Configuration Mode”.
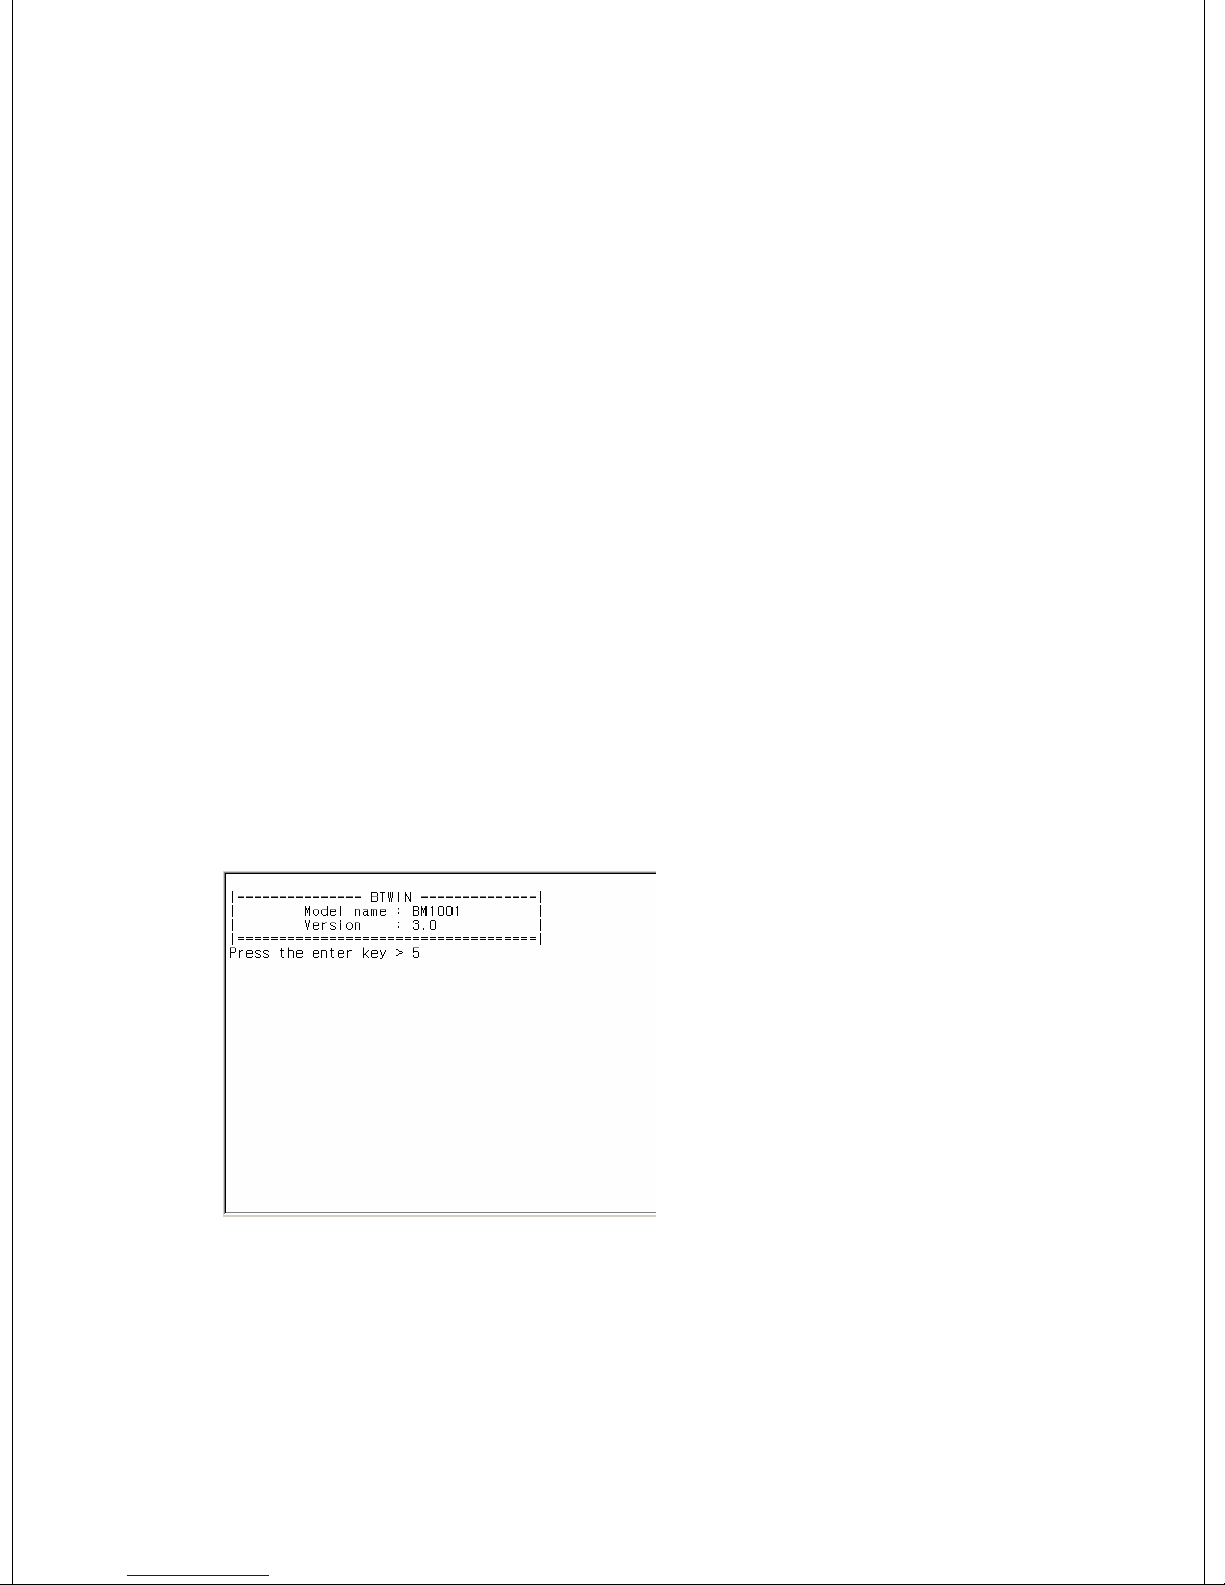
[3] Turn on BM2001, you will find the below picture at your monitor.
[4] Press the Enter key within 5 seconds.
[5] It will enter the PC configuration Mode.
[6] Select No.5 Connection Mode in the menu. And then press the Enter key.
[7] Select No.2 MODE2 in the connectin mode menu. And then press the Enter key.
[8] Turn off BM2001.
[9] Move up the pin#4 of the function select switch. It will ba DIP Switch Mode.
[10] Turn on BM2001.
Page 44
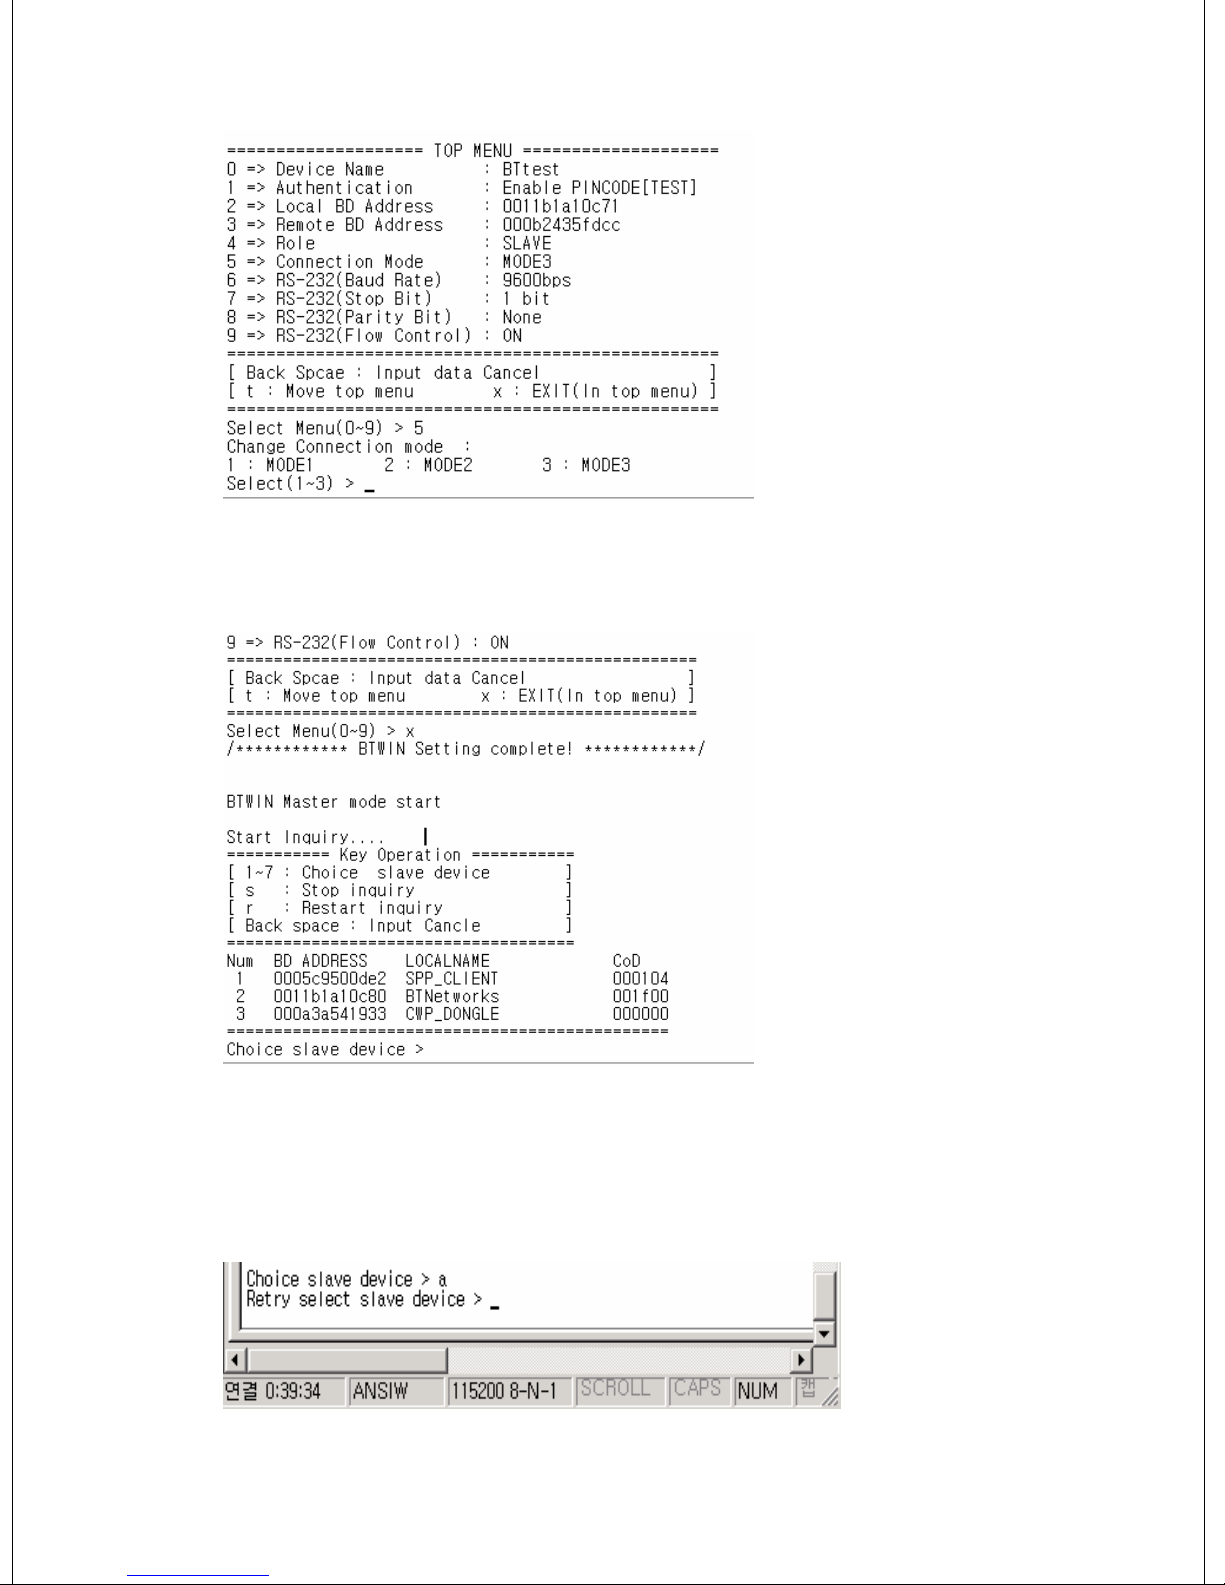
In Master Case
[11] You can see the below picture.
- BM2001 will find the bluetooth devices with same PIN code.
- The searching will be kept on until look for 7 slaves.
- Some keys have a function while searching.
“r” : Retry searching
“Í” Back space key : Cancel the entered data
“s” : Stop searching
Select one slave device of the list, and master will connect to that.
- If connection is fail, “The slave device is not connectable!!” message will be displayed.
- And retry search for bluetooth devices.
Page 45
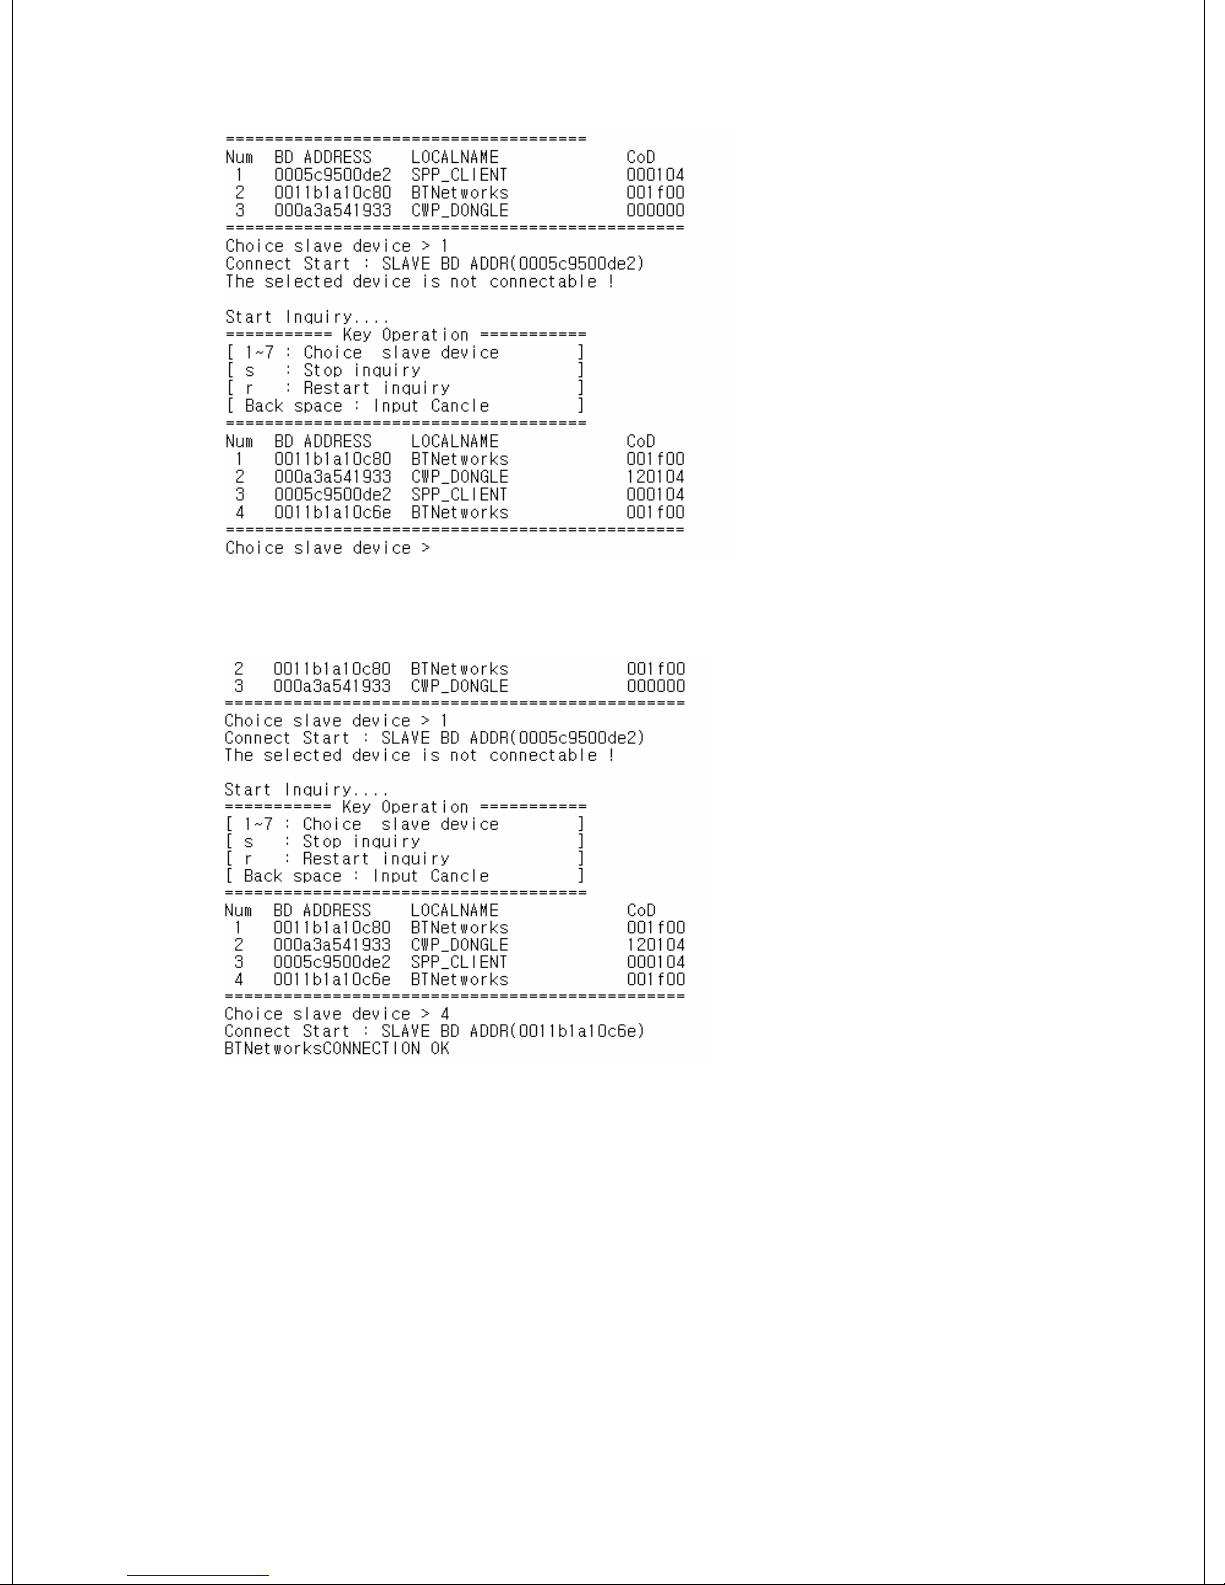
When the connection is successful, it will be displayed “CONNECTION OK”.
In Slave case
When slave device receive the connection request from the master device has same
PIN code, it will connect with master device.
After Pairing with new bluetooth device, BM2001 must retrun to MODE1.
If you don’t do it, whenever turn on BM2001 it will be find the new bluetooth
devices.
Back to Mode1
[1] Turn off BM2001. And move down the pin#4 of the function switch to be PC
configuration Mode.
[2] Turn on BM2001. And change the connection mode as MODE1 at the main menu.
[3] Turn on BM2001. And move up the pin#4 of the function switch to be DIP Switch
Mode.
Page 46

MODE 3
You can change the remote bluetooth device’s address directly.
[1]Enter the PC configuration Mode with BM2001.
[2] Select No.5 Connection Mode at the main menu.
[3] Select MODE3 in the connection mode menu.
[4] Go back main menu.
[5] Select No.3 Remote BD address at the main menu.
[6] Input the Remote device’s address.
[7] Input “x”, and then BM2001 will try to connect with new device what you want to
connect.
[8]Wait until “Connection Ok” message will be displayed.
[9] Restart BM2001.
[8]Change the connection mode as MODE1 at the main menu.
[9] Turn off BM2001, and then move up pin#4 of the function switch to be DIP Swtich
mode.
HANTZ + PARTNER
The Upgrade Company! www.hantz.com
Deutschland:
Tel.: 0761 / 59 21 00
Fax: 0761 / 58 52 28
Schweiz:
Tel.: 061 / 27 311 - 31
Fax: 061 / 27 311 - 39
Österreich:
Tel.: 01 / 58 55 430
Fax: 01 / 58 55 460
 Loading...