

Page 1

USER'S MANUAL
ST 800ST 800
ST 800ST 800
FLEX Numeric Pager
SUN TELECOM
INTERNATIONAL
TM
Page 2

ST 800
Congratulations on your purchase of our pager.
By incorporating some of the most advanced electronic
paging technologies, the pager is reliable & easy
to use. Best of all, the is affordable & will keep
you in touch with those important to you. Please carefully
read this manual before using your pager in order to fully
understand the 's functions & capabilities. Once
again, congratulations on your purchase.
ST 800
ST 800
ST 800
ST 800
Page 3

CONTENTS
1. STANDARD FEATURES
2. BUTTONS
3. ICONS AND DESCRIPTIONS
4. TURNING THE PAGER ON
5. FUNCTION MENU
6. TURNING THE PAGER OFF
7. SETTING THE TIME AND DATE
8. SETTING VIBRATION / AUDIBLE ALERT
9. SETTING ALERT MODE
10. RECEIVING AND READING MESSAGES
11. LOCKING AND UNLOCKING MESSAGES
12. DELETING MESSAGES
13. SETTING THE ALARM
14. BACKLIGHTING
15. OTHER FEATURES
4
5
6
7
8
10
11
12
13
14
15
17
19
21
22
Page 4
1. STANDARD FEATURES
21 message slots capable of storing
up to 20 digits per slot
Backlight
Read time clock (12hr) with calendar
date display
Reminder alert
Message lock (Up to 10 message slots)
Message time stamping
( Specifications are subject to change without prior notice )
STANDARD FEATURES
Low battery indicator
Individual delete or delete all
In service range indicator
Daily Alarm
5 Standard alert modes : Audio, Pleasing
Melody, Chirp, Vibration and Silent
4 Standard tone alerts and 3 different
pleasing melody alerts available for
selection
Page 5
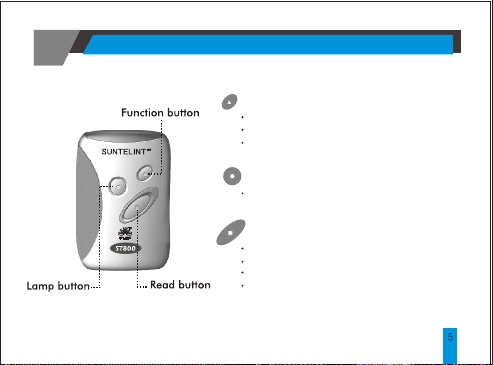
2. BUTTONS
FUNCTION BUTTON
Use to enter the function menu mode
Use to lock and unlock messages
Use to turn the back lighting display on
LAMP BUTTON
Use to turn the light on or off
READ BUTTON
Use to turn the pager on
Use to read messages
Use to select desired function
Use to set the date and time, alarm and
standard alert mode
BUTTONS
Page 6
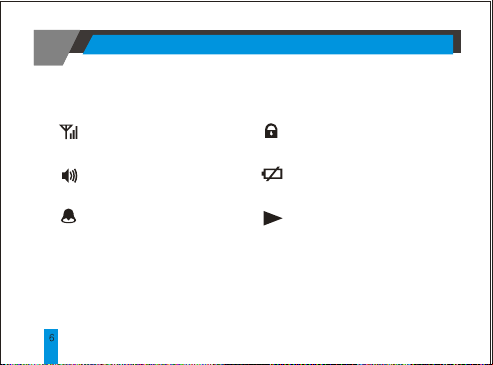
3. ICONS AND DESCRIPTIONS
: In service range indicator
: Audio alert icon
: Alarm icon
ICONS AND DESCRIPTIONS
: Message lock icon
: Low Battery indicator
: Message continuation icon
Page 7

4. TURNING THE PAGER ON
Insert battery into battery compartment and close the
battery door. Pager will power up with a full display
of all LCD segments and emit a short audible alert
with date and time display.
< Standby Screen >
To turn the pager on from the power off state, press
and hold the READ button for at least 2 seconds.
TURNING THE PAGER ON
Page 8

5. FUNCTION MENU
To access the function menu mode, press the
FUNCTION button for at least 2 seconds.
This mode allows the user to access the various
functions and features of the pager through a series
of menu prompts.
Pressing the FUNCTION button allows you to scroll
the menu prompts as illustrated(Page 9).
The menu prompt "CLEAR ALL?"will not appear
Note
if no message is received.
Pressing the READ button allows you to select the
function and takes you to the setting mode (depending
on the function selected). The pager will return to the
standby screen if no button is pressed within 8 seconds.
FUNCTION MENU
Page 9

/
FUNCTION MENU
Page 10

6. TURNING THE PAGER OFF
Press the FUNCTION button and hold for at least
2 seconds to enter the function menu mode.
Press the FUNCTION button to display the
"POWER OFF?"prompt, now press the READ
button to turn off the pager. If the pager is off,
the LCD will only display the date and time.
Although the alarm icon is not displayed, the
feature will operate normally. If the pager is OFF,
it cannot receive any messages.
The colon separating the hour from the minute
will continue to blink to indicate that the clock is
working.
TURNING THE PAGER OFF
Page 11

7. SETTING THE TIME AND DATE
Press the FUNCTION button and hold for at least 2
seconds to enter the function menu mode.
Press the function button to scroll through the
menu prompts until the "SET TIME ?"prompt is
< Fig.7a >
< Fig.7b >
displayed.
Press the READ button to enter the set time mode.
The pager will first display a blinking field for the
year.
Press the READ button to set correct year(Fig.7a).
Press the FUNCTION button to move to the date
and time field(Fig.7b).
Press the READ button to set the digits for each
field.
Complete each field(hour, minute & AM/PM) in
the same manner. The pager returns to standby
upon completing all the fields.
SETTING THE TIME AND DATE
Page 12

8. SETTING VIBRATION/AUDIBLE ALERT
You can select the alert mode to vibrate or to
produce an audible tone. Within the standby screen,
< Fig.8a >
< Fig.8b >
SETTING VIBRATION/AUDIBLE ALERT
press the FUNCTION button for at least 2 seconds
to enter the function menu mode.
The pager will display either <Fig.8a> of <Fig.
8b> depending on the initial state of the alert mode.
Press the READ button to select the audible or
vibration mode.
In the audible mode, the pager will display the
speaker icon .
No speaker will be displayed in the vibration mode.
Page 13

9. SETTING ALERT MODE
< Fig.9a >
< Fig.9b >
Enter this mode to select the different type of alerts:
Standard Tone Melody Silent
Press the FUNCTION button and hold for at least 2
seconds to enter the function menu mode. Press the
FUNCTION button to scroll through the menu prompt
until the "SET ALERT?"
READ button to enter the set alert mode(Fig 9b).
Press the READ button twice to scroll though the
choice alerts available.
Beep1/Beep2/Beep3/Beep4/Melody1/Melody2/
Melody3/Chirp/Silent
In the silent mode, the pager continues to receive
messages but will not emit an alert to prompt the user.
Press the FUNCTION button to select the desired alert.
The pager will return to standby.
SETTING ALERT MODE
is displayed(Fig.9a). Press the
Chirp
.
Page 14

10. RECEIVING AND READING MESSAGES
The pager will emit an audible alert or
vibrate(depending on the alert setting mode)
< Fig.10a >
< Fig.10b >
< Fig.10c >
< Fig.10d >
RECEIVING AND READING MESSAGES
when a message is received. The pager will
also display the number of unread messages.
If there are two unread messages, the pager will
display as <Fig.10a>.
Press the READ button to display the first
message(Fig.10b).
Press the READ button to advance to the
display the message arrival time(Fig.10c).
If no message is received, pressing the READ
button will cause the pager to display as
<Fig.10d>.
Page 15

11. LOCKING AND UNLOCKING
MESSAGES
The pager allows you to lock up to 10 messages,
preventing you from accidentally erasing or losing them
due to incoming messages when memory is full.
To lock messages
Select the message you want to lock by pressing the
< Fig.11a >
< Fig.11b >
< Fig.11c >
READ button to scroll through the memory(Fig.11a).
Press the FUNCTION button to display the
"LOCK?"prompt(Fig.11b). Press the READ button to lock
the message. The Pager will display "LOCKED"and the lock
icon will appear on the top row of the LCD(Fig.11c).
Lock memory is full when up to 10 messages
Note
are locked. Attempting to lock the 11 message
will cause the pager to display " ". LOCK FULL
.
LOCKING AND UNLOCKING MESSAGES
th
Page 16

To unlock messages
Locked messages can be unlocked in a similar way.
< Fig.11d >
< Fig.11e >
< Fig.11f >
LOCKING AND UNLOCKING MESSAGES
Press the READ button to display the message you wish
to unlock(Fig.11d).
Press the FUNCTION button to display the "UNLOCK? "
prompt(Fig.11e).
Press the FUNCTION button to display the "UNLOCKED"
prompt and the lock icon will disappear(Fig.11f).
Page 17

12. DELETING MESSAGES
The pager allows you to delete either a single
message or all messages at one time.
Only read and unlocked message can be deleted.
< Fig.12a >
< Fig.12b >
Selective Delete
Select the message you want to delete by pressing
the READ button to scroll through the memory.
Press the FUNCTION button twice on the desired
message screen to display the "CLEAR ? " prompt
(Fig.12a).
Press the READ button to delete the message.
The display will show the prompt "CLEARED" to
indicate message has been deleted(Fig.12b).
DELETING MESSAGES
Page 18

< Fig.12c >
< Fig.12d >
DELETING MESSAGES
Clear All
The pager will allow the"CLEAR ALL" function only if it
has received more than one message. In the standby
screen, press the FUNCTION button and hold for at
least 2 seconds to enter into the function menu mode.
Press the FUNCTION button to scroll through
the menu prompt until the "CLEAR ALL? "prompt is
displayed(Fig.12c).
Press the READ button to delete all read and
unlock messages. The pager will display "ALL
CLEARED" to indicate that all messages have been
deleted(Fig.12d).
Page 19

13. SETTING THE ALARM
The pager has a daily alarm for you to set at a
specific time to alert you to any important task.
Within the standby screen, press the FUNCTION
< Fig.13a >
< Fig.13b >
< Fig.13c >
< Fig.13d >
button and hold for at least 2 seconds to enter the
function menu mode.
Press the FUNCTION button to scroll through the
menu prompt until the "SET ALARM?"prompt is
displayed(Fig.13a).
Press the READ button to access the alarm setting
mode.
The pager will display the "ALARM ON"prompt
(Fig.13b).
Press the FUNCTION button to set the alarm.
This will cause the hour field to blink.
Press the READ button to add the hour.
Press the FUNCTION button to move to the minute
field and set the minute by pressing the READ
button(Fig.13d).
SETTING THE ALARM
Page 20

< Fig.13e >
< Fig.13f >
20
SETTING THE ALARM
Continue to set the AM/PM field in a similar way.
Upon completion, the pager returns to the
standby screen displaying the desired set time.
The alarm icon will light up to indicate the
alarm is active.
To Turn Off Alarm
While in standby mode, press the FUNCTION
button and hold for at least 2 seconds to enter
the function menu mode. Press the FUNCTION
button to scroll through the menu prompt until
the "SET ALARM?" prompt is displayed.
Pressing the READ button will cause the pager
to display "ALARM ON"(Fig.13e).
Press the READ button again to turn off the
alarm(Fig.13f).
Page 21

Press the FUNCTION button to return the pager
to the standby screen(Fig.13g).
< Fig.13g >
14. BACKLIGHTING
In low light conditions, pressing the LAMP button will
turn the backlight on.
The backlight will automatically turn off after 8
seconds.
BACKLIGHTING
Page 22

15. OTHER FEATURES
Memory Full
The pager will display "MEM FULL" when all 21
< Fig. 14 >
OTHER FEATURES
slots are filled(Fig 14).
In Service Range Indicator
When the pager is within the coverage area, the
In Service Range Indicator icon will appear on
the LCD screen.
Low Battery Indicator
The low battery indicator will appear when the
battery energy is depleted. Users are advised to
replace the battery immediately.
Page 23

Battery Information
The pager is designed to operate with a "AAA" size
alkaline battery.
Do not use carbon zinc battery.
Note
To install or replace the battery
Place the pager face down in the palm of your hand.
Push to slide the battery door off.
Place the new battery into the battery compartment.
CAUTION
Ensure battery polarity is correct before
installing battery.
Do not insert battery in reverse polarity.
OTHER FEATURES
Page 24

FCC COMPLIANCE STATEMENT:
This device complies with part 15 of the FCC Rules. Operation is subject to
the following two conditions: (1)this device may not cause harmful
interference, and (2)this device must accept any interference received,
including interference that may cause undesired operation.
Caution : Changes or modifications not expressly approved by the
manufacturer responsible for compliance could void the user's authority
to operate this equipment.
 Loading...