

Page 1

FCC ID : ODGQOOLQEEI
ATTACHMENT E.
- USER’S MANUAL -
REPORT NO. : HCT-F05-0804 HYUNDAI C–TECH
1/1
Page 2
1
Page 3

2
[TABLE OF CONTENTS]
QUICK START
1) Power On / Off
2) Listening to music
3) Listening to radio
4) Recording
5) Charging the battery
Chapter 1 GETTING STARTED
1) Introduction
2) Copyrights and Certification
3) Registered Trademarks
4) Product Features
5) Package Contents
6) Product Overview
7) LCD Overview
8) Button Operations
Chapter 2 BASIC OPERATIONS
1) Before installation
1.Minimum requirements for software installation
2.USB driver confirmation method
2) Installing software
1.Master CD
2.Using Media Sync
3) Connecting the product to a PC
4) File Management using a removable disk
1.File Upload / Download
2.Format
5) Disconnecting the product from a PC
6) Firmware Upgrade
7) Main Menu
1. Browser
2. MP3
3. FM
4. REC
5. Setup
6. Favorites
8) Hold
9) Low Battery
Page 4

3
Chapter 3 Browser Mode
1) Browser Mode Enter / Exit
2) Browse a file or a directory
3) Select a file or a directory
4) Playlist Add / Remove
5) Deleting a file in the File Browser
Chapter 4 MP3 MODE
1)Display info
2) MP3 Play / Stop
3 Move to the next / previous file
4) Fast-forward / Rewind
5) A-B Repeat
6) Bookmark
7) EQ Setting
8) Volume Control
9) Mode Switch
Chapter 5 FM Mode
1) Display Info
2) Changing frequency
3) SCAN / CHANNEL Switch
4) Changing channel
5) FM Station Automatic Scan
6) Channel Save / Delete
7) FM RADIO Record / Stop
8) Volume Control
9) Mode Switch
Chapter 6 REC Mode
1) Display Info
2) Voice Recording
3) Line-in Recording
4) Recording Start / Pause / Restart / Stop
5) volume control
6) Mode Switch
Chapter 7 Favorites
1) Playlist
2) Bookmark List
Page 5

4
Chapter 8 SET UP
1) SOUND
1. EQ
2. User EQ 1/2
3. QBS ON/OFF
4. QBS Setting
5. Exit
2) CONTROL
1. Repeat Mode
2. Time Skip
3. Scan Speed
4. Resume
5. Exit
3) TIME
1. Sleep
2. Auto Off
3. Current Time
4. Alarm
5. Exit
4) FM RADIO
1. Scheduled FM Record
2. Region
3. Exit
5) RECORDING
1. Record Source
2. Voice Record quality
3. FM Record Quality
4. Line-in Quality
5. Sync
6. Exit
6) DISPLAY
1. Contrast
2. Back Light
3. Scroll
4. Song Title
5. Play time
6. LED EQ
7. Exit
Page 6

5
7) SYSTEM Setting
1. Language
2. Initialize
3. Information
4. Exit
Chapter 9 MISCELLANEOUS
1) General Cautions
2) Earphone-related Cautions
3) Troubleshooting
4) Product Specifications
Page 7

6
Chapter 0 QUICK START
1) Power On / Off
While the product is off, press and hold the <JOG> button to turn the power on.
[NOTE] When the product is turned on, it enters the last mode used.
2) Listening to music
Press the <JOG>
3) Listening to radio
Select FM in the Main Menu. Press the <Menu>
4) Recording
Select REC in the Main Menu. Press the <Menu>
Press the <A↔B > button briefly to record in REC mode.
button briefly to play or stop music in MP3 mode.
button briefly to enter the Main Menu.
button briefly to enter the Main Menu.
Page 8

7
Chapter 1 GETTING STARTED
1) Introduction
Qoolqee i
Thank you for purchasing the i Audio player. This manual is provided to describe the correct use of the product and all of
its features. Please read thoroughly before using the product.
http://www.qoolqee.com
Go to the official Qoolqee website for the latest product information, user registration, and assistance if required. By
registering the product with the serial number indicated on the manual you can receive online support, upgrade firmware
for enhancement of the product’s features and download any revisions to the user manual.
2) Copyrights and Certification
The copyright of this manual is owned by Hantel Co., Ltd. Any unauthorized duplication or distribution of all or any part
of the manual is prohibited. WMA is the registered trademark of Microsoft corp.
The copyright of the Hantel MP3 software program is owned by Hantel Co., Ltd. and any unauthorized duplication,
distribution or commercial use of the program without the prior written consent of Hantel Co., Ltd. is against the law.
With the exception of the right provided to the user specifically for use of the product, this manual does not grant the user
any other right to use patents, trademarks, copyrights or any other intellectual property rights owned by Hantel Co., Ltd.
Page 9

8
3) FCC Certification
This equipment has been tested and found to comply with the limits for a Class B digital device, pursuant to part 15 of the FCC Rules.
These limits are designed to provide reasonable protection against harmful interference in a residential installation.
This equipment generates, uses and can radiate radio frequency energy and, if not installed and used in accordance with the
instructions, may cause harmful interference to radio communications. However, there is no guarantee that interference will not occur
in a particular installation. If this equipment does cause harmful interference to radio or television reception, which can be determined
by turning the equipment off and on, the user is encouraged to try to correct the interference by one or more of the following measures:
- Reorient or relocate the receiving antenna.
- Increase the separation between the equipment and receiver.
- Connect the equipment into an outlet on a circuit different from that to which the receiver is connected.
- Consult the dealer or an experienced radio / TV technician for help.
CAUTION : Changes or modifications not expressly approved by the party responsible for compliance could void the user’s authority
to operate the equipment.
4) Registered Trademarks
Windows, Windows 98 SE, Windows ME, Windows 2000, Windows XP and Windows Media Player are the registered
trademarks of Microsoft Corp.
5) Product Features
Page 10

9
Speed UP-USB High speed 2.0
Graphic Equalizer, LED Equalizer
Multi-Codec (MP3 / WMA / OGG) music playback
The best sound quality!
Powerful yet seamless file browsing
A-B Repeat that facilitate language study
A Time Skip function that skips the specified time duration and play
Various EQs and two user-defined EQs supported,
A Sleep function that allows you to go to sleep listening to music & an Alarm function to wake up
again!
Media Sync - lyrics supported, Multiple languages supported
FM Radio with Recording and Scheduled Recording
V oice Re cording
A SYNC function that allows automatic segmentation of recorded sounds during direct encoding
USB 2 - Use as a Removable disk
Firmware Upgradeable
Page 11

10
6) Package Contents
i Audio player, Master CD, USB Cable, Line-in Cable, User’s Manual (Quick Guide), Neck, Earphone , Carrying
Case(Option)
[NOTE] The above components may change without prior notice for enhancement of product performance.
Page 12
11
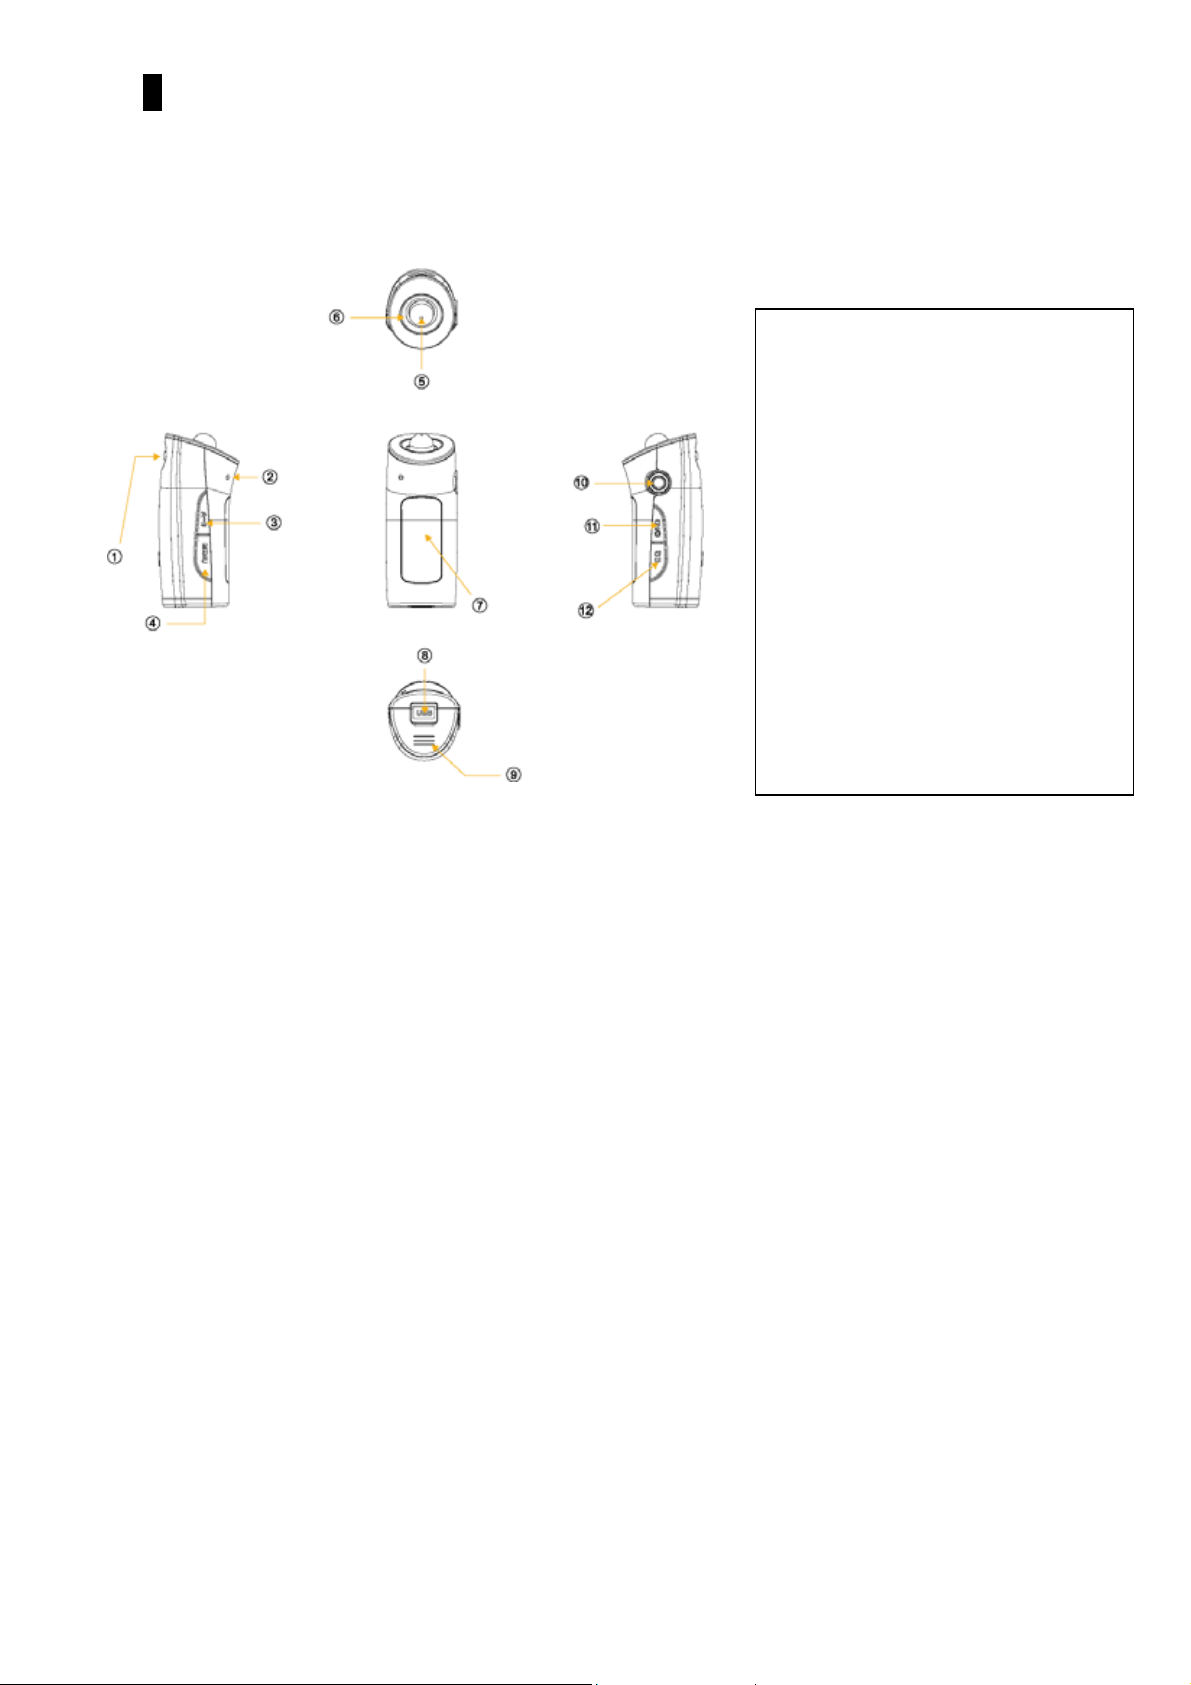
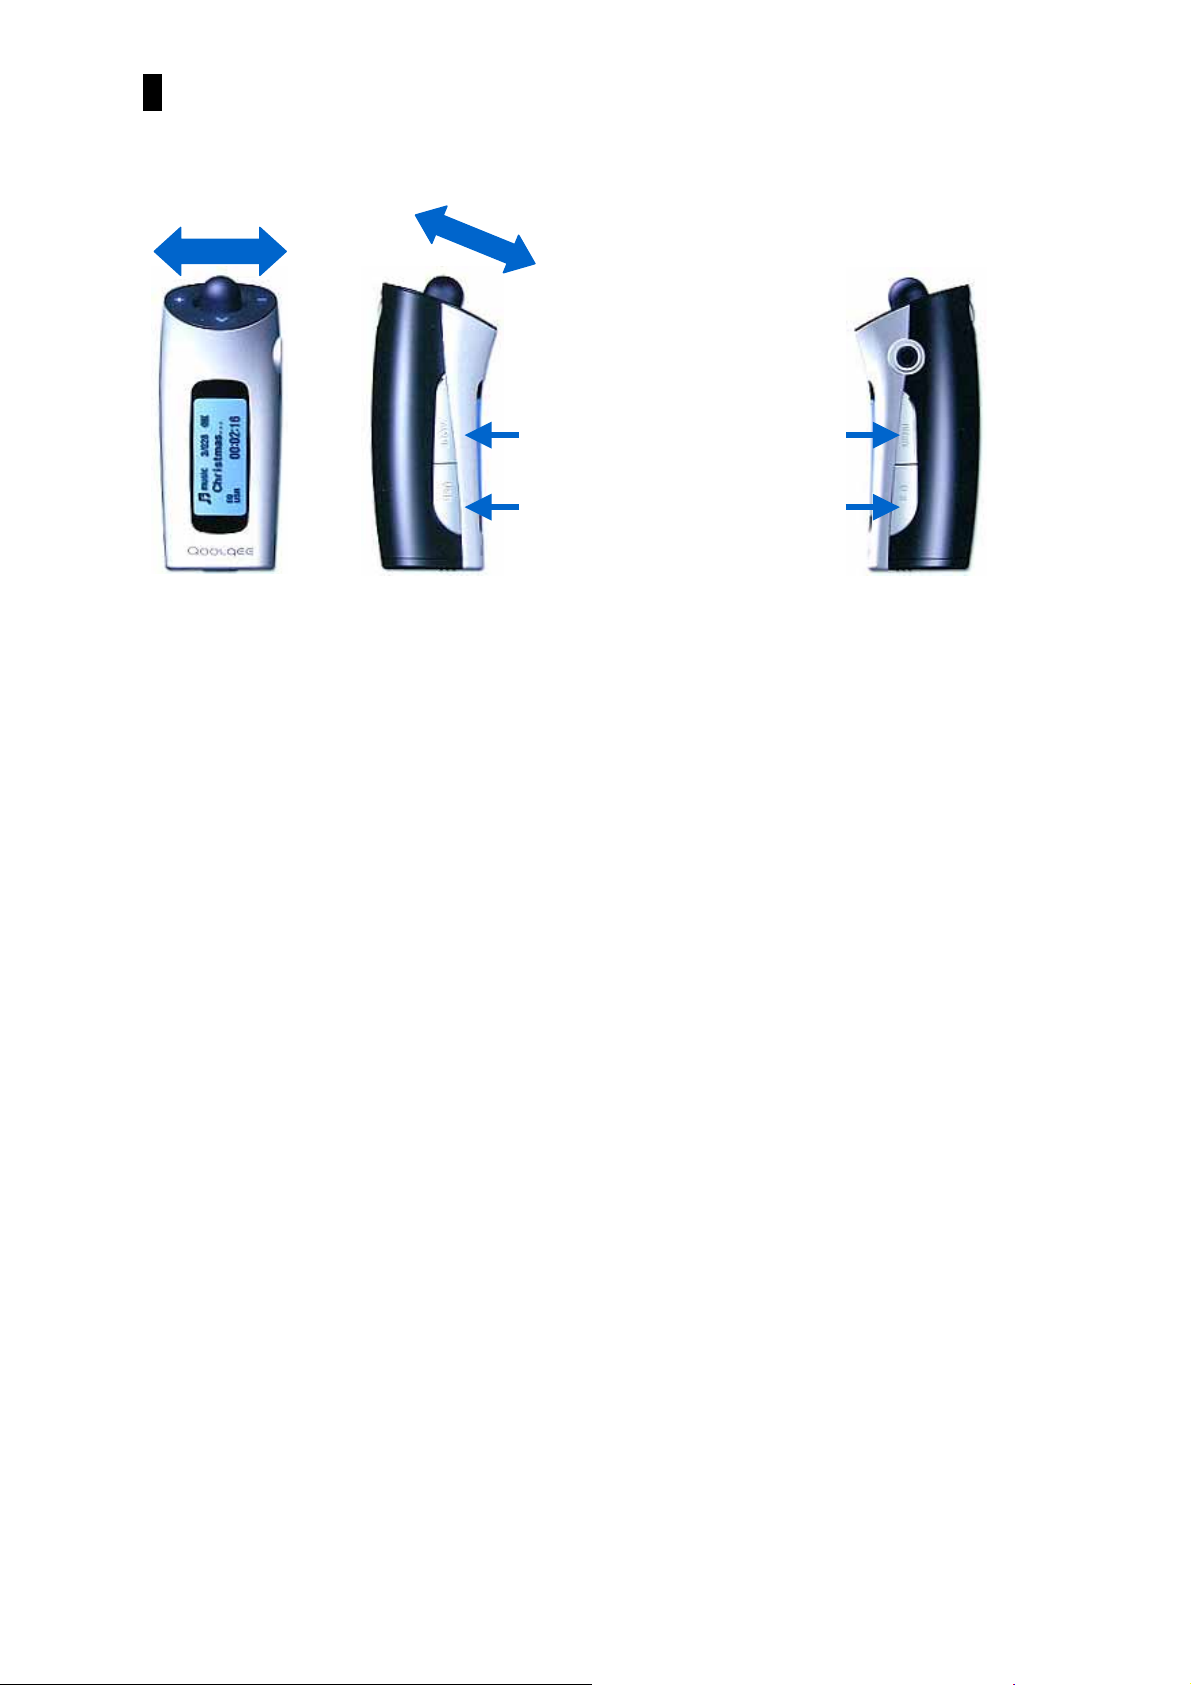
7) Product Overview
1) Neck Strap Hook
2) Built-in Microphone
3) A↔B
4) Menu
5) Jog ( Rew < , FF>
Volume-, Volume+)
6) LED
7) Mono LCD
8) USB Cover
9) AAA Battery Cover
10) Earphone / Line-In Jack
11) ⓛ / Hold
12) EQ
Page 13
12
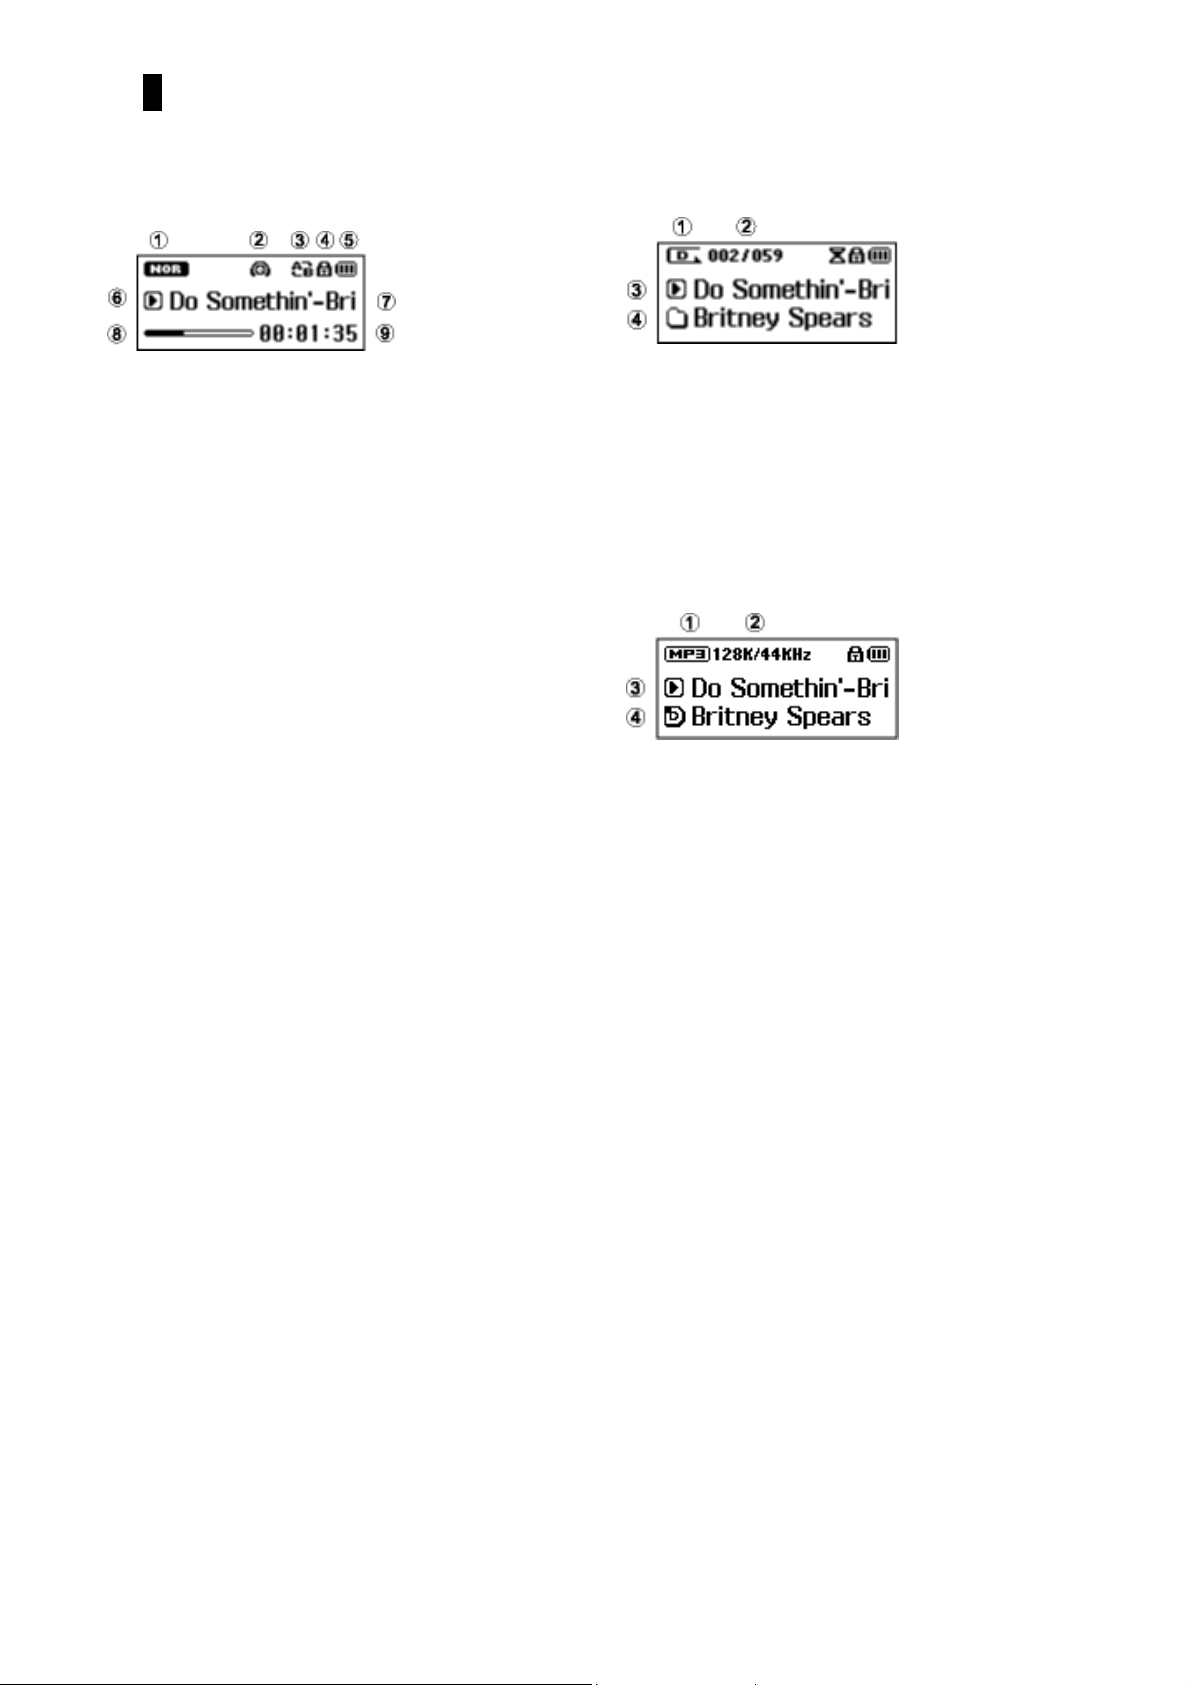
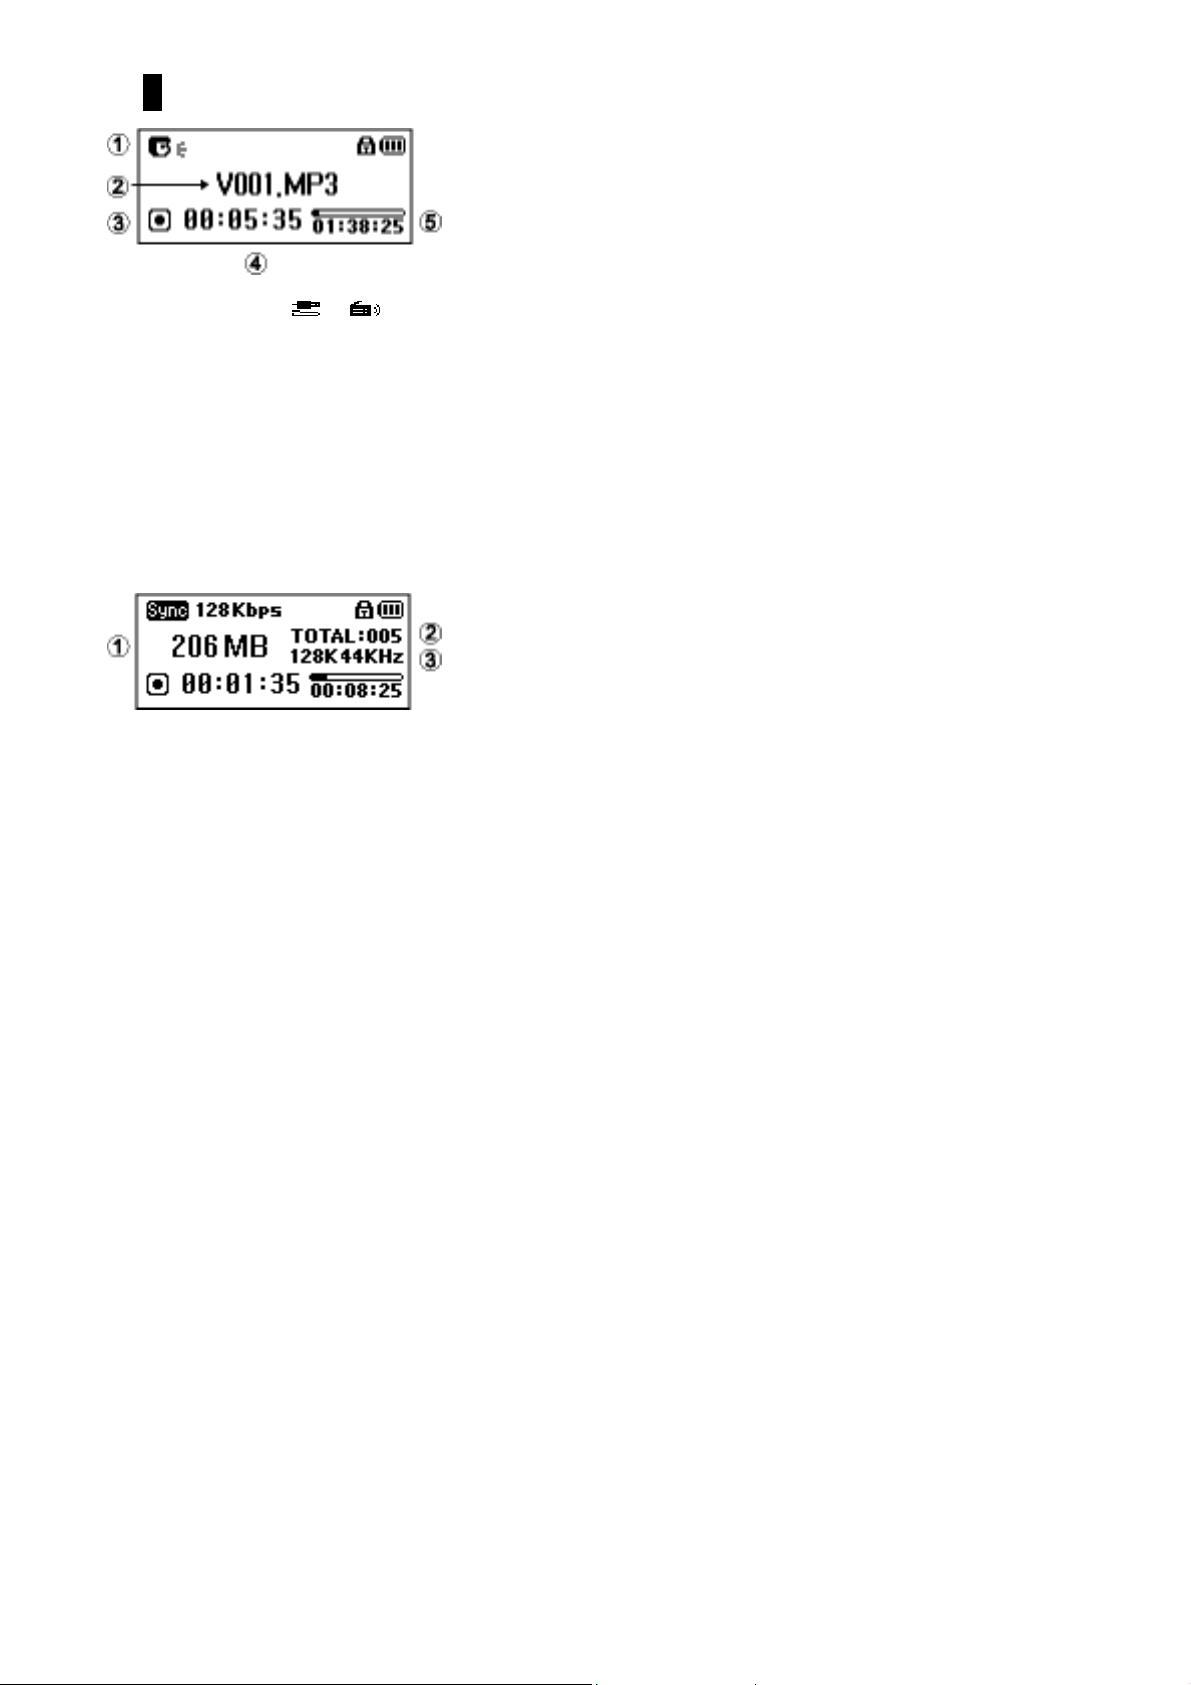
8) LCD Overview
<MP3 Mode>
1.
2.
(1) EQ Icon
(2) QBS Icon
(3) A↔B Repeat
(4) Hold Icon
(5) Battery Gauge
(6) Play/Pause Icon
(7) Song Title
(8) Progress Bar
(9) Playing Time
4.
(1) Repeat Mode Icon
(2) Track Number
(3) Sleep Icon
(4) File Name
(5) Folder
3.
(1) File Format
(2) kbps/KHz
(3) ID3 Tag Artist-Song Title
(4) ID3 Tag Album
Page 14
13
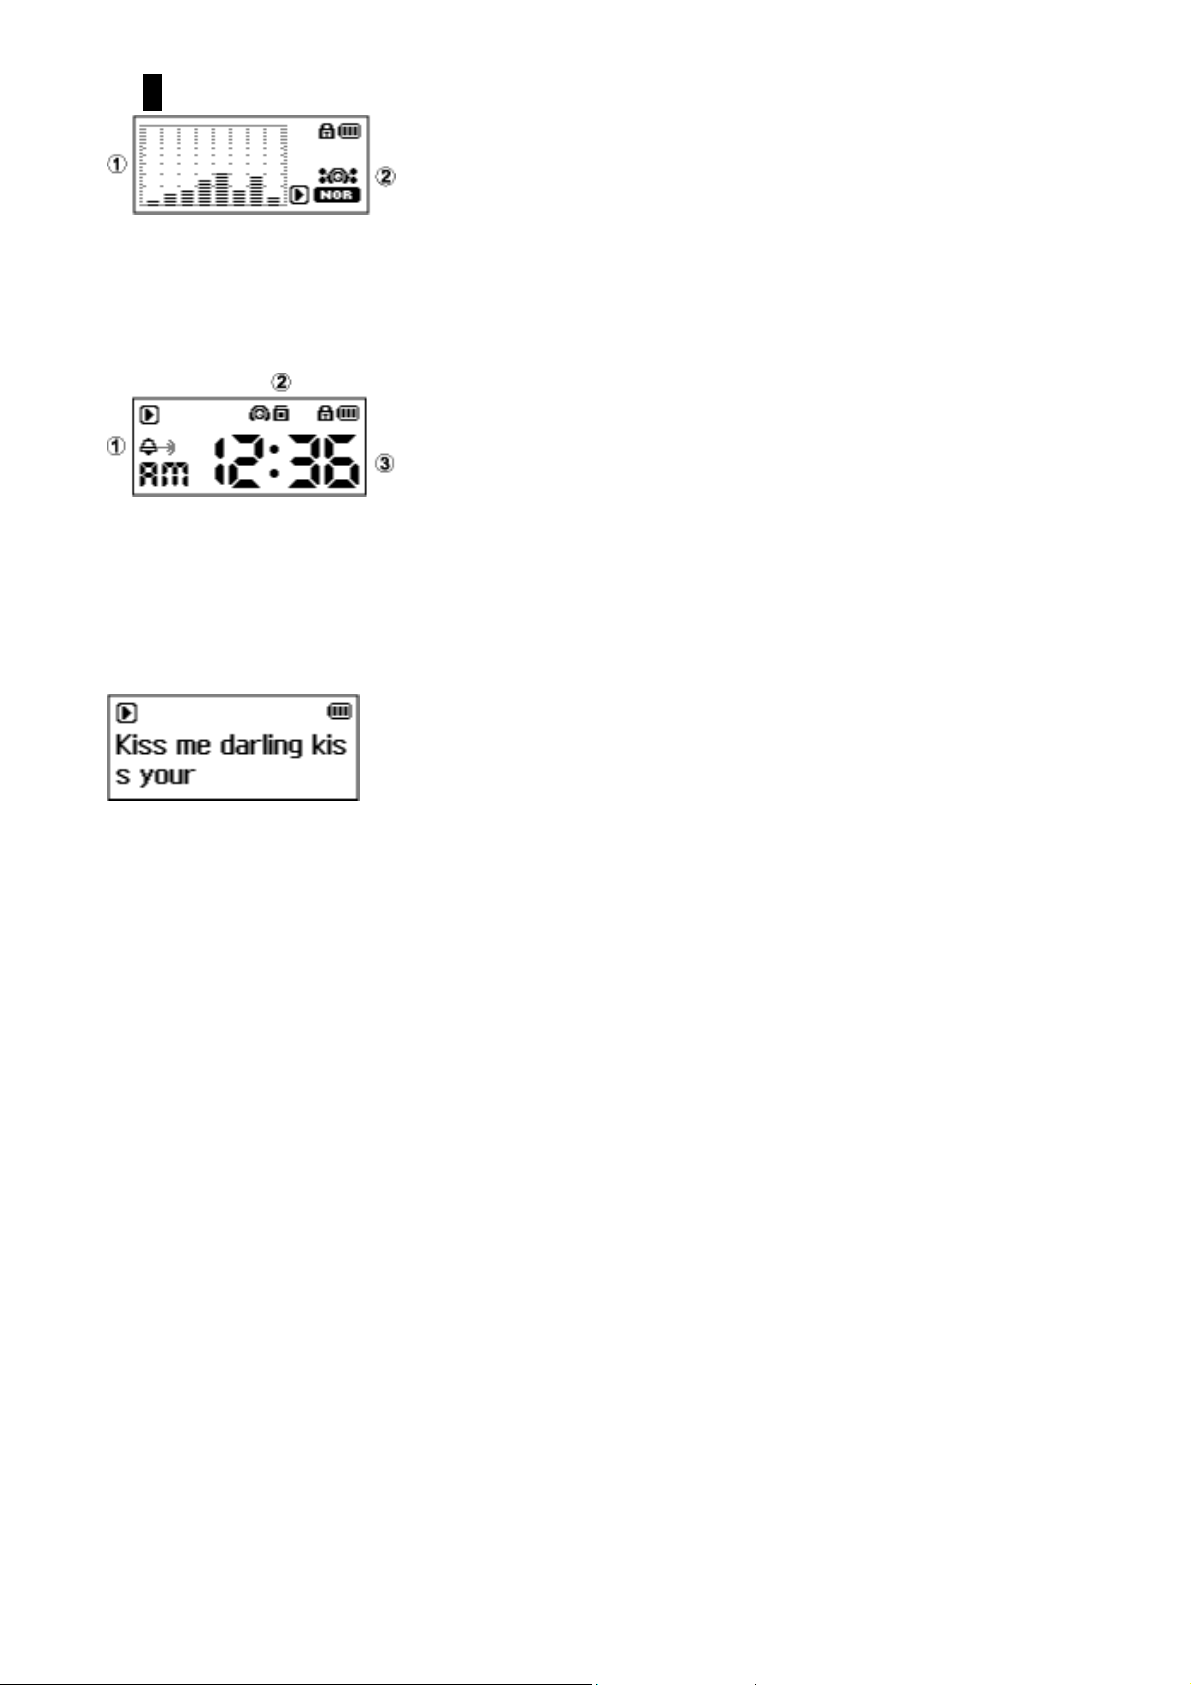
(1) 8 Bands Graphic Equalizer
(2) QBS Icon
5.
(1) Alarm Icon
(2) FM Scheduled Icon
(3) Current Time
6.
Lyrics Disp lay
<FM Mode>
Page 15

14
1.
(1) Channel Number
(2) Current Frequency
(3) Progress Bar
2.
(1) Current Frequency
(2) Channel List
3.
(1) Current Frequency
(2) Current Time
<Record Mode>
1.
3.
Page 16
15
(1)Record Mode Icon ( / )
(2)Record Ready Status / File name
(3)Record Icon
(4)Playing Time
(5)Progress Bar
(6)Remaining Time
2.
(1) Remaining Memory capacity Display
(2) Recorded File Number
(3) Record Quality
Page 17
16
9) Button Operations
∧
-
∨
A↔B
+, - : Increment /
∧,∨ : Select Previous Track / Next Track , Scan FM Frequency.
A↔B : A ↔B Segment Repeat / Record
Menu : Main Menu / Browser
<JOG > button : Power On / Off
Decrement the volume.
MENU
JOG
ⓛ/ HD
EQ
ⓛ / HD : Information / Hold
EQ : Change EQ Status / Bookmark
Page 18

17
Chapter 2 BASIC OPERATIONS
Please install the software before connecting the product to your PC.
1) Before installation
1.Minimum requirements for software installation
• Pentium 133 MHz or above
• Windows 98SE / ME / 2000 / XP
• More than 20 MB of available hard disk space
• CD-ROM drive
• USB port support
• For Windows 2000 systems, you must log in to an account with administrator privileges for software installation.
[NOTE]
The USB driver is automatically installed for Windows 98SE users when installing the program using the master CD, and
may be recognized without installing a separate drive in Windows ME/2000/XP.
2. USB driver confirmation method
• Windows 98SE : Control Panel → System → Device Manager → General Serial Bus Controller
• Windows 2000 : Control Panel → System → Hardware → Device Manager → General Serial Bus Controller
• Windows XP : Control Panel → Performance and Maintenance → System → Hardware → Device Manager →
Page 19

18
General Serial Bus Controller
2) Installing software
1. Master CD
• Insert the installation CD into the CD-ROM drive.
• Choose "Next" in the windows that follow.
(Program Installation Process)
Page 20

19
2. How to Use Media Sync Soft Ware
(1) Select a file to enter lyrics into and click the “Enter Lyrics” Icon at the top of the Window.
(2) Lyrics can be entered when the corresponding lyrics for a file are available in the server that provides them.
The model name (Qoolqee i) of the product displayed at the lyrics mark in the file property window indicates that
the lyrics for the file property window indicates that the lyrics for the file have been already entered.
(3) After transferring the file to the Qoolqee, you can enjoy lyrics along with the music.
3) Connecting the product to a PC
Connect the USB port of the product and the USB port of your PC with the cable provided. The connection should be
made after the product is turned on.
Following the message "Searching for a new device", the required USB driver is installed. The installation screen may
not be visible.
(!)Connecting the product to your PC while playing or while another operation is in progress may cause the product to
malfunction. Please make sure that all operations in progress are stopped before connecting..
Page 21

20
4) File Management using a removable disk
1.File Upload / Download
-.After connecting the player to your PC, run Windows Explorer.
-.After selecting a file or a folder to save, drag & drop the selected file or folder to the desired folder in the
removable disk drive.
[NOTE] When saving a music file in the removable disk, it is recommended that you create a separate folder and not to
use the default folder (RECORD folder) shown in Windows Explorer.
Page 22

21
[NOTE] Do not remove the USB cable while files are being moved. It may cause the product to malfunction.
2. Format
• Formatting in Windows Explorer.
Select the removable disk and press the right button of the mouse to format in Windows explorer.
• Formatting in F/W Upgrade Program
Select “Data formatting” and “Format Data Area” to do F/W Upgrade, and format at the same time.
(!) Once formatting is done, all the data in the removable disk is deleted. Please make sure to back up all important data
before formatting
5) Disconnecting the product from a PC
1. Double-click the "Safely Remove Hardware" icon in the system tray at the lower right corner of the PC screen.
2. Select a USB device and click the <Stop> button.
Page 23

22
d
[NOTE]
In Windows 98 systems, the above icon is not available
in the system tray. When the message "Safely Remove
Hardware?" is displayed, click the <OK> button an
then unplug the USB cable from the product.
6) Firmware Upgrade
● Firmware upgrades update the product when new features or improvements are available.
1. Firmware Download & Install
- Download the latest firmware file from www.qoolqee.com.
[NOTE]
The firmware upgrade program is needed to install upgrades. ( Located on the installation CD)
2. How to use the firmware Upgrade program.
- Install the firmware upgrade program. Extract the downloaded zip file, and run “setup.exe”.
- If you have the firmware upgrade program, change (bootmanager.sb, usbmsc.sb, stmpsys.sb, resource.bin)files in the
previous folder, and run the firmware upgrade program.
Page 24

23
-After the installation of the firmware upgrade program, connect the product to a PC. And
run upgrade program.
(in your PC: Start> Program> Qoolqee i Audio Player> Update Qoolqee i)
Page 25

24
- Press “Start” to run the firmware upgrade”. If you check the “Format Data Area”, all the data in the removable disk is
deleted. Do not remove the USB cable while files are being moved. It may cause the product to malfunction.
Page 26

25
7) Main Menu
1. Browser
A file can be viewed / played / deleted / added as Playlist in Browser.
2. MP3 Mode
It is possible play MP3, WMA, OGG files.
3. FM Mode
It is possible to listen FM Radio.
4. REC Mode
It is possible to record a voice, or signals from an external sound via the line-in cable. FM record is possible when
listen to.
5. Setup
It is possible to change the setting value.
6. Favorites
Playlist : It is possible to view / play / remove the registered file (files) by Playlist
Bookmark List : It is possible to view / play / remove the registered file (files) by Bookmark.
Page 27

26
7. Exit
It is possible to move to the upper Menu.
8) Hold
-Hold is for not having any external input to the device. If you use the Hold function, you do not have to worry your
device works without any purpose I your pocket etc.
-Press and hold the <Info / Hold> button to make the device locked.
-f the decide is locked the locker icon appears on the right hand side of the screen.
Press and hold the <Info / Hold> button to make the device unlocked.
9) Low Battery
-If the battery goes low, it is needed to change it.
-The below picture shows the low Battery alarm.
After showing the Low Battery Alarm, the device goes off.
Page 28

27
[Note] In case of playing an OGG file, FM Recording, Voice Recording, Line-in Recording, it is possible to have the
Low Battery Alarm, it is because the device needed to have lots of current at that moment. Please play another file (MP3
etc), if the device does not show the Low Battery Alarm, you can use the device without changing the battery.
Chapter 3 Browser Mode
1) Browser Mode Enter / Exit
Select “Browser” to run it in the Main Menu., or press and hole the <Menu> button from MP3, FM, and
REC Mode. Press the <Menu>button briefly to go back to the previous status, again.
2) Browse a file or a directory
It is possible to view a file or a directory by pressing the <+>, <-> button in Browser mode. Press the <∨>
button to go to the upper Menu.
3) Select a file or a directory
Press the <JOG > button briefly or press the <∧> button to play the desired file.
If you press the <JOG > button briefly or press <∧> button, you can view the selected directory, as well.
4) Playlist Add / Remove
The Playlist function allows you to list up the desired files in the device. Move the cursor to the wished file and
press the <A↔B > button to register it in Browser.
Page 29

28
Select “Add List” to register the desired file. The registered file
Move the cursor to the wished file and press the <A↔B > button to cancel the listed file.
Select “Remove List” to remove the
Favorites Menu to view it.
5 ) Deleting a file in the File Browser
After moving a cursor to the wished file, press the <A↔B > button briefly to delete it.
Select “Delete File” via the <+>, <-> button, and a popup window appears asking "Delete File, Yes [No]?".
Use the <JOG> button to choose "YES".
[Note] Once the deleting is done, the file can not be restored. Please make sure to back up all important data
before deleting.
will be marked.
currently selected track from Playlist. Select the Playlist mode from
Page 30

29
Chapter 4 MP3 Mode
You can play MP3, WMA or OGG files in MP3 Mode. It provides various useful functions such as bookmark, lyrics view and
(A-B) segment repeat.
1) Display Information
MP3 Mode has 6 displays. Each Display has various information relating playing files. Press the <Ⓛ/ HD
>button to change the Display .
• Basic Display
• file Name / Directory Display
• ID3 Tag Display
• 8 Band Graphic Equalizer Display
• Time Display
• Lyrics Display
※ For more information refer to the “Chapter 1)7) LCD Overview ”.
2) MP3 Play / Stop
Press the <JOG> button briefly to switch between Play and Pause.
3) Move to the next / previous file
Press the <∧> / <∨> button to move to the next / previous track.
To move to the previous track, press the <∨> button within 5 seconds after starting to play and press the <∨>
button after 6 seconds to move to the beginning of the current track.
Page 31

30
4) Fast-forward / Rewind
Press and hold the <∧> / <∨> button to rewind or fast-forward within the track.
5) <A↔B > segment Repeat
1. While playing, press the <A-B / REC> button briefly to select the start point (A) and press it once more
briefly to select the end point (B), enabling repeat playing for a desired segment.
2.With an A-B segment set, press the <A-B / REC> button briefly once more to free A-B Repeat.
6) Bookmark
The bookmark function allows you to add a bookmark at a certain point within a song or language file for later reference.
Press and hold the
Book list, it is possible to view a list of the currently available bookmarks.
<EQ> button while playing displays the current track, along with the time to add a bookmark. In the
7) EQ
Select and enjoy one of the EQ settings, such as Normal / Pop / Rock / Soft / Classical / Live / Techno / Reggae
Page 32

31
/ User EQ. Use the <EQ> button to make a selection.
8) Volume control
You can adjust the volume level using the <+> / <-> button.
9) Mode Switch
• Press the <Menu> button in MP3 Mode to move to the Main Menu.
• Press and hold the <Menu> in MP3 Mode to move to the Browser.
• Press and hold the <A↔B > in MP3 Mode to move to the Record Mode.
[Note] Qoolqee i supports OGG Q0 ~ Q9 . Q10 will be supported by F/W Upgrade.
Playing OGG needs lots currency. Therefore to play OGG, it is recommended to play with a enough battery,
Page 33

32
Chapter 5 FM Mode
You can listen to FM radio in FM Mode. Many useful functions such as frequency storing, automatic frequency scanning,
FM radio recording and scheduled radio recording are provided in the FM Mode..
1) Display Information
FM Mode has 3 displays. Each Display has various information relating FM radio. Press the <Ⓛ/ H>button to
change the Display .
• Basic Display
• Channel List Display
It displays the registered channel lists. After moving the cursor, press the <JOG> button to listen the channel.
It is possible to move 4 directions via the <+>, <->, <∧>,<∨> button.
• Time Display
※ For more information refer to the “Chapter 1)7. LCD Overview ”.
Changing frequency
In SCAN mode, press the <∧> / <∨> button briefly to fine-tune the frequency to suit the frequency band for
your region. (Japan: 0.05 MHz International: 0.1 MHz)
Page 34

33
2) SCAN / CHANNEL Switch
The FM RADIO mode has SCAN and CHANNEL modes. In SCAN mode, you can scan and tune to a
frequency without any channel stored, and in CHANNEL mode you can search for and tune to a frequency that
has been stored. In Channel mode, there the indication on the left hand side of the screen, and if the there is not
the indication, it is Scan mode. To switch the Scan / Channel mode, press the <A↔B >, <EQ>, <JOG> button
briefly.
Select “to Ch” to switch to the Channel mode, and select “to Scan” to switch to the Scan mode. You cannot
switch from Scan mode to Channel mode when there is no stored channel available.
3) Changing channel
Page 35

34
In Channel mode, press the <∧> / <∨> button briefly to move to a stored channel.
FM Station Automatic Scan
4)
Press and hold the <∧> / <∨> button to automatically scan the previous / next receivable frequency for the
band that you are currently listening to, and store all receivable frequencies to the channel list.
If you activate automatic scan, a popup window appears on the screen by pressing <A↔B > ,or <EQ>, or <JOG
> button. Select “Auto Scan” to start it.
5) Channel Save / Delete
You can store or delete the current frequency in the channel list. If the current frequency has never been stored, it
is stored in the list, and if it has been stored, it is deleted from the list. If you press pressing <A↔B > ,or <EQ>,
or <JOG > button., a popup window appears on the screen. Press the <+>, <-> button to select “Save Ch” or
“Delete Ch”. Press the <JOG >button to confirm it.
Page 36

35
When storing a channel, use the <+> / <-> button to select a channel number and use the <∧> / <∨> button to
select "YES" or "NO". When deleting a channel, the channel number is automatically determined and you can
use the <∧> / <∨> button to select "YES" or "NO".
6) FM Record / Stop
It is possible to record the FM program that you are currently listening to in FM mode. After selecting the
desired channel, press and hold the <A↔B> button to record it. Press the <A↔B >, <EQ>, <JOG> button
briefly, and select “FM Record” to start FM record, and the mode automatically changes to RECORD mode.
To stop recording, press the <A↔B> button briefly.
[Note] Recording needs lots of currency. Therefore it is recommended to record with a enough battery,
FM Radio Record does not function when the battery indicates level one. (The battery level is from one
to three)
Page 37

36
7) Volume control
You can adjust the volume level using the <+> / <-> button.
8) Mode Switch
• Press the <Menu> button in FM Mode to move to the Main Menu.
• Press and hold the <Menu> in FM Mode to move to the Browser.
• Press and hold the <A↔B > in FM Mode to move to the Record Mode, and it records.
Chapter 6 REC Mode
You can make voice and line-in recordings in the RECORD mode. Many useful functions such as Sync are also provided.
1) Display Information
REC Mode has 3 displays. Each Display has various information relating Record. Press the <Ⓛ/ H>button to
change the Display .
• Basic Display
• Remaining Memory Capacity Display
• Time Display
※ For more information refer to the “Chapter 1)7. LCD Overview ”.
Page 38

37
2) Voice Recording
Voice recording is made using the product’s built-in microphone.
The upper picture shows the voice recording ready state. Press the <A↔B > button to start voice recording.
The upper picture shows that voice recording is in progress
3) Line-in Recording
The Line-in Recording function allows you to record signals from an external sound source via the line-in cable.
Plug in the line-in cable to the line in jack (also Earphone jack) , and select “Line-In” from Setup Menu>
Recording Menu.
Page 39

38
The upper picture shows the line-in recording ready state. Press the <A↔B >button to start to record.
You can use the Sync function during line-in recording. The Sync function automatically detects when there is
no incoming signal for a certain period of time, and records in separate files with signals incoming before and
after a pause. For example, if you use this function when receiving signals via line-in from a CD that has many
tracks, you can save each of the tracks from the CD in a separate file with a different name. The SYNC settings
can be changed by going to SETUP > Recording.
4) Recording Start / Pause / Restart / Stop
• Start recording
In the record ready state, press the <A↔B > to start recording.
• Pause recording
While the recording is in progress, press the <JOG> button briefly to pause recording.
Page 40

39
• Restart recording
When the recording is paused, press the <JOG> button briefly, to restart recording. When restarted, the
recording continues from where it left off when paused..
• Stop recording
While the recording is in progress, press the <A↔B > button briefly to stop recording.
5) Volume Control
You can adjust the volume level using the <+> / <-> button.
6) Mode Switch
• Press the <Menu> button in REC Mode to move to the Main Menu.
• Press and hold the <Menu> in REC Mode to move to the Browser.
Chapter 7 Favorites
In Favorites mode, there is Playlist to edit your favorite song lists, also Bookmark list for the specific part of the file to
list up.
Page 41

40
1) Playlist
• Add Playlist
Playlist is to edit your favorite song lists, press the <A↔B> button briefly and select “Add List” to register
it in Browser mode.
• Playlist Browse / Select
It is possible to browse in Playlist mode. If you select the desired file, it plays.
• Remove Playlist
To remove the registered files from Playlist, press the <A↔B > button briefly and select “Remove List” in
Browser mode. Select “Remove All” to delete all Playlists.
※ If you remove the file from Playlist, the dong still remains in the device.
2) Bookmark List
Page 42

41
• Bookmark Add
The bookmark function allows you to add a bookmark at a certain point within a song or language file for later reference.
Press and hold the
<EQ> button while playing displays the current track, along with the time to add a bookmark.
The file name and time information will be listed up in Bookmark mode.
• Bookmark List Browse / Select
It is possible to browse in Bookmark List mode. If you select the desired file, it plays the specific registered
time.
• Remove Bookmark
To remove the registered files from Bookmark List mode, press the <A↔B > button briefly and select
“Remove” in Browser mode. Select “Remove All” to delete all Bookmark Lists.
Page 43

42
Chapter 8 SETUP
1) SOUND
1. EQ Setting
• Select and enjoy one of the EQ settings, such as Normal / Pop / Rock / Soft / Classical / Live / Techno / Reggae / User
EQ.
• Use the <+ / -> button to move between items and press the <JOG> button to return to the previous stage.
• Press the <Menu> button to move to the upper menu.
2. User EQ 1 / 2
Define your own EQ settings for the 5-band frequency range.
• Use the <∧ / ∨> button to move between the frequency bands and the <+ / -> button to set their value.
• Use the <A-B / REC> button to select Save / Cancel, the <JOG> button to specify whether to save the newly defined
EQ setting.
• Press the <Menu> button to move to the upper menu.
3. QBS ON/OFF
• The player provides rich QSE sound effects.
• Use the <+ / - > button to switch QBS On / Off, <JOG> button to make a selection and return to the previous stage.
Page 44

43
• Press the <Menu> button to move to the upper menu.
4. QBS Setting
• QBS(Q Big Sound)delivers natural, realistic 3D sound image for listeners. You can experience the wide sound image
field with QBS. Users can experience a very wide and clear virtual 3D surround with Qoolqee i and, QBS.
• QBS Features
- Advanced Surround Sound Enhancement
- Sound Quality Enhancement
- Comfortable & and soft sound for the ears
- High-quality, based on the advanced real time 3D Positioning Sound
• QBS SURROUND(3D): It is possible to adjust the 3D effect level up to the user.
• QBS BASS: It is possible to adjust the bass level up to the user.
• Adjust the value of QBS SURROUND(3D)by the button <+ / ->.
• Adjust the value of QBS BASS by the button of <∧ / ∨>.
• Press the <JOG> button to apply the 3D and it goes to the upper menu.
• Press the <Menu> button to move to the upper menu.
Page 45

44
5. Exit
• Press the <JOG> button to move to the upper menu while “Exit” is selected.
• Press the <Menu> button to move to the upper menu.
2) CONTROL
1. Repeat Mode
• Specify how to repeat a track or tracks.
• Use the <+ / -> button to move up or down in the menu and the <JOG> button to select an item.
• Press the <Menu> button to move to the upper menu.
• Normal: Play all the tracks and stop.
• Repeat1: Repeat a single track.
• Repeat All : Continuously repeat all tracks.
• Repeat Directory 1: Repeat playing of the tracks in the specified folder.
• Repeat Directory All: Continuously repeat all tracks in the specified folder..
• Shuffle All: Repeat playing of all the tracks on a random basis.
• Shuffle Repeat All : Repeat playing of all the tracks on a random basis continuously.
• Shuffle Directory: Repeat playing of the tracks in the specified folder on a random basis.
• Shuffle Directory All: Repeat playing of the tracks in the specified folder on a random basis continuously
Page 46

45
2. Time Skip
• Set the search speed. Time skip refers to the interval that the player skips when the <∧ / ∨> button is pressed briefly
in MP3 mode. The feature can be useful when you are searching for a language or study file.
• The search speed can be set to “Off”, ‘2 sec’, ‘5 sec’, ‘10 sec’, ‘15 sec’, ‘20 sec’, ‘25 sec’, ‘30 sec’. If it is set to “Off”,
the player skips to the previous/next track when the <∧ / ∨> button is pressed during playback, and if it is set to a value
other than “Off”, the player skips for the specified interval.
• Press the <Menu> button to move to the upper menu.
3. Search Speed
• Set the speed at which the player fast-forwards and rewinds.
• You can select 1x, 2x or 3x using the <∧ / ∨> button. Press the <JOG> button to confirm your selection and return to
the previous stage.
• Press the <Menu> button to move to the upper menu.
Page 47

46
4. Resume
• Store the position within a track where you left off playing last time.
• If it is set to on, the last position is stored, and if it is set to off, the position is not saved.
• Use the <+ / -> button to select on or off. Press the <JOG> button to confirm your selection and return to the previous stage.
• Press the <Menu> button to move to the upper menu.
5. Exit
• Press the <JOG> button to move to the upper menu while “Exit” is selected.
• Press the <Menu> button to move to the upper menu.
Page 48

47
3) TIME
1. Auto Sleep
• Qoolqee can be set to automatically turn off after a preset time.
• Set the time between OFF (Disable Auto Sleep) and 120 minutes using the <∧ / ∨> button. Press the <JOG > button
to confirm your selection and return to the previous stage.
• Press the <Menu> button to move to the upper menu.
2. Auto Power Off
• Specify the time that the player should wait before automatic power off, when it is stopped and there is no button
Page 49

48
activity.
• Specify a time between 30 seconds and 10 minutes using the <∧ / ∨> button. Press the <JOG> button to make a
selection and return to the previous stage.
• Press the <Menu> button to move to the upper menu.
3. Time Setting
• Set the current time displayed on the player.
• Use the <∧ / ∨> button to move between items and the <+ / -> button to change their setting.
• Press the <JOG> button to specify whether to save the changes.
• Press the <Menu> button to move to the upper menu.
4. Alarm Control
• Set the alarm time.
• Use the < / > button to move∧∨ between items and the <+ / -> button to change their setting.
• Press the <JOG> button to specify whether to save the changes
• Press the <Menu> button to move to the upper menu.
5. Exit
Page 50

49
• Press the <JOG> button to move to the upper menu while “Exit” is selected.
• Press the <Menu> button to move to the upper menu.
4) FM Radio Control
1. FM Scheduled Record
• Change the setting of the FM record reservation.
• Use the <∧ / ∨> button to move between items and the <+ / ->button to change their setting.
• press the <JOG> button to specify whether to save the changes.
• Press the <Menu> button to move to the upper menu.
Page 51

50
2. FM Band
•You can specify your FM region. Select "Japan" if you are using the product in Japan and "International" for all other
regions.
•Use the <+ / -> button to move between items. Press the <JOG> button to make a selection and return to the previous
stage.
• Press the <Menu> button to move to the upper menu.
5. Exit
• Press the <JOG> button to move to the upper menu while “Exit” is selected.
• Press the <Menu> button to move to the upper menu.
5) RECORD Control
1. Record Source
• Specify the recording source.
• Use the <+ / -> button to select Voice Recording or Line-in Recording .
Page 52

51
• Press the <JOG> button to make a selection and return to the previous stage.
• Press the <Menu> button to move to the upper menu.
2.Voice Quality
• Set the voice recording quality.
• Use the <∧ / ∨> button to set BPS and the sampling frequency .
• Press the <JOG> button to make a selection and return to the previous stage.
• Press the <Menu> button to move to the upper menu.
3. FM Record Quality
• Set the FM recording quality.
• Use the <∧ / ∨> button to set BPS and the sampling frequency .
• Press the <JOG> button to make a selection and return to the previous stage.
• Press the <Menu> button to move to the upper menu.
4. (Line-in) Record quality
• Set the Line-in recording quality.
Page 53

52
• Use the <∧ / ∨> button to set BPS and the sampling frequency in Main Menu> Record Mode. Press the <JOG>
button to make a selection and return to the previous stage.
• Press the <Menu> button to move to the upper menu.
5. Sync
• You can use the Sync function during line-in recording. The Sync function automatically detects when there is no
incoming signal for a certain period of time, and records in separate files with signals incoming before and after a pause.
For example, if you use this function when receiving signals via line-in from a CD that has many tracks, you can save
each of the tracks from the CD in a separate file with a different name
• Use the <∧ / ∨> button to set On / Off in Main Menu> Record Mode. Press the <JOG> button to make a selection
and return to the previous stage.
• Press the <Menu> button to move to the upper menu.
6. Exit
• Press the <JOG> button to move to the upper menu while “Exit” is selected.
• Press the <Menu> button to move to the upper menu.
Page 54

53
6) Display Control
1. Contrast
• Adjust the LCD Contrast.
• Adjust the brightness from between 0 (Min) and 9 (Max) using the <∧ / ∨> button. Press the <JOG> button to make
a selection and return to the previous stage.
• Press the <Menu> button to move to the upper menu.
2. Backlight Time
• Adjust the time the LCD display is on.
• You can adjust the lighting time between 10 seconds and ON (always on) using the <∧ / ∨> button. Press the <JOG>
button to make a selection and return to the previous stage.
• Press the <Menu> button to move to the upper menu.
3. Scroll Speed
• Set the speed and the way that file names and ID3 TAG information are displayed.
• You can select 1x, 2x, 3x,4x scroll using the <+ / -> button .
• Press the <JOG> button to confirm your selection and return to the previous stage.
• Press the <Menu> button to move to the upper menu.
Page 55

54
4. Song Title
• Specify how the track title is displayed on the screen during playback.
• Choose between the filename or the ID3 tag using the <+ / -> button.
• Press the <JOG> button to confirm your selection and return to the previous stage
• Press the <Menu> button to move to the upper menu.
5. Play Time
• Specify how the playing time information is displayed on the screen.
• Choose the elapsed time or the remaining time using the <+ / -> button.
• Press the <JOG> button to confirm your selection and return to the previous stage.
• Press the <Menu> button to move to the upper menu.
6. LED
• Specify the flickering way of the two LEDs at the top of Qoolqee i.
• Select LED Off, LED EQ1, 2, 3 using the <+ / -> button. Press the <JOG> button to confirm your selection and return
to the previous stage.
Page 56

55
• LED EQ1, 2 and 3 settings make the LEDs blink in different ways, along the spectrum of the currently played track.
Press the <JOG> button to confirm your selection and return to the previous stage.
• Press the <Menu> button to move to the upper menu.
7. Exit
• Press the <JOG> button to move to the upper menu while “Exit” is selected.
• Press the <Menu> button to move to the upper menu.
Page 57

56
7) General
1. Language
• You can set the language to display the filename or ID3 tag information of a track in a foreign language.
• The player supports Korean, English, French, German, Dutch, Swedish, Japanese etc.
• Some languages or special fonts may not be displayed properly due to compatibility issues.
• Use the <+ / -> button to move between items, and the <JOG> button to make a selection.
• Press the <Menu> button to move to the upper menu.
2. Initialize
• Restore the factory settings of the player, set at the time of shipment.
• A popup window appears asking for your confirmation on resetting.
• Use the < / > button to choose YES or NO and the <JOG> button to confirm. Choose YES to proceed with ∧∨
resetting and NO to cancel and return to the previous screen.
Page 58

57
3. System Information
• Display the model name, firmware version, link to our web page and memory space.
• Press the < JOG > or <Menu > button to return to the previous screen.
4. Exit
• Press the <JOG> button to move to the upper menu while “Exit” is selected.
• Press the <Menu> button to move to the upper menu.
Page 59

58
Chapter 9 MISCELLANEOUS
1) General Cautions
The following is provided to protect the user's safety and prevent property damage. Please read this section thoroughly ※
for correct use of the product.
1. Do not store the product where the temperature is too high (over35℃) or too low (bellow-5℃).
2. Do not drop the product, subject it to impact or place it near a magnet. (e.g. Hifi Speakers)
3. Avoid contact with chemicals such as benzene or thinner as they may cause deterioration of the product.
4. Do not attempt to disassemble, repair or modify the product.
5. Avoid dusty or dirty locations.
6. If the product got wet or dropped in water, contact our customer service for assistance.
7. Exercise care when using the neck strap – Hooking other objects could cause injury.
8. Remove this section
9. For prolonged life of the product, do not store in humid conditions, or subject to intense direct heat such as a heater or radiator.
Page 60

59
2) Earphone-related Cautions
Page 61

60
3) Troubleshooting
Q. The product does not power on.
A. the battery might be completely discharged. Please change the battery and try it again.
Q. The power goes of f aut o mati cally.
A. Please check the Set Up>Control Menu to find out the setting value, Or if the battery is low, the device will power off
automatically.
Q. There is no sound output.
A. Check if the volume level is set to "0"
A. Check connection of earphones.
Q. There is some noise during listening to the music by earphone.
A, Check if the earphone jack has any foreign matter on it.
A. If any part of the MP3, WMA ,OGG file is damaged, it may result in sound distortion or noise. Try playing another
music file to see if this is the cause of your problem.
Q. I can't download a file.
A. Make sure that the USB cable has been properly connected.
A. Check if the OS of your PC is Windows 98. (For a Windows 98 system, you need to install a driver separately. The
driver is in the Install CD or available at www.qoolqee.com
)
Page 62

61
4) Product Specifications
Classification Option Specification
Audio
Supported File
Type s
Vo i c e R e co rd
Frequency Range 20Hz ~ 20kHz
Earphone Output Left 20mW, Right 20mW
(16Ω, Volume Max)
Signal to Noise Ratio Over 90dB
Decoding MP3 : MPEG 1/2/2)5 layer 3, 8kbps ~ 320kbps, 8kHz ~ 48kHz, VBR
WMA : WMA7 WMA, 20kbps~ 192kbps, 8kHz ~ 48kHz
WMA9 CBR, 5Kbps mono ~ 320kbps stereo
VBR Average 48kbps ~ Average 256kbps
(WMA9 Professional, lossless compression Codec- not support Audio Codec)
Ogg: q0 ~ q10
Encoding MP3 : 32 ~ 128 kbps
Tag Info ID3 V1/V2 Tag (Song Title, Artist, Album)
LCD 128 x 48 Mono STN
Languages Korean, English, French, German, Spanish, Danish, Swedish, Italian, Hungarian , Portuguese,
Czech, Chinese Simple, Chinese Traditional, Japanese, Russian, Turkish, Dutch.
Play Time 15hours, approx (128kbps MP3 file Play, Volume: 15, EQ: NOR, Backlight & LED Off)
Dimension 60x25x25.3mm
Weight 21.9g (not including AAA battery)
Battery 1)5V AAA
Operational Temperature Range
-5°C ~50°C
Page 63

62
 Loading...