

Page 1

Hantek2000 Series Handheld Scopemeter
User Manual
V1.1
Page 2

Copyright Declaration
All rights reserved; no part of this document may be reproduced or transmitted in any form
or by any means, electronic or mechanical, without prior written permission from Hantek
Technologies Co., Ltd (hereinafter referred to as „Hantek‟).
Hantek reserves all rights to modify this document without prior notice. Please contact
Hantek for the latest version of this document before placing an order.
Hantek has made every effort to ensure the accuracy of this document but does not
guarantee the absence of errors. Moreover, Hantek assumes no responsibility in obtaining
permission and authorization of any third party patent, copyright or product involved in
relation to the use of this document.
Page 3

General Safety Summary
Read the following safety precautions to avoid injury and prevent damage to this product
or any products connected to it. To evade potential hazards, use this product only as
specified.
Only qualified personnel should perform maintenance.
Avoid fire or personal injury.
Use suitable power cord. Use only the power cord specified for this product and certified
for the country of use.
Connect and disconnect properly. Connect a probe with the oscilloscope before it is
connected to measured circuits; disconnect the probe from the oscilloscope after it is
disconnected from measured circuits.
Ground the product. This product is grounded through the grounding conductor of the
power cord. To avoid electric shock, the grounding conductor must be connected to earth
ground. Before making connections to the input or output terminals of the product, ensure
that the product is properly grounded.
Connect the probe in a right way. The probe ground lead is at ground potential. Do not
connect the ground lead to an elevated voltage.
Check all terminal ratings. To avoid fire or shock hazard, check all ratings and markings
on the product. Refer to the product manual for detailed information about ratings before
making connections to the product.
Do not operate without covers. Do not operate this product with covers or panels
removed.
Avoid exposed circuitry. Do not touch exposed connections and components when power
is present.
Do not operate with suspected failures. If you suspect there is damage to this product,
have it inspected by qualified service personnel.
Assure good ventilation.
Do not operate in wet/damp environments.
Do not operate in an explosive atmosphere.
Keep product surfaces clean and dry.
Page 4

Safety Terms and Symbols
Terms on the product. The following terms may appear on the product:
Danger It represents that harms may be caused to you at once
if you perform the operation.
Warning It represents that latent harms may be caused to you if
you perform the operation.
Notice It represents the damage possibly caused to the product
or other properties if you perform the operation.
Characters on the product. The following characters may appear on the product:
Product Scrapping
Device Recycling
We need extract and utilize natural resources to produce this device. If you do not reclaim
the device in a proper way, some substances it contains may become harmful or
poisonous to environments or human bodies. To avoid them being released outside and to
minimize the waste of natural resources, we suggest you reasonably call back this device
to ensure proper recovery and recycling of most materials within it.
Notice
Please read
the manual
Protective
ground terminal
Measuring
ground terminal
Chassis
ground terminal
Page 5

Brief Introduction
This series Scopemeter is compact, portable, and flexible operation; Using color TFTLCD
and pop-up menus to display; to achieve its ease of use, greatly improving the user
productivity.
In addition, this product has superior performance and it is powerful, affordable, high cost.
The real-time sampling rate can be as high as 250MSa/S,can meet the market demand of
complex signals and capture speed; Support for USB storage devices, users can upgrade
via USB, the maximum to meet customer needs.
Model
Channel
Bandwidth
Sampling Rate
GEN
DMM
Hantek2C72
2
70MHz
250MSa/S
N
Y
Hantek2C42
2
40MHz
250MSa/S
N
Y
Hantek2D72
2
70MHz
250MSa/S
Y
Y
Hantek2D42
2
40MHz
250MSa/S
Y
Y
Product features:
New exterior design, small size, light weight, more convenient to carry
Color TFT LCD, 320×240 pixels resolution
Maximum real-time sampling rate: 250MSa/s
With edge triggering function, it can be automatically detected
Backlight luminance can be adjusted
User selectable fast offset calibration
Pop-up menu makes it easy to read and easy to use
Selectable bandwidth limit: 20MHz
Page 6

Content
Copyright Declaration ........................................................................................................ 2
General Safety Summary ........................................................................................... 3
Safety Terms and Symbols ........................................................................................ 4
Product Scrapping ..................................................................................................... 4
Brief Introduction ............................................................................................................... 5
Content ............................................................................................................................. 6
Getting Started .................................................................................................................. 7
Front Panel ................................................................................................................ 8
The user interface ...................................................................................................... 9
General Inspection ..................................................................................................... 9
Functional Check ..................................................................................................... 10
Probe Check ............................................................................................................ 10
Function Introduction ....................................................................................................... 12
Menu and Control Keys ........................................................................................... 13
Connectors .............................................................................................................. 14
Automatically set ...................................................................................................... 14
Default Setting ......................................................................................................... 15
Horizontal System .................................................................................................... 16
Vertical System ........................................................................................................ 17
Trigger System ......................................................................................................... 17
Save Waveform ....................................................................................................... 18
Reference Waveform ............................................................................................... 19
Measurement ........................................................................................................... 19
Utility ........................................................................................................................ 21
DMM ............................................................................................................................... 23
Interface ................................................................................................................... 23
Measurement ........................................................................................................... 23
Generator ........................................................................................................................ 26
Interface ................................................................................................................... 26
Operation description ............................................................................................... 26
Troubleshooting .............................................................................................................. 29
General Care and Cleaning ............................................................................................ 30
Appendix A: Technical Specifications .............................................................................. 31
Appendix B: Accessories ................................................................................................. 35
Page 7

Getting Started
This oscilloscope is a small, lightweight portable instrument,to provide users with a
convenient and easy to operate front panel, you can perform basic tests.
Front Panel
The user interface
General Inspection
Functional Check
Probe Check
Page 8
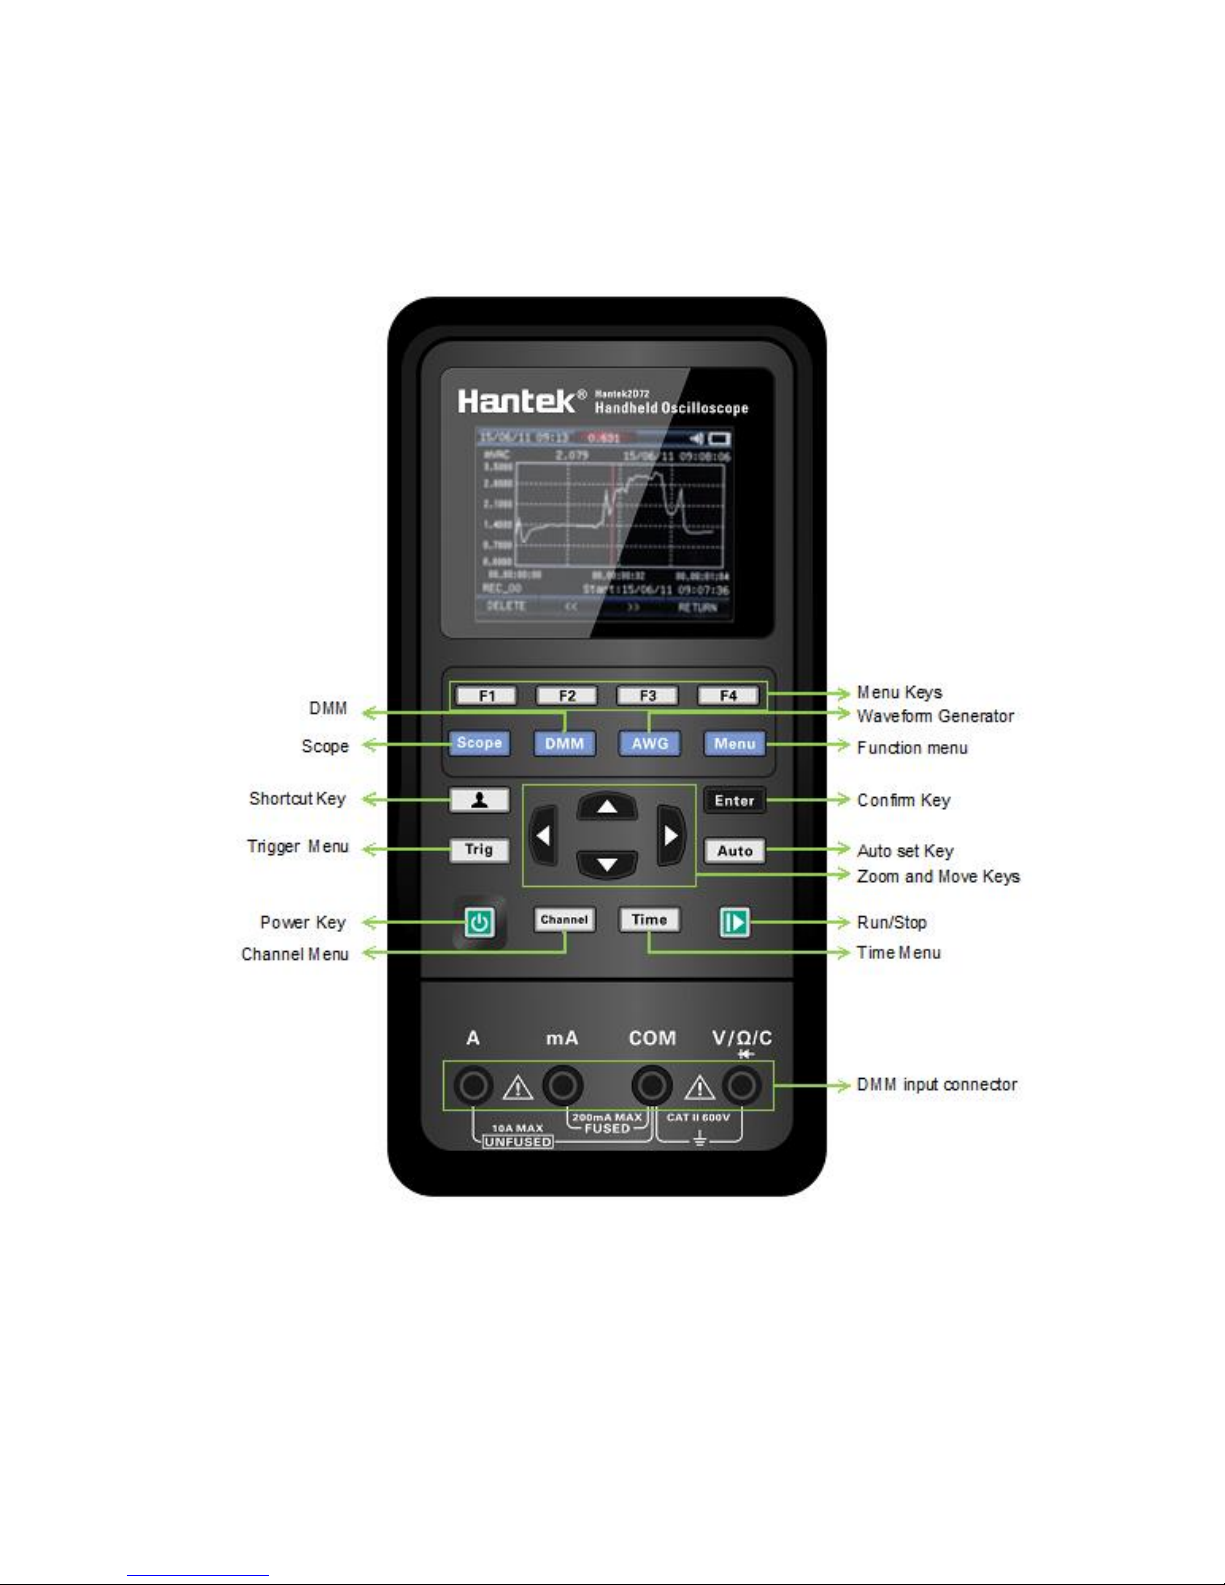
Front Panel
The following diagram briefly describes the front panel of this series oscilloscope, so that
you can be familiar with it in the shortest possible time.
Page 9
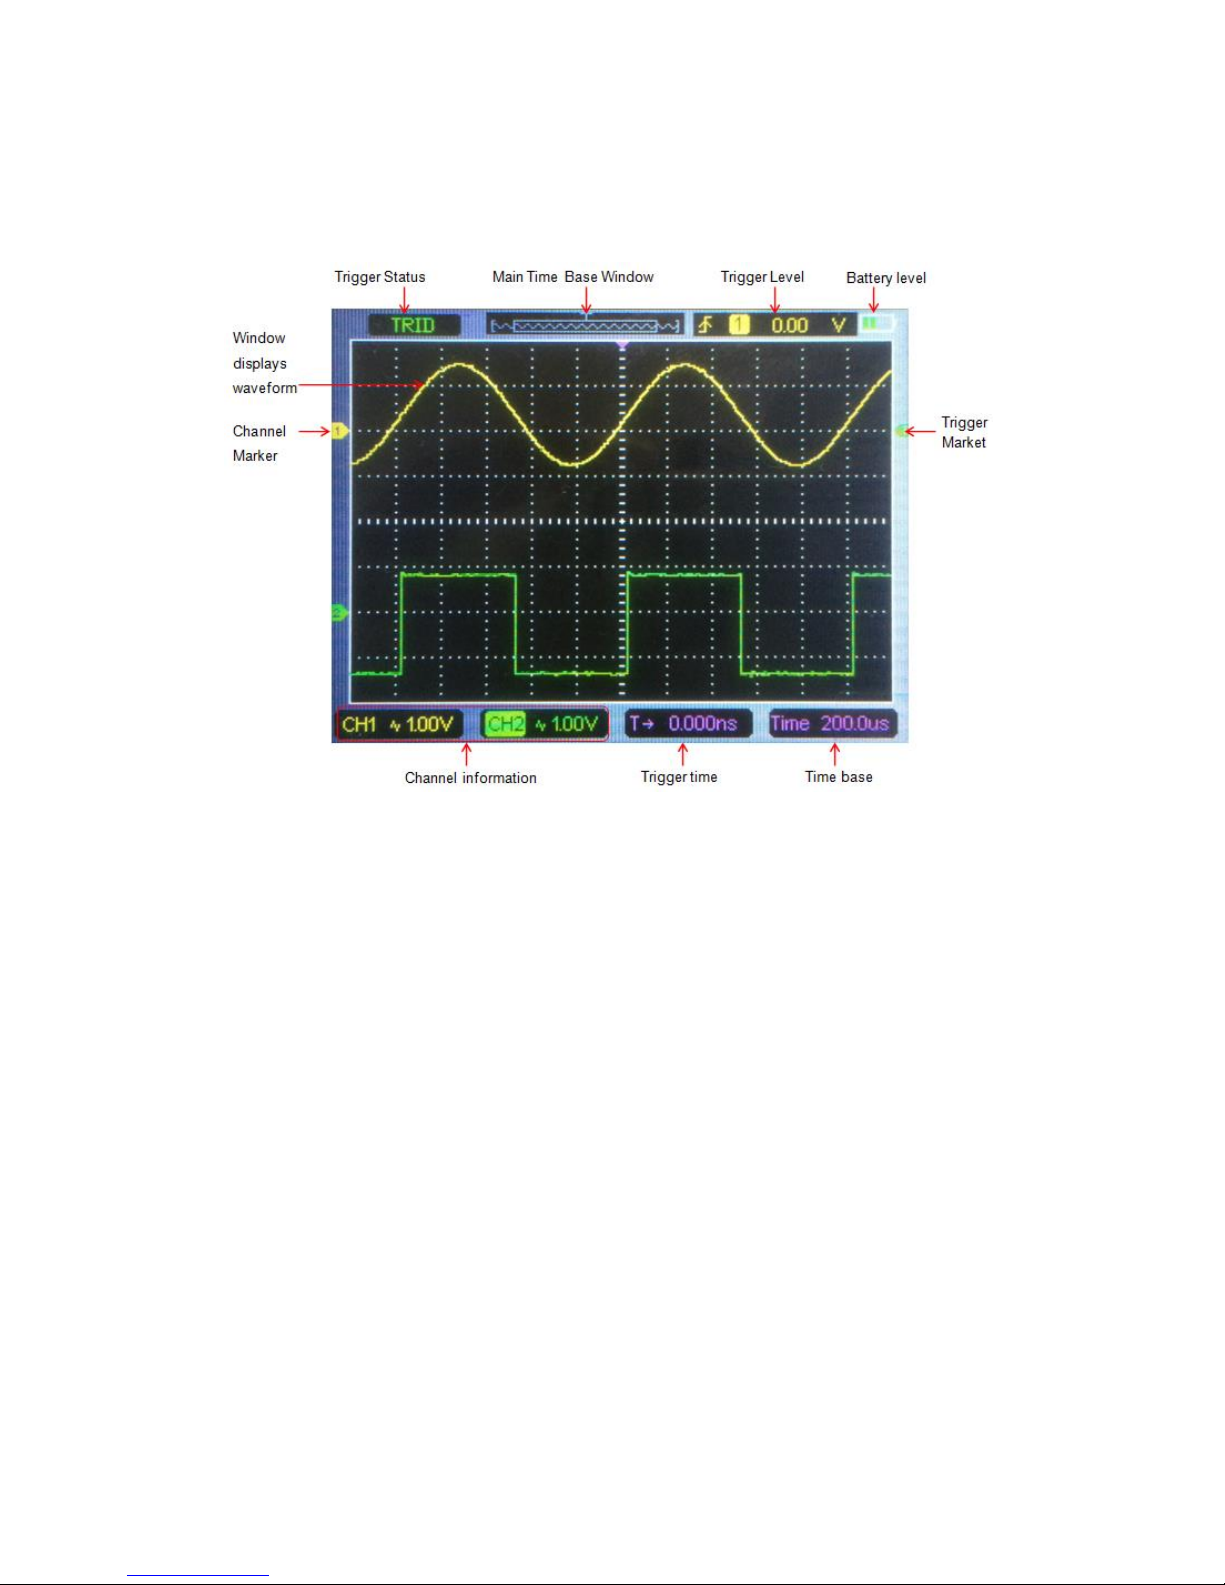
The user interface
General Inspection
Please check the instrument as following steps after receiving an oscilloscope:
Check the shipping container for damage:
Keep the damaged shipping container or cushioning material until the contents of the
shipment have been checked for completeness and the instrument has been checked
mechanically and electrically.
Check the accessories:
Accessories supplied with the instrument are listed in "Accessories" in this manual. If
the contents are incomplete or damaged, please notify the franchiser.
Check the instrument:
In case there is any mechanical damage or defect, or the instrument does not operate
properly or fails performance tests, please notify the franchiser.
Page 10

Functional Check
Follow the steps below to perform a quick functional check to your oscilloscope.
1. Power
Press the power key and the device starts. Press the power key again, and the device
will shut down. Before start it, please confirm that the battery has enough power.
The oscilloscope is equipped with a power adapter and the interface is Type-C. The
input AC power supply is 100~240V, 50~60Hz. The output is 5V@2A. The power
adapter can be used to supply the oscilloscope or charge the battery.
When connect the power adapter to the oscilloscope, if the battery is not installed
inside the oscilloscope, the power key backlight is red and flash; if the battery is
installed inside the oscilloscope and the battery power is not filled, the power key
backlight is red; if the battery is installed inside the oscilloscope and the battery power
is full, the backlight of the source key is extinguishes.
2. Observe the waveform
1) Set the switch on the probe to 1X and connect the probe to Channel 1 on the
oscilloscope. First, align the slot in the probe connector with the protuberance on the
CH1 BNC and push to connect; then, turn to right to lock the probe in place;
2)Connect the probe tip and reference lead to the generator output connector.
Recommended input ~2V@1KHz peak-peak square wave.
3)Press the [Auto] button and you should see within a few seconds a square wave of
about 2V peak-to-peak at 1KHz in the display. Repeat the steps to observe CH2.
Probe Check
Safety
When using the probe, keep your fingers behind the guard on the probe body to avoid
electric shock. Do not touch metallic portions of the probe head while it is connected to a
voltage source. Connect the probe to the oscilloscope and connect the ground terminal to
ground before you start any measurements.
Manual Probe Compensation
Upon the first connection of a probe and an input channel, you should manually perform
this adjustment to match the probe to the input channel. Uncompensated or
miscompensated probes may lead to errors or faults in measurement. To adjust the probe
compensation, follow the steps below.
1. Press Channel button to enter channel setting menu, Set the Probe option
Page 11
attenuation in the channel menu to 10X. Set the switch on the probe to 10X and
connect the probe to Channel 1 on the oscilloscope. If you use the probe hook-tip,
ensure it is firmly inserted onto the probe. Attach the probe tip to the generator output
connector (recommended input ~2V@1KHz peak-peak square wave), and connect
the reference lead to the ground of the generator. Press the [Auto] button.
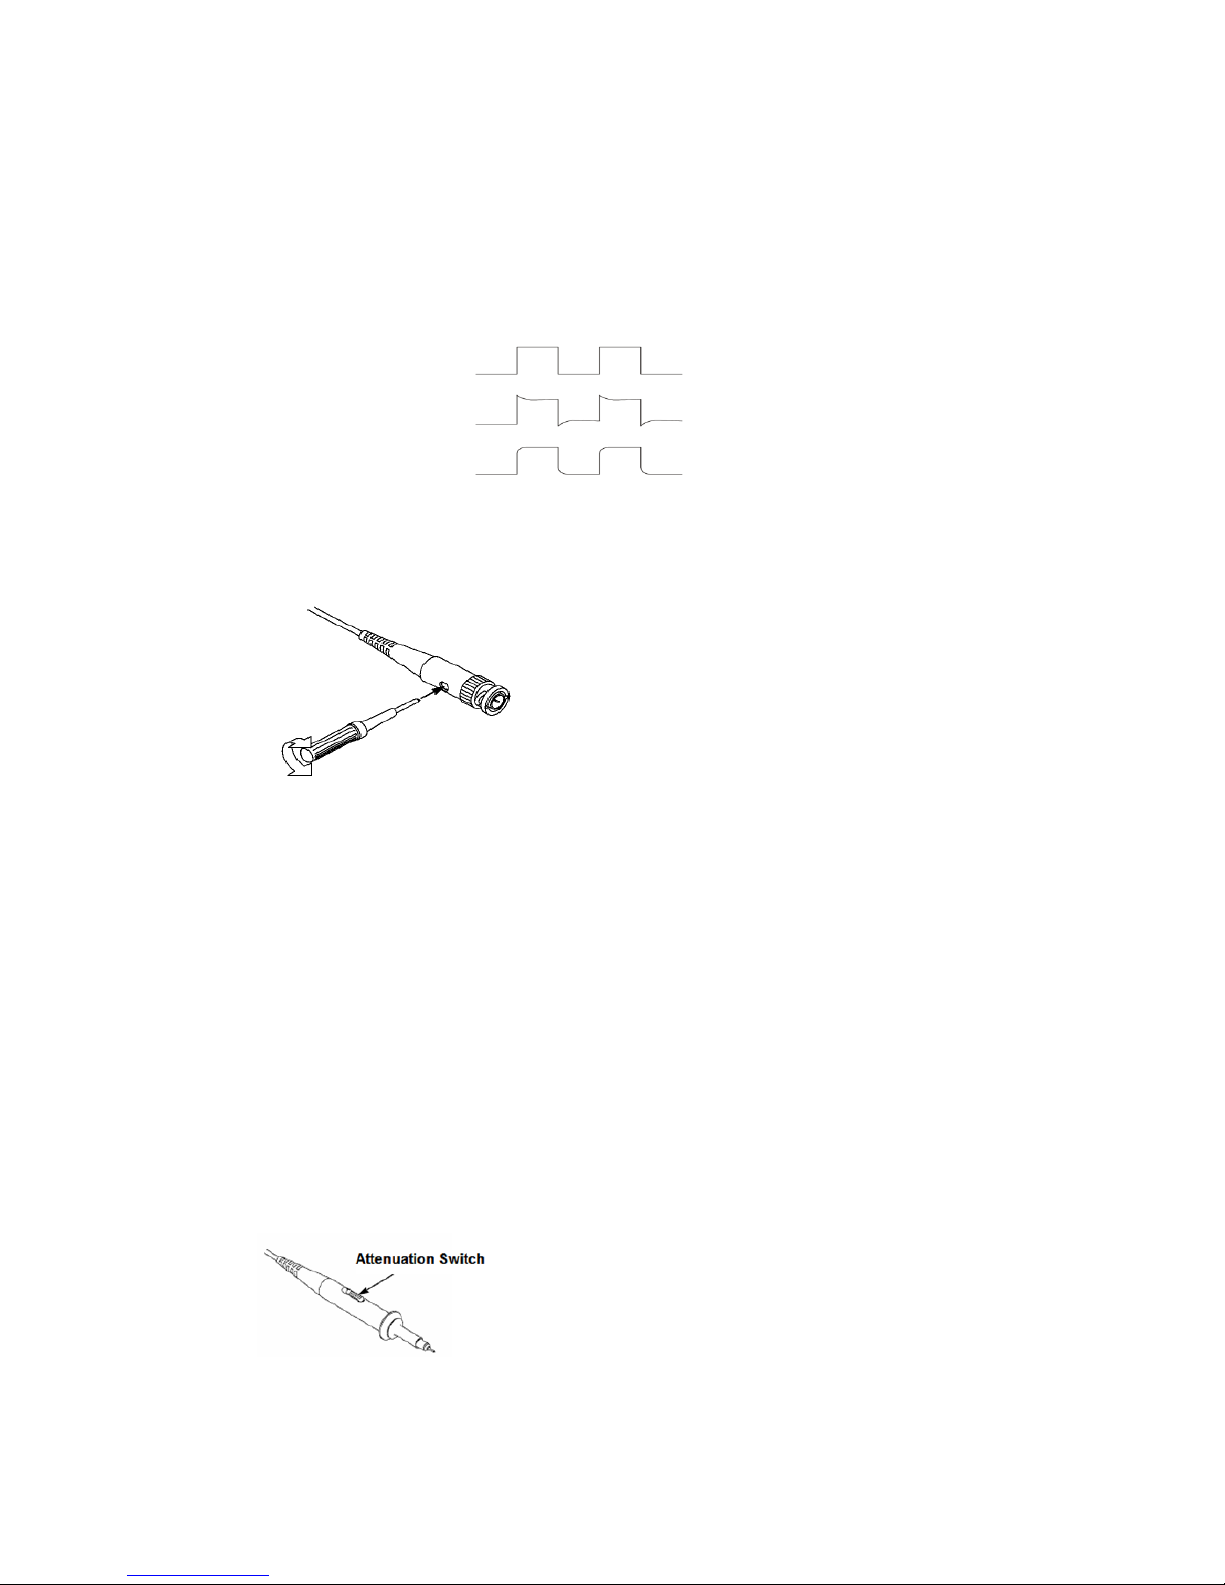
2. Check the shape of the displayed waveform.
3. If necessary, use a nonmetallic screwdriver to adjust the variable capacity of your
probe until the shape of the waveform turns to be the same as the above figure.
Repeat this step as necessary. See the figure below for the way of adjustment.
Probe Attenuation Setting
Probes are of various attenuation factors which affect the vertical scale of the signal. The
Probe Check function is used to verify if the Probe attenuation option matches the
attenuation of the probe.
You can press Channel button to enter the channel setting menu and select CH1, and
select the Probe option that matches the attenuation factor of your probe.
Make sure that the Attenuation switch on the probe matches the Probe option in the
oscilloscope. Switch settings are 1X and 10X.
When the Attenuation switch is set to 1X, the probe limits the bandwidth of the
oscilloscope to 6MHz. To use the full bandwidth of the oscilloscope, be sure to set the
switch to 10X.
Compensated correctly
Overcompensated
Undercompensated
Page 12

Function Introduction
This chapter will introduce the functions of oscilloscope in detail.
Menu and Control Keys
Connectors
Automatically set
Default setting
Horizontal System
Vertical System
Trigger System
Save Waveform
Reference Waveform
Measurement
Utility
Page 13

Menu and Control Keys
All the keys are described as follows:
Scope: Oscilloscope mode.
DMM:Multimeter mode.
AWG:Waveform generator.
Menu:Function menu.
Trig:Trigger setting menu.
Enter: In scope, save the user-defined settings of the oscilloscope;
In generator, press the button to confirm after entering the character.
Auto: It automatically adjust the horizontal and vertical scales of the oscilloscope
automatically and set the trigger coupling, type, position, slope, level and mode,
etc., to acquire a stable waveform display.
Channel: Channel setting menu.
Time: Horizontal setting menu.
Zoom and move keys:
In the trigger menu, the left and down keys push the trigger level down, and the
right and upper direction keys push the trigger level up;
In the channel menu, the upper and lower direction keys change the zero level
position of the channel, and the left and right direction keys change the volt/div of
the channel;
In the time base menu, the upper and lower direction keys change the time/div, and
the left and right direction keys change the horizontal trigger position;
In DMM, switch measurement function;
In generator, after choosing a parameter, the left and lower direction key will reduce
the parameter value, the right and up direction key will increase the parameter
value; it is also used for the digital selection of the virtual keyboard.
F1/F2/F3/F4: Multi function key, in each menu mode, is responsible for selecting
Page 14

corresponding menu items in the screen.
:
Shortcut keys. Long press this button to enter the menu, and choose
shortcut key function; After setting, press this button single time to respond
to the corresponding function.
:
In scope, stop or run the waveform acquisition;
In DMM, hold the measuring data or update data;
In generator, turn on or off the waveform output.
:
Power key.
Connectors
Automatically set
Auto set is one of the advantages digital oscilloscopes have. When you push the Auto
button, the oscilloscope will identify the type of waveform (sine or square wave) and adjust
controls according to input signals so that it can accurately display the waveform of the
CH1/CH2:Measured Signal Input
Gen Out: Waveform Generator Output
Charging and
USB Communication
Connector
DMM input connectors
Page 15

input signal.
Functions
Settings
Cursor
Off
Display Format
Set to YT
Horizontal Position
Adjusted
SEC/DIV
Adjusted
Trigger Level
Set to 50%
Trigger Mode
Auto
Trigger Source
Adjusted
Trigger Slope
Adjusted
Trigger Type
Edge
Vertical Bandwidth
Full
Vertical Coupling
DC
VOLTS/DIV
Adjusted
The Auto function examines all channels for signals and displays corresponding
waveforms. Auto determines the trigger source according to the following conditions.
If multiply channels get signals, the oscilloscope will use the channel with the lowest
frequency signal as the trigger source.
If no signals are found, the oscilloscope will use the lowest-numbered channel
displayed in Auto Scale as the trigger source.
If no signals are found and no channels are displayed, the oscilloscope will display and
use Channel 1 as the trigger source.
Default Setting
Long press button, enter Short key setting menu, and select Default. Press
button, pops up the prompt to recall the default settings on the screen, now press F1 to
confirm. The oscilloscope will display the CH1 waveform and remove all the others. Press
F4 to cancel. The table below gives the options, buttons and controls that change settings
at default setup.
Menu or
System
Option, Button or
Knob
Default Setting
Cursor
Type
Off
Source
CH1
Horizontal (amplitude)
±4div
Vertical (time)
±4div
Display
Format
YT
Horizontal
Position
0.00s
SEC/DIV
500μs
Page 16

Measure
On or Off
Off
Trigger (Edge)
Source
CH1
Slope
Rising
Mode
Auto
Level
0.00v
Vertical
System,
All Channels
Bandwidth Limit
Unlimited
Coupling
AC
Probe Attenuation
1X
Position
0.00div (0.00V)
VOLTS/DIV
1V
The following settings do not change when you recall default settings.
Language Option
Saved Settings
Saved waveform
Saved Reference Waveforms
Calibration Data
Horizontal System
Press Time button to enter horizontal system menu, use the direction keys to change the
horizontal scale (time base) and the horizontal trigger position. When you change the
horizontal scale, the waveform will expand or contract to the screen center.
1. SEC/DIV Knob: Used to change the horizontal time scale so as to magnify or compress
the waveform horizontally. If the waveform acquisition is stopped (by using button),
press Time button and Up or Down buttons to expand or compress the waveform.
2. Horizontal Position Knob: Used to control the trigger position against the screen
center. Press Time button and Right or Left buttons to move the waveform right or left.
The key resolution vary according to time base. Press "AUTO" key can make the
horizontal position return to zero.
3. Mode: Y-T, Roll, Scan.
Y-T: YT format shows the vertical voltage in relation to time (horizontal scale)
Roll: In Roll mode, the waveform display rolls from right to left. Trigger or horizontal offset
control of waveforms is available during Roll Mode, and it‟s only available when set to
100ms/div or slower.
Scan: In Scan Mode, the waveform display scan updates from left to right. In Scan mode,
trigger and horizontal offset control of waveforms are available during Scan Mode. This
mode is only available when set to 100ms/div or slower. Generally, used for measuring
low frequency signal. When the time/div is 100ms/div or slower, the oscilloscope
Page 17

Automatically enters the scan mode.
Vertical System
Vertical system can be used to adjust the vertical scale and location and other settings of
the channel. Each channel has a separate vertical menu, and each channel can be set
separately.
1. Vertical Position
Press Channel->F1 to select the channel, and press Up or Down direction keys to
move the vertical position of the selected channel.
2. VOLTS/DIV Settings
The range of Volt/div is 10mV/div-10V/div (1X), or 100mV/div-100V/div (10X),
1V/div-1000V/div (100X), step by 1-2-5.
Press Channel->F1 to select the channel, and press Right or Left direction keys to
change the Volt/div of the selected channel.
3. Channel Setting Menu
Options
Settings
Comments
On/Off
On
Off
Turn on the waveform display.
Turn off the waveform display.
Coupling
DC
AC
GND
DC passes both DC and AC components of the input
signal.
AC blocks the DC component of the input signal and
attenuates signals below 10Hz.
GND disconnects the input signal.
Probe
1X
10X
100X
1000X
Selects a value according to the probe attenuation
factor so as to ensure correct vertical readouts.
Reduce bandwidth to 6MHz when using a 1X probe.
BW
20MHz
On
Off
Limits the bandwidth to reduce display noise; filters the
signal to eliminate noise and other unnecessary HF
components.
Trigger System
The trigger determines when the oscilloscope begins to acquire data and display a
waveform. Once a trigger is properly set up, the oscilloscope can convert unstable
displays or blank screens to meaningful waveforms.
The triggering mode of this series oscilloscope is edge trigger.
Edge trigger distinguishes the trigger points by seeking the specified edge (rising, falling,
rising & falling) and trigger level.
Page 18

Trigger Source: Select the trigger source signal to CH1 or CH2. You can use the trigger
source options to select the signal that the oscilloscope uses as a trigger.
Trigger Mode: You can select the Auto or Normal mode to define how the oscilloscope
acquires data when it does not detect a trigger condition. Auto Mode performs the
acquisition freely in absence of valid trigger. It allows the generation of untriggered
waveforms with the time base set to 100ms/div or slower. Normal Mode updates the
displayed waveforms only when the oscilloscope detects a valid trigger condition. Before
this update, the oscilloscope still displays the old waveforms. This mode shall be used
when you want to only view the effectively triggered waveforms. In this mode, the
oscilloscope displays waveforms only after the first trigger.
Trigger Level: It sets the amplitude level the signal must cross to cause an acquisition
when using the Edge or Pulse Width trigger. Press Trig button to enter, and press Up or
Down direction keys to change the trigger level.
Force Trigger: Used to complete an acquisition regardless of an adequate trigger signal.
This button becomes useless if the acquisition is already stopped.
Save Waveform
Press Menu button to enter, and select Save to enter store waveform menu. The
waveform can be saved to the oscilloscope inside, also can be recalled to view.
The Save Menu Table
Menu
Setting
Description
Position
1,2,3,4,5,6
Select the internal storage position.
Save
Save waveform data.
Recall
Recall the waveform.
To save the waveform, follow these steps:
1. Press F1, select the storage position of the waveform.
2. Press F2 to save the waveform data to the specified position. Also users can long
press button to enter, and select F4->F2 (Data Save) as shortcut keys. Press
button one time to save the current waveform data.
3. Press F3, recall the saved waveform. The waveform can be enlarged or reduced in
the Channel or Time menu by using the direction keys.
Attention:
1. Waveform storage can not only save the waveform of the current channel, but also
save the current state settings at the same time.
Page 19

2. users can permanently store 6 waveforms in the oscilloscope memory and rewrite them
at any time.
Reference Waveform
The REF channel is used to display the reference waveform, which can compare the
actual waveforms with the reference waveforms so as to find out the differences.
Press Menu button to enter, and select Ref to enter reference Waveform menu.
REF Menu Table
Menu
Setting
Description
Position
Ref-A
Ref-B
The REF waveform is saved to the oscilloscope
Ref-A or Ref-B.
Enable
On
Off
Open the REF waveform.
Close the REF waveform.
Source
CH1
CH2
Select CH1 to save as a REF waveform.
Select CH2 to save as a REF waveform
Save
Save the REF waveform.
To save the reference waveform, follow these steps:
1. Press F1 to select the position of the reference waveform.
2. Press F2 to open the REF channel.
3. Press F3 to select the source to CH1 (or CH2), and only select the open channel.
4. Press F4 to save the current waveform to the specified location..
Measurement
Scale measurement
Graticule: This method allows you to make a quick, visual estimate and take a simple
measurement through the graticule divisions and the scale factor.
For example, you can take simple measurements by counting the major and minor
graticule divisions involved and multiplying by the scale factor. If you counted 6 major
vertical graticule divisions between the minimum and maximum values of a waveform and
knew you had a scale factor of 50mV/division, you could easily calculate your
peak-to-peak voltage as follows:
6 divisions x 50mV/division = 300mV.
Cursor measurement
The cursor measurement has two parallel lines on the screen, and move two lines to
measure the time and voltage parameters of the input signal. The result of cursor
measurement will be displayed on the second page of the cursor menu. Before use cursor
Page 20

measurement, make sure that the measured source is the signal you need to measure.
Press Menu button to enter, and select Cursor to enter cursor measurement.
Cursor Measurement Menu Table
Menu
Setting
Description
Enable
On
Off
Open the cursor measurement.
Close the cursor measurement.
Type
Voltage
Time
The horizontal line is shown to measure the voltage
parameters.
The vertical line is shown to measure the time
parameters.
Source
CH1
CH2
Select the measured source.
Cursor1
Select Cursor1 and press up, down, left and right keys to
move the Cursor1 position, and display the Cursor1 value.
Cursor2
Select Cursor2 and press up, down, left and right keys to
move the Cursor2 position, and display the Cursor2 value.
Increment
The difference between the Cursor1 and the Cursor2.
To do cursor measurement, follow these steps:
1. Press F1 to open the cursor measurement;
2. Press F2 to select a type of cursor measurement.
3. Press F3 to select the channel that needs to be measured.
4. Press F4 to enter the second page, press F1 or F2 to select Cursor1 or Cursor2, press
up, down, left and right to move Cursor1 or Cursor1;
5. The result of cursor measurement will be displayed on the cursor menu.
Automatic Measurement
The oscilloscope provides 2 kinds of automatic measurements, including frequency and
amplitude.
Press Menu button to enter, select Measure to enter automatic measurement. Press F1
to open, the measurement results will be displayed on the top left corner of the screen.
Measurement Menu Table
Menu
Description
Frequency
Measure the frequency of the signal.
Amplitude
Measure the amplitude of the signal, the low end value - the top
value.
Attention:
In the measurement result, the yellow font is the result of CH1, and the green font is the
result of CH2.
Page 21

Utility
Press Menu button to enter.
Utility Menu Table
Menu
Setting
Description
Language
中文
English
Set the menu language.
Sound
On
Off
Open the key sound.
Close the key sound.
Backlight
luminance
1~10
Set backlight brightness of the screen.
Backlight
time
30s
60s
90s
120s
Unlimited
Set the screen backlight time.
System
information
Display system information, such as software
version or PCB version.
Automatic
shutdown
5 Minute
10 Minute
20 Minute
30 Minute
Unlimited
Set automatic shutdown time.
Calibration
Start
Return
Start the self calibration.
Exit the self calibration.
Note:
1. Backlight time and automatic shutdown time will not be executed when the
oscilloscope is plugged in with an external charging device or connected to a
computer via a USB cable.
2. Shutdown automatically saves last setup.
Self calibration
The self calibration routine helps optimize the oscilloscope signal path for maximum
measurement accuracy. You can run the routine at any time but should always run it if the
ambient temperature changes by 5℃ or more. For a more accurate calibration, please
power on the oscilloscope and wait for 20 minutes until it has adequately warmed up.
To do self calibration, follow these steps:
1. Ensure that no input signal is input, otherwise it may damage the instrument.
2. Press Menu button to select the self calibration function.
Update
Connect the oscilloscope to the computer with USB cable. Press the F1 button and the
Page 22
boot button at the same time. The backlight of the button will jump between red and green,
that is, enter the upgrade mode. Using the Dfu download tool to download the program,
the oscilloscope power off, and then re-energize.
Shortcut key
Long press button to enter shortcut key settings menu, and choose shortcut key
function; After setting, press this button single time to respond to the corresponding
function.
Default settings: Long press button to enter, and select F1 (Default) as the
shortcut key, then press button one time and select F1 TO confirm to recall the
default settings
Custom settings: Long press button to enter, and select F2 or F3 (custom 1 or 2)
as shortcut keys. Now press Enter button and click F1 to confirm to save the current
settings to custom settings. Press button one time and click F1 to confirm to recall
the custom settings.
Save data: Long press button to enter, and select F4->F1 (Data Save) as shortcut
keys. Press Menu -> Save to enter the save menu, select a location, press
button one time to save the current waveform data.
Page 23

DMM
This chapter introduces the multimeter function.
Interface
The measuring types include DC voltage (V, mV), AC voltage, DC current (A, mA), AC
current (A, mA), resistance, capacitance, diode, and on-off test.
Measurement
1. DC and AC voltage measurement
a) Press the power button to turn on, then press the "DMM" button to enter to the
multimeter function interface;
b) Press the up, down, left and right direction keys or F1, F2, F3, F4 multi-function
keys to select "DC V", "DC mV" or "AC V";
c) Insert the black pen into the input port of the COM banana socket, and insert the
red pen into the input port of the V/Ω/C banana port;
d) Connect the red and black forms to the measured point. The voltage value of the
measured point will be displayed on the screen.
2. DC and AC current measurement
Page 24

a) Press the power button to turn on, then press the "DMM" button to enter to the
multimeter function interface;
b) To measure the DC current greater than 200mA, press the up, down, left and right
keys or F1, F2, F3, F4 multi function keys to select "DC A" or "AC A", and insert the
black pen to the input end of the COM banana socket, and insert the red pen into
the input port of the “A” banana socket;
c) To measure the DC current less than 200mA, press the up, down, left and right
keys or F1, F2, F3, F4 multi function keys to select "DC mA" or "AC mA", and insert
the black pen to the input end of the COM banana socket, and insert the red pen
into the input port of the “mA” banana socket.;
d) Connect the red and black forms to the measured point. The current value of the
measured point will be displayed on the screen.
3. Resistance measurement
a) Press the power button to turn on, then press the "DMM" button to enter to the
multimeter function interface;
b) Press the up, down, left and right direction keys or F1, F2, F3, F4 multi-function
keys to select "Ω";
c) Insert the black pen into the input port of the COM banana socket, and insert the
red pen into the input port of the V/Ω/C banana port;
d) Connect the red and black forms to the measured point. The resistance value of
the measured point will be displayed on the screen.
4. Capacitance measurement
e) Press the power button to turn on, then press the "DMM" button to enter to the
multimeter function interface;
f) Press the up, down, left and right direction keys or F1, F2, F3, F4 multi-function
keys to select " ";
g) Insert the black pen into the input port of the COM banana socket, and insert the
red pen into the input port of the V/Ω/C banana port;
h) Connect the red and black forms to the measured point. The capacitance value of
the measured point will be displayed on the screen.
5. Diode measurement
i) Press the power button to turn on, then press the "DMM" button to enter to the
multimeter function interface;
j) Press the up, down, left and right direction keys or F1, F2, F3, F4 multi-function
keys to select " ";
k) Insert the black pen into the input port of the COM banana socket, and insert the
red pen into the input port of the V/Ω/C banana port;
l) Connect the red and black forms to the measured point. The diode value of the
measured point will be displayed on the screen.
6. On-Off measurement
Page 25

m) Press the power button to turn on, then press the "DMM" button to enter to the
multimeter function interface;
n) Press the up, down, left and right direction keys or F1, F2, F3, F4 multi-function
keys to select " ";
o) Insert the black pen into the input port of the COM banana socket, and insert the
red pen into the input port of the V/Ω/C banana port;
p) Connect the red and black forms to the measured point. If the resistance of the
measured point is less than 50 ohms, the instrument will emit "drop" sound.
7. Data retention function
Press the button on the instrument, and the displayed data will remain on the
display, even if the input signal changes or eliminates, the value will not change.
Note: Please select the required measuring gear correctly and then measure again.
Page 26

Generator
This chapter introduces the function of waveform generator.
Interface
Operation description
Press the power button to turn on, then press the "AWG" button to enter the waveform
generator function interface.
1. Set type
Press F1 button to select the desired signal waveform, the optional waveform type
includes square, triangle, sine, trapezoidal and four arbitrary.
2. Set frequency
Press F2 button to select Frequency, then use the up, down, left and right direction
keys to adjust the frequency, press F2 button to open the digital keyboard again, use
the up, down, left, right direction keys and "Enter" key to set frequency parameter,
select "OK" and press "Enter" button to confirm.
3. Set amplitude
Press F3 button to select Amplitude, then use the up, down, left and right direction
keys to adjust the frequency, press F3 button to open the digital keyboard again, use
the up, down, left, right direction keys and "Enter" key to set frequency parameter,
Page 27

select "OK" and press "Enter" button to confirm.
4. Set offset
Press F4 button to enter the second page. Press F2 to select Offset, then use the up,
down, left and right direction keys to adjust the frequency, press F2 button to open the
digital keyboard again, use the up, down, left, right direction keys and "Enter" key to
set frequency parameter, select "OK" and press "Enter" button to confirm.
5. Set duty cycle
enter the second page. Press F3 to select Duty, then use the up, down, left and right
direction keys to adjust the frequency, press F3 button to open the digital keyboard
again, use the up, down, left, right direction keys and "Enter" key to set frequency
parameter, select "OK" and press "Enter" button to confirm.
6. Generate an arbitrary waveform
It is necessary to edit the arbitrary waveform in connection with the software and
download it into the machine. There are 4 arbitrary wave positions, and each position
can permanently store an arbitrary wave.
7. After setting the waveform parameters, press the button to turn on or off the
signal output. The output waveform of the signal generator can be observed through
an oscilloscope.
For example, set a sine waveform with 2Vpp@10KHz to output as follows:
Page 28

The waveform observed by an oscilloscope is as follows:
Page 29

Troubleshooting
1. If the oscilloscope does not start up at power on, follow these steps:
1) Check whether the battery is installed and confirm whether the battery level is enough.
2) If the battery level is not enough, use the power adapter to charge.
3) Restart the instrument after the battery level is enough.
4) Contact your local HANTEK distributor or directly keep touch with HANTEK Technical
Support department if the oscilloscope still can not be turned on normally.
2. If there is no display of waveforms on the screen when the oscilloscope is
turned on, follow these steps:
1) Check the probe to assure its proper connection to the input BNC;
2) Check the channel switch (Channel button) to make sure it has been turned on;
3) Check the input signal to verify it has been connected to the probe correctly;
4) Affirm that all measured circuits have signals to output;
5) Turn up the magnitude for DC signals with large magnitude;
6) In addition, you may press the Auto button to perform an automatic detection of
signals at first.
7) Contact HANTEK Technical Support department in time if there is still no display of
waveforms.
3. If the waveform of the input signal is distorted seriously, follow these steps:
1) Check the probe to assure its proper connection to the channel BNC;
2) Check the probe to assure its good connection to the measured object;
3) Check the probe to verify it has been well calibrated. Otherwise, refer to the content
about calibration described in this manual.
4. If the waveform is rolling continuously on the screen but can not be triggered,
follow these steps:
1) Check the trigger source to make sure it consistent with the input channel;
2) Check the trigger level to assure its correct adjustment. You may press TRIGGER
button to enter trigger menu, and use Up, Down, Right, Left direction keys to adjust
trigger level to return to signal.
Page 30

General Care and Cleaning
General Care
Do not put or leave the device in a place where the LCD display will be exposed to direct
sunlight for long periods of time.
Note: To avoid damage to the oscilloscope or probes, do not expose them to sprays,
liquids, or solvents.
Cleaning
Examine the oscilloscope and probes as often as operating conditions require. To clean
the exterior surface, perform the following steps:
1) Use a lint-free cloth to remove floating dust on the outside of the oscilloscope and
probes. Take care to avoid scratching the glabrous display filter.
2) Use a soft cloth dampened with water to clean the oscilloscope. For more efficient
cleaning, you may use an aqueous solution of 75% isopropyl alcohol.
Note: To avoid damage to the surface of the oscilloscope or probes, do not use any
corrosive or chemical cleaning agents.
Page 31

Appendix A: Technical Specifications
All specifications herein mentioned apply to the series oscilloscopes. Before checking an
oscilloscope to see if it complies with these specifications, make sure it meets the
following conditions:
The oscilloscope must have been operating continuously for twenty minutes under
the specified operating temperature.
The Do Self Cal operation must be performed through the Utility menu if the operating
temperature changes by more than 5℃.
The oscilloscope must be within the factory calibration interval.
All specifications are guaranteed unless noted „typical‟.
Oscilloscope Specifications
Horizontal
Model
Hantek2C72/Hantek2D72
Hantek2C42/Hantek2D42
Band Width
70MHz
40MHz
Rising time
≤5ns
≤8.75ns
Sample Rate Range
250MSa/s(Single-channel), 125MSa/s(Dual-channel)
Waveform Interpolation
(sin x)/x
Record Length
Max. 6K samples for single-channel,
3K samples per dual-channel
SEC/DIV Range
5ns/div~500s/div 1, 2, 5 sequence
Vertical
A/D Converter
8-bit resolution, each channel sampled simultaneously
VOLTS/DIV Range
10mV/div~10V/divat input BNC
Selectable Analog
Bandwidth Limit, typical
20MHz
Low Frequency Response
(-3db)
≤10Hz at BNC
Rise Time at BNC, typical
≤5ns
DC Gain Accuracy
±3% for Normal or Average acquisition mode, 10V/div to 10mV/div
Note: Bandwidth reduced to 6MHz when using a 1X probe.
Acquisition
Acquisition Modes
Normal
Trigger
Type
Edge
Page 32

Mode
Auto, Normal, single
Level
±4 divisions from center of screen
Trigger Level Accuracy
0.2div × volts/div within ±4 divisions from center of screen
Slope
Rising, Falling, Rising & Falling
Source
CH1, CH2
Input
Coupling
DC, AC or GND
Input Impedance,
DC coupled
25pF±3 pF,1MΩ±2%
Probe Attenuation
1X, 10X
Supported Probe
Attenuation Factors
1X, 10X, 100X, 1000X
Maximum Input Voltage
150V
RMS
Measurement
Cursor
Voltage difference between cursors: △V
Time difference between cursors: △T
Automatic Measurements
Frequency, Amplitude
General Specifications
Display
Display Type
2.8 inch 64K color TFT
Display Resolution
320 horizontal by 240 vertical pixels
Display Contrast
Adjustable
Power Supply
Supply Voltage
100V-240VAC, 50Hz-60Hz; DC INPUT: 5VDC, 2A
Power Consumption
<2.5W
Fuse
T, 3A
Battery
2600mAh*2
Environmental
Operating Temperature
0℃ to 50℃
Storage Temperature
-20℃ to 60℃
Humidity
≤+104℉(≤+40°C): ≤90% relative humidity
106℉~122℉ (+41°C ~50°C): ≤60% relative humidity
Cooling Method
Convection
Altitude
Operating and
Nonoperating
3,000m (10,000 feet)
Random Vibration
0.31g
RMS
from 50Hz to 500Hz,
10 minutes on each axis
Nonoperating
2.46g
RMS
from 5Hz to 500Hz, 10
minutes on each axis
Mechanical Shock
Operating
50g, 11ms, half sine
Page 33

Mechanical
Dimension
199 x 98x 40mm (L x W x H)
Weight
624g
Arbitrary Waveform Generator (Hantek2D72/Hantek2D42)
Waveform Frequency
Sine: 1Hz~25MHz
Square: 1Hz~10MHz
Ramp: 1Hz~1MHz
EXP: 1Hz~5MHz
Sampling
250MSa/s
Amplitude
2.5Vpp(50Ω)
5Vpp(High impedance)
Frequency Resolution
0.10%
Channel
1CH waveform output
Waveform Depth
512Sa
Vertical Resolution
12 bit
Output Impedance
50 Ω
Square Characteristics
Pulse width accuracy
±10ns
DMM
Maximum Resolution
4000 Counts
DMM Testing Modes
Voltage, Current, Resistance, Capacitance, Diode &
On-Off
Maximum Input Voltage
AC : 600V DC : 600V
Maximum Input Current
AC : 10A DC : 10A
Range
Accuracy
Resolution
DC Voltage
400.00mV
±(0.8% + 5)
100uV
4.000V
1mV
40.00V
10mV
400.0V
100mV
600.0V
±(1% + 2)
1V
Overload protection:
Page 34

400mV: 250V, other: 600Vrms.
AC Voltage
4.000V
±(1.2% + 5)
1mV
40.00V
10mV
400.0V
100mV
600.0V
±(1.5% + 5)
1V
Frequency: 40Hz~400Hz;
Frequency of 400V and 600V: 40Hz~100Hz
DC Current
40.00mA
±(1% + 2)
10uA
200.0mA
±(1.5% + 2)
100uA
4.000A
±(1.8% + 2)
1mA
10.00A
±(3% + 2)
10mA
Overload protection:
self restoring fuse: 200mA/250V, 4A and 10A range no fuse.
AC Current
40.00mA
±(1.3% + 2)
10uA
400.0mA
±(1.8% + 2)
100uA
4.000A
±(2% + 3)
1mA
10.00A
±(3% + 5)
10mA
Frequency: 40Hz~400Hz;
self restoring fuse: 200mA/250V, 4A and 10A range no fuse.
Resistance
400.0Ω
±(1% + 3)
0.1Ω
4.000KΩ
±(1.2% + 5)
1Ω
60.00KΩ
10Ω
400.0KΩ
100Ω
4.000MΩ
1KΩ
40.00MΩ
±(1.5%±3)
10KΩ
Overload protection: 220Vrms
Capacitance
40.00nF
±(3% + 5)
10pF
400.0nF
100pF
4.000uF
1nF
40.00uF
10nF
100.0uF
100nF
Overload protection: 220Vrms
Diode
0V~2.0V
On-Off
<50Ω
Page 35

Appendix B: Accessories
All the following accessories are available by contacting your local HANTEK distributor.
Standard Accessories
• Probe×1 (1.5m), 1:1, (10:1) Passive Probes
• A Power adapter
• A USB Line
• Crocodile clip line *1 (For Hantek2C42/Hantek2C72)
• Crocodile clip line *2 (For Hantek2D42/Hantek2D72)
• A Multimeter Probe
• A PC software CD of the oscilloscope
• Warranty Card
• Manufacturer Certificate
 Loading...