

Page 1
MANUALE UTENTE
USER MANUAL
LCD 32 – 40 TV
Page 2

IT
PRECAUZIONI DI SICUREZZA 1
CONSIGLI D’USO 2
INSTALLAZIONE 3
SUPPORTI – PRIMA ACCENSIONE 3
CONNETTORI D’INGRESSO SEGNALE 3.1
CABLAGGI 3.3
COMANDI 4
TASTIERA LOCALE – SMART CARD 4
TELECOMANDO 4.1
OPERAZIONI DI BASE 5
COLLEGARE UN VCR 5.1
COLLEGARE UN DVD 5.2
SPECIFICHE MODI RGB (PC E DVI) 5.3
STRUTTURA OSD FLAT TV 6
INDICE
IMMAGINE (TV E VIDEO) 6.1
IMMAGINE (PC) 6.2
NATIVO 6.4
AUDIO 6.5
OPZIONI –TIMER – SALVASCHERMO 6.6
RICERCA CANALI 6.7
PIP 6.8
MANUTENZIONE - TRASPORTO 7
CARATTERISTICHE TECNICHE 8
CONNETTORI 8.3
RISOLUZIONE PROBLEMI 9
ACCESSORI 10
DIAGRAMMA COLLEGAMENTI 11
Page 3
IT
PRECAUZIONI PER LA SICUREZZA
Questo monitor è stato progettato e costruito a regola d’arte, nel rispetto delle direttive Europee
89/336/CEE, 73/23/CEE modificato dalla 93/68/CEE per quanto riguarda la sicurezza e la
soppressione dei radiodisturbi . Seguire le istruzioni e le precauzioni per l’uso; un utilizzo improprio o
scorretto dell’apparecchio potrebbe causare rischi d’incendio o pericolo di folgorazione.
PRECAUZIONI DI SICUREZZA
Alimentazione:
L’apparecchio è costruito secondo la norma di sicurezza in Classe 1; deve essere collegato alla rete
d’alimentazione a 115V∼ o 230V∼ e ad un collegamento di terra efficiente, per mezzo del cordone di
rete dato in dotazione o d’altro equivalente omologato, adatto nel paese d’utilizzazione.
Non utilizzare l’apparecchio se non è disponibile una presa di rete conforme alle normative, provvista
di messa a terra.
Evitare di danneggiare il cordone d’alimentazione avendo cura che non venga schiacciato, calpestato,
inciso oppure strappato.
Per separare l’apparecchio dalla rete elettrica distaccare il cordone dalla presa di corrente.
Peso:
Visto il peso dell’apparecchio (Vedi caratteristiche tecniche del modello) per l’installazione e la
movimentazione sono necessarie due persone.
ATTENZIONE:
Si raccomanda di installare l’apparecchio utilizzando esclusivamente gli appositi accessori e
seguendo le istruzioni riportate nei relativi capitoli.
Un’installazione precaria, eseguita senza utilizzare gli accessori di serie, può essere causa di
facile caduta dell’apparecchio, con conseguenti gravi danni allo stesso, pericolo d’incendio e di
salvaguardia dell’incolumità personale.
Ubicazione: l’apparecchio va utilizzato in ambienti interni. Evitare l’esposizione all’umidità, al gelo, alla
pioggia ed agli agenti corrosivi.
Se l’escursione termica fra il luogo di provenienza dell’apparecchio ed il sito d’installazione previsto è
molto alta, assicurarsi di attendere almeno 15 minuti prima di procedere con la prima accensione, per
evitare fenomeni di condensa.
Evitare l’introduzione di liquidi dalle feritoie di areazione.
Consentire un’adeguata ventilazione dell’apparecchio e non ostruire le feritoie d’areazione.
Non posizionare in vicinanza di fonti di calore e mantenere una distanza di almeno 10 cm. da altri
apparecchi elettrici.
In caso di:
- Caduta o ribaltamento
- Immersione in liquidi, penetrazione di liquidi od esposizione ad elevata umidità o condensa;
- Danni dovuti ad urti;
-
Danneggiamento del connettore di rete o del cordone di rete;
-
Forte degrado nelle prestazioni o guasto;
Non accendere l’apparecchio ed inviarlo ad un Centro d’Assistenza autorizzato.
Non aprire l’apparecchio in nessuna occasione; in caso di guasto o per la manutenzione, rivolgersi ai
Servizi Autorizzati, che garantiscono l’impiego di ricambi originali ed il mantenimento del livello di
qualità e sicurezza d’origine. L’apparecchio non contiene parti di ricambio o punti di regolazione interni
manipolabili dall’utilizzatore. La sostituzione di parti contenute nell’apparecchio, cui sono affidate le
caratteristiche di sicurezza dello stesso, con parti di ricambio non originali, può generare pericolo
d’incendio o di folgorazione e può comprometterne le prestazioni.
__________________________________________________________________________________________
LCD 32 – 40 TV
1
Page 4
IT
Compatibilità elettromagnetica (Radio disturbi)
L’apparecchio è stato costruito in conformità alla direttiva Europea 89/336/CEE. La verifica è stata fatta
tramite l’esecuzione dei test indicati nelle seguenti norme:
EN 55020:1994+A11:1996+A112:1999+A13:1999+A14:1999
EN 61000-3-2:1995+A1:1998+A2:1998+A14:2000
EN 61000-3-3:1995
PRECAUZINE DI SICUREZZA
EN 55013:1990+A12:1994+A13:1996+A14:1999
EN 55024:1998
EN 55022:1998+A1:2000
Conformità a regole Nazionali
Monitor provvisto di ricevitore TV assemblato nella CEE nel rispetto delle disposizioni contenute
nell’art. 1 del D.M. 26-03-1992 ed al D.M. 28-08-1995 numero 548.
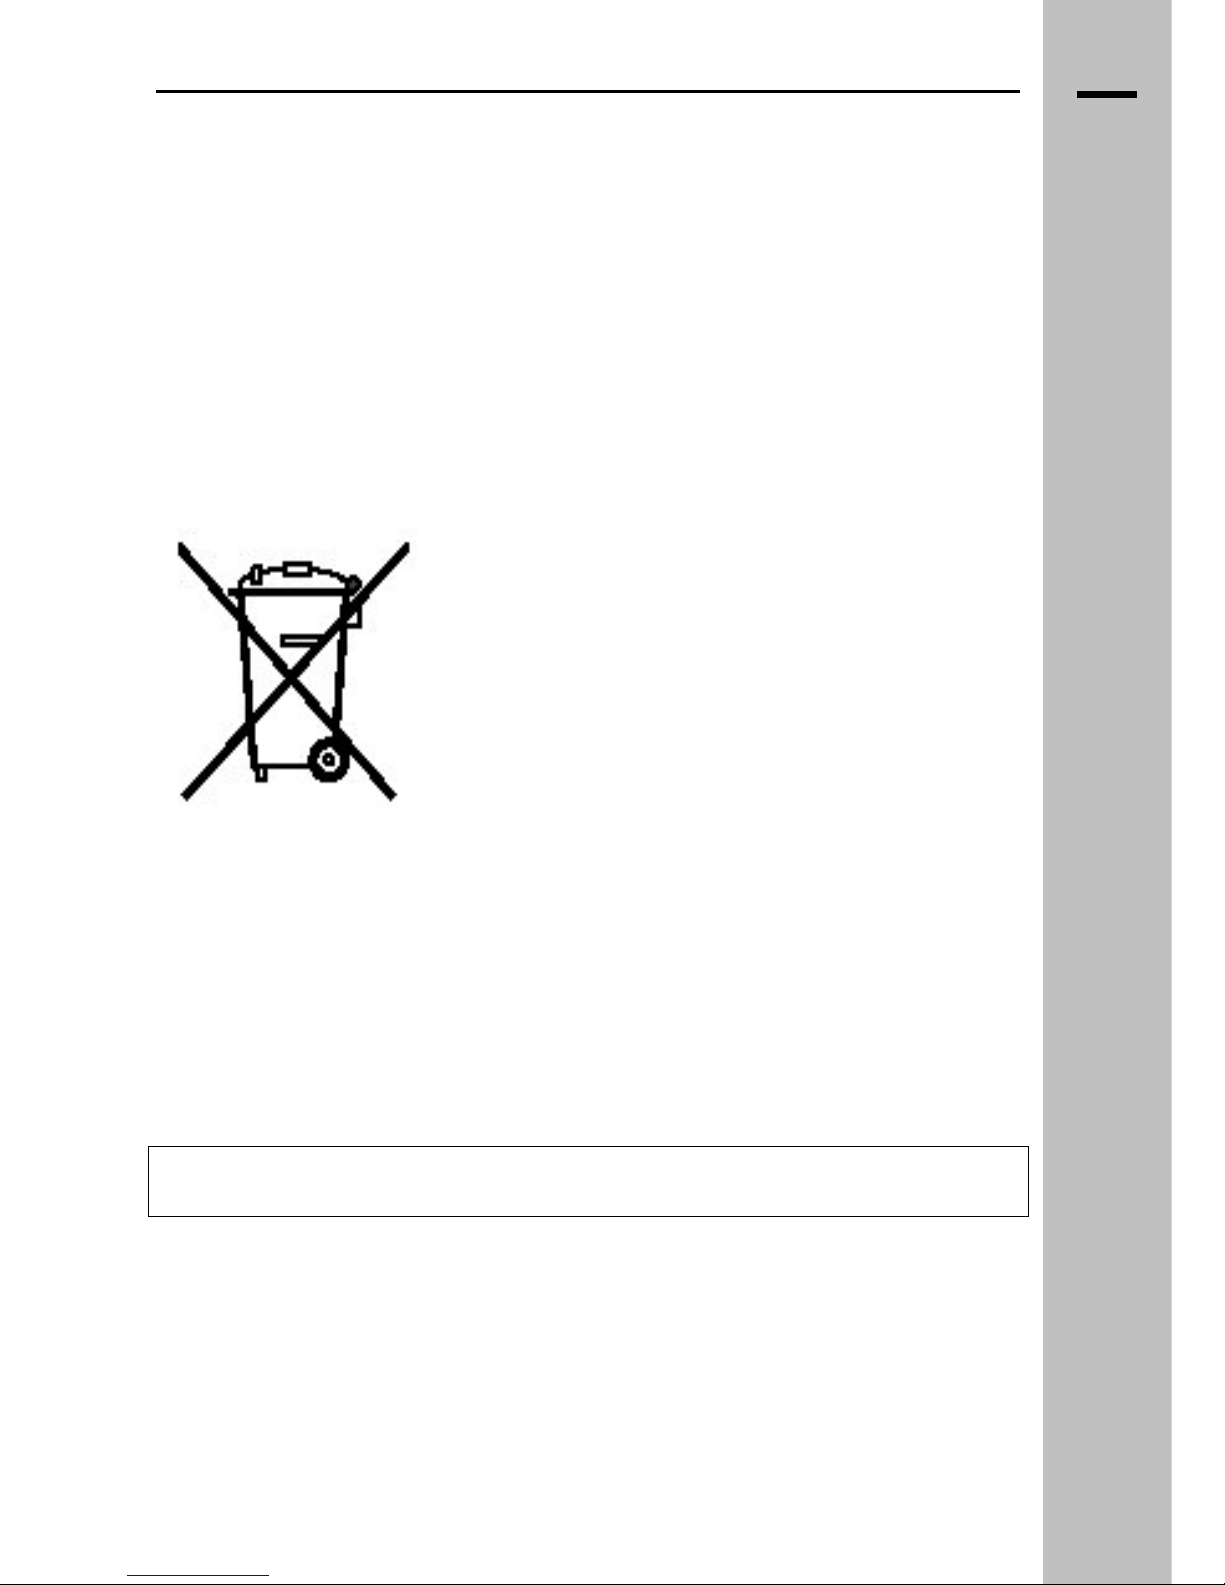
Questo prodotto è conforme alla Direttiva EU 2002/96/EC
Il simbolo del cestino barrato riportato sull’apparecchio indica che il
prodotto, alla fine della propria vita utile, devono essere trattato
separatamente dai rifiuti domestici, deve essere conferito in un centro di
raccolta differenziata per apparecchiature elettriche ed elettroniche oppure
riconsegnato al rivenditore al momento dell’acquisto di una nuova
apparecchiatura equivalente. L’utente è responsabile del conferimento
dell’apparecchio a fine vita alle appropriate strutture di raccolta. L’adeguata
raccolta differenziata per l’avvio successivo dell’apparecchio dimesso al
riciclaggio, al trattamento e allo smaltimento ambientalmente compatibile
contribuisce ad evitare possibili effetti negativi sull’ambiente e sulla salute e
favorisce il riciclo dei materiali di cui è composto il prodotto. Pe
r
informazioni più dettagliate inerenti i sistemi di raccolta disponibili, rivolgersi
al servizio locale di smaltimento rifiuti, o al negozio in cui è stato effettuato
l’acquisto.
Precauzioni per l’ambiente:
Ogni apparecchio è munito di telecomando alimentato a pile. Si raccomanda di non disperdere le pile
esaurite nell’ambiente, ma di smaltirle negli appositi contenitori, secondo le norme vigenti localmente.
Nel caso di caduta dell’apparecchio e di conseguente rottura del pannello foto emittente in esso
contenuto, inviare l’apparecchio nel suo imballo originale ad un Centro d’Assistenza, che provvederà a
smaltire il pannello infranto. Non disperdere gli imballi nell’ambiente, ma conservarli per il trasporto
dell’apparecchio che deve essere assolutamente salvaguardato da cadute e sollecitazioni meccaniche
lungo l’asse frontale.
Portata del fusibile:
Questo monitor è stato progettato per funzionare da 115V∼ a 230V∼ protetto da un fusibile.
Avvertenze generiche:
La luce emessa dal pannello decresce gradualmente nell’uso a lungo termine a causa del normale
degrado delle lampade.
Questa evenienza non è coperta da garanzia.
Altezza:
Il monitor funziona normalmente entro i 2000 metri di altitudine. Oltre tale quota si possono presentare
problemi funzionali.
__________________________________________________________________________________________
LCD 32 – 40 TV
1.1
Page 5
IT
CONSIGLI D’USO:
Per una visione confortevole porsi ad una distanza pari a circa tre volte la larghezza dello schermo:
una visione troppo ravvicinata potrebbe produrre fenomeni d’affaticamento visivo.
CONSIGLI D’USO
AVVERTENZA
Le informazioni e le caratteristiche specificate in questo manuale possono variare senza
preavviso. Il costruttore non si assume nessuna responsabilità per qualsiasi conseguenza
derivante dalla incompletezza delle informazioni qui contenute.
ATTENZIONE
Conservare il certificato di garanzia che riporta il modello dell’apparecchio per poterlo
comunicare al Servizio di Assistenza in caso di guasto dell’apparecchio
__________________________________________________________________________________________
LCD 32 – 40 TV
2
Page 6
IT
INSTALLAZIONE
SUPPORTI
Il monitor è stato progettato per essere fissato, tramite appositi supporti, a muro o in appoggio
(opzionali).
Sono quindi disponibili diversi tipi di supporto secondo le specifiche esigenze:
♦ A muro fisso
♦ In appoggio su tavolo, con basamento
♦ In appoggio su tavolo, con piedini
Le specifiche e le istruzioni di montaggio per i diversi tipi di fissaggi sono fornite con i supporti stessi.
INSTALLAZIONE
Per tutte le operazioni d’installazione e movimentazione del monitor è richiesta la partecipazione di
almeno due persone.
PRIMA ACCENSIONE
1. Collegare il cavo di antenna terrestre.
2. Collegare il cavo telefonico alla porta del modem.
3. Collegare il cordone di rete elettrica.
4. Accendere l’apparecchio, apparirà il menu di scelta della nazione
5. Selezionare con i tasti S / T la nazione in cui si risiede (Italia) e premere OK per confermare.
6. Apparirà il menu di Ricerca dei canali TV analogici.
7. Selezionare INIZIO e premere OK. Il vostro TV inizierà la ricerca automatica delle stazioni
disponibili che verranno automaticamente memorizzate. Questa operazione richiederà qualche
minuto.
8. Una volta completata la sintonia dei canali analogici, verrà chiesto di selezionare la lingua.
9. L’apparecchio successivamente visualizzerà la sorgente TV digitale, per la sintonia automatica
dei canali digitali. Premere OK.
10. Una volta completata la sintonia dei canali digitali, confermare il salvataggio dei dati premendo
OK.
11. Per modificare l’ordine di memorizzazione dei canali riferirsi ai paragrafi 6.7 e 7.4.
ATTENZIONE:
Si raccomanda di installare l’apparecchio utilizzando esclusivamente gli appositi accessori e seguendo
scrupolosamente le istruzioni riportate negli specifici capitoli.
Un’installazione precaria, eseguita senza utilizzare gli accessori di serie, può essere causa di facile
caduta del monitor, con conseguenti gravi danni all’apparecchio stesso, pericolo d’incendio e
salvaguardia dell’incolumità personale.
__________________________________________________________________________________________
LCD 32 – 40 TV
3
Page 7
__________________________________________________________________________________________
.
3.1
CONNETTORI D’INGRESSO LCD 32
IT
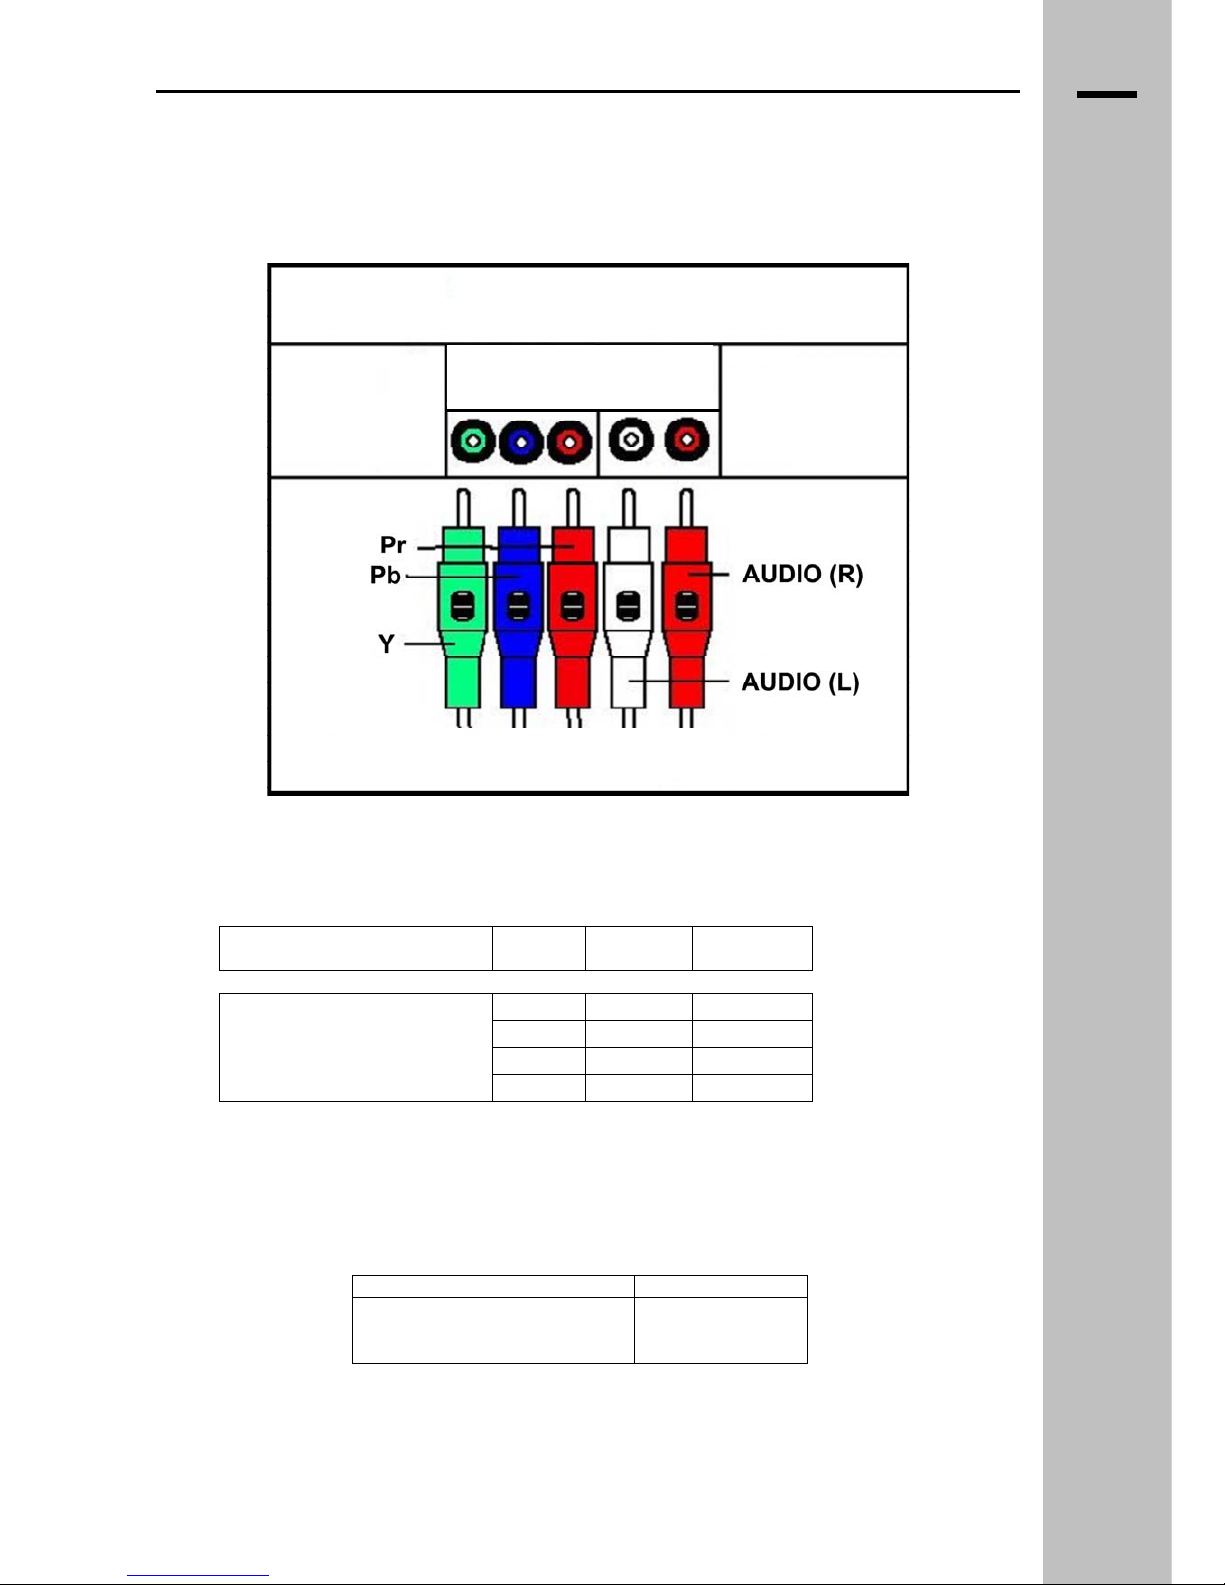
1 – RS232 Consente di controllare tutte le funzioni del monitor tramite connessione serial standard RS232.
2 - PC DVI-D Connettore standard DVI (ingresso RGB-PC Digitale) 3 – PC RGB Connettore standard (ingresso RGB-PC analogico) tipo D-SUB 15 poli. 4 – Component 2 + Audio 3 connettori RCA ingresso Y,Pb,Pr + 2 connettori RCA per ingresso canale destro e sinistro
5 – Component 1 + Audio 3 connettori RCA ingresso Y,Pb,Pr + 2 connettori RCA per ingresso canale destro e sinistro. 6 – Scart1 Connettore audio/video SCART 21 poli (SCART RGB). 7 – Scart2 Connettore audio/video SCART 21 poli. 8 – TV Presa coassiale per collegamento antenna TV terrestre. 9 – Connettore di rete Spina di tipo IEC/CEE222, da collegarsi alla rete tramite il cordone di rete dato in dotazione. 10 – Video + S-video + Audio Connettore RCA + conn. SVHS + 2 connettori RCA per ingresso canale destro e sinistro. 11 – AUDIO per PC DVI/RGB 1 connettore Jack 3.5mm per canale destro e sinistro per ingresso PC DVI-D (2) o PC RGB(3)
12 – Uscita Cuffia 1 connettore Jack 3.5mm per uscita audio canale destro e sinistro.
13 – COMMUTATORE AUDIO Commutatore a slitta per selezione altoparlanti interni/esterni. 14 – ALTOPARLANTI ESTERNI Morsettiera 4 poli. Potenza di uscita 7+7Wrms 8Ohm.
DESCRIZIONE DELLE CONNESSIONI DISPONIBILI
LCD 32 – 40 TV
Page 8
__________________________________________________________________________________________
.
3.2
CONNETTORI D’INGRESSO LCD 40
IT
1 – RS232 Consente di controllare tutte le funzioni del monitor tramite connessione serial standard RS232.
2 - PC DVI-D Connettore standard DVI (ingresso RGB-PC Digitale) 3 – PC RGB Connettore standard (ingresso RGB-PC analogico) tipo D-SUB 15 poli. 4 – Component 2 + Audio 3 connettori RCA ingresso Y,Pb,Pr + 2 connettori RCA per ingresso canale destro e sinistro
5 – Component 1 + Audio 3 connettori RCA ingresso Y,Pb,Pr + 2 connettori RCA per ingresso canale destro e sinistro. 6 – Scart1 Connettore audio/video SCART 21 poli (SCART RGB). 7 – Scart2 Connettore audio/video SCART 21 poli. 8 – TV Presa coassiale per collegamento antenna TV terrestre. 9 – Connettore di rete Spina di tipo IEC/CEE222, da collegarsi alla rete tramite il cordone di rete dato in dotazione. 10 – Video + S-video + Audio Connettore RCA + conn. SVHS + 2 connettori RCA per ingresso canale destro e sinistro. 11 – AUDIO per PC DVI/RGB 1 connettore Jack 3.5mm per canale destro e sinistro per ingresso PC DVI-D (2) o PC RGB(3)
12 – Uscita Cuffia 1 connettore Jack 3.5mm per uscita audio canale destro e sinistro.
13 – COMMUTATORE AUDIO Commutatore a slitta per selezione altoparlanti interni/esterni. 14 – ALTOPARLANTI ESTERNI Morsettiera 4 poli. Potenza di uscita 7+7Wrms 8Ohm.
DESCRIZIONE DELLE CONNESSIONI DISPONIBILI
12
11
10
9
14
13
8
7
6
5
4
3
2
1
LCD 32 – 40 TV
Page 9

IT
Collegamento cablaggi
Dopo aver posizionato l’apparecchio, procedere ai collegamenti dei vari segnali d’ingresso :
ANTENNA TV: Connettore per cavo antenna terrestre (12).
PC DVI: Connettore per segnali DVI-D all’ingresso (3), AUDIO all’ingresso (2).
PC RGB: Connettore PC VGA all’ingresso (4), AUDIO PC all’ingresso (2)
Component: Connettori RCA (Y,Pb,Pr) (6), AUDIO all’ingresso (7).
S-VIDEO: Connettore S-Video all’ingresso (1), AUDIO all’ingresso (7).
Scart 1: Connettore SCART all’ingresso (6).
SCHEMA COLLEGAMENTI
Scart 2: Connettore SCART all’ingresso (7).
AV: Connettore RCA all’ingresso (5), AUDIO all’ingresso (7).
Presa di rete: Connettore per cavo rete (13).
Line out: Connettori RCA all’uscita AUDIO (8).
SPDIF: Connettore per fibra ottica a impianto Home Theatre all’ingresso (9).
Accendere il monitor utilizzando l’interruttore principale situato nella parte posteriore dell’apparecchio, il
monitor si porterà in modalità STAND-BY (LED rosso). Premere tasto STD-BY della tastiera locale o
del telecomando per accendere il televisore (il LED diventa verde).
In mancanza di un segnale valido in ingresso compare a video l’indicazione di segnale mancante.
Se l’ultima sorgente selezionata è stata quella relativa al Digitale Terrestre (DTV), attendere per
qualche secondo il caricamento del modulo MHP.
Controllo da telecomando
Il telecomando, fornito in dotazione, consente di accedere a tutte le funzioni del televisore.
Una volta entrati nel menù OSD, se non vengono effettuati ingressi di tastiera entro un certo tempo il
menù stesso si disabilita automaticamente.
* La SCART 1 è dotata di uscita video connessa sempre alla sorgente TV.
** La SCART 2 è dotata di uscita video connessa all’ingresso attivo
__________________________________________________________________________________________
LCD 32 – 40 TV
3.3
Page 10
4
4
IT
TASTIERA LOCALE
COMANDI
TASTIERA LOCALE
__________________________________________________________________________________________
FUNZIONE DEI TASTI
Interruttore generale :
Interruttore generale. Spegne o accende il monitor.
M o
:
Con l’apparecchio in St-By accensione.
Con apparecchio acceso: cambia l’ingresso ciclicamente tra quelli disponibili.
+ / - :
Aumenta o diminuisce il volume dell’audio (visualizzando una barra di controllo volume sullo schermo).
/ :
Utilizzati per cambiare canale (in su o in giù)
LCD 32 – 40 TV
Page 11
IT
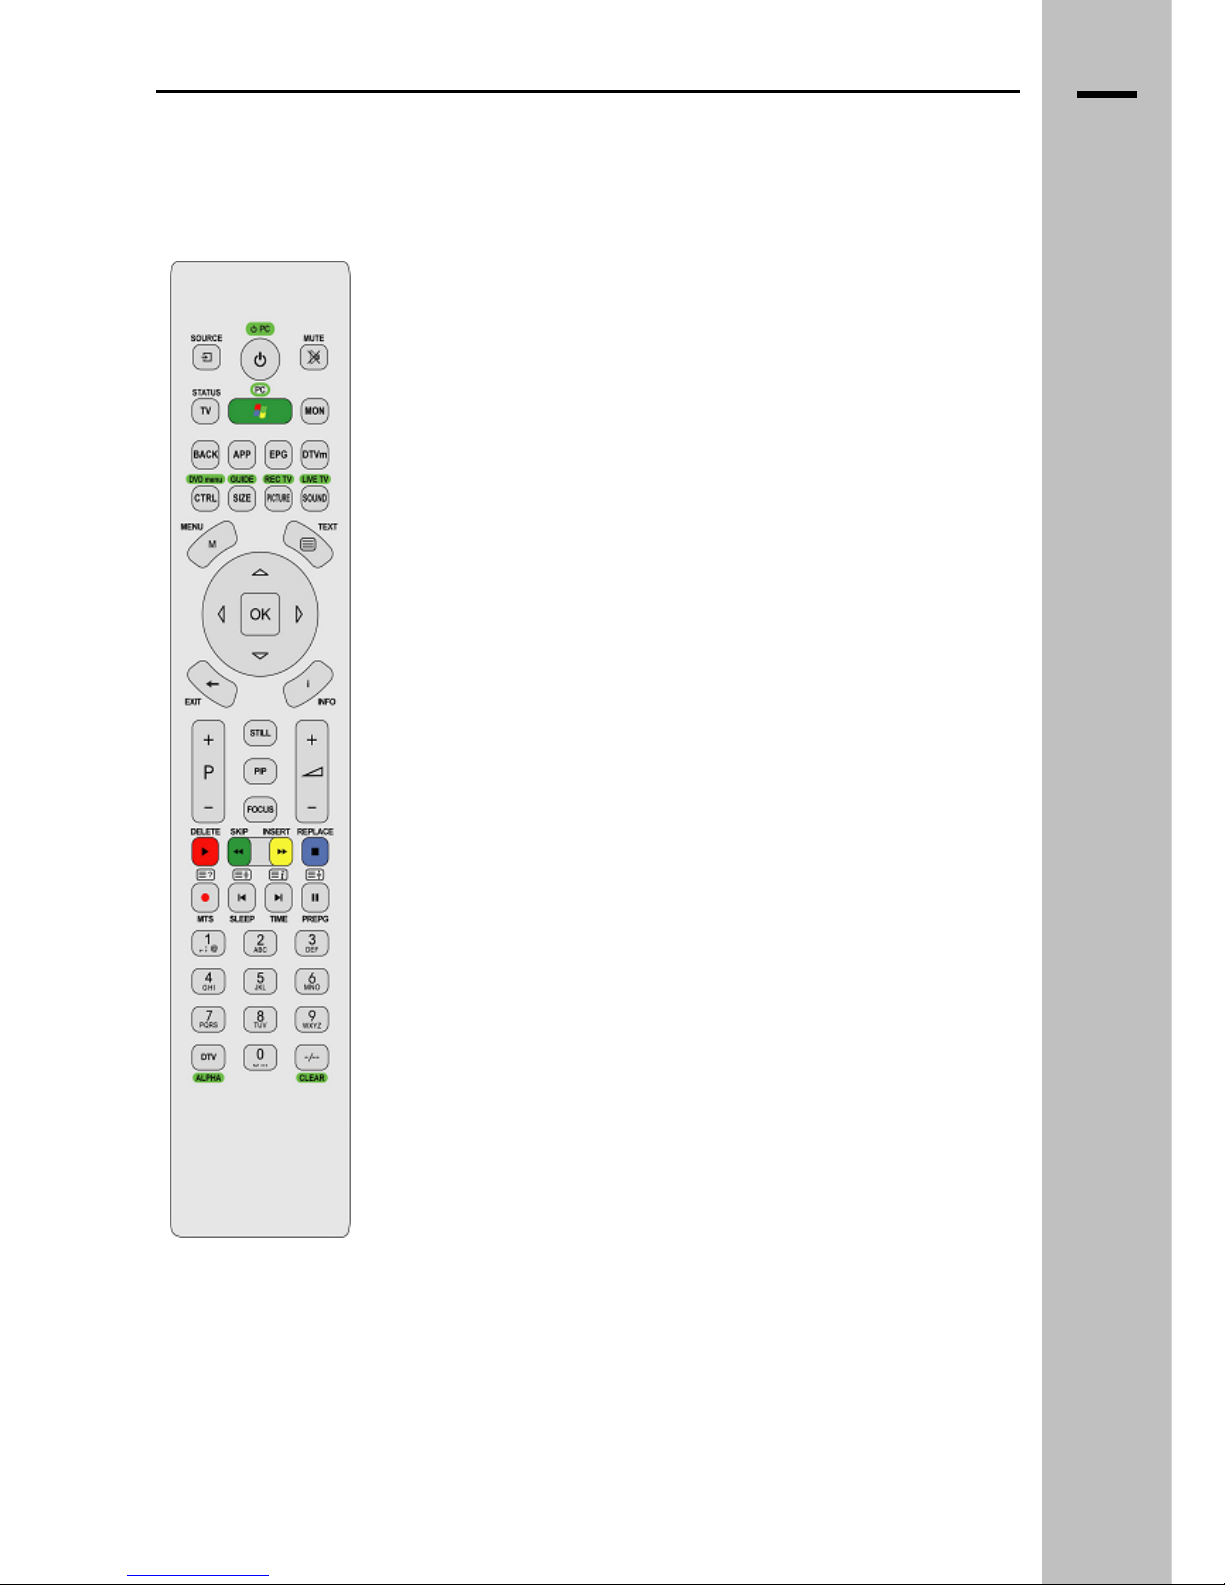
TELECOMANDO
Il telecomando unico permette di controllare tutte le funzioni del Flat TV con integrato il modulo Digitale
Terrestre. Le funzionalità di alcuni tasti possono variare a seconda della sorgente video attiva.
POWER Accensione / spegnimento TV
SOURCE Menù selezione ingressi
MUTE Azzera il volume audio
TV / STATUS Informazione sulla sorgente visualizzata
PC / GREEN BUTTON Non attivo
MON Non attivo
BACK Programma / schermata precedente
APP DTV: Carica l’applicazione MHP
Altre sorgenti: non attivo
EPG DTV: Guida Elettronica alla
Programmazione
Altre sorgenti: non attivo
DTVm
DTV: Accesso al menù del modulo
Digitale Terrestre MHP
Altre sorgenti: non attivo
CTRL / DVD menu Regolazioni video
SIZE / GUIDE Formato immagine
PICTURE / REC TV Impostazione tipo di immagine
SOUND / LIVE TV Modalità sonora
MENU Accesso al menù principale
TEXT Teletext (ON/MIX/OFF)
EXIT Uscita da menù o da sottomenù
INFO Informazione sulla sorgente
▲, ▼, ►, ◄ Tasti direzione
OK Tasto di conferma
STILL Fermo immagine
PIP Seleziona modalità di PIP (Picture in
Picture)
FOCUS Modo PIP: seleziona focus e audio
principale o secondario
P + Seleziona programma successivo
P - Seleziona programma precedente
VOL + Aumenta il volume
VOL - Diminuisce il volume
RED / DELETE / PLAY Teletext/MHP RED
GREEN / SKIP / REW Teletext/MHP GREEN
YELLOW / INSERT / FWD Teletext/MHP YELLOW
BLUE / REPLACE / STOP Teletext/MHP BLUE
TXT ? / MTS / REC Teletext info / Selezione canale audio
TXT stop / SLEEP / REPLAY Teletext stop / Selezione tempo
autospegnimento
TXT i / TIME / SKIP Teletext index / Visualizza orario attuale
TXT zoom / PREPG / PAUSE Teletext zoom / Ultimo canale
selezionato
0..9 Tastiera numerica
DTV / ALPHA DTV: visualizza Lista Canali digitali
Altre sorgenti: seleziona sorgente DTV
-/-- / CLEAR TV: Abilita selezione canali a due cifre
DTV: visualizza finestra Opzioni canale
Altre sorgenti: non attivo
TELECOMANDO
__________________________________________________________________________________________
LCD 32 – 40 TV
4.1
Page 12

__________________________________________________________________________________________
OPERAZIONE DI BASE
ITIT
5
5
OPERAZIONE DI BASE
OPERAZIONE BASE
Accensione e spegnimento monitor TV
Una volta inserito il cordone della corrente elettrica, il TV si troverà in una condizione di ACCESO (led
verde) o di STAND-BY (led rosso) a seconda dell’ultimo stato prima dello spegnimento (funzione di
memoria di stato). Se il dispositivo si trova in stato di STAND-BY sarà necessario premere il tasto
”Power” del telecomando o i tasti “SOURCE” o “STD-BY” della tastiera locale per visualizzare
l’immagine.
Led frontale:
ROSSO STAND-BY
VERDE FISSO ACCESO
Selezione programmi TV
1. Assicurarsi che l’apparecchio sia in funzione TV (tasto SOURCE da telecomando o da tastiera
locale)
2. Usare i tasti (P+) o (P-) del telecomando oppure (▲) o (▼) della tastiera locale o un tasto
numerico per selezionare un programma televisivo.
Volume audio
Usare i tasti (VOL+) o (VOL-) del telecomando oppure (◄) o (►) della tastiera locale per regolare il
volume audio come desiderato.
Premere il tasto “MUTE” del telecomando per togliere completamente o ridare l’audio.
Ricerca o impostazione nuovi canali TV analogici
Selezionare la sorgente TV e premere “MENU” da telecomando per entrare nel menu OSD.
Selezionare con tasti (▲) o (▼) la funzione “CANALE”, premere “OK” per entrare nel relativo sotto
menu. Selezionare con i tasti (▲) o (▼) “Ricerca automatica” o “Ricerca manuale” (riferimento al
paragrafo 6.7), premendo “OK” per entrare nei relativi sottomenu.
Una volta terminata la ricerca l’associazione del programma al canale può essere modificata (in base
alle proprie esigenze) selezionando dal menu “CANALE” la funzione “Modifica” e spostando o
rinominando i vari canali disponibili. Riferirsi per i tutti i dettagli operativi a quanto riportato al paragrafo
6.7.
Selezione di una differente sorgente video
Premere “SOURCE” da telecomando o dalla tastiera locale per visualizzare il menù ingressi. Utilizzare
i tasti (▲) / (▼) per selezionare la sorgente selezionata e “OK” per confermare.
NOTE: Se l’ingresso selezionato non è attivo dopo alcuni secondi , apparirà la scritta “Non connesso”
o “Segnale assente” sullo schermo. Se l’ingresso desiderato non è selezionabile nel menù ingressi,
assicurarsi che il relativo cavo sia collegato correttamente.
LCD 32 – 40 TV
Page 13

IT
5.1
COLLEGARE UN VCR
Collegamento di un’ apparato esterno VCR (Videoregistratore)
Per collegare il display ad un’apparecchiatura esterna utilizzando l’ingresso Scart1 o Scart2, collegare
il cavo Scart alla corrispondente porta di connessione sul Display .
Per evitare possibili interferenze mantenere un’adeguata distanza tra il VCR ed l’apparecchio.
Evitare la permanenza di immagini fisse per un lungo periodo di tempo. Ad esempio, un’immagine
bloccata, un’immagine in formato 4:3 o un logo sempre presente nella stessa posizione
__________________________________________________________________________________________
LCD 32 – 40 TV
Page 14
IT
Collegamento di un DVD
Collegare l’uscita video DVD all’ingresso COMPONENT (Y,Pb, Pr) e l’ingresso AUDIO al monitor
come sotto illustrato.
COLLEGARE UN DVD
Connettori d’ingresso COMPONENT
Si può ottenere una miglior qualità d’immagine utilizzando il segnale COMPONENT quando
disponibile:
Ingressi Video Component del
monitor
Y Pb Pr
Y Pb Pr
Y B-Y R-Y
Y Cb Cr
Uscite Video Component dal
DVD player
Y PB PR
NOTA :
L’ingresso component del vostro TV accettano indifferentemente sia segnali interlacciati che
progressivi.
Sorgente DVD Ingresso TV
480i/480p/576i/576p/720p/1080i
RCA DVD
(tipo RCA,YPbPr)
__________________________________________________________________________________________
LCD 32 – 40 TV
5.2
Page 15

IT
Specifiche dei modi RGB/DVI
Modo Risoluzione Frequenza Orizzontale (KHz) Frequenza Verticale(Hz)
DMT 0660 640 X 480 31 60
DMT 0672 640 X 480 38 72
DMT 0675 640 X 480 38 75
DMT 0860 800 X 600 38 60
DMT 0872 800 X 600 48 72
DMT 0875 800 X 600 47 75
DMT 1060 1024 X 768 48 60
DMT 1070 1024 X 768 56 70
DMT 1075 1024 X 768 60 75
DMT 1260G 1280 X 1024 63 60
GTF 1368x768 1368 X 768* 48 60
MODI RGB
NOTE:
• Ingresso : Sincronismo separato
• L’apparecchio potrebbe funzionare anche con modalità non standard, ma in tal caso non è
garantita la corretta visualizzazione.
• L’uso di una frequenza verticale troppo elevata potrebbe non garantire alcuna visualizzazione.
__________________________________________________________________________________________
LCD 32 – 40 TV
5.3
Page 16
IT
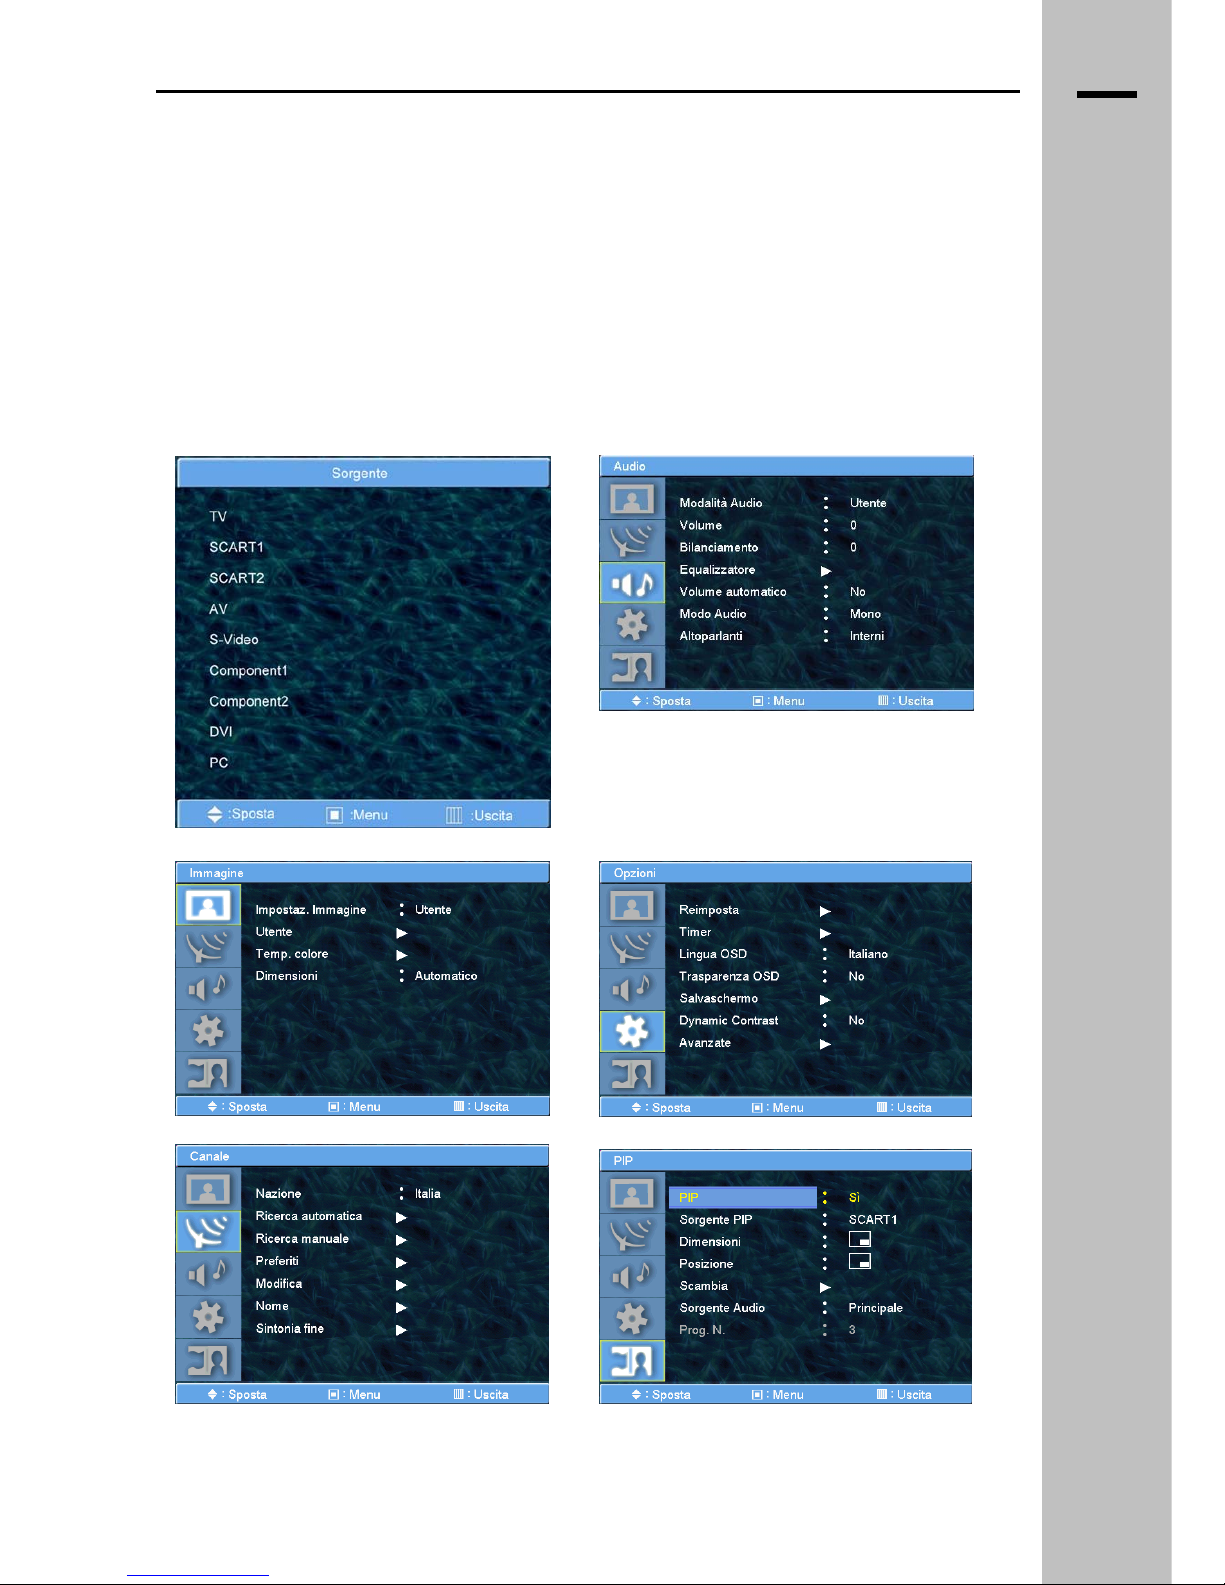
STRUTTURA OSD FLAT TV
L’OSD (On Screen Display) del Flat TV permette all’utente di controllare o regolare le varie funzionalità
dell’apparecchio televisivo impostandole in accordo alle proprie specifiche esigenze. Al contrario
dell’OSD relativo al modulo digitale terrestre, questo OSD principale e’ sempre attivo
indipendentemente dalla sorgente selezionata.
• Premere il pulsante “MENU” del telecomando per accedere all’OSD.
• Utilizzare i tasti (▲) o (▼) per passare da un menù all’altro.
STRUTTURA OSD FLAT TV
• Premere “OK” per entrare nel menù selezionato.
• Utilizzare i tasti (▲) o (▼) per selezionare la voce interessata.
• Utilizzare i tasti (►) o (◄) per variane i parametri o per entrare nei sottomenu.
• Tasto “EXIT” per uscire dal sotto menu o dal menu principale.
__________________________________________________________________________________________
LCD 32 – 40 TV
6
Page 17
IT
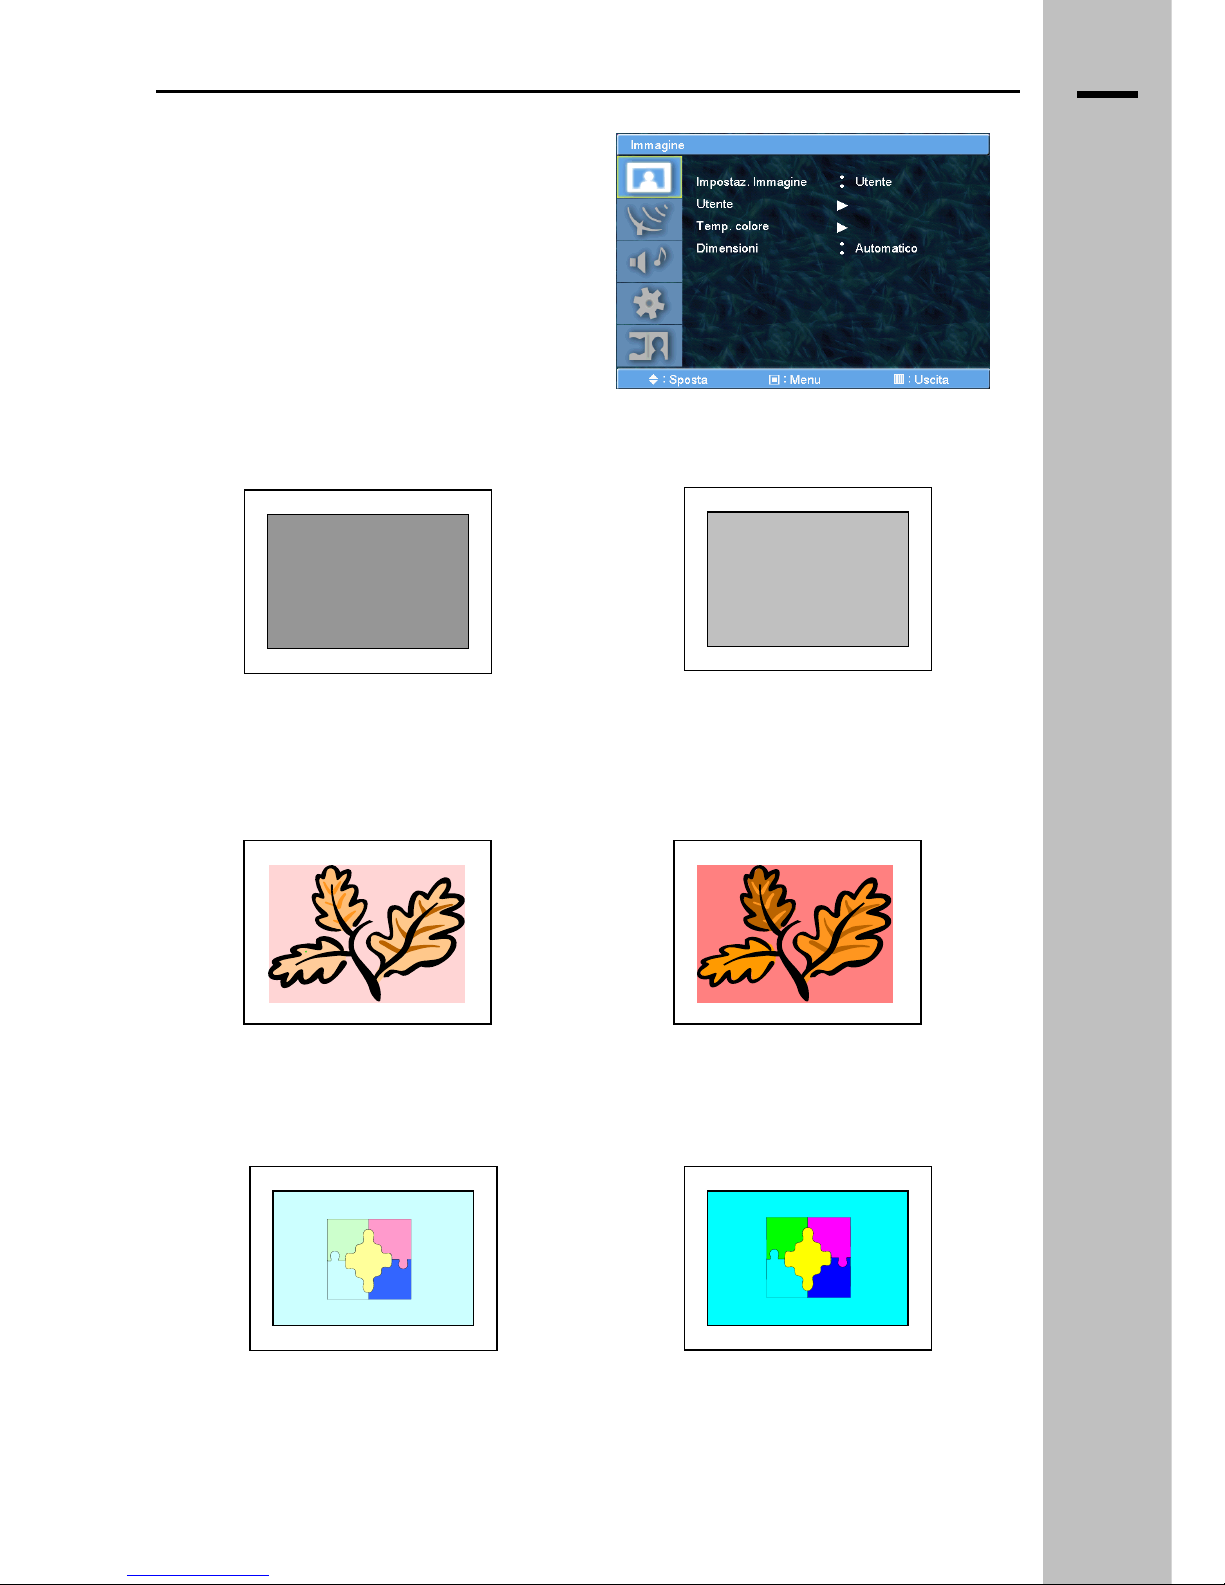
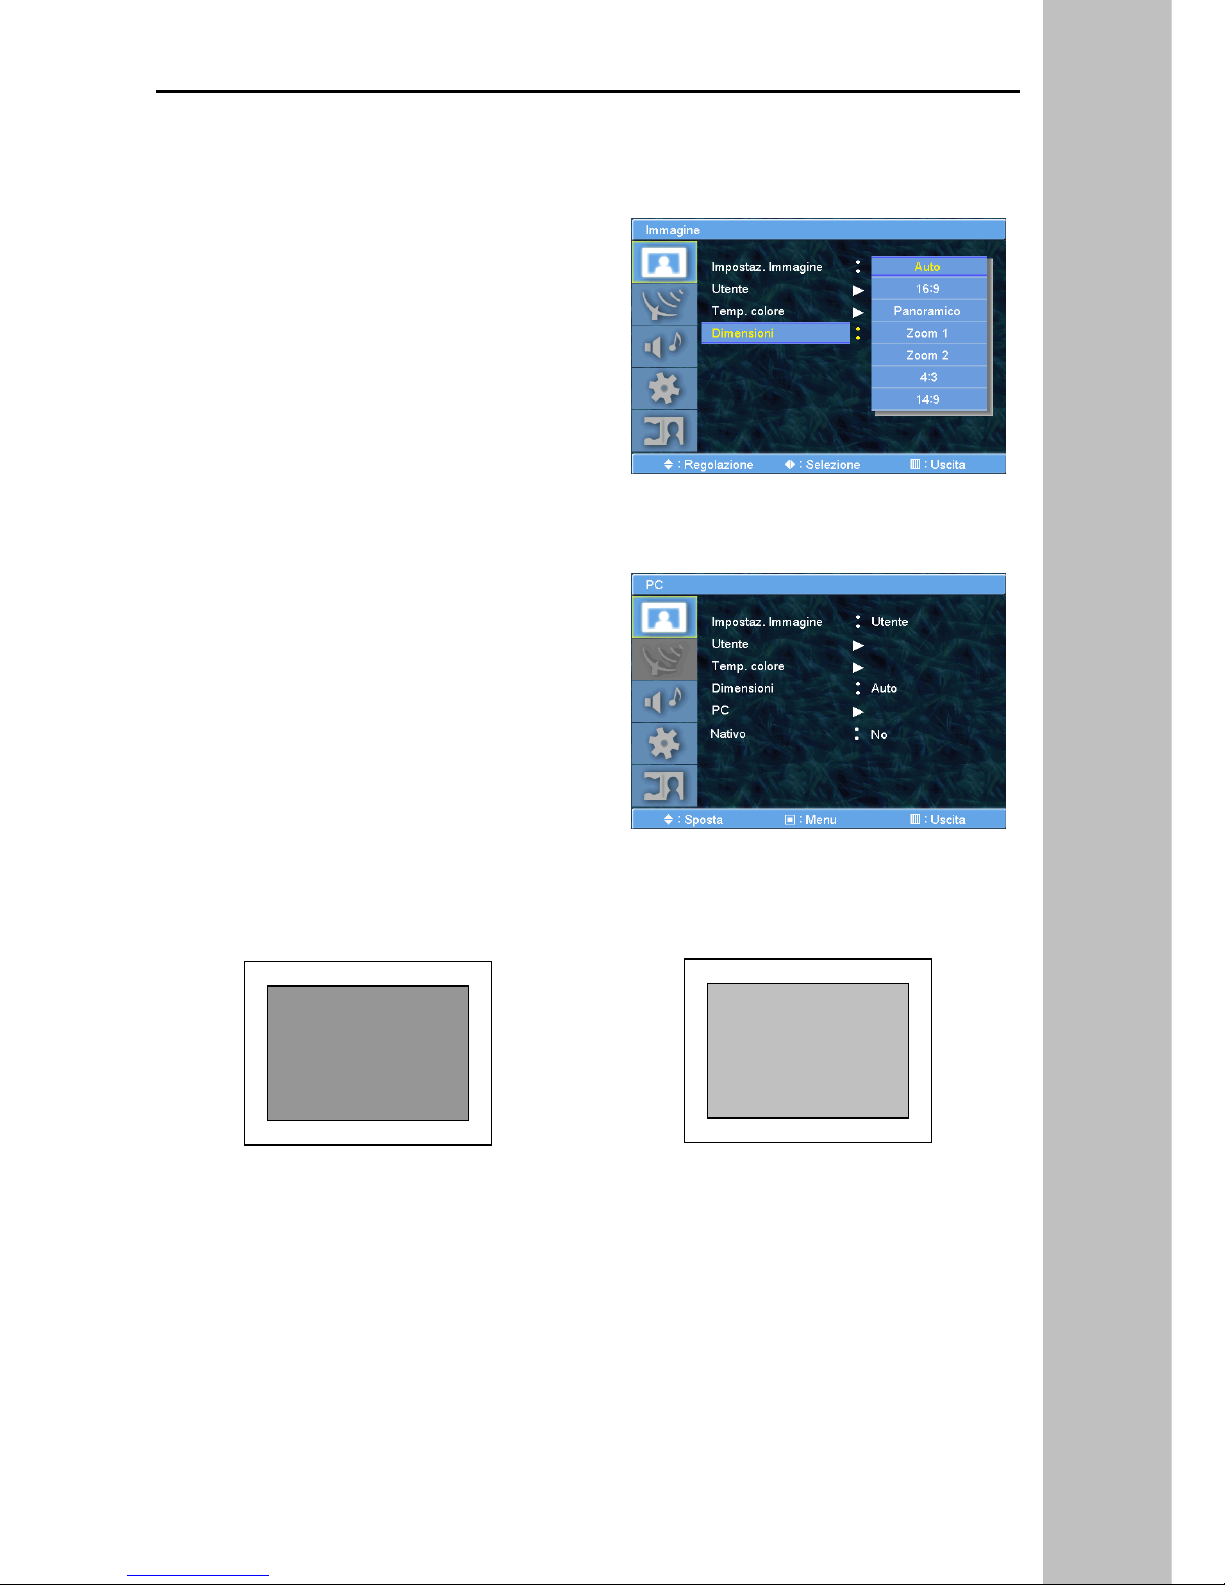
IMMAGINE (TV e VIDEO)
Regolazioni:
Impostaz. Immagine (Utente, Dinamica, Normale,
Film, Morbida), Temperatura colore, Dimensioni.
Regolazioni modo Utente: Luminosità, Contrasto,
Colore, Tinta, Nitidezza.
STRUTTURA OSD FLAT TV
LUMINOSITA’ (Utente)
Controlla la luminosità dell’immagine.
Scuro ◄ Chiaro ►
CONTRASTO (Utente)
Controlla il contrasto dell’immagine.
Diminuisce ◄ Aumenta ►
COLORE (Utente)
Controlla il livello di saturazione dell’immagine.
Diminuisce ◄ Aumenta ►
__________________________________________________________________________________________
LCD 32 – 40 TV
6.1
Page 18
IT
NITIDEZZA
(Utente)
Controlla la nitidezza dell’immagine.
TEMPERATURA
Controlla la temperatura colore dell’immagine fra
Caldo 1, Caldo 2, Freddo 1, Freddo 2, Normale o
Utente.
DIMENSIONI
STRUTTURA OSD FLAT TV
Scelta fra 7 differenti formati: Auto, 16:9, Panoramico,
Zoom1, Zoom2, 4:3, 14:9.
E’ possibile selezionare i differenti formati anche
premendo il tasto SIZE del telecomando.
IMMAGINE (PC)
Regolazioni base: Impostaz. Immagine (Utente, Alto,
Medio, Basso).
Modo Utente, Temp. colore (Utente, Freddo 1-2,
Normale, Caldo 1-2), Dimensioni (4/3, 16/9, Nativo),
PC.
PC: Auto regolazione, Fase, Posiz.orizzontale,
Posizione verticale, Frequenza.
LUMINOSITA’ (Utente)
Controlla la luminosità dell’immagine.
Scuro ◄ Chiaro ►
__________________________________________________________________________________________
LCD 32 – 40 TV
6.5
Page 19
IT
CONTRASTO (Utente)
Controlla il contrasto dell’immagine.
Diminuisce ◄ Aumenta ►
STRUTTURA OSD FLAT TV
TEMPERATURA
Controlla la temperatura colore dell’immagine fra Utente, Freddo 1-2, Normale, Caldo 1-2. Nel modo
Utente è possibile modificare in base ai propri gusti la temperatura colore del bianco agendo sulle
regolazioni del Verde, del Rosso e del Blu (si consiglia di agire su questa regolazione solo agli utenti
esperti).
PC (Geometria)
Premere “MENU” per accedere alle regolazioni della geometria come segue.
AUTO REGOLAZIONE(PC)
Regola automaticamente la centratura dell’immagine eliminando eventuali “tremolii” dell’immagine
stessa.
FASE(PC)
Regolazione fine dei dettagli visualizzati sullo schermo. Disponibile solo quando si è in modo PC.
__________________________________________________________________________________________
Errato Corretto
POSIZ. ORIZZONTALE (PC)
Sposta orizzontalmente l’immagine visualizzata. Dopo aver selezionato il menù, spostare l’immagine
con i tasti (◄) o (►).
◄ ►
LCD 32 – 40 TV
6.3
Page 20
IT
POSIZ. VERTICALE (PC)
Sposta orizzontalmente l’immagine visualizzata. Dopo aver selezionato il menù, spostare l’immagine
con i tasti (◄) o (►).
◄ ►
STRUTTURA OSD FLAT TV
FREQUENZA (PC)
Regolazione fine dei dettagli visualizzati sullo schermo. Disponibile solo quando si è in modo PC (solo
per utenti esperti).
__________________________________________________________________________________________
Errato Corretto
DIMENSIONI
Scelta tra 3 formati:
4:3: Per formati PC 4/3 (es.:800x600,1024x768 etc..)
16:9: Per formati 16/9 o wide (es.:848x480,1280x720 etc..)
Nativo: Per risoluzione native (1366x768 per LCD32/40)
NATIVO
Ingresso PC (DSUB15 RGB analogico)
Avviare il PC con il monitor collegato con il cavo analogico (PC-RGB)
Dal Pannello di Controllo di Windows selezionare:
Proprietà Schermo
Impostazioni
Impostare la risoluzione dello schermo su quella NATIVA del pannello (vedi pg. 5.3)
Utilizzando il tasto SOURCE del telecomando selezionare l’ingresso “PC”
Attivare il MENU principale del monitor con il tasto MENU
1. Selezionare: NATIVO = ON
2. Selezionare: SIZE = NATIVO
3. Selezionare: PC
4. attivare AUTOAGGIUSTAMENTO usando il tasto freccia-destra.
Il modo VGA verrà ora acquisito e visualizzato al meglio.
NOTA: utilizzare la procedura appena descritta OGNI VOLTA che la modalità nativa viene
cambiata (ON o OFF) per la migliore visualizzazione.
LCD 32 – 40 TV
6.4
Page 21
IT
La voce NATIVO deve essere attivata quando si utilizza l’ingresso analogico PC-RGB per consentire al
monitor di distinguere tra il ‘reale’ modo VGA nativo ed altri modi VGA simili.
Ingresso DVI
Avviare il PC con il monitor collegato con il cavo Digitale (cavo tipo DVI-D)
Dal Pannello di Controllo di Windows selezionare:
Proprietà Schermo
Impostazioni
Impostare la risoluzione dello schermo su quella NATIVA del pannello (vedi pg. 5.3)
Utilizzando il tasto SOURCE del telecomando selezionare l’ingresso “PC”
STRUTTURA OSD FLAT TV
Attivare il MENU principale del monitor con il tasto MENU
1. Selezionare: SIZE = NATIVO
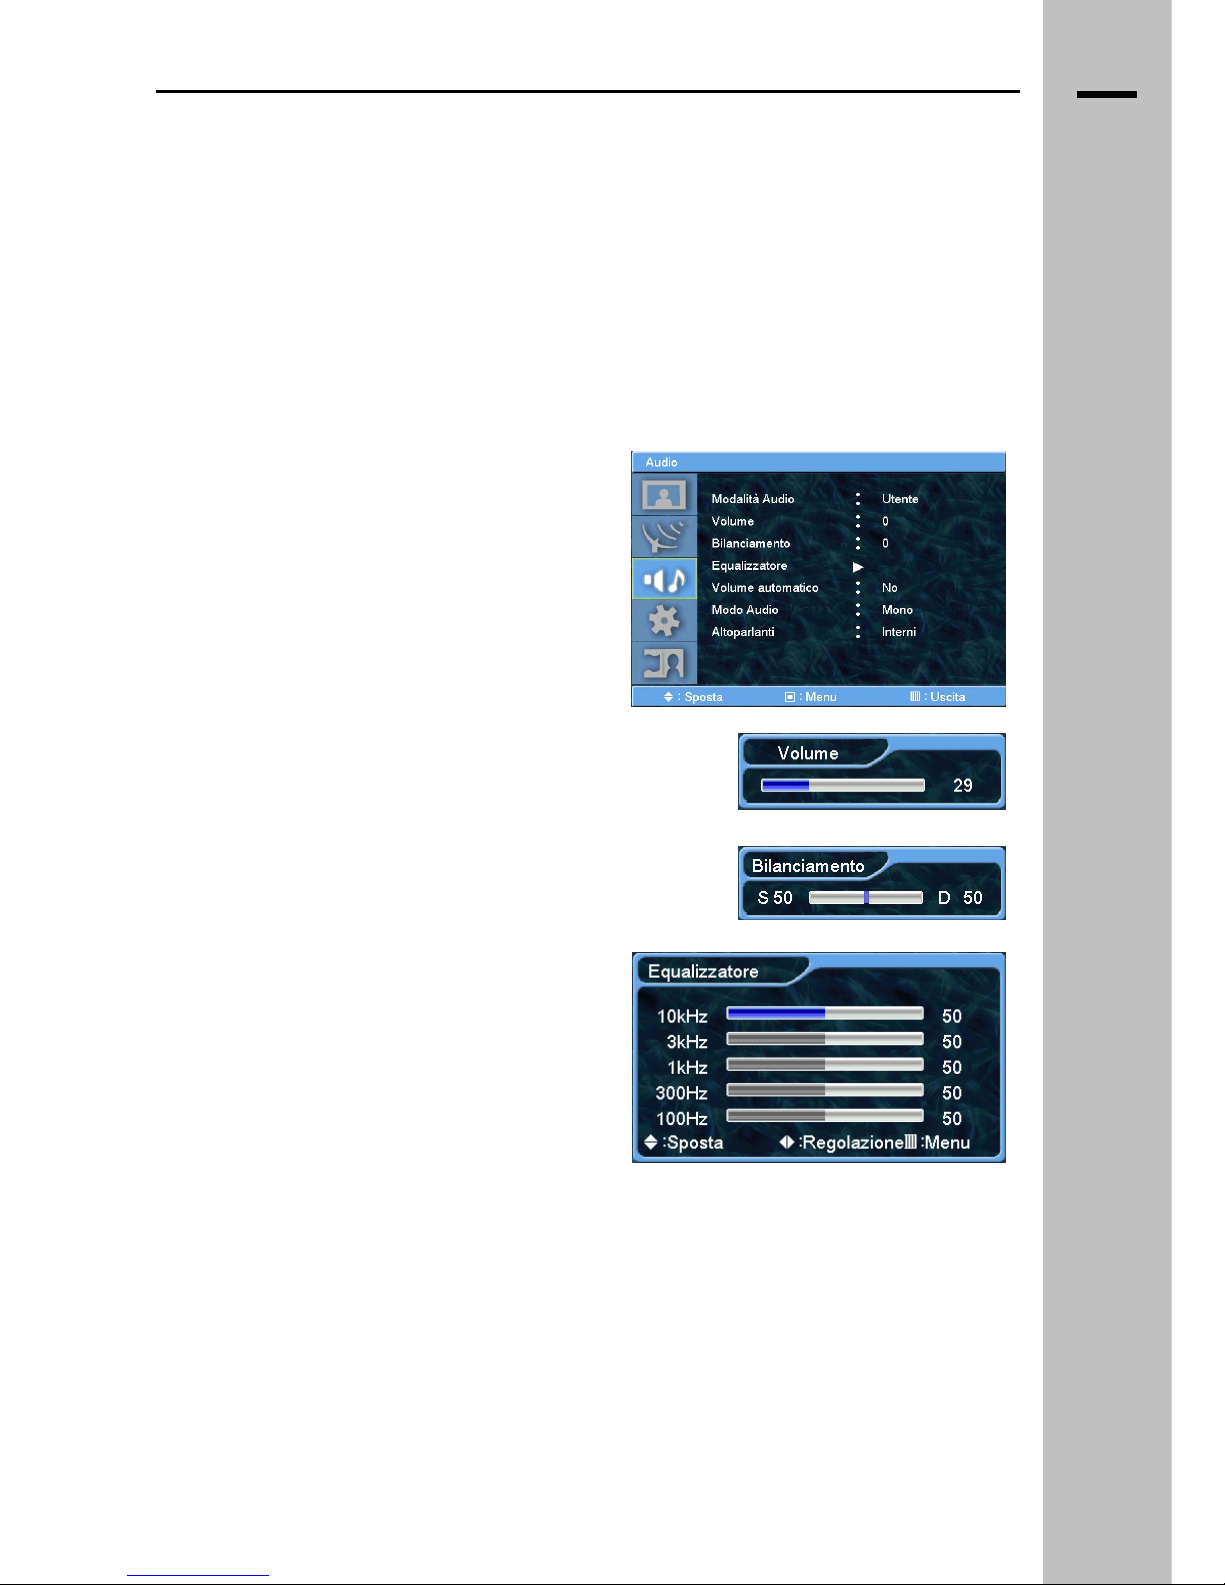
AUDIO
Regolazione modalità (Utente, Normale, Musica, Film,
Dialoghi), Volume, Bilanciamento, Equalizzatore,
Volume automatico, Modo Audio (Stereo, Dual1,
Dual2).
Modalità audio
Scelte disponibili, utilizzando (▲) o (▼): Utente,
Normale, Musica, Film, Dialoghi.
Volume
Controllo del volume del suono. Regolazione da 0 a 100.
Bilanciamento
Controllo del bilanciamento del canale destro e sinistro.
Equalizzatore
NOTA: Disponibile solo in modalità sonora Utente,
regola il guadagno delle varie frequenze audio.
Volume automatico
Controllo automatico del volume, scelta disponibile tra Spento ed acceso. Elimina i picchi di volume
dovuti a brusche variazioni del segnale audio di ingresso.
Modo audio
Selezione dei canali audio disponibili:
Stereo: forza la modalità stereo
Dual 1: Lingua 1
Dual 2: Lingua 2
__________________________________________________________________________________________
LCD 32 – 40 TV
6.5
Page 22

IT
OPZIONI
Reimposta, Timer, LinguaOSD, Trasparenza OSD,
Salvaschermo, Dynamic Contrast, Avanzate.
Reimposta
Ripristina le impostazioni iniziali di fabbrica di tutti i
parametri.
ATTENZIONE! Verranno cancellati tutte le
memorizzazioni dei canali TV e sarà necessario
riacquisirli tutti.
STRUTTURA OSD FLAT TV
Timer
Permette di selezionare l’ora di accensione o di
spegnimento automatico del vostro Flat-TV.
E’ possibile inoltre selezionare il programma sul quale
il TV si accenderà e il volume desiderato. E’ attivo solo
se l’orologio è stato impostato.
Lingua OSD
Seleziona la lingua utilizzata dal menù OSD tra
Italiano, Inglese, Spagnolo, Francese, Tedesco,
Portoghese, Olandese, Arabo.
Trasparenza OSD
Seleziona lo sfondo del menù OSD. Si può selezionare tra “Si” o “No”.
“No” imposta lo sfondo OSD come colore solido. “Si” setta invece lo sfondo OSD come traslucido, in
pratica si cambia la trasparenza del colore di sfondo della finestra OSD
Salvaschermo
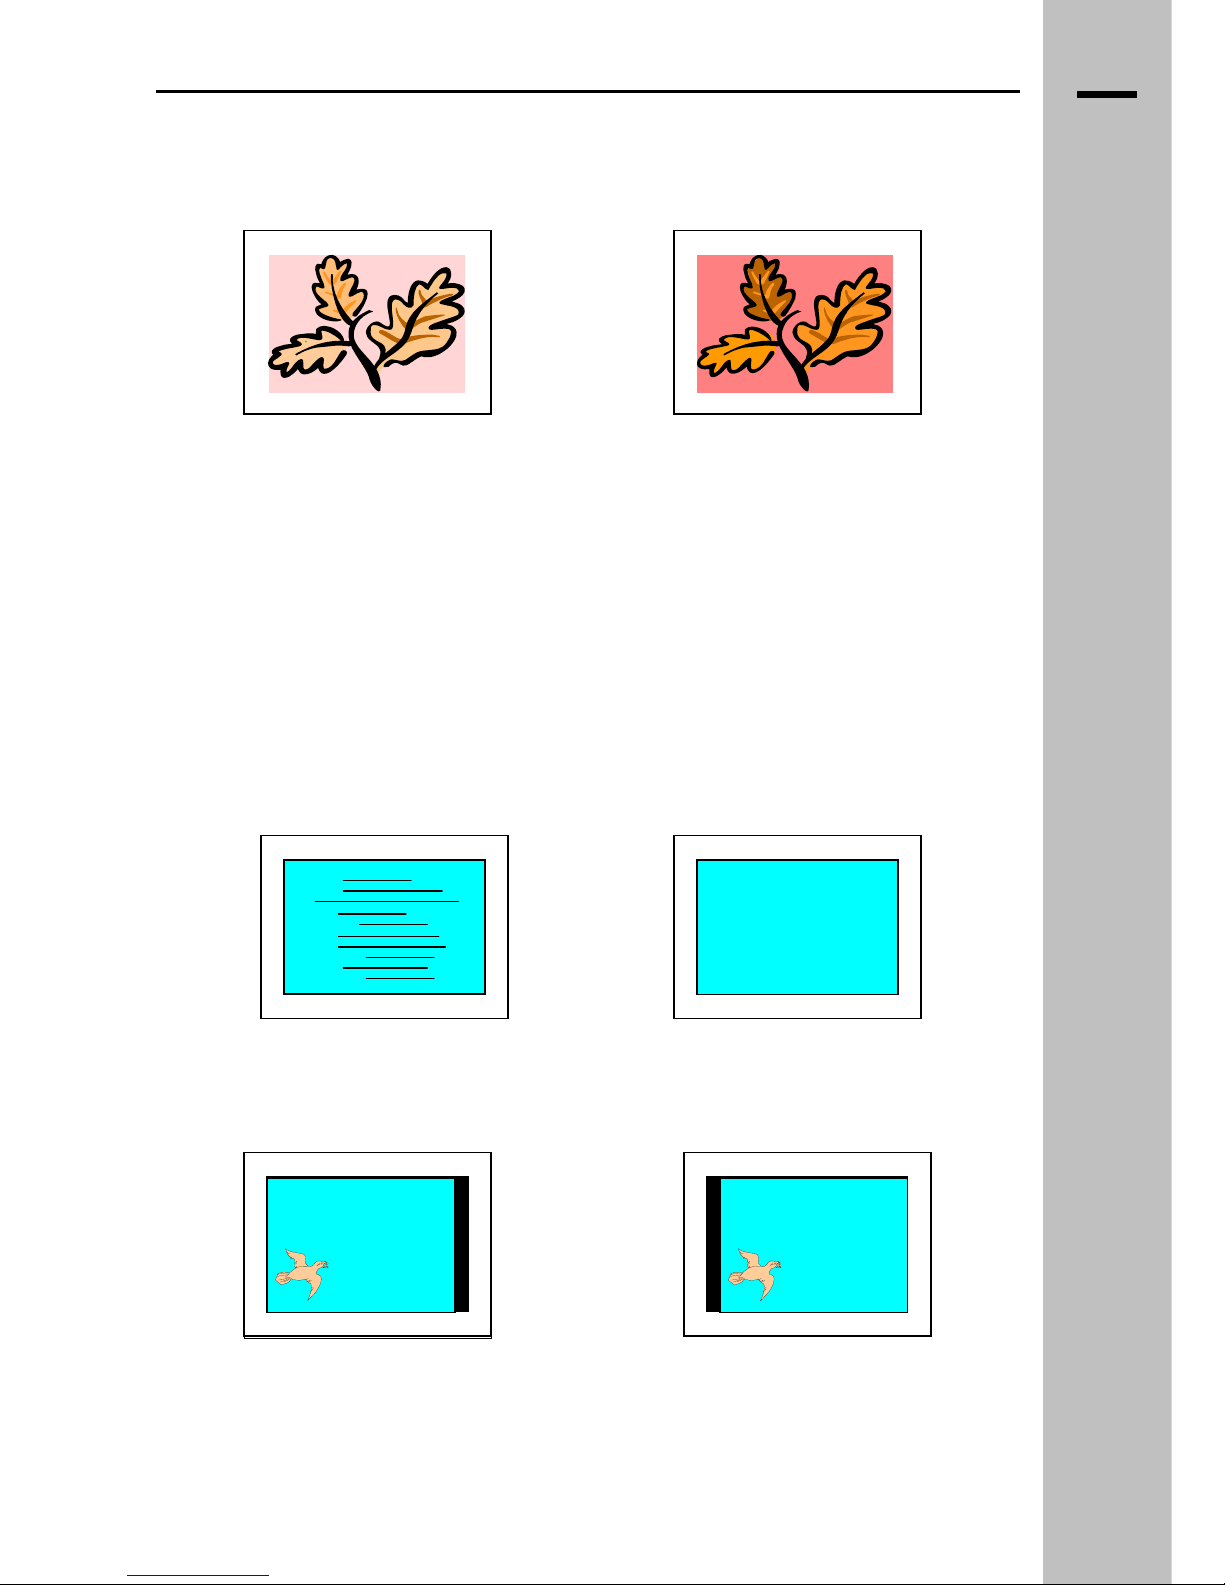
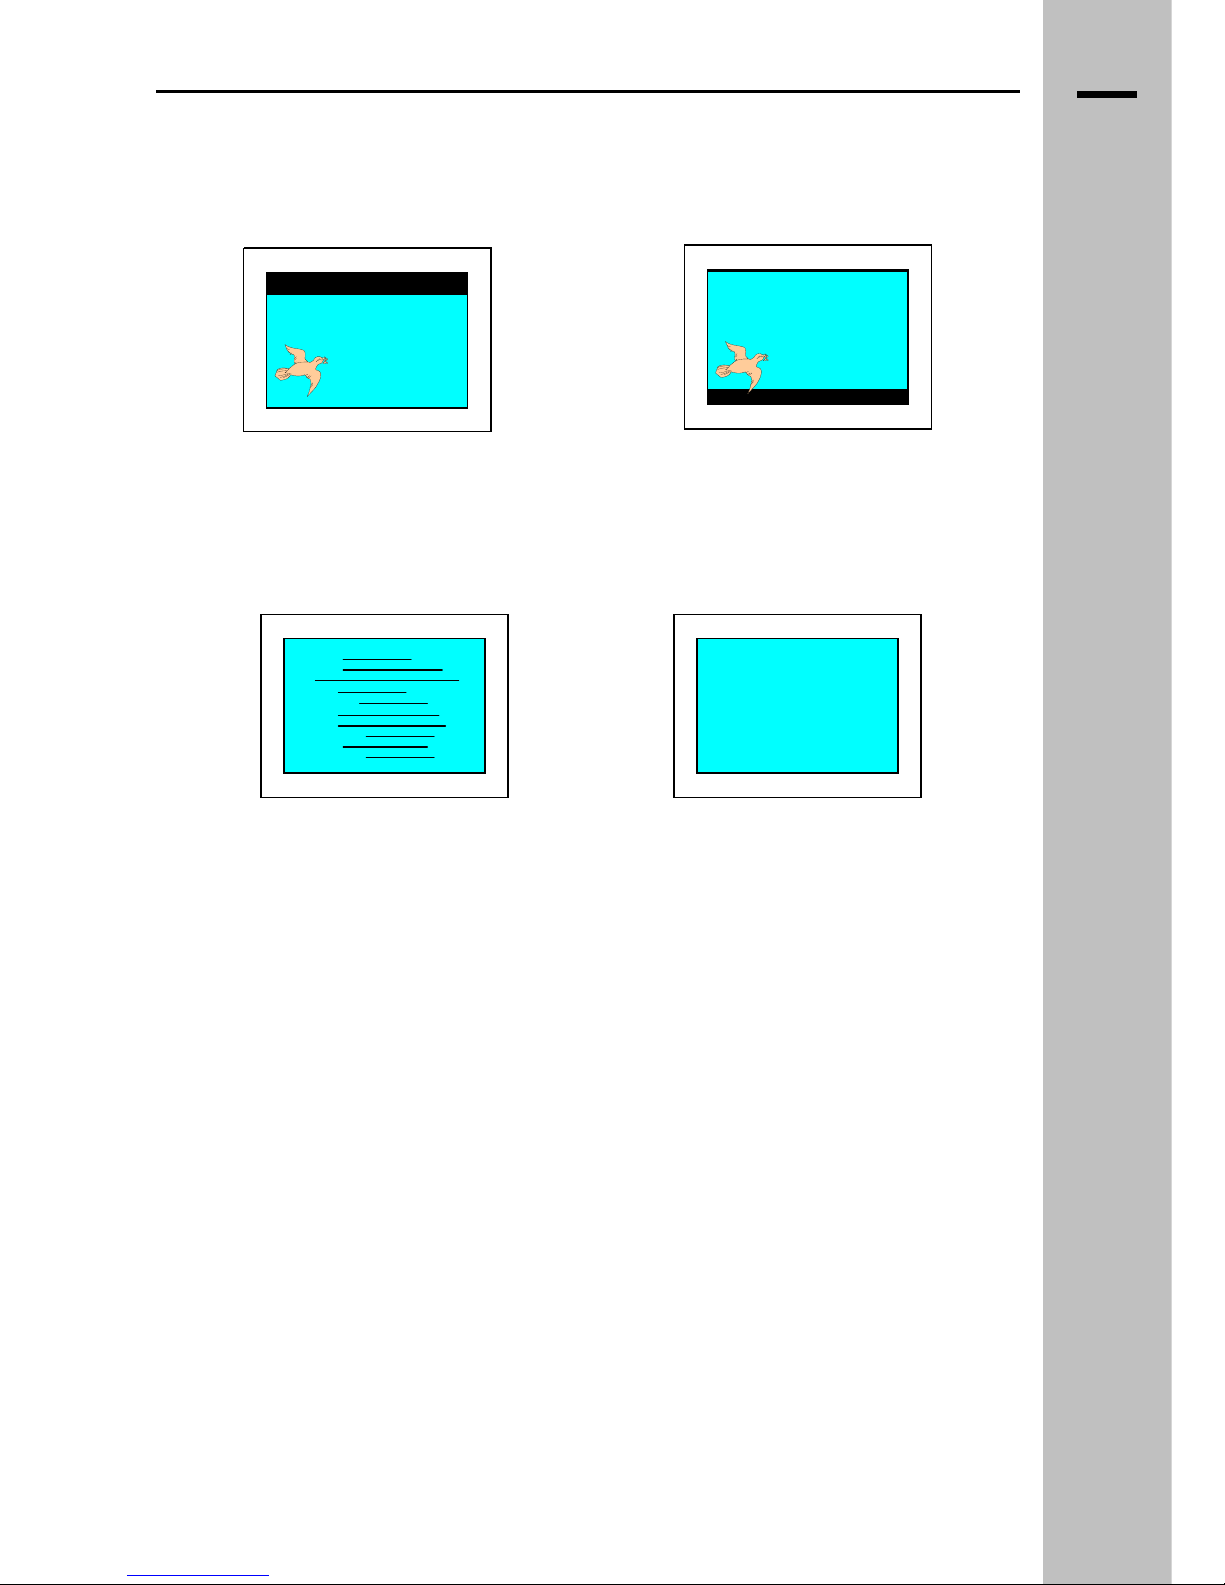
E’ possibile selezionare varie modalità per salvaguardare il vostro TV da danneggiamenti dovuti alla
persistenza di immagini fisse:
Schermo Blu: Attiva una schermata di colore
blu in assenza di segnale (opzione di livello
unicamente estetico, non apporta benefici allo
schermo, non disponibile in PC e DVI).
Pixelshift: Sposta a intervalli regolari l’area
attiva dello schermo.
Wiper: Genera una banda nera verticale che
scorre orizzontalmente sullo schermo ogni 10
minuti.
Sfondo grigio: Genera uno sfondo grigio in
tutti quei formati dove l’area attiva non ricopre
l’intero schermo (es.: 4/3, 14/9, Nativo).E’
possibile regolare la luminosità dello sfondo con 7 valori differenti.
Dynamic contrast
Questa opzione abilita il controllo automatico del contrasto per ottenere un’immagine più incisiva.
E’ molto indicata per l’ingresso televisivo e per qualsiasi altro ingresso dove ci siano immagini in
movimento (attivo solo per ingressi TV, S-Video, SCART1, SCART2, AV, Component interlacciati
15KHz.).
__________________________________________________________________________________________
LCD 32 – 40 TV
6.6
Page 23

IT
Avanzate
Visualizzazione della versione Software installata. NOTA: Questo valore deve essere sempre
comunicato al Servizio Assistenza Tecnica in caso di necessità.
Backlight: e’ possibile impostare un valore di luminosità delle lampade di retroilluminazione dell’LCD. Si
consiglia tuttavia di mantenere il valore reimpostato di fabbrica per il quale la qualità d’immagine è
stata ottimizzata.
STRUTTURA OSD FLAT TV
RICERCA CANALI
Scelta Nazione,Ricerca automatica,Ricerca manuale
Preferiti,Modifica,Nome,Sintonia fine.
Nazione
Permette di impostare la ricerca in base alla Nazione
dov’è installato l’apparecchio.
Ricerca automatica
Esegue una scansione completa delle emittenti
disponibili partendo dalla frequenza più bassa alla
più alta.Una volta entrati nel sottomenu selezionare
INIZIO e premere MENU
Ricerca manuale
Permette di impostare manualmente i programmi:
1. Selezionare il programma sul quale si vuole
Memorizzare il canale.
2. Selezionare il sistema colore relativo alla
Nazione (PAL Europa, SECAM Francia).
3. Selezionare il sistema Audio relativo alla
nazione. Selezioni disponibili tra B/G”,”D/K”,”I”
(Gran Bretagna, Irlanda del Nord e Sud Africa,
Australia, Europa e Medio Oriente); “L”
(Europa dell’Est, Repubbliche Sovietiche,
Francia, Africa centrale).
4. Ricerca per canale: cercare il canale
desiderato premendo OK per entrare nel sottomenù. Selezionare prima il tipo di canale (C o S)
premere (►) e selezionare con i tasti (▲) / (▼) o numerici il canale.
5. Ricerca per frequenza: premere OK per entrare nella voce. Utilizzare il tasto (▼) per far partire
la ricerca verso frequenze più basse o (▲) per farla partire verso frequenze più alte.
6. Una volta selezionato il canale portare il cursore sulla voce “Memorizza” e premere OK.
Selezionare “SI” e premere OK per confermare. A questo punto il canale viene memorizzato
sul programma selezionato alla voce “Prog.”
__________________________________________________________________________________________
LCD 32 – 40 TV
6.7
Page 24

IT
Preferiti
Permette di saltare i programmi selezionati mentre si scorrono con i tasti (▲) / (▼) .
1. Selezionare il programma desiderato con i tasti (▲) / (▼).
2. Premere (►) / (◄) per cambiare lo stato del programma da “Preferito” a “Salta”.
3. Premere “EXIT” per uscire.
Modifica
Permette di modificare l’ordine dei programmi trovati a proprio piacimento.
1. Selezionare il canale desiderato con i tasti (▲) / (▼).
2. Premere MOK per selezionare il canale.
STRUTTURA OSD FLAT TV
3. Utilizzare i tasti (▲) / (▼) per spostare il canale sul programma desiderato.
4. Una volta posizionato il canale premere “EXIT” per confermare la scelta.
Nome
Permette di modificare il nome di ogni programma.
1. Selezionare il programma desiderato con i tasti (▲) / (▼).
2. Premere OK per selezionare il programma da rinominare.
3. Utilizzare i tasti (►) / (◄) per selezionare la il carattere da cambiare e (▲) / (▼) per cambiare
la lettera.
4. Una volta rinominato il programma premere “EXIT” per confermare la scelta.
Sintonia fine
Permette di regolare la sintonia fine del programma selezionato.
1. Premere (►) / (◄) per regolare la sintonia del
programma.
2. Premere EXIT per confermare e uscire.
3. Se si vuole ritornare al valore iniziale “0” della
sintonia selezionare “REIMPOSTA” con i tasti
(▲) / (▼) e premere “OK”.
PIP
La funzione PIP permette di visualizzare due sorgenti
contemporaneamente.
E’ possibile attivare, disattivare e cambiare lo stato del
PIP con premendo più volte il tasto PIP del
telecomando.
Sorgente PIP
Seleziona la sorgente da visualizzare nel PIP.
Premere OK per visualizzare le scelte disponibili.
Attenzione! Il PIP permette di visualizzare due
sorgenti a scelta tra una sorgente di tipo Video(TV,
SCART, AV, Component interlacciato) e una di tipo
HD (PC, DVI, Component progressivo).
Dimensioni PIP
E’ possibile scegliere il tipo di visualizzazione selezionando tra tre
differenti modi:
1. PIP Window. Finestra delle dimensioni di ¼ dello schermo.
2. POP (Picture on Picture). Schermo diviso orizzontalmente in
due parti.
3. POP. Come POP ma con aree attive che occupano tutto lo
schermo.
__________________________________________________________________________________________
LCD 32 – 40 TV
6.8
Page 25

IT
Posizione PIP
Permette di scegliere la posizione della finestra tra le quattro disponibili.
Scambia
STRUTTURA OSD FLAT TV
Utilizzando la funzione SCAMBIA è possibile invertire la posizione delle sorgenti.E’ possibile attivare
questa funzione senza passare dal Menu premendo il tasto PREPG del telecomando.
Sorgente audio
Seleziona la sorgente audio quando è attiva la funzionalità PIP. Quando è selezionato il modo
“PRINCIPALE”, si udirà la sorgente audio dell’ingresso principale. Quando invece viene selezionato il
modo “SECONDARIA”, si udirà la sorgente audio della finestra PIP o dell’ingresso secondario.
__________________________________________________________________________________________
LCD 32 – 40 TV
6.9
Page 26

IT
Manutenzione
Il display non necessita di particolare manutenzione.
Periodicamente, se l’ambiente d’installazione è polveroso o fumoso, é opportuno ripulire il cristallo
frontale utilizzando normali detergenti per la pulizia dei vetri. Evitare l’uso di solventi o sostanze
corrosive sia per il cristallo che per il mobile. Particolare cura deve essere inoltre prestata nella pulizia
del cristallo evitando assolutamente di esercitare pressione o di insistere oltre modo nella pulizia dello
stesso. Utilizzare esclusivamente panni morbidi.
MANUTENZIONE TRASPORTO
Nel caso fosse penetrata della polvere tra il cristallo ed il pannello in quantità tale da disturbare la
visione é necessario inviare l’apparecchio ad un Centro d’Assistenza Autorizzato.
Trasporto
L’apparecchio, deve essere efficacemente protetto dagli urti durante il trasporto.
E’ importante impiegare il suo imballo originale completo e trasportarlo sempre in posizione verticale,
orientandolo con il lato lungo nel senso di marcia facendo uso di pedane (pallet) per le movimentazioni
e le operazioni di carico e scarico. L’imballo deve essere saldamente assicurato alla pedana con
apposite funi di fissaggio.
ATTENZIONE
Il costruttore non si assume nessuna responsabilità per eventuali danni subiti dall’apparecchio
a causa del mancato rispetto delle norme e delle disposizioni suggerite.
__________________________________________________________________________________________
LCD 32 – 40 TV
7
Page 27

IT
LCD TV
CARATTERISTICHE
- Standard video PAL (BG/H/ I, 60) , NTSC (M,4.43) , SECAM
CARATTERISTICHE TECNICHE
- Risoluzione in ingresso (per PC) fino a SXGA (1280X1024)
- PIP (Picture-in-Picture)
- Regolazione della posizione e della modalità del PIP
- Selezione del rapporto d’aspetto dell’immagine (compatibilità 4:3 e 16:9)
SPECIFICHE TECNICHE
Product name:
LCD 32" SG LCD 40" SG
Screen size:
32" (81 cm) diagonal 40" (101 cm) diagonal
Aspect Ratio:
16:9 16:9
Resolution:
1366 (H) x 768 (V) pixels 1366 (H) x 768 (V) pixels
Brightness:
550 cd/m2 500 cd/m2
Contrast ratio:
1,000:1 1,200:1
Response time:
8 msec 8 msec
View angle:
H:176°, V:176° H:170°, V:170°
Display panel
Colors:
16.7 Mil 16.7 Mil
Video:
Video [CVBS] Video [CVBS]
S-Video [Y/C] S-Video [Y/C]
SCART1 [CVBS, RGB], SCART2 [CVBS] SCART1 [CVBS, RGB], SCART2 [CVBS]
Component [Y,Pb,Pr] Component [Y,Pb,Pr]
PC:
Analog RGB [PC] Analog RGB [PC]
Digital RGB [DVI-D] Digital RGB [DVI-D]
Tuner:
Antenna [75 Ohm - VHF/UHF] Antenna [75 Ohm - VHF/UHF]
Audio:
Video / S-Video / Component stereo input Video / S-Video / Component stereo input
PC / DVI stereo input PC / DVI stereo input
Line stereo output Line stereo output
Optical audio output (SPDIF) Optical audio output (SPDIF)
Connections
__________________________________________________________________________________________
LCD 32 – 40 TV
8
Page 28

IT
CARATTERISTICHE TECNICHE
Video:
PAL (BGH/D/I, 60), NTSC (M, 4.43), SECAM PAL (BGH/D/I, 60), NTSC (M, 4.43), SECAM
PC:
VGA ~ SXGA (1280x1024) VGA ~ SXGA (1280x1024)
NATIVE (1368x768) NATIVE (1368x768)
DTV:
480i/p, 576i/p, 720p, 1080i @ 50/60 Hz 480i/p, 576i/p, 720p, 1080i @ 50/60 Hz
Analog Tuner:
Standard: PAL BG/I/DK, SECAM L/L' Standard: PAL BG/I/DK, SECAM L/L'
Tuning system: Electronic with PLL Tuning system: Electronic with PLL
Teletext: BESIC1.5/TOP/FAST Teletext: BESIC1.5/TOP/FAST
Audio:
Power audio output: 2 x 7W Power audio output: 2 x 7W
Speakers:
Built-in stereo speakers Built-in stereo speakers
Video:
Brightness, Contrast, Color, Sharpness Brightness, Contrast, Color, Sharpness
Dynamic contrast Dynamic contrast
Colour temperature (5 selections, user) Colour temperature (5 selections, user)
Size (16:9, 14:9, 4:3, Panorama, Zoom, Auto) Size (16:9, 14:9, 4:3, Panorama, Zoom, Auto)
PIP / POP / Split Screen PIP / POP / Split Screen
Still Still
TV:
Auto scan Auto scan
Manual scan / fine tune Manual scan / fine tune
Auto station name Auto station name
Edit program Edit program
Audio:
Volume, Balance Volume, Balance
Equalizer (5 band) Equalizer (5 band)
Stereo/mono/dual sound/NICAM Stereo/mono/dual sound/NICAM
AutomaticVolumeControl AutomaticVolumeControl
Others:
Stand-by mode Stand-by mode
Timer (wake-up, sleep) Timer (wake-up, sleep)
Screensaver (orbital, wiper, blue, gray) Screensaver (orbital, wiper, blue, gray)
Programmable OSD Programmable OSD
Backlight control Backlight control
Controls
OSD Language:
D, E, F, GB, I, NL, P, SA D, E, F, GB, I, NL, P, SA
__________________________________________________________________________________________
LCD 32 – 40 TV
8.1
Page 29

IT
Dimensions:
815 x 515 x 105 mm 1034 x 648 x 98 mm
Weight:
23 Kg (without base) 37 Kg (without base)
Mains voltage:
115/230 VAC ± 15%, 50/60 Hz 115/230 VAC ± 15%, 50/60 Hz
Power
consumption:
170 W 275 W
Power cable Power cable
Remote control with batteries Remote control with batteries
Accessorie
s
User manual User manual
CARATTERISTICHE TECNICHE
__________________________________________________________________________________________
LCD 32 – 40 TV
8.2
Page 30

IT
CONNETTORI
CONNETTORE HD VGA/RGB D15
1 Rosso
2 Verde
3 Blu
4 N.C.
5 Massa
6 Massa
7 Massa
8 Massa
9 N.C.
10 Massa
11 Massa
12 Massa
13 Sincronismo orizzontale
14 Sincronismo verticale
15 N.C.
CONNETTORI
CONNETTORE S-VHS
1 Massa
2 Massa
3 Ingresso Crominanza C
4 Ingresso Luminanza Y
EUROCONNETTORE SCART
1 Uscita audio canale destro 0,5 Vrms Impedenza ≤ 1K.
2 Ingresso audio canale destro 0,5 Vrms Impedenza ≥ 10K.
3 Uscita audio canale sinistro 0,5 Vrms Impedenza ≤ 1K.
4 Massa audio
5 Massa ingresso B
6 Ingresso audio canale sinistro 0,5 Vrms Impedenza ≥ 10K.
7 Ingresso B 0.7Vpp/75.
8 Ingresso comm. Lenta 0÷2V logic 0; 9,5÷12V logic 1
9 Massa ingresso G
10 N.C.
11 Ingresso G 0.7Vpp/75.
12 N.C.
13 Massa ingresso R
14 Massa
15 Ingresso R 0.7Vpp/75.
16 Ingresso comm. Veloce 0÷0,4V logic 0 ; 1÷3V logic 1
17 Massa
18 Massa
19 Uscita CVBS 1Vpp/75. (compresi i sincronismi)
20 Ingresso CVBS 1Vpp/75. (compresi i sincronismi)
21 Schermo
__________________________________________________________________________________________
LCD 32 – 40 TV
8.3
Page 31

IT
Problema
Controllo apparecchio
Nessuna immagine sullo
schermo e nessun suono dagli
altoparlanti.
• Verificare che il cavo di alimentazione sia
inserito. (sez.3.2)
• Verificare che l’interruttore principale sia su “I”. (sez.3.2)
• Verificare che l’apparecchio non sia in ST-BY (led
rosso). Accendere l’apparecchio utilizzando il tasto
Power del telecomando o della tastiera. (sez.4-4.1)
Nessuna immagine
• Verificare che l’ingresso selezionato sia collegato alla
sorgente. Premere il tasto Source del telecomando
o della tastiera per cambiare l’ingresso. (sez.4-4.1)
Appare l’immagine ma non c’è
suono dagli altoparlanti
• Verificare che i cavi audio della sorgente siano collegati
all’ingresso corrispondente. (sez.3.2)
Il TV non risponde al
telecomando.
• Puntare il telecomando direttamente verso il sensore.
• Rimuovere qualsiasi ostacolo tra il Display e il
telecomando.
• Verificare le batterie.
• Premere il tasto TV.
Cattiva ricezione o interferenza sui canali TV
analogici o digitali
• Verificare che il cavo di connessione dell’antenna sia
collegato correttamente.
• Verificare che il cavo di connessione dell’antenna abbia
una buona connessione di massa.
• Verificare che non ci siano altri apparecchi (es.: forni a
microonde) che disturbano la ricezione dell’apparecchio.
Il TV non sintonizza
correttamente i canali analogici
• Verificare che il sistema colore selezionato nel menu
CANALE “Ricerca manuale” o “Ricerca automatica”
sia corretto.(sez.6.7)
• Regolare la sintonia fine (sez.6.8)
Non si sente l’audio nei canali analogici
sintonizzati
• Verificare che il sistema colore selezionato nel menu
CANALE sia corretto.(sez.6.7, es.:BG)
RISOLUZIONE PROBLEMI
__________________________________________________________________________________________
LCD 32 – 40 TV
9
Page 32

IT
ACCESSORI IN DOTAZIONE
Telecomando Manuale utente
Cavo rete Imballo
ACCESSORI
Pile tipo AAA
__________________________________________________________________________________________
LCD 32 – 40 TV
10
Page 33

IT
11
DIAGRAMMA COLLEGAMENTI LCD 32
__________________________________________________________________________________________
LCD 32 – 40 TV
Page 34

__________________________________________________________________________________________
LCD 32 – 40 TV
IT
DIAGRAMMA COLLEGAMENTI LCD 40
11.1
Page 35

__________________________________________________________________________________________
LCD 32 – 40 TV
Page 36

EN
SAFETY PRECAUTIONS 1
OPERATING TIPS 2
INSTALLATION 3
SUPPORTS - POWER ON 3
SIGNAL INPUT CONNECTORS 3.1
CONNECTIONS 3.2
CONTROLS 4
LOCAL KEYBOARD – SMART CARD 4
REMOTE CONTROL 4.1
MAIN FUNCTIONS 5
CONNECTING A VCR 5.1
CONNECTING A DVD 5.2
RGB VIDEO MODE SPECIFICATION (PC, DVI) 5.3
FLAT TV OSD LAYOUT 6
PICTURE (TV AND VIDEO) 6.1
PICTURE (PC) 6.2
NATIVE 6.4
INDEX
SOUND 6.5
OPTIONS – TIMER – SCREENSAVER 6.6
CHANNEL SEARCH 6.7
PIP 6.8
MAINTENANCE- TRANSPORT 7
TECHNICAL CHARATERISTICS 8
CONNECTORS 8.3
TROUBLESHOOTING 9
ACCESSORY 10
DIAGRAM 11
Page 37

EN
SAFETY PRECAUTIONS
This Display was designed and manufactured in accordance with the rules of good manufacturing
practices and respects European directives 89/336/CEE, 73/23/CEE amended by directive 93/68/CEE
as regards to safety and the elimination of radio interference. Follow the instructions and take the
operating precautions indicated; incorrect use of the equipment could result in a fire or a risk of
electrocution.
Power supply:
The device was manufactured in accordance with Class 1 safety standards; it is to be connected to a
115V∼ or 230V∼ power supply and an efficient grounding system, by means of the power cable
provided or another certified, equivalent, suitable for the country in which it is to be used.
Do not use the device if there is no mains socket compliant to the rules and equipped with a ground
connection.
SAFETY PRECAUTIONS
Take care not to damage the power cable and make sure that it is not crimped, trodden on, cut or torn.
To turn off the device completely, remove the power cable from the power socket.
Weight:
Two persons are required to transport and install the device.
WARNING:
We recommend you install the device using only the relevant accessories and following the
instructions given in the relevant chapters.
A precarious installation, carried out without using the standard accessories, may result in the
device being dropped, with consequent serious damage to it, a risk of fire and a risk of injury to
persons.
Location: the device is to be used in indoor environments. Avoid exposing it to dampness, frost, rain
and corrosive agents.
If the difference in temperature between the place of origin of the device and the installation site is very
high, make sure you wait for at least 15 minutes before turning it on for the first time to avoid
condensation problems.
Make sure that the device receives adequate ventilation and do not block the vents.
Do not place near heat sources and maintain a distance of at least 10 cm from other electrical devices.
In case of:
- Dropping or overturning
- Immersion in liquids, penetration of liquids or exposure to high degree of dampness or
condensation;
- Damage caused by shock;
- Damage to network connector or power cable;
- Marked deterioration in performance or failure;
Do not turn on the device, and send it to an authorized service centre.
Never open the device under any circumstances; if a failure occurs or maintenance is required, call the
authorized service center, who guarantees the use of original spare parts and maintenance of the
original quality and security standards. The device contains no spare parts of internal regulation or
adjustment points that should be used by the user. The replacement of parts present in the device, on
which its safety is based, with non-original spare parts, may cause a risk of fire and result in the
deterioration of its performance.
__________________________________________________________________________________________
LCD 32 – 40 TV
1
Page 38

EN
Electromagnetic Compatibility (Radio interference)
The device was manufactured in accordance with European directive 89/336/CEE. The
verification was made by carrying out the tests indicated by the standards listed below:
EN 55020:1994+A11:1996+A12:1999+A13:1999+A14:1999
EN 61000-3-2:1995+A1:1998+A2:1998+A14:2000
EN 61000-3-3:1995
EN 55013:1990+A12:1994+A13:1996+A14:1999
EN 55024:1998
EN 55022:1998+A1:2000
SAFETY PRECAUTIONS
Conformity with national rules
Monitor equipped with a TV receiver assembled in the EEC respecting the provisions laid down
in art. 1 of M.D. 26-03-1992 and M.D. 28-08-1995, number 548.
This product complies with EU Directive 2002/96/EC
The crossed bin symbol on the appliance indicates that the product, at the
end of its life span, must be disposed of separately from domestic waste,
either by taking it to a separate waste disposal site for electric and
electronic appliances or by returning it to your dealer when you buy anothe
r
similar appliance. The user is responsible for taking the appliance to a
special waste disposal site at the end of its life span. If the appliance in
question is collected correctly as separate waste, it can be recycled, treated
and disposed of ecologically; this avoids a negative impact on both the
environment and the health and contributes towards the recycling of the
product’s materials. For further information regarding the waste disposal
services available, contact your local waste disposal agency or the point o
f
sale where you bought the appliance.
Environmental precautions:
Each device is equipped with a battery-powered remote control. We recommend you do not
dispose of the used batteries directly into the environment but in the special containers in
accordance with the local regulations in force.
If the device is dropped and the light emitting panel is consequently broken, send the device in
its original package to an authorized service centre, which will dispose of the broken panel
properly.
Do not dispose of the packaging in the environment; keep it for when the device has to be
moved as it requires maximum protection against shocks and mechanical stress along its front
axis.
Fuse capacity:
This Display was designed to operate from 115V∼ to 230V∼ under the protection of a fuse.
General warnings:
The light emitted by the panel decreases gradually during use over the long term. We recommend you
avoid displaying static pictures for long periods. This event is not covered by the guarantee
Height:
The panel works normally at an altitude of up to 2000 meters; higher than this elevation, problems
could occur.
__________________________________________________________________________________________
LCD 32 – 40 TV
1.1
Page 39

EN
OPERATING TIPS
For proper viewing, sit at a distance equivalent to three times the width of the screen: sitting too
close may lead to eye fatigue.
OPERATING TIPS
CAUTION
The information and characteristics specified in this manual may vary without notice. The
manufacturer declines all liability for any damage deriving from omissions in the information
contained in it
ATTENTION
Save the guarantee label that includes the model of the display to be able to communicate it to
the service center in case the device needs service.
__________________________________________________________________________________________
LCD 32 – 40 TV
2
Page 40

EN
INSTALLATION
This display was designed to be fixed to the wall by means of special brackets or placed on a table
(optional).
Various types of supports are therefore available according to the specific requirements:
♦ Wall mount (fixed)
♦ Placed on a table with a base
♦ Placed on a table with a feet
The assembly specifications and instructions for the various types of assemblies are provided with the
supports themselves. Two persons are required to transport and install the device.
INSTALLATION
POWER ON
1. Connect terrestrial antenna cable.
2. Connect phone line to modem port.
3. Connect AC cable.
4. Switch on TV, a menu for Country choice will appear.
5. Select the correct Country with the S / T keys and press OK to confirm.
6. Analog channel-search will appear.
7. Select Start and press OK. The TV will run a search and memorize all available stations
automatically. This operation will take a couple of minutes.
8. Once the analog channel search is finished, you should set the OSD language.
9. The source will switch to digital TV, to automatically search for digital channels. Press OK.
10. Once the digital channel search is finished, memorize the data by pressing OK.
11. To modify the channels’ positions refer to sections 6.7 and 7.4.
WARNING:
We recommend you install the device using only its own accessories and scrupulously following the
instructions given in the specific chapters.
A precarious installation, carried out without using the standard accessories, may result in the device
being dropped, with consequent serious damage to it, and the risk of fire and injury to persons.
__________________________________________________________________________________________
LCD 32 – 40 TV
3
Page 41

3.1
EN
INPUT CONNECTORS LCD 32
1 – RS232 Used to control all the monitor functions using a standard RS 232 connection. 2 – PC DVI-D input Standard DVI connector (Digital RGB-PC input). 3 – PC RGB Standard connector (analog RGB-PC input) of 15-pin D-SUB type. 4 – Component 2 + Audio 3 RCA connectors (Y,Pb,Pr input ) + 2 RCA audio connectors for left and right audio input.. 5 – Component 1 + Audio 3 RCA connectors (Y,Cb,Cr input ) + 2 RCA audio connectors for left and right audio input.. 6 – Scart 1 21-pole SCART audio/video connector. (RGB SCART) 7 – Scart 2 21-pole SCART audio/video connector. 8 – TV Coaxial socket for connecting the terrestrial TV antenna. 9 – Main connector IEC/CEE222 type plug, to be connected to the mains using the power cable provided.
10 – Video + S-video + Audio RCA connector + 1 SVHS connector + 2 RCA audio connectors for left and right audio input. 11 – AUDIO PC DVI/RGB 1 Jack 3.5 mm for left and right channel for PC DVI input (or PC RGB input). 12 – Headphone 1 Jack 3.5 mm connectors for lheadphone output..
13 – AUDIO SWITCH Switch for internal/external speaker selection. 14 – EXTERNAL SPEAKERS 4-pin terminal board. Output power 7+7Wrms 8 Ohms.
.
__________________________________________________________________________________________
LCD 32 – 40 TV
Page 42

3.1
3.2
EN
INPUT CONNECTORS LCD 40
1 – RS232 Used to control all the monitor functions using a standard RS 232 connection.
2 – PC DVI-D input Standard DVI connector (Digital RGB-PC input).
3 – PC RGB Standard connector (analog RGB-PC input) of 15-pin D-SUB type.
4 – Component 2 + Audio 3 RCA connectors (Y,Pb,Pr input ) + 2 RCA audio connectors for left and right audio input..
5 – Component 1 + Audio 3 RCA connectors (Y,Cb,Cr input ) + 2 RCA audio connectors for left and right audio input..
6 – Scart 1 21-pole SCART audio/video connector. (RGB SCART)
7 – Scart 2 21-pole SCART audio/video connector.
8 – TV Coaxial socket for connecting the terrestrial TV antenna.
9 – Main connector IEC/CEE222 type plug, to be connected to the mains using the power cable provided.
10 – Video + S-video + Audio RCA connector + 1 SVHS connector + 2 RCA audio connectors for left and right audio input.
11 – AUDIO PC DVI/RGB 1 Jack 3.5 mm for left and right channel for PC DVI input (or PC RGB input).
12 – Headphone 1 Jack 3.5 mm connectors for lheadphone output..
13 – AUDIO SWITCH Switch for internal/external speaker selection.
14 – EXTERNAL SPEAKERS 4-pin terminal board. Output power 7+7Wrms 8 Ohms.
9
14
13
8
7
6
5
4
3
10
2
11
12
1
__________________________________________________________________________________________
LCD 32 – 40 TV
Page 43

EN
Connecting cables
Having set up the device, proceed to make the various input signal connections:
ANTENNA TV: Terrestrial antenna cable connector (12).
PC DVI: Connector for DVI-D signals at input (3), AUDIO signals at input (2).
PC RGB: PC VGA connector at input (4), PC AUDIO at input (2).
Component: RCA (Y, Pb, Pr) connectors (6), AUDIO at input (7).
S-VIDEO: S-Video connector at input (1), AUDIO at input (7).
Scart 1: SCART connector at input (6).
Scart 2: SCART connector at input (7).
AV: RCA connector at input (5), AUDIO at input (7).
Power cable: Connector for main power cable (13).
Line out: RCA connector at output (8).
SPDIF: Connector for optical fiber to Home Theatre at output (9).
Turn on the monitor at the ON/OFF switch on the rear part of the monitor; the monitor will be in
STAND-BY mode (LED red). Press the STD-BY key on local keyboard or remote control to switch on
the TV (green LED).
CONNECTIONS
If there is no valid input signal, the “no signal” indication will appear on the screen.
If last source selected was Digital Terrestrial TV (DTV), please wait a few seconds for MHP module to
load.
Controlling the monitor from the remote control
The remote control provided may be used to perform all television functions.
Once you have entered the OSD menu, if no buttons are pressed for some time, the menu will be
automatically disappear.
*Scart 1 video output is always connected to TV source.
**Scart 2 video output is connected to active source.
__________________________________________________________________________________________
LCD 32 – 40 TV
3.3
Page 44

EN
LOCAL KEYBOARD
__________________________________________________________________________________________
LOCAL KEYBOARD
BUTTON FUNCTIONS
Main switch :
Switch on and switch off monitor.
M o :
From STAND-BY mode, it turns on the monitor.
From standard working mode it change input signal.
+ / - :
Increases or decreases the volume (showing a volume control bar on the screen).
/ :
Used to change channel (up or down).
LCD 32 – 40 TV
4
Page 45

EN
REMOTE CONTROL
The Hantarex remote control allows you to control all the functions of your Flat TV with Digital
Terrestrial integrated decoder. The functionalities of some keys may be different depending on the
active video source.
POWER Power on/off
SOURCE Source selection menu
MUTE Turns off the volume
TV / STATUS Info on source displayed
PC/GREEN BUTTON Not active
MON Not active
BACK Previous program / window
APP DTV: Load MHP application
Other sources: Not active
EPG DTV: Electronic Program Guide
Other sources: Not active
DTVm DTV: Digital Terrestrial MHP menu
Other sources: Not active
CTRL / DVD menu Video settings
SIZE / GUIDE Image size
PICTURE / REC TV Picture mode
SOUND / LIVE TV Sound mode
MENU Main menu
TEXT Teletext (ON/MIX/OFF)
EXIT Exit from menu or submenu
INFO Information on active signal source
▲, ▼, ►, ◄ Directional keys
OK Confirmation key
STILL Freeze frame
PIP PIP mode selection (Picture in Picture)
FOCUS PIP mode: focus selection
P + Next TV channel
P - Previous TV channel
VOL + Raises volume
VOL - Lowers volume
RED / DELETE / PLAY Teletext/MHP RED
GREEN / SKIP / REW Teletext/MHP GREEN
YELLOW / INSERT / FWD Teletext/MHP YELLOW
BLUE / REPLACE / STOP Teletext/MHP BLUE
TXT ? / MTS / REC Teletext info / audio channel selection
TXT stop / SLEEP / REPLAY Teletext stop / Auto power-off time
TXT i / TIME / SKIP Teletext index / Shows current time
TXT zoom / PREPG / PAUSE Teletext zoom / Last selected channel
0..9 Numeric keyboard
DTV / ALPHA DTV: shows Digital Channel List
Other sources: select DTV source
-/-- / CLEAR TV: Enables 2-digit channel selection
DTV: shows Options window
Other sources: Not active
REMOTE CONTROL
__________________________________________________________________________________________
LCD 32 – 40 TV
4.1
Page 46

EN
BASIC OPERATIONS
Switch on the TV by pushing the ON/OFF main switch. Wait for a few seconds. NOTE: This TV set
maintains the latest working status detected before the Power off in its memory. If switched OFF when
in STAND-BY mode (Red Led), once switched ON, it will power up again in STAND-BY mode and it
will be necessary to push the ”Power” key on the IR remote control or on the local keyboard to display
the image. However, if the unit has been switched off with the mains switch in a working condition
(Green Led), once switched on again, the unit will restart in the same condition.
Diagnostic Led:
RED STAND-BY
GREEN WORKING
Selection of TV/DTV channels
BASIC OPERATIONS
1. Select TV or DTV source (SOURCE key from remote control or local keyboard)
2. Press (P+) or (P-) keys from remote control or the (▲) , (▼) keys on the local keyboard, or use the
numeric keypad to select a television channel.
Volume
Use the (VOL+), (VOL-) keys on the remote control or the (◄), (►) keys on the local keyboard
to adjust the volume as desired.
Press the “MUTE” button on the remote control to turn the sound off completely or to restore the
volume.
Searching for and setting new analog TV channels
Select TV source and press the “MENU” key on the remote control to access the OSD menu.
Select the “CHANNEL” function using the (▲),(▼) buttons, press “OK” to enter the
corresponding submenu. Select “Auto SCAN” or “Manual scan” (see section 6.7 for details)
using the (▲),(▼) buttons, and press “OK” to confirm your choice. The association between the
program and the channel can be modified subsequently based on one’s preferences by selecting
the “Edit” function from the “CHANNEL” menu and moving or renaming the various channels
available. See the details on section 6.7 for operating instructions.
Select a different source
Press “SOURCE” on the remote control.
Use the (▲) or (▼) keys to select input. Press “OK” to confirm.
NOTE: If the input selected is not enabled within few seconds, the message “NO SIGNAL” will
appear on the screen.
__________________________________________________________________________________________
LCD 32 – 40 TV
5
Page 47

__________________________________________________________________________________________
CONNECTING A VCR
5.1
5.1
EN
CONNECTING A VCR
Connecting an external VCR (Video recorder) device
To connect display to an external device using Scart1 or Scart2
input , connect the SCART cable to the corresponding input port
on product.
To avoid “picture interference”, make sure that an adequate distance is kept between the VCR
and the monitor.
Avoid keeping fixed pictures on the screen for long periods. For example, a still picture (using the
STILL function), a 4:3 picture or a logo that is always present in the same position..
LCD 32 – 40 TV
Page 48

EN
Connecting a DVD
Connect the DVD video output to COMPONENT 1 or COMPONENT 2 (Y, Pb, Pr) and the AUDIO input
as illustrated below.
CONNECTING A DVD
COMPONENT input connectors
A higher picture quality can be obtained using COMPONENT signal when available:
Component Video inputs of
monitor
Y Pb Pr
Y Pb Pr
Y B-Y R-Y
Y Cb Cr
Component Video outputs
from DVD player
Y PB PR
NOTE :
Every Component input accepts both interlaced and progressive signals.
DVD source TV input
480i/480p/576i/576p/720p/1080i
RCA DVD
(RCA,YPbPr type)
__________________________________________________________________________________________
LCD 32 – 40 TV
5.2
Page 49

EN
Analog RGB video mode specifications (PC)
Mode Resolution Horizontal Frequency (KHz) Vertical Frequency (Hz)
DMT 0660 640 X 480 31 60
DMT 0672 640 X 480 38 72
DMT 0675 640 X 480 38 75
DMT 0860 800 X 600 38 60
DMT 0872 800 X 600 48 72
DMT 0875 800 X 600 47 75
DMT 1060 1024 X 768 48 60
DMT 1070 1024 X 768 56 70
DMT 1075 1024 X 768 60 75
DMT 1260G 1280 X 1024 63 60
GTF 1368x768 1368 X 768* 48 60
RGB MODES
NOTE:
• Input: separated synchronism
• Display could work with no standard RGB input, but in this case, acceptable image quality is
not guaranteed.
• Using a high vertical frequency with bigger resolution than XGA may cause an error in
displaying signals.
__________________________________________________________________________________________
LCD 32 – 40 TV
5.3
Page 50

EN
FLAT TV OSD LAYOUT
The OSD (On Screen Display) of the Flat TV allows the user to fully control the functionalities of the
television in order to set preferred parameters.
This OSD menu is different from the digital terrestrial module’s OSD menu. It is always available,
regardless the active video source.
• Press the “MENU” key on the remote control to activate the OSD.
• Use the (▲), (▼) keys to select different submenu.
• Press “OK” to enter the selected submenu.
• Use the (▲), (▼) keys to select desired option.
• Use the (►), (◄) keys to modify the settings or to enter the submenu.
FLAT TV OSD LAYOUT
• Press the “EXIT” key to exit from current menu or submenu.
__________________________________________________________________________________________
LCD 32 – 40 TV
6
Page 51

EN
PICTURE (TV and VIDEO)
Options: Picture Mode (User, Dynamic, Standard,
Movie, Mild); User; Color Temp. (User, Cool1,
Cool2, Normal, Warm1, Warm2); Size (Auto Wide,
16:9, Panorama, Zoom1, Zoom2, 4:3, 14:9)
User Mode: Brightness, Contrast, Color, Hue,
Sharpness.
BRIGHTNESS (User)
Controls the brightness of the picture.
FLAT OSD LAYOUT
Dark ◄ Light ►
CONTRAST (User)
Controls the contrast of the picture.
Vague ◄ Distinct ►
COLOR (User)
Controls the color saturation of the picture.
Decreases ◄ Increases ►
__________________________________________________________________________________________
LCD 32 – 40 TV
6.1
Page 52

EN
SHARPNESS
(User)
Controls the sharpness of the picture.
COLOR TEMPERATURE
Controls the color temperature of the picture and may
be set to: User, Cool1, Cool2, Normal, Warm1,
Warm2.
SIZE
Choice from 7 different sizes: Auto Wide, 16:9,
Panorama, Zoom1, Zoom2, 4:3, 14:9
FLAT OSD LAYOUT
PICTURE (PC)
Options: Picture Mode (User, High, Middle, Low);User
(Brightness, Contrast, Sharpness); Color Temp.( User,
Cool1, Cool2, Normal, Warm1, Warm2); Size (4:3,
16:9, Native); PC (Auto Adjust, Phase, H-Position, VPosition, Frequency).
BRIGHTNESS (User)
Controls the brightness of the picture.
Dark ◄ Light ►
__________________________________________________________________________________________
LCD 32 – 40 TV
6.2
Page 53

EN
CONTRAST (User)
Controls the contrast of the picture.
Vague ◄ Distinct ►
COLOR TEMPERATURE
FLAT OSD LAYOUT
Controls the color temperature of the picture and may be set User, Cool1, Cool2, Normal, Warm1,
Warm2.On User color temperature it is also possible to modify the basic white temperature color by
singular setting Red, Green or Blue based on your own specific requirements.*
PC (Geometry adjustments)
Press Set to access the geometry regulations as follows:
Auto-adjust
Automatically regulates the position of the picture.
Phase (PC)
Fine adjustment of details shown on the screen. Only available when in the PC/HD mode (only for
experts users).
__________________________________________________________________________________________
Incorrect Correct
Horizontal position (PC)
Moves the picture displayed horizontally. Having selected the menu, shift the picture using the (►) or
(◄) buttons.
◄ ►
LCD 32 – 40 TV
6.3
Page 54

EN
Vertical position (PC)
Moves the picture displayed vertically. Having selected the menu, shift the picture using the (►) or (◄)
buttons.
◄ ►
__________________________________________________________________________________________
FLAT OSD LAYOUT
Frequency (PC)
Adjust frequency to obtain correct visualization. Available only in PC/HD mode (only for expert users).
Incorrect Correct
SIZE
3 available options: 4/3, 16:9, Native
4:3: For 4:3 PC resolutions. (ex.:800x600,1024x768 etc..)
16:9: For 16/9 or wide PC resolutions. (ex.: 848x480,1280x720 etc.)
Native: For native resolutions PC. (1366x768 for LCD32/40)
NATIVE
PC Input (analog RGB DSUB15)
Start the PC with the monitor connected with the analog cable (PC-RGB)
From the Windows Control Panel select:
- Screen Properties
- Settings
- Set the screen resolution to the native screen resolution (crf 5.3)
Using the SOURCE key on the remote control select PC input
Press the MENU key to activate main MENU
1. Select NATIVE=ON
2. Select SIZE = NATIVE
3. SELECT: PC
4. Activate SELFADJUSTMENT using right-arrow key. The PC mode will be acquired and
displayed in the best way possible.
NOTE: apply the same procedure EVERY time the native mode is switched ON/OFF
LCD 32 – 40 TV
6.4
Page 55

EN
NATIVE mode must be activated when using PC-RGB input in order to let the monitor distinguish the
real NATIVE mode from similar timings.
DVI input
Start the PC with the monitor connected with the digital cable (DVI-D)
From the Windows Control Panel select:
- Screen Properties
- Settings
- Set the screen resolution to the native screen resolution (crf 5.3)
Using the SOURCE key on the remote control, select PC input
Press the MENU key to activate the main MENU
1. Select NATIVE=ON
SOUND
FLAT OSD LAYOUT
Options: Mode; Volume (User, Standard, Music,
Movie, Speech); Balance; Equalizer; Auto Volume;
Sound Mode (Stereo, Dual1, Dual2).
Mode
Select the available options using the (▲) or (▼)
buttons: User, Standard, Music, Movie, Speech.
Volume
Controls the volume. Adjust from 0 to 100.
Balance
Controls the balance between the left and right channels.
Equalizer
Only available in USER sound mode, adjusts the gain
of the various audio frequencies.
Auto Volume
Automatic volume control. Adjusts the volume to avoid volume peaks caused by the audio input
signals.
Available options are Off and On.
Sound mode
Select the available audio channels with the (▲) or (▼) buttons:
Stereo: Stereo forced
Dual1: Language 1
Dual2: Language 2
__________________________________________________________________________________________
LCD 32 – 40 TV
6.5
Page 56

EN
OPTIONS
Available options: Reset, Time, Language, OSD
Sheet, Screen Saver, Dynamic Contrast, Advanced.
Reset
Restores all values to their factory settings.
WARNING! All memorized TV channels will be
erased. It will be necessary to run another channel
search.
Time
Possibility to select Power-on and Power-Off Time.
It’s possible to select a TV program and Volume
Value.
FLAT OSD LAYOUT
Feature available only if the clock is set to the right
time.
OSD Language
Select from available languages: English, French,
German, Italian, Spanish, Portuguese, Dutch, Arab.
OSD Transparency
Selects the background of the OSD menu. You can select “Off” or “On”.
“Off” sets the OSD background as solid color. “On” makes the OSD background half transparent,
basically, the transparency of the background color of the OSD window changes.
Screensaver
It’s possible to select different screensaver modes to avoid display damage:
Blue screen: Activate blue background when
there are no input signals on selected source
(not for screen saving, just for appearance,
not available on PC and DVI input).
Pixel shift: It moves the active area to the
predefined parameters.
Wiper: It generates a vertical moving bar that
slides through the screen every 10 minutes.
BackGray: Activates a gray background with 7
different levels for 4/3, 16/9 and native size
modes.
Dynamic contrast
Activates automatic contrast control to obtain the best possible image. Designed for TV input and any
other input with moving images (active only for sources TV, S-Video, SCART1, SCART2, AV,
Component interlaced 15KHz.).
__________________________________________________________________________________________
LCD 32 – 40 TV
6.6
Page 57

EN
Advanced
Displays current software version. NOTE: You may need to provide this information when requesting
technical support.
Backlight: it’s possible to set the LCD backlight level. Image settings are optimized for default backlight
value.
CHANNEL SEARCH
Available options: Country, Automatic Scan, Manual
Scan, Favorites, Edit, Name, Fine Tune.
FLAT OSD LAYOUT
Country
Select the Country where the display is used. The TV
will automatically set a preset-channel configuration
based on selected country.
Automatic scan
To automatically search for all available channels.
Select Start and press OK to start search.
Manual scan
Manual channel search:
1. Select program on which you want to Save the
channel.
2. Select Color System of your Country (PAL
Europe, SECAM France).
3. Select Audio system for your Country.
Available options are B/G”,”D/K”,”I” (Great
Britain, North Ireland and South Africa,
Australia, Europe and Middle East); “L” (East
Europe, Soviet Republics, France, Central
Africa).
4. Channel search: search for the desired channel by pressing OK to enter in the submenu. First,
select the channel type (C or S), then press (►) and select the channel with (▲)/(▼) or the
numeric keys.
5. Frequency search: press OK to enter the option. Use the (▼) key to start the search toward
lower frequencies or (▲) toward higher frequencies.
6. Once the right channel is selected, go to the “Memorize” option and press OK. Select “Yes”
and press OK to confirm.
__________________________________________________________________________________________
LCD 32 – 40 TV
6.7
Page 58

EN
Favorites
Use the “Favorites” option to enable the automatic skip function when you change programs by
pressing the (▲) or (▼) buttons.
1. Select the Program with the (▲) or (▼) buttons.
2. Press (►) or (◄) to change the program status from “Active” to “Skip”.
3. Press memorize to memorize the new program status.
Modify
Allows you to modify the program’s order.
1. Select program with the (▲) or (▼) buttons.
2. Press OK to edit program’s position.
3. Press the (▲) or (▼) buttons to move channel to the desired program.
4. Press “EXIT” to memorize position.
Rename
FLAT OSD LAYOUT
Allows you to rename a program.
1. Select program with the (▲) or (▼) buttons.
2. Press OK to edit program’s position.
3. Press the (►) or (◄) buttons to move to desired position and (▲) or (▼) to change letters.
4. Press EXIT to memorize the new name.
Fine tune
Allows you to fine tune a selected program.
1. Press (►) or (◄) to fine tune a selected
program.
2. Press EXIT to memorize the fine tuning.
3. If you want to return to original value of fine
tuning “0” select “RESET” and press OK.
PIP
PIP mode allows you to display two sources at the
same time. It’s possible to activate/deactivate and
change PIP mode with remote control by pressing PIP
button.
PIP Source
Select the input signal to display in PIP window. Press
MENU to display the available sources.
WARNING! PIP allows you to display two input video
signals sources including: TV, SCART, AV, Interlaced
Component and HD sources like PC, DVI, Progressive
Component.
PIP Size
It’s possible to select between three different PIP modes:
1. PIP Window. Window ¼ the size of the screen.
2. POP (Picture on Picture). Dual screen function, two sources with
half screen area for everyone.
3. POP ScreenSaver. Like POP with active areas which cover the
entire screen to avoid image sticking.
__________________________________________________________________________________________
LCD 32 – 40 TV
6.8
Page 59

EN
PIP Position
Allows you to choose from 4 different positions of PIP window.
Change
Allows you to change source position on PIP layout. It’s possible to activate this option with the PREPG
button on the remote control.
Audio source
Allows you to change audio source between displayed inputs. Choose “MAIN” to select the main
source and “SUB” for the secondary source.
FLAT OSD LAYOUT
__________________________________________________________________________________________
LCD 32 – 40 TV
6.9
Page 60

EN
Maintenance
The display does not require any particular maintenance.
Periodically, if the installation environment is dusty or smoky, the glass screen should be cleaned using
a normal glass cleaning product. Avoid using solvents or substances that could corrode the glass and
the stand. Particular care should also be taken when cleaning the glass not to apply excessive
pressure to it. Use a soft cloth only.
MAINTAINANCE - TRANSPORT
If dust penetrates between the glass and the light-emitting panel in a quantity that interferes with
viewing, send the monitor to an Authorized Service Centre.
Transport
Due to the fragility of the light-emitting panel, which is made entirely of glass and a fundamental
characteristic of this specific technology, the device must be effectively protected against shock during
transport.
It is important to use its complete, original packaging and always transport it in a vertical position,
orienting it with its long side in the direction of motion using pallets for all the transporting, loading and
unloading operations. The box must be firmly fixed to the pallet using special straps.
Transport direction
If these precautions are not adhered to, accidental shock may cause the breakage of the light-emitting
panel, making the device unusable.
WARNING
The manufacturer declines all liability for damage to the monitor caused by failure to respect
the rules and provisions laid down.
__________________________________________________________________________________________
LCD 32 – 40 TV
7
Page 61

__________________________________________________________________________________________
LCD TV
CHARACTERISTICS
- Standard video PAL (BG/H/ I, 60) , NTSC (M,4.43) , SECAM
- Input resolution (for PC) up to SXGA (1280X1024)
- PIP (Picture-in-Picture)
- PIP mode and position settings
- Selection of picture aspect ratio (4:3 and 16:9 compatibility)
TECHNICAL SPECIFICATIONS
Product name:
LCD 32" SG LCD 40" SG
Screen size:
32" (81 cm) diagonal 40" (101 cm) diagonal
Aspect Ratio:
16:9 16:9
Resolution:
1366 (H) x 768 (V) pixels 1366 (H) x 768 (V) pixels
Brightness:
550 cd/m2 500 cd/m2
Contrast ratio:
1,000:1 1,200:1
Response time:
8 msec 8 msec
View angle:
H:176°, V:176° H:170°, V:170°
Display panel
Colors:
16.7 Mil 16.7 Mil
Video:
Video [CVBS] Video [CVBS]
S-Video [Y/C] S-Video [Y/C]
SCART1 [CVBS, RGB], SCART2 [CVBS] SCART1 [CVBS, RGB], SCART2 [CVBS]
Component [Y,Pb,Pr] Component [Y,Pb,Pr]
PC:
Analog RGB [PC] Analog RGB [PC]
Digital RGB [DVI-D] Digital RGB [DVI-D]
Tuner:
Antenna [75 Ohm - VHF/UHF] Antenna [75 Ohm - VHF/UHF]
Audio:
Video / S-Video / Component stereo input Video / S-Video / Component stereo input
PC / DVI stereo input PC / DVI stereo input
Line stereo output Line stereo output
Connections
Optical audio output (SPDIF) Optical audio output (SPDIF)
EN
8
TECHNICAL CHARACTERISTICS
LCD 32 – 40 TV
Page 62

__________________________________________________________________________________________
Video:
PAL (BGH/D/I, 60), NTSC (M, 4.43), SECAM PAL (BGH/D/I, 60), NTSC (M, 4.43), SECAM
PC:
VGA ~ SXGA (1280x1024) VGA ~ SXGA (1280x1024)
NATIVE (1368x768) NATIVE (1368x768)
DTV:
480i/p, 576i/p, 720p, 1080i @ 50/60 Hz 480i/p, 576i/p, 720p, 1080i @ 50/60 Hz
Analog Tuner:
Standard: PAL BG/I/DK, SECAM L/L' Standard: PAL BG/I/DK, SECAM L/L'
Tuning system: Electronic with PLL Tuning system: Electronic with PLL
Teletext: BESIC1.5/TOP/FAST Teletext: BESIC1.5/TOP/FAST
Audio:
Power audio output: 2 x 7W Power audio output: 2 x 7W
Features
Speakers:
Built-in stereo speakers Built-in stereo speakers
Video:
Brightness, Contrast, Color, Sharpness Brightness, Contrast, Color, Sharpness
Dynamic contrast Dynamic contrast
Colour temperature (5 selections, user) Colour temperature (5 selections, user)
Size (16:9, 14:9, 4:3, Panorama, Zoom, Auto) Size (16:9, 14:9, 4:3, Panorama, Zoom, Auto)
PIP / POP / Split Screen PIP / POP / Split Screen
Still Still
TV:
Auto scan Auto scan
Manual scan / fine tune Manual scan / fine tune
Auto station name Auto station name
Edit program Edit program
Audio:
Volume, Balance Volume, Balance
Equalizer (5 band) Equalizer (5 band)
Stereo/mono/dual sound/NICAM Stereo/mono/dual sound/NICAM
AutomaticVolumeControl AutomaticVolumeControl
Others:
Stand-by mode Stand-by mode
Timer (wake-up, sleep) Timer (wake-up, sleep)
Screensaver (orbital, wiper, blue, gray) Screensaver (orbital, wiper, blue, gray)
Programmable OSD Programmable OSD
Backlight control Backlight control
Controls
OSD Language:
D, E, F, GB, I, NL, P, SA D, E, F, GB, I, NL, P, SA
8.1
EN
TECHNICAL CHARACTERISTICS
LCD 32 – 40 TV
Page 63

8.2
EN
TECHNICAL CHARACTERISTICS
Dimensions:
815 x 515 x 105 mm 1034 x 648 x 98 mm
Weight:
23 Kg (without base) 37 Kg (without base)
Mains voltage:
115/230 VAC ± 15%, 50/60 Hz 115/230 VAC ± 15%, 50/60 Hz
Physical
Power
consumption:
170 W 275 W
Power cable Power cable
Remote control with batteries Remote control with batteries
Accessorie
s
User manual User manual
__________________________________________________________________________________________
LCD 32 – 40 TV
Page 64

8.3
EN
CONNECTORS
CONNECTORS
HD VGA/RGB D15 CONNECTOR
1 Red
2 Green
3 Blue
4 N.C.
5 Ground
6 Ground
7 Ground
8 Ground
9 N.C.
10 Ground
11 Ground
12 Ground
13 Horizontal synchronization
14 Vertical synchronization
15 N.C.
S-VHS CONNECTOR
1 Ground
2 Ground
3 Chrominance C input
4 Luminance Y input
SCART EUROCONNECTOR
1 Right channel audio output 0.5 Vrms Impedance ≤1KΩ
2 Right channel audio input 0.5 Vrms Impedance ≥10KΩ
3 Left channel audio output 0.5 Vrms Impedance ≤1KΩ
4 Audio ground
5 Input B ground
6 Left channel audio input 0.5 Vrms Impedance ≥10KΩ
7 Input B 0.7Vpp/75Ω
8 Slow input 0÷2V logic 0; 9,5÷12V logic 1
9 Ground Input G
10 N.C.
11 Input G 0.7Vpp/75Ω
12 N.C.
13 Ground input R
14 Ground
15 Input R 0.7Vpp/75Ω
16 Fast blanking 0÷0,4V logic 0 ; 1÷3V logic 1
17 Ground
18 Ground
19 CVBS output 1Vpp/75Ω (including synch.)
20 CVBS input 1Vpp/75Ω (including synch.)
21 Screen
__________________________________________________________________________________________
LCD 32 – 40 TV
Page 65

9
EN
TROUBLESHOOTING
Problem
Device Control
No image on the screen
and no sound from
the speakers
.
• Check that the power cable is connected.(sec.3.2)
• Check that the main switch is on “I”. (sec.3.2)
• Check that the device is not in ST-BY (red led)
Turn on the device using the Power button on the remote control
or key board (sec.4-4.1)
No Image
• Check that the selected input is connected to the source. Press
the Source button on the remote control or change the input (sec.
4-4.1)
The image appears but there is no sound
from the speakers
• Check that the audio wires from the source are connected to the
corresponding input (sec. 3.2).
The TV does not respond to
the remote control
• Point the remote control directly at the sensor.
• Remove any obstacle between the display and the remote
control.
• Check the remote control’s batteries.
• Press the TV button.
Bad reception or interference on the analog
or digital TV channels
• Check that the antenna cable is connected properly.
• Check that the antenna cable is grounded properly.
• Check that there are no other appliances like microwave ovens
that disturb the reception.
The TV does not tune in properly
to the analog channels
• Check that the color system selected in the CHANNEL menu is
“Manual Search” or “Automatic Search “ is correct (sec. 6.7).
• Adjust the fine tuning (sec.6.8).
You do not hear the audio when tuned to an
analog channel
• Check that the color system selected in the CHANNEL menu is
correct (sec.6.7, ex.: BG).
__________________________________________________________________________________________
LCD 32 – 40 TV
Page 66

EN
INCLUDED ACCESSORIES
Remote control User Manual
ACCESSORIES
Power cable Packaging
Batteries size AAA
__________________________________________________________________________________________
LCD 32 – 40 TV
10
Page 67

11
EN
DIAGRAM LCD 32
__________________________________________________________________________________________
LCD 32 – 40 TV
Page 68

11.1
EN
DIAGRAM LCD 40
__________________________________________________________________________________________
LCD 32 – 40 TV
Page 69

made by
SAMBERS ITALIA S.P.A.
Via Friuli 10/D
20046 Biassono (MI)
Phone: +39.039.22.24.1
Fax:+39.039.22.24.200
Mail info@hantarex.it
made by
Le informazioni ed i dati tecnici contenuti sono soggetti a modifiche anche senza preavviso – Product specification are subject to change without notice.
Cod. 53894940
 Loading...