

Page 1
User’s Manual2
User’s Manual 3
FCC Information
This equipment has been tested and found to comply with limits for a class B digital device,
pursuant to Part 15 of the FCC Rules. These limits are designed to provide reasonable
protection against harmful interference in a residential installation.
This equipment can generates, uses, and radiate radio frequency energy and, if not installed
and used in accordance with the instructions, may cause harmful inteference to radio
Communications. However, there is no guarantee that interference will not occur in a particular
installation.
If this equipment does cause unacceptable interference to radio and television reception, which
can be determined by turning the equipment off and on, the user is encouraged to try to correct
the interference by one or more of the following measures.
Reorient or relocate the receiving antenna.
Increase the separation between the equipment and receiver.
Connect the equipment into an outlet on a circuit different from that to which the
receiver is connected.
Consult the dealer or an experienced Radio/TV technician for help.
DECLARA TION OF CONFORMITY
PRODUCT NAME : 17" COLOR MONITOR
MODEL NUMBER : D17CL
FCC RULES : TESTED TO COMPLY WITH FCC PART 15, CLASS B
OPERATING ENVIRONMENT : FOR HOME OR OFFICE USE
FCC COMPLIANCE STATEMENT :
This device complies with part 15 of FCC Rules. Operation is subject to the following two
conditions : (1) This device may not cause harmful interference, and (2) this device must accept
any interference received, including interference that may cause undesired operation.
THE PARTY RESPONSIBLE FOR PRODUCT COMPLIANCE
HANSOL MULTITECH, INC.
7001, VILLAGE DRIVE, SUITE 255, BUENA PARK, CA. 90621, USA
TEL : (714)562-5151
Introduction
Package 4
Safety Information 4
Features 5
Power management system 6
Installation
Connection to your personal computer. 7
Pin assignment table D-sub mini 15 pin connector 7
Controls
OSD Controls 8
OSD Menus 9
Troubleshooting
No picture 12
Image is scrolling or unstable 12
Picture is fuzzy 12
Picture bounces or a waving pattern is present in the picture
12
Edges of the display image are not square 12
Display image is not centered, too small, or too large 12
Specifications
Electrical specifications 13
Mechanical specifications 13
Environmental specifications 13
Appendix
Preset Timings 14
Caution
Changes or modifications not expressly approved by the party responsible for
compliance could void the user’s authority to operate the equipment.
Canadian Notice
This Class B digital apparatus meets all requirements of the Canadian
Interference Causing Equipment Regulations.
Avis Canadien
Cet appareil numérique de la classe B respecte toutes les exigences du
Règlement sur le matériel brouilleur du Canada.
Notice
The information contained in this document is subject to change without notice.
English
Page 2
Introduction
User’s Manual 5
Introduction
User’s Manual4
ENGLISH
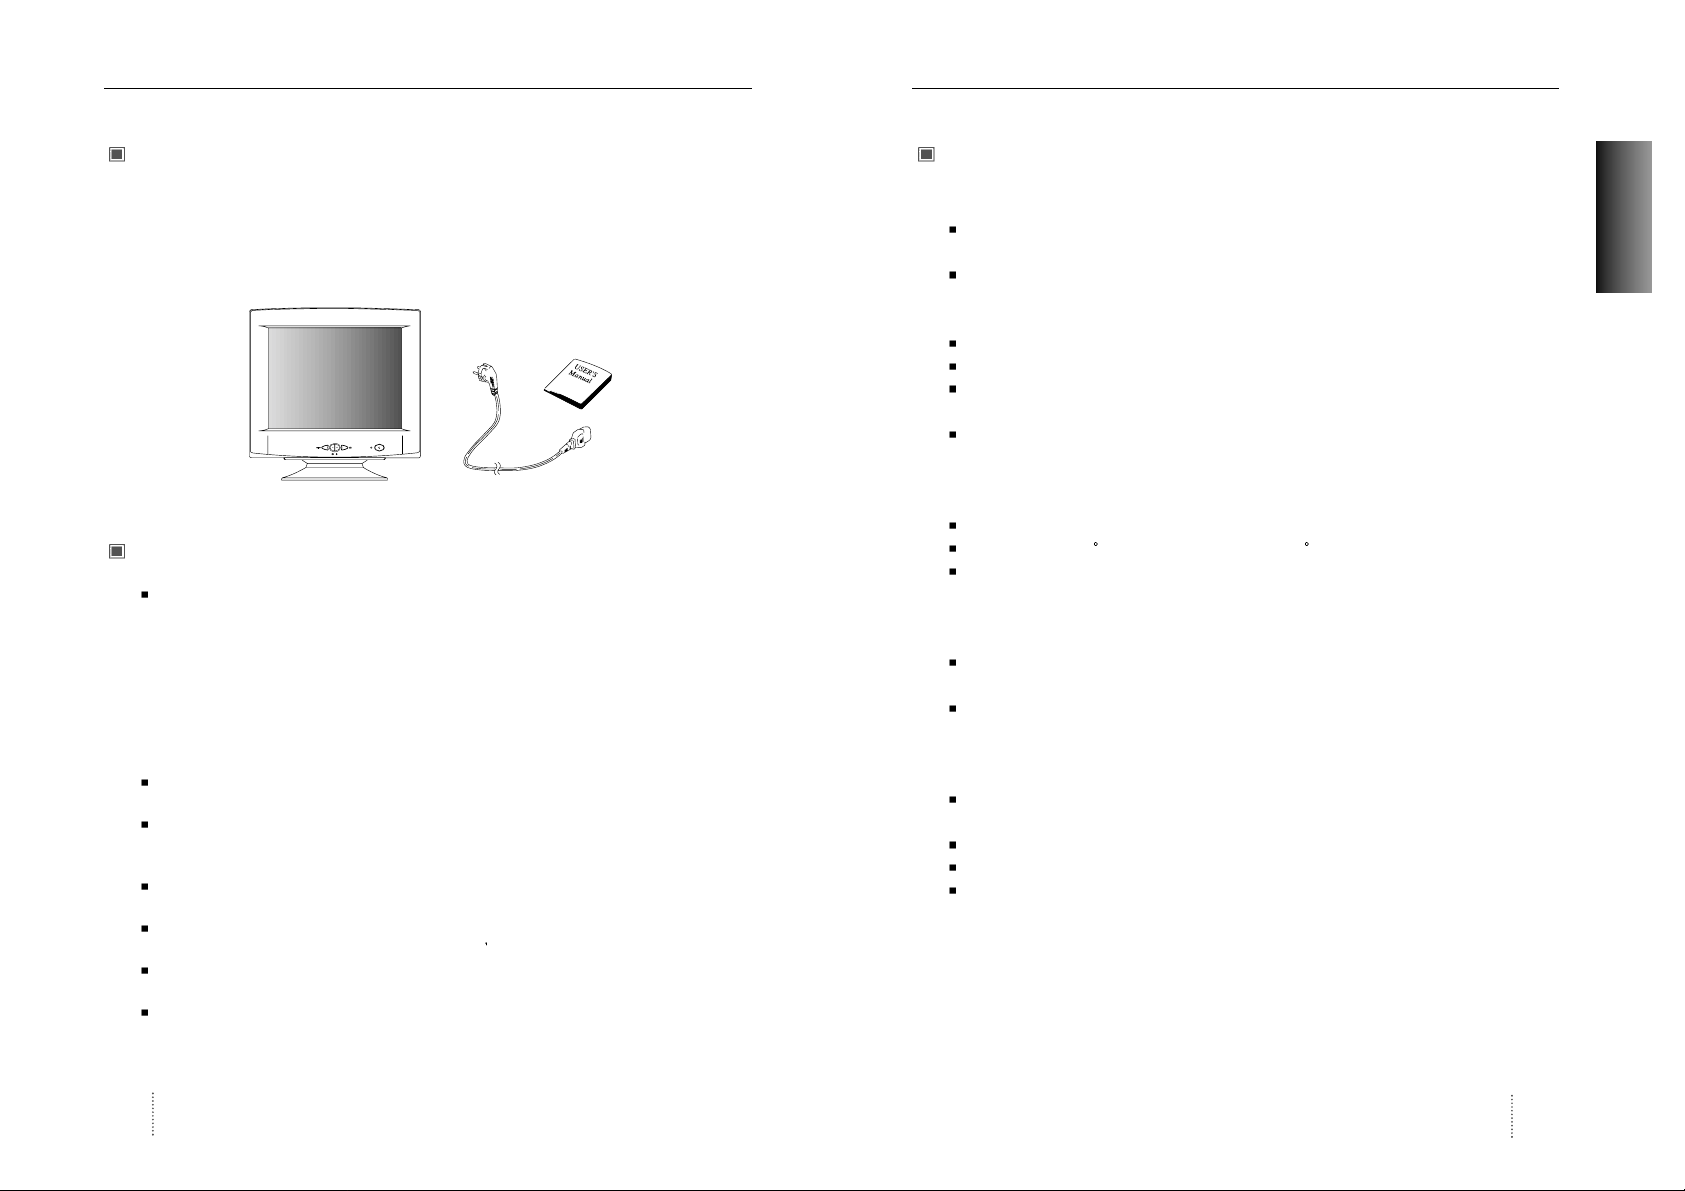
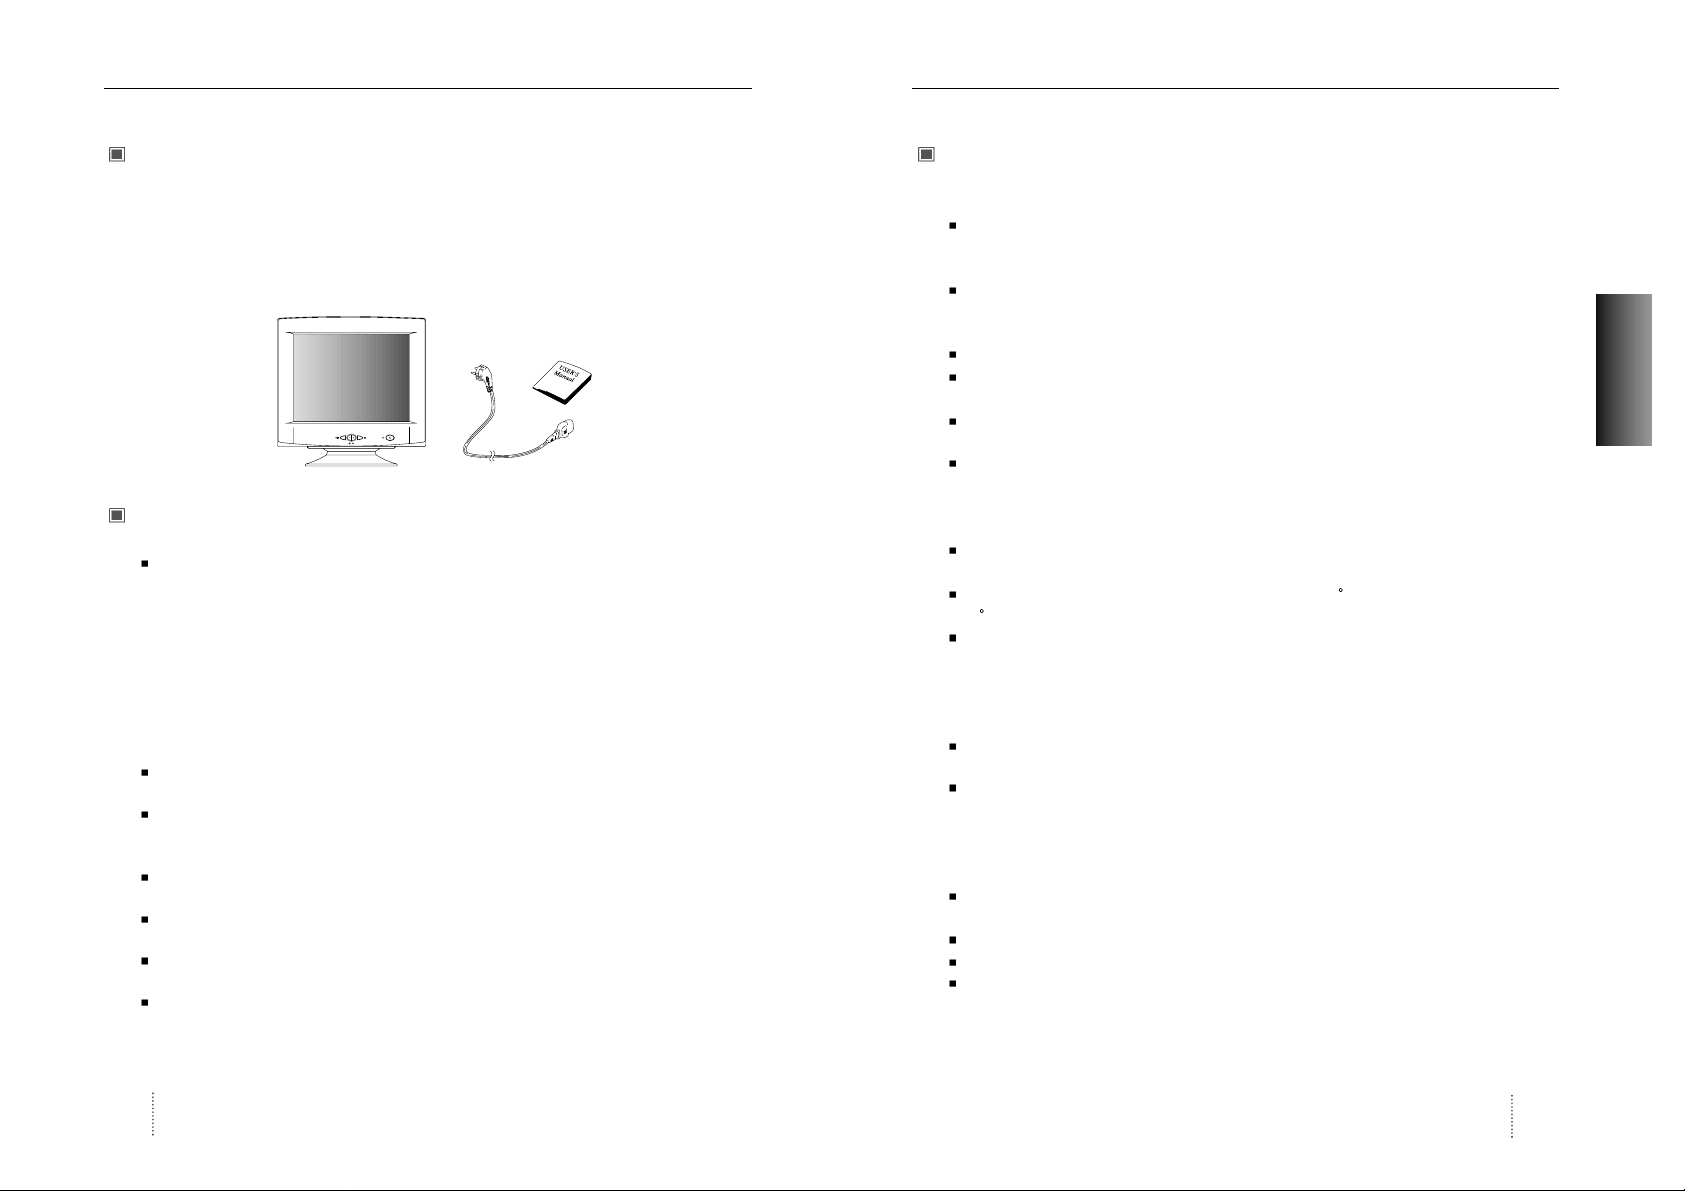
Package
Congratulations on your purchase of this top quality color monitor!
The items illustrated below are contained in the carton.
First, be sure that your carton includes all of them.
If any items are missing or damaged, please contact your local dealer or supplier.
Safety information
Provided with this monitor is a detachable power supply cord with IEC320 style terminations.
It may be suitable for connection to any UL listed personal computer with similar
configuration. Before making the connection ensure that the voltage rating of the computer
convenience outlet is the same as the monitor and that the ampere rating of the computer
convenience outlet is equal to or exceeds the monitor current rating.
For 120Volt applications use only UL listed detachable power cord with NEMA configuration
5-15P type(parallel blades) plug cap.
For 240Volt applications use only UL listed detachable power cord with NEMA configuration
6-15P type(tandem blades) plug cap.
Use only a power source and connection appropriate for the monitor as indicated on the
marking label.
Slots and openings in the cabinet are provided for ventilation;
these openings must not be blocked or covered. Never push objects of any kind into cabinet
slots or other openings.
Never insert anything metallic into the monitor openings.
Doing so may create a danger of electric shock.
To avoid electric shock, never touch the inside of the monitor.
Only a qualified technician should open the monitor s case.
Unplug the monitor from the wall outlet before cleaning. Do not use liquid cleaners or aerosol
cleaners. Use a damp, lint-free cloth for cleaning.
Install the monitor near an outlet that you can reach easily. Disconnect the product by
grasping the plug firmly and pulling in from the outlet.
Never disconnect it by pulling the cord.
Display Monitor
AC Power Input Cable
Features
Superior image
On Screen menu fingertip control system to visually select and adjust screen using buttons
on front panel and on screen menus.
The exclusive double dynamic focus system with a hyperbolic focus compensation circuit
controls the electron beams resulting in a fine image display over the entire area of the
screen.
Super contrast screen for superior contrast and richer color.
Advanced INVAR Shadow mask for superior focus, brightness and color.
17", 0.25dot pitch high resolution, non-interlaced technology provides sharp, flicker-free
images.
On screen menu color control system easily allows the white of the image to be adjusted as
well as R.G.B signals, resulting in true-to-life colors.
Ergonomic Design
Flat, square screen to reduce image distortion and glare, thus relieving eye strain.
Tilt base allowing 90 rotation in the horizontal and 17 in the vertical for greater user comfort.
Low-leak radiation prevention meeting MPR II and the very stringent TCO (option) magnetic
field emissions standards for increased user safety.
Environmentally Friendly
Power management circuit conforming to VESA DPMS standards controls energy
consumption when monitor is not in use, you save energy.
All plastic parts are recyclable. All materials are strictly selected to ensure ease of
maintenance, inspection and disposal.
Timing
Automatic tracking of horizontal frequencies of 30 to 72 kHz,and vertical frequencies of
47 to 160 Hz.
Ten timings are factory preset for image size and position
Ten additional timings are user definable.
Synchronizing input signals (separate, composite) can be automatically selected.
Page 3
User’s Manual 7
ENGLISH
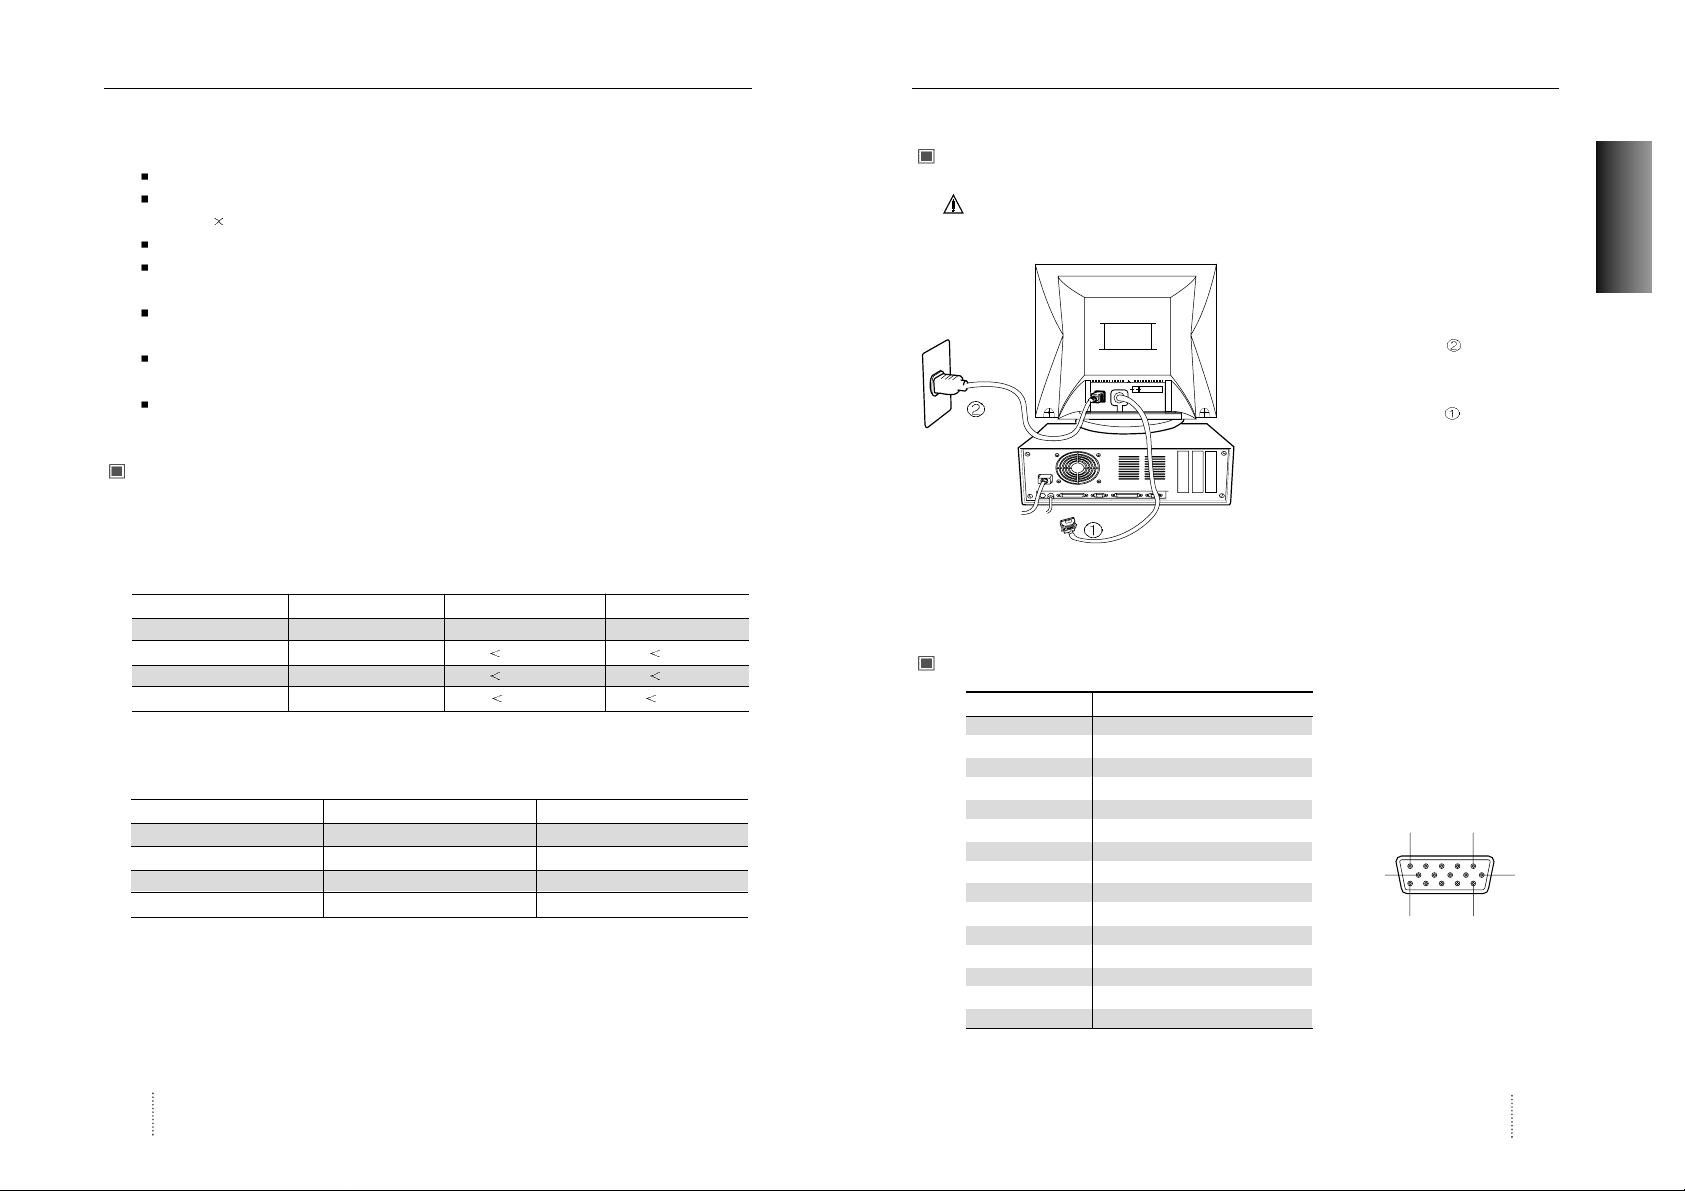
Installation
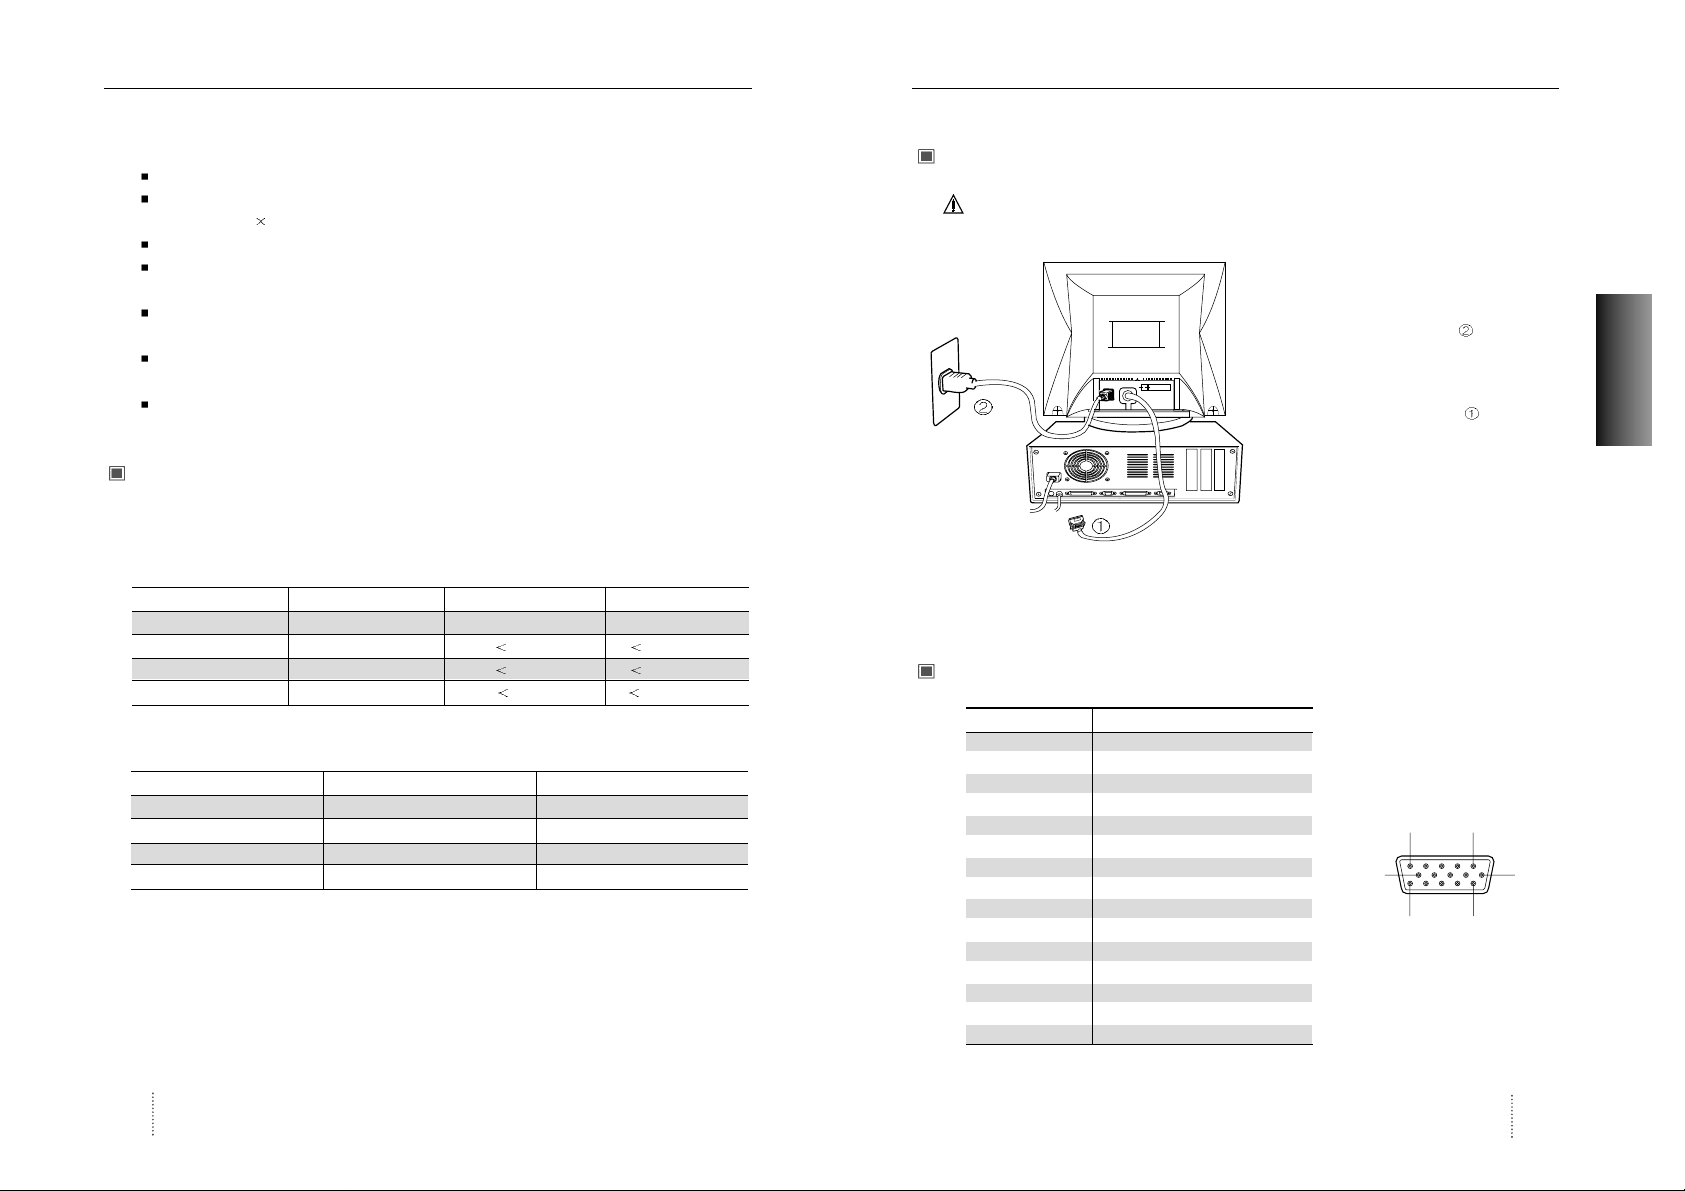
Connection to your computer
CAUTION
Ensure that both the PC and the display monitor are switched off.
To attach the monitor to your system, as
shown in the following illustrations.
1. Insert the AC power cord into monitor
and then into an AC power outlet.
2. Connect the signal cable to the 15pin
graphics connector of the system and
tighten the fastening screws.
3. To turn on the monitor, push the power
switch.
Note : To attach the monitor to the Macintosh system, please contact an authorized
dealer.(Need to use a special adaptor)
Pin assignment table D-Sub Mini 15pin connector
The 15-pin D-Sub connector
(male) of the signal cable
(IBM Systems) :
(15 Pin D-Sub)
15
11 15
6
10
Pin No. Assignment
1 Red Video
2 Green Video
3 Blue Video
4 Frame Ground
5 Ground
6 Red Video Ground
7 Green Video Ground
8 Blue Video Ground
9 N.C
10 Sync. Ground
11 Ground
12 SDA
13 H-Sync.
14 V-Sync.
15 SCL
Introduction
User’s Manual6
System Flexibility
Equipped with DDC1, DDC2B and DDC2Bi for Plug & Play compatibility.
Monitor is compatible with VGA, SVGA, VESA and high resolution video modes up to
1280(H) 1024(V) @ 60Hz
Monitor may be used with IBM or compatible PC, MAC.
Automatic universal power supply is built in permitting AC power input of 100 - 240V AC,
50 or 60Hz.
Self-test menu allows the display unit to be checked on screen without connecting to a
computer.
Compact case minimizes desktop space giving you a large screen image without loss of
workspace.
Power cable included easily plugs into a standard outlet.
Power management system
This monitor complies with VESA, Nutek, and Energy Star power saving requirements. The
power saving system works only when used with VESA DPMS compliant PC’s and/or graphic
controllers.
The monitor goes into various power saving stages depending on the incoming
video signal as shown in the following table
Note
The monitor automatically goes through the DPMS steps when it is idle.
To release the monitor from the DPMS condition, press any key on the keyboard or mouse.
State Horizontal Sync Vertical Sync
On On On
Stand by Off On
Suspend On Off
Off Off Off
State LED Power Recovery Time
On Green Under 75 Watts N/A
Stand by Green
60 Watts 2 Sec
Suspend Amber 15 Watts 5 Sec
Off Amber/Blink
5 Watts 15 Sec
Page 4
User’s Manual 9
ENGLISH
User’s Manual8
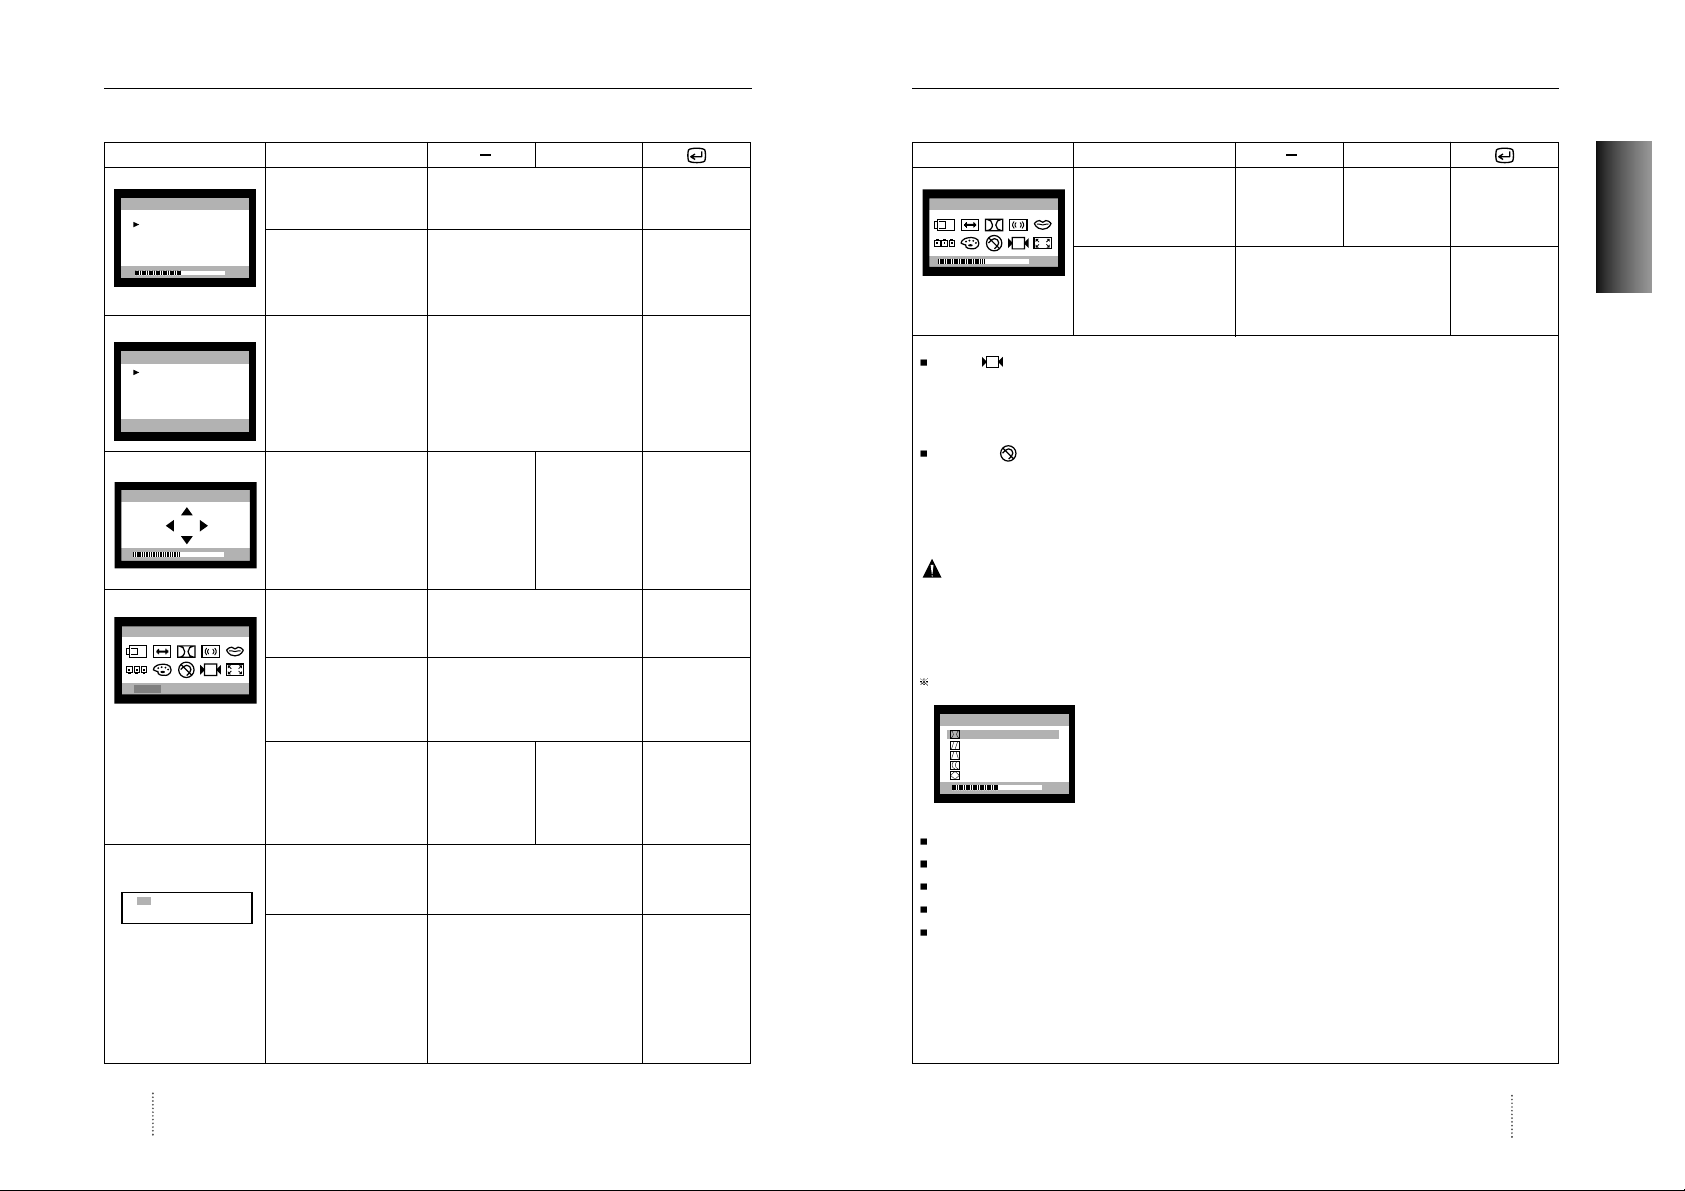
Controls
OSD Menu
Controls
OSD controls
"ON SCREEN MENU" controls include the following extended controls such as Size, Position,
Geometry, Color Adjust, Brightness and Contrast Utilities. Adjustments are saved instantly. The
currently addressed control can be reset to factory settings by pressing the Reset button.
Function of OSD buttons on the front of the monitor
: In the main menu, exits the OSD controls. In a submenu, exits to the OSD main menu.
/+
1) When no OSD on the Screen,
: Direct access to Brightness controls.
+: Direct access to Contrast controls.
2) When main menu is displayed. : Moves to function what you want to adjust.
3) When the sub menu is displayed. : Controls the amount what you want to adjust.
MENU : Displays OSD main Menu.
1) When main menu is displayed. : Selects function with RED ICON.
2) When sub menu is displayed. : Selects function with RED ICON.
Additional front controls
Power Switch : Turns the monitor power on or off. When the power is on, the LED is on.
LED Power indicator Light : Located left side of the power switch and indicates the monitor's
power mode. Each mode reduces the amount of power used by the monitor.
Accessing on screen menu
Press MENU Button.
Turning off on screen menu
When in the main menu, press button.
When in submenus, press button twice.
OSD MENU MENU +
1. NO OSD Proceeds to NO.2 Proceeds to Proceeds to No meaning
NO.3 NO.4
2. MAIN MENU The function with RED Moves to function you want. Exit to No.1
ICON is
- Performed : Recall,
Degauss
- Selected and blinked
: Color Adjust, Zoom
- Proceeded : Others
3. BRIGHTNESS Moves to No.2 Decreases the Increases the Exit to No.1
brightness brightness
4. CONTRAST Moves to No.2 Decreases the Increases the Exit to No.1
contrast contrast
5.H/V-POSITION Toggles horizontal or Moves the Moves the Exit to No.2
vertical position image down or image up or
left in the right in the
selected selected
function. function.
6. H/V-SIZE Toggles horizontal or Shinks the Expands the Exit to No.2
vertical size image in the image in the
selected selected
function. function.
7.GEOMETRY Odd press Controls the amount of the Exit to No.2
: Selects and blinks the Selected funcion. (Refer to Geofunction with RED ICON metry controls menu in detail)
Even press Moves to function you want. Exit to No.2
: Stops blinking and
ready to move function
you want.
POSITION
PRESS MENU KEY
BRIGHTNESS
50
PP
31.5KHz 60Hz
CONTRAST
PP
50
31.5KHz 60Hz
H. POSITION
50
H. SIZE
50
50%
PINCUSHION
PARALLELOGRAM
TRAPEZOID
PINBALANCE
ROTATION
GEOMETRY
50
Page 5
User’s Manual 11
ENGLISH
User’s Manual10
Controls
Controls
OSD MENU MENU +
8. MOIRE Odd press Contros the amount of selected Exit to No.2
: Selects and blinks the function. Please control these key
function with RED ICON in order the image not to shiver.
Even press Moves to function you want.
: Stops blinking and
ready to move function
you want.
9. LANGUAGE Selects the languages Moves to language you want. Exit to No.2
with RED ICON and
Exit to No.2
10. OSD POSITION Toggles OSD position Moves the OSD Moves the OSD Exit to No.2
horizontally or vertically. menu left or menu right or
down in the up in the
selected selected
function. function.
11. COLOR MODE Odd press Moves to color mode you want Exit to No.1
: Blinks the RED ICON and the selected “color mode”
- color menu ICON. will blink.
Even press Moves to function you want. Exit to No.1
: Stops blinking and
ready to move function
you want.
When the color mode _ _ _
ICON is blinking in user
mode, press, then go to
color adjust mode
No.12.
12. COLOR ADJUST Odd press Controls the amount of function Exit to No.11
MODE : Selects and blinks the you want.
function you want.
Even press Moves to the function you want. Exit to No.11
: Stops blinking and
ready to move function
you want.
50
MOIRE CONTROL
H. MOIRE ADJUST
V. MOIRE ADJUST
LANGUAGE
ENGLISH
DEUTSCH
FRANÇAIS
ESPAÑOL
PORTUGUÊS
PRESS MENU KEY
OSD H.POSITION
50
COLOR - TEMP
USER 6500K 9300K
50
RB GB BB RG GG BG
USER
OSD MENU MENU +
13. ZOOM Odd press Shinks the Expands the Exit to No.1
: Selects zoom and image image
blinks the zoom ICON. horizontally horizontally
and vertically. and vertically.
Even press Moves to the function you want. Exit to No.1
: Stops blinking and
ready to move anther
function.
Recall ( ) : Recall control to the factory setting resets all the controls within the all menu.
If you want to return to the factory mode setting, press Recall key 5~8 Sec
continuously.
Degauss ( ) : Eliminates the build-up of stray magnetic fields which alter the correct scan of the
electron beams and affect the purity of the screen colors, focus, and
convergence. When pressed, you screen image will jump and waver a bit as the
screen is demagnetized.
Caution : Please allow aminimum of 20 minutes to elapse between uses of the Degauss
button. Do not hold the button down continuously to avoid decreasing the life the
Deguass circuitry.
Geometry Controls Menu
The Geometry controls allow you to adjust the curvature or angle
of the sides of you display.
Pincushion : Increases or decreases the curvature of the sides either inward or outward.
Parallelogram : Increases or decreases the tilt of the sides either to the left or right.
Trapezoid : Increases or decreases the bottom of the screen to be the same as the top.
Pin Balance : Increases or decreases the curvature of the sides either to the left or right.
Rotation : Increases or decreases the tilt of the screen image relative to a horizontal line.
ZOOM
50
50%
PINCUSHION
PARALLELOGRAM
TRAPEZOID
PINBALANCE
ROTATION
GEOMETRY
50
RB - Red background raster
GB - Green background raster
BB - Blue background raster
RG - Red level gain
GG - Green level gain
BG - Blue level gain
Page 6

User’s Manual 13
ENGLISH
User’s Manual12
13
Specifications
Electrical Specifications
Mechanical Specifications
Environmental Specifications
ITEM D17CL
CRT Type 17 , 90 deflection DF
CRT Dot pitch 0.25mm
CRT Surface Non-glare
H/V Separate, TTL, positive/negative
H/V Composite, TTL, positive/negative
RGB Analog (0.7Vp-p), positive
75 Terminated
30kHz~72kHz (Automatically)
47Hz~160Hz (Automatically)
Maximum Resolution 1280Dots 1024Lines (Non-interlace)
Pixel Clock (Max.) 110 MHz
Display Size (Standard) Horizontal 306mm, Vertical 230mm
Power Consumption Under 75 Watts
Power Supply AC 100~240Volt, 50/60Hz 3Hz
Input Connector D-Sub, 15Pin Connectors
Display Colors Unlimited
ITEM D17CL
16.5
(W) 16.5 (D) 16.4 (H)
418mm(W) 419mm(D) 417mm(H)
21.2 (W) 21.7 (D) 20.9 (H)
538mm(W) 550mm(D) 530mm(H)
37.5Ibs (17.0Kg)
44.8Ibs (20.3Kg)
ITEM D17CL
32
F to 104 F (0 C to 40 C)
-4 F to 140 F (-20 C to 60 C)
10% to 85% R.H. Non-condensing
Input
Signal
Dimension
Sync
Video
Carton
Unit
Horizontal
Net
Vertical
Gross
Operating
Storage
Humidity
Scanning
frequency
Weight
Temperature
Troubleshooting
No picture
Check that the AC cord is correctly connected.
Check that the AC socket is live by plugging in another piece of equipment.
Power switch and computer power switch should be in position.
Ensure that the signal cable is properly connected to the video card or PC.
Ensure that the video card is securely seated in the PC.
Check the connector for bent or pushed-in pins.
Press a key on the keyboard or move the mouse, in case the screen power-saver mode has
blanked the screen.
Image is scrolling or unstable
Signal cable should be securely attached to the computer.
Check the pin assignments and signal timings of the monitor and your video card with
respect to recommended timings and pin assignments.
Ensure that the video card is securely seated in the PC.
Picture is fuzzy
Adjust the Contrast and Brightness Controls.
Push the Degauss Button once.
Caution : A minimum interval of 20 minutes should exist before the Degauss Button is used a
second time. Do not hold the button down continuously.
Picture bounces or a waving pattern is present in the picture
Move electrical devices that may be causing electrical interference away from the monitor.
See the inside front cover of this manual for FCC information.
Unshielded audio speakers placed next to the monitor can cause picture distortion. Move
the speakers away.
Edges of the display image are not square
Adjust the distortion using the Side Pincushion or Trapezoid Pincushion Balance, Parallel
adjustment controls under the on screen menu.
Display image is not centered, too small, or too large
Adjust the horizontal and vertical image sizes using the Horizontal and Vertical Size
adjustment controls under the on screen menu.
Page 7
User’s Manual14
Appendix
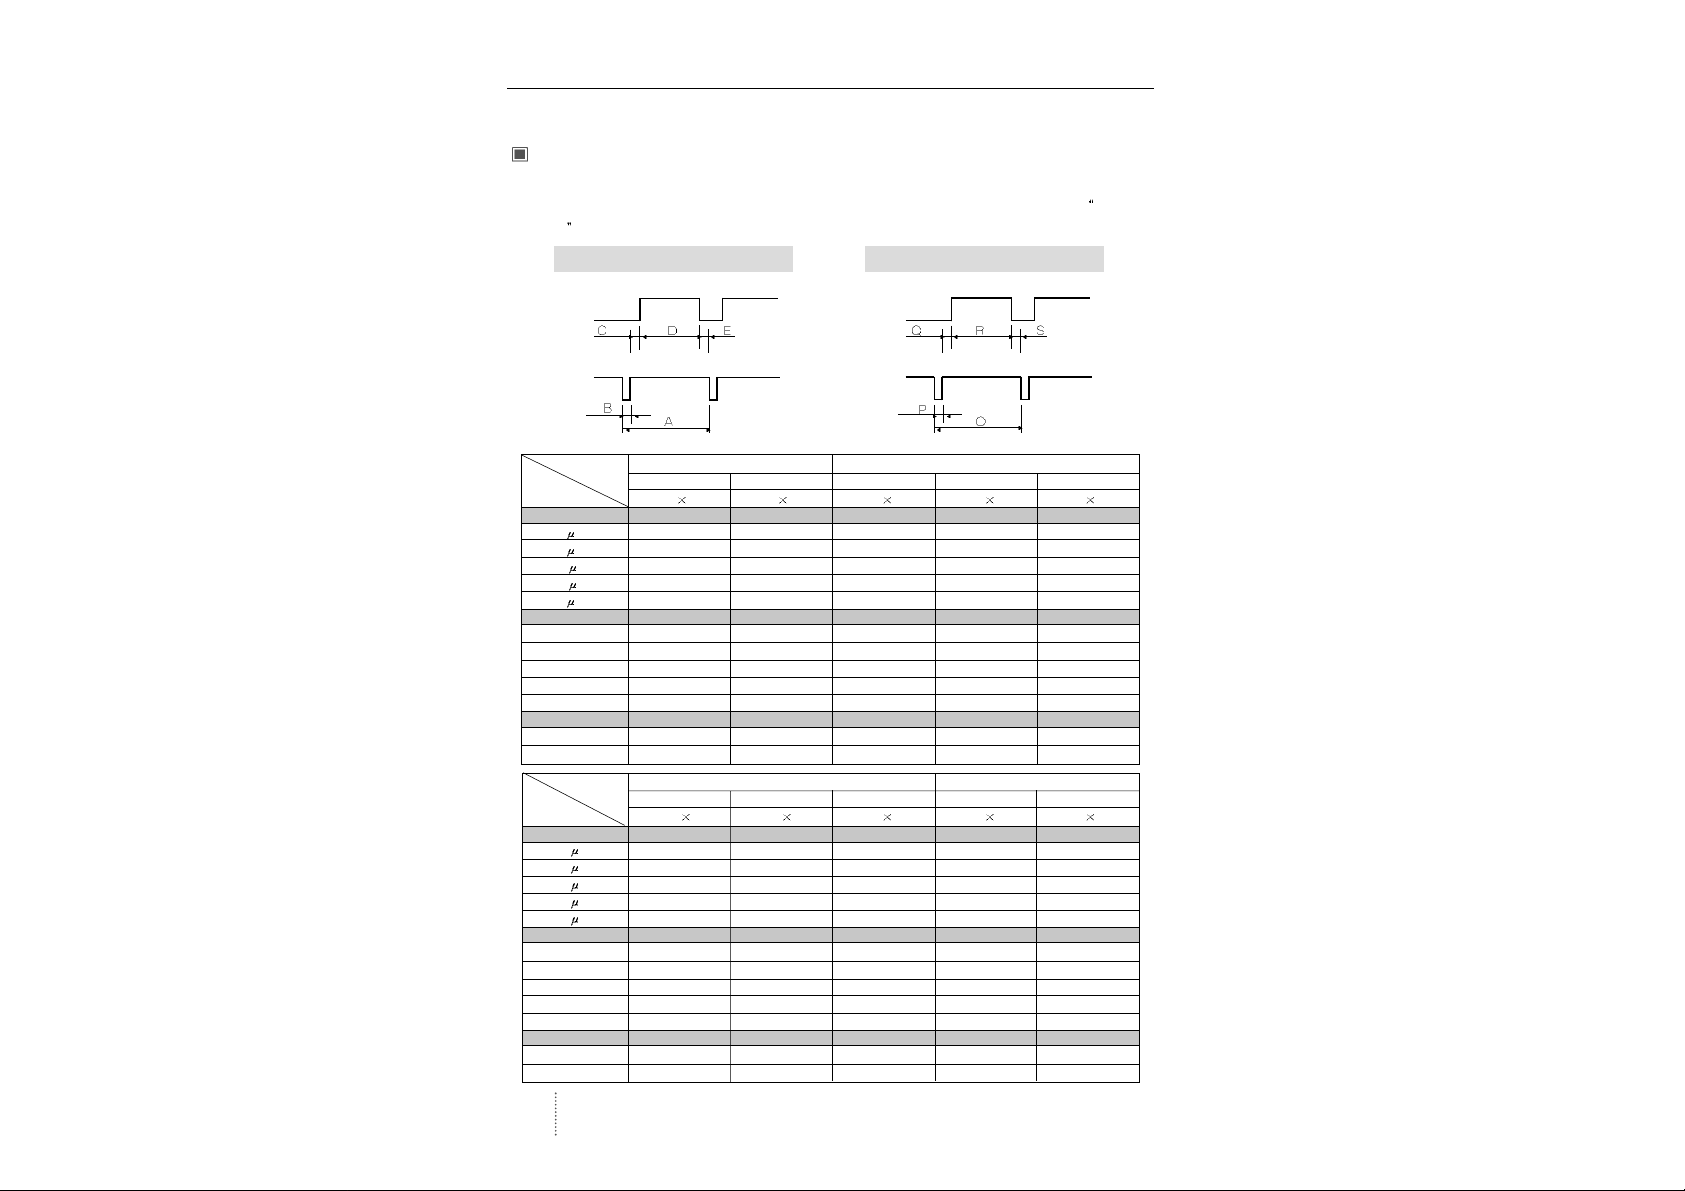
Preset Timings
This Monitor D17CL has preset modes for the 10 most popular industry standards for Plug and
Play capability.
Video
Sync
Vertical
Video
Sync
Horizontal
1024/75Hz 1024/85Hz 1280/60Hz 640/67Hz 832/75Hz
1024
768 1024
768 1280
1024 640 480 832 624
H-Freq(kHz) 60.023 68.677 63.953 35 49.726
A
sec 16.660 14.561 15.636 28.571 20.11
B
sec 1.219 1.016 1.018 2.116 1.117
C
sec 2.235 2.201 2.255 3.175 3.91
D
sec 13.003 10.836 11.636 21.164 14.524
E
sec 0.203 0.508 0.727 2.116 0.559
V-Freq(Hz) 75.029 84.997 59.938 66.667 74.551
Omsec 13.328 11.765 16.684 15 13.414
Pmsec 0.050 0.044 0.078 0.086 0.06
Qmsec 0.466 0.524 0.579 1.114 0.784
Rmsec 12.795 11.183 16.012 13.714 12.549
Smsec 0.017 0.015 0.016 0.086 0.02
Pixel rate(MHz) 78.750 94.5 107.761 30.24 57.284
H-Polarity Positive Positive Positive Negative Negative
V-Polarity Positive Positive Positive Negative Negative
VESA
MACINTOSH
Resolution
Timing
VGA/70Hz VGA/60Hz 640/85Hz 800/75Hz 800/85Hz
720
400 640 480 640 480 800 600 800 600
H-Freq(kHz) 31.469 31.469 43.269 46.875 53.674
A
sec 31.777 31.777 23.111 21.333 18.631
B
sec 3.813 3.813 1.556 1.616 1.138
C
sec 1.907 1.907 2.222 3.232 2.702
D
sec 25.422 25.422 17.778 16.162 14.222
E
sec 0.636 0.636 1.556 0.323 0.569
V-Freq(Hz) 70.09 59.94 85.008 75 85.061
Omsec 14.268 16.684 11.764 13.333 11.756
Pmsec 0.064 0.064 0.069 0.064 0.056
Qmsec 1.08 1.048 0.578 0.448 0.503
Rmsec 12.711 15.253 11.093 12.8 11.179
Smsec 0.413 0.318 0.023 0.021 0.019
Pixel rate(MHz) 28.322 25.175 36 49.5 56.25
H-Polarity Negative Negative Negative Positive Positive
V-Polarity Positive Negative Negative Positive Positive
Resolution
Timing
IBM
VESA
Page 8
Benutzerhandbuch 15
Einführung
Verpackung 16
Sicherheitshinweise 16
Merkmale 17
Energieüberwachungssystem 18
Installation
Anschluß an Ihren Personal-Computer 19
Steckerbelegungstabelle 15poliger Mini-D-Sub Anschluß
19
Steuerungen
OSD-Steuerungen 20
OSD-Menüs 21
Anleitung zur Fehlersuche
Kein Bild 24
Bild rollt oder ist instabil 24
Bild ist verschwommen 24
Bild springt oder es treten Wellenmuster im Bild auf 24
Die Ränder des angezeigten Bildes sind nicht quadratisch
24
Das angezeigte Bild ist nicht zentriert, ist zu klein oder zu gro
ß 24
Spezifikationen
Elektrische Spezifikationen 25
Mechanische Spezifikationen 25
Umwelt-Spezifikationen 25
Anhang
Zeitdiagramme 26
Achtung
Mit dem optionalen Dreh-Kippfuß kann der Monitor aus verschiedenen
Blickwinkeln betrachtet werden.
Canadian Notice
This Class B digital apparatus meets all requirements of the Canadian
Interference Causing Equipment Regulations.
Avis Canadien
Cet appareil numÈrique de la classe B respecte toutes les exigences du
Rëglement sur le matÈrial brouilleur du Canada.
Hinweis
Alle Daten in dieser Anleitung können sich ohne besondere Ankündigung
ändern.
Deutsch
Page 9
Einleitung
Benutzerhandbuch 17
Einleitung
Benutzerhandbuch16
DEUTSCH
Verpackung
Wir beglückwünschen Sie zum Kauf dieses Spitzenqualitäts-Farbmonitors!
Die unten gezeigten Artikel befinden sich im Versandkarton.
Zuerst müssen Sie sicherstellen, daß sich auch alle Artikel in Ihrem Karton befinden.
Falls Artikel fehlen oder beschädigt sind, wenden Sie sich bitte an Ihren örtlichen Händler oder
Lieferanten.
Sicherheitshinweise
Mit diesem Computer wird ein separates Netzkabel mit IEC320-Stecker geliefert. Es kann
zusammen mit jedem UL-geprüften Computer verwendet werden, der entsprechend
ausgerüstet ist. Vergewissern Sie sich vor dem Anschluß, daß an der
Netzstromausgangsbuchse des Computers eine für den Monitor geeignete Spannung
anliegt und daß der angegebene Amperewert der Leistungsaufnahme des Monitors
entspricht bzw. sie übersteigt.
Für den Anschluß an 120V-Stromquellen dürfen nur UL-geprüfte steckbare Netzkabel mit
einem 5-15P-NEMA-Stecker (mit Parallelkontakten) verwendet werden. Für den Anschluß an
240V-Stromquellen dürfen nur UL-geprüfte steckbare Netzkabel mit einem 6-15P-NEMAStecker (Doppelkontakte) verwendet werden.
Verwenden Sie nur für den Monitor geeignete Stromquellen und Kabel wie auf dem
Typenschild angegeben.
Die Schlitze und Gehäuseöffnungen gewährleisten die Luftzirkulation im Gerät. Sie dürfen
nicht verschlossen oder verdeckt werden. Stecken Sie auf keinen Fall Fremdkörper durch
die Schlitze im Gehäuse oder in andere Öffnungen.
Stecken Sie keine metallenen Gegenstände in die Monitoröffnungen. Dabei können Sie einen
elektrischen Schlag erleiden.
Zur Vermeidung von elektrischen Schlägen sollten Sie keine Bauteile im Inneren des
Monitors berühren. Nur qualifizierte Techniker dürfen den Monitor öffnen.
Ziehen Sie vor der Reinigung des Monitors den Netzstecker. Verwenden Sie zur Reinigung
keine Flüssigreiniger oder Sprays, sondern ein feuchtes, fusselfreies Tuch.
Stellen Sie den Monitor in der Nähe einer gut zugänglichen Netzsteckdose auf. Trennen Sie
den Monitor vom Netz, indem Sie das Kabel am Stecker fassen und aus der Steckdose
ziehen; ziehen Sie niemals am Kabel selbst.
Display Monitor
AC Power Input Cable
Merkmale
Hervorragendes Bild
Bildschirmmenü mit berührungssensitivem OSD-Menüsystem, um die Schaltflächen auf dem
vorderen Bedienfeld und auf den Bildschirmmenüs visuell auswählen und justieren zu
können.
Das exklusive Doppel-Dynamik-Fokussystem mit einem hyperbolischen FukusKompensationsschaltkreis steuert den Elektronenstrahl und führt zu einer Feinbild-Anzeige
über die gesamte Bildschirmfläche.
Superkontrast-Bildschirm für außergewönlichen Kontrast und sattere Farben.
Fortschrittliche INVAR-Schattenmaske für hervorragenden Fokus, ausgezeichnete Helligkeit
und Farbe.
17", 0.25 Punkt Abstand mit hoher Auflösung, die Halbbildverfahrenstechnollogie liefert
scharfe, flackerfreie Bilder.
Das Bildschirmmenü-Farbsteuersystem erlaubt eine leichte Justierung des weißen Anteils
des Bildes ebenso wie der R.G.B-Signale, was zu lebensechten Farben führt.
Ergonomisches Design
Flacher, quadratischer Bildschirm, um Bildverzerrungen und Blendungen zu reduzieren,
wodurch der Streß auf die Augen vermindert wird.
Der Schwenkfuß gestattet eine horizontale Drehung von 90 und eine vertikale Drehung von
17 für größeren Bedienungskomfort.
Die Verhinderung der geringen Reststrahlung entspricht MPR II oder den strengen
TCO-Bestimmungen (magnetic field emissions standards for increased user safety :
magnetische Feldemissionsstandards für erhöhte Anwendersicherheit).
Umweltfreundlich
Die den DPMS-Spezificationen der VESA entsprechende Power Management Schaltung
kontrolliert den Energieverbrauch, während der Monitor nicht benutzt wird. Sie spart Energie.
Alle Kunststoffteile können den gängigen Recyclingsverfahren zugeführt werden. Alle
Materialien sind sorgfältig ausgewählt worden, um leichtere Wartung, Inspektionen und
eventuell notwendige Reparaturen zu gewährleisten.
Zeitsteuerung
Automatische Syncronisation horizontaler Frequenzen von 30 bis 72 kHz und vertikaler
Frequenzen von 47 bis 160 Hz.
10 Bildschirmstandards für bildgröße und-position sind werkseitig abgespeichert.
Zehn zusätzliche Zeitsteuerungen sind Anwender-definierbar.
Synchronisierungs-Eingabesignale (getrennt, composit) können automatisch ausgewählt
werden.
Page 10
Benutzerhandbuch 19
DEUTSCH
Installation
Anschluß an Ihren Personal - Computer
VORSICHT
Vergewissern Sie sich, daß sowohl der Computer als auch der Monitor ausgeschaltet sind.
Befolgen Sie beim Anschließen des Monitors
an Ihren Computer die folgenden Hinweise.
1. Stecken Sie das Netzkabel in die
Buchse am Monitor und dann in eine
Netzsteckdose.
2. Stecken Sie das Videokabel in den 15poligen Videoausgang des Computers
und ziehen Sie die Befestigungsschrauben
an.
3. Schalten Sie den Monitor mit dem
Netzschalter ein.
Hinweis : Wenden Sie sich bitte an einen autorisierten Händler, wenn Sie den Monitor an einen
Macintosh-Computer anschließen wollen. Es wird dazu ein spezieller Adapter
benötigt.
Steckerbelegungstabelle 15poliger Mini-D-Sub-anschluß
Der 15polige D-Sub-Stecker des
Signalkabels (IBM-Systeme) :
(15 Pin D-Sub)
15
11 15
6
10
Pin Nr. Belegung
1 Rot Video
2 Grün Video
3 Blau Video
4 Rahmen-Erde
5 Erde
6 Rot Video Erde
7 Grün Video Erde
8 Blau Video Erde
9 N/C
10 Erde
11 Erde
12 SDA
13 H.Sync
14 V. Sync
15 SCL
Einleitung
Benutzerhandbuch18
System-Flexibilität
Ausgestattet mit DDC1, DDC2B und DDC2Bi für Plug & Play-Kompatibilität.
Der Monitor ist kompatibel mit VGA, SVGA, VESA und Hochauflösungs-Video-Betriebsarten
bis zu 1280 (H) 1024 (V) @ 60Hz.
Der Monitor ist IBM und MAC Kompatibel.
Es ist eine automatische Universal-Stromversorgung eingebaut, die eine WechselstromEingabe von 100 - 240V AC, 50 oder 60 Hz gestattet.
Testmenüs gestatten eine Überprüfung der Anzeigeeinheit auf dem Bildschirm, ohne daß
der Computer angeschlossen werden muß.
Das kompakte Gehäuse spart Arbeitsfläche ein, bietet Ihnen ein großes Bild auf dem
Bildschirm, ohne viel Platz wegzunehmen.
Das mitgelieferte Net Kabel entspricht den VDE-Vorschriften.
Energieüberwachungssystem
Der Monitor entspricht den Energiesparerfordernissen von VESA, Nutek und Energy Star. Das
Energiesparensystem arbeitet nur, wenn der Monitor mit einem den DPMS Spezifikationen der
VESA entsprechenden PC und/oder mit Graphik-Karten benutzt wird.
Der Monitor geht, je nach dem hereinkommenden Videosignal,in unterschiedliche EnergieSparstufen wie es in der folgenden Tabelle gezeigt wird:
Anmerkung
Der Monitor geht automatisch durch die DPMS-Schritte, wenn er sich im Ruhezustand befindet.
Um den Monitor aus dem DPMS-Zustand freizuschalten, müssen Sie eine beliebige Taste auf
der Tastatur drücken.
Zustand Horizontale Sync Vertikale Sync
An An An
Bereitschaftsmodus Aus An
Ruhe-Modus An Aus
Aus Aus Aus
Zustand LED-Anzeige Stromversorgung Erhozeit
An Grün Under 75 Watt n.z.(nicht zut ref fend)
Bereitschaftsmodus Grün 60 Watt 2 Sekunden
Ruhe-Modus Gelb 15 Watt 5 Sekunden
Aus Gelb/Blinkend 5 Watt 15 Sekunden
Page 11
Benutzerhandbuch 21
DEUTSCH
Benutzerhandbuch20
Steuerungen
OSD Menü
Steuerungen
OSD-Steuerungen
ON SCREEN MENU (Bildschirm-Menü-Steuerungen) schließen die folgenden erweiterten
Steuerungen ein: Größe, Position, Geometrie, Farbjustierung, Helligkeit und
Kontrasteigenschaften. Die Justierungen werden sofort gespeichert. Die gegenwärtig
adressierte Steuerung kann zu der Werkseinstellung zurückgesetzt werden, in dem die
Rücksetzungstaste(Reset) gedrückt wird.
Funktion der OSD-Drucktasten an der Vorderseite des Monitors.
: Im Hauptmenü werden die OSD-Steuerungen verlassen, in einem Untermenü wird zum
OSD-Hauptmenü gesprungen.
/+
1) Wenn kein On Screen Display-Menü auf dem Bildschirm zu sehen ist,
: Direkter Zugang zu Helligkeitseinstellungen.
+: Direkter Zugang zu Kontrasteinstellungen.
2) Wenn das Haupt-Menü geöffnet ist: Geht zur Funktion, die man einstellen will.
3) Wenn das Unter-Menü geöffnet ist: Kontrolliert das Ausmaß, das man einstellen will.
MENU : öffnet das OSD Haupt-Menü
1) Wenn das Haupt-Menü geöffnet ist: Wählt die Funktion mit dem roten Ikon aus.
2) Wenn das Unter-Menü geöffnet ist: Wählt die Funktion mit dem roten Ikon aus.
Zusätzliche Steuerungen
Stromschalter : Schaltet den Monitor ein oder aus.
Wenn der Strom eingeschaltet ist, leuchtet eine LED.
LED-Anzeige der Leistungsaufnahme : Befindet sich links neben der Power-schaltung, zeigt
den Leistungsaufnahmemodus des monitors an.
Zugriff auf das Bildschirm-Menü
Drücken sie die MENU-Taste.
Abschalten des Bildschirm-Menüs
Wenn Sie sich im Hauptmenü befinden, drücken Sie die Taste.
Wenn Sie sich in einem der Untermenüs befinden, drücken Sie die Taste zweimal.
OSD MENÜ MENÜ +
1. KEIN OSD Öffnet das fenster Nr.2 Öffnet das Öffnet das Keine funktion
fenster Nr.3 fenster Nr.3
2. HAUPT-MENü Die Funktion mit dem Auswahl der gewünschten Zurück zu
roten Ikon ist Funktion. Funktionsebene
- Ausgeführt: Rückruf, Nr.1
Degauss
- Selektiert und blinkt
: Farbeinstellung, Zoom
- Fortgesetzt: Andere
Funktionen
3. HELLIGKEIT Zurück zu Nr.2 Verringert die Erhöht die Zurück zu Nr.1
Helligkeit. Helligkeit.
4. KONTRAST Zurück zu Nr.2 Verringert den Erhöhrt den Zurück zu Nr.1
kontrast. kontrast.
5.BILD-LAGE Ändert horizontal oder Ändert die Bild- Ändert die Bild- Zurück zu Nr.2
vertikal die Bildposition. position nach position nach
unten oder nach oben oder nach
links in der rechts in der
selektierten selektierten
Funktion. Funktion.
6. BILD-GRößE Ändert horizontal oder Verkleinert die Vergrößert die Zurück zu Nr.2
vertikal die Bildgröße. Bildgröße in der Bildgröße in der
selektierten selektierten
Funktion. Funktion.
7.GEOMETRIE Einmal drücken Kontrolliert das Ausmaß der Zurück zu Nr.2
: Selektiert und blinkt die gewählten Funktion.
Funktion mit dem roten (Siehe das Menü “GeometrieIkon. bedienelemente”)
Zweimaliges drücken Auswahl der gewünschten Zurück zu Nr.2
: Beendet das blinken, Funktion.
bereit zur Auswahl der
gewünschter Funktion.
LAGE
TASTE MEN BET TIGEN
HELLIGKEIT
50
PP
31.5KHz 60Hz
KONTRAST
PP
50
31.5KHz 60Hz
H. LAGE
50
H. GR §E
50
50%
KISSENVERZ
PRARLLELOGRAM
TRAPEZ
KISSENAUSGL.
DREHUNG
GEOMERIE
50
Page 12

Benutzerhandbuch 23
DEUTSCH
Benutzerhandbuch22
Steuerungen
Steuerungen
OSD MENÜ MENÜ +
8. MOIRE Einmaliges drücken Kontrolliert das ausmaß der Zurück zu Nr.2
: Selektiert, die funktion gewählten funktion. Bitte kontrollmit dem roten ikon blinkt. ieren sie die taste, um das zittern
des bildes zu verhindern.
Zweimaliges drücken Auswahl der gewünschten
: Beendet das blinken, funktion.
bereit zur auswahl der
gewünschten funktion.
9. SPRACHE Wählt eine spr ache mit Auswahl der gewünschten Zurück zu Nr.2
dem roten ikon und sprache.
kehrt zurück zu Nr.2
10. OSD LAGE Bewegt die OSD- Bewegt das Bewegt das Zurück zu Nr.2
Position horizontal oder OSD-Menü OSD-Menü
vertikal. nach links oder nach rechts
nach unten in oder nach oben
der gewählten in der
funktion. gewählten
funktion.
11. FARBE Einmaliges drücken Wählt den gewünschten Zurück zu Nr.1
: Das rote ikon blinkt farbmodus aus, der gewählte
- farbmenü ikon. “Farbmodus” blinkt.
Zweimaliges drücken Auswahl der gewünschten Zurück zu Nr.1
: Beendet das blinken, funktion.
bereit zur auswahl der
gewünschten funktion.
Wenn das farbmodus- _ _ _
ikon blinkt, drücke die
taste, um zum farbeinstellungsmodus Nr. 12
zurückzukehren.
12. FARBEINSTELL- Einmaliges drücken Kontrolliert das ausmaß der Zurück zu Nr.11
UNG : Wählt die gewünschte gewünschten funktion.
funktion aus.
Die funktion blinkt.
Zweimaliges drücken Auswahl der gewünschten Zurück zu Nr.11
: Beendet das blinken, funktion.
bereit zur auswahl der
gewünschter funktion.
50
MOIRE STEUERUNG
H. MOIRE STEUERUNG
V. MOIRE STEUERUNG
SPRACHE
ENGLISH
DEUTSCH
FRAN AIS
ESPA OL
PORTUGU S
TASTE MEN BET TIGEN
OSD H. LAGE
50
FARBE
USER 6500K 9300K
50
RB GB BB RG GG BG
USER
OSD MENÜ MENÜ +
13. ZOOM Einmal drücken Verringert die Vergrößert die Zurück zu Nr.1
: Selektiert die zoom- bildgröße bildgröße
funktion, das zoom-ikon horizontal horizontal
blinkt. und vertikal. und vertikal
Zweimal drücken Auswahl der gewünschten Zurück zu Nr.1
: Beendet das blinken, funktion.
bereit zur auswahl
anderer funktion.
Grundeinstellung ( ) : Es erfolgt eine Rückstellung auf die vom Werk voreingestellten
Standards innerhalb aller Menüs. Wenn Sie zu den vom Werk
eingestellten Einstellungen zurückkehren wollen, drücken Sie die
Rückstellungstaste 5 bis 8 Sekunden lang ohne Unterbrechung.
Entmagnetisierung ( ) : Eliminiert den Aufbau von mangetischen Streufeldern, welche den
Korrekturscan des Elektronenstrahls verändern und die Reinheit der
Bildschirmfarben, den Fokus und die Konvergenz beeinträchtigen.
Wenn diese Taste gedrückt wird, wird das Bild auf dem Bildschirm
springen und etwas flimmern, da der Bildschirm entmagnetisiert wird.
Vorsicht : Bitte warten Sie mindestens 20 Minuten lang, ehe Sie die Degauss-
Drucktaste erneut verwenden. Drücken Sie die Taste nicht für längere
Zeit, um die Lebensdauer des Degauss-Schaltkreises nicht zu
verringern.
Geometrie-Steuerungsmenü
Die Geometriesteuerungen gestatten Ihnen, eine Justierung der
Rundungen oder Winkel an den Ecken Ihres Bildschirmes
vorzunehmen.
Kissenverz : Erhöht oder verringert die Rundung der Seiten entweder nach innen oder nach
außen.
Parallelogram : Erhöht oder verringert die Neigung der Seiten entweder nach links oder rechts.
Trapez : Erhöht oder verringert den unteren Bildschirm, damit er genauso groß ist wie der
obere Bildschirm.
Kissenausgl. : Dieser Regler verändert die Geometrie des Bildschirms nach links oder nach rechts.
Drehung : Dreht den gesamten Bildschirm im Uhrzeigersinn oder gegen den Uhrzeigersinn.
ZOOM
50
50%
KISSENVERZ
PRARLLELOGRAM
TRAPEZ
KISSENAUSGL.
DREHUNG
GEOMERIE
50
RB - Red background raster
GB - Green background raster
BB - Blue background raster
RG - Red level gain
GG - Green level gain
BG - Blue level gain
Page 13

Benutzerhandbuch 25
DEUTSCH
Benutzerhandbuch24
25
Spezifikationen
Elektrische Spezifikationen
Mechanische Spezifikationen
Umwelt-Spezifikationen
Merkmal D17CL
Bildröhrentyp 17 -Klasse, 90 Ablenkung (DF)
Lochabstand der Bildröhre 0.25mm
Bildröhrenbeschichtung Entspiegelt
H/V separat, TTL, positiv/negativ
H/V composite, TTL, positiv/negativ
RGB analog (0.7 Vp-p), positiv
mit 75 1/2 terminiert
30kHz~72kHz (Automatisch)
47Hz~160Hz (Automatisch)
Maximale Auflösung 1280Dots 1024Linien (Non-interlaced)
Pixelfrequenz (Max.) 110 MHz
Die Größ von Bildschirm (Standard)
Horizontal 306mm, Vertikal 230mm
Leistungsaufnahme Under 75 Watts
Stromversorgung Wechselstrom, 100-240V 50/60 Hz 3Hz
Eingangsstecker 15-Pin-D-Sub-Stecker
Farbspektrum Unbegrenzt
Merkmal D17CL
16.5
(L) 16.5 (P) 16.4 (H)
418mm(L) 419mm(P) 417mm(H)
21.2 (L) 21.7 (P) 20.9 (H)
538mm(L) 550mm(P) 530mm(H)
37.5Ibs (17.0Kg)
44.8Ibs (20.3Kg)
Merkmal D17CL
32
F bis 104 F (0 C bis 40 C)
-4 F bis 140 F (-20 C bis 60 C)
10 % bis 85 % relative Luftfeuchtigkeit, nicht kondensierend
Eingangssignal
Abmess-ungen
Synchronisation
Video
Verpackung
Gerät
Horizontal
Netto
Vertikal
Brutto
Betrieb
Lagerung
Luftfeuchtigkeit
Scanning
frequency
Gewicht
Temperatur
Anleitung zer Fehlersuche
Kein Bild
Überprüfen Sie, daß das Wechselstromkabel richtig angeschlossen ist.
Überprüfen Sie, daß die Steckdose unter Strom steht, indem Sie ein anderes Gerät anschließen.
Der Stromschalter und der Computer-Stromschalter müssen eingeschaltet sein.
Stellen Sie sicher, daß das Signalkabel richtig an die Videokarte oder an den PC angeschlossen ist.
Stellen Sie sicher, daß die Videokarte im PC einen sicheren Kontakt hat.
Überprüfen Sie den Stecker auf verbogene oder eingedrückte Stifte.
Drücken Sie eine Taste auf der Tastatur oder bewegen Sie die Maus, falls der
Bildschirmschoner eingeschaltet ist.
Bild rollt oder ist instabil
Das Signalkabel muß sicher mit dem Computer verbunden sein.
Überprüfen Sie die Steckerbelegungen und die Signal-Zeiteinstellungen am Monitor und an
Ihrer Videokarte in Hinsicht auf die empfohlenen Zeiteinstellungen und Steckerbelegungen.
Stellen Sie sicher, daß die Videokarte im PC einen sicheren Kontakt hat.
Bild ist verschwommen
Justieren Sie Steuerungen für Kontrast und Helligkeit
Drücken Sie die Degauss-Taste einmal.
Vorsicht: Ein mindestzeitabstand von 20 minuten ist notwendig, bevor die degauss-schaltung zum
zweiten mal angeschaltet wird. Nicht ununterbrochen den konpf drücken.
Bild springt oder es treten Wellenmuster im Bild auf
Entfernen Sie elektrische Geräte, die Störungen verursachen können und die sich in der
Nähe des Monitors befinden.
Schlagen Sie zur näheren FCC-Information die Vorderseite dieses Handbuches auf.
Nicht abgeschirmte Lautsprecher können eine Bildverzerrung verursachen, sie müssen
enfternt werden.
Die Ränder des angezeigten Bildes sind nicht quadratisch
Justieren Sie die Verzerrung mit der Seiten-Kissenverzerrungskorrektur oder der trapezoiden
Korrektur der Kissenverzerrung, den parallelen Justiersteuerungen unter dem
berührungssensitiven Menüsystem.
Das angezeigte Bild ist nicht zentriert, ist zu klein oder zu groß
Justieren Sie die horizontalen und vertikalen Bildgrößen mit den Justiersteuerungen unter
dem berührungssensitiven Menüsystem.
Page 14

Benutzerhandbuch26
Anhang
Zeitdiagramme
Dieser Monitor - der D17CL - verfügt über voreingestellte Modi für die 10 am häufigsten
verwendeten Standardauflösungen. So ist die “Plug and Play”-Kompatibilität gewährleistet.
Video
Sync
Vertikal
Video
Sync
Horizontal
1024/75Hz 1024/85Hz 1280/60Hz 640/67Hz 832/75Hz
1024
768 1024 768 1280 1024 640 480 832 624
H-Freq(kHz) 60.023 68.677 63.953 35 49.726
A
sec 16.660 14.561 15.636 28.571 20.11
B
sec 1.219 1.016 1.018 2.116 1.117
C sec 2.235 2.201 2.255 3.175 3.91
D
sec 13.003 10.836 11.636 21.164 14.524
E
sec 0.203 0.508 0.727 2.116 0.559
V-Freq(Hz) 75.029 84.997 59.938 66.667 74.551
Omsec 13.328 11.765 16.684 15 13.414
Pmsec 0.050 0.044 0.078 0.086 0.06
Qmsec 0.466 0.524 0.579 1.114 0.784
Rmsec 12.795 11.183 16.012 13.714 12.549
Smsec 0.017 0.015 0.016 0.086 0.02
P-Freq(MHz) 78.750 94.5 107.761 30.24 57.284
H-Polarität Positiv Positiv Positiv Negativ Negativ
V-Polarität Positiv Positiv Positiv Negativ Negativ
VESA
MACINTOSH
Auflösung
Timing
VGA/70Hz VGA/60Hz 640/85Hz 800/75Hz 800/85Hz
720
400 640 480 640 480 800 600 800 600
H-Freq(kHz) 31.469 31.469 43.269 46.875 53.674
A
sec 31.777 31.777 23.111 21.333 18.631
B
sec 3.813 3.813 1.556 1.616 1.138
C
sec 1.907 1.907 2.222 3.232 2.702
D
sec 25.422 25.422 17.778 16.162 14.222
E
sec 0.636 0.636 1.556 0.323 0.569
V-Freq(Hz) 70.09 59.94 85.008 75 85.061
Omsec 14.268 16.684 11.764 13.333 11.756
Pmsec 0.064 0.064 0.069 0.064 0.056
Qmsec 1.08 1.048 0.578 0.448 0.503
Rmsec 12.711 15.253 11.093 12.8 11.179
Smsec 0.413 0.318 0.023 0.021 0.019
P-Freq(MHz) 28.322 25.175 36 49.5 56.25
H-Polarität Negativ Negativ Negativ Positiv Positiv
V-Polarität Positiv Negativ Negativ Positiv Positiv
Auflösung
Timing
IBM
VESA
Page 15

Mode D’emploi 27
Introduction
Emballage 28
Informations de sécurité 28
Description 29
Système d´utilisation du courant 30
Installation
Raccordement à l’ordinateur 31
Tableau d’affectation du connecteur mini sub-D 15 broches
31
Reglages
Commandes OSD 32
Menus OSD 33
En Cas De Panne
Pas d´image 36
L´image défile ou bouge 36
L´image est floue 36
L´image saute ou des ondulations passent á l´image 36
Les contours de l´image ne sont pas droits 36
L´image affichée n´est pas centrée, est trop petite ou trop grande
36
Charactéristiques
Charactéristiques électriques 37
Charactéristiques mécaniques 37
Charactéristiques du domaine de l´environnemen 37
Annexe
Chronogrammes 38
Avertissement
Si cet appareil présente plus d’un connecteur d’interface, ne laissez pas des
câbles connectés à des interfaces non utilisées.
Canadian Notice
This class B digital apparatus meets all requirements of the Canadian
Interference Causing Equipment Regulations.
Avis Canadien
Cet appareil numérique de la classe B respecte toutes les exigences du
Règlement sur le matériel brouilleur du Canada.
NB
Les informations contenues dans ce document peuvent être modifiées sans
avis préalable.
Français
Page 16

Introduction
Mode D’emploi 29
Introduction
Mode D’emploi28
FRANÇAIS
Emballage
Vous avez bien fait d´acheter ce moniteur couleur de toute premiére qualité!
Les objets illustrés ci-dessous se trouvent dans le carton.
Assurez-vous tout d´abord que tous ces objets se trouvent bien dans le carton.
Si un objet manque ou est endommagé, prenez contact avec votre vendeur ou votre
fournisseur.
Informations de sécurité
Ce moniteur est fourni avec un cordon d’alimentation détachable muni de fiches de type
IEC320. Il convient au raccordement de tout micro-ordinateur agréé UL de configuration
similaire. Avant de procéder au raccordement, vérifiez que la tension secteur de la prise de
courant de l’ordinateur est la même que celle du moniteur et que la puissance nominale de
la prise de courant de l’ordinateur est identique ou supérieure à celle du moniteur.
Pour des applications en 120 V, utilisez uniquement un cordon d’alimentation détachable
agrée UL avec une fiche de configuration NEMA 5-15P (lames parallèles).
Pour des applications en 240 V, utilisez uniquement un cordon d’alimentation détachable
agréé UL avec une fiche de configuration NEMA 6-15P (lames tandem).
Utilisez uniquement une alimentation et un raccordement adéquats pour le moniteur comme
indiqué sur l’étiquette de fabrication.
Les fentes et ouvertures du boîtier sont prévues pour l’aération; ces ouvertures ne doivent
pas être obturées ni fermées. Ne jamais introduire d’objets dans les fentes ou autres
ouvertures du boîtier.
N’insérez jamais d’objet métallique dans les ouvertures du moniteur. Ceci peut créer un
risque d’électrocution.
Pour éviter tout électrochoc, ne touchez jamais l’intérieur du moniteur. Seul un technicien
qualifié doit ouvrir le boîtier du moniteur.
Débranchez le moniteur de la prise secteur avant le nettoyage. N’utilisez pas de nettoyants liquides
ou de nettoyants en aérosol. Utilisez un linge humide, non pelucheux pour le nettoyage.
Installez le moniteur près d’une prise de courant facile d’accès. Déconnectez l’appareil en
saisissant fermement la fiche et en la sortant de la prise. Ne déconnectez jamais l’appareil
en tirant sur le cordon.
Display Monitor
AC Power Input Cable
Description
Une image parfaite
Système de contrôle du menu de l´écran par pression du doigt pour choisir et régler
visuellement les touches de mise au point de l´écran sur le devant du moniteur, ainsi que les
menus á l´écran
Le système exclusif de mise au point à double dynamique équipé d´un circuit de
compensation de la mise au point hyperbolique contrôle les faisceaux électrons et a pour
résultat une excellente image sur toute la surface de l´écran.
Un écran. avec contraste accentué pour un meilleur contraste et des couleurs plus belles.
Masque d´ombre INVAR perfectionné pour une mise au point, une luminosité et des
couleurs parfaites.
Une technologie haute-résolution de 17" non interlacée, avec un espacement des points de
0.25, donne des images nettes qui ne tremblent pas.
Le système de contrôle par menu à l´écran. des couleurs permet de régler facilement le
blanc de l´image ainsi que les signaux R.G.B., donnant des couleurs identiques aux
couleurs réelles.
Un design ergonomique
Ecran plat et carré pour réduire la distorsion et le scintillement de l´image, évitant de fatiguer
les yeux.
Support incliné permettant une rotation horizontale de 90 et verticale de 17 , rendant
l´utilisation plus confortable.
Prévention des fuites de radiation conformément aux réglements MPR II et aux normes très
strictes TCO (en option) concernant les émissions de champs magnétiques, pour mieux
protéger l´utilisateur.
Respect de l´environnement
Le circuit du systéme de Power conforme à VESA DPMS srandard contôlle l’énergie de
consomation quand l’écran n’est pas utilisé si bien que vous pouvez économiser l’énergie.
Tous les éléments en plastique sont recyclables. Tous les matériaux sont strictement choisis
pour assurer un entretien, une inspection et une destruction facile.
Synchronisation
Dépistage automatique des fréquences horizontales de 30 à 72 kHz et des fréquences
verticales de 47 à 160 Hz.
10 synchronisations pour l’utilisation sont préréglées en usine pour la taille et la position de
l’image.
Ten synchronisations supplémentaires peuvent être définies par l´utilisateur.
La synchronisation des signaux d´entrée (séarés, composites) peut être choisie
automatiquement.
Page 17

Mode D’emploi 31
FRANÇAIS
Installation
Raccordement à l’ordinateur
ATTENTION
Assurez-vous que l’ordinateur et le moniteur sont mis hors tension.
Pour raccorder le moniteur à votre système,
suivez les instructions ci-dessous :
1. Fixez le cordon d’alimentation au
moniteur et branchez-le ensuite sur une
prise de courant.
2. Connectez le câble de signal vidéo au
connecteur vidéo 15 broches du système
et serrez les vis de fixation.
3. Mettez le moniteur sous tension en
appuyant sur l’interrupteur d’alimentation.
NB : Pour raccorder le moniteur à un système Macintosh, adressez-vous à un distributeur
agréé. (Un adaptateur spécial est nécessaire.)
Tableau d’affectation du connecteur mini sub-D 15 broches
La prise á 15 broches D-Sub
(mâble) du cáble de signal
(systémes IBM) :
(15 Pin D-Sub)
15
11 15
6
10
No. Sub-D 15 broches
1 Vidéo rouge
2 Vidéo vert
3 Vidéo bleu
4 Terre de protection
5 Terre
6 Terre rouge
7 Terre vert
8 Terre bleu
9NC
10 Terre synch.
11 Terre
12 SDA
13 Synch. H
14 Synch. V
15 SCL
Introduction
Mode D’emploi30
Souplesse du système
Equipe avec DDC1, DDC2B et DDC2Bi pour compatibilité Plug & Play.
Le moniteur est compatible avec les modes VGA, SVGA, VESA et les modes vidéo haute
résolution jusqu´ à 1280 (H) x 1024(V) @ 60 Hz.
Le moniteur peut être utilisé avec un PC IBM ou compatible, MAC.
L´alimentation universelle automatique en courant est incorporée et permet une alimentation
AC de 100 - 240 V AC, 50 ou 60 Hz.
Le menu autotest permet de contrôler l´écareil à l´appran sans qu´il soit raccordé à un
ordinateur.
Sa forme compacte permet un encombrement minimum de l´espace de travail, vous
permettant de disposer d´un grand ecran sans perte de place pour travailler.
Le câble électrique fourni se branche facilement sur une prise standard.
Système d´uilisation du courant
Cet écran est adapté à VESA, Nutek et Energy Star conservant le demande. Le sysème
conservant Power travaille seulement quand il est utilisé avec VESA DPMS adaptant le contôle
graphique de and/or de PC.
Le moniteur passe par différentes étapes pour économiser le courant, en fonction du signal
vidéo recu tel qu´il est indiqué dans le tableau suivant.
Remarque
Le moniteur passe automatiquement par les étapes DPMS lorsqu´il reste inutilisé. Pour que le
moniteur cesse d´êre dans l´éat de DPMS, il suffit d´appuyer sur une touche quelconque du
clavier.
Position Synchronisation Horizontale Synchronisation Verticale
Allumée Allumée Allumée
Veille Eteinte Allumée
Suspension Allumée Eteinte
Eteinte Eteinte Eteinte
Position Voyant Courant Temps de réupéation
Allumée Vert Under 75 Watts N/A
Veille Vert 60 Watts 2 Sec
Suspension Jaune 15 Watts
5 Sec
Eteint Jaune/clignotant
5 Watts
15 Sec
Page 18

Mode D’emploi 33
FRANÇAIS
Mode D’emploi32
Commandes
OSD Menu
Commandes
Commandes OSD
Les commandes par MENU A L´ECRAN permettent d´effectuer l´ensemble des réglages
suivants tels que Dimension, Position, Géomérie, Réglage des couleurs, Luminosité et
Contraste. Les réglages sont instantanément mis en mémoire. La commande dont on effectue
le réglage peut être remise sur le réglage standard en appuyant sur la touche Reset.
Fonction des touches OSD sur le devant du moniteur.
: Dans le menu principal, fait sortir du menu du réglage des touches OSD.
Dans un sous-menu, fait revenir au menu principal OSD.
/+
1) Quand OSD ne s’apparait pas sur l’écran,
: Accès direct à contrôle de l’éclairage.
+: Accès direct à contrôle de contraste.
2) Quand le Menu principal s’apparaît : Déplacer à la fonction que vous voulez adjuster.
3) Quand le Sous Menu s’apparaît : Contrôller l’ensemble que vous voulez adjuster.
MENU : Déplacer OSD Menu principal
1) Quand le Menu principal s’apparaît : Selectionner la fonction avec RED ICON.
2) Quand le Sous Menu s’apparaît : Selectionner la fonction avec RED ICON.
Commandes supplémentaire sur le devant
Interrupteur : Permet d´allumer et d´éindre le moniteur. Lorsque le courant est mis, le voyant
est allumé.
LED Power Lignt indicateur : Localisé à gauche de la touche de Power et indique le mode
power de moniteur. Chaque mode diminue l’ensemble de power
utilisé par le moniteur.
Accès au menu à l´écran
Appuyer sur la touche MENU.
Pour éteindre le menu à l´écran
Lorsque vous êtes dans le menu principal, appuyer sur la touche .
Lorsque vous êtes dans un sous-menu, appuyer deux fois sur la touche .
OSD MENU MENU +
1. NO OSD Accès a No.2 Accès a No.3 Accès a No.4 Non sens
2. MENU PRINCIPAL RED ICON est Déplacer à la fonction que vous Exit to à No.1
- Exécute: Rappeler, voulez.
Degauss
- Selectionné et cligné
: Couleur adjustée, Zoom
- Accéder aux autres
3. LUMINOSITÉ Déplacer à No.2 Diminuer Augmenter Exit to à No.1
l’eclairage. l’eclairage.
4. CONTRASTE Déplacer à No.2 Diminuer Augmenter Exit to à No.1
le contraste. le contraste.
5.H/V-POSITION Barres de position Déplacer Déplacer Exit to à No.2
horizontale ou l’image en bas l’image en haut
verticale. ou en gauche ou en droite
selon la selon la
fonction fonction
selectionnée. selectionnée.
6. H/V TAILLE Barres de taille Shinks l’image Déplacer Exit to à No.2
horizontale ou verticale. selon la fonction l’image selon la
selectionnée. fonction
selectionnée.
7.GEOMETRIE Touche arbitraire Contrôller l’ensemble de la Exit to à No.2
: Selectionner et cligner fonction selectionnée.
la fonction avec RED (Consulter en detail le menu de
ICON. Géometrie controle)
Même touche Déplacer à la fonction que vous Exit to à No.2
: Arrêter de cligner et voulez.
être prêt d’accéder à
la fonction que vous
voulez.
LANGUE
APPUYER TOUCHE MENU
LUMINOSIT
50
PP
31.5KHz 60Hz
CONTRASTE
PP
50
31.5KHz 60Hz
POSITION H.
50
TAILLE H.
50
50%
COUSSINS
PARALLELE
TRAPEZE
EQUILIBRE
ROTATION
G OM TRIE
50
Page 19

Mode D’emploi 35
FRANÇAIS
Mode D’emploi34
Commandes
Commandes
OSD MENU MENU +
8. MOIRE Touche arbitraire Contrôller l’ensemble de la Exit to à No.2
: Selectionner et cligner fonction selectionnee.
la fonction avec RED Contrôller cette touche pour que
ICON. l’image ne tremble pal.
Même touche Déplacer à la fonction que vous
: Arrêter de cligner et voulez.
être prêt de déplacer à
fonction que vous voulez.
9. LANGUE Selectionner la langue Déplacer à la langue que vous Exit to à No.2
avec RED ICON et voulez.
accès à No.2
10. OSD POSITION Barres de position Déplacer Déplacer Exit to à No.2
horizontale ou verticale. l’image en bas l’image en haut
ou en gauche on en droite
selon la fonction selon la fonction
selectionnée. selectionnée.
11. MODE DE Touche arbitraire Déplacer à la mode de couleur Exit to à No.1
COULEUR : Cligner RED ICON que vous voulez et “la mode de
- Icon de menue de couleur” selectionnée cligne.
couleur.
Même touche Déplacer à la fonction que vous Exit to à No.1
: Arrêter de cligner et voulez.
être prêt de dàplacer à
la fonction selectionnée.
Quand ICON de mode _ _ _
de couleur cligne,
presser et aller à la
mode de couleur
adjustée.
12. MODE DE Touche arbitraire Contôller l’ensemble de la Exit to à No.11
COULEUR : Selectionner et cligner fonction que vous voulez.
ADJUSTEE la fonction que vous
voulez.
Même touche Déplacer à la fonction que vous Exit to à No.11
: Arrêter de cligner et voulez.
etre prêt de déplacer à
fonction que vous
voulez.
50
CONTR LE MOIRE
CONTR LE MOIRE H.
CONTR LE MOIRE V.
LANGUE
APPUYER TOUCHE MENU
ENGLISH
DEUTSCH
FRAN AIS
ESPA OL
PORTUGU S
AFFICHAGE H.
50
COULEURS
USER 6500K 9300K
50
RB GB BB RG GG BG
USER
OSD MENU MENU +
13. ZOOM Touche arbitraire Shinks l’image Déplayer Exit to à No.1
: Selectionner le zoom horizontalement l’image
et cligner le zoom ICON. et verticalement. horizontalement
et verticalement.
Même touche Déplacer à la fonction que vous Exit to à No.1
: Arreterde dligner et voulez.
être prêe de déplacer
à une autre fonction.
Rappel ( ) : Remet toutes les commandes sur le réglage usine standard dans
l´ensemble du menu. Si vous souhaitez retourner au réglage usine
standard, garder la touche Reset appuyée pendant 5 à 8 secondes.
Demagnetiser ( ): Élimine l´accumulation de champs magnétiques rayonnants qui
empêchent un balayage correct des faisceaux d´éctrons et agit sur la
pureté des couleurs, de la mise au point et de la convergence de l´écran.
Lorsqu´on appuie sur la touche, l´image à l´écran saute et tremble un peu
cependant que lécran est démagnétisé.
Attention : Respecter un minimum de 20 minutes entre deux utilisations de la touche
Degauss. Ne pas garder la touche enfoncée pour éviter de réduire la durée
de vie du circuit de démagnétisation.
Menu de réglage de la géométrie
Le réglage de la géométrie vous permet de mettre au point la courbe
ou l´angle des côtés de votre image.
Coussins : Augmente ou diminue la courbure des côtés soit vers l´intérieur soit vers l´extérieur.
Parallele : Augmente ou diminue l´inclinaison des côtés soit vers la gauche soit vers la droite.
Trapeze : Augmente ou diminue le bas de l´image pour le rendre identique au haut.
Equilibre : Augumenter ou diminuer la courbure des faces gauche ou dr oite.
Rotation : Fait tourner l ensemble de lécran dans le sens des aiguilles d´une montre ou dans le
sens inverse.
MISE AU POINT
50
50%
COUSSINS
PARALLELE
TRAPEZE
EQUILIBRE
ROTATION
G OM TRIE
50
RB - Red background raster
GB - Green background raster
BB - Blue background raster
RG - Red level gain
GG - Green level gain
BG - Blue level gain
Page 20

Mode D’emploi 37
FRANÇAIS
Mode D’emploi36
37
Charactéristiques
Charactéristiques électriques
Charactéristiques mécaniques
Charactéristiques du domaine de l´environnemen
Article D17CL
Type de TRC 17 , déflexion 90 DF
Pas de masque de TRC 0.25mm
Surface de TRC Anti-reflet
H/V séparée, TTL, positive/ négative
H/V composite, TTL, positive/négative
RVB analogique (0.7 Vp-p), positive
Terminaison 75
30kHz~72kHz (Automatique)
47Hz~160Hz (Automatique)
Résolution maximale 1280Dots 1024Lines (Non entrelacée)
Fréquence d’horloge (Max.) 110 MHz
Talle de l’écran (Norme) Horizontale 306mm, Verticale 230mm
Consommation Under 75 Watts
Alimentation AC 100~240Volt, 50/60Hz 3Hz
Connecteur d’entrée Connecteurs sub-D, 15 broches
Couleurs affichées Unlimitées
Article D17CL
16.5
(L) 16.5 (P) 16.4 (H)
418mm(L)
419mm(P) 417mm(H)
21.2
(L) 21.7 (P) 20.9 (H)
538mm(L) 550mm(P) 530mm(H)
37.5Ibs (17.0Kg)
44.8Ibs (20.3Kg)
Article D17CL
32
F à 104 F (0 C à 40 C)
-4 F à 140 F (-20 C à 60 C)
10% à 85% d’humidité relative, sans condensation
Signal
d’entrée
Dimension
Synch.
Vidéo
Carton
Unité
Horizontale
Net
Verticale
Brut
Utilisation
Stockage
Humidité
Fréquence
de balayage
Poids
Température
Spécifications
Pas d´image
S´assurer que le cordon électrique soit bien branché.
S´assurer que la prise murale fonctionne en branchant un autre appareil.
L´interrupteur du moniteur et l´interrupteur de l´ordinateur doivent être sur la position allumée.
S´assurer que le câble de signal soit correctement relié à la carte vidéo ou á l´ordinateur.
S´assurer que la carte vidéo soit bien placée dans l´ordinateur.
Contrôler que les broches de la prise ne soient pas tordues ou enfoncées.
Appuyer sur une touche du clavier ou déplacer la souris, pour le cas où le mode d´économie
d´électricité ait effacé l´écran.
L´image défile ou bouge
Le câble de signal doit être bien branché sur l´ordinateur.
Contrôler l´attribution des broches et la synchronisation des signaux du moniteur ainsi que
votre carte vidéo, en ce qui concerne les synchronisations de signaux et l´attribution des
broches.
S´assurer que la carte vidéo soit bien placée dans l´ordinateur.
L´image est floue
Régler le contraste et la luminosité.
Appuyer une fois sur la touche Degauss.
Attention : Au moins, l’interval de 20 minutes peut exister avant que Degauss Button soit utilisé à
seconde fois. Ne rester pas en appuyant la touche continuellement.
L´image saute ou des ondulations passent á l´image
Eloigner du moniteur les appareils électriques qui peuvent causer des interférences.
Voir la page de garde de ce mode d´emploi pour les informations FCC.
Des hauts-parleurs non-couverts placés à cêté du moniteur peuvent provoquer des
distorsions de l´image. Eloigner les hauts-parleurs.
Les contours de l´image ne sont pas droits
Régler la distorsion en utilisant la balance de la courbe latérale ou de la courbe trapézoïdale,
ou la commande de réglage du parallélisme en bas du menu à l´écran.
L´image affichée n´est pas centrée, est trop petite ou trop grande
Régler les dimensions de l´image verticale et horizontale en utilisant les commandes de mise
au point de la dimension horizontale et verticale en bas du menu à l´écran.
Page 21

Mode D’emploi38
Annexe
Chronogrammes
Ce moniteur D17CL dispose de modes préréglés pour les 10 normes industrielles les plus répandues
afin d’assurer une fonction “Plug & Play” (prêt-à-brancher).
Vidéo
Synch.
Verticale
Vidéo
Synch.
Horizontale
1024/75Hz 1024/85Hz 1280/60Hz 640/67Hz 832/75Hz
1024
768 1024 768 1280 1024 640 480 832 624
H-Fréq(kHz) 60.023 68.677 63.953 35 49.726
A
sec 16.660 14.561 15.636 28.571 20.11
B
sec 1.219 1.016 1.018 2.116 1.117
C
sec 2.235 2.201 2.255 3.175 3.91
D
sec 13.003 10.836 11.636 21.164 14.524
E
sec 0.203 0.508 0.727 2.116 0.559
V-Fréq(Hz) 75.029 84.997 59.938 66.667 74.551
Omsec 13.328 11.765 16.684 15 13.414
Pmsec 0.050 0.044 0.078 0.086 0.06
Qmsec 0.466 0.524 0.579 1.114 0.784
Rmsec 12.795 11.183 16.012 13.714 12.549
Smsec 0.017 0.015 0.016 0.086 0.02
Nombre de pixels(MHz)
78.750 94.5 107.761 30.24 57.284
H-Polarité Positive Positive Positive Negative Negative
V-Polarité Positive Positive Positive Negative Negative
VESA
MACINTOSH
Résolution
Synchronisation
VGA/70Hz VGA/60Hz 640/85Hz 800/75Hz 800/85Hz
720
400 640 480 640 480 800 600 800 600
H-Fréq(kHz) 31.469 31.469 43.269 46.875 53.674
A
sec 31.777 31.777 23.111 21.333 18.631
B
sec 3.813 3.813 1.556 1.616 1.138
C
sec 1.907 1.907 2.222 3.232 2.702
D
sec 25.422 25.422 17.778 16.162 14.222
E
sec 0.636 0.636 1.556 0.323 0.569
V-Fréq(Hz) 70.09 59.94 85.008 75 85.061
Omsec 14.268 16.684 11.764 13.333 11.756
Pmsec 0.064 0.064 0.069 0.064 0.056
Qmsec 1.08 1.048 0.578 0.448 0.503
Rmsec 12.711 15.253 11.093 12.8 11.179
Smsec 0.413 0.318 0.023 0.021 0.019
Nombre de pixels(MHz)
28.322 25.175 36 49.5 56.25
H-Polarité Negative Negative Negative Positive Positive
V-Polarité Positive Negative Negative Positive Positive
Résolution
Synchronisation
IBM
VESA
Page 22

Manuale D’uso 39
Introduzione
Contenuto dell´ imballaggio 40
Informazioni sulla sicurezza 40
Caratteristiche 41
Sistema di risparmio energetico 42
Installazione
Collegamento al computer 43
Configurazione dei pin del mini connettore D-Sub a 15 pin
43
Controlli
Controlli OSD 44
Menu OSD 45
Cosa Fare In Caso Di Problemi
Nessuna immagine 48
Schermo instabile 48
Immagini confusi 48
Immagini traballanti o presenza di ondulazioni 48
Contorni delle immagini sono non diritti 48
Immagini non sono centrate, troppo piccole o troppo grandi
48
Specifiche T ecniche
Caratteristiche Elettriche 49
Caratteristiche Meccaniche 49
Caratteristiche Ambientale 49
Appendice
Cronogrammi 50
Attenzione
Il monitor potrebbe disporre del piedistallo basculante girevole opzionale che
consente di orientarlo con vari angoli di visualizzazione.
Avvertenza
Nel caso questa apparecchiatura fosse dotata di più connettori di interfaccia,
non lasciare alcun cavo collegato alle interfacce non utilizzate.
Avis Canadien
Cet appareil mumÈrique de la classe B respecte toutes les exigences du
Règlement sur le matÈriel brouilleur du Canada.
Avviso
Le informazioni contenute in questo documento sono soggette a modifica senza
preavviso.
Italiano
Page 23

Introduzione
Manuale D’uso 41
Introduzione
Manuale D’uso40
ITALIANO
Contenuto dell´imballaggio
Congratulazioni per aver acquistato questo monitor a colori di altissima qualità!
Nell´imballaggio troverete gli oggetti raffigurati nell´illustrazione.
Assicuratevi, innanzitutto, che l´imballaggio sia completo.
In caso di pezzi mancanti o danneggiati, contattate il venditore locale o il fornitore.
Informazioni sulla sicurezza
Questo monitor viene fornito in dotazione con un cavo di alimentazione staccabile dotato di
terminali standard IEC320. Questo cavo può essere utilizzato per il collegamento a
qualunque personal computer omologato UL con configurazione simile. Prima di effettuare il
collegamento, assicurarsi che la tensione nominale della presa elettrica passante del
computer sia la stessa del monitor e che l’amperaggio massimo della presa elettrica
passante del computer sia uguale o superiore a quello del monitor.
Per applicazioni da 120 Volt, utilizzare esclusivamente un cavo di alimentazione staccabile
omologato UL con spina tipo NEMA 5-15P (con spinotti piatti in parallelo). Per applicazioni
da 240 Volt, utilizzare esclusivamente un cavo di alimentazione staccabile omologato UL con
spina tipo NEMA 6-15P (con spinotti piatti in serie).
Impiegare esclusivamente una fonte di alimentazione ed un cavo adatti al monitor, secondo
quanto indicato sulla targhetta.
Il cabinet del monitor è dotato di fessure ed aperture di ventilazione; queste aperture non
devono essere ostruite o coperte. Non introdurre assolutamente oggetti di alcun tipo nelle
fessure del cabinet o nelle altre aperture.
Non inserire mai alcun oggetto metallico nelle aperture del monitor.
Ciò può creare rischi di scosse elettriche.
Per evitare scosse elettriche, non toccare mai i componenti interni del monitor.
L’involucro esterno del monitor deve essere aperto esclusivamente da un tecnico qualificato.
Prima di procedere con la pulizia, scollegare il monitor dalla presa elettrica. Non usare
detergenti liquidi o aerosol. Pulire utilizzando un panno inumidito privo di sfilacciature.
Installare il monitor in prossimità di una presa elettrica facilmente accessibile. Scollegare
l’apparecchio dalla presa afferrando saldamente e tirando la spina, non il cavo.
Display Monitor
AC Power Input Cable
Caratteristiche
Immagini di qualità superiore
Il sistema di controllo su schermo e il menu su schermo permettono di selezionare le opzioni
visualmente e di regolare lo schermo tramite i pulsanti sul pannello frontale e i menu su
schermo.
L´esclusivo sistema di messa a fuoco a duplice dinamica dotato di circuito di
compensazione della messa a fuoco iperbolica controlla i fasci di elettroni, fornendo in tal
modo immagini perfette in ogni parte dello schermo.
Schermo dal contrasto eccezionale per fornire contrasto di alta qualità e colori più vivi.
Maschera Shadow INVAR avanzata per messa a fuoco, luminosità e colori di eccellente
qualità.
La tecnologia non interlacciata di questo monitor a 17", alta risoluzione, 0.25 punti per passo
ha come risultato delle immagini vivide e non sfarfallanti.
Il sistema di controllo dei colori su schermo rende facile la regolazione del colore bianco
delle immagini e dei segnali R.G.B. e i colori risultanti sono fedeli alla realtà
Design ergonomico
Schermo piatto e quadrato per ridurre distorsioni e riflessi e per non affaticare, allo stesso
tempo, la vista.
Base oscillante che permette una rotazione di 90 sul piano orizzontale e di 17 su quello
verticale per un maggiore comfort dell´utente.
Sistema di prevenzione della fuga di radiazioni conforme all´MPR II e agli estremamente
severi standard TCO (opzionali) concernenti le emissioni di campi magnetici, per una
maggiore sicurezza dell´utente.
Ecologico
Gestione Power circuito confermando a VESA DPMS stendardi controlla l`energia consume
quando monitor non è uso, risparmiare l`energia.
Tutti gli elementi in plastica sono riciclabili. Tutti i materiali sono selezionati accuratamente
per permettere una facile manutenzione, ispezione e smaltimento.
Sincronizzazione
Individuazione automatica delle frequenze orizzontali comprese tra 30 e 72 kHz e delle
frequenze verticali tra 47 e 160 Hz.
10 orari sono fabbrica preset per l`immgine della misura e posizione.
10 ulteriori sincronizzazioni sono definibili dall´utente.
Selezione automatica dei segnali input sincronizzati (separati, composti) .
Page 24

Manuale D’uso 43
ITALIANO
Introduzione
Collegamento al computer
ATTENZIONE
Assicurarsi che sia il PC che il monitor siano spenti.
Per collegare il monitor al sistema, procedere
come segue.
1. Inserire il cavo di alimentazione nel
monitor e collegarlo ad una presa
elettrica.
2. Collegare il cavo del segnale video al
connettore video a 15 pin del sistema e
stringere le viti di fissaggio.
3. Per accendere il monitor, premere
l’interruttore di accensione.
Nota : Per collegare il monitor ad un sistema Macintosh, rivolgersi ad un rivenditore autorizzato
(è necessario un adattatore speciale).
Configurazione dei pin del mini connettore D-Sub a 15 pin
(15 Pin D-Sub)
15
11 15
6
10
N pin D-Sub a 15 pin
1 Rosso, video
2 Verde, video
3 Blu, video
4 Massa telaio
5 Massa
6 Rosso, massa
7 Verde, massa
8 Blu, massa
9N.C.
10 Sync, massa
11 Massa
12 SDA
13 H-Sync
14 V-Sync
15 SCL
Introduzione
Manuale D’uso42
Versatilità di sistema
Dodato con DDC1, DDC2B e DDC2Bi per Plug & Play compatibilità.
Il monitor è compatibile con le schede grafiche VGA, SVGA e VESA e con modalità ad alta
risoluzione fino a 1280 (O) 1024 (V) @ 60HZ.
Questo monitor può essere utilizzato con PC IBM e PC compatibili IBM, MAC.
L´alimentazione automatica universale è integrata, permettendo un´alimentazione a corrente
alternata di 100-240V AC, 50 o 60 Hz.
Il menu di auto test permette di controllare l´unità video sullo schermo senza doversi
collegare al computer.
Le dimensioni compatte permettono di avere, nonostante un ingombro minimo, immagini a
tutto schermo senza spreco di spazio di lavoro.
Il cavo di alimentazione incluso è collegabile facilmente alle prese standard.
Sistema di risparmio energetico
Questo monitor osserva con VESA, Nutec e Energy Star power saving riquisti, Power saving
sistema lavora soltanto quando usato con VESA DPMS compliant and or grafica controlista.
Il monitor attraversa diverse fasi di risparmio energetico dipendenti dal segnale video in entrata
mostrato nella seguente tabella.
Nota
Il monitor passa automaticamente attraverso le fasi DPMS quando non viene utilizzato per
alcuni minuti. Per abbandonare la fase DPMS, è sufficiente premere un qualunque tasto sulla
tastiera.
Stato Sincr. Orizzontale Sincr. Verticale
Acceso Acceso Acceso
Stnad by Spento Acceso
Suspensione Acceso Spento
Spento Spento Spento
Stato LED Corrente Tempo di recupero
Acceso Verde Under 75 Watt N/A
Stand by Verde
60 Watt 2 Sec.
Suspensione Giallo 15 Watt 5 Sec.
Spento Giallo/lampegg 5 Watt 15 Sec.
Page 25

Manuale D’uso 45
ITALIANO
Manuale D’uso44
Controlli
OSD Menu
Controlli
Controlli OSD
I comandi del Menu su schermo includono i seguenti controlli avanzati, quali Size, Position,
Geometry, Color Adjust, Brightness e Contrast (dimensioni, posizione, geometria, regolazione
colori, luminosità e contrasto).
I cambiamenti vengono salvati immediatamente. I comandi appena menzionati possono essere
riportati alla situazione predefinita premendo il pulsante Reset.
Funzioni dei pulsanti OSD presenti nella parte anteriore dei monitor
: Quando ci si trova nel menu principale, esce dai comandi OSD. In un sotto-menu,
riporta al menu OSD principale.
/+
1) Quando no OSD sul schermo,
: Diretto accesso luminosità controlla.
+: Diretto accesso contrasto controlla.
2) Quando Menu Principale è mostrato : Muovere alla funzione che hai voluto per agiustare.
3) Quando Sub Menu è mostrato : Controlla la somma che hai voluto per agiustare.
MENU : Mostra OSD Menu principale.
1) Quando Menu Principale è mostrato : Selezionare la funziona con RED ICON.
2) Quando Sub Menu è mostrato : Selezionare la funziona con RED ICON.
Ulteriori comandi frontali
Pulsante di accensione : accende e spegne il monitor. Quando il monitor è acceso, il led è
illuminato.
LED Power segno Light : Situato la parte sinistra di interruttore e indica modo power del
monitor.
Accedere al menu su schermo
Premere il pulsante MENU.
Uscire dal menu su schermo
Dal menu principale, premere il pulsante .
Dal sotto-menu, premere il pulsante due volte.
OSD MENU MENU +
1. NO OSD Procede a No.2 Procede a Procede a No significato
No.3 No.4
2. MENU La funzione con RED Muove a funzione che la voluto. Exit a No.1
PRINCIPALE ICON è
- Svolto : Richiamo
Degauss
- Scelto e lampeggiato
: Colore Agiusto, Zoom
- Processo : Altri
3. LUMINOSITÀ Muove a No.2 Diminuire la Aumentare la Exit a No.1
luminosità. luminosità.
4. CONTRASTO Muove a No.2 Diminuire il Aumentare il Exit a No.1
contrasto. contrasto.
5.POSIZIONE O/V Toggles la posizione Muove Muove Exit a No.2
orizzontale o verticale. l`immagine l`immagine
sotto o sinistra sopra o destra
nella funzione nella funzione
selezionato. selezionato.
6. MISURA O/V Toggles la misura Shinks Sviluppa Exit a No.2
orrizzontale o verticale. l`immagine l`immagine
nella funzione nella funzione
selezionato. selezionato.
7.GEOMETRIA Odd premere Controlla la funzione selezionato Exit a No.2
: Seleziona e lampeggia la somma (Riferire a Geometria
la funziona con controlla menu nei dettagli)
RED ICON.
Even Premere Muovere alla funziona che ha Exit a No.2
: Ferma lampeggiando voluto.
e è pronto a muovere la
funzione che ha voluto.
POSITION
PRESS MENU KEY
BRIGHTNESS
50
PP
31.5KHz 60Hz
CONTRAST
PP
50
31.5KHz 60Hz
H. POSITION
50
H. SIZE
50
50%
PINCUSHION
PARALLELOGRAM
TRAPEZOID
PINBALANCE
ROTATION
GEOMETRY
50
Page 26

Manuale D’uso 47
ITALIANO
Manuale D’uso46
Controlli
Controlli
OSD MENU MENU +
8. MOIRE Odd premere Controlla la somma della Exit a No.2
: Seleziona e lampeggia funzione selezionato. Per favvore
la funzione con controllare questi chiavi per
RED ICON. l`immagine non rabbrividire.
Even premere Muovere alla funzione che hai
: Fetma lampeggiando voluto.
e è pronto a muovere la
funzione che hai voluto.
9. LINGUA Selezionare la lingua Muovere alla lingua che hai Exit a No.2
con RED ICON e voluto.
EXIT to No.2.
10. OSD POSIZIONE Toggles OSD posizione Muovere OSD Muovere OSD Exit a No.2
orizzontale e verticale. menu sinistra o menu destra o
sotto nel sopra nel
funzione funzione
selezionato. selezionato.
11. MODO COLORE Odd premere Muove al modo colore che hai Exit a No.1
: Lampeggia RED ICON voluto e il “color mode”
colore menu ICON. selezionato sarà lampeggiare.
Even premere Muovere alla funziona che hai Exit a No.1
: Fetma lampeggiando voluto.
e è pronto a muovere la
funzione che hai voluto.
Quando il modo colore _ _ _
ICON è lampeggiando
nel modo utente,
premere, allora va al
colore agiusta il
modo No.12.
12. MODO AGIUSTA Odd premere Controlla la somma della Exit a No.11
COLORE : Seleziona e lampeggia funzione che hai voluto.
la funzione che hai voluto.
Even premere Muover alla funzione che hai Exit a No.11
: Ferma lampeggiando voluto.
e è pronto a muovere la
funzione che hai voluto.
50
MOIRE CONTROL
H. MOIRE ADJUST
V. MOIRE ADJUST
LANGUAGE
ENGLISH
DEUTSCH
FRANÇAIS
ESPAÑOL
PORTUGUÊS
PRESS MENU KEY
OSD H.POSITION
50
COLOR - TEMP
USER 6500K 9300K
50
RB GB BB RG GG BG
USER
OSD MENU MENU +
13. ZOOM Odd premere Shinks Sviluppare Exit a No.1
: Seleziona zoom e l`immagine l`immagine
blinks ICON zoom. orizontalmente orizontale e
e veriticalmente. veriticamente.
Even premere Muovere alla funzione che hai Exit a No.1
: Ferma lampeggiando voluto.
è pronto per muovere
altre funzione.
Reset ( ) : Riporta tutti i comandi del menu alla situazione predefinita. Se si vuole tornare
alla situazione predefinita, premere il pulsante Reset per 5-8 secondi.
Degauss ( ): Elimina l´accumulo di campi magnetici esterni che alterano la corretta scansione
dei fasci di elettroni e diminuiscono la purezza dei colori, della messa a fuoco e
della convergenza dello schermo. Dopo aver premuto questo pulsante,
l´immagine sullo schermo si muoverà e oscillerà per un attimo durante la
smagnetizzazione.
Attenzione : Lasciare passare almeno 20 minuti prima di premere di nuovo il pulsante
Degauss.Non tenere il pulsante premuto a lungo, perchè ciò riduce la durata dei
circuiti di smagnetizzazione.
Geometry Controls Menu
I comandi di questo menu permettono di aggiustare la curvatura
oppure l´angolo dei lati dello schermo.
Pincushion : Aumenta o diminuisce la curvatura dei lati verso l´interno o verso l´esterno.
Parallelogram : Aumenta o diminuisce l´inclinazione dei lati verso sinistra o verso destra.
Trapezoid : Aumenta o dimuisce la grandezza della parte inferiore dello schermo affinché sia
uguale alla parte superiore.
Pinbalance : Aumentare o diminuire il curvante del lati entrambi alla sinistra o alla destra.
Rotation : Ruota l´intero schermo in senso orario o antiorario.
ZOOM
50
50%
PINCUSHION
PARALLELOGRAM
TRAPEZOID
PINBALANCE
ROTATION
GEOMETRY
50
RB - Red background raster
GB - Green background raster
BB - Blue background raster
RG - Red level gain
GG - Green level gain
BG - Blue level gain
Page 27

Manuale D’uso 49
ITALIANO
Manuale D’uso48
49
Caratteristiche
Caratteristiche elettriche
Caratteristiche meccaniche
Caratteristiche ambientali
Caratteristica D17CL
Tipo CRT 17 , deflessione 90 DF
Dot pitch CRT 0.25mm
Superficie CRT Antiriflesso
H/V separata, TTL, positivo/negativo
H/V composita, TTL, positivo/negativo
RGB analogico (0.7 Vp-p), positivo
75 Terminato
30kHz~72kHz (Automatica)
47Hz~160Hz (Automatica)
Risoluzione massima 1280Punti 1024Linee (Non interlacciata)
Frequenza pixel (Max.) 110 MHz
Misura de Display (Standard)
Orizzontale 306mm, Verticale 230mm
Consumo Under 75 Watt
Alimentazione AC 100~240Volt, 50/60Hz 3Hz
Connettore di ingresso D-Sub, 15 pin
Colori visualizzabili Unlimitati
Caratteristica D17CL
16.5
(L) 16.5 (P) 16.4 (A)
418mm(L) 419mm(P)
417mm(A)
21.2
(L) 21.7 (P) 20.9 (A)
538mm(L)
550mm(P) 530mm(A)
37.5Ibs (17.0Kg)
44.8Ibs (20.3Kg)
Caratteristica D17CL
32
F ~ 104 F (0 C ~ 40 C)
-4 F ~ 140 F (-20 C ~ 60 C)
10% ~ 85% U.R. senza condensa
Segnale di
ingresso
Dimensioni
Sincronizzazione
Video
Imballo
Unità
Orizzontale
Netto
Verticale
Lordo
Funzionamento
Immagazzinamento
Umidità
Scanning
frequency
Peso
Temperatura
Cosa Fare In Caso Di Problemi
Nessuna immagine
Assicurarsi che il cavo di alimentazione sia collegato correttamente.
Assicurarsi che la presa di corrente funzioni collegandovi un altro apparecchio elettrico.
Controllare che il computer e il monitor siano accesi.
Controllare che il cavo di segnale sia correttamente collegato alla scheda video o al PC.
Verificare che la scheda video sia inserita saldamente all interno del PC.
Controllare la spina e assicurarsi che non presenti dei pin piegati o schiacciati all´interno.
Premere un tasto sulla tastiera oppure muovere il mouse, può darsi che lo screen-saver sia
entrato in funzione.
Schermo instabile
Controllare che il cavo di segnale sia collegato saldamente al computer.
Controllare l´attribuzione dei pin e le sincronizzazioni del monitor e la scheda video rispetto
all´attribuzione raccomandata delle sincronizzazioni e dei pin.
Verificare che la scheda video sia inserita saldamente all´interno del PC.
Immagini confusi
Regolare il contrasto e la luminosità
Premere il pulsante Degauss.
Attenzione : Un minimo intervallo della 20 minuti deve essere esistere prima Degauss Button è
usato al tempo secondo. Non tenere il bottone a sotto continuamente.
Immagini traballanti o presenza di ondulazioni
Allontanare apparecchi elettrici che possono causare delle interferenze elettriche con il
monitor.
Consultare le informazioni della FCC poste nella seconda di copertina di questo manuale.
Altoparlanti non schermati posti vicino al monitor possono provocare immagini distorte,
pertanto occorre allontanarli.
Contorni delle immagini non sono diritti
Regolare la distorsione utilizzando i comandi Side Pincushion, Pincushion Balance,
Parallelogram oppure Trapezoid, accessibili tramite il menu su schermo.
Immagini non sono centrale, troppo piccole o troppo grandi
Regolare le dimensione orizzontali e verticali delle immagini utilizzando i comandi Horizontal
and Vertical Size posti all´interno del menu su schermo.
Page 28

Manuale D’uso50
Appendice
Cronogrammi
Questo monitor D17CL dispone di 10 modi predefiniti corrispondenti agli standard industriali più
diffusi di compatibilità “Plug & Play”.
Video
Sync
Verticale
Video
Sync
Orizzontale
1024/75Hz 1024/85Hz 1280/60Hz 640/67Hz 832/75Hz
1024
768 1024 768 1280 1024 640 480 832 624
H-Freq(kHz) 60.023 68.677 63.953 35 49.726
A
sec 16.660 14.561 15.636 28.571 20.11
B
sec 1.219 1.016 1.018 2.116 1.117
C
sec 2.235 2.201 2.255 3.175 3.91
D
sec 13.003 10.836 11.636 21.164 14.524
E
sec 0.203 0.508 0.727 2.116 0.559
V-Freq(Hz) 75.029 84.997 59.938 66.667 74.551
Omsec 13.328 11.765 16.684 15 13.414
Pmsec 0.050 0.044 0.078 0.086 0.06
Qmsec 0.466 0.524 0.579 1.114 0.784
Rmsec 12.795 11.183 16.012 13.714 12.549
Smsec 0.017 0.015 0.016 0.086 0.02
P-Freq(MHz) 78.750 94.5 107.761 30.24 57.284
H-Polarià Positiva Positiva Positiva Negativa Negativa
V-Polarià Positiva Positiva Positiva Negativa Negativa
VESA
MACINTOSH
Risoluzione
Sincronizzazione
VGA/70Hz VGA/60Hz 640/85Hz 800/75Hz 800/85Hz
720
400 640 480 640 480 800 600 800 600
H-Freq(kHz) 31.469 31.469 43.269 46.875 53.674
A
sec 31.777 31.777 23.111 21.333 18.631
B
sec 3.813 3.813 1.556 1.616 1.138
C
sec 1.907 1.907 2.222 3.232 2.702
D
sec 25.422 25.422 17.778 16.162 14.222
E
sec 0.636 0.636 1.556 0.323 0.569
V-Freq(Hz) 70.09 59.94 85.008 75 85.061
Omsec 14.268 16.684 11.764 13.333 11.756
Pmsec 0.064 0.064 0.069 0.064 0.056
Qmsec 1.08 1.048 0.578 0.448 0.503
Rmsec 12.711 15.253 11.093 12.8 11.179
Smsec 0.413 0.318 0.023 0.021 0.019
P-Freq(MHz) 28.322 25.175 36 49.5 56.25
H-Polarià Negativa Negativa Negativa Positiva Positiva
V-Polarià Positiva Negativa Negativa Positiva Positiva
Risoluzione
Sincronizzazione
IBM
VESA
Page 29

Manual de instrucciones para el usuario 51
Introducción
Embalaje 52
Información de Seguridad 52
Características 53
Sistema de gestión de potencia 54
Instalación
Conexión a su ordenador 55
Tabla de asignación de patillas del Miniconector D-Sub de 15 patillas
55
Controles
Controles OSD 56
Menús OSD 57
Búsqueda De Las Causas De Incidentes
No hay imagen 60
La imagen a desfilando o es inestable 60
La imagen está imprecisa 60
La imagen da saltos hacia arriba o está presente en
ella un patrón de ondasá 60
Las esquinas de la imagen visualizada no son cuadradas
60
La imagen visualizada no está centrada, es demasiado
pequeña o grande 60
Especificaciones Técnicas
Especificaciones Eléctricas 61
Especificaciones Técnicas 61
Especificaciones Ambientales 61
Apéndice
Organigramas de los tiempos 62
Precaución
Puede acoplarse la base de inclinación y giro opcional para obtener una
variedad de ángulos de visualización.
Notificación de Canadá
Este aparato digital Clase B cumple con todos los requisitos de las Normas
Canadienses sobre Equipos que Generan Interferencias.
Avis Canadien
Cet appareil numérique de la classe B respecte toutes les exigences du
Reglément sur le materiel brouilleur du Canada.
Aviso
La información contenida en este documento está sujeta a cambios sin previo aviso.
Español
Page 30

Introducción
Manual de instrucciones para el usuario 53
Introducción
Manual de instrucciones para el usuario52
ESPAñOL
Embalaje
En horabuena por su compra de este monitor color de primera calidad!
Los artículos abajo ilustrados se encuentran en la caja.
En primer lugar, asegúrese de que su caja los contenga todos.
Si falta o está dañado cualquier artículo, sírvase tomar contacto con su concesionario o
proveedor local.
Información de Seguridad
Este monitor se entrega con un cable de alimentación eléctrica desmontable con
terminaciones tipo IEC320. Puede resultar adecuado para la conexión a cualquier
ordenador personal de la Lista UL que dispongan de configuraciones similares. Antes de
efectuar la conexión, verifique que el voltaje de la toma de corriente del ordenador sea la
misma que la del monitor y que el voltaje en amperes de la toma de corriente del ordenador
sea igual o superior al voltaje de la corriente del monitor.
Para aplicaciones de 120 V utilice solamente el cable de alimentación desmontable de la
Lista UL con la configuración NEMA.
Clavija de conexión tipo 5-15P (cuchillas en paralelo). Para aplicaciones de 240 V utilice
solamente el cable de alimentación desmontable de la Lista UL con clavija de conexión tipo
6-15P con configuración NEMA (cuchillas en serie).
Utilice solamente una fuente de alimentación y conexión apropiadas para el monitor tal
como se indica en la etiqueta de marca.
Las ranuras y aberturas de la carcasa se utilizan para ventilación; dichas aberturas no
deben estar bloqueadas o tapadas. No debe introducir nunca ningún objeto dentro de las
ranuras o aberturas de la carcasa.
Nunca inserte ningún objeto metálico dentro de las aberturas del monitor. De lo contrario,
podrÍa producirse una descarga eléctrica.
Para evitar la descarga eléctrica, no debe tocar nunca el interior del monitor. Únicamente un
técnico autorizado debe abrir la carcasa del monitor.
Desenchufe el monitor de la toma de corriente de la pared antes de efectuar la limpieza. No
debe utilizar ningún limpiador lÍquido o en aerosol. Para realizar la limpieza, utilice un paño
húmedo sin pelusa.
Instale el monitor cerca de una toma de corriente a la que pueda acceder fácilmente.
Desconecte el equipo sujetando firmemente el enchufe y quitándolo de la toma de corriente.
Nunca desconecte el equipo tirando del cable.
Display Monitor
AC Power Input Cable
Características
Imagen superior
Menú en Pantalla de sistema de control punta del dedo para seleccionar visualmente y
ajustar la pantalla usando las teclas en el panel frontal y los menús en pantalla.
El exclusivo sistema de enfoque dinámico doble controla los haces de electrones resultando
en una visualización de imagen buena sobre toda la zona de la pantalla.
Pantalla de contraste super para un contraste superior y color más profundo.
Avanzada máscara de Sombra INVAR para un enfoque, claridad y color superiores.
Alta resolución de 17" separación de puntos de 0.25, una tecnología no entrelazada facilita
imágenes marcadas, sin parpadeos.
Sistema de control de color de menú en pantalla permite fácilmente ajustar el blanco de la
imagen así como las señales R.G.B. resultando en colores realistas.
Diseño ergonómico
Pantalla plana cuadrada para reducir la distorsión de imagen y deslumbramiento, aliviando
el cansancio óptico.
Base de inclinación permitiendo una rotación de 90 en el plano horizontal y de 17 en el
plano vertical para mayor confort del usuario.
Acuerdo de prevención de baja fuga de radiación MPR II y las normas muy rigurosas de
emisiones de campos magnéticos TCO (opción) para una mayor seguridad del usuario.
En defensa del medio ambiente
El circuito de manejo de energía formado de acuerdo con los estandares de VESA DPMS
controla el consumo de energía cuando el monitor no está en uso y usted puede ahorrar la
energía.
Todas las partes son reciclables. Todos los materiales han sido rigurosamente
seleccionados para asegurar su facilidad de mantenimiento, inspección y desecho.
Sincronización
Visualización inmediata automática de frecuencias horizontales de 30 a 72 kHz y frecuencia
vertical de 47 a 160 Hz.
Ten tiempos están preajustados en la fábrica para el tamaño y posición de imagen.
Ten tiempos adicionales los que puede definir el usuario.
Se pueden seleccionar automáticamente señales de entrada de sincronización (separada,
compuesta).
Page 31

Manual de instrucciones para el usuario 55
ESPAñOL
Introducción
Conexión a su ordenador
PRECAUCIÓN
Verifique que el PC y el monitor estén desconectados.
Para conectar el monitor a su sistema, siga
las instrucciones que se indican a
continuación:
1. Inserte el cable de alimentación de CA
en el monitor y luego en una toma de
corriente de CA.
2. Conecte el cable de señal de vÍdeo al
conector para gráficos de 15 patillas del
sistema y ajuste los tornillos
correspondientes.
3. Para encender el monitor, presione el
interruptor de alimentación.
Nota : Para conectar el monitor a un sistema Macintosh, póngase en contacto con un
distribuidor autorizado. (Es necesario utilizar un adaptador especial)
Tabla de asignación de patillas del Miniconector D-Sub de 15 patillas
El conector D-Sub de 15 Patillas
(macho) del cable de señal
(sistemas IBM) :
(15 Pin D-Sub)
15
11 15
6
10
N patilla D-Sub de 15 patillas
1 VÍdeo Rojo
2 VÍdeo Verde
3 VÍdeo Azul
4 Tierra del bastidor
5 Tierra
6 Tierra Rojo
7 Tierra Verde
8 Tierra Azul
9NC
10 Sinc. Tierra
11 Tierra
12 SDA
13 Sinc. H
14 Sinc. V
15 SCL
Introducción
Manual de instrucciones para el usuario54
Flexibilidad del sistema
Equipado con DDC1, DDC2B y DDC2Bi para compatibilidad de enchufe y función.
Monitor compatible con VGA, SVGA, VESA y modo de vídeo de alta resolución hasta
1280(H) 1024(V) @ 60Hz.
El monitor se puede usar con IBM o PC, MAC y puestos de trabajo compatibles.
Alimentación de energía universal automática incorporada permitiendo una entrada de
corriente alterna de 100-240V de CA, 50 ó 60Hz.
Menú de auto-prueba permite controlar en pantalla la unidad de visualización sin conectar a
un ordenador.
La caja compacta ocupa un espacio mínimo en su escritorio, dándole una imagen en
pantalla amplia sin perder espacio de trabajo.
Cable elétrico incluido fácil de enchufar en una toma de corriente estándar.
Sistema de gestón de potencia
Este monitor cumple con los requerimientos para ahorro de energía de VESA, Nutek y Energy
Star. El sistema de ahorro de energía funciona sólo cunado usa la computadora personal que
obedece al sistema de VESA DPMS y/o controladores de gráfico.
El monitor entra en varias fases de ahorro de energía en función de la señal video entrante
como indicado en la siguiente tabla:
Observación
El monitor pasa automáticamente por los pasos DPMS cuando no está funcionando.
Para anular la condición DPMS del monitor, oprimir cualquier tecla en el teclado.
Estado Sincr. horizontal Sincr. vertical
Activado Activado Activado
de reserva desactivado Activado
Suspender Activado desactivado
desactivado desactivado desactivado
Estado LED Energia
Tiempo de restablecimiento
activado Verde Under 75 Vatios N/ A
de reserva Verde
60 Vatios 2 Seg
Suspender Amarillo 15 Vatios 5 Seg
desactivado Amarillo/destello 5 Vatios 15 Seg
Page 32

Manual de instrucciones para el usuario 57
ESPAñOL
Manual de instrucciones para el usuario56
Controles
Menú de OSD
Controles
Controles OSD
Los controles del MENÚ EN PANTALLA incluyen los siguientes controles ampliados como
Tamaño, Posición, Geometría, Ajuste de Color, Claridad y Utilidades de Contraste. Los ajustes
se preservan inmediatamente. El control de trabajo en curso se puede restablecer a los ajustes
de fábrica pulsando una tecla de Restauración.
Función de los botones OSD en la parte frontal del monitor
: En el menú principal, salir de los controles OSD. En un submenú: salir al menú principal
OSD.
/+
1) Cuando la pantalla no muestra OSD,
: Accede directamente a los controles de luminosidad.
+: Accede directamente a los controles de contraste.
2) Cuado el menú principal está expuesto en la pantalla
: Transladar a la función que usted desea ajustar.
3) Cuado el sub-menú está expuesto en la pantalla
: Controlar la cantidad que usted desea ajustar.
MENú : Expone el Menú principal de OSD.
1) Cuando el menú principal está expuesto en la pantalla
: Seleccionar la función con el icono rojo.
2) Cuando el sub-menú está expuesto en la pantalla :
: Seleccionar la función con el icono rojo.
Controles adicionales frontales
Interruptor eléctrico : Activa o desactiva la alimentación eléctrica del monitor.
Cuando está activado, se ilumina el LED.
Luz de indicador de energía, LED (diodo electrolumínico): Está ubicada en la izquierda del
conmutador de alimentación eléctrica. Cada modo reduce la cantidad de energía usada por
el monitor.
Entrar en el menú en pantalla
Pulsar la tecla Proceder.
Apagar el menú en pantalla
Cuando se está en el menú principal, pulsar la tecla de .
Cuando se está en submenús, pulsar dos veces la tecla de .
MENÚ DE OSD MENÚ +
1. NúMERO DE OSD Proceder a N˚2 Proceder a N˚3 Proceder a N˚4 No tiene
significado.
2. MENÚ PRINCIPAL La función de icono rojo Transladar a las funciones que Salir al N˚1
es: usted desea.
- Realizer: La rellamada,
y la desmagnetización
- Seleccionar y parpadear
: Colores ajustados y
zoom
- Proceder: otros
3. LUMINOSIDAD Transladar al N˚2 Reducir la Incrementar la Salir al N˚1
luminosidad. luminosidad.
4. CONTRASTE Transladar al N˚2 Reducir el Incrementar el Salir al N˚1
contraste. contraste
5.POSICIÓN H/V Bascular la posición Transladar el Transladar el Salir al N˚2
horizontal y vertical. imagen hacia imagen hacia
abajo o hacia la arriba o hacia la
izquierda en la derecha en la
función función
seleccionada. seleccionada.
6. TAMAÑO H/V Bascular el tamaño Disminuir el Expander el Salir al N˚2
horizontal o vertical. imagen en la imagen en la
función función
seleccionada. seleccionada.
7.GEOMETRÍA Opresión de tecla impar Controla la cantidad de funciones Salir al N˚2
: Selecciona la función seleccionadas. (para mayor
y hace parpadear con el detalle, referirse al menú de
icono rojo. control de geometría)
Opresión de tecla par Transladar a la función que Salir al N˚2
: Detiene el parpadeo usted desea.
de la luz y prepara para
transladar a la función
que usted desea.
POSICIÓN
PULSAR TECAL MENÚ
LUMINOSIDAD
50
PP
31.5KHz 60Hz
CONTRASTE
PP
50
31.5KHz 60Hz
POSICIÓN H.
50
TAMAÑO H.
50
50%
ACERICO
PARALELOGRAMO
TRAPEZOIDE
EQUILIBRIO
ROTACIÓN
GEOMETRÍA
50
Page 33

Manual de instrucciones para el usuario 59
ESPAñOL
Manual de instrucciones para el usuario58
Controles
Controles
MENÚ DE OSD MENÚ +
8. MUARÉ Opresión de tecla impar Controla la cantidad de funciones Salir al N˚2
: Selecciona la función sel eccionadas. Por favor maneje
y hace parpadear con esta tecla para eliminar el
el icono rojo. temblor de imagen.
Opresión de tecla par Transladar a la función que
: Detiene el pardadeo usted desea.
de la luz y prepara para
transladar a la función
que usted desea.
9. IDIOMA Selecciona el lenguaje Transladar al lenguaje que Salir al N˚2
con el icono rojo y salir usted desea usar.
al N˚2
10. POSICIÓN DE OSD Bascular horizontal y Transladar el Transladar el Salir al N˚2
verticalmente a la menú de OSD menú OSD
posición de OSD.
hacia la izquierda
hacia la
o hacia abajo derecha arriba
en la función en la función
seleccionada. seleccionada.
11. MODE DE COLOR Opresión de tecla impar Transladar al modo de color que Salir al N˚1
: Parpadea el icono rojo usted desea y selecciona “el
- Icono de menú de modo de color” con el parpadeo.
colores.
Opresión de tecla par Transladar a la función que Salir al N˚1
: Detiene el pardadeo y usted desea.
prepara para transladar
a la función que usted
desea.
Cuando está parpadeando
___
el icono de mode de
color, presione y luego
translade al N˚12, el
mode de adjuste de color.
12. MODE DE AJUSTE Opresión de tecla impar Controla la cantidad de función Salir al N˚11
DE COLOR : Selecciona y hace que usted desea.
parpadear a la función
que usted desea.
Opresión de tecla par Transladar a la función que Salir al N˚11
: Detiene el parpadeo usted desea.
y prepara para transladar
la función que usted desea.
50
CONTROL MUARÉ
CONTROL MUARÉ H.
CONTROL MUARÉ V.
IDIOMA
ENGLISH
DEUTSCH
FRANÇAIS
ESPAÑOL
PORTUGUÊS
PULSAR TECAL MENÚ
POSICIÓN H. OSD
50
COLOR
USER 6500K 9300K
50
RB GB BB RG GG BG
USER
MENÚ DE OSD MENÚ +
13. ZOOM Opresión de tecla impar Reduce Expande Salir al N˚1
: Selecciona el zoom y horizontal y horizontal y
hace parpadear el verticalmente al verticalmente al
icono de zoom. imagen. imagen.
Opresión de tecla par Transladar a la función que Salir al N˚1
: Detiene el parpadeo y usted desea.
prepara para transladar
a otra función.
Llamar ( ) : Restablece el control al ajuste de fábrica, restablece todos los controles
dentro del menú alt. - Si ud. quiere volver al ajuste de modo de fábrica,
pulse continuamente la tecla de restauración durante 5-8 segundos.
Desmagnetizar ( ) : Elimina la acumulación de campos magnéticos interferentes que alteran la
exploración correcta de los haces de electrones y afectan la pureza de los
colores de la pantalla, el enfoque y la convergencia. Cuando se pulsa, su
imagen en pantalla saltará y vacilar· un poco al desmagnetizarse la pantalla.
Precaución : Por favor observe un lapso de tiempo al menos 20 minutos entre los usos
de la tecla Desmagnetizar. No mantener la tecla presionada continuamente
para evitar acortar la vida útil del conjunto de circuitos de Desmagnetizar.
Menú de Controles para Geometría
Los controles de Geometría le permiten ajustar la curvatura o el ángulo
de los lados de su representación visual.
Acerico : Incrementa o disminuye la curvatura de los lados, tanto hacia adentro como afuera.
Paralelogramo : Incrementa o disminuye la inclinación de los lados tanto hacia la izquierda como
la derecha.
Trapezoide : Incrementa o disminuye la parte inferior de la pantalla para ser igual a la parte superior.
Equilibrio : Aumenter o diminuir la curvidad de las caras a la izquierda ua la derecha.
Rotación : Gira la representación visual entera en el sentido de las agujas del reloj o en
sentido inverso.
ZOOM
50
50%
ACERICO
PARALELOGRAMO
TRAPEZOIDE
EQUILIBRIO
ROTACIÓN
GEOMETRÍA
50
RB - Red background raster
GB - Green background raster
BB - Blue background raster
RG - Red level gain
GG - Green level gain
BG - Blue level gain
Page 34

Manual de instrucciones para el usuario 61
ESPAñOL
Manual de instrucciones para el usuario60
61
Especificaciones
Especificaciones Eléctricas
Especificaciones Técnicas
Condiciones Ambientales
Elemento D17CL
Tipo de Tubo de Rayos Catódicos
De 17 y 90 de desviación DF
Paso de Puntos del Tubo 0.25mm
Superficie del Tubo Antireflectante
H/V Separada, TTL, positiva/negativa
H/V Compuesta, TTL, positiva/negativa
Analógico RGB (0.7 Vp-p), positivo
75 ohms de Impedancia Final
30kHz~72kHz (Automáticamente)
47Hz~160Hz (Automáticamente)
Resolución Máxima 1280Puntos 1024 Líneas (Sin exploración entrelazada)
Reloj de Pixels (Máx.) 110 MHz
Tamaño de la Pantalla (Estandar)
Horizontal 306mm, Vertical 230mm
Consumo de Alimentación
Under 75 Watts
Fuente de EnergÍa 100~240V AC, 50/60 Hz (3Hz
Conector Interno D-Sub, 15Pin Connectors
Colores Unlimitados
Elemento D17CL
16.5
(A) 16.5 (P) 16.4 (A)
418mm(A) 419mm(P) 417mm(A)
21.2 (A) 21.7 (P) 20.9 (A)
538mm(A) 550mm(P) 530mm(A)
37.5Ibs (17.0Kg)
44.8Ibs (20.3Kg)
Elemento D17CL
De 32
F a 104 F (De 0 C a 40 C)
De -4 F a 140 F (De -20 C a 60 C)
De 10% a 85% H R sin condensación
Señal de
Entrada
Dimensiones
Sinc.
VÍdeo
Embalaje
Equipo
Horizontal
Neto
Vertical
Bruto
Funcionamiento
Almacenamiento
Humedad
Frecuencia
de Rastreo
Peso
Temperatura
Búsqueda De Las Causas De Incidentes
No hay imagen
Controlar si el cable de CA está correctamente conectado.
Controlar si el enchufe de la pared tiene tensión al enchufarle otro aparato eléctrico.
El interruptor eléctrico y el del ordenador deben estar en la posición de activado.
Asegurar que el cable de señal está correctamente conectado a la ficha video o PC.
Asegurar que la ficha video está colocada fija dentro del PC.
Controlar el conector para ver si está curvado o si presenta patillas empujadas hacia adentro.
Oprimir una tecla en el teclado o mover el ratón, en caso de que el modo de ahorro de
energía haya dejado en blanco la pantalla.
La imagen va desfilando o es inestable
El cable de señal ha de estar fijamente conectado al ordenador.
Controlar las asignaciones de patilla y tiempos de señal del monitor y su ficha video con
respecto a los tiempos y asignaciones de patillas recomendados.
Asegurar que la ficha video está colocada fijamente en el PC.
La Imagen está imprecisa
Ajustar los Controles de Contraste y Claridad.
Pulsar una vez la Tecla de Desmagnetización.
Precausión: Por lo menos debe tener un intervalo de 20 minutos antes de usar por segunda vez al
botón de desmagnetización. No debe oprimir continuamente a este botón.
La imagen da saltos hacia arriba o está presente en ella un patrón de
ondasá
Apartar del monitor dispositivos eléctricos que pueden causar interferencias eléctricas.
Consulte el interior de la portada de este manual para información FCC.
Altavoces audio no protegidos colocados al lado del monitor pueden causar una distorsión
de la imagen. Apartar los altavoces.
Las esquinas de la imagen visualizada no son cuadradas
Ajustar la distorsión usando el Acerico Lateral o Balance de Acerico Trapezoidal. Igualar los
controles de ajuste debajo del menú en pantalla.
La imagen visualizada no está centrada, es demasiado pequeña o grande
Ajustar los tamaños de imagen horizontal y vertical usando los controles de ajuste de
Tamaño Horizontal y Vertical debajo del menú en pantalla.
Page 35

Manual de instrucciones para el usuario62
Apéndice
Organigramas de los tiempos
Este monitor D17CL dispone de modos preestablecidos correspondientes a los 10 estándares
más difundidos del sector en lo que a función “Plug and Play” se refiere.
Video
Sync
Vertical
Video
Sync
Horizontal
1024/75Hz 1024/85Hz 1280/60Hz 640/67Hz 832/75Hz
1024
768 1024 768 1280 1024 640 480 832 624
Frec-H(kHz) 60.023 68.677 63.953 35 49.726
A
sec 16.660 14.561 15.636 28.571 20.11
B
sec 1.219 1.016 1.018 2.116 1.117
C
sec 2.235 2.201 2.255 3.175 3.91
D
sec 13.003 10.836 11.636 21.164 14.524
E
sec 0.203 0.508 0.727 2.116 0.559
Frec-V(Hz) 75.029 84.997 59.938 66.667 74.551
Omsec 13.328 11.765 16.684 15 13.414
Pmsec 0.050 0.044 0.078 0.086 0.06
Qmsec 0.466 0.524 0.579 1.114 0.784
Rmsec 12.795 11.183 16.012 13.714 12.549
Smsec 0.017 0.015 0.016 0.086 0.02
Veloc Pixels(MHz)
78.750 94.5 107.761 30.24 57.284
Polaridad-H Positiva Positiva Positiva Negativa Negativa
Polaridad-V Positiva Positiva Positiva Negativa Negativa
VESA
MACINTOSH
Resolución
Temporización
VGA/70Hz VGA/60Hz 640/85Hz 800/75Hz 800/85Hz
720
400 640 480 640 480 800 600 800 600
Frec-H(kHz) 31.469 31.469 43.269 46.875 53.674
A
sec 31.777 31.777 23.111 21.333 18.631
B
sec 3.813 3.813 1.556 1.616 1.138
C
sec 1.907 1.907 2.222 3.232 2.702
D
sec 25.422 25.422 17.778 16.162 14.222
E
sec 0.636 0.636 1.556 0.323 0.569
Frec-V(Hz) 70.09 59.94 85.008 75 85.061
Omsec 14.268 16.684 11.764 13.333 11.756
Pmsec 0.064 0.064 0.069 0.064 0.056
Qmsec 1.08 1.048 0.578 0.448 0.503
Rmsec 12.711 15.253 11.093 12.8 11.179
Smsec 0.413 0.318 0.023 0.021 0.019
Veloc Pixels(MHz)
28.322 25.175 36 49.5 56.25
Polaridad-H Negativa Negativa Negativa Positiva Positiva
Polaridad-V Positiva Negativa Negativa Positiva Positiva
Resolución
Temporización
IBM
VESA
 Loading...