Page 1
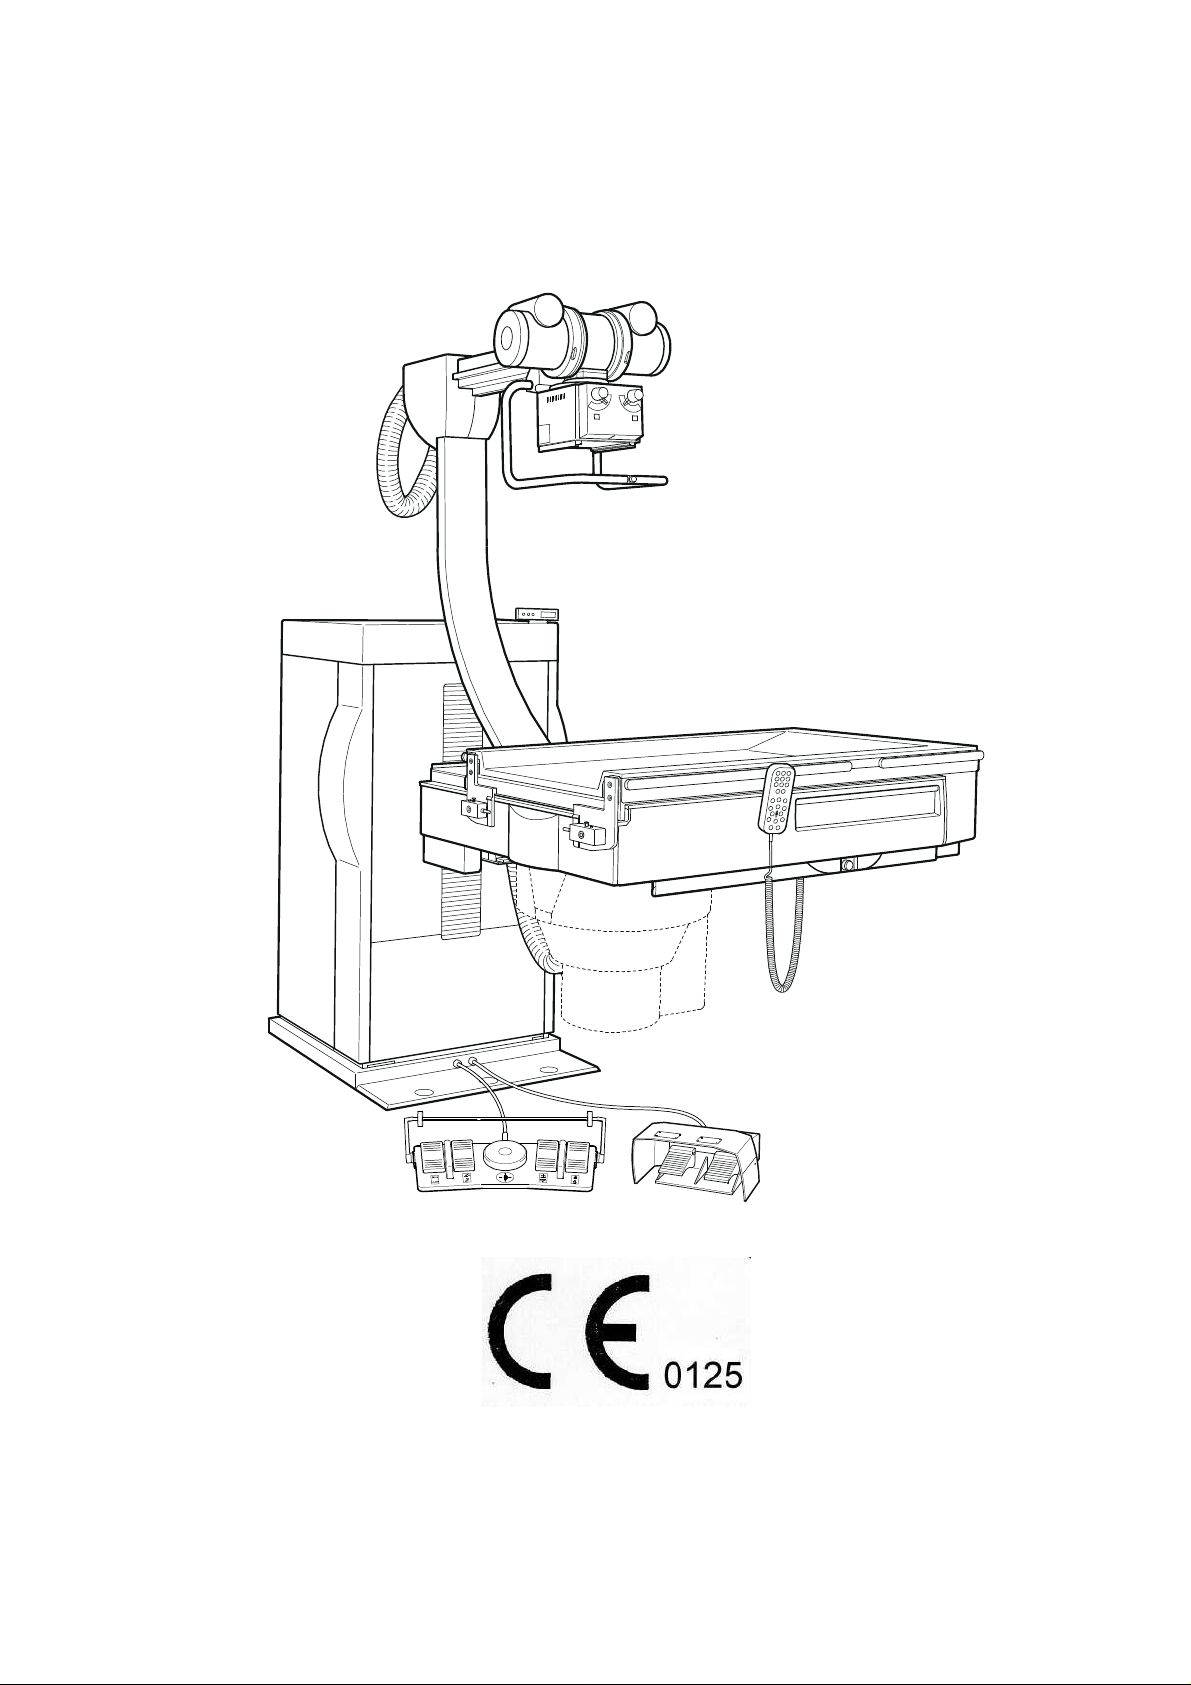
INSTALLATION INSTRUCTIONS Uromat 3000
________________________________________________________________________
________________________________________________________________________
English Version
06/00 - 1 of 90 - 0116 7201
Rev. 00 © 2000 Hans Pausch Röntgengerätebau Graf-Zeppelin-Str. 1 D-91056 Erlangen ALL RIGHTS RESERVED Ru
Page 2

CONTENTS Page
1. Technical Data
1.1 General Safety Information 4
1.2 Component Weights 4
1.3 Component Dimensions 4
1.4 Packaging Dimensions and Weights 4
1.5 Component Designations 5
1.6 Dimensional Drawing 6
1.7 Cable Lengths of the High Voltage, Collimator,
Adjustable Bucky and Image lntensifier Cables 10
1.8 Power Line Connection Data 11
1.9 Required Special Tools 11
1.10 Required Test Equipment 11
1.11 Environmental Conditions 11
1.12 Operating Conditions 11
1.13 Circuit Diagram Overview 12
1.14 Component Designations for the Circuit Diagram 27
1.15 Function Description of the Controller 31
2. Installation
2.1 Preparations for Installation 35
2.2 Unpacking the Unit Parts 35
2.3 Taking the Unit Off the Pallet 36
2.4 Installing the Unit 37
2.5 Aligning the Unit 38
2.6 Temporarily Connecting Line Power 39
2.7 Installing the Tube Unit Support Arm 39
2.8 Preinstallation of the Tube Unit - Collimator 40
2.9 Installing the Tube Unit - Collimator on the Tube
Unit Support Arm 40
2.10 Installing the Image Intensifier (I.I.) 41
2.11 Laying the Collimator Cables 41
2.12 Laying the High Voltage Cables 42
2.13 Laying the I.I. Cables 44
2.14 Connecting the Power Supply via the Generator 44
2.15 Installing the Measuring Chamber 45
2.16 Installing the Grid 46
2.17 Installing the Tilt Angle Indicator - Error Display 46
2.18 Installing the Cover Panels 47
2.19 Installing the Monitor Support Arm 47
2.20 Installing the Holder for the Flush Bowl 47
2.21 Sealing the Table Frame Cover Panel 48
0116 7201 -2 of 90 - 06/00
Rev. 00 © 2000 Hans Pausch Röntgengerätebau Graf-Zeppelin-Str. 1 D-91056 Erlangen ALL RIGHTS RESERVED Ru
Page 3

3. Adjustments
3.1 Installing the Tube Unit Support Arm 48
3.2 Central Beam to Center of Bucky 50
3.3 Central Beam to Center of I.I. 50
3.4 Tabletop, Longitudinal Movement Path Potentiometer 51
3.5 Tabletop, Transverse Movement Path Potentiometer 52
3.6 Bucky Movement Path Potentiometer 52
3.7 I.I. Carriage Movement Path Potentiometer 52
3.8 Table Tilt Movement Path Potentiometer 1 53
3.9 Table Tilt Movement Path Potentiometer 2 53
3.10 Table, Longitudinal Safety Switches 54
3.11 Tabletop, Transverse Safety Switches not configured 54
3.12 Tabletop, Longitudinal Safety Switches 55
3.13 I.I. Carriage Movement Path Safety Switches 55
3.14 Table Tilt Up Movement Path Switch Strike Plate 55
3.15 Table Tilt Down Movement Path Switch Strike Plate 55
3.16 +88° Tilt Movement Safety Switches 56
3.17 -20° Tilt Movement Safety Switches 56
3.18 Spindle Nut Safety Switches 56
3.19 Accessory Sensor Switches 57
3.20 Longitudinal Tabletop Belt Tension 57
3.21 Raise - Lower Table Belt Tension 57
3.22 Cassette Carriage Drive Belt Tension 58
3.23 Operation in the Service Mode 59
3.24 Startup 61
3.25 Collimator Basic Setting 62
3.26 Collimation to Cassette and I.I. Formats 63
3.27 Saving the Parameters in the PC 64
3.28 Setting Parameters - Electronics 65
4. Technical Maintenance
4.1 Mechanical and Electrical Checks 67
4.2 Function Test 70
4.3 Spare Parts - Overall View 72
4.4 List of Spare Parts 79
5. Troubleshooting 84
6. Replacing Boards 86
7. Version Updates 86
8. Maintenance Verification 87
9. Location of Identification Labels 88
06/00 - 3 of 90 - 0116 7201
Rev. 00 © 2000 Hans Pausch Röntgengerätebau Graf-Zeppelin-Str. 1 D-91056 Erlangen ALL RIGHTS RESERVED Ru
Page 4

1. TECHNICAL DATA
1.1 General Safety Information
Maintenance and repair may be performed only by an office that is authorized by the
manufacturer.
In the Federal Republic of Germany, electrical installation of medically used rooms must
conform to VDE Regulation 0107. In all other countries, the particular applicable national
regulations take precedence and must be observed. These can be found in the system
project plan.
During installation, it must be assured that all ground wire connections provided by the
manufacturer must be connected prior to starting up the unit.
The ground wire between the individual components and the power supply must be
connected as shown in the Wiring Diagram.
The regulations provided by the trade unions for occupational safety and prevention of
accidents must be observed.
No work may be performed on parts that are under power (above 42 V).
This condition applies for both measurement and adjustment work steps. However, special
care is required when performing these worksteps.
If the operating instructions call for voltage to be switched on for unit movements, the system
must be shut down immediately following such tests.
The radiation regulations must be observed while making settings and checks that must be
performed under X-radiation; radiation protective clothing must be worn.
1.2 Component Weights
Unit column approx. 320 kg
Table approx. 230 kg
Tube unit support arm approx. 50 kg
Footswitch approx. 5 kg
Total weight, incl. tube unit, collimator,
adjustable Bucky and I.I.: approx. 730 kg
1.3 Component Dimensions
Unit column with table and tube unit support arm on the pallet.
2050 mm x 1015 x 1800 mm
1.4 Packaging Dimensions and Weights
Unit column with table, incl. accessories 2050 mm x 1015 mm x 1890 mm
approx. 900 kg
Transport carriage 1800 mm x 200 mm x 200 mm
approx. 85 kg
0116 7201 -4 of 90 - 06/00
Rev. 00 © 2000 Hans Pausch Röntgengerätebau Graf-Zeppelin-Str. 1 D-91056 Erlangen ALL RIGHTS RESERVED Ru
Page 5
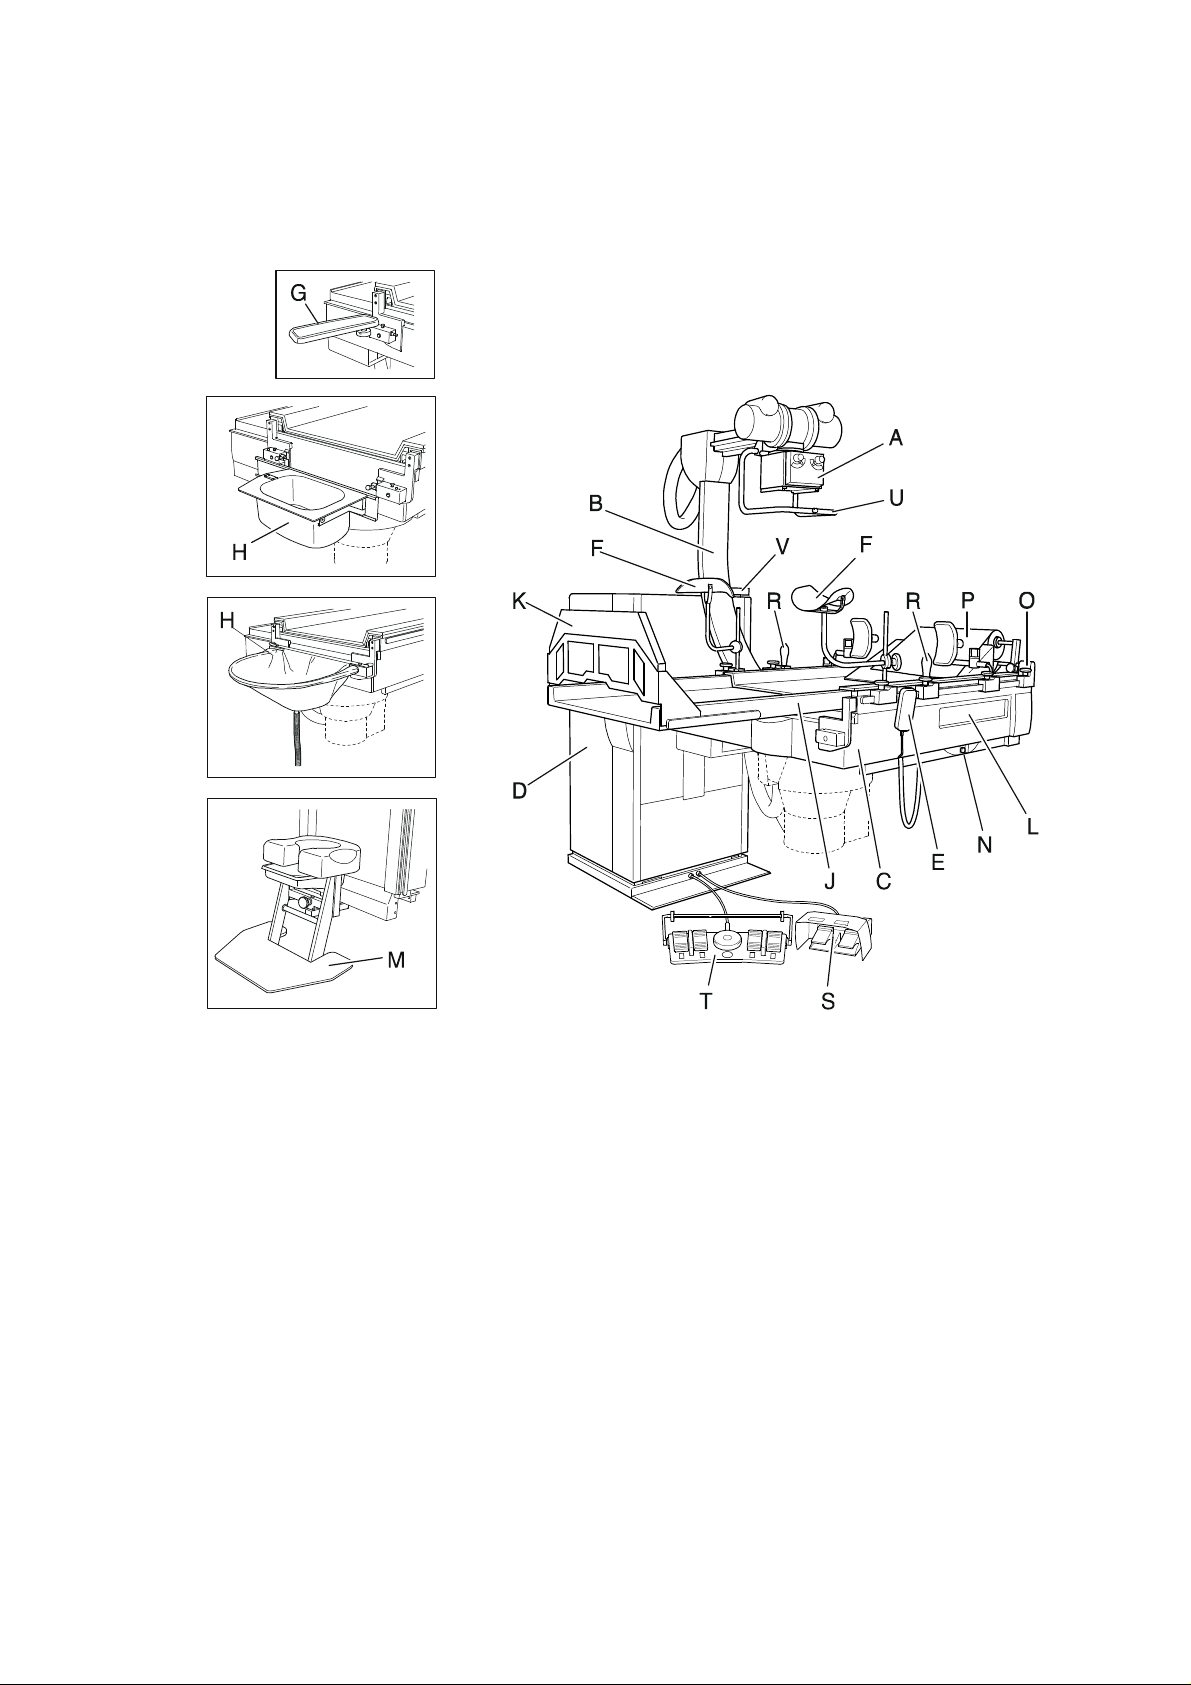
1.5 Component Designations
(the illustration shows the right-handed version, the left-handed version is the mirror
image)
A X-ray tube unit - collimator
B Tube unit support arm, adjustable
C Unit table with four-way table movement
D Unit column
E Manual control unit
F Leg supports
G Elbow supports
H Flush bowl and rinse bag holder
J Table extension
K Footrest for table extension
L Cassette shaft cover
M Micturation seat
N Emergency stop switch
O Head cushion with holder
P Paper roll with holder
R Patient handgrips
S Footswitch for exposure and fluoroscopy
T Multi-function footswitch
U Grip handle
V Tilt angle display / position memory display / error display
06/00 - 5 of 90 - 0116 7201
Rev. 00 © 2000 Hans Pausch Röntgengerätebau Graf-Zeppelin-Str. 1 D-91056 Erlangen ALL RIGHTS RESERVED Ru
Page 6
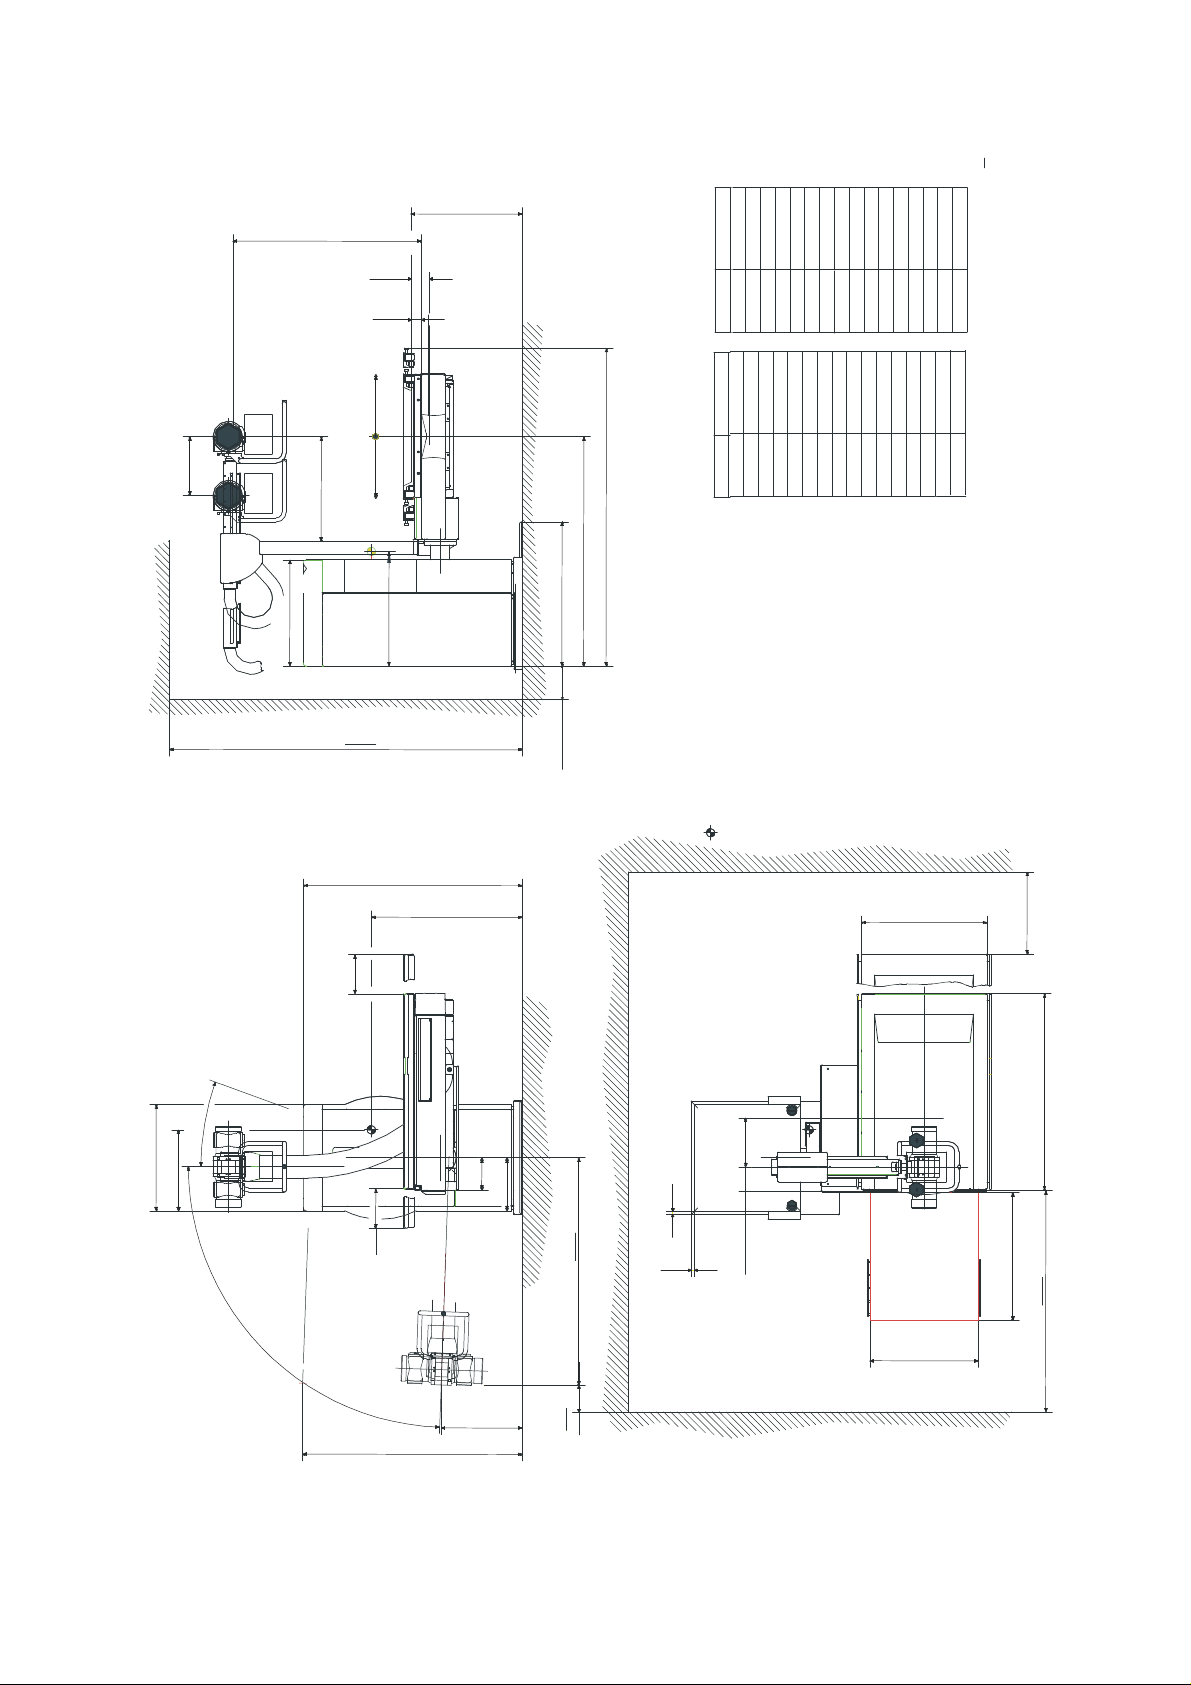
1.6 Dimensional Drawing, Right-handed Version
min.
650
1750min.
1200
The mentioned centre of gravity applies
without X-ray components and accessories.
Table horizontal in highest position,
tube support arm at the head end.
* gemÌB DIN EN 349
according to DIN EN 349
min.680 - max.1225
1150FFA
113
BV
65
Film
360
650
640
130 130
1940max.
1400
880
700
inchmm
inchmm
26,772
27,559700
680
0,787
2,559
65
20
30,709
29,921
780
760
5,118
4,449
113
130
34,646
36,220
880
920
5,709
7,087
180
145
45,276
47,244
1150
1200
7,874
9,449
240
200
48,228
52,559
1335
1225
11,811
12,795
300
325
55,118
52,756
1400
1340
14,173
19,488
495
360
57,087
68,898
1450
1750
19,685
25,197
640
500
76,378
102,362
1940
2600
26,063
25,591
650
662
2600min.
200min.
Der angegebene Schwerpunkt gilt
ohne RÎntgenkomponenten und ZubehÎr.
Tisch horizontal in oberster Stellung,
RÎhrentragarm auf der Kopfseite.
Gewicht ca. 670 kg
weight approx. 670 kg
1335
920
760
500min. *
240
495
20°
88°
240
200
325
1450max. ca.
300max.
20
20
145min.
TischverlÌngerung
+ FuBbank table extension
+ foot rest
780
662
*
495min. ca.
500
1340max. ca.
0116 7201 -6 of 90 - 06/00
Rev. 00 © 2000 Hans Pausch Röntgengerätebau Graf-Zeppelin-Str. 1 D-91056 Erlangen ALL RIGHTS RESERVED Ru
Page 7
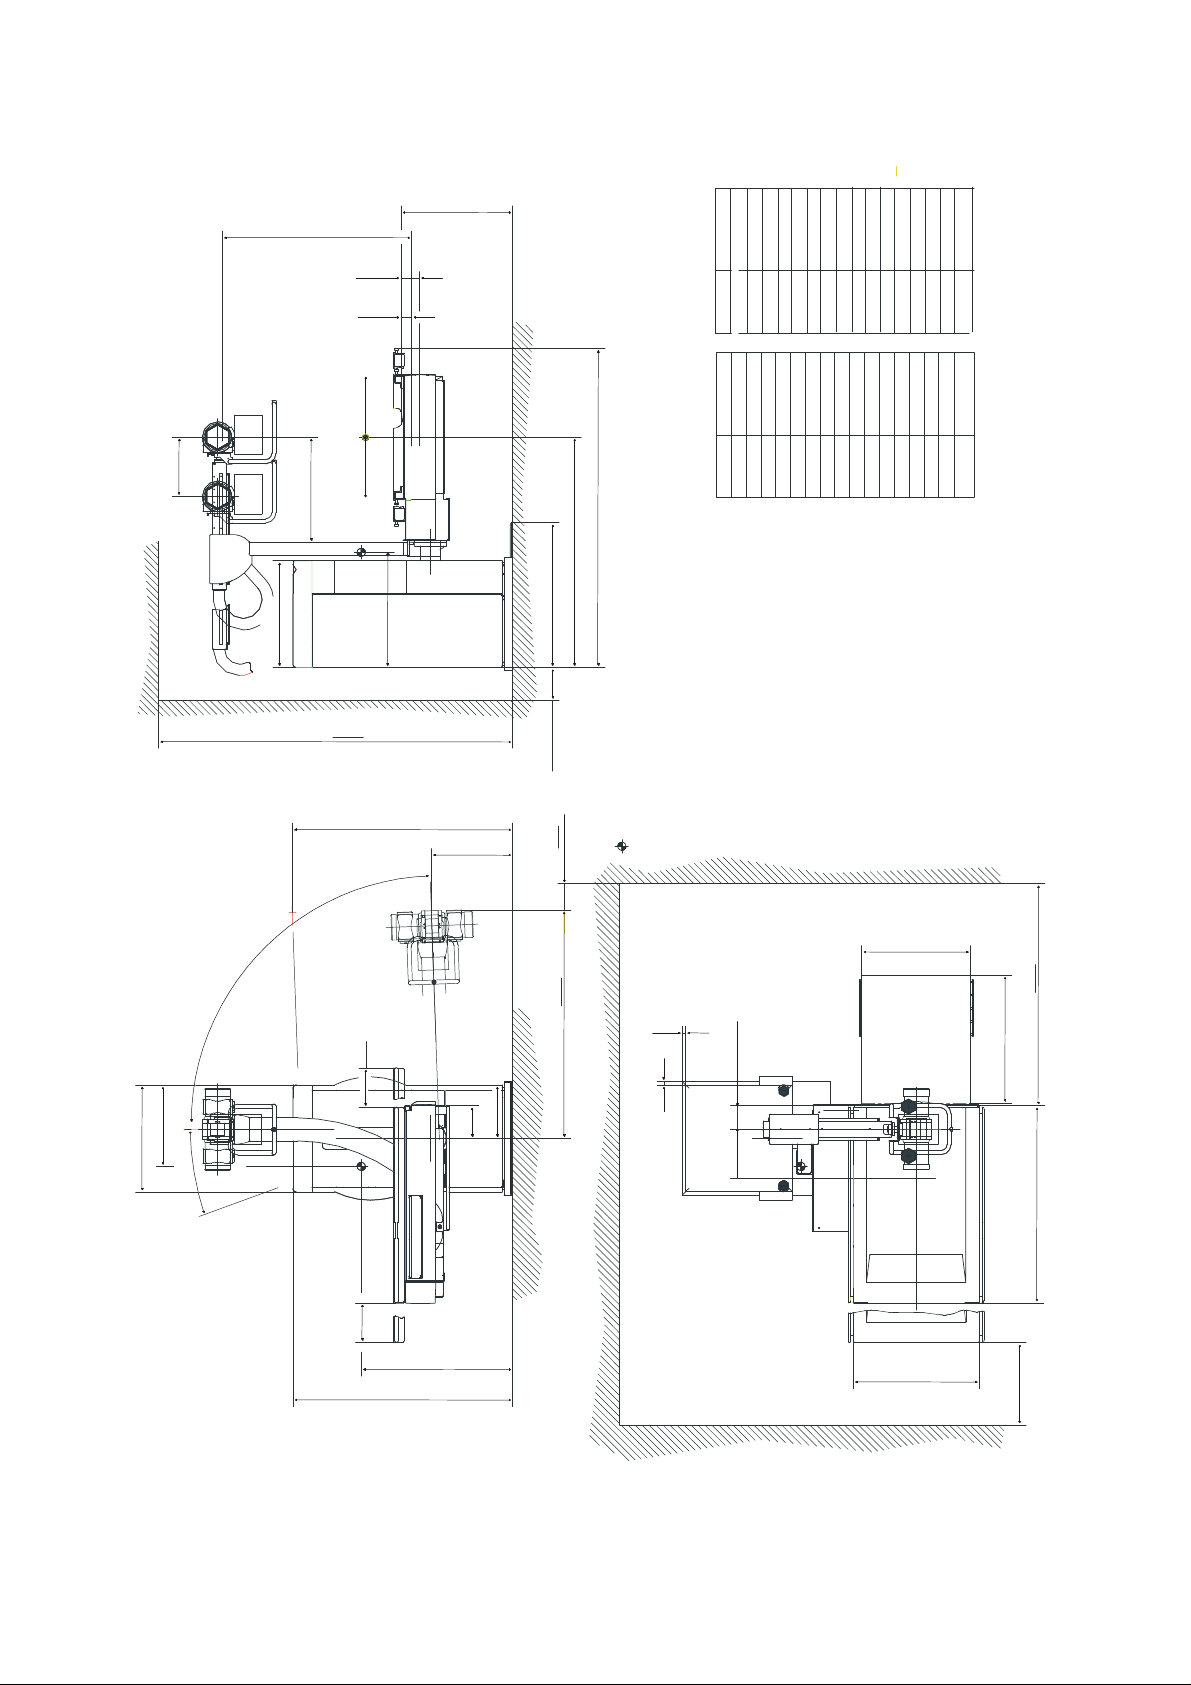
1.6.1 Dimensional Drawing, Left-handed Version
1200
1750min.
650
min.680 - max.1225
1150FFA
113
BV
65
Film
130130
360
650
640
700
1940max.
1400
880
mm inch
mm inch
27,559
26,772
700
680
0,787
2,559
65
20
30,709
29,921
780
760
5,118130
4,449
113
36,220
34,646
920
880
5,709
7,087
145
180
47,244
45,276
1150
1200
9,449
7,874
200
240
52,559
48,228
1225
1335
11,811
12,795
300
325
55,118
52,756
1340
1400
19,488
14,173
360
495
68,898
57,087
1750
1450
25,197
19,685
500
640
76,378
102,362
2600
1940
26,063
25,591
650
662
495
20°
88°
2600min.
1340max. ca.
495min. ca.
200min.
500min. *
Der angegebene Schwerpunkt gilt
ohne RÎntgenkomponenten und ZubehÎr.
Tisch horizontal in oberster Stellung,
RÎhrentragarm auf der Kopfseite.
The mentioned centre of gravity applies
without X-ray components and accessories.
Table horizontal in highest position,
tube support arm at the head end.
Gewicht ca. 670 kg
weight approx. 670 kg
* gemÌB DIN EN 349
according to DIN EN 349
662
1450max. ca.
240
200
325
20
20
145min.
TischverlÌngerung
+ FuBbank table extension
+ foot rest
780
300max.
240
920
760
1335
06/00 - 7 of 90 - 0116 7201
Rev. 00 © 2000 Hans Pausch Röntgengerätebau Graf-Zeppelin-Str. 1 D-91056 Erlangen ALL RIGHTS RESERVED Ru
500min. *
Page 8
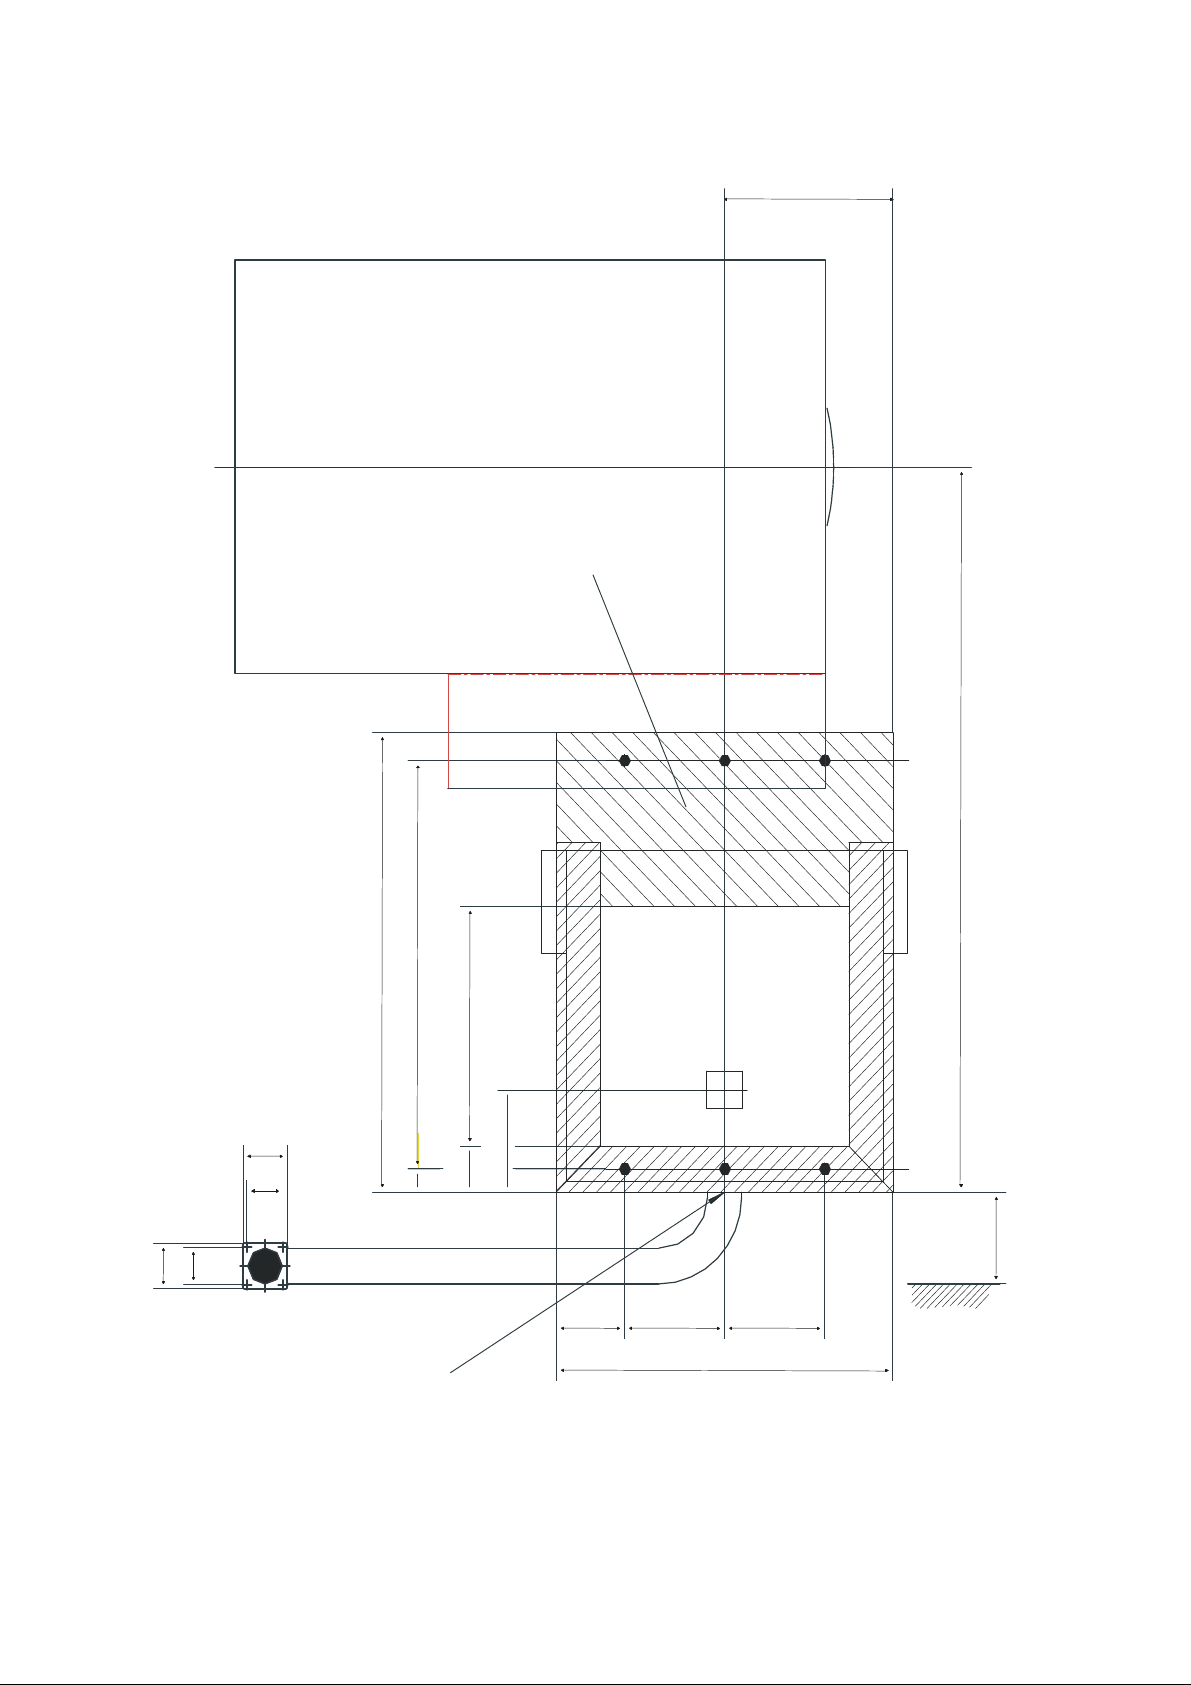
1.6.2 Dimensional Drawing for Floor Mounting, Right-handed Version
450 mm über dem Boden
345
90
min. Wandabstand
Drehachse
Fußauflagfläche
1420
74
90
74
**
900
45 800
90 470
P1
*
200
P2
180
140 205205
* Cable intake through the floor
** End of flexible hose for wall connection of 2000 mm flexible hose length
0116 7201 -8 of 90 - 06/00
Rev. 00 © 2000 Hans Pausch Röntgengerätebau Graf-Zeppelin-Str. 1 D-91056 Erlangen ALL RIGHTS RESERVED Ru
Kabelanschluß
690
mit Rillenschlauch
Page 9
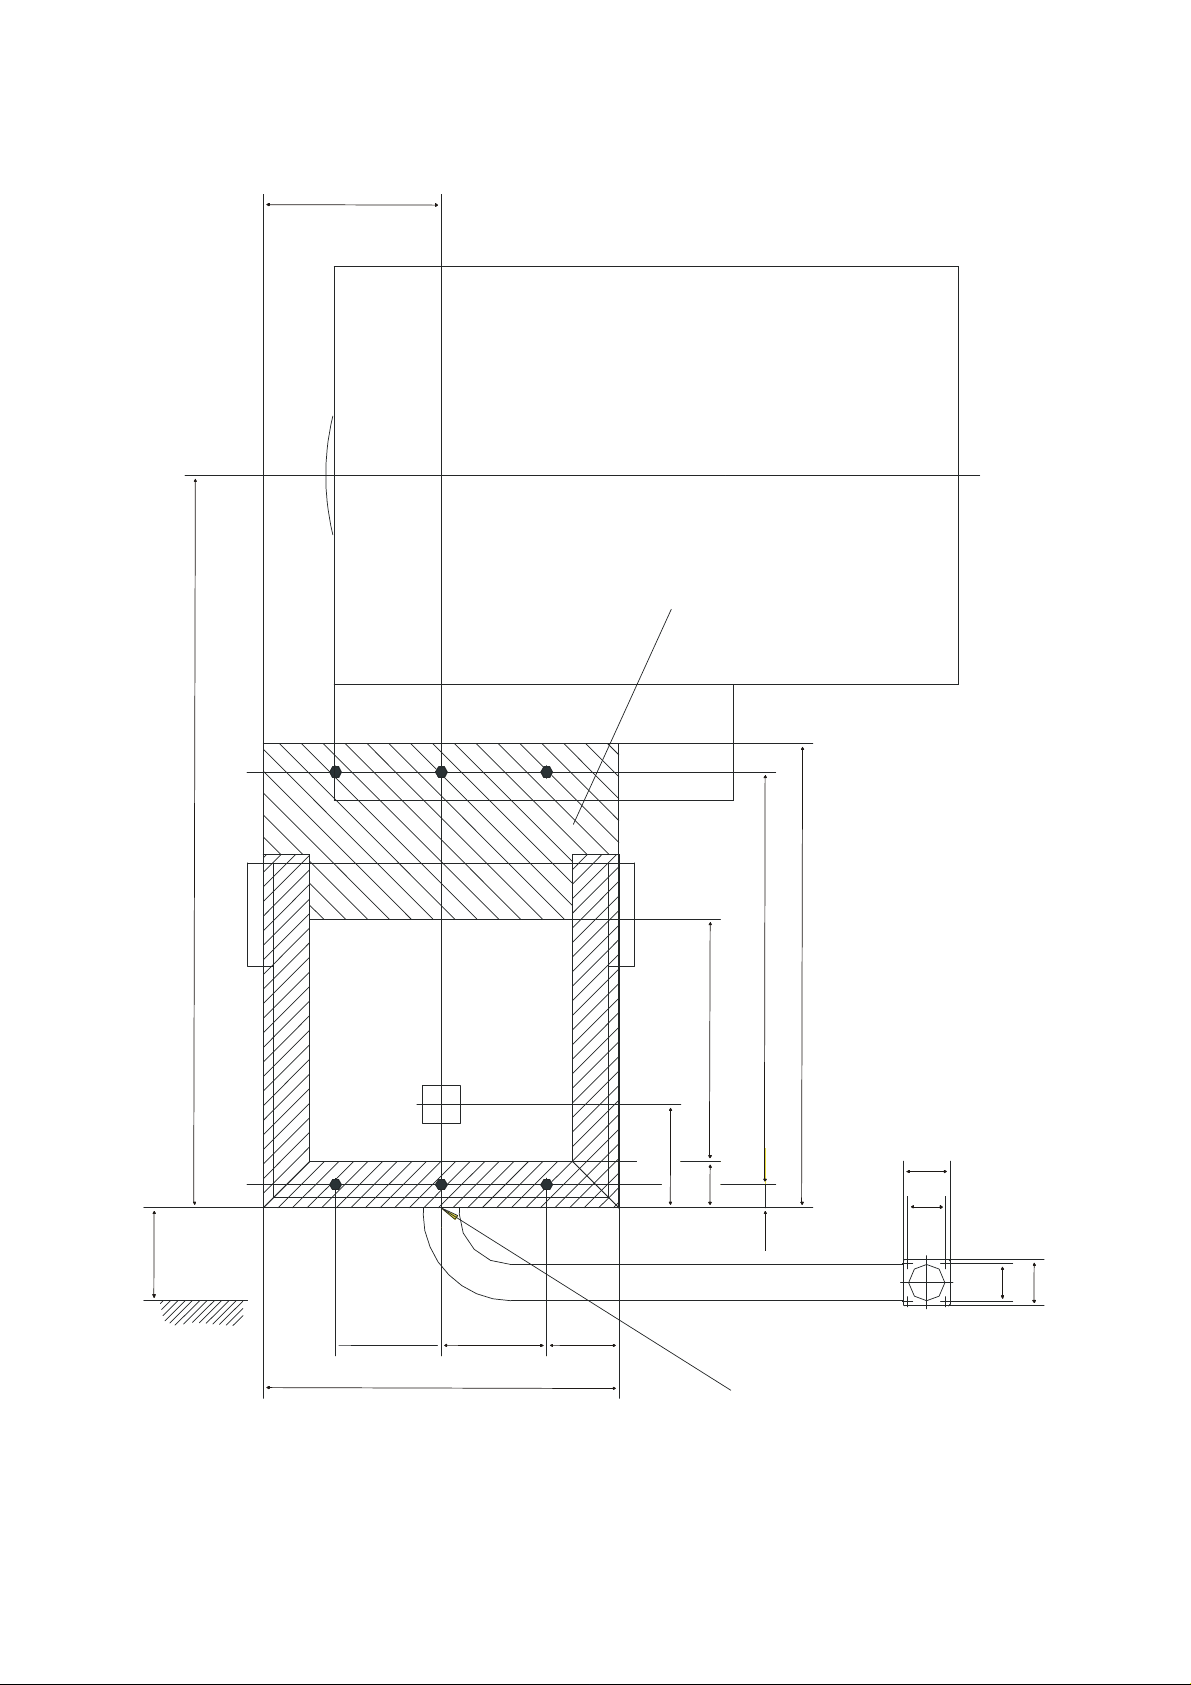
1.6.3 Dimensional Drawing for Floor Mounting, Left-handed Version
450 mm über dem Boden
345
180
min. Wandabstand
Drehachse
Fußauflagefläche
P1
1420
P2
900
*
200
90 470
90
74
45 800
74
140205 205
**
* Cable intake through the floor
** End of flexible hose for wall connection of 2000 mm flexible hose length
06/00 - 9 of 90 - 0116 7201
Rev. 00 © 2000 Hans Pausch Röntgengerätebau Graf-Zeppelin-Str. 1 D-91056 Erlangen ALL RIGHTS RESERVED Ru
690
Kabelanschluß
mit Rillenschlauch
Page 10
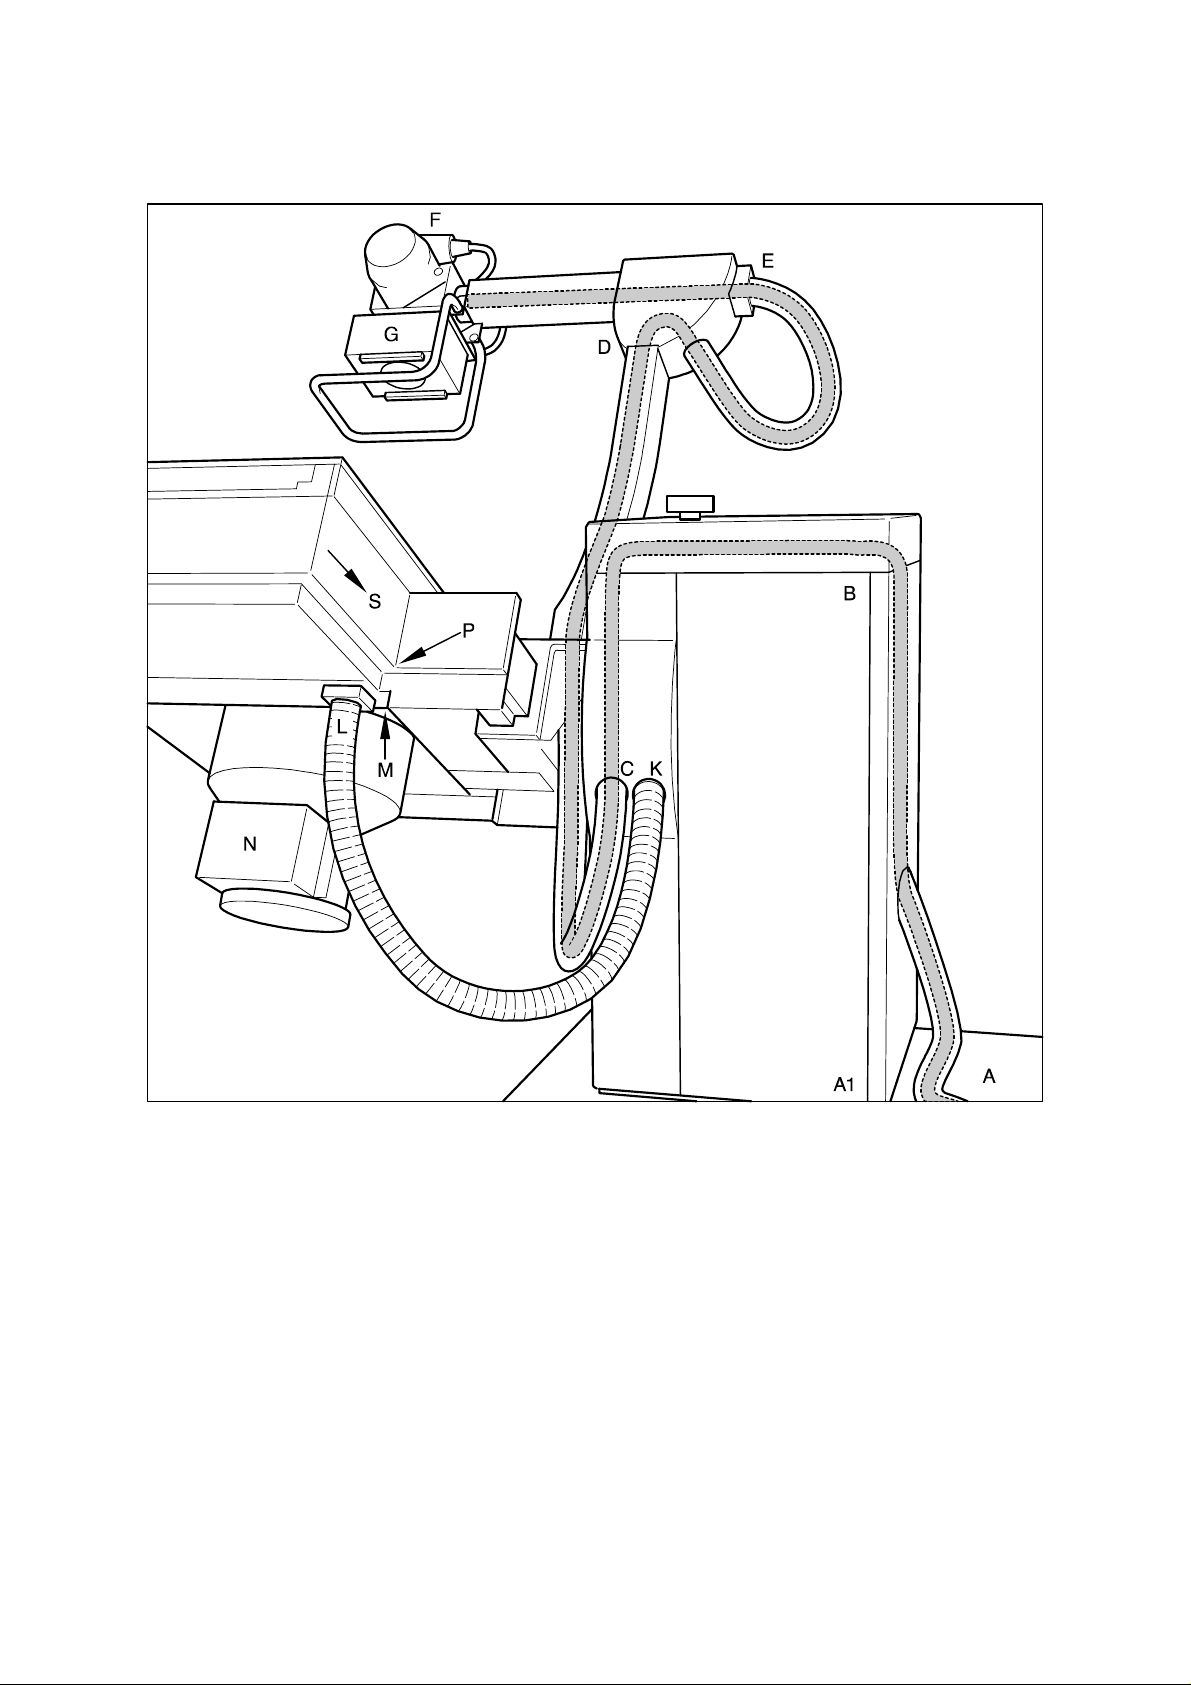
1.7 Cable Lengths of the High Voltage, Collimator, Bucky and Image
Intensifier Cables
High voltage cables A, C, D, E, F, 700 cm
Collimator cables B, C, D, E, G, 650 cm
Bucky, measuring chamber A, K, L, M, P, S, 490 cm
Image intensifier cables A, K, L, M, N, 630 cm
0116 7201 -10 of 90 - 06/00
Rev. 00 © 2000 Hans Pausch Röntgengerätebau Graf-Zeppelin-Str. 1 D-91056 Erlangen ALL RIGHTS RESERVED Ru
Page 11

1.8 Power Line Connection Data
Power lead-in must be routed over a 30 mA fault current interrupter that is provided by the
customer. The room installation must comply with VDE 0107.
In all other countries outside the Federal Republic Germany, the legally specified country
regulations take precedence and must be maintained.
Prerequisite:
The unit is designed for single-phase DC current with a fixed installation and for a fixed
connection using an all-pole separator from the Network (IEC 601, Chapter 57.1).
During installation, it must be possible to adapt the power line voltage and frequency to
correspond to the order.
Power connection: 1 N 115 /200/208/ 230/240 V AC
Frequency: 50 / 60 Hz
Nominal current (fuse): 13/7.5/7.2/6.5/6.25 A
Nominal line power: 1500 VA
Heat dissipation: 240 W
1.9 Required Special Tools
Torque wrench 50 Nm (5 mkp)
Masonry drill bit 12 mm dia.
Sista sanitary caulking F 101
Special grease - Tunap Tungrease BS Pa. Nr.: 9026 0001
1.10 Required Test Equipment
PC or laptop with color display (black/white is also sufficient, but operation is made more difficult);
min. 486 processor; 16 MB RAM; with a 3 ½" diskette drive and hard drive.
Windows 3.x ; Win 95 operating system (Windows NT can cause difficulties with the Com interface).
Serial connection cable (9-pole, Sub-D connector to 9-pole Sub-D socket, 1-1 connection), length > 1m.
Spirit level
Tape measure
Multimeter test instrument
1.11 Conditions for Transport and Storage
Ambient temperature range -25 C to 70 C
Relative humidity in the range 5% to 95%
Air pressure in the range 700 hPa to 1100 hPa
1.12 Operating Conditions
Ambient temperature range 10 C to 40 C
Relative humidity in the range 20% to 80%
Air pressure in the range 700 hPa to 1100 hPa
06/00 - 11 of 90 - 0116 7201
Rev. 00 © 2000 Hans Pausch Röntgengerätebau Graf-Zeppelin-Str. 1 D-91056 Erlangen ALL RIGHTS RESERVED Ru
Page 12
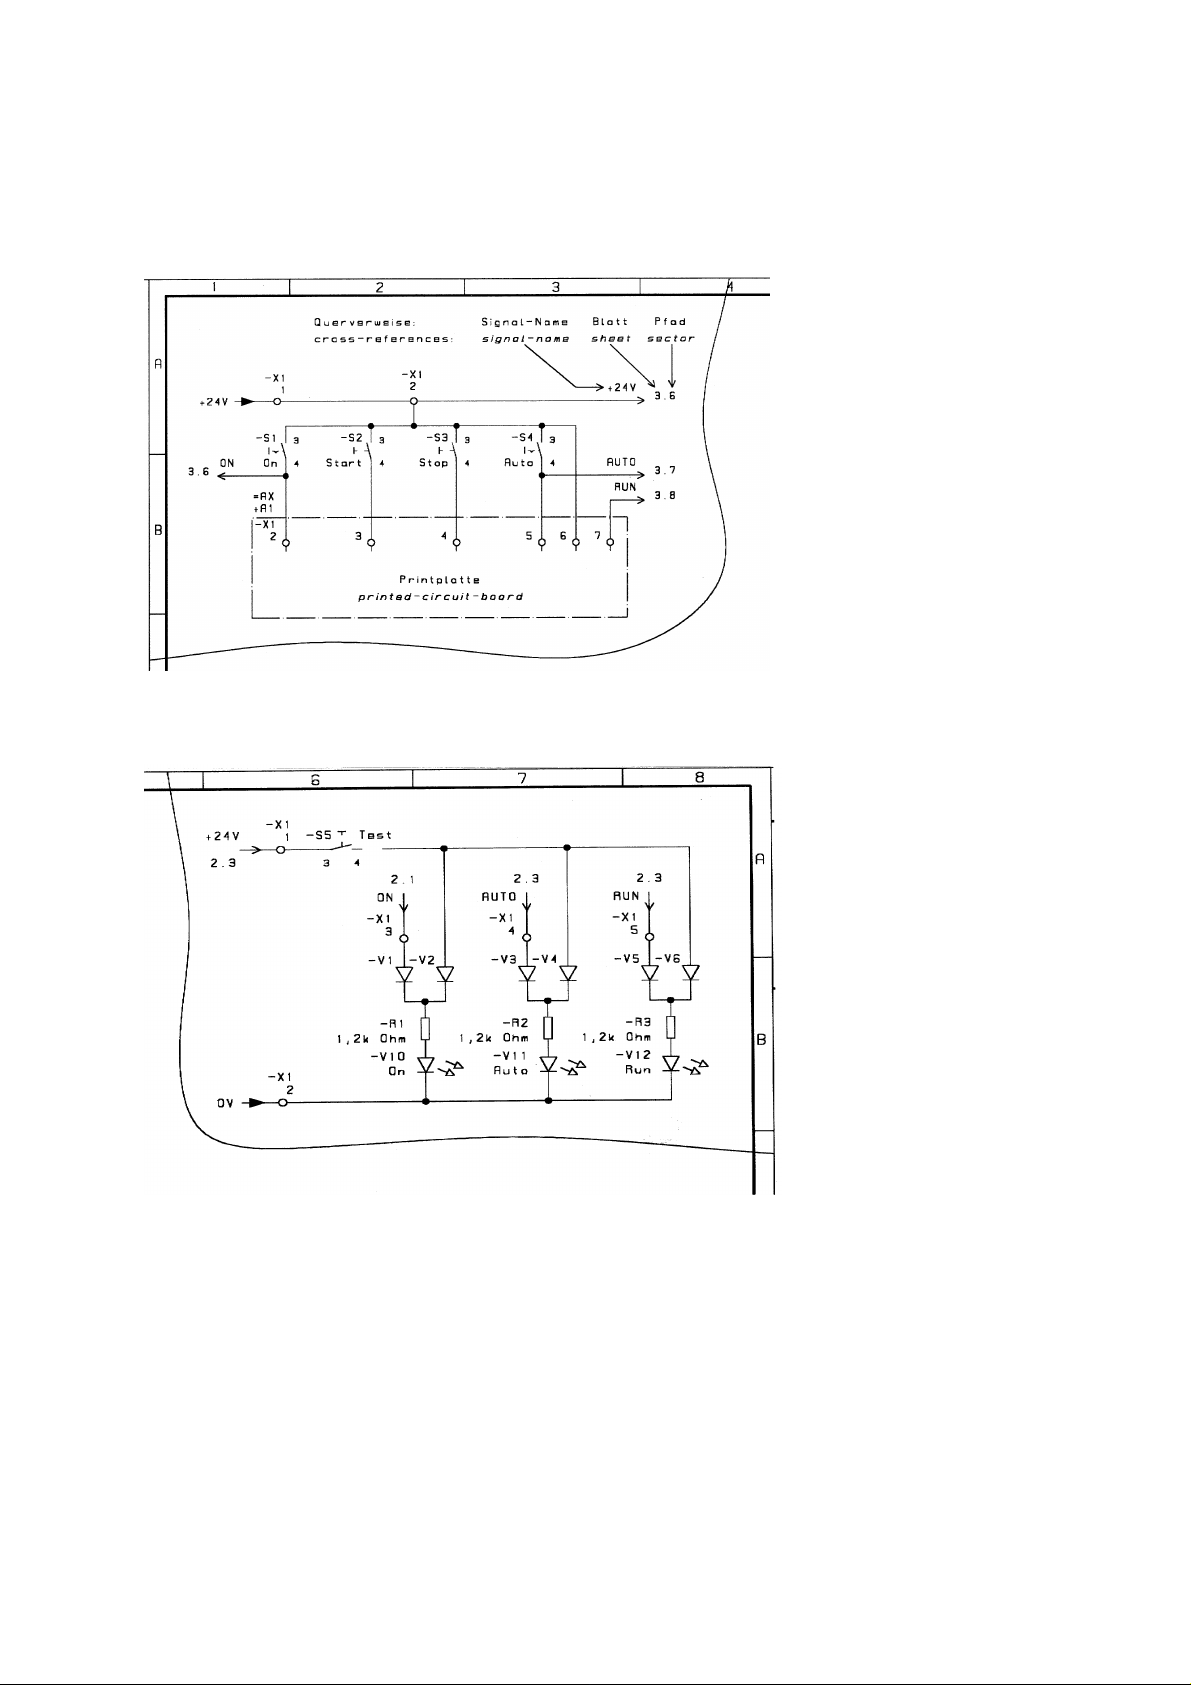
1.13 Circuit Diagram, Page 1
1.13.1 Description of Circuit Diagram
....... Circuit Diagram, Page 2
= AX Control unit
= system, designation
...... Circuit Diagram, Page 3
= AX + A2 Display unit
= system, + location, designation
1.13.2 Contents of Circuit Diagram
1.13 Circuit Diagram, Page 2 Page 13
1.13 Circuit Diagram, Page 3 Page 14
1.13 Circuit Diagram, Page 4 Page 15
1.13 Circuit Diagram, Page 5 Page 16
1.13 Circuit Diagram, Page 6 Page 17
1.13 Circuit Diagram, Page 7 Page 18
1.13 Circuit Diagram, Page 8 Page 19
1.13 Circuit Diagram, Page 9 Page 20
1.13 Circuit Diagram, Page 10 Page 21
1.13 Circuit Diagram, Page 11 Page 22
1.13 Circuit Diagram, Page 12 Page 23
1.13 Circuit Diagram, Page 13 Page 24
1.13 Circuit Diagram, Page 14 Page 25
1.13 Circuit Diagram, Page 15 Collimator Page 26
0116 7201 -12 of 90 - 06/00
Rev. 00 © 2000 Hans Pausch Röntgengerätebau Graf-Zeppelin-Str. 1 D-91056 Erlangen ALL RIGHTS RESERVED Ru
Page 13
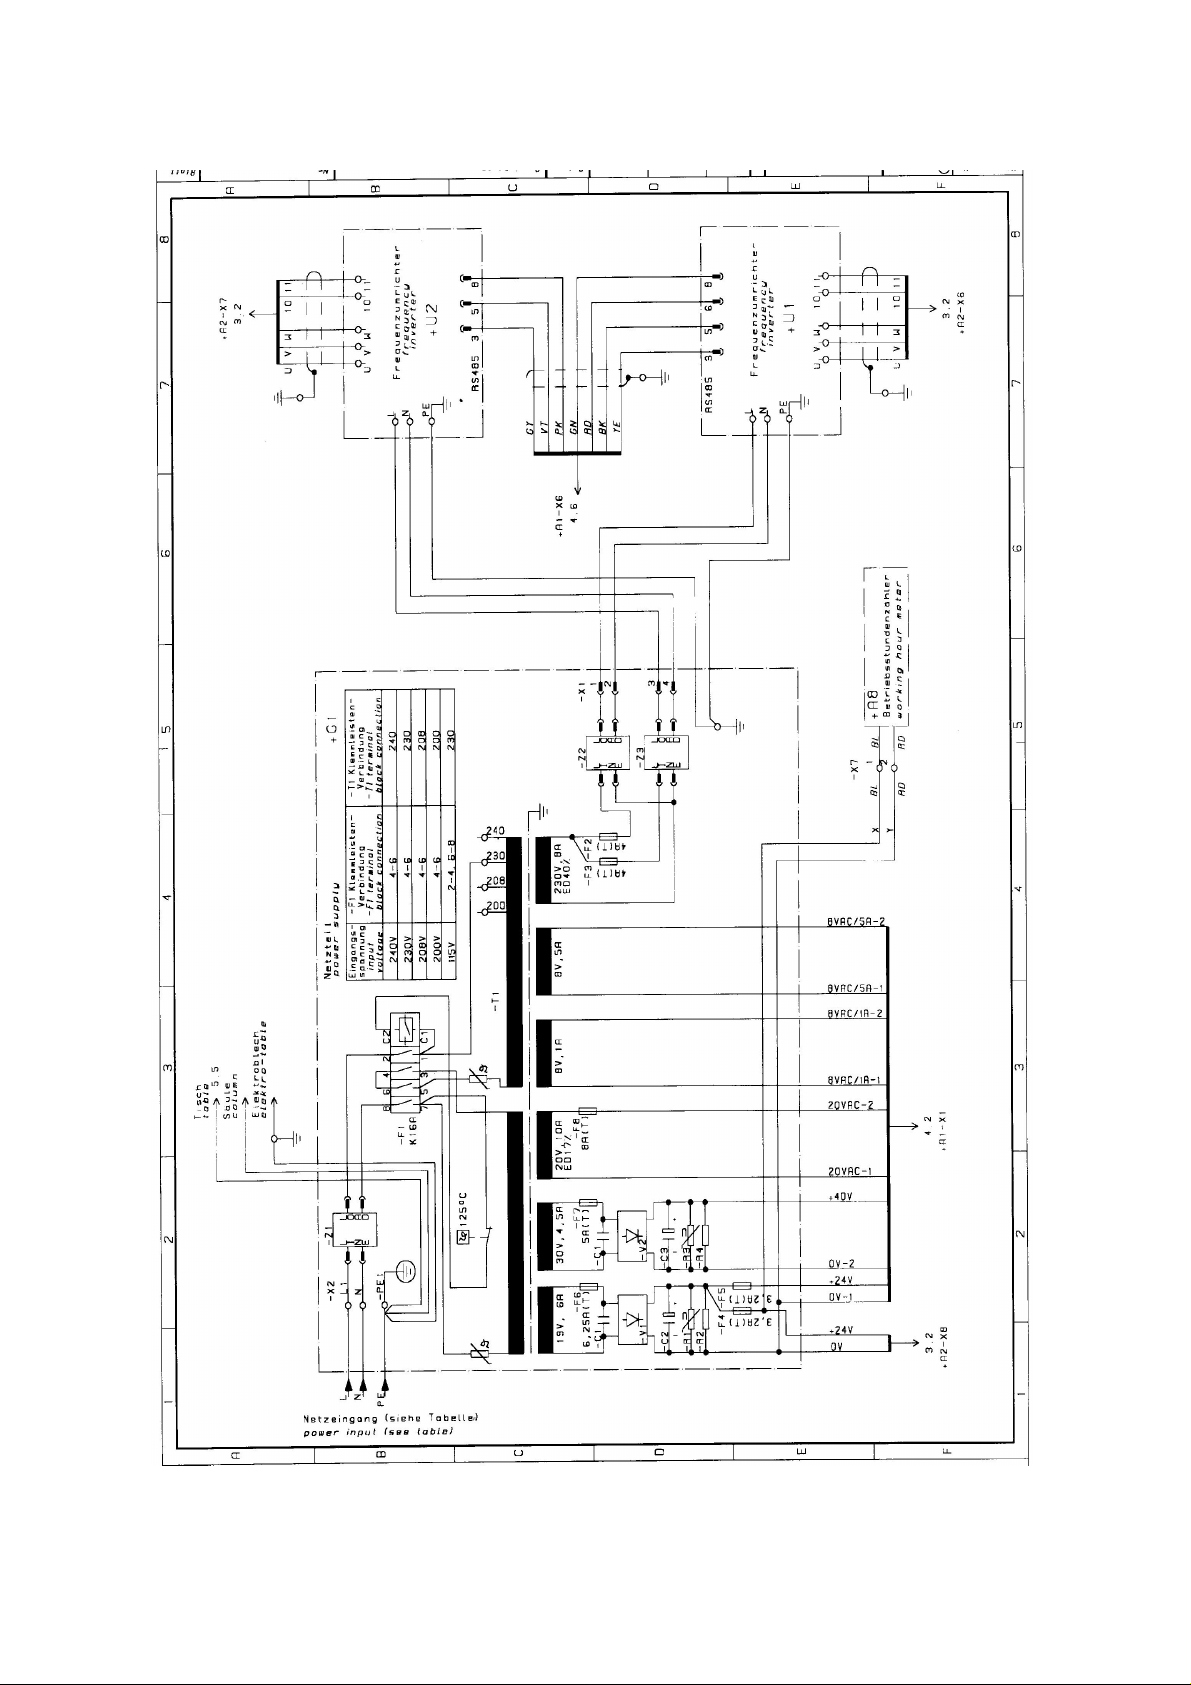
1.13 Circuit Diagram, Page 2
06/00 - 13 of 90 - 0116 7201
Rev. 00 © 2000 Hans Pausch Röntgengerätebau Graf-Zeppelin-Str. 1 D-91056 Erlangen ALL RIGHTS RESERVED Ru
Page 14
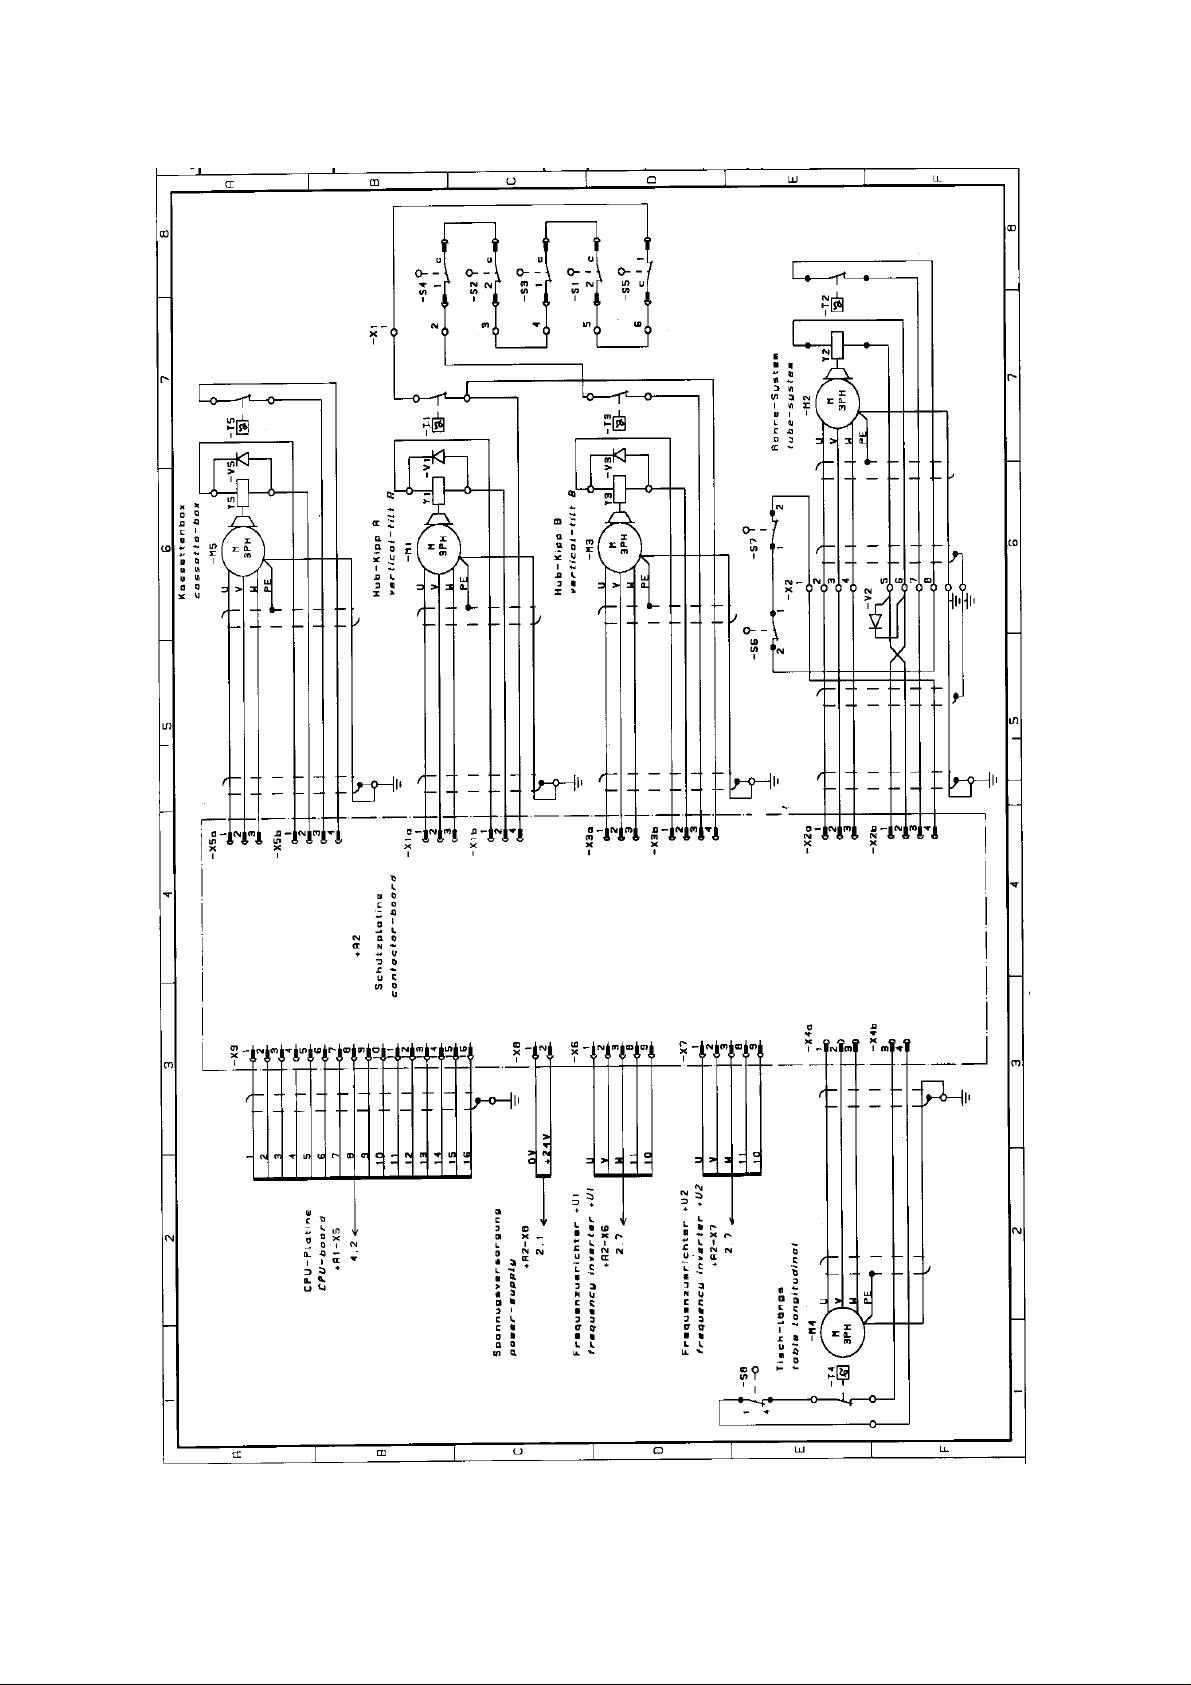
1.13 Circuit Diagram, Page 3
0116 7201 -14 of 90 - 06/00
Rev. 00 © 2000 Hans Pausch Röntgengerätebau Graf-Zeppelin-Str. 1 D-91056 Erlangen ALL RIGHTS RESERVED Ru
Page 15
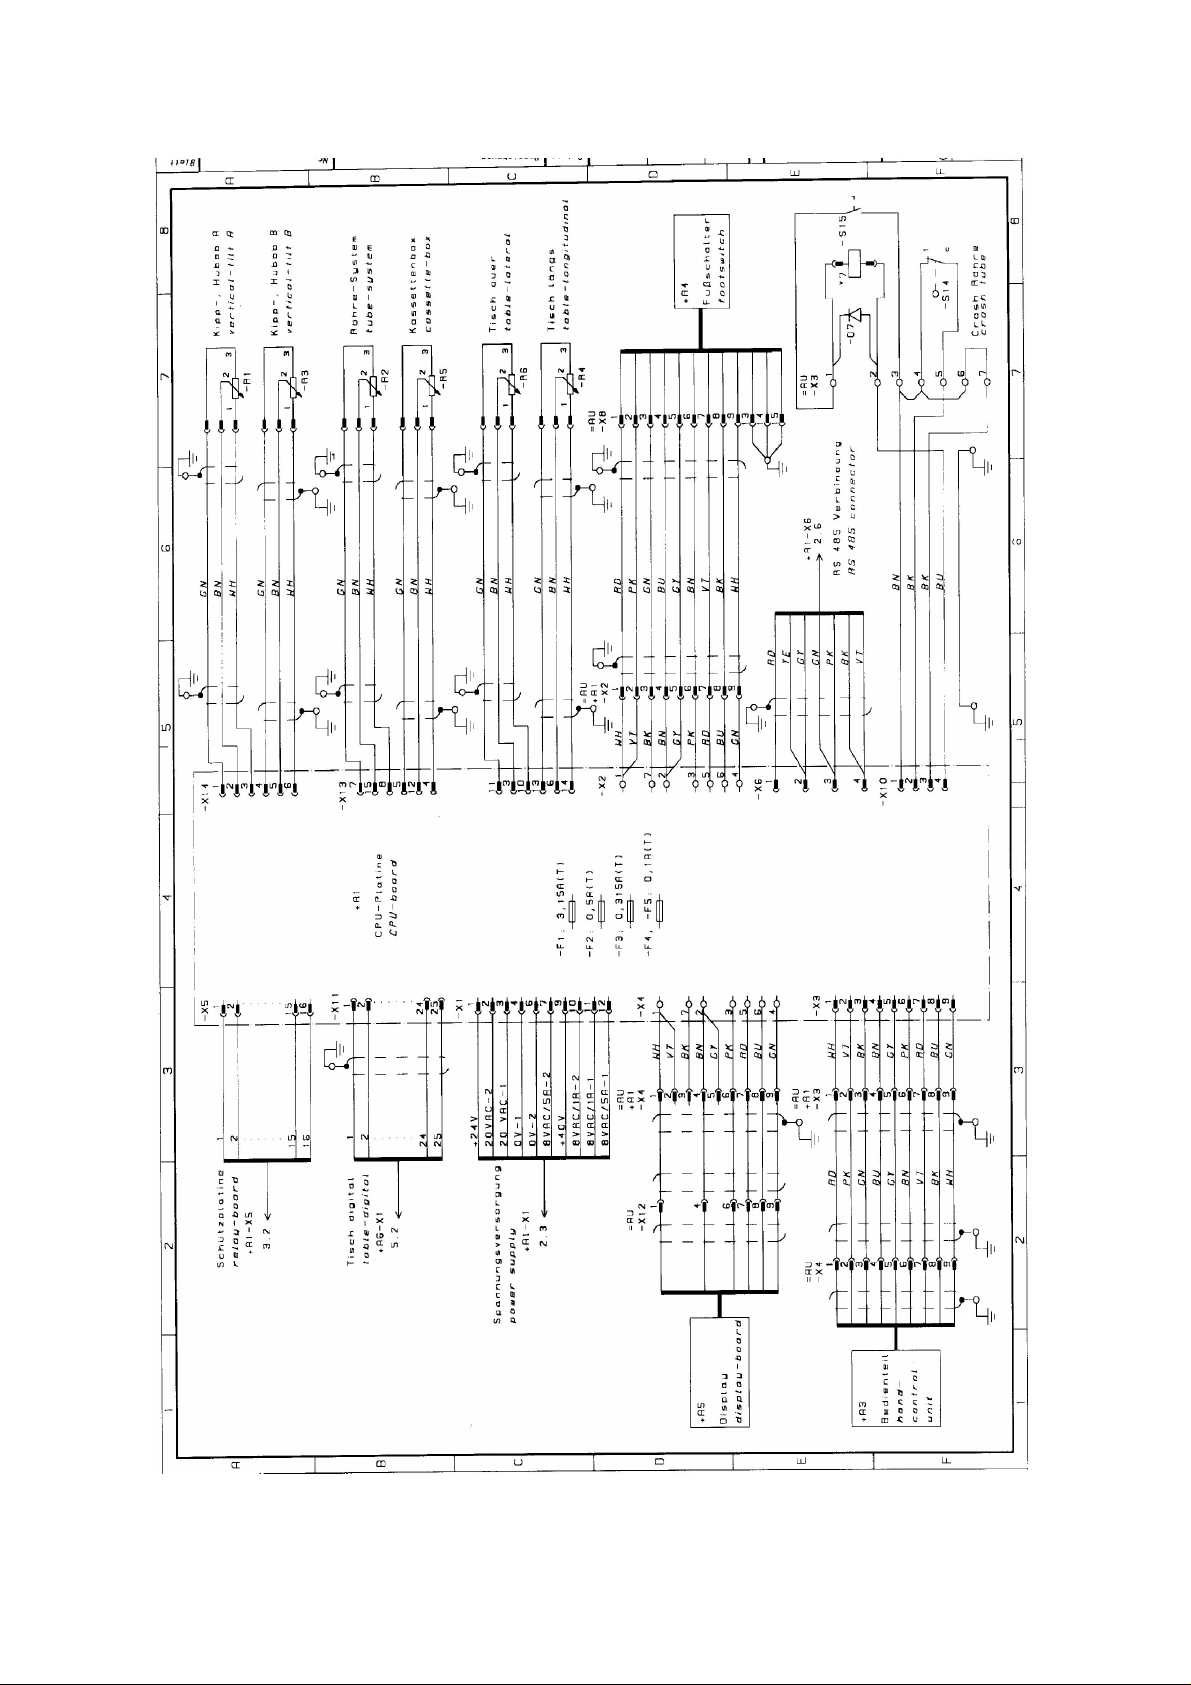
1.13 Circuit Diagram, Page 4
06/00 - 15 of 90 - 0116 7201
Rev. 00 © 2000 Hans Pausch Röntgengerätebau Graf-Zeppelin-Str. 1 D-91056 Erlangen ALL RIGHTS RESERVED Ru
Page 16
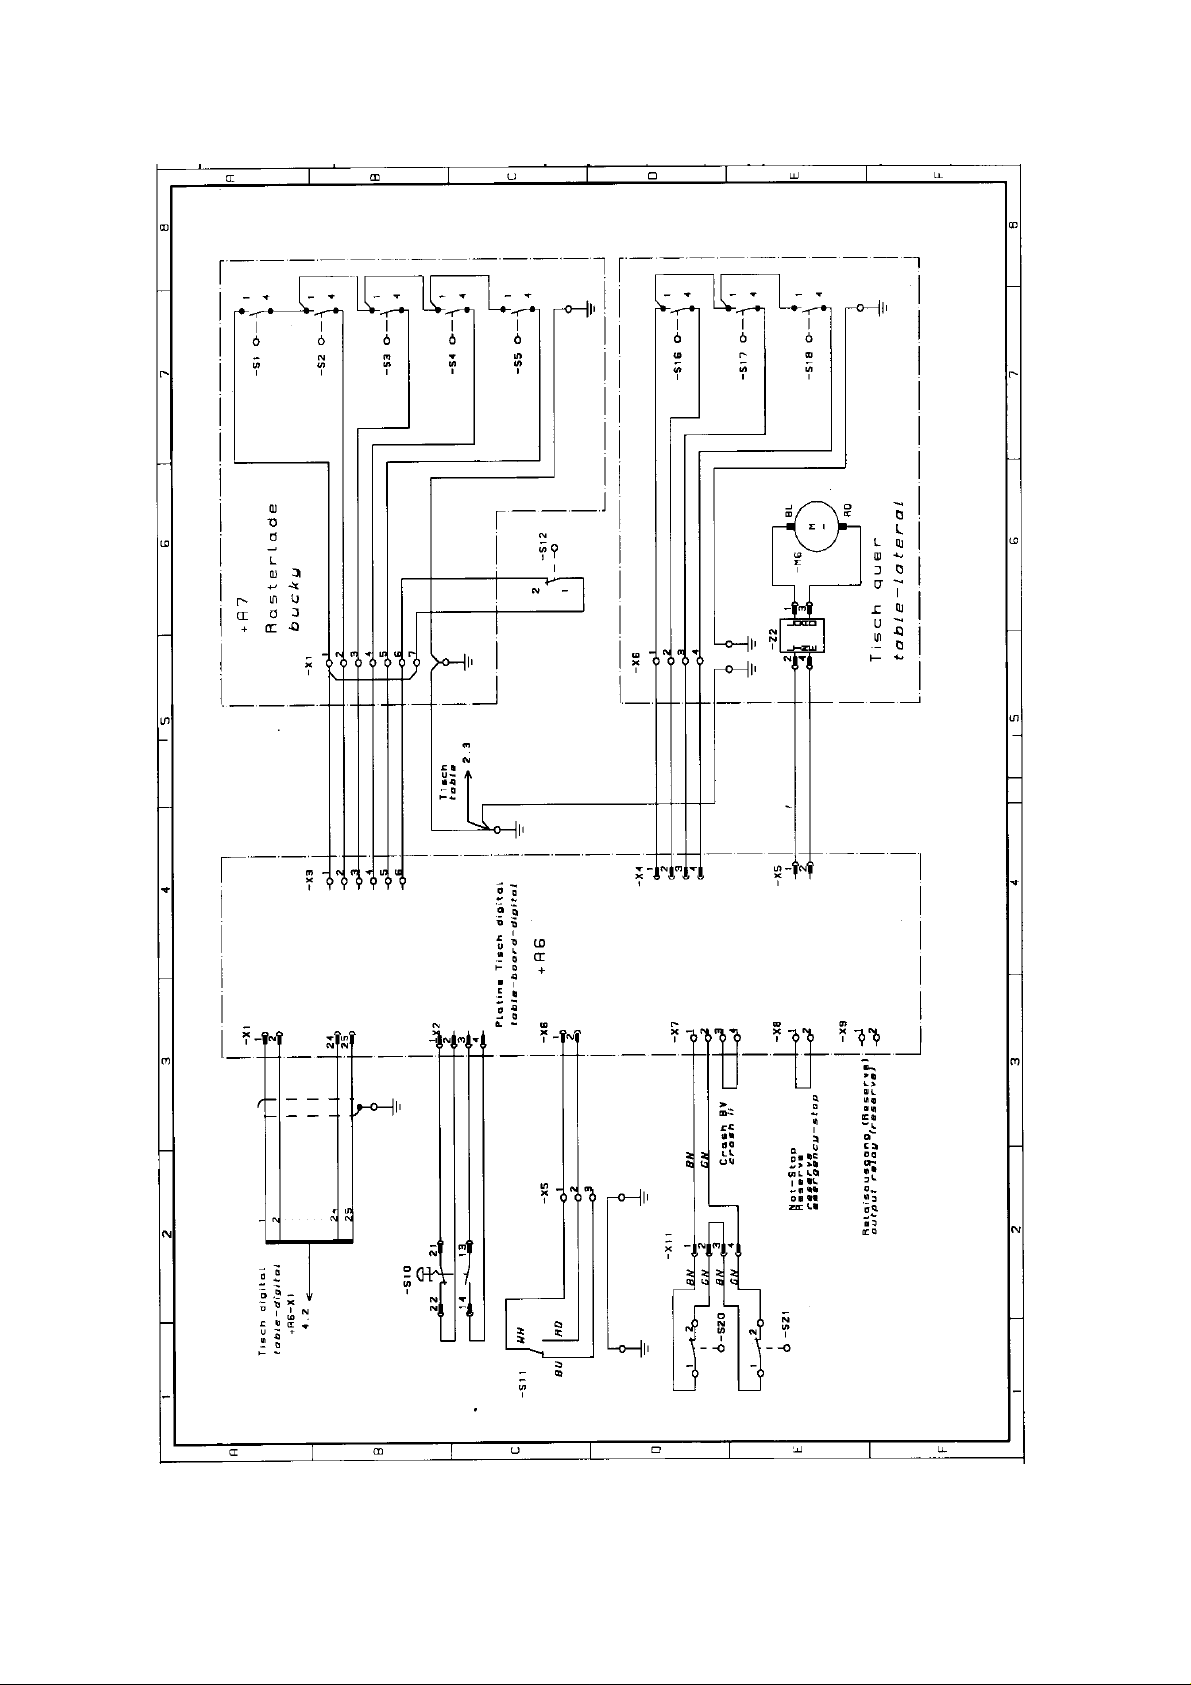
1.13 Circuit Diagram, Page 5
0116 7201 -16 of 90 - 06/00
Rev. 00 © 2000 Hans Pausch Röntgengerätebau Graf-Zeppelin-Str. 1 D-91056 Erlangen ALL RIGHTS RESERVED Ru
Page 17
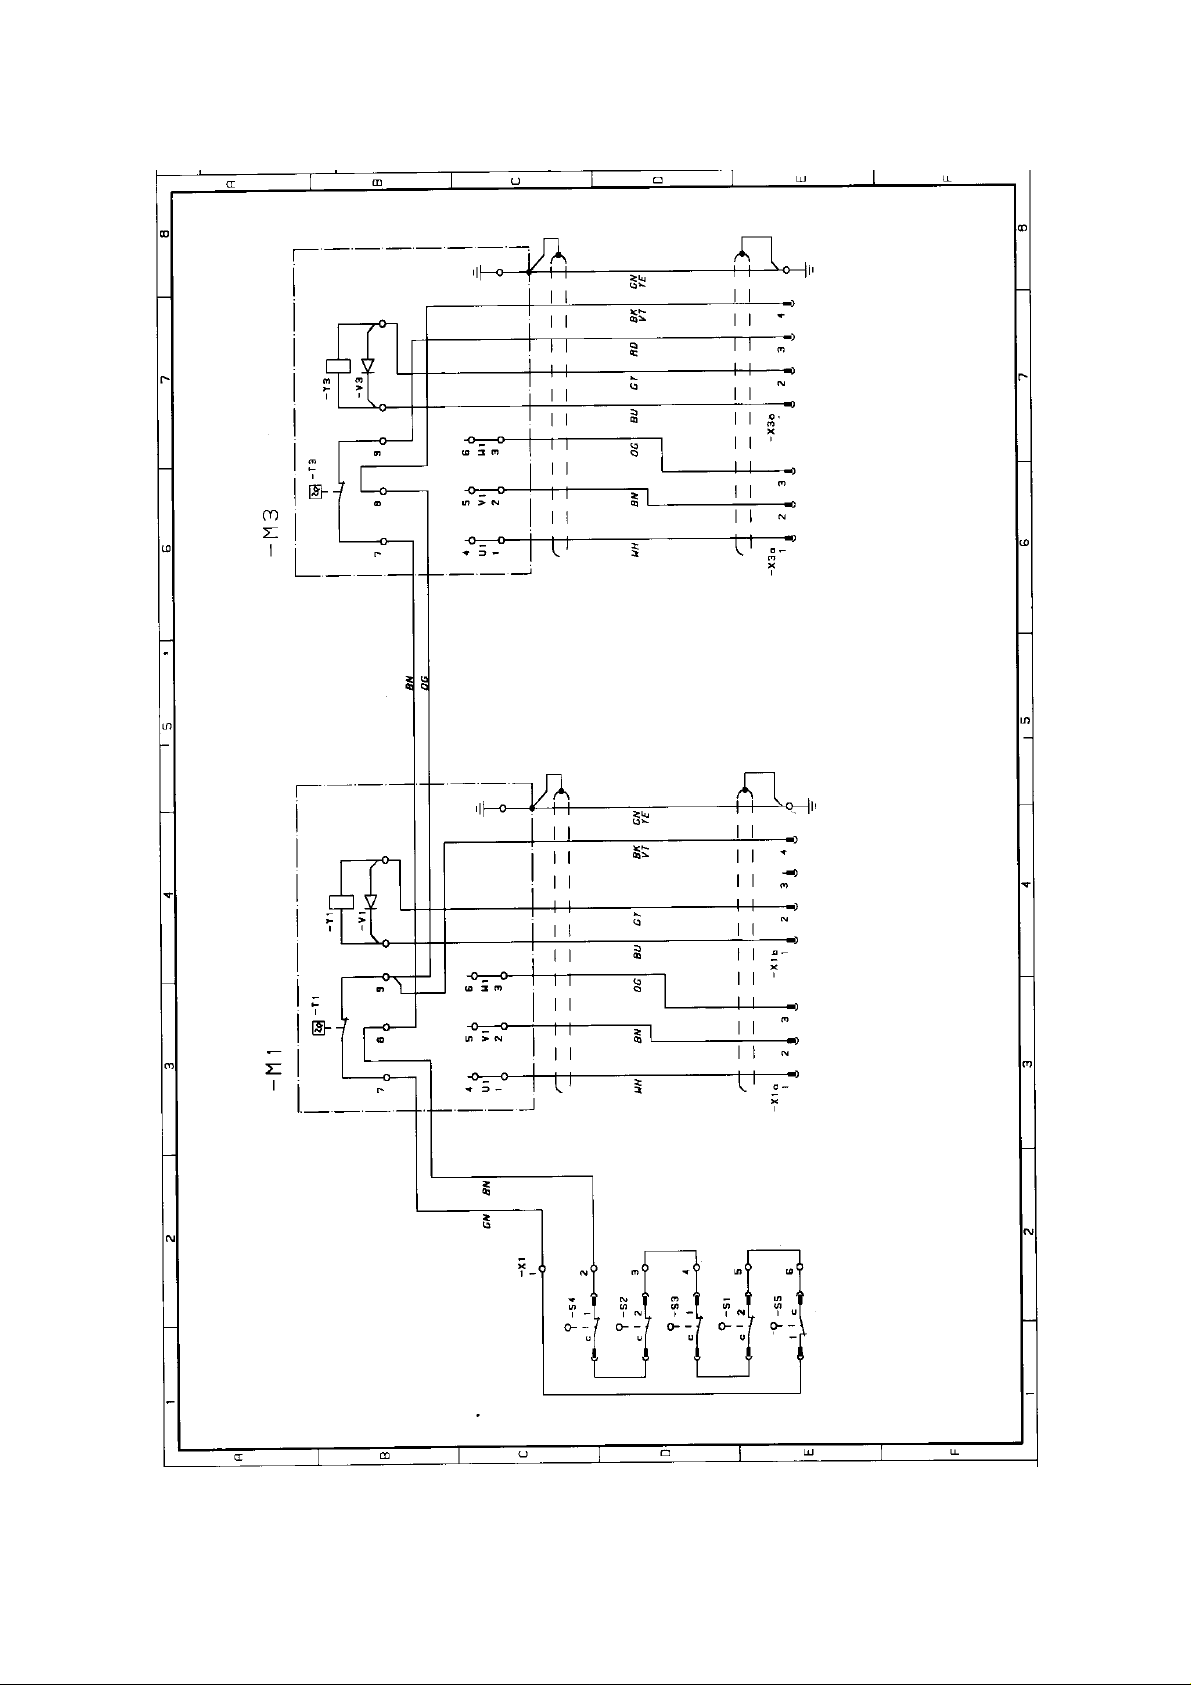
1.13 Circuit Diagram, Page 6
06/00 - 17 of 90 - 0116 7201
Rev. 00 © 2000 Hans Pausch Röntgengerätebau Graf-Zeppelin-Str. 1 D-91056 Erlangen ALL RIGHTS RESERVED Ru
Page 18
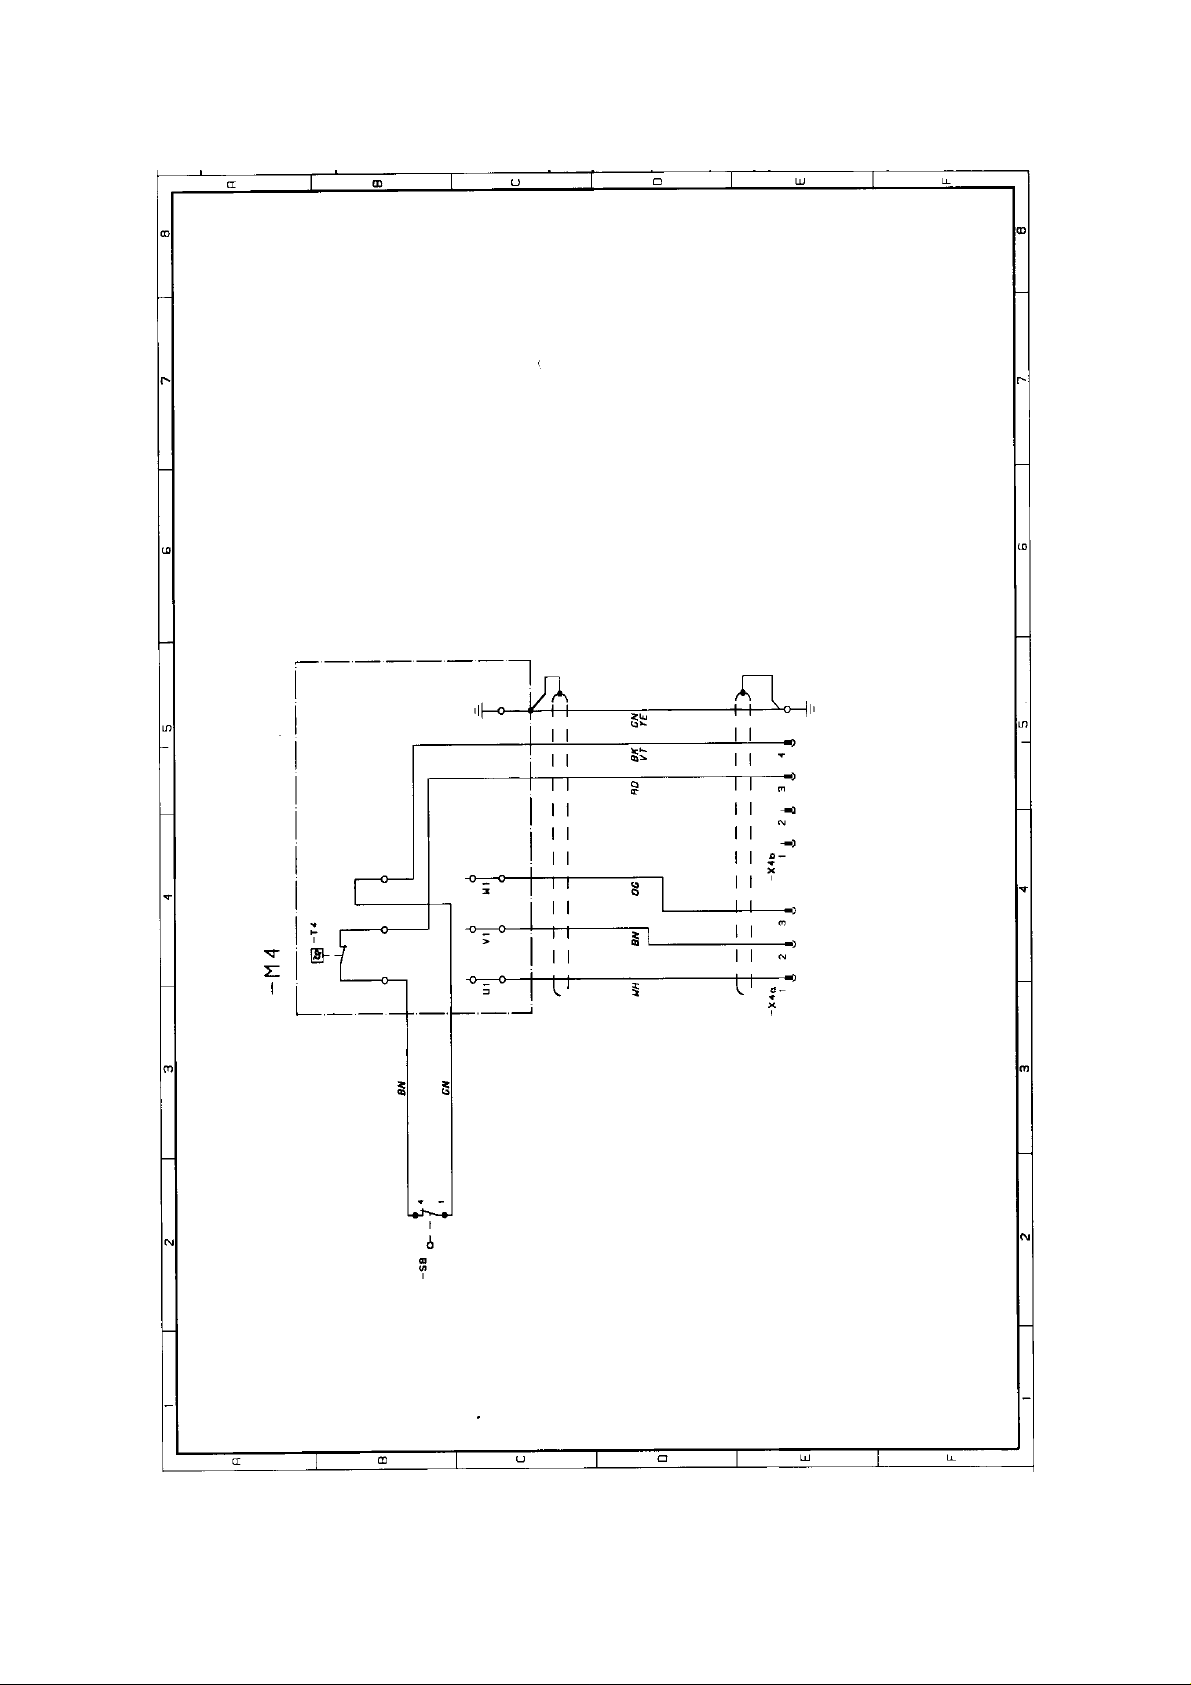
1.13 Circuit Diagram, Page 7
0116 7201 -18 of 90 - 06/00
Rev. 00 © 2000 Hans Pausch Röntgengerätebau Graf-Zeppelin-Str. 1 D-91056 Erlangen ALL RIGHTS RESERVED Ru
Page 19
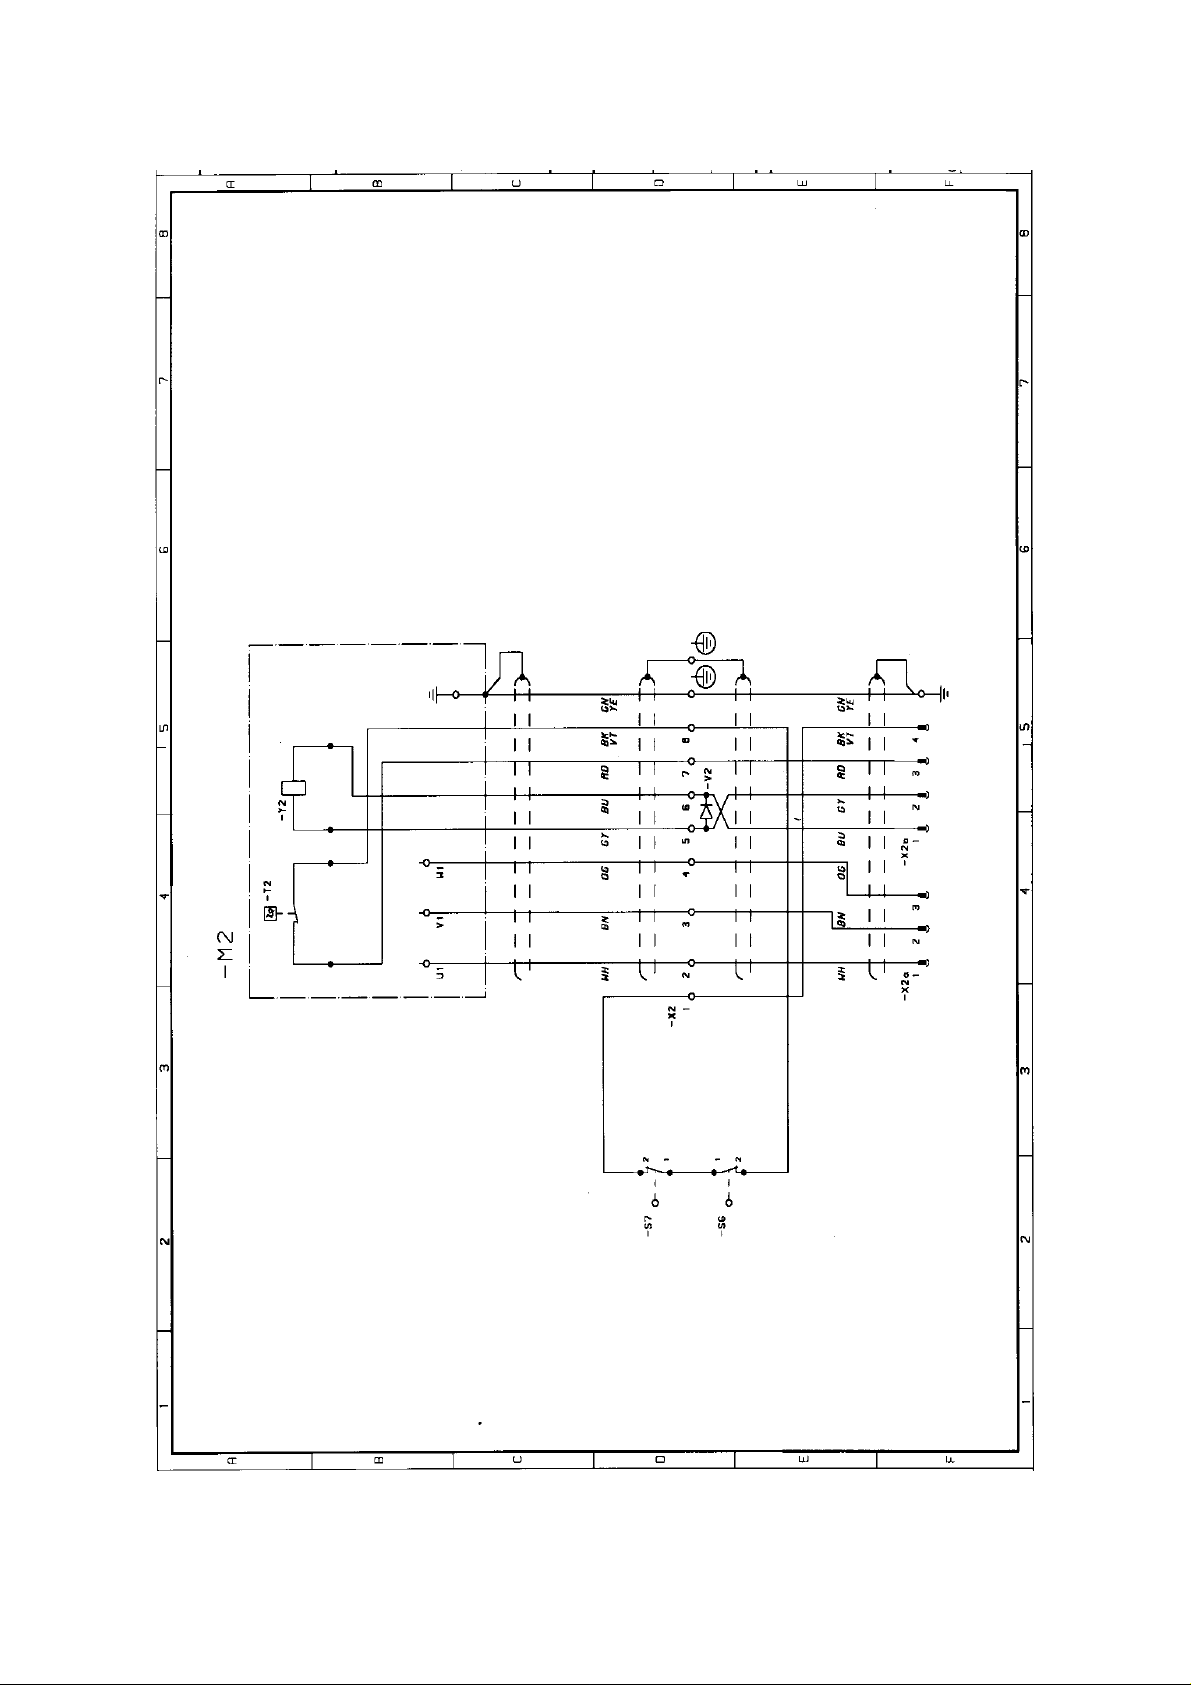
1.13 Circuit Diagram, Page 8
06/00 - 19 of 90 - 0116 7201
Rev. 00 © 2000 Hans Pausch Röntgengerätebau Graf-Zeppelin-Str. 1 D-91056 Erlangen ALL RIGHTS RESERVED Ru
Page 20
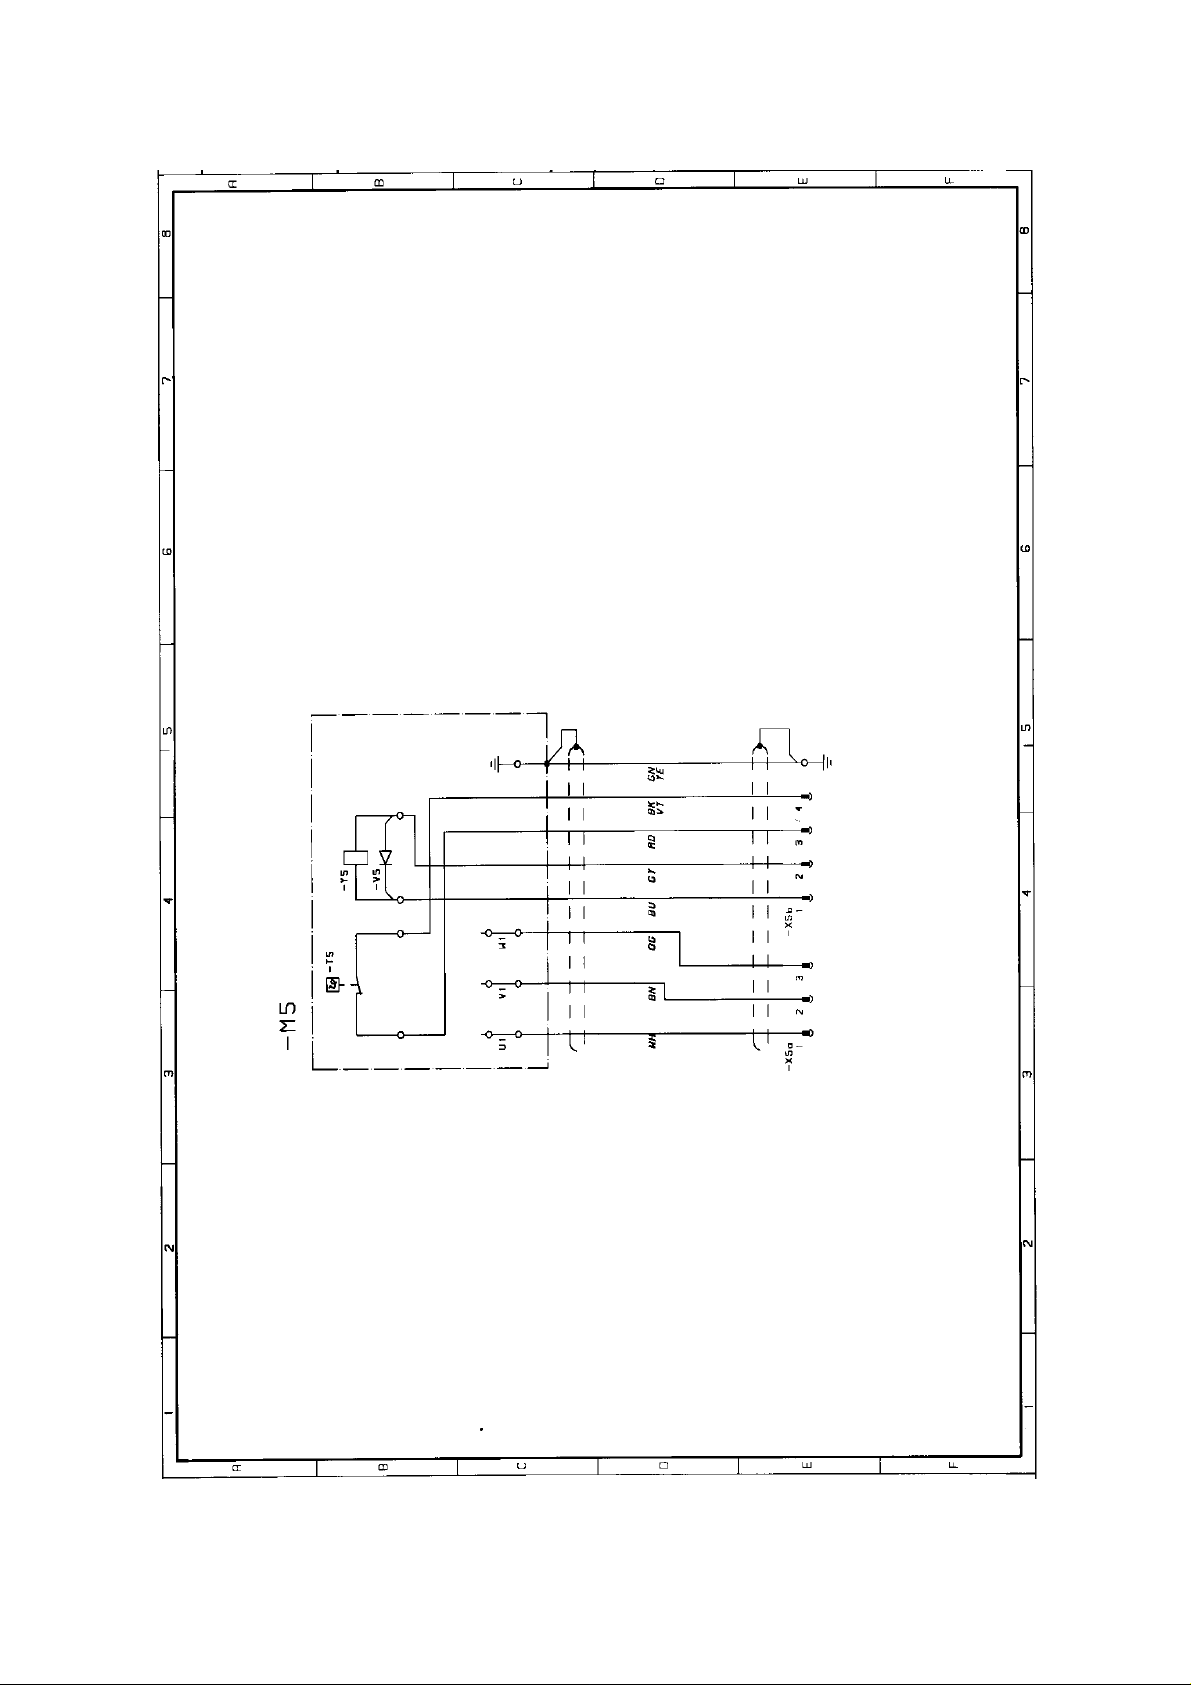
1.13 Circuit Diagram, Page 9
0116 7201 -20 of 90 - 06/00
Rev. 00 © 2000 Hans Pausch Röntgengerätebau Graf-Zeppelin-Str. 1 D-91056 Erlangen ALL RIGHTS RESERVED Ru
Page 21
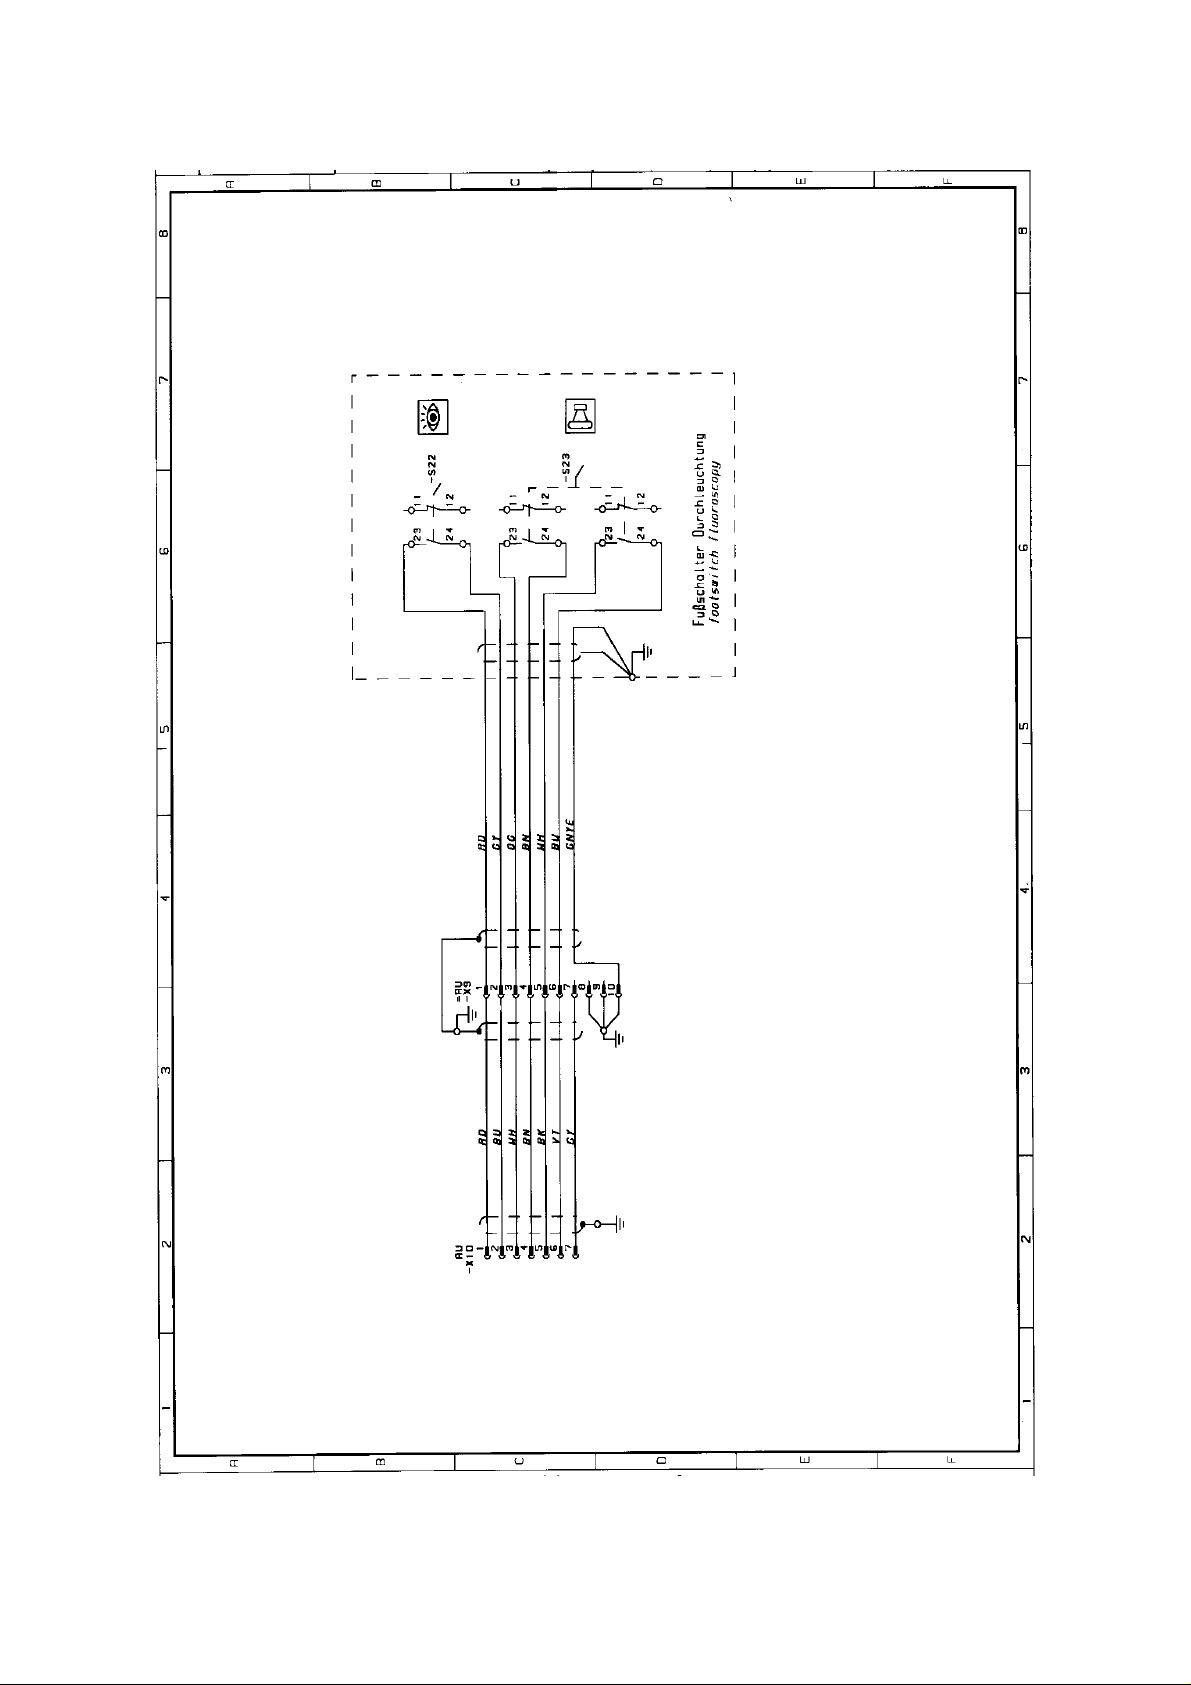
1.13 Circuit Diagram, Page 10
06/00 - 21 of 90 - 0116 7201
Rev. 00 © 2000 Hans Pausch Röntgengerätebau Graf-Zeppelin-Str. 1 D-91056 Erlangen ALL RIGHTS RESERVED Ru
Page 22
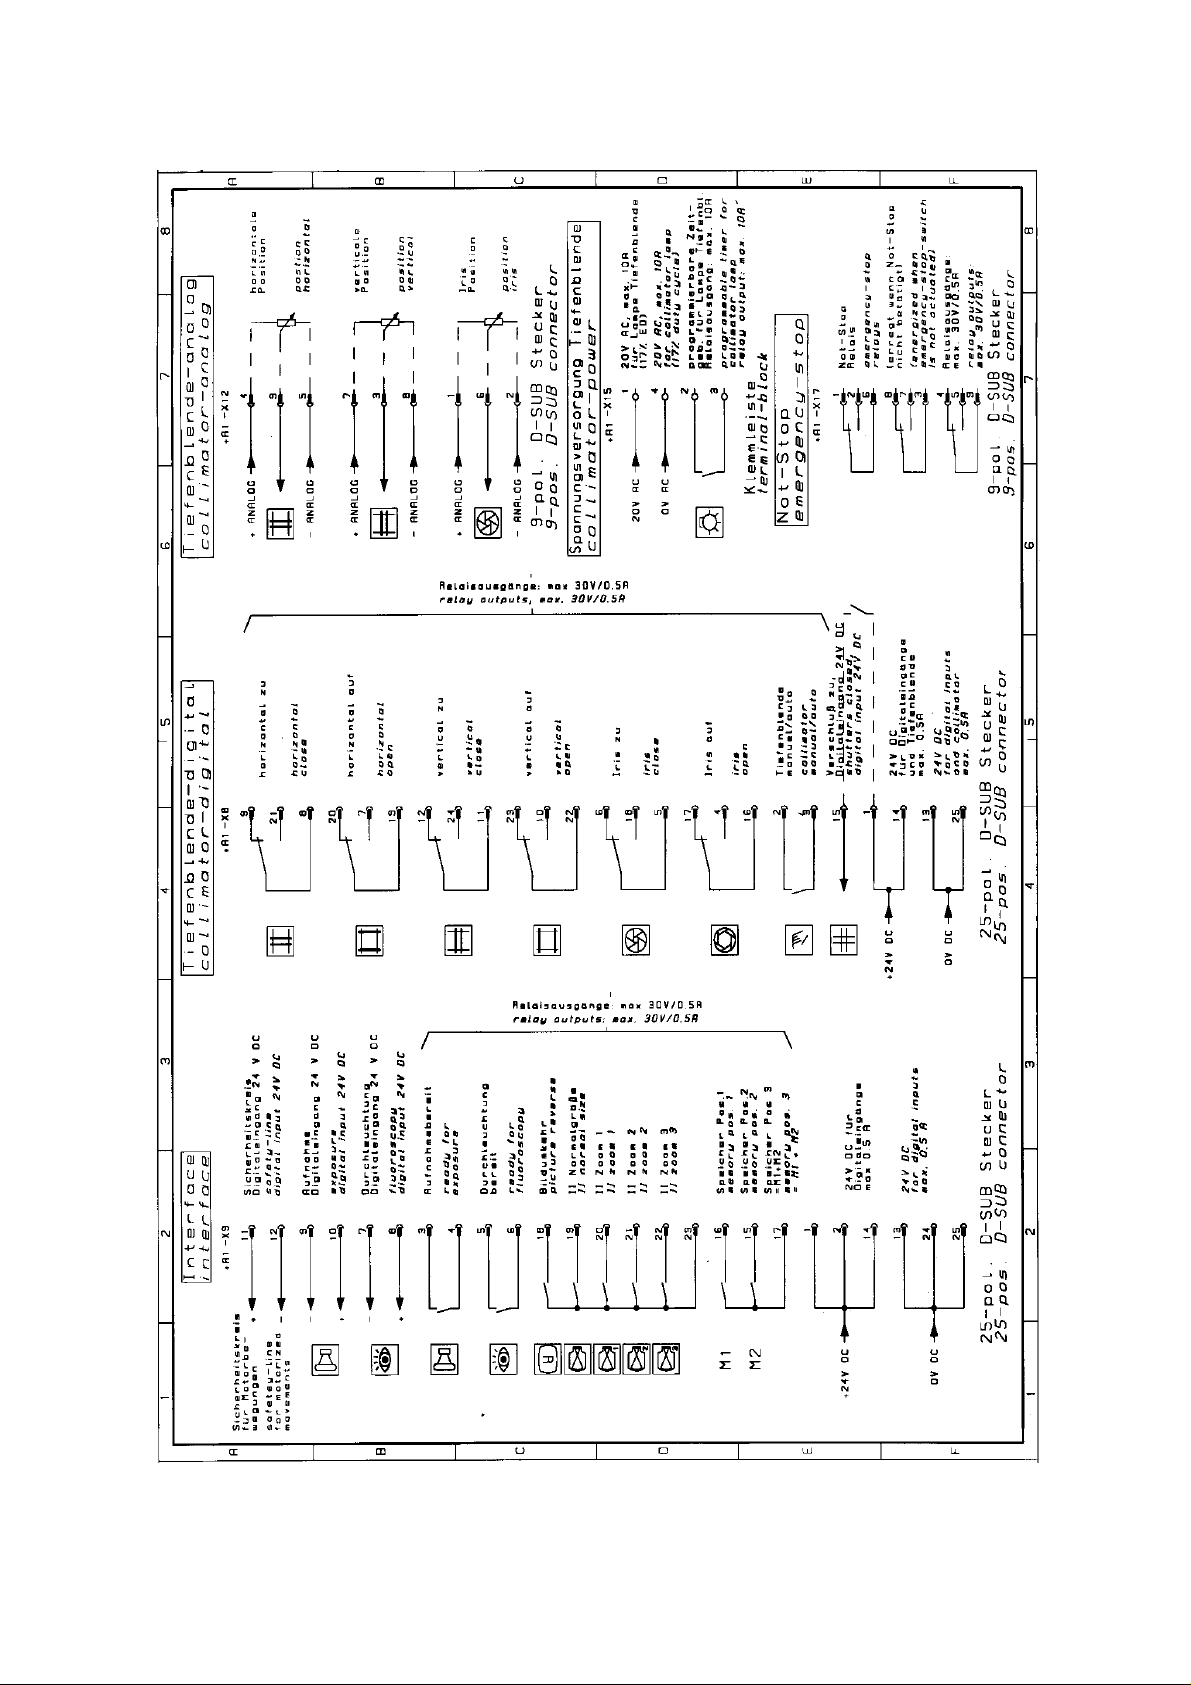
1.13 Circuit Diagram, Page 11
0116 7201 -22 of 90 - 06/00
Rev. 00 © 2000 Hans Pausch Röntgengerätebau Graf-Zeppelin-Str. 1 D-91056 Erlangen ALL RIGHTS RESERVED Ru
Page 23
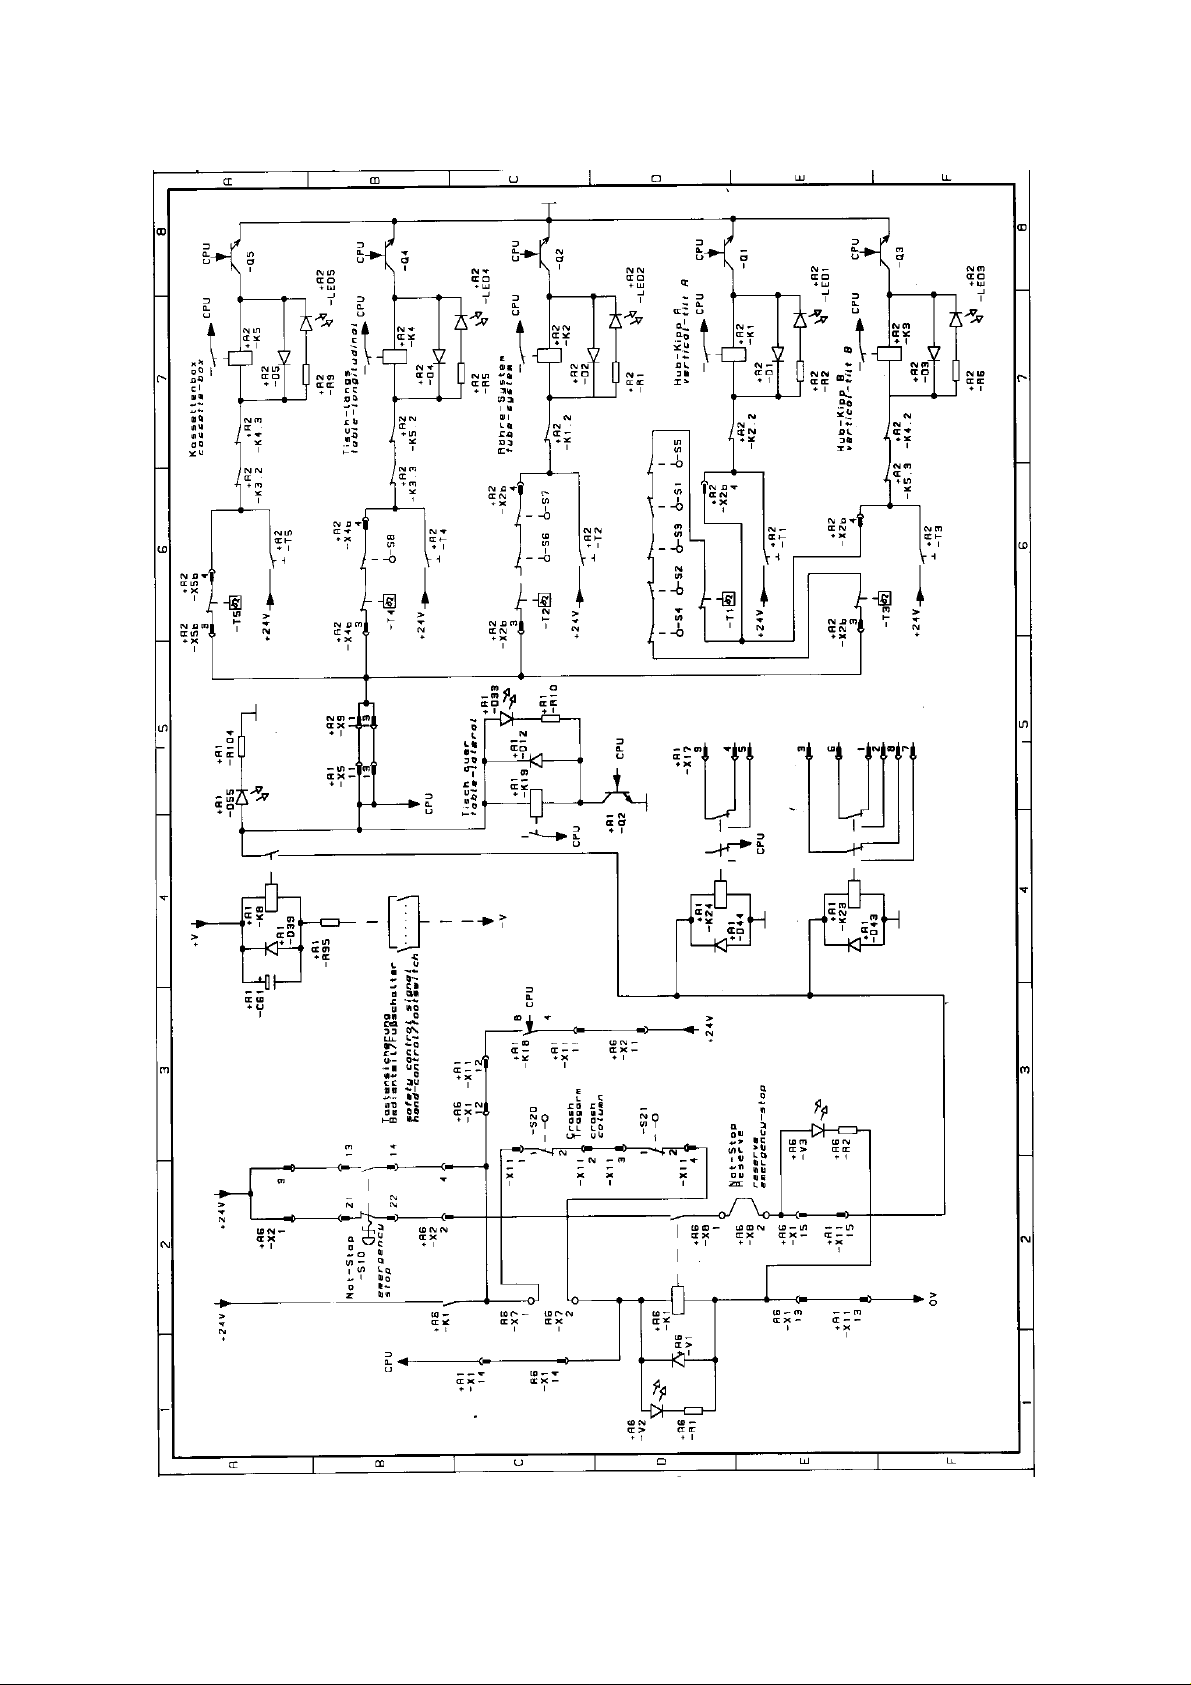
1.13 Circuit Diagram, Page 12
06/00 - 23 of 90 - 0116 7201
Rev. 00 © 2000 Hans Pausch Röntgengerätebau Graf-Zeppelin-Str. 1 D-91056 Erlangen ALL RIGHTS RESERVED Ru
Page 24
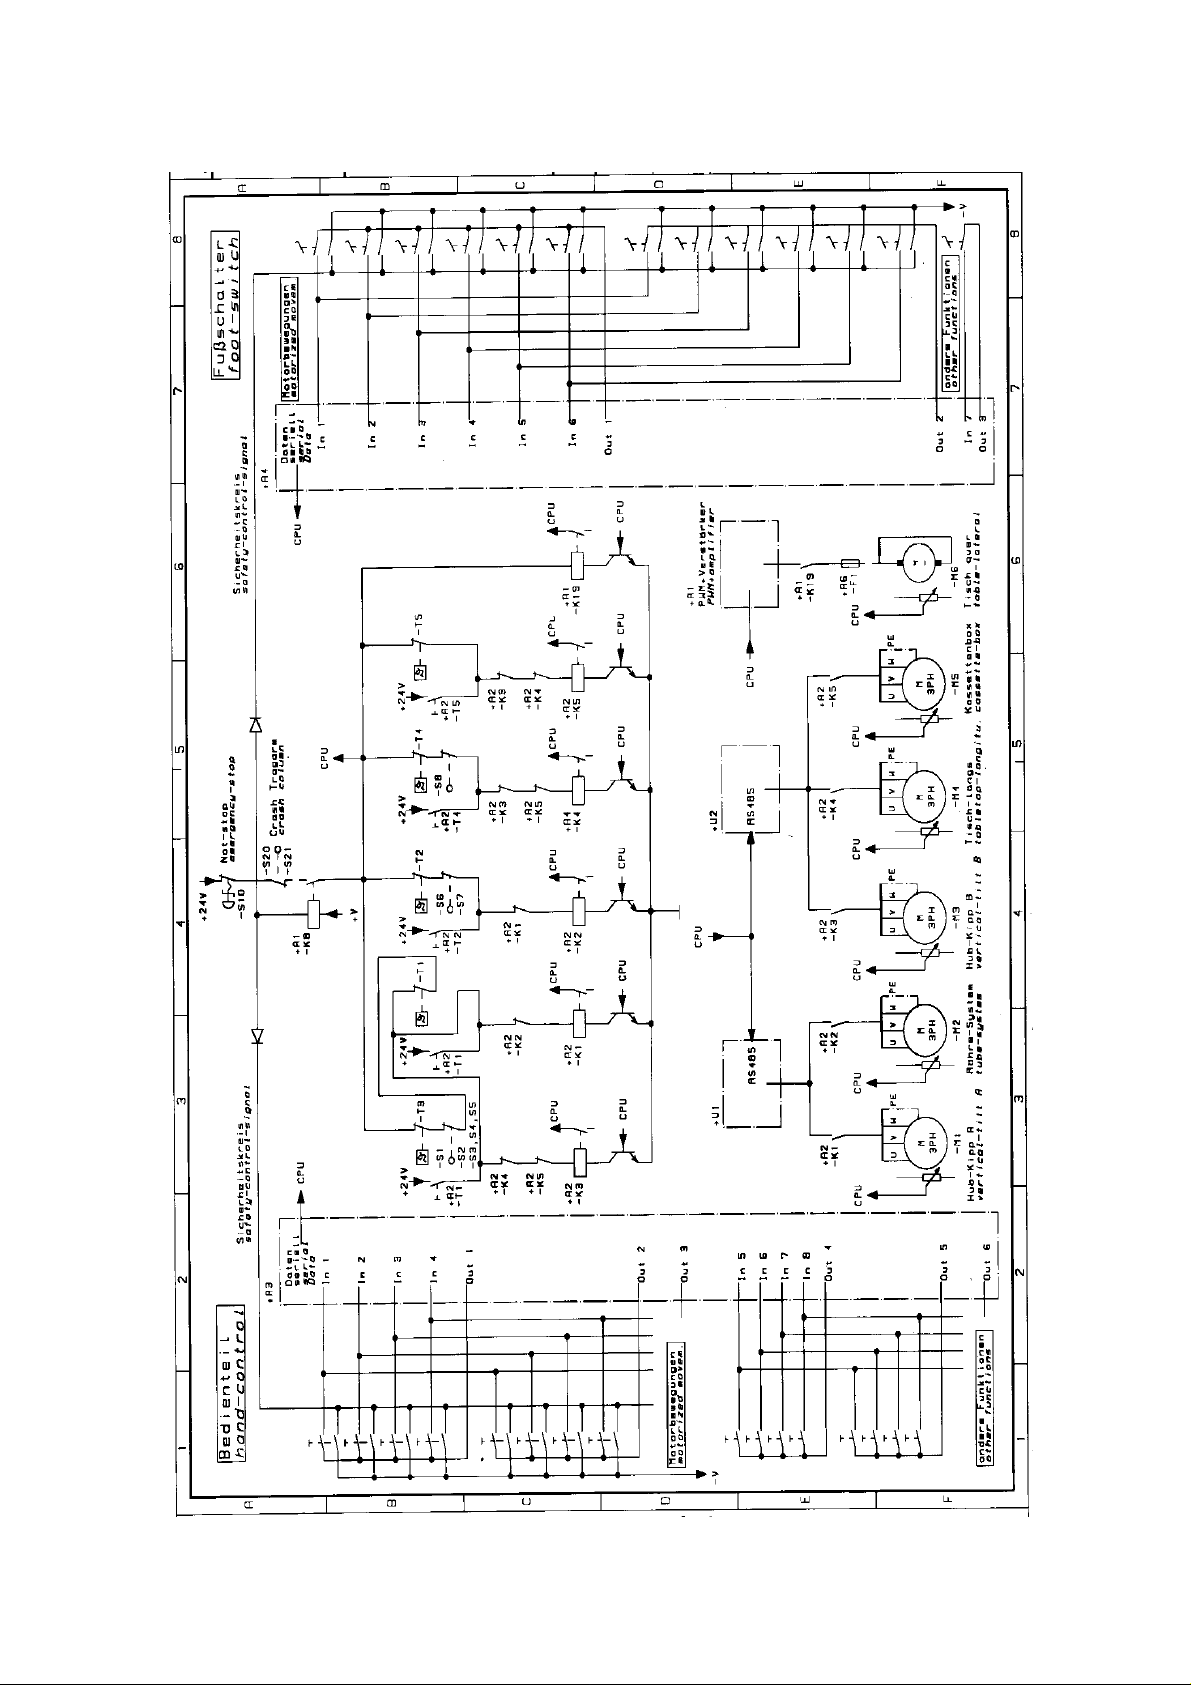
1.13 Circuit Diagram, Page 13
0116 7201 -24 of 90 - 06/00
Rev. 00 © 2000 Hans Pausch Röntgengerätebau Graf-Zeppelin-Str. 1 D-91056 Erlangen ALL RIGHTS RESERVED Ru
Page 25
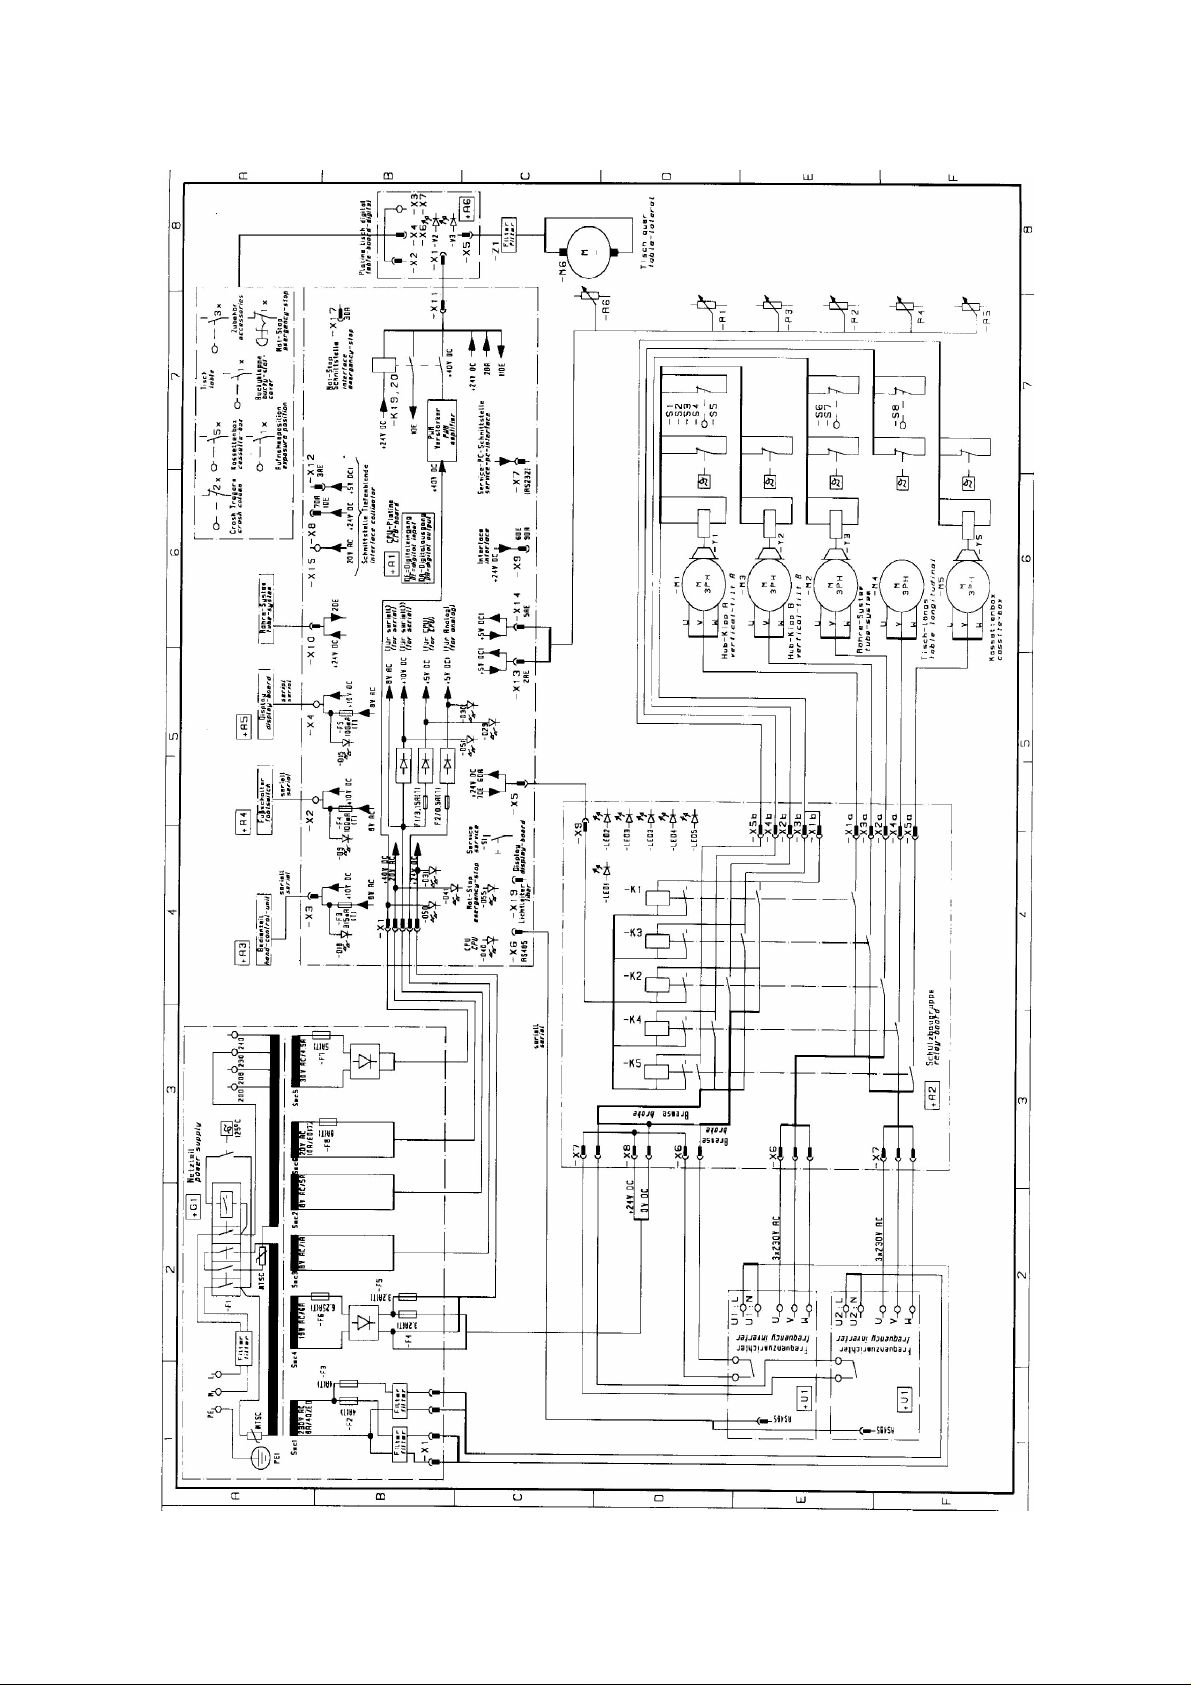
1.13 Circuit Diagram, Page 14
06/00 - 25 of 90 - 0116 7201
Rev. 00 © 2000 Hans Pausch Röntgengerätebau Graf-Zeppelin-Str. 1 D-91056 Erlangen ALL RIGHTS RESERVED Ru
Page 26
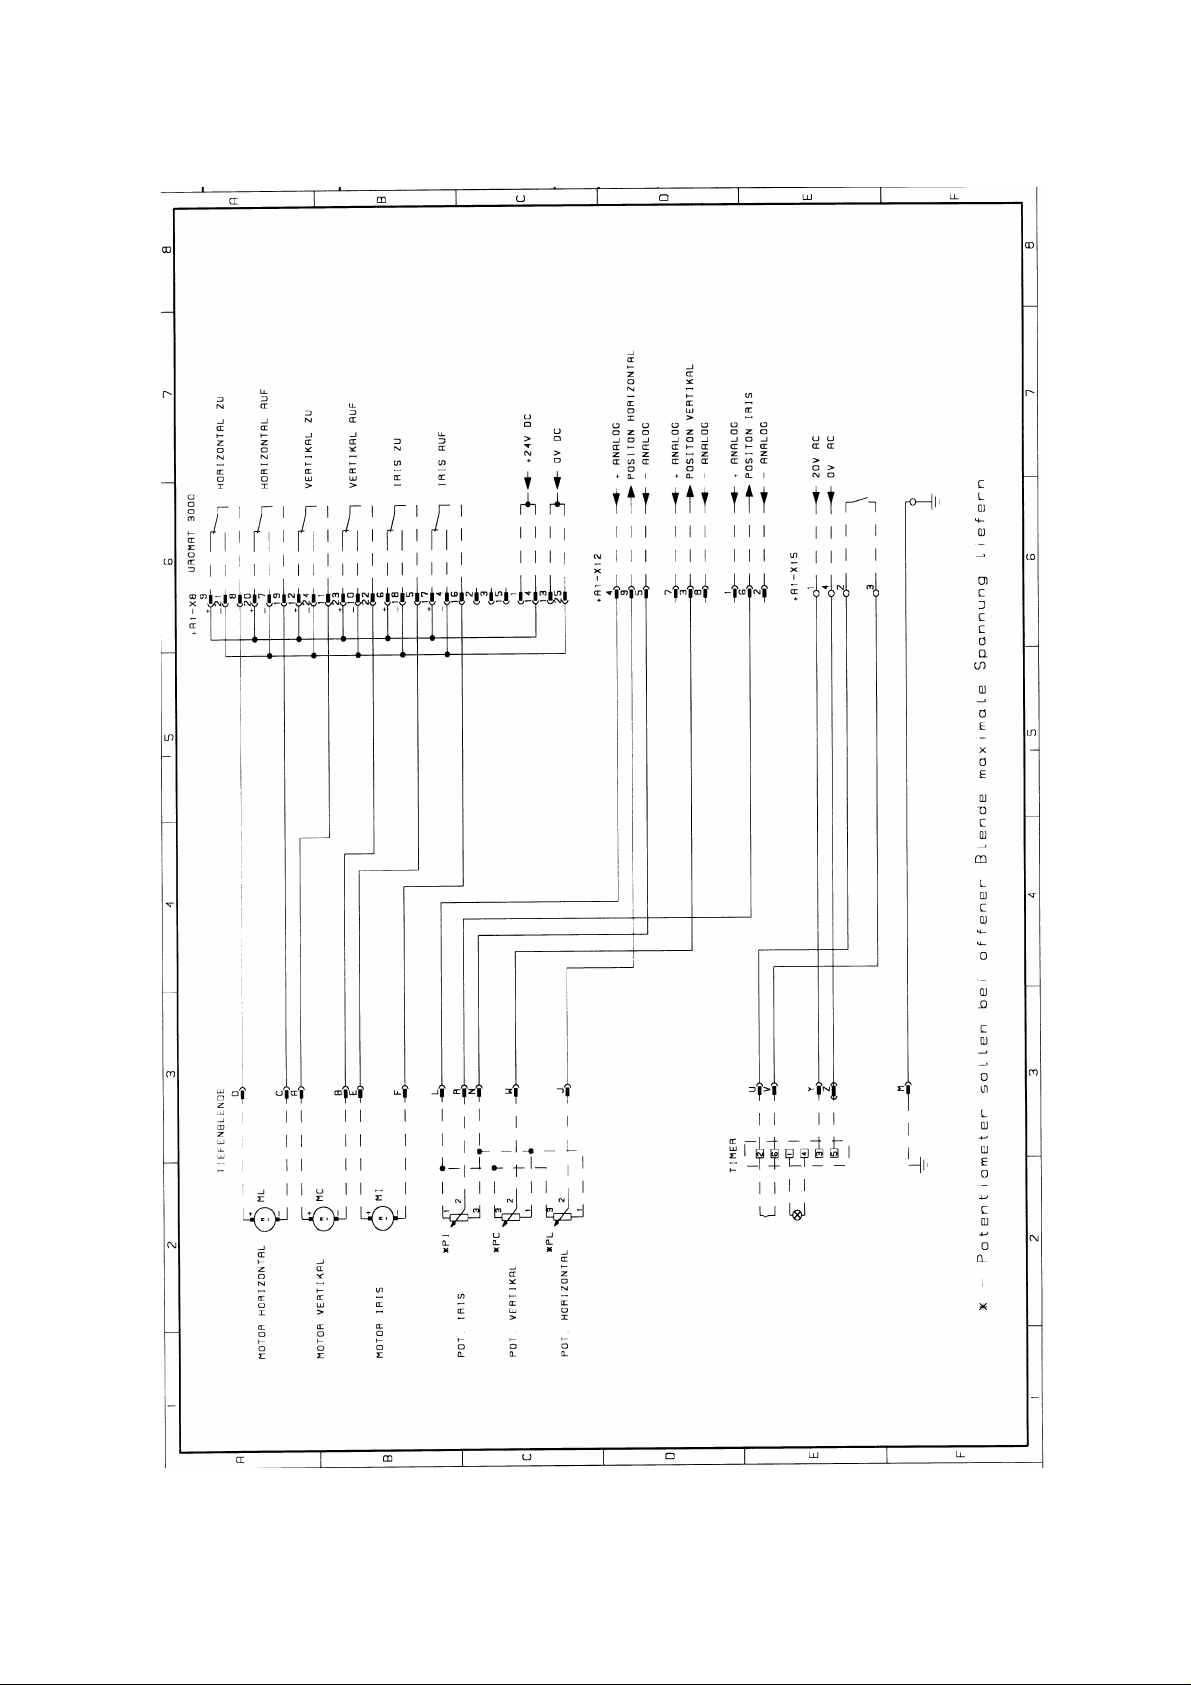
1.13 Circuit Diagram, Page 15 Collimator connection
0116 7201 -26 of 90 - 06/00
Rev. 00 © 2000 Hans Pausch Röntgengerätebau Graf-Zeppelin-Str. 1 D-91056 Erlangen ALL RIGHTS RESERVED Ru
Page 27

1.14 Component Designations for the Circuit Diagram
System Location Component Function
=AU Uromat 3000
=AU +A1 CPU board
=AU +A1 -D9 LED, footswitch power supply
=AU +A1 -D15 LED, display power supply
=AU +A1 -D18 LED, control console power supply
=AU +A1 -D29 LED, CPU power supply
=AU +A1 -D30 LED, Analog power supply
=AU +A1 -D31 LED, + 24 V power supply
=AU +A1 -D33 LED, K19 relay activated
=AU +A1 -D40 LED, CPU status
=AU +A1 -D41 LED, 20VAC power supply
=AU +A1 -D50 LED, +24V DC power supply
=AU +A1 -D51 LED, +10V DC power s
=AU +A1 -D55 LED, emergency stop
=AU +A1 -F1 Fuse, CPU power supply
=AU +A1 -F2 Fuse, analog power supply
=AU +A1 -F3 Fuse, control console power supply
=AU +A1 -F4 Fuse, footswitch power supply
=AU +A1 -F5 Fuse, display power supply
=AU +A1 -K8 Button fuse relay
=AU +A1 -K19 Enable table transverse movement relay
=AU +A1 -K20 Table, transverse, left, right movement relay
=AU +A1 -K23 Emergency stop interface relay
=AU +A1 -K24 Emergency stop interface relay
=AU +A1 -Q2 Transistor for K19 pull-in relay
=AU +A1 -S1 Service switch
=AU +A1 -X1 Power supply plug-in connector
=AU +A1 -X2 Footswitch plug-in connector
=AU +A1 -X3 Control console plug-in connector
=AU +A1 -X4 Display connector strip
=AU +A1 -X5 Display connector strip
=AU +A1 -X6 RS 485 plug-in connector
=AU +A1 -X7 Service PC plug-in connector
=AU +A1 -X8 Collimator plug-in connector
=AU +A1 -X9 Interface plug-in connector
=AU +A1 -X10 Tube unit system plug-in connector
=AU +A1 -X11 Digital table plug-in connector
=AU +A1 -X12 Collimator plug-in connector
=AU +A1 -X13 Analog table plug-in connector
=AU +A1 -X14 Analog column plug-in connector
=AU +A1 -X15 Power supply terminal strip
=AU +A1 -X17 Emergency stop plug-in connector
=AU +A1 -X19 Display fiber-optic cable plug-in connector
06/00 - 27 of 90 - 0116 7201
Rev. 00 © 2000 Hans Pausch Röntgengerätebau Graf-Zeppelin-Str. 1 D-91056 Erlangen ALL RIGHTS RESERVED Ru
Page 28

System Location Component Function
=AU +A2 Breaker board
=AU +A2 -K1 Motor breaker for M1 motor
=AU +A2 -K2 Motor breaker for M2 motor
=AU +A2 -K3 Motor breaker for M3 motor
=AU +A2 -K4 Motor breaker for M4 motor
=AU +A2 -K5 Motor breaker for M5 motor
=AU +A2 -LED1 Motor breaker LED - K1 energized
=AU +A2 -LED2 Motor breaker LED - K2 energized
=AU +A2 -LED3 Motor breaker LED - K3 energized
=AU +A2 -LED4 Motor breaker LED - K4 energized
=AU +A2 -LED5 Motor breaker LED - K5 energized
=AU +A2 -LED6 +24V power supply LED
=AU +A2 -Q1 Transistor for K1 breaker
=AU +A2 -Q2 Transistor for K2 breaker
=AU +A2 -Q3 Transistor for K3 breaker
=AU +A2 -Q4 Transistor for K4 breaker
=AU +A2 -Q5 Transistor for K5 breaker
=AU +A2 -T1 M1 safety circuit override button
=AU +A2 -T2 M2 safety circuit override button
=AU +A2 -T3 M3 safety circuit override button
=AU +A2 -T4 M4 safety circuit override button
=AU +A2 -T5 M5 safety circuit override button
=AU +A2 -X1a M1 power supply plug-in connector
=AU +A2 -X1b M1 brake safety switch plug-in connector
=AU +A2 -X2a M2 power supply plug-in connector
=AU +A2 -X2b M2 brake safety switch plug-in connector
=AU +A2 -X3a M3 power supply plug-in connector
=AU +A2 -X3b M3 brake safety switch plug-in connector
=AU +A2 -X4a M4 brake safety switch plug-in connector
=AU +A2 -X4b M4 brake safety switch plug-in connector
=AU +A2 -X5a M5 power supply plug-in connector
=AU +A2 -X5b M5 brake safety switch plug-in connector
=AU +A2 -X6 +U1 frequency converter plug-in connector
=AU +A2 -X7 +U2 frequency converter plug-in connector
=AU +A2 -X8 +24V DC power supply plug-in connector
=AU +A2 -X9 CPU board plug-in connector
=AU +A3 Control unit
=AU +A4 Footswitch
=AU +A5 Display
=AU +A6 Digital table board
=AU +A6 -V2 LED, K1 relay energized
=AU +A6 -V3 LED, emergency stop not pressed and K1 energized
=AU +A6 -X1 CPU board cable plug-in connector
=AU +A6 -X2 Emergency stop switch plug-in connector
0116 7201 -28 of 90 - 06/00
Rev. 00 © 2000 Hans Pausch Röntgengerätebau Graf-Zeppelin-Str. 1 D-91056 Erlangen ALL RIGHTS RESERVED Ru
Page 29

System Location Component Function
=AU +A6 -X3 Terminal strip for Bucky
=AU +A6 -X4 Plug-in connectors for accessories
=AU +A6 -X5 Table, transverse motor plug-in connector
=AU +A6 -X6 Bucky shaft cover plug-in connector
=AU +A6 -X7 Support arm collision, I.I. collision terminal strip
=AU +A6 -X8 Spare emergency stop plug-in connector
=AU +A7 Bucky
=AU +A7 -S1 Cassette inserted switch
=AU +A7 -S2 24x43 cassette switch
=AU +A7 -S3 30x43 cassette switch
=AU +A7 -S4 24x30 cassette switch
=AU +A7 -S5 18x43 cassette switch
=AU +A8 Operating hours counter
=AU +G1 Power supply
=AU +G1 -F1 Trip breaker
=AU +G1 -F2 +U1 frequency converter fuse
=AU +G1 -F3 +U2 frequency converter fuse
=AU +G1 -F4 Fuse for breaker, motor brake
=AU +G1 -F5 Fuse for inputs/outputs
=AU +G1 -F6 +24V power supply fuse
=AU +G1 -F7 Table transverse power supply fuse
=AU +G1 -F8 Collimator power supply fuse
=AU +G1 -PE1 Main grounding stud
=AU +G1 -T1 Isolation transformer
=AU +G1 -X1 Frequency converter plug-in connector
=AU +G1 -X2 Power supply terminal strip
=AU +G1 -Z1 Power input filter
=AU +G1 -Z2 +U2 frequency converter filter
=AU +G1 -Z3 +U1 frequency converter filter
=AU +U1 Frequency converter
=AU +U2 Frequency converter
=AU -M1 Lift motor tilt A
=AU -M2 Tube unit system motor
=AU -M3 Lift motor tilt B
=AU -M4 Table longitudinal motor
=AU -M5 Cassette box motor
=AU -M6 Table transverse motor
=AU -R1 Lift motor tilt A potentiometer
=AU -R2 Tube unit system motor potentiometer
=AU -R3 Lift motor tilt B potentiometer
=AU -R4 Table longitudinal motor potentiometer
06/00 - 29 of 90 - 0116 7201
Rev. 00 © 2000 Hans Pausch Röntgengerätebau Graf-Zeppelin-Str. 1 D-91056 Erlangen ALL RIGHTS RESERVED Ru
Page 30

System Location Component Function
=AU -R5 Cassette box motor potentiometer
=AU -R6 Table transverse motor potentiometer
=AU -S1 M1 spindle nut safety switch
=AU -S2 M3 spindle nut safety switch
=AU -S3 M1 counterweight safety switch
=AU -S4 M3 counterweight safety switch
=AU -S5 Vertical movement safety switch
=AU -S6 Tube unit system safety switch, foot end
=AU -S7 Tube unit system safety switch, head end
=AU -S8 Table longitudinal safety switch
=AU -S10 Emergency switch
=AU -S11 Bucky shaft cover switch
=AU -S12 System cassette exposure position switch
=AU -S14 Tube unit support arm exposure position switch
=AU -S15 Tube unit support arm movement switch
=AU -S16 Accessory switch
=AU - S17 Accessory switch
=AU - S18 Accessory switch
=AU - S20 Support arm collision switch
=AU - S21 Support arm collision switch
=AU - S22 Fluoroscopy switch
=AU - S23 Exposure switch
=AU - T1 Lift motor tilt A thermoswitch
=AU - T2 Tube unit system motor thermoswitch
=AU - T3 Lift motor tilt B thermoswitch
=AU - T4 Table longitudinal motor thermoswitch
=AU - T5 Tube unit system motor thermoswitch
=AU - T6 Table transverse motor thermoswitch
=AU - X1 Lift, tilt movement safety circuit connector strip
=AU - X2 Tube unit system motor connector strip
=AU - X3 Tube unit support arm connector strip
=AU - X4 Control unit plug-in connector
=AU - X5 Bucky shaft cover connector strip
=AU - X6 Accessories connector strip
=AU - X7 Operating hours counter connector strip
=AU - X8 Footswitch plug-in connector
=AU - X9 Fluoro plug-in connector (table)
=AU - X10 Fluoro connector (electronics panel)
=AU - X11 Support arm collision plug-in connector
=AU - X12 Display plug-in connector
=AU - Y1 M1 motor brake
=AU - Y2 M2 motor brake
=AU - Y3 M3 motor brake
=AU - Y5 M5 motor brake
=AU - Y7 Tube unit support arm lift magnet
=AU - Z1 Table transverse motor filter
0116 7201 -30 of 90 - 06/00
Rev. 00 © 2000 Hans Pausch Röntgengerätebau Graf-Zeppelin-Str. 1 D-91056 Erlangen ALL RIGHTS RESERVED Ru
Page 31

1.15 Function Description of the Controller
wire bit bus
a. System Overview
The electronic controller for the UROMAT 3000 is comprised of a max. of 5 units that are
connected to each other via a bus.
UNIT FUNCTION LOCATION REMARK
CPU board
Central unit for the
entire controller with
all interfaces.
Breaker board
Board with 5 breakers
for the 5 AC motors.
Footswitch
Operation using
pedals, equivalent to
control unit, but does
Control unit
not have all functions.
Portable manual
control unit with all
functions.
Display unit
Display of the tilt
angle and of various
statuses.
Additional peripheral equipment can be connected via the USS interface.
All interfaces are located on the CPU board:
INTERFACE FUNCTION MODE REMARK
MOTRON bus Connection of the
CPU in the star
configuration to the
display unit, control
unit and footswitch.
USS bus Connection to the
frequency converters.
Fiber optic Connection to status
display (customer
request)
Behind the cover
panel, top.
Behind the cover
panel, below the CPU
board.
Metal housing on the
floor, connected to
the CPU board via
cables.
External, connected
by a spiral cable to
the CPU.
Permanently mounted
on the housing.
Connected to the
CPU by cable.
Serial, two-wire bit
bus via optocoupler
with full duplex
connection.
Serial twovia RS485 with
full duplex connection
with USS protocol.
Optical serial bus with
USS protocol.
All connectors on the
CPU board are
labeled.
If there is a foot-
switch, not absolutely
necessary for
operation.
If there is a foot-
switch, not absolutely
necessary for
operation.
Not absolutely
necessary for
operation.
1 direction only:
write!
06/00 - 31 of 90 - 0116 7201
Rev. 00 © 2000 Hans Pausch Röntgengerätebau Graf-Zeppelin-Str. 1 D-91056 Erlangen ALL RIGHTS RESERVED Ru
Page 32

b. Boards
Emergency off Digital Interface
Interface
to frequency
converter
Potentiometer
Fiber optic monitoring
Service LED
Potentiometer
Service switch for adjustment of
the stopping
force of the DCConnector to PC motor
Eprom with URO connector
Software DC Motor
power supply
Plug-in
Processor
Module
Interface for Interface for
display multi-function
footswitch-
Interface for
manual controller
CPU Board
0116 7201 -32 of 90 - 06/00
Rev. 00 © 2000 Hans Pausch Röntgengerätebau Graf-Zeppelin-Str. 1 D-91056 Erlangen ALL RIGHTS RESERVED Ru
Page 33

5 buttons with
LED
to freely move
out of the limit
positions
5 Switch
breakers
for -
the 5
motors
Breaker Board
06/00 - 33 of 90 - 0116 7201
Rev. 00 © 2000 Hans Pausch Röntgengerätebau Graf-Zeppelin-Str. 1 D-91056 Erlangen ALL RIGHTS RESERVED Ru
Page 34

Interface for CPU board
Key connections
Footswitch Board
Control Unit
Interface for CPU board
Display Board
0116 7201 -34 of 90 - 06/00
Rev. 00 © 2000 Hans Pausch Röntgengerätebau Graf-Zeppelin-Str. 1 D-91056 Erlangen ALL RIGHTS RESERVED Ru
Page 35

2. Installation
2.1 Preparations for Mounting
Prepare the unit location according to the dimensional drawing, Page 6 or 7 or Page 8 or 9.
Caution: The minimum distances listed in the dimensional drawings must be maintained to
assure that all movements of the system are possible.
The floor must be capable of bearing a load of 10,450 N on the front mounting points
according to Dimensional Drawing, Pages 8 and 9.
The P2 mounting points on the back of the unit must each be capable of assuming 1020 N
pull.
Example: Liebig S12/40 or S12/65 expansion bolts with an image quality of 2 with a
concrete quality of B 25, DIN 1045. The minimum drill hole depth may be 80 or 105 mm.
With a vinyl tile floor, the floor covering must be cut out in the area of the unit base.
2.2 Unpacking the Unit
Open the crate and remove the protective film (Fig. 01 /Pos. 1). Only open the cartons (Pos.
2,3+4) and place them to one side until it is time to use them.
Check the items included in the shipment or the parts for completeness and for good
condition.
Unit on pallet
Fig. 01 Fig. 02
Remove the securing screws on the unit base cover panel (Fig. 02/Pos.1). The left cover
panel (Fig.03/Pos. 2) and right cover panel (Fig.02/Pos. 3) after removing the mounting
screws closest to the floor.
Remove the narrow left (Fig.03/Pos. 4) and narrow right cover panel (Fig.02/Pos. 5).
06/00 - 35 of 90 - 0116 7201
Rev. 00 © 2000 Hans Pausch Röntgengerätebau Graf-Zeppelin-Str. 1 D-91056 Erlangen ALL RIGHTS RESERVED Ru
Page 36

Fig. 03 Fig. 04
Take off the back wall (Fig. 04/Pos. 7).
Notice:
The tube unit support arm (Fig. 05/Pos. 1) is hooked onto the opening of the base with the
mounting bracket (painted red) (Pos. 2) and secured on the floor plate. The tube unit support
arm is unhooked from its holder only after it is installed.
7
8
6
Fig. 05 Fig. 06
2.3 Removing the Unit from the Pallet
Remove the transport safety devices (Fig. 05/Pos. 6, 7 + 8 ).
Install the two support struts of the installation frame (Fig. 06/Pos. 1+2) on both sides of the
unit column and the connector piece (Pos. 3) between the two support struts.
0116 7201 -36 of 90 - 06/00
Rev. 00 © 2000 Hans Pausch Röntgengerätebau Graf-Zeppelin-Str. 1 D-91056 Erlangen ALL RIGHTS RESERVED Ru
Page 37

Install a spindle cross piece (Pos. 5+6) on each end of both support struts.
Remove the mounting screws (Fig. 07/Pos. 1+ Fig.06/Pos. 8) of the unit column from the
pallet and press it down onto the pallet.
Use the 4 lift spindles (Fig. 06/Pos. 7) to evenly raise the unit until the transport pallet
(Pos.9) is free and then slide it out from under the unit.
Install the 4 castors (Fig. 08/Pos. 3+4) (transport castors) for transport on the support studs
(Pos. 1+2). Use the 4 lift spindles to lower the unit (with narrow transport pathways, remove
the spindle cross pieces, Pos. 5+6) and move the unit to its installation location.
At the installation location, use the spindles to raise the unit until the castors are off the floor.
Remove the castors and evenly lower the unit.
Caution:
The two support struts on the installation frame (Fig. 06/Pos. 1+2) may be removed
only when the unit is secured to the floor.
Fig. 07 Fig. 08
2.4 Installing the Unit Column
Remove the lower transport bracket (Fig. 05/Pos. 2) on the tube unit support arm.
While observing the tensile strength data that is listed on them, use the 6 heavy-duty load
expansion bolts (for example, Liebig S12/40 or S12/65 expansion bolts) (Fig. 07/Pos. 1 and
Fig. 09/Pos. 2).
Remove the transport frame (Fig. 06/Pos. 1+2).
Disengage the tube unit support arm (Fig. 03/Pos. 3) towards the top out of the unit base
and carefully place it down on the floor next to the unit.
Disconnect the plug-in connector for the display.
Remove the cover panel on the unit base (Fig. 02/Pos. 1).
06/00 - 37 of 90 - 0116 7201
Rev. 00 © 2000 Hans Pausch Röntgengerätebau Graf-Zeppelin-Str. 1 D-91056 Erlangen ALL RIGHTS RESERVED Ru
Page 38

Fig.09 Fig. 10
2.5 Aligning the Unit Column
Check the unit column (Fig. 10/Pos. 1) in both directions using a spirit level that has been
placed on the guide rail (Fig. 10/Pos. 3+4).
Compensate for the differences using shims (Fig. 11/Pos. 1+2) from the items included in
the shipment.
Caution: The unit column may not be under tension in any direction.
Fig. 11 Fig. 12
0116 7201 -38 of 90 - 06/00
Rev. 00 © 2000 Hans Pausch Röntgengerätebau Graf-Zeppelin-Str. 1 D-91056 Erlangen ALL RIGHTS RESERVED Ru
Page 39

2.6 Temporarily Connecting Line Power
Caution:
If the unit is connected to a different line power than that listed on the order, the setting must
be changed to the one that corresponds to the local line power as specified by the Wiring
Diagram to the power line transformer (Fig. 12/Pos. 1).
Provide the unit with power by connecting a temporary connection cable (plug-in cable) to
move the table for individual installation steps.
Connect the multi-function footswitch on the bottom of the table.
Fig. 13 Fig. 14
2.7 Installing the Tube Unit Support Arm
Tilt the tabletop all the way down into the horizontal position and move it towards the front,
transversely to the user, until it is in the end position. Move the tube unit carriage (system
carriage) max. to the head end.
Remove the drain panel (Fig. 13/Pos. 1) after loosening the 5 mounting screws (Pos. 2,3+4).
Place the tube unit support arm (Fig. 14/Pos. 1) on the longitudinal carriage (Pos. 2) and
secure it in place with the 6 screws (Pos. 3+4).
Remove the red transport bracket (Fig. 05/Pos. 1) (hooking device).
Reinstall the drain panel (Fig. 13/Pos. 1).
06/00 - 39 of 90 - 0116 7201
Rev. 00 © 2000 Hans Pausch Röntgengerätebau Graf-Zeppelin-Str. 1 D-91056 Erlangen ALL RIGHTS RESERVED Ru
Page 40

2.8 Preinstalling the Tube Unit – Collimator Combination
Assemble the tube unit – Collimator combination according to the description in the
manufacturer's installation instructions. See Fig. 15
Fig. 15 Fig. 16
2.9 Installing the Tube Unit – Collimator on the Tube Unit Support Arm
Tilt the tabletop until it is vertical and move the tube unit carriage towards the foot-end.
Remove the cover (Fig. 18/Pos. 6) on the tube unit support arm. Remove the support studs
(Fig. 16/Pos. 1) from the tube unit support arm (Pos. 2). Place the preinstalled tube unit –
collimator combination (Fig. 17/Pos. 1) down on its side and move the command arm (Pos.
2) between the support studs (Pos. 3) and the tube unit housing (Pos. 1) and secure them in
place with the 4 screws (Pos. 5).
Fig. 17 Fig. 18
0116 7201 -40 of 90 - 06/00
Rev. 00 © 2000 Hans Pausch Röntgengerätebau Graf-Zeppelin-Str. 1 D-91056 Erlangen ALL RIGHTS RESERVED Ru
Page 41

Place the assembled tube unit – collimator combination (Fig. 17/Pos. 1) on the tube unit
support arm (Fig. 18/Pos. 2) using the support studs (Pos. 3), insert the shims (Fig. 16/ Pos.
5) and secure it in place using the 4 screws (Pos. 6).
2.10 Installing the Image Intensifier
Remove the I.I. adapter plate (Fig. 20/Pos. 1) from the I.I. carriage (Pos. 2). Secure the I.I.
adapter plate (Fig. 19/Pos. 1) in position on the I.I. housing (Pos. 2) with the screws. Install
the I.I. unit on the I.I. carriage (Fig. 20/Pos. 2) using the two strips (Pos. 4+5) the 8 washers
and the 8 nuts (Pos. 7). Max. torque: 20 Nm.
Fig. 19 Fig. 20
2.11 Laying the Collimator Cables
The cable for the collimator is laid in the unit base parallel to the high voltage cables. The
cable for the collimator is laid parallel from the unit controller in the unit base to the high
voltage cables.
Clamp, or plug in, the cable (Fig. 12/Pos. 2) on the unit controller (Pos. 3),at the connection
points provided.
Lay the cables later in Section 2.12, Section 2.12.
06/00 - 41 of 90 - 0116 7201
Rev. 00 © 2000 Hans Pausch Röntgengerätebau Graf-Zeppelin-Str. 1 D-91056 Erlangen ALL RIGHTS RESERVED Ru
Page 42

Fig.21 Fig. 22
2.12 Laying the High Voltage Cables
Preparations:
Remove the cover (Fig. 18/Pos. 6), the flexible hose holder (Fig. 23/Pos. 1), the flexible hose
mount (Pos. 3) and the flexible hose holder (Pos. 5).
Remove the lift magnet (Fig. 22/Pos. 1), the latching stud (Pos. 2) and the cable deflector
(Pos. 3).
Take the two safety limit switches (Fig. 21/Pos. 1+2) out of the tube unit support arm after
removing the screws (Pos. 8).
Lay the high voltage cables and the stator cable coming from the generator up to the wall or
to the floor outlet.
To lay cables in the unit, 7 meters are required.
The high voltage cable coming from the wall and the stator cable must first be laid through
the flexible hose (Fig. 23/Pos. 9), through the back wall (Pos. 10), or if it is coming directly
from the floor, then lay it directly to the cable channel (Pos. 11) and up into the unit base.
Lay the cable for the collimator, the high voltage cable and the stator cable parallel to the
cables for the unit controller to the cable outlet (to the side of the unit table) (Fig. 23/Pos.
14).
Gather the cables together so that they are slightly staggered, pass them through the flexible
hose (Pos. 16) while being careful of the flexible hose mounting, and then pull them through
the hose mounting and through the support arm (Pos. 17), in the direction of the tube unit
(Pos. 20).
0116 7201 -42 of 90 - 06/00
Rev. 00 © 2000 Hans Pausch Röntgengerätebau Graf-Zeppelin-Str. 1 D-91056 Erlangen ALL RIGHTS RESERVED Ru
Page 43

Fig. 23
Lay the cables through the support arm towards the back, through the flexible hose (Pos. 22)
and through the carriage (Pos. 23) to the tube and to the collimator.
Guide the cable for the control handle (Pos. 24) to the connector strip (Pos. 25) in the
support arm and clamp it in place.
Secure the cables in place with the cable ties provided.
Reinstall the cable deflector (Fig. 22/Pos. 1) the latching studs (Pos. 2) and reinstall the lift
magnet (Pos. 3).
Reinstall the two safety switches (Fig. 21/Pos. 1+2) for the tube unit support arm and secure
them in place with the screws (Pos. 8).
Reinstall the flexible hose holder (Fig. 23/Pos. 1), the flexible hose mount (Pos. 3) and the
flexible hose holder (Pos. 5). Reinstall the cover panel (Fig. 18/Pos. 6).
06/00 - 43 of 90 - 0116 7201
Rev. 00 © 2000 Hans Pausch Röntgengerätebau Graf-Zeppelin-Str. 1 D-91056 Erlangen ALL RIGHTS RESERVED Ru
Page 44

Fig.25 Fig. 26
2.13 Laying the I.I. Cable
First lay the I.I. cable coming from the wall through the flexible hose (Fig. 23/ Pos. 9),
through the back wall (Pos. 10) and then – if it is coming directly through the floor – to the
cable channel (Fig. 23/Pos. 11) and up into the unit base.
Lay the I.I. cable parallel to the cables for the unit controller to the cable outlet (on the side of
the unit base) (Fig. 25/Pos. 4).
Remove the flexible hose (Fig. 26/Pos. 1). Pull the I.I. cable through the flexible hose to the
table, place it in the flexible plastic link chain (Pos. 2) and lay it to the I.I. connector (Pos. 3).
2.14 Making the Power Connection through the Generator
Remove the temporary power connection and connect the power via the generator.
0116 7201 -44 of 90 - 06/00
Rev. 00 © 2000 Hans Pausch Röntgengerätebau Graf-Zeppelin-Str. 1 D-91056 Erlangen ALL RIGHTS RESERVED Ru
Page 45

Fig. 27 Fig. 28
2.15 Installing the Measuring Chamber
Lift up the tabletop (CFC panel) (Fig. 27/Pos. 1), it will be held by the gas spring.
Move the tabletop towards the back and remove the front Nirosta panel. Move the tabletop
towards the front and remove the rear Nirosta panel. Remove the left (Fig. 27/Pos. 3) and
right (Pos. 4) cover panels. Remove the screws for the spiral cable guide panel and remove
the cable guide panel. Move the tabletop longitudinally, remove the 6 mounting screws in the
polycarbonate panel (Pos. 2) and remove the polycarbonate panel towards the front.
Switch the unit into the service mode, the green LED on the controller goes on and stays on.
Press the Store and Reset buttons on the control unit simultaneously, the three memory
LED`s on the control unit will blink green and the LED on the controller will blink very rapidly.
The cassette Bucky can be moved slowly forward and backward using the Recall and Reset
buttons.
Move the Bucky into the exposure position using the Recall button. Remove the grid frame
(Fig. 28/Pos. 1) after removing the two screws (Pos. 3). Insert the measuring chamber into
the holder (take note of the measuring chamber orientation) and secure it in place.
First lay the measuring chamber cable coming out of the wall through the corrugated hose
(Fig. 23/ Pos. 9), through the back wall (Pos. 10), or the cable coming directly out of the
floor, to the cable channel (Pos. 11) up and into the unit base.
Lay the measuring chamber cable parallel to the cables for the unit controller to the cable
outlet (on the side of the unit base) (Fig. 25/Pos. 4).
Remove the corrugated hose holder (Fig. 26/Pos. 1). Pull the measuring chamber cable
through the corrugated hose to the table. Insert the measuring chamber cable through the
side frame box into the flexible plastic chain of the Bucky and bring it to the measuring
chamber connector.
Caution:
The cable must be laid so that the cassette drive belt does not touch the cable.
Then reinstall the grid frame. Reinstall the polycarbonate panel (Pos. 2).
06/00 - 45 of 90 - 0116 7201
Rev. 00 © 2000 Hans Pausch Röntgengerätebau Graf-Zeppelin-Str. 1 D-91056 Erlangen ALL RIGHTS RESERVED Ru
Page 46

2.16 Installing the Grid – Replacing the Grid
Lift up the tabletop (CFC panel) (Fig. 27/Pos. 1), it will be held by the gas spring.
Move the tabletop towards the back and remove the front Nirosta panel. Move the tabletop
towards the front and remove the rear Nirosta panel. Remove the left (Fig. 27/Pos. 3) and
right (Pos. 4) cover panels. Remove the screws for the spiral cable guide panel and remove
the cable guide panel. Move the tabletop longitudinally, remove the 6 mounting screws in the
polycarbonate panel (Pos. 2) and remove the polycarbonate panel towards the front.
Switch the unit to the service mode, the green LED on the controller will go on and stay on.
Press the Store and Reset buttons on the controller simultaneously, the three memory LED’s
on the controller will blink green and the LED on the controller will blink very rapidly.
The cassette Bucky can now be moved slowly forward and backward using the Recall and
Reset buttons.
Move the Bucky into the exposure position using the Recall button. Remove the mounting
brackets (Fig. 28/ Pos. 2). Insert the grid with the focus mark facing up and secure it in place
with the mounting brackets. Reinstall the polycarbonate panel (Fig. 27Pos. 2).
2.17 Installing the Tilt Angle Display- Error Display
Place the unit base cover panel (Fig. 29/Pos. 1) on the unit base. Guide the cable (Pos. 2)
into the conduit (Pos. 3), install the tilt angle display (Pos. 4) and plug in the connector.
Secure the plug-in connector with cable ties.
Fig. 29 Fig. 30
0116 7201 -46 of 90 - 06/00
Rev. 00 © 2000 Hans Pausch Röntgengerätebau Graf-Zeppelin-Str. 1 D-91056 Erlangen ALL RIGHTS RESERVED Ru
Page 47

2. 18 Installing the Cover Panels
Caution: Before the cover panels are installed, it is best to carry out the adjustment as
described in Section 3.
Tube unit support arm:
Place the two halves of the cover panel (Fig. 30/Pos. 1) over the support arm (Pos. 2) while
paying attention to the two safety switches (Fig. 21/Pos. 1+2) and secure them in place with
the roll pins (Pos. 4). Place the two head cover panels (Pos. 5) over the support arm and
secure them in place with the paneling screws (Pos. 6).
Unit base:
Reinstall the narrow left (Fig. 31/Pos. 4) and the narrow right cover panel (Pos. 5).
Reinstall the unit base cover panel (Fig. 29/Pos.1), the left (Pos. 2) and right cover panels
(Pos. 3).
Reinstall the cover panel bracket for the floor panel (Pos. 6) and the back wall (Pos. 7).
Monitor support arm
Fig. 31 Fig. 32
2.19 Installing the Monitor Support Arm (Option)
Insert the monitor support arm (Fig. 32/Pos. 1) into the tube (Pos. 3).
06/00 - 47 of 90 - 0116 7201
Rev. 00 © 2000 Hans Pausch Röntgengerätebau Graf-Zeppelin-Str. 1 D-91056 Erlangen ALL RIGHTS RESERVED Ru
Page 48

Fig. 33 Fig. 34
2.20 Installing the Mount for the Flush Bowl
Lift up the tabletop (CFC panel) (Fig. 34/Pos. 1), it will be held in place by the gas spring.
Remove the two covers on the tube frame. Insert the left and right mounts (Fig. 33/ Pos.
2+3) into the opening of the tube frame and secure them with 2 screws for each.
2.21 Sealing the Table Frame Cover Panel
Seal the table frame cover panel (Fig. 34/Pos. 2) along the table frame using the Sista F 101
sanitary caulking.
0116 7201 -48 of 90 - 06/00
Rev. 00 © 2000 Hans Pausch Röntgengerätebau Graf-Zeppelin-Str. 1 D-91056 Erlangen ALL RIGHTS RESERVED Ru
Page 49

3. Adjustment
Caution: If changes are made to the movement paths, the software must
afterward be corrected.
3.1 Tube Unit Support Arm
Check the tube unit support arm (Fig. 51/Pos. 1) with the spirit level (Pos. 2) and loosen the
nuts (Fig. 51a/Pos. 5) and the mounting screws (Fig. 51b/Pos. 6). Correct any differences
with the screws (Pos. 8). Retighten the mounting screws and nuts.
Fig.51 Fig.51a
Fig.51b Fig.52
06/00 - 49 of 90 - 0116 7201
Rev. 00 © 2000 Hans Pausch Röntgengerätebau Graf-Zeppelin-Str. 1 D-91056 Erlangen ALL RIGHTS RESERVED Ru
Page 50

3.2 Central Beam - Center of Bucky
Determine the deviation of the central beam.
Transverse to the tabletop, for this:
Caution:
Risk of an accident exists here because the tube unit must be loosened.
Remove the cover panel (Fig. 52/Pos. 6). Remove the mounting screws (Fig. 52/Pos. 1),
remove the shims (Pos. 2) for the tube unit and insert them to compensate for any difference
in the central beam. Reinstall the mounting screws (Pos. 1).
Lengthwise to the tabletop, for this:
Remove the cover panel (Fig. 53/Pos. 1). Correct the exposure position of the system using
the software and the switch strike plate (Fig. 54/ Pos. 2) by the amount of the difference.
Reinstall the cover panel (Fig. 53/Pos. 1).
Fig.53 Fig.54
3.3 Central Beam – Center of I.I.
Determine the deviation of the central beam.
Loosen the screws (Fig. 54/Pos. 1), correct the connector brackets (Pos. 3) by the amount of
the difference and retighten the screws.
0116 7201 -50 of 90 - 06/00
Rev. 00 © 2000 Hans Pausch Röntgengerätebau Graf-Zeppelin-Str. 1 D-91056 Erlangen ALL RIGHTS RESERVED Ru
Page 51

Fig.55 Fig.56
3.4 Movement Path Potentiometer, Tabletop longitudinal
Lift up the tabletop (Fig. 55/Pos. 2) (it will be held in place by the gas spring) and
remove the cover panel (Fig. 55/Pos. 1). Move potentiometer =AU -R4 (Fig. 56/Pos.
1) away from the pinion rack, move the tabletop into the centered position. Turn the
potentiometer to the middle position, mesh it back into the pinion rack and align the
pinion on the rack. Check the function over the entire movement path and reinstall
the cover panel.
Fig.57 Fig.58
06/00 - 51 of 90 - 0116 7201
Rev. 00 © 2000 Hans Pausch Röntgengerätebau Graf-Zeppelin-Str. 1 D-91056 Erlangen ALL RIGHTS RESERVED Ru
Page 52

3.5 Movement Path Potentiometer, Tabletop transverse
Remove the cover panel (Fig. 57/Pos. 1). Move the tabletop transversely into the
centered position, lift up potentiometer =AU -R6 (Fig. 58/Pos. 1) (the view in Fig. 58
is visible only when the cover is removed Fig. 55/Pos. 3, however, the potentiometer
can be reached from behind through the slot Pos.2) and set it to the middle position.
Mesh the pinion and align it to the rack. Move through the entire movement path and
while doing this, check the function.
Fig.59 Fig.60
3.6 Bucky - Cassette Tray Movement Path Potentiometer
Move the cassette carriage into the park position and turn the potentiometer =AU -R5
(Fig. 59/Pos. 1) until it is one half turn before the mechanical end position, while
doing this, take note of the direction of the turn. Adjust the potentiometer pinion (Pos.
2) to the opposing pinion (Pos. 3).
3.7 I.I. Carriage System Potentiometer
Move the support arm until it is at the mechanical end stop at the foot end. Turn the
potentiometer =AU -R2 (Fig. 60/Pos. 2) until it is half a turn in front of the mechanical
end position; while doing this, take note of the direction of the turn.
Move the system toward the head end until it is 7 mm in front of the stop and save
the software limit for the head-end limit position.
Move the system toward the head end until it is 7 mm in front of the stop and save
the software limit for the foot-end limit position.
0116 7201 -52 of 90 - 06/00
Rev. 00 © 2000 Hans Pausch Röntgengerätebau Graf-Zeppelin-Str. 1 D-91056 Erlangen ALL RIGHTS RESERVED Ru
Page 53

Fig.61 Fig.62
3.8 Potentiometer 1 – Table Tilt Movement Path
Take off the potentiometer belt (Fig. 61/Pos. 2). Move the vertical carriage into the
top position and tilt the tabletop so that the potentiometer moves into the highest
possible position, e.g. -20° position. Turn potentiometer =AU -R1 (Pos. 1) until it is
half a turn in front of the mechanical end position; while doing this, take note of the
direction of the turn. Place the potentiometer belt back on without turning the
potentiometer and secure it in position.
3.9 Potentiometer 2 – Table Tilt Movement Path
Take off the potentiometer belt (Fig. 62/Pos. 2). Move the vertical carriage into the
top position and tilt the tabletop so that potentiometer =AU -R3 (Pos. 1) moves into
the highest possible position, e.g. +88° position. Turn the potentiometer until it is half
a turn in front of the mechanical end position; while doing this, take note of the
direction of the turn. Place the potentiometer belt back on without turning the
potentiometer and secure it in position.
06/00 - 53 of 90 - 0116 7201
Rev. 00 © 2000 Hans Pausch Röntgengerätebau Graf-Zeppelin-Str. 1 D-91056 Erlangen ALL RIGHTS RESERVED Ru
Page 54

Fig.63 Fig.64
3.10 Tabletop Longitudinal Safety Switch
Lift up the tabletop (it will be held in place by the gas spring) and remove the cover
panel (Fig. 63/Pos. 1). Set the software end positions to 240+/- 5 mm in each
direction. Adjust the limit switch (Fig. 64/Pos. 2) so that it switches off approx. 3 - 5
mm behind each end position. To do this, either the limit switch or the switch strike
place can be adjusted. Check the function over the entire movement path and
reinstall the cover panel.
3.11 Tabletop Transverse Safety Switch not configured
Fig.65 Fig.66
0116 7201 -54 of 90 - 06/00
Rev. 00 © 2000 Hans Pausch Röntgengerätebau Graf-Zeppelin-Str. 1 D-91056 Erlangen ALL RIGHTS RESERVED Ru
Page 55

3.12 Bucky Movement Path Safety Switch
Move the Bucky to the foot end to the mechanical stop, move the system carriage
into the exposure position. Adjust the S12 switch (Fig. 66/Pos. 1) so that it positively
switches.
3.13 I.I. Carriage Movement Path Safety Switch
Remove the cover panel (Fig. 65/Pos. 1). Move the system carriage to the head end until
there is 3 mm distance and adjust the switch strike plate (Fig. 67/ Pos. 1) so that it just
actuates the S6 switch. Move the system carriage to the foot end until there is 3 mm
distance and adjust the switch strike plate (Fig. 67/Pos. 2) so that it just actuates the S7
switch.
Fig.67 Fig.68
3.14 Table Up Movement Path Switch Strike Plate
Raise the table to max. 1225+/-10 mm position.
When the software limit is set, the top switch strike plate (Fig. 68 / Pos. 1) can be
adjusted so that the limit switch (Pos. 3) actuates approx. 2 - 5 mm behind the
maximum height.
3.15 Table Down Movement Path Switch Strike Plate
Lower the table to the min. 680+/-10 mm position.
When the software limit is set, the bottom switch strike plate (Fig. 68/ Pos. 2) can be
adjusted so that the limit switch actuates approx. 2 - 5 mm behind the minimum
height.
06/00 - 55 of 90 - 0116 7201
Rev. 00 © 2000 Hans Pausch Röntgengerätebau Graf-Zeppelin-Str. 1 D-91056 Erlangen ALL RIGHTS RESERVED Ru
Page 56

Fig.69 Fig.70
3.16 -20° Tilt Movement Safety Switch
Tilt the tabletop into the -20° end position.
The top of the two switches is the limit switch and the floating switch (bronze) is also
the switch strike plate, respectively.
The floating switch (Fig. 69/Pos. 1) should actuate the microswitch approx. 2 mm
after the end position (Pos. 2).
3.17 +88° Tilt Movement Safety Switch
Tilt the tabletop into the +88° end position.
The top o the two switches is the limit switch for tilt movement and the floating switch
(bronze) is also the switch strike plate, respectively.
The floating switch (Fig. 69/Pos. 1) should actuate the microswitch (not shown in Fig.
69) approx. 2 mm after the end position.
3.18 Spindle Nut Safety Limit Switch
The safety nut (Fig. 70/Pos. 1) must be installed centered in the bottom half between
the two steel plates (Pos. 2+3).
The switch strike plate in the microswitch with the roller must be up against the safety
nut and actuated; when the safety nut moves up, the microswitch responds and the
switch circuit is interrupted.
0116 7201 -56 of 90 - 06/00
Rev. 00 © 2000 Hans Pausch Röntgengerätebau Graf-Zeppelin-Str. 1 D-91056 Erlangen ALL RIGHTS RESERVED Ru
Page 57

Fig.71 Fig.72
3.19 Accessory Sensor Switches
Securely and audibly insert the table extension or the micturation seat into the
opening.
The corresponding microswitch is for sensing of the S17 table extension (Fig. 71/
Pos. 1) and S18 is for the micturation seat (Pos. 2). The switch strike plate must be
adjusted so that it is on the tip of the nib so that any play will trigger a positive
response of the S16 microswitch (Pos. 3).
3.20 Tabletop longitudinal Belt Tension
Belt tension should be determined as follows:
The spring balance should be placed centered between the belt return wheel (Fig. 72/Pos. 2)
and the belt tension roller (Pos. 3) to achieve a deflection of 1 cm when a force of 35 N is
applied. Adjustment can be made by means of the tension screw (Pos. 4) after loosening the
two mounting screws (Pos. 5+6).
3.21 Raise-Lower Tabletop Belt Tension
Belt tension should be determined as follows:
The spring balance should be placed centered between the drive wheel (on motor side) and
the belt wheel for the spindle (Fig. 73/Pos. 2) to achieve a deflection of 1 cm when a force of
80 N is applied. Adjustment can be made by means of the tension screw (Pos. 4) after
loosening the two mounting screws (Pos. 5+6).
06/00 - 57 of 90 - 0116 7201
Rev. 00 © 2000 Hans Pausch Röntgengerätebau Graf-Zeppelin-Str. 1 D-91056 Erlangen ALL RIGHTS RESERVED Ru
Page 58

Fig.73 Fig. 74
3.22 Cassette Carriage Drive Belt Tension
Move the tabletop max. forward and take off the cover panel (Fig. 74/Pos. 1) after removing
the 5 mounting screws.
Belt tension should be determined as follows:
The spring balance should be placed centered between the motor-side drive pulley (Fig.
75/Pos. 3) and the belt return pulley (Pos. 2) to achieve a deflection of 1 cm when a force of
25 N is applied. Adjustment can be made by means of the tension screw (Pos. 4) after
loosening the 4 mounting screws (Pos. 5).
Fig.75 Fig. 76
0116 7201 -58 of 90 - 06/00
Rev. 00 © 2000 Hans Pausch Röntgengerätebau Graf-Zeppelin-Str. 1 D-91056 Erlangen ALL RIGHTS RESERVED Ru
Page 59

3.23 Operation in the Service Mode
a. Connection of a Laptop
To establish a connection with the URO controller, a PC/laptop is required.
Equipment:
⇒ PC or laptop with color display (black/white is also sufficient, but makes operation more
difficult)
⇒ 486 processor, 16 MB RAM
⇒ Windows 3.x Win 95 operating system (Windows NT can cause difficulties with the Com
interface)
⇒ Hard drive
⇒ Serial connection cable (9-pole, Sub-D connector to a 9-pole, Sub-D socket, connected
1 - 1), length > 1m.
⇒ Current version of the "hp-Service" software
b. Procedure
• Switch off the URO
• Connect the PC and the URO CPU board using the connection cable
• Switch on the URO
• After approx. 1 s, the service LED will begin to blink
• Switch on the PC
• Start the PC software
• Set the PC software to monitor. The terminal screen will appear
• Set the service switch on the CPU board to the up "Service" position
• After approx. 1 s, the service LED will switch to continuously on
• The start message of the service menu will appear on the screen.
U U RRRR OOO 333 000 000 000
U U R R O O 3 0 00 0 00 0 00
U U RRRR O O 33 0 0 0 0 0 0 0 0 0
U U R R O O 3 00 0 00 0 00 0
UUU R R OOO 333 000 000 000
Service mode
(1) Input test
(2) Analog test
(3) Handcontrol and footswitch test
(4) Axis calibration
(5) Versioncheck
Select testmode
06/00 - 59 of 90 - 0116 7201
Rev. 00 © 2000 Hans Pausch Röntgengerätebau Graf-Zeppelin-Str. 1 D-91056 Erlangen ALL RIGHTS RESERVED Ru
Page 60

The service technician can now start the desired adjustment. The above-listed sequence
does not have to be followed when making the connection. However, it should be noted that
the cable connection may not be plugged in while power is switched on!
c. Setting Parameters
A critical and often-used routine is setting the table parameters to adapt speeds or limits.
Procedure:
Once the URO controller has been set to the service mode (see above), the PC software is
not switched to the monitor mode, but to the parameter mode after clicking on the
"Parameters" button. (We also refer you to the Online Help of the PC software, which can be
selected by pressing the F1 key).
A file window open with which the supplied adjustment file named "*.HPP" can be opened.
Using data from this file, a complete parameter table is described. Please enter your name.
Data can be viewed, changed or saved this way in the usual manner.
Changing the parameters in the URO controller is performed as follows:
⇒ Read out the URO with "Read CPU".
⇒ Save these data under a new name as xxx.HPP as a backup.
⇒ Change the parameters as desired.
⇒ Write them into the URO with "Write CPU".
⇒ Test the new parameters.
⇒ If ok, save these new parameters in the URO with "EEPROM"
d. Self Test
All boards in the controller, with the exception of the breaker board, have a software self test,
which is performed after switching on power. To the extent possible, this test can be viewed.
e. CPU Self Test
After switching on power, the CPU reads all inputs. This takes approx. 1 - 2 s. If this is
correct, the service LED does into the blink mode.
If this does not happen, there is a malfunction.
If a peripheral unit is not connected or the bus traffic is malfunctioning, this is signaled on the
display as an error code. If the display cannot be addressed, the error message can be read
on the service laptop.
If an error occurs in the footswitch or in the control unit, the URO can still be operated using
the other unit.
0116 7201 -60 of 90 - 06/00
Rev. 00 © 2000 Hans Pausch Röntgengerätebau Graf-Zeppelin-Str. 1 D-91056 Erlangen ALL RIGHTS RESERVED Ru
Page 61

f. Display Self Test
After switching on power, all segments in the tilt display and the large round LED’s are
tested individually. If this does not happen, there is a malfunction.
Seven-segment display: visible by a circular sequence of the active segments. All segments
must light up. If a segment does not go on, there is a malfunction.
LED’s: All three LED’s light up cyclically in the three colors: red, green and yellow. If one
color does not appear, there is a malfunction.
g. Footswitch Self Test
This test cannot be viewed. However, correct function is signaled via the bus.
h. Control Unit Self Test
After switching on power, all LED’s are individually tested by blinking, the multi-colored
LED’s also blink in the three colors. If this does not happen, there is a malfunction.
3.24 Startup
Adjusting the Axes
If a PC is not available, proceed as described below:
Switch the unit with the switch (Fig. 76/Pos. 1) into the service mode, the green LED (Pos. 2)
on the controller goes on and stays on.
Press the Store and Reset buttons on the control unit at the same time, the three memory
LED`s on the control unit blink green and the LED on the controller blinks very quickly.
Each axis can now be moved normally. Exception: the cassette can be moved slowly forward
and backward by pressing the Recall and Reset buttons.
To save a new software limit, Store must be pressed and held (M1 LED blinks red) and the
corresponding direction button for the desired movement must also be pressed.
If the controller has recognized this correctly, the M1 LED blinks red, and the position has
been accepted and the keys can be released again. The M1 LED then blinks green again.
To save a centered position, the Store button must again be pressed and held and then the
two buttons for the corresponding axis must either be pressed and held, or pressed in
sequence.
To move past an incorrectly set software limit, the ZOOM button must be held down and the
corresponding direction button must also be held. The software limit is now set to the
maximum AD value.
If an axis is completely adjusted, the new limits should be saved in the EEprom. To do this,
the Store and Reset buttons must be pressed at the same time. During the save routine
(approx. 5 sec) all three memory LED’s will blink red.
When the save routine is completed, the memory LED`s will again blink green.
06/00 - 61 of 90 - 0116 7201
Rev. 00 © 2000 Hans Pausch Röntgengerätebau Graf-Zeppelin-Str. 1 D-91056 Erlangen ALL RIGHTS RESERVED Ru
Page 62

3.25 Collimator Basic Setting
Switch the unit into the service mode using the switch (Fig. 77/Pos. 1), the green LED (Pos.
2) on the controller will go on and stay on.
Simultaneously press the Store (Fig. 78/Pos. 54) and Reset (Pos. 56) buttons on the control
unit, the three memory LED`s (Pos. 51-53) on the control unit will blink green and the LED
on the control unit (Fig. 77/Pos. 2) will blink very rapidly.
Fig. 77 Fig. 78
The movement paths must be moved manually to the mechanical end stops using the
direction buttons (the collimator plate will not move any further because the motor has a slip
clutch).
Save the position that is established this way for each of the 6 end positions by holding the
Store button (Fig. 78/Pos. 54) (M1 LED (Pos. 52) blinks red) and pressing the
corresponding direction button for the movement at the same.
If the controller has correctly detected this position, the M1 LED (Pos. 52) goes on red. The
position has been accepted and buttons can be released again. The M1 LED (Pos. 52) then
blinks again green.
To move past an incorrectly set software limit, the Zoom (Pos. 54) must be pressed and
held and the corresponding direction button (Pos. 31, 32, 37, 35, 36, 38) must be pressed at
the same time. The software limit is now set to the maximum AD value and the axis can now
be moved to a new position and stored again by pressing the Store (Pos. 54) and directional
buttons (Pos. 31, 32, 37, 35, 36, 38) again.
To determine the tracking path of the motors, the collimator must be closed using the button
(Pos. 34) and auto tuning started. All three collimator motors will then be started
automatically 5 times and stopped again to save the tracking time that has been determined.
0116 7201 -62 of 90 - 06/00
Rev. 00 © 2000 Hans Pausch Röntgengerätebau Graf-Zeppelin-Str. 1 D-91056 Erlangen ALL RIGHTS RESERVED Ru
Page 63

3.26 Setting the Collimator to the Cassette and I.I. Format
Cassette Format:
To adjust the collimator to the 4 possible film formats, the corresponding cassette must be
inserted.
Use the button (Fig. 78/Pos. 33) to switch on the collimator light field and center the cassette
template included in the shipment so it is centered on the tabletop.
With the light field switched on, move the collimator plates using the buttons (Fig. 78/Pos.
31, 32, 35, 37) horizontal open, horizontal closed, vertical open, vertical closed to the
position of the cassette template and save the position with the Store (Pos. 54) and Light
(Pos. 33) buttons.
Then as a control, make a radiographic exposure and, if needed, correct the collimator plate
adjustment.
Caution:
During exposure, radiation protective measures must be observed.
Perform this routine with all 4 cassettes.
A format that has been saved previously can be overwritten by repeating the save routine.
I.I. Format:
The unit can store 3 Zoom steps.
LED`s Z-N (Pos. 41) = I.I. size, LED`s Z-1 (Pos. 42) = Zoom step 1, LED`s Z-2 (Pos. 43) =
Zoom step 2, LED`s Z-1 + Z-2 (Pos. 41 + 42) = Zoom step 3.
The Zoom step is changed by pressing the Zoom button (Pos. 44).
Use the button (Fig. 78/Pos. 33) to switch on the collimator light field and center the cassette
template included in the shipment on the tabletop.
Move the iris diaphragm to the desired position with the keys Iris open (Fig. 78/Pos. 38) or
Iris closed (Pos. 36).
To save the currently selected zoom step, press and hold the Store button (Pos. 54) on the
manual controller and then, both iris buttons (Pos. 36 and 38) should be pressed either
together or in sequence.
Then the adjustment should be checked, and if needed, corrected under fluoroscopy.
Caution:
During radiographic fluoroscopy, radiation safety regulations must be observed.
Since the position of the horizontal and vertical collimator plates also need to be saved for
improved radiation safety, they must be moved as exactly as possible to the limit of the iris
diaphragm without them being visible in the radiation field.
Save the position of the collimator plates with the Store (Fig. 78/Pos. 54) and Light (Pos. 33)
buttons.
Perform this routine for all zoom steps.
The values can be resaved as often as wished, the old settings will be overwritten when this
is done.
After completing adjustment work, all parameters must be saved in the EEprom by pressing
the Reset button (Pos. 56).
The switch the unit into the normal mode with the switch (Fig. 77/Pos. 1), the green LED
(Pos. 2) on the controller blinks.
06/00 - 63 of 90 - 0116 7201
Rev. 00 © 2000 Hans Pausch Röntgengerätebau Graf-Zeppelin-Str. 1 D-91056 Erlangen ALL RIGHTS RESERVED Ru
Page 64

3.27 Saving the Parameters in the PC
Switch off the unit. Connect the PC and the unit using the connection cable included in the
shipment.
Switch the unit into the service mode with the switch (Fig. 77/Pos. 1), the green LED (Pos. 2)
controller goes on continuously.
Start the URO service tool. See 3.23
Open the parameter file included in the shipment and read the parameters from the Uromat
and save them (do not overwrite the original file).
0116 7201 -64 of 90 - 06/00
Rev. 00 © 2000 Hans Pausch Röntgengerätebau Graf-Zeppelin-Str. 1 D-91056 Erlangen ALL RIGHTS RESERVED Ru
Page 65

3.28 Electronic Adjustment Parameters
Min Max Wert
40
70
40
70
40
70
25
0
Setup Parameters
lf. Nr.: Name
1 Tilt MAX 0
2 Tilt MIN 0
3 Tilt Null-Grad 0
4 Tilt V1 [Hz] 0
5 Tilt ACC V1 [s/10] 0
7 Tilt V2 [Hz] 0
8 Tilt ACC V2 [s/10] 0
9 Tilt DEC [s/10] 0
10 Tilt DNS 0
11 Vertical MAX 0
12 Vertical MIN 0
13 Vertical V1 [Hz] 0
14 Vertical ACC V1 [s/10] 0
15 Vertical V2 [Hz] 0
16 Vertical ACC V2 [s/10] 0
17 Vertical DEC [s/10] 0
18 Vertical DNS 0
19 System MAX 0
20 System MIN 0
21 System X-ray position 0
22 System V1 [Hz] 0
23 System ACC V1 [s/10] 0
24 System V2 [Hz] 0
25 System ACC V2 [s/10] 0
26 System DEC [s/10] 0
27 System DNS 0
28 Tabletop long. MAX 0
29 Tabletop long. MIN 0
30 Tabletop long. NULL 0
31 Tabletop long. V1 [Hz] 0
32 Tabletop long. ACC V1 [s/10] 0
33 Tabletop long. V2 [Hz] 0
34 Tabletop long. ACC V2 [s/10] 0
35 Tabletop long. DEC [s/10] 0
36 Tabletop long. DNS 0
37 Tabletop lateral MAX 0
38 Tabletop lateral MIN 0
39 Tabletop lateral NULL 0
40 Tabletop lateral V1 [PWM%] 0
41 Tabletop lateral ACC V1 [s/10] 0
42 Tabletop lateral V2 [PWM%] 0
43 Tabletop lateral ACC V2 [s/10] 0
44 Tabletop lateral DEC [s/10] 0
45 Tabletop lateral DNS 0
46 Cassette MAX 0
47 Cassette MIN 0
48 Cassette V1 [Hz] 0
49 Cassette V2 [Hz] 0
50 Cassette ACC V1 [s/10] 0
51 Cassette DEC [s/10] 0
52 Cassette DNS 0
53 Cassette V X-ray [Hz] 0
54 ***** Colimator-Axisdata ***** 0
55 Col horizontal MAX 0
56 Col horizontal MIN 0
57 Col horizontal Format 1 0
1023
1023
1023
100
255
100
255
255
255
1023
1023
255
255
255
255
1023
1023
1023
255
255
255
255
1023
1023
1023
255
255
255
255
1023
1023
1023
150
255
255
255
255
255
1023
1023
255
255
255
255
255
1023
1023
1023
06/00 - 65 of 90 - 0116 7201
Rev. 00 © 2000 Hans Pausch Röntgengerätebau Graf-Zeppelin-Str. 1 D-91056 Erlangen ALL RIGHTS RESERVED Ru
Page 66

0
0
4
0
1
0
0
1
1
1
1
1
1
1
1
0
1
1
58 Col horizontal Format 2 0
59 Col horizontal Format 3 0
60 Col horizontal Format 4 0
61 Col horizontal delay 0
62 Col vertical MAX 0
63 Col vertical MIN 0
64 Col vertical Format 1 0
65 Col vertical Format 2 0
66 Col vertical Format 3 0
67 Col vertical Format 4 0
68 Col vertical delay 0
69 Iris MAX 0
70 Iris MIN 0
71 Iris Zoom-normal 0
72 Iris Zoom-1 0
73 Iris Zoom-2 0
74 Iris Zoom-3 0
75 Iris delay 0
76 ***** Colimator-Zoom ***** 0
77 Col horizontal Zoom-normal 0
78 Col horizontal Zoom-1 0
79 Col horizontal Zoom-2 0
80 Col horizontal Zoom-3 0
81 Col vertical Zoom-normal 0
82 Col vertical Zoom-1 0
83 Col vertical Zoom-2 0
84 Col vertical Zoom-3 0
85 ******** Colimator ******** 0
86 Lightvisor timer [s] 0
87 II Magnification [1..4] 1
88 Colimator-Typ [0=none] 0
89 Iris shut analog/digital [1/0] 0
90 Film cassette Detector/yes/no [2/1/0] 0
91 ***** Image Intensifier ***** 0
92 II depth [mm] 0
93 II width-foot [mm] 0
94 II width-head [mm] 0
95 Distance II-center - footend [mm] 0
96 ***** Axis Positionmemory ***** 0
97 Vertical store yes/no [1/0] 0
98 Tilt store yes/no [1/0] 0
99 System store yes/no [1/0] 0
100 Tabletop long. Store yes/no [1/0] 0
101 Tabletop lateral store yes/no [1/0] 0
102 Col horizontal store yes/no [1/0] 0
103 Col vertical store yes/no [1/0] 0
104 Iris store yes/no [1/0] 0
105 ***** Table configuration ***** 0
106 Slow motion [s/10] 0
107 Isocentric yes/no [1/0] 0
108 V1 isocentric [Hz] 0
109 V2 isocentric [Hz] 0
110 Uro-type right/left [1/0] 0
111 Tableextension [mm] 0
112 Micturitionseat [mm] 0
113 Ellbowrests [mm] 0
114 Saftydistance first [mm] 0
115 Saftydistance end [mm] 0
1023
1023
1023
255
1023
1023
1023
1023
1023
1023
255
1023
1023
1023
1023
1023
1023
255
1023
1023
1023
1023
1023
1023
1023
1023
255
255
1000
1000
1000
1023
255
255
255
1000
1000
1000
1000
1000
0116 7201 -66 of 90 - 06/00
Rev. 00 © 2000 Hans Pausch Röntgengerätebau Graf-Zeppelin-Str. 1 D-91056 Erlangen ALL RIGHTS RESERVED Ru
Page 67

4. Technical Maintenance
NOTE:
The maintenance described below must be performed every12 months.
If unit components need to be moved using the motor during maintenance, or if functions
need to be checked while the unit is under power, the unit must be switched off immediately
after reaching the new position or after completing the particular work step and the
immediately disconnected from power again.
Components that are removed may only be replaced with original parts that are listed in the
attached spare parts list. For maintenance, only acid-free grease may be used. Do not
grease or oil bearings with seals.
4.1 Mechanical and Electrical Checks
Preparations:
- Move table to the max. up position.
- Switch power off to the system (line power)
- Remove the unit base cover cap
- Remove the unit base cover panels
- Remove the system carriage cover panels
Floor mounting:
- Check the unit column in both directions with the spirit level. Compensate any
differences by using shims and retighten the mounting screws.
- Check the mounting screws for secure tightness. If needed, retighten.
Torque 25 Nm (2.5 kpm)
Manual control unit:
- Check cable lead-in for good condition and for secure connection.
- Check the function of all buttons
- Check the function of all LED’s.
Multi-function footswitch:
- Check the cables for good condition and for secure connection.
If necessary, replace damaged cables.
- Clean the spaces between the individual footswitches.
- Check all switch functions.
Fluoroscopy and exposure footswitch:
- Check the cables for good condition and for secure connection.
If necessary, replace damaged cables.
- Clean the spaces between the individual footswitches.
- Check the switch functions.
06/00 - 67 of 90 - 0116 7201
Rev. 00 © 2000 Hans Pausch Röntgengerätebau Graf-Zeppelin-Str. 1 D-91056 Erlangen ALL RIGHTS RESERVED Ru
Page 68

Lift and tilt drive:
- Move through the entire lift and tilt range.
- Check for soft start and movement out of positions.
- Check automatic stop in the horizontal position.
- Check automatic stop in the vertical position (88°).
- Check automatic stop in the Trendelenburg position (-20°).
- Check stop with manual actuation of the limit switches.
- Clean the guide rails and the counterweight guides.
- Check for play in the bearings. If necessary, readjust them.
Tabletop drive:
- Move through the entire longitudinal and transverse movement range.
- Check for soft start and movement out of positions.
- Check automatic stop in head-end limit position.
- Check automatic stop in foot-end limit position.
- Check automatic stop in the left limit position.
- Check automatic stop in the right limit position.
- Check automatic stop in the center position.
- Lift up the tabletop and clean the space in between.
Tube unit carriage drive:
- Move through the entire movement range.
- Check soft start and movement out of positions.
- Check automatic stop in head-end limit position.
- Check automatic stop in foot-end limit position.
- Clean guide rails.
- Check for play in the bearings. If necessary, readjust them.
Bucky carriage drive:
Preparations:
Switch the unit to the service mode, the green LED on the controller goes on green
continuously. Press the Store and Reset buttons at the same time, the three memory LED’s
on the controller will blink green and the LED on the controller will blink very quickly. See
3.24
The cassette can now be moved forward and backward slowly by pressing the Recall and
Reset buttons.
- Move through the entire movement range.
- Check soft start and movement out of positions.
- Check automatic stop in head-end limit position.
- Check automatic stop in foot-end limit position.
- Clean the guide rails.
- Check for play in the bearings. If necessary, readjust.
I.I. carriage drive:
- Initiate movement through entire movement range.
- Check soft start and movement out of movements.
- Check automatic stop in head-end limit position.
0116 7201 -68 of 90 - 06/00
Rev. 00 © 2000 Hans Pausch Röntgengerätebau Graf-Zeppelin-Str. 1 D-91056 Erlangen ALL RIGHTS RESERVED Ru
Page 69

- Check automatic stop in foot-end limit position
- Clean the guide rails.
- Check for play in the bearings. If necessary, readjust.
Tube unit support arm, exposure position, park position:
- Press the buttons on the control handle and move through the entire movement
range.
- Check for even movement during the unit movements.
- Check for engagement into the end positions.
- Clean the guide rails.
- Check for play in the bearings. If necessary, readjust them.
- Check for fluoroscopy and exposure blocking when the tube unit support arm is
not in the exposure position.
Component Panel:
- Switch power off to the system.
- Check all cables laid for good condition and secure connection.
If necessary, replace any damaged cables.
- Retighten any cable connections.
- Retighten the mounting screws of all components.
- Check P/C boards for secure seating.
- Check strain-reliefs and ground connections for secure connection.
Electronics:
- Electronic adjustment parameters per section.3.28
Accessories:
- Check all accessories present at the customer’s location.
- Hook in the table extension, tilt the table and check the factory set safety
distance of 12 cm; if necessary, adjust it.
- Check engagement of the leg support on the profile rail.
- Check for secure mounting of the head cushion mount.
- Check the patient table pad for good condition.
- Check the flush bowl for damage and check the function.
General:
- Reinstall the unit base cover panel.
- Reinstall the unit base cover panels.
- Reinstall the base cover panels.
- Reinstall the system carriage cover panels.
- Clean the unit.
- Clean surfaces with one of the following tested disinfecting agents:
Tego 103, Kosolin, Misty Multi-Purpose Disinfectant Cleaner, Misty Multi-Purpose
Disinfectant Cleaner II, Misty Disinfectant and Deodorant RTU, Precise Hospital
Foam Cleaner Disinfectant.
- Switch power back on.
- Carry out a function check according to 4.2.
06/00 - 69 of 90 - 0116 7201
Rev. 00 © 2000 Hans Pausch Röntgengerätebau Graf-Zeppelin-Str. 1 D-91056 Erlangen ALL RIGHTS RESERVED Ru
Page 70

4.2 Function Check
Switch on the system. Initiate movement through the entire movement path.
Vertical drive:
- Even movement?
- Automatic stop in the bottom and top positions?
- Soft start and smooth movement out?
- Movement initiated from footswitch?
- Movement initiated from manual control unit?
- Any uninitiated lowering with load applied?
Tilt drive:
- Even movement?
- Soft start and smooth movement out?
- Automatic stop in vertical limit position (88°) ?
- Automatic stop in horizontal limit position (0°) ?
- Automatic stop in Trendelenburg position (-20°) ?
- Movement initiated from footswitch?
- Movement initiated from manual control unit?
- Any uninitiated lowering with load applied?
System longitudinal movement:
- Even movement?
- Soft start and smooth movement out?
- Automatic stop in head-end limit position?
- Automatic stop in foot-end limit position?
- Movement initiated from footswitch?
- Movement initiated from manual control unit?
- Any movement with opened Bucky flap?
Tabletop longitudinal movement:
- Even movement?
- Soft bootup and soft outward movement?
- Automatic stop in the middle position?
- Automatic stop in the head-end limit position?
- Automatic stop in the foot-end limit position?
- Movement initiated from footswitch?
- Movement initiated from manual control unit?
0116 7201 -70 of 90 - 06/00
Rev. 00 © 2000 Hans Pausch Röntgengerätebau Graf-Zeppelin-Str. 1 D-91056 Erlangen ALL RIGHTS RESERVED Ru
Page 71

Tabletop transverse movement:
- Even movement?
- Soft startup and soft outward movement?
- Automatic stop in the centered position?
- Automatic stop in the limit position?
- Movement initiated from footswitch?
- Movement initiated from the manual control unit?
Movable Tube Unit Support Arm:
- Easy separation in the exposure position?
- Easy separation in the park position?
- Even movement?
- Positive engagement into the limit positions?
Table extension:
- Does the table extension engage in place in the opening at the foot end?
- Is the table extension blocked from sliding out?
- Does the controller when the table extension is controlled?
Footrest:
- Does the footrest securely and easily engage the footrest?
Micturation seat:
- Does the micturation seat engage in place in the opening?
- Is the micturation seat secured against falling out?
- Does the controller sense the micturation seat?
Accessories:
- Are all configured accessories functional?
General:
- Is the centering of the tube unit to the adjustable Bucky okay?
- Is the centering of the tube unit to the I.I. okay?
- Is radiation blocked when the tube unit support arm is in the park position?
06/00 - 71 of 90 - 0116 7201
Rev. 00 © 2000 Hans Pausch Röntgengerätebau Graf-Zeppelin-Str. 1 D-91056 Erlangen ALL RIGHTS RESERVED Ru
Page 72

4.3 Spare Parts, Overview
168
169
174
175
166
170
8
174
173
32
29 / 30
209
162 / 163
179
188
158 -160
8
176
7
9
165
9
186
29 / 30
27
182
246 247
166
209
78 / 79
162 / 163
174
178
184
168
169
172
171
32
8
158 - 160
187
165
185
9
181
27
246 247
0116 7201 -72 of 90 - 06/00
Rev. 00 © 2000 Hans Pausch Röntgengerätebau Graf-Zeppelin-Str. 1 D-91056 Erlangen ALL RIGHTS RESERVED Ru
Page 73

4.3.1 Spare Parts, Unit Column (Right-handed, Left-handed Versions)
16 / 15
16 / 15
2
5
19 / 21
4
13
38
35
46
50
24
19 / 21
49
1 63
13
50
46
41
34
24
48
19 / 21
18 / 19
16 / 15
36
41/43
49
38
48
40
50 13
40/41 /10
35
16 / 15
19 / 21
51 / 52
11
34
3636
06/00 - 73 of 90 - 0116 7201
Rev. 00 © 2000 Hans Pausch Röntgengerätebau Graf-Zeppelin-Str. 1 D-91056 Erlangen ALL RIGHTS RESERVED Ru
Page 74

4.3.2 Spare Parts, Table Frame - Tabletop, Right-handed Version
118
90
91
94
68
69
94
100
100
220
214
100
219
216
218
146145
215
143
142
92
54
53
63
65
139
143
142
143
93
70
54
56 / 96
59
83
57
54
74
140
141
108
75
104
76
185
136
129
187
128
72 / 96
81
135
100
151
127
126
130
122
74
88
114
79
78
123
116
125
119
120
121
0116 7201 -74 of 90 - 06/00
Rev. 00 © 2000 Hans Pausch Röntgengerätebau Graf-Zeppelin-Str. 1 D-91056 Erlangen ALL RIGHTS RESERVED Ru
Page 75

4.3.3 Spare Parts, Table Frame - Tabletop, Left-handed Version
185
143
108
214
219
142
141
215
139
140
104
143
76
218
142
75
65
54
74
62
57
53
56 / 96
83
220
54
59
143
216
54
100
92
93
70
100
100
146 145
94
90
91
94
67
69
79
74
72 / 96
78
123
118
88
126
127
100
81
128
187
129
136
116
125
119
120
121
122
114
130
151
135
06/00 - 75 of 90 - 0116 7201
Rev. 00 © 2000 Hans Pausch Röntgengerätebau Graf-Zeppelin-Str. 1 D-91056 Erlangen ALL RIGHTS RESERVED Ru
Page 76

4.3.4 Spare Parts, Tube Unit Support - Right-handed Version
191 / 192
193
207 / 210 -212
193 / 195
213
198 / 199
209
201
202
203 - 205
191
192
192
191
192
191197
194
198 / 199
207 / 210 -212
213
209
207 / 210 -212
0116 7201 -76 of 90 - 06/00
Rev. 00 © 2000 Hans Pausch Röntgengerätebau Graf-Zeppelin-Str. 1 D-91056 Erlangen ALL RIGHTS RESERVED Ru
Page 77

4.3.5 Spare Parts, Tube Unit Support - Left-handed Version
191 / 192
193
197
192
193 / 195
213
207 / 210 -212
198 / 199
209
201
202
203 - 205
191
192
191
192
191
194
06/00 - 77 of 90 - 0116 7201
Rev. 00 © 2000 Hans Pausch Röntgengerätebau Graf-Zeppelin-Str. 1 D-91056 Erlangen ALL RIGHTS RESERVED Ru
198 / 199
207 / 210 -212
213
209
207 / 210 -212
Page 78

4.3.6 Spare Parts, Accessories
224
234
230
(231)
242
236
241
228
237
(238)
221
243
225
(226)
223
222
240
248
249
252
251
249
243
253
250
239
235
233
155 156
0116 7201 -78 of 90 - 06/00
Rev. 00 © 2000 Hans Pausch Röntgengerätebau Graf-Zeppelin-Str. 1 D-91056 Erlangen ALL RIGHTS RESERVED Ru
Page 79

4.4 Spare Parts List
Note:
If there is a failure, components may only be replaced with the listed original parts. When
ordering spare parts, always list the complete production number of the unit, the designation
and the order number of the part.
Replacement of components or assemblies may only be done by us or by offices that have
express authorization from us to do this. See also the chapter "Safety-technical Remarks".
Pos. Designation Part No.:
1 Electronics panel, complete 0116 2000
2 CPU board 0116 2020
3 Breaker assembly 0116 2025
4 Power supply 0116 2030
5 CPU 0116 2021
6 Frequency converter, three-phase 0006 0774a
7
8 Back wall 0116 0310
9 Service door 0116 0306
10 Potentiometer, 10K, 10-turn 0006 0251b
11 Microswitch 0006 0184
12
13 Spindle unit, installed 0116 0150
14
15 Bearing stud, centered 0116 0421
16 Roller bearing 0005 0161i
17
18 Bearing stud, centered 0116 0426
19 Roller bearing 0005 0161a
20
21 Bearing stud, eccentric 0116 0431
22 Roller bearing 0005 0161a
23
24 Complete shaft 0005 0145f
25
26
27 Front cover panel 0116 0303
28
29 Roll bar 80 pcs. 0116 0333a
30 Roll bar 4 pcs. 0116 0333b
31
32 Front cover panel 0116 0304
33
34 Lift/tilt drive, compl. 0116 0185a
35 Lift/tilt drive, compl. 0116 0185b
36 HTD toothed belt 2 pcs. 0005 0243l
37
38 Microswitch, complete 0116 0170
39
40 Potentiometer, complete 0116 0171
41 Synchroflex toothed belt 0005 0170i
42
06/00 - 79 of 90 - 0116 7201
Rev. 00 © 2000 Hans Pausch Röntgengerätebau Graf-Zeppelin-Str. 1 D-91056 Erlangen ALL RIGHTS RESERVED Ru
Page 80

Pos. Designation Part No.:
43 Clamp, potentiometer belt 0116 0174
44
45
46 Guide strip 0116 0135
47
48 Tilt shaft, installed 0116 0140
49 Counterweight 0116 0164
50 Spindle nut 0116 0156
51 Locking nut 0116 0157
52 Compression spring 0005 0151au
53 Movement rail 0116 0560
54 Movement rail 0116 0561
55
56 Switch mount 0116 0635
57 Pinion rack, installed 0116 0585
58
59 Bearing block, installed 0116 0592
60
61
62 System drive, cpl. 0116 0583b
63 System drive, cpl. 0116 0583a
64
65 Spindle bearing 0116 0567
66
67 Worm gear drive motor, cpl. 0116 0550b
68 Worm gear drive motor, cpl. 0116 0550a
69 Synchroflex toothed belt pulley 0005 0157ae
70 Synchroflex toothed belt 0005 0146h
71
72 Potentiometer mount, cpl. 0116 0613
73
74 Radiation curtain guide 0116 0615
75 Radiation curtain guide 0116 0616
76 Extension spring 0116 0621
77
78 EMERGENCY OFF switch latch 0006 0752
79 Switch element 0006 0751a
80
81 Digital table board, cpl. 0116 2280
82
83 Flexible plastic cable chain, cpl. 0116 0945
84
85 Paneling screw, M 4 x 8 0005 0406d
86 Paneling screw, M 4 x 12 0005 0406k
87
88 Reed switch 0006 0549b
89
90 Eccentric stud 0116 1860b
91 Bearing stud 0116 1862b
92 Eccentric stud with bearing 0115 0395
93 Bearing stud with roller bearing 0115 0397
94 Roller bearing 0005 0161b
95
0116 7201 -80 of 90 - 06/00
Rev. 00 © 2000 Hans Pausch Röntgengerätebau Graf-Zeppelin-Str. 1 D-91056 Erlangen ALL RIGHTS RESERVED Ru
Page 81

Pos. Designation Part No.:
96 Spring, extension 0005 0040ac
97
98 Potentiometer, cpl. 0116 0580
99
100 Microswitch 0006 0779a
101
102 Switch strip 0116 0589
103
104 Pinion rack 0116 0587
105 Pinion rack 0116 0588
106
107
108 Worm gear drive motor 0006 0767
109 Spring, extension 0005 0040ac
110
111 Rocker switch, cpl. 0116 0930
112 Switch strike plate 0116 0940
113 Rocker switch, cpl. 0116 0925
114 Cassette Bucky 0116 1305
115
116 Cassette tray with sensor 0116 1335
117
118 Cassette slider, rear 0116 1360
119 Cassette slider, front 0116 1362
120 Latching lever 0116 1383
121 Latching lever 0116 1384
122 Format stop, cpl. 0116 1389
123 Roller bearing grabber 0005 0246
124
125 Grid handle, GN425 0005 0188b
126 Unit base 0005 0388
127 Switch, installed 0116 1410
128 Connector piece 0116 1107
129 Bearing unit 0116 1125
130 Bearing unit 0116 1110
131 Roller bearing 0005 0161b
132 Sleeve 0116 1537
133 Roller bearing stud 0116 1538
134
135 Rocker switch 0116 0925
136 Rocker switch 0116 0930
137
138
139 Spindle unit, installed 0116 1540
140 Toothed belt 0005 0164h
141 Longitudinal drive, compl. 0116 1575
142 Threaded spindle 0116 1541
143 Spindle nut 0116 1542
144
145 Potentiometer, complete 0116 1563
146 Microswitch 0006 0779a
147
148
06/00 - 81 of 90 - 0116 7201
Rev. 00 © 2000 Hans Pausch Röntgengerätebau Graf-Zeppelin-Str. 1 D-91056 Erlangen ALL RIGHTS RESERVED Ru
Page 82

Pos. Designation Part No.:
149
150
151 Rubber-metal bumper 0005 0164b
152
153
154
155 Elbow support, cpl. 0900 1752
156 Outlet 0900 1754
157
158 Control unit, cpl. 0116 2200
159 Control unit 0116 2210
160 Mount 0116 2220
161
162 Display unit, cpl. 0116 2250
163 Display board 0116 2260
164
165 Mount for flush bowl 0900 1703a
166 Mount for flush bowl 0900 1703b
167
168 Housing cowl, left 0116 3024
169 Housing cowl, right 0116 3025
170 Cover panel 0116 3026
171 Cover panel 0116 3028
172 Cover panel 0116 3027
173 Cover panel 0116 3029
174 Cover 0116 3030
175 Side panel 0116 3031b
176 Side panel 0116 3031a
177
178 Side panel 0116 3032b
179 Side panel 0116 3032a
180
181 Side panel 0116 3033b
182 Side panel 0116 3033a
183
184 Cover panel 0116 3050
185 Cover panel 0116 3051a
186 Cover panel 0116 3051b
187 Cover panel 0116 3053b
188 Cover panel 0116 3053a
189 Cover panel 0116 3052b
190 Cover panel 0116 3052a
191 Eccentric stud 0116 1860a
192 Bearing stud 0116 1862a
193 Movement rail 0116 1920
194 Switch mount, cpl. 0116 1855
195 Stop rail 0116 1922
196 Stop 0116 1865
197 Flexible corrugated hose 0115 0897c
198 Stop unit 0116 1988
199 Stop magnet, installed 0116 1990
200
0116 7201 -82 of 90 - 06/00
Rev. 00 © 2000 Hans Pausch Röntgengerätebau Graf-Zeppelin-Str. 1 D-91056 Erlangen ALL RIGHTS RESERVED Ru
Page 83

Pos. Designation Part No.:
201 Tube unit studs 0116 1930
202 Adjustment plate 10 thick 0116 1935
203 Adjustment plate 1 thick 0116 1936a
204 Adjustment plate 2 thick 0116 1936b
205 Adjustment plate 3 thick 0116 1936c
206
207 Switch unit, installed 0116 1995
208
209 Command arm, cpl. 0116 1950
210 Microswitch 0006 0480
211 Compression switch 0005 0151aw
212 Microswitch with roller lever 0006 0616ba
213 Button 0006 0761
214
215 Table rail 0116 1738a
216 Table rail 0116 1738b
217
218 Gas spring 0005 0394a
219 Hinge, installed 0116 1730
220 CFC tabletop 0116 1740
221 Monitor support arm 0900 1800
222 Monitor adjustment plate 0900 1844
223 Screw stud 0900 1846
224 Grip handle 0005 0415d
225 Mount for head cushion, right 0900 1732a
226 Mount for head cushion, left 0900 1732b
227
228 Head cushion 0900 0085
229
230 Handgrip 0900 0551a
231 Handgrip 0900 0551b
232
233 Tension block 0900 0701
234 Block 0900 0702
235 Tension belt 0902 0022
236 Latch 0900 1530
237 Tabletop extension, 780 mm 0900 1500
238 Patient mat 0900 1720
239 Footrest for tabletop extension 0900 1580
240 Table insert 0900 1525a
241 Paper roll holder, incl. 1 paper roll 0900 1740
242 Table insert 0900 1525b
243 Mounting rail 0900 1518
244
245
246 Multi-function footswitch 0116 2320
247 Footswitch for fluoro / exposure 0900 1780
248 Seat cushion 0900 1131
249 Latch 0900 1625
250 Micturation seat, cpl. Including footrest 0900 1600
251 Insert 0900 1620b
252 Insert 0900 1620a
253 Footrest 0900 1680
06/00 - 83 of 90 - 0116 7201
Rev. 00 © 2000 Hans Pausch Röntgengerätebau Graf-Zeppelin-Str. 1 D-91056 Erlangen ALL RIGHTS RESERVED Ru
Page 84

5. Troubleshooting
Error
Number
F 1 Frequency converter 0 for tilt/vertical,
F 2 Frequency converter 1 for tilt/vertical, table
F 3 Frequency converters 0+1 failed. Check connection cables, settings
F 10 Footswitch communication problem. Check fuse, cabling.
F 11 Manual control unit communication
F 13 Incorrect footswitch software version. Replace footswitch.
F 14 Incorrect manual control unit software
F 20 Analog voltage failed. Check fuse.
F 21 M1 tilt/vertical potentiometer error. Check potentiometer cables and
F 22 System potentiometer error. Check potentiometer cables and
F 23 M3 tilt/vertical potentiometer error. Check potentiometer cables and
F 24 Table longitudinal potentiometer error. Check potentiometer cables and
F 25 Cassette potentiometer error. Check potentiometer cables and
F26 Table transverse potentiometer error /
F 28 Collimator vertical potentiometer error. Check potentiometer cables and
F 30 Button fuse malfunction. Check buttons, cables.
F 31 Footswitch button sticking. Check buttons.
F 32 Manual control unit button sticking. Check buttons.
F 33 Exposure switch active during system start. Check switches.
F 34 Fluoroscopy switch active during system
F 35 Exposure centering switch defective. Check switches, cabling.
Cause
system failed.
longitudinal movement, cassette failed.
problem.
version.
motor defective.
start.
Corrective Measure
Check connection cables, settings
(address, Baud rate).
Check connection cables, settings
(address, Baud rate).
(address, Baud rate).
Check fuse, cabling.
Replace manual control unit.
potentiometer.
potentiometer.
potentiometer.
potentiometer.
potentiometer.
Check motor potentiometer cables
and potentiometer.
potentiometer.
Check switches.
0116 7201 -84 of 90 - 06/00
Rev. 00 © 2000 Hans Pausch Röntgengerätebau Graf-Zeppelin-Str. 1 D-91056 Erlangen ALL RIGHTS RESERVED Ru
Page 85

F 40 Format switch cassette incorrect. Check 4 format switches.
F 41 M1 motor breaker stuck/defective. Check K1 breaker.
F 42 M2 motor breaker stuck /defective. Check K2 breaker.
F 43 M3 motor breaker stuck /defective. Check K3 breaker.
F 44 M4 motor breaker stuck /defective. Check K4 breaker.
F 45 M5 motor breaker stuck /defective. Check K5 breaker.
F 46 M6 motor relay stuck /defective. Check K19 relay (CPU board).
F 47 FU0 N>0 active. FU0 relay defective/ input
defective / check cabling.
F 48 FU1 N>0 active. FU1 relay defective / input
defective / check cabling.
F 50 Collimator malfunction. Check cabling, potentiometers,
setup parameters.
F 61 Limit switch, temperature, breaker
malfunction, M1 tilt /vertical drive or M3.
F 62 Limit switch, temperature, breaker
malfunction, M2 system drive.
F 64 Limit switch, temperature, breaker
malfunction, M4 table longitudinal drive.
Free run (press button on breaker
board). Allow motor to cool down.
Free run (press button on breaker
board). Allow motor to cool down.
Free run (press button on breaker
board). Allow motor to cool down.
F 79 Invalid parameter version Initialize correct parameter
version.
F 80 EEPROM memory error. Download new parameter file.
F 99 Unit is in the service mode. Set the service switch to the RUN
mode.
F = Fatal Error = System error = cannot be corrected
06/00 - 85 of 90 - 0116 7201
Rev. 00 © 2000 Hans Pausch Röntgengerätebau Graf-Zeppelin-Str. 1 D-91056 Erlangen ALL RIGHTS RESERVED Ru
Page 86

6. Board Replacement
All boards are connected to each other by connectors and are replaceable. After they have
been replaced correctly, they should perform a self test after power is switched on and log
themselves into the CPU.
The CPU board and breaker board are accessible after opening the URO cover panel. They
are seated on several round snap-on mounts, each of which musts be pressed through.
The footswitch board is accessible only after opening the metal housing.
The control unit with spiral must be completely replaced.
The display with connection cable must be completely replaced.
Do not disconnect plug-in connections that are under voltage!
7. Version Update
Only the software of the CPU board can be updated to the latest version. The software in the
other board cannot be updated.
The update is performed by replacing the EPROM on the processor module.
EPROM's are CMOS components. Please observe the guidelines for EMI protection.
0116 7201 -86 of 90 - 06/00
Rev. 00 © 2000 Hans Pausch Röntgengerätebau Graf-Zeppelin-Str. 1 D-91056 Erlangen ALL RIGHTS RESERVED Ru
Page 87

8. MAINTENANCE VERIFICATION
Maintenance per the attached maintenance instructions has been performed. When
required, parts were replaced only with original replacement parts per the listing.
Parts Replaced (list only Pos. No.)
............. .................. .......................
Date Company (stamp) Signature
Parts Replaced (list only Pos. No.)
............. .................. .......................
Date Company (stamp) Signature
Parts Replaced (list only Pos. No.)
............. .................. .......................
Date Company (stamp) Signature
Parts Replaced (list only Pos. No.)
............. .................. .......................
Date Company (stamp) Signature
Parts replaced (list only Pos. No.)
............. .................. ......................
Date Company (stamp) Signature
Parts replaced (list only Pos. No.)
............. .................. ......................
Date Company (stamp) Signature
06/00 - 87 of 90 - 0116 7201
Rev. 00 © 2000 Hans Pausch Röntgengerätebau Graf-Zeppelin-Str. 1 D-91056 Erlangen ALL RIGHTS RESERVED Ru
Page 88

9. Location of Identification Labels
Labeling:
see also opposite page
0116 7201 -88 of 90 - 06/00
Rev. 00 © 2000 Hans Pausch Röntgengerätebau Graf-Zeppelin-Str. 1 D-91056 Erlangen ALL RIGHTS RESERVED Ru
Page 89

Overview of Labels:
1. Model plate 2. CE label
3. Observe operating instructions 4. Do not sit here - max. load, 30 kg
5. Caution: crush zone 6. Inherent filtration
06/00 - 89 of 90 - 0116 7201
Rev. 00 © 2000 Hans Pausch Röntgengerätebau Graf-Zeppelin-Str. 1 D-91056 Erlangen ALL RIGHTS RESERVED Ru
IP X1
Page 90

Notes:
We reserve the right to make changes resulting from subsequent technical advances.TV/Ru
0116 7201 -90 of 90 - 06/00
Rev. 00 © 2000 Hans Pausch Röntgengerätebau Graf-Zeppelin-Str. 1 D-91056 Erlangen ALL RIGHTS RESERVED Ru
 Loading...