

Page 1
EN Installation / User Instructions / Warranty
FR Instructions de montage / Mode d'emploi / Garantie
ES Instrucciones de montaje / Manejo / Garantía
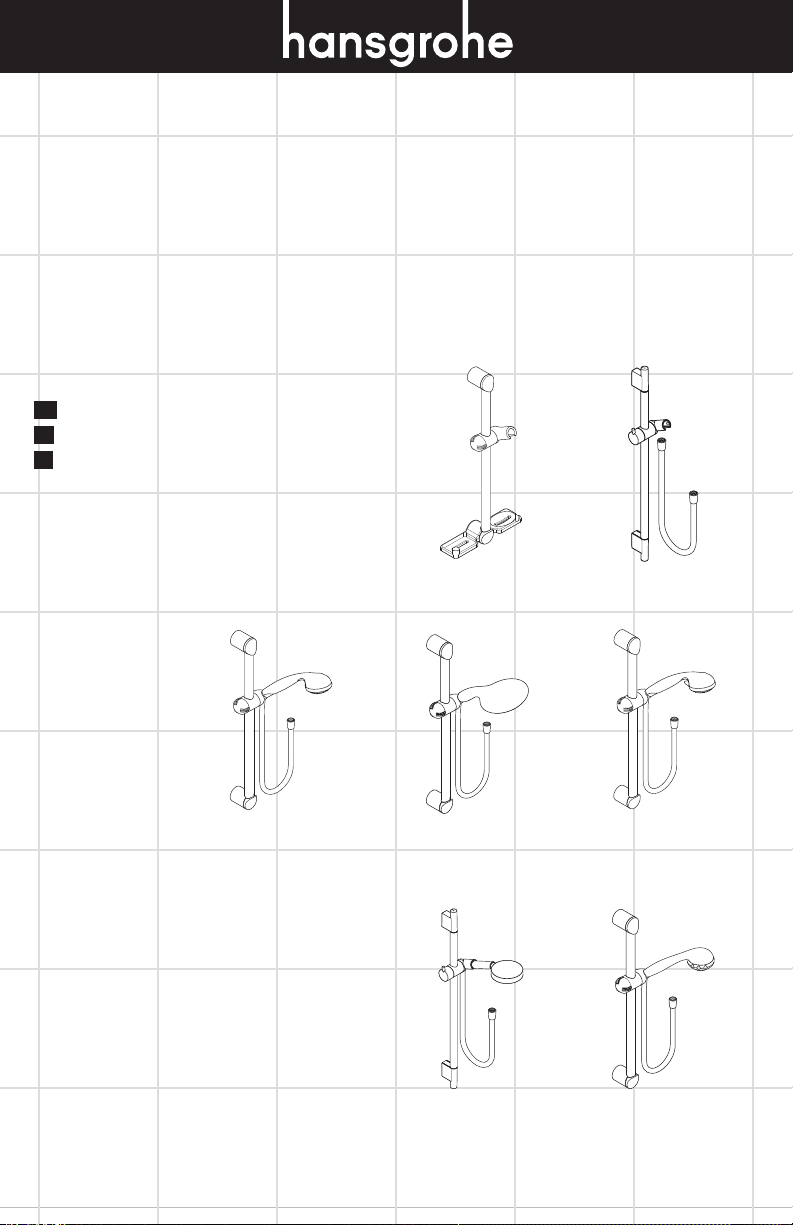
Croma E 75 Eco-Air
27744xx1
Unica'E
06890xx0
Raindance E 120 3-Jet
04265xx0
Raindance E 100 Green
04519xx0
Clubmaster
04044xx0
Unica'S
28632xx0
28631xx0
Croma E 75 3-Jet
06494xx0
Croma E 75 2-Jet
06496xx0
Raindance S 120 3-Jet
04266xx0
Page 2
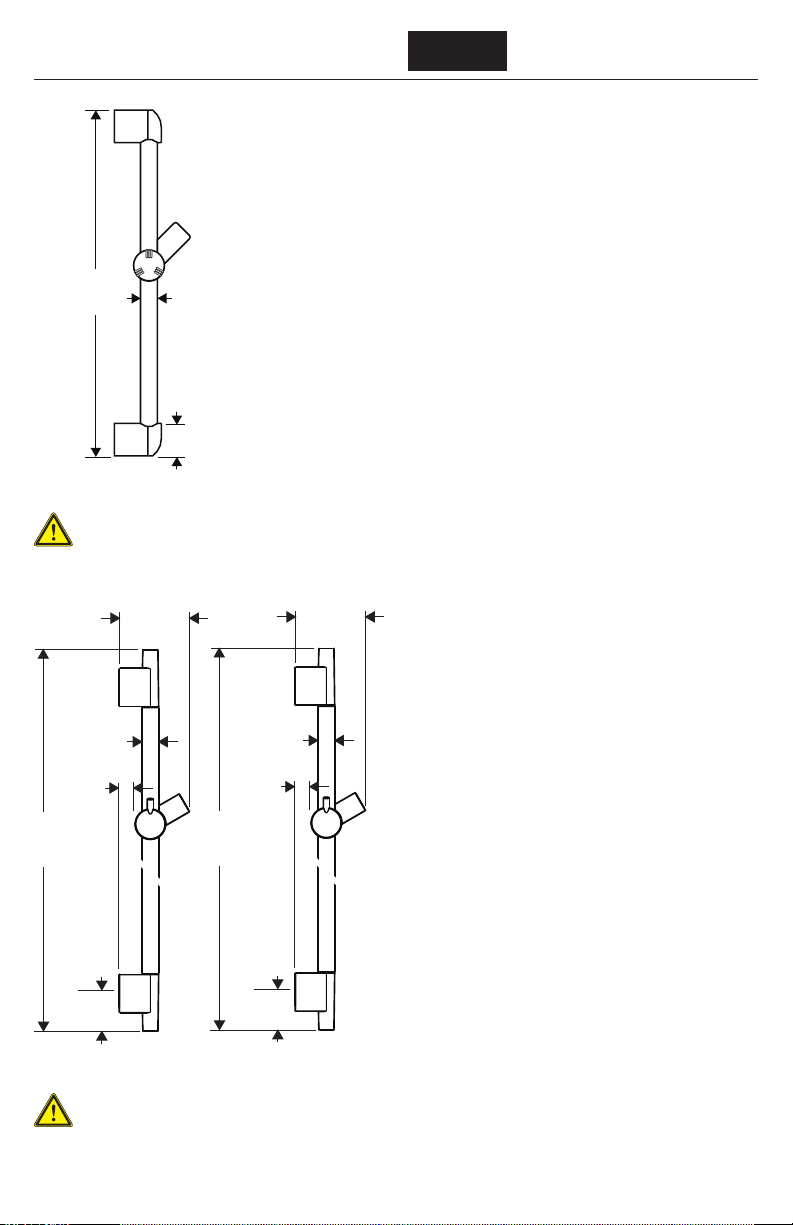
39⅝"
max. 4⅛"
28¼"
26⅜"
⅞"
1⅝"
06890xx0
Follow the installation instructions (see page
7) when drilling the mounting holes.
max. 4⅛"
⅞"
¾"
1⅞"
28632xx0
⅞"
¾"
1⅞"
28631xx0
English
Technical Information
Max. flow rate - model 04344xxx 2.0 GPM
Max. flow rate - model 06497xxx 1.5 GPM
Max. flow rate - all others 2.5 GPM
Installation Considerations
• For best results, Hansgrohe recommends that
this unit be installed by a licensed, professional
plumber.
• Please read over these instructions thoroughly
before beginning installation. Make sure that
you have all tools and supplies needed to
complete the installation.
• The screws and anchors included with this
set are suitable for use in a tile or other solid
surface wall. They are not suitable for use in an
acrylic or fiberglass shower enclosure. Please
contact the manufacturer of the enclosure
regarding recommended mounting locations,
reinforcement requirements, and mounting
hardware.
• This unit does not include a wall supply. It must
be used with Hansgrohe model 27458xx3 or
another approved supply that complies with
ASME A112.18.1/CSA B125.1 including
ASME A112.18.3.
• Handshower #04344xxx (Raindance E
100 AIR Green) is intended for use with an
automatically compensating valve rated at 1.5
GPM (5.7 l/min) or less.
• Handshower #06497xxx (Croma E 75 EcoAir)
is intended for use with an automatically
compensating valve rated at 1.1 GPM (4.2 l/min)
or less.
• To prevent scald injury, the maximum output
temperature of the shower valve must be
no more than 120°F.In Massachusetts, the
maximum output temperature of the shower
valve can be no higher than 112°F.
• Keep this booklet and the receipt (or other
proof of date and place of purchase) for this
product in a safe place. The receipt is required
should it be necessary to request warranty
parts.
Follow the installation instructions (see page
10) when drilling the mounting holes.
2
Page 3

Français Español
Données techniques
Capacité nominale - #04344xxx 2.0 GPM
Capacité nominale - #06497xxx 1.5 GPM
Capacité nominale - Tous les autres 2.5 GPM
modèles
À prendre en considération pour
l’installation
• Pour de meilleurs résultats, Hansgrohe recommande que ce produit soit installé par un plombier professionnel licencié.
• Veuillez lire attentivement ces instructions avant
de procéder à l’installation. Assurez-vous de
disposer de tous les outils et du matériel nécessaires pour l’installation.
• Les vis et chevilles comprises dans cet ensemble conviennent pour une utilisation sur mur
carrelé ou autre surface solide.
• Pour une installation dans une cabine de
douche en fibre de verre ou en acrylique, contactez le fabricant de la cabine pour connaître
les pièces de fixation et emplacements de montage recommandés.
• Ce produit n’est pas fourni avec un coude
de raccordement. Il doit être utilisé avec le
modèle 27458xx3 d’Hansgrohe ou un autre coude approuvé et conforme à la norme
ASME A112.18.1/CSA B125.1, incluant
ASME A112.18.3.
• Douchette #04344xxx (Raindance E 100 AIR
Green) est à utiliser avec des valves de compensation automatiques ayant un débit de 5.7
l/min (1.5 GPM) ou inférieur.
• Douchette #006497xxx (Croma E 75 EcoAir)
est à utiliser avec des valves de compensation
automatiques ayant un débit de 4.2 l/min (1.1
GPM) ou inférieur.
• Pour empêcher des blessures par ébouillantement, la température de sortie maximale du
robinet de douche ne doit pas excéder 120°F.
Au Massachusetts, la température de sortie
maximale du robinet de douche ne doit pas
excéder 112°F.
• Conservez ce livret et le reçu (ou une autre
preuve sur laquelle figurent la date et l’endroit
de l’achat) pour ce produit dans un endroit
sûr. Le reçu est requis si vous commandez des
pièces sous garantie.
Datos tecnicos
Caudal máximo - #04344xxx 2.0 GPM
Caudal máximo - #06497xxx 1.5 GPM
Caudal máximo - Todos los demás 2.5 GPM
modelos
Consideraciones para la instalación
• Para obtener mejores resultados, la instalación
debe estar a cargo de un plomero profesional
matriculado.
• Antes de comenzar la instalación, lea estas
instrucciones detenidamente. Asegúrese de
tener las herramientas y los insumos necesarios
para completar la instalación.
• Los tornillos y pernos de anclaje incluidos en
este juego son aptos para utilizar en azulejos
u otra superficie sólida de pared.
• En caso de instalarlo en un cerramiento de ducha de fibra de vidrio o acrílico, contáctese
con el fabricante del cerramiento con respecto
a los lugares de montaje y los herrajes para el
montaje recomendados.
• Esta unidad no incluye una toma de pared
(coude de raccordement/toma de agua)
Debe utilizarse con el modelo Hansgrohe
27458xx3 u otra toma aprobada que cumpla con las normas ASME A112.18.1/CSA
B125.1, incluida la norma ASME A112.18.3.
• Teleducha # 04344xxx (Raindance E 100
AIR Green) está diseñado para uso con válvulas de compensación automáticas calificado a
5.7 l/min (1.5 GPM) o menos.
• Teleducha # 06497xxx (Croma E 75 EcoAir)
está diseñado para uso con válvulas de compensación automáticas calificado a 4.2 l/min
(1.1 GPM) o menos.
• Para evitar escaldaduras, la máxima
temperatura de salida de la válvula de la
ducha no debe exceder los 120°F. En
Massachusetts, la máxima temperatura de
salida de la válvula de la ducha no debe
exceder los 112°F.
• Mantenga este folleto y el recibo (u otro
comprobante del lugar y fecha de compra)
de este producto en lugar seguro. El recibo
se requiere en caso de ser necesario solicitar
piezas bajo garantía.
3
Page 4
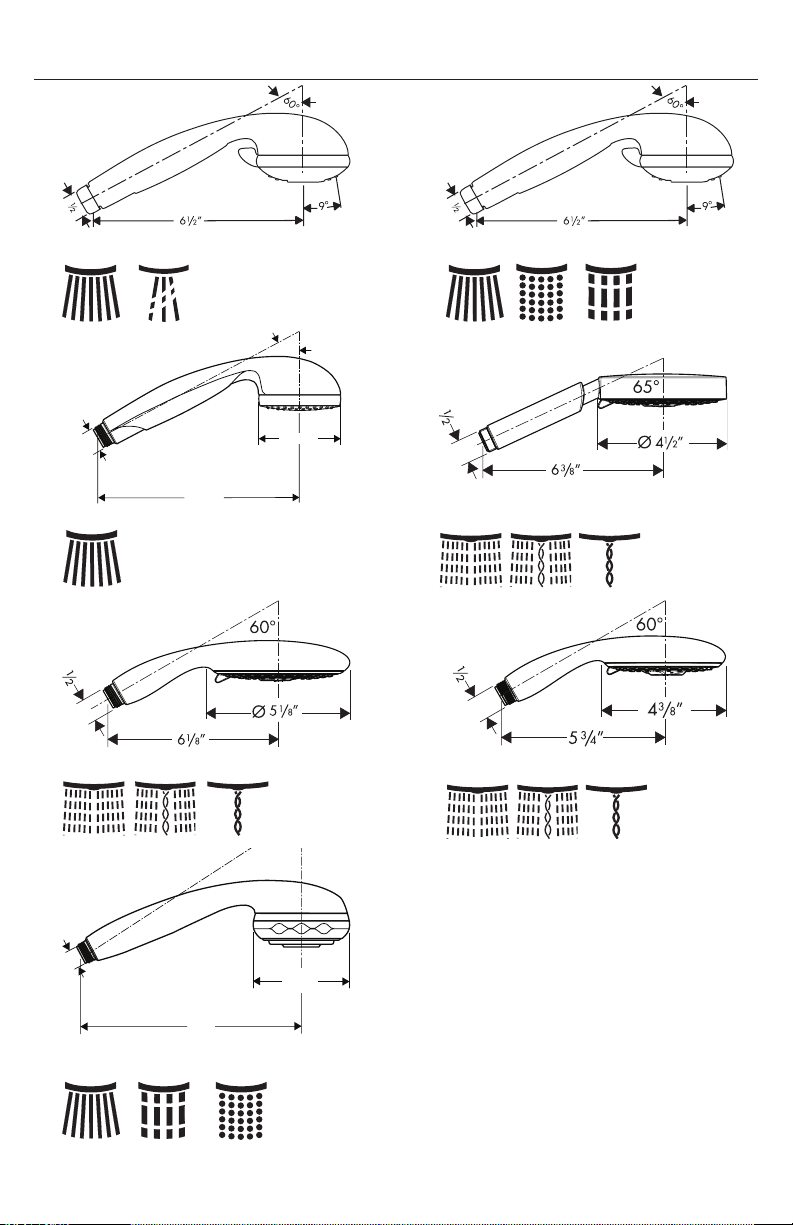
Croma E 75 2-jet
57°
G½
Croma E 75 EcoAir
Croma E 75 3-Jet
60°
2⅞"
6½"
Raindance S 120 AIR 3-Jet
Raindance E 120 AIR 3-Jet
G ½
8"
3⅝"
Raindance E 100 AIR Green 3-Jet
Clubmaster
4
Page 5
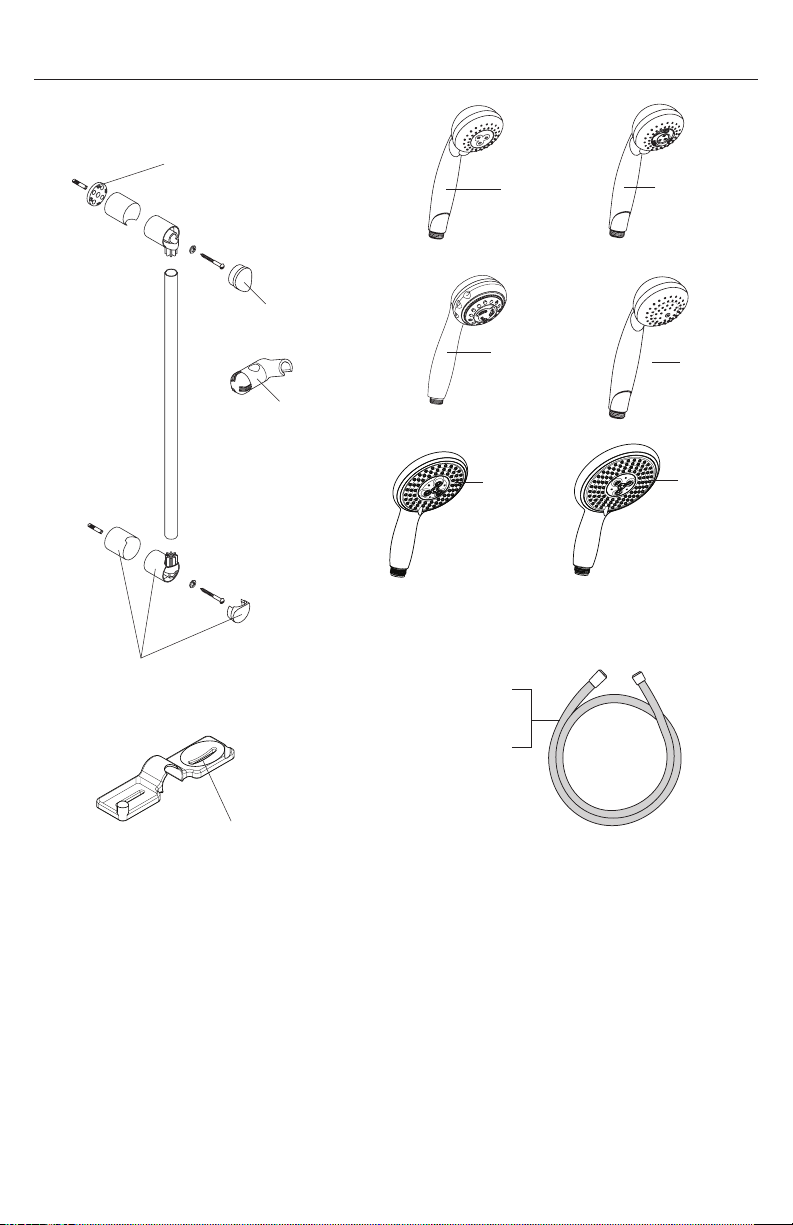
Replacement Parts
06890xx0 / 06494xx0 / 06496xx0 / 04044xx0 /
04265xx0 / 04519xx0
96184000
88534xx0
28570xx1
28573xx1
96191xx0
88590xx0
88700000
28525xx1
04344xx0
63" 28276xx3
72" 88625xx0
06497xx0
28507xx1
xx = colors / couleurs / acabados
00 = chrome
62 = oil rubbed bronze
82 = brushed nickel
83 = polished nickel
92 = rubbed bronze
93 = polished brass
5
Page 6
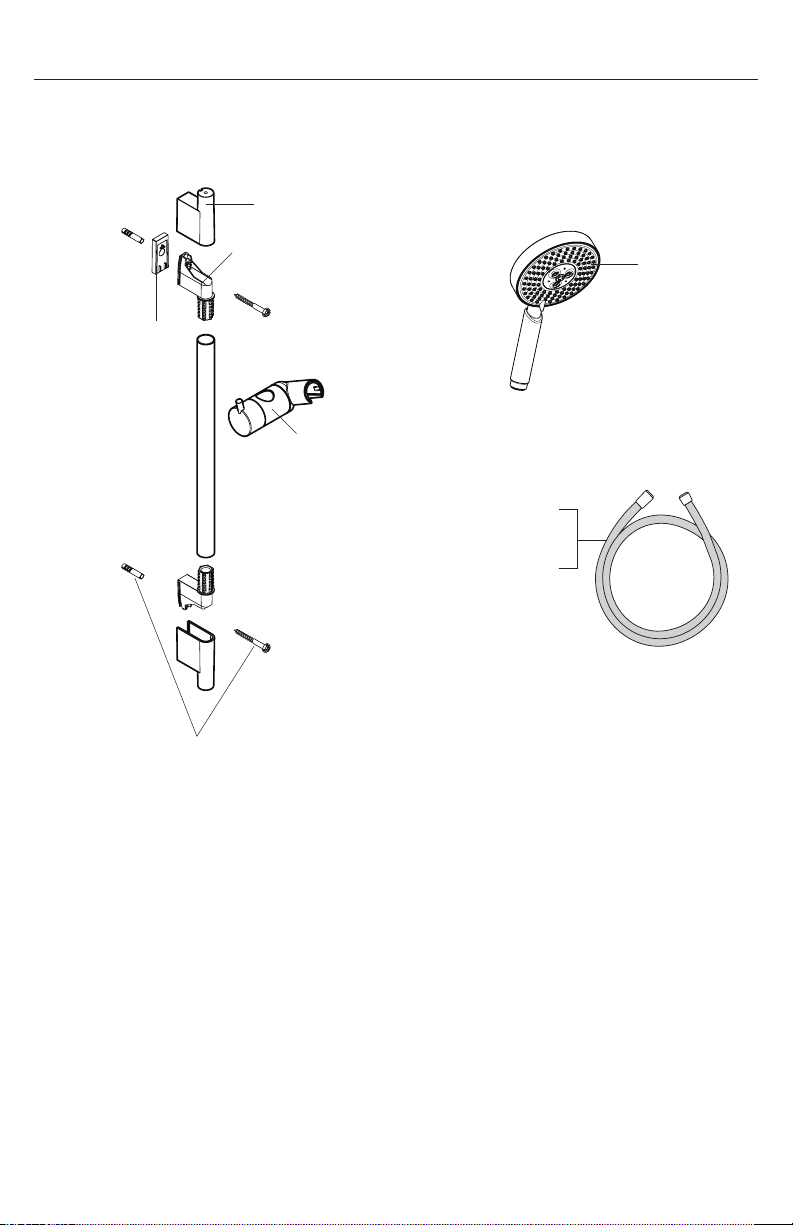
Replacement Parts
04266xx0 / 28632xx0 / 28631xx0
97709xx0
96275000
97450000
28514xx1
97651xx0
63" 28276xx3
72" 88625xx0
96179000
xx = colors / couleurs / acabados
00 = chrome
82 = brushed nickel
6
Page 7
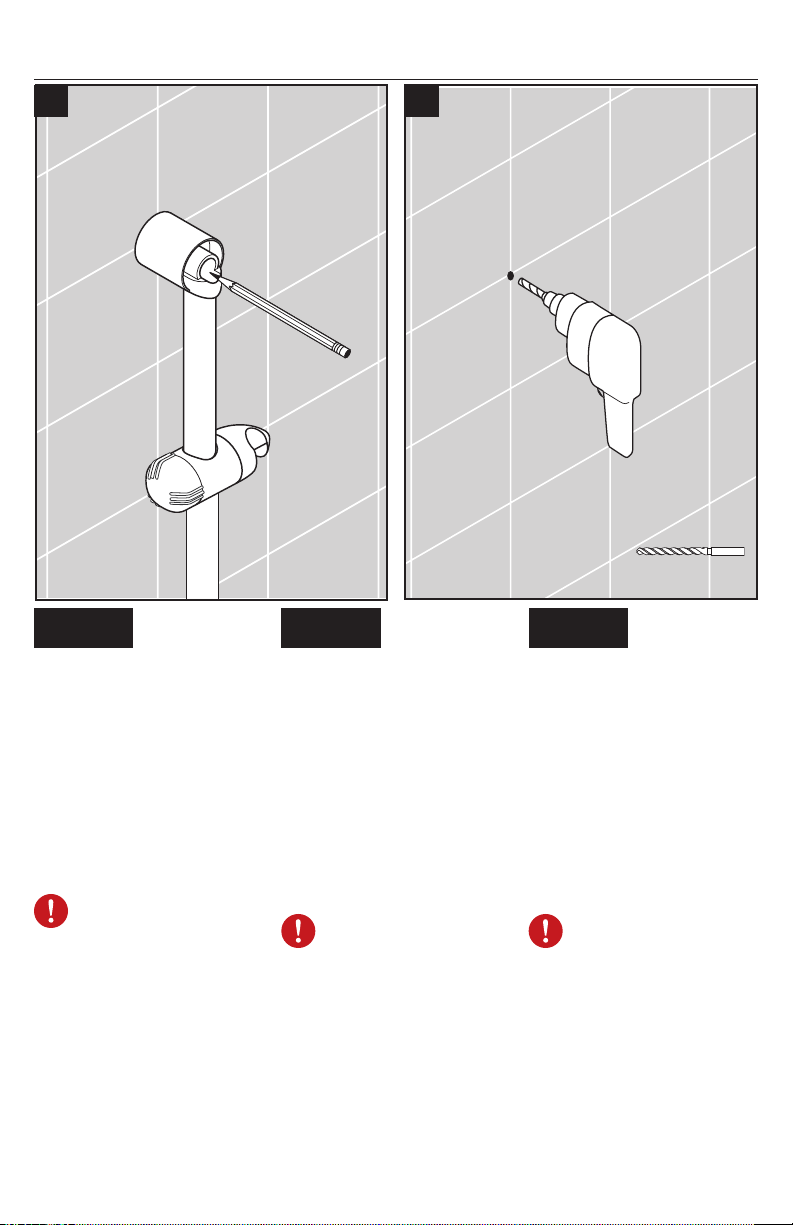
Unica’E Installation / Installation de Unica’E / Instalación de Unica’E
1 2
¼" (6 mm)
English Français Español
Place the bar against the wall at
the desired mounting location.
Mark the positions of the screw
holes.
Drill the holes using a 6 mm bit.
Do not drill into
existing water lines!
Placez la barre murale sur
l’emplacement souhaité.
Marquez les positions des trous
de vissage.
Percez les trous à l’aide d’une
mèche de 6 mm.
Ne percez pas dans
les conduites d’eau!
Coloque el soporte de pared en
el lugar deseado.
Marque las posiciones de los
orificios para tornillos.
Perfore los orificios con una
broca de 6 mm.
¡No perfore las
tuberías de agua
existentes!
7
Page 8
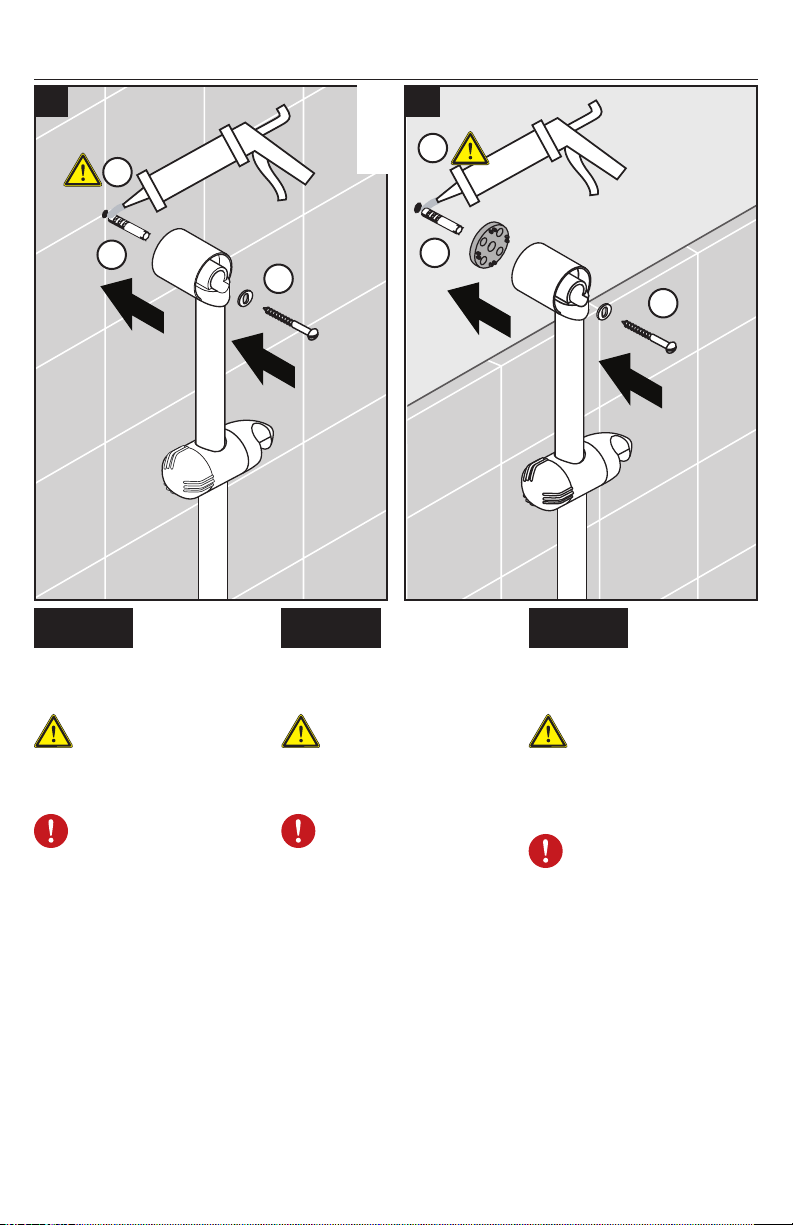
Unica’E Installation / Installation de Unica’E / Instalación de Unica’E
3a 3b
OR
OU
2
2
O
1
1
3
English Français Español
Install the anchors.
Seal the wall
around the anchors
with waterproof
sealant.
Failure to seal the
wall can lead to
possible water
damage.
Install the wallbar using the
screws and washers.
Installez les chevilles.
Scellez le mur
autour des chevilles
à l’aide d’un agent
d’étanchéité.
Si le mur n’est pas
scellé, l’eau pourrait
éventuellement
causer des
dommages.
Installez la barre murale à l’aide
des vis et des rondelles.
Instale los pernos de anclaje.
Instale el soporte de pared con
tornillos y arandelas.
3
Selle la pared
alrededor de los
pernos de anclaje
con un sellador
impermeable.
Si no se sella la
pared, pueden
producirse daños
por acción del agua.
If the tile does not go all the way
up the wall, install the tile matching disk.
8
Si les carreaux ne couvrent pas
la surface jusqu’au plafond,
installez le disque adaptateur.
Si el azulejo no va hasta arriba
de la pared, instale el disco que
coincida con el azulejo.
Page 9
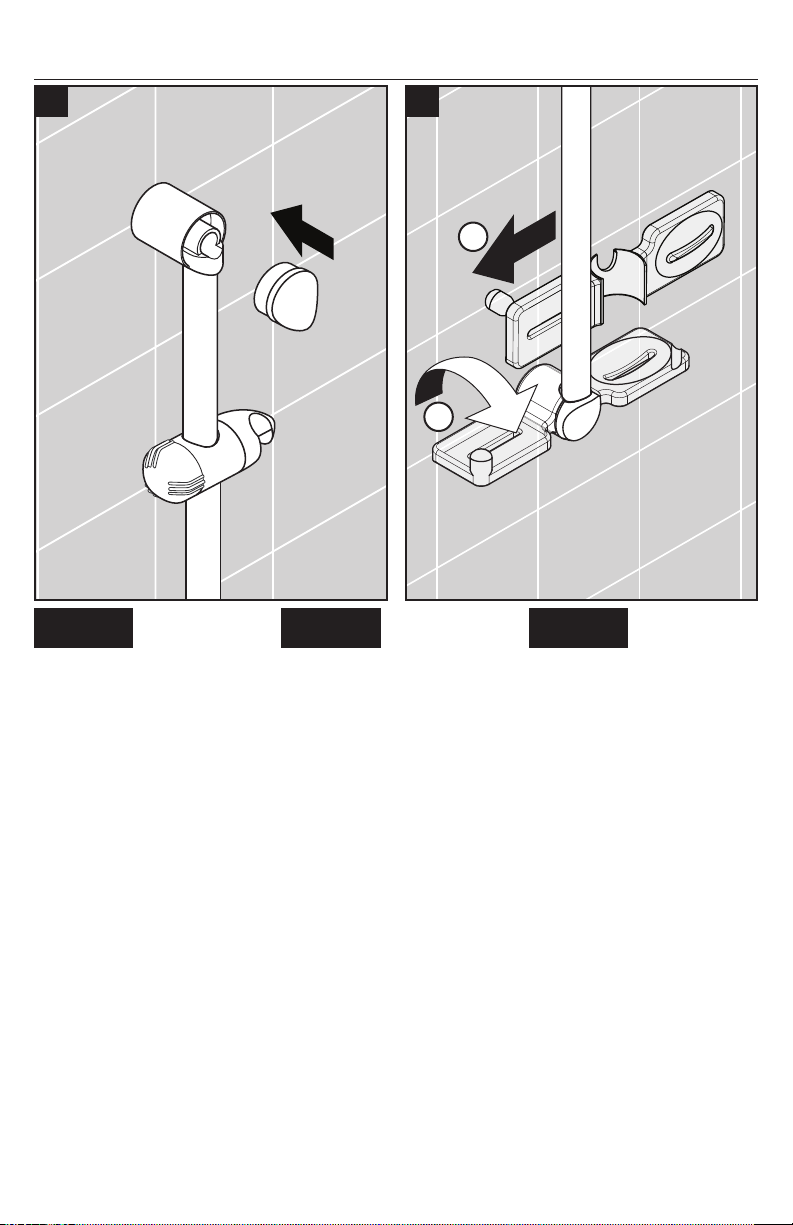
Unica’E Installation / Installation de Unica’E / Instalación de Unica’E
4 5
1
2
English Français Español
Install the screw covers. Installez les cache-vis. Instale las tapas de los tornillos.
Install the soap dish (optional). Installez le porte-savon (en
option).
Instale la jabonera (opcional).
9
Page 10
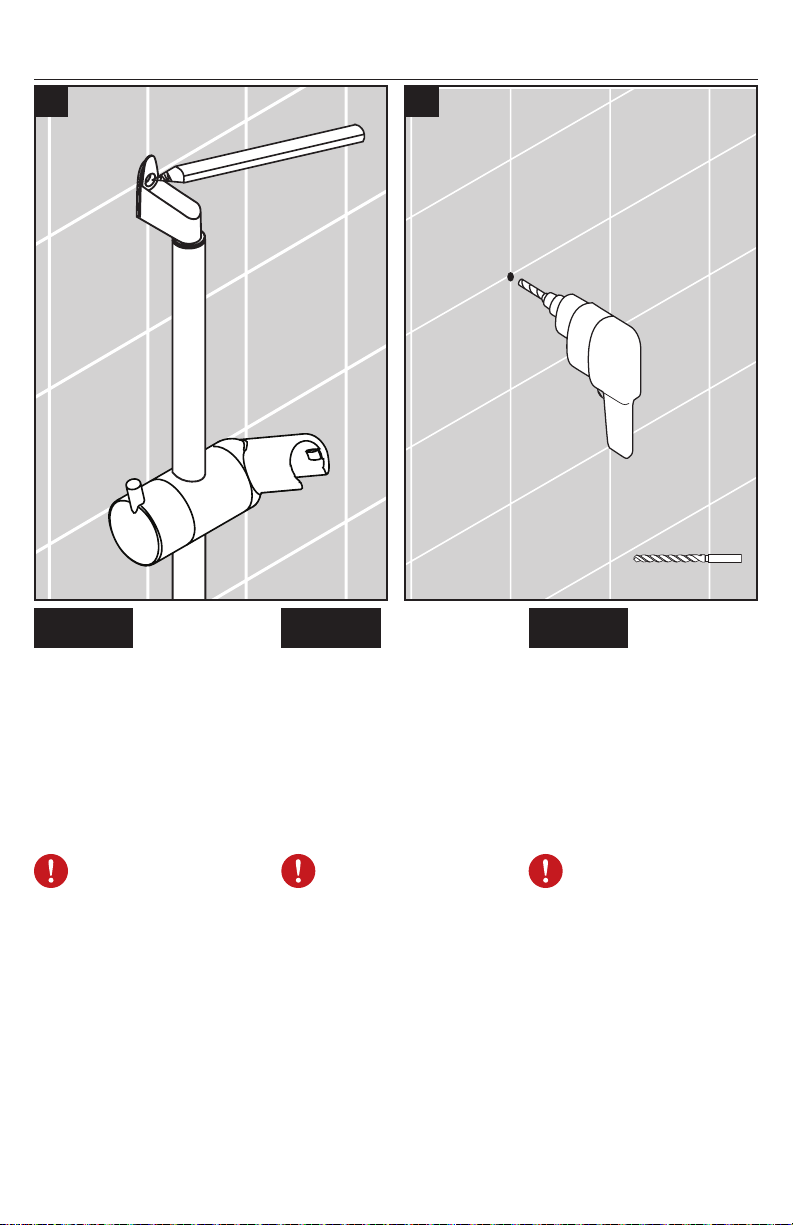
Unica’S Installation / Installation de Unica’S / Instalación de Unica’S
1 2
¼" (6 mm)
English Français Español
Mark the positions of the screw
holes.
Drill the holes using a ¼" (6mm)
bit.
Do not drill into
existing water lines!
10
Marquez les positions des trous
de vissage.
Percez les trous à l’aide d’une
mèche de 6 mm.
Ne percez pas dans
les conduites d’eau!
Marque las posiciones de los
orificios para tornillos.
Perfore los orificios con una
broca de 6 mm.
¡No perfore las
tuberías de agua
existentes!
Page 11
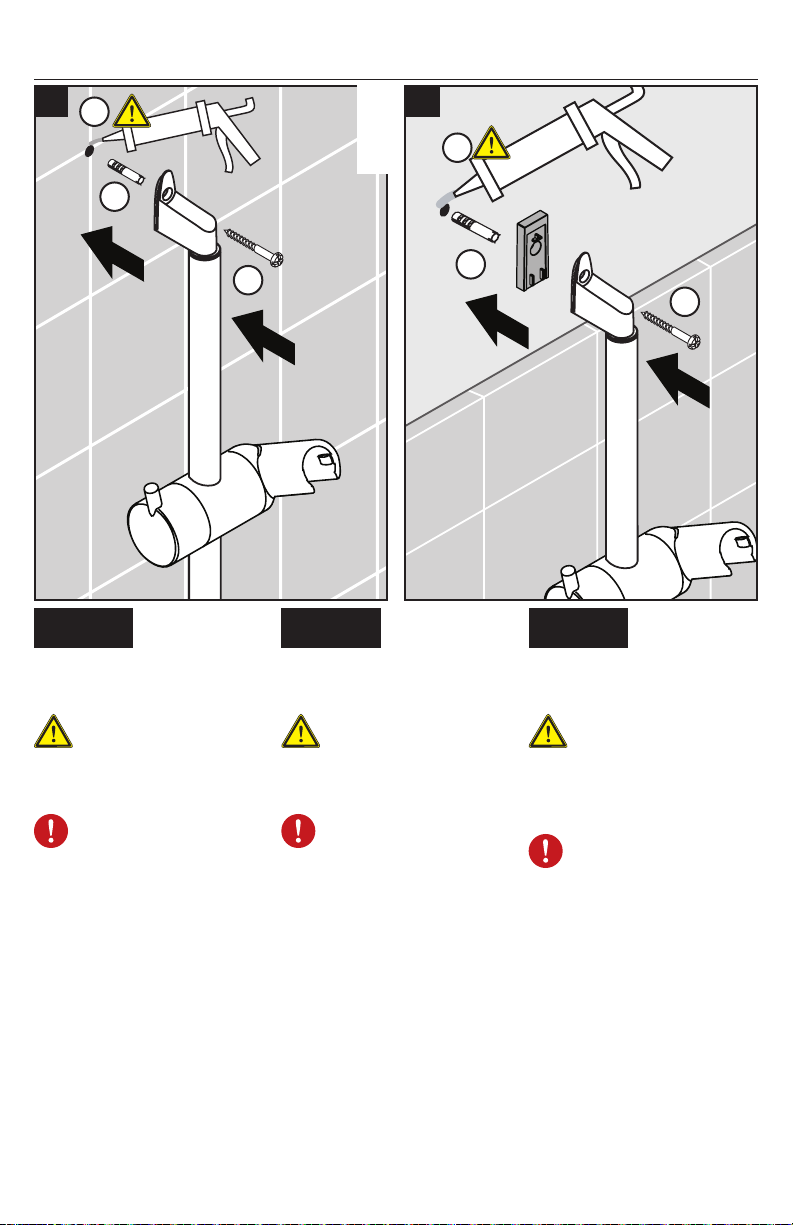
Unica’S Installation / Installation de Unica’S / Instalación de Unica’S
3a 3b
2
OR
OU
2
O
1
3
1
English Français Español
Install the anchors.
Seal the wall
around the anchors
with waterproof
sealant.
Failure to seal the
wall can lead to
possible water
damage.
Install the wallbar using the
screws and washers.
Installez les chevilles.
Scellez le mur
autour des chevilles
à l’aide d’un agent
d’étanchéité.
Si le mur n’est pas
scellé, l’eau pourrait
éventuellement
causer des
dommages.
Installez la barre murale à l’aide
des vis et des rondelles.
Instale los pernos de anclaje.
Instale el soporte de pared con
tornillos y arandelas.
3
Selle la pared
alrededor de los
pernos de anclaje
con un sellador
impermeable.
Si no se sella la
pared, pueden
producirse daños
por acción del agua.
If the tile does not go all the way
up the wall, install the tile spacer.
Si les carreaux ne couvrent pas
la surface jusqu’au plafond,
installez le disque adaptateur.
Si el azulejo no va hasta arriba
de la pared, instale el disco que
coincida con el azulejo.
11
Page 12
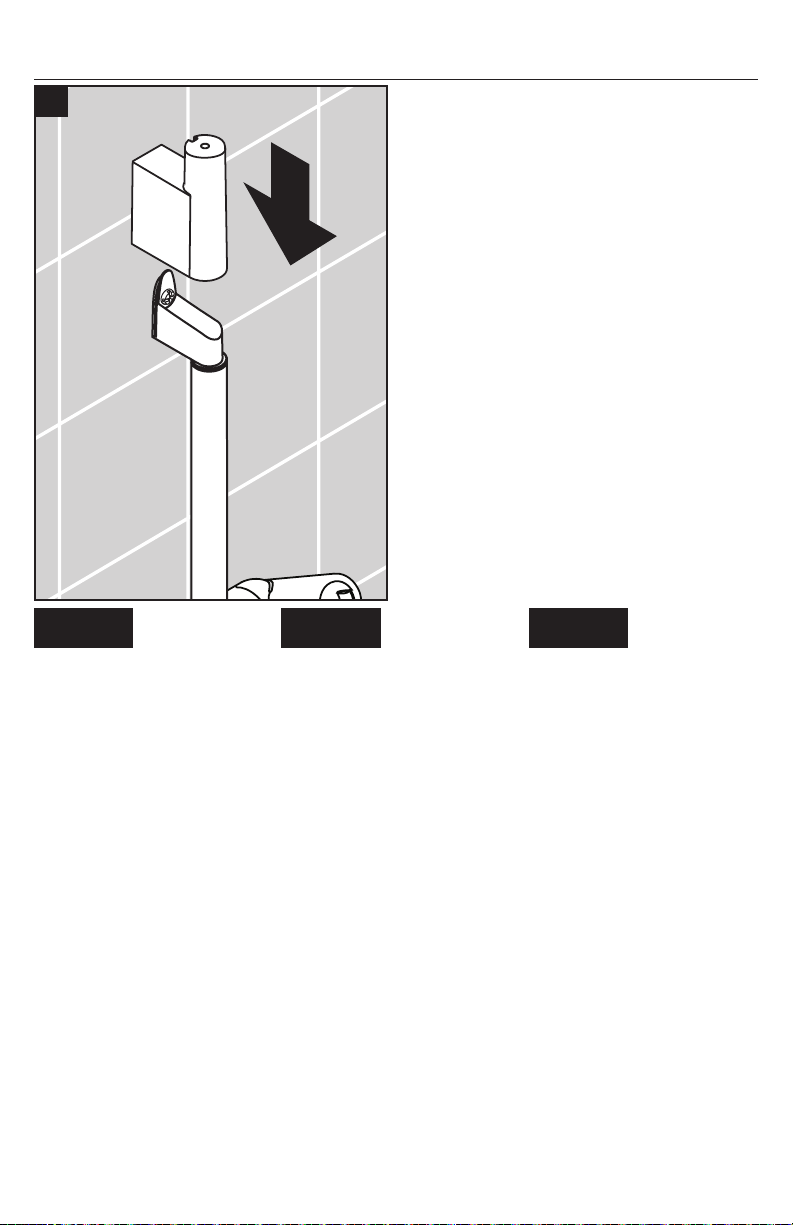
Unica’S Installation / Installation de Unica’S / Instalación de Unica’S
4
English Français Español
Installez les cache-vis. Instale las tapas de los tornillos.Install the covers.
12
Page 13
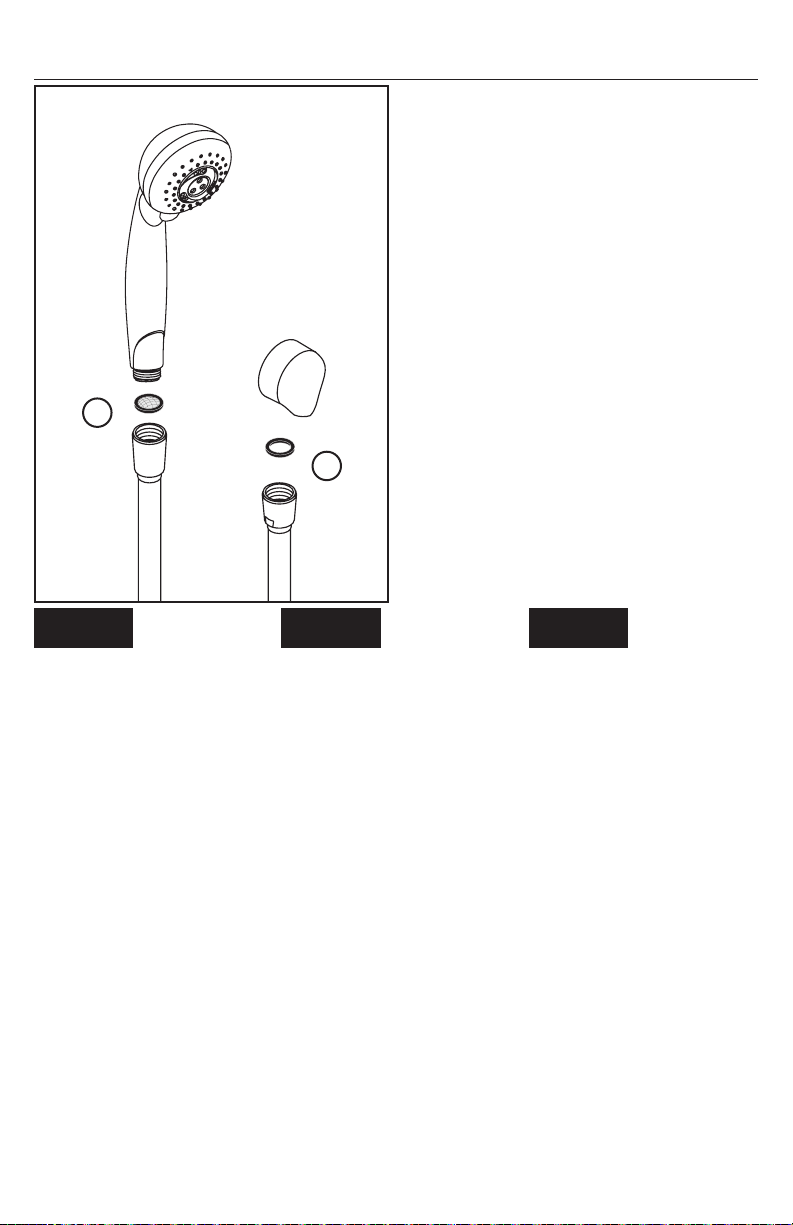
All models / Tous les modèles / Todos los modelos
2
1
English Français Español
Place a black rubber washer in
the short end of the handshower
hose.
Connect this end to the wall supply (not included).
Place a second washer in the
long end of the hose.
Connect this end to the
handshower.
Rest the handshower in the
holder.
Placez une rondelle en caoutchouc noir dans l’une des extrémités du tuyau de douchette.
Vissez le tuyau à la coude
d’alimentation (pas inclus).
Placez la deuxième rondelle en
caoutchouc noir dans l’autre
extrémité du tuyau.
Vissez cette extrémité du tuyau
à la douchette. Déposez la
douchette dans son support.
Coloque una arandela de
goma negra en un extremo de
la manguera de la ducha de
mano.
Enrosque la manguera al codo
abastecador (no incluidos).
Coloque la segunda arandela
de goma negra en el otro extremo de la manguera.
Enrosque este extremo de la
manguera a la ducha de mano.
Apoye la ducha de mano en el
soporte.
13
Page 14
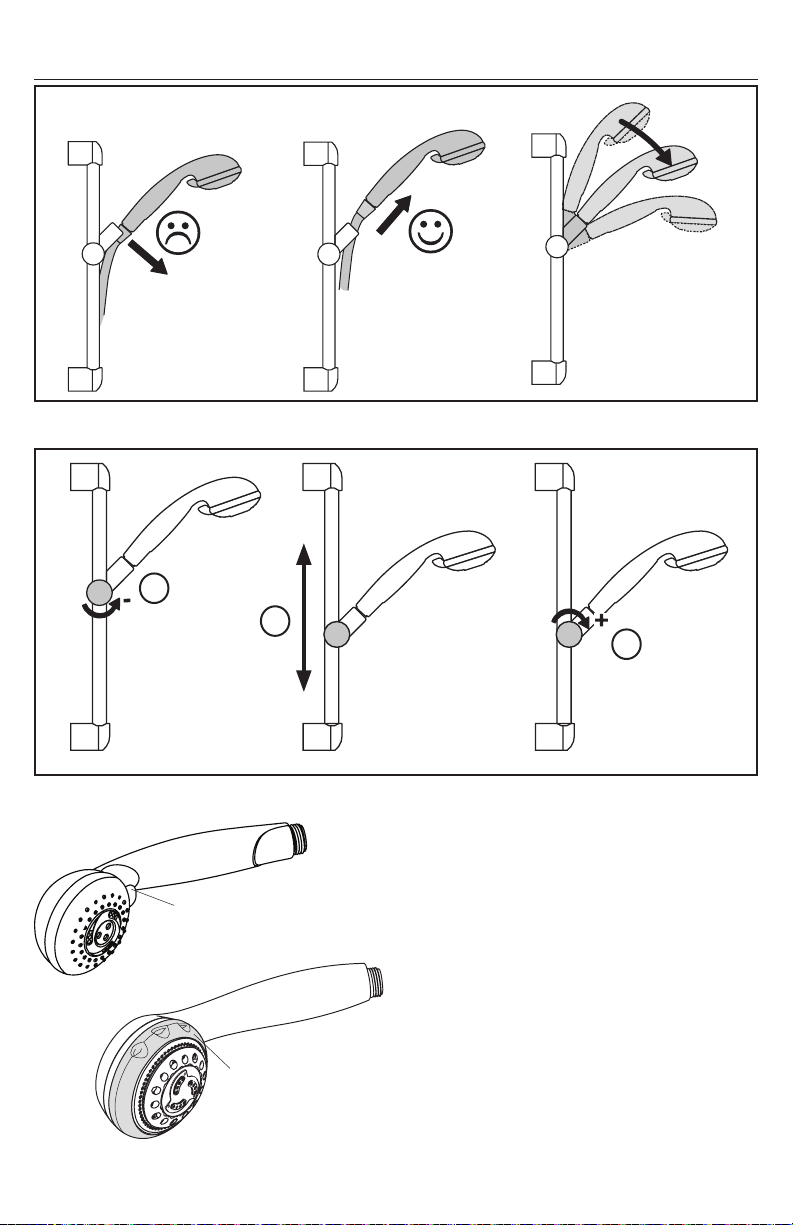
User Instructions / Instructions de service / Manejo
1
2
3
Push the function lever or turn the function ring to
the desired function.
Pour changer de mode de jet, pousser le levier ou
function lever
levier
palanca
function ring
anneau de fonction
anillo de función
14
tournez l’anneau de fonction.
Cambie los modos de rociado pulsando la
palanca o gire el anillo de función.
Page 15
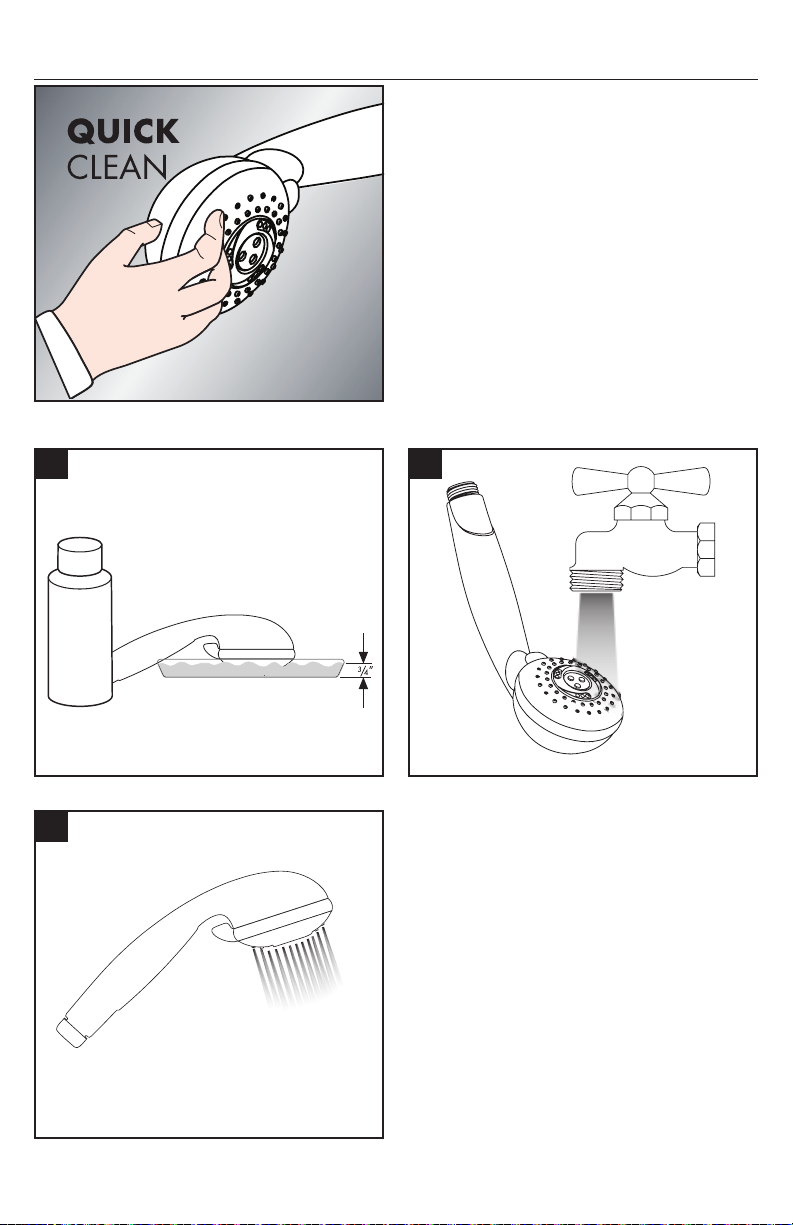
Cleaning / Nettoyage / Limpieza
1 2
scale remover
détartrant
desincrustante
S
e
c
l
a
R
r
e
e
m
v
o
Remove scale deposits from the spray channels by
rubbing across them with fingers or a sponge.
Si les canaux de jet deviennent entartrés, frottezles avec les doigts ou à l’aide d’une éponge pour
en déloger les dépôts.
Elimine los depósitos calcificados de los canales
de rociado frotándolos con los dedos o una
esponja.
3
> 1 min
15
Page 16

Cleaning Recommendation for Hansgrohe Products
Modern bathroom faucets, kitchen faucets and shower products are made from different materials to comply with the
needs of the market with regard to design and functionality. To avoid damage to the product, it is necessary to take
proper care of it.
For best results:
• Prevent the buildup of mineral scale and /or soap residue by cleaning your Hansgrohe product(s) when
needed.
• Select a cleaning agent specifically intended for the type of product.
• Do not use these types of cleaners as they will cause damage to your Hansgrohe product:
Any cleaning agent containing hydrochloric acid, formic acid, lye, or acetic acid.
Abrasive cleaning powders, pads, or brushes.
Steam cleaners.
“No rinse” cleaning agents.
• Always follow the instructions provided by the manufacturer of the cleaning agent.
• Do not mix cleaning agents, unless directed by the manufacturer.
• Do not spray cleaners directly onto the product as drops could enter openings and gaps and cause damage.
When using spray cleaners, spray the cleaner onto a soft cloth or sponge.
• Always rinse your Hansgrohe product thoroughly with clear water and polish dry with a soft cloth after clean-
ing.
Important
• Residue from soaps and shampoos can cause damage. Rinse the product with clean water after each use.
• Residue from basin/tub/tile cleaner can cause damage to faucets and fittings. Immediately rinse any over-
spray from the Hansgrohe product.
• Damage to the product caused by improper care or the use of improper cleaning agents is not covered by the
warranty.
• If a component of the product is damaged, replace it, as there is risk of injury.
Conseil de nettoyage pour les produits Hansgrohe
Les robinets pour les salles de bains et les cuisines modernes ainsi que les produits récents pour les douches se composent de matériaux différents afin de satisfaire aux besoins du marché en termes de conception et de fonctionnalité.
Afin d'éviter d'endommager le produit, il est nécessaire d'en prendre soin.
Pour de meilleurs résultats :
• Empêchez l'accumulation de tarte et/ou de résidu de savon en nettoyant votre produit Hansgrohe lorsque c'est
nécessaire.
• Sélectionnez un produit de nettoyage spécifiquement prévu pour ce type de produit.
• N'utilisez pas ces types de nettoyants car ils peuvent endommager votre produit Hansgrohe :
Tout produit de nettoyage contenant de l’acide chlorhydrique, de l’acide formique, de la potasse ou de
l’acide acétique.
Les poudres de nettoyage, les tampons ou les brosses abrasives.
Les nettoyeurs à vapeur.
Les produits de nettoyage « sans rinçage ».
16
Page 17

• Ne mélangez pas les produits de nettoyage, à moins que cela soit indiqué par le fabricant.
• Ne pulvérisez pas les nettoyants directement sur le produit car des gouttes pourraient entrer dans les ouver-
tures et les fentes et causer des dommages. Lorsque vous utilisez des nettoyants par pulvérisation, pulvérisez le
nettoyant sur un chiffon ou une éponge douce.
Important
• Le résidu provenant des savons et des shampoings peut causer des dommages. Rincez le produit avec de l'eau
propre après chaque utilisation.
• Le résidu provenant des nettoyants pour cuvette/baignoire/carrelage peut endommager les robinets et les
raccords de tuyauterie. Rincez immédiatement toute surpulvérisation sur le produit Hansgrohe.
• Les dommages au produit causés par un mauvais entretien ou par l'utilisation de produits de nettoyage inadé-
quats ne sont pas couverts par la garantie.
• Si un composant du produit est endommagé, remplacez-le, car il existe un risque de blessure.
Recomendación de limpieza para los productos de Hansgrohe
Hoy en día, las griferías de baño y de cocina así como duchas modernas se componen de materiales muy distintos
para satisfacer las exigencias del mercado respecto al diseño y la funcionalidad. Para evitar daños y reclamaciones
hay que tener en cuenta ciertos aspectos tanto en el uso como en su limpieza.
Para obtener mejores resultados:
• Evite la acumulación de restos de jabón o sarro limpiando el producto Hansgrohe cuando sea necesario.
• Seleccione un agente de limpieza diseñado específicamente para el tipo de producto.
• No use estos tipos de limpiadores, ya que causarán daño a su producto Hansgrohe:
Agentes limpiadores que contengan ácido clorhídrico, fórmico, acético o lejía.
Polvos, paños o cepillos de limpieza abrasivos.
Limpiadores a vapor
Agentes de limpieza "sin enjuague”.
• Siempre siga las instrucciones provistas por el fabricante del agente de limpieza.
• No mezcle los agentes de limpieza, a menos que esté indicado por el fabricante.
• No rocíe limpiadores directamente sobre el producto, ya que podrían caer gotas sobre las aberturas y espacios
y causar daños. Cuando use limpiadores en spray, rocíe el limpiador sobre un paño suave o esponja.
• Siempre enjuague su producto Hansgrohe con agua limpia y séquelo y lústrelo con un paño suave después de
la limpieza.
Importante
• Los residuos de jabón y champú pueden causar daños. Enjuague el producto con agua limpia después de cada
uso.
• Los residuos de limpiadores para lavatorios, bañeras o azulejos pueden causar daño a los grifos y accesorios.
Enjuague inmediatamente cualquier derrame que haya sobre el producto de Hansgrohe.
• Los daños que resulten de un cuidado inadecuado o uso de agentes de limpieza inadecuados no están cubier-
tos por la garantía
• Si se daña un componente del producto, reemplácelo, ya que existe riesgo de lesión.
17
Page 18

Limited Consumer Warranty
This product has been manufactured and tested to the highest quality standards by Hansgrohe, Inc. (“Hansgrohe”).
This warranty is limited to Hansgrohe products that are purchased by a consumer in the United States or Canada
after March 1, 1996, and installed in either in the United States or in Canada.
WHO IS COVERED BY THE WARRANTY
This warranty extends to the original purchaser only. This warranty is non-transferable.
WHAT IS COVERED BY THE WARRANTY
The warranty covers only your Hansgrohe manufactured product. Hansgrohe warrants this product against defects in
material or workmanship as follows:
Hansgrohe will replace at no charge for parts only or, at its option, replace any product or part of the product
that proves defective because of improper workmanship and/or material, under normal installation, use,
service and maintenance. If Hansgrohe is unable to provide a replacement and repair is not practical or
cannot be made in timely fashion, Hansgrohe may elect to refund the purchase price in exchange for the return
of the product.
LENGTH OF WARRANTY
Replacement or repaired parts of products will be covered for the term of this warranty, as stated in the following
two sentences. If you are a consumer who purchased the product for use primarily for personal, family or household
purposes, this warranty extends for as long as you own the product and the home in which the product is originally
installed. If you purchased the product for use primarily for any other purpose, including, without limitation, a
commercial purpose, this warranty extends only (i) for 1 year, with respect to Hansgrohe & Commercial products,
and (ii) for 5 years, with respect to Axor products.
THIS WARRANTY DOES NOT COVER, AND HANSGROHE WILL NOT PAY FOR:
A. Conditions, malfunctions or damage not resulting from defects in material or workmanship.
B. Conditions, malfunctions or damage resulting from (1) normal wear and tear, improper installation, improper
maintenance, misuse, abuse, negligence, accident or alteration; (2) the use of abrasive or caustic cleaning agents
or “no-rinse” cleaning products, or the use of the product in any manner contrary to the product instructions; or (3)
conditions in the home such as excessive water pressure or corrosion.
C.Labor and other expenses for disconnection, deinstallation, or return of the product for warranty service
(including but not limited to proper packaging and shipping costs), or for installation or reinstallation of the
product.
D. Accessories, connected materials and products, or related products not manufactured by Hansgrohe.
E. Any Hansgrohe or Axor product sold for display purposes.
F. Rubbed Bronze finish is subject to a 3-year limited warranty. Chrome and all PVD finishes are covered by the
limited lifetime warranty.
G. Hansgrohe Water Filtration System is subject to a 1-year limited warranty. Warranty does not include
replacement filters.
TO OBTAIN WARRANTY PARTS OR INFORMATION
Contact your Hansgrohe retailer, or contact Technical Service at:
Hansgrohe, Inc.
1492 Bluegrass Lakes Parkway
Alpharetta, GA 30004
Toll-free 800-334-0455
In requesting warranty service, you will need to provide:
1. The sales receipt or other evidence of the date and place of purchase.
2. A description of the problem.
3. Delivery of the product or the defective part, postage prepaid and carefully packed and insured, to:
Hansgrohe, Inc.
1492 Bluegrass Lakes Parkway
Alpharetta, GA 30004
Toll-free 800-334-0455
18
Page 19

When warranty service is completed, any repaired or replacement product or part will be returned to you postage
prepaid.
EXCLUSIONS AND LIMITATIONS
REPAIR OR REPLACEMENT (OR, IN LIMITED CIRCUMSTANCES, REFUND OF THE PURCHASE
PRICE) AS PROVIDED UNDER THIS WARRANTY IS THE EXCLUSIVE REMEDY OF THE PURCHASER.
HANSGROHE NEITHER ASSUMES NOR AUTHORIZES ANY PERSON TO CREATE FOR IT ANY
OTHER OBLIGATION OR LIABILITY IN CONNECTION WITH THIS PRODUCT. HANSGROHE SHALL
NOT BE LIABLE TO PURCHASER OR ANY OTHER PERSON FOR ANY INCIDENTAL, SPECIAL OR
CONSEQUENTIAL DAMAGES, ARISING OUT OF BREACH OF THIS WARRANTY OR ANY IMPLIED
WARRANTY (INCLUDING BUT NOT LIMITED TO ANY IMPLIED WARRANTY OF MERCHANTABILITY).
Some States do not allow the exclusion or limitation of incidental or consequential damages, so the above limitation
or exclusion may not apply to you. This warranty gives you specific legal rights, and you may also have other rights
that vary from state to state.
TO THE EXTENT PERMITTED BY LAW, ANY IMPLIED WARRANTIES OF MERCHANTABILITY AND
FITNESS FOR A PARTICULAR PURPOSE, ARE LIMITED TO THE DURATION OF THE EXPRESS
WARRANTY.
Some states do not allow limitations on how long an implied warranty may last, so the above limitations may not
apply to you. You may be required by law to give us a reasonable opportunity to correct or cure any failure to
comply before you can bring any action in court against us under the Magnuson-Moss Warranty Act.
PRODUCT INSTRUCTIONS AND QUESTIONS
Upon purchase or prior to installation, please carefully inspect your Hansgrohe product for any damage or visible
defect. Prior to installing, always carefully study the enclosed instructions on the proper installation and the care and
maintenance of this product. If you have questions at any time about the use, installation or performance of your
Hansgrohe product, or this warranty, please write us or call us toll-free at 800-334-0455.
19
Page 20

Hansgrohe, Inc. • 1490 Bluegrass Lakes Parkway • Alpharetta, GA 30004
Tel. 770-360-9880 • Fax 770-360-9887
www.hansgrohe-usa.com
US - Installation Instructions • Part No. 90965603 • Revised 12/2014
 Loading...