

Page 1
EN Installation / User Instructions / Warranty
FR Instructions de montage / Mode d'emploi / Garantie
ES Instrucciones de montaje / Manejo / Garantía
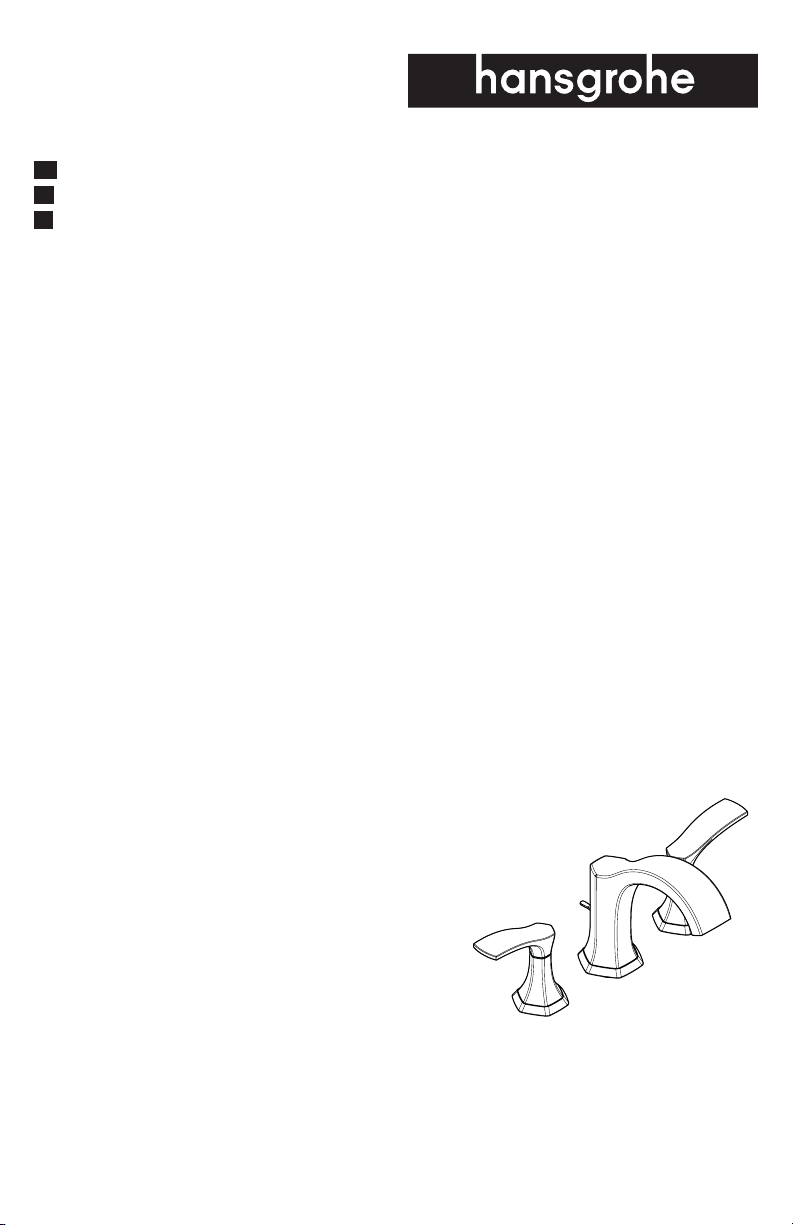
Locarno 110
04813xx0
Page 2

English
Technical Information
Water pressure
Recommended 15 - 75 PSI (0.1 - 0.5 MPa)
Maximum 145 PSI (1 MPa)
Hot water temp.
Recommended 120°-140° F (48° - 60° C)*
Maximum 158°F (70° C)*
Max. flow rate 1.2 GPM (5.4 L/min)
Hole size in mounting surface
valves 1⅛" (30 mm)
spout 1⅜" (34 mm)
Max. depth of mounting surface 1⅛" (30 mm)
* Please know and follow all applicable local plumb-
ing codes when setting the temperature on the water
heater.
Installation Considerations
• For best results, Hansgrohe recommends that
this unit be installed by a licensed, professional
plumber.
• Please read over these instructions thoroughly
before beginning installation. Make sure that
you have all tools and supplies needed to
complete the installation.
• The hot and cold supply hoses included with this
faucet are for use with ⅜ stops. If your stops are
a different size, purchase adapters at your local
plumbing supply store or home center. Adapters
are not available from Hansgrohe.
• The drain is suitable for most, but not all, lavatory
sinks sold in the United States and Canada.
• The drain is intended for use in a sink with an
overflow. If your sink does not have an overflow,
or if this drain is too small for the hole in your sink,
please refer to the instructions included
with the sink. Some sinks include special drain
installation instructions and/or parts. Others
require the use of a specialty drain. Hansgrohe
is not respnsible for the cost of a specialty drain.
• Keep this booklet and the receipt (or other proof
of date and place of purchase) for this product
in a safe place. The receipt is required should it
be necessary to request warranty parts.
2
Page 3

Français
Données techniques
Pression d’eau
recommandée 15 - 75 PSI (0.1 - 0.5 MPa)
maximum 145 PSI (1 MPa)
Température d'eau chaude
recommandée 120°-140° F (48° - 60° C)*
maximum 158°F (70° C)*
Capacité nominale 1.2 GPM (5.4 L/min)
Dimension du trou dans la surface de montage
robinets 1⅛" (30 mm)
bec 1⅜" (34 mm)
Profondeur maximale de 1⅛" (30 mm)
la surface de montage
* Vous devez connaître et respecter tous les codes de
plomberie locaux applicables pour le réglage de la
température du chauffe-eau.
À prendre en considération pour l’installation
• Pour de meilleurs résultats, Hansgrohe
recommande que ce produit soit installé par un
plombier professionnel licencié.
• Veuillez lire attentivement ces instructions avant
de procéder à l’installation. Assurez-vous
de disposer de tous les outils et du matériel
nécessaires pour l’installation.
• Les tuyaux d'alimentation pour l'eau chaude et
froide inclus avec ce robinet sont pour l'usage
avec les butées d'arrêt de ⅜. Si vos butées
d'arrêt sont d'une taille différente, achetez
des adaptateurs à votre magasin d'articles de
plomberie ou centre de rénovation local.Les
adaptateurs ne sont pas disponibles auprès de
Hansgrohe.
• Ce drain est adapté à la plupart, mais pas à
l'ensemble, des éviers vendus aux États-Unis et
au Canada.
• Ce drain est prévu pour un évier avec trop-plein.
Si votre évier ne dispose pas d'un trop-plein,
ou si ce drain est trop petit pour le trou dans
l'évier, consultez les instructions fournies
avec l'évier. Certains éviers comprennent des
instructions spéciales d'installation d’évier et/ou
de pièces. D'autres nécessitent l'utilisation d'un
drain spécial.
• Conservez ce livret et le reçu (ou une autre
preuve sur laquelle figurent la date et l’endroit
de l’achat) pour ce produit dans un endroit sûr.
Le reçu est requis si vous commandez des pièces
sous garantie.
3
Page 4

Español
Datos tecnicos
Presión en servicio
recomendada 15 - 75 PSI (0.1 - 0.5 MPa)
max. 145 PSI (1 MPa)
Temperatura del agua caliente
recomendada 120°-140° F (48° - 60° C)*
max. 158°F (70° C)*
Caudal máximo 1.2 GPM (5.4 L/min)
Tamaño del orificio en la superficie de montaje
válvulas 1⅛" (30 mm)
surtidor 1⅜" (34 mm)
Profundidad máxima de la 1⅛" (30 mm)
superficie de montaje
* Debe conocer y cumplir todos los códigos locales
aplicables para ajustar la temperatura del calentador de agua.
Consideraciones para la instalación
• Para obtener mejores resultados, la instalación
debe estar a cargo de un plomero profesional
matriculado.
• Antes de comenzar la instalación, lea estas
instrucciones detenidamente. Asegúrese de
tener las herramientas y los insumos necesarios
para completar la instalación.
• Las tuberías de suministro incluyeron con este
chorro son para el uso con topes de ⅜. Si
sus topes son un tamaño diferente, compra
adaptadores en su tienda de suministro de
plomería local. Los adaptadores no están
disponibles de Hansgrohe.
• Este drenaje es adecuado para la mayoría
de los lavabos vendidos en Estados Unidos y
Canadá, pero no para todos.
• Este drenaje debe ser usado en un lavabo con
desborde. Si su lavabo no posee desborde,
o si este drenaje es demasiado pequeño
para el agujero en el lavabo, consulte las
instrucciones incluidas con el lavabo.
Algunos lavabos incluyen instrucciones
especiales para la instalación del drenaje o sus
piezas. Otros requieren el uso de un drenaje
especial.
• Mantenga este folleto y el recibo (u otro
comprobante del lugar y fecha de compra)
de este producto en lugar seguro. El recibo
se requiere en caso de ser necesario solicitar
piezas bajo garantía.
4
Page 5

Locarno 110
1¼" O.D
2¼"
14⅜" (364 mm)
4" (102 mm)
20⅛" (510 mm)
04813xx0
3¼" (82 mm)
2½"/2¾"
(62/69 mm)
6" (152 mm)
5⅝" (144 mm)
88509xx0
(57 mm)
1¼"
(32 mm)
3½"
(89 mm)
2⅜"/2⅛"
(59/54 mm)
(28 mm)
max. 1³⁄₁₆" (30 mm)
Ø1⅛"
Ø1⅛"
(28 mm)
Ø1¼"
(32 mm)
4" (100 mm)
Ø1¼"-1⅜"
(30-34 mm)
21
Ø1⅛"
(28 mm)
⅜
Ø1¼"
(32 mm)
°
4⅜" (112 mm)
6⅛" (157 mm)
(32 mm)
.
4⅝"
(117 mm)
Tools Required / Outiles Utiles /
Herramientas Útiles
9 mm
16 mm
22 mm
5
Page 6
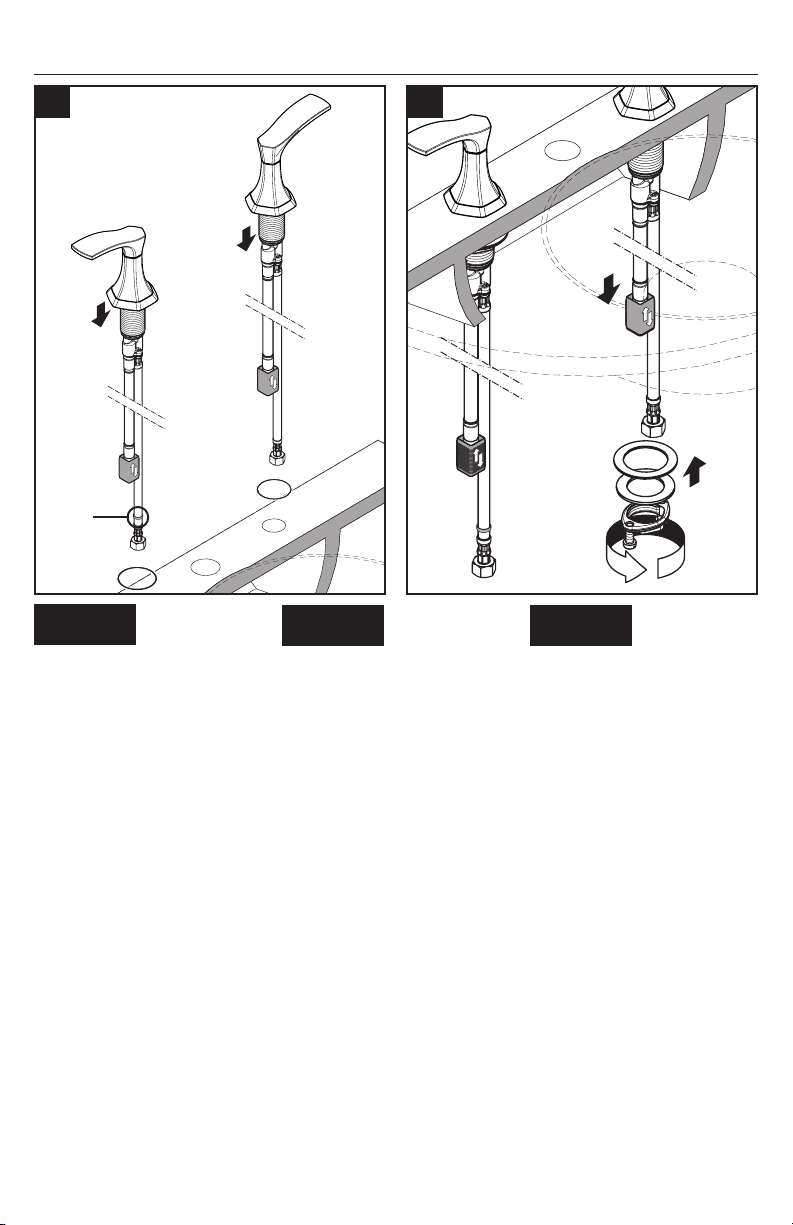
Installation / Installation / Instalación
1 2
red
rouge
rojo
English
Place the hot and cold valve
assemblies on the mounting
surface.
The hot valve should
be on the left, the cold
valve on the right.
Rest the valve on the mounting
surface.
Install the fiber washer, metal
washer, and mounting nut.
Do not fully tighten the nut at
this time.
6
Français Español
Placez les ensembles de valve
d’eau chaude et d’eau froide
sur la surface de montage.
La valve d’eau chaude
doit être à gauche, et
celle de l’eau froide à
droite.
Déposez la valve sur la surface
de montage.
Installez la rondelle en fibre, la
rondelle métallique et l’écrou de
montage.
Ne serrez pas l’écrou à fond
pour l’instant.
Coloque las válvulas de agua
fría y caliente sobre la superficie
de montaje.
La válvula de agua
caliente debe estar a la
izquierda y la de agua
fría a la derecha.
Apoye la válvula en la superficie
de montaje.
Instale la arandela de fibra, la
arandela metálica y la tuerca de
montaje.
No apriete la tuerca completamente en este momento.
Page 7
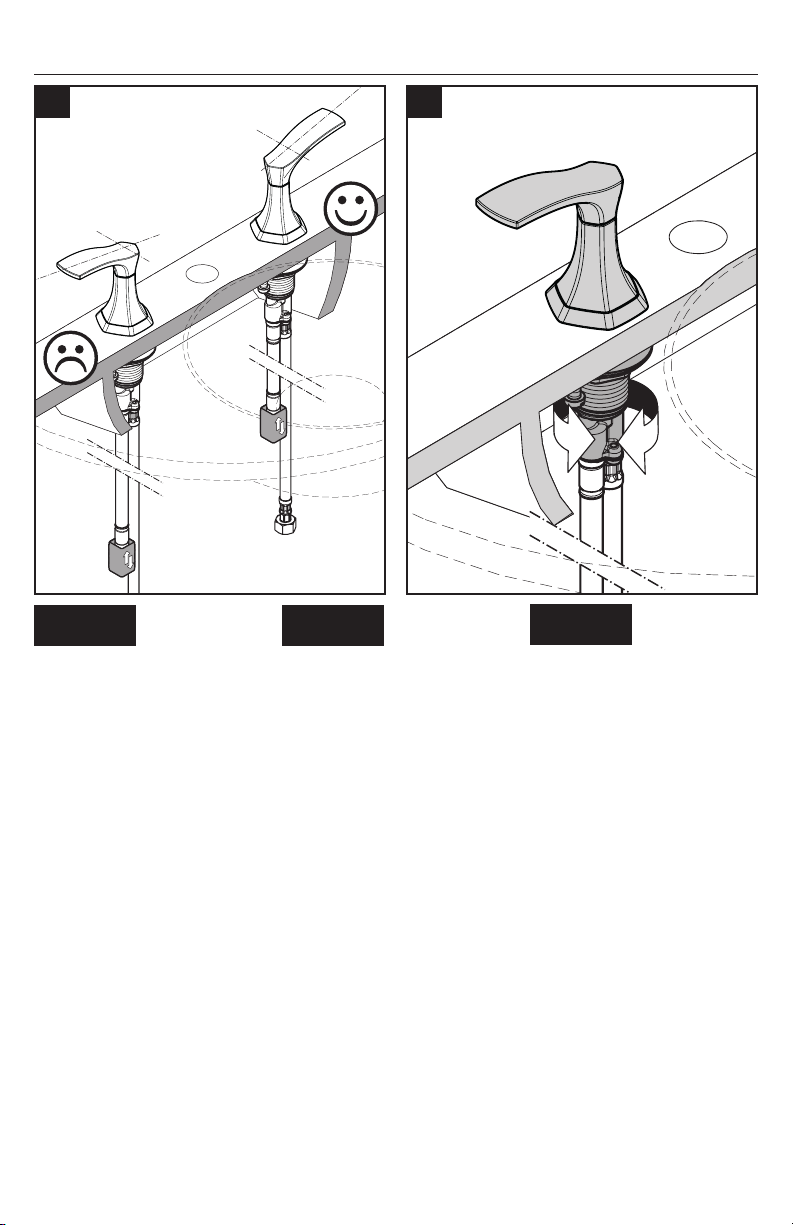
3 4
English Français
Inspect the alignment of the
handles and the escutcheons.
If necessary, rotate the valve.
Vérifiez l’alignement des poignées et les écussons.
Au besoin, tournez la valve.
Español
Inspeccione la alineación de las
manijas et los rosaces.
Si es necesario, gire la válvula.
7
Page 8
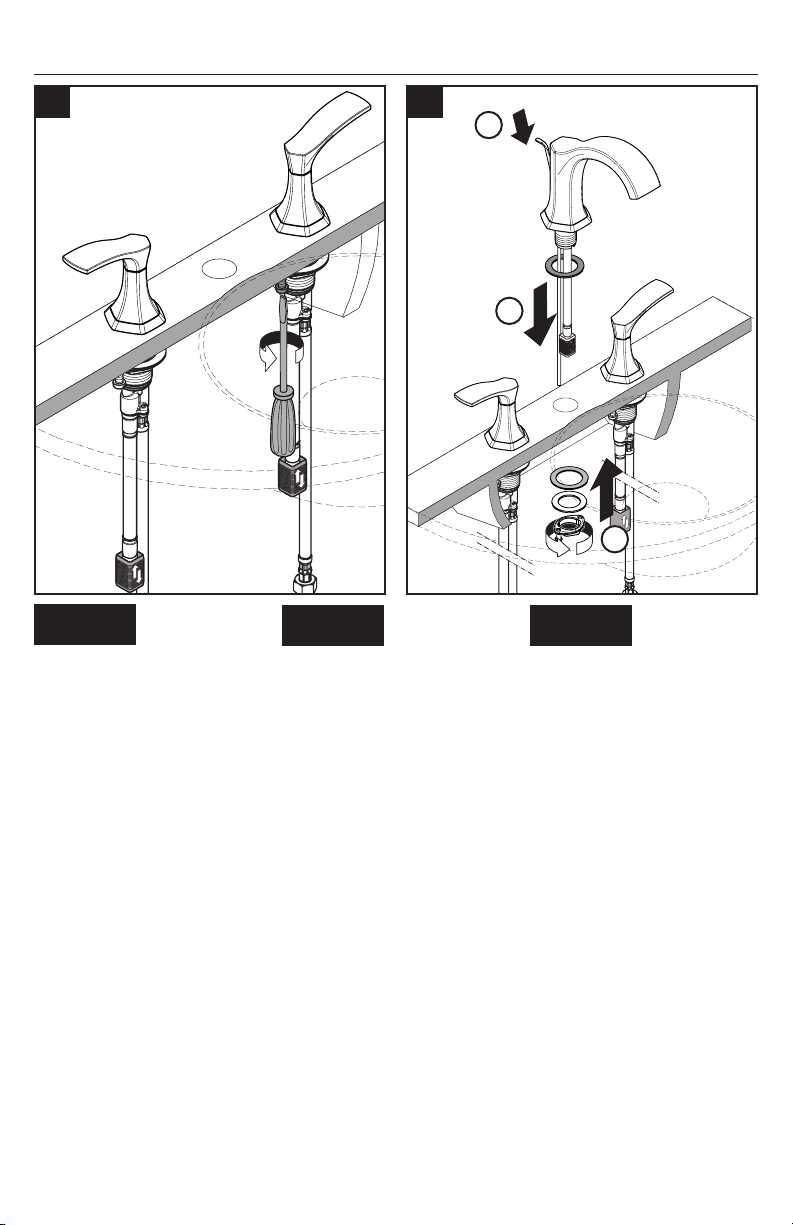
5 6
2.2 ft-lb
3 Nm
3
1
2
English
Tighten the nut. Tighten the
tensioning screws.
Install the drain pull rod on the
spout.
Position the spout on the mounting surface.
Slide the washer over the bolt.
Install the collar.
8
Français Español
Serrez l’écrou. Serrez les vis de
pression.
Installez la tige d’entraînement
du trou d’écoulement sur le bec.
Placez le bec sur la surface de
montage.
Installez la rondelle et le collier
de montage.
Apriete la tuerca. Apriete los
tornillos tensores.
Instale el tirador de drenaje en
el surtidor.
Coloque el surtidor sobre la
superficie de montaje.
Instale la arandela y el collar de
montaje.
Page 9
7 8
2.2 ft-lb
3 Nm
English Français
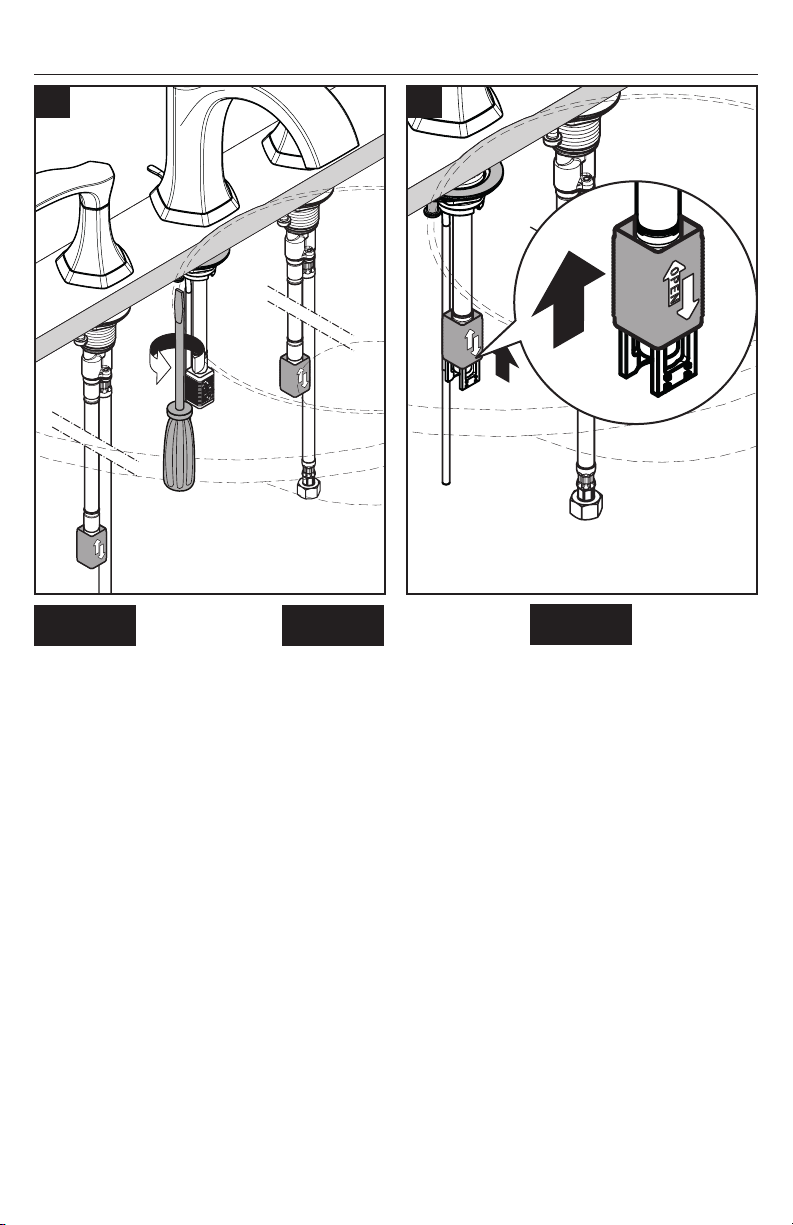
Tighten the collar using a
screwdriver.
Open the quick-connect by pushing it upwards.
Serrez le collier de montage.
Ouvrez la douille de raccord
rapide en la poussant vers le
haut.
Español
Apriete el collar de montaje.
Abra la conexión rápida empujándola hacia arriba.
9
Page 10
9 10
English
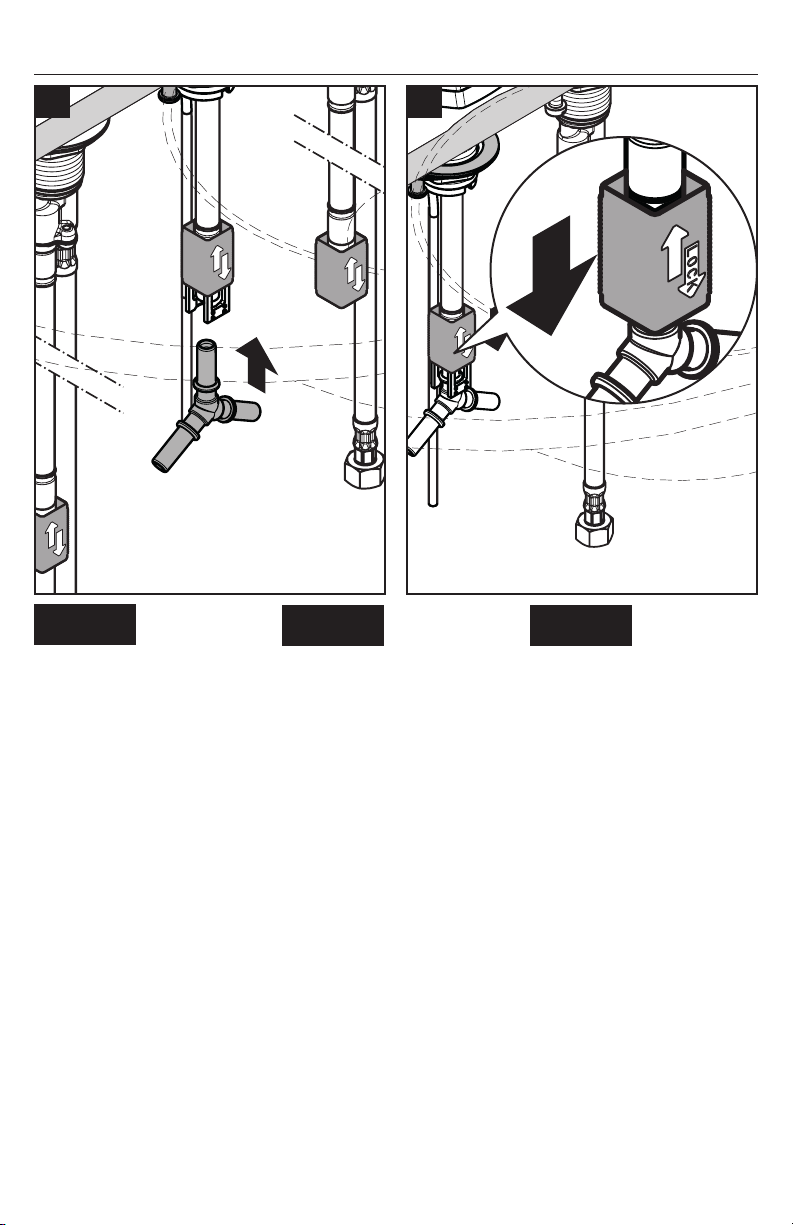
Insert the connection angle in
the spout quick-connect.
Lock the quick-connect by pulling down on it.
10
Français Español
Insérez le coude de raccordement dans la douille de raccord
rapide du bec.
Verrouillez la douille de raccord
rapide en la tirant vers le bas.
Inserte el codo de conexión en
la conexión rápida del surtidor.
Trabe la conexión rápida
tirando hacia abajo.
Page 11
11 12
9 mm
16 mm
1
2
English Français
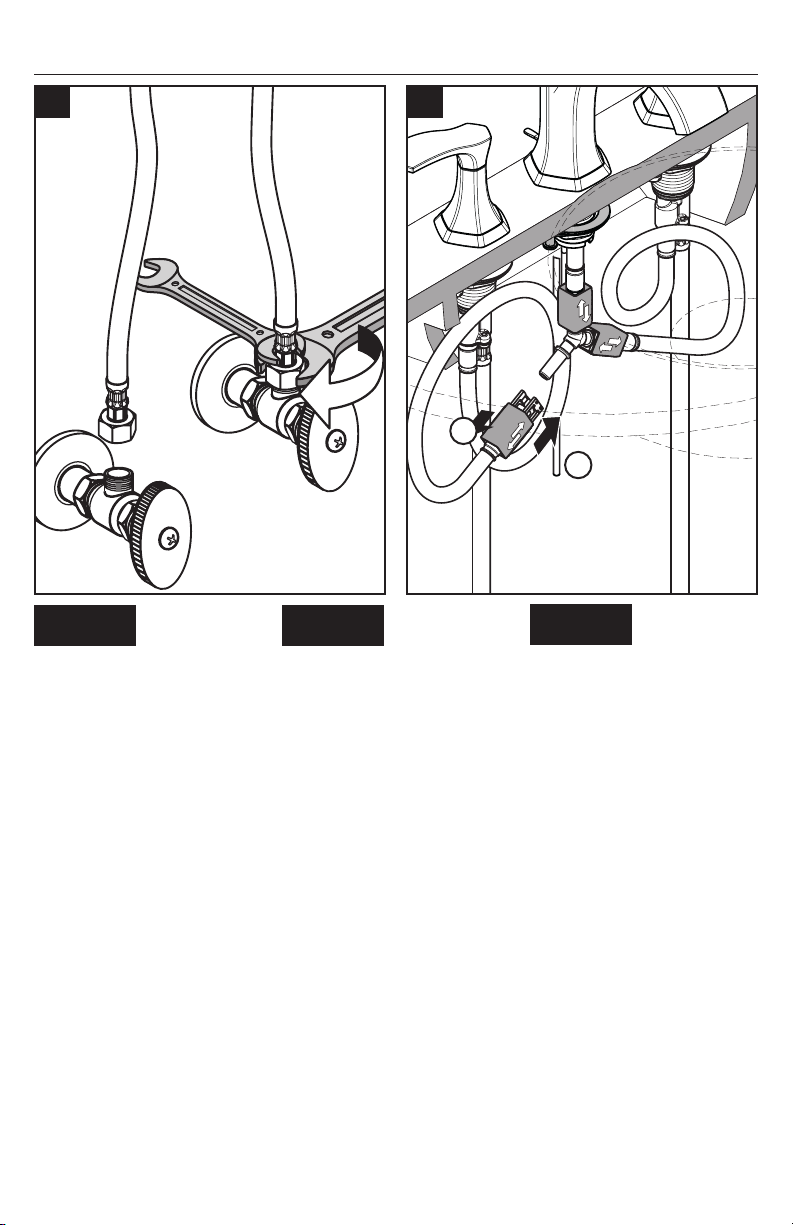
Connect the hot and cold supply
hoses to the stops.
Open the quick-connect on one
of the connection hoses by pushing it upwards.
Push the quick-connect over one
of the inlets on the connection
angle.
Connectez les tuyaux d’arrivée
d’eau chaude et d’eau froide
aux butées d’arrêt.
Ouvrez la douille de raccord
rapide de l’un des tuyaux de
raccordement en la poussant
vers le haut.
Poussez la douille de raccord rapide sur l’une des
orifices d’arrivée du coude de
raccordement.
Español
Conecte las mangueras de
suministro de agua caliente y
fría a los topes.
Abra la conexión rápida en una
de las mangueras de conexión
empujándola hacia arriba.
Presione la conexión rápida
sobre una de las entradas en el
codo de conexión.
11
Page 12
13 14
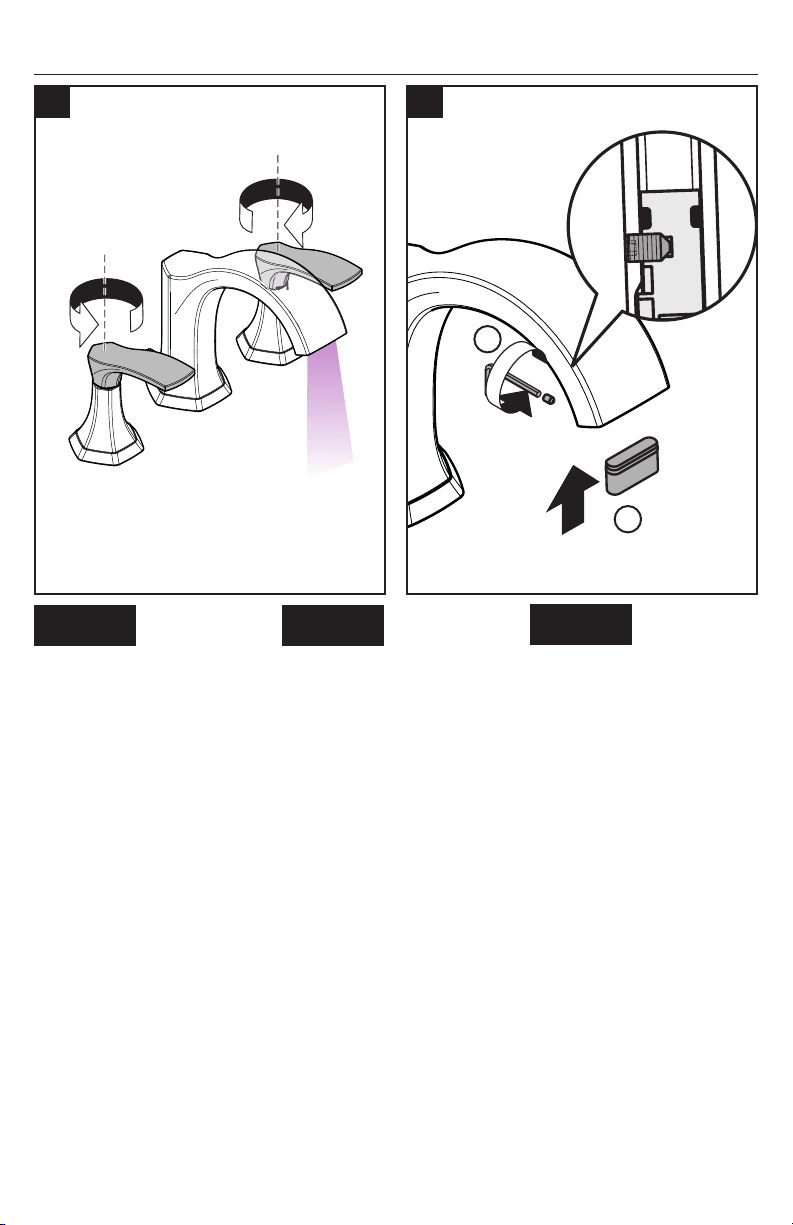
English
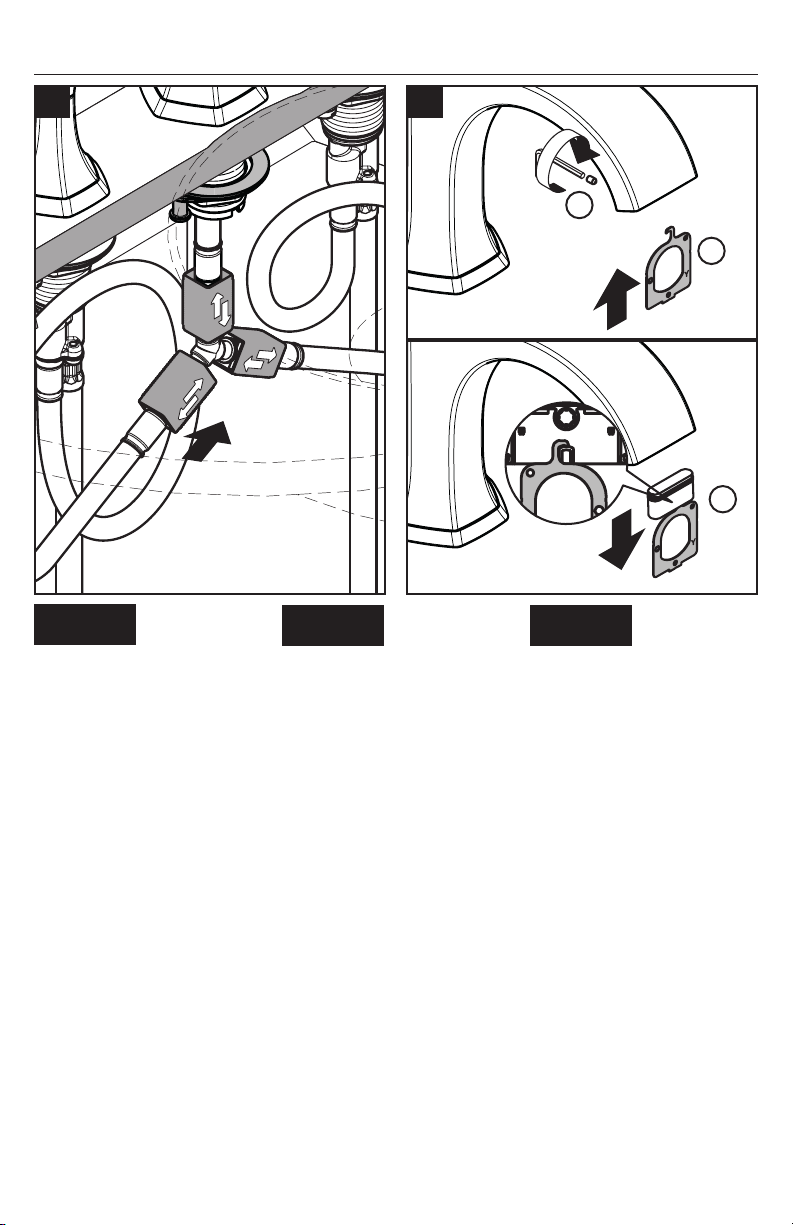
Lock the quick-connect by pushing it toward the connection
angle.
Repeat with the second connection hose.
1.5 mm
1
Français Español
Verrouillez la douille de raccord
rapide en la poussant vers le
coude de raccordement.
Répétez l’opération pour le second tuyau de raccordement.
Trabe la conexión rápida empujándola hacia el codo.
Repita con la segunda
manguera de conexión.
2
3
Loosen the aerator screw.
Remove the aerator.
12
Deserrez la vis de l'aérateur.
Retirez l’aérateur.
Afloje el tornillo del aireador.
Retire el aireador.
Page 13
15 16
2
> 2 min
English Français
Flush the hot and cold supply
lines for at least two minutes.
Install the aerator.
Tighten the aerator screw.
Rincez les conduites
d’alimentation d’eau chaude et
d’eau froide pendant au moins
deux minutes.
Installez l’aérateur.
Serrez la vis de l'aérateur
1.5 mm
1
Español
Purgue los suministros de agua
caliente y agua fría durante al
menos dos minutos.
Instale el aireador.
Apriete el tornillo del aireador.
Do not overtighten the
screw as damage may
result.
Ne serrez pas trop
la vis, vous pourriez
l’endommager.
No apriete el tornillo
en exceso, puesto que
podría dañarlo.
13
Page 14

Installation / Installation / Instalación
1
2
1
3
4
2
1
2
5
3
2
1
6 7
shorter
plus court
más corto
Petroleum-based plumbers putty can
damage the surface of some sinks.
Please consult the manufacturer of the
sink regarding compatible sealants.
14
longer
plus long
más largo
Les mastics de plomberie à base de pé-
trole peuvent endommager la surface
de certains lavabos. Veuillez consulter
le fabricant du lavabo pour connaître
les scellants compatibles.
Masilla de petróleo-basó puede da-
ñar la superficie de algún bañeras.
Consulte por favor al fabricante del
bañera con respecto a selladores
aceptables.
Page 15
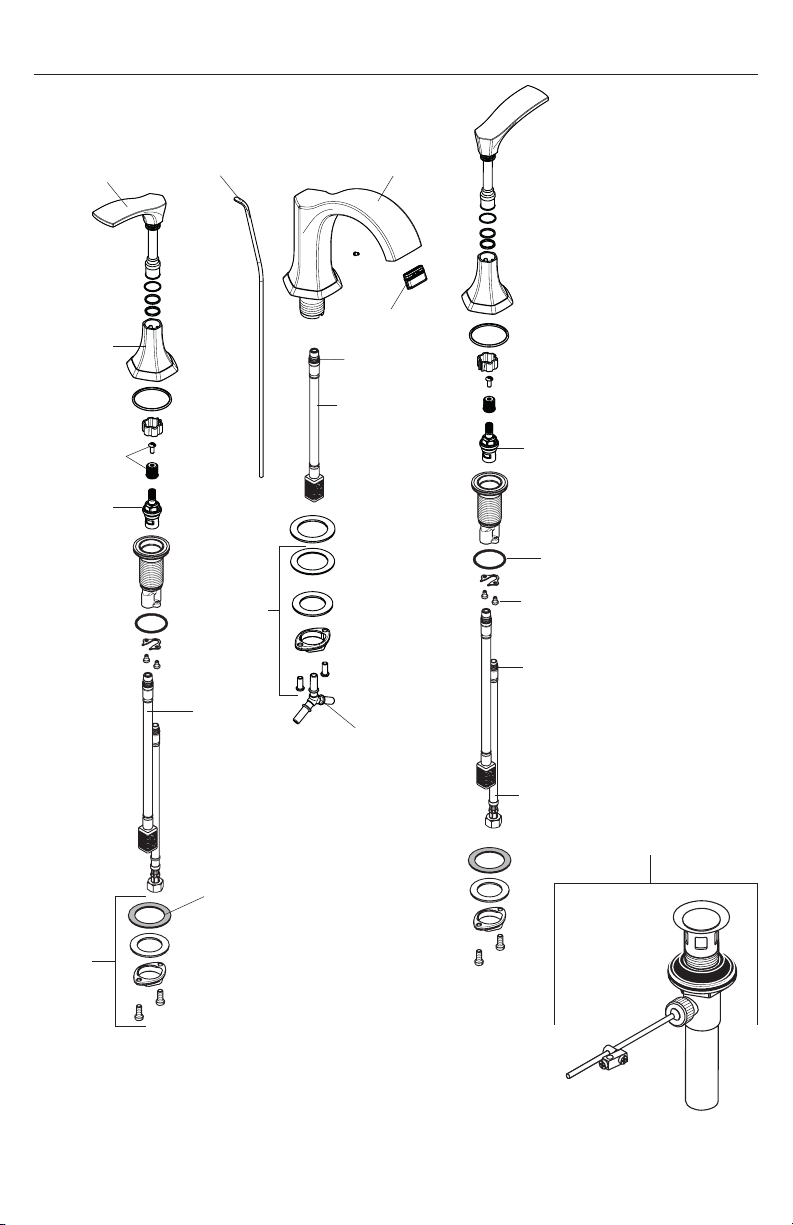
Replacement Parts / Pièces détachées / Repuestos
Locarno 110
04813xx0
93922xx0
93923xx0
98932000
98817001
96657xx0
92914000
(400 mm)
93924xx0
93085001
97827000
(8x1.75)
92913000
(200 mm)
95366001
92907000
(33x2.5)
(M4x6)
92909000
97827000
(8x1.75)
92905000
97548000
92909000
xx = Colors / Couleurs / Acabados
00 = Chrome
67 = Matte Black
82 = Brushed Nickel
83 = Polished Nickel
96321001
(450 mm)
88509xx0
15
Page 16

User Instructions / Instructions de service / Manejo
off
fermé
cerrado
hot
chaud
caliente
on
ouvert
abierto
cold
froid
frío
16
Page 17
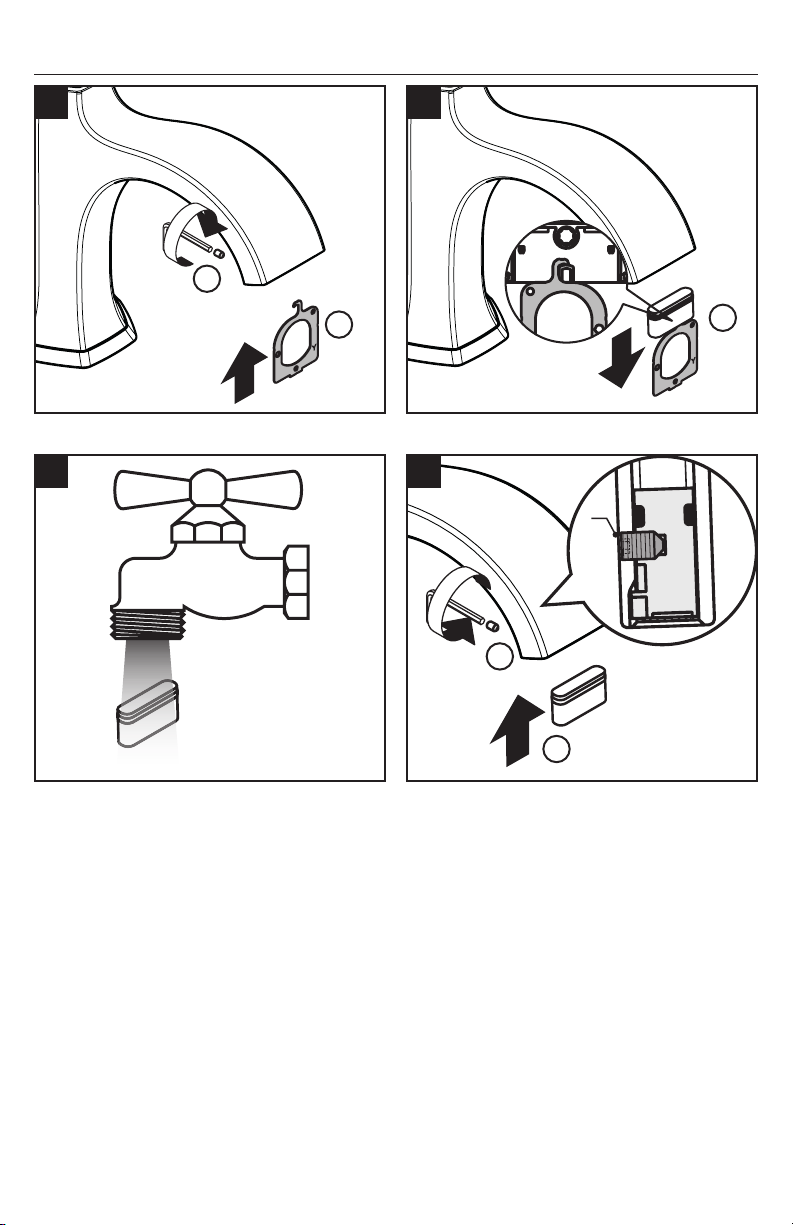
Cleaning / Nettoyage / Limpieza
1 2
1.5 mm
3
1
2
3
4
!
1.5 mm
2
1
17
Page 18

Cleaning Recommendation for Hansgrohe Products
Modern bathroom faucets, kitchen faucets and shower products are made from different materials to comply with the
needs of the market with regard to design and functionality. To avoid damage to the product, it is necessary to take
proper care of it.
For best results:
• Prevent the buildup of mineral scale and /or soap residue by cleaning your Hansgrohe product(s) when
needed.
• Select a cleaning agent specifically intended for the type of product.
• Do not use these types of cleaners as they will cause damage to your Hansgrohe product:
´ Any cleaning agent containing hydrochloric acid, formic acid, lye, or acetic acid.
´ Abrasive cleaning powders, pads, or brushes.
´ Steam cleaners.
´ “No rinse” cleaning agents.
• Always follow the instructions provided by the manufacturer of the cleaning agent.
• Do not mix cleaning agents, unless directed by the manufacturer.
• Do not spray cleaners directly onto the product as drops could enter openings and gaps and cause damage.
When using spray cleaners, spray the cleaner onto a soft cloth or sponge.
• Always rinse your Hansgrohe product thoroughly with clear water and polish dry with a soft cloth after
cleaning.
Important
• Residue from soaps and shampoos can cause damage. Rinse the product with clean water after each use.
• Residue from basin/tub/tile cleaner can cause damage to faucets and fittings. Immediately rinse any
overspray from the Hansgrohe product.
• Do not store any cleaning agents under your Hansgrohe product, such as in a vanity unit, as the fumes may
damage the product.
• Damage to the product caused by improper care or the use of improper cleaning agents is
not covered by the warranty.
• If a component of the product is damaged, replace it, as there is risk of injury.
Conseil de nettoyage pour les produits Hansgrohe
Les robinets pour les salles de bains et les cuisines modernes ainsi que les produits récents pour les douches se composent
de matériaux différents afin de satisfaire aux besoins du marché en termes de conception et de fonctionnalité. Afin
d’éviter d’endommager le produit, il est nécessaire d’en prendre soin.
Pour de meilleurs résultats :
• Empêchez l’accumulation de tarte et/ou de résidu de savon en nettoyant votre produit Hansgrohe lorsque
c’est nécessaire.
• Sélectionnez un produit de nettoyage spécifiquement prévu pour ce type de produit.
• N’utilisez pas ces types de nettoyants car ils peuvent endommager votre produit Hansgrohe :
´ Tout produit de nettoyage contenant de l’acide chlorhydrique, de l’acide formique, de la potasse ou de
l’acide acétique.
´ Les poudres de nettoyage, les tampons ou les brosses abrasives.
´ Les nettoyeurs à vapeur.
´ Les produits de nettoyage « sans rinçage ».
• Ne mélangez pas les produits de nettoyage, à moins que cela soit indiqué par le fabricant.
• Ne pulvérisez pas les nettoyants directement sur le produit car des gouttes pourraient entrer dans les
ouvertures et les fentes et causer des dommages. Lorsque vous utilisez des nettoyants par pulvérisation,
pulvérisez le nettoyant sur un chiffon ou une éponge douce.
• Après le nettoyage rincer abondamment à l’eau clair pour éliminer intégralement les restes de détergent.
18
Page 19

Important
• Les residus de produits pour le corps comme les savons liquides, shampooings, gels de douche, teintures pour
cheveux, parfums, apres-rasage et vernis a ongles peuvent causer des deteriorations. Rincez le produit avec
de l’eau propre après chaque utilisation.
• Le résidu provenant des nettoyants pour cuvette/baignoire/carrelage peut endommager les robinets et les
raccords de tuyauterie. Rincez immédiatement toute surpulvérisation sur le produit Hansgrohe.
• De meme, il est interdit de stocker des detergents ou des produits chimiques sous les produits, par ex. dans un
meuble sous lavabo, car les vapeurs qui s’en degagent risquent d’abimer les produits.
• Les dommages au produit causés par un mauvais entretien ou par l’utilisation de produits
de nettoyage inadéquats ne sont pas couverts par la garantie.
• Si un composant du produit est endommagé, remplacez-le, car il existe un risque de
blessure.
Recomendación de limpieza para los productos de Hansgrohe
Hoy en día, las griferías de baño y de cocina así como duchas modernas se componen de materiales muy distintos
para satisfacer las exigencias del mercado respecto al diseño y la funcionalidad. Para evitar daños y reclamaciones
hay que tener en cuenta ciertos aspectos tanto en el uso como en su limpieza.
Para obtener mejores resultados:
• Evite la acumulación de restos de jabón o sarro limpiando el producto Hansgrohe cuando sea necesario.
• Seleccione un agente de limpieza diseñado específicamente para el tipo de producto.
• No use estos tipos de limpiadores, ya que causarán daño a su producto Hansgrohe:
´ Agentes limpiadores que contengan ácido clorhídrico, fórmico, acético o lejía.
´ Polvos, paños o cepillos de limpieza abrasivos.
´ Limpiadores a vapor
´ Agentes de limpieza “sin enjuague”.
• Siempre siga las instrucciones provistas por el fabricante del agente de limpieza.
• No mezcle los agentes de limpieza, a menos que esté indicado por el fabricante.
• No rocíe limpiadores directamente sobre el producto, ya que podrían caer gotas sobre las aberturas
y espacios y causar daños. Cuando use limpiadores en spray, rocíe el limpiador sobre un paño suave o
esponja.
• Siempre enjuague su producto Hansgrohe con agua limpia y séquelo y lústrelo con un paño suave después
de la limpieza.
Importante
• Los residuos de productos de aseo como jabon liquido, champus, gel de ducha, tintes de pelo, perfumes,
lociones de afeitado y esmalte de unas pueden danar tambien los materiales. Enjuague el producto con agua
limpia después de cada uso.
• Los residuos de limpiadores para lavatorios, bañeras o azulejos pueden causar daño a los grifos y accesorios.
Enjuague inmediatamente cualquier derrame que haya sobre el producto de Hansgrohe.
• Tampoco pueden generarse depositos de productos de limpieza o quimicos debajo de los productos, p. ej. En
un armario de lavabo. De lo contrario, los vapores generados pueden danar los productos.
• Los daños que resulten de un cuidado inadecuado o uso de agentes de limpieza
inadecuados no están cubiertos por la garantía.
• Si se daña un componente del producto, reemplácelo, ya que existe riesgo de lesión.
19
Page 20

202122
Page 21

Page 22

Page 23

Hansgrohe, Inc. Limited Warranty
Offering our customers the highest quality at all times is a fundamental part of the Hansgrohe, Inc. company philosophy. We offer consumers a limited warranty on our hansgrohe
branded products.
This warranty is limited to products manufactured by Hansgrohe,
Inc. that are purchased from a Hansgrohe, Inc. authorized seller
by a consumer in the United States or Canada after September
1, 2019, and installed in either the United States or in Canada.
WARRANTY
Hansgrohe, Inc. warrants to the original consumer purchaser that
hansgrohe and AXOR products will be free from defects in material and workmanship for as long as the original consumer purchaser owns both the product and the home in which the product
was originally installed. For commercial purchasers, the warranty
period is (a) one (1) year for hansgrohe products and (b) five (5)
years for AXOR products, in each case from the date of purchase.
The warranty period for products in the Rubbed Bronze, Matte
Black and Matte White finishes are three (3) years from the date
of purchase. This warranty is non-transferable.
WHAT WE WILL DO
Hansgrohe, Inc., at its option, will replace any product or part of
the product that proves defective in workmanship and/ or material, under normal installation, use, service and maintenance.
If Hansgrohe, Inc. is unable to provide a replacement part or
product and repair is not practical or cannot be made in timely
fashion, Hansgrohe, Inc. may elect to refund the purchase price
in exchange for the return of the defective product. REPAIR OR
REPLACEMENT (OR, IN LIMITED CIRCUMSTANCES, REFUND
OF THE PURCHASE PRICE) AS PROVIDED UNDER THIS LIMITED
WARRANTY IS THE EXCLUSIVE REMEDY OF THE PURCHASER.
WHAT IS NOT COVERED BY THE WARRANTY
Because Hansgrohe, Inc. is unable to control the quality of
hansgrohe or AXOR products sold by unauthorized sellers, unless otherwise prohibited by law, this warranty does not cover
hansgrohe or AXOR products purchased from unauthorized sellers. Authorized sellers can be found on hansgrohe and AXOR
branded websites.
Labor and other expenses for disconnection, deinstallation, or
return of the product for warranty service (including but not limited to proper packaging and shipping costs), or for installation
or reinstallation of the product are not covered by this warranty.
Hansgrohe, Inc. shall not be liable for any damage to the product
resulting from
• reasonable wear and tear
• outdoor use
• misuse (including use of the product for an unintended
application)
• freezing water
• excessive water pressure
• pipe corrosion in the home in which the product is
installed
®
and AXOR®
• abuse, neglect or improper or incorrectly performed
installation, maintenance or repair, including the use of
abrasive or caustic cleaning agents or “no-rinse” cleaning products.
This warranty does not cover: (i) accessories, connected materials and products, or related products not manufactured by
Hansgrohe, Inc. (ii) any hansgrohe or AXOR product sold for
display purposes or (iii) hansgrohe or AXOR products purchased
from unauthorized sellers.
WHAT YOU MUST DO TO OBTAIN WARRANTY
SERVICE OR INFORMATION
Contact your retailer, or contact Technical Service at:
Hansgrohe, Inc.
1492 Bluegrass Lakes Parkway
Alpharetta, GA 30004
Toll-free 800 -334- 0455
In requesting warranty service, you will need to provide:
1. The sales receipt or other evidence of the date and place of
purchase.
2. A description of the problem.
3. Delivery of the product or the defective part, postage prepaid
and carefully packed and insured, to:
Hansgrohe, Inc.
1492 Bluegrass Lakes Parkway
Alpharetta, GA 30004
Toll-free 800 -334- 0455
When warranty service is completed, any repaired or replacement product or part will be returned to you postage prepaid.
REVISED SEPTEMBER 1, 2019.
Limitation on Duration of Implied Warranties: Some
States do not allow limitations on how long an implied warranty
lasts, so the below limitations may not apply to you. TO THE
MAXIMUM EXTENT PERMITTED BY APPLICABLE LAW, ANY
IMPLIED WARRANTY, INCLUDING THE IMPLIED WARRANTIES
OF MERCHANTABILITY AND OF FITNESS FOR A PARTICULAR
PURPOSE, IS LIMITED TO THE STATUTORY PERIOD OR THE
DURATION OF THIS WARRANTY, WHICHEVER IS SHORTER.
Limitation of Special, Incidental or Consequential
Damages: Some States do not allow the exclusion or limitation
of incidental or consequential damages, so the below limitations
and exclusions may not apply to you. TO THE MAXIMUM EXTENT
PERMITTED BY APPLICABLE LAW, THIS WARRANTY DOES NOT
COVER, AND HANSGROHE, INC. SHALL NOT BE LIABLE FOR,
ANY SPECIAL, INCIDENTAL OR CONSEQUENTIAL DAMAGES
(INCLUDING LABOR CHARGES TO REPAIR, REPLACE, INSTALL
OR REMOVE THIS PRODUCT), WHETHER ARISING OUT OF
BREACH OF ANY EXPRESS OR IMPLIED WARRANTY, BREACH
OF CONTRACT, TORT, OR OTHERWISE. HANSGROHE,
INC. SHALL NOT BE LIABLE FOR ANY DAMAGE TO THE
PRODUCT RESULTING FROM REASONABLE WEAR AND
23
Page 24

TEAR, OUTDOOR USE, MISUSE (INCLUDING USE OF THE
PRODUCT FOR AN UNINTENDED APPLICATION), FREEZING
WATER, EXCESSIVE WATER PRESSURE, PIPE CORROSION IN
THE HOME IN WHICH THE PRODUCT IS INSTALLED, ABUSE,
NEGLECT OR IMPROPER OR INCORRECTLY PERFORMED
INSTALLATION, MAINTENANCE OR REPAIR, INCLUDING
THE USE OF ABRASIVE OR CAUSTIC CLEANING AGENTS OR
“NO-RINSE” CLEANING PRODUCTS.
Notice to residents of the State of New Jersey: The
provisions of this warranty, including its limitations, are intended
to apply to the fullest extent permitted by the laws of the State of
New Jersey.
This warranty gives you specific legal rights, and you may also
have other rights which vary from state to state.
PRODUCT INSTRUCTIONS AND QUESTIONS
Upon purchase or prior to installation, please carefully inspect
your product for any damage or visible defect. Prior to installing,
always carefully study the enclosed instructions on the proper installation and the care and maintenance of this product.
If you have questions at any time about the use, installation or performance of your product, or the Limited Warranty, please write
us or call us toll-free at 800 -334- 0455.
Hansgrohe, Inc. 1490 Bluegrass Lakes Parkway Alpharetta, GA 30004
Tel. 800-334-0455 Fax 770-889-1783
www.hansgrohe-usa.com
US - Installation Instructions • Part No. 90729321 • Revised 08/2020
 Loading...