

Hansaton soundHD 13, sound 13, soundHD 312, sound 312, soundHD S312 Instructions For Use Manual
...Page 1
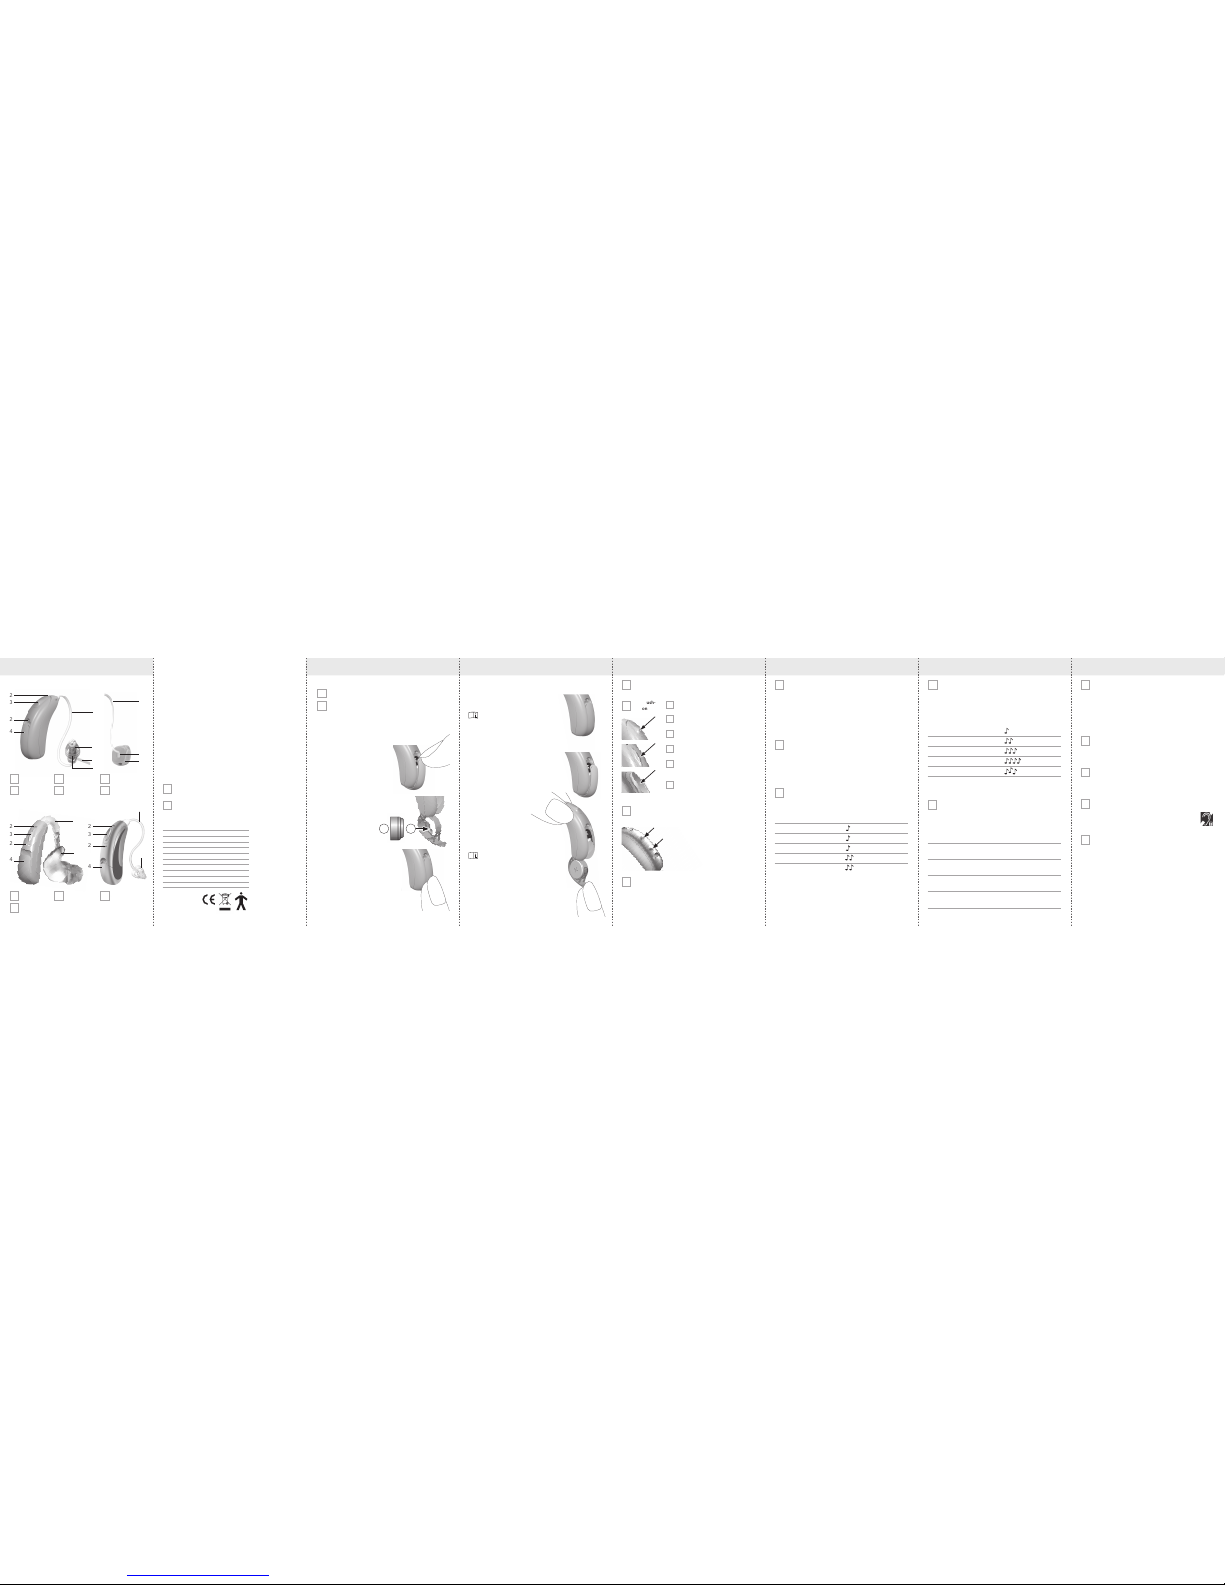
Your Hearing System. Operating Element.Replacing the Battery. Turning Your Hearing Systems on and o. Optional Functionalities.
1 Wire
– connects the sp eaker unit to your hearin g systems
1a Earhook
2 Microphone / Microphone shield
3 Push button
– switches betwe en listening progr ams and/or
changes the volume lev el (depending on indi vidual fitting)
4 Battery door
5 Dome (Olive)
6 Retention piece
– helps prevent the dom e and wire from moving
out of the ear canal
7 External receiver
7a Slim tube (
mini tube
)
8 Earmold
Which System Goes in Which Ear:
Red = right ear Blue = lef t ear
Option: Slim tube (
with mini tube)
•
Refer to th e remote control user g uide.
Option: Remote control
0124
Conformity to directive
93/42/EEC concerning
medical devices
Low Battery Warning
Two long beeps indicate th e hearing system ba ttery is
low. After the low bat tery warning, so unds may not be
as clear. This is normal and c an be fixed by changing
the batteries in th e hearing systems .
If you are not able to hear the l ow battery war ning,
your hearing syste m professional can c hange its pitch
or loudness. If you pr efer, it can be turned of f entirely.
13
312
Battery type:
•
Ope n the battery do or.
•
Close t he battery doo r.
•
Inser t the batter y into the batter y
compartment, s o that the negative pole
faces into the door.
–
+
With a new battery, it may take a few
minutes for the battery to de velop its full
output. Only then should yo u close the
battery door.
!
With Battery Door
1. On:
•
Close the batter y door fully.
Note: It may take 5 seconds b efore the
hearing system tu rns on. Your hearing healt hcare
provider can increa se the start up d elay if
required.
3. Open:
•
Fully open the batte ry door to access a nd
change the batter y.
Note: To switch the hearing s ystem on
your ear on or off, hold the d evice between you r
thumb and forefinger.
Open and close the ba ttery compar tment with
the forefinger of your ot her hand. Use the index
finger of your opposit e hand to open and close
the battery doo r.
2. O:
•
Partially open the b attery door.
With Push-
button
With Remote Control
Program change
Volume control:
right device – louder, lef t device – quieter
Combination:
Program change – rig ht device and
volume control – lef t device
Combination:
Volume control – right dev ice and
program change – lef t device
Volume control:
right/left de vice – louder
Volume control:
right/left de vice – quieter
Without Operating Element
•
Refer to th e remote control user g uide.
•
Refer to th e remote control user g uide.
With Remote Control
If the pushbutto n has been configured a s a volume control, you can
adjust the volume leve l by pushing the + or – but ton.
Push the button on yo ur right hearing sy stem to increase the vo lume
in both hearing sys tems.
Push the button on yo ur left hearing sy stem to decrease th e volume
in both hearing sys tems.
As you change the volum e, your hearing syste ms will beep.
With Pushbutton
With Lever
•
If the leve r has been configured a s a volume control, you can a djust
the volume of your heari ng systems.
Press up to increase; pre ss down to decreas e. As you change the
volume level, your hearin g systems will beep.
Volume setting
Suggested volume level
Turning volume up
Turning volume down
Maximum volume level
Minimum volume level
Beeps
1 beep
short beep
short beep
2 beeps
2 beeps
Hearing Program/Description
1
2
3
4
•
Use the p rogram pushbut ton to select one o f the hearing progr ams
individually programmed for you.
•
When changing, your he aring system use s signal sounds to ind icate
which program you have s elected.
•
You can thu s adjust your syste m to the relevant heari ng situation.
With Pushbutton
•
Refer to th e remote control user g uide.
With Remote Control
Program 1 (e.g. AutoSurro und)
Program 2 (e.g. speech in n oise)
Program 3 (e.g. PhoneConnect)
Program 4 (e.g. music)
PhoneConnect
Wireless synchronization
(if enabled)
1 beep
2 beeps
3 beeps
4 beeps
short melody
Opposite ear beep s the same
as side being adjust ed
•
If wirel ess synchroniz ation is enabled, the n changing the volume o r
program settin g on one hearing syst em, will automaticall y make the
change to both hearin g systems at the sam e time. Wireless syn chronization works for bot h the push button a nd the lever.
•
Please r efer all questions c oncerning your hear ing system to your
hearing system professional.
The Bi feature enables y ou to hold a phone to one ear a nd hear the
sound clearly in bot h ears. No accessor ies are required.
Wireless Synchronisation (BiLink)
Binaural Phone (BiPhone)
Telephone Coil
The telephone coil all ows inductive sig nal reception (e.g.,
when telephoning). The reception of noise through the microphone is reduced or su ppressed.
Tinnitus Manager
If your hearing syste m professional has c onfigured both a Tinn itus
Manager program an d a volume control, you ca n adjust the Tinnit us
Manager level while you ar e in the Tinnitus Mana ger program.
•
allows yo u to turn the hearing s ystems on with an au tomatic delay of
5, 10, or 15 seconds to avoid feedbac k (whistling).
Power-on-Delay
Switching Hearing Programs.Adjusting Volume.
With Lever
The lever on your hearin g systems can be
set up as a volume control.
quieter
louder
5
1
6
7
8
7
1
sound/soundHD
2
2
3
4
2
2
2 2
3 3
4
4
jam/jamHD
1a
8
7a
sound 13
jam 13 P
jamHD RS13 P
soundHD 13
sound 312
jamHD S13 P
soundHD 312
soundHD S312
jamHD S312 M
5
soundHD S312e
Hörsystem: FCC ID:
sound 13 VMY-UWBTE1
soundHD 13 VMY-UWNB1
sound 312 VMY-UWCRT2
soundHD 312 VMY-UWNB0
soundHD S312 VMY-UWNB2
soundHD S312e VMY-UWNB2
jam 13 P VMY-UWBTE1
jamHD S13 P VMY-UWNB1
jamHD RS13 P VMY-UWNB3
jamHD S312 M VMY-UW NB4
Page 2

JE-SP
94822
Troubleshooting.Advice on Care.
You are advised to use our HA DEO care product s to clean
your hearing syste m. These product s were developed
specifically for th is purpose and are ava ilable exclusively
from your hearing system professional.
•
Clean hearing syst ems regularly to preve nt damage
to the hearing syste ms and to avoid health pro blems.
•
If requ ired, disconnect t he hearing
system from the Sli m tube. Starting
from the hearing sys tem side, push
the cleaning wire comp letely through
the Slim tube.
Problem
No sound.
Not loud enough.
Possible Solution
Turn on.
Replace battery.
Consult your hearin g
system professional.
Insert batter y plus (+)
side up.
Clean earmolds/slim
tubes/domes.
Consult your hearin g
system professional.
Turn up volume; see
hearing system
professional for mo dels
without a manual volum e
control or if problem
persists.
Replace battery.
Remove and reinser t
carefully.
Consult your hearin g
system professional.
Clean earmolds/slim
tubes/domes.
Consult your hearin g
system professional.
Possible Cause
Not turned on.
Low/dead battery.
Poor battery contact.
Battery upsid e down.
Earmolds/slim tubes/
domes blocked with
ear wax.
Plugged microphone
shield.
Low volume.
Low battery.
Earmolds/slim tub es/
domes not inserte d
properly.
Change in hearing.
Earmolds/slim tub es/
domes blocked with
ear wax.
Plugged microphone
shield.
Instructions For Use
EN
See also ”General Warnings and
Safety Instruct ions“, Page 11-20
Accessories.
uDirect 2/3, uStr eam , uTV3
The uDirect 2/3, uStr eam and uTV3 are opti onal
accessories for yo ur hearing system s. For more informati on on using
the uDirect 2/3, uStr eam and uTV3, pleas e see the user guide for t hat
accessory. For info rmation on how to get a uDi rect 2/3, uStream or
uTV3 accessor y, please contact yo ur hearing system p rofessional.
Please refer all questions co ncerning your hearin g system
to your hearing system professional.
!
Should a problem occ ur, you can usually corre ct it quickly. Use the
following troubles hooting tips to reso lve simple issues.
If you still encounter p roblems after tr ying these sugg estions, consult
your hearing system professional.
The wireless func tion of your hearing s ystems allows
you to use a remote contro l to change the progr am
and volume of your heari ng systems.
For detailed inform ation and instru ctions, refer to the
user guide, or ask your he aring system profe ssional.
Remote Control RCV1/2
Your hearing system pro fessional can put t ogether your
own individual user manual for you.
PhoneConnect
Your hearing system pro fessional may have confi gured a telephone
program, which you c an reach via the automa tic program switc hing
function (PhoneConnect). The magnet on the telephone (optional) provides the magnetic fie ld required to acti vate the telephone p rogram.
Receiver molds and Slim tube (mini tube)
•
The hear ing system its elf, wires, speakers, d omes or
custom shells sho uld never be rinsed or s ubmerged in
water as water drops may b lock sound or damage t he
electrical com ponents of the hear ing systems. Clea n
your hearing syste m with a soft cloth, kee ping it dry.
•
The hear ing system must b e kept dry. Please put it in a H ADEO
DryBox, HADEO Dr ying Bag or Drying C ontainer overnig ht to extract
any moisture from th e inside of the syste m.
Problem
Intermittent.
Two long beeps.
Whistling.
Not clear,
distorted.
Earmolds, slim
tubes or domes
falling out of ear.
Weak on the
telefon.
Possible Cause
Low battery.
Dirty battery contact.
Low battery.
Earmolds/slim tubes/
domes not inserte d
properly.
Hand/clothing near
ear.
Poorly fitting earmolds/slim tubes/
domes.
Earmolds/slim tub es/
domes not inserte d
properly.
Low battery.
Plugged microphone
shield.
Poorly fitting earmolds/slim tubes/
domes.
Earmolds/slim tub es/
domes not inserte d
properly.
Telephone not positioned properly.
Hearing system re quires adjustment.
Possible Solution
Replace battery.
Consult your hearin g
system professional.
Replace battery.
Remove and reinser t
carefully.
Move hand/clothing
away from your ear.
Consult your hearin g
system professional.
Remove and reinser t
carefully.
Replace batter y.
Consult your hearin g
system professional.
Consult your hearin g
system professional.
Remove and reinser t
carefully.
Move telephone receiver
around ear for clearer
signal.
Consult your hearin g
system professional.
External receiver
•
Only us e the handset unit and d ome (olive)/ear adapte rs as descri-
bed in the „General Warn ing and Safety Notes“.
•
Clean Do mes and Receiver Mold s right after remov ing the hearing
systems. This way, ceru men (earwax) ca nnot dry and harde n.
•
Remove ce rumen with a soft t issue. If necessa ry, moisten the tis sue
with a cerumen solvent.
•
Domes should be repl aced by your hearing sy stem professio nal
every 3-6 month s or when they become s tiff, brittle, or d iscolored.
Full functionalit y of Domes and Receive r Molds is only assur ed
with a working wax gu ard.
•
Do not disassemble the Receiver Mold yourself. Ask your hearing
system professi onal for help when the Re ceiver Mold needs ex tensive
cleaning.
Domes and Receiver Molds are e asily damaged whe n
handled incorrectly. Ensure you do not twist or squee ze the
wire when your hearing systems are placed in their case.
•
When ne cessary, remove th e
sound tube from the h earing system
and put the earmold fo r at least
15 minutes into the HADEO clea ning
liquid.
Distributed in USA b y
Hansaton Acoustics Inc.
13845 Industrial Park Bl vd
Plymouth MN, 55441
USA
www.hansaton-usa.com
order@hansaton.com
Manufactured by
Hansaton Akustik GmbH
Sachsenkamp 5
20097 Hamburg
Germany
www.hansaton.com
sound
13
HD 13
312
HD 312
HD S312 e
jam
13 P
HD S13 P
HD RS13 P
HD S312 M
HD S312
 Loading...