

Page 1
Your Charging Station. Your Hearing System.
Connection to ex ternal power sourc e
and charging indica tor light on the
back (micro-USB)
•
The cover of the Comfor t Charger can be clo sed during chargin g.
Interrupting the charging process
•
Hearing systems c an be removed from the c harging station o r
re-inserted a t any time during the cha rging process.
•
Removing the hearing s ystems from the s tation before they h ave
finished charging ca n shorten their r unning time.
The end of the charging proces s
•
Charging time depen ds on how much power is le ft in your hearing
systems’ batter ies, up to a maximum of th ree hours.
•
When the hearing sy stems are fully charg ed, the charging st ation
will automatically e nd the charging proce ss.
The LEDs on the hearing s ystems will stop fla shing and switch to a
steady green.
Removing the hearing systems
•
Once charging finish es, you can remove your he aring systems fro m
the charging station.
•
Switch your hearing s ystems on.
•
Removing the hearing s ystems from the s tation before they h ave
finished charging ca n shorten their r unning time.
Charging times
100 % charge: 3 hours 50 % charge: 60 minutes
80 % charge: 90 minutes 30 % charge: 30 minutes
Using the Comfort Power Pack (optional)
The Comfort Power Pac k is only usable in comb ination with the
Comfort Charger.
Never pull the hearing aids out o f the station by the tube s,
as this can damage the tubes.
!
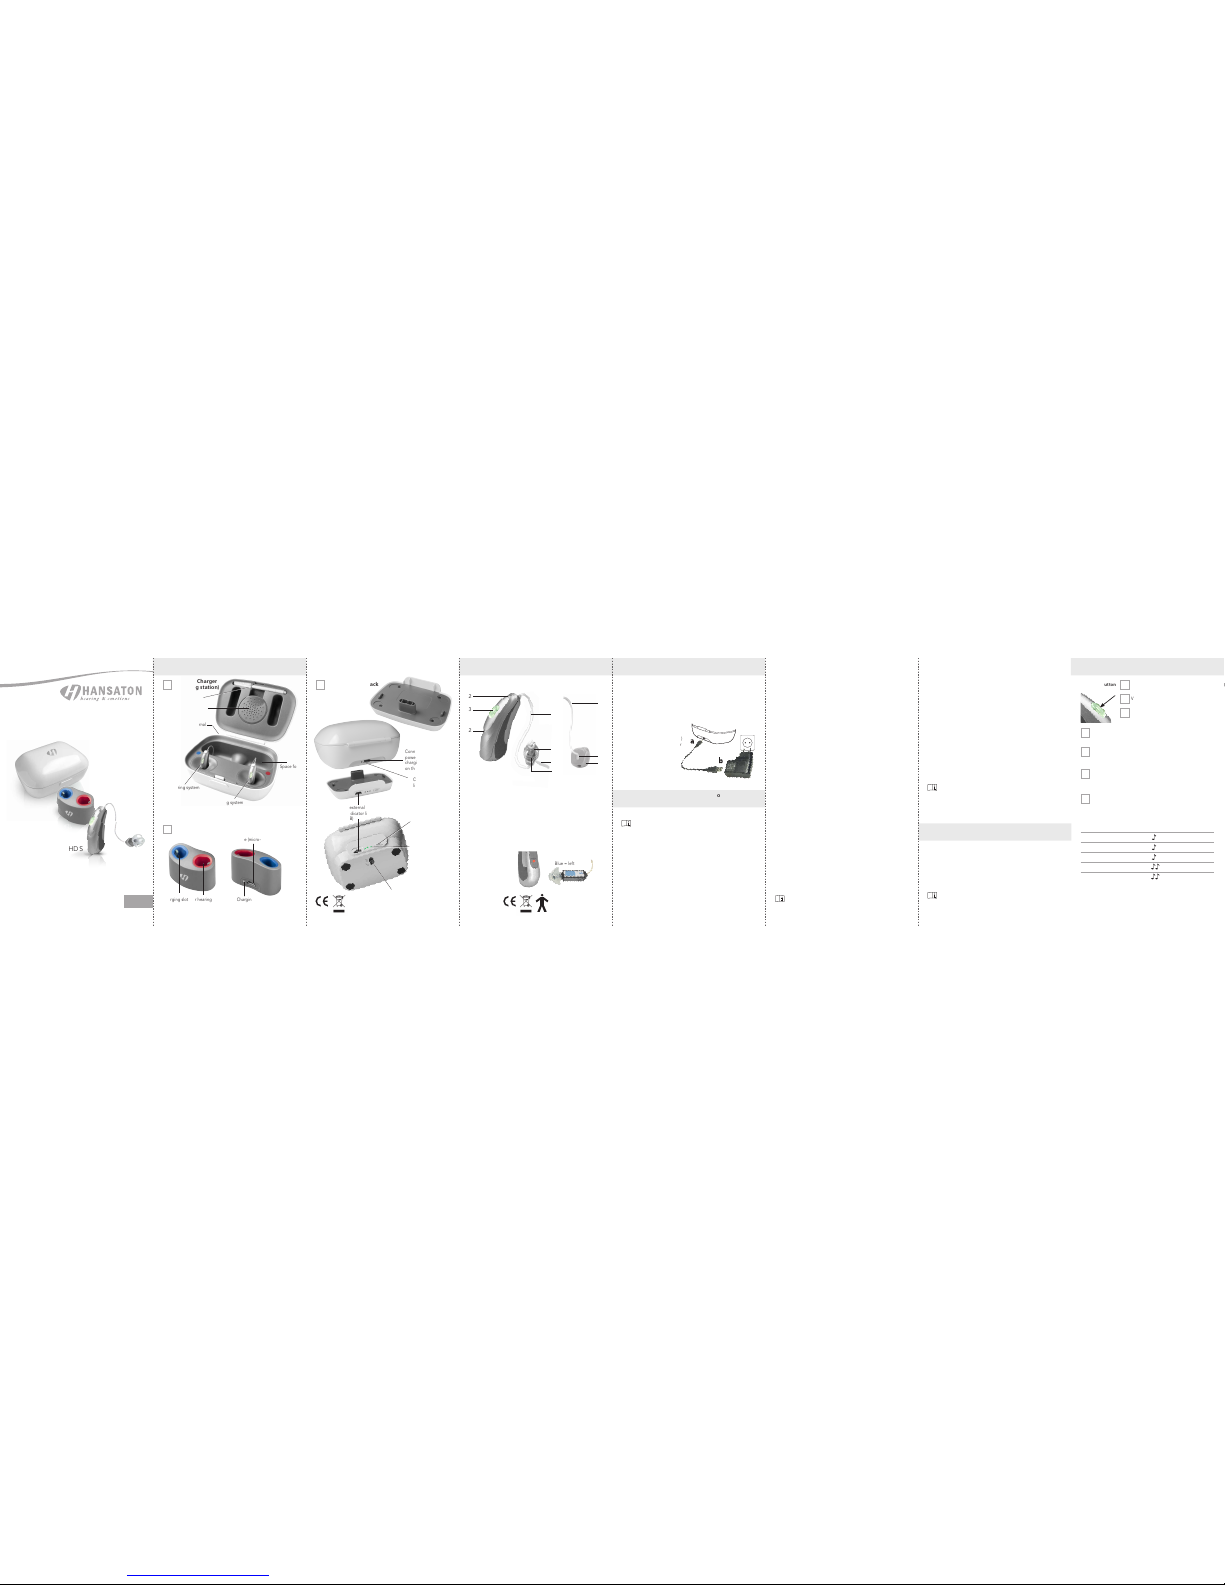
Comfort Charger
(charging station)
Light Charger
•
Charging station s are used to charge your h earing systems.
(AQ hearing system s are delivered alread y fully charged.)
•
Place the charging st ation on a level surf ace. Avoid locations w ith
direct sunlight or ot her sources of heat. D o not cover the charging
station (with a towel, f or example) while it is ch arging.
•
To start the charging s tation, please ins ert the micro- USB plug (a)
on the cable provide d into the
port on the back of t he charging
station.
Then plug the USB conne ctor (b)
end into the USB power ada pter
provided
and then plug the adap ter
into an electrica l outlet.
•
The hearing syste m has a built-in lithium -ion battery.
Please only charge or us e the hearing syst em within the
following tempera ture range:
0° to +40° Celsius (32 ° to 104° Fahrenheit)
•
Charge the hearing sy stem for at least thr ee hours before usi ng for
the first time.
•
Make sure the hearing sy stem is dry befor e connecting it to t he
charging station.
Starting the charging process
•
When your hearing sy stems are situated c orrectly withi n the slots,
their LED lights will bli nk green. The hearin g systems will be swi tched
off automaticall y as soon as they are place d in the charging st ation.
•
The charging proces s will start auto matically.
Hearing system - Charging using the Comfort Charger
or Light Charger.
Cleaning tool
Space for drying
capsule
Space for
earmolds
Right hearing syste m
(marked in red)
Connection to external
power source and
charging indicator
light on the back
(micro-USB)
Left hearing sys tem
(marked in blue)
4
1
5
6
7
6
1
2
2
3
AQ HD-S
Comfort Power Pack
Hearing system:
AQ HD-S
FCC-ID:
KWC-RICR
Charging slots for hearing systems:
blue = left, red = right
Charging indicator
light (green)
Connection to ex ternal power
source (micro-USB)
Battery contro l
button
Comfort Power Pack
lock
Charging status
display
Connection to external
power source and
charging indicator l ight
on the back (micro- USB)
Charging indicator
light (green)
1 Tube –
connects the hea ring system to the re ceiver unit
2 Microphone / Microphone protector
3 Button –
Status display when p ositioning in char ging station (LED)
– used to select pro grams and/or adjust vo lume (depend ing on individual settings)
4 Dome
5 Support –
prevents dome and tu be from slipping ou t of the ear
canal
6 External receiver
7 Earmold
Setting up / Starting the Charging Station.
Switching the Hearing System on/o.
On/O
•
To switch a hea ring system on or of f, press the butto n with the tip of
your finger and hold it do wn for three second s, until the LED begins to
blink.
1x short flash = hearing s ystem switching o n2x short flashe s = hearing
system switchin g off
A startup melod y will play when the hear ing system is swit ched
on.
Adjusting Volume.
0124
Conformity to direc tive
93/42/EEC concerning
medical devices
•
0% - 29%
••
30% - 59%
•••
60% - 100%
0% - 29%
30% - 59%
60% - 100%
Instructions For Use
EN
See also ”General Warnings and
Safety Instruct ions“, Page 00-00
Comfort
Charger
Light
Charger
AQ HD S
D
en
F
e
•
Charge the Comfor t Power Pack for at least th ree hours before us ing
for the first time.
•
The Comfort Power Pac k has a built-in lithium -ion battery.
•
Connect the Comfo rt Charger to the Co mfort Power Pack and u se
the slider on the bot tom to lock it into place.
•
Connect the charg ing cable, then plug it i nto an external powe r
source. The Comfor t Power Pack and the hear ing systems will be
charged at the same ti me.
While the Comfort Pow er Pack is connecte d to an external powe r
source, the charging in dicator light will bli nk and display curre nt
battery status.
•
When fully charged, t he Comfort Power Pac k can charge one pair of
hearing systems up t o seven times.
To check the Comfort Powe r Pack’s remaining bat tery capacit y, press
the battery con trol button (sta tus indicators wil l otherwise rema in off
in order to save power).
Please only charge or us e the Comfort Cha rger / Light Charger
or the Comfort Power Pa ck within the followi ng temperature ra nge:
0° to +40° Celsius (32 ° to 104° Fahrenheit)
No function (deactivated)
Volume control: louder
Volume control: quieter
With Pushbutton
Volume control: rig ht-hand system – lou der
left-hand syste m – quieter
Combination: Change program – right-hand system
Volume control – left- hand system – quiete r
Combination: Change program – lef t-hand system
Volume control – right-h and system – loude r
Side marking
Red = right Blue = left
•
Refer to th e remote control user g uide.
With Remote Control
Volume setting
Suggested volume level
Turning volume up
Turning volume down
Maximum volume level
Minimum volume level
Beeps
1 beep
short beep
short beep
2 beeps
2 beeps
Page 2
Advice on Care. Accessories.
Problem
The battery doe s
not last the entire
day.
Possible Cause
Charging station n ot
connected to a powe r
source.
Hearing system not
fully charged.
Battery may need to
be replaced.
Possible solutions
•
Connect the charg ing
station to a power
source.
•
Charge the hearing
system.
•
Consult your hearin g
systems professional.
Hearing System Troubleshooting.
Problem
Hearing system
does not work.
Hearing system
whistles.
Hearing system is
not loud enough
or sound is dis
-
torted.
Hearing system
plays two signal
tones.
Hearing system
status display flas
hes rapidly while
charging.
Possible solutions
•
Clean or replace the
dome/earmold.
•
Press the button a nd
hold for three secon ds.
•
Charge the hearing
system.
•
Insert the heari ng
system/dome/earmold
again.
•
Consult your ear, nose,
and throat speciali st/
doctor/hearing systems
professional.
•
Lower the volume.
•
Charge the hearing
system.
•
Clean dome/earmold.
•
Raise the volume.
•
Consult your hearin g
systems professional.
•
Charge the hearing
system.
•
Place the hearing
system into the char ging
station correctly.
Possible Cause
Dome/earmold is
blocked with cerum en
(ear wax).
Hearing system is
switched of f.
Battery is compl etely
discharged.
Hearing system not
inserted into ear
correctly.
Ear wax in ear canal.
Volume too high.
Low battery.
Dome/earmold
clogged.
Volume too low.
Hearing has changed .
Indicates low battery.
Hearing system not
correctly inse rted into
charging station.
Should a problem occ ur, you can usually corre ct it quickly. Use the
following troubles hooting tips to reso lve simple issues.
If you still encounter p roblems after tr ying these sugg estions, consult
your hearing system professional.
Charging Station Troubleshooting.
Problem
Charging does
not start even
though hearing
systems are
inserted (witho ut
Comfort Power
Pack).
The charging
process does
not start when
using the Comfort
Power Pack.
Possible solutions
•
Connect the charg ing
station correc tly to an
electrical out let or to the
Comfort Power Pack.
•
Insert the heari ng
system into the char ging
station correctly.
•
Charge the Comfor t
Power Pack.
Possible Cause
Comfort Charger/Light
Charger not connec ted
to power source.
Hearing system not
correctly inse rted into
charging station.
Comfort Power Pack
battery is comp letely
discharged.
Optional Functionalities.Switching Hearing Programs.
Tinnitus Manager
If your hearing syste m professional has c onfigured both a Tinn itus
Manager program an d a volume control, you ca n adjust the Tinnit us
Manager level while you ar e in the Tinnitus Mana ger program.
•
Ensure s that the hearing sy stems only turn on af ter an automatic
delay, in order to avoid feedb ack (whistling) wh en the systems are
inserted.
Power-on-Delay
5 seconds 10 seconds 15 seconds
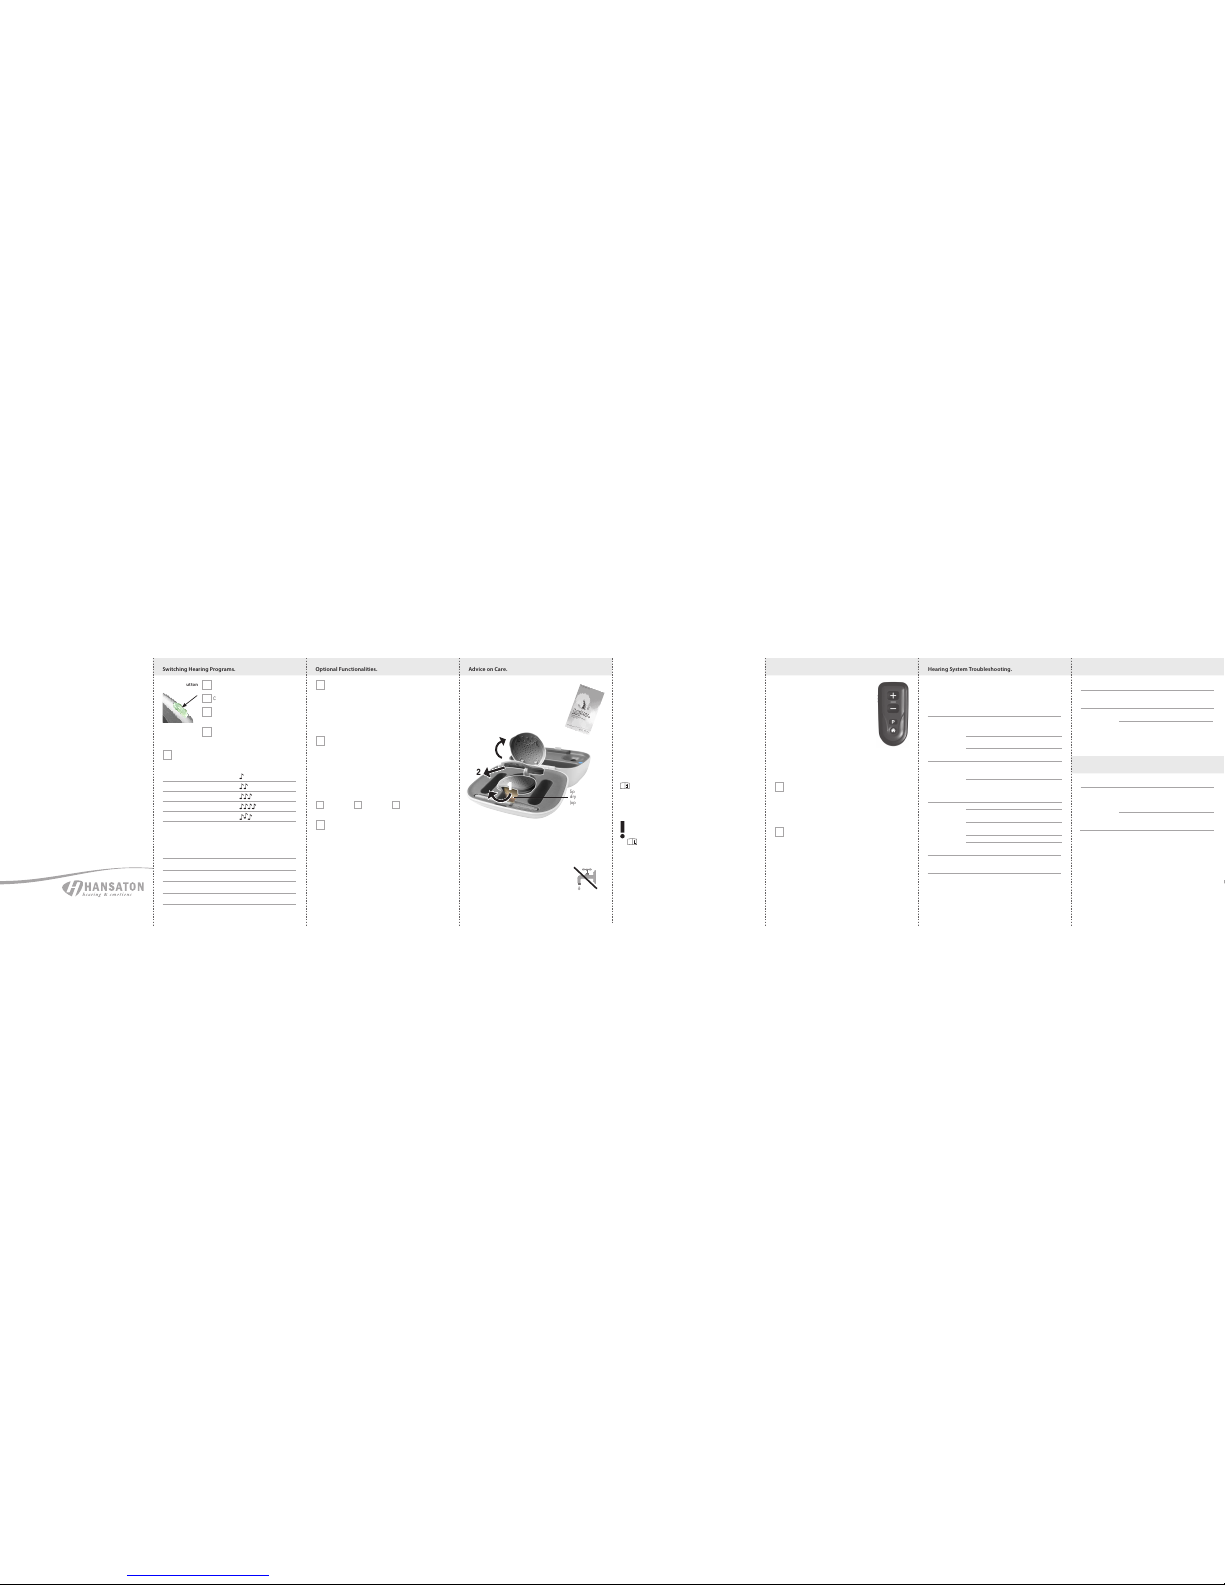
You are advised to use our HA DEO care product s to
clean your hearing sy stem. These produ cts were de
veloped specific ally for this purpos e and are available
exclusively from you r hearing system pr ofessional.
•
Clean hearing systems regularly to prevent damage
to the hearing systems and to avoid health problems.
uDirect 3, uStr eam, uTV3
The uDirect 3, uStream a nd uTV3 are optiona l
accessories for yo ur hearing system s. For more informati on on using
the uDirect 3, uStream a nd uTV3, please see t he user guide for that
accessory. For info rmation on how to get a uDi rect 3, uStream or uTV 3
accessory, please c ontact your hear ing system profes sional.
The wireless func tion of your hearing s ystems allows
you to use a remote contro l to change the progr am
and volume of your heari ng systems.
For detailed inform ation and instru ctions, refer to the
user guide, or ask your he aring system profe ssional.
Remote Control RCV2
Hansaton Akusti k GmbH · Sachsenkam p 5 · 20097 Hamburg · Ger many
www.hansaton.com
JE-SP
100895
Hearing Program/Description
1
2
3
4
•
Refer to th e remote control user g uide.
With Remote Control
No function (deactivated)
Change program
With Pushbutton
Combination:
Change program – rig ht-hand system
Volume control – left- hand system – quiete r
Combination:
Change program – lef t-hand system
Volume control – right-h and system – loude r
Please refer all questions co ncerning your hearin g system
to your hearing system professional.
!
Your hearing system pro fessional can put t ogether your
own individual user manual for you.
PhoneConnect
Your hearing system pro fessional may have confi gured a telephone
program, which you c an reach via the automa tic program switc hing
function (PhoneConnect). The magnet on the telephone (optional) provides the magnetic fie ld required to acti vate the telephone p rogram.
Distributed in USA b y
Hansaton Acoustics Inc.
13845 Industrial Park Bl vd
Plymouth MN, 55441
USA
www.hansaton-usa.com
order@hansaton.com
Manufactured by
Hansaton Akustik GmbH
Sachsenkamp 5
20097 Hamburg
Germany
www.hansaton.com
Program 1 (e.g. AutoSurro und)
Program 2 (e.g. speech in n oise)
Program 3 (e.g. PhoneConnect)
Program 4 (e.g. music)
PhoneConnect
Wireless synchronization
(if enabled)
1 beep
2 beeps
3 beeps
4 beeps
short melody
Opposite ear beep s the same
as side being adjust ed
•
If wirel ess synchroniz ation is enabled, the n changing the volume o r
program settin g on one hearing syst em, will automaticall y make the
change to both hearin g systems at the sam e time. Wireless syn chronization works for bot h the push butto n and the lever.
•
Please r efer all questions c oncerning your hear ing system to your
hearing system professional.
The Bi feature enables y ou to hold a phone to one ear a nd hear the
sound clearly in bot h ears. No accessor ies are required.
Wireless Synchronisation (BiLink)
Binaural Phone (BiPhone)
•
The hear ing system its elf, the tube, the receive r, and the dome or
fitting pieces mus t never be rinsed or su bmerged in water, as water
droplets can bloc k the sound or cause d amage to the hearing s ystem’s
electronic components.
•
Clean su rfaces using a lin t-free cloth or the cle aning brush includ ed
in the Comfort Char ger.
External receiver
•
Only use the handset unit and dome (olive)/ear adapters as described
in the „General Warning and Safety Notes“.
•
Clean Domes and earmolds right after removing the hearing systems.
This way, cerumen (earwax) cannot dry and harden.
•
Remove cerumen with a soft tissue. If necessary, moisten the tissue
with a cerumen solvent.
•
Domes should be repl aced by your hearing sy stem professio nal
every 3-6 month s or when they become s tiff, brittle, or d iscolored.
Full functionalit y of Domes and earmo lds is only assured w ith a
working wax guard.
•
Do not disassemble the earmolds yourself. Ask your hearing system
professional for help when the earmold needs extensive cleaning.
Domes and earmolds are easily damaged when handled
incorrectly. Ensure you do not t wist or squeeze the w ire
when your hearing systems are placed in their case.
Always make sure the hea ring systems and t he charging
slots on the chargin g station are clean an d dry before begi nning the
charging process.
Never use cleaning pro ducts such as hou sehold cleaners , soap, or
similar products.
The hearing syste m is Protection Clas s IP68 and designed for us e in
all everyday situations.
AQ HD S hearing systems a re water-resistan t but not water-tight.
They are robust and du rable enough to be wo rn during all ever yday
activities, and can occasionally be exposed to extreme conditions
as well.
•
Never su bmerge your hearin g system in water!
AQ HD S hearing systems a re not suitable for lon g,
repeated immersi ons in water and thus may no t be
worn while showeri ng, bathing or swimmi ng.
•
They sh ould still be cleane d and then dried af ter
coming into contac t with water, sweat or dir t.
Cover
open
3
2
1
Space for HADEO
drying capsule
(optional)
 Loading...