

Hans HT60 Operation Manual

LASER DISTANCE METER
OPERATION MANUAL
HANS HT60
1 2
. Safety Information
1. This is a Class 2 laser tool, laser radiation is emitted from this product and is manufactured to
comply IEC 60825-1: 2007, EN 60825-1:2007, EN 61326-1:2013 and CRF21, parts 1040.10 and
1040.11.
2. Use of controls, adjustment procedures other than those specified herein may result in laser
radiation exposure.
3. Never stare directly into beam or aim the laser beams at others.
4. Product contains semiconductor laser diodes with wavelengths of 650 nanometers.
5. The total continuous output of the beams never exceeds 1.0 milli-watts.
6. Product complies with EMC Test according to EN61000-6-3:2001+A11:2004,
EN61000-6-1:2001, EN61326-1:2013, IEC 61326:2012 and FCC Test according to PART 15.
7. This equipment has been tested and found to comply with the limits for a Class B digital device,
pursuant to part 15 of the FCC Rules. These limits are designed to provide reasonable protection
against harmful interference in a residential installation.
This equipment generates, uses and can radiate radio frequency energy and, if not installed and
used in accordance with the instructions, may cause harmful interference to radio
communications. However, there is no guarantee that interference will not occur in a particular
installation.
If this equipment does cause harmful interference to radio or television reception, which can be
determined by turning the equipment off and on, the user is encouraged to try to correct the
interference by one or more of the following measures:
—Reorient or relocate the receiving antenna.
—Increase the separation between the equipment and receiver.
—Connect the equipment into an outlet on a circuit different from that to which the receiver is
connected.
—Consult the dealer or an experienced radio/TV technician for help.
Changes or modifications not expressly approved by the party responsible for compliance could
void the user’s authority to operate the equipment.
8. This device complies with Industry Canada license-exempt RSS standard(s).
Operation is subject to the following two conditions: (1) this device may not cause interference,
and (2) this device must accept any interference, including interference that may cause undesired
operation of the device.
Le present appareil est conforme aux CNR d'Industrie Canada applicables aux appareils radio
exempts de licence. L'exploitation est autorisee aux deux conditions suivantes : (1) l'appareil ne
doit pas produire de brouillage, et (2) l'utilisateur de l'appareil doit accepter tout brouillage
radioelectrique subi, meme si le brouillage est susceptible d'en compromettre le fonctionnement.
. Error Code
Err01
Err02
Err03
Out of measuring range Measuring in a proper range
Reflected signal is too weak
Pythagorean calculation error
Low Battery
Out of working temperature
Ambient light is too strong
Check and verify values and
steps are correct
Install a new battery
Measure in an environment
within specified working
temperature
Measure in a darker place
(shadow target)
Select a better surface
Out of display range (Max Value:
99999), e.g: result of area or
dimension is out of display range.
Divide caculation into
intermediate steps
Err04
Err05
Err06
Err07
Code Description Solution
. Inside The Box
· HT60 Laser Distance Meter x1 · AAA Battery x2 · Operation Manual x1
· Carrying Case x1 · Safety Strap x1
. Specification
· Measuring Range
· Resolution
· Accuracy
· Measuring Speed
· Laser Type
· Beam Size
· Battery
· Dimension
· Operation Temperature
· Storage Temperature
· Automatic Power-Off
0.05m- 60m
0.001m
±1.5mm
0.5sec
650nm, Class II, <1mW
25mm@15m
AAA Battery x2, Up to 10,000 measures
105x48x21mm
-5°C~40°C
-20°C~60°C
-Laser 30 Seconds -Device 180 Seconds
. Service Support
Please contact your local dealer or contact us through servise email : [ reps@precaster.com.tw ] for
further assistance.
. FCC Statement
This device complies with part 15 of the FCC Rules. Operation is subject to the following two
conditions:
(1) This device may not cause harmful interference, and
(2) this device must accept any interference received, including interference that may cause
undesired operation.
PRECASTER ENTERPRISES CO., LTD.
Add: No. 204, Sec. 2, Fu-Hsing Rd., Taichung, Taiwan
Tel: 886-4-2262 1000. Fax: 886-4-2261 6565
Http://www.precaster.com.tw
Email: service@precaster.com.tw
LASER DISTANCE METER
5
4
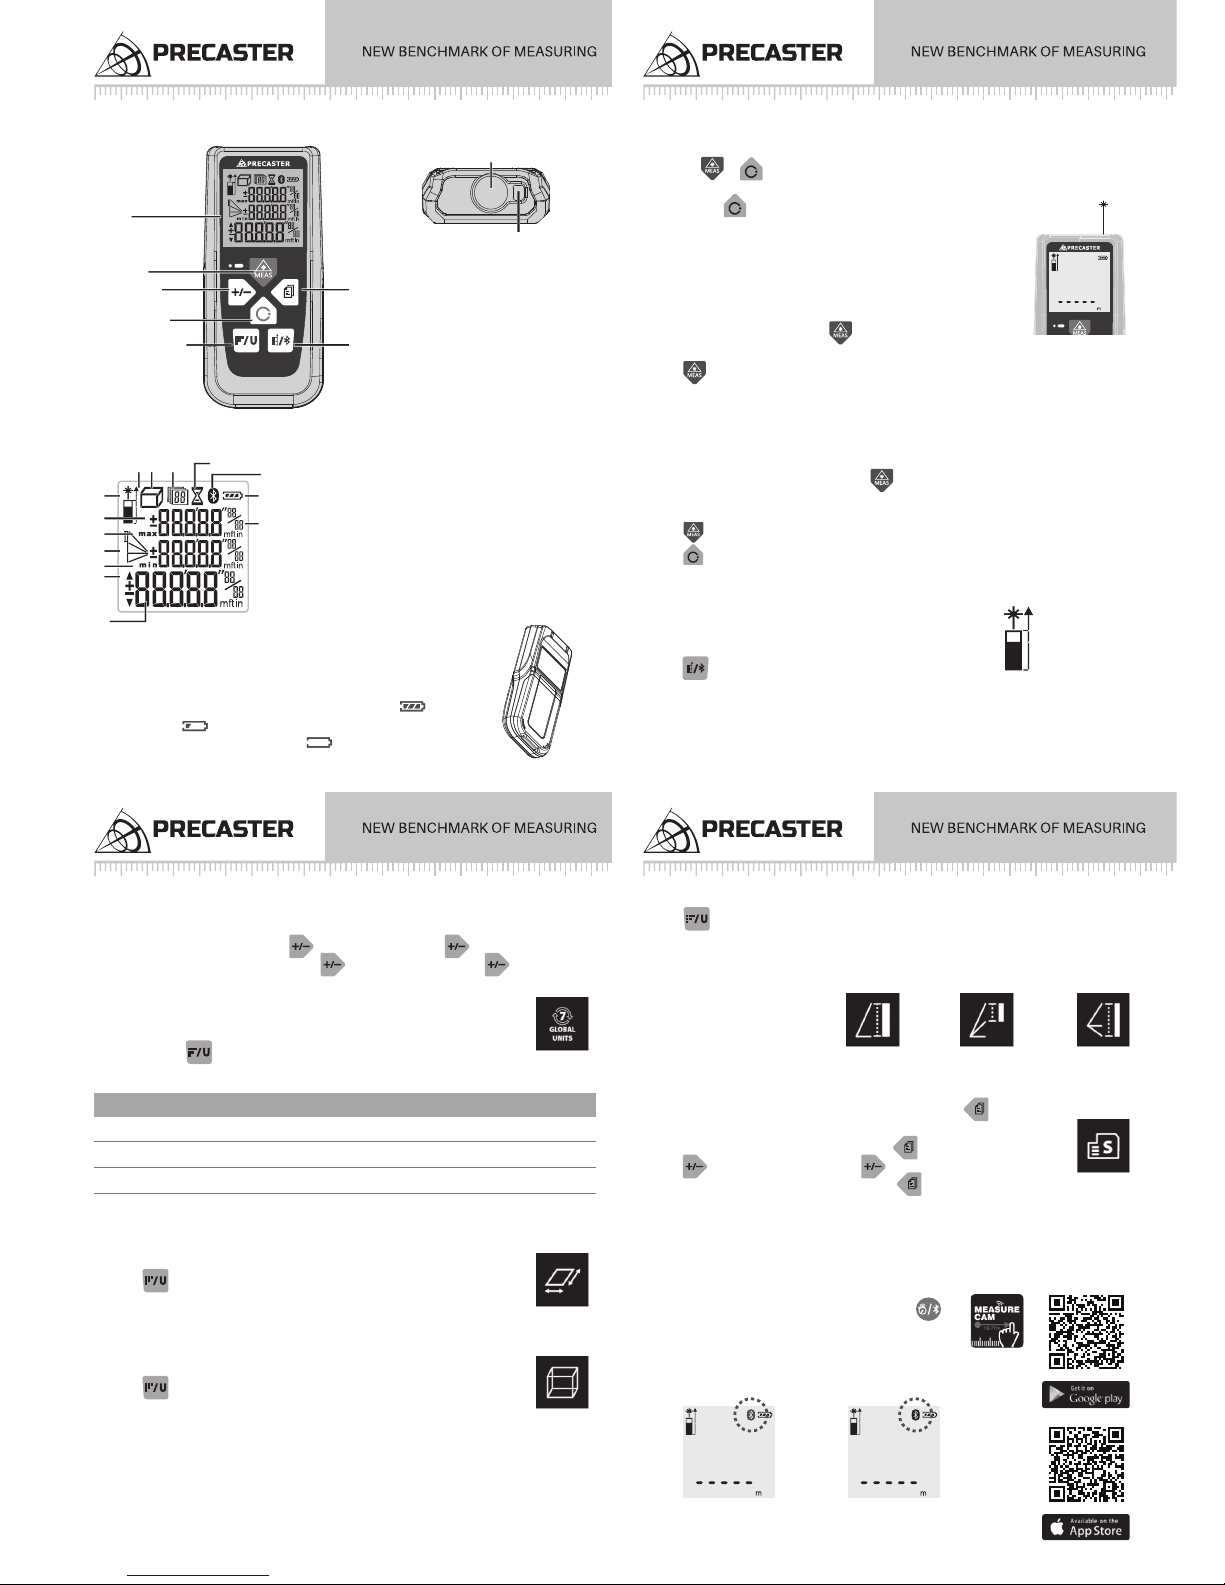
. Overview for HT60
. Overview for Screen
HT-60
· LCD
· Clear / Power
· Addition /
Subtraction
· Functions / Units
-Area
-Volume
-Indirect Measure
I, II, III
-Stake Out Setup
· Measure
· Measurement Records
· Reference / Bluetooth
· Laser Emitted Window
· Laser Receiving Window
1. Measuring Reference
2. Measuring Function
3. Memories
4. Laser Indicator
5. Add and Subtract
6. Maxmum Display
7. Indirect Measuring
8. Minimum Display
9. Stakes Direction Indicator
10. Main Screen and Units
11. Countdown Measuring
12. Bluetooth Indicator
13. Battery Status
14. Sub-Screen and Units
1
4
5
6
7
9
10
2 3 11
12
13
14
8
. Battery Installation & Power Status
1. This unit is powered by 2 x AAA Batteries.
2. Remove battery lid and observing correct polarity before install batteries.
3. Battery level is showed on screen with batty icon on screen .
4. When the icon appears, there are approximately 1000 times to measure.
5. Replace batteries when low battery icon flash on screen.
6. To change new batteries, when install new batteries, then close back lid.
1. To make summary or difference between two measurements is easy
2. Finish your first measure, than click to save as addend or hold to save as Minuend.
3. Take the second measurement, than click to add from addend or hold to subtract minuend.
. Measuring Functions
Area Measurement
1. Click to enable Area measurement.
2. Laser will be activated when entering area measurement mode.
3. Follow the instructions on main screen to measure WIDTH and LENGTH.
4. After finish all the instructions, the result [AREA] will be showed on screen.
2. Volume Measurement
1. Click twice to enable Volume measurement.
2. Laser will be activated when entering volume measurement mode.
3. Follow the instructions on main screen to measure WIDTH, LENGTH and HEIGHT.
4. After finish all the instructions, the result [VOLUME] will be showed on screen.
. Measurement Addition & Subtraction
meter
Length
Area
Volume
m
m²
m³
ft
ft²
ft³
in
ft²
ft³
0’0”1/32
ft²
ft³
1/32in
ft²
ft³
1/16in
ft²
ft³
1/8in
ft²
ft³
10/33
P
m³
feet inch inch inch inch 尺0’0”1/32
. Unit Setting
1. There are 8 units inside the laser distance meter.
2. Click and hold to select preferred unit.
3. Unit Switch Reference
Single Measurement Mode
1. Move the laser dot onto the target.
2. Keep your position stable and click .
3. The measurement will be displayed on LCD Screen and laser will be turn off.
4. Click again to enable the laser dot for next measurement.
Continuous Measurement Mode
1. Continuous Measurement is also called tracking measurement and is recommend to use for seeking
proper distance.
2. Move the laser dot onto the target.
3. Keep your position stable and tap and hold , the laser distance meter will enter continuous
measurement mode.
4. Move the device back and forward to proper distance.
5. Click to pause the measurement.
6. Click again to leave the continuously measurement mode.
. Switch On and Off
1. Be sure to check battery status before start.
2. Click the or to turn on the device.
3. Device will process the initial procedure and get ready to measure by turn on the laser dot.
4. Tap and hold for 2 seconds to turn off.
5. The device will turn off automatically after 180 seconds.
. Distance Measurement
. Measurement Reference
1. There are two reference positions for measurement .
They are back of the unit, front of the unit, tripod thread and the spike
2. Click to select the proper position.
3. Indirectly Height I, II & III Measurement (base on Pythagorean)
1. Click thrice, four and five times to enable Indirectly Measurement.
2. Laser will be activated when entering indirectly measurement mode.
3. Follow the instructions on main screen to measure the LENGTH OF HYPOTENUSE(S) and BASE.
4. After finish all the instructions, the result [HEIGHT] will be showed on screen.
Indirect
Measure I
Indirect
Measure II
Indirect
Measure III
. iM² app & Bluetooth Setup
For the model supported Bluetooth could connected with phones support BLE4.0,
For Bluetooth version on your phone, please contact with your phone manufacturer.
We currently offer Measurement Kit on iTune and Play Store.
1. To turn on Bluetooth in pairing mode, press and hold .
2. The Bluetooth icon will keep flashing during paring.
3. Select proper device in the Connection Manager of APP
4. After connected with a beep sound the icon will stop flashing.
Pairing Connected
. Store Measurement to Memory and Lookup
1. When you want to add the measurements on the screen, press to add to memory.
You could find the location in memory on the top of screen.
2. To lookup stored measurements, press and hold to enter the lookup mode.
3. Press to move the index up and hold to move index down.
4. To clear all stored measurements, press and hold again in lookup mode to clear all memory.
 Loading...